Managing systems using the RHEL 9 web console
Server management with a graphical web-based interface
Abstract
Providing feedback on Red Hat documentation
We are committed to providing high-quality documentation and value your feedback. To help us improve, you can submit suggestions or report errors through the Red Hat Jira tracking system.
Procedure
Log in to the Jira website.
If you do not have an account, select the option to create one.
- Click Create in the top navigation bar.
- Enter a descriptive title in the Summary field.
- Enter your suggestion for improvement in the Description field. Include links to the relevant parts of the documentation.
- Click Create at the bottom of the dialogue.
Chapter 1. Getting started using the RHEL web console
Learn how to install the Red Hat Enterprise Linux 9 web console, how to add and manage remote hosts through its convenient graphical interface, and how to monitor the systems managed by the web console.
1.1. What is the RHEL web console
The RHEL web console is a web-based interface designed for managing and monitoring your local system, as well as Linux servers located in your network environment.

The RHEL web console enables you to perform a wide range of administration tasks, including:
- Managing services
- Managing user accounts
- Managing and monitoring system services
- Configuring network interfaces and firewall
- Reviewing system logs
- Managing virtual machines
- Creating diagnostic reports
- Setting kernel dump configuration
- Configuring SELinux
- Updating software
- Managing system subscriptions
The RHEL web console uses the same system APIs as you would use in a terminal, and actions performed in a terminal are immediately reflected in the RHEL web console.
You can monitor the logs of systems in the network environment, as well as their performance, displayed as graphs. In addition, you can change the settings directly in the web console or through the terminal.
1.2. Installing and enabling the web console
To access the RHEL web console, first enable the cockpit.socket service.
Red Hat Enterprise Linux 9 includes the web console installed by default in many installation variants. If this is not the case on your system, install the cockpit package before enabling the cockpit.socket service.
Procedure
If the web console is not installed by default on your installation variant, manually install the
cockpitpackage:# dnf install cockpitEnable and start the
cockpit.socketservice, which runs a web server:# systemctl enable --now cockpit.socketIf the web console was not installed by default on your installation variant and you are using a custom firewall profile, add the
cockpitservice tofirewalldto open port 9090 in the firewall:# firewall-cmd --add-service=cockpit --permanent # firewall-cmd --reload
Verification
- To verify the previous installation and configuration, open the web console.
1.3. Logging in to the web console
When the cockpit.socket service is running and the corresponding firewall port is open, you can log in to the web console in your browser for the first time.
Prerequisites
Use one of the following browsers to open the web console:
- Mozilla Firefox 52 and later
- Google Chrome 57 and later
- Microsoft Edge 16 and later
System user account credentials
The RHEL web console uses a specific pluggable authentication modules (PAM) stack at
/etc/pam.d/cockpit. The default configuration allows logging in with the user name and password of any local account on the system.- Port 9090 is open in your firewall.
Procedure
In your web browser, enter the following address to access the web console:
https://localhost:9090NoteThis provides a web-console login on your local machine. If you want to log in to the web console of a remote system, see Section 1.5, “Connecting to the web console from a remote machine”
If you use a self-signed certificate, the browser displays a warning. Check the certificate, and accept the security exception to proceed with the login.
The console loads a certificate from the
/etc/cockpit/ws-certs.ddirectory and uses the last file with a.certextension in alphabetical order. To avoid having to grant security exceptions, install a certificate signed by a certificate authority (CA).- In the login screen, enter your system user name and password.
- Click Log In.
After successful authentication, the RHEL web console interface opens.
To switch between limited and administrative access, click Administrative access or Limited access in the top panel of the web console page. You must provide your user password to gain administrative access.
1.4. Disabling basic authentication in the web console
You can modify the behavior of an authentication scheme by modifying the cockpit.conf file. Use the none action to disable an authentication scheme and only allow authentication through GSSAPI and forms.
Prerequisites
You have installed the RHEL 9 web console.
For instructions, see Installing and enabling the web console.
-
You have
rootprivileges or permissions to enter administrative commands withsudo.
Procedure
Open or create the
cockpit.conffile in the/etc/cockpit/directory in a text editor of your preference, for example:# vi cockpit.confAdd the following text:
[basic] action = none- Save the file.
Restart the web console for changes to take effect.
# systemctl try-restart cockpit
1.5. Connecting to the web console from a remote machine
You can connect to your web console interface from any client operating system and also from mobile phones or tablets.
Prerequisites
A device with a supported internet browser, such as:
- Mozilla Firefox 52 and later
- Google Chrome 57 and later
- Microsoft Edge 16 and later
The RHEL 9 you want to access with an installed and accessible web console.
For instructions, see Installing and enabling the web console.
Procedure
- Open your web browser.
Type the remote server’s address in one of the following formats:
With the server’s host name:
https://<server.hostname.example.com>:<port-number>For example:
https://example.com:9090With the server’s IP address:
https://<server.IP_address>:<port-number>For example:
https://192.0.2.2:9090
- After the login interface opens, log in with your RHEL system credentials.
1.6. Connecting to the web console from a remote machine as a root user
On new installations of RHEL 9.2 or later, the RHEL web console disallows root account logins by default for security reasons. You can allow the root login in the /etc/cockpit/disallowed-users file.
Prerequisites
You have installed the RHEL 9 web console.
For instructions, see Installing and enabling the web console.
Procedure
Open the
disallowed-usersfile in the/etc/cockpit/directory in a text editor of your preference, for example:# vi /etc/cockpit/disallowed-usersEdit the file and remove the line for the
rootuser:# List of users which are not allowed to login to Cockpit root- Save the changes and quit the editor.
Verification
Log in to the web console as a
rootuser.For details, see Logging in to the web console.
1.7. Logging in to the web console using a one-time password
If your system is part of an Identity Management (IdM) domain with enabled one-time password (OTP) configuration, you can use an OTP to log in to the RHEL web console.
It is possible to log in using a one-time password only if your system is part of an Identity Management (IdM) domain with enabled OTP configuration.
Prerequisites
You have installed the RHEL 9 web console.
For instructions, see Installing and enabling the web console.
- An Identity Management server with enabled OTP configuration.
- A configured hardware or software device generating OTP tokens.
Procedure
Open the RHEL web console in your browser:
-
Locally:
https://localhost:PORT_NUMBER -
Remotely with the server hostname:
https://example.com:PORT_NUMBER Remotely with the server IP address:
https://EXAMPLE.SERVER.IP.ADDR:PORT_NUMBERIf you use a self-signed certificate, the browser issues a warning. Check the certificate and accept the security exception to proceed with the login.
The console loads a certificate from the
/etc/cockpit/ws-certs.ddirectory and uses the last file with a.certextension in alphabetical order. To avoid having to grant security exceptions, install a certificate signed by a certificate authority (CA).
-
Locally:
- The Login window opens. In the Login window, enter your system user name and password.
- Generate a one-time password on your device.
- Enter the one-time password into a new field that appears in the web console interface after you confirm your password.
- Click Log in.
- Successful login takes you to the Overview page of the web console interface.
1.8. Adding a banner to the login page
You can set the web console to show a content of a banner file on the login screen.
Prerequisites
You have installed the RHEL 9 web console.
For instructions, see Installing and enabling the web console.
-
You have
rootprivileges or permissions to enter administrative commands withsudo.
Procedure
Open the
/etc/issue.cockpitfile in a text editor of your preference:# vi /etc/issue.cockpitAdd the content you want to display as the banner to the file, for example:
This is an example banner for the RHEL web console login page.You cannot include any macros in the file, but you can use line breaks and ASCII art.
- Save the file.
Open the
cockpit.conffile in the/etc/cockpit/directory in a text editor of your preference, for example:# vi /etc/cockpit/cockpit.confAdd the following text to the file:
[Session] Banner=/etc/issue.cockpit- Save the file.
Restart the web console for changes to take effect.
# systemctl try-restart cockpit
Verification
Open the web console login screen again to verify that the banner is now visible:

1.9. Configuring automatic idle lock in the web console
You can enable the automatic idle lock and set the idle timeout for your system through the web console interface.
Prerequisites
You have installed the RHEL 9 web console.
For instructions, see Installing and enabling the web console.
-
You have
rootprivileges or permissions to enter administrative commands withsudo.
Procedure
Open the
cockpit.conffile in the/etc/cockpit/directory in a text editor of your preference, for example:# vi /etc/cockpit/cockpit.confAdd the following text to the file:
[Session]
IdleTimeout=<X>
Substitute <X> with a number for a time period of your choice in minutes.
- Save the file.
Restart the web console for changes to take effect.
# systemctl try-restart cockpit
Verification
- Check if the session logs you out after a set period of time.
1.10. Changing the web console listening port
By default, the RHEL web console communicates through TCP port 9090. You can change the port number by overriding the default socket settings.
Prerequisites
You have installed the RHEL 9 web console.
For instructions, see Installing and enabling the web console.
-
You have
rootprivileges or permissions to enter administrative commands withsudo. -
The
firewalldservice is running.
Procedure
Pick an unoccupied port, for example, <4488/tcp>, and instruct SELinux to allow the
cockpitservice to bind to that port:# semanage port -a -t websm_port_t -p tcp <4488>Note that a port can be used only by one service at a time, and thus an attempt to use an already occupied port implies the
ValueError: Port already definederror message.Open the new port and close the former one in the firewall:
# firewall-cmd --service cockpit --permanent --add-port=<4488>/tcp
# firewall-cmd --service cockpit --permanent --remove-port=9090/tcp
Create an override file for the
cockpit.socketservice:# systemctl edit cockpit.socketIn the following editor screen, which opens an empty
override.conffile located in the/etc/systemd/system/cockpit.socket.d/directory, change the default port for the web console from 9090 to the previously picked number by adding the following lines:[Socket] ListenStream= ListenStream=<4488>Note that the first
ListenStream=directive with an empty value is intentional. You can declare multipleListenStreamdirectives in a single socket unit and the empty value in the drop-in file resets the list and disables the default port 9090 from the original unit.ImportantInsert the previous code snippet between the lines starting with
# Anything between hereand# Lines below this. Otherwise, the system discards your changes.- Save the changes by pressing + and . Exit the editor by pressing +.
Reload the changed configuration:
# systemctl daemon-reloadCheck that your configuration is working:
# systemctl show cockpit.socket -p Listen
Listen=[::]:4488 (Stream)
Restart
cockpit.socket:# systemctl restart cockpit.socket
Verification
Open your web browser, and access the web console on the updated port, for example:
https://machine1.example.com:4488
Chapter 2. Installing and configuring web console by using RHEL system roles
With the cockpit RHEL system role, you can automatically deploy and enable the web console on multiple RHEL systems.
2.1. Installing the web console by using the cockpit RHEL system role
You can use the cockpit system role to automate installing and enabling the RHEL web console on multiple systems.
You use the cockpit system role to:
- Install the RHEL web console.
-
Allow the
firewalldandselinuxsystem roles to configure the system for opening new ports. -
Set the web console to use a certificate from the
ipatrusted certificate authority instead of using a self-signed certificate.
You do not have to call the firewall or certificate system roles in the playbook to manage the firewall or create the certificate. The cockpit system role calls them automatically as needed.
Prerequisites
- You have prepared the control node and the managed nodes.
-
The account you use to connect to the managed nodes has
sudopermissions for these nodes.
Procedure
Create a playbook file, for example,
~/playbook.yml, with the following content:--- - name: Manage the RHEL web console hosts: managed-node-01.example.com tasks: - name: Install RHEL web console ansible.builtin.include_role: name: redhat.rhel_system_roles.cockpit vars: cockpit_packages: default cockpit_manage_selinux: true cockpit_manage_firewall: true cockpit_certificates: - name: /etc/cockpit/ws-certs.d/01-certificate dns: ['localhost', 'www.example.com'] ca: ipaThe settings specified in the example playbook include the following:
cockpit_manage_selinux: true-
Allow using the
selinuxsystem role to configure SELinux for setting up the correct port permissions on thewebsm_port_tSELinux type. cockpit_manage_firewall: true-
Allow the
cockpitsystem role to use thefirewalldsystem role for adding ports. cockpit_certificates: <YAML_dictionary>By default, the RHEL web console uses a self-signed certificate. Alternatively, you can add the
cockpit_certificatesvariable to the playbook and configure the role to request certificates from an IdM certificate authority (CA) or to use an existing certificate and private key that is available on the managed node.For details about all variables used in the playbook, see the
/usr/share/ansible/roles/rhel-system-roles.cockpit/README.mdfile on the control node.
Validate the playbook syntax:
$ ansible-playbook --syntax-check ~/playbook.ymlNote that this command only validates the syntax and does not protect against a wrong but valid configuration.
Run the playbook:
$ ansible-playbook ~/playbook.yml
Chapter 3. Installing web console add-ons and creating custom pages
Depending on how you want to use your Red Hat Enterprise Linux system, you can add additional available applications to the web console or create custom pages based on your use case.
3.1. Add-ons for the RHEL web console
While the cockpit package is a part of Red Hat Enterprise Linux by default, you can install add-on applications on-demand by using the following command:
# dnf install <add-on>In the previous command, replace <add-on> by a package name from the list of available add-on applications for the RHEL web console.

| Feature name | Package name | Usage |
|---|---|---|
| Composer |
| Building custom OS images |
| File manager |
| Managing files and directories in the standard web-console interface |
| Machines |
|
Managing |
| PackageKit |
| Software updates and application installation (usually installed by default) |
| PCP |
| Persistent and more fine-grained performance data (installed on demand from the UI) |
| Podman |
| |
| Session Recording |
| Recording and managing user sessions |
| Storage |
|
Managing storage through |
3.2. Creating new pages in the web console
If you want to add customized functions to your Red Hat Enterprise Linux web console, you must add the package directory that contains the HTML and JavaScript files for the page that runs the required function.
For detailed information about adding custom pages, see Creating Plugins for the Cockpit User Interface on the Cockpit Project website.
3.3. Overriding the manifest settings in the web console
You can modify the menu of the web console for a particular user and all users of the system. In the cockpit project, a package name is a directory name. A package contains the manifest.json file along with other files. Default settings are present in the manifest.json file. You can override the default cockpit menu settings by creating a <package-name>.override.json file at a specific location for the specified user.
Prerequisites
You have installed the RHEL 9 web console.
For instructions, see Installing and enabling the web console.
Procedure
Override manifest settings in the
<systemd>.override.jsonfile in a text editor of your choice, for example:To edit for all users, enter:
# vi /etc/cockpit/<systemd>.override.jsonTo edit for a single user, enter:
# vi ~/.config/cockpit/<systemd>.override.json
Edit the required file with the following details:
{ "menu": { "services": null, "logs": { "order": -1 } } }-
The
nullvalue hides the services tab -
The
-1value moves the logs tab to the first place.
-
The
Restart the
cockpitservice:# systemctl restart cockpit.service
Chapter 4. Managing subscriptions in the web console
You can manage your Red Hat product subscriptions in the Red Hat Enterprise Linux 9 web console.
Prerequisites
- Your Red Hat Customer Portal or a subscription activation key.
4.1. Subscription management in the web console
The RHEL 9 web console provides an interface for using Red Hat Subscription Manager installed on your local system.
The Subscription Manager connects to the Red Hat Customer Portal and verifies available:
- Active subscriptions
- Expired subscriptions
- Renewed subscriptions
If you want to renew the subscription or get a different one on the Red Hat Customer Portal, you do not have to update the Subscription Manager data manually.
The Subscription Manager synchronizes data with the Red Hat Customer Portal automatically.
4.2. Registering a system by using the web console
Subscriptions cover products installed on Red Hat Enterprise Linux, including the operating system itself. If you have not registered the system, you have no access to the RHEL repositories. You cannot install software updates such as security, bug fixes. Even if you have a self-support subscription, it grants access to the Red Hat Knowledgebase portal while more resources remain unavailable in the lack of subscriptions. You can register a newly installed Red Hat Enterprise Linux with your account credentials in the Red Hat Enterprise Linux web console.
Prerequisites
- You have an active subscription of the RHEL system.
You have installed the RHEL 9 web console.
For instructions, see Installing and enabling the web console.
Procedure
Log in to the RHEL 9 web console.
For details, see Logging in to the web console.
- In the Health field on the Overview page, click the Not registered warning, or click Subscriptions in the main menu to move to page with your subscription information.
- In the Overview field, click .
In the Register system dialog, select the registration method.
Optional: Enter your organization’s name or ID. If your account belongs to more than one organization on the Red Hat Customer Portal, you must add the organization name or ID. To get the organization ID, check with your Technical Account Manager at Red Hat.
- If you do not want to connect your system to Red Hat Red Hat Lightspeed, clear the Insights checkbox.
- Click .
Verification
- Check details of your subscription in the Hybrid Cloud Console.
4.3. Registering subscriptions with activation keys in the web console
You can register a newly installed Red Hat Enterprise Linux with an activation key in the RHEL web console.
Prerequisites
- An activation key of your Red Hat product subscription.
You have installed the RHEL 9 web console.
For instructions, see Installing and enabling the web console.
Procedure
Log in to the RHEL 9 web console.
For details, see Logging in to the web console.
In the Health field on the Overview page, click the Not registered warning, or click Subscriptions in the main menu to move to the page with your subscription information.

.
- In the Overview field, click .
- In the Register system dialog box, select Activation key to register using an activation key.
- Enter your key or keys.
Enter your organization’s name or ID.
To get the organization ID, go to your Red Hat contact point.
- If you do not want to connect your system to Red Hat Lightspeed, clear the Insights checkbox.
- Click .
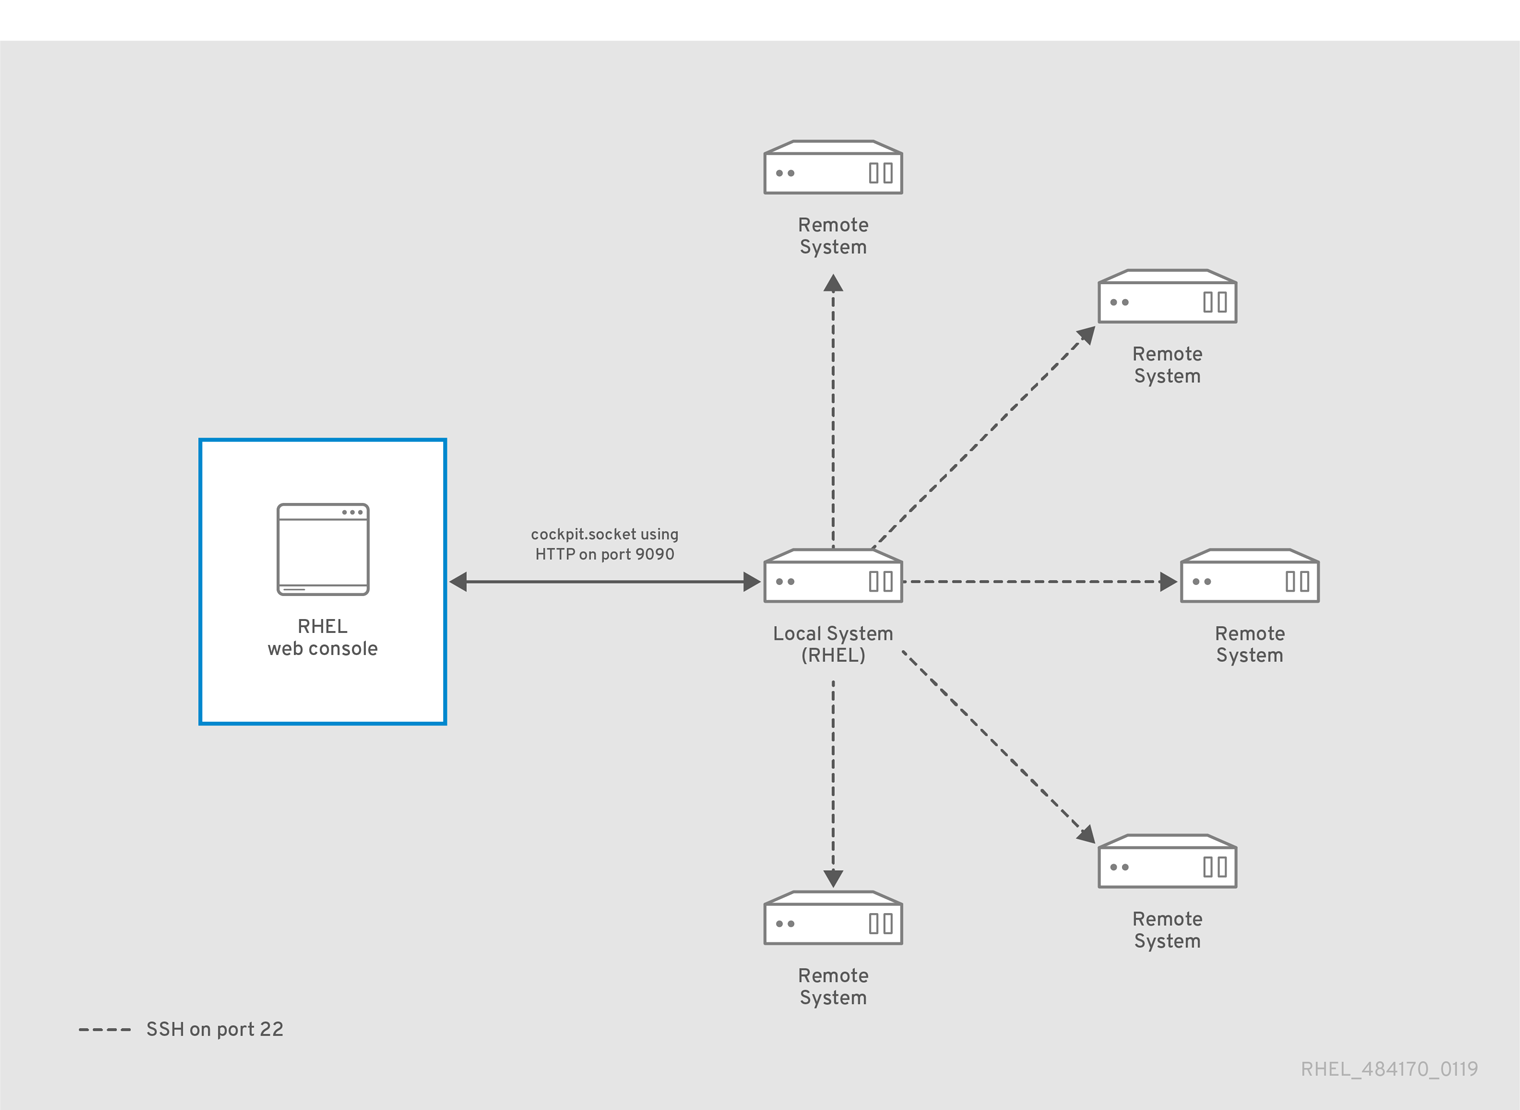
Chapter 5. Managing remote systems in the web console
You can connect to remote systems and manage them in the RHEL 9 web console.
5.1. Remote system manager in the web console
For security reasons, use the following network setup of remote systems managed by the web console:
- Configure one system as a bastion host. The bastion host is a system with opened HTTPS port.
- All other systems communicate through SSH.
With the web interface running on the bastion host, you can reach all other systems through the SSH protocol.
5.2. Connecting to a remote host using SSH from the web console login page
You can connect to a remote system through the SSH protocol directly from the login page of the RHEL web console. After you log in remotely, you can manage the remote system in the graphical interface of the web console with encrypted connection traffic.
Prerequisites
You have installed the RHEL 9 web console.
For instructions, see Installing and enabling the web console.
-
The
cockpit-systempackage is installed on the remote system. -
The
sshdservice runs on the remote system, and the corresponding port is allowed in the firewall.
Procedure
- Open the web console login page.
- Enter the username on the remote host in the User name field.
- Click Other options to reveal the Connect to text field.
Specify the remote host you want to connect to using SSH in the Connect to text field. If you do not specify any port, the web console attempts to connect to port 22 on the specified remote host.

- Click Log in.
5.3. Adding remote hosts to the web console
When logged in to the RHEL web console, you can switch between the local system and multiple remote hosts through the host switcher in the upper-left corner of the Overview page. You can connect to and manage a remote system after you add its credentials to the host switcher.
Prerequisites
You have installed the RHEL 9 web console.
For instructions, see Installing and enabling the web console.
Procedure
Log in to the RHEL 9 web console.
For details, see Logging in to the web console.
In the RHEL web console, click
<username>@<hostname>in the upper-left corner of the Overview page.
- In the drop-down menu, click .
- In the Add new host dialog box, specify the host you want to add.
Optional: Add the username for the account you want to connect to.
You can use any user account of the remote system. However, if you use the credentials of a user account without administration privileges, you cannot perform administration tasks.
If you use the same credentials as on your local system, the web console authenticates remote systems automatically every time you log in.
ImportantThe web console does not save passwords used to log in to remote systems.
- Optional: Click the Color field to change the color of the system.
- Click .
Verification
-
The new host is listed in the
<username>@<hostname>drop-down menu
5.4. Enabling SSH login for a new host
When you add a new host to the web console, you can also log in to the host with an SSH key. If you already have an SSH key on your system, the web console uses the existing one; otherwise, the web console can create a key.
Prerequisites
You have installed the RHEL 9 web console.
For instructions, see Installing and enabling the web console.
Procedure
Log in to the RHEL 9 web console.
For details, see Logging in to the web console.
In the RHEL web console, click
<username>@<hostname>in the top left corner of the Overview page.
- In the drop-down menu, click .
- In the Add new host dialog box, specify the host you want to add. If you connect to the host for the first time, you must click in the following dialog box.
The password dialog box differs depending on the existence of an SSH key file on the host:
- If you already have the SSH key for the host, select the Authorize SSH key option.
- If you do not have the SSH key, select the Create a new SSH key and authorize it option. The web console creates the key.
- Add and confirm a password for the SSH key.
- Click .
Verification
- Log out.
- Log back in.
- Click in the Not connected to host screen.
- Select SSH key as your authentication option.
- Enter your key password.
- Click .
5.5. Configuring smart-card authentication for SSH logins in the web console
After logging in to a user account on the RHEL web console, you can connect to remote machines by using the SSH protocol. You can use the constrained delegation feature to use SSH without being asked to authenticate again.
In the example procedure, the web console session runs on the myhost.idm.example.com host, and you configure the console to access the remote.idm.example.com host by using SSH on behalf of the authenticated user.
Prerequisites
-
You have obtained an IdM
adminticket-granting ticket (TGT) onmyhost.idm.example.com. -
You have
rootaccess toremote.idm.example.com. - The host that runs the web console is a member of an IdM domain
Procedure
In the Terminal page, verify that the web console has created a Service for User to Proxy (S4U2proxy) Kerberos ticket in the user session:
$ klist
…
Valid starting     Expires            Service principal
05/20/25 09:19:06 05/21/25 09:19:06 HTTP/myhost.idm.example.com@IDM.EXAMPLE.COM
…
Create a list of the target hosts that the delegation rule can access:
Create a service delegation target:
$ ipa servicedelegationtarget-add cockpit-targetAdd the target host to the delegation target:
$ ipa servicedelegationtarget-add-member cockpit-target \
  --principals=host/remote.idm.example.com@IDM.EXAMPLE.COM
Allow
cockpitsessions to access the target host list by creating a service delegation rule and adding the HTTP service Kerberos principal to it:Create a service delegation rule:
$ ipa servicedelegationrule-add cockpit-delegationAdd the web console client to the delegation rule:
$ ipa servicedelegationrule-add-member cockpit-delegation \
  --principals=HTTP/myhost.idm.example.com@IDM.EXAMPLE.COM
Add the delegation target to the delegation rule:
$ ipa servicedelegationrule-add-target cockpit-delegation \
  --servicedelegationtargets=cockpit-target
Enable Kerberos authentication on the
remote.idm.example.comhost:-
Connect through SSH to
remote.idm.example.comasroot. -
Add the
GSSAPIAuthentication yessetting to the/etc/ssh/sshd_configfile.
-
Connect through SSH to
Restart the
sshdservice onremote.idm.example.comso that the changes take effect immediately:$ systemctl try-restart sshd.service
5.6. Using Ansible to configure smart-card authentication for SSH logins in the web console
After logging in to a user account on the RHEL web console, you can connect to remote machines by using the SSH protocol. You can use the servicedelegationrule and servicedelegationtarget Ansible modules to configure the web console for the constrained delegation feature, which enables SSH connections without being asked to authenticate again.
In the example procedure, the web console session runs on the myhost.idm.example.com host and you configure it to access the remote.idm.example.com host by using SSH on behalf of the authenticated user.
Prerequisites
-
You have obtained an IdM
adminticket-granting ticket (TGT) onmyhost.idm.example.com. -
You have
rootaccess toremote.idm.example.com. - The host that runs the web console is a member of an IdM domain
You have configured your Ansible control node to meet the following requirements:
-
You have installed the
ansible-freeipapackage. - You are using Ansible version 2.14 or later.
-
The example assumes you have created an Ansible inventory file with the fully-qualified domain name (FQDN) of the IdM server in the
~/MyPlaybooks/directory. -
The example assumes that the
secret.ymlAnsible vault stores the admin password in theipaadmin_passwordvariable.
-
You have installed the
-
The target node, that is the node on which the
ansible-freeipamodule runs, is part of the IdM domain as an IdM client, server, or replica.
Procedure
In the Terminal page, verify that the web console has created a Service for User to Proxy (S4U2proxy) Kerberos ticket in the user session:
$ klist
…
Valid starting     Expires            Service principal
05/20/25 09:19:06 05/21/25 09:19:06 HTTP/myhost.idm.example.com@IDM.EXAMPLE.COM
…
Navigate to your
~/MyPlaybooks/directory:$ cd ~/MyPlaybooks/Create a
web-console-smart-card-ssh.ymlplaybook with the following content:Create a task that ensures the presence of a delegation target:
---
- name: Playbook to create a constrained delegation target
  hosts: ipaserver

  vars_files:
  - /home/user_name/MyPlaybooks/secret.yml
  tasks:
  - name: Ensure servicedelegationtarget web-console-delegation-target is present
    ipaservicedelegationtarget:
      ipaadmin_password: "{{ ipaadmin_password }}"
      name: web-console-delegation-target
Add a task that adds the target host to the delegation target:
  - name: Ensure servicedelegationtarget web-console-delegation-target member principal host/remote.idm.example.com@IDM.EXAMPLE.COM is present
    ipaservicedelegationtarget:
      ipaadmin_password: "{{ ipaadmin_password }}"
      name: web-console-delegation-target
      principal: host/remote.idm.example.com@IDM.EXAMPLE.COM
      action: member
Add a task that ensures the presence of a delegation rule:
  - name: Ensure servicedelegationrule delegation-rule is present
    ipaservicedelegationrule:
      ipaadmin_password: "{{ ipaadmin_password }}"
      name: web-console-delegation-rule
Add a task that ensures that the Kerberos principal of the web console client service is a member of the constrained delegation rule:
  - name: Ensure the Kerberos principal of the web console client service is added to the servicedelegationrule web-console-delegation-rule
    ipaservicedelegationrule:
      ipaadmin_password: "{{ ipaadmin_password }}"
      name: web-console-delegation-rule
      principal: HTTP/myhost.idm.example.com
      action: member
Add a task that ensures that the constrained delegation rule is associated with the web-console-delegation-target delegation target:
  - name: Ensure a constrained delegation rule is associated with a specific delegation target
    ipaservicedelegationrule:
      ipaadmin_password: "{{ ipaadmin_password }}"
      name: web-console-delegation-rule
      target: web-console-delegation-target
      action: member
- Save the file.
Run the Ansible playbook. Specify the playbook file, the file storing the password protecting the
secret.ymlfile, and the inventory file:$ ansible-playbook --vault-password-file=password_file -v -i inventory web-console-smart-card-ssh.ymlEnable Kerberos authentication on
remote.idm.example.com:-
Connect through SSH to
remote.idm.example.comasroot. -
Add the
GSSAPIAuthentication yessetting to the/etc/ssh/sshd_configfile.
-
Connect through SSH to
Restart the
sshdservice onremote.idm.example.comso that the changes take effect immediately:$ systemctl try-restart sshd.service
Chapter 6. Configuring Single Sign-On for logging in to the RHEL web console service running on an IdM client and an IdM server
Using Single Sign-on (SSO) authentication provided by Identity Management (IdM) in the RHEL 9 web console has the following advantages:
- Users with a Kerberos ticket in the IdM domain do not need to provide login credentials to access the web console.
- Users with a certificate issued by the IdM certificate authority (CA) do not need to provide login credentials to access the web console. The web console server automatically switches to a certificate issued by the IdM certificate authority and accepted by browsers. Certificate configuration is not necessary.
- IdM domain administrators can use the RHEL 9 web console to manage the systems in the domain. With the proper permissions configured, IdM administrators can use their web console client, that is their browser, to run any command on any IdM host.
This chapter describes:
- How to configure SSO for logging in to the RHEL web console service running on an IdM client.
- How to configure SSO for logging in to the RHEL web console service running on an IdM server.
-
How to configure
sudoaccess to IdM hosts for an IdM system administrator logged in to a web console client.
Prerequisites
The RHEL web console service is installed on a RHEL 9 system.
For details, see Installing the web console.
The IdM client is installed on the system where the RHEL web console service is running.
For details, see IdM client installation.
6.1. Joining a RHEL 9 system to an IdM domain using the web console
You can use the web console to join a Red Hat Enterprise Linux 9 system to the Identity Management (IdM) domain.
Prerequisites
- The IdM domain is running and reachable from the client you want to join.
- You have the IdM domain administrator credentials.
You have installed the RHEL 9 web console.
For instructions, see Installing and enabling the web console.
Procedure
Log in to the RHEL 9 web console.
For details, see Logging in to the web console.
- In the Configuration field of the Overview tab click Join Domain.
- In the Join a Domain dialog box, enter the host name of the IdM server in the Domain Address field.
- In the Domain administrator name field, enter the user name of the IdM administration account.
- In the Domain administrator password, add a password.
- Click .
Verification
- If the RHEL 9 web console did not display an error, the system has been joined to the IdM domain and you can see the domain name in the System screen.
To verify that the user is a member of the domain, click the Terminal page and type the
idcommand:$ id euid=548800004(example_user) gid=548800004(example_user) groups=548800004(example_user) context=unconfined_u:unconfined_r:unconfined_t:s0-s0:c0.c1023
6.2. Logging in to the web console using Kerberos authentication
As an Identity Management (IdM) user, you can use Single Sign-On (SSO) authentication to automatically access the RHEL web console in your browser.
With SSO, you usually do not have any administrative privileges in the web console. This only works if you configure passwordless sudo. The web console does not interactively ask for a sudo password.
Prerequisites
The IdM domain is resolvable by DNS. For instance, the SRV records of the Kerberos server are resolvable:
$ host -t SRV _kerberos._udp.idm.example.com
_kerberos._udp.idm.example.com has SRV record 0 100 88 dc.idm.example.com
If the system where you are running your browser is a RHEL 9 system and has been joined to the IdM domain, you are using the same DNS as the web console server and no DNS configuration is necessary.
- You have configured the web console server for SSO authentication.
- The host on which the web console service is running is an IdM client.
- You have configured the web console client for SSO authentication.
Procedure
Obtain your Kerberos ticket-granting ticket:
$ kinit idmuser@IDM.EXAMPLE.COM
Password for idmuser@IDM.EXAMPLE.COM:
Enter the fully qualified name of the host on which the web console service is running into your browser:
https://<dns_name>:9090
Next steps
- After you successfully connect to the RHEL web console, you can join a RHEL 9 system to the IdM domain in the web console.
6.3. Enabling the RHEL web console Single Sign-on with GSSAPI on IdM servers
The RHEL web console can use the Generic Security Services Application Program Interface (GSSAPI) authentication. However, the IdM framework already owns an HTTP/server.idm.example.com@IDM.EXAMPLE.COM Kerberos service and its keytab. Therefore, to implement GSSAPI authentication on Identity Management (IdM) servers, create a symlink /etc/cockpit/krb5.keytab to /var/lib/ipa/gssproxy/http.keytab and then generate a certificate-key pair.
Prerequisites
-
You have
rootprivileges. - You are using RHEL 9.6 or later.
Procedure
Create a symlink:
# ln -s /var/lib/ipa/gssproxy/http.keytab /etc/cockpit/krb5.keytabSet a certificate file Bash variable:
# CERT_FILE=/etc/cockpit/ws-certs.d/50-certmonger.crtSet a certificate key Bash variable:
# KEY_FILE=/etc/cockpit/ws-certs.d/50-certmonger.keyGenerate a certificate-key pair:
# ipa-getcert request -f ${CERT_FILE} -k ${KEY_FILE} -D $(hostname --fqdn)
6.4. Enabling sudo access for IdM administrators on IdM hosts
You can configure Identity Management (IdM) system administrators to have sudo privileges on an IdM host.
Prerequisites
- You are logged in as an IdM administrator to an IdM host.
-
You have
rootprivileges on the host.
Procedure
Enable
sudoaccess on the host:# ipa-advise enable-admins-sudo | sh -ex
Chapter 7. Configuring smart card authentication with the web console for centrally managed users
You can configure smart card authentication in the RHEL web console for users who are centrally managed by:
- Identity Management
- Active Directory which is connected in the cross-forest trust with Identity Management
Prerequisites
The system for which you want to use the smart card authentication must be a member of an Active Directory or Identity Management domain.
For details about joining the RHEL 9 system into a domain by using the web console, see Joining a RHEL system to an IdM domain by using the web console.
The certificate used for the smart card authentication must be associated with a particular user in Identity Management or Active Directory.
For more details about associating a certificate with the user in Identity Management, see Adding a certificate to a user entry in the IdM Web UI or Adding a certificate to a user entry in the IdM CLI.
7.1. Smart card authentication for centrally managed users
A smart card is a physical device, which can provide personal authentication using certificates stored on the card. Personal authentication means that you can use smart cards in the same way as user passwords.
You can store user credentials on the smart card in the form of a private key and a certificate. Special software and hardware is used to access them. You insert the smart card into a reader or a USB socket and supply the PIN code for the smart card instead of providing your password.
Identity Management (IdM) supports smart card authentication with:
- User certificates issued by the IdM certificate authority.
- User certificates issued by the Active Directory Certificate Service (ADCS) certificate authority.
If you want to start using smart card authentication, see the hardware requirements: Smart Card support in RHEL8+.
7.2. Installing tools for managing and using smart cards
Before you can configure your smart card, you must install the corresponding tools that can generate certificates and start the pscd service.
Prerequisites
-
You have
rootpermissions.
Procedure
Install the
openscandgnutls-utilspackages:# dnf -y install opensc gnutls-utilsStart the
pcscdservice.# systemctl start pcscd
Verification
Verify that the
pcscdservice is up and running:# systemctl status pcscd
7.3. Preparing your smart card and uploading your certificates and keys to your smart card
Follow this procedure to configure your smart card with the pkcs15-init tool, which helps you to configure:
- Erasing your smart card
- Setting new PINs and optional PIN Unblocking Keys (PUKs)
- Creating a new slot on the smart card
- Storing the certificate, private key, and public key in the slot
- If required, locking the smart card settings as certain smart cards require this type of finalization
The pkcs15-init tool may not work with all smart cards. You must use the tools that work with the smart card you are using.
Prerequisites
The
openscpackage, which includes thepkcs15-inittool, is installed.For more details, see Installing tools for managing and using smart cards.
- The card is inserted in the reader and connected to the computer.
-
You have a private key, a public key, and a certificate to store on the smart card. In this procedure,
testuser.key,testuserpublic.key, andtestuser.crtare the names used for the private key, public key, and the certificate. - You have your current smart card user PIN and Security Officer PIN (SO-PIN).
Procedure
Erase your smart card and authenticate yourself with your PIN:
$ pkcs15-init --erase-card --use-default-transport-keys
Using reader with a card: Reader name
PIN [Security Officer PIN] required.
Please enter PIN [Security Officer PIN]:
The card has been erased.
Initialize your smart card, set your user PIN and PUK, and your Security Officer PIN and PUK:
$ pkcs15-init --create-pkcs15 --use-default-transport-keys \
    --pin 963214 --puk 321478 --so-pin 65498714 --so-puk 784123
Using reader with a card: Reader name
The
pcks15-inittool creates a new slot on the smart card.Set a label and the authentication ID for the slot:
$ pkcs15-init --store-pin --label testuser \
    --auth-id 01 --so-pin 65498714 --pin 963214 --puk 321478
Using reader with a card: Reader name
The label is set to a human-readable value, in this case,
testuser. Theauth-idmust be two hexadecimal values, in this case it is set to01.Store and label the private key in the new slot on the smart card:
$ pkcs15-init --store-private-key testuser.key --label testuser_key \ --auth-id 01 --id 01 --pin 963214 Using reader with a card: Reader nameNoteThe value you specify for
--idmust be the same when storing your private key and storing your certificate in the next step. Specifying your own value for--idis recommended as otherwise a more complicated value is calculated by the tool.Store and label the certificate in the new slot on the smart card:
$ pkcs15-init --store-certificate testuser.crt --label testuser_crt \
    --auth-id 01 --id 01 --format pem --pin 963214
Using reader with a card: Reader name
Optional: Store and label the public key in the new slot on the smart card:
$ pkcs15-init --store-public-key testuserpublic.key \ --label testuserpublic_key --auth-id 01 --id 01 --pin 963214 Using reader with a card: Reader nameNoteIf the public key corresponds to a private key or certificate, specify the same ID as the ID of the private key or certificate.
Optional: Certain smart cards require you to finalize the card by locking the settings:
$ pkcs15-init -FAt this stage, your smart card contains the certificate, private key, and public key in the newly created slot. You have also created your user PIN and PUK and the Security Officer PIN and PUK.
7.4. Enabling smart card authentication for the web console
To use smart card authentication in the web console, enable this authentication method in the cockpit.conf file.
Additionally, you can disable password authentication in the same file.
Prerequisites
You have installed the RHEL 9 web console.
For instructions, see Installing and enabling the web console.
Procedure
Log in to the RHEL 9 web console.
For details, see Logging in to the web console.
- Click Terminal.
In the
/etc/cockpit/cockpit.conf, set theClientCertAuthenticationtoyes:[WebService] ClientCertAuthentication = yesOptional: Disable password based authentication in
cockpit.confwith:[Basic] action = noneThis configuration disables password authentication and you must always use the smart card.
Restart the web console to ensure that the
cockpit.serviceaccepts the change:# systemctl restart cockpit
7.5. Logging in to the web console with smart cards
You can use smart cards to log in to the web console.
Prerequisites
- A valid certificate stored in your smart card that is associated to a user account created in a Active Directory or Identity Management domain.
- PIN to unlock the smart card.
- The smart card has been put into the reader.
You have installed the RHEL 9 web console.
For instructions, see Installing and enabling the web console.
Procedure
Log in to the RHEL 9 web console.
For details, see Logging in to the web console.
The browser asks you to add the PIN protecting the certificate stored on the smart card.
- In the Password Required dialog box, enter PIN and click OK.
- In the User Identification Request dialog box, select the certificate stored in the smart card.
Select Remember this decision.
The system does not open this window next time.
NoteThis step does not apply to Google Chrome users.
- Click OK.
You are now connected and the web console displays its content.
7.6. Enabling passwordless sudo authentication for smart card users
You can configure passwordless authentication to sudo and other services for smart card users in the web console.
As an alternative, if you use Red Hat Enterprise Linux Identity Management, you can declare the initial web console certificate authentication as trusted for authenticating to sudo, SSH, or other services. For that purpose, the web console automatically creates an S4U2Proxy Kerberos ticket in the user session.
Prerequisites
- Identity Management installed.
- Active Directory connected in the cross-forest trust with Identity Management.
- Smart card set up to log in to the web console. See Configuring smart card authentication with the web console for centrally managed users for more information.
Procedure
Set up constraint delegation rules to list which hosts the ticket can access.
Example 7.1. Setting up constraint delegation rules
The web console session runs host
host.example.comand should be trusted to access its own host withsudo. Additionally, we are adding second trusted host -remote.example.com.Create the following delegation:
Run the following commands to add a list of target machines a particular rule can access:
# ipa servicedelegationtarget-add cockpit-target
# ipa servicedelegationtarget-add-member cockpit-target \
   --principals=host/host.example.com@EXAMPLE.COM \
   --principals=host/remote.example.com@EXAMPLE.COM
To allow the web console sessions (HTTP/principal) to access that host list, use the following commands:
# ipa servicedelegationrule-add cockpit-delegation
# ipa servicedelegationrule-add-member cockpit-delegation \
  --principals=HTTP/host.example.com@EXAMPLE.COM
# ipa servicedelegationrule-add-target cockpit-delegation \
  --servicedelegationtargets=cockpit-target
Enable GSS authentication in the corresponding services:
For sudo, enable the
pam_sss_gssmodule in the/etc/sssd/sssd.conffile:As root, add an entry for your domain to the
/etc/sssd/sssd.confconfiguration file.[domain/example.com] pam_gssapi_services = sudo, sudo-iEnable the module in the
/etc/pam.d/sudofile on the first line.auth sufficient pam_sss_gss.so
-
For SSH, update the
GSSAPIAuthenticationoption in the/etc/ssh/sshd_configfile toyes.
The delegated S4U ticket is not forwarded to remote SSH hosts when connecting to them from the web console. Authenticating to sudo on a remote host with your ticket will not work.
Verification
- Log in to the web console using a smart card.
-
Click the
Limited accessbutton. - Authenticate using your smart card.
Alternatively:
- Try to connect to a different host with SSH.
7.7. Limiting user sessions and memory to prevent a DoS attack
A certificate authentication is protected by separating and isolating instances of the cockpit-ws web server against attackers who wants to impersonate another user. However, this introduces a potential denial of service (DoS) attack: A remote attacker could create a large number of certificates and send a large number of HTTPS requests to cockpit-ws each using a different certificate.
To prevent such DoS attacks, the collective resources of these web server instances are limited. By default, limits for the number of connections and memory usage are set to 200 threads and 75 % (soft) or 90 % (hard) memory limit.
The example procedure demonstrates resource protection by limiting the number of connections and memory.
Procedure
In the terminal, open the
system-cockpithttps.sliceconfiguration file:# systemctl edit system-cockpithttps.sliceLimit the
TasksMaxto 100 andCPUQuotato 30%:[Slice] # change existing value TasksMax=100 # add new restriction CPUQuota=30%To apply the changes, restart the system:
# systemctl daemon-reload
# systemctl stop cockpit
Now, the new memory and user session lower the risk of DoS attacks on the cockpit-ws web server.
Chapter 8. Satellite host management and monitoring in the web console
After enabling RHEL web console integration on a Red Hat Satellite Server, you manage many hosts at scale in the web console.
Red Hat Satellite is a system management solution for deploying, configuring, and maintaining your systems across physical, virtual, and cloud environments. Satellite provides provisioning, remote management and monitoring of multiple Red Hat Enterprise Linux deployments with a centralized tool.
By default, RHEL web console integration is disabled in Red Hat Satellite. To access RHEL web console features for your hosts from within Red Hat Satellite, you must first enable RHEL web console integration on a Red Hat Satellite Server.
To enable the RHEL web console on your Satellite Server, enter the following command as root:
# satellite-installer --enable-foreman-plugin-remote-execution-cockpit --reset-foreman-plugin-remote-execution-cockpit-ensure