Upgrading from RHEL 8 to RHEL 9
Instructions for an in-place upgrade from Red Hat Enterprise Linux 8 to Red Hat Enterprise Linux 9
Abstract
Providing feedback on Red Hat documentation
We are committed to providing high-quality documentation and value your feedback. To help us improve, you can submit suggestions or report errors through the Red Hat Jira tracking system.
Procedure
Log in to the Jira website.
If you do not have an account, select the option to create one.
- Click Create in the top navigation bar.
- Enter a descriptive title in the Summary field.
- Enter your suggestion for improvement in the Description field. Include links to the relevant parts of the documentation.
- Click Create at the bottom of the dialogue.
Key migration terminology
While the following migration terms are commonly used in the software industry, these definitions are specific to Red Hat Enterprise Linux (RHEL).
Update
Sometimes called a software patch, an update is an addition to the current version of the application, operating system, or software that you are running. A software update addresses any issues or bugs to provide a better experience of working with the technology. In RHEL, an update relates to a minor release, for example, updating from RHEL 8.1 to 8.2.
Upgrade
An upgrade is when you replace the application, operating system, or software that you are currently running with a newer version. Typically, you first back up your data according to instructions from Red Hat. When you upgrade RHEL, you have two options:
- In-place upgrade: During an in-place upgrade, you replace the earlier version with the new version without removing the earlier version first. The installed applications and utilities, along with the configurations and preferences, are incorporated into the new version.
- Clean install: A clean install removes all traces of the previously installed operating system, system data, configurations, and applications and installs the latest version of the operating system. A clean install is ideal if you do not need any of the previous data or applications on your systems or if you are developing a new project that does not rely on prior builds.
Operating system conversion
A conversion is when you convert your operating system from a different Linux distribution to Red Hat Enterprise Linux. Typically, you first back up your data according to instructions from Red Hat.
Migration
Typically, a migration indicates a change of platform: software or hardware. Moving from Windows to Linux is a migration. Moving a user from one laptop to another or a company from one server to another is a migration. However, most migrations also involve upgrades, and sometimes the terms are used interchangeably.
- Migration to RHEL: Conversion of an existing operating system to RHEL
- Migration across RHEL: Upgrade from one version of RHEL to another
Chapter 1. Supported upgrade paths
The in-place upgrade replaces the RHEL 8 operating system on your system with a RHEL 9 version.
It is not possible to perform an in-place upgrade directly from RHEL 7 to RHEL 9. However, you can perform an in-place upgrade from RHEL 7 to RHEL 8 and then perform a second in-place upgrade to RHEL 9.
Currently, it is possible to perform an in-place upgrade from the following source RHEL 8 minor versions to the following target RHEL 9 minor versions:
| System configuration | Source OS version | Target OS version |
|---|---|---|
| RHEL | RHEL 8.10 | RHEL 9.6 (EUS) |
| RHEL 9.8 | ||
| RHEL with SAP NetWeaver | RHEL 8.10 | RHEL 9.6 (E4S or EUS) |
| RHEL 9.8 (E4S or EUS) | ||
| RHEL with SAP HANA | RHEL 8.10 | RHEL 9.6 (E4S) |
In-place upgrade paths in this table are guaranteed only for systems that use Red Hat Subscription Manager (RHSM). For Pay-As-You-Go (PAYG) RHEL systems that use Red Hat Update Infrastructure (RHUI), only the latest available upgrade path is supported. Note that this does not impact RHEL systems with SAP HANA installed.
Chapter 2. Planning an upgrade to RHEL 9
Before beginning your upgrade from RHEL 8 to RHEL 9, review system requirements, limitations, and other considerations.
2.1. Planning an upgrade from RHEL 8 to RHEL 9
An in-place upgrade is the recommended and supported way to upgrade your system to the next major version of RHEL.
You should consider the following before upgrading to RHEL 9:
Operating system - The operating system is upgradable by the
Leapputility under the following conditions:The source OS version is installed on a system with one of the following supported architectures:
- AMD and Intel 64-bit architectures (x86-64-v3)
- 64-bit ARM architecture (ARMv8.0-A)
- IBM POWER 9 (little endian) and later
64-bit IBM Z (IBM z14 or IBM LinuxONE II or later)
For more information, see Red Hat certified hardware.
- Minimum hardware requirements for RHEL 9 are met.
- You have access to up-to-date content for the selected source and target OS versions. See Preparing a RHEL 8 system for the upgrade for more information.
Applications - You can migrate applications installed on your system using
Leapp. However, in certain cases, you have to create custom actors, which specify actions to be performed byLeappduring the upgrade, for example, reconfiguring an application or installing a specific hardware driver. For more information, see Handling the migration of your custom and third-party applications. Note that custom actors are unsupported by Red Hat.ImportantThe SHA-1 algorithm has been deprecated in RHEL 9. If your system contains any packages with RSA/SHA-1 signatures, the upgrade is inhibited. Before upgrading, either remove these packages or contact the vendor for packages with RSA/SHA-256 signatures. For more information, see SHA-1 deprecation in Red Hat Enterprise Linux 9.
Security - You should evaluate this aspect before the upgrade and take additional steps when the upgrade process completes. Consider especially the following:
- Before the upgrade, define the security standard your system has to comply with and understand the security changes in RHEL 9.
-
During the upgrade process, the
Leapputility sets SELinux mode to permissive. -
Leappsupports in-place upgrades of RHEL 8.8 and later systems in Federal Information Processing Standard (FIPS) 140 mode to RHEL 9 FIPS-mode-enabled systems. FIPS mode stays enabled during the complete upgrade process. - After the upgrade is finished, re-evaluate and re-apply your security policies. For information about applying and updating security policies, see Applying security policies.
Storage and file systems
Backup - You should always back up your system prior to upgrading. For example, you can use the Relax-and-Recover (ReaR) utility, LVM snapshots, RAID splitting, or a virtual machine snapshot.
NoteFile systems formats are intact. As a consequence, file systems have the same limitations as when they were originally created.
- Encryption - Systems with encrypted storage can be upgraded if the storage uses the LUKS2 format configured with the Clevis TPM 2.0 token. For more information, see Configuring manual enrollment of LUKS-encrypted volumes by using a TPM 2.0 policy.
- High Availability - If you are using the High Availability add-on, follow the Recommended Practices for Applying Software Updates to a RHEL High Availability or Resilient Storage Cluster Knowledgebase article.
- Downtime - The upgrade process can take from several minutes to several hours.
Satellite
- Client - If you manage your hosts through Satellite, you can upgrade multiple hosts simultaneously from RHEL 8 to RHEL 9 by using the Satellite web UI. For more information, see Upgrading hosts to next major Red Hat Enterprise Linux release.
- Server and Capsule - You can upgrade Satellite Servers and Capsules starting in Satellite 6.16. For more information, see Upgrading Satellite or Capsule to RHEL 9 in-place by using Leapp.
- SAP HANA - If you are using SAP HANA, follow the Upgrading SAP environments from RHEL 8 to RHEL 9 guide instead. Note that the upgrade path for RHEL with SAP HANA might differ.
- RHEL for Real Time - Upgrades on real-time systems are supported.
- Real Time for Network Functions Virtualization (NFV) in Red Hat OpenStack Platform - Upgrades on real-time systems are supported.
Public clouds
- Pay-As-You-Go - The in-place upgrade is supported for on-demand Pay-As-You-Go (PAYG) instances that use Red Hat Update Infrastructure (RHUI) on Amazon Web Services (AWS) on all supported architectures, and on Google Cloud and Microsoft Azure only on the Intel architecture.
- Bring Your Own Service - The in-place upgrade is supported for Bring Your Own Subscription instances on all public clouds that use RHSM for a RHEL subscription.
-
Language - All
Leappreports, logs, and other generated documentation are in English, regardless of the language configuration. - Boot loader - It is not possible to switch the boot loader from BIOS to UEFI on RHEL 8 or RHEL 9. If your RHEL 8 system uses BIOS and you want your RHEL 9 system to use UEFI, perform a fresh install of RHEL 9 instead of an in-place upgrade. For more information, see Is it possible to switch the BIOS boot to UEFI boot on preinstalled Red Hat Enterprise Linux machine?
- JBoss Enterprise Application Platform (EAP) - You can upgrade to RHEL 9 with JBoss EAP version 7.4 and 8.1.
Known limitations - Notable known limitations of
Leappcurrently include:- Network based multipath and network storage that use Ethernet or Infiniband are not supported for the upgrade. This includes SAN using FCoE and booting from SAN using FC. Note that SAN using FC are supported.
- The in-place upgrade is not supported for systems with Ansible Automation Platform installed. To use a RHEL 8 Ansible Automation Platform installation on RHEL 9, see the How do I migrate my Ansible Automation Platform installation from one environment to another? Knowledgebase solution.
See also Known Issues.
You can use Red Hat Lightspeed to determine which of the systems you have registered to Red Hat Lightspeed is on a supported upgrade path to RHEL 9. To do so, navigate to the respective Advisor recommendation in Red Hat Lightspeed, enable the recommendation under the Actions drop-down menu, and inspect the list under the Affected systems heading. Note that the Advisor recommendation considers only the RHEL 8 minor version and does not perform a pre-upgrade assessment of the system. See also Advisor-service recommendations overview.
Chapter 3. Preparing for the upgrade
To prevent issues after the upgrade and to ensure that your system is ready to be upgraded to the next major version of RHEL, complete all necessary preparation steps before upgrading.
You must perform the preparation steps described in Preparing a RHEL 8 system for the upgrade on all systems. In addition, on systems that are registered to Satellite Server, you must also perform the preparation steps described in Preparing a Satellite-registered system for the upgrade.
3.1. Preparing a RHEL 8 system for the upgrade
This procedure describes the steps that are necessary before performing an in-place upgrade to RHEL 9 by using the Leapp utility.
If you do not plan to use Red Hat Subscription Manager (RHSM) during the upgrade process, follow instructions in Upgrading to RHEL 9 without Red Hat Subscription Manager.
Prerequisites
- The system meets conditions listed in Planning an upgrade.
- If the system has been previously upgraded from RHEL 7 to RHEL 8, ensure that all required post-upgrade steps have been completed. For more information, see Performing post-upgrade tasks in the Upgrading from RHEL 7 to RHEL 8 guide.
Procedure
- Optional: Review the best practices in The best practices and recommendations for performing RHEL Upgrade using Leapp Knowledgebase article.
- Ensure your system has been successfully registered to the Red Hat Content Delivery Network (CDN) or Red Hat Satellite by using the Red Hat Subscription Manager.
If you have registered your system to Satellite Server, complete the steps in Preparing a Satellite-registered system for the upgrade to ensure that your system meets the requirements for the upgrade.
ImportantIf your system is registered to Satellite Server, you must complete the steps in Preparing a Satellite-registered system for the upgrade for the upgrade before proceeding with the steps in this procedure to prevent issues from occurring.
-
Optional: Unmount non-system OS file systems that are not required for the upgrade, such as file systems containing only data files unrelated to the system itself, and comment them out from the
/etc/fstabfile. This can reduce the amount of time needed for the upgrade process and prevent potential issues related to third-party applications that are not migrated properly during the upgrade by custom or third-party actors. Verify that the system is subscribed using subscription-manager:
If your system is registered by using an account with Simple Content Access (SCA) enabled, verify that the
Content Access Mode is set to Simple Content Accessmessage appears:# subscription-manager status +-------------------------------------------+ System Status Details +-------------------------------------------+ Overall Status: Disabled Content Access Mode is set to Simple Content Access. This host has access to content, regardless of subscription status. System Purpose Status: DisabledIf your system is registered by using an account with SCA disabled, verify that the Red Hat Linux Server subscription is attached, the product name is
Server, and the status isSubscribed. For example:# subscription-manager list --installed +-------------------------------------------+ Installed Product Status +-------------------------------------------+ Product Name: Red Hat Enterprise Linux for x86_64 Product ID: 479 Version: 8.10 Arch: x86_64 Status: Subscribed
Ensure you have appropriate repositories enabled. The following command enables the Base and AppStream repositories for the 64-bit Intel architecture; for other architectures, see RHEL 8 repositories.
# subscription-manager repos --enable rhel-8-for-x86_64-baseos-rpms --enable rhel-8-for-x86_64-appstream-rpmsNoteOptionally, you can enable the CodeReady Linux Builder (also known as Optional) or Supplementary repositories. For more information about repository IDs, see RHEL 8 repositories. For more information about the content of these repositories, see the Package manifest.
Set the system release version:
For systems subscribed using RHSM, lock the system to the source OS version:
# subscription-manager release --set 8.10If you are upgrading by using Red Hat Update Infrastructure (RHUI) on a public cloud, set the expected system release version manually:
# rhui-set-release --set 8.10ImportantIf the
rhui-set-releasecommand is not available on your system, you can set the expected system release version by updating the/etc/dnf/vars/releasefile:# echo "8.10" > /etc/dnf/vars/releasever
- Optional: To use custom repositories, see the Configuring custom repositories Knowledgebase article.
If you use the
dnf versionlockplugin to lock packages to a specific version, clear the lock by running:# dnf versionlock clearFor more information, see the Red Hat Knowledgebase solution How to restrict dnf to install or upgrade a package to a fixed specific package version?.
If you performed an in-place upgrade from RHEL 7 to RHEL 8, ensure that there are no leftover upgrade-related files before you begin installing
leapp-upgradepackages:# rm -rf /usr/share/leapp-repository/repositoriesIf you are upgrading by using Red Hat Update Infrastructure (RHUI) on a public cloud, enable required RHUI repositories and install required RHUI packages to ensure your system is ready for upgrade:
For AWS Red Hat Enterprise Linux:
# dnf config-manager --set-enabled rhui-client-config-server-8
# dnf -y install leapp-rhui-aws
For AWS Red Hat Enterprise Linux with High Availability:
# dnf config-manager --set-enabled rhui-client-config-server-8-ha
# dnf -y install leapp-rhui-aws-ha
For Microsoft Azure:
# dnf config-manager --set-enabled rhui-microsoft-azure-rhel8 # dnf -y install rhui-azure-rhel8 leapp-rhui-azure- For Google Cloud, follow the Leapp RHUI packages for Google Cloud Knowledgebase article.
Install the
Leapputility:# dnf install leapp-upgradeNote that you need up-to-date
leappandleapp-repositorypackages, namelyleappversion0.21.0of theleapppackage and version0.24.0of theleapp-repositorypackage.NoteThe
leapp-repositorypackage contains theleapp-upgrade-el8toel9RPM package.NoteIf your system does not have internet access, download the following packages from the Red Hat Customer Portal:
-
leapp -
leapp-deps -
python3-leapp -
leapp-upgrade-el8toel9 -
leapp-upgrade-el8toel9-deps leapp-upgrade-el8toel9-fapolicyd-
Include only if you installed the
fapolicydRPM package on your system.
-
Include only if you installed the
-
Update all packages to the latest RHEL 8 version and reboot:
# dnf update # reboot-
The latest release of the
leapp-upgrade-el8toel9package contains all required data files. If you have replaced these data files with older versions, remove all JSON files in the/etc/leapp/filesdirectory and reinstall theleapp-upgrade-el8toel9package to ensure your data files are up-to-date. -
Optional: Review, remediate, and then remove the
rpmnewandrpmsavefiles. For more information, see What are rpmnew & rpmsave files? - Temporarily disable antivirus software to prevent the upgrade from failing.
- Temporarily disable all configured health checks, including IPMI watchdogs, to prevent the upgrade process from being interrupted during critical phases, causing system loss.
Ensure that any configuration management system does not interfere with the in-place upgrade process:
-
If you use a configuration management system with a client-server architecture, such as Puppet, Salt, or Chef, disable the system before running the
leapp preupgradecommand. Do not enable the configuration management system until after the upgrade is complete to prevent issues during the upgrade. If you use a configuration management system with agentless architecture, such as Ansible, do not execute the configuration and deployment file, such as an Ansible playbook, during the in-place upgrade as described in Performing the upgrade.
Automation of the pre-upgrade and upgrade process by using a configuration management system is not supported by Red Hat. For more information, see Using configuration management systems to automate parts of the Leapp pre-upgrade and upgrade process on Red Hat Enterprise Linux.
-
If you use a configuration management system with a client-server architecture, such as Puppet, Salt, or Chef, disable the system before running the
- If your NSS database was created in RHEL 7 or earlier, verify that the database has been converted from the DBM database format to SQLite. For more information, see Updating NSS databases from DBM to SQLite.
-
RHEL 9 does not support the legacy
network-scriptspackage, which was deprecated in RHEL 8. Before upgrading, move your custom network scripts and write a NetworkManager dispatcher script that executes your existing custom scripts. For more information, see the Red Hat Knowledgebase solution Migrating custom network scripts to NetworkManager dispatcher scripts. -
If you are upgrading using an ISO image, verify that the ISO image contains the target OS version, for example, RHEL 9.8, and is saved to a persistent local mount point to ensure that the
Leapputility can access the image throughout the upgrade process. Ensure that you have a full system backup or a virtual machine snapshot. You should be able to get your system to the pre-upgrade state if you follow standard disaster recovery procedures within your environment. You can use the following backup options:
- Create a full backup of your system by using the Relax-and-Recover (ReaR) utility. For more information, see the ReaR documentation and the Red Hat Knowledgebase solution What is Relax and Recover (ReaR) and how can I use it for disaster recovery?.
Create a snapshot of your system by using LVM snapshots or RAID splitting. In case of upgrading a virtual machine, you can create a snapshot of the whole VM. You can also manage snapshot and rollback boot entries by using the Boom utility. For more information, see the Red Hat Knowledgebase solution What is BOOM and how to install it? and the Managing system upgrades with snapshots guide.
NoteBecause LVM snapshots do not create a full backup of your system, you might not be able to recover your system after certain upgrade failures. As a result, it is safer to create a full backup by using the ReaR utility.
3.2. Preparing a Satellite-registered system for the upgrade
This procedure describes the steps that are necessary to prepare a system that is registered to Satellite for the upgrade to RHEL 9. There steps are performed on the Satellite Server.
Users on Satellite systems must complete the preparatory steps described both in this procedure and in Preparing a RHEL 8 system for the upgrade.
Prerequisites
- You have administrative privileges for the Satellite Server.
Procedure
- Verify that Satellite is on a version in full or maintenance support. For more information, see Red Hat Satellite Product Life Cycle.
- Import a subscription manifest with RHEL 9 repositories into Satellite Server. For more information, see the Managing Red Hat Subscriptions chapter in the Managing Content Guide for the particular version of Red Hat Satellite, for example, for version 6.17.
Enable and synchronize all required RHEL 8 and RHEL 9 repositories on the Satellite Server with the latest updates for the source and target OS versions. Required repositories must be available in the Content View and enabled in the associated activation key.
NoteFor RHEL 9 repositories, enable the target OS version, for example, RHEL 9.8, of each repository. If you enable only the RHEL 9 version of the repositories, the in-place upgrade is inhibited.
For example, for the Intel architecture without an Extended Update Support (EUS) subscription, enable at minimum the following repositories:
Red Hat Enterprise Linux 8 for x86_64 - AppStream (RPMs)
rhel-8-for-x86_64-appstream-rpms
x86_64 <source_os_version>
Red Hat Enterprise Linux 8 for x86_64 - BaseOS (RPMs)
rhel-8-for-x86_64-baseos-rpms
x86_64 <source_os_version>
Red Hat Enterprise Linux 9 for x86_64 - AppStream (RPMs)
rhel-9-for-x86_64-appstream-rpms
x86_64 <target_os_version>
Red Hat Enterprise Linux 9 for x86_64 - BaseOS (RPMs)
rhel-9-for-x86_64-baseos-rpms
x86_64 <target_os_version>
Replace <source_os_version> and <target_os_version> with the source OS version and target OS version respectively, for example, 8.10 and 9.8.
For other architectures, see RHEL 8 repositories and RHEL 9 repositories.
For more information, see the Importing Content chapter in the Managing Content Guide for the particular version of Red Hat Satellite, for example, for version 6.17.
Attach the content host to a Content View containing the required RHEL 8 and RHEL 9 repositories.
For more information, see the Managing Content Views chapter in the Managing Content Guide for the particular version of Red Hat Satellite, for example, for version 6.17.
Verification
Verify that the correct RHEL 8 and RHEL 9 repositories have been added to the correct Content View on Satellite Server.
- In the Satellite web UI, navigate to Content > Lifecycle > Content Views and click the name of the Content View.
Click the Repositories tab and verify that the repositories appear as expected.
NoteYou can also verify that the repositories have been added to the Content View using the following commands:
# hammer repository list --search 'content_label ~ rhel-8' --content-view <content_view_name> --organization <organization> --lifecycle-environment <lifecycle_environment>
# hammer repository list --search 'content_label ~ rhel-9' --content-view <content_view_name> --organization <organization> --lifecycle-environment <lifecycle_environment>
Replace <content_view_name> with the name of the Content View, <organization> with the organization, and <lifecycle_environement> with the name of the lifecycle environment..
Verify that the correct RHEL 9 repositories are enabled in the activation key associated with the Content View:
- In Satellite web UI navigate to Content > Lifecycle > Activation Keys and click the name of the activation key.
-
Click the Repository Sets tab and verify that the statuses of the required repositories are
Enabled.
. Verify that all expected RHEL 8 repositories are enabled in the host. For example:
# subscription-manager repos --list-enabled | grep "^Repo ID"
Repo ID:   rhel-8-for-x86_64-baseos-rpms
Repo ID:   rhel-8-for-x86_64-appstream-rpms
3.3. Configuring the upgrade with LiveMode
LiveMode is an alternative method of preparing and booting to the upgrade environment. LiveMode uses the standard booting process. The standard booting process can prevent or help diagnose certain problems that occur during the upgrade, such as issues related to the storage initialization. Note that LiveMode requires approximately 700 MB of additional disk space to create and store the upgrade environment before the reboot.
LiveMode is a Technology Preview feature only. Technology Preview features are not supported with Red Hat production service level agreements (SLAs) and might not be functionally complete. Red Hat does not recommend using them in production. These features provide early access to upcoming product features, enabling customers to test functionality and provide feedback during the development process.
For more information about the support scope of Red Hat Technology Preview features, see Technology Preview Features Support Scope.
When using LiveMode, you can also configure the upgrade experience beyond the default specifications. This can be useful when troubleshooting during the upgrade process or if you want to view the upgrade’s progress by using an SSH connection.
If you are using LiveMode without any modifications to the default settings, you do not need to complete any preparation steps for LiveMode before the upgrade. If you want to change the default specifications, you must create and modify a YAML file.
Procedure
-
If you want to modify LiveMode’s default specifications, create a YAML file in the
/etc/leapp/actor_conf.d/file, for examplelivemode.yaml. Enter the desired LiveMode configuration into the YAML file.
Expand Table 3.1. LiveMode configuration Configuration field Value type Default Description additional_packagesList[str][]Additional packages to be installed into the upgrade image.
autostart_upgrade_after_rebootboolTrueIf set to
True, the upgrade starts automatically after the reboot. Otherwise, a manual trigger is required.capture_strace_info_intostr''If set to a non-empty string,
leappis executed understraceand results are stored within the provided file path.dracut_networkstr''Dracut network arguments. Required if the
url_to_load_squashfs_from option is set to a non-empty string.setup_network_managerboolFalseIf set to
False, the Leapp utility enables Network Manager in the upgrade image.setup_opensshd_using_auth_keysstr''If set to a non-empty string,
opensshdaemon is set up within the upgrade image using the provided authorized keys file.setup_passwordless_rootboolFalseIf set to
True, the root account of the upgrade image has an empty password. Use with caution.squashfs_image_pathstr/var/lib/leapp/live-upgrade.imgDesired location of the upgrade image of the minimal target system.
url_to_load_squashfs_image_fromstr''URL of the desired upgrade image.
The following is an example of a
/etc/leapp/actor_conf.d/livemode.yamlfile:livemode: additional_packages : [ vim ] autostart_upgrade_after_reboot : false setup_network_manager : true setup_opensshd_using_auth_keys : /root/.ssh/authorized_keysThe example file results in the following actions:
-
The Leapp utility installs the
vimpackage into the upgrade environment. - The upgrade does not start automatically after reboot. You must manually restart it. This allows you to manually inspect the system and verify that the upgrade finished as expected and the system is ready for use before starting.
- The Leapp utility attempts to enable NetworkManager inside the upgrade environment by using the source system’s network profiles.
-
The Leapp utility enables the
opensshdservice. If the system establishes network access successfully, you can use SSH to log in to the upgrade environment by using the root account and interact with the system.
-
The Leapp utility installs the
Chapter 4. Manually upgrading small deployments
You can upgrade your system manually by using the command-line interface and web console. This method is preferred when upgrading a small number of machines because manual upgrades are usually easier and less time-consuming than using Ansible roles.
4.1. Reviewing the pre-upgrade report
To assess upgradability of your system, start the pre-upgrade process by using the leapp preupgrade command. During this phase, the Leapp utility collects data about the system, assesses upgradability, and generates a pre-upgrade report. The pre-upgrade report summarizes potential problems and suggests recommended solutions. The report also helps you decide whether it is possible or advisable to proceed with the upgrade.
The pre-upgrade assessment does not modify the system configuration, but it does consume non-negligible space in the /var/lib/leapp directory. In most cases, the pre-upgrade assessment requires up to 4 GB of space, but the actual size depends on your system configuration. If there is not enough space in the hosted file system, the pre-upgrade report might not show complete results of the analysis. To prevent issues, ensure that your system has enough space in the /var/lib/leapp directory or move the directory to a dedicated partition so that space consumption does not affect other parts of the system.
Always review the entire pre-upgrade report, even when the report finds no inhibitors to the upgrade. The pre-upgrade report contains recommended actions to complete before the upgrade to ensure that the upgraded system functions correctly.
Reviewing a pre-upgrade report can also be useful if you want to perform a fresh installation of a RHEL 9 system instead of the in-place upgrade process.
You can assess upgradability in the pre-upgrade phase using either of the following ways:
-
Review the pre-upgrade report in the generated
leapp-report.txtfile and manually resolve reported problems using the command line. - Use the web console to review the report, apply automated remediations where available, and fix remaining problems using the suggested remediation hints.
You can process the pre-upgrade report by using your own custom scripts, for example, to compare results from multiple reports across different environments. For more information, see Automating your Red Hat Enterprise Linux pre-upgrade report workflow.
The pre-upgrade report cannot simulate the entire in-place upgrade process and therefore cannot identify all inhibiting problems with your system. As a result, your in-place upgrade might still be terminated even after you have reviewed and remediated all problems in the report. For example, the pre-upgrade report cannot detect issues related to broken package downloads.
4.1.1. Assessing upgradability of RHEL 8 to RHEL 9 from the command line
Identify potential upgrade problems during the pre-upgrade phase before the upgrade by using the command line.
Prerequisites
- The steps listed in Preparing for the upgrade have been completed.
You are logged in to root with the unconfined SELinux role. If you are using
sudo, you must use the-r unconfined_r -t unconfined_toptions when running each leapp command, for example:$ sudo -r unconfined_r -t unconfined_t leapp preupgrade
Procedure
On your RHEL 8 system, perform the pre-upgrade phase:
# leapp preupgrade --target-version <_target_os_version_>Replace target_os_version with the target OS version, for example
9.6. If no target OS version is defined,Leappuses the default target OS version specified in the table 1.1 in Supported upgrade paths.If you are using custom repositories from the
/etc/yum.repos.d/directory for the upgrade, enable the selected repositories as follows:# leapp preupgrade --enablerepo <repository_id1> --enablerepo <repository_id2> ...-
If you are upgrading without RHSM or by using RHUI, add the
--no-rhsmoption. -
If you have an Extended Upgrade Support (EUS), Advanced Update Support (AUS), or Update Services for SAP Solutions (E4S) (Red Hat Knowledgebase) subscription, add the
--channel <channel>option. Replace <channel> with the channel name, for example,eus,aus, ore4s. Note that SAP HANA customers must perform the in-place upgrade by using the Upgrading SAP environments from RHEL 8 to RHEL 9 guide. If you are using RHEL for Real Time or the Real Time for Network Functions Virtualization (NFV) in your Red Hat OpenStack Platform, enable the deployment by using the
--enablerepooption. For example:# leapp preupgrade --enablerepo rhel-9-for-x86_64-rt-rpmsFor more information, see Configuring Real-Time Compute.
Examine the report in the
/var/log/leapp/leapp-report.txtfile and manually resolve all the reported problems. Some reported problems contain remediation suggestions. Inhibitor problems prevent you from upgrading until you have resolved them.The report contains the following risk factor levels:
- High
- Very likely to result in a deteriorated system state.
- Medium
- Can impact both the system and applications.
- Low
- Should not impact the system but can have an impact on applications.
- Info
- Informational with no expected impact to the system or applications.
In certain system configurations, the
Leapputility generates true or false questions that you must answer manually. If the pre-upgrade report contains a Missing required answers in the answer file message, complete the following steps:-
Open the
/var/log/leapp/answerfilefile and review the true or false questions. Manually edit the
/var/log/leapp/answerfilefile, uncomment the confirm line of the file by deleting the#symbol, and confirm your answer asTrueorFalse. For more information, see the Leapp answerfile.NoteAlternatively, you can answer the true or false question by running the following command:
# leapp answer --section <question_section>.<field_name>=<answer>For example, to confirm a
Trueresponse to the question Are all VDO devices, if any, successfully converted to LVM management?, execute the following command:# leapp answer --section check_vdo.confirm=True
-
Open the
- Repeat the previous steps to rerun the pre-upgrade report to verify that you have resolved all critical issues.
4.1.2. Assessing upgradability of RHEL 8 to RHEL 9 and applying automated remediations through the web console
Identify potential problems in the pre-upgrade phase before the upgrade and apply automated remediations by using the web console.
Prerequisites
- You have completed the steps listed in Preparing for the upgrade.
You are logged in to root with the unconfined SELinux role. If you are using
sudo, you must use the-r unconfined_r -t unconfined_toptions when running each leapp command, for example:$ sudo -r unconfined_r -t unconfined_t leapp preupgrade
Procedure
Install the
cockpit-leappplug-in:# dnf install cockpit-leapp-
Log in to the web console as
rootor as a user that has permissions to enter administrative commands withsudo. See Managing systems using the RHEL 8 web console for more information about the web console. On your RHEL 8 system, perform the pre-upgrade phase either from the command line or from the web console terminal:
# leapp preupgrade --target-version <target_os_version>Replace target_os_version with the target OS version, for example
9.6. If no target OS version is defined,Leappuses the default target OS version specified in the table 1.1 in Supported upgrade paths.If you are using custom repositories from the
/etc/yum.repos.d/directory for the upgrade, enable the selected repositories as follows:# leapp preupgrade --enablerepo <repository_id1> --enablerepo <repository_id2> ...-
If you are upgrading without RHSM or by using RHUI, add the
--no-rhsmoption. -
If you have an Extended Upgrade Support (EUS), Advanced Update Support (AUS), or Update Services for SAP Solutions (E4S) subscription, add the
--channel <channel>option. Replace <channel> with the channel name, for example,eus,aus, ore4s. Note that SAP HANA customers should perform the in-place upgrade using the Upgrading SAP environments from RHEL 8 to RHEL 9 guide. If you are using RHEL for Real Time or the Real Time for Network Functions Virtualization (NFV) in your Red Hat OpenStack Platform, enable the deployment by using the
--enablerepooption. For example:# leapp preupgrade --enablerepo rhel-9-for-x86_64-rt-rpmsFor more information, see Configuring Real-Time Compute.
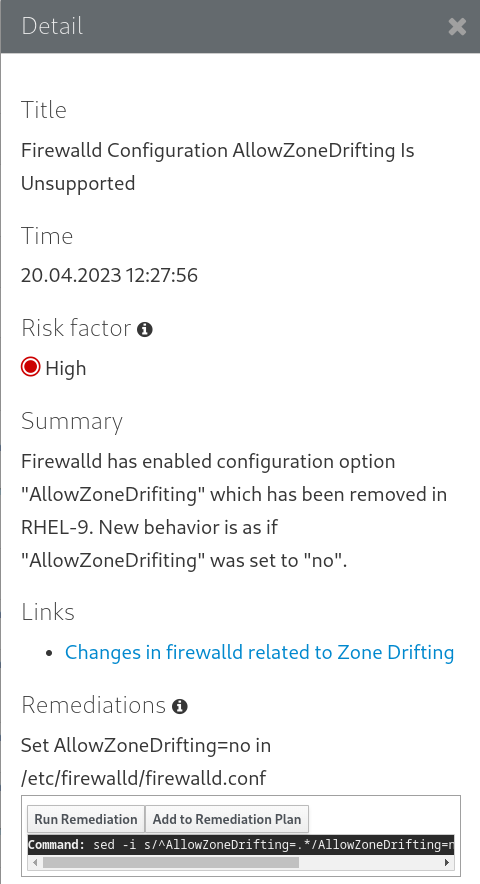
In the web console, select Upgrade Report from the navigation menu to review all reported problems. Inhibitor problems prevent you from upgrading until you have resolved them. To view a problem in detail, select the row to open the Detail pane.
Figure 4.1. In-place upgrade report in the web console

The report contains the following risk factor levels:
- High
- Very likely to result in a deteriorated system state.
- Medium
- Can impact both the system and applications.
- Low
- Should not impact the system but can have an impact on applications.
- Info
- Informational with no expected impact to the system or applications.
In certain configurations, the
Leapputility generates true or false questions that you must answer manually. If the Upgrade Report contains a Missing required answers in the answer file row, complete the following steps:- Select the Missing required answers in the answer file row to open the Detail pane. The default answer is stated at the end of the remediation command.
- To confirm the default answer, select Add to Remediation Plan to execute the remediation later or Run Remediation to execute the remediation immediately.
To select the non-default answer instead, execute the
leapp answercommand in the terminal, specifying the question you are responding to and your confirmed answer.# leapp answer --section <question_section>.<field_name>=<answer>For example, to confirm a
Trueresponse to the question Are all VDO devices, if any, successfully converted to LVM management?, execute the following command:# leapp answer --section check_vdo.confirm=TrueNoteYou can also manually edit the
/var/log/leapp/answerfilefile, uncomment the confirm line of the file by deleting the#symbol, and confirm your answer asTrueorFalse. For more information, see the Leapp answerfile example.
Some problems have remediation commands that you can run to automatically resolve the problems. You can run remediation commands individually or all together in the remediation command.
- To run a single remediation command, open the Detail pane for the problem and click Run Remediation.
To add a remediation command to the remediation plan, open the Detail pane for the problem and click Add to Remediation Plan.
Figure 4.2. Detail pane
- To run the remediation plan containing all added remediation commands, click the Remediation plan link in the top right corner above the report. Click Execute Remediation Plan to execute all listed commands.
- After reviewing the report and resolving all reported problems, repeat steps 3-7 to rerun the report to verify that you have resolved all critical issues.
4.2. Performing the upgrade
After you have completed the preparatory steps and reviewed and resolved the problems found in the pre-upgrade report, you can perform the in-place upgrade on your system.
4.2.1. Performing the upgrade from RHEL 8 to RHEL 9
This procedure lists steps required to perform the upgrade by using the Leapp utility.
Prerequisites
The steps listed in Preparing for the upgrade have been completed, including a full system backup and temporarily disabling configured health check.
WarningIt is critical to temporarily disable configured health checks before performing the in-place upgrade to prevent the upgrade process from being interrupted during critical phases, causing system loss.
- The steps listed in Reviewing the pre-upgrade report have been completed and all reported issues resolved.
Procedure
On your RHEL 8 system, start the upgrade process:
# leapp upgrade --target-version <_target_os_version_>Replace target_os_version with the target OS version, for example
9.6. If no target OS version is defined,Leappuses the default target OS version specified in the table 1.1 in Supported upgrade paths.If you are using custom repositories from the
/etc/yum.repos.d/directory for the upgrade, enable the selected repositories as follows:# leapp upgrade --enablerepo <repository_id1> --enablerepo <repository_id2> ...-
If you are upgrading without RHSM or using RHUI, add the
--no-rhsmoption. -
If you are upgrading by using an ISO image, add the
--no-rhsmand--iso <file_path>options. Replace <file_path> with the file path to the saved ISO image, for example/home/rhel9.iso. -
If you have an Extended Upgrade Support (EUS), Advanced Update Support (AUS), or Update Services for SAP Solutions (E4S) (Red Hat Knowledgebase) subscription, add the
--channel channeloption. Replace channel with the value you used with theleapp preupgradecommand, for example,eus,aus, ore4s. Note that you must use the same value with the--channeloption in both theleapp preupgradeandleapp upgradecommands. If you are using RHEL for Real Time or the Real Time for Network Functions Virtualization (NFV) in your Red Hat OpenStack Platform, enable the deployment by using the
--enablerepooption. For example:# leapp upgrade --enablerepo rhel-9-for-x86_64-rt-rpmsFor more information, see Configuring Real-Time Compute.
If you are upgrading with LiveMode, set the
LEAPP_UNSUPPORTED=1environment variable and use the--enable-experimental-featureoption with thelivemodevalue. For example:# LEAPP_UNSUPPORTED=1 leapp upgrade --enable-experimental-feature livemodeFor more information, see Configuring the upgrade with LiveMode.
ImportantLiveMode is a Technology Preview feature only. Technology Preview features are not supported with Red Hat production service level agreements (SLAs) and might not be functionally complete. Red Hat does not recommend using them in production. These features provide early access to upcoming product features, enabling customers to test functionality and provide feedback during the development process.
For more information about the support scope of Red Hat Technology Preview features, see Technology Preview Features Support Scope.
At the beginning of the upgrade process,
Leappperforms the pre-upgrade phase described in Reviewing the pre-upgrade report.-
If the system is upgradable,
Leappdownloads necessary data and prepares an RPM transaction for the upgrade. -
If your system does not meet the parameters for a reliable upgrade,
Leappterminates the upgrade process and provides a record describing the issue and a recommended solution in the/var/log/leapp/leapp-report.txtfile. For more information, see Troubleshooting.
-
If the system is upgradable,
Manually reboot the system:
# rebootThe system boots into a RHEL 9-based initial RAM disk image, initramfs.
Leappupgrades all packages and automatically reboots to the RHEL 9 system.Alternatively, you can run the
leapp upgradecommand with the--rebootoption and skip this manual step.If a failure occurs, investigate logs and known issues as described in Troubleshooting.
- Log in to the RHEL 9 system and verify its state as described in Verifying the post-upgrade state.
- Perform all post-upgrade tasks described in the upgrade report and in Performing post-upgrade tasks.
Chapter 5. Upgrading large deployments by using Ansible roles
To efficiently upgrade large numbers of systems, you can automate parts of the upgrade process by using Ansible roles.
The following Ansible roles are available:
-
analysis- This Ansible role runs the pre-upgrade report, which analyzes the target system for upgradability and flags potential issues. Along with theremediaterole, this role replaces the Reviewing the pre-upgrade report manual procedure. -
remediate- This Ansible role fixes issues found in the pre-upgrade report. Along with theanalysisrole, this role replaces the Reviewing the pre-upgrade report manual procedure. -
upgrade- This Ansible role runs the upgrade from RHEL 8 to RHEL 9 on the target system and verifies that the upgrade was successful. This role replaces the Performing the upgrade and Verifying the upgrade manual procedures.
To use the analysis, remediate, and upgrade Ansible roles to upgrade from RHEL 8 to RHEL 9, you must install and run the roles from an Ansible control node running on RHEL 9 or RHEL 10. These Ansible roles are part of the ansible-collection-redhat-leapp package available in the AppStream repository on RHEL 9 and RHEL 10 and are supported by Red Hat.
You can also use these Ansible roles to upgrade from RHEL 7 to RHEL 8 from an Ansible control node running on RHEL 9 or RHEL 10 or from RHEL 9 to RHEL 10 from an Ansible control node running on RHEL 10.
5.1. Running the pre-upgrade report by using Ansible roles
You can use the analysis Ansible role to run the pre-upgrade report on the target system. The pre-upgrade report summarizes potential problems and suggests recommended solutions. The report also helps you decide whether it is possible or advisable to proceed with the upgrade.
The analysis Ansible role is best used in conjunction with the remediate Ansible role, which completes the pre-upgrade process by remediating and fixing issues found within the report. These two roles replace the manual procedure described in Reviewing the pre-upgrade report.
Prerequisites
- You have prepared the control node and the managed nodes
-
The account you use to connect to the managed nodes has
sudopermissions for these nodes. - You have completed the Planning an upgrade to RHEL 9 and Preparing for the upgrade procedures.
You have installed the
ansible-collection-redhat-leapppackage to an Ansible control node running on RHEL 9 or RHEL 10.NoteRHEL 9 contains
ansible-core2.14. This Ansible version supports managing RHEL 7, RHEL 8, and RHEL 9 nodes. Therefore, you can upgrade both RHEL 7 and RHEL 8 managed nodes by using a RHEL 9 control node.
Procedure
Create a playbook file, for example
~/analysis.yml, with the following content:--- - name: RHEL pre-upgrade analysis hosts: managed-node-01.example.com tasks: - name: Generate pre-upgrade analysis report ansible.builtin.import_role: name: redhat.leapp.analysis vars: leapp_upgrade_type: satellite leapp_satellite_organization: <satellite_org> leapp_satellite_activation_key_post_analysis: <activation_key_post_analysis> leapp_satellite_activation_key: <activation_key>The settings specified in the example playbook include the following:
leapp_upgrade_type: <upgrade_type>-
Optional: The type of upgrade being performed. The default value is
cdn, which must be used for hosts registered with Red Hat CDN. Set tosatellitefor hosts registered with Satellite,rhuifor hosts using RHUI repositories, andcustomfor custom repositories. Note that the playbook example above uses Satellite, not the default CDN. leapp_satellite_organization: <organization>- Optional: Organization used in Satellite definition. Use only if upgrading by using Satellite. You can omit this variable if the system is registered with an activation key for a content view that includes both the current RHEL version and the next version repositories.
leapp_satellite_activation_key_post_analysis: <activation_key_post_analysis>- Optional: Activation key for the current RHEL version content view to register to after analysis. Use only if upgrading by using Satellite. You can omit this variable if the system is registered with an activation key for the content view, including both the current RHEL version and the next version.
leapp_satellite_activation_key: <activation_key>- Optional: Activation key for the content view, including both the current RHEL version and the next version. Use only if upgrading by using Satellite. You can omit this variable if the system is registered with an activation key for the content view, including both the current RHEL version and the next version.
leapp_preupg_opts: <options>Optional: List of command line options to run with the pre-upgrade command, namely:
-
--target-version <target_os_version> -
--enablerepo <repository_id>if you are upgrading with custom repositories -
--no-rhsmif you are upgrading with custom repositories -
--channel <channel>if you have an EUS or AUS subscription
-
leapp_answerfile: <answerfile>- Optional: In certain system configurations, the pre-upgrade report requires you to respond to certain true or false questions. This variable sets the true or false answer to the designated question.
For details about all variables that can be used in the playbook, see the
/usr/share/ansible/collections/ansible_collections/redhat/leapp/roles/analysis/README.mdfile on the control node.Note that if you upgrade systems that run different RHEL versions, you can specify their variables within Ansible
host_varsfiles.Validate the playbook syntax:
$ ansible-playbook --syntax-check ~/analysis.ymlNote that this command only validates the syntax and does not protect against a wrong but syntactically valid configuration.
Run the playbook:
$ ansible-playbook ~/analysis.ymlReview the output to confirm that the analysis was successful:
RUNNING HANDLER [redhat.leapp.analysis : Pre-upgrade analysis report is done] *************************************************************************************************
ok: [managed-node-01.example.com] => {
    "msg": "The pre-upgrade analysis report generation is now complete. SUCCESS: No inhibitors found. Review the tasks above or the result file at /var/log/leapp/leapp-report.txt."
}
Review the pre-upgrade report at one of the following locations:
-
/var/log/leapp/leapp-report.txton the managed node. -
<workdir>/ansible_leapp_<role_name>_logs_<timestamp>directory on the control node. This directory contains subdirectories for each managed node.
-
5.2. Remediating the pre-upgrade report by using Ansible roles
You can use the remediate Ansible role to remediate and fix problems found on the target system by the pre-upgrade report. The pre-upgrade report summarizes potential problems and suggests recommended solutions. The report also helps you decide whether it is possible or advisable to proceed with the upgrade.
The remediate Ansible role is best used in conjunction with the analysis Ansible role, which starts the pre-upgrade process by analyzing the target system and generating the pre-upgrade report. These two roles replace the manual procedure described in Reviewing the pre-upgrade report.
Prerequisites
- You have prepared the control node and the managed nodes
-
The account you use to connect to the managed nodes has
sudopermissions for these nodes. - You have completed the Planning an upgrade to RHEL 9 and Preparing for the upgrade procedures.
-
You have installed the
ansible-collection-redhat-leapppackage to an Ansible control node running on RHEL 9 or RHEL 10. -
You have generated the pre-upgrade report by using the
analysisAnsible role. See Reviewing the pre-upgrade report and Running the pre-upgrade report by using Ansible roles for more information.
Procedure
Review the
host_varsfiles created by the analysis role on the control node. By default, thehost_varsfiles are created in the playbook location. These files contain instructions on whichremediaterole tasks can be applied to remediate the upgrade inhibitors detected by the analysis role.NoteNot all inhibitors can be remediated by the
remediateAnsible role, and either must instead be remediated manually or cannot be remediated.The following is an example of a
host_varsfile:--- leapp_remediation_todo: - leapp_nfs_detected - leapp_remote_using_root leapp_satellite_activation_key: <activation_key> leapp_satellite_activation_key_post_analysis: <activation_key_post_analysis> leapp_satellite_activation_key_post_upgrade: <activation_key_post_upgrade>Use the
remediate.ymlplaybook, generated by theanalysisrole, to resolve the identified inhibitors. This playbook executes theremediationrole and you can customize the playbook to meet your requirements. For example:--- - name: Remediate hosts: managed-node-01.example.com tasks: - name: Perform remediations on the system ansible.builtin.include_role: name: redhat.leapp.remediateNoteYou can also create a new remediation playbook instead of copying the generated playbook. For more information, see the
/usr/share/ansible/collections/ansible_collections/redhat/leapp/roles/remediate/README.mdfile on the control node.Validate the playbook syntax:
$ ansible-playbook --syntax-check ~/remediate.ymlNote that this command only validates the syntax and does not protect against a wrong but valid configuration.
Run the playbook:
$ ansible-playbook ~/remediate.yml- After remediations are applied, re-run the pre-upgrade report. For more information, see Running the pre-upgrade report by using Ansible roles.
5.3. Upgrading to RHEL 9 by using Ansible roles
You can use the upgrade Ansible role to upgrade the RHEL 8 target system to RHEL 9 and to run verification steps to ensure the upgrade was successful.
The upgrade role replaces the Performing the upgrade and Verifying the post-upgrade state manual procedures.
Prerequisites
- You have prepared the control node and the managed nodes
-
The account you use to connect to the managed nodes has
sudopermissions for these nodes. - You have completed the Planning an upgrade to RHEL 9 and Preparing for the upgrade procedures.
-
You have installed the
ansible-collection-redhat-leapppackage to an Ansible control node running on RHEL 9 or RHEL 10. -
You have generated and remediated the pre-upgrade report, either by manually running the pre-upgrade report or by using the
analysisandremediateAnsible roles, and no longer have any inhibitors in the report. See Reviewing the pre-upgrade report, Running the pre-upgrade report by using Ansible roles, and Remediating the pre-upgrade report by using Ansible roles for more information.
Procedure
Create a playbook file, for example
~/upgrade.yml, with the following content:--- - name: RHEL upgrade hosts: managed-node-01.example.com tasks: - name: Perform OS upgrade ansible.builtin.import_role: name: redhat.leapp.upgrade vars: leapp_upgrade_type: satellite leapp_satellite_organization: <satellite_org> leapp_satellite_activation_key: <activation_key> leapp_satellite_activation_key_post_upgrade: <activation_key_post_upgrade> leapp_upgrade_opts: --target-version 9.8 leapp_selinux_mode: permissiveThe settings specified in the example playbook include the following:
leapp_upgrade_type: <upgrade_type>-
Optional: The type of upgrade being performed. The default value is
cdn, which should be used for hosts registered with Red Hat CDN. Set tosatellitefor hosts registered with Satellite,rhuifor hosts using RHUI repositories, andcustomfor custom repositories. leapp_satellite_organization: <satellite_org>- Optional: Organization used in Satellite definition. Use only if upgrading by using Satellite. You can omit this variable if the system is registered with an activation key for the content view, including both the current RHEL version and the next version.
leapp_satellite_activation_key: <activation_key>- Optional: Activation key for the content view, including both the current RHEL version and the next version. Use only if upgrading by using Satellite. You can omit this variable if the system is registered with an activation key for the content view, including both the current RHEL version and the next version.
leapp_satellite_activation_key_post_upgrade: <activation_key_post_upgrade>- Optional: Activation key for the content view with the next RHEL version to register to after the upgrade. Use only if upgrading by using Satellite. You can omit this variable if the system is registered with an activation key for the content view, including both the current RHEL version and the next version.
leapp_upgrade_opts: <options>Optional: List of command line options to run with the upgrade command, namely:
-
--target-version <target_os_version> -
--enablerepo <repository_id>if you are upgrading with custom repositories -
--no-rhsmif you are upgrading with custom repositories -
--channel <channel>if you have an EUS or AUS subscription
-
leapp_selinux_mode: <mode>-
Optional: By default, the SELinux mode on the RHEL 9 system is set to whichever mode was selected in RHEL 8. Enter
enforcing,permissive, ordisabledto change the mode in RHEL 9.
For details about all variables used in the playbook, see the
/usr/share/ansible/collections/ansible_collections/redhat/leapp/roles/upgrade/README.mdfile on the control node.Validate the playbook syntax:
$ ansible-playbook --syntax-check ~/upgrade.ymlNote that this command only validates the syntax and does not protect against a wrong but valid configuration.
Run the playbook:
$ ansible-playbook ~/upgrade.yml
Verification
Verify that the following message appears in the Ansible role output:
RUNNING HANDLER [redhat.leapp.upgrade : Ansible leapp in-place OS upgrade is done] ******************************************************************************************
ok: [managed-node-01.example.com] => {
    "msg": "The in-place OS upgrade is now complete. Engage partner teams to begin application validation."
}
Next steps
Chapter 6. Verifying the post-upgrade state
After performing the in-place upgrade to RHEL 9, verify that the system is in the correct state. Doing so allows you to identify and correct any critical errors that could impact your system.
6.1. Verifying the post-upgrade state of the RHEL 9 system
This procedure lists Verification recommended to perform after an in-place upgrade to RHEL 9.
Prerequisites
- The system has been upgraded following the steps described in Performing the upgrade and you have been able to log in to RHEL 9.
Procedure
After the upgrade completes, determine whether the system is in the required state, at least:
Verify that the Leapp utility has finished all actions in the upgrade process and the system is ready to be used:
# [ -e "/etc/systemd/system/leapp_resume.service" ] || ps -e | grep -q leapp && echo "Leapp has not finished the execution yet!"ImportantIf you attempt to use the system before the upgrade is complete, serious issues could occur.
Verify that the current OS version is RHEL 9. For example:
# cat /etc/redhat-release
Red Hat Enterprise Linux release 9.6 (Plow)
Check the OS kernel version. For example:
# uname -r
5.14.0-70.10.1.el9_0.x86_64
Note that
.el9is important and the version should not be earlier than 5.14.0.If you are using the Red Hat Subscription Manager:
Verify that the correct product is installed. For example:
# subscription-manager list --installed
+-----------------------------------------+
    	  Installed Product Status
+-----------------------------------------+
Product Name: Red Hat Enterprise Linux for x86_64
Product ID:   479
Version:      9.6
Arch:         x86_64
Status:       Subscribed
Verify that the release version is set to the expected target OS version immediately after the upgrade. For example:
# subscription-manager release
Release: 9.6
- Verify that network services are operational, for example, try to connect to a server using SSH.
- Check the post-upgrade status of your applications. In some cases, you may need to perform migration and configuration changes manually. For example, to migrate your databases, follow instructions in Configuring and using database servers.
Chapter 7. Performing post-upgrade tasks on the RHEL 9 system
After the in-place upgrade, clean up your RHEL 9 system by remove unneeded packages, disable incompatible repositories, and update the rescue kernel and initial RAM disk.
7.1. Performing post-upgrade tasks
This procedure lists major tasks recommended to perform after an in-place upgrade to RHEL 9.
Prerequisites
- The system has been upgraded following the steps described in Performing the upgrade
and you have been able to log in to RHEL 9.
- The status of the in-place upgrade has been verified following the steps described in Verifying the post-upgrade state. This includes verification that the Leapp utility has finished the upgrade process.
Procedure
After performing the upgrade, complete the following tasks:
Remove any remaining
Leapppackages from the exclude list in the/etc/dnf/dnf.confconfiguration file, including thesnactorpackage, which is a tool for upgrade extension development. During the in-place upgrade,Leapppackages that were installed with theLeapputility are automatically added to the exclude list to prevent critical files from being removed or updated. After the in-place upgrade, theseLeapppackages must be removed from the exclude list before they can be removed from the system.-
To manually remove packages from the exclude list, edit the
/etc/dnf/dnf.confconfiguration file and remove the desiredLeapppackages from the exclude list. To remove all packages from the exclude list:
# dnf config-manager --save --setopt exclude=''
-
To manually remove packages from the exclude list, edit the
Remove remaining RHEL 8 packages, including remaining
Leapppackages.- Remove the old kernel packages from the RHEL 9 system. For more information on removing kernel packages, see the Red Hat Knowledgebase solution What is the proper method to remove old kernels from a Red Hat Enterprise Linux system?
Locate remaining RHEL 8 packages:
# rpm -qa | grep -e '\.el[78]' | grep -vE '^(gpg-pubkey|libmodulemd|katello-ca-consumer)' | sortRemove remaining RHEL 8 packages from your RHEL 9 system. To ensure that RPM dependencies are maintained, use the
dnf removecommand.For example:
# dnf remove $(rpm -qa | grep \.el[78] | grep -vE 'gpg-pubkey|libmodulemd|katello-ca-consumer')ImportantThis step might also remove third-party packages. Review the transaction before accepting to ensure no packages are unintentionally removed.
Remove remaining
Leappdependency packages:# dnf remove leapp-deps-el9 leapp-repository-deps-el9
Disable DNF repositories whose packages are not RHEL 9-compatible. Repositories managed by RHSM are handled automatically. To disable these repositories:
# dnf config-manager --set-disabled <repository_id>Replace repository_id with the repository ID.
Verify that the rescue kernel is present on the system:
# ls /boot/vmlinuz*rescue* 2>/dev/null || echo "No rescue kernel installed."If the rescue kernel is present, replace the old rescue kernel and initial RAM disk with the current kernel and disk:
Install the
dracut-config-rescueRPM:# dnf -y install dracut-config-rescueRemove the existing rescue kernel and initial RAM disk:
# rm /boot/vmlinuz-*rescue* /boot/initramfs-*rescue*Reinstall the rescue kernel and related initial RAM disk:
# /usr/lib/kernel/install.d/51-dracut-rescue.install add "$(uname -r)" /boot "/boot/vmlinuz-$(uname -r)"If your system is on the IBM Z architecture, update the
ziplboot loader:# zipl
Check existing configuration files:
-
Review, remediate, and then remove the
rpmnew,rpmsave, andleappsavefiles. Note thatrpmsaveandleappsaveare equivalent and can be handled similarly. For more information, see What are rpmnew & rpmsave files? -
Remove configuration files for RHEL 8 DNF modules from the
/etc/dnf/modules.d/directory that are no longer valid. Note that these files have no effect on the system when related DNF modules do not exist.
-
Review, remediate, and then remove the
Remove all remaining upgrade-related data from the system:
Optional: Back up the /
var/lib/leapp/leapp.dbfile and the/var/log/leapp/directory to ensure Red Hat support can investigate and troubleshoot any post-upgrade problems.ImportantDo not make the backed up files accessible to unauthorized users because they can contain potentially sensitive data.
Remove remaining upgrade-related data:
# rm -rf /var/log/leapp /root/tmp_leapp_py3 /var/lib/leapp
- Re-evaluate and re-apply your security policies. Especially, change the SELinux mode to enforcing. For details, see Applying security policies.
Verification
Verify that the previously removed rescue kernel and rescue initial RAM disk files have been created for the current kernel:
# ls /boot/vmlinuz-*rescue* /boot/initramfs-*rescue*
# lsinitrd /boot/initramfs-*rescue*.img | grep -qm1 "$(uname -r)/kernel/" && echo "OK" || echo "FAIL"
Verify the rescue boot entry refers to the existing rescue files. See the grubby output:
# grubby --info /boot/vmlinuz-*rescue*Review the grubby output and verify that no RHEL 8 boot entries are configured:
# grubby --info ALLVerify that no files related to previous RHEL are present in the /boot/loader/entries file:
# grep -r ".el8" "/boot/loader/entries/" || echo "Everything seems ok."
Chapter 8. Applying security policies
During the in-place upgrade process, the SELinux policy must be switched to permissive mode. Furthermore, security profiles might contain changes between major releases. To restore system security, switch SELinux to enforcing mode again and verify the system-wide cryptographic policy. You may also want to remediate the system to be compliant with a specific security profile. Also, some security-related components require pre-update steps for a correct upgrade.
8.1. Changing SELinux mode to enforcing
During the in-place upgrade process, the Leapp utility sets SELinux mode to permissive. When the system is successfully upgraded, you have to manually change SELinux mode to enforcing.
Prerequisites
- The system has been upgraded and you have performed the Verification described in Verifying the post-upgrade state.
Procedure
Ensure that there are no SELinux denials, for example, by using the
ausearchutility:# ausearch -m AVC,USER_AVC -ts bootNote that the previous step covers only the most common scenario. To check for all possible SELinux denials, see the Identifying SELinux denials section in the Using SELinux title, which provides a complete procedure.
Open the
/etc/selinux/configfile in a text editor of your choice, for example:# vi /etc/selinux/configConfigure the
SELINUX=enforcingoption:# This file controls the state of SELinux on the system. # SELINUX= can take one of these three values: # enforcing - SELinux security policy is enforced. # permissive - SELinux prints warnings instead of enforcing. # disabled - No SELinux policy is loaded. SELINUX=enforcing # SELINUXTYPE= can take one of these two values: # targeted - Targeted processes are protected, # mls - Multi Level Security protection. SELINUXTYPE=targetedSave the change, and restart the system:
# reboot
Verification
After the system restarts, confirm that the
getenforcecommand returnsEnforcing:$ getenforce Enforcing
8.2. System-wide cryptographic policies
The system-wide cryptographic policies is a system component that configures the core cryptographic subsystems, covering the TLS, IPSec, SSH, DNSSec, and Kerberos protocols.
The in-place upgrade process preserves the cryptographic policy you used in RHEL 8. For example, if you used the DEFAULT cryptographic policy in RHEL 8, your system upgraded to RHEL 9 also uses DEFAULT. Note that specific settings in predefined policies differ, and RHEL 9 cryptographic policies contain more strict and more secure default values. For example, the RHEL 9 DEFAULT cryptographic policy restricts SHA-1 usage for signatures and the LEGACY policy no longer allows DH and RSA ciphers with less than 2048 bits. See the Using system-wide cryptographic policies section in the Security hardening document for more information. Custom cryptographic policies are preserved across the in-place upgrade.
To view or change the current system-wide cryptographic policy, use the update-crypto-policies tool:
$ update-crypto-policies --show
DEFAULT
For example, the following command switches the system-wide crypto policy level to FUTURE, which should withstand any near-term future attacks:
# update-crypto-policies --set FUTURE
Setting system policy to FUTURE
If your scenario requires the use of SHA-1 for verifying existing or third-party cryptographic signatures, you can enable it by entering the following command:
# update-crypto-policies --set DEFAULT:SHA1
Alternatively, you can switch the system-wide crypto policies to the LEGACY policy. However, LEGACY also enables many other algorithms that are not secure.
Enabling the SHA subpolicy makes your system more vulnerable than the default RHEL 9 settings. Switching to the LEGACY policy is even less secure, and you should use it with caution.
You can also customize system-wide cryptographic policies. For details, see the Customizing system-wide cryptographic policies with subpolicies and Creating and setting a custom system-wide cryptographic policy sections. If you use a custom cryptographic policy, consider reviewing and updating the policy to mitigate threats brought by advances in cryptography and computer hardware.
8.3. Upgrading a system hardened to a security baseline
To get a fully hardened system after a successful upgrade to RHEL 9, you can use automated remediation provided by the OpenSCAP suite. OpenSCAP remediations align your system with security baselines, such as PCI-DSS, OSPP, or ACSC Essential Eight. The configuration compliance recommendations differ among major versions of RHEL due to the evolution of the security offering.
When upgrading a hardened RHEL 8 system, the Leapp tool does not provide direct means to retain the full hardening. Depending on the changes in the component configuration, the system might diverge from the recommendations for the RHEL 9 during the upgrade.
You cannot use the same SCAP content for scanning RHEL 8 and RHEL 9. Update the management platforms if the compliance of the system is managed by tools such as Red Hat Satellite or Red Hat Lightspeed.
As an alternative to automated remediations, you can make the changes manually by following an OpenSCAP-generated report. For information about generating a compliance report, see Scanning the system for security compliance and vulnerabilities.
Automated remediations support RHEL systems in the default configuration. Because the system configuration has been altered after the upgrade, running automated remediations might not make the system fully compliant with the required security profile. You might need to fix some requirements manually.
The following example procedure hardens your system settings according to the PCI-DSS profile.
Prerequisites
-
The
scap-security-guidepackage is installed on your RHEL 9 system.
Procedure
Find the appropriate security compliance data stream
.xmlfile:$ ls /usr/share/xml/scap/ssg/content/ ... ssg-rhel9-ds.xml ...See the Viewing compliance profiles section for more information.
Remediate the system according to the selected profile from the appropriate data stream:
# oscap xccdf eval --profile pci-dss --remediate /usr/share/xml/scap/ssg/content/ssg-rhel9-ds.xmlYou can replace the
pci-dssvalue in the--profileargument with the ID of the profile according to which you want to harden your system. For a full list of profiles supported in RHEL 9, see SCAP security profiles supported in RHEL.WarningIf not used carefully, running the system evaluation with the
--remediateoption enabled might render the system non-functional. Red Hat does not provide any automated method to revert changes made by security-hardening remediations. Remediations are supported on RHEL systems in the default configuration. If your system has been altered after the installation, running remediation might not make it compliant with the required security profile.Restart your system:
# reboot
Verification
Verify that the system is compliant with the profile, and save the results in an HTML file:
$ oscap xccdf eval --report pcidss_report.html --profile pci-dss /usr/share/xml/scap/ssg/content/ssg-rhel9-ds.xml
8.4. Verifying USBGuard policies
With the USBGuard software framework, you can protect your systems against intrusive USB devices by using lists of permitted and forbidden devices based on the USB device authorization feature in the kernel.
Prerequisites
- You have created a rule set for USB devices that reflected the requirements of your scenario before the upgrade.
-
The
usbguardservice is installed and running on your RHEL 9 system.
Procedure
-
Back up your *.conf files stored in the
/etc/usbguard/directory. -
Use the
usbguard generate-policyto generate a new policy file. Note that the command generates rules for the currently present USB devices only. Compare the newly generated rules against the rules in the previous policy:
- If you identify differences in the rules for the devices that were present when you generated the new policy and the pre-upgrade rules for the same devices, modify the original rules correspondingly also for devices that might be inserted later.
- If there are no differences between the newly generated and the pre-upgrade rules, you can use the policy files created in RHEL 8 without any modification.
8.5. Updating fapolicyd databases
The fapolicyd software framework controls the execution of applications based on a user-defined policy.
In rare cases, a problem with the fapolicyd trust database format can occur. To rebuild the database:
Stop the service:
# systemctl stop fapolicydDelete the database:
# fapolicyd-cli --delete-dbStart the service:
# systemctl start fapolicyd
If you added custom trust files to the trust database, update them either individually by using the fapolicyd-cli -f update <FILE> command or altogether by using fapolicyd-cli -f update. To apply the changes, use either the fapolicyd-cli --update command or restart the fapolicyd service.
Additionally, custom binaries might require a rebuild for the new RHEL version. Perform any such updates before you update the fapolicyd database.
8.6. Updating NSS databases from DBM to SQLite
Many applications automatically convert the NSS database format from DBM to SQLite after you set the NSS_DEFAULT_DB_TYPE environment variable to the sql value on the system. You can ensure that all databases are converted by using the certutil tool.
Convert your NSS databases stored in the DBM format before you upgrade to RHEL 9. In other words, perform the following steps on RHEL systems (6, 7, and 8) from which you want to upgrade to RHEL 9.
Prerequisites
-
The
nss-toolspackage is installed on your system.
Procedure
Set
NSS_DEFAULT_DB_TYPEtosqlon the system:# export NSS_DEFAULT_DB_TYPE=sqlUse the conversion command in every directory[1] that contains NSS database files in the DBM format, for example:
# certutil -K -X -d /etc/ipsec.d/Note that you have to provide a password or a path to a password file as a value of the
-foption if your database file is password-protected, for example:# certutil -K -X -f /etc/ipsec.d/nsspassword -d /etc/ipsec.d/
/etc/pki/nssdb directory. Other locations depend on applications you use. For example, Libreswan stores its database in the /etc/ipsec.d/ directory and Firefox uses the /home/<username>/.mozilla/firefox/ directory.
8.7. Migrating Cyrus SASL databases from the Berkeley DB format to GDBM
The RHEL 9 cyrus-sasl package is built without the libdb dependency, and the sasldb plugin uses the GDBM database format instead of Berkeley DB.
Prerequisites
-
The
cyrus-sasl-libpackage is installed on your system.
Procedure
To migrate your existing Simple Authentication and Security Layer (SASL) databases stored in the old Berkeley DB format, use the
cyrusbdb2currenttool with the following syntax:# cyrusbdb2current <sasldb_path> <new_path>
Chapter 9. Troubleshooting
You can refer to the following tips to troubleshoot upgrading from RHEL 8 to RHEL 9.
9.1. Troubleshooting resources
You can refer to the following troubleshooting resources.
Console output
By default, only error and critical log level messages are printed to the console output by the Leapp utility. To change the log level, use the --verbose or --debug options with the leapp upgrade command.
-
In verbose mode,
Leappprints info, warning, error, and critical messages. -
In debug mode,
Leappprints debug, info, warning, error, and critical messages.
Logs
-
The
/var/log/leapp/leapp-upgrade.logfile lists issues found during the initramfs phase. -
The
/var/log/leapp/dnf-debugdata/directory contains transaction debug data. This directory is present only if theleapp upgradecommand is executed with the--debugoption. -
The
/var/log/leapp/answerfilecontains questions required to be answered byLeapp. -
The
journalctlutility provides complete logs.
Reports
-
The
/var/log/leapp/leapp-report.txtfile lists issues found during the pre-upgrade phase. The report is also available in the web console, see Assessing upgradability and applying automated remediations through the web console. -
The
/var/log/leapp/leapp-report.jsonfile lists issues found during the pre-upgrade phase in a machine-readable format, which enables you to process the report using custom scripts. For more information, see Automating your Red Hat Enterprise Linux pre-upgrade report workflow.
9.2. Troubleshooting tips
You can refer to the following troubleshooting tips.
Pre-upgrade phase
- Verify that your system meets all conditions listed in Planning an upgrade.
-
Make sure you have followed all steps described in Preparing for the upgrade for example, your system does not use more than one Network Interface Card (NIC) with a name based on the prefix used by the kernel (
eth). Make sure you have answered all questions required by
Leappin the/var/log/leapp/answerfilefile. If any answers are missing,Leappinhibits the upgrade. For example:- Are there no VDO devices on the system?
-
Make sure you have resolved all problems identified in the pre-upgrade report, located at
/var/log/leapp/leapp-report.txt. To achieve this, you can also use the web console, as described in Assessing upgradability and applying automated remediations through the web console.
Example 9.1. Leapp answerfile
The following is an example of an unedited /var/log/leapp/answerfile file that has one unanswered question:
[check_vdo]
# Title:              None
# Reason:             Confirmation
# ============================= check_vdo.confirm =============================
# Label:              Are all VDO devices, if any, successfully converted to LVM management?
# Description:        Enter True if no VDO devices are present on the system or all VDO devices on the system have been successfully converted to LVM management. Entering True will circumvent check of failures and undetermined devices. Recognized VDO devices that have not been converted to LVM management can still block the upgrade despite the answer.All VDO devices must be converted to LVM management before upgrading.
# Reason:             To maximize safety all block devices on a system that meet the criteria as possible VDO devices are checked to verify that, if VDOs, they have been converted to LVM management. If the devices are not converted and the upgrade proceeds the data on unconverted VDO devices will be inaccessible. In order to perform checking the 'vdo' package must be installed. If the 'vdo' package is not installed and there are any doubts the 'vdo' package should be installed and the upgrade process re-run to check for unconverted VDO devices. If the check of any device fails for any reason an upgrade inhibiting report is generated. This may be problematic if devices are dynamically removed from the system subsequent to having been identified during device discovery. If it is certain that all VDO devices have been successfully converted to LVM management this dialog may be answered in the affirmative which will circumvent block device checking.
# Type:               bool
# Default:            None
# Available choices: True/False
# Unanswered question. Uncomment the following line with your answer
# confirm =
The Label field specifies the question that requires an answer. In this example, the question is Are all VDO devices, if any, successfully converted to LVM management?
To answer the question, uncomment the last line and enter an answer of True or False. In this example, the selected answer is True:
[check_vdo]
...
# Available choices: True/False
# Unanswered question. Uncomment the following line with your answer
confirm = True
Download phase
If a problem occurs during downloading RPM packages, examine transaction debug data located in the
/var/log/leapp/dnf-debugdata/directory.NoteThe
/var/log/leapp/dnf-debugdata/directory is empty or does not exist if no transaction debug data was produced. This might occur when the required repositories are not available.
Initramfs phase
During this phase, potential failures redirect you to the Dracut shell. Check the Journal log:
# journalctlAlternatively, restart the system from the Dracut shell using the
rebootcommand and check the/var/log/leapp/leapp-upgrade.logfile.
Post-upgrade phase
- If your system seems to be successfully upgraded but booted with the old RHEL 8 kernel, restart the system and check the kernel version of the default entry in GRUB.
- Make sure you have followed the recommended steps in Verifying the post-upgrade state.
If your application or a service stops working or behaves incorrectly after you have switched SELinux to enforcing mode, search for denials using the ausearch, journalctl, or dmesg utilities:
# ausearch -m AVC,USER_AVC -ts boot
# journalctl -t setroubleshoot
# dmesg | grep -i -e selinux -e type=1400
The most common problems are caused by incorrect labeling. See Troubleshooting problems related to SELinux for more details.
9.3. Known issues for the RHEL 8 to RHEL 9 upgrade
The following are Known Issues you may encounter when upgrading.
- Network teaming currently does not work when the in-place upgrade is performed while Network Manager is disabled or not installed.
-
If your RHEL 8 system uses a device driver that is provided by Red Hat but is not available in RHEL 9,
Leappinhibits the upgrade. However, if the RHEL 8 system uses a third-party device driver thatLeappdoes not have data for in the/etc/leapp/files/device_driver_deprecation_data.jsonfile,Leappdoes not detect such a driver and proceeds with the upgrade. Consequently, the system might fail to boot after the upgrade. If the name of a third-party package (not signed by Red Hat) installed on your system is the same as the name of a package provided by Red Hat, the in-place upgrade fails. To work around this problem, choose one of the following options prior to upgrading:
- Remove the third-party package
- Replace the third-party package with the package provided by Red Hat
- In RHEL 8, you can manage Virtual Data Optimizer (VDO) volumes by using either the VDO manager or the Logical Volume Manager (LVM). In RHEL 9, it is only possible to manage VDO volumes by using LVM. To continue using VDO-managed volumes on RHEL 9, import those volumes to LVM-managed VDO volumes before the upgrade. For more information, see Importing existing VDO volumes to LVM.
- The in-place upgrade might fail on systems with Software Redundant Array of Independent Disks (RAID). (BZ#1957192)
After the in-place upgrade, SSH keys are no longer auto-generated if the system meets the following conditions:
- The system is on a cloud.
- The cloud-init package is installed.
The ssh_genkeytypes configuration is set to ~ in the /etc/cloud/cloud.cfg file, which is the default.
This issue prevents the system from connecting by using SSH if the original keys have been removed. For more information about preventing this issue, see the Red Hat Knowledgebase solution Unable to SSH to new Virtual Machine after upgrading the template to RHEL 8.7 or 9. (BZ#2210012)
- VMWare virtual machines that were created at Hardware Level 13 and are booting with UEFI might experience issues during the upgrade because the NVRAM file is too small. For more information, see the Red Hat Knowledgebase solution VMWare: Getting "No space left on device" when executing efibootmgr or mokutil command to add entries. (RHEL-3362)
-
The upgrade might fail if you are upgrading by using RHUI with an ISO image. You can work around this issue by not using the
--isooption with the upgrade or see the Red Hat Knowledgebase solution Offline Leapp upgrade using ISO fails with "Failed to synchronize cache for repo 'rhul-microsoft-azure-rhel8', ignoring this repo. (RHEL-3296)
If any of the mounted file systems that are defined in the
/etc/fstabfile do not have thesharedpropagation flag set, the upgrade might fail. To prevent this issue, remount these file systems to set them as shared:# mount -o remount --make-shared <mountpoint>Replace mountpoint with the mountpoint of each file system.
For more information, see the Red Hat Knowledgebase solution Leapp "Can not load RPM file" during the DNF transaction check. (RHEL-23449)
-
If you are upgrading by using RHUI, files in the
/usr/share/leapp-repository/repositories/system_upgrade/common/files/rhui/directory are incorrectly reported as custom files in the pre-upgrade report. Unless you modified these files manually, you can ignore the warnings about these files in the report and the in-place upgrade will not be affected. (RHEL-40115) By default, the
logrotateis not active after the upgrade. Thelogrotatewas previously managed bycronin RHEL 8 and earlier. In RHEL 9, it is managed bysystemd. To activatelogrotatepersistently, run the following command after the upgrade:# systemctl enable --now logrotate.timer-
If you use an HTTP proxy, Red Hat Subscription Manager must be configured to use such a proxy, or the
subscription-managercommand must be executed with the--proxy <hostname>option. Otherwise, an execution of thesubscription-managercommand fails. If you use the--proxyoption instead of the configuration change, the upgrade process fails becauseLeappis unable to detect the proxy. To prevent this problem from occurring, manually edit therhsm.conffile. For more information, see the Red Hat Knowledgebase solution How to configure HTTP Proxy for Red Hat Subscription Management. (BZ#1689294) -
For systems that require a proxy to access RHEL 9 content, you usually need to configure the use of the proxy by DNF in the
/etc/dnf/dnf.confconfiguration file. If the current DNF configuration is not compatible with the DNF version on the target system, specify the valid target configuration in the/etc/leapp/files/dnf.confconfiguration file. For more information, see the Red Hat Knowledgebase solution How does Leapp work with a proxy? The upgrade might fail with a
MountErrormessage when all of the following conditions are met:-
A mount point that is defined in
/etc/fstabcontains underscore characters. Another mount point defined in
/etc/stabhas the same name if the underscore character is replaced with a forward slash.For example, having both
/var/tmpand/var_tmpmount points defined in/etc/fstabcauses the upgrade to fail.To prevent this problem, unmount the mount point that contains underscore characters, and comment that mount point out from the
/etc/fstabfile before the upgrade. You can restore the configuration after the upgrade.
-
A mount point that is defined in
-
When upgrading systems by using Red Hat Upgrade Infrastructure (RHUI), the upgrade could fail if the RHUI setup of the system differs from defaults implemented in the in-place upgrade solution RHUI systems expected by the
Leapputility. To resolve this problem, configure the upgrade process to adjust it for your RHUI setup. For more information, see Using RHUI to configure an in-place upgrade. Systems that were upgraded from RHEL 7 to RHEL 8 might contain leftover upgrade-related files that could cause issues with the RHEL 8 to RHEL 9 in-place upgrade. To prevent these issues, complete the following steps:
If you already installed the RHEL 8 to RHEL 9 upgrade packages, remove them:
# dnf remove "*leapp*" -yRemove leftover RHEL 7 to RHEL 8 upgrade-related files:
# rm -rf /usr/share/leapp-repository/repositoriesInstall the RHEL 8 to RHEL 9 upgrade packages:
# dnf install leapp-upgrade -y
- The upgrade might fail on systems with multiple LUKS devices. To work around this issue, see leapp upgrade fails when LUKS devices are present even though TPM2 is used to decrypt them. (RHEL-145136)
-
Systems that use
cgroups1, which is deprecated on RHEL 9, can experience higher swap utilization after the upgrade. To work around this issue, switch tocgroups2. For more information about this and other workarounds, see Premature swapping while there is still plenty of pagecache to be reclaimed.
9.4. Obtaining support
To open a support case, select RHEL 8 as the product, and provide a sosreport from your system.
-
To generate a
sosreporton your system, run:
# sosreportNote that you can leave the case ID empty.
For more information about generating a sosreport, see the Red Hat Knowledgebase solution What is an sosreport and how to create one in Red Hat Enterprise Linux?.
For more information about opening and managing a support case on the Customer Portal, see the Red Hat Knowledgebase solution, How do I open and manage a support case on the Customer Portal?.
Appendix A. RHEL 8 repositories
Before the upgrade, ensure you have appropriate repositories enabled as described in step 6 of the procedure in Preparing a RHEL 8 system for the upgrade.
If you plan to use Red Hat Subscription Manager during the upgrade, you must enable the following repositories before the upgrade by using the subscription-manager repos --enable repository_id command:
| Architecture | Repository | Repository ID |
|---|---|---|
| 64-bit Intel and AMD | Base |
|
| AppStream |
| |
| 64-bit ARM | Base |
|
| Extras |
| |
| IBM POWER (little endian) | Base |
|
| AppStream |
| |
| IBM Z | Base |
|
| AppStream |
|
You can enable the following repositories before the upgrade by using the subscription-manager repos --enable repository_id command:
| Architecture | Repository | Repository ID |
|---|---|---|
| 64-bit Intel and AMD | Code Ready Linux Builder |
|
| Supplementary |
| |
| 64-bit ARM | Code Ready Linux Builder |
|
| Supplementary |
| |
| IBM POWER (little endian) | Code Ready Linux Builder |
|
| Supplementary |
| |
| IBM Z | Code Ready Linux Builder |
|
| Supplementary |
|
If you have enabled a RHEL 8 Code Ready Linux Builder or a RHEL 8 Supplementary repository before an in-place upgrade, Leapp enables the RHEL 8 CodeReady Linux Builder or the RHEL 8 Supplementary repositories, respectively. For more information, see the Package manifest.
If you decide to use custom repositories, enable them per instructions in Configuring custom repositories.
Appendix B. RHEL 9 repositories
If your system is registered to the Red Hat Content Delivery Network (CDN) using the Red Hat Subscription Manager (RHSM), RHEL 9 repositories are automatically enabled during the in-place upgrade. However, on systems registered to Red Hat Satellite using RHSM, you must manually enable and synchronize both RHEL 8 and RHEL 9 repositories before running the pre-upgrade report.
Make sure to enable the target OS version of each repository, for example 9.6. If you have enabled only the RHEL 9 version of the repositories, the in-place upgrade is inhibited.
If you plan to use Red Hat Satellite during the upgrade, you must enable and synchronize at least the following RHEL 9 repositories before the upgrade using either the Satellite web UI or the hammer repository-set enable and hammer product synchronize commands:
| Architecture | Repository | Repository ID | Repository name | Release version |
|---|---|---|---|---|
| 64-bit Intel and AMD | BaseOS |
| Red Hat Enterprise Linux 9 for x86_64 - BaseOS (RPMs) | x86_64 <target_os_version> |
| AppStream |
| Red Hat Enterprise Linux 9 for x86_64 - AppStream (RPMs) | x86_64 <target_os_version> | |
| 64-bit ARM | BaseOS |
| Red Hat Enterprise Linux 9 for ARM 64 - BaseOS (RPMs) | aarch64 <target_os_version> |
| AppStream |
| Red Hat Enterprise Linux 9 for ARM 64 - AppStream (RPMs) | aarch64 <target_os_version> | |
| IBM Power (little endian) | BaseOS |
| Red Hat Enterprise Linux 9 for Power, little endian - BaseOS (RPMs) | ppc64le <target_os_version> |
| AppStream |
| Red Hat Enterprise Linux 9 for Power, little endian - AppStream (RPMs) | ppc64le <target_os_version> | |
| IBM Z | BaseOS |
| Red Hat Enterprise Linux 9 for IBM z Systems - BaseOS (RPMs) | s390x <target_os_version> |
| AppStream |
| Red Hat Enterprise Linux 9 for IBM z Systems - AppStream (RPMs) | s390x <target_os_version> |
Replace <target_os_version> with the target OS version, for example 9.6.