Chapter 4. Mounting NFS shares
As a system administrator, you can mount remote NFS shares on your system to access shared data.
4.6. Connecting NFS mounts in the web console
Connect a remote directory to your file system by using NFS.
Prerequisites
- You have installed the RHEL 9 web console.
- You have enabled the cockpit service.
Your user account is allowed to log in to the web console.
For instructions, see Installing and enabling the web console.
-
The
cockpit-storagedpackage is installed on your system. - NFS server name or the IP address.
- Path to the directory on the remote server.
Procedure
Log in to the RHEL 9 web console.
For details, see Logging in to the web console.
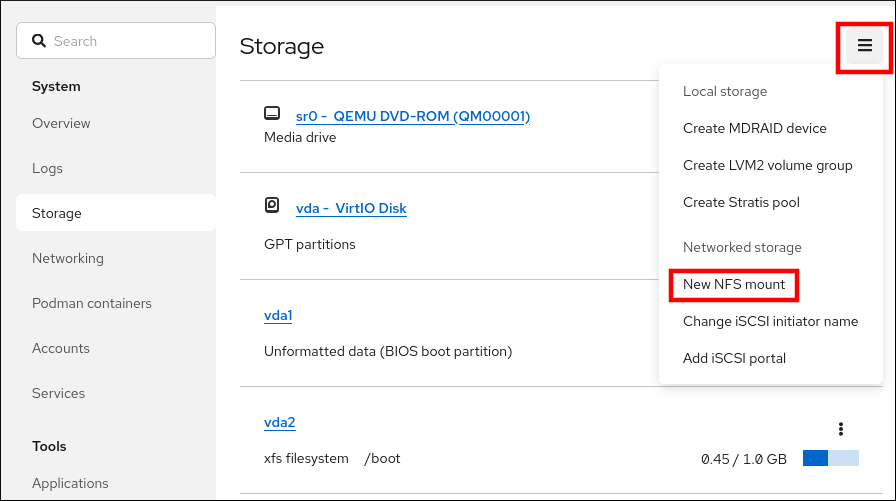
- Click Storage.
- In the Storage table, click the menu button.
From the drop-down menu, select New NFS mount.
- In the New NFS Mount dialog box, enter the server or IP address of the remote server.
- In the Path on Server field, enter the path to the directory that you want to mount.
- In the Local Mount Point field, enter the path to the directory on your local system where you want to mount the NFS.
In the Mount options checkbox list, select how you want to mount the NFS. You can select multiple options depending on your requirements.
- Check the Mount at boot box if you want the directory to be reachable even after you restart the local system.
- Check the Mount read only box if you do not want to change the content of the NFS.
Check the Custom mount options box and add the mount options if you want to change the default mount option.
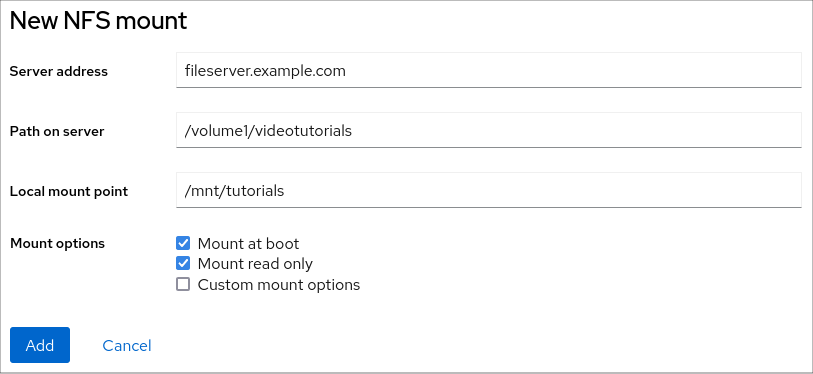
- Click .
Verification
- Open the mounted directory and verify that the content is accessible.
4.14. Enabling client-side caching of NFS content
FS-Cache is a persistent local cache on the client that file systems can use to take data retrieved from over the network and cache it on the local disk. This helps to minimize network traffic.
4.14.1. How NFS caching works
The following diagram is a high-level illustration of how FS-Cache works:
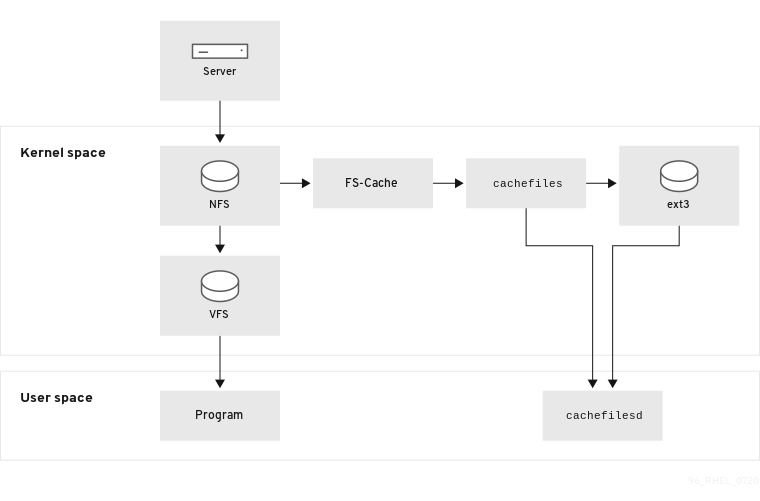
FS-Cache is designed to be as transparent as possible to the users and administrators of a system. FS-Cache allows a file system on a server to interact directly with a client’s local cache without creating an over-mounted file system. With NFS, a mount option instructs the client to mount the NFS share with FS-cache enabled. The mount point will cause automatic upload for two kernel modules: fscache and cachefiles. The cachefilesd daemon communicates with the kernel modules to implement the cache.
FS-Cache does not alter the basic operation of a file system that works over the network. It merely provides that file system with a persistent place in which it can cache data. For example, a client can still mount an NFS share whether or not FS-Cache is enabled. In addition, cached NFS can handle files that will not fit into the cache (whether individually or collectively) as files can be partially cached and do not have to be read completely up front. FS-Cache also hides all I/O errors that occur in the cache from the client file system driver.
To provide caching services, FS-Cache needs a cache back end, the cachefiles service. FS-Cache requires a mounted block-based file system, that supports block mapping (bmap) and extended attributes as its cache back end:
- XFS
- ext3
- ext4
FS-Cache cannot arbitrarily cache any file system, whether through the network or otherwise: the shared file system’s driver must be altered to allow interaction with FS-Cache, data storage or retrieval, and metadata setup and validation. FS-Cache needs indexing keys and coherency data from the cached file system to support persistence: indexing keys to match file system objects to cache objects, and coherency data to determine whether the cache objects are still valid.
Using FS-Cache is a compromise between various factors. If FS-Cache is being used to cache NFS traffic, it may slow the client down, but can massively reduce the network and server loading by satisfying read requests locally without consuming network bandwidth.
4.14.2. Installing and configuring the cachefilesd service
Red Hat Enterprise Linux provides only the cachefiles caching back end. The cachefilesd service initiates and manages cachefiles. The /etc/cachefilesd.conf file controls how cachefiles provides caching services.
Prerequisites
-
The file system mounted under the
/var/cache/fscache/directory isext3,ext4, orxfs. -
The file system mounted under
/var/cache/fscache/uses extended attributes, which is the default if you created the file system on RHEL 8 or later.
Procedure
Install the
cachefilesdpackage:# dnf install cachefilesdEnable and start the
cachefilesdservice:# systemctl enable --now cachefilesd
Verification
Mount an NFS share with the
fscoption to use the cache:To mount a share temporarily, enter:
# mount -o fsc server.example.com:/nfs/projects/ /mnt/To mount a share permanently, add the
fscoption to the entry in the/etc/fstabfile:<nfs_server_ip_or_hostname>:/<exported_share> <mount point> nfs fsc 0 0
Display the FS-cache statistics:
# cat /proc/fs/fscache/stats
4.14.3. Sharing NFS cache
Because the cache is persistent, blocks of data in the cache are indexed on a sequence of four keys:
- Level 1: Server details
- Level 2: Some mount options; security type; FSID; a uniquifier string
- Level 3: File Handle
- Level 4: Page number in file
To avoid coherency management problems between superblocks, all NFS superblocks that require to cache the data have unique level 2 keys. Normally, two NFS mounts with the same source volume and options share a superblock, and therefore share the caching, even if they mount different directories within that volume.
Example 4.1. NFS cache sharing:
The following two mounts likely share the superblock as they have the same mount options, especially if because they come from the same partition on the NFS server:
# mount -o fsc home0:/nfs/projects /projects
# mount -o fsc home0:/nfs/home /home/
If the mount options are different, they do not share the superblock:
# mount -o fsc,rsize=8192 home0:/nfs/projects /projects
# mount -o fsc,rsize=65536 home0:/nfs/home /home/
The user cannot share caches between superblocks that have different communications or protocol parameters. For example, it is not possible to share caches between NFSv4.0 and NFSv3 or between NFSv4.1 and NFSv4.2 because they force different superblocks. Also setting parameters, such as the read size (rsize), prevents cache sharing because, again, it forces a different superblock.
4.14.4. NFS cache limitations
There are some cache limitations with NFS:
- Opening a file from a shared file system for direct I/O automatically bypasses the cache. This is because this type of access must be direct to the server.
- Opening a file from a shared file system for either direct I/O or writing flushes the cached copy of the file. FS-Cache will not cache the file again until it is no longer opened for direct I/O or writing.
- Furthermore, this release of FS-Cache only caches regular NFS files. FS-Cache will not cache directories, symlinks, device files, FIFOs, and sockets.
4.14.5. How cache culling works
The cachefilesd service works by caching remote data from shared file systems to free space on the local disk. This could potentially consume all available free space, which could cause problems if the disk also contains the root partition. To control this, cachefilesd tries to maintain a certain amount of free space by discarding old objects, such as less-recently accessed objects, from the cache. This behavior is known as cache culling.
Cache culling is done on the basis of the percentage of blocks and the percentage of files available in the underlying file system. There are settings in /etc/cachefilesd.conf which control six limits:
- brun N% (percentage of blocks), frun N% (percentage of files)
- If the amount of free space and the number of available files in the cache rises above both these limits, then culling is turned off.
- bcull N% (percentage of blocks), fcull N% (percentage of files)
- If the amount of available space or the number of files in the cache falls below either of these limits, then culling is started.
- bstop N% (percentage of blocks), fstop N% (percentage of files)
- If the amount of available space or the number of available files in the cache falls below either of these limits, then no further allocation of disk space or files is permitted until culling has raised things above these limits again.
The default value of N for each setting is as follows:
-
brun/frun: 10% -
bcull/fcull: 7% -
bstop/fstop: 3%
When configuring these settings, the following must hold true:
-
0 ≤
bstop<bcull<brun< 100 -
0 ≤
fstop<fcull<frun< 100
These are the percentages of available space and available files and do not appear as 100 minus the percentage displayed by the df program.
Culling depends on both bxxx and fxxx pairs simultaneously; the user cannot treat them separately.