Chapter 2. Getting Started for administrators
If you are an OpenShift administrator, you can prepare an OpenShift cluster for Fuse on OpenShift deployments by:
- Configuring authentication to the Red Hat Container Registry.
- Installing the Fuse on OpenShift images and templates.
2.1. Configuring Red Hat Container Registry authentication
You must configure authentication to Red Hat container registry before you can import and use the Red Hat Fuse on OpenShift image streams and templates.
Procedure
Log in to the OpenShift Server as an administrator:
oc login -u system:adminLog in to the OpenShift project where you want to install the image streams. We recommend that you use the
openshiftproject for the Fuse on OpenShift image streams.oc project openshiftCreate a docker-registry secret using either your Red Hat Customer Portal account or your Red Hat Developer Program account credentials. Replace
<pull_secret_name>with the name of the secret that you wish to create.oc create secret docker-registry <pull_secret_name> \ --docker-server=registry.redhat.io \ --docker-username=CUSTOMER_PORTAL_USERNAME \ --docker-password=CUSTOMER_PORTAL_PASSWORD \ --docker-email=EMAIL_ADDRESSNoteYou need to create a docker-registry secret in every new namespace where the image streams reside and in every namespace that uses registry.redhat.io.
To use the secret for pulling images for pods, add the secret to your service account. The name of the service account must match the name of the service account pod uses. The following example uses
defaultwhich is the default service account.oc secrets link default <pull_secret_name> --for=pullTo use the secret for pushing and pulling build images, the secret must be mountable inside of a pod. To mount the secret, use following command:
oc secrets link builder <pull_secret_name>
If you do not want to use your Red Hat account username and password to create the secret, you should create an authentication token by using a registry service account.
For more information see:
2.2. Installing Fuse imagestreams and templates on the OpenShift 4.x server
Openshift Container Platform 4.x uses the Samples Operator, which operates in the OpenShift namespace, installs and updates the Red Hat Enterprise Linux (RHEL)-based OpenShift Container Platform imagestreams and templates. To install the Fuse on OpenShift imagestreams and templates:
- Reconfigure the Samples Operator
Add Fuse imagestreams and templates to
Skipped Imagestreams and Skipped Templatesfields.- Skipped Imagestreams: Imagestreams that are in the Samples Operator’s inventory, but that the cluster administrator wants the Operator to ignore or not manage.
- Skipped Templates: Templates that are in the Samples Operator’s inventory, but that the cluster administrator wants the Operator to ignore or not manage.
Prerequisites
- You have access to OpenShift Server.
- You have configured authentication to the Red Hat Container Registry.
- Optionally, if you want the Fuse templates to be visible in the OpenShift dashboard after you install them, you must first install the service catalog and the template service broker as described in the OpenShift documentation (https://docs.openshift.com/container-platform/4.1/applications/service_brokers/installing-service-catalog.html).
Procedure
- Start the OpenShift 4 Server.
Log in to the OpenShift Server as an administrator.
oc login -u system:adminVerify that you are using the project for which you created a docker-registry secret.
oc project openshiftView the current configuration of Samples operator.
oc get configs.samples.operator.openshift.io -n openshift-cluster-samples-operator -o yamlConfigure Samples operator to ignore the fuse templates and image streams that are added.
oc edit configs.samples.operator.openshift.io -n openshift-cluster-samples-operatorAdd the Fuse imagestreams Skipped Imagestreams section and add Fuse and Spring Boot 2 templates to Skipped Templates section.
[...]
spec:
  architectures:
  - x86_64
  managementState: Managed
  skippedImagestreams:
  - fis-java-openshift
  - fis-karaf-openshift
  - fuse7-console
  - fuse7-eap-openshift
  - fuse7-java-openshift
  - fuse7-karaf-openshift
  - jboss-fuse70-console
  - jboss-fuse70-eap-openshift
  - jboss-fuse70-java-openshift
  - jboss-fuse70-karaf-openshift
  - fuse-apicurito-generator
  - apicurito-ui
  skippedTemplates:
  - s2i-fuse77-eap-camel-amq
  - s2i-fuse77-eap-camel-cdi
  - s2i-fuse77-eap-camel-cxf-jaxrs
  - s2i-fuse77-eap-camel-cxf-jaxws
  - s2i-fuse77-eap-camel-jpa
  - s2i-fuse77-karaf-camel-amq
  - s2i-fuse77-karaf-camel-log
  - s2i-fuse77-karaf-camel-rest-sql
  - s2i-fuse77-karaf-cxf-rest
  - s2i-fuse77-spring-boot-camel
  - s2i-fuse77-spring-boot-camel-amq
  - s2i-fuse77-spring-boot-camel-config
  - s2i-fuse77-spring-boot-camel-drools
  - s2i-fuse77-spring-boot-camel-infinispan
  - s2i-fuse77-spring-boot-camel-rest-sql
  - s2i-fuse77-spring-boot-camel-rest-3scale
  - s2i-fuse77-spring-boot-camel-xa
  - s2i-fuse77-spring-boot-camel-xml
  - s2i-fuse77-spring-boot-cxf-jaxrs
  - s2i-fuse77-spring-boot-2-camel-amq
  - s2i-fuse77-spring-boot-2-camel-config
  - s2i-fuse77-spring-boot-2-camel-drools
  - s2i-fuse77-spring-boot-2-camel-infinispan
  - s2i-fuse77-spring-boot-2-camel-rest-3scale
  - s2i-fuse77-spring-boot-2-camel-rest-sql
  - s2i-fuse77-spring-boot-2-camel
  - s2i-fuse77-spring-boot-2-camel-xa
  - s2i-fuse77-spring-boot-2-camel-xml
  - s2i-fuse77-spring-boot-2-cxf-jaxrs
  - s2i-fuse77-spring-boot-2-cxf-jaxws
  - s2i-fuse77-spring-boot-2-cxf-jaxrs-xml
  - s2i-fuse77-spring-boot-2-cxf-jaxws-xml
Install Fuse on OpenShift image streams.
BASEURL=https://github.com/jboss-fuse/application-templates/blob/application-templates-2.1.0.fuse-sb2-7_11_1-00016-redhat-00002/ oc create -n openshift -f ${BASEURL}/fis-image-streams.jsonNoteIf an error is displayed, with the message "Error from server (AlreadyExists): imagestreams.image.openshift.io <imagestreamname> already exists", use the following command to replace the existing imagestreams with the latest.
oc replace --force -n openshift -f ${BASEURL}/fis-image-streams.jsonInstall Fuse on OpenShift quickstart templates:
for template in eap-camel-amq-template.json \
 eap-camel-cdi-template.json \
 eap-camel-cxf-jaxrs-template.json \
 eap-camel-cxf-jaxws-template.json \
 eap-camel-jpa-template.json \
 karaf-camel-amq-template.json \
 karaf-camel-log-template.json \
 karaf-camel-rest-sql-template.json \
 karaf-cxf-rest-template.json \
 spring-boot-camel-amq-template.json \
 spring-boot-camel-config-template.json \
 spring-boot-camel-drools-template.json \
 spring-boot-camel-infinispan-template.json \
 spring-boot-camel-rest-sql-template.json \
 spring-boot-camel-rest-3scale-template.json \
 spring-boot-camel-template.json \
 spring-boot-camel-xa-template.json \
 spring-boot-camel-xml-template.json \
 spring-boot-cxf-jaxrs-template.json \
 spring-boot-cxf-jaxws-template.json ;
 do
 oc create -n openshift -f \
 https://github.com/jboss-fuse/application-templates/blob/application-templates-2.1.0.fuse-sb2-7_11_1-00016-redhat-00002//quickstarts/${template}
 done
Install Spring Boot 2 quickstart templates:
for template in spring-boot-2-camel-amq-template.json \
 spring-boot-2-camel-config-template.json \
 spring-boot-2-camel-drools-template.json \
 spring-boot-2-camel-infinispan-template.json \
 spring-boot-2-camel-rest-3scale-template.json \
 spring-boot-2-camel-rest-sql-template.json \
 spring-boot-2-camel-template.json \
 spring-boot-2-camel-xa-template.json \
 spring-boot-2-camel-xml-template.json \
 spring-boot-2-cxf-jaxrs-template.json \
 spring-boot-2-cxf-jaxws-template.json \
 spring-boot-2-cxf-jaxrs-xml-template.json \
 spring-boot-2-cxf-jaxws-xml-template.json ;
 do oc create -n openshift -f \
 https://raw.githubusercontent.com/jboss-fuse/application-templates/application-templates-2.1.0.fuse-sb2-7_11_1-00016-redhat-00002/quickstarts/${template}
 done
(Optional) View the installed Fuse on OpenShift templates:
oc get template -n openshift
2.3. Installing API Designer on OpenShift 4.x
Red Hat Fuse on OpenShift provides API Designer, a web-based API designer tool that you can use to design REST APIs. The API Designer operator simplifies the installation and upgrading of API Designer on OpenShift Container Platform 4.x.
As an OpenShift administrator, you install the API Designer operator to an OpenShift project (namespace). When the operator is installed, the operator is running in the selected namespace. However, to make the API Designer available as a service, either you , as the OpenShift administrator, or a developer must create an instance of the API Designer. The API Designer service provides the URL to access the API Designer web console.
Prerequisites
- You have administrator access to the OpenShift cluster.
- You have configured authentication to the Red Hat Container Registry.
Procedure
- Start the OpenShift 4.x Server.
- In a web browser, navigate to the OpenShift console in your browser. Log in to the console with your credentials.
- Click Catalog and then click OperatorHub.
In the search field, type API Designer.
You can see the API Designer card in the right-side panel.
- Click API Designer. The API Designer operator install window appears.
Click Install. The Create Operator Subscription form opens.
- For Installation mode, select a namespace (project) from the list of namespaces on the cluster,
For the Approval Strategy, select Automatic or Manual to configure how OpenShift handles updates to the API Designer Operator.
- If you select Automatic updates, when a new version of the API Designer operator is available, the OpenShift Operator Lifecycle Manager (OLM) automatically upgrades the running instance of the API Designer without human intervention.
- If you select Manual updates, when a newer version of an Operator is available, the OLM creates an update request. As a cluster administrator, you must then manually approve that update request to have the API Designer operator updated to the new version.
- Click Subscribe to make the API Designer Operator available to the specified namespace (project).
- To verify that the API Designer is installed in the project, click Operators and then click Installed Operators to see the API Designer in the list.
Next Steps
After the API Designer operator is installed, the API Designer must be added as a service to the OpenShift project by creating an instance of the API Designer. This task can be accomplished in two ways:
- An OpenShift administrator can follow the steps in Section 2.3.1, “Adding API Designer as a service to an OpenShift 4.x project”.
An OpenShift developer can follow the steps described in Designing APIs.
The API Designer service provides the URL to access the API Designer web console.
2.3.1. Adding API Designer as a service to an OpenShift 4.x project
After the API Designer operator is installed in an OpenShift 4.x project, you (or an OpenShift developer) can add it as a service to the OpenShift project. The API Designer service provides the URL that a developer uses to access the API Designer web console.
See Designing APIs for the steps that an OpenShift developer follows to add API Designer as a service to an OpenShift 4.x project.
Prerequisites
- You have administrator access to the OpenShift cluster.
- The API Designer operator is installed into the current OpenShift project.
Procedure
- In the OpenShift web console, click Operators and then click Installed Operators.
- In the Name column, click API Designer.
Under Provided APIs, click Create Instance.
A default form with a minimal starting template for the API Designer instance opens.
Accept the default values or optionally edit the following values:
size: The number of pods for the API Designer instance.
The default is three pods for three new resource types that contain logic specific to managing API Designer.
- image: The API Designer image. If you change this image, the API Designer operator is automatically upgraded on the cluster.
- Click Create to create a new apicurito-service. OpenShift starts up of the pods, services, and other components for the new API Designer service.
To verify that the API Designer service is available:
- Click Operators and then click Installed Operators.
In the Provided APIs column, click Apicurito CRD.
On the Operator Details page, the apicurito-service is listed.
To obtain the URL for the API Designer:
- Click Networking > Routes.
- Make sure that the correct project is selected.
- In the apicurito-service row, find the URL for the API Designer web console in the Location column.
2.3.2. Upgrading the API Designer on OpenShift 4.x
Red Hat OpenShift 4.x handles updates to operators, including the Red Hat Fuse operators. For more information see the Operators OpenShift documentation.
In turn, operator updates can trigger application upgrades. How an application upgrade occur differs according to how the application is configured.
For API Designer applications, when you upgrade the API Designer operator, OpenShift automatically also upgrades any API designer applications on the cluster.
Since OCP 4.6, the name of the operator channel for the API Designer operator (Apicurito operator) has changed from alpha to fuse-apicurito-7.7.x. If you cannot see the new operator channel after upgrading OpenShift to OCP 4.6, see known issue ENTESB-15232 for details of how to refresh the operator channels visible from the OperatorHub on OpenShift.
2.4. Setting up the Fuse Console on OpenShift 4.x
On OpenShift 4.x, setting up the Fuse Console involves securing, installing, and deploying it.
First, you must generate a client certificate so that you can secure the Fuse Console as described in Section 2.4.1, “Generating a certificate to secure the Fuse Console on OpenShift 4.x”.
After you generate the client certificate, you have these options for installing and deploying the Fuse Console:
Section 2.4.2, “Installing and deploying the Fuse Console on OpenShift 4.x by using the OperatorHub”
You can use the Fuse Console Operator to install and deploy the Fuse Console so that it has access to Fuse applications in a specific namespace.
You can use the command line and one of the Fuse Console templates to install and deploy the Fuse Console so that it has access to Fuse applications in multiple namespaces on the OpenShift cluster or in a specific namespace.
You can implement role-based access control (RBAC) for the Fuse Console by using the command line option to install one of the RBAC Fuse Console templates as described in Section 2.4.3, “Installing and deploying the Fuse Console on OpenShift 4.x by using the command line”.
NoteFor this release, RBAC is not supported when you use the operator to install the Fuse Console.
2.4.1. Generating a certificate to secure the Fuse Console on OpenShift 4.x
On OpenShift 4.x, to keep the connection between the Fuse Console proxy and the Jolokia agent secure, you must generate a client certificate before you deploy the Fuse Console. You must use the service signing certificate authority private key to sign the client certificate.
You must generate and sign a separate client certificate for each OpenShift cluster. Do not use the same certificate for more than one cluster.
Prerequisites
-
You have
cluster adminaccess to the OpenShift cluster. If you are generating certificates for more than one OpenShift cluster and you previously generated a certificate for a different cluster in the current directory, do one of the following to ensure that you generate a different certificate for the current cluster:
-
Delete the existing certificate files (for example,
ca.crt,ca.key, andca.srl) from the current directory. Change to a different working directory. For example, if your current working directory is named
cluster1, create a newcluster2directory and change your working directory to it:mkdir ../cluster2cd ../cluster2
-
Delete the existing certificate files (for example,
Procedure
Login to OpenShift as a user with cluster admin access:
oc login -u <user_with_cluster_admin_role>Retrieve the service signing certificate authority keys, by executing the following commands:
To retrieve the certificate:
oc get secrets/signing-key -n openshift-service-ca -o "jsonpath={.data['tls\.crt']}" | base64 --decode > ca.crtTo retrieve the private key:
oc get secrets/signing-key -n openshift-service-ca -o "jsonpath={.data['tls\.key']}" | base64 --decode > ca.key
Generate the client certificate, as documented in Kubernetes certificates administration, using either
easyrsa,openssl, orcfssl.Here are the example commands using openssl:
Generate the private key:
openssl genrsa -out server.key 2048Write the CSR config file.
cat <<EOT >> csr.conf
  [ req ]
  default_bits = 2048
  prompt = no
  default_md = sha256
  distinguished_name = dn

  [ dn ]
  CN = fuse-console.fuse.svc

  [ v3_ext ]
  authorityKeyIdentifier=keyid,issuer:always
  keyUsage=keyEncipherment,dataEncipherment,digitalSignature
  extendedKeyUsage=serverAuth,clientAuth
EOT
Generate the CSR:
openssl req -new -key server.key -out server.csr -config csr.confIssue the signed certificate:
openssl x509 -req -in server.csr -CA ca.crt -CAkey ca.key -CAcreateserial -out server.crt -days 10000 -extensions v3_ext -extfile csr.conf
Next steps
You need this certificate to create the secret for the Fuse Console as described in the following sections, depending on how you want to install the Fuse Console:
2.4.2. Installing and deploying the Fuse Console on OpenShift 4.x by using the OperatorHub
To install the Fuse Console on OpenShift 4.x, you can use the Fuse Console Operator provided in the OpenShift OperatorHub. To deploy the Fuse Console, you create an instance of the installed operator.
Prerequisite
-
You have
cluster adminaccess to the OpenShift cluster. - You have generated a client certificate for the Fuse Console as described in Generating a certificate to secure the Fuse Console on OpenShift 4.x.
Procedure
To install and deploy the Fuse Console:
-
Log in to the OpenShift console in your web browser as a user with
cluster adminaccess. - Select Home > Projects, and then select the project to which you want to add the Fuse Console.
- Click Operators and then click OperatorHub.
- In the search field window, type Fuse Console to filter the list of operators.
- Click Fuse Console Operator.
In the Fuse Console Operator install window, click Install.
The Create Operator Subscription form opens.
For Installation mode, you install the Fuse Console Operator to a specific namespace (the current OpenShift project).
Note that after you install the operator, you can then choose to deploy the Fuse Console to monitor applications in all namespaces on the cluster or to monitor applications only in the namespace in which the Fuse Console operator is installed.
For the Approval Strategy, you can select Automatic or Manual to configure how OpenShift handles updates to the Fuse Console Operator.
- If you select Automatic updates, when a new version of the Fuse Console Operator is available, the OpenShift Operator Lifecycle Manager (OLM) automatically upgrades the running instance of the Fuse Console without human intervention.
- If you select Manual updates, when a newer version of an Operator is available, the OLM creates an update request. As a cluster administrator, you must then manually approve that update request to have the Fuse Console Operator updated to the new version.
Click Subscribe.
OpenShift installs the Fuse Console Operator in the current namespace.
- To verify the installation, click Operators and then click Installed Operators. You can see the Fuse Console in the list of operators.
In a Terminal window, use the certificate that you generated in Securing the Fuse Console on OpenShift 4.x to create the secret and mount it in the Fuse Console by using the following command where APP_NAME is the name of the Fuse Console Deployment (for example,
fuse-console).oc create secret tls APP_NAME-tls-proxying --cert server.crt --key server.keyFor example, if the name of the Fuse Console application is fuse-console, type this command:
oc create secret tls fuse-console-tls-proxying --cert server.crt --key server.keyIf successful, this command returns a response that confirms the secret was created, for example:
secret/fuse-console-operator-tls-proxying createdTo deploy the Fuse Console by using the OpenShift web console:
- In the list of Installed Operators, under the Name column, click Fuse Console.
On the Overview page under Provided APIs, click Create Instance. A new Custom Resource Definition (CRD) file opens.
By default, the Fuse Console is deployed to the current namespace.
If you want to deploy the Fuse Console to discover and manage applications within the current namespace, skip to the next step.
Optionally, if you want to deploy the Fuse Console to discover and manage applications across all namespaces that are on the cluster (and for which you are an authenticated user), edit the CRD file by changing the value of the
spec.typefield fromnamespacetocluster.Click Create.
After you deploy the Fuse Console, the Fuse Console CRD page opens showing the new Fuse Console service.
For Fuse 7.7.0, the deployed Fuse Console might become unstable after a while, continuously stopping and restarting accompanied by the error Liveness probe failed. This instability is caused by the Fuse Console pod exceeding its memory allocation on OpenShift.
To fix the instability, modify the memory limits for the Fuse Console deployment as follows:
-
Use the
oc rollout pausecommand to pause automatic redeployment of the Fuse Console pod. -
Edit the Fuse Console’s deployment configuration (YAML file) to increase the memory allocation. Change the values of the
containers:resources:limits:memoryandcontainers:resources:requests:memoryfields from 32Mi to 100Mi. -
Use the
oc rollout resumecommand to resume automatic redeployment of the Fuse Console pod.
To open the Fuse Console:
For a namespace deployment, in the OpenShift web console, open the project in which you installed the Fuse Console operator, and then select Overview. In the Project Overview page, scroll down to the Launcher section and click the the Fuse Console URL to open it.
For a cluster deployment, in the OpenShift web console’s title bar, click the grid icon (
 ). In the popup menu, under Red Hat applications, click the Fuse Console URL link.
Log into the Fuse Console.
An Authorize Access page opens in the browser listing the required permissions.
Click Allow selected permissions.
The Fuse Console opens in the browser and shows the Fuse application pods that you have authorization to access.
Click Connect for the application that you want to view.
A new browser window opens showing the application in the Fuse Console.
2.4.3. Installing and deploying the Fuse Console on OpenShift 4.x by using the command line
On OpenShift 4.x, you can choose one of these deployment options to install and deploy the Fuse Console from the command line:
- cluster - The Fuse Console can discover and connect to Fuse applications deployed across multiple namespaces (projects) on the OpenShift cluster. To deploy this template, you must have the administrator role for the OpenShift cluster.
- cluster with role-based access control - The cluster template with configurable role-based access control (RBAC). For more information, see Role-based access control for the Fuse Console on OpenShift 4.x[Role-based access control for the Fuse Console on OpenShift 4.x].
- namespace - The Fuse Console has access to a specific OpenShift project (namespace). To deploy this template, you must have the administrator role for the OpenShift project.
- namespace with role-based access control - The namespace template with configurable RBAC. For more information, see Role-based access control for the Fuse Console on OpenShift 4.x[Role-based access control for the Fuse Console on OpenShift 4.x].
To view a list of the parameters for the Fuse Console templates, run the following OpenShift command:
oc process --parameters -f https://github.com/jboss-fuse/application-templates/blob/application-templates-2.1.0.fuse-sb2-7_11_1-00016-redhat-00002//fuse-console-namespace-os4.jsonPrerequisites
- Before you install and deploy the Fuse Console, you must generate a client certificate that is signed with the service signing certificate authority as described in Generating a certificate to secure the Fuse Console on OpenShift 4.x.
-
You have the
cluster adminrole for the OpenShift cluster. - The Fuse Console image stream (along with the other Fuse image streams) are installed, as described in Installing Fuse imagestreams and templates on the OpenShift 4.x server.
Procedure
Verify that the Fuse Console image stream is installed by using the following command to retrieve a list of all templates:
oc get template -n openshiftOptionally, if you want to update the already installed image stream with new release tags, use the following command to import the Fuse Console image to the openshift namespace:
oc import-image fuse7/fuse7-console:1.7 --from=registry.redhat.io/fuse7/fuse-console:1.7 --confirm -n openshiftObtain the Fuse Console APP_NAME value by running the following command:
oc process --parameters -f TEMPLATE-FILENAMEwhere
TEMPLATE-FILENAMEis one of the following templates:Cluster template:
Cluster template with configurable RBAC:
Namespace template:
Namespace template with configurable RBAC:
For example, for the cluster template with configurable RBAC, run this command:
oc process --parameters -f https://github.com/jboss-fuse/application-templates/blob/application-templates-2.1.0.fuse-sb2-7_11_1-00016-redhat-00002//fuse-console-cluster-rbac.yml
From the certificate that you generated in Securing the Fuse Console on OpenShift 4.x, create the secret and mount it in the Fuse Console by using the following command (where APP_NAME is the name of the Fuse Console application).
oc create secret tls APP_NAME-tls-proxying --cert server.crt --key server.keyCreate a new application based on your local copy of the Fuse Console template by running the following command (where myproject is the name of your OpenShift project, mytemp is the path to the local directory that contains the Fuse Console template, and myhost is the hostname to access the Fuse Console:
For the cluster template:
oc new-app -n myproject -f {templates-base-url}/fuse-console-cluster-os4.json -p ROUTE_HOSTNAME=myhost”For the cluster with RBAC template:
oc new-app -n myproject -f {templates-base-url}/fuse-console-cluster-rbac.yml -p ROUTE_HOSTNAME=myhost”For the namespace template:
{templates-base-url}/fuse-console-namespace-os4.jsonFor the namespace with RBAC template:
oc new-app -n myproject -f {templates-base-url}/fuse-console-namespace-rbac.yml
To configure the Fuse Console so that it can open the OpenShift Web console, set the
OPENSHIFT_WEB_CONSOLE_URLenvironment variable by running the following command:oc set env dc/${APP_NAME} OPENSHIFT_WEB_CONSOLE_URL=`oc get -n openshift-config-managed cm console-public -o jsonpath={.data.consoleURL}`Obtain the status and the URL of your Fuse Console deployment by running this command:
oc status- To access the Fuse Console from a browser, use the URL that is returned in Step 7 (for example, https://fuse-console.192.168.64.12.nip.io).
2.4.3.1. Role-based access control for the Fuse Console on OpenShift 4.x
The Fuse Console offers role-based access control (RBAC) that infers access according to the user authorization provided by OpenShift. In the Fuse Console, RBAC determines a user’s ability to perform MBean operations on a pod.
For information on OpenShift authorization see the “Using RBAC to define and apply permissions” section of the OpenShift documentation.
If you want to implement role-based access for the Fuse Console, you must use one of the templates that are configurable with RBAC (fuse-console-cluster-rbac.yml or fuse-console-namespace-rbac.yml) to install the Fuse Console as described in Installing and deploying the Fuse Console on OpenShift 4.x by using the command line.
For this release, RBAC is not supported when you use the operator to install the Fuse Console.
Fuse Console RBAC leverages the user’s verb access on a pod resource in OpenShift to determine the user’s access to a pod’s MBean operations in the Fuse Console. By default, there are two user roles for the Fuse Console:
admin
If a user can update a pod in OpenShift, then the user is conferred the admin role for the Fuse Console. The user can perform write MBean operations in the Fuse Console for the pod.
viewer
If a user can get a pod in OpenShift, then the user is conferred the viewer role for the Fuse Console. The user can perform read-only MBean operations in the Fuse Console for the pod.
If you do not use a RBAC template to install the Fuse Console, only OpenShift users that are granted the update verb on the pod resource are authorized to perform the Fuse Console MBeans operations. Users that are granted the get verb on the pod resource can view the pod but they cannot perform any Fuse Console operations.
2.4.3.2. Determining access roles for the Fuse Console on OpenShift 4.x
The Fuse Console role-based access control is inferred from a user’s OpenShift permissions for a pod. To determine the Fuse Console access role granted to a particular user, obtain the OpenShift permissions granted to the user for a pod.
Prerequisites
- You know the user’s name.
- You know the pod’s name.
Procedure
To determine whether a user has the Fuse Console admin role for the pod, run the following command to see whether the user can update the pod on OpenShift:
oc auth can-i update pods/<pod> --as <user>If the response is
yes, the user has the Fuse Console admin role for the pod. The user can perform write MBean operations in the Fuse Console for the pod.To determine whether a user has the Fuse Console viewer role for the pod, run the following command to see whether the user can get a pod on OpenShift:
oc auth can-i get pods/<pod> --as <user>If the response is
yes, the user has the Fuse Console viewer role for the pod. The user can perform read-only MBean operations in the Fuse Console for the pod. Depending on the context, the Fuse Console prevents the user with the viewer role from performing a write MBean operation, by disabling an option or by displaying an "operation not allowed for this user" message when the user attempts a write MBean operation.If the response is
no, the user is not bound to any Fuse Console roles and the user cannot view the pod in the Fuse Console.
2.4.3.3. Customizing role-based access to the Fuse Console on OpenShift 4.x
The deployment-cluster-rbac.yml and deployment-namespace-rbac.yml templates create a ConfigMap that contains the configuration file (ACL.yml). The configuration file defines the roles allowed for MBean operations.
Prerequisite
You installed the Fuse Console by using one of the Fuse Console RBAC templates (deployment-cluster-rbac.yml or deployment-namespace-rbac.yml).
Procedure
If you want to customize the Fuse Console RBAC roles:
Edit the ConfigMap by running the following command:
oc edit cm $APP_NAME-rbac- Save the file to apply the changes. OpenShift automatically restarts the Fuse Console pod.
2.4.3.4. Disabling role-based access control for the Fuse Console on OpenShift 4.x
The Fuse Console’s HAWTIO_ONLINE_RBAC_ACL environment variable passes the role-based access control (RBAC) ConfigMap configuration file path to the OpenShift server. If the HAWTIO_ONLINE_RBAC_ACL environment variable is not specified, RBAC support is disabled and only users that are granted the update verb on the pod resource (in OpenShift) are authorized to call MBeans operations on the pod in the Fuse Console.
Prerequisite
You installed the Fuse Console by using one of the Fuse Console RBAC templates (deployment-cluster-rbac.yml or deployment-namespace-rbac.yml).
Procedure
To disable role-based access for the Fuse Console):
- In OpenShift, edit the Deployment Config resource for the Fuse Console.
Delete the entire
HAWTIO_ONLINE_RBAC_ACLenvironment variable definition.(Note that only clearing its value is not sufficient).
- Save the file to apply the changes. OpenShift automatically restarts the Fuse Console pod.
2.4.4. Upgrading the Fuse Console on OpenShift 4.x
Red Hat OpenShift 4.x handles updates to operators, including the Red Hat Fuse operators. For more information see the Operators OpenShift documentation.
In turn, operator updates can trigger application upgrades, depending on how the application is configured.
For Fuse Console applications, you can also trigger an upgrade to an application by editing the .spec.version field of the application custom resource definition.
Since OCP 4.6, the name of the operator channel for the Fuse Console operator has changed from alpha to fuse-console-7.7.x. If you cannot see the new operator channel after upgrading OpenShift to OCP 4.6, see known issue ENTESB-15232 for details of how to refresh the operator channels visible from the OperatorHub on OpenShift.
Prerequisite
- You have OpenShift cluster admin permissions.
Procedure
To upgrade a Fuse Console application:
In a terminal window, use the following command to change the
.spec.versionfield of the application custom resource definition:oc patch <project-name> <custom-resource-name> --type='merge' -p '{"spec":{"version":"1.7.1"}}'For example:
oc patch myproject example-fuseconsole --type='merge' -p '{"spec":{"version":"1.7.1"}}'Check that the application’s status has updated:
oc get myprojectThe response shows information about the application, including the version number:
NAME                  AGE   URL                                        IMAGE
example-fuseconsole   1m    https://fuseconsole.192.168.64.38.nip.io   docker.io/fuseconsole/online:1.7.1
When you change the value of the
.spec.versionfield, OpenShift automatically redeploys the application.To check the status of the redeployment that is triggered by the version change:
oc rollout status deployment.v1.apps/example-fuseconsoleA successful deployment shows this response:
deployment "example-fuseconsole" successfully rolled out
2.5. Configuring Prometheus to monitor Fuse applications on OpenShift
2.5.1. About Prometheus
Prometheus is an open-source systems and service monitoring and alerting toolkit that you can use to monitor services deployed in your Red Hat OpenShift environment. Prometheus collects and stores metrics from configured services at given intervals, evaluates rule expressions, displays the results, and can trigger alerts if a specified condition becomes true.
Red Hat support for Prometheus is limited to the setup and configuration recommendations provided in Red Hat product documentation.
To monitor OpenShift services, you must configure each service to expose an endpoint to Prometheus format. This endpoint is an HTTP interface that provides a list of metrics and the current values of the metrics. Prometheus periodically scrapes each target-defined endpoint and writes the collected data to its database. Prometheus gathers data over an extended time, rather than just for the currently running session. Prometheus stores the data so that you can graphically visualize and run queries on the data.
2.5.1.1. Prometheus queries
In the Prometheus web interface, you can write queries in Prometheus Query Language (PromQL) to select and aggregate the collected data.
For example, you can use the following query to select all of the values that Prometheus has recorded within the last five minutes for all time-series data that has http_requests_total as the metric name:
http_requests_total[5m]
To further define or filter the results of the query, specify a label (a key:value pair) for the metric. For example, you can use the following query to select all the values that Prometheus has recorded within the last five minutes for all time-series data that has the metric name http_requests_total and a job label set to integration:
http_requests_total{job="integration"}[5m]2.5.1.2. Options for displaying Prometheus data
You can specify how Prometheus handles the result of a query:
- View Prometheus data as tabular data in Prometheus’s expression browser.
- Consume Prometheus data by external systems through the Prometheus HTTP API.
Display Prometheus data in a graph.
Prometheus provides a default graphical view of the data that it collects. If you prefer a more robust graphical dashboard to view Prometheus data, Grafana is a popular choice.
NoteGrafana is a community-supported feature. Deploying Grafana to monitor Red Hat products is not supported with Red Hat production service level agreements (SLAs).
You can also use the PromQL language to configure alerts in Prometheus’s Alertmanager tool.
2.5.2. Setting up Prometheus
To set up Prometheus, install the Prometheus operator custom resource definition on the cluster and then add Prometheus to an OpenShift project that includes a Fuse application.
Prerequisites
-
You have
cluster adminaccess to the OpenShift cluster. - You have prepared the OpenShift cluster by installing the Fuse on OpenShift images and templates as described in the Fuse on OpenShift Guide.
- You have created an OpenShift project on the cluster and added a Fuse application to it.
Procedure
Login to OpenShift with administrator permissions:
oc login -u system:adminInstall the custom resource definitions necessary for running the Prometheus operator, where
{$templates-base-url}is the location of the Fuse on OpenShift template files:oc create -f {$templates-base-url}\fuse-prometheus-crd.ymlThe Prometheus operator is now available to any namespace on the cluster.
Install the Prometheus operator to your namespace by using the following command syntax:
oc process -f {$templates-base-url}/fuse-prometheus-operator.yml -p NAMESPACE=<YOUR NAMESPACE> | oc create -f -For example, use this command for a project (namespace) named myproject:
oc process -f {$templates-base-url}/fuse-prometheus-operator.yml -p NAMESPACE=myproject | oc create -f -NoteThe first time that you install the Prometheus operator into a namespace, it might take a few minutes for the Prometheus resource pods to start. Subsequently, if you install it to other namespaces on your cluster, the Prometheus resource pods start much faster.
Instruct the Prometheus operator to monitor the Fuse application in the project by using the following command syntax::
oc process -f {$templates-base-url}/fuse-servicemonitor.yml -p NAMESPACE=<YOUR NAMESPACE> -p FUSE_SERVICE_NAME=<YOUR FUSE SERVICE> | oc apply -f -For example, use this command for an OpenShift project (namespace) named myproject that includes a Fuse application named myfuseapp:
oc process -f {$templates-base-url}/fuse-servicemonitor.yml -p NAMESPACE=myproject -p FUSE_SERVICE_NAME=myfuseapp | oc apply -f -To open the Prometheus dashboard:
- Login to the OpenShift console.
- Open the project to which you added Prometheus.
In the left pane, select Applications
Routes. 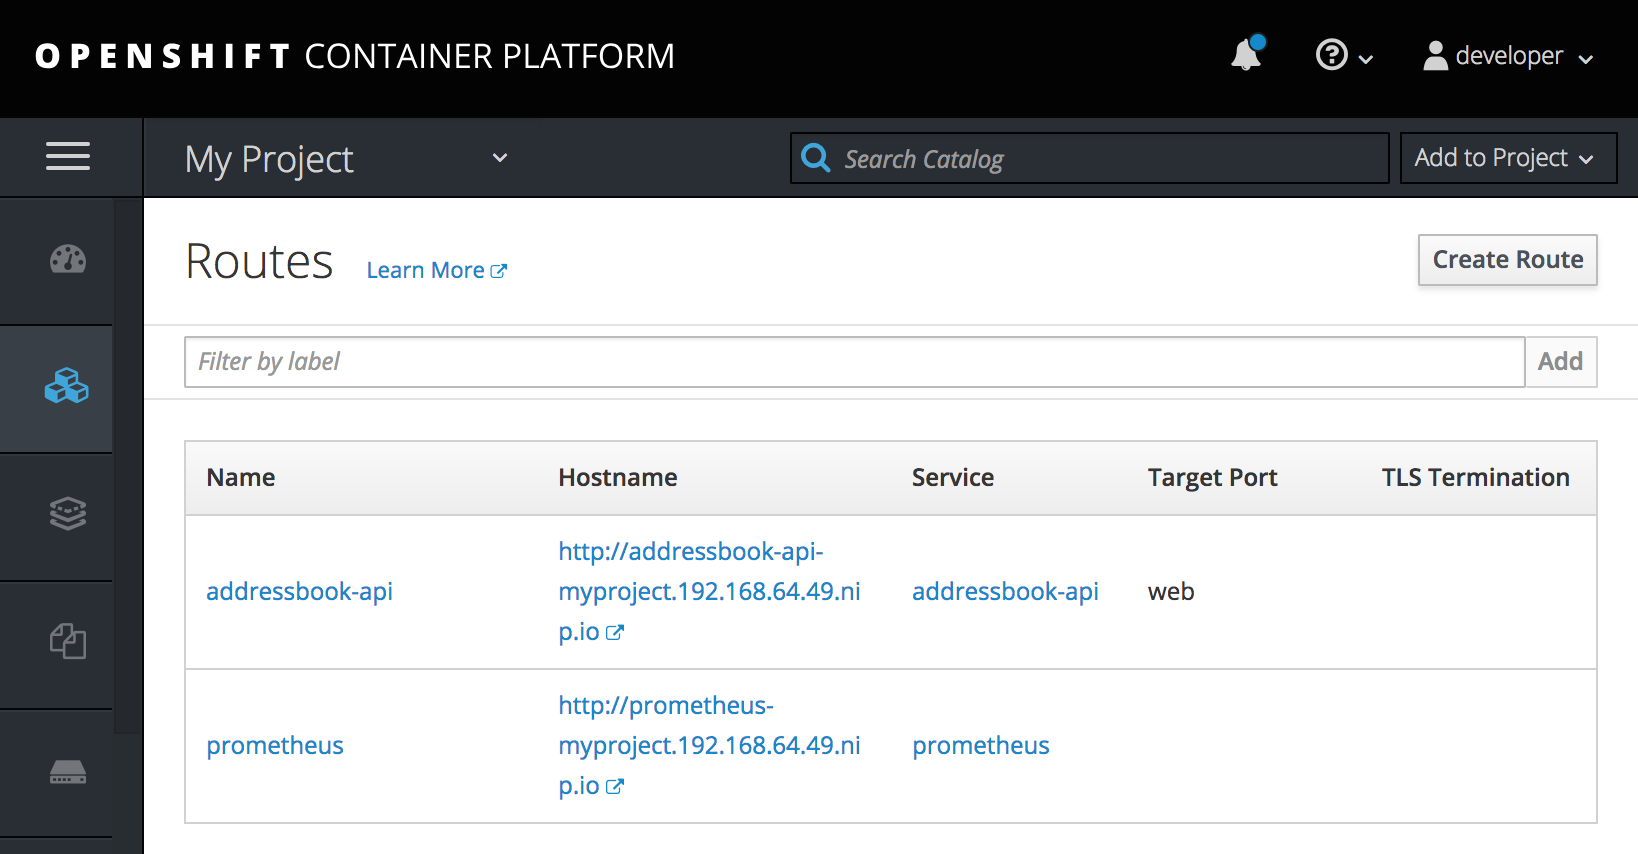
Click the Prometheus Hostname URL to open the Prometheus dashboard in a new browser tab or window.

- For information about getting started with Prometheus, go to: https://prometheus.io/docs/prometheus/latest/getting_started/
2.5.3. OpenShift environment variables
To configure your application’s Prometheus instance, you can set the OpenShift environment variables listed in Table 2.1, “Prometheus Environment Variables”.
| Environment Variable | Description | Default |
|---|---|---|
|
| The host address to bind. |
|
|
| If set, disables the activation of Prometheus (echoes an empty value). | Prometheus is enabled. |
|
| The Port to use. |
|
|
| Uses the file (including path) as the Prometheus configuration file. | The /opt/prometheus/prometheus-config.yml file with Camel metrics. |
|
| Additional options to append to the JMX exporter configuration. | Not applicable. |
Additional resources
For information on setting environment variables for a pod, see the OpenShift Developer Guide (https://access.redhat.com/documentation/en-us/openshift_container_platform/3.11/html/developer_guide/).
2.5.4. Controlling the metrics that Prometheus monitors and collects
By default, Prometheus uses a configuration file ( https://raw.githubusercontent.com/jboss-fuse/application-templates/master/prometheus/prometheus-config.yml) that includes all possible metrics exposed by Camel.
If you have custom metrics within your application that you want Prometheus to monitor and collect (for example, the number of orders that your application processes), you can use your own configuration file. Note that the metrics that you can identify are limited to those supplied in JMX.
Procedure
To use a custom configuration file to expose JMX beans that are not covered by the default Prometheus configuration, follow these steps:
Create a custom Prometheus configuration file. You can use the contents of the default file (
prometheus-config.ymlhttps://raw.githubusercontent.com/jboss-fuse/application-templates/master/prometheus/prometheus-config.yml) as a guide for the format.You can use any name for the custom configuration file, for example:
my-prometheus-config.yml.-
Add your prometheus configuration file (for example,
my-prometheus-config.yml) to your application’ssrc/main/fabric8-includesdirectory. Create a
src/main/fabric8/deployment.xmlfile within your application and add an entry for the AB_JMX_EXPORTER_CONFIG environment variable with its value set to your configuration file. For example:spec: template: spec: containers: - resources: requests: cpu: "0.2" limits: cpu: "1.0" env: - name: SPRING_APPLICATION_JSON value: '{"server":{"tomcat":{"max-threads":1}}}' - name: AB_JMX_EXPORTER_CONFIG value: "my-prometheus-config.yml"This environment variable applies to your application at the pod level.
- Rebuild and deploy your application.
2.6. Installing Fuse imagestreams and templates on the OpenShift 3.x server
After you configure authentication to the Red Hat container registry, import and use the Red Hat Fuse on OpenShift image streams and templates.
Procedure
- Start the OpenShift Server.
Log in to the OpenShift Server as an administrator.
oc login -u system:adminVerify that you are using the project for which you created a docker-registry secret.
oc project openshiftInstall the Fuse on OpenShift image streams.
BASEURL=https://github.com/jboss-fuse/application-templates/blob/application-templates-2.1.0.fuse-sb2-7_11_1-00016-redhat-00002/

oc create -n openshift -f ${BASEURL}/fis-image-streams.json
Install the quickstart templates:
for template in eap-camel-amq-template.json \
 eap-camel-cdi-template.json \
 eap-camel-cxf-jaxrs-template.json \
 eap-camel-cxf-jaxws-template.json \
 eap-camel-jpa-template.json \
 karaf-camel-amq-template.json \
 karaf-camel-log-template.json \
 karaf-camel-rest-sql-template.json \
 karaf-cxf-rest-template.json \
 spring-boot-camel-amq-template.json \
 spring-boot-camel-config-template.json \
 spring-boot-camel-drools-template.json \
 spring-boot-camel-infinispan-template.json \
 spring-boot-camel-rest-sql-template.json \
 spring-boot-camel-rest-3scale-template.json \
 spring-boot-camel-template.json \
 spring-boot-camel-xa-template.json \
 spring-boot-camel-xml-template.json \
 spring-boot-cxf-jaxrs-template.json \
 spring-boot-cxf-jaxws-template.json ;
 do
 oc create -n openshift -f \
 https://github.com/jboss-fuse/application-templates/blob/application-templates-2.1.0.fuse-sb2-7_11_1-00016-redhat-00002//quickstarts/${template}
 done
Install Spring Boot 2 quickstart templates:
for template in spring-boot-2-camel-amq-template.json \
 spring-boot-2-camel-config-template.json \
 spring-boot-2-camel-drools-template.json \
 spring-boot-2-camel-infinispan-template.json \
 spring-boot-2-camel-rest-3scale-template.json \
 spring-boot-2-camel-rest-sql-template.json \
 spring-boot-2-camel-template.json \
 spring-boot-2-camel-xa-template.json \
 spring-boot-2-camel-xml-template.json \
 spring-boot-2-cxf-jaxrs-template.json \
 spring-boot-2-cxf-jaxws-template.json \
 spring-boot-2-cxf-jaxrs-xml-template.json \
 spring-boot-2-cxf-jaxws-xml-template.json ;
 do oc create -n openshift -f \
 https://raw.githubusercontent.com/jboss-fuse/application-templates/application-templates-2.1.0.fuse-sb2-7_11_1-00016-redhat-00002/quickstarts/${template}
 done
Install the templates for the Fuse Console.
oc create -n openshift -f https://github.com/jboss-fuse/application-templates/blob/application-templates-2.1.0.fuse-sb2-7_11_1-00016-redhat-00002//fis-console-cluster-template.json oc create -n openshift -f https://github.com/jboss-fuse/application-templates/blob/application-templates-2.1.0.fuse-sb2-7_11_1-00016-redhat-00002//fis-console-namespace-template.jsonNoteFor information on deploying the Fuse Console, see Set up Fuse Console on OpenShift.
Install the Apicurito template:
oc create -n openshift -f ${BASEURL}/fuse-apicurito.yml(Optional) View the installed Fuse on OpenShift images and templates:
oc get template -n openshift
2.6.1. Setting up the Fuse Console on OpenShift 3.11
On OpenShift 3.11, you can set up the Fuse Console in two ways:
- By adding the centralized Fuse Console catalog item to a project so that you can monitor all the running Fuse containers in the project.
- From a specific pod so that you can monitor that single running Fuse container.
You can deploy the Fuse Console either from the OpenShift Console or from the command line.
To install Fuse Console on Minishift or CDK based enviroments, follow the steps explained in the KCS article below.
- To install Fuse Console on Minishift or CDK based enviroments, see KCS 4998441.
- If it is necessary to disable Jolokia authentication see the workaround described in KCS 3988671.
Prerequisites
- Install the Fuse on OpenShift image streams and the templates for the Fuse Console as described in Fuse on OpenShift Guide.
For cluster mode on OpenShift 3.11, you need the cluster admin role and the cluster mode template. Run the following command:
oc adm policy add-cluster-role-to-user cluster-admin system:serviceaccount:openshift-infra:template-instance-controller
- The cluster mode template is only available, by default, on the latest version of the OpenShift Container Platform. It is not provided with the OpenShift Online default catalog.
- The Fuse Console templates configure end-to-end encryption by default so that your Fuse Console requests are secured end-to-end, from the browser to the in-cluster services.
- User management for the Fuse Console is handled by OpenShift.
- Role-based access control (for users accessing the Fuse Console after it is deployed) is not yet available for Fuse on OpenShift.
Section 2.6.1.1, “Deploying the Fuse Console from the OpenShift 3.11 Console”
Section 2.6.1.2, “Monitoring a single Fuse pod from the Fuse Console on OpenShift 3.11”
Section 2.6.1.3, “Deploying the Fuse Console from the command line”
2.6.1.1. Deploying the Fuse Console from the OpenShift 3.11 Console
To deploy the Fuse Console on your OpenShift cluster from the OpenShift 3.11 Console, follow these steps.
Procedure
- In the OpenShift console, open an existing project or create a new project.
Add the Fuse Console to your OpenShift project:
Select Add to Project
Browse Catalog. The Select an item to add to the current project page opens.
In the Search field, type Fuse Console.
The Red Hat Fuse 7.x Console and Red Hat Fuse 7.x Console (cluster) items should appear as the search result.
If the Red Hat Fuse Console items do not appear as the search result, or if the items that appear are not the latest version, you can install the Fuse Console templates manually as described in the "Prepare the OpenShift server" section of the Fuse on OpenShift Guide.
Click one of the Red Hat Fuse Console items:
- Red Hat Fuse 7.x Console - This version of the Fuse Console discovers and connects to Fuse applications deployed in the current OpenShift project.
- Red Hat Fuse 7.x Console (cluster) - This version of the Fuse Console can discover and connect to Fuse applications deployed across multiple projects on the OpenShift cluster.
In the Red Hat Fuse Console wizard, click Next. The Configuration page of the wizard opens.
Optionally, you can change the default values of the configuration parameters.
Click Create.
The Results page of the wizard indicates that the Red Hat Fuse Console has been created.
- Click the Continue to the project overview link to verify that the Fuse Console application is added to the project.
To open the Fuse Console, click the provided URL link and then log in.
An Authorize Access page opens in the browser listing the required permissions.
Click Allow selected permissions.
The Fuse Console opens in the browser and shows the Fuse pods running in the project.
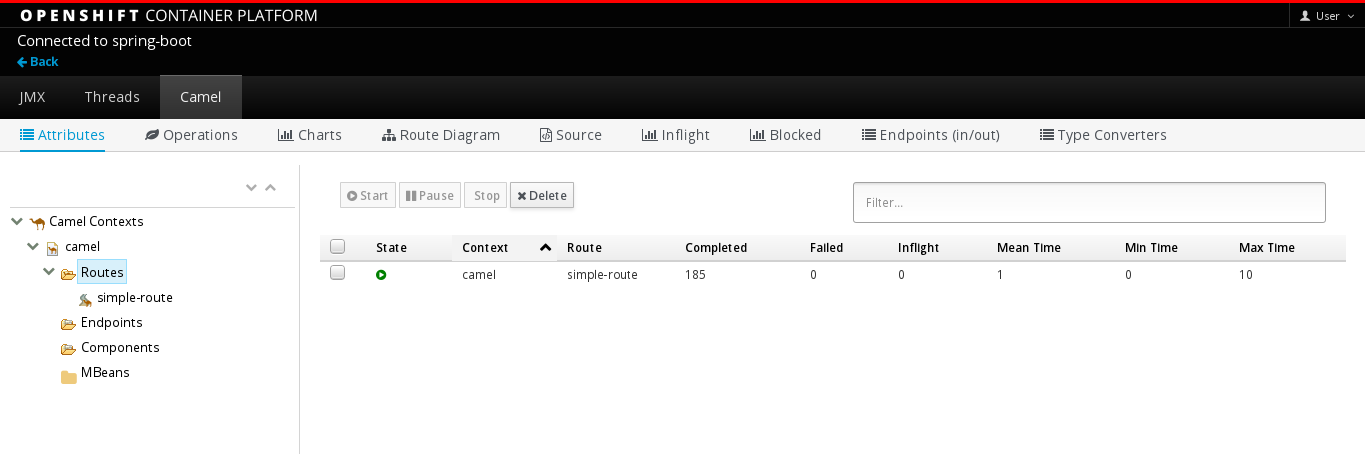
Click Connect for the application that you want to view.
A new browser window opens showing the application in the Fuse Console.
2.6.1.2. Monitoring a single Fuse pod from the Fuse Console on OpenShift 3.11
You can open the Fuse Console for a Fuse pod running on OpenShift 3.11:
From the Applications
Pods view in your OpenShift project, click on the pod name to view the details of the running Fuse pod. On the right-hand side of this page, you see a summary of the container template: 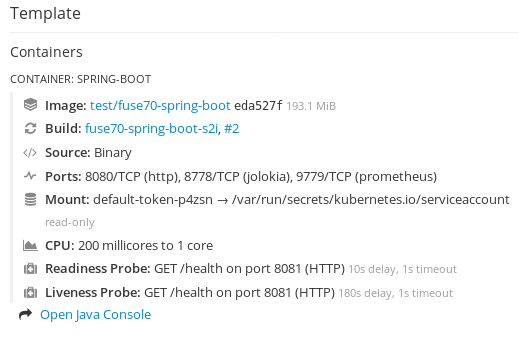
From this view, click on the Open Java Console link to open the Fuse Console.
 Note
NoteIn order to configure OpenShift to display a link to Fuse Console in the pod view, the pod running a Fuse on OpenShift image must declare a TCP port within a name attribute set to
jolokia:{ "kind": "Pod", [...] "spec": { "containers": [ { [...] "ports": [ { "name": "jolokia", "containerPort": 8778, "protocol": "TCP" }
2.6.1.3. Deploying the Fuse Console from the command line
Table 2.2, “Fuse Console templates” describes the OpenShift 3.1 templates that you can use to deploy the Fuse Console from the command line, depending on the type of Fuse application deployment.
| Type | Description |
|---|---|
|
| The Fuse Console can discover and connect to Fuse applications deployed across multiple namespaces or projects. To deploy this template, you must have the OpenShift cluster-admin role. |
|
| This template restricts the Fuse Console access to the current OpenShift project (namespace), and as such acts as a single tenant deployment. To deploy this template, you must have the admin role for the current OpenShift project. |
Optionally, you can view a list of the parameters for all of the templates by running this command:
oc process --parameters -f https://github.com/jboss-fuse/application-templates/blob/application-templates-2.1.0.fuse-sb2-7_11_1-00016-redhat-00002//fis-console-namespace-template.jsonProcedure
To deploy the Fuse Console from the command line:
Create a new application based on a Fuse Console template by running one of the following commands (where myproject is the name of your project):
For the Fuse Console cluster template, where
myhostis the hostname to access the Fuse Console:oc new-app -n myproject -f https://github.com/jboss-fuse/application-templates/blob/application-templates-2.1.0.fuse-sb2-7_11_1-00016-redhat-00002//fis-console-cluster-template.json -p ROUTE_HOSTNAME=myhostFor the Fuse Console namespace template:
oc new-app -n myproject -f https://github.com/jboss-fuse/application-templates/blob/application-templates-2.1.0.fuse-sb2-7_11_1-00016-redhat-00002//fis-console-namespace-template.jsonNoteYou can omit the route_hostname parameter for the namespace template because OpenShift automatically generates one.
Obtain the status and the URL of your Fuse Console deployment by running this command:
oc status- To access the Fuse Console from a browser, use the provided URL (for example, https://fuse-console.192.168.64.12.nip.io).