Chapter 1. Inventory Groups
Inventory groups allow you to select specific systems and group them together. You can view and manage the individual inventory groups and the system membership of each group. In addition, you can filter your system lists across applications by groups. You can also manage user access to specific inventory groups to enhance security.
Inventory groups have the following characteristics:
- Inventory groups are only for systems.
- An inventory group cannot be added as a child of another inventory group.
- Each system can belong to only one inventory group.
- Using inventory groups is not mandatory; systems that are not assigned to specific groups can remain unassigned.
1.1. User access to inventory groups
Inventory groups support role-based access (RBAC). Using RBAC enables you to set custom permissions on inventory groups according to user role.
The Inventory Group Administrator role allows the creation of Inventory Groups. This role is automatically included in the Default administrator access group and cannot be removed from it. However, users with this role can modify any Inventory Groups. Provide this role only to the users who are entitled to access the entire system inventory.
For a user to be able to use Inventory Groups and RBAC to restrict access to specific systems, that user must either be a member of the Default admin access group or have both the Inventory Group Administrator and the User Access administrator roles.
Inventory group users have group-level RBAC permissions. Custom permissions include the following:
inventory: groups: read
- View group details page
inventory: groups: write
- Rename the group
- Add systems to group
- Remove systems from group
A user cannot view the systems inside the group without inventory: hosts: read permissions.
Systems users have system-level RBAC permissions. They can perform the following inventory groups operations:
Inventory hosts read
- View all the systems in the inventory group and their details, or view ungrouped systems
- View information about the systems for other Insights services
Inventory hosts write
- Rename the system
- Delete the system
1.1.1. Managing user access using Inventory groups
If you do not have access to Inventory groups, navigating to Inventory > Groups shows the message Inventory group access permissions needed.
Be aware that you can still view the Inventory group name assigned to the system for which you have read access, even if you do not have access to the group itself. To view the Inventory group that contains the system, you need to have the Inventory Group Viewer role or Inventory group view permissions assigned.
Before making changes in the RBAC configuration, review the list of known limitations in the User Scenarios section.
For more information about managing user access, assigning roles, and adding members to user access groups, see User Access Configuration Guide for Role-based Access Control (RBAC).
1.2. User scenarios
This section contains two scenarios that illustrate the features of inventory groups. These scenarios follow a procedure format, so that you can follow the required steps and test them, if desired.
1.2.1. Scenario 1: Two different IT teams must manage their systems with Insights
In this scenario, two different IT teams working for the same company share the same Insights organization within their Red Hat account.
- Each IT team must have complete control of their systems in the Red Hat Hybrid Cloud Console, but should not be able to see or modify the systems belonging to the other team.
- All users within the same team have the same level of access on both their inventory groups and their systems. Access levels can be adjusted as needed.
- Regular users of both IT teams will not be able to see or modify systems that are not part of any inventory groups.
- Organization administrators, or anyone with Inventory Group administrator and Inventory Hosts administrator roles, have access to the entire inventory. Any other users without those roles cannot access the entire inventory.
1.2.1.1. Initial phase
By default, organization administrators (who are members of the Default administrator access group) on the Red Hat Hybrid Cloud Console always have read/write access to all inventory groups and read/write access to all systems, regardless of how permissions are defined for the inventory group objects and systems assigned to them.
These users are the only ones who may configure user access for inventory groups. If any regular users need to manage user access, the administrators may grant them Inventory Group admin and Inventory Hosts admin roles separately.
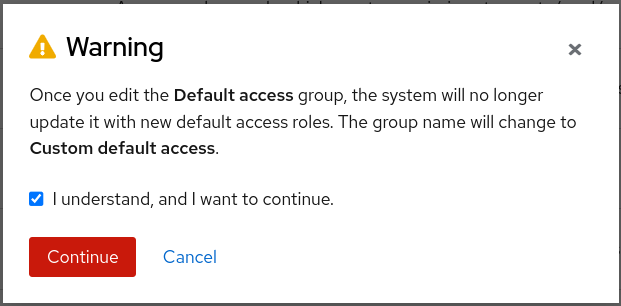
By default, users who are not Organization administrators are assigned the Inventory Hosts Administrator role from the Default access group. The Default access group gives these users inventory:hosts:read and inventory:hosts:write access across the entire inventory. Those permissions grant read and write permissions on all systems and all inventory groups.
For more information about the Default access group, see The Default access group.
1.2.1.2. Restricting access
Prerequisites
- You are a member of the Default administrator access group.
Step 1: Create Inventory groups
First, create two separate inventory groups. (This example shows two groups, but you may create as many as you need).
- Inventory Group 1: IT team A - Systems
- Inventory Group 2: IT team B - Systems
Step 2: Add systems to Inventory groups
Now that the groups have been created, add systems to them. Click in each group and select Add systems.
At this stage, all the users still have access to all systems, regardless of the groups they are in. This is because they still have the Inventory hosts administrator role, which allows them to see all systems, whether or not they are grouped.
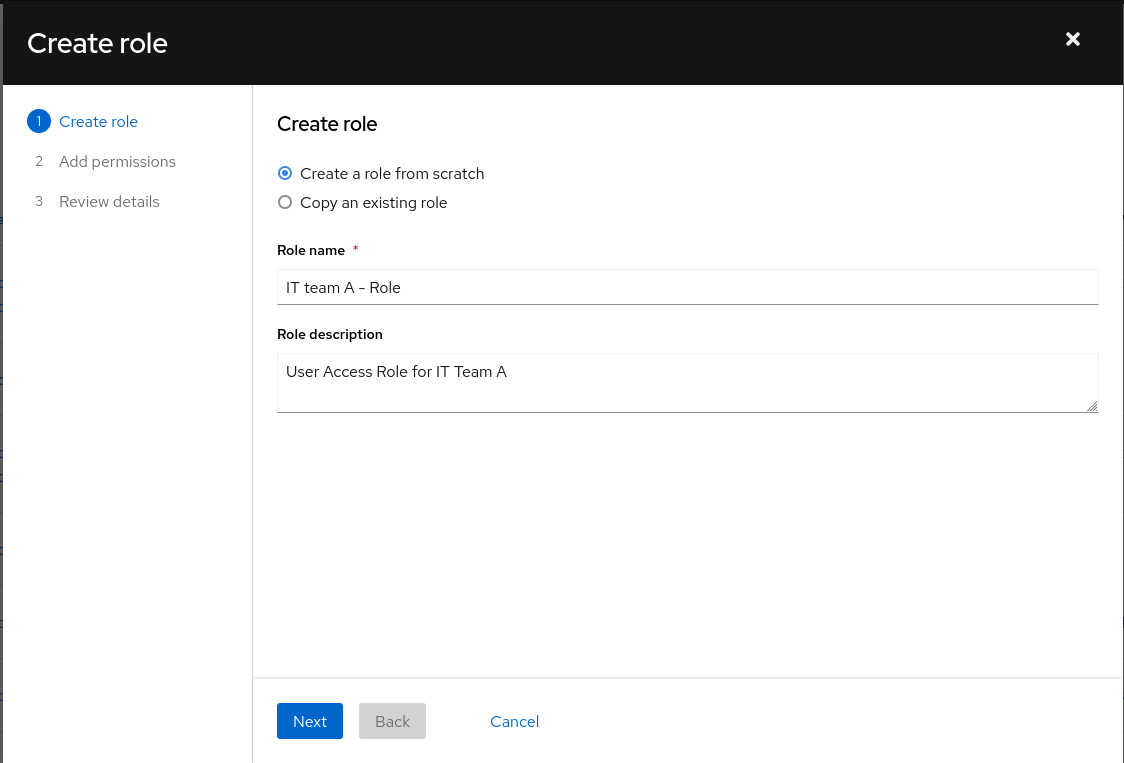
Step 3: Create custom roles
To customize access for different inventory groups, create custom roles for those groups. To create a custom role, navigate to User Access > Roles, and click Create role. A wizard opens. Name your role (For example, IT Team - A Role), and click Next.
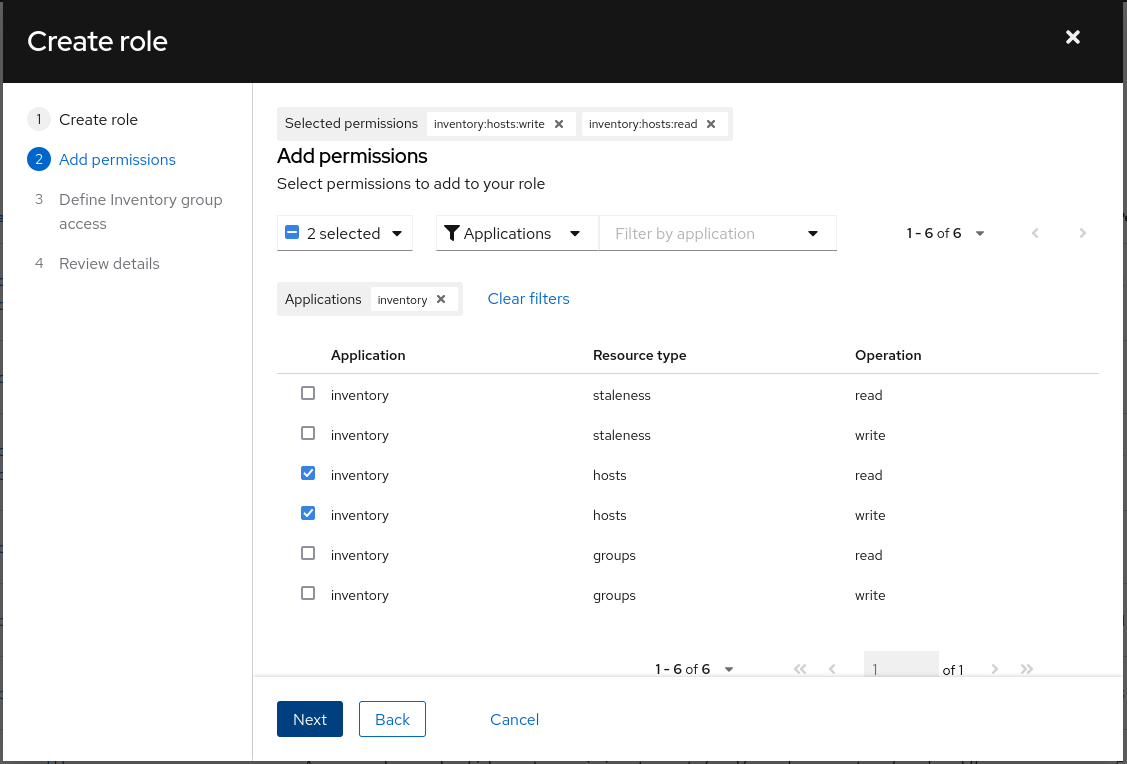
Step 3a: Select permissions to add to the custom role
The wizard displays the Add permissions step. This step contains four inventory permissions options. Select them depending on the desired level of access.
For full access to group(s) and its systems, select:
- inventory: groups: read
- inventory: groups: write
- inventory: hosts: read
- inventory: hosts: write
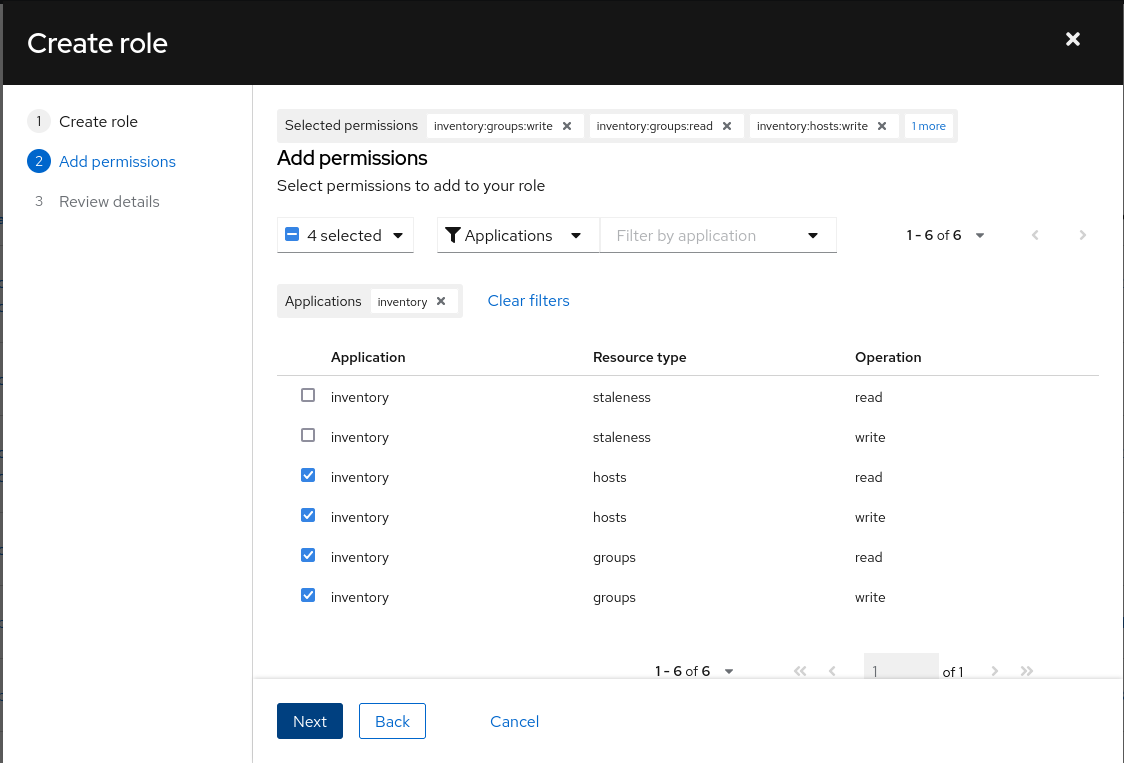
After selecting permissions, click Next. You may adjust the permissions as needed.
For more information about permissions, see User access to inventory groups.
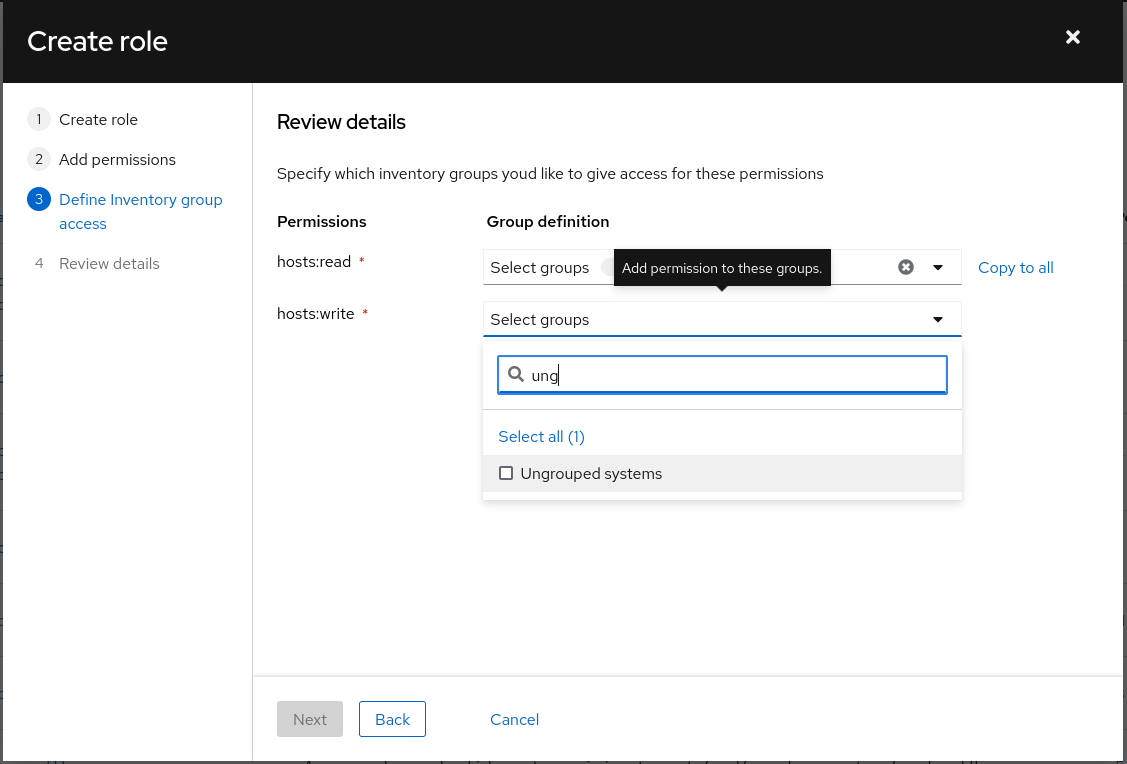
Step 3b: Assign permissions to selected inventory groups
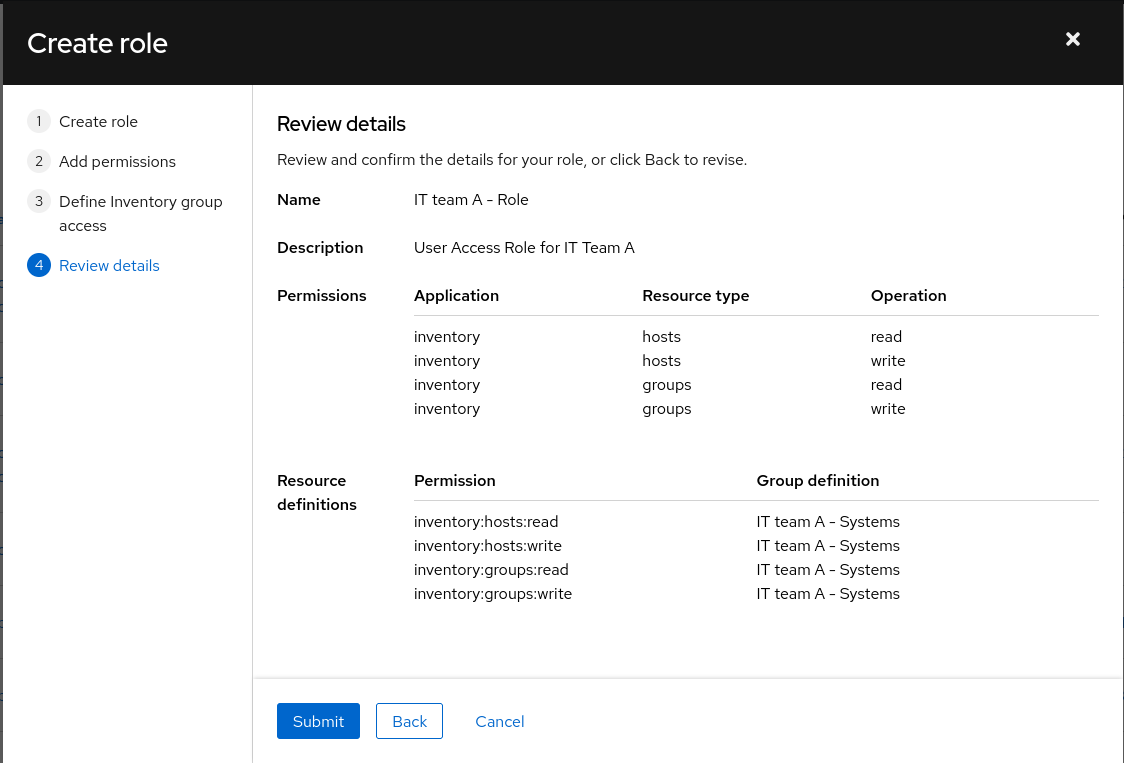
In this step, choose the Inventory group(s) to which you want to grant permission. This example shows how to select the inventory group that corresponds to the current role. For example, create the role IT team A - Role, and specify the inventory group IT team A - Systems for each permission.
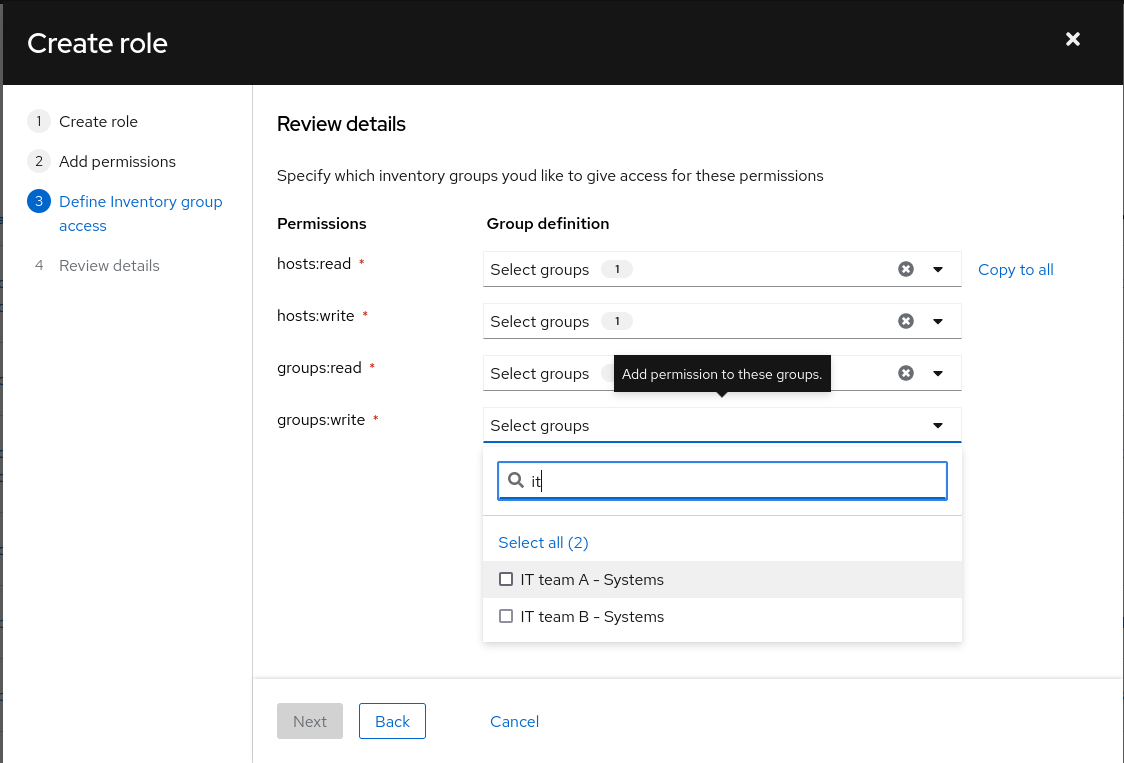
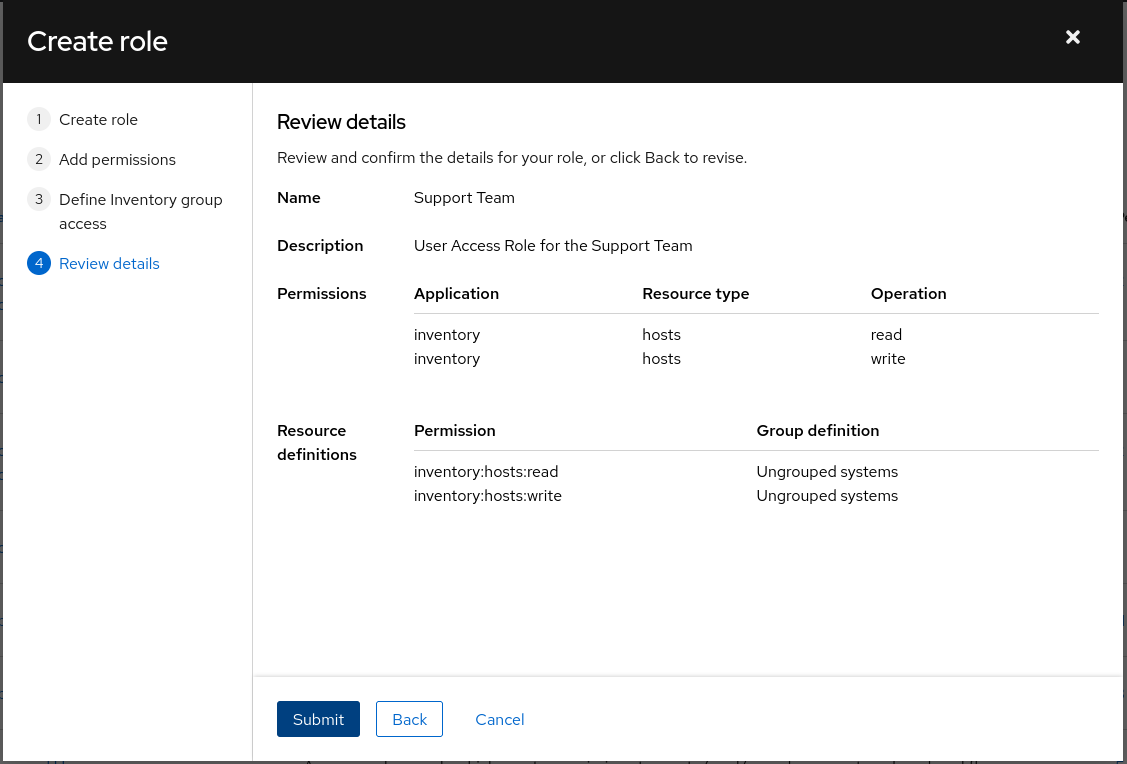
Review the details and click Submit.
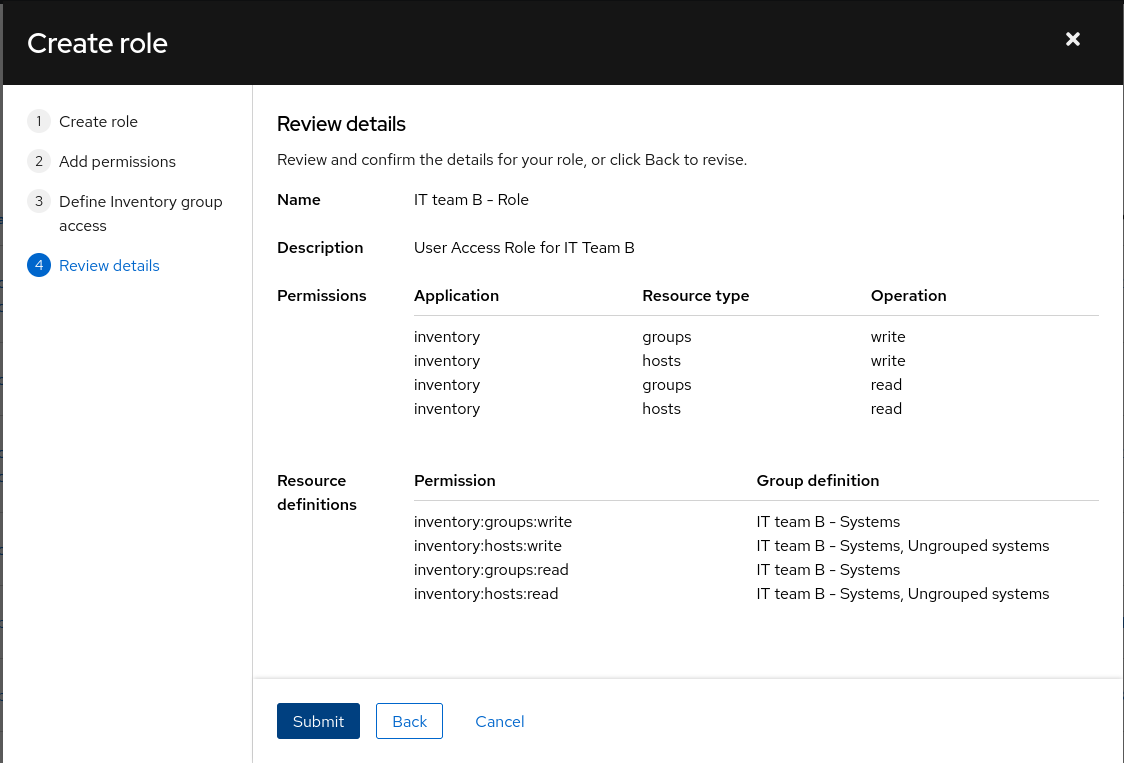
Repeat the steps in this section to create a second custom role called IT team B - Role and select the IT team B - Systems inventory group.

You can grant access to systems that are not part of an inventory group to one or both IT teams. To add those systems, add the Ungrouped systems that appear in the Group definition of the host permissions to your custom role.
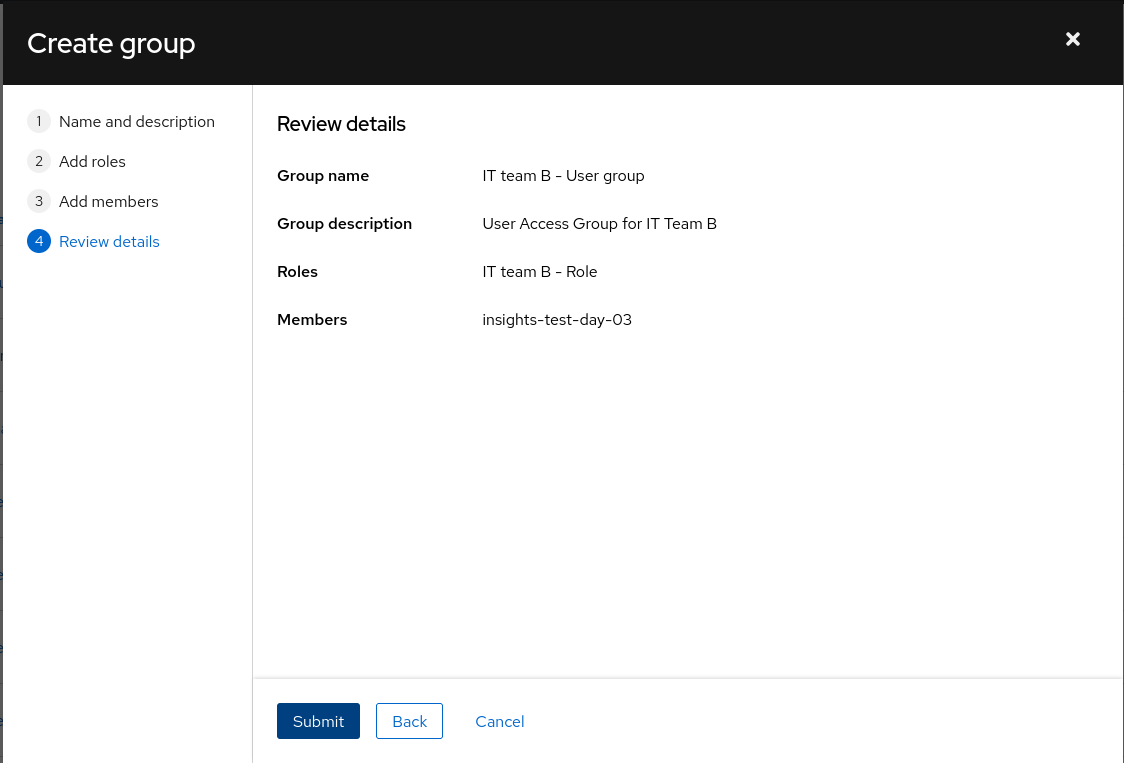
Step 4: Create User Access groups to assign custom roles to users
Now that the custom roles are created, create User Access groups to assign the custom roles to users.
To create a new group, navigate to User Access > Groups and click Create group. Name the group, select the newly created role, and select the users to whom you want to give the role.
For example, two IT groups have the following permissions:
- IT team A - user group
- IT team A - role
- IT team B - user group
- IT team B - role
The groups appear as follows:

Step 5: Remove Inventory Hosts Admin role from Default Access group
At this stage, despite all the steps taken above, all users still have access to all systems, regardless of the groups they are in. This is because they still have the Inventory Hosts Administrator role, which allows them to see all systems, whether or not they are grouped.
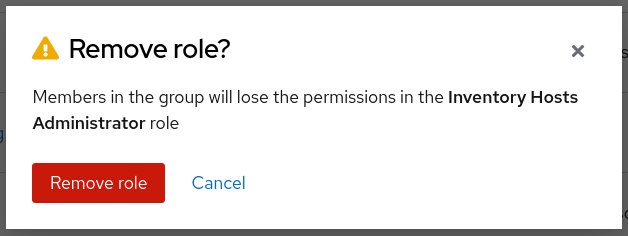
To limit access to systems, navigate to User Access > Groups and select the Default Access group. Remove the Inventory Hosts Administrator role from this group.
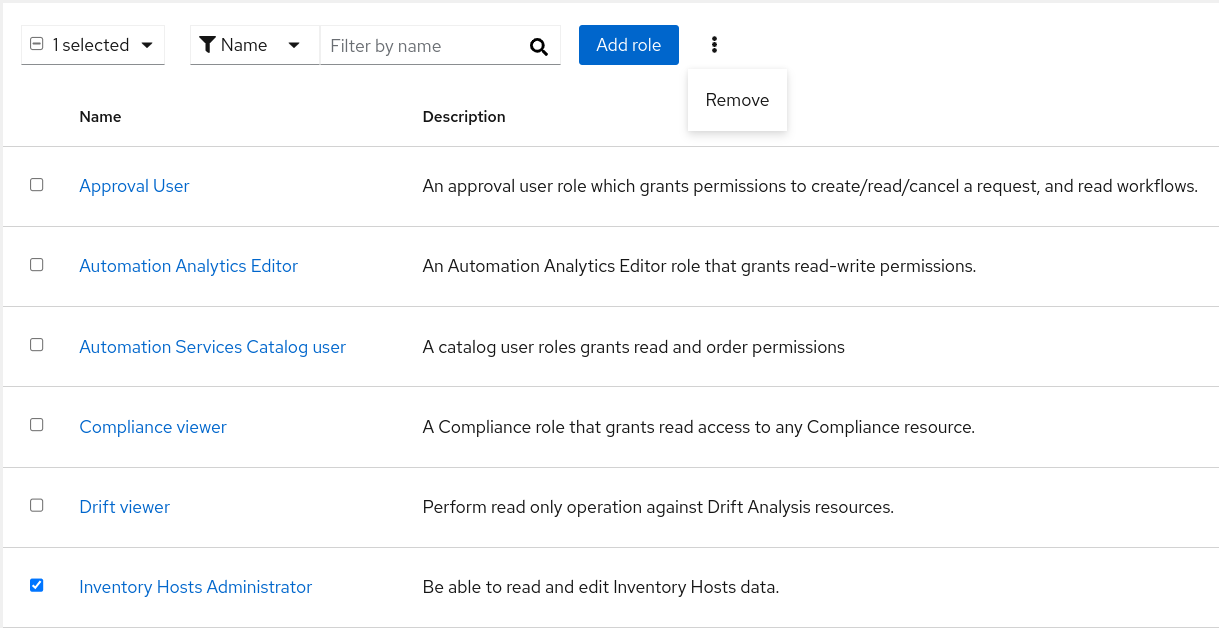
If the users are also members of additional User Access Groups, make sure to review and remove the Inventory Hosts Administrator role from those groups as needed.
Once the role has been removed, the User Access controls behave as expected: Users given custom roles to limit their views to certain groups and systems only see those groups and systems.
1.2.1.3. Adjustment considerations
- If you have more than two IT groups, you can create as many custom roles and user groups as you need.
- If you are trying to grant the same people the same access to multiple Inventory groups, you can select more than one Inventory Group to grant permissions within the same custom role.
- You can grant access to systems that are not part of an inventory group. Add the Ungrouped systems in the Group definition of the host permissions to the custom role.
- Remember that as long the Inventory hosts administrator role is still in the Default Access group, all users who have that role still have access to everything.
- If you do not select Ungrouped systems in your custom roles, users with those roles will not be able to see any ungrouped systems once you remove the inventory hosts administrator permission from the Default access group.
1.2.2. Scenario 2: Access to ungrouped systems
In this example, an admin wants to give a group of users access to ungrouped systems, but not to grouped systems.
Step 1: Create a custom role
Navigate to User Access > Roles and click Create role. The Create Role wizard displays.
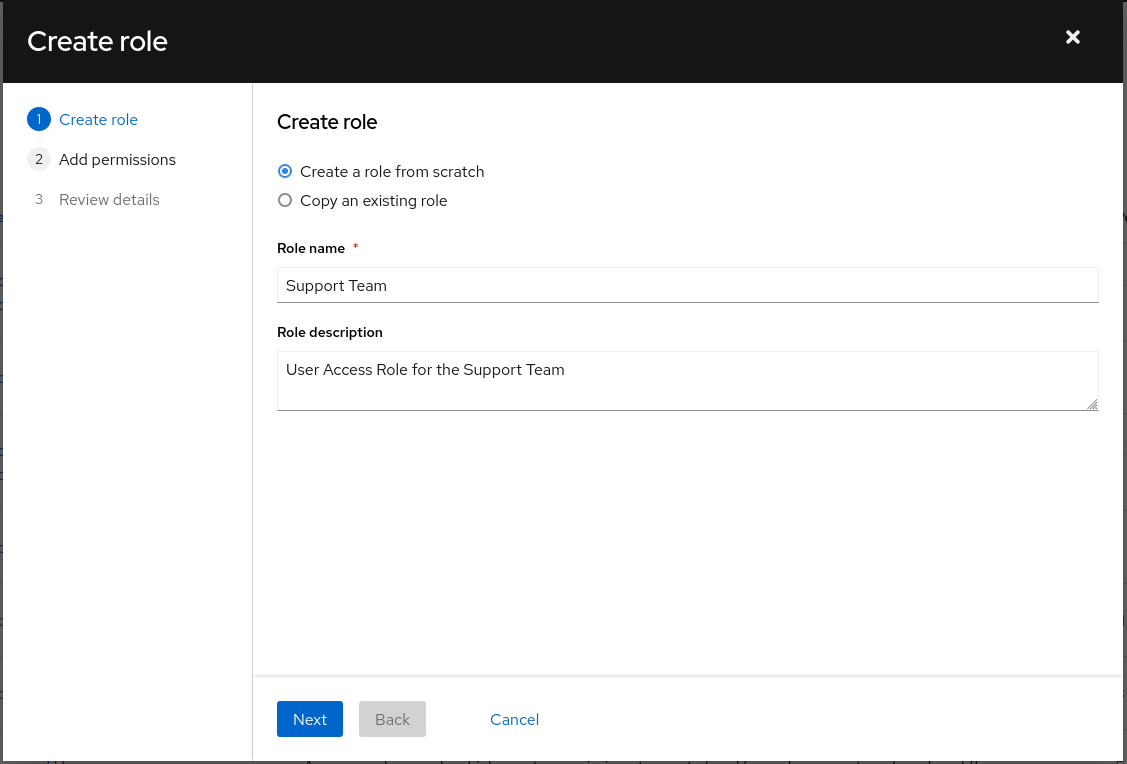
Set the role name and description and click Next.
Add the inventory:hosts permissions and click Next.
Configure both of the permissions to apply to the Group definition named Ungrouped systems. Click Next.
Review the details of the role and click Submit.
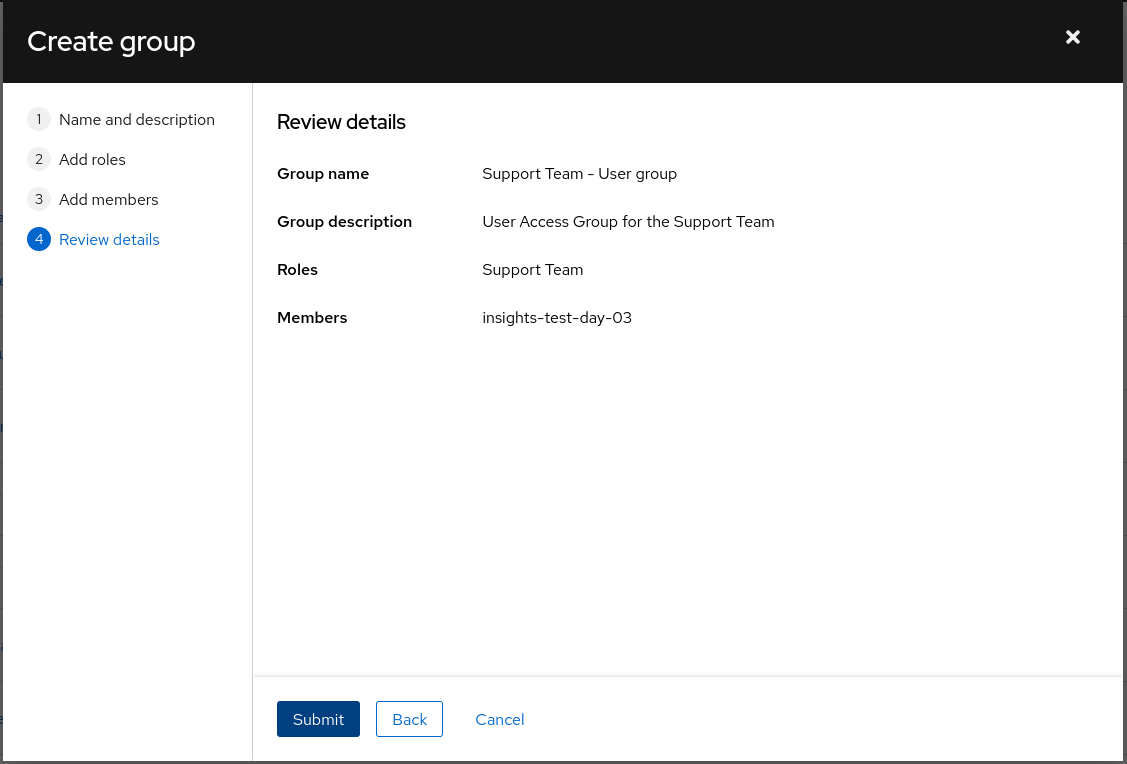
Step 2: Add the custom role to an RBAC group
Once you create the custom role, navigate to User Access > Groups and click Create Group to create a User Access (RBAC) group. Name the group, select the new custom role, and select the users to whom you want to assign this role.
These steps only work when the users do not have the inventory hosts admin role assigned from the Default Access group. To check this, navigate to User Access > Groups and click on the Default Access group at the top. If that role is in the group, remove it, because that role gives users access to the whole inventory - including both ungrouped and grouped systems.
After you remove the role, the selected set of users only has access to ungrouped systems in your inventory.
1.2.3. Known limitations
- Users who are Org Admin (member of the Default admin access group) will always have full access to systems and Inventory Groups
- A user without permission on the system will not be able to add it to a Remediation. However, if an existing Remediation with active systems was created in the past, the user will still be able to run it, even if the permissions have been removed on that system for the current user.
Before enabling Inventory groups in your organization, review your Notifications configuration to ensure that only appropriate groups of users are configured to receive Email notifications. If you do not review your Notifications configuration, users might receive alerts triggered by systems outside of their Inventory group permission scope.
1.3. Creating an inventory group
Prerequisites
- You must be an Organization administrator (member of the Default administrator access group) or have the Inventory Group Administrator role.
Procedure
- On the Red Hat Hybrid Cloud Console, navigate to Inventory.
- Click the Inventory drop-down menu and select Groups.
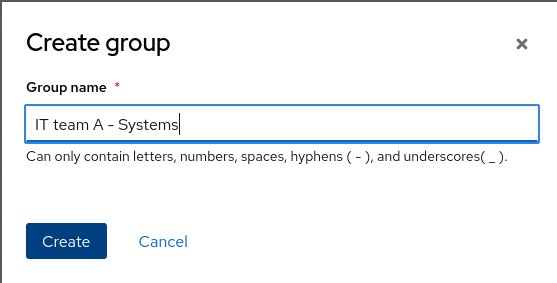
- Click Create group. The Create group dialog box displays.
- Type a name for the group in the Group name field. Names can consist of lowercase letters, numbers, spaces, hyphens (-), and underscores (_).
- Click Create. A Group Created message displays, and the new group appears in the list of inventory groups.
1.4. Adding systems to a newly created inventory group
Each system can belong to only one inventory group. In the current release of inventory groups, a system cannot be reassigned to a different group in a single step. You must first remove the system from its current group, and then assign it to a new group.
Prerequisites
- Organization Administrator access to Insights for Red Hat Enterprise Linux, or Inventory Groups administrator permissions to the group, or both inventory:groups:write and inventory:groups:read permissions to the group
Procedure
- On the Red Hat Hybrid Cloud Console, navigate to Inventory > Groups.
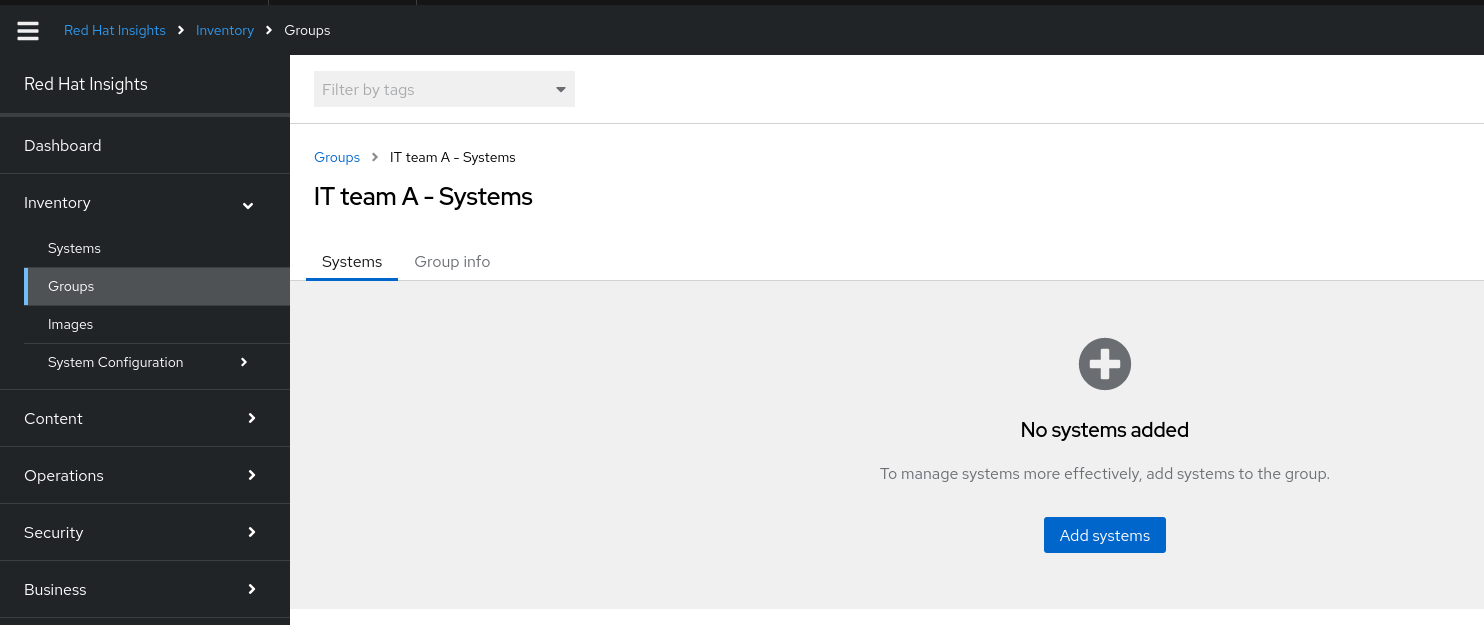
- Click the name of the group to which you want to add systems. An Inventory group page displays with the name of the group and two tabs, Systems and Group Details.
- On the Systems tab, click Add systems. The Add systems dialog box displays and shows the systems available for you to view in inventory.
Select the systems you want to add to the group.
NoteIf you select a system that already belongs to another group, a warning message displays: One or more of the selected systems already belong to a group. Make sure that all the systems you have selected are ungrouped, or you will not be able to proceed.
- When you have finished selecting systems, click Add systems. The Inventory group page displays and includes the systems you added to the group.
1.4.1. Adding a system and creating a group from the Inventory systems page
Prerequisites
- Organization Administrator access to Insights for Red Hat Enterprise Linux, or Inventory Groups administrator permissions to the group, or both inventory:groups:write and inventory:groups:read permissions to the group
Procedure
- On the Red Hat Hybrid Cloud Console, navigate to Inventory. The list of systems in your inventory appears.
- Locate the system that you want to add.
- Click the More options icon (⋮) on the far right side of the system listing.
- Select Add to group from the pop-up menu. The Add to group dialog box displays.
- Click Create a new group. The Create group dialog box displays.
- Type a name for the new group in the Name field and click Create.
The Inventory page appears and displays a status (success or failure) message.
1.5. Removing systems from a group
You can remove systems from an inventory group from two pages in the Red Hat Hybrid Cloud Console: the Groups page and the Systems page.
1.5.1. Removing systems from the group using the Groups page
Prerequisites
- You must be an Organization administrator (member of the Default admin access group), or have the Inventory Group Administrator role, or have the inventory:group:write permissions for that particular inventory group.
Procedure
- On the Red Hat Hybrid Cloud Console, navigate to Inventory.
- Click the Inventory drop-down menu and select Groups. The Groups page displays.
- Select the group that contains the systems that you want to remove.
- Locate the system that you want to remove from the group.
- Click the More options icon (⋮) on the far right side of the system listing.
- Select Remove from group from the pop-up menu. The Remove from group? dialog box displays.
- Optional: To remove multiple systems from the group at once, select each system you want to remove, and then select Remove from group from the More options menu (⋮) in the toolbar.
- Click Remove.
The group page displays and shows the updated group with a status (success or failure) message.
1.5.2. Removing systems from the group using the Systems page
Prerequisites
- Organization Administrator access to Insights for Red Hat Enterprise Linux, or Inventory Groups administrator permissions to the group, or both inventory:groups:write and inventory:groups:read permissions to the group
Procedure
- On the Red Hat Hybrid Cloud Console, navigate to Inventory.
- Click the Inventory drop-down menu and select Systems. The Systems page displays.
- Locate the system that you want to remove from the group.
- Click the More options icon (⋮) on the far right side of the system listing.
Select Remove from group from the pop-up menu. The Remove from group? dialog box displays.
NoteIf any of the systems you selected do not belong to any group, the Remove from group option remains disabled. Make sure that you select only systems that belong to the group.
- Optional: To remove multiple systems from the group, select each system you want to remove, and then select Remove from group from the More options (⋮) menu.
- Click Remove.
The Systems page displays and shows a status (success or failure) message.
1.6. Renaming a group
Prerequisites
- You must be an Organization administrator (member of the Default admin access group), or have the Inventory Group Administrator role, or have the inventory:group:write permissions for that particular inventory group.
Procedure
- On the Red Hat Hybrid Cloud Console, navigate to Inventory.
- Click the Inventory drop-down menu and select Groups. The Groups page displays.
- Click the Group actions drop-down menu in the upper right corner of the Groups page.
- Select Rename from the drop-down menu. The Rename group dialog box displays.
- Type the new name into the Name field, and click Save.
- The Groups page shows the renamed group in the list of groups.
1.7. Deleting a group
Before you delete a group, make sure that the group does not contain any systems. You can only delete empty groups. If you attempt to delete a group that still contains systems, Insights returns a warning message.
Prerequisites
- You must be an Organization administrator (member of the Default admin access group), or have the Inventory Group Administrator role, or have the inventory:group:write permissions for that particular inventory group.
Procedure
- On the Red Hat Hybrid Cloud Console, navigate to Inventory.
- Click the Inventory drop-down menu and select Groups. The Groups page displays.
- Click the More options icon (⋮) on the far right side of the listing for the group you want to delete.
- Select Delete from the pop-up menu. The Delete group dialog box displays.
- Select the checkbox to acknowledge that the delete operation cannot be undone. Click Delete.
The Groups page shows an updated list of groups and a status (success or failure) message.
You can also delete a group from within the page for the group. Navigate to the group and click the Group Actions drop-down menu, and then select Delete from the drop-down menu.