Chapter 3. Managing Service Registry content using the web console
This chapter explains how to manage schema and API artifacts stored in Service Registry by using the Service Registry web console. This includes uploading and browsing Service Registry content, and configuring optional rules:
- Section 3.1, “Viewing artifacts using the Service Registry web console”
- Section 3.2, “Adding artifacts using the Service Registry web console”
- Section 3.3, “Configuring content rules using the Service Registry web console”
- Section 3.4, “Configuring Service Registry instance settings using the web console”
- Section 3.5, “Changing an artifact owner using the Service Registry web console”
- Section 3.6, “Exporting and importing data using the Service Registry web console”
3.1. Viewing artifacts using the Service Registry web console
You can use the Service Registry web console to browse the event schema and API artifacts stored in Service Registry. This section shows a simple example of viewing Service Registry artifacts, groups, versions, and artifact rules.
Prerequisites
- Service Registry is installed and running in your environment.
You are logged in to the Service Registry web console:
http://MY_REGISTRY_URL/ui- Artifacts have been added to Service Registry using the web console, command line, Maven plug-in, or a Java client application.
Procedure
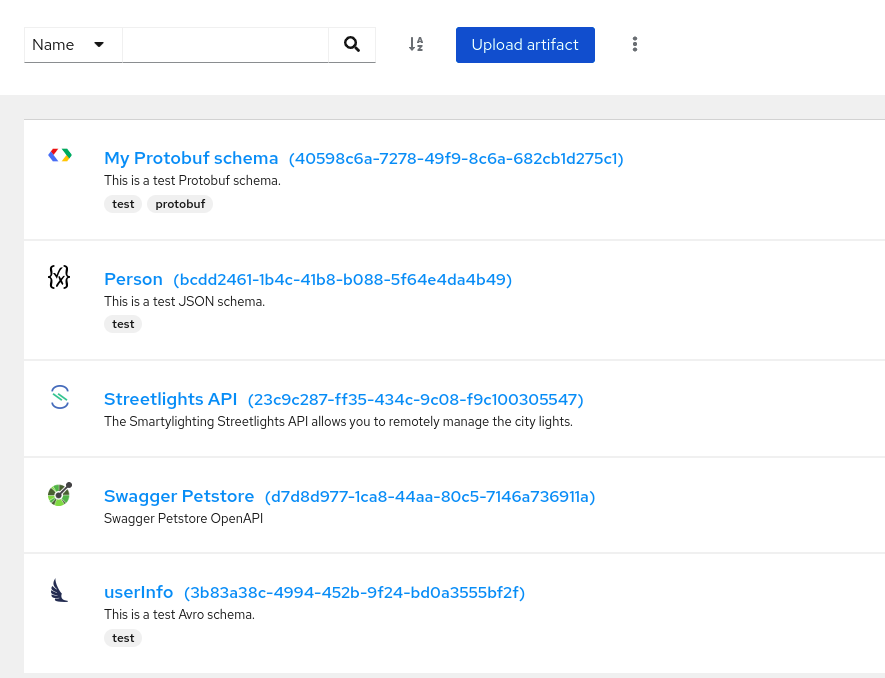
On the Artifacts tab, browse the list of artifacts stored in Service Registry, or enter a search string to find an artifact. You can select from the list to search by specific criteria such as name, group, labels, or global ID.
Figure 3.1. Artifacts in Service Registry web console
Click an artifact to view the following details:
- Overview: Displays artifact version metadata such as artifact name, artifact ID, global ID, content ID, labels, properties, and so on. Also displays rules for validity and compatibility that you can configure for artifact content.
- Documentation (OpenAPI and AsyncAPI only): Displays automatically-generated REST API documentation.
- Content: Displays a read-only view of the full artifact content. For JSON content, you can click JSON or YAML to display your preferred format.
- If additional versions of this artifact have been added, you can select them from the Version list in page header.
-
To save the artifact contents to a local file, for example,
my-protobuf-schema.proto, click Download at the end of the page.
3.2. Adding artifacts using the Service Registry web console
You can use the Service Registry web console to upload event schema and API artifacts to Service Registry. This section shows simple examples of uploading Service Registry artifacts and adding new artifact versions.
Prerequisites
- Service Registry is installed and running in your environment.
You are logged in to the Service Registry web console:
http://MY_REGISTRY_URL/ui
Procedure
On the Artifacts tab, click Upload artifact, and specify the following details:
-
Group & ID: Use the default empty settings to automatically generate an artifact ID and add the artifact to the
defaultartifact group. Alternatively, you can enter an optional artifact group name or ID. - Type: Use the default Auto-Detect setting to automatically detect the artifact type, or select the artifact type from the list, for example, Avro Schema or OpenAPI. You must manually select the Kafka Connect Schema artifact type, which cannot be automatically detected.
Artifact: Specify the artifact location using either of the following options:
-
From file: Click Browse, and select a file, or drag and drop a file. For example,
my-openapi.jsonormy-schema.proto. Alternatively, you can enter the file contents in the text box. -
From URL: Enter a valid and accessible URL, and click Fetch. For example:
https://petstore3.swagger.io/api/v3/openapi.json.
-
From file: Click Browse, and select a file, or drag and drop a file. For example,
-
Group & ID: Use the default empty settings to automatically generate an artifact ID and add the artifact to the
Click Upload and view the artifact details:
- Overview: Displays artifact version metadata such as artifact name, artifact ID, global ID, content ID, labels, properties, and so on. Also displays rules for validity and compatibility that you can configure for artifact content.
- Documentation (OpenAPI and AsyncAPI only): Displays automatically-generated REST API documentation.
Content: Displays a read-only view of the full artifact content. For JSON content, you can click JSON or YAML to display your preferred format.
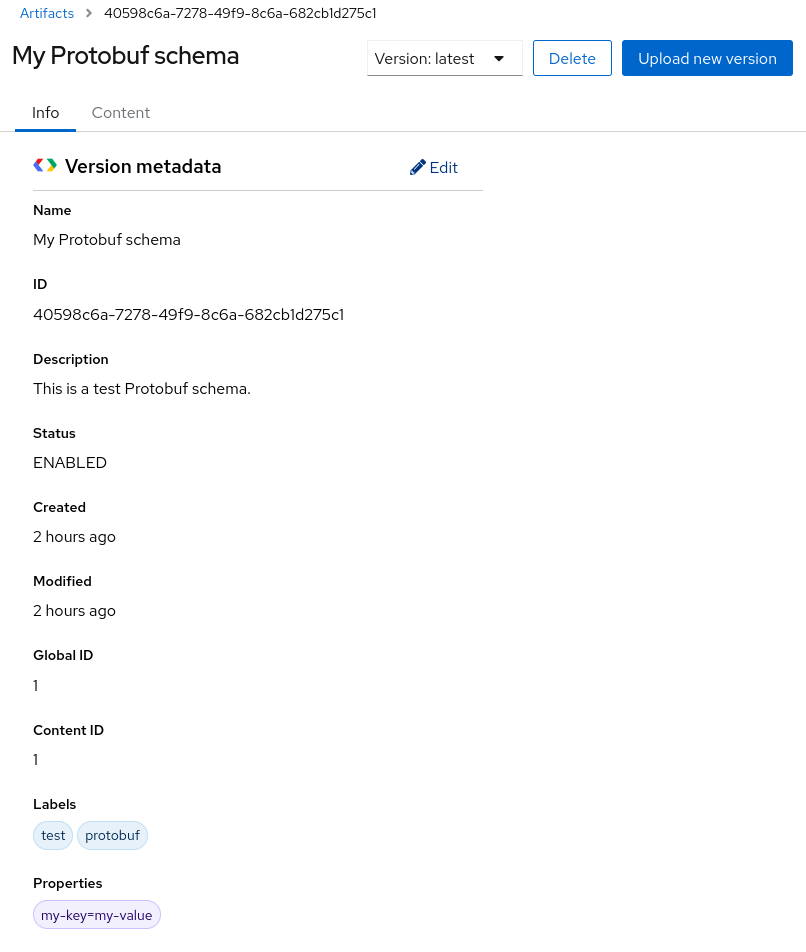
The following example shows an example Protobuf schema artifact:
Figure 3.2. Artifact details in Service Registry web console
On the Overview tab, click the Edit pencil icon to edit artifact metadata such as name or description.
You can also enter an optional comma-separated list of labels for searching, or add key-value pairs of arbitrary properties associated with the artifact. To add properties, perform the following steps:
- Click Add property.
- Enter the key name and the value.
- Repeat the first two steps to add multiple properties.
- Click Save.
-
To save the artifact contents to a local file, for example,
my-protobuf-schema.proto, click Download at the end of the page. -
To add a new artifact version, click Upload new version in the page header, and drag and drop or click Browse to upload the file, for example,
my-avro-schema.jsonormy-openapi.json. To delete an artifact, click Delete in the page header.
WarningDeleting an artifact deletes the artifact and all of its versions, and cannot be undone.
3.3. Configuring content rules using the Service Registry web console
You can use the Service Registry web console to configure optional rules to prevent invalid content from being added to Service Registry. All configured artifact rules or global rules must pass before a new artifact version can be uploaded to Service Registry. Configured artifact rules override any configured global rules. This section shows a simple example of configuring global and artifact rules.
Prerequisites
- Service Registry is installed and running in your environment.
You are logged in to the Service Registry web console:
http://MY_REGISTRY_URL/ui- Artifacts have been added to Service Registry using the web console, command line, Maven plug-in, or a Java client application.
Procedure
- On the Artifacts tab, browse the list of artifacts in Service Registry, or enter a search string to find an artifact. You can select from the list to search by specific criteria such as artifact name, group, labels, or global ID.
- Click an artifact to view its version details and content rules.
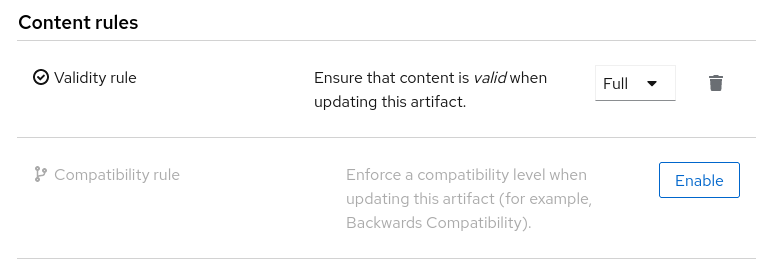
In Content rules, click Enable to configure a validity rule or compatibility rule for artifact content, and select the appropriate rule configuration from the list, for example, Full for the validity rule.
Figure 3.3. Artifact content rules in Service Registry web console
- To access global rules, click the Service Registry instance, and click the Global rules tab. Click Enable to configure a global validity rule or compatibility rule for all artifact content, and select the appropriate rule configuration from the list.
- To disable an artifact rule or global rule, click the trash icon next to the rule.
3.4. Configuring Service Registry instance settings using the web console
As an administrator, you can use the Service Registry web console to configure dynamic settings for Service Registry instances at runtime. You can manage configuration options for features such as authentication, authorization, and API compatibility.
Authentication and authorization settings are only displayed in the web console if authentication was already enabled when the Service Registry instance was deployed. For more details, see the Installing and deploying Service Registry on OpenShift.
Prerequisites
- The Service Registry instance is already deployed.
You are logged in to the Service Registry web console with administrator access:
http://MY_REGISTRY_URL/ui
Procedure
- In the Service Registry web console, click the Settings tab.
Select the settings that you want to configure for this Service Registry instance:
Expand Table 3.1. Authentication settings Setting Description HTTP basic authentication
Displayed only when authentication is already enabled. When selected, Service Registry users can authenticate using HTTP basic authentication, in addition to OAuth. Not selected by default.
Expand Table 3.2. Authorization settings Setting Description Anonymous read access
Displayed only when authentication is already selected. When selected, Service Registry grants read-only access to requests from anonymous users without any credentials. This setting is useful if you want to use this instance to publish schemas or APIs externally. Not selected by default.
Artifact owner-only authorization
Displayed only when authentication is already enabled. When selected, only the user who created an artifact can modify that artifact. Not selected by default.
Artifact group owner-only authorization
Displayed only when authentication is already enabled and Artifact owner-only authorization is selected. When selected, only the user who created an artifact group has write access to that artifact group, for example, to add or remove artifacts in that group. Not selected by default.
Authenticated read access
Displayed only when authentication is already enabled. When selected, Service Registry grants at least read-only access to requests from any authenticated user regardless of their user role. Not selected by default.
Expand Table 3.3. Compatibility settings Setting Description Legacy ID mode (compatibility API)
When selected, the Confluent Schema Registry compatibility API uses
globalIdinstead ofcontentIdas an artifact identifier. This setting is useful when migrating from legacy Service Registry instances based on the v1 Core Registry API. Not selected by default.Expand Table 3.4. Web console settings Setting Description Download link expiry
The number of seconds that a generated link to a
.zipdownload file is active before expiring for security reasons, for example, when exporting artifact data from the instance. Defaults to 30 seconds.UI read-only mode
When selected, the Service Registry web console is set to read-only, preventing create, read, update, or delete operations. Changes made using the Core Registry API are not affected by this setting. Not selected by default.
3.5. Changing an artifact owner using the Service Registry web console
As an administrator or as an owner of a schema or API artifact, you can use the Service Registry web console to change the artifact owner to another user account.
For example, this feature is useful if the Artifact owner-only authorization option is set for the Service Registry instance on the Settings tab so that only owners or administrators can modify artifacts. You might need to change owner if the owner user leaves the organization or the owner account is deleted.
The Artifact owner-only authorization setting and the artifact Owner field are displayed only if authentication was enabled when the Service Registry instance was deployed. For more details, see Installing and deploying Service Registry on OpenShift.
Prerequisites
- The Service Registry instance is deployed and the artifact is created.
You are logged in to the Service Registry web console as the artifact’s current owner or as an administrator:
http://MY_REGISTRY_URL/ui
Procedure
- On the Artifacts tab, browse the list of artifacts stored in Service Registry, or enter a search string to find the artifact. You can select from the list to search by criteria such as name, group, labels, or global ID.
- Click the artifact that you want to reassign.
- In the Version metadata section, click the pencil icon next to the Owner field.
- In the New owner field, select or enter an account name.
- Click Change owner.
3.6. Exporting and importing data using the Service Registry web console
As an administrator, you can use the Service Registry web console to export data from one Service Registry instance, and import this data into another Service Registry instance. You can use this feature to easily migrate data between different instances.
The following example shows how to export and import existing data in a .zip file from one Service Registry instance to another instance. All of the artifact data contained in the Service Registry instance is exported in the .zip file.
You can import only Service Registry data that has been exported from another Service Registry instance.
Prerequisites
Service Registry instances have been created as follows:
- The source instance that you are exporting from contains at least one schema or API artifact
- The target instance that you are importing into is empty to preserve unique IDs
You are logged into the Service Registry web console with administrator access:
http://MY_REGISTRY_URL/ui
Procedure
- In the web console for the source Service Registry instance, view the Artifacts tab.
-
Click the options icon (three vertical dots) next to Upload artifact, and select Download all artifacts (.zip file) to export the data for this Service Registry instance to a
.zipdownload file. - In the the web console for the target Service Registry instance, view the Artifacts tab.
- Click the options icon next to Upload artifact, and select Upload multiple artifacts.
-
Drag and drop or browse to the
.zipdownload file that you exported earlier. - Click Upload and wait for the data to be imported.


