Chapter 3. Configure
Before you can deploy Red Hat JBoss BPM Suite as a web archive on IBM WebSphere Application Server, configure the server to accept the deployable WAR files. Follow the steps outlined in this section to deploy Red Hat JBoss BPM Suite on IBM WebSphere Application Server.
Log in to your IBM WebSphere console using an administrative login before performing any of these steps. The usual login URL is http://TARGET_SERVER:9060/ibm/console (for example http://localhost:9060/ibm/console).
The IBM Integrated Solutions Console with the welcome screen opens. The main menu on the left side of the console contains all the links necessary for setting the application server.
Figure 3.1. IBM Integrated Solutions Console

3.1. Increasing JVM Heap Size
With the default JVM heap size, the IBM WebSphere Application Server freezes or causes deployment errors when deploying Business Central. To increase the heap size:
-
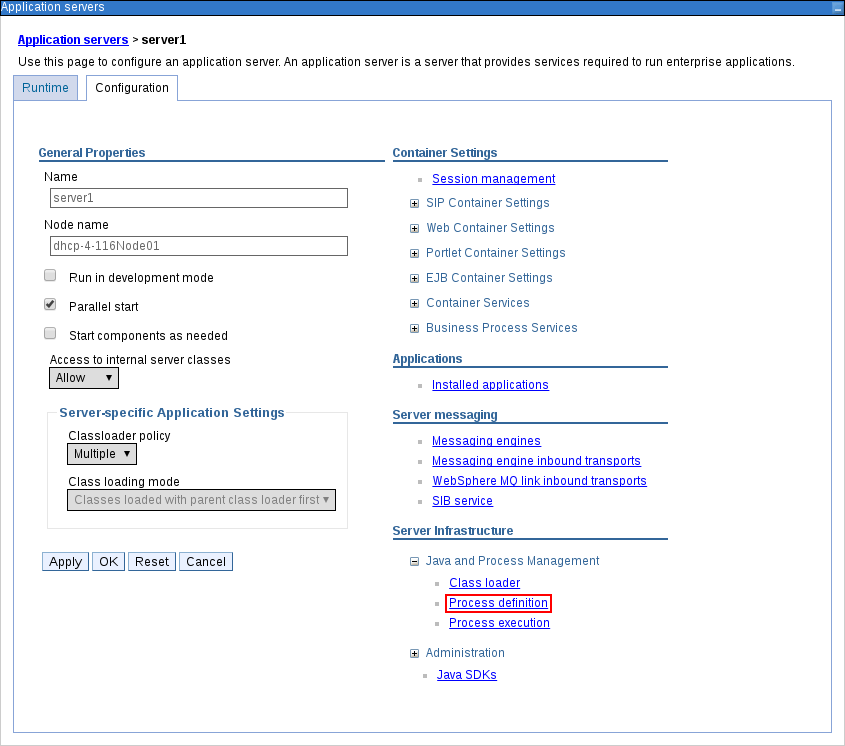
In the Integrated Solutions Console, go to Servers
Server Types WebSphere Application Servers. In the list of application servers, click on the server on which you are going to deploy Business Central. For example
server1.The configuration page for that server opens.
Under Server Infrastructure heading on the right side, click Java and Process Management
Process Definition. Figure 3.2. Application Server Configuration Page
Click Java Virtual Machine under the Additional Properties heading on the right.
Figure 3.3. Process Definition Configuration Page
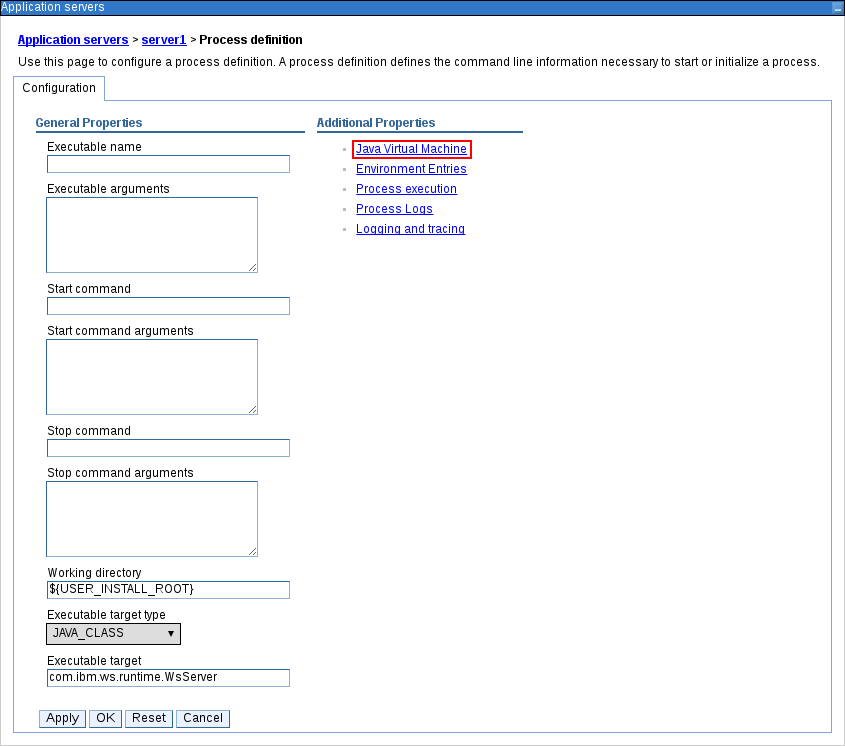
This will open up the configuration properties for the JVM that is used to start the server.
Change both the Initial Heap Size and Maximum Heap Size to
2048. This is the configuration Red Hat JBoss BPM Suite is tested with.Figure 3.4. JVM Configuration Page

Click Apply at the bottom.
Messages pop-up window appears at the top of the Application Servers configuration page. You can choose to save these configuration settings to the master configuration at this stage.
Figure 3.5. Messages Pop-up

- Restart the server at this point or wait till other configuration changes have been made.
3.2. Modifying Security Settings
For the Business Central application to work, you need to modify several security settings on IBM WebSphere Application Server. To enable the container-managed authentication mechanisms provided by the server:
In the main menu, click Security
Global Security. Ensure that the option Enable Application Security is checked. This may already be checked and overridden at the server level. Figure 3.6. Global Security Configuration Page

Click Custom Properties on the right side and then New… to enter a new custom property with the following details:
-
Name:
com.ibm.ws.security.web.logoutOnHTTPSessionExpire -
Value:
true
This property instructs the server to invalidate LTPA tokens on session invalidation, which makes the logout process consistent across multiple users using the same browser.
-
Name:
- Click Apply and then OK.
3.3. Creating Users and Groups
-
In the main menu on the left, click Users and Groups
Manage Groups. Create five new groups:
admin,analyst,developer,manager, anduserby clicking Create….Figure 3.7. Created Groups
 Note
NoteAdd the
kie-servergroup as well if you are going to install the Intelligent Process Server. Also add therest-alland other REST API groups if you are going to use the API. For further information about API roles, see chapter Remote API of Red Hat JBoss BPM Suite Development Guide.-
In the main menu on the left, click Users and Groups
Manage Users. Click Create… and fill in the user credentials.
ImportantMake sure that the selected User ID does not conflict with any known title of a role or a group.
For example, if there is a role called
admin, you should not create a user with the user nameadmin.Figure 3.8. Create User Dialog Window
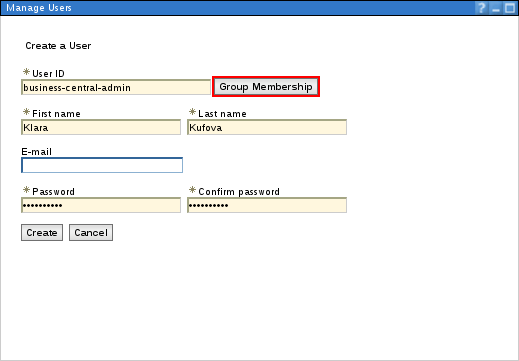
Click Group Membership and assign the user to the
admingroup that you created previously.NoteYou may assign this user to any of the groups you have just created. In the production systems, you are likely to create separate users for separate groups that align with business roles. The
admingroup is all encompassing and is therefore useful for the purposes of this setup.- Click Create.
3.4. Session Management Custom Settings
-
In the main menu on the left, go to Servers
Server Types WebSphere Application Servers and select the server on which you are deploying Business Central. - Click Session Management under the Container Settings heading on the right.
- In the Additional Properties section on the right, click Custom Properties and then New….
Fill in the required information:
-
Name:
InvalidateOnUnauthorizedSessionRequestException -
Value:
true
-
Name:
- Click Apply and then OK.
3.5. Setting up Data Source
The Business Central application requires a data source which must be created prior to the deployment of the actual WAR file. This means that you must have access to an underlying database to which the data source connects. Whatever your underlying database, make sure you have the data source ready. Follow the steps below to set the data source.
In the following procedure, the data source setup is demonstrated on the Oracle Database 12c.
Creating JDBC Providers
-
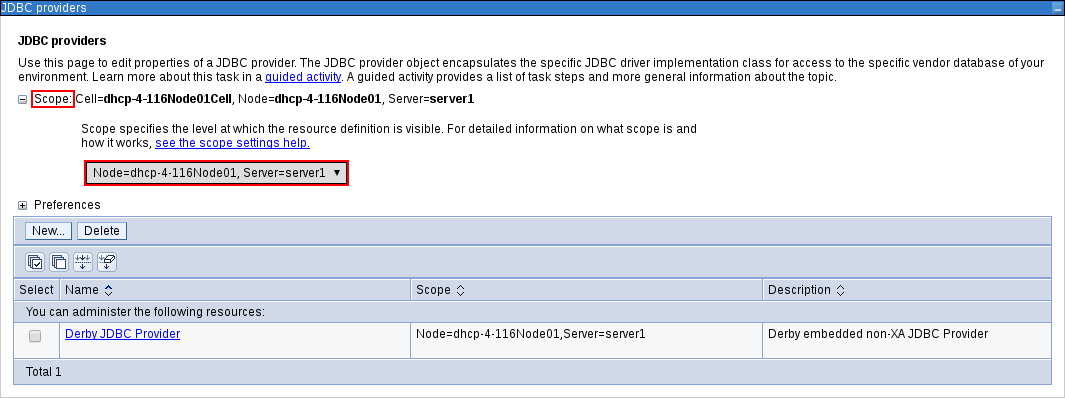
Open up the JDBC Providers page by clicking Resources
JDBC JDBC Providers. At the top of the JDBC Providers page, click Scope. Select the scope of this JDBC provider to include your server and node. Note that it cannot be
All scopes.Figure 3.9. Selecting Scope of JDBC Provider
Click New….
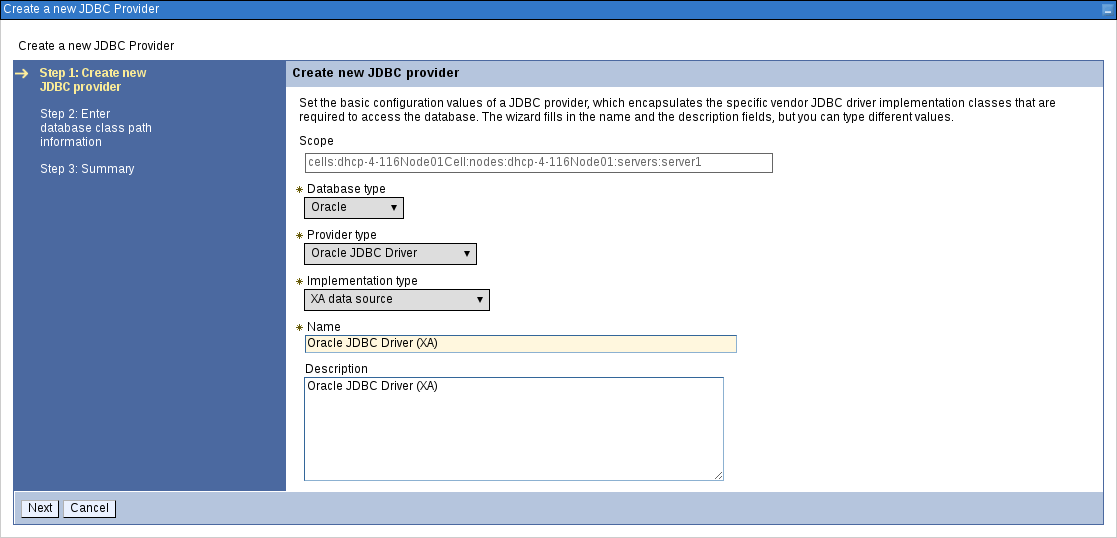
The Create a New JDBC Provider page opens.
Fill in the form based on the database driver that you have available.
Figure 3.10. First Step of Creating New JDBC Provider
If your database is not listed, select the User-Defined option from the Database Type selection box and provide the implementation class name.
For example, for H2, PostgreSQL, or MySQL, the implementation class name will be
org.h2.jdbcx.JdbcDataSource,org.postgresql.xa.PGXADataSource, andcom.mysql.jdbc.jdbc2.optional.MysqlXADataSourcerespectively.- Give the JDBC Provider a descriptive name and click Next.
Provide the class path information for the JDBC driver class files you defined. Click Apply.
Figure 3.11. Defining Database Class Path

- Click Next.
Click Finish to accept and add this new JDBC provider.
Figure 3.12. JDBC Provider Summary Page

Using this new JDBC provider, you will now need to set up the actual data source for Business Central.
Before you create the data source, open the persistence.xml file located in the WEB-INF/classes/META-INF directory of the Business Central WAR file (business-central.war) that you have downloaded. You will need to know the JNDI name of the data source defined within the <jta-data-source> tag. For Business Central, it is jdbc/jbpm.
Also change the hibernate.dialect property to suit your database. For example, if your underlying database is Oracle Database 12c, change the property value to org.hibernate.dialect.Oracle10gDialect.
Setting up Data Source
-
Open the Data Sources page by clicking Resources
JDBC Data Sources in the main menu on the left and make sure that the appropriate scope has been selected. - Click New….
Enter a unique Data Source Name by which you will refer to this data source and the JNDI name that you found in the
persistence.xmlfile.Figure 3.13. First Step of Creating New Data Source

Click Next.
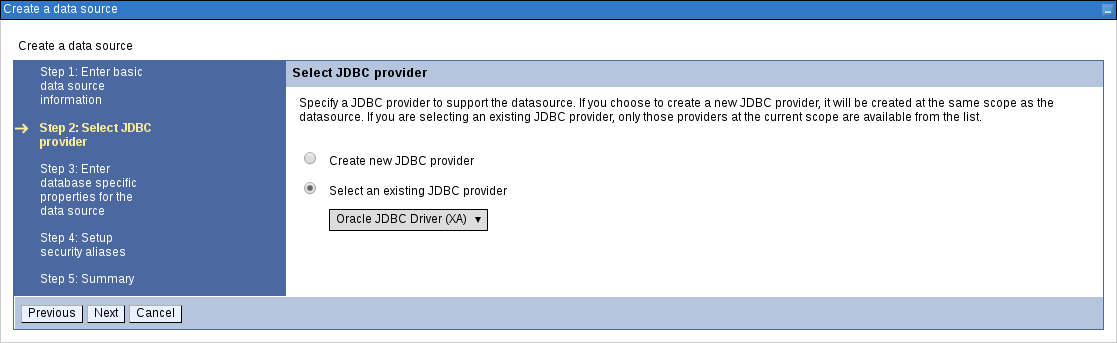
From the Select an Existing JDBC Provider drop-down menu, select the JDBC provider created earlier and click Next.
Figure 3.14. Selecting JDBC Provider
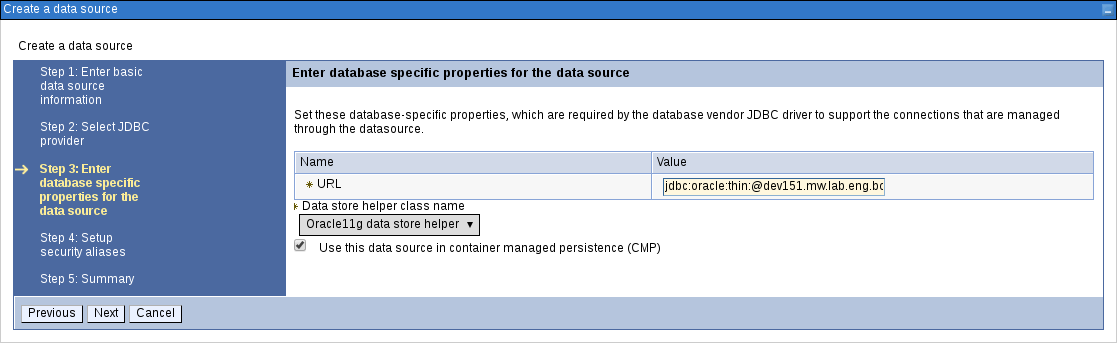
In the Enter Database Specific Properties for the Data Source step, enter the database JDBC URL and click Next.
Figure 3.15. Enter Database Specific Properties for Data Source Screen
In the Setup Security Aliases screen, set the authentication values for connecting to this data source. If the aliases are not yet created, click Global J2C Authentication Alias at the bottom. Note that in this case, the Create a Data Source wizard will be canceled.
- Click New….
Fill in the Alias, User ID, and Password.
Figure 3.16. Creating New Security Alias
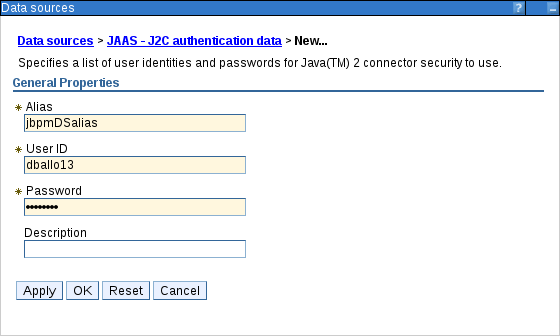
- Click OK.
Go back to the Setup Security Aliases screen and set the Component-Managed Authentication Alias to the newly created alias and the Mapping-Configuration Alias to
DefaultPrincipalMapping.You can also create and set a different alias for XA recovery. If the Authentication Alias for XA Recovery is set to
(none), the component-managed authentication alias is used by default.Figure 3.17. Setting Security Aliases
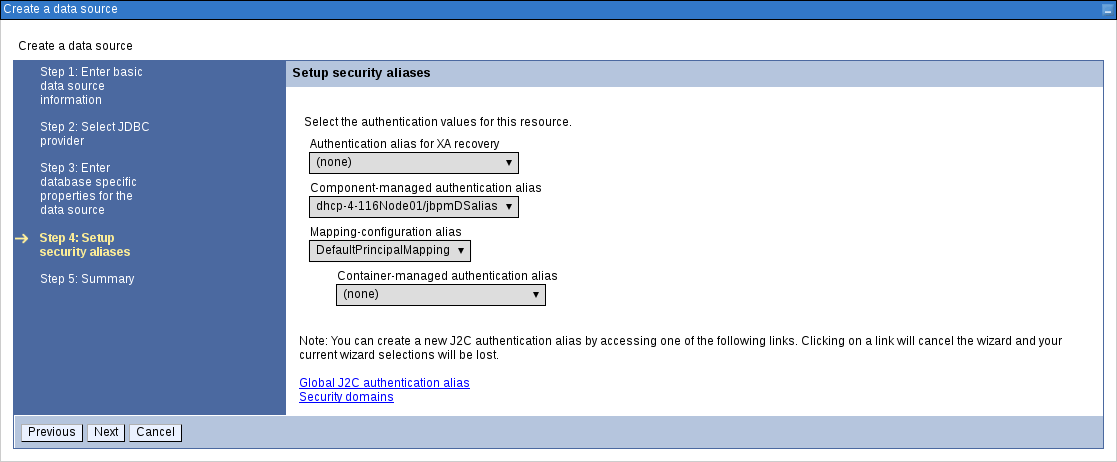
Click Next.
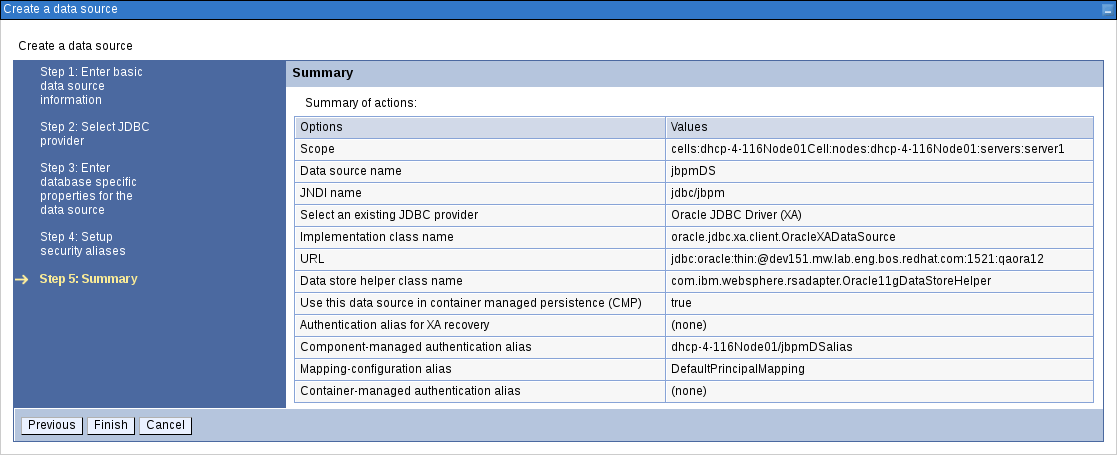
In the Summary screen, check the values and click Finish. Choose to save the changes to the master configuration as well.
Figure 3.18. Creating Data Source Summary Screen
- Choose the created data source from a list of all data sources to provide the basic meta properties.
Click Custom Properties under the Additional Properties section on the right.
Properties like
serverName,databaseName,userName, andpasswordmust now be defined and vary for different databases. Some example database properties are shown below.Table 3.1. Custom Properties for Different Databases Database Properties H2
URL,user,passwordMySQL
serverName,databaseName,port,user,passwordPostgreSQL
serverName,databaseName,portNumber,user,passwordOracle
jdbcURL
Once all the connection properties have been defined, click Test Connection to ensure the validity of the data source. If the connection was successful, the following message appears at the top of the screen:
The test connection operation for data source DATA_SOURCE_NAME on server SERVER_NAME at node NODE_NAME was successful.
3.6. Setting up JMS Resources
IBM WebSphere Application Server must be configured to send and receive JMS messages through Red Hat JBoss BPM Suite. However, before you do this, a service bus must be present. Follow the steps below to create a service bus if one does not already exist.
Setting up Buses
Creating Service Bus
-
In the main menu on the left, click Service Integration
Buses. - Click New….
- Enter the name and make sure that the Bus Security option is unchecked.
- Click Next and then Finish to create the service bus.
Adding Bus Member
Before you continue, add a new bus member. A bus member is a server or a cluster that has been added to this service bus.
-
Go to Service Integration
Buses and click on the service bus that you have created. - Under the Topology heading on the right, click Bus Members.
- Click Add.
- In the Add a New Bus Member wizard, choose the server and the type of message store for the persistence in the first two steps. Depending on the previous selection, you can also specify the properties of the message store.
- Click Finish in the last step to add a new bus member.
Creating JMS Connection Factories
To send and receive messages from Red Hat JBoss BPM Suite, you have to create the JMS connection factories, which are needed for establishing connections used for sending messages into queues.
For Business Central, create the following connection factories: KIE.SIGNAL, KIE.INPUT (for queries), KIE.RESPONSE.ALL (for responses), and KIE.EXECUTOR (for the executor).
If you will be installing the Intelligent Process Server as well, you need to create KIE.SERVER.REQUEST, KIE.SERVER.RESPONSE, and KIE.SERVER.EXECUTOR connection factories.
The factory names shown above are suggestions only and you can change them to suit your needs and company guidelines.
-
In the main menu on the left, go to Resources
JMS Connection Factories. - Make sure the correct scope is selected and click New.
- Select the Default Messaging Provider option and click OK.
Enter the name and JNDI name of the factory. For example:
-
Name:
KIE.SIGNAL -
JNDI name:
jms/conn/KIE.SIGNAL
NoteThe JNDI names for
KIE.INPUT,KIE.RESPONSE.ALL, andKIE.EXECUTORarejms/conn/KIE.INPUT,jms/conn/KIE.RESPONSE.ALL, andjms/conn/KIE.EXECUTORrespectively.-
Name:
From the Bus Name drop-down list, select the service bus created earlier.
The rest of the options are not mandatory and can be left with default values.
- Click Apply and choose to save the changes to the master configuration.
Creating JMS Queues
The next step is to create the JMS queues. These queues are the destination end points for point-to-point messaging.
For Business Central, create the following queues: KIE.RESPONSE.ALL (for responses), KIE.AUDIT (for asynchronous audit logs), KIE.SESSION (for ksession-based operations), KIE.TASK (for task-based operations), KIE.EXECUTOR (for Business Central executor services), and KIE.SIGNAL (for sending external global signals to processes).
For Intelligent Process Server, create the following: KIE.SERVER.REQUEST (for requests), KIE.SERVER.RESPONSE (for responses), and KIE.SERVER.EXECUTOR (for executor services).
To create these queues:
-
In the main menu, go to Resources
JMS Queues. - Make sure the correct scope is selected and click New.
- Select the Default Messaging Provider radio button and click OK.
Enter the name and the JNDI name of the queue, for example:
-
Name:
KIE.RESPONSE.ALL -
JNDI name:
jms/KIE.RESPONSE.ALL
NoteAll of the JNDI names of other queues follow the same convention as the example above.
-
Name:
- From the Bus Name drop-down list, select the service bus created earlier.
From the Queue Name drop-down list, make sure to select the Create Service Integration Bus Destination.
This will open up the Create New Queue form for creating a new service integration bus. In this form, enter a unique identifier and select the bus member created earlier in this section.
- Click Apply at the bottom and choose to save the changes to the master configuration.
Creating JMS Activation Specifications
A JMS activation specification is required to be the bridge between the queue and the message-driven bean.
For Business Central, create the following activation specifications: KIE.RESPONSE.ALL (for responses), KIE.AUDIT (for asynchronous audit logs), KIE.SESSION (for ksession-based operations), KIE.TASK (for task-based operations), KIE.EXECUTOR (for Business Central executor services), and KIE.SIGNAL (for sending external global signals to processes).
For Intelligent Process Server, create the following: KIE.SERVER.REQUEST (for requests), KIE.SERVER.RESPONSE (for responses), and KIE.SERVER.EXECUTOR (for executor services).
-
In the main menu, go to Resources
JMS Activation Specifications. - Make sure the correct scope is selected and click New.
- Check the Default Messaging Provider radio button and click OK.
Enter the name and the JNDI name of the activation specification, for example:
-
Name:
KIE.RESPONSE.ALL -
JNDI name:
jms/activation/KIE.RESPONSE.ALL
NoteAll of the JNDI names of other activation specifications follow the same convention as the example above.
-
Name:
- From the Destination Type drop-down list, make sure to select Queue.
-
Enter the Destination JNDI Name (as created in the previous procedure), for example
jms/KIE.RESPONSE.ALL. - From the Bus Name drop-down list, choose the service bus created earlier.
- Click OK at the bottom with the rest of the field values as default and choose to save the changes to the master configuration.
You have now successfully completed the JMS configurations required for setting up Red Hat JBoss BPM Suite on IBM WebSphere Application Server.
3.7. Adding Custom JVM Properties
You must add custom properties to the JVM that is used to start IBM WebSphere Application Server. These custom properties take into consideration the configuration changes that have been outlined in previous sections of this guide.
-
In the main menu, go to Servers
Server Types WebSphere Application Servers. - In the list of application servers, choose the server on which you are going to deploy Business Central.
-
Under the Server Infrastructure heading on the right, click Java and Process Management
Process Definition. Click Java Virtual Machine under the Additional Properties heading.
This opens up the configuration properties for the JVM that is used to start WebSphere Application Server.
- Click Custom Properties under Additional Properties.
Create the following properties by clicking New….
Custom JVM Properties
Table 3.2. Properties Required for Business Central and Intelligent Process Server Name Value Description org.kie.executor.jms.queuejms/KIE.EXECUTORorjms/KIE.SERVER.EXECUTORThe JNDI name of the JMS queue for scheduling asynchronous job execution by Business Central (
jms/KIE.EXECUTOR) or Intelligent Process Server (jms/KIE.SERVER.EXECUTOR). Choose the right value based on the application being used for execution.org.kie.executor.jms.cfjms/conn/KIE.EXECUTORThe JNDI name of connection factory to be used for sending messages.
org.jboss.logging.providerjdkThis property is only required where a
CA SiteMinder TAI (SMTAI)is installed in the environment. Using this property forces Hibernate to useJDKinstead oflog4jfor logging within Dashbuilder.CA SiteMinder TAI (SMTAI)contains an old version oflog4j, which causes conflicts.org.apache.wink.jaxbcontextcacheoffThis property ensures that the IBM WebSphere Apache Wink framework does not cache
JAXBContexts, which negatively impacts the performance and interferes with the custom-type serialization for the REST API.Table 3.3. Properties Required for Business Central Name Value Description jbpm.ut.jndi.lookupjta/usertransactionUsed to look up user transactions from within non-managed threads, such as timers.
kie.services.jms.queues.responsejms/KIE.RESPONSE.ALLThe JNDI name of the response queue for the JMS remote API created earlier. You may have given this a different name from
KIE.RESPONSE.ALL. Change if required.org.uberfire.start.methodejbDefines startable beans for Uberfire.
Set this property if following warning message appears in the logs during the deployment of
business-central.war:WARNING: Unable to instantiate EJB Asynchronous Bean. Falling back to Executors' CachedThreadPool
NoteRed Hat JBoss BPM Suite uses an embedded version of Git for its artifact versioning. This version of Git uses ports
9418and8001for standard and SSH access (org.uberfire.nio.git.ssh.port) respectively.Ensure that these embedded Git ports are not already in use in your version of IBM WebSphere Application Server.
If these ports are being used and you need to change the default Git ports, they can be changed by setting the
org.uberfire.nio.git.daemon.portandorg.uberfire.nio.git.ssh.portproperties using the steps described above.For more information, see section Configuring LDAP Principal and Role Names Matching Criteria below.
Table 3.4. Properties Required for Intelligent Process Server Name Value Description kie.server.jms.queues.responsejms/conn/KIE.SERVER.RESPONSEThe JNDI name of connection factory for responses used by the Intelligent Process Server .
org.kie.server.domainWSLoginJAAS
LoginContextdomain used to authenticate users when using JMS.org.kie.server.persistence.dsSet according to database type and configuration.
Datasource JNDI name.
org.kie.server.persistence.tmorg.hibernate.service.jta.platform.internal.WebSphereExtendedJtaPlatformTransaction manager platform for setting Hibernate properties.
org.kie.server.persistence.dialectSet according to database type and configuration.
Specifies the Hibernate dialect to be used.
- Save these configuration settings to the master configuration.
- Restart IBM WebSphere Application Server for these changes to take effect.
3.8. Configuring LDAP Principal and Role Names Matching Criteria
The client applications using ssh to interact with the Git server bundled with Business Central are authenticated and authorised to perform git operations using the security API offered by the Uberfire server. If your Red Hat JBoss BPM Suite application is deployed on WebSphere Application Server (WAS) using an LDAP security realm, the git clients may not be authorized as expected. This is because the distinguished name (DN) for the principal (user or group name) assigned by WAS is the more complex DN associated with that principal by LDAP, which leads to a mismatch of names when the Uberfire server tries to map the roles. To ensure that the role mapping does not fail, use the system property org.uberfire.ldap.regex.role_mapper to control the matching criteria of LDAP principal to role names.
The system property org.uberfire.ldap.regex.role_mapper is a regex pattern used to map LDAP principal names to application role names. Ensure that this pattern contains the variable role as it is substited by the application role name when matching a principal value to the role name. Only after the pattern is matched, the role is added to the user.
For example, if the distinguished name (DN) for the admin group in LDAP is cn=admin,ou=groups,dc=example,dc=com and the intended role is admin, then setting the following value for property org.uberfire.ldap.regex.role_mapper finds a match on admin role:
cn[\\ ]*=[\\ ]*role
3.9. Configuring Unified Execution Servers
To configure Business Central to manage the Intelligent Process Server and use the same data source, follow the instructions in the Unified Execution Servers section of the Red Hat JBoss BPM Suite Administration and Configuration Guide.