1.3. Getting Started with Transactions
1.3.1. Prerequisites
Copy linkLink copied to clipboard!
Overview
Copy linkLink copied to clipboard!
The following are required to complete this example:
- Internet connection (required by Maven)
Java Runtime
Copy linkLink copied to clipboard!
Apache Camel requires a Java 6 development kit (JDK 1.6.0). After installing the JDK, set your
JAVA_HOME environment variable to point to the root directory of your JDK, and set your PATH environment variable to include the Java bin directory.
Apache Maven 2
Copy linkLink copied to clipboard!
The Apache Camel Maven tooling requires Apache Maven version 2.2.1 or later. To download Apache Maven, go to http://maven.apache.org/download.html.
After installing Apache Maven do the following:
- Set your
M2_HOMEenvironment variable to point to the Maven root directory. - Set your
MAVEN_OPTSenvironment variable to-Xmx512Mto increase the memory available for Maven builds. - Set your
PATHenvironment variable to include the Mavenbindirectory:Expand Platform Path Windows %M2_HOME%\binUNIX $M2_HOME/bin
1.3.2. Generate a New Project
Copy linkLink copied to clipboard!
Overview
Copy linkLink copied to clipboard!
Use the Maven archetype,
camel-archetype-java, to generate a sample Java application which you can then use as a starting point for your application.
Steps
Copy linkLink copied to clipboard!
To generate the new project, perform the following steps:
- Open a new command window and change to the directory where you want to store the new Maven project.
- Enter the following command to generate the new Maven project:
mvn archetype:generate
  -DarchetypeRepository=http://repo.fusesource.com/maven2
  -DarchetypeGroupId=org.apache.camel.archetypes
  -DarchetypeArtifactId=camel-archetype-java
  -DarchetypeVersion=6.0.0.redhat-024
  -DgroupId=tutorial
  -DartifactId=tx-jms-router
This command generates a basic router application under thetx-jms-routerdirectory. You will customize this basic application to demonstrate transactions in .Apache CamelNoteMaven accesses the Internet to download JARs and stores them in its local repository. - Customize the project POM file,
tx-jms-router/pom.xml, by adding some new project dependencies. First of all, define some properties for the dependency versions. Using your favorite text editor, open the POM file and add aspring-versionproperty and anactivemq-versionproperty as follows:<project ...> ... <properties> ... <spring-version>3.1.3.RELEASE</spring-version> <activemq-version>5.8.0.redhat-60024</activemq-version> <xbean-version>3.7</xbean-version> </properties> ... </project> - Add dependencies on the artifacts that implement Spring transactions. Look for the
dependencieselement in the POM file and add the followingdependencyelements:<project ...> ... <dependencies> ... <!-- Spring transaction dependencies --> <dependency> <groupId>org.springframework</groupId> <artifactId>spring-core</artifactId> <version>${spring-version}</version> </dependency> <dependency> <groupId>org.springframework</groupId> <artifactId>spring-context</artifactId> <version>${spring-version}</version> </dependency> <dependency> <groupId>org.springframework</groupId> <artifactId>spring-tx</artifactId> <version>${spring-version}</version> </dependency> <dependency> <groupId>org.springframework</groupId> <artifactId>spring-aop</artifactId> <version>${spring-version}</version> </dependency> </dependencies> ... </project> - Add the JMS and ActiveMQ dependencies. Look for the
dependencieselement in the POM file and add the followingdependencyelements:<project ...> ... <dependencies> ... <!-- Persistence artifacts --> <dependency> <groupId>org.apache.camel</groupId> <artifactId>camel-jms</artifactId> <version>${camel-version}</version> </dependency> <dependency> <groupId>org.apache.activemq</groupId> <artifactId>activemq-core</artifactId> <version>${activemq-version}</version> </dependency> <!-- This is needed by the camel-jms component --> <dependency> <groupId>org.apache.xbean</groupId> <artifactId>xbean-spring</artifactId> <version>${xbean-version}</version> </dependency> </dependencies> ... </project>
1.3.3. Configure a Transaction Manager and a Resource
Copy linkLink copied to clipboard!
Overview
Copy linkLink copied to clipboard!
The basic requirements for writing a transactional application in Spring are a transaction manager bean and a resource bean (or, in some cases, multiple resource beans). You can then use the transaction manager bean either to create a transactional Apache Camel component (see Section 5.2, “Demarcation by Transactional Endpoints”) or to mark a route as transactional, using the
transacted() Java DSL command (see Section 5.1, “Demarcation by Marking the Route”).
Steps
Copy linkLink copied to clipboard!
To configure the JMS transaction manager and the JMS resource, perform the following steps:
- Customize the Spring XML configuration. Using your favorite text editor, open the
tx-jms-router/src/main/resources/META-INF/spring/camel-context.xmlfile and add the following content to thebeanselement:<beans ... > ... <bean id="jmstx" class="org.apache.camel.component.jms.JmsComponent"> <property name="configuration" ref="jmsConfig" /> </bean> <bean id="jmsConfig" class="org.apache.camel.component.jms.JmsConfiguration"> <property name="connectionFactory" ref="jmsConnectionFactory"/> <property name="transactionManager" ref="jmsTransactionManager"/> <property name="transacted" value="true"/> </bean> <bean id="jmsTransactionManager" class="org.springframework.jms.connection.JmsTransactionManager"> <property name="connectionFactory" ref="jmsConnectionFactory" /> </bean> <bean id="jmsConnectionFactory" class="org.apache.activemq.ActiveMQConnectionFactory"> <property name="brokerURL" value="vm://broker1?brokerConfig=xbean:tutorial/activemq.xml"/> </bean> </beans>This configuration creates a custom JMS component, with bean ID equal tojmstx, that you can use to define transactional JMS endpoints in your routes. The underlying JMS system is an embedded Apache ActiveMQ broker, which takes its configuration from the file,tutorial/activemq.xml. - Create the ActiveMQ configuration file,
activemq.xml. First create the new directory,tx-jms-router/src/main/resources/tutorial. Next, using your favorite text editor, create the file,activemq.xml, under thetutorialdirectory, and add the following text:<?xml version="1.0" encoding="UTF-8"?> <beans> <bean class="org.springframework.beans.factory.config.PropertyPlaceholderConfigurer"/> <broker useJmx="true" xmlns="http://activemq.org/config/1.0" persistent="false" brokerName="broker1"> <transportConnectors> <transportConnector name="openwire" uri="tcp://localhost:61616"/> </transportConnectors> </broker> </beans>
1.3.4. Define a Route
Copy linkLink copied to clipboard!
Overview
Copy linkLink copied to clipboard!
With the transactional JMS component,
jmstx, you can define a transactional route written in Java DSL.
Note
It is also possible to define the route using Spring XML syntax.
Steps
Copy linkLink copied to clipboard!
To define a route using the transactional JMS component,
jmstx, perform the following steps:
- Define a route in the Java domain specific language (DSL). Using your favorite text editor, open the file,
tx-jms-router/src/main/java/tutorial/MyRouteBuilder.java. Edit the body of theMyRouteBuilder.configure()method, discarding the existing route and replacing it with the following code:public class MyRouteBuilder extends SpringRouteBuilder { ... public void configure() { from("file:src/data?noop=true") .convertBodyTo(String.class) .to("jmstx:queue:giro"); from("jmstx:queue:giro") .to("jmstx:queue:credits") .to("jmstx:queue:debits") .process(new Processor() { public void process(Exchange exchange) throws Exception { // should be printed n times due to redeliveries System.out.println("exchange = " + exchange); // force rollback throw new Exception("test"); } }); } ... } - Near the top of the
MyRouteBuilder.javafile, add the requisite import statements, as follows:// Java ... import org.apache.camel.Processor; import org.apache.camel.Exchange; ...
1.3.5. Build and Run the Example
Copy linkLink copied to clipboard!
Overview
Copy linkLink copied to clipboard!
After building and running the example using Maven, you can use JMX to examine what has happened to the JMS queues involved in the application.
Steps
Copy linkLink copied to clipboard!
To build and run the transactional JMS example, perform the following steps:
- To build the example, open a command prompt, change directory to
tx-jms-router, and enter the following Maven command:mvn installIf the build is successful, you should see the file,tx-jms-router-1.0-SNAPSHOT.jar, appear under thetx-jms-router/targetdirectory. - To run the example using the
camel-maven-plugin, enter the following Maven command:mvn camel:runIf all goes well, you should see about a dozen occurrences ofjava.lang.Exception: testscrolling past, before activity in the console window comes to a halt. Do not kill the running application at this point!NoteBut make sure that the exceptions you are seeing in the console do not indicate a failure to download and install thecamel-maven-plugin. Normally, the plug-in should download and install without any problems, because the generated POM file,tx-jms-router/pom.xml, contains all of the requisite settings. - What happened? The series of runtime exceptions thrown by the application is exactly what we expect to happen, because the route is programmed to throw an exception every time an exchange is processed by the route. The purpose of throwing the exception is to trigger a transaction rollback, causing the current exchange to be un-enqueued from the
queue:creditandqueue:debitqueues.To gain a better insight into what occurred, open a JMX console and point it at the ActiveMQ broker. Open a new command prompt and enter the following command:jconsoleNoteThejconsoleutility is a standard tool provided with Sun's J2SE distribution (JDK). - To open a JMX connection to the ActiveMQ broker (which is embedded in the running example application), click on the Remote tab of the JConsole: Connect to Agent dialog and enter the Port number, 1099 (the default JMX port for ActiveMQ). Click Connect.
 NoteIt is possible to customize the JMX port used by ActiveMQ. See http://activemq.apache.org/jmx.html for details.
 - If the connection succeeds, the JConsole window shows you a summary of the Virtual Machine (VM) instance that you are connected to. Click the MBeans tab and drill down to the
giroqueue, inTree/org.apache.activemq/broker1/Queue.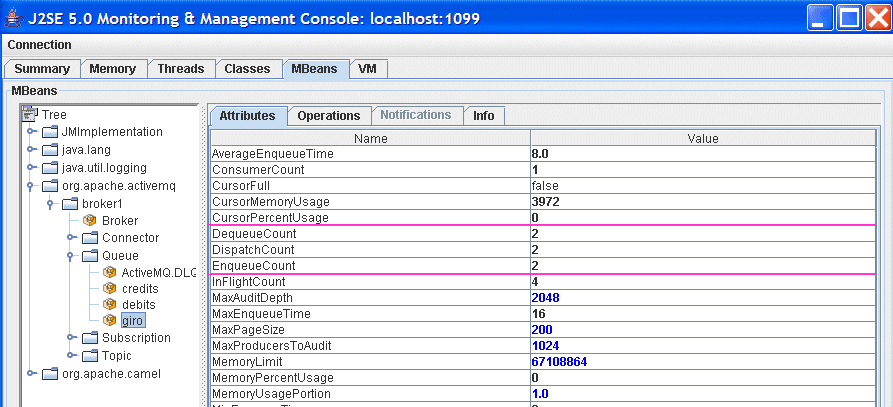 Notice that the
EnqueueCount,DispatchCount, andDequeueCountforgiroare all equal to 2, which indicates that two messages entered the queue and two messages were pulled off the queue. - Click on the
debitsqueue. Notice that theEnqueueCount,DispatchCount, andDequeueCountfordebitsare all equal to 0. This is because thetestexception caused the enqueued message to be rolled back each time an exchange passed through the route. The same thing happened to thecreditsqueue. - Click on the
ActiveMQ.DLQqueue. TheDLQpart of this name stands for Dead Letter Queue and it is an integral part of the way ActiveMQ deals with failed message dispatches. In summary, the default behavior of ActiveMQ when it fails to dispatch a message (that is, when an exception reaches the JMS consumer endpoint,jmstx:queue:giro), is as follows:- The consumer endpoint attempts to redeliver the message. Redelivery attempts can be repeated up to a configurable maximum number of times.
- If the redeliveries limit is exceeded, the consumer endpoint gives up trying to deliver the message and enqueues it on the dead letter queue instead (by default,
ActiveMQ.DLQ).
You can see from the status of theActiveMQ.DLQqueue that the number of enqueued messages,EnqueueCount, is equal to 2. This is where the failed messages have ended up. - You can now kill the example application by typing Ctrl-C in its command window.