6. Configuring Agents
The agent can be configured and managed through the agent prompt, which is opened through the
rhq-agent.sh script.
6.1. Registering and Re-registering the Agent
When an agent registers with the JBoss ON server, the agent name is used as a unique resource key to identify the agent. In addition, the server generates a random string which it sends to the agent to use as a registration token or security token.
6.1.1. About the Security Token and Agent Registration
When the JBoss ON agent starts up, it registers with the JBoss ON server and sends the server its information. The JBoss ON server creates an entry based on the given agent name, IP address, and port number.
The JBoss ON server also creates a randomly-generated string, a security token, which is also associated with the agent name and with the IP address and port number pair.
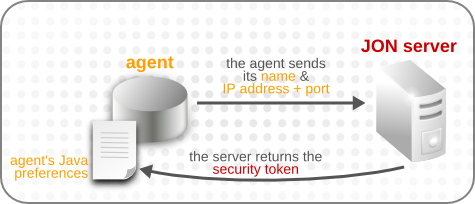
Figure 4. Agent Registration
The agent sends its security token to the server when it restarts as a form of pseudo-authentication. The JBoss ON server uses the unique resource key (the agent's name) and its security token as a way to verify the agent identity.
The JBoss ON server associates the agent name and its security token every time the agent starts up and registers with the server. If the agent-supplied information does not match the information that the JBoss ON server has for that agent, then it rejects the agent's connection attempt.
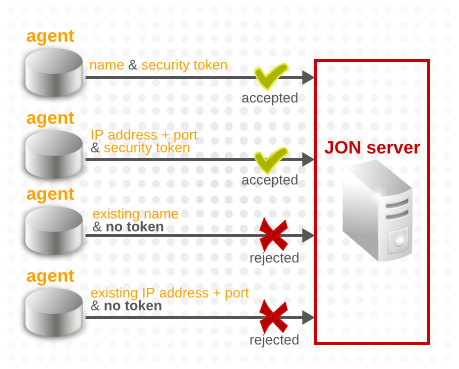
Figure 5. Different Agent Connection Attempts
That means that there are a few rules about when the JBoss ON server will accept changes to the agent's registration information:
- An agent cannot register with an existing agent name without the corresponding security token.To register an agent with an existing agent name, you must first install the corresponding security token, as described in Section 6.1.2, “Re-installing a Lost Security Token”.
- An agent cannot register with an existing IP address/port combination without having the corresponding security token and using the original agent name.This essentially means that you cannot rename an agent. If an agent is registered with an existing IP address/port combination, then both the original security token and the original name must also be used. This re-establishes the original identity of the agent and prevents one agent from effectively stealing the identity of another agent.
- An agent can register with an existing name and a new IP address/port combination if it has the security token which corresponds to that agent name.While the agent name cannot be changed during re-registration, the agent IP address, the agent port, or both can be changed. This is a common and useful scenario in cloud, virtual, or DHCP environments where an existing agent needs to re-register with a new IP address or port.
Note
The security token is stored in the agent's Java preferences. This security token persists even if the agent is restarted, is uninstalled, or has its configuration wiped with
--cleanconfig. This allows the agent to re-register easily.
6.1.2. Re-installing a Lost Security Token
- Stop the agent.
- Log into the web UI as a user with manage security permissions.
- Click the Administration tab and select the Agents link under the Topology section on the left.
- Select the agent from the list, and click its name to open its details page.

- Copy the security token.
- Restart the agent, and use the
-Doption to set therhq.agent.security-tokenproperty to the security token.agentRoot/rhq-agent/bin/rhq-agent.sh -Drhq.agent.security-token=abcd1234
6.2. Working with the Agent Command Prompt
When the agent is started in a terminal, then (along with starting the agent process) the script starts the agent command prompt. The agent prompt can be used to managed the agent by checking configuration, executing some tasks, or editing the agent setup.
6.2.1. Opening the Agent Command Prompt
The agent command prompt opens when the agent start script is run. If the agent is already running, then the command prompt can be opened by itself, without attempting to start the agent, by using the
--nostart option.
$ rhq-agent.sh --nostart
6.2.2. Agent Start Options
Some agent management can be performed by passing options with the
rhq-agent.sh start script; these mainly relate to passing persistent configuration options to the server by loading external preferences through input files or passed parameters. These options are listed in Table 13, “Options for the rhq-agent.sh Script”.
| Short Argument | Long Argument | Description |
|---|---|---|
| -a | --advanced | Runs the agent script in setup mode, rather than basic start mode. |
| -c | --config=filename | Specifies an agent configuration preferences file on filesystem or classpath. |
| -d | --daemon | Runs the agent in daemon mode, which means it will not read additional commands from stdin. |
| -Dname[=value] | Overrides an agent configuration preference and sets a system property. | |
| -e | --console=type | Specifies the implementation to use when reading console input. The three available values are jline, sigar, and java. |
| -h | --help | Opens the help message. |
| -i | --input=filename | Specifies a script file to use for input. |
| -l | --cleanconfig | Clears out any existing configuration and data files so the agent starts with blank configuration, with the exception of the agent security token, which is preserved. |
| -L | --fullcleanconfig | Clears out any existing configuration and data files so the agent starts with a totally clean slate, including purging the security token. |
| -n | --nostart | Runs the agent script without starting the agent process. |
| -o | --output=filename | Specifies a file to write all output from the script, excluding log messages (which are always written to the agent logs). |
| -p | --pref=preferences_name | Specifies the agent preferences name used to identify what configuration to use. |
| -s | --setup | Forces the agent to ask setup questions. |
| -t | --nonative | Forces the agent to disable the native system. |
| -u | --purgedata | Purges persistent inventory and other data files. |
| -- | Stops the agent from processing options. |
6.2.3. Agent Prompt Commands
The agent processes prompt commands that are passed to it, either interactively through the agent prompt or from an input file that can be passed when the start script is launched. Agent prompt commands (listed in Table 14, “Agent Prompt Commands”) can be used to manage resource (by checking availability, running discovery, or checking monitoring information) or to manage the agent itself (such as registering with a server, loading plug-ins, or viewing or reloading configuration settings).
| Prompt Command | Description |
|---|---|
|
avail
|
Provides availability of inventoried resources.
|
|
config
|
Manages the agent configuration.
|
|
debug
|
Provides features to help debug the agent.
|
|
discovery
|
Asks a plug-in to run a server scan discovery.
|
|
download
|
Downloads a file from the JBoss ON server.
|
|
dumpspool
|
Shows the entries found in the command spool file.
|
|
exit
|
Shuts down the agent's communications services and kills the agent.
|
|
failover
|
Shows or updates the high availability server failover list.
|
|
gc
|
Helps free up memory by invoking the garbage collector.
|
|
getconfig
|
Displays one, several or all agent configuration preferences.
|
|
help
|
Shows help for a given command.
|
|
identify
|
Asks to identify a remote server.
|
|
inventory
|
Provides information about the current inventory of resources.
|
|
log
|
Configures some settings for the log messages.
|
|
metrics
|
Shows the agent metrics.
|
|
native
|
Accesses native system information.
|
|
pc
|
Starts and stops the plug-in container and all deployed plug-ins.
|
|
ping
|
Pings the JBoss ON server.
|
|
piql
|
Executes a PIQL query to search for running processes.
|
|
plugins
|
Updates the agent plug-ins with the latest versions from the server.
|
|
quit
|
Exits the agent prompt (without stopping the agent).
|
|
register
|
Registers this agent with the JBoss ON server.
|
|
schedules
|
Retrieves measurement schedule information for the specified resource.
|
|
sender
|
Controls the command sender to start or stop sending commands.
|
|
setconfig
|
Sets an agent configuration preference.
|
|
setup
|
Sets up the agent configuration by asking a series of questions.
|
|
shutdown
|
Shuts down all communications services without killing the agent.
|
|
sleep
|
Puts the agent prompt to sleep for a given amount of seconds.
|
|
start
|
Starts the agent comm services so it can accept remote requests.
|
|
timer
|
Times how long it takes to execute another prompt command.
|
|
update
|
Provides agent update functionality.
|
|
version
|
Shows the agent version information.
|
6.3. Running the Agent as a Non-Root User
To access some resource information, the agent must have root access to the resource itself. However, for security, many administrators do not want to run the agent process as root.
On Red Hat Enterprise Linux, it is possible to grant access to the agent to specific resources while running the agent as a non-root user. This is done by setting local access control rules to the local directories or files for the resource.
Note
This example sets ACLs for a PostgreSQL database; the directories and files to specify in the
setfacl command will vary depending on the resource type.
- Log into the system as root.
- Make sure that the acl package is installed on the system.
# rpm -q acl
acl-2.2.39-6.el5
Theacloption must be applied to the filesystem. This can be done by editing the/etc/fstabfile or usingtune2fs. For example:# vim /etc/fstab LABEL=/ / ext3 defaults
,acl1 1 ...Then re-mount the filesystem.# mount -o remount /
- Optionally, create a system user to use for the agent.
useradd jonagent
- For PostgreSQL, the agent needs to be able to access the
postgresql.conffile. Open the PostgreSQL directory:# cd /var/lib/pgsql
- Grant read and write access to the
postgresql.conffile to the agent user. For example:# setfacl -m u:jonagent:rw $PGDATA/postgresql.conf
- Then, grant access to the
data/directory to the agent user. For example:# setfacl -m u:jonagent:x $PGDATA
- Check that the new ACLs were added properly using the
getfaclcommand:# getfacl . # file: . # owner: postgres # group: postgres user::rwx user:jonagent:--x group::--- mask::--x other::---
6.4. Enabling Debug Mode for the Agent
The JBoss ON agent, like the JBoss ON server, uses
log4j for its logging. To troubleshoot agent performance or server-agent communication, enable debug logging for the agent, which enables the log4j debug log.
The log files are in the
agentRoot/rhq-agent/logs directory.
6.4.1. Using an Environment Variable
The quickest way to enable debug logging is to set the
RHQ_AGENT_DEBUG environment variable to any value before starting the agent. When you start the agent, both the launcher scripts and the agent itself will output debug messages.
If the JBoss ON agent is running on Microsoft Windows using the service wrapper, set
RHQ_AGENT_DEBUG and then install the service:
rhq-agent-wrapper.bat install
6.4.2. Setting log4j Priorities
log4j categories support priorities for logging levels. This means that different areas of the agent can be configured for different log levels.
Note
Do not set the
RHQ_AGENT_DEBUG environment variable if you are setting priorities in the log4j.xml file. The environment variable overrides this log4j.xml configuration.
To enable debug logging for a category, change the priority value to
DEBUG:
- Open the agent
log4jfile:# vim agentRoot/rhq-agent/conf/log4j.xml
- Reset the
priorityelement for the category. By default, the agent configuration has logging for both incoming and outgoing server-agent communication and for the baseorg.rhqclass. Optionally, logging can be enabled for plug-in class loaders and JBoss remoting communication.<!-- ================ --> <!-- Limit categories --> <!-- ================ --> <!-- RHQ --> <category name="org.rhq"> <priority value="INFO"/> </category> <!-- RHQ outgoing command tracing - set to TRACE to trace commands sent by the agent --> <category name="org.rhq.enterprise.communications.command.client.OutgoingCommandTrace"> <priority value="NONE"/> <appender-ref ref="COMMANDTRACE"/> </category> ... - Restart the agent to load the new configuration.
The
log4j file format is described more in the Apache log4j documentation.
6.4.3. Using the Agent debug Prompt Command
Debug logging can be enabled using the
debug command in the agent command prompt (Section 6.2.1, “Opening the Agent Command Prompt”).
Using the
--enable option enables the log4j debug log.
> debug --enable
log4j:WARN No appenders could be found for logger (org.rhq.core.pc.measurement.MeasurementCollectorRunner).
log4j:WARN Please initialize the log4j system properly.
Switched to log file [log4j-debug.xml]. Root log level is [DEBUG]
started>
To enable debug logging specifically for server-agent communication layers, set the
--comm option to true.
> debug --comm=true
Agent-server communications tracing has been enabled.
You may set the following, additional configuration settings
to collect more detailed trace data. You can set these
using the setconfig prompt command. Please refer to the
documentation for more information on these settings. The
values you see here are the current settings:
   rhq.trace-command-config=true
   rhq.trace-command-response-results=256
   rhq.trace-command-size-threshold=99999
   rhq.trace-command-response-size-threshold=99999
The
debug command can also be used to check all of the agent threads, to the server and to the system management handlers, using the --threaddump option. This prints the information for each thread, whether the thread is running or any errors that the agent is encountering, per thread. For example:
> debug --threaddump
"DestroyJavaVM" Id=47 RUNNABLE


"RHQ Agent Prompt Input Thread" Id=46 RUNNABLE


"EventManager.sender-2" Id=49 TIMED_WAITING on java.util.concurrent.locks.AbstractQueuedSynchronizer$ConditionObject@17d7c01
        at sun.misc.Unsafe.park(Native Method)
        -  waiting on java.util.concurrent.locks.AbstractQueuedSynchronizer$ConditionObject@17d7c01
        at java.util.concurrent.locks.LockSupport.parkNanos(LockSupport.java:226)
        at java.util.concurrent.locks.AbstractQueuedSynchronizer$ConditionObject.awaitNanos(AbstractQueuedSynchronizer.java:2081)
        at java.util.concurrent.DelayQueue.take(DelayQueue.java:193)
        at java.util.concurrent.ScheduledThreadPoolExecutor$DelayedWorkQueue.take(ScheduledThreadPoolExecutor.java:688)
        at java.util.concurrent.ScheduledThreadPoolExecutor$DelayedWorkQueue.take(ScheduledThreadPoolExecutor.java:681)
        at java.util.concurrent.ThreadPoolExecutor.getTask(ThreadPoolExecutor.java:1043)
        at java.util.concurrent.ThreadPoolExecutor.runWorker(ThreadPoolExecutor.java:1103)
	...
6.5. Changing the Agent IP Address
The agent IP address is set in the
rhq.communications.connector.bind-address configuration preference. This is the IP address the agent binds to when it starts its server socket, meaning this is the site that the agent uses to listen for incoming messages from the server.
Note
Do not attempt to edit the
agent-configuration.xml file. The agent does not use this file once the initial setup is complete, so any changes to this file aren't loaded automatically by the agent.
- Open the agent prompt. For example, if the agent process is already running, the prompt can be opened by re-running the
rhq-agent.shscript with the-noption.agentRoot/rhq-agent/bin/rhq-agent.sh -n
- Send the
setconfigwith therhq.communications.connector.bind-addressconfiguration preference and new value.> setconfig rhq.communications.connector.bind-address=1.2.3.4
- Restart the agent process to load the new configuration.
agentRoot/rhq-agent/bin/rhq-agent-wrapper.sh stop

agentRoot/rhq-agent/bin/rhq-agent.sh
6.6. Managing the Agent as a Resource
The agent can be added as a resource to the JBoss ON inventory, so its behavior and metrics can be monitored to ensure that it is working properly and it can have alerts and operations launched, as with any other resource.
Important
If the agent is shut down, the JBoss ON GUI cannot be used to restart it because there is no active agent available to issue the start command. To restart the agent, use the restart operation on the agent's child resource of the launcher script, rather than the agent resource itself.
The shutdown operation kills the agent process if it is running as a daemon. If the agent is running as a command prompt, the shutdown operation stops the agent but not the JVM, so that prompt commands can still be run through the agent command prompt.
When the agent is imported into the inventory, several child resources are automatically added as well. These are listed in Table 15, “Agent Child Resources”.
| Child Resource | Description |
|---|---|
| The agent itself | Provides monitoring, configuration, and control functionality for the agent and its internal components. These configuration settings correspond to the preferences defined in the agent-configuration.xml file and are persisted on the agent machine as Java preferences.
Important
The operations for the agent resource normally do not affect the agent process directory. These do not provide control over the JVM settings or process or the JRE options. Controlling the JVM is done through the agent child resources, not the agent resource.
|
| Agent measurement subsystem | Provides data on the measurement collection and reporting components in the agent. |
| Agent JVM | Provides fine-grained monitoring and management of the JVM that is running the agent and all its plugins, which includes the classloader, threading and memory management subsystems, among others. This is a child server. |
| Agent environment setup script | Configured environment variables that server set when the agent launcher script is started. |
| Agent plug-in container | Provides a view into the embedded plug-in container and gives management data related directly to the plug-in container. The plug-in container runs within the agent and handles the deployment of all management plug-ins and infrastructure necessary to run those plug-ins. |
| Java service wrapper launcher (Windows) | Controls the Java service wrapper. This is a third-party library that installs and runs the agent as a Windows service. There is one primary configuration file for the Java service wrapper, the read-only rhq-agent-wrapper.conf file. This defines the base set of configuration settings necessary for the agent to start and operate properly. Two additional groups of configuration settings can customize the agent's environment. The Environment group defines environment variables that are used by the main configuration in addition to the environment variables defined by the common Environment Setup Script. The Includes group defines any of the wrapper configuration settings. These groups should almost never be edited except to configure debugging or to pass new JVM options to the agent JVM. |
| Agent launcher script (UNIX) | Controls the agent. If the agent is running as a background daemon process that was spawned by the launcher script, the launcher script stops or restarts it. There is no additional configuration. The launcher script is configured by the Environment Setup Script. |
6.7. Configuring Agent Update Settings
The JBoss ON server configuration defines two settings for how the server sends updates to the JBoss ON agents. One setting sets how long the server waits to hear from the agent before it considers that the agent is down. The second enables automatic updates for agent configuration.
- Click the Administration tab in the top menu.

- In the menu table on the left, select the item.
- Scroll to the JON General Configuration Properties section in the main work area.

- Change the agent settings:
- Agent Max Quiet Time Allowed sets the longest interval that the server waits for agent availability reports before marking the agent as down.
- Enable Agent Auto-Updates sets whether the agent is allowed to check, itself, for updates to configuration or new agent JAR files.
6.8. Managing the Agent's Persisted Configuration
The agent uses Java preferences in the Java platform to store its configuration. Java preferences in general are described in the Java documentation at http://download.oracle.com/javase/1.5.0/docs/guide/preferences/index.html. JBoss ON stores user preferences in the backing store's root node.
The location of the backing store depends on the system:
- On Windows, the backing store is located in the Windows registry.
- On Linux and Unix systems, the backing store is in the agent user's home directory, in
~/.java.Important
The agent's configuration is determined by what user is running the agent. If the agent is run as one user and then later run as another user, the agent will have a different configuration that second time because it will use a different backing store for its configuration settings.For example, if the agent is configured by a system user namedjsmith, its persisted configuration is in~jsmith/.java. If the agent is then configured to run as a background service as the root user, the agent looks for its configuration in~root/.java, and it finds different configuration settings.This means that if one user is used to configure the agent when it is installed, that same user must be used to run the agent subsequently, or the agent will apparently lose its configuration and need to be reconfigured under the new user.
The agent gets the configuration that it uses to run from its backing store. It only reads configuration settings from the
agent-configuration.xml file when the agent needs to initialize its backing store, either at its first configuration or if the agent was started with --cleanconfig and fresh configuration settings should be loaded.
6.8.1. Viewing the Persisted Configuration
Agent configuration is comprised of Java preferences, which are persisted for each JBoss ON user. The way that the configuration is persisted depends on the operating system; Windows stores the configuration in the registry, for example, while Unix keeps it in the user's home directory.
The agent configuration is loaded when it is first set up and then persisted in the database, with the exception of a few parameters which can be set and loaded through the
rhq-agent-env.sh file. The agent's persisted configuration can be viewed in several different ways:
- If the agent is in the JBoss ON inventory, then its complete configuration settings are visible through the Configuration tab, with collapsible tables that display each configuration area.
- The configuration can also be returned through the
getconfigorconfigprompt commands for the agent. These commands can be run through a terminal, if the agent is running through a command prompt, or through the Execute Command Prompt operation in the JBoss ON UI for the agent resource.>
getconfigrhq.agent.agent-update.enabled=true rhq.agent.client.command-preprocessors=org.rhq.enterprise.agent. SecurityTokenCommandPreprocessor: org.rhq.enterprise.agent. ExternalizableStrategyCommandPreprocessor rhq.agent.client.command-spool-file.compressed=true rhq.agent.client.command-spool-file.name=command-spool.dat rhq.agent.client.command-spool-file.params=10000000:75 rhq.agent.client.command-timeout-msecs=600000 rhq.agent.client.max-concurrent=5 rhq.agent.client.max-retries=10 rhq.agent.client.queue-size=50000 rhq.agent.client.queue-throttling=200:2000 rhq.agent.client.retry-interval-msecs=15000 rhq.agent.client.send-throttling=100:1000 rhq.agent.client.server-polling-interval-msecs=60000 rhq.agent.configuration-schema-version=5 rhq.agent.configuration-setup-flag=true rhq.agent.data-directory=data rhq.agent.disable-native-system=false rhq.agent.name=localhost.localdomain rhq.agent.plugins.directory=plugins ... - The agent configuration is persisted in Java preferences, so any tool which examines Java preferences can be used to view the persisted configuration.
Warning
Do not attempt to change the values of the preferences using third-party tools. Setting an agent preference to a bad value can completely disable the agent.
6.8.2. Changing Preferences in the Persisted Configuration (Agent Preferences)
The agent's configuration is initially read from
agent-configuration.xml and overlaid with the values entered at the setup prompts at start up. After the agent is initially configured, the agent persists that configuration and never refers to the agent-configuration.xml again, unless the configuration is purged and reloaded. Most configuration changes are made to the rhq-agent-env.sh file, which is loaded every time the agent starts.
It is possible to change the persisted configuration (without editing the configuration files) using the
setconfig command at the agent prompt.
- Open the agent prompt. For example, if the agent process is already running, the prompt can be opened by re-running the
rhq-agent.shscript with the-noption.agentRoot/rhq-agent/bin/rhq-agent.sh -n
- Send the
setconfigwith the name of the preference to edit and its new value. The preference name is whatever the entry name is in theagent-configuration.xmlfile. For example:> setconfig rhq.agent.client.max-concurrent=20
- Restart the agent process to load the new configuration.
agentRoot/rhq-agent/bin/rhq-agent-wrapper.sh stop

agentRoot/rhq-agent/bin/rhq-agent.sh
6.8.3. Overriding Persisted Configuration Settings
The settings in the Java backing store and in the
agent-configuration.xml file for the agent can be overridden using the -D option, the configuration parameter name, and the new value when the agent is started.
For example, to set a temporary value for how long the agent waits at startup to detect the JBoss ON server (
rhq.agent.wait-for-server-at-startup-msecs), pass this argument with the start command:
agentRoot/rhq-agent/bin/rhq-agent.sh -Drhq.agent.wait-for-server-at-startup-msecs=90000
6.9. Managing the Agent JVM
6.9.1. Setting Options for the Agent JVM
The agent runs in a Java Virtual Machine, and aspects of its behavior can be defined in the
rhq-agent-env.sh file and passed to the JVM.
There are two arguments that set JVM options:
RHQ_AGENT_JAVA_OPTSresets the any of the default JVM settings.RHQ_AGENT_ADDITIONAL_JAVA_OPTSadds JVM settings without changing any of the default settings.
For more information on JVM settings, see http://java.sun.com/javase/technologies/hotspot/vmoptions.jsp and other Sun JVM documentation.
Note
Restart the agent after making changes to the JVM settings to load the new settings.
6.9.2. Setting the Agent JVM Memory Size
When an agent manages a large number of resources, it can begin running out of memory with the default settings of its JVM. This can cause errors like memory has crossed the threshold and is low to be recorded in the agent log, and the agent is automatically rebooted. This is usually caused by the agent's heap size begin set too low, but it can also be related to a low perm gen size.
To change the agent's memory settings, use the
RHQ_AGENT_JAVA_OPTS in the rhq-agent-env.sh file to set the appropriate JVM settings.
- Stop the agent.
- Open the
rhq-agent-env.shfile.vim agentRoot/rhq-agent/bin/rhq-agent-env.sh
- Uncomment the
RHQ_AGENT_JAVA_OPTSline, and set the-Xmsand-Xmxparameters to set the minimum and maximum bounds of the heap size for the agent JVM.RHQ_AGENT_JAVA_OPTS="-Xms1024m -Xmx1024m -XX:PermSize=256M -XX:MaxPermSize=256M -Djava.net.preferIPv4Stack=true"
- Optionally, use
-XX:PermSizeand-XX:MaxPermSizeto set the perm gen size. - Restart the agent.
agentRoot/rhq-agent/bin/rhq-agent.sh
6.10. Setting Discovery Scan Intervals
The agent scans a platform routinely to look for new servers or services to add to the discovery queue and, subsequently, to inventory. There are two parameters which set scan intervals:
- The scan interval for servers, set in the
rhq.agent.plugins.server-discovery.period-secs. The default is 900 seconds (15 minutes). - The scan interval for services, set in the
rhq.agent.plugins.service-discovery.period-secs. The default is 86400 seconds (24 hours).
These are set in the
agent-configuration.xml file, so the configuration must be cleanly reloaded before the changes take effect.
- Stop the agent.
- Open the
agent-configuration.xmlfile.vim agentRoot/rhq-agent/conf/agent-configuration.xml
- Uncomment the scan interval entry keys and set the new values.
<entry key="rhq.agent.plugins.server-discovery.period-secs" value="600"/>

<entry key="rhq.agent.plugins.service-discovery.period-secs" value="1440"/>
- Start the agent with the
--cleanconfigoption to reload the configuration from theagent-configuration.xmlfile.agentRoot/rhq-agent/bin/rhq-agent.sh --cleanconfig
6.11. Viewing the Server Failover Lists for Agents
JBoss ON agents are automatically included in high availability in order to assign them to servers for management. Agent-server preferences are assigned through affinity groups (Section 4.4.2, “Creating Affinity Groups”). The agent high availability settings show its affinity groups, the server currently managing it, and any servers available for failover.
The first server that an agent contacts is defined in its
agent-configuration.xml file, and that is the server that the agent sends its initial registration request. After registration, the agent joins the high availability cloud, and it sends its updates — monitoring information, resource changes — to any server in the cloud. At registration, the agent gets its first affinity group assignment. If its primary server is different than its registration server, then the agent switches communication over to the primary server.
The high availability server cloud helps define the relationships between servers and agents once the agent is running normally.
The group of servers that an agent sends updates to can be loosely restricted by defining an affinity group. The affinity group creates a list of servers that the agent prefers to access. This list is ordered; the first server entry is the primary server that the agent connects to. If that primary server is unavailable, then the agent cycles through the other servers in the list in order. This allows the agent to connect to defined servers in the high availability cloud gracefully and automatically, without interrupting JBoss ON performance.
If the agent cannot connect to any server in the failover list, then the agent temporarily stops communication and spools its messages. After a period of time, it will run through the failover list again, beginning with its primary server.
An agent always try to ensure that it is connected to its primary server. Once an hour, by default, it checks its connection to verify that the server it is using is its primary server. If it is not, then the agent tries to reconnect to its primary server.
The actual failover list for an agent is generated by the server and edited in the affinity group configuration for the server. Any changes to the affinity group, like new servers or agents, changed server priority, or new group assignments, are sent to the agent hourly when the agent polls the server for configuration changes.
To view the agent's failover list from the agent command prompt:
> failover --list localhost.localdomain:7080/7443 server2.example.com:7080/7443 1.2.34.56:7080/7443
To view the failover list from the UI:
- Click the Administration tab in the top menu.
- In the menu, select the item.
- The agent high availability page shows information about the agents, including three things that are relevant for high availability:
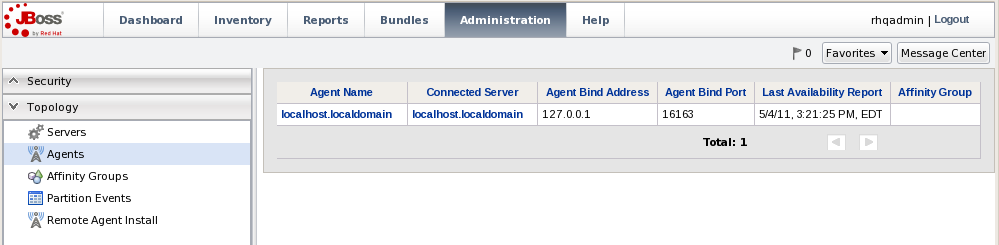
- The JBoss ON server that the agent is currently connected to (or the one it was most recently connected to).
- The time that the last agent availability report was sent to the server.
- The affinity group that the agent is assigned to.
- Click the name of the agent. This opens the agent's server failover list. The first server listed is the primary server for the agent; all other servers are available in the high availability cloud. The connected server is usually also the primary server, unless the primary is offline.

6.12. Setting the Agent to Detect or Poll the Server
The agent has to stay in contact with a JBoss ON server. This can either be done by using multicast detection to monitor when its primary JBoss ON server comes online or goes offline or by simply polling the JBoss ON server at intervals to see if the server is online.
These polling methods aren't exclusive; they can both be set, so that the agent can use whatever method is convenient or available to poll the server.
Polling the server allows the agent to stop sending commands and data to the server if the server goes offline and then to resume automatically when the server is back online. If server polling is not enabled on the agent, then the agent always assumes that the server is online and sends its information to the server. If the server goes down, then the agent records repeated connection refused errors, which (if the server is down for a long time) can make the agent log grow very large.
6.12.1. Settings for Polling the JBoss ON Server
The simplest configuration is to set a polling interval for the agent. With this method, the agent simply pings the server at the predefined interval.
- Open the agent prompt. For example, if the agent process is already running, the prompt can be opened by re-running the
rhq-agent.shscript with the-noption.agentRoot/rhq-agent/bin/rhq-agent.sh -n
- Send the
setconfigwith therhq.agent.client.server-polling-interval-msecssetting and a value (in milliseconds). Setting this value to zero (0) or a negative number disables server polling.> setconfig rhq.agent.client.server-polling-interval-msecs=500
- Restart the agent process to load the new configuration.
agentRoot/rhq-agent/bin/rhq-agent-wrapper.sh stop

agentRoot/rhq-agent/bin/rhq-agent.sh
6.12.2. Setting up Multicast Detection
Multicast detection uses JBoss's Remoting framework, which allows the agent to detect whenever a server comes on or goes off line within a few seconds. Using the Remoting framework requires support for multicast traffic; otherwise, the agent cannot detect the server. This has more configuration parameters than simple polling:
- Setting to enable both server detection and multicast traffic (
rhq.agent.server-auto-detectionandrhq.communications.multicast-detector.enabled, respectively). - A wait interval between server communications (
rhq.communications.multicast-detector.default-time-delay); if the server is silent longer than that interval, then the server is considered offline. - Await, or heartbeat, interval for the agent's own messages (
rhq.communications.multicast-detector.heartbeat-time-delay). This value must be shorter than the JBoss ON server's heartbeat interval (rhq.communications.multicast-detector.default-time-delay), or it results in unnecessary messages and network traffic.
To enable multicast detection:
- Open the agent prompt. For example, if the agent process is already running, the prompt can be opened by re-running the
rhq-agent.shscript with the-noption.agentRoot/rhq-agent/bin/rhq-agent.sh -n
- Send the
setconfigwith the multicast settings. The time-delay values are in milliseconds.> setconfig rhq.agent.server-auto-detection=true > setconfig rhq.communications.multicast-detector.enabled=true > setconfig rhq.communications.multicast-detector.default-time-delay=75000 > setconfig rhq.communications.multicast-detector.heartbeat-time-delay=60000
- Restart the agent process to load the new configuration.
agentRoot/rhq-agent/bin/rhq-agent-wrapper.sh stop

agentRoot/rhq-agent/bin/rhq-agent.sh
6.13. Throttling the Agent
Some agent settings control how many resources the agent can access and how many tasks it can perform at one time. Throttling the agent has a twofold purpose: it limits how many resources on its host it can monopolize (which can improve performance on the host machine) and it keeps the agent from flooding the server with data and overloading or monopolizing the server.
Several different settings (listed in Table 16, “Agent Parameters for Throttling Agent Operations”) can be used to throttle different aspects of the agent performance. These settings operate independently of each other, but they can be more effective when the settings are made after considering the other values. For example, the queue size should be set larger then the command timeout period, unless the max-concurrent setting is increased. Changing one of these values has a different effect than adjusting all of these values.
| Parameter | Description |
|---|---|
| rhq.agent.client.queue-size | Sets the maximum number of commands the agent can queue up for sending to the JBoss ON server. The larger the number, the more memory the agent can use, and setting this to zero (0) means the queue size is unlimited. Setting this to 0 could allow the agent to queue up more commands than the machine has memory for, if the server goes offline for a long time. |
| rhq.agent.client.max-concurrent | Sets the maximum number of messages the agent can send to the server at any one time. A larger number allows the agent to process its queue more quickly, but this can also set the agent to use more CPU cycles. |
| rhq.agent.client.command-timeout-msecs | Sets the amount of time the agent waits for a reply from the JBoss ON server for an agent command before it aborts the command. A long interval can give the server the time it needs to complete some commands, but it also means that other messages are queued up waiting to be processed. |
| rhq.agent.client.retry-interval-msecs | Sets the time that the agent waits before retrying a command. Only commands with the guaranteed delivery tag are retried. |
| rhq.agent.client.send-throttling |
Sets a limit on the number of commands than an agent can send before it enters a quiet period, when the agent suspends sending commands. This setting only affects commands which can be throttled, which are commands that are sent to the server frequently and in large numbers, such as metric collection. Send-throttling prevents messages storms to the server.
This parameter sets both the number of commands and the quiet period, in the form commands:timeout_milliseconds. For example,
50:10000 sets a limit of 50 commands and a quiet period of 10000 milliseconds.
|
| rhq.agent.client.queue-throttling |
Limits the amount of commands that can be dequeued in a given amount of time; this is the burst period. If more commands are attempted to be dequeued during the burst period than allowed, those dequeue requests are blocked until the next burst period begins.
As with send throttling, this parameter sets both the number of commands and the quiet period, in the form commands:timeout_milliseconds. For example,
50:10000 sets a limit of 50 commands and a quiet period of 10000 milliseconds.
Queue throttling prevents the agent from spinning the CPU by trying to process and send commands as fast as possible. Queue throttling is one way to reduce the amount of CPU required by the agent.
When setting the queue throttling value, be sure to set the queue size to a large enough value that the agent has room to queue up the additional commands.
|
6.14. Setting Guaranteed Delivery for Commands
Many commands, like pings between the agent and server, are not critical to JBoss ON functions. These are volatile commands. Volatile commands are sent once; if they fail, the failure is logged, the agent drops the command, and the next command is processed.
Critical commands, however, must be sent to the JBoss ON server and successfully processed. The agent must guarantee that these commands are delivered. These are guaranteed commands. The agent guarantees, as far as possible, that these commands reach the server (although outside events, such as a JVM crashing, can keep the commands from being sent). Guaranteed commands persist in a command spool file even if the agent shuts down, so that the next time the agent starts, it can be loaded and queued to be delivered to the server.
There are four parameters that are related to guaranteed delivery:
- A time interval that sets how frequently the agent should try to resend a failed command (
rhq.agent.client.retry-interval-msecs) - A filename for the spool file (
rhq.agent.client.command-spool-file.name) - A setting that configures the spool file (
rhq.agent.client.command-spool-file.params). This settings has the format max_file_size:purge_percentage. The file size is defined in bytes; once the file hits that file size, then a purge operation trims the file down to whatever the percentage is. So, if the file is set to be 100 KB (100000) and the purge percentage is 90, then the file is trimmed back to 90 KB after a purge operation. The purge operation first tries to compress unused space, and then begins purging commands, starting with the oldest. - An optional setting that allows the spool file to be compressed (
rhq.agent.client.command-spool-file.compressed). Compressing the spool file can reduce its size 30-40%, but in some corner cases, it can adversely affect agent performance (such as when the agent shuts down before all of the guaranteed commands have been sent).
Guaranteed delivery is configured by default, allowing both the agent to resend critical commands and to compress spool file.
rhq.agent.client.command-spool-file.compressed=true
rhq.agent.client.command-spool-file.name=command-spool.dat
rhq.agent.client.command-spool-file.params=10000000:75
rhq.agent.client.retry-interval-msecs=15000
To change any of the guaranteed delivery settings:
- Open the agent prompt. For example, if the agent process is already running, the prompt can be opened by re-running the
rhq-agent.shscript with the-noption.agentRoot/rhq-agent/bin/rhq-agent.sh -n
- Send the
setconfigwith the new guaranteed delivery settings.> setconfig rhq.agent.client.command-spool-file.compressed=true rhq.agent.client.command-spool-file.name=my-spool.dat rhq.agent.client.command-spool-file.params=25000000:67 rhq.agent.client.retry-interval-msecs=25000
- Restart the agent process to load the new configuration.
agentRoot/rhq-agent/bin/rhq-agent-wrapper.sh stop

agentRoot/rhq-agent/bin/rhq-agent.sh
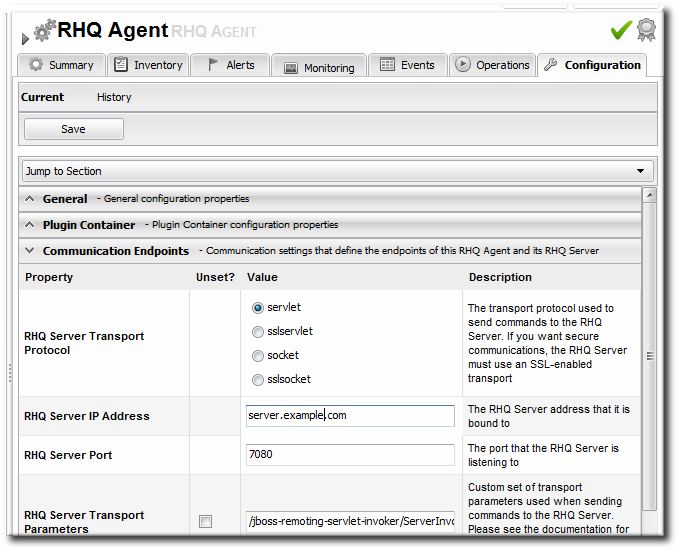
6.15. Configuring Agent Communication
Both the JBoss ON agent and server use the same underlying communications services. The types of connections used for agent-server communication are defined through agent preferences and can be edited by changing those preferences. The agent uses two settings for communications:
- A parameter which defines the protocol that the agent uses to talk to the server (
rhq.agent.server.transport) and any additional transport parameters (rhq.agent.server.transport-params) - A parameter which defines the protocol that the agent expects for incoming communications from the server (
rhq.communications.connector.transport) and then any optional transport parameters (rhq.communications.connector.transport-params)
Both JBoss ON servers and agents use communications layers that are build on the JBoss Remoting framework. Agents support four different transport types:
- servlet (only for agent to server communications)
- sslservlet
- socket (only for server to agent communications)
- sslsocket
Note
Unlike JBoss ON servers, JBoss ON agents do not host a servlet container. This means that servlets cannot be used for server-to-agent communications; these connections use sockets. Only agent-to-server connections use servlets.
The behavior of connections between agents and servers can be controlled by setting transport parameters. The connections between agents and servers are defined by strings which look, roughly, like URLs, with this basic format:
protocol://hostname:port/?param1=value¶m2=value
For example:
socket://server.example.com:16163/?serverBindAddress=127.0.0.1&serverBindPort=16163&numAcceptThreads=3&maxPoolSize=303&clientMaxPoolSize=304&socketTimeout=60000&enableTcpNoDelay=true&backlog=200
Both servers and agents have a
rhq.communications.connector.transport-params configuration settings which allows transport parameters to be set. These parameters are appended to the end of the URL and can configure both server-side and client-side behavior. For example, the backlog parameter is used by JBoss ON servers; with this URL, the server sets its backlog value to 200, but this setting is ignored by agents since they are clients. Likewise, the enableTcpNoDelay parameter is used by agents when they connect to servers, but is ignored by the servers themselves.
For more information on all available transport parameters, see the JBoss Remoting documentation at http://labs.jboss.com/portal/jbossremoting/docs/guide/ch05.html.