3. Writing Server-Side Plug-ins: Procedures
3.1. Writing Server-Side Plug-ins
Copy linkLink copied to clipboard!
Server-side plug-ins are highly flexible. While there are some categories that structure the behavior of server-side plug-ins (alerts, content, GUI), generic plug-ins can cover almost any server function.
Because of the flexibility of server-side plug-ins, there is no one way to write plug-ins. The outline of writing these plug-ins is simple:
- The example plug-ins are the sourceRoot
/etc/samples/custom-serverplugin/directory which can be used as a template for writing new plug-ins. Manually download the custom-serverplugin files to use as a template:http://git.fedorahosted.org/git/?p=rhq/rhq.git;a=tree;f=etc/samples/custom-serverplugin;hb=master - Identify the type of plug-in. Each server-side plug-in is managed by a higher level plug-in container, which correlates to the type or function of the plug-in.
- Optional. Write custom schema for the plug-in configuration.
- Create the directory for the custom plugin in the sourceRoot
/modules/enterprise/server/pluginsdirectory. For example:mkdir myPlugin cd myPlugin/ mkdir -p src/main/java/org/rhq/enterprise/server/plugins/myPlugin mkdir -p src/main/resources/META-INF - Copy the
pom.xmlfile from a similar existing plug-in to use for the Maven builds to package your new plug-in. For example:cp ../alert-email/pom.xml . - Edit the
pom.xmlfile so that its properties reflect the new plug-in.Note
Be sure to include the location of the parent repositories used by server-side plug-ins, which are inhttps://repository.jboss.org/nexus/content/groups/public/org/rhq/rhq-enterprise-server-plugins-parent/. For example:<repositories> <repository> <snapshots> <enabled>true</enabled> </snapshots> <id>jboss</id> <name>JBoss Repository</name> <url>https://repository.jboss.org/nexus/content/groups/public/org/rhq/rhq-enterprise-server-plugins-parent/</url> </repository> ... </repositories> - Write the plug-in descriptor that defines that specific plug-in instance. The plug-in descriptor is the heart of the plug-in since it defines everything from the plug-in classes to scheduled jobs. Plug-in descriptor elements are covered in Section 2.2.1.4, “Plug-in Configuration (Both Global and Local)”.
- Implement the Java classes for the plug-in.
- Build the plug-in. During the Maven build process, the plug-in files can be validated.
mvn install - Deploy the plug-in, as in Section 3.3, “Deploying Server-Side Plug-ins”. When a server-side plug-in is deployed on one server, it is automatically propagated to all of the other JBoss ON servers in the cloud.
3.2. Validating Server-Side Plug-ins
Copy linkLink copied to clipboard!
The JBoss ON server includes special classes that validate server-side plug-ins when the plug-in is built. This validation is done as part of the Maven build process.
Validation means that the build process checks that the server-side plug-in descriptor is acceptable and complete. Every server-side plug-in is checked for a handful of things:
- The XML is well-formed and validates with the configured server plug-in XML schema
- If a plug-in component is specified, its class is found in the plug-in JAR and can be instantiated
- All scheduled jobs are configured properly
- The plug-in has a valid version
- The plug-in configuration is declared correctly
Note
Plug-in validation is done during the Maven build process when creating the JAR file. If the plug-in JAR is built using another system or on a different machine, then validation isn't run.
Plug-ins are not validated automatically just because they are built using Maven; any plug-ins to be validated must be added to the validator's
pom.xml configuration file.
- Open the
pom.xmlfile in the sourceRoot/modules/enterprise/server/plugins/validate-all-serverplugins/directory. - Add a
<pathelement>line to the file which points to the custom server-side plug-in JAR file. For example:<pathelement location="../myPlugin/target/myPlugin.jar" /> - Build the plug-in.
mvn install
Note
The RHQ source code includes a validator utility which can be used with custom plug-in infrastructure. This is contained in the
org.rhq.enterprise.server.plugin.pc.ServerPluginValidatorUtil class.
3.3. Deploying Server-Side Plug-ins
Copy linkLink copied to clipboard!
Server-side are deployed in one of two ways:
- Copying the plug-in JAR file into the sourceRoot
/plugins/folder in the server root directory (locally). - Uploading the plug-in JAR file through the web interface (remotely).
Server-side plug-ins are hot-deployed, so they are active as soon as they are deployed without having to restart any of the JBoss ON servers. Every server-side plug-in is deployed globally and is automatically propagated among the server cloud. The configuration for each server is polled regularly (at an interval defined in the server properties file).
It doesn't matter the method used to deploy the server-side plug-in; the plug-in is active and propagated the same either way.
By default, every server-side plug-in is automatically enabled (and therefore active) unless the configuration in the plug-in descriptor explicitly disables the server. When a plug-in is deployed and enabled, it is automatically propagated to other JBoss ON servers in the infrastructure.
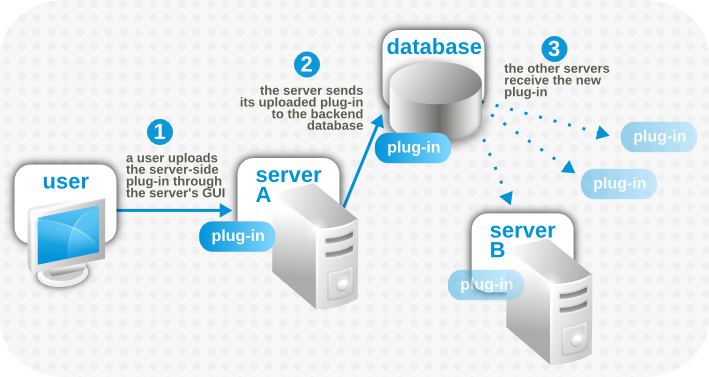
Figure 4. Server-Side Plug-in Propagation
There are three possible states for a server-side plug-in:
- Deployed and enabled
- Deployed and disabled
- Undeployed
When a plug-in is deployed, it is available to the server. Undeploying deletes the plug-in from the server plug-ins directory and lists it in the server's databases as deleted.
Undeploying the plug-in is a permanent deletion from the server configuration. Even if the JAR file still exists somewhere in the JBoss ON cloud, all of the JBoss ON servers will ignore it because it is marked as undeployed in the shared database. This prevents accidentally reloading and re-deploying the plug-in or applying upgrades to the plug-in.
If for some reason the plug-in should be re-deployed later on, then there is a purge option for undeployed plug-ins. This removes the database entry for the plug-in marking it as deleted (undeployed). Once that entry is purged, then the plug-in can be deployed again, fresh.
3.3.1. Remotely Deploying Plug-ins
Copy linkLink copied to clipboard!
- In the top menu, click the Administration tab.

- In the Configuration box on the left navigation bar, click the Plugins link.

- Click the Server Plugins tab.

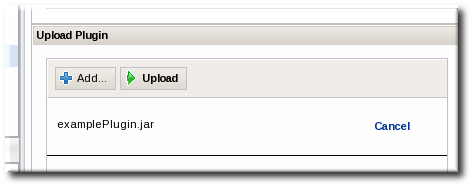
- Scroll to the Upload Plugin section at the bottom of the page.
- Click the Add button, and browse to the plug-in JAR file's location. If there are multiple plug-ins to deploy, just hit Add again and add in each one.
- When all of the plug-ins to be deployed are listed in the box, click the Upload button.
Any plug-ins uploaded to one server will be automatically deployed and registered on all other JBoss ON servers in the cloud within a few minutes.
3.3.2. Locally Deploying Plug-ins
Copy linkLink copied to clipboard!
Each server installation has a top-level plugins/ directory. The server periodically polls this directory. Any new or updated JAR files are copied to the appropriate directory in the server configuration, and then the original JAR file is deleted from the plugins/ directory.
If the JAR file is on the same host machine as an JBoss ON server, the JAR file can just be copied into that sourceRoot
/plugins/ directory and the server will deploy it.
3.4. Updating Server-Side Plug-ins
Copy linkLink copied to clipboard!
Server-side plug-ins can be updated simply by deploying updated plug-in JAR files. The plug-in descriptor can contain a version number for the plug-in package. The server uses this version number (or, alternatively, the
Implementation-Version setting found in the META-INF/MANIFEST.MF file in the JAR file) to identify later version of the plug-in and to update the plug-ins on the JBoss ON servers in the cloud.
3.5. Disabling Server-Side Plug-ins
Copy linkLink copied to clipboard!
Plug-ins are active when they are enabled. A flag in the plug-in descriptor indicated whether the plug-in is enabled. The assumption is that all plug-ins are enabled when they are deployed, so if that parameter is not explicitly set, then the server assumes that the plug-in is enabled.
It's convenient in some situations to suspend running a plug-in, such as when the plug-in's scheduled jobs need to be suspended. In that situation, the plug-in can be disabled.
Disabling a plug-in is very different than undeploying it. Even when it's disabled, the plug-in is still listed in the configuration for all of the JBoss ON servers in the cloud; disabling the plug-in simply tells the server to skip loading and starting the plug-in. Undeploying a plug-in, on the other hand, removes the plug-in from the server configuration and prevents any server in the cloud from loading it.
To disable a plug-in:
- In the top menu, click the Administration tab.
- In the Configuration box on the left navigation bar, click the Plugins link.
- Click the Server Plugins tab.
- Check the box by any server-side plug-in which should be disabled.
- Click the DISABLE button.

Any disabled plug-in can be re-enabled later by selecting that plug-in and clicking the ENABLE button.
3.6. Removing and Re-deploying Server-Side Plug-ins
Copy linkLink copied to clipboard!
As mentioned in Section 3.3, “Deploying Server-Side Plug-ins”, there are basically three states that a plug-in can be in:
- Deployed and enabled
- Disabled
- Undeployed
Deployed plug-ins — whether they're enabled or disabled — are listed in the JBoss ON servers as available and the JAR files are in the server configuration. However, undeployed plug-ins are deleted from the server configuration and have a special entry indicating that the plug-in should never be loaded, even if the JAR file is added again.
In other words, undeploying a server-side plug-in permanently removes it from the configuration. To re-deploy a plug-in, the undeploy entry for the plug-in has to be removed, and then the plug-in can be re-deployed.
3.6.1. Undeploying a Plug-in
Copy linkLink copied to clipboard!
- In the top menu, click the Administration tab.
- In the Configuration box on the left navigation bar, click the Plugins link.
- Click the Server Plugins tab.
- Select the checkbox by the plug-ins to undeploy.
- Click the Undeploy button.
To view all of the undeployed plug-ins, click the SHOW UNDEPLOYED button.
3.6.2. Re-deploying a Plug-in
Copy linkLink copied to clipboard!
- In the top menu, click the Administration tab.
- In the Configuration box on the left navigation bar, click the Plugins link.
- Click the Server Plugins tab.
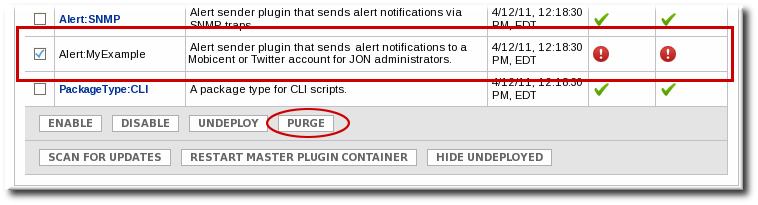
- Click the SHOW UNDEPLOYED button at the bottom of the plug-ins list.

- Select the checkbox by the plug-in to re-deploy, and then click the PURGE button. This removes the entry in the JBoss ON database that tells the servers to ignore that plug-in and any updates to it.Undeployed plug-ins have only black text, with no active link to the plug-in configuration. They also have two red marks, indicating they are both disabled and undeployed.
- Add and upload the plug-in like it is being deployed as new. This is described in Section 3.3, “Deploying Server-Side Plug-ins”.
3.7. Restarting Plug-in Containers
Copy linkLink copied to clipboard!
Each type of server-side plug-in is controlled by a corresponding plug-in container. Each plug-in container is controlled, in turn, by a master plug-in container. The plug-in containers load, start, and stop plug-ins.
As developers hot-deploy new server-side plug-ins, it can be useful to restart the plug-in container to check the plug-in performance. This is done by restarting the master plug-in container.
Note
All other actions with server-side plug-ins occur in the cloud. When a new plug-in is added, it is added to the entire cloud; if it is undeployed, it is undeployed for the whole cloud. Plug-in containers, however, perform their tasks locally. Restarting the plug-in containers, then, restarts the master plug-in container for whichever JBoss ON server is hosting the web interface (in essence, the server which is local to the command) — and it only restarts that master plug-in container.
- In the top menu, click the Administration tab.
- In the Configuration box on the left navigation bar, click the Plugins link.
- Click the Server Plugins tab.
- Scroll to the bottom of the table, and click the RESTART MASTER PLUGIN CONTAINER button.

- When the restart process is done (and assuming no problems were encountered), then there will be a success message in the upper left corner.

3.8. Setting Plug-in Configuration Properties
Copy linkLink copied to clipboard!
A few default server-side plug-ins and many custom plug-ins allow administrators to define specific configuration properties for the plug-in instance. The available properties are defined in the plug-in's
rhq-plugin.xml file, and the values are then supplied in the JBoss ON UI.
The descriptor file can define certain configuration parameters that apply to every instance of that plug-in (the descriptor parameters are described in Section 2.2.1, “Descriptor and Configuration” and Section 4.2.1, “Descriptor and Configuration”). The descriptor can set default values to use or can leave these fields blank. Either way, the global plug-in configuration parameters can be set or changed in the JBoss ON web UI.
- In the top menu, click the Administration tab.
- In the Configuration box on the left navigation bar, click the Plugins link.
- Click the Server Plugins tab.
- Click the name of the server-side plug-in in the table.
- In the middle of the plug-in details page, click the Configure 'Name' link.

- All of the editable global configuration settings for the plug-in are listed in the Plugin Configuration table. To make any changes, click the EDIT button.

- Unselect the Unset checkbox to activate the field to be edited.
- Make any changes, and click SAVE.