 Red Hat Summit
Chapter 1. Deploying OpenShift Container Storage
OpenShift Container Storage 4.3, installation is supported only on existing Red Hat OpenShift Container Platform (OCP) worker nodes. Follow the instructions in Section 1.1, “Deploying Red Hat OpenShift Container Storage on an existing Red Hat OpenShift Container Platform” to deploy OpenShift Container Storage.
When you install OpenShift Container Storage in a restricted network environment, you need to apply a custom Network Time Protocol (NTP) configuration to the nodes, because by default, internet connectivity is assumed in OpenShift Container Platform and chronyd is configured to use *.rhel.pool.ntp.org servers. See https://access.redhat.com/solutions/4828941 and Configuring chrony time service for more details.
1.1. Deploying Red Hat OpenShift Container Storage on an existing Red Hat OpenShift Container Platform
The deployment process consists of two main parts:
- Install the OpenShift Container Storage Operator by following the instructions in Section 1.1.1, “Installing Red Hat OpenShift Container Storage Operator using the Operator Hub”.
- Create the OpenShift Container Storage service by following the instructions in Section 1.1.2, “Creating an OpenShift Container Storage service”.
For Red Hat Enterprise Linux based hosts in a user provisioned infrastructure (UPI), you need to enable container access to the underlying file system by following the instructions in Section 1.1.3, “Enabling file system access for containers on Red Hat Enterprise Linux based nodes”.
1.1.1. Installing Red Hat OpenShift Container Storage Operator using the Operator Hub
You can install Red Hat OpenShift Container Storage using the Red Hat OpenShift Container Platform Operator Hub on Amazon Web Services (AWS) and VMware vSphere platforms. For information about the hardware and software requirements, see Planning your deployment.
Prerequisites
- You must be logged into OpenShift Container Platform (OCP) cluster.
- You must have at least three worker nodes in OCP cluster.
You must create a namespace called
openshift-storageas follows:-
Click Administration
Namespaces in the left pane of the OpenShift Web Console. - Click Create Namespace.
-
In the Create Namespace dialog box, enter
openshift-storagefor Name andopenshift.io/cluster-monitoring=truefor Labels. This label is required to get the dashboards. - Select No restrictions option for Default Network Policy.
- Click Create.
-
Click Administration
When you need to override the cluster-wide default node selector for OpenShift Container Storage, you can use the following command in command line interface to specify a blank node selector for the openshift-storage namespace:
$ oc annotate namespace openshift-storage openshift.io/node-selector=Procedure
Click Operators
OperatorHub in the left pane of the OpenShift Web Console. Figure 1.1. List of operators in the Operator Hub

- Search for OpenShift Container Storage Operator from the list of operators and click on it.
- On the OpenShift Container Storage Operator page, click Install.
On the Create Operator Subscription page, the Installation Mode, Update Channel, and Approval Strategy options can be set.
Figure 1.2. Create Operator Subscription page
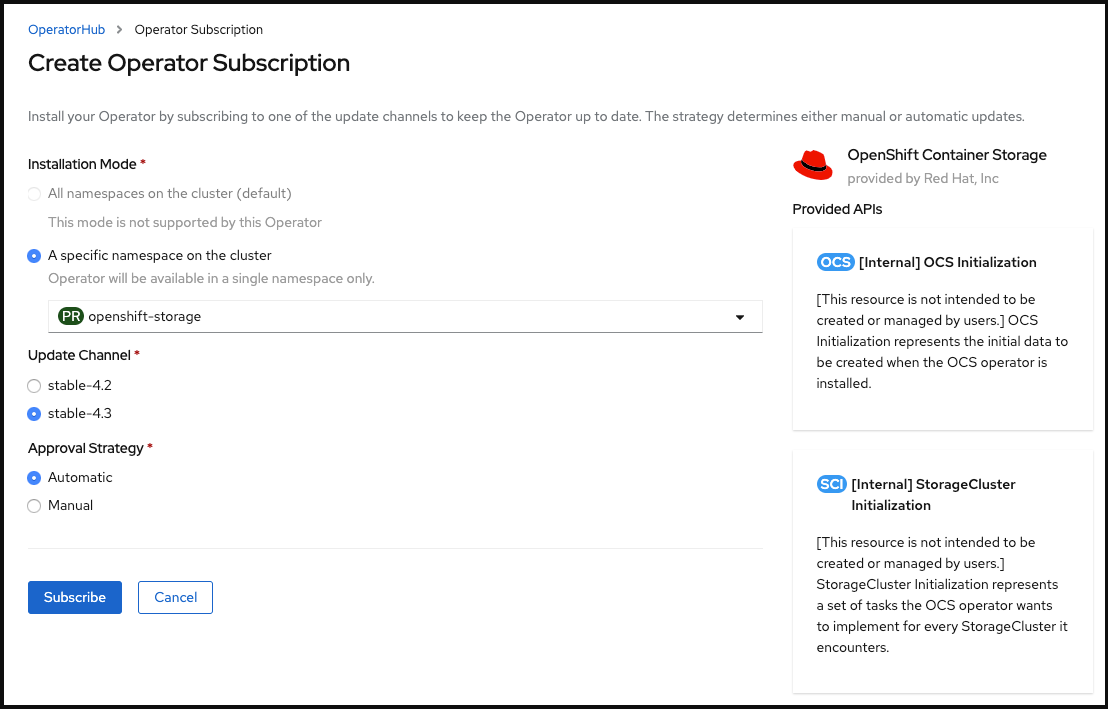
Select A specific namespace on the cluster for the Installation Mode option.
-
Select
openshift-storagenamespace from the drop down menu.
-
Select
- Select stable-4.3 as the update channel based on your requirement.
Select an Approval Strategy:
- Automatic specifies that you want OpenShift Container Platform to upgrade OpenShift Container Storage automatically.
- Manual specifies that you want to have control to upgrade OpenShift Container Storage manually.
Click Subscribe.
Figure 1.3. Installed operators
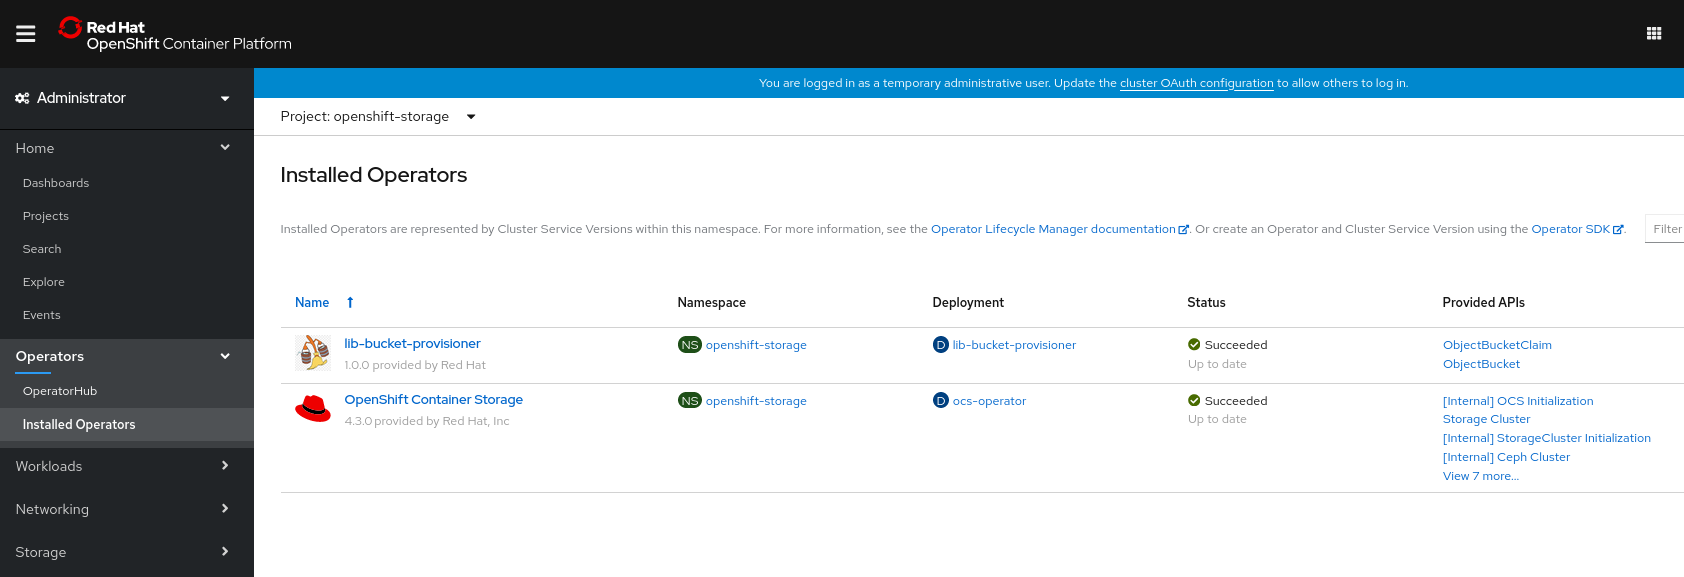
The Installed Operators page is displayed with the status of the operator.
Verification steps
-
Verify that the lib-bucket-provisioner and OpenShift Container Storage Operator show the Status as
Succeeded.
1.1.2. Creating an OpenShift Container Storage service
You need to create a new OpenShift Container Storage service after you install OpenShift Container Storage operator on a user provisioned cloud for both Amazon Web Services (AWS) and VMware vSphere platforms.
Prerequisites
- OpenShift Container Storage operator must be installed from the Operator Hub. For more information, see Installing OpenShift Container Storage Operator using the Operator Hub.
Procedure
-
Click Operators
Installed Operators from the left pane of the OpenShift Web Console to view the installed operators. - On the Installed Operator page, select openshift-storage from the Project drop down list to switch to the openshift-storage project.
Click OpenShift Container Storage Operator.
OpenShift Container Storage operator creates a OCSInitialization resource automatically.
On the OpenShift Container Storage Operator page, scroll right and click the Storage Cluster tab.
Figure 1.4. OpenShift Container Storage Operator page

On the OCS Cluster Services page, click Create OCS Cluster Service.
Figure 1.5. Create New OCS Service page
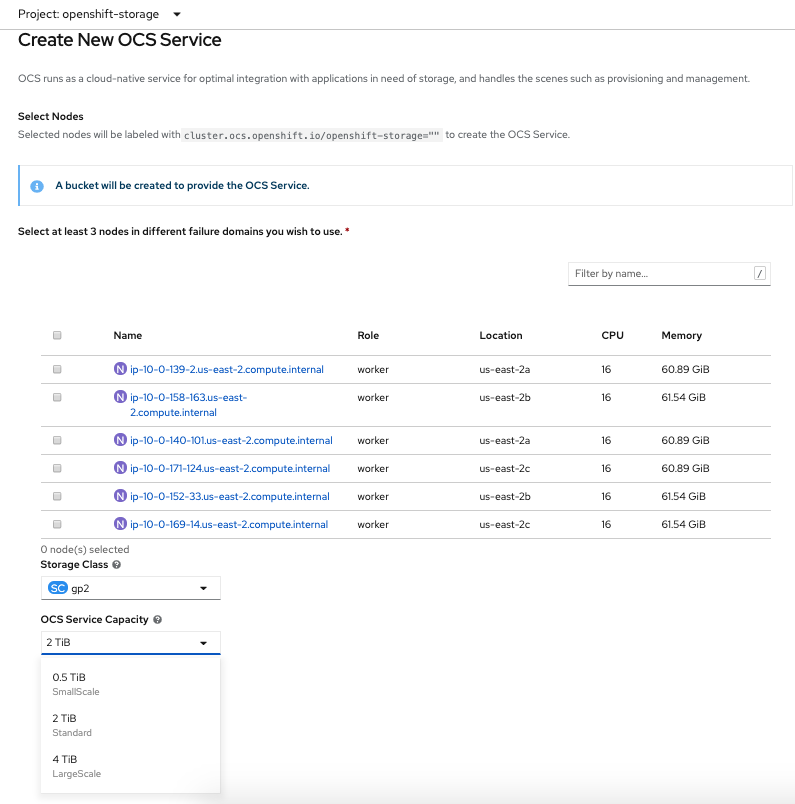
On the Create New OCS Service page, perform the following:
- Select at least three worker nodes from the available list of nodes for the use of OpenShift Container Storage service. Ensure that the nodes are in different Location.
-
Storage Class is set by default to
gp2for AWS andthinfor VMware. Select OCS Service Capacity from drop down list.
NoteOnce you select the initial storage capacity here, you can add more capacity only in this increment.
Click Create.
The Create button is enabled only after you select three nodes. A new storage cluster of three volumes will be created with one volume per worker node. The default configuration uses a replication factor of 3.
Verification steps
- To verify that OpenShift Container Storage is successfully installed, see Verifying your OpenShift Container Storage installation.
1.1.3. Enabling file system access for containers on Red Hat Enterprise Linux based nodes
Deploying OpenShift Container Platform on a Red Hat Enterprise Linux base in a user provisioned infrastructure (UPI) does not automatically provide container access to the underlying Ceph file system. This is a bug tracked by RHSTOR-787.
This process is not necessary for hosts based on Red Hat Enterprise Linux CoreOS.
Procedure
Perform the following steps on each node in your cluster.
- Log in to the Red Hat Enterprise Linux based node and open a terminal.
Verify that the node has access to the rhel-7-server-extras-rpms repository.
# subscription-manager repos --list-enabled | grep rhel-7-serverIf you do not see both
rhel-7-server-rpmsandrhel-7-server-extras-rpmsin the output, or if there is no output, run the following commands to enable each repository.# subscription-manager repos --enable=rhel-7-server-rpms # subscription-manager repos --enable=rhel-7-server-extras-rpmsInstall the required packages.
# yum install -y policycoreutils container-selinuxPersistently enable container use of the Ceph file system in SELinux.
# setsebool -P container_use_cephfs on- Verify that containers can now access OpenShift Container Storage hosted on this node.
1.2. Installing OpenShift Container Storage using local storage devices
Use this section to install OpenShift Container Storage on bare metal, Amazon EC2, and VMware infrastructures where OpenShift Container Platform is already installed.
Installing OpenShift Container Storage on bare metal, Amazon EC2, and VMware using local storage operator is a Technology Preview feature. Technology Preview features are not supported with Red Hat production service level agreements (SLAs) and might not be functionally complete. Red Hat does not recommend using them in production. These features provide early access to upcoming product features, enabling customers to test functionality and provide feedback during the development process.
To install OpenShift Container Storage using local storage devices, perform the following steps:
- Understand the requirements for installing OpenShift Container Storage using local storage devices.
- Install Red Hat OpenShift Container Storage Operator.
- Install Local Storage Operator.
- Find the available storage devices.
Create OpenShift Container Storage cluster based on your requirement:
- For Amazon EC2, follow the instructions in Creating OpenShift Container Storage cluster on Amazon EC2.
- For VMware, follow the instructions in Creating OpenShift Container Storage cluster on VMware.
- For bare metal, follow the instructions in Creating OpenShift Container Storage cluster on bare metal.
1.2.1. Requirements for installing OpenShift Container Storage using local storage devices
You must have at least three OpenShift Container Platform worker nodes in the cluster with locally attached storage devices on each of them.
- Each of the three worker nodes must have at least one raw block device available to be used by OpenShift Container Storage.
- For minimum starting node requirements, see Node Requirements section in Planning guide.
- The devices to be used must be empty, that is, there should be no PVs, VGs, or LVs remaining on the disks.
You must have a minimum of three labeled nodes.
Each worker node that has local storage devices to be used by OpenShift Container Storage must have a specific label to deploy OpenShift Container Storage pods. To label the nodes, use the following command:
$ oc label nodes <NodeName> cluster.ocs.openshift.io/openshift-storage=''
- There should not be any storage providers managing locally mounted storage on the storage nodes that would conflict with the use of Local Storage Operator for Red Hat OpenShift Container Storage.
1.2.2. Installing Red Hat OpenShift Container Storage Operator using the Operator Hub
You can install Red Hat OpenShift Container Storage using the Red Hat OpenShift Container Platform Operator Hub on Amazon Web Services (AWS) and VMware vSphere platforms. For information about the hardware and software requirements, see Planning your deployment.
Prerequisites
- You must be logged into OpenShift Container Platform (OCP) cluster.
- You must have at least three worker nodes in OCP cluster.
You must create a namespace called
openshift-storageas follows:-
Click Administration
Namespaces in the left pane of the OpenShift Web Console. - Click Create Namespace.
-
In the Create Namespace dialog box, enter
openshift-storagefor Name andopenshift.io/cluster-monitoring=truefor Labels. This label is required to get the dashboards. - Select No restrictions option for Default Network Policy.
- Click Create.
-
Click Administration
When you need to override the cluster-wide default node selector for OpenShift Container Storage, you can use the following command in command line interface to specify a blank node selector for the openshift-storage namespace:
$ oc annotate namespace openshift-storage openshift.io/node-selector=Procedure
Click Operators
OperatorHub in the left pane of the OpenShift Web Console. Figure 1.6. List of operators in the Operator Hub
- Search for OpenShift Container Storage Operator from the list of operators and click on it.
- On the OpenShift Container Storage Operator page, click Install.
On the Create Operator Subscription page, the Installation Mode, Update Channel, and Approval Strategy options can be set.
Figure 1.7. Create Operator Subscription page
Select A specific namespace on the cluster for the Installation Mode option.
-
Select
openshift-storagenamespace from the drop down menu.
-
Select
- Select stable-4.3 as the update channel based on your requirement.
Select an Approval Strategy:
- Automatic specifies that you want OpenShift Container Platform to upgrade OpenShift Container Storage automatically.
- Manual specifies that you want to have control to upgrade OpenShift Container Storage manually.
Click Subscribe.
Figure 1.8. Installed operators
The Installed Operators page is displayed with the status of the operator.
Verification steps
-
Verify that the lib-bucket-provisioner and OpenShift Container Storage Operator show the Status as
Succeeded.
1.2.3. Installing Local Storage Operator
Use this procedure to install Local Storage Operator from the Operator Hub before creating OpenShift Container Storage clusters on local storage devices in Amazon EC2, VMware, and bare metal infrastructures.
Prerequisites
Create a namespace called
local-storageas follows:-
Click Administration
Namespaces in the left pane of the OpenShift Web Console. - Click Create Namespace.
-
In the Create Namespace dialog box, enter
local-storagefor Name. - Select No restrictions option for Default Network Policy.
- Click Create.
-
Click Administration
Procedure
-
Click Operators
OperatorHub in the left pane of the OpenShift Web Console. - Search for Local Storage Operator from the list of operators and click on it.
Click Install.
Figure 1.9. Create Operator Subscription page

Select A specific namespace on the cluster for the Installation Mode option.
-
Select
local-storagenamespace from the drop down menu.
-
Select
- Select a desired value for the Update Channel option.
- Select the desired Approval Strategy.
- Click Subscribe.
-
Verify that the Local Storage Operator show the Status as
Succeeded.
1.2.4. Finding available storage devices
Use this procedure to identify the device name for each of the three or more worker nodes that you have labeled with OpenShift Container Storage label, cluster.ocs.openshift.io/openshift-storage='' before creating PVs for bare metal, Amazon EC2, or VMware storage devices.
Procedure
List and verify the name of the worker nodes with the OpenShift Container Storage label.
$ oc get nodes -l cluster.ocs.openshift.io/openshift-storage=Example output:
NAME                                        STATUS   ROLES    AGE     VERSION
ip-10-0-135-71.us-east-2.compute.internal    Ready    worker   6h45m   v1.16.2
ip-10-0-145-125.us-east-2.compute.internal   Ready    worker   6h45m   v1.16.2
ip-10-0-160-91.us-east-2.compute.internal    Ready    worker   6h45m   v1.16.2
Log in to each worker node that is used for OpenShift Container Storage resources and find the unique
by-iddevice name for each available raw block device.$ oc debug node/<Nodename>Example output:
$ oc debug node/ip-10-0-135-71.us-east-2.compute.internal
Starting pod/ip-10-0-135-71us-east-2computeinternal-debug ...
To use host binaries, run `chroot /host`
Pod IP: 10.0.135.71
If you don't see a command prompt, try pressing enter.
sh-4.2# chroot /host
sh-4.4# lsblk
NAME                         MAJ:MIN RM   SIZE RO TYPE MOUNTPOINT
xvda                         202:0    0   120G  0 disk
|-xvda1                      202:1    0   384M  0 part /boot
|-xvda2                      202:2    0   127M  0 part /boot/efi
|-xvda3                      202:3    0     1M  0 part
`-xvda4                      202:4    0 119.5G  0 part
  `-coreos-luks-root-nocrypt 253:0    0 119.5G  0 dm   /sysroot
nvme0n1                      259:0    0   1.7T  0 disk
nvme1n1                      259:1    0   1.7T  0 disk
In this example, the local devices available are
nvme0n1andnvme1n1.Find the unique
by-iddevice name depending on the hardware serial number for each device.sh-4.4# ls -l /dev/disk/by-id/ total 0 lrwxrwxrwx. 1 root root 10 Mar 17 16:24 dm-name-coreos-luks-root-nocrypt -> ../../dm-0 lrwxrwxrwx. 1 root root 13 Mar 17 16:24 nvme-Amazon_EC2_NVMe_Instance_Storage_AWS10382E5D7441494EC -> ../../nvme0n1 lrwxrwxrwx. 1 root root 13 Mar 17 16:24 nvme-Amazon_EC2_NVMe_Instance_Storage_AWS60382E5D7441494EC -> ../../nvme1n1 lrwxrwxrwx. 1 root root 13 Mar 17 16:24 nvme-nvme.1d0f-4157533130333832453544373434313439344543-416d617a6f6e20454332204e564d6520496e7374616e63652053746f72616765-00000001 -> ../../nvme0n1 lrwxrwxrwx. 1 root root 13 Mar 17 16:24 nvme-nvme.1d0f-4157533630333832453544373434313439344543-416d617a6f6e20454332204e564d6520496e7374616e63652053746f72616765-00000001 -> ../../nvme1n1In this example, all the OpenShift Container Storage worker nodes are of the Amazon EC2 type
i3.2xlarge. So, all the three worker nodes have the same type of machine but theby-ididentifier is unique for every local device. Thelsblkcommand shows the last two devices,nvme0n1andnvme1n1with a size of 1.7 TB each.For each worker node that has the OpenShift Container Storage label (a minimum of three), you need to find the unique
by-iddevice names. In this example, theby-iddevice names are:-
nvme-Amazon_EC2_NVMe_Instance_Storage_AWS10382E5D7441494EC -
nvme-Amazon_EC2_NVMe_Instance_Storage_AWS60382E5D7441494EC
-
You must repeat finding the device name by-id for all the other nodes that have the storage devices to be used by OpenShift Container Storage. See https://access.redhat.com/solutions/4928841 for more details.
1.2.5. Creating OpenShift Container Storage cluster on Amazon EC2 storage optimized - i3en.2xlarge instance type
Use this procedure to create OpenShift Container Storage cluster on Amazon EC2 (storage optimized - i3en.2xlarge instance type) infrastructure, which involves:
-
Creating PVs by using the
LocalVolumeCR -
Creating a new
StorageClass
The Amazon EC2 storage optimized - i3.2xlarge instance type includes two non-volatile memory express (NVMe) disks. The example in this procedure illustrates the use of both the disks that the instance type comes with.
It is not recommended to use ephemeral storage of Amazon EC2 for OpenShift Container Storage persistent data, because stopping all the three nodes can cause data loss. It is recommended to use ephemeral storage only in scenarios such as the following:
- Cloud burst where data is copied from another location for a specific data crunching, which is limited in time
- Development or testing environment
When you are using the ephemeral storage of Amazon EC2, it is recommended to:
- Use three availability zones to decrease the risk of losing all the data
-
Limit the number of users with
ec2:StopInstancespermissions to avoid instance shutdown by mistake
Prerequisites
- Ensure that all the requirements in the Requirements for installing OpenShift Container Storage using local storage devices section are met.
Verify your OpenShift Container Platform worker nodes are labeled for OpenShift Container Storage, which is used as the
nodeSelector.$ oc get nodes -l cluster.ocs.openshift.io/openshift-storage -o jsonpath='{range .items[*]}{.metadata.name}{"\n"}'Example output:
ip-10-0-135-71.us-east-2.compute.internal
ip-10-0-145-125.us-east-2.compute.internal
ip-10-0-160-91.us-east-2.compute.internal
Procedure
Create local persistent volumes (PVs) on the storage nodes using
LocalVolumecustom resource (CR).Example of
LocalVolumeCRlocal-storage-block.yamlusing OpenShift Storage Container label as node selector andby-iddevice identifier:apiVersion: local.storage.openshift.io/v1 kind: LocalVolume metadata: name: local-block namespace: local-storage labels: app: ocs-storagecluster spec: nodeSelector: nodeSelectorTerms: - matchExpressions: - key: cluster.ocs.openshift.io/openshift-storage operator: In values: - '' storageClassDevices: - storageClassName: localblock volumeMode: Block devicePaths: - /dev/disk/by-id/nvme-Amazon_EC2_NVMe_Instance_Storage_AWS10382E5D7441494EC # <-- modify this line - /dev/disk/by-id/nvme-Amazon_EC2_NVMe_Instance_Storage_AWS1F45C01D7E84FE3E9 # <-- modify this line - /dev/disk/by-id/nvme-Amazon_EC2_NVMe_Instance_Storage_AWS136BC945B4ECB9AE4 # <-- modify this line - /dev/disk/by-id/nvme-Amazon_EC2_NVMe_Instance_Storage_AWS10382E5D7441464EP # <-- modify this line - /dev/disk/by-id/nvme-Amazon_EC2_NVMe_Instance_Storage_AWS1F45C01D7E84F43E7 # <-- modify this line - /dev/disk/by-id/nvme-Amazon_EC2_NVMe_Instance_Storage_AWS136BC945B4ECB9AE8 # <-- modify this lineEach Amazon EC2 instance has two disks and this example uses both the disks.
Create the
LocalVolumeCR.$ oc create -f local-storage-block.yamlExample output:
localvolume.local.storage.openshift.io/local-block createdCheck if the pods are created.
$ oc -n local-storage get podsExample output:
NAME                                      READY   STATUS    RESTARTS   AGE
local-block-local-diskmaker-59rmn         1/1     Running   0          15m
local-block-local-diskmaker-6n7ct         1/1     Running   0          15m
local-block-local-diskmaker-jwtsn         1/1     Running   0          15m
local-block-local-provisioner-6ssxc       1/1     Running   0          15m
local-block-local-provisioner-swwvx       1/1     Running   0          15m
local-block-local-provisioner-zmv5j       1/1     Running   0          15m
local-storage-operator-7848bbd595-686dg   1/1     Running   0          15m
Check if the PVs are created.
You must see a new PV for each of the local storage devices on the three worker nodes. Refer the example in the Finding available storage devices section that shows two available storage devices per worker node with a size 1.7 TB for each node.
$ oc get pvExample output:
NAME               CAPACITY ACCESS MODES  RECLAIM POLICY STATUS     CLAIM   STORAGECLASS  REASON   AGE
local-pv-1a46bc79  2328Gi   RWO           Delete         Available          localblock             14m
local-pv-429d90ee  2328Gi   RWO           Delete         Available          localblock             14m
local-pv-4d0a62e3  2328Gi   RWO           Delete         Available          localblock             14m
local-pv-55c05d76  2328Gi   RWO           Delete         Available          localblock             14m
local-pv-5c7b0990  2328Gi   RWO           Delete         Available          localblock             14m
local-pv-a6b283b   2328Gi   RWO           Delete         Available          localblock             14m
Check if a new
StorageClassis created due to the creation ofLocalVolumeCR. ThisStorageClassis used while creatingStorageClusterto create PVCs.$ oc get sc | grep localblockExample output:
NAME            PROVISIONER                    AGE
localblock      kubernetes.io/no-provisioner   7m46s
Create
StorageClusterCR that uses thelocalblockStorageClassand the three PVs that are created.Example
StorageClusterCRocs-cluster-service.yamlusingmonDataDirHostPathandlocalblockStorageClass.apiVersion: ocs.openshift.io/v1 kind: StorageCluster metadata: name: ocs-storagecluster namespace: openshift-storage spec: manageNodes: false resources: mds: limits: cpu: 3 requests: cpu: 1 noobaa-core: limits: cpu: 2 memory: 8Gi requests: cpu: 1 memory: 8Gi noobaa-db: limits: cpu: 2 memory: 8Gi requests: cpu: 1 memory: 8Gi monDataDirHostPath: /var/lib/rook storageDeviceSets: - count: 2 dataPVCTemplate: spec: accessModes: - ReadWriteOnce resources: requests: storage: 2328Gi storageClassName: localblock volumeMode: Block name: ocs-deviceset placement: {} portable: false replica: 3 resources: {}ImportantTo ensure that the OSDs have a guaranteed size across the nodes, the storage size for
storageDeviceSetsmust be specified as less than or equal to the size of the desired PVs created on the nodes.Create
StorageClusterCR.$ oc create -f ocs-cluster-service.yamlExample output
storagecluster.ocs.openshift.io/ocs-cluster-service created
Verification steps
See Verifying your OpenShift Container Storage installation.
1.2.6. Creating OpenShift Container Storage cluster on VMware
Use this procedure to create storage cluster on VMware infrastructure.
VMware supports the following three types of local storage:
- Virtual machine disk (VMDK)
- Raw device mapping (RDM)
- VMDirectPath I/O
Prerequisites
- Ensure that all the requirements in the Requirements for installing OpenShift Container Storage using local storage devices section are met.
- You must have three worker nodes with the same storage size and type attached to each node to use local storage devices on VMware.
Verify your OpenShift Container Platform worker nodes are labeled for OpenShift Container Storage:
$ oc get nodes -l cluster.ocs.openshift.io/openshift-storage -o jsonpath='{range .items[*]}{.metadata.name}{"\n"}'
To identify storage devices on each node, refer to Finding available storage devices.
Procedure
Create the LocalVolume CR for block PVs.
Example of
LocalVolumeCRlocal-storage-block.yamlusing OpenShift Container Storage label as node:apiVersion: local.storage.openshift.io/v1 kind: LocalVolume metadata: name: local-block namespace: local-storage labels: app: ocs-storagecluster spec: nodeSelector: nodeSelectorTerms: - matchExpressions: - key: cluster.ocs.openshift.io/openshift-storage operator: In values: - "" storageClassDevices: - storageClassName: localblock volumeMode: Block devicePaths: - /dev/disk/by-id/scsi-36000c2991c27c2e5ba7c47d1e4352de2 # <-- modify this line - /dev/disk/by-id/scsi-36000c29682ca9e347926406711f3dc4e # <-- modify this line - /dev/disk/by-id/scsi-36000c296aaf03a9b1e4b01d086bc6348 # <-- modify this lineCreate
LocalVolumeCR for block PVs.$ oc create -f local-storage-block.yamlExample output:
localvolume.local.storage.openshift.io/local-block createdCheck if the pods are created.
$ oc -n local-storage get podsExample output:
NAME                                      READY   STATUS    RESTARTS   AGE
local-block-local-diskmaker-5brzv         1/1     Running   0          31s
local-block-local-diskmaker-8sxcs         1/1     Running   0          31s
local-block-local-diskmaker-s7s9p         1/1     Running   0          31s
local-block-local-provisioner-9cbw8       1/1     Running   0          31s
local-block-local-provisioner-cpddv       1/1     Running   0          31s
local-block-local-provisioner-f6h7h       1/1     Running   0          31s
local-storage-operator-75b9776b75-vwdzh   1/1     Running   0          2m47s
Check the new
localblockStorageClass.$ oc get sc | grep localblockExample output:
NAME            PROVISIONER                     AGE
localblock      kubernetes.io/no-provisioner    8m38s
Check the PVs that are created with the
Availablestatus.$ oc get pvExample output:
NAME                CAPACITY   ACCESS MODES   RECLAIM POLICY   STATUS      CLAIM   STORAGECLASS   REASON   AGE
local-pv-150fdc87   100Gi      RWO            Delete           Available           localblock              2m11s
local-pv-183bfc0a   100Gi      RWO            Delete           Available           localblock              2m11s
local-pv-b2f5cb25   100Gi      RWO            Delete           Available           localblock              2m21s
In this example, three PVs are used for OSD storage (100 GB).
Create
StorageClusterCRocs-cluster-service-VMware.yamlthat uses themonDataDirHostPathandlocalblockStorageClass.apiVersion: ocs.openshift.io/v1 kind: StorageCluster metadata: name: ocs-storagecluster namespace: openshift-storage spec: manageNodes: false monDataDirHostPath: /var/lib/rook storageDeviceSets: - count: 1 dataPVCTemplate: spec: accessModes: - ReadWriteOnce resources: requests: storage: 100Gi storageClassName: localblock volumeMode: Block name: ocs-deviceset placement: {} portable: false replica: 3 resources: {}ImportantTo ensure that the OSDs have a guaranteed size across the nodes, the storage size for
storageDeviceSetsmust be specified as less than or equal to the size of the desired PVs created on the nodes.Create
StorageClusterCR.$ oc create -f ocs-cluster-service-VMware.yamlExample output:
storagecluster.ocs.openshift.io/ocs-storagecluster created
Verification steps
See Verifying your OpenShift Container Storage installation.
1.2.7. Creating OpenShift Container Storage cluster on bare metal
Prerequisites
- Ensure that all the requirements in the Requirements for installing OpenShift Container Storage using local storage devices section are met.
- You must have three worker nodes with the same storage size and type attached to each node (for example, 2TB NVMe hard drive) to use local storage devices on bare metal.
Verify your OpenShift Container Platform worker nodes are labeled for OpenShift Container Storage:
$ oc get nodes -l cluster.ocs.openshift.io/openshift-storage -o jsonpath='{range .items[*]}{.metadata.name}{"\n"}'
To identify storage devices on each node, refer to Finding available storage devices.
Procedure
Create
LocalVolumeCR for block PVs.Example of
LocalVolumeCRlocal-storage-block.yamlusing OCS label as node selector.apiVersion: local.storage.openshift.io/v1 kind: LocalVolume metadata: name: local-block namespace: local-storage labels: app: ocs-storagecluster spec: nodeSelector: nodeSelectorTerms: - matchExpressions: - key: cluster.ocs.openshift.io/openshift-storage operator: In values: - "" storageClassDevices: - storageClassName: localblock volumeMode: Block devicePaths: - /dev/disk/by-id/nvme-INTEL_SSDPEKKA128G7_BTPY81260978128A # <-- modify this line - /dev/disk/by-id/nvme-INTEL_SSDPEKKA128G7_BTPY80440W5U128A # <-- modify this line - /dev/disk/by-id/nvme-INTEL_SSDPEKKA128G7_BTPYB85AABDE128A # <-- modify this line - /dev/disk/by-id/nvme-INTEL_SSDPEKKA128G7_BTPY0A60CB81128A # <-- modify this line - /dev/disk/by-id/nvme-INTEL_SSDPEKKA128G7_BTPY0093D45E128A # <-- modify this line - /dev/disk/by-id/nvme-INTEL_SSDPEKKA128G7_BTPYE46F6060128A # <-- modify this lineCreate the
LocalVolumeCR for block PVs.$ oc create -f local-storage-block.yamlCheck if the pods are created.
$ oc -n local-storage get podsCheck if the PVs are created.
$ oc get pvCheck for the new
localblockStorageClass.$ oc get sc | grep localblockExample output:
NAME            PROVISIONER                     AGE
localblock     kubernetes.io/no-provisioner    10m20s
Create
StorageClusterCRcluster-service-metal.yamlusingmonDataDirHostPathandlocalblockstorage classes.apiVersion: ocs.openshift.io/v1 kind: StorageCluster metadata: name: ocs-storagecluster namespace: openshift-storage spec: manageNodes: false monDataDirHostPath: /var/lib/rook storageDeviceSets: - count: 2 dataPVCTemplate: spec: accessModes: - ReadWriteOnce resources: requests: storage: 2Ti storageClassName: localblock volumeMode: Block name: ocs-deviceset placement: {} portable: false replica: 3 resources: {}ImportantTo ensure that the OSDs have a guaranteed size across the nodes, the storage size for
storageDeviceSetsmust be specified as less than or equal to the size of the desired PVs created on the nodes.Create the
StorageClusterCR.$ oc create -f cluster-service-metal.yamlExample output:
storagecluster.ocs.openshift.io/ocs-storagecluster created
Verification steps
See Verifying your OpenShift Container Storage installation.

'%20d='M201.5%20305.5c-13.8%200-24.9-11.1-24.9-24.6%200-13.8%2011.1-24.9%2024.9-24.9%2013.6%200%2024.6%2011.1%2024.6%2024.9%200%2013.6-11.1%2024.6-24.6%2024.6zM504%20256c0%20137-111%20248-248%20248S8%20393%208%20256%20119%208%20256%208s248%20111%20248%20248zm-132.3-41.2c-9.4%200-17.7%203.9-23.8%2010-22.4-15.5-52.6-25.5-86.1-26.6l17.4-78.3%2055.4%2012.5c0%2013.6%2011.1%2024.6%2024.6%2024.6%2013.8%200%2024.9-11.3%2024.9-24.9s-11.1-24.9-24.9-24.9c-9.7%200-18%205.8-22.1%2013.8l-61.2-13.6c-3-.8-6.1%201.4-6.9%204.4l-19.1%2086.4c-33.2%201.4-63.1%2011.3-85.5%2026.8-6.1-6.4-14.7-10.2-24.1-10.2-34.9%200-46.3%2046.9-14.4%2062.8-1.1%205-1.7%2010.2-1.7%2015.5%200%2052.6%2059.2%2095.2%20132%2095.2%2073.1%200%20132.3-42.6%20132.3-95.2%200-5.3-.6-10.8-1.9-15.8%2031.3-16%2019.8-62.5-14.9-62.5zM302.8%20331c-18.2%2018.2-76.1%2017.9-93.6%200-2.2-2.2-6.1-2.2-8.3%200-2.5%202.5-2.5%206.4%200%208.6%2022.8%2022.8%2087.3%2022.8%20110.2%200%202.5-2.2%202.5-6.1%200-8.6-2.2-2.2-6.1-2.2-8.3%200zm7.7-75c-13.6%200-24.6%2011.1-24.6%2024.9%200%2013.6%2011.1%2024.6%2024.6%2024.6%2013.8%200%2024.9-11.1%2024.9-24.6%200-13.8-11-24.9-24.9-24.9z'/%3e%3c/svg%3e)