Chapter 5. Triggers
5.1. Triggers overview
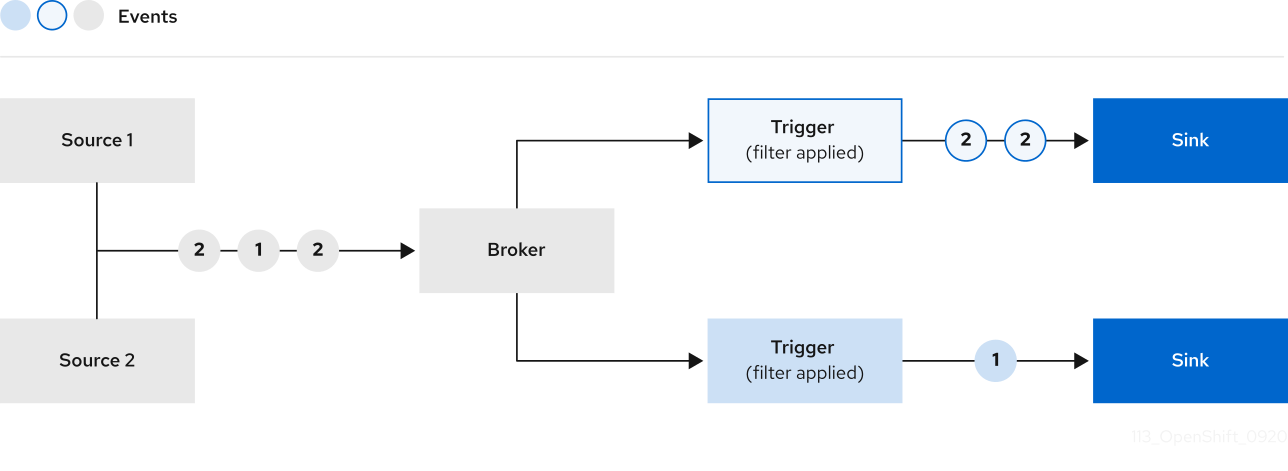
Brokers can be used in combination with triggers to deliver events from an event source to an event sink. Events are sent from an event source to a broker as an HTTP POST request. After events have entered the broker, they can be filtered by CloudEvent attributes using triggers, and sent as an HTTP POST request to an event sink.
If you are using a Knative broker for Apache Kafka, you can configure the delivery order of events from triggers to event sinks. See Configuring event delivery ordering for triggers.
5.1.1. Configuring event delivery ordering for triggers
If you are using a Kafka broker, you can configure the delivery order of events from triggers to event sinks.
Prerequisites
- The OpenShift Serverless Operator, Knative Eventing, and Knative Kafka are installed on your OpenShift Container Platform cluster.
- Kafka broker is enabled for use on your cluster, and you have created a Kafka broker.
- You have created a project or have access to a project with the appropriate roles and permissions to create applications and other workloads in OpenShift Container Platform.
-
You have installed the OpenShift (
oc) CLI.
Procedure
Create or modify a
Triggerobject and set thekafka.eventing.knative.dev/delivery.orderannotation:apiVersion: eventing.knative.dev/v1 kind: Trigger metadata: name: <trigger_name> annotations: kafka.eventing.knative.dev/delivery.order: ordered # ...The supported consumer delivery guarantees are:
unordered- An unordered consumer is a non-blocking consumer that delivers messages unordered, while preserving proper offset management.
orderedAn ordered consumer is a per-partition blocking consumer that waits for a successful response from the CloudEvent subscriber before it delivers the next message of the partition.
The default ordering guarantee is
unordered.
Apply the
Triggerobject:$ oc apply -f <filename>
5.1.2. Next steps
- Configure event delivery parameters that are applied in cases where an event fails to be delivered to an event sink.
5.2. Creating triggers
Brokers can be used in combination with triggers to deliver events from an event source to an event sink. Events are sent from an event source to a broker as an HTTP POST request. After events have entered the broker, they can be filtered by CloudEvent attributes using triggers, and sent as an HTTP POST request to an event sink.
5.2.1. Creating a trigger by using the Administrator perspective
Using the OpenShift Container Platform web console provides a streamlined and intuitive user interface to create a trigger. After Knative Eventing is installed on your cluster and you have created a broker, you can create a trigger by using the web console.
Prerequisites
- The OpenShift Serverless Operator and Knative Eventing are installed on your OpenShift Container Platform cluster.
- You have logged in to the web console and are in the Administrator perspective.
- You have cluster administrator permissions on OpenShift Container Platform, or you have cluster or dedicated administrator permissions on Red Hat OpenShift Service on AWS or OpenShift Dedicated.
- You have created a Knative broker.
- You have created a Knative service to use as a subscriber.
Procedure
-
In the Administrator perspective of the OpenShift Container Platform web console, navigate to Serverless
Eventing. -
In the Broker tab, select the Options menu
 for the broker that you want to add a trigger to.
- Click Add Trigger in the list.
- In the Add Trigger dialogue box, select a Subscriber for the trigger. The subscriber is the Knative service that will receive events from the broker.
- Click Add.
5.2.2. Creating a trigger by using the Developer perspective
Using the OpenShift Container Platform web console provides a streamlined and intuitive user interface to create a trigger. After Knative Eventing is installed on your cluster and you have created a broker, you can create a trigger by using the web console.
Prerequisites
- The OpenShift Serverless Operator, Knative Serving, and Knative Eventing are installed on your OpenShift Container Platform cluster.
- You have logged in to the web console.
- You have created a project or have access to a project with the appropriate roles and permissions to create applications and other workloads in OpenShift Container Platform.
- You have created a broker and a Knative service or other event sink to connect to the trigger.
Procedure
- In the Developer perspective, navigate to the Topology page.
- Hover over the broker that you want to create a trigger for, and drag the arrow. The Add Trigger option is displayed.
- Click Add Trigger.
- Select your sink in the Subscriber list.
- Click Add.
Verification
- After the subscription has been created, you can view it in the Topology page, where it is represented as a line that connects the broker to the event sink.
Deleting a trigger
- In the Developer perspective, navigate to the Topology page.
- Click on the trigger that you want to delete.
- In the Actions context menu, select Delete Trigger.
5.2.3. Creating a trigger by using the Knative CLI
You can use the kn trigger create command to create a trigger.
Prerequisites
- The OpenShift Serverless Operator and Knative Eventing are installed on your OpenShift Container Platform cluster.
-
You have installed the Knative (
kn) CLI. - You have created a project or have access to a project with the appropriate roles and permissions to create applications and other workloads in OpenShift Container Platform.
Procedure
Create a trigger:
$ kn trigger create <trigger_name> --broker <broker_name> --filter <key=value> --sink <sink_name>Alternatively, you can create a trigger and simultaneously create the
defaultbroker using broker injection:$ kn trigger create <trigger_name> --inject-broker --filter <key=value> --sink <sink_name>By default, triggers forward all events sent to a broker to sinks that are subscribed to that broker. Using the
--filterattribute for triggers allows you to filter events from a broker, so that subscribers will only receive a subset of events based on your defined criteria.
5.3. List triggers from the command line
Using the Knative (kn) CLI to list triggers provides a streamlined and intuitive user interface.
5.3.1. Listing triggers by using the Knative CLI
You can use the kn trigger list command to list existing triggers in your cluster.
Prerequisites
- The OpenShift Serverless Operator and Knative Eventing are installed on your OpenShift Container Platform cluster.
-
You have installed the Knative (
kn) CLI.
Procedure
Print a list of available triggers:
$ kn trigger listExample output
NAME    BROKER    SINK           AGE   CONDITIONS   READY   REASON
email   default   ksvc:edisplay   4s    5 OK / 5     True
ping    default   ksvc:edisplay   32s   5 OK / 5     True
Optional: Print a list of triggers in JSON format:
$ kn trigger list -o json
5.4. Describe triggers from the command line
Using the Knative (kn) CLI to describe triggers provides a streamlined and intuitive user interface.
5.4.1. Describing a trigger by using the Knative CLI
You can use the kn trigger describe command to print information about existing triggers in your cluster by using the Knative CLI.
Prerequisites
- The OpenShift Serverless Operator and Knative Eventing are installed on your OpenShift Container Platform cluster.
-
You have installed the Knative (
kn) CLI. - You have created a trigger.
Procedure
Enter the command:
$ kn trigger describe <trigger_name>Example output
Name:         ping
Namespace:    default
Labels:       eventing.knative.dev/broker=default
Annotations:  eventing.knative.dev/creator=kube:admin, eventing.knative.dev/lastModifier=kube:admin
Age:          2m
Broker:       default
Filter:
  type:       dev.knative.event

Sink:
  Name:       edisplay
  Namespace:  default
  Resource:   Service (serving.knative.dev/v1)

Conditions:
  OK TYPE                  AGE REASON
  ++ Ready                  2m
  ++ BrokerReady            2m
  ++ DependencyReady        2m
  ++ Subscribed             2m
  ++ SubscriberResolved     2m
5.5. Connecting a trigger to a sink
You can connect a trigger to a sink, so that events from a broker are filtered before they are sent to the sink. A sink that is connected to a trigger is configured as a subscriber in the Trigger object’s resource spec.
Example of a Trigger object connected to an Apache Kafka sink
apiVersion: eventing.knative.dev/v1
kind: Trigger
metadata:
  name: <trigger_name>
spec:
...
  subscriber:
    ref:
      apiVersion: eventing.knative.dev/v1alpha1
      kind: KafkaSink
name: <kafka_sink_name> 5.6. Filtering triggers from the command line
Using the Knative (kn) CLI to filter events by using triggers provides a streamlined and intuitive user interface. You can use the kn trigger create command, along with the appropriate flags, to filter events by using triggers.
5.6.1. Filtering events with triggers by using the Knative CLI
In the following trigger example, only events with the attribute type: dev.knative.samples.helloworld are sent to the event sink:
$ kn trigger create <trigger_name> --broker <broker_name> --filter type=dev.knative.samples.helloworld --sink ksvc:<service_name>You can also filter events by using multiple attributes. The following example shows how to filter events using the type, source, and extension attributes:
$ kn trigger create <trigger_name> --broker <broker_name> --sink ksvc:<service_name> \
--filter type=dev.knative.samples.helloworld \
--filter source=dev.knative.samples/helloworldsource \
--filter myextension=my-extension-value
5.7. Advanced trigger filters
The advanced trigger filters give you advanced options for more precise event routing. You can filter events by exact matches, prefixes, or suffixes, as well as by CloudEvent extensions. This added control makes it easier to fine-tune how events flow ensuring that only relevant events trigger specific actions.
Advanced trigger filters feature is a Technology Preview feature only. Technology Preview features are not supported with Red Hat production service level agreements (SLAs) and might not be functionally complete. Red Hat does not recommend using them in production. These features provide early access to upcoming product features, enabling customers to test functionality and provide feedback during the development process.
For more information about the support scope of Red Hat Technology Preview features, see Technology Preview Features Support Scope.
5.7.1. Advanced trigger filters overview
The advanced trigger filters feature adds a new filters field to triggers that aligns with the filters API field defined in the CloudEvents Subscriptions API. You can specify filter expressions, where each expression evaluates to true or false for each event.
The following example shows a trigger using the advanced filters field:
apiVersion: eventing.knative.dev/v1
kind: Trigger
metadata:
  name: my-service-trigger
spec:
  broker: default
  filters:
    - cesql: "source LIKE '%commerce%' AND type IN ('order.created', 'order.updated', 'order.canceled')"
  subscriber:
    ref:
      apiVersion: serving.knative.dev/v1
      kind: Service
      name: my-service
The filters field contains an array of filter expressions, each evaluating to either true or false. If any expression evaluates to false, the event is not sent to the subscriber. Each filter expression uses a specific dialect that determines the type of filter and the set of allowed additional properties within the expression.
5.7.2. Supported filter dialects
You can use dialects to define flexible filter expressions to target specific events.
The advanced trigger filters support the following dialects that offer different ways to match and filter events:
-
exact -
prefix -
suffix -
all -
any -
not -
cesql
Each dialect provides a different method for filtering events based on a specific criteria, enabling precise event selection for processing.
5.7.2.1. exact filter dialect
The exact dialect filters events by comparing a string value of the CloudEvent attribute to exactly match the specified string. The comparison is case sensitive. If the attribute is not a string, the filter converts the attribute to its string representation before comparing it to the specified value.
Example of the exact filter dialect
apiVersion: eventing.knative.dev/v1
kind: Trigger
metadata:
  ...
spec:
  ...
  filters:
    - exact:
        type: com.github.push
5.7.2.2. prefix filter dialect
The prefix dialect filters events by comparing a string value of the CloudEvent attribute that starts with the specified string. This comparison is case sensitive. If the attribute is not a string, the filter converts the attribute to its string representation before matching it against the specified value.
Example of the prefix filter dialect
apiVersion: eventing.knative.dev/v1
kind: Trigger
metadata:
  ...
spec:
  ...
  filters:
    - prefix:
        type: com.github.
5.7.2.3. suffix filter dialect
The suffix dialect filters events by comparing a string value of the CloudEvent attribute that ends with the specified string. This comparison is case-sensitive. If the attribute is not a string, the filter converts the attribute to its string representation before matching it to the specified value.
Example of the suffix filter dialect
apiVersion: eventing.knative.dev/v1
kind: Trigger
metadata:
  ...
spec:
  ...
  filters:
    - suffix:
        type: .created
5.7.2.4. all filter dialect
The all filter dialect needs that all nested filter expressions evaluate to true to process the event. If any of the nested expressions return false, the event is not sent to the subscriber.
Example of the all filter dialect
apiVersion: eventing.knative.dev/v1
kind: Trigger
metadata:
  ...
spec:
  ...
  filters:
    - all:
        - exact:
            type: com.github.push
        - exact:
            subject: https://github.com/cloudevents/spec
5.7.2.5. any filter dialect
The any filter dialect requires at least one of the nested filter expressions to evaluate to true. If none of the nested expressions return true, the event is not sent to the subscriber.
Example of the any filter dialect
apiVersion: eventing.knative.dev/v1
kind: Trigger
metadata:
  ...
spec:
  ...
  filters:
    - any:
        - exact:
            type: com.github.push
        - exact:
            subject: https://github.com/cloudevents/spec
5.7.2.6. not filter dialect
The not filter dialect requires that the nested filter expression evaluates to false for the event to be processed. If the nested expression evaluates to true, the event is not sent to the subscriber.
Example of the not filter dialect
apiVersion: eventing.knative.dev/v1
kind: Trigger
metadata:
  ...
spec:
  ...
  filters:
    - not:
        exact:
          type: com.github.push
5.7.2.7. cesql filter dialect
CloudEvents SQL expressions (cesql) allow computing values and matching of CloudEvent attributes against complex expressions that lean on the syntax of Structured Query Language (SQL) WHERE clauses.
The cesql filter dialect uses CloudEvents SQL expressions to filter events. The provided CESQL expression must evaluate to true for the event to be processed.
Example of the cesql filter dialect
apiVersion: eventing.knative.dev/v1
kind: Trigger
metadata:
  ...
spec:
  ...
  filters:
    - cesql: "source LIKE '%commerce%' AND type IN ('order.created', 'order.updated', 'order.canceled')"
For more information about the syntax and the features of the cesql filter dialect, see CloudEvents SQL Expression Language.
5.7.3. Conflict with the existing filter field
You can use the filters and the existing filter field at the same time. If you enable the new new-trigger-filters feature and an object contains both filter and filters, the filters field overrides. This setup allows you to test the new filters field while maintaining support for existing filters. You can gradually introduce the new field into existing trigger objects.
Example of filters field overriding the filter field:
apiVersion: eventing.knative.dev/v1
kind: Trigger
metadata:
  name: my-service-trigger
spec:
  broker: default
  # Existing filter field. This will be ignored when the new filters field is present.
  filter:
    attributes:
      type: dev.knative.foo.bar
      myextension: my-extension-value
  # New filters field. This takes precedence over the old filter field.
  filters:
    - cesql: "type = 'dev.knative.foo.bar' AND myextension = 'my-extension-value'"
  subscriber:
    ref:
      apiVersion: serving.knative.dev/v1
      kind: Service
      name: my-service
5.8. Updating triggers from the command line
Using the Knative (kn) CLI to update triggers provides a streamlined and intuitive user interface.
5.8.1. Updating a trigger by using the Knative CLI
You can use the kn trigger update command with certain flags to update attributes for a trigger.
Prerequisites
- The OpenShift Serverless Operator and Knative Eventing are installed on your OpenShift Container Platform cluster.
-
You have installed the Knative (
kn) CLI. - You have created a project or have access to a project with the appropriate roles and permissions to create applications and other workloads in OpenShift Container Platform.
Procedure
Update a trigger:
$ kn trigger update <trigger_name> --filter <key=value> --sink <sink_name> [flags]You can update a trigger to filter exact event attributes that match incoming events. For example, using the
typeattribute:$ kn trigger update <trigger_name> --filter type=knative.dev.eventYou can remove a filter attribute from a trigger. For example, you can remove the filter attribute with key
type:$ kn trigger update <trigger_name> --filter type-You can use the
--sinkparameter to change the event sink of a trigger:$ kn trigger update <trigger_name> --sink ksvc:my-event-sink
5.9. Deleting triggers from the command line
Using the Knative (kn) CLI to delete a trigger provides a streamlined and intuitive user interface.
5.9.1. Deleting a trigger by using the Knative CLI
You can use the kn trigger delete command to delete a trigger.
Prerequisites
- The OpenShift Serverless Operator and Knative Eventing are installed on your OpenShift Container Platform cluster.
-
You have installed the Knative (
kn) CLI. - You have created a project or have access to a project with the appropriate roles and permissions to create applications and other workloads in OpenShift Container Platform.
Procedure
Delete a trigger:
$ kn trigger delete <trigger_name>
Verification
List existing triggers:
$ kn trigger listVerify that the trigger no longer exists:
Example output
No triggers found.