Chapter 3. Event sinks
3.1. Event sinks
When you create an event source, you can specify an event sink where events are sent to from the source. An event sink is an addressable or a callable resource that can receive incoming events from other resources. Knative services, channels, and brokers are all examples of event sinks. There is also a specific Apache Kafka sink type available.
Addressable objects receive and acknowledge an event delivered over HTTP to an address defined in their status.address.url field. As a special case, the core Kubernetes Service object also fulfills the addressable interface.
Callable objects are able to receive an event delivered over HTTP and transform the event, returning 0 or 1 new events in the HTTP response. These returned events may be further processed in the same way that events from an external event source are processed.
3.1.1. Knative CLI sink flag
When you create an event source by using the Knative (kn) CLI, you can specify a sink where events are sent to from that resource by using the --sink flag. The sink can be any addressable or callable resource that can receive incoming events from other resources.
The following example creates a sink binding that uses a service, http://event-display.svc.cluster.local, as the sink:
Example command using the sink flag
$ kn source binding create bind-heartbeat \
  --namespace sinkbinding-example \
  --subject "Job:batch/v1:app=heartbeat-cron" \
  --sink http://event-display.svc.cluster.local \
--ce-override "sink=bound"- 1
svcinhttp://event-display.svc.cluster.localdetermines that the sink is a Knative service. Other default sink prefixes includechannel, andbroker.
You can configure which CRs can be used with the --sink flag for Knative (kn) CLI commands by Customizing kn.
3.2. Creating event sinks
When you create an event source, you can specify an event sink where events are sent to from the source. An event sink is an addressable or a callable resource that can receive incoming events from other resources. Knative services, channels, and brokers are all examples of event sinks. There is also a specific Apache Kafka sink type available.
For information about creating resources that can be used as event sinks, see the following documentation:
3.3. Sink for Apache Kafka
Apache Kafka sinks are a type of event sink that are available if a cluster administrator has enabled Apache Kafka on your cluster. You can send events directly from an event source to a Kafka topic by using a Kafka sink.
3.3.1. Creating an Apache Kafka sink by using YAML
You can create a Kafka sink that sends events to a Kafka topic. By default, a Kafka sink uses the binary content mode, which is more efficient than the structured mode. To create a Kafka sink by using YAML, you must create a YAML file that defines a KafkaSink object, then apply it by using the oc apply command.
Prerequisites
-
The OpenShift Serverless Operator, Knative Eventing, and the
KnativeKafkacustom resource (CR) are installed on your cluster. - You have created a project or have access to a project with the appropriate roles and permissions to create applications and other workloads in OpenShift Container Platform.
- You have access to a Red Hat AMQ Streams (Kafka) cluster that produces the Kafka messages you want to import.
-
Install the OpenShift CLI (
oc).
Procedure
Create a
KafkaSinkobject definition as a YAML file:Kafka sink YAML
apiVersion: eventing.knative.dev/v1alpha1
kind: KafkaSink
metadata:
  name: <sink-name>
  namespace: <namespace>
spec:
  topic: <topic-name>
  bootstrapServers:
   - <bootstrap-server>
To create the Kafka sink, apply the
KafkaSinkYAML file:$ oc apply -f <filename>Configure an event source so that the sink is specified in its spec:
Example of a Kafka sink connected to an API server source
apiVersion: sources.knative.dev/v1alpha2
kind: ApiServerSource
metadata:
  name: <source-name>
1 namespace: <namespace>2 spec: serviceAccountName: <service-account-name>3 mode: Resource resources: - apiVersion: v1 kind: Event sink: ref: apiVersion: eventing.knative.dev/v1alpha1 kind: KafkaSink name: <sink-name>4
3.3.2. Creating an event sink for Apache Kafka by using the OpenShift Container Platform web console
You can create a Kafka sink that sends events to a Kafka topic in the OpenShift Container Platform web console. By default, a Kafka sink uses the binary content mode, which is more efficient than the structured mode.
As a developer, you can create an event sink to receive events from a particular source and send them to a Kafka topic.
Prerequisites
- You have installed the OpenShift Serverless Operator, with Knative Serving, Knative Eventing, and Knative broker for Apache Kafka APIs, from the OperatorHub.
- You have created a Kafka topic in your Kafka environment.
Procedure
- Navigate to the +Add view.
- Click Event Sink in the Eventing catalog.
-
Search for
KafkaSinkin the catalog items and click it. - Click Create Event Sink.
In the form view, type the URL of the bootstrap server, which is a combination of host name and port.
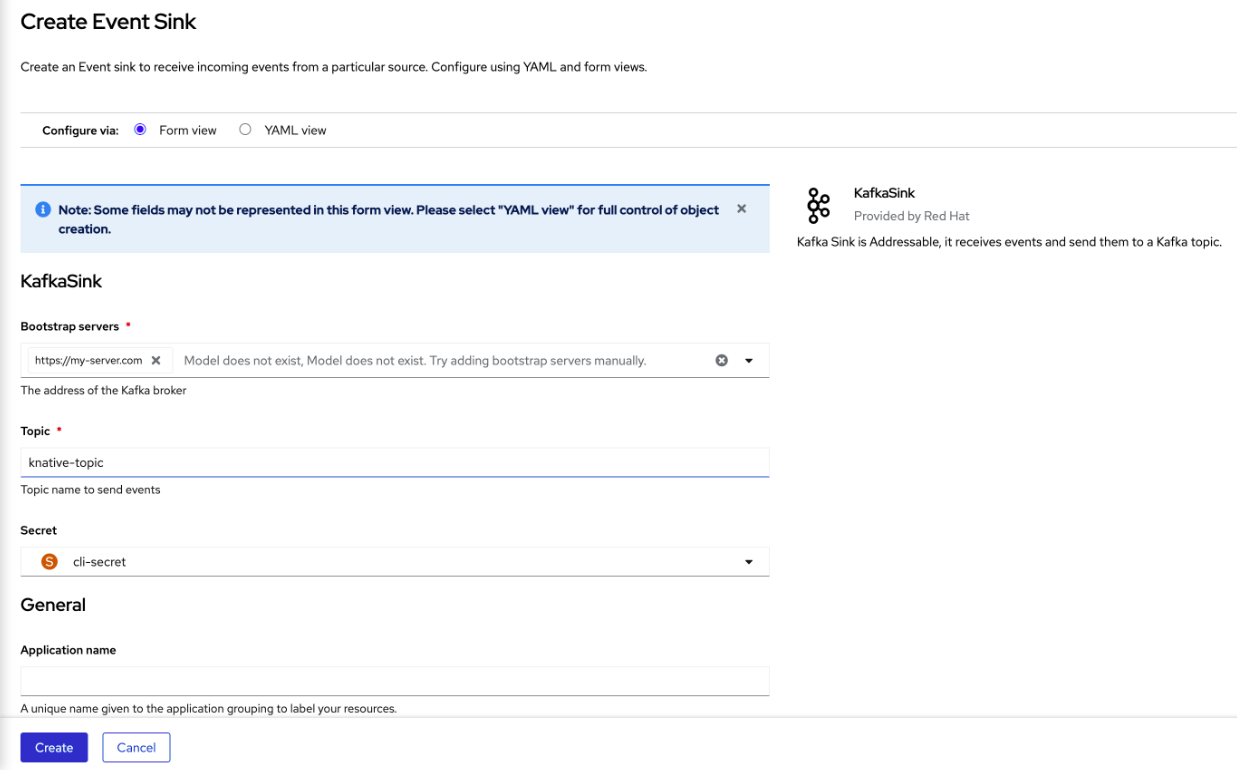
- Type the name of the topic to send event data.
- Type the name of the event sink.
- Click Create.
Verification
- Navigate to the Topology view.
- Click the created event sink to view its details in the right panel.
3.3.3. Configuring security for Apache Kafka sinks
Transport Layer Security (TLS) is used by Apache Kafka clients and servers to encrypt traffic between Knative and Kafka, as well as for authentication. TLS is the only supported method of traffic encryption for the Knative broker implementation for Apache Kafka.
Simple Authentication and Security Layer (SASL) is used by Apache Kafka for authentication. If you use SASL authentication on your cluster, users must provide credentials to Knative for communicating with the Kafka cluster; otherwise events cannot be produced or consumed.
Prerequisites
-
The OpenShift Serverless Operator, Knative Eventing, and the
KnativeKafkacustom resources (CRs) are installed on your OpenShift Container Platform cluster. -
Kafka sink is enabled in the
KnativeKafkaCR. - You have created a project or have access to a project with the appropriate roles and permissions to create applications and other workloads in OpenShift Container Platform.
-
You have a Kafka cluster CA certificate stored as a
.pemfile. -
You have a Kafka cluster client certificate and a key stored as
.pemfiles. -
You have installed the OpenShift (
oc) CLI. -
You have chosen the SASL mechanism to use, for example,
PLAIN,SCRAM-SHA-256, orSCRAM-SHA-512.
Procedure
Create the certificate files as a secret in the same namespace as your
KafkaSinkobject:ImportantCertificates and keys must be in PEM format.
For authentication using SASL without encryption:
$ oc create secret -n <namespace> generic <secret_name> \
  --from-literal=protocol=SASL_PLAINTEXT \
  --from-literal=sasl.mechanism=<sasl_mechanism> \
  --from-literal=user=<username> \
  --from-literal=password=<password>
For authentication using SASL and encryption using TLS:
$ oc create secret -n <namespace> generic <secret_name> \
  --from-literal=protocol=SASL_SSL \
  --from-literal=sasl.mechanism=<sasl_mechanism> \
  --from-file=ca.crt=<my_caroot.pem_file_path> \
1 --from-literal=user=<username> \ --from-literal=password=<password>- 1
- The
ca.crtcan be omitted to use the system’s root CA set if you are using a public cloud managed Kafka service.
For authentication and encryption using TLS:
$ oc create secret -n <namespace> generic <secret_name> \
  --from-literal=protocol=SSL \
  --from-file=ca.crt=<my_caroot.pem_file_path> \
1 --from-file=user.crt=<my_cert.pem_file_path> \ --from-file=user.key=<my_key.pem_file_path>- 1
- The
ca.crtcan be omitted to use the system’s root CA set if you are using a public cloud managed Kafka service.
Create or modify a
KafkaSinkobject and add a reference to your secret in theauthspec:apiVersion: eventing.knative.dev/v1alpha1 kind: KafkaSink metadata: name: <sink_name> namespace: <namespace> spec: ... auth: secret: ref: name: <secret_name> ...Apply the
KafkaSinkobject:$ oc apply -f <filename>
3.4. JobSink
Event processing usually completes within a short time frame, such as a few minutes. This ensures that the HTTP connection remains open and the service does not scale down prematurely.
Maintaining long-running connections increases the risk of failure, potentially leading to processing restarts and repeated request retries.
You can use JobSink to support long-running asynchronous jobs and tasks using the full Kubernetes batch/v1 Job resource and features and Kubernetes job queuing systems such as Kueue.
3.4.1. Using JobSink
When an event is sent to a JobSink, Eventing creates a Job and mounts the received event as JSON file at /etc/jobsink-event/event.
Procedure
Create a
JobSinkobject definition as a YAML file:JobSink YAML
apiVersion: sinks.knative.dev/v1alpha1
kind: JobSink
metadata:
  name: job-sink-logger
spec:
  job:
    spec:
      completions: 1
      parallelism: 1
      template:
        spec:
          restartPolicy: Never
          containers:
            - name: main
              image: docker.io/library/bash:5
              command: [ "cat" ]
              args:
                - "/etc/jobsink-event/event"
Apply the
JobSinkYAML file:$ oc apply -f <job-sink-file.yaml>Verify
JobSinkis ready:$ oc get jobsinks.sinks.knative.devExample output:
NAME              URL                                                                          AGE   READY   REASON
job-sink-logger   http://job-sink.knative-eventing.svc.cluster.local/default/job-sink-logger   5s    True
Trigger a
JobSink.JobSinkcan be triggered by any event source or trigger.$ oc run curl --image=curlimages/curl --rm=true --restart=Never -ti -- -X POST -v \ -H "content-type: application/json" \ -H "ce-specversion: 1.0" \ -H "ce-source: my/curl/command" \ -H "ce-type: my.demo.event" \ -H "ce-id: 123" \ -d '{"details":"JobSinkDemo"}' \ http://job-sink.knative-eventing.svc.cluster.local/default/job-sink-loggerVerify a
Jobis created:$ oc logs job-sink-loggerszoi6-dqbtqExample output:
{"specversion":"1.0","id":"123","source":"my/curl/command","type":"my.demo.event","datacontenttype":"application/json","data":{"details":"JobSinkDemo"}}
JobSink creates a Job for each unique event it receives.
An event is uniquely identified by the combination of its source and id attributes.
If an event with the same attributes is received while a Job for that event already exists, another Job will not be created.
3.4.2. Reading the Job event file
Procedure
Read the
eventfile and deserialize it by using any CloudEvents JSON deserializer. The following example demonstrates how to read and process an event using CloudEvents Go SDK:package mytask import ( "encoding/json" "fmt" "os" cloudevents "github.com/cloudevents/sdk-go/v2" ) func handleEvent() error { eventBytes, err := os.ReadFile("/etc/jobsink-event/event") if err != nil { return err } event := &cloudevents.Event{} if err := json.Unmarshal(eventBytes, event); err != nil { return err } fmt.Println(event) return nil }
3.4.3. Setting custom event file mount path
You can set a custom event file mount path in your JobSink definition.
Procedure
Inside your container definition, include the
volumeMountsconfiguration and set as required.apiVersion: sinks.knative.dev/v1alpha1 kind: JobSink metadata: name: job-sink-custom-mount-path spec: job: spec: completions: 1 parallelism: 1 template: spec: restartPolicy: Never containers: - name: main image: docker.io/library/bash:5 command: [ "bash" ] args: - -c - echo "Hello world!" && sleep 5 # The event will be available in a file at `/etc/custom-path/event` volumeMounts: - name: "jobsink-event" mountPath: "/etc/custom-path" readOnly: true
3.4.4. Cleaning up finished jobs
You can clean up finished jobs by setting a ttlSecondsAfterFinished value in your JobSink definition. For example, setting the value to 600 removes completed jobs 600 seconds (10 minutes) after they finish.
Procedure
In your definition, set the value of
ttlSecondsAfterFinishedto the required amount.Example of ttlSecondsAfterFinished set to 600
apiVersion: sinks.knative.dev/v1alpha1
kind: JobSink
metadata:
  name: job-sink-example
spec:
  job:
    spec:
      ttlSecondsAfterFinished: 600
3.4.5. Simulating FailJob action
Procedure
Trigger a
FailJobaction by including a bug simulating command in your JobSink definition.Example of JobSink failure
apiVersion: sinks.knative.dev/v1alpha1
kind: JobSink
metadata:
  name: job-sink-failure
spec:
  job:
    metadata:
      labels:
        my-label: my-value
    spec:
      completions: 12
      parallelism: 3
      template:
        spec:
          restartPolicy: Never
          containers:
            - name: main
              image: docker.io/library/bash:5
              command: [ "bash" ]        # example command simulating a bug which triggers the FailJob action
              args:
                - -c
                - echo "Hello world!" && sleep 5 && exit 42
      backoffLimit: 6
      podFailurePolicy:
        rules:
          - action: FailJob
            onExitCodes:
              containerName: main      # optional
              operator: In             # one of: In, NotIn
              values: [ 42 ]
          - action: Ignore             # one of: Ignore, FailJob, Count
            onPodConditions:
              - type: DisruptionTarget   # indicates Pod disruption