Framework for Upgrades (13 to 16.1)
In-place upgrades from Red Hat OpenStack Platform 13 to 16.1
Abstract
Making open source more inclusive
Red Hat is committed to replacing problematic language in our code, documentation, and web properties. We are beginning with these four terms: master, slave, blacklist, and whitelist. Because of the enormity of this endeavor, these changes will be implemented gradually over several upcoming releases. For more details, see our CTO Chris Wright’s message.
Providing feedback on Red Hat documentation
We appreciate your input on our documentation. Tell us how we can make it better.
Using the Direct Documentation Feedback (DDF) function
Use the Add Feedback DDF function for direct comments on specific sentences, paragraphs, or code blocks.
- View the documentation in the Multi-page HTML format.
- Ensure that you see the Feedback button in the upper right corner of the document.
- Highlight the part of text that you want to comment on.
- Click Add Feedback.
- Complete the Add Feedback field with your comments.
- Optional: Add your email address so that the documentation team can contact you for clarification on your issue.
- Click Submit.
Chapter 1. About the Red Hat OpenStack Platform framework for upgrades
The Red Hat OpenStack Platform framework for upgrades is a workflow to upgrade your Red Hat OpenStack Platform environment from one long life version to the next long life version. This workflow is an in-place solution and the upgrade occurs within your existing environment.
1.1. Upgrade framework for long life versions
You can use the Red Hat OpenStack Platform upgrade framework to perform an in-place upgrade path through multiple versions of the overcloud. The goal is to provide you with an opportunity to remain on certain OpenStack versions that are considered long life versions and upgrade when the next long life version is available.
You can upgrade Red Hat OpenStack Platform 13 to Red Hat OpenStack Platform 16.1. However, to avail of full product support, only the Red Hat OpenStack Platform 13 to Red Hat OpenStack Platform 16.2 upgrade path is supported. If you want to upgrade from 13 to 16.1, you must obtain a Support Exception.
For more information about upgrading to Red Hat OpenStack Platform 16.2, see Framework for upgrades 13 to 16.2.
This guide provides an upgrade framework through the following versions:
| Current Version | Target Version |
|---|---|
| Red Hat OpenStack Platform 13 | Red Hat OpenStack Platform 16.1 |
1.2. Lifecycle support for long life versions
For detailed support dates and information on the lifecycle support for Red Hat OpenStack Platform, see Red Hat OpenStack Platform Life Cycle.
1.3. Upgrade paths for long life release
Red Hat provides two options for upgrading your environment to the next long life release:
- In-place upgrade
- Perform an upgrade of the services in your existing environment. This guide primarily focuses on this option.
- Parallel migration
- Create a new Red Hat OpenStack Platform 16.1 environment and migrate your workloads from your current environment to the new environment. For more information about Red Hat OpenStack Platform parallel migration, contact Red Hat Global Professional Services.
The durations in this table are minimal estimates based on internal testing and might not apply to all productions environments. For example, if your hardware has low specifications or an extended boot period, allow for more time with these durations. To accurately gauge the upgrade duration for each task, perform these procedures in a test environment with hardware similar to your production environment.
| In-place upgrade | Parallel migration | |
|---|---|---|
| Upgrade duration for undercloud | Estimated duration for each major action includes the following:
| None. You are creating a new undercloud in addition to your existing undercloud. |
| Upgrade duration for overcloud control plane | Estimates for each Controller node:
| None. You are creating a new control plane in addition to your existing control plane. |
| Outage duration for control plane | The duration of the service upgrade of the bootstrap Controller node, which is approximately 60 minutes. | None. Both overclouds are operational during the workload migration. |
| Consequences of control plane outage | You cannot perform OpenStack operations during the outage. | No outage. |
| Upgrade duration for overcloud data plane | Estimates for each Compute node and Ceph Storage node:
| None. You are creating a new data plane in addition to your existing data plane. |
| Outage duration for data plane | The outage is minimal due to workload migration from node to node. | The outage is minimal due to workload migration from overcloud to overcloud. |
| Additional hardware requirements | No additional hardware is required. | Additional hardware is required to create a new undercloud and overcloud. |
Chapter 2. Planning and preparation for an in-place upgrade
Before you conduct an in-place upgrade of your OpenStack Platform environment, create a plan for the upgrade and accommodate any potential obstacles that might block a successful upgrade.
2.1. Familiarize yourself with Red Hat OpenStack Platform 16.1
Before you perform an upgrade, familiarize yourself with Red Hat OpenStack Platform 16.1 to help you understand the resulting environment and any potential version-to-version changes that might affect your upgrade. To familiarize yourself with Red Hat OpenStack Platform 16.1, follow these suggestions:
Read the release notes for all versions across the upgrade path and identify any potential aspects that require planning:
- Components that contain new features
- Known issues
Open the release notes for each version using these links:
- Red Hat OpenStack Platform 13, which is your current version
- Red Hat OpenStack Platform 14
- Red Hat OpenStack Platform 15
- Red Hat OpenStack Platform 16.0
- Red Hat OpenStack Platform 16.1, which is your target version
- Read the Director Installation and Usage guide for version 16.1 and familiarize yourself with any new requirements and processes in this guide.
- Install a proof-of-concept Red Hat OpenStack Platform 16.1 undercloud and overcloud. Develop hands-on experience of the target OpenStack Platform version and investigate potential differences between the target version and your current version.
2.2. High level changes in Red Hat OpenStack Platform 16.1
The following high-level changes occur during the upgrade to Red Hat OpenStack Platform 16.1:
-
OpenStack Platform director 16.1 configures the overcloud using an Ansible-driven method called
config-download. This replaces the standard heat-based configuration method. Director still uses heat to orchestrate provisioning operations. -
The director installation uses the same method as the overcloud deployment. Therefore, the undercloud also uses
openstack-tripleo-heat-templatesas a blueprint for installing and configuring each service. - The undercloud runs OpenStack services in containers.
- The undercloud pulls and stores container images through a new method. Instead of pulling container images before deploying the overcloud, the undercloud pulls all relevant container images during the deployment process.
- The overcloud deployment process includes an Advanced Subscription Management method to register nodes. This method incorporates an Ansible role to register OpenStack Platform nodes. The new method also applies different subscriptions to different node roles if necessary.
- The overcloud now uses Open Virtual Network (OVN) as the default ML2 mechanism driver. It is possible to migrate your Open vSwitch (OVS) service to OVN, which you perform after the completion of a successful upgrade.
- The undercloud and overcloud both run on Red Hat Enterprise Linux 8.
-
openstack-tripleo-heat-templatesincludes a unified composable service template collection in thedeploymentdirectory. This directory now includes templates with merged content from both the containerized service and Puppet-based composable service templates. The OpenStack Data Processing service (sahara) is no longer supported.
ImportantIf you have sahara enabled in your Red Hat OpenStack Platform 13 environment, do not continue with this upgrade and contact Red Hat Global Support Services.
- The OpenStack Telemetry components are deprecated in favor of the Service Telemetry Framework (STF).
2.3. Changes in Red Hat Enterprise Linux 8
The undercloud and overcloud both run on Red Hat Enterprise Linux 8. This includes new tools and functions relevant to the undercloud and overcloud:
-
The undercloud and overcloud use the Red Hat Container Toolkit. Instead of
dockerto build and control the container lifecycle, Red Hat Enterprise Linux 8 includesbuildahto build new container images andpodmanfor container management. -
Red Hat Enterprise Linux 8 does not include the
docker-distributionpackage. The undercloud now includes a private HTTP registry to provide container images to overcloud nodes. -
The upgrade process from Red Hat Enterprise Linux 7 to 8 uses the
leapptool. -
Red Hat Enterprise Linux 8 does not use the
ntpservice. Instead, Red Hat Enterprise Linux 8 useschronyd. - Red Hat Enterprise Linux 8 includes new versions of high availability tools.
The Red Hat OpenStack Platform 16.1 uses Red Hat Enterprise Linux 8.2 as the base operating system. As a part of the upgrade process, you will upgrade the base operating system of nodes to Red Hat Enterprise Linux 8.2.
For more information about the key differences between Red Hat Enterprise Linux 7 and 8, see Considerations in adopting RHEL 8. For general information about Red Hat Enterprise linux 8, see Product Documentation for Red Hat Enterprise Linux 8.
2.4. Leapp upgrade usage in Red Hat OpenStack Platform
The long-life Red Hat OpenStack Platform upgrade requires a base operating system upgrade from Red Hat Enterprise Linux 7 to Red Hat Enterprise Linux 8. Red Hat Enterprise Linux 7 uses the Leapp utility to perform the upgrade to Red Hat Enterprise Linux 8. To ensure that Leapp and its dependencies are available, verify that the following Red Hat Enterprise Linux 7 repositories are enabled:
Red Hat Enterprise Linux 7 Server RPMs x86_64 7Server or Red Hat Enterprise Linux 7 Server RPMs x86_64 7.9
rhel-7-server-rpms
x86_64 7Server
or:
rhel-7-server-rpms
x86_64 7.9
rhel-7-server-rpms
x86_64 7Server
or:
rhel-7-server-rpms
x86_64 7.9
Copy to Clipboard Copied! Toggle word wrap Toggle overflow Red Hat Enterprise Linux 7 Server - Extras RPMs x86_64
rhel-7-server-extras-rpms
x86_64
rhel-7-server-extras-rpms
x86_64
Copy to Clipboard Copied! Toggle word wrap Toggle overflow
For more information, see Preparing a RHEL 7 system for the upgrade.
The undercloud and overcloud use a separate process for performing the operating system upgrade.
Undercloud process
Run the leapp upgrade manually before you run the openstack undercloud upgrade command. The undercloud upgrade includes instructions for performing the leapp upgrade.
Overcloud process
The overcloud upgrade framework automatically runs the leapp upgrade.
Limitations
For information of potential limitations that might affect your upgrade, see the following sections from the Upgrading from RHEL 7 to RHEL 8 guide:
In particular, you cannot perform a Leapp upgrade on nodes that use encryption of the whole disk or a partition, such as LUKS encryption, or file-system encryption. This limitation affects Ceph OSD nodes that you have configured with the dmcrypt: true parameter.
If any known limitations affect your environment, seek advice from the Red Hat Technical Support Team.
Troubleshooting
For information about troubleshooting potential Leapp issues, see Troubleshooting in Upgrading from RHEL 7 to RHEL 8.
2.5. Supported upgrade scenarios
Before proceeding with the upgrade, check that your overcloud is supported.
If you are uncertain whether a particular scenario not mentioned in these lists is supported, seek advice from the Red Hat Technical Support Team.
Supported scenarios
The following in-place upgrade scenarios are tested and supported.
- Standard environments with default role types: Controller, Compute, and Ceph Storage OSD
- Split-Controller composable roles
-
Ceph Storage composable roles, including Ceph Storage custom configurations, such as
CephConfigOverridesandCephAnsibleExtraConfig - Hyper-Converged Infrastructure: Compute and Ceph Storage OSD services on the same node
- Environments with Network Functions Virtualization (NFV) technologies: Single-root input/output virtualization (SR-IOV) and Data Plane Development Kit (DPDK)
Environments with Instance HA enabled
NoteDuring an upgrade procedure, nova live migrations are supported. However, evacuations initiated by Instance HA are not supported. When you upgrade a Compute node, the node is shut down cleanly and any workload running on the node is not evacuated by Instance HA automatically. Instead, you must perform live migration manually.
Technology preview scenarios
The framework for upgrades is considered a Technology Preview when you use it in conjunction with these features, and therefore is not fully supported by Red Hat. You should only test this scenario in a proof-of-concept environment and not upgrade in a production environment. For more information about Technology Preview features, see Scope of Coverage Details.
- Edge and Distributed Compute Node (DCN) scenarios
2.6. Considerations for upgrading with external Ceph deployments
If you have deployed a Red Hat Ceph Storage system separately and then used director to deploy and configure OpenStack, you can use the Red Hat OpenStack Platform framework for upgrades to perform an in-place upgrade with external Ceph deployments. This scenario is different from upgrading a Ceph cluster that was deployed using director.
The differences that you must take into account when planning and preparing for an in-place upgrade with external Ceph deployments are the following:
- Before you can upgrade your Red Hat OpenStack Platform deployment from version 13 to version 16.1, you must upgrade your Red Hat Ceph Storage cluster from version 3 to version 4. For more information, see Upgrading a Red Hat Ceph Storage cluster in the Red Hat Ceph Storage 4 Installation Guide.
- After you upgrade your Red Hat Ceph Storage cluster from version 3 to version 4, Red Hat OpenStack Platform 13 might still run RHCSv3 client components, however these are compatible against the RHCSv4 cluster.
- You can follow the upgrade path described in the Framework For Upgrades (13 to 16.1) document, and where applicable, you must complete the conditional steps that support this particular scenario. A conditional step starts with the following statement: "If you are upgrading with external Ceph deployments".
-
When you upgrade with external Ceph deployments, you install RHCSv4
ceph-ansibleas part of the overcloud upgrade process. When you upgrade a Ceph cluster that was deployed using director, you install RHCSv4ceph-ansibleafter the overcloud upgrade process is complete.
When you upgrade a Red Hat Ceph Storage cluster from a previous supported version to version 4.2z2, the upgrade completes with the storage cluster in a HEALTH_WARN state with a warning message that states monitors are allowing insecure global_id reclaim. This is due to the patched CVE (CVE-2021-20288), see Ceph HEALTH_WARN with 'mons are allowing insecure global_id reclaim' after install/upgrade to RHCS 4.2z2 (or newer).
Because the HEALTH_WARN state is displayed due to the CVE, it is possible to mute health warnings temporarily. However, there is a risk that if you mute warnings you do not have visibility about potential older and unpatched clients connected to your cluster. For more information about muting health warnings, see Upgrading a Red Hat Ceph Storage cluster in the Red Hat Ceph Storage documentation.
Do not disable global_id_reclaim manually until all clients are upgraded and patched otherwise they cannot connect. You can run the following command as the root user to view a list of unpatched clients that are connected to the cluster:
ceph health detail
# ceph health detail2.7. Known issues that might block an upgrade
Review the following known issues that might affect a successful upgrade.
- BZ#1997351 - (13→16.1) Instance are inaccessible after bootstrap controller upgrade
-
When you upgrade a Red Hat OpenStack Platform (RHOSP) 13 environment that has been deployed with ML2-OVN, the upgrade process on your Controller nodes might fail. After the Leapp reboot, the
ovn-dbscontainer might fail to start due to an SELinux permission denial. For more information about how to avoid bug BZ#1997351, see the Red Hat Knowledgebase solution OVN fails to configure after reboot during OSP-13 → OSP-16.1 FFU. - BZ#1902849 - osp13-osp16.1 ffu fails on clusters previously upgraded from osp8, osp10
-
Red Hat OpenStack Platform (RHOSP) environments that have been previously upgraded from version RHOSP 10, require the
python-dockerpackage to avoid BZ#1902849. For more information, see the Red Hat Knowledgebase solution osp13-osp16.1 ffu fails on older environments missing python-docker package. - BZ#1925078 - RHOSP13-16.1 FFU: Overcloud upgrade hangs in controller after failed attempt with reference to wrong ceph image
Systems that use UEFI boot and a UEFI bootloader in OSP13 might run into an UEFI issue that results in:
-
/etc/fstabnot being updated - grub-install is incorrectly used on EFI system
For more information, see the Red Hat Knowledgebase solution FFU 13 to 16.1: Leapp fails to update the kernel on UEFI based systems and /etc/fstab does not contain the EFI partition.
If your systems use UEFI, contact Red Hat Technical Support.
-
- BZ#1895887 - ovs+dpdk fail to attach device OvsDpdkHCI
After upgrading with the Leapp utility, the Compute node with OVS-DPDK workload does not function properly. To resolve this issue, perform one of the following steps:
Remove the
/etc/modules-load.d/vfio-pci.conffile before you upgrade the Compute node.or
Restart
ovs-vswitchdservice on the Compute node after you upgrade the Compute node.This issue affects RHOSP 16.1.3. For more information, see the Red Hat Knowledgebase solution OVS-DPDK errors after Framework Upgrade from OSP 13 to 16.1 on HCI compute node.
- BZ#1936419 - FFU 13-16.1 Upgrade: Leapp upgrade on ceph nodes failing as leap parameters try to enable the Fast datapath repo
If you use a Ceph subscription and have configured director to use the
overcloud-minimalimage for Ceph storage nodes, the upgrade of the operating system for Ceph storage nodes might fail due to a Leapp limitation. To avoid this issue, after thesystem_upgraderun step, you must log in to the Ceph node to unset the RHEL minor release version, update to the latest available RHEL minor release version, and reboot the node.If you use Red Hat Satellite Server to host RPM content for the Leapp upgrade, you must add the following 8.2 repositories to the Content View that you use:
Red Hat Enterprise Linux 8 for x86_64 - AppStream (RPMs)
rhel-8-for-x86_64-appstream-rpms
x86_64 8.2
rhel-8-for-x86_64-appstream-rpms
x86_64 8.2
Copy to Clipboard Copied! Toggle word wrap Toggle overflow Red Hat Enterprise Linux 8 for x86_64 - BaseOS (RPMs)
rhel-8-for-x86_64-baseos-rpms
x86_64 8.2
rhel-8-for-x86_64-baseos-rpms
x86_64 8.2
Copy to Clipboard Copied! Toggle word wrap Toggle overflow This guide includes a workaround to avoid this issue.
- BZ#2016144 - FFU 13-16.1: During Leapp upgrade reboot, openvswitch failed to start with error
Starting ovsdb-server ovsdb-server: /var/run/openvswitch/ovsdb-server.pid.tmp: create failed (Permission denied) -
Red Hat OpenStack Platform (RHOSP) environments that have been upgraded from previous versions might contain unnecessary files in
/etc/systemd/system/ovs*. You must remove these files before you begin the overcloud upgrade process from RHOSP 13 to RHOSP 16.1. - BZ#2008976 - Python2 packages cleaning up after Leapp upgrade failing in Leapp dependencies
With Leapp version 5.0.8-100.202109241452Z.1332835, the automatic removal of
python2Leapp packages is unsuccessful because of a DNFexcludeoption that retains Leapp packages.Include the
UpgradeInitCommandparameter in an environment file and remove the DNF exclude statements:parameter defaults: UpgradeInitCommand: "sudo dnf config-manager --save --setopt exclude=''"
parameter defaults: UpgradeInitCommand: "sudo dnf config-manager --save --setopt exclude=''"Copy to Clipboard Copied! Toggle word wrap Toggle overflow For more information, see Creating an upgrades environment file.
- BZ#1978228 - OSP13→16.2 Leapp upgrade failed with TLSEverywhere
-
If you use TLS-Everywhere in your environment and want to migrate from
authconfigtoauthselect, set theauthselect_check.confirmparameter toTrue. Otherwise, set this value toFalse. For more information, see Creating an upgrades environment file. - BZ#2021525 - openstack overcloud upgrade run times out / HAProxy container fails to start
- An upgrade from Red Hat OpenStack Platform (RHOSP) 13 to RHOSP 16.1 might fail during the deployment step because of invalid SELinux labels. For a resolution and more information, see the Red Hat Knowledgebase solution Pacemaker managed services might not restart during an OSP13 - OSP16.x FFU.
- BZ#2015325 - FFU: upgrade failed during "Upgrade Mysql database from a temporary container" step
-
Red Hat Enterprise Linux includes an upgradable RPM for
mariadb-serverthat interferes with the upgrade of containerized mariadb in Red Hat OpenStack Platform (RHOSP). Before you perform a RHOSP upgrade, remove themariadb-serverpackage from your Controller hosts. For more information, see Creating an upgrades environment file. - BZ#2024447 - Identity service (keystone) password for the placement user was overridden by NovaPassword during FFU RHOSP 13 to 16
During an upgrade from Red Hat OpenStack Platform 13 to 16.1, if you define a value for the
NovaPasswordparameter but not thePlacementPasswordparameter, theNovaPasswordparameter overrides the OpenStack Identity service (keystone) password for the placement user. To preserve the Identity service password, do not set theNovaPasswordor thePlacementPasswordin theparameter_defaultssection.If you set both passwords in the
parameter_defaultssection, the Compute nodes might not be able to communicate with the control plane until they are upgraded. For more information about upgrading Compute nodes, see Upgrading Compute nodes.Additionally, if you deployed the overcloud on RHOSP 13 by using the
NovaPassword,PlacementPassword, or both, you must remove those passwords from the template and run theopenstack overcloud deploycommand on RHOSP 13 before upgrading to RHOSP 16.1.- BZ#2164396 - FFU: Redhat satellite tools repository to be enabled for FFU (13 to 16.2)
- If you are using Satellite version 6.7, the upgrade fails when you enable the Red Hat Satellite Tools for RHEL 8 Server RPMs x86_64 repository. The failure occurs because the appropriate packages cannot be installed. The Red Hat engineering team is investigating a solution to this issue.
- BZ#2245602 - Upgrade (OSP16.2 →OSP17.1) controller-0 does not perform leapp upgrade due to packages missing ovn2.15 openvswitch2.15
If you upgrade from Red Hat OpenStack Platform (RHOSP) 13 to 16.1 or 16.2, or from RHOSP 16.2 to 17.1, do not include the
system_upgrade.yamlfile in the--answers-file answer-upgrade.yamlfile. If thesystem_upgrade.yamlfile is included in that file, theenvironments/lifecycle/upgrade-prepare.yamlfile overwrites the parameters in thesystem_upgrade.yamlfile. To avoid this issue, append thesystem_upgrade.yamlfile to theopenstack overcloud upgrade preparecommand. For example:openstack overcloud upgrade prepare --answers-file answer-upgrade.yaml /
$ openstack overcloud upgrade prepare --answers-file answer-upgrade.yaml /
-r roles-data.yaml /
-n networking-data.yaml /
-e system_upgrade.yaml /
-e upgrade_environment.yaml /
Copy to Clipboard Copied! Toggle word wrap Toggle overflow With this workaround, the parameters that are configured in the
system_upgrade.yamlfile overwrite the default parameters in theenvironments/lifecycle/upgrade-prepare.yamlfile.
Red Hat Ceph Storage Issues
- BZ#1855813 - Ceph tools repository should be switched from RHCS3 to RHCS4 only after converge, before running external-upgrade
-
The
ceph-ansibleplaybook collection on the undercloud deploys Red Hat Ceph Storage containers on the overcloud. To upgrade your environment, you must have Red Hat Ceph Storage 3 version ofceph-ansibleto maintain Ceph Storage 3 containers through the upgrade. This guide includes instructions on how to retainceph-ansibleversion 3 over the course of the upgrade until you are ready to upgrade to Ceph Storage 4. Before performing the 13 to 16.1 upgrade, you must perform a minor version update of your Red Hat OpenStack Platform 13 environment and ensure you haveceph-ansibleversion 3.2.46 or later.
2.8. Backup and restore
Before you upgrade your Red Hat OpenStack Platform 13 environment, back up the undercloud and overcloud control plane. For more information about backing up nodes with the Relax-and-recover (ReaR) utility, see the Undercloud and Control Plane Back Up and Restore guide.
- Back up your nodes before you perform an upgrade. For more information about backing up nodes before you upgrade, see Red Hat OpenStack Platform 13 Undercloud and Control Plane Back Up and Restore.
- You can back up each node after it has been upgraded. For more information about backing up upgraded nodes, see Red Hat OpenStack Platform 16.1 Backing up and restoring the undercloud and control plane nodes.
- You can back up the database that runs on the undercloud node after you perform the undercloud upgrade and before you perform the overcloud upgrade. For more information about backing up the undercloud database, see Creating a database backup of the undercloud node in the Red Hat OpenStack Platform 16.1 Backing up and restoring the undercloud and control plane nodes guide.
2.9. Minor version update
Before you upgrade your Red Hat OpenStack Platform environment, update the environment to the latest minor version of your current release. For example, perform an update of your Red Hat OpenStack Platform 13 environment to the latest 13 before running the upgrade to Red Hat OpenStack Platform 16.1.
For instructions on performing a minor version update for Red Hat OpenStack Platform 13, see Keeping Red Hat OpenStack Platform Updated.
2.10. Proxy configuration
If you use a proxy with your Red Hat OpenStack Platform 13 environment, the proxy configuration in the /etc/environment file will persist past the operating system upgrade and the Red Hat OpenStack Platform 16.1 upgrade.
- For more information about proxy configuration for Red Hat OpenStack Platform 13, see Considerations when running the undercloud with a proxy.
- For more information about proxy configuration for Red Hat OpenStack Platform 16.1, see Considerations when running the undercloud with a proxy.
2.11. Validating Red Hat OpenStack Platform 13 before the upgrade
Before you upgrade to Red Hat OpenStack Platform 16.1, validate your undercloud and overcloud with the tripleo-validations playbooks. In Red Hat OpenStack Platform 13, you run these playbooks through the OpenStack Workflow Service (mistral).
If you use CDN or Satellite as repository sources, the validation fails. To resolve this issue, see the Red Hat Knowledgebase solution, repos validation fails because of SSL certificate error.
Procedure
-
Log in to the undercloud as the
stackuser. Source the
stackrcfile:source ~/stackrc
$ source ~/stackrcCopy to Clipboard Copied! Toggle word wrap Toggle overflow Create a bash script called
pre-upgrade-validations.shand include the following content in the script:Copy to Clipboard Copied! Toggle word wrap Toggle overflow Add permission to run the script:
chmod +x pre-upgrade-validations.sh
$ chmod +x pre-upgrade-validations.shCopy to Clipboard Copied! Toggle word wrap Toggle overflow Run the script:
./pre-upgrade-validations.sh
$ ./pre-upgrade-validations.shCopy to Clipboard Copied! Toggle word wrap Toggle overflow Review the script output to determine which validations succeed and fail:
=== Running validation: "check-ftype" ===

Success! The validation passed for all hosts:
* undercloud
=== Running validation: "check-ftype" ===

Success! The validation passed for all hosts:
* undercloud
Copy to Clipboard Copied! Toggle word wrap Toggle overflow
Chapter 3. Repositories
This section contains the repositories for the undercloud and overcloud. Refer to this section when you need to enable repositories in certain situations:
- Enabling repositories when registering to the Red Hat Customer Portal.
- Enabling and synchronizing repositories to your Red Hat Satellite Server.
- Enabling repositories when registering to your Red Hat Satellite Server.
3.1. Undercloud repositories
Red Hat OpenStack Platform (RHOSP) 16.1 runs on Red Hat Enterprise Linux 8.2. As a result, you must lock the content from these repositories to the respective Red Hat Enterprise Linux version.
If you synchronize repositories by using Red Hat Satellite, you can enable specific versions of the Red Hat Enterprise Linux repositories. However, the repository label remains the same despite the version you choose. For example, if you enable the 8.2 version of the BaseOS repository, the repository name includes the specific version that you enabled, but the repository label is still rhel-8-for-x86_64-baseos-tus-rpms.
Any repositories outside the ones specified here are not supported. Unless recommended, do not enable any other products or repositories outside the ones listed in the following tables or else you might encounter package dependency issues. Do not enable Extra Packages for Enterprise Linux (EPEL).
Core repositories
The following table lists core repositories for installing the undercloud.
| Name | Repository | Description of requirement |
|---|---|---|
| Red Hat Enterprise Linux 8.2 for x86_64 - BaseOS (RPMs) Telecommunications Update Service (TUS) |
| Base operating system repository for x86_64 systems. |
| Red Hat Enterprise Linux 8.2 for x86_64 - AppStream (RPMs) |
| Contains Red Hat OpenStack Platform dependencies. |
| Red Hat Enterprise Linux 8.2 for x86_64 - High Availability (RPMs) Telecommunications Update Service (TUS) |
| High availability tools for Red Hat Enterprise Linux. Used for Controller node high availability. |
| Red Hat Ansible Engine 2.9 for RHEL 8 x86_64 (RPMs) |
| Ansible Engine for Red Hat Enterprise Linux. Used to provide the latest version of Ansible. |
| Advanced Virtualization for RHEL 8 x86_64 (RPMs) |
| Provides virtualization packages for OpenStack Platform. |
| Red Hat Satellite Tools for RHEL 8 Server RPMs x86_64 |
| Tools for managing hosts with Red Hat Satellite 6. |
| Red Hat OpenStack Platform 16.1 for RHEL 8 (RPMs) |
| Core Red Hat OpenStack Platform repository, which contains packages for Red Hat OpenStack Platform director. |
| Red Hat Fast Datapath for RHEL 8 (RPMS) |
| Provides Open vSwitch (OVS) packages for OpenStack Platform. |
Ceph repositories
The following table lists Ceph Storage related repositories for the undercloud.
| Name | Repository | Description of Requirement |
|---|---|---|
| Red Hat Ceph Storage Tools 4 for RHEL 8 x86_64 (RPMs) |
|
Provides tools for nodes to communicate with the Ceph Storage cluster. The undercloud requires the |
IBM POWER repositories
The following table contains a list of repositories for RHOSP on POWER PC architecture. Use these repositories in place of equivalents in the Core repositories.
| Name | Repository | Description of requirement |
|---|---|---|
| Red Hat Enterprise Linux for IBM Power, little endian - BaseOS (RPMs) |
| Base operating system repository for ppc64le systems. |
| Red Hat Enterprise Linux 8 for IBM Power, little endian - AppStream (RPMs) |
| Contains Red Hat OpenStack Platform dependencies. |
| Red Hat Enterprise Linux 8 for IBM Power, little endian - High Availability (RPMs) |
| High availability tools for Red Hat Enterprise Linux. Used for Controller node high availability. |
| Red Hat Fast Datapath for RHEL 8 IBM Power, little endian (RPMS) |
| Provides Open vSwitch (OVS) packages for OpenStack Platform. |
| Red Hat Ansible Engine 2.8 for RHEL 8 IBM Power, little endian (RPMs) |
| Ansible Engine for Red Hat Enterprise Linux. Provides the latest version of Ansible. |
| Red Hat OpenStack Platform 16.1 for RHEL 8 (RPMs) |
| Core Red Hat OpenStack Platform repository for ppc64le systems. |
3.2. Overcloud repositories
Red Hat OpenStack Platform (RHOSP) 16.1 runs on Red Hat Enterprise Linux 8.2. As a result, you must lock the content from these repositories to the respective Red Hat Enterprise Linux version.
If you synchronize repositories by using Red Hat Satellite, you can enable specific versions of the Red Hat Enterprise Linux repositories. However, the repository label remains the same despite the version you choose. For example, if you enable the 8.2 version of the BaseOS repository, the repository name includes the specific version that you enabled, but the repository label is still rhel-8-for-x86_64-baseos-tus-rpms.
Any repositories outside the ones specified here are not supported. Unless recommended, do not enable any other products or repositories outside the ones listed in the following tables or else you might encounter package dependency issues. Do not enable Extra Packages for Enterprise Linux (EPEL).
Controller node repositories
The following table lists core repositories for Controller nodes in the overcloud.
| Name | Repository | Description of requirement |
|---|---|---|
| Red Hat Enterprise Linux 8.2 for x86_64 - BaseOS (RPMs) Telecommunications Update Service (TUS) |
| Base operating system repository for x86_64 systems. |
| Red Hat Enterprise Linux 8.2 for x86_64 - AppStream (RPMs) |
| Contains Red Hat OpenStack Platform dependencies. |
| Red Hat Enterprise Linux 8.2 for x86_64 - High Availability (RPMs) Telecommunications Update Service (TUS) |
| High availability tools for Red Hat Enterprise Linux. |
| Red Hat Ansible Engine 2.9 for RHEL 8 x86_64 (RPMs) |
| Ansible Engine for Red Hat Enterprise Linux. Used to provide the latest version of Ansible. |
| Advanced Virtualization for RHEL 8 x86_64 (RPMs) |
| Provides virtualization packages for OpenStack Platform. |
| Red Hat OpenStack Platform 16.1 for RHEL 8 (RPMs) |
| Core Red Hat OpenStack Platform repository. |
| Red Hat Fast Datapath for RHEL 8 (RPMS) |
| Provides Open vSwitch (OVS) packages for OpenStack Platform. |
| Red Hat Ceph Storage Tools 4 for RHEL 8 x86_64 (RPMs) |
| Tools for Red Hat Ceph Storage 4 for Red Hat Enterprise Linux 8. |
| Red Hat Satellite Tools for RHEL 8 Server RPMs x86_64 |
| Tools for managing hosts with Red Hat Satellite 6. |
Compute and ComputeHCI node repositories
The following table lists core repositories for Compute and ComputeHCI nodes in the overcloud.
| Name | Repository | Description of requirement |
|---|---|---|
| Red Hat Enterprise Linux 8.2 for x86_64 - BaseOS (RPMs) Telecommunications Update Service (TUS) |
| Base operating system repository for x86_64 systems. |
| Red Hat Enterprise Linux 8.2 for x86_64 - AppStream (RPMs) |
| Contains Red Hat OpenStack Platform dependencies. |
| Red Hat Enterprise Linux 8.2 for x86_64 - High Availability (RPMs) Telecommunications Update Service (TUS) |
| High availability tools for Red Hat Enterprise Linux. |
| Red Hat Ansible Engine 2.9 for RHEL 8 x86_64 (RPMs) |
| Ansible Engine for Red Hat Enterprise Linux. Used to provide the latest version of Ansible. |
| Advanced Virtualization for RHEL 8 x86_64 (RPMs) |
| Provides virtualization packages for OpenStack Platform. |
| Red Hat OpenStack Platform 16.1 for RHEL 8 (RPMs) |
| Core Red Hat OpenStack Platform repository. |
| Red Hat Fast Datapath for RHEL 8 (RPMS) |
| Provides Open vSwitch (OVS) packages for OpenStack Platform. |
| Red Hat Ceph Storage Tools 4 for RHEL 8 x86_64 (RPMs) |
| Tools for Red Hat Ceph Storage 4 for Red Hat Enterprise Linux 8. |
| Red Hat Satellite Tools for RHEL 8 Server RPMs x86_64 |
| Tools for managing hosts with Red Hat Satellite 6. |
Real Time Compute repositories
The following table lists repositories for Real Time Compute (RTC) functionality.
| Name | Repository | Description of requirement |
|---|---|---|
| Red Hat Enterprise Linux 8 for x86_64 - Real Time (RPMs) |
|
Repository for Real Time KVM (RT-KVM). Contains packages to enable the real time kernel. Enable this repository for all Compute nodes targeted for RT-KVM. NOTE: You need a separate subscription to a |
| Red Hat Enterprise Linux 8 for x86_64 - Real Time for NFV (RPMs) |
|
Repository for Real Time KVM (RT-KVM) for NFV. Contains packages to enable the real time kernel. Enable this repository for all NFV Compute nodes targeted for RT-KVM. NOTE: You need a separate subscription to a |
Ceph Storage node repositories
The following table lists Ceph Storage related repositories for the overcloud.
| Name | Repository | Description of requirement |
|---|---|---|
| Red Hat Enterprise Linux 8.2 for x86_64 - BaseOS (RPMs) Telecommunications Update Service (TUS) |
| Base operating system repository for x86_64 systems. |
| Red Hat Enterprise Linux 8.2 for x86_64 - AppStream (RPMs) |
| Contains Red Hat OpenStack Platform dependencies. |
| Red Hat Enterprise Linux 8.2 for x86_64 - High Availability (RPMs) Telecommunications Update Service (TUS) |
|
High availability tools for Red Hat Enterprise Linux. NOTE: If you used the |
| Red Hat Ansible Engine 2.9 for RHEL 8 x86_64 (RPMs) |
| Ansible Engine for Red Hat Enterprise Linux. Used to provide the latest version of Ansible. |
| Red Hat OpenStack Platform 16.1 Director Deployment Tools for RHEL 8 x86_64 (RPMs) |
|
Packages to help director configure Ceph Storage nodes. This repository is included with standalone Ceph Storage subscriptions. If you use a combined OpenStack Platform and Ceph Storage subscription, use the |
| Red Hat OpenStack Platform 16.1 for RHEL 8 (RPMs) |
|
Packages to help director configure Ceph Storage nodes. This repository is included with combined OpenStack Platform and Ceph Storage subscriptions. If you use a standalone Ceph Storage subscription, use the |
| Red Hat Ceph Storage Tools 4 for RHEL 8 x86_64 (RPMs) |
| Provides tools for nodes to communicate with the Ceph Storage cluster. |
| Red Hat Fast Datapath for RHEL 8 (RPMS) |
| Provides Open vSwitch (OVS) packages for OpenStack Platform. If you are using OVS on Ceph Storage nodes, add this repository to the network interface configuration (NIC) templates. |
IBM POWER repositories
The following table lists repositories for RHOSP on POWER PC architecture. Use these repositories in place of equivalents in the Core repositories.
| Name | Repository | Description of requirement |
|---|---|---|
| Red Hat Enterprise Linux for IBM Power, little endian - BaseOS (RPMs) |
| Base operating system repository for ppc64le systems. |
| Red Hat Enterprise Linux 8 for IBM Power, little endian - AppStream (RPMs) |
| Contains Red Hat OpenStack Platform dependencies. |
| Red Hat Enterprise Linux 8 for IBM Power, little endian - High Availability (RPMs) |
| High availability tools for Red Hat Enterprise Linux. Used for Controller node high availability. |
| Red Hat Fast Datapath for RHEL 8 IBM Power, little endian (RPMS) |
| Provides Open vSwitch (OVS) packages for OpenStack Platform. |
| Red Hat Ansible Engine 2.8 for RHEL 8 IBM Power, little endian (RPMs) |
| Ansible Engine for Red Hat Enterprise Linux. Used to provide the latest version of Ansible. |
| Red Hat OpenStack Platform 16.1 for RHEL 8 (RPMs) |
| Core Red Hat OpenStack Platform repository for ppc64le systems. |
3.3. Red Hat Satellite Server 6 considerations
If you use Red Hat Satellite Server 6 to host RPMs and container images for your Red Hat OpenStack Platform environment, you must account for certain considerations when you use Satellite Server 6 to deliver content during the Red Hat OpenStack Platform 16.1 upgrade.
Assumptions about your current environment
- Your Satellite Server already hosts Red Hat OpenStack Platform 13 RPMs and container images.
- You have already registered all nodes in your Red Hat OpenStack Platform 13 environment to your Satellite Server. For example, you previously used an activation key linked to an Red Hat OpenStack Platform 13 content view to register nodes to OpenStack Platform 13 content.
Recommendations for Red Hat OpenStack Platform upgrades
- Enable and synchronize the necessary RPM repositories for both the Red Hat OpenStack Platform 13 undercloud and overcloud. This includes the necessary Red Hat Enterprise Linux 8.2 repositories.
Create custom products on your Satellite Server to host container images for the following Red Hat OpenStack Platform versions:
- Red Hat OpenStack Platform 16.1
- Red Hat OpenStack Platform 15
Create and promote a content view for Red Hat OpenStack Platform 16.1 upgrade and include the following content in the content view:
The following Red Hat Enterprise Linux 7 repositories:
Red Hat Enterprise Linux 7 Server RPMs x86_64 7Server or Red Hat Enterprise Linux 7 Server RPMs x86_64 7.9
rhel-7-server-rpms
x86_64 7Server
or:
rhel-7-server-rpms
x86_64 7.9
rhel-7-server-rpms
x86_64 7Server
or:
rhel-7-server-rpms
x86_64 7.9
Copy to Clipboard Copied! Toggle word wrap Toggle overflow Red Hat Enterprise Linux 7 Server - Extras RPMs x86_64
rhel-7-server-extras-rpms
x86_64
rhel-7-server-extras-rpms
x86_64
Copy to Clipboard Copied! Toggle word wrap Toggle overflow
- All undercloud and overcloud RPM repositories, including Red Hat Enterprise Linux 8.2 repositories. Ensure that you include the correct version of the Red Hat Enterprise Linux repositories, which is 8.2. If you don’t include the correct version, you might run into issues with enabling RHEL 8 repositories. For more information, see the Red Hat Knowledgebase solution RHEL 7 to RHEL 8 LEAPP Upgrade Failing When Using Red Hat Satellite.
- Red Hat OpenStack Platform 16.1 container images.
- Red Hat OpenStack Platform 15 container images.
- Associate an activation key with the Red Hat OpenStack Platform 16.1 content view that you have created for the Red Hat OpenStack Platform 16.1 upgrade.
-
Check that no node has the
katello-host-tools-fact-pluginpackage installed. The Leapp upgrade does not upgrade this package and leaving this package on a Red Hat Enterprise Linux 8.2 system causessubscription-managerto report errors. - You can configure Satellite Server to host Red Hat OpenStack Platform 16.1 container images. For more information, see Preparing a Satellite server for container images in Director Installation and Usage.
If you use a Ceph subscription and have configured director to use the
overcloud-minimalimage for Ceph storage nodes, on your Satellite Server you must create a Content View and add the following Red Hat Enterprise Linux (RHEL) 8.2 repositories to it:Red Hat Enterprise Linux 8 for x86_64 - AppStream (RPMs)
rhel-8-for-x86_64-appstream-rpms
x86_64 8.2
rhel-8-for-x86_64-appstream-rpms
x86_64 8.2
Copy to Clipboard Copied! Toggle word wrap Toggle overflow Red Hat Enterprise Linux 8 for x86_64 - BaseOS (RPMs)
rhel-8-for-x86_64-baseos-rpms
x86_64 8.2
rhel-8-for-x86_64-baseos-rpms
x86_64 8.2
Copy to Clipboard Copied! Toggle word wrap Toggle overflow For more information, see Importing Red Hat Content and Managing Content Views in the Red Hat Satellite Content Management Guide.
Chapter 4. Preparing for the undercloud upgrade
Before you perform the undercloud upgrade, you must complete some preparation steps so that the undercloud upgrade runs successfully.
4.1. Upgrading with external Ceph prerequisite
If you are upgrading with external Ceph deployments, before you can upgrade your Red Hat OpenStack Platform deployment, you must upgrade your Red Hat Ceph Storage cluster from version 3 to version 4. For more information, see Upgrading a Red Hat Ceph Storage cluster in the Red Hat Ceph Storage 4 Installation Guide .
4.2. New memory requirements
In Red Hat OpenStack Platform 16.1, the undercloud has new memory requirements:
| Red Hat OpenStack Platform 13 | Red Hat OpenStack Platform 16.1 |
|---|---|
| 16 GB RAM | 24 GB RAM |
Ensure that your undercloud meets these new requirements before you proceed with the upgrade.
4.3. Using predictable NIC names for the undercloud node
Before you run the Leapp upgrade on the undercloud node, you must check for kernel-based NIC names, which usually contain an eth prefix. These NIC names are usually unpredictable in terms of NIC assignments.
You can run the playbook-nics.yaml playbook to rename NIC names to use the em NIC prefix. You can also set a different NIC prefix, by modifying the prefix variable when running the playbook. However, the NIC changes are only applied after the Leapp upgrade process completes and the node is rebooted.
Procedure
-
Log in to the undercloud as the
stackuser. Create an Ansible playbook named
playbook-nics.yamland copy the following content into the playbook:Copy to Clipboard Copied! Toggle word wrap Toggle overflow NoteYou will use this playbook to rename the overcloud NICs at a later stage in the upgrade process.
Run the
playbook-nics.yamlplaybook on the undercloud:ansible-playbook -c local -i localhost, playbook-nics.yaml
$ ansible-playbook -c local -i localhost, playbook-nics.yamlCopy to Clipboard Copied! Toggle word wrap Toggle overflow The playbook sets the new NIC prefix to
em. To set a different NIC prefix, set theprefixvariable when running the playbook:ansible-playbook -c local -i localhost, -e prefix="mynic" ~/playbook-nics.yaml
$ ansible-playbook -c local -i localhost, -e prefix="mynic" ~/playbook-nics.yamlCopy to Clipboard Copied! Toggle word wrap Toggle overflow The NIC changes are only applied after the Leapp upgrade process completes and the node is rebooted.
4.4. Setting the SSH root permission parameter on the undercloud
The Leapp upgrade checks whether the PermitRootLogin parameter exists in the /etc/ssh/sshd_config file. You must explicitly set this parameter to either yes or no.
For security purposes, set this parameter to no to disable SSH access to the root user on the undercloud.
Procedure
-
Log in to the undercloud as the
stackuser. Check the
/etc/ssh/sshd_configfile for thePermitRootLoginparameter:sudo grep PermitRootLogin /etc/ssh/sshd_config
$ sudo grep PermitRootLogin /etc/ssh/sshd_configCopy to Clipboard Copied! Toggle word wrap Toggle overflow If the parameter is not in the
/etc/ssh/sshd_configfile, edit the file and set thePermitRootLoginparameter:PermitRootLogin no
PermitRootLogin noCopy to Clipboard Copied! Toggle word wrap Toggle overflow - Save the file.
4.5. Converting to next generation power management drivers
Red Hat OpenStack Platform now uses next generation drivers, also known as hardware types, that replace older drivers.
The following table shows an analogous comparison between older drivers with their next generation hardware type equivalent:
| Old Driver | New Hardware Type |
|---|---|
|
|
|
|
|
|
|
|
|
|
|
|
|
VBMC ( |
|
|
|
|
In OpenStack Platform 15, these older drivers have been removed and are no longer accessible. You must change to hardware types before upgrading to OpenStack Platform 16.1.
Procedure
Check the current list of hardware types enabled:
source ~/stackrc
openstack baremetal driver list --type dynamic
$ source ~/stackrc
$ openstack baremetal driver list --type dynamic
Copy to Clipboard Copied! Toggle word wrap Toggle overflow If you use a hardware type driver that is not enabled, enable the driver using the
enabled_hardware_typesparameter in theundercloud.conffile:enabled_hardware_types = ipmi,redfish,idrac
enabled_hardware_types = ipmi,redfish,idracCopy to Clipboard Copied! Toggle word wrap Toggle overflow Save the file and refresh the undercloud:
openstack undercloud install
$ openstack undercloud installCopy to Clipboard Copied! Toggle word wrap Toggle overflow Run the following commands, substituting the
OLDDRIVERandNEWDRIVERvariables for your power management type:source ~/stackrc OLDDRIVER="pxe_ipmitool" NEWDRIVER="ipmi" for NODE in $(openstack baremetal node list --driver $OLDDRIVER -c UUID -f value) ; do openstack baremetal node set $NODE --driver $NEWDRIVER; done
$ source ~/stackrc
$ OLDDRIVER="pxe_ipmitool"
$ NEWDRIVER="ipmi"
$ for NODE in $(openstack baremetal node list --driver $OLDDRIVER -c UUID -f value) ; do openstack baremetal node set $NODE --driver $NEWDRIVER; done
Copy to Clipboard Copied! Toggle word wrap Toggle overflow
Chapter 5. Upgrading the undercloud operating system
Before you upgrade director, you must upgrade the undercloud operating system from Red Hat Enterprise Linux 7 to Red Hat Enterprise Linux 8. As a part of this operating system upgrade, you must remove the Red Hat OpenStack Platform 13 packages and then run the Leapp utility to upgrade the system packages. This package removal and operating system upgrade does not affect the undercloud database. After you complete the operating system upgrade, reinstall the Red Hat OpenStack Platform 16.1 versions of the director packages.
5.1. Removing Red Hat OpenStack Platform director packages
Before you run the Leapp utility, remove the Red Hat OpenStack Platform 13 packages tied to Red Hat Enterprise Linux 7. These package names use a release suffix of el7ost. Some el7ost remain on the system as dependencies for subscription-manager and the Leapp utility.
Procedure
-
Log in to the undercloud as the
stackuser. Disable the main OpenStack services on the undercloud:
sudo systemctl stop 'openstack-*' httpd haproxy mariadb 'rabbitmq*' docker xinetd
$ sudo systemctl stop 'openstack-*' httpd haproxy mariadb 'rabbitmq*' docker xinetdCopy to Clipboard Copied! Toggle word wrap Toggle overflow Remove the main OpenStack services from the undercloud, except OpenvSwitch and certain Python 2 packages that are required for the upgrade:
Copy to Clipboard Copied! Toggle word wrap Toggle overflow Remove the content from the
/etc/httpdand/var/lib/dockerdirectories:sudo rm -rf /etc/httpd /var/lib/docker
$ sudo rm -rf /etc/httpd /var/lib/dockerCopy to Clipboard Copied! Toggle word wrap Toggle overflow
5.2. Performing a Leapp upgrade on the undercloud
Install and run the Leapp utility to upgrade the operating system to Red Hat Enterprise Linux (RHEL) 8.
Prerequisites
- Before you install and run Leapp, ensure that you have familiarized yourself with the Section 2.4, “Leapp upgrade usage in Red Hat OpenStack Platform” section.
- Before you perform the Leapp upgrade, ensure that you complete the Section 4.3, “Using predictable NIC names for the undercloud node” section. If you do not rename the network interface names before you perform the Leapp upgrade process, the interface names might change after the upgrade to RHEL 8.2 is complete.
Procedure
-
Log in to the undercloud as the
stackuser. Install the Leapp utility and jq:
sudo yum install leapp
sudo yum install jq
$ sudo yum install leapp
$ sudo yum install jq
Copy to Clipboard Copied! Toggle word wrap Toggle overflow -
Download the additional required data files (RPM package changes and RPM repository mapping) attached to the Knowledge Base article Data required by the Leapp utility for an in-place upgrade from RHEL 7 to RHEL 8 and place these files in the
/etc/leapp/files/directory. Update your Red Hat subscription:
If your undercloud uses the Red Hat Customer Portal for registration, refresh your current subscription to obtain access to the Red Hat Enterprise Linux 8.2 content:
sudo subscription-manager refresh
$ sudo subscription-manager refreshCopy to Clipboard Copied! Toggle word wrap Toggle overflow If your undercloud uses Red Hat Satellite Server for registration, re-register the undercloud to a content view associated with your Red Hat OpenStack Platform (RHOSP)16.1 activation key.
sudo subscription-manager register --force --org ORG --activationkey ACTIVATION_KEY
$ sudo subscription-manager register --force --org ORG --activationkey ACTIVATION_KEYCopy to Clipboard Copied! Toggle word wrap Toggle overflow NoteThe content view that you create for Red Hat OpenStack Platform 16.1 must contain content for Red Hat Enterprise Linux 8.2.
Red Hat OpenStack Platform 16.1 uses a newer version of Open vSwitch`. Substitute the Open vSwitch version through the
to_removeandto_installtransaction files:echo 'openvswitch2.11' | sudo tee -a /etc/leapp/transaction/to_remove echo 'openvswitch2.13' | sudo tee -a /etc/leapp/transaction/to_install
$ echo 'openvswitch2.11' | sudo tee -a /etc/leapp/transaction/to_remove
$ echo 'openvswitch2.13' | sudo tee -a /etc/leapp/transaction/to_install
Copy to Clipboard Copied! Toggle word wrap Toggle overflow Retain the Red Hat Ceph Storage 3 version of
ceph-ansiblethrough the upgrade with theto_keeptransaction file:echo 'ceph-ansible' | sudo tee -a /etc/leapp/transaction/to_keep
$ echo 'ceph-ansible' | sudo tee -a /etc/leapp/transaction/to_keepCopy to Clipboard Copied! Toggle word wrap Toggle overflow Adjust the kernel modules that are no longer supported in RHEL 8:
Copy to Clipboard Copied! Toggle word wrap Toggle overflow Run the
leapp answercommand and specify the Leapp answer to remove thepam_pkcs11module:sudo leapp answer --add --section remove_pam_pkcs11_module_check.confirm=True
$ sudo leapp answer --add --section remove_pam_pkcs11_module_check.confirm=TrueCopy to Clipboard Copied! Toggle word wrap Toggle overflow Optional: If your environment is deployed with a TLS-Everywhere architecture and it uses the deprecated
authconfigutility to configure authentication on your system, configure your RHEL 8 system with theauthselectutility:sudo leapp answer --add --section authselect_check.confirm=True
$ sudo leapp answer --add --section authselect_check.confirm=TrueCopy to Clipboard Copied! Toggle word wrap Toggle overflow For more information about authentication configuration during the Leapp upgrade process, see Known issues in Upgrading from RHEL 7 to RHEL 8.
Set the
LEAPP_DEVEL_TARGET_RELEASEandLEAPP_UNSUPPORTEDenvironment variables to specify the RHEL 8 minor version that you want to upgrade to. For RHOSP 16.1, you must set the RHEL 8 minor version to8.2:export LEAPP_UNSUPPORTED=1 export LEAPP_DEVEL_TARGET_RELEASE=8.2
$ export LEAPP_UNSUPPORTED=1
$ export LEAPP_DEVEL_TARGET_RELEASE=8.2
Copy to Clipboard Copied! Toggle word wrap Toggle overflow You must use the
LEAPP_UNSUPPORTEDenvironment variable every time you use a environment variable with theLEAPP_DEVELprefix.Remove the persistent network names actor from the Leapp process:
NoteIf you do not rename the network interface names before you perform the Leapp upgrade process, the interface names might change after the upgrade to RHEL 8.2 is complete. For more information about renaming the network interface names, see Section 4.3, “Using predictable NIC names for the undercloud node”.
sudo rm -f /usr/share/leapp-repository/repositories/system_upgrade/el7toel8/actors/persistentnetnamesdisable/actor.py
$ sudo rm -f /usr/share/leapp-repository/repositories/system_upgrade/el7toel8/actors/persistentnetnamesdisable/actor.pyCopy to Clipboard Copied! Toggle word wrap Toggle overflow Start the Leapp upgrade process:
sudo -E leapp upgrade --debug --enablerepo rhel-8-for-x86_64-baseos-tus-rpms --enablerepo rhel-8-for-x86_64-appstream-tus-rpms --enablerepo fast-datapath-for-rhel-8-x86_64-rpms --enablerepo ansible-2.9-for-rhel-8-x86_64-rpms
$ sudo -E leapp upgrade --debug --enablerepo rhel-8-for-x86_64-baseos-tus-rpms --enablerepo rhel-8-for-x86_64-appstream-tus-rpms --enablerepo fast-datapath-for-rhel-8-x86_64-rpms --enablerepo ansible-2.9-for-rhel-8-x86_64-rpmsCopy to Clipboard Copied! Toggle word wrap Toggle overflow Use the
--enablerepooption to set the repositories that you want to enable during the Leapp upgrade process. You must include these repositories to facilitate the Red Hat OpenStack Platform 16.1 transition, especially with the newer version of Open vSwitch.-
Wait for the
leapp upgradecommand to successfully complete. Create an empty
.autorelabelfile in your root directory:sudo touch /.autorelabel
$ sudo touch /.autorelabelCopy to Clipboard Copied! Toggle word wrap Toggle overflow After a reboot, SELinux detects this file and automatically relabels the file system.
Reboot the undercloud:
sudo reboot
$ sudo rebootCopy to Clipboard Copied! Toggle word wrap Toggle overflow Remove the Leapp packages from the transaction exclusion that is defined in the DNF configuration:
sudo dnf config-manager --save --setopt exclude=''
$ sudo dnf config-manager --save --setopt exclude=''Copy to Clipboard Copied! Toggle word wrap Toggle overflow
Chapter 6. Upgrading director
After you complete the undercloud operating system upgrade, upgrade director. The database from the previous Red Hat OpenStack Platform 13 undercloud remains on host after the operating system upgrade. Install the new Red Hat OpenStack Platform 16.1 packages and configure the new source for Red Hat OpenStack Platform 16.1 container images before you run the openstack undercloud upgrade command.
6.1. Locking the environment to a Red Hat Enterprise Linux release
Red Hat OpenStack Platform 16.1 is supported on Red Hat Enterprise Linux 8.2. Before you perform the update, you must lock the undercloud repositories to the Red Hat Enterprise Linux 8.2 release to avoid upgrading the operating system to a newer minor release.
Procedure
-
Log in to the undercloud as the
stackuser. Lock the undercloud to a specific version with the
subscription-manager releasecommand:sudo subscription-manager release --set=8.2
$ sudo subscription-manager release --set=8.2Copy to Clipboard Copied! Toggle word wrap Toggle overflow
6.2. Enabling repositories for the undercloud
Enable the repositories that are required for the undercloud, and update the system packages to the latest versions.
Procedure
-
Log in to your undercloud as the
stackuser. Disable all default repositories, and enable the required Red Hat Enterprise Linux repositories:
sudo subscription-manager repos --disable=*
sudo subscription-manager repos --enable=rhel-8-for-x86_64-baseos-tus-rpms --enable=rhel-8-for-x86_64-appstream-tus-rpms --enable=rhel-8-for-x86_64-highavailability-tus-rpms --enable=ansible-2.9-for-rhel-8-x86_64-rpms --enable=openstack-16.1-for-rhel-8-x86_64-rpms --enable=fast-datapath-for-rhel-8-x86_64-rpms --enable=advanced-virt-for-rhel-8-x86_64-eus-rpms
[stack@director ~]$ sudo subscription-manager repos --disable=*
[stack@director ~]$ sudo subscription-manager repos --enable=rhel-8-for-x86_64-baseos-tus-rpms --enable=rhel-8-for-x86_64-appstream-tus-rpms --enable=rhel-8-for-x86_64-highavailability-tus-rpms --enable=ansible-2.9-for-rhel-8-x86_64-rpms --enable=openstack-16.1-for-rhel-8-x86_64-rpms --enable=fast-datapath-for-rhel-8-x86_64-rpms --enable=advanced-virt-for-rhel-8-x86_64-eus-rpms
Copy to Clipboard Copied! Toggle word wrap Toggle overflow These repositories contain packages that the director installation requires.
Set the
container-toolsrepository module to version2.0:sudo dnf module reset container-tools sudo dnf module enable -y container-tools:2.0
[stack@director ~]$ sudo dnf module reset container-tools
[stack@director ~]$ sudo dnf module enable -y container-tools:2.0
Copy to Clipboard Copied! Toggle word wrap Toggle overflow Synchronize the operating system to ensure that your system packages match the operating system version:
sudo dnf distro-sync -y
sudo reboot
[stack@director ~]$ sudo dnf distro-sync -y
[stack@director ~]$ sudo reboot
Copy to Clipboard Copied! Toggle word wrap Toggle overflow
6.3. Installing director packages
Install packages relevant to Red Hat OpenStack Platform director.
Procedure
Install the command line tools for director installation and configuration:
sudo dnf install -y python3-tripleoclient
[stack@director ~]$ sudo dnf install -y python3-tripleoclientCopy to Clipboard Copied! Toggle word wrap Toggle overflow
6.4. Preparing container images
The undercloud installation requires an environment file to determine where to obtain container images and how to store them. Generate and customize this environment file that you can use to prepare your container images.
If you need to configure specific container image versions for your undercloud, you must pin the images to a specific version. For more information, see Pinning container images for the undercloud.
Procedure
-
Log in to your undercloud host as the
stackuser. Generate the default container image preparation file:
sudo openstack tripleo container image prepare default \
  --local-push-destination \
  --output-env-file containers-prepare-parameter.yaml
$ sudo openstack tripleo container image prepare default \
  --local-push-destination \
  --output-env-file containers-prepare-parameter.yaml
Copy to Clipboard Copied! Toggle word wrap Toggle overflow This command includes the following additional options:
-
--local-push-destinationsets the registry on the undercloud as the location for container images. This means that director pulls the necessary images from the Red Hat Container Catalog and pushes them to the registry on the undercloud. Director uses this registry as the container image source. To pull directly from the Red Hat Container Catalog, omit this option. --output-env-fileis an environment file name. The contents of this file include the parameters for preparing your container images. In this case, the name of the file iscontainers-prepare-parameter.yaml.NoteYou can use the same
containers-prepare-parameter.yamlfile to define a container image source for both the undercloud and the overcloud.
-
-
Modify the
containers-prepare-parameter.yamlto suit your requirements.
6.5. Container image preparation parameters
The default file for preparing your containers (containers-prepare-parameter.yaml) contains the ContainerImagePrepare heat parameter. This parameter defines a list of strategies for preparing a set of images:
Each strategy accepts a set of sub-parameters that defines which images to use and what to do with the images. The following table contains information about the sub-parameters that you can use with each ContainerImagePrepare strategy:
| Parameter | Description |
|---|---|
|
| List of regular expressions to exclude image names from a strategy. |
|
|
List of regular expressions to include in a strategy. At least one image name must match an existing image. All |
|
|
String to append to the tag for the destination image. For example, if you pull an image with the tag 16.1.3-5.161 and set the |
|
| A dictionary of image labels that filter the images that you want to modify. If an image matches the labels defined, the director includes the image in the modification process. |
|
| String of ansible role names to run during upload but before pushing the image to the destination registry. |
|
|
Dictionary of variables to pass to |
|
| Defines the namespace of the registry that you want to push images to during the upload process.
If you set this parameter to
If the |
|
| The source registry from where to pull the original container images. |
|
|
A dictionary of |
|
|
Use the value of specified container image metadata labels to create a tag for every image and pull that tagged image. For example, if you set |
When you push images to the undercloud, use push_destination: true instead of push_destination: UNDERCLOUD_IP:PORT. The push_destination: true method provides a level of consistency across both IPv4 and IPv6 addresses.
The set parameter accepts a set of key: value definitions:
| Key | Description |
|---|---|
|
| The name of the Ceph Storage container image. |
|
| The namespace of the Ceph Storage container image. |
|
| The tag of the Ceph Storage container image. |
|
| The name, namespace, and tag of the Ceph Storage Alert Manager container image. |
|
| The name, namespace, and tag of the Ceph Storage Grafana container image. |
|
| The name, namespace, and tag of the Ceph Storage Node Exporter container image. |
|
| The name, namespace, and tag of the Ceph Storage Prometheus container image. |
|
| A prefix for each OpenStack service image. |
|
| A suffix for each OpenStack service image. |
|
| The namespace for each OpenStack service image. |
|
|
The driver to use to determine which OpenStack Networking (neutron) container to use. Use a null value to set to the standard |
|
|
Sets a specific tag for all images from the source. If not defined, director uses the Red Hat OpenStack Platform version number as the default value. This parameter takes precedence over the |
The container images use multi-stream tags based on the Red Hat OpenStack Platform version. This means that there is no longer a latest tag.
6.6. Guidelines for container image tagging
The Red Hat Container Registry uses a specific version format to tag all Red Hat OpenStack Platform container images. This format follows the label metadata for each container, which is version-release.
- version
- Corresponds to a major and minor version of Red Hat OpenStack Platform. These versions act as streams that contain one or more releases.
- release
- Corresponds to a release of a specific container image version within a version stream.
For example, if the latest version of Red Hat OpenStack Platform is 16.1.3 and the release for the container image is 5.161, then the resulting tag for the container image is 16.1.3-5.161.
The Red Hat Container Registry also uses a set of major and minor version tags that link to the latest release for that container image version. For example, both 16.1 and 16.1.3 link to the latest release in the 16.1.3 container stream. If a new minor release of 16.1 occurs, the 16.1 tag links to the latest release for the new minor release stream while the 16.1.3 tag continues to link to the latest release within the 16.1.3 stream.
The ContainerImagePrepare parameter contains two sub-parameters that you can use to determine which container image to download. These sub-parameters are the tag parameter within the set dictionary, and the tag_from_label parameter. Use the following guidelines to determine whether to use tag or tag_from_label.
The default value for
tagis the major version for your OpenStack Platform version. For this version it is 16.1. This always corresponds to the latest minor version and release.Copy to Clipboard Copied! Toggle word wrap Toggle overflow To change to a specific minor version for OpenStack Platform container images, set the tag to a minor version. For example, to change to 16.1.2, set
tagto 16.1.2.Copy to Clipboard Copied! Toggle word wrap Toggle overflow -
When you set
tag, director always downloads the latest container imagereleasefor the version set intagduring installation and updates. If you do not set
tag, director uses the value oftag_from_labelin conjunction with the latest major version.Copy to Clipboard Copied! Toggle word wrap Toggle overflow The
tag_from_labelparameter generates the tag from the label metadata of the latest container image release it inspects from the Red Hat Container Registry. For example, the labels for a certain container might use the followingversionandreleasemetadata:"Labels": { "release": "5.161", "version": "16.1.3", ... }"Labels": { "release": "5.161", "version": "16.1.3", ... }Copy to Clipboard Copied! Toggle word wrap Toggle overflow -
The default value for
tag_from_labelis{version}-{release}, which corresponds to the version and release metadata labels for each container image. For example, if a container image has 16.1.3 set forversionand 5.161 set forrelease, the resulting tag for the container image is 16.1.3-5.161. -
The
tagparameter always takes precedence over thetag_from_labelparameter. To usetag_from_label, omit thetagparameter from your container preparation configuration. -
A key difference between
tagandtag_from_labelis that director usestagto pull an image only based on major or minor version tags, which the Red Hat Container Registry links to the latest image release within a version stream, while director usestag_from_labelto perform a metadata inspection of each container image so that director generates a tag and pulls the corresponding image.
6.7. Obtaining container images from private registries
The registry.redhat.io registry requires authentication to access and pull images. To authenticate with registry.redhat.io and other private registries, include the ContainerImageRegistryCredentials and ContainerImageRegistryLogin parameters in your containers-prepare-parameter.yaml file.
ContainerImageRegistryCredentials
Some container image registries require authentication to access images. In this situation, use the ContainerImageRegistryCredentials parameter in your containers-prepare-parameter.yaml environment file. The ContainerImageRegistryCredentials parameter uses a set of keys based on the private registry URL. Each private registry URL uses its own key and value pair to define the username (key) and password (value). This provides a method to specify credentials for multiple private registries.
In the example, replace my_username and my_password with your authentication credentials. Instead of using your individual user credentials, Red Hat recommends creating a registry service account and using those credentials to access registry.redhat.io content.
To specify authentication details for multiple registries, set multiple key-pair values for each registry in ContainerImageRegistryCredentials:
The default ContainerImagePrepare parameter pulls container images from registry.redhat.io, which requires authentication.
For more information, see Red Hat Container Registry Authentication.
ContainerImageRegistryLogin
The ContainerImageRegistryLogin parameter is used to control whether an overcloud node system needs to log in to the remote registry to fetch the container images. This situation occurs when you want the overcloud nodes to pull images directly, rather than use the undercloud to host images.
You must set ContainerImageRegistryLogin to true if push_destination is set to false or not used for a given strategy.
However, if the overcloud nodes do not have network connectivity to the registry hosts defined in ContainerImageRegistryCredentials and you set ContainerImageRegistryLogin to true, the deployment might fail when trying to perform a login. If the overcloud nodes do not have network connectivity to the registry hosts defined in the ContainerImageRegistryCredentials, set push_destination to true and ContainerImageRegistryLogin to false so that the overcloud nodes pull images from the undercloud.
6.8. Obtaining transitional containers for upgrades
The upgrade requires containers from previous versions of Red Hat OpenStack Platform and Red Hat Ceph Storage. These containers help transition to Red Hat OpenStack Platform 16.1.
Procedure
-
Log in to your undercloud host as the
stackuser. -
Edit the
containers-prepare-parameter.yamlfile. Add the transitional container parameters to
setin theContainerImagePrepareparameter. Set the parameters in one of the following ways depending on your type of deployment.If your deployment uses a Red Hat Ceph Storage cluster that was deployed using director, add the following parameters:
Copy to Clipboard Copied! Toggle word wrap Toggle overflow -
The
*_steinparameters define the container images for Red Hat OpenStack Platform 15, which the upgrade process uses for database migration. -
The
ceph3_*parameters define the current Red Hat Ceph Storage container images that the overcloud uses. The overcloud requires both theceph3_*andceph_*parameters for the transition from Red Hat Ceph Storage 3 to 4. - If you use Red Hat Satellite Server for container image storage, set the namespaces to the image locations on your Red Hat Satellite Server.
-
The
If your deployment uses an external Ceph Storage cluster, add the following parameters:
Copy to Clipboard Copied! Toggle word wrap Toggle overflow -
The
*_steinparameters define the container images for Red Hat OpenStack Platform 15, which the upgrade process uses for database migration. -
The
ceph_*parameters define the current Red Hat Ceph Storage 4 container images that the overcloud uses. - If you use Red Hat Satellite Server for container image storage, set the namespaces to the image locations on your Red Hat Satellite Server.
-
The
Change the
neutron_driverparameter toopenvswitch:Copy to Clipboard Copied! Toggle word wrap Toggle overflow The upgrade retains Open vSwitch compatibility throughout the process. After you complete the upgrade to Red Hat OpenStack Platform 16.1, you migrate the overcloud from Open vSwitch to Open Virtual Network (OVN).
-
Save the
containers-prepare-parameter.yamlfile.
6.9. Updating the undercloud.conf file
You can continue using the original undercloud.conf file from your Red Hat OpenStack Platform 13 environment, but you must modify the file to retain compatibility with Red Hat OpenStack Platform 16.1.
Procedure
-
Log in to your undercloud host as the
stackuser. -
Edit the
undercloud.conffile. Add the following parameter to the
DEFAULTsection in the file:container_images_file = /home/stack/containers-prepare-parameter.yaml
container_images_file = /home/stack/containers-prepare-parameter.yamlCopy to Clipboard Copied! Toggle word wrap Toggle overflow This parameter defines the location of the
containers-prepare-parameter.yamlenvironment file so that director pulls container images for the undercloud from the correct location.-
Check the
generate_service_certificateparameter. The default for this parameter changes fromfalsetotrue, which enables SSL/TLS on your undercloud, during the upgrade. -
Check the
local_interfaceparameter if you have migrated to a predictable NIC naming convention. -
If you set the
masquerade_networkparameter in Red Hat OpenStack Platform 13, remove this parameter and setmasquerade = truefor each subnet. - Check all other parameters in the file for any changes.
- Save the file.
6.10. Director configuration parameters
The following list contains information about parameters for configuring the undercloud.conf file. Keep all parameters within their relevant sections to avoid errors.
At minimum, you must set the container_images_file parameter to the environment file that contains your container image configuration. Without this parameter properly set to the appropriate file, director cannot obtain your container image rule set from the ContainerImagePrepare parameter nor your container registry authentication details from the ContainerImageRegistryCredentials parameter.
Defaults
The following parameters are defined in the [DEFAULT] section of the undercloud.conf file:
- additional_architectures
-
A list of additional (kernel) architectures that an overcloud supports. Currently the overcloud supports
ppc64learchitecture in addition to the defaultx86_64architecture. - certificate_generation_ca
-
The
certmongernickname of the CA that signs the requested certificate. Use this option only if you have set thegenerate_service_certificateparameter. If you select thelocalCA, certmonger extracts the local CA certificate to/etc/pki/ca-trust/source/anchors/cm-local-ca.pemand adds the certificate to the trust chain. - clean_nodes
- Defines whether to wipe the hard drive between deployments and after introspection.
- cleanup
-
Delete temporary files. Set this to
Falseto retain the temporary files used during deployment. The temporary files can help you debug the deployment if errors occur. - container_cli
-
The CLI tool for container management. Leave this parameter set to
podman. Red Hat Enterprise Linux 8.2 only supportspodman. - container_healthcheck_disabled
-
Disables containerized service health checks. Red Hat recommends that you enable health checks and leave this option set to
false. - container_images_file
Heat environment file with container image information. This file can contain the following entries:
- Parameters for all required container images
-
The
ContainerImagePrepareparameter to drive the required image preparation. Usually the file that contains this parameter is namedcontainers-prepare-parameter.yaml.
- container_insecure_registries
-
A list of insecure registries for
podmanto use. Use this parameter if you want to pull images from another source, such as a private container registry. In most cases,podmanhas the certificates to pull container images from either the Red Hat Container Catalog or from your Satellite Server if the undercloud is registered to Satellite. - container_registry_mirror
-
An optional
registry-mirrorconfigured thatpodmanuses. - custom_env_files
- Additional environment files that you want to add to the undercloud installation.
- deployment_user
-
The user who installs the undercloud. Leave this parameter unset to use the current default user
stack. - discovery_default_driver
-
Sets the default driver for automatically enrolled nodes. Requires the
enable_node_discoveryparameter to be enabled and you must include the driver in theenabled_hardware_typeslist. - enable_ironic; enable_ironic_inspector; enable_mistral; enable_nova; enable_tempest; enable_validations; enable_zaqar
-
Defines the core services that you want to enable for director. Leave these parameters set to
true. - enable_node_discovery
-
Automatically enroll any unknown node that PXE-boots the introspection ramdisk. New nodes use the
fakedriver as a default but you can setdiscovery_default_driverto override. You can also use introspection rules to specify driver information for newly enrolled nodes. - enable_novajoin
-
Defines whether to install the
novajoinmetadata service in the undercloud. - enable_routed_networks
- Defines whether to enable support for routed control plane networks.
- enable_swift_encryption
- Defines whether to enable Swift encryption at-rest.
- enable_telemetry
-
Defines whether to install OpenStack Telemetry services (gnocchi, aodh, panko) in the undercloud. Set the
enable_telemetryparameter totrueif you want to install and configure telemetry services automatically. The default value isfalse, which disables telemetry on the undercloud. This parameter is required if you use other products that consume metrics data, such as Red Hat CloudForms.
RBAC is not supported by every component. The Alarming service (aodh) and Gnocchi do not take secure RBAC rules into account.
- enabled_hardware_types
- A list of hardware types that you want to enable for the undercloud.
- generate_service_certificate
-
Defines whether to generate an SSL/TLS certificate during the undercloud installation, which is used for the
undercloud_service_certificateparameter. The undercloud installation saves the resulting certificate/etc/pki/tls/certs/undercloud-[undercloud_public_vip].pem. The CA defined in thecertificate_generation_caparameter signs this certificate. - heat_container_image
- URL for the heat container image to use. Leave unset.
- heat_native
-
Run host-based undercloud configuration using
heat-all. Leave astrue. - hieradata_override
-
Path to
hieradataoverride file that configures Puppet hieradata on the director, providing custom configuration to services beyond theundercloud.confparameters. If set, the undercloud installation copies this file to the/etc/puppet/hieradatadirectory and sets it as the first file in the hierarchy. For more information about using this feature, see Configuring hieradata on the undercloud. - inspection_extras
-
Defines whether to enable extra hardware collection during the inspection process. This parameter requires the
python-hardwareorpython-hardware-detectpackages on the introspection image. - inspection_interface
-
The bridge that director uses for node introspection. This is a custom bridge that the director configuration creates. The
LOCAL_INTERFACEattaches to this bridge. Leave this as the defaultbr-ctlplane. - inspection_runbench
-
Runs a set of benchmarks during node introspection. Set this parameter to
trueto enable the benchmarks. This option is necessary if you intend to perform benchmark analysis when inspecting the hardware of registered nodes. - ipa_otp
-
Defines the one-time password to register the undercloud node to an IPA server. This is required when
enable_novajoinis enabled. - ipv6_address_mode
IPv6 address configuration mode for the undercloud provisioning network. The following list contains the possible values for this parameter:
- dhcpv6-stateless - Address configuration using router advertisement (RA) and optional information using DHCPv6.
- dhcpv6-stateful - Address configuration and optional information using DHCPv6.
- ipxe_enabled
-
Defines whether to use iPXE or standard PXE. The default is
true, which enables iPXE. Set this parameter tofalseto use standard PXE. - local_interface
The chosen interface for the director Provisioning NIC. This is also the device that director uses for DHCP and PXE boot services. Change this value to your chosen device. To see which device is connected, use the
ip addrcommand. For example, this is the result of anip addrcommand:Copy to Clipboard Copied! Toggle word wrap Toggle overflow In this example, the External NIC uses
em0and the Provisioning NIC usesem1, which is currently not configured. In this case, set thelocal_interfacetoem1. The configuration script attaches this interface to a custom bridge defined with theinspection_interfaceparameter.- local_ip
The IP address defined for the director Provisioning NIC. This is also the IP address that director uses for DHCP and PXE boot services. Leave this value as the default
192.168.24.1/24unless you use a different subnet for the Provisioning network, for example, if this IP address conflicts with an existing IP address or subnet in your environment.For IPv6, the local IP address prefix length must be
/64to support both stateful and stateless connections.- local_mtu
-
The maximum transmission unit (MTU) that you want to use for the
local_interface. Do not exceed 1500 for the undercloud. - local_subnet
-
The local subnet that you want to use for PXE boot and DHCP interfaces. The
local_ipaddress should reside in this subnet. The default isctlplane-subnet. - net_config_override
-
Path to network configuration override template. If you set this parameter, the undercloud uses a JSON or YAML format template to configure the networking with
os-net-configand ignores the network parameters set inundercloud.conf. Use this parameter when you want to configure bonding or add an option to the interface. For more information about customizing undercloud network interfaces, see Configuring undercloud network interfaces. - networks_file
-
Networks file to override for
heat. - output_dir
- Directory to output state, processed heat templates, and Ansible deployment files.
- overcloud_domain_name
The DNS domain name that you want to use when you deploy the overcloud.
NoteWhen you configure the overcloud, you must set the
CloudDomainparameter to a matching value. Set this parameter in an environment file when you configure your overcloud.- roles_file
- The roles file that you want to use to override the default roles file for undercloud installation. It is highly recommended to leave this parameter unset so that the director installation uses the default roles file.
- scheduler_max_attempts
- The maximum number of times that the scheduler attempts to deploy an instance. This value must be greater or equal to the number of bare metal nodes that you expect to deploy at once to avoid potential race conditions when scheduling.
- service_principal
- The Kerberos principal for the service using the certificate. Use this parameter only if your CA requires a Kerberos principal, such as in FreeIPA.
- subnets
-
List of routed network subnets for provisioning and introspection. The default value includes only the
ctlplane-subnetsubnet. For more information, see Subnets. - templates
- Heat templates file to override.
- undercloud_admin_host
The IP address or hostname defined for director Admin API endpoints over SSL/TLS. The director configuration attaches the IP address to the director software bridge as a routed IP address, which uses the
/32netmask.If the
undercloud_admin_hostis not in the same IP network as thelocal_ip, you must set theControlVirtualInterfaceparameter to the interface on which you want the admin APIs on the undercloud to listen. By default, the admin APIs listen on thebr-ctlplaneinterface. Set theControlVirtualInterfaceparameter in a custom environment file, and include the custom environment file in theundercloud.conffile by configuring thecustom_env_filesparameter.For information about customizing undercloud network interfaces, see Configuring undercloud network interfaces.
- undercloud_debug
-
Sets the log level of undercloud services to
DEBUG. Set this value totrueto enableDEBUGlog level. - undercloud_enable_selinux
-
Enable or disable SELinux during the deployment. It is highly recommended to leave this value set to
trueunless you are debugging an issue. - undercloud_hostname
- Defines the fully qualified host name for the undercloud. If set, the undercloud installation configures all system host name settings. If left unset, the undercloud uses the current host name, but you must configure all system host name settings appropriately.
- undercloud_log_file
-
The path to a log file to store the undercloud install and upgrade logs. By default, the log file is
install-undercloud.login the home directory. For example,/home/stack/install-undercloud.log. - undercloud_nameservers
- A list of DNS nameservers to use for the undercloud hostname resolution.
- undercloud_ntp_servers
- A list of network time protocol servers to help synchronize the undercloud date and time.
- undercloud_public_host
The IP address or hostname defined for director Public API endpoints over SSL/TLS. The director configuration attaches the IP address to the director software bridge as a routed IP address, which uses the
/32netmask.If the
undercloud_public_hostis not in the same IP network as thelocal_ip, you must set thePublicVirtualInterfaceparameter to the public-facing interface on which you want the public APIs on the undercloud to listen. By default, the public APIs listen on thebr-ctlplaneinterface. Set thePublicVirtualInterfaceparameter in a custom environment file, and include the custom environment file in theundercloud.conffile by configuring thecustom_env_filesparameter.For information about customizing undercloud network interfaces, see Configuring undercloud network interfaces.
- undercloud_service_certificate
- The location and filename of the certificate for OpenStack SSL/TLS communication. Ideally, you obtain this certificate from a trusted certificate authority. Otherwise, generate your own self-signed certificate.
- undercloud_timezone
- Host timezone for the undercloud. If you do not specify a timezone, director uses the existing timezone configuration.
- undercloud_update_packages
- Defines whether to update packages during the undercloud installation.
Subnets
Each provisioning subnet is a named section in the undercloud.conf file. For example, to create a subnet called ctlplane-subnet, use the following sample in your undercloud.conf file:
You can specify as many provisioning networks as necessary to suit your environment.
Director cannot change the IP addresses for a subnet after director creates the subnet.
- cidr
-
The network that director uses to manage overcloud instances. This is the Provisioning network, which the undercloud
neutronservice manages. Leave this as the default192.168.24.0/24unless you use a different subnet for the Provisioning network. - masquerade
Defines whether to masquerade the network defined in the
cidrfor external access. This provides the Provisioning network with network address translation (NAT) so that the Provisioning network has external access through director.NoteThe director configuration also enables IP forwarding automatically using the relevant
sysctlkernel parameter.- dhcp_start; dhcp_end
- The start and end of the DHCP allocation range for overcloud nodes. Ensure that this range contains enough IP addresses to allocate your nodes.
- dhcp_exclude
- IP addresses to exclude in the DHCP allocation range.
- dns_nameservers
-
DNS nameservers specific to the subnet. If no nameservers are defined for the subnet, the subnet uses nameservers defined in the
undercloud_nameserversparameter. - gateway
-
The gateway for the overcloud instances. This is the undercloud host, which forwards traffic to the External network. Leave this as the default
192.168.24.1unless you use a different IP address for director or want to use an external gateway directly. - host_routes
-
Host routes for the Neutron-managed subnet for the overcloud instances on this network. This also configures the host routes for the
local_subneton the undercloud. - inspection_iprange
-
Temporary IP range for nodes on this network to use during the inspection process. This range must not overlap with the range defined by
dhcp_startanddhcp_endbut must be in the same IP subnet.
6.11. Running the director upgrade
Complete the following steps to upgrade the director.
Procedure
Run the following command to upgrade the director on the undercloud:
openstack undercloud upgrade
$ openstack undercloud upgradeCopy to Clipboard Copied! Toggle word wrap Toggle overflow This command launches the director configuration script. The director upgrades its packages and configures its services to suit the settings in the
undercloud.conf. This script takes several minutes to complete.NoteThe director configuration script prompts for confirmation before proceeding. Bypass this confirmation using the
-yoption:openstack undercloud upgrade -y
$ openstack undercloud upgrade -yCopy to Clipboard Copied! Toggle word wrap Toggle overflow The script also starts all OpenStack Platform service containers on the undercloud automatically. You manage each service through a
systemdresource. Check thesystemdresources:sudo systemctl list-units "tripleo_*"
$ sudo systemctl list-units "tripleo_*"Copy to Clipboard Copied! Toggle word wrap Toggle overflow Each
systemdservice controls a container. Check the enabled containers using the following command:sudo podman ps
$ sudo podman psCopy to Clipboard Copied! Toggle word wrap Toggle overflow The script adds the
stackuser to thedockergroup to ensure that thestackuser has access to container management commands. Refresh thestackuser permissions with the following command:exec su -l stack
$ exec su -l stackCopy to Clipboard Copied! Toggle word wrap Toggle overflow The command prompts you to log in again. Enter the stack user password.
To initialize the
stackuser to use the command line tools, run the following command:source ~/stackrc
$ source ~/stackrcCopy to Clipboard Copied! Toggle word wrap Toggle overflow The prompt now indicates OpenStack commands authenticate and execute against the undercloud;
(undercloud) $
(undercloud) $Copy to Clipboard Copied! Toggle word wrap Toggle overflow
The director upgrade is complete.
Chapter 7. Initial steps for overcloud preparation
You must complete some initial steps to prepare for the overcloud upgrade.
7.1. Preparing for overcloud service downtime
The overcloud upgrade process disables the main control plane services at key points. You cannot use any overcloud services to create new resources when these key points are reached. Workloads that are running in the overcloud remain active during the upgrade process, which means instances continue to run during the upgrade of the control plane. During an upgrade of Compute nodes, these workloads can be live migrated to Compute nodes that are already upgraded.
It is important to plan a maintenance window to ensure that no users can access the overcloud services during the upgrade.
Affected by overcloud upgrade
- OpenStack Platform services
Unaffected by overcloud upgrade
- Instances running during the upgrade
- Ceph Storage OSDs (backend storage for instances)
- Linux networking
- Open vSwitch networking
- Undercloud
7.2. Selecting Compute nodes for upgrade testing
The overcloud upgrade process allows you to either:
- Upgrade all nodes in a role
- Individual nodes separately
To ensure a smooth overcloud upgrade process, it is useful to test the upgrade on a few individual Compute nodes in your environment before upgrading all Compute nodes. This ensures no major issues occur during the upgrade while maintaining minimal downtime to your workloads.
Use the following recommendations to help choose test nodes for the upgrade:
- Select two or three Compute nodes for upgrade testing
- Select nodes without any critical instances running
- If necessary, migrate critical instances from the selected test Compute nodes to other Compute nodes
7.3. Creating an overcloud inventory file
Generate an Ansible inventory file of all nodes in your environment with the tripleo-ansible-inventory command.
Procedure
-
Log in to the undercloud as the
stackuser. Source the
stackrcfile.source ~/stackrc
$ source ~/stackrcCopy to Clipboard Copied! Toggle word wrap Toggle overflow Create a static inventory file of all nodes:
tripleo-ansible-inventory --static-yaml-inventory ~/inventory.yaml --stack STACK_NAME
$ tripleo-ansible-inventory --static-yaml-inventory ~/inventory.yaml --stack STACK_NAMECopy to Clipboard Copied! Toggle word wrap Toggle overflow If you are not using the default
overcloudstack name, set your stack name with the--stack STACK NAMEoption replacingSTACK NAMEwith the name of your stack.To execute Ansible playbooks on your environment, run the
ansible-playbookcommand and include the full path of the dynamic inventory tool using the-ioption. For example:(undercloud) $ ansible-playbook -i ~/inventory.yaml PLAYBOOK
(undercloud) $ ansible-playbook -i ~/inventory.yaml PLAYBOOKCopy to Clipboard Copied! Toggle word wrap Toggle overflow
7.4. Validating the pre-upgrade requirements
Run the pre-upgrade validation group to check the pre-upgrade requirements.
For more information about the Red Hat OpenStack Platform (RHOSP) validation framework, see Using the validation framework in the Director Installation and Usage guide.
Procedure
Source the
stackrcfile.source ~/stackrc
$ source ~/stackrcCopy to Clipboard Copied! Toggle word wrap Toggle overflow Run the
openstack tripleo validator runcommand with the--group pre-upgradeoption and include the/usr/libexec/platform-pythonpython runtime environment:openstack tripleo validator run --group pre-upgrade --python-interpreter /usr/libexec/platform-python -i inventory.yaml
$ openstack tripleo validator run --group pre-upgrade --python-interpreter /usr/libexec/platform-python -i inventory.yamlCopy to Clipboard Copied! Toggle word wrap Toggle overflow Review the results of the validation report. To view detailed output from a specific validation, run the
openstack tripleo validator show run --fullcommand against the UUID of the specific validation from the report:openstack tripleo validator show run --full <UUID>
$ openstack tripleo validator show run --full <UUID>Copy to Clipboard Copied! Toggle word wrap Toggle overflow
A FAILED validation does not prevent you from deploying or running RHOSP. However, a FAILED validation can indicate a potential issue with a production environment.
7.5. Disabling fencing in the overcloud
Before you upgrade the overcloud, ensure that fencing is disabled.
When you upgrade the overcloud, you upgrade each Controller node individually to retain high availability functionality. If fencing is deployed in your environment, the overcloud might detect certain nodes as disabled and attempt fencing operations, which can cause unintended results.
If you have enabled fencing in the overcloud, you must temporarily disable fencing for the duration of the upgrade to avoid any unintended results.
Procedure
-
Log in to the undercloud as the
stackuser. Source the
stackrcfile.source ~/stackrc
$ source ~/stackrcCopy to Clipboard Copied! Toggle word wrap Toggle overflow Log in to a Controller node and run the Pacemaker command to disable fencing:
ssh heat-admin@CONTROLLER_IP "sudo pcs property set stonith-enabled=false"
$ ssh heat-admin@CONTROLLER_IP "sudo pcs property set stonith-enabled=false"Copy to Clipboard Copied! Toggle word wrap Toggle overflow -
In the
fencing.yamlenvironment file, set theEnableFencingparameter tofalseto ensure that fencing stays disabled during the upgrade process.
Additional Resources
7.6. Checking custom Puppet parameters
If you use the ExtraConfig interfaces for customizations of Puppet parameters, Puppet might report duplicate declaration errors during the upgrade. This is due to changes in the interfaces provided by the puppet modules themselves.
This procedure shows how to check for any custom ExtraConfig hieradata parameters in your environment files.
Procedure
Select an environment file and the check if it has an
ExtraConfigparameter:grep ExtraConfig ~/templates/custom-config.yaml
$ grep ExtraConfig ~/templates/custom-config.yamlCopy to Clipboard Copied! Toggle word wrap Toggle overflow -
If the results show an
ExtraConfigparameter for any role (e.g.ControllerExtraConfig) in the chosen file, check the full parameter structure in that file. If the parameter contains any puppet Hierdata with a
SECTION/parametersyntax followed by avalue, it might have been been replaced with a parameter with an actual Puppet class. For example:parameter_defaults: ExtraConfig: neutron::config::dhcp_agent_config: 'DEFAULT/dnsmasq_local_resolv': value: 'true'parameter_defaults: ExtraConfig: neutron::config::dhcp_agent_config: 'DEFAULT/dnsmasq_local_resolv': value: 'true'Copy to Clipboard Copied! Toggle word wrap Toggle overflow Check the director’s Puppet modules to see if the parameter now exists within a Puppet class. For example:
grep dnsmasq_local_resolv
$ grep dnsmasq_local_resolvCopy to Clipboard Copied! Toggle word wrap Toggle overflow If so, change to the new interface.
The following are examples to demonstrate the change in syntax:
Example 1:
parameter_defaults:
  ExtraConfig:
    neutron::config::dhcp_agent_config:
      'DEFAULT/dnsmasq_local_resolv':
        value: 'true'
parameter_defaults: ExtraConfig: neutron::config::dhcp_agent_config: 'DEFAULT/dnsmasq_local_resolv': value: 'true'Copy to Clipboard Copied! Toggle word wrap Toggle overflow Changes to:
parameter_defaults:
  ExtraConfig:
    neutron::agents::dhcp::dnsmasq_local_resolv: true
parameter_defaults: ExtraConfig: neutron::agents::dhcp::dnsmasq_local_resolv: trueCopy to Clipboard Copied! Toggle word wrap Toggle overflow Example 2:
parameter_defaults:
  ExtraConfig:
    ceilometer::config::ceilometer_config:
      'oslo_messaging_rabbit/rabbit_qos_prefetch_count':
        value: '32'
parameter_defaults: ExtraConfig: ceilometer::config::ceilometer_config: 'oslo_messaging_rabbit/rabbit_qos_prefetch_count': value: '32'Copy to Clipboard Copied! Toggle word wrap Toggle overflow Changes to:
parameter_defaults:
  ExtraConfig:
    oslo::messaging::rabbit::rabbit_qos_prefetch_count: '32'
parameter_defaults: ExtraConfig: oslo::messaging::rabbit::rabbit_qos_prefetch_count: '32'Copy to Clipboard Copied! Toggle word wrap Toggle overflow
7.7. Undercloud node database backup
You can use the backup-and-restore Ansible role to create a backup of the database that runs on the undercloud node and use that backup to recover the state of the database in the event that it becomes corrupted. For more information about backing up the undercloud database, see Creating a database backup of the undercloud node in the Red Hat OpenStack Platform 16.1 Backing up and restoring the undercloud and control plane nodes guide.
Chapter 8. Configuring the overcloud for a Leapp upgrade
The long-life Red Hat OpenStack Platform (RHOSP) upgrade requires a base operating system upgrade from Red Hat Enterprise Linux 7 to Red Hat Enterprise Linux 8. Red Hat Enterprise Linux 7 uses the Leapp utility to perform the upgrade to Red Hat Enterprise Linux 8. For more information about Leapp and its dependencies, see Preparing a RHEL 7 system for the upgrade.
The overcloud upgrade framework automatically runs the leapp upgrade. To ensure a successful RHOSP upgrade, it is recommended that you manually run a pre-upgrade report to identify and resolve any potential problems. Run pre-upgrade reports for at least one host of each of the Compute, Controller, and Ceph Storage roles. For more information about Leapp pre-upgrade reports, see Reviewing the pre-upgrade report.
8.1. Creating an upgrades environment file
The upgrade process uses an environment file to enable the upgrade process and configure specific upgrade parameters.
Procedure
-
Log in to the undercloud as the
stackuser. Create an environment file called
upgrades-environment.yamlin yourtemplatesdirectory:touch templates/upgrades-environment.yaml
$ touch templates/upgrades-environment.yamlCopy to Clipboard Copied! Toggle word wrap Toggle overflow Edit the file and add the following mandatory content:
Copy to Clipboard Copied! Toggle word wrap Toggle overflow -
UpgradeLeappDevelSkipskips Leapp checks and sets environment variables when Leapp runs. -
LeappInitCommandpasses commands or script snippets that run on each of the overcloud nodes, and prepares the nodes for the Leapp upgrade. -
UpgradeInitCommandpasses commands or script snippets that run on each of the overcloud nodes. Thednf config-manager --save --setopt exclude=''command removes Leapp packages from DNF exclusion so that automatic removal ofpython2packages is successful.
-
Optional: If you use TLS-Everywhere in your environment and want to migrate from
authconfigtoauthselect, set theauthselect_check.confirmparameter toTrueto avoid bug BZ#1978228 - OSP13→16.2 Leapp upgrade failed with TLSEverywhere:parameter_defaults: LeappInitCommand: | sudo leapp answer --section authselect_check.confirm=True --addparameter_defaults: LeappInitCommand: | sudo leapp answer --section authselect_check.confirm=True --addCopy to Clipboard Copied! Toggle word wrap Toggle overflow Otherwise, set the value to
False.NoteUse the
|syntax to pass multiple commands to theLeappInitCommandparameter:parameter-defaults: LeappInitCommand: | <command_1> <command_2>parameter-defaults: LeappInitCommand: | <command_1> <command_2>Copy to Clipboard Copied! Toggle word wrap Toggle overflow -
Save the
upgrades-environment.yamlfile.
8.2. Upgrade parameters
| Parameter | Description |
|---|---|
|
| Command or script snippet to run on all overcloud nodes to initialize the upgrade process. For example, a repository switch. |
|
| Common commands required by the upgrades process. This should not normally be modified by the operator and is set and unset in the major-upgrade-composable-steps.yaml and major-upgrade-converge.yaml environment files. |
|
| Additional command line options to append to the Leapp command. |
|
|
Print debugging output when running Leapp. The default value is |
|
| Skip Leapp checks by setting env variables when running Leapp in development/testing. For example, LEAPP_DEVEL_SKIP_RHSM=1. |
|
|
Use Leapp for operating system upgrade. The default value is |
|
|
Maximum (seconds) to wait for machine to reboot and respond to a test command. The default value is |
|
|
Timeout (seconds) for the OS upgrade phase via Leapp. The default value is |
|
| List of packages to install after Leapp upgrade. |
|
| List of packages to remove during Leapp upgrade. |
8.3. Copying the Leapp data on the overcloud nodes
Each overcloud node requires Leapp data files. Copy the data files in the /etc/leapp/files directory on the undercloud to the same location on each overcloud node.
Procedure
-
Log in to the undercloud as the
stackuser. Source the
stackrcfile.source ~/stackrc
$ source ~/stackrcCopy to Clipboard Copied! Toggle word wrap Toggle overflow Create a static inventory file of all the nodes in your environment:
tripleo-ansible-inventory --static-yaml-inventory ~/inventory.yaml --stack STACK_NAME
$ tripleo-ansible-inventory --static-yaml-inventory ~/inventory.yaml --stack STACK_NAMECopy to Clipboard Copied! Toggle word wrap Toggle overflow If you are not using the default
overcloudstack name, set your stack name with the--stack STACK NAMEoption replacingSTACK NAMEwith the name of your stack.To copy the leapp data to the overcloud nodes, run the following
synchronizeAnsible command:ansible -i ~/inventory.yaml --become -m synchronize -a "src=/etc/leapp/files dest=/etc/leapp/" overcloud
$ ansible -i ~/inventory.yaml --become -m synchronize -a "src=/etc/leapp/files dest=/etc/leapp/" overcloudCopy to Clipboard Copied! Toggle word wrap Toggle overflow
8.4. Using predictable NIC names for overcloud nodes
Before you run the Leapp upgrade on overcloud nodes, you must check for kernel-based NIC names, which usually contain an eth prefix. These NIC names are usually unpredictable in terms of NIC assignments.
You can run the playbook-nics.yaml playbook to rename NIC names to use the em NIC prefix. You can also set a different NIC prefix, by modifying the prefix variable when running the playbook. However, the NIC changes are only applied after the Leapp upgrade process completes and the node is rebooted.
Prerequisites
The
playbook-nics.yamlplaybook created during the undercloud preparation process. Theplaybook-nics.yamlplaybook accommodates most overcloud networking scenarios that use Ethernet devices, bridges, and Linux bonds. If your environment requires additional configuration beyond these device types, follow these recommendations before proceeding:- Test the playbook on a separate system with a similar networking configuration to your overcloud nodes
-
Modify the playbook to accommodate renaming the
ethprefix within the configuration of other device types - Check the networking configuration of your overcloud nodes after you complete this procedure
Procedure
-
Log in to the undercloud as the
stackuser. Run the
playbook-nics.yamlplaybook on all overcloud nodes:ansible-playbook -i ~/inventory.yaml playbook-nics.yaml
$ ansible-playbook -i ~/inventory.yaml playbook-nics.yamlCopy to Clipboard Copied! Toggle word wrap Toggle overflow The playbook sets the new NIC prefix to
em. To set a different NIC prefix, set theprefixvariable when running the playbook:ansible-playbook -i ~/inventory.yaml -e prefix="mynic" playbook-nics.yaml
$ ansible-playbook -i ~/inventory.yaml -e prefix="mynic" playbook-nics.yamlCopy to Clipboard Copied! Toggle word wrap Toggle overflow The NIC changes are only applied after the Leapp upgrade process completes and the node is rebooted.
Chapter 9. Updating composable services and parameters
You must complete some composable service configuration to prepare for the overcloud upgrade.
9.1. Updating composable services in custom roles_data files
This section contains information about new and deprecated composable services.
-
If you use the default
roles_datafile, these services are included automatically. -
If you use a custom
roles_datafile, add the new services and remove the deprecated services for each relevant role.
If any overcloud nodes in your deployment are dedicated Object Storage (swift) nodes, you must copy the default roles_data.yaml file and edit ObjectStorage to remove the following line: deprecated_server_resource_name: 'SwiftStorage'
Controller nodes
The following services have been deprecated for Controller nodes. Remove them from your Controller role.
| Service | Reason |
|---|---|
|
| The OpenStack Telemetry services are deprecated in favour of Service Telemetry Framework (STF) for metrics and monitoring. The legacy telemetry services are only available in RHOSP 16.1 to help facilitate the transition to STF and will be removed in a future version of RHOSP. Note If you use auto scaling, do not remove these services from your Controller nodes. |
|
| The OpenStack Telemetry services are deprecated in favour of Service Telemetry Framework (STF) for metrics and monitoring. The legacy telemetry services are only available in RHOSP 16.1 to help facilitate the transition to STF and will be removed in a future version of RHOSP. Note If you use CloudForms, do not remove these services from your Controller nodes. |
|
| These services are no longer supported. Remove these services from your Controller nodes. |
|
| Congress is no longer supported. |
|
| This service is no longer supported due to OpenStack Platform Image Service (glance) API v2. |
|
| Deprecated plug-ins for OpenStack Networking (neutron). |
|
| OpenStack Networking (neutron) Load Balancing as a Service deprecated in favour of Octavia. |
|
| This service is removed. |
|
|
Deprecated in favor of |
|
| OpenDaylight is no longer supported. |
|
| This service has been substituted for two new services:
|
|
| Skydive is no longer supported. |
|
| Tacker is no longer supported. |
The following services are new for Controller nodes. Add them to your Controller role.
| Service | Reason |
|---|---|
|
| Tasks to enable Ceph Dashboard service. |
|
| New backends for Block Storage (cinder). |
|
| Run the commands to automatically pull and prepare container images relevant to the services in your overcloud. |
|
| Services for DNS-as-a-Service (designate). |
|
| Service for Bare Metal Introspection for the overcloud. |
|
| The networking agent for OpenStack Bare Metal (ironic). |
|
| Service for OpenStack Networking (neutron) agent for Mellanox InfiniBand. |
|
| Service for installing the Red Hat OpenStack Platform command line tools. |
|
|
Replacement services for the |
|
| Service for the Placement API. |
Compute Nodes
The following services have been deprecated for Compute nodes. Remove them from your Compute role.
| Service | Reason |
|---|---|
|
| OpenDaylight is no longer supported. |
|
| Skydive is no longer supported. |
The following services are new for Compute nodes. Add them to your Compute role.
| Service | Reason |
|---|---|
|
| Service to configure host aggregate and availability zone in OpenStack Compute (nova). |
All Nodes
The following services have been deprecated for all nodes. Remove them from all roles.
| Service | Reason |
|---|---|
|
| Replaced with Podman. |
|
|
Deprecated in favour of |
|
|
Deprecated in favour of |
|
| Deprecated service. |
|
|
Deprecated in favour of |
The following services are new for all nodes. Add them to all roles.
| Service | Reason |
|---|---|
|
| Service to set Kernel arguments, Tuned profiles, and CPU isolation. |
|
| Service to configure Collectd. |
|
| Provides a Multipathd service, which is disabled by default |
|
| Service to install and enable Podman. |
|
| Service to install and enable Relax-and-Recover (ReaR) backup and restore tools. |
|
| Service to configure centralized log collection. |
|
| Service to enable time synchronization method, which is Chronyd by default. |
9.2. Updating composable services in custom environment files
If you have any custom environment files with resource_registry sections, check the resource_registry sections for changes in composable service template mappings. The composable service files for Red Hat OpenStack Platform 16.1 reside in a new location within /usr/share/openstack-tripleo-heat-templates/:
| Red Hat OpenStack Platform 13 | Red Hat OpenStack Platform 16.1 |
|---|---|
|
|
|
The deployment directory contains a set of sub-directories to group composable services. For example, the keystone sub-directory contains composable service templates for OpenStack Identity (keystone).
To remap composable services in custom environment files, check the template location for the current service mapping and edit the mapping to the new location. This procedure uses ceph-mgr.yaml as an example.
This procedure acts as guidance only for remapping composable services. If you are unsure of any mapping, contact Red Hat and request advice on the correct mapping.
Procedure
Search for custom environment files that use composable services. You usually store custom environment files in the
/home/stack/templatesdirectory:cd ~/templates/ grep "OS::TripleO::Services" *
$ cd ~/templates/
$ grep "OS::TripleO::Services" *
Copy to Clipboard Copied! Toggle word wrap Toggle overflow In this scenario, one of the files shows an outdated mapping:
OS::TripleO::Services::CephMgr: /usr/share/openstack-tripleo-heat-templates/docker/services/ceph-ansible/ceph-mgr.yaml
OS::TripleO::Services::CephMgr: /usr/share/openstack-tripleo-heat-templates/docker/services/ceph-ansible/ceph-mgr.yamlCopy to Clipboard Copied! Toggle word wrap Toggle overflow Identify the new
ceph-mgr.yamllocation in/usr/share/openstack-tripleo-heat-templates/. This file is now located in the `deployment/ceph-ansible' directory:find /usr/share/openstack-tripleo-heat-templates/ -name ceph-mgr.yaml
$ find /usr/share/openstack-tripleo-heat-templates/ -name ceph-mgr.yaml
/usr/share/openstack-tripleo-heat-templates/deployment/ceph-ansible/ceph-mgr.yaml
Copy to Clipboard Copied! Toggle word wrap Toggle overflow Edit the service in the custom environment file:
resource_registry:
  OS::TripleO::Services::CephMgr: /usr/share/openstack-tripleo-heat-templates/deployment/ceph-ansible/ceph-mgr.yaml
resource_registry:
  OS::TripleO::Services::CephMgr: /usr/share/openstack-tripleo-heat-templates/deployment/ceph-ansible/ceph-mgr.yaml
Copy to Clipboard Copied! Toggle word wrap Toggle overflow Save the file.
9.3. Configuring access to the undercloud registry
To configure access to the undercloud registry, add the control plane host name of the undercloud and the IP address of the undercloud on the provisioning network to the DockerInsecureRegistryAddress parameter. Place this parameter in the containers-prepare-parameter.yaml file to ensure that the parameter is included in future overcloud deployments.
Procedure
-
Log in to the undercloud as the
stackuser. Obtain the control plane host name on the undercloud:
sudo hiera container_image_prepare_node_names
$ sudo hiera container_image_prepare_node_names
["undercloud.ctlplane.localdomain"]
Copy to Clipboard Copied! Toggle word wrap Toggle overflow Edit the
containers-prepare-parameter.yamlfile and add theDockerInsecureRegistryAddressparameter with a YAML list that contains the control plane host name of the undercloud and the IP address of the undercloud on the provisioning network:parameter_defaults: DockerInsecureRegistryAddress: - undercloud.ctlplane.localdomain:8787 - 192.168.24.1:8787 ...
parameter_defaults: DockerInsecureRegistryAddress: - undercloud.ctlplane.localdomain:8787 - 192.168.24.1:8787 ...Copy to Clipboard Copied! Toggle word wrap Toggle overflow You must also append the port number of the overcloud registry to the host name and IP address values. The port number is
8787.
9.4. Deprecated and removed filters for the NovaSchedulerDefaultFilters parameter
If your environment uses a custom NovaSchedulerDefaultFilters parameter, edit the parameter to remove the following deprecated and removed filters:
| Filter | Status |
|---|---|
|
| Deprecated |
|
| Deprecated |
|
| Deprecated |
|
| Removed |
|
| Removed |
|
| Removed |
|
| Removed |
|
| Removed |
|
| Removed |
|
| Deprecated |
Avoid using filters marked Deprecated. Red Hat OpenStack Platform 16.1 still includes deprecated filters but future versions of Red Hat OpenStack Platform will not include these filters.
9.5. Setting the Compute name format
Red Hat OpenStack Platform 13 uses %stackname%-compute-%index% as the default naming format for Compute nodes. Red Hat OpenStack Platform 16.1 uses %stackname%-novacompute-%index% as the default naming format for Compute nodes. Change the default naming format to retain the original Red Hat OpenStack Platform 13 naming format. If you do not use the original naming format, director configures new OpenStack Compute (nova) agents with the new naming format and keeps the existing OpenStack Compute (nova) agents with the old naming format as orphaned services.
Procedure
-
Log in to the undercloud as the
stackuser. Set the Compute naming format:
If you use a custom
roles_datafile, edit the customroles_datafile and set theHostnameFormatDefaultparameter for theComputerole:- name: Compute … HostnameFormatDefault: '%stackname%-compute-%index%' …
- name: Compute … HostnameFormatDefault: '%stackname%-compute-%index%' …Copy to Clipboard Copied! Toggle word wrap Toggle overflow Save the custom
roles_datafile.If you use the default
roles_datafile inopenstack-tripleo-heat-templates, set the naming format in an environment file. Edit the environment file with your node counts and flavors, which is usually namednode-info.yaml. Add theComputeHostnameFormatparameter to theparameter_defaultssection:parameter_defaults: … ComputeHostnameFormat: '%stackname%-compute-%index%' …
parameter_defaults: … ComputeHostnameFormat: '%stackname%-compute-%index%' …Copy to Clipboard Copied! Toggle word wrap Toggle overflow Save the
node-info.yamlfile.
9.6. Configuring the instance serial number
In Red Hat OpenStack Platform 13, the serial number for instances stored in the virtual BIOS of the host machine is based on the serial number of the host.
In Red Hat OpenStack Platform 16.1, the serial number for instances stored in the virtual BIOS of the host machine is based on the UUID of the instance by default.
If you want to retain the behaviour of your Red Hat OpenStack Platform 13 deployment when you upgrade to Red Hat OpenStack Platform 16.1, you must configure [libvirt]sysinfo_serial.
Procedure
-
Log in to the undercloud as the
stackuser. Source the
stackrcfile:source ~/stackrc
[stack@director ~]$ source ~/stackrcCopy to Clipboard Copied! Toggle word wrap Toggle overflow - Open an environment file.
Add the following configuration to your environment file to specify that the instance serial number is based on the serial number of the host:
parameter_defaults:
  <Role>ExtraConfig:
    nova::config::nova_config:
      libvirt/sysinfo_serial:
        value: auto
parameter_defaults: <Role>ExtraConfig: nova::config::nova_config: libvirt/sysinfo_serial: value: autoCopy to Clipboard Copied! Toggle word wrap Toggle overflow - Save the updates to your environment file, and add the file to your overcloud upgrade and deployment commands.
9.7. Updating your SSL/TLS configuration
Remove the NodeTLSData resource from the resource_registry to update your SSL/TLS configuration.
Procedure
-
Log in to the undercloud as the
stackuser. Source the
stackrcfile:source ~/stackrc
$ source ~/stackrcCopy to Clipboard Copied! Toggle word wrap Toggle overflow -
Edit your custom overcloud SSL/TLS public endpoint file, which is usually named
~/templates/enable-tls.yaml. Remove the
NodeTLSDataresource from the `resource_registry:resource_registry: OS::TripleO::NodeTLSData: /usr/share/openstack-tripleo-heat-templates/puppet/extraconfig/tls/tls-cert-inject.yaml …
resource_registry: OS::TripleO::NodeTLSData: /usr/share/openstack-tripleo-heat-templates/puppet/extraconfig/tls/tls-cert-inject.yaml …Copy to Clipboard Copied! Toggle word wrap Toggle overflow The overcloud deployment uses a new service in HAProxy to determine if SSL/TLS is enabled.
NoteIf this is the only resource in the
resource_registrysection of theenable-tls.yamlfile, remove the completeresource_registrysection.- Save the SSL/TLS public endpoint file file.
9.8. Updating post configuration templates
If you use the OS::TripleO::NodeExtraConfigPost resource to register and run a post-configuration template, you must add the EndpointMap parameter to the template.
Procedure
- Edit the post-configuration template.
Under the
parameterssection, add theEndpointMapparameter and its sub-parameters:Copy to Clipboard Copied! Toggle word wrap Toggle overflow - Save the template.
9.9. Considerations when retaining legacy telemetry services
In Red Hat OpenStack Platform (RHOSP) 16.1, the OpenStack Telemetry components are deprecated in favor of the Service Telemetry Framework (STF), therefore the legacy telemetry components are not enabled after the upgrade.
If you use auto scaling or CloudForms services, you must retain the legacy telemetry services.
To retain legacy RHOSP 13 telemetry services, include the /usr/share/openstack-tripleo-heat-templates/environments/enable-legacy-telemetry.yaml environment file when you run the openstack overcloud upgrade prepare and openstack overcloud upgrade converge commands.
You must also include the enable-legacy-telemetry.yaml environment file every time you update the overcloud after the upgrade.
The legacy telemetry services are only available to help facilitate the transition to STF and will be removed in a future version of RHOSP.
Chapter 10. Updating overcloud registration to the Red Hat Customer Portal
Red Hat OpenStack Platform 16.1 uses Ansible-based methods to register overcloud nodes to the Red Hat Customer Portal.
10.1. Red Hat Subscription Manager (RHSM) composable service
You can use the rhsm composable service to register overcloud nodes through Ansible. Each role in the default roles_data file contains a OS::TripleO::Services::Rhsm resource, which is disabled by default. To enable the service, register the resource to the rhsm composable service file:
resource_registry:
  OS::TripleO::Services::Rhsm: /usr/share/openstack-tripleo-heat-templates/deployment/rhsm/rhsm-baremetal-ansible.yaml
resource_registry:
  OS::TripleO::Services::Rhsm: /usr/share/openstack-tripleo-heat-templates/deployment/rhsm/rhsm-baremetal-ansible.yaml
The rhsm composable service accepts a RhsmVars parameter, which you can use to define multiple sub-parameters relevant to your registration:
You can also use the RhsmVars parameter in combination with role-specific parameters, for example, ControllerParameters, to provide flexibility when enabling specific repositories for different nodes types.
10.2. RhsmVars sub-parameters
Use the following sub-parameters as part of the RhsmVars parameter when you configure the rhsm composable service. For more information about the Ansible parameters that are available, see the role documentation.
rhsm | Description |
|---|---|
|
|
Choose the registration method. Either |
|
|
The organization that you want to use for registration. To locate this ID, run |
|
|
The subscription pool ID that you want to use. Use this parameter if you do not want to auto-attach subscriptions. To locate this ID, run |
|
| The activation key that you want to use for registration. |
|
|
Use this parameter to attach compatible subscriptions to this system automatically. Set the value to |
|
| The base URL for obtaining content. The default URL is the Red Hat Content Delivery Network. If you use a Satellite server, change this value to the base URL of your Satellite server content repositories. |
|
| The hostname of the subscription management service for registration. The default is the Red Hat Subscription Management hostname. If you use a Satellite server, change this value to your Satellite server hostname. |
|
| A list of repositories that you want to enable. |
|
| The username for registration. If possible, use activation keys for registration. |
|
| The password for registration. If possible, use activation keys for registration. |
|
| Red Hat Enterprise Linux release for pinning the repositories. This is set to 8.2 for Red Hat OpenStack Platform |
|
|
The hostname for the HTTP proxy. For example: |
|
|
The port for HTTP proxy communication. For example: |
|
| The username to access the HTTP proxy. |
|
| The password to access the HTTP proxy. |
You can use rhsm_activation_key and rhsm_repos together only if rhsm_method is set to portal. If rhsm_method is set to 'satellite', you can only use either rhsm_activation_key or rhsm_repos.
10.3. Switching to the rhsm composable service
The previous rhel-registration method runs a bash script to handle the overcloud registration. The scripts and environment files for this method are located in the core heat template collection at /usr/share/openstack-tripleo-heat-templates/extraconfig/pre_deploy/rhel-registration/.
Complete the following steps to switch from the rhel-registration method to the rhsm composable service.
Procedure
Exclude the
rhel-registrationenvironment files from future deployments operations. In most cases, exclude the following files:-
rhel-registration/environment-rhel-registration.yaml -
rhel-registration/rhel-registration-resource-registry.yaml
-
If you use a custom
roles_datafile, ensure that each role in yourroles_datafile contains theOS::TripleO::Services::Rhsmcomposable service. For example:Copy to Clipboard Copied! Toggle word wrap Toggle overflow -
Add the environment file for
rhsmcomposable service parameters to future deployment operations.
This method replaces the rhel-registration parameters with the rhsm service parameters and changes the heat resource that enables the service from:
resource_registry:
  OS::TripleO::NodeExtraConfig: rhel-registration.yaml
resource_registry:
OS::TripleO::NodeExtraConfig: rhel-registration.yamlTo:
resource_registry:
  OS::TripleO::Services::Rhsm: /usr/share/openstack-tripleo-heat-templates/deployment/rhsm/rhsm-baremetal-ansible.yaml
resource_registry:
  OS::TripleO::Services::Rhsm: /usr/share/openstack-tripleo-heat-templates/deployment/rhsm/rhsm-baremetal-ansible.yaml
You can also include the /usr/share/openstack-tripleo-heat-templates/environments/rhsm.yaml environment file with your deployment to enable the service.
10.4. rhel-registration to rhsm mappings
To help transition your details from the rhel-registration method to the rhsm method, use the following table to map your parameters and values.
rhel-registration | rhsm / RhsmVars |
|---|---|
|
|
|
|
|
|
|
|
|
|
|
|
|
|
|
|
|
|
|
|
|
|
|
|
|
|
|
|
|
|
|
|
|
|
|
|
|
|
|
|
|
|
10.5. Registering the overcloud with the rhsm composable service
Create an environment file that enables and configures the rhsm composable service. Director uses this environment file to register and subscribe your nodes.
Procedure
-
Create an environment file named
templates/rhsm.ymlto store the configuration. Include your configuration in the environment file. For example:
Copy to Clipboard Copied! Toggle word wrap Toggle overflow -
The
resource_registrysection associates therhsmcomposable service with theOS::TripleO::Services::Rhsmresource, which is available on each role. -
The
RhsmVarsvariable passes parameters to Ansible for configuring your Red Hat registration.
-
The
- Save the environment file.
10.6. Applying the rhsm composable service to different roles
You can apply the rhsm composable service on a per-role basis. For example, you can apply different sets of configurations to Controller nodes, Compute nodes, and Ceph Storage nodes.
Procedure
-
Create an environment file named
templates/rhsm.ymlto store the configuration. Include your configuration in the environment file. For example:
Copy to Clipboard Copied! Toggle word wrap Toggle overflow The
resource_registryassociates therhsmcomposable service with theOS::TripleO::Services::Rhsmresource, which is available on each role.The
ControllerParameters,ComputeParameters, andCephStorageParametersparameters each use a separateRhsmVarsparameter to pass subscription details to their respective roles.NoteSet the
RhsmVarsparameter within theCephStorageParametersparameter to use a Red Hat Ceph Storage subscription and repositories specific to Ceph Storage. Ensure therhsm_reposparameter contains the standard Red Hat Enterprise Linux repositories instead of the Extended Update Support (EUS) repositories that Controller and Compute nodes require.- Save the environment file.
Chapter 11. Updating overcloud registration to Red Hat Satellite Server
Red Hat OpenStack Platform 16.1 uses Ansible-based methods to register overcloud nodes to Red Hat Satellite Server 6.
11.1. Red Hat Subscription Manager (RHSM) composable service
You can use the rhsm composable service to register overcloud nodes through Ansible. Each role in the default roles_data file contains a OS::TripleO::Services::Rhsm resource, which is disabled by default. To enable the service, register the resource to the rhsm composable service file:
resource_registry:
  OS::TripleO::Services::Rhsm: /usr/share/openstack-tripleo-heat-templates/deployment/rhsm/rhsm-baremetal-ansible.yaml
resource_registry:
  OS::TripleO::Services::Rhsm: /usr/share/openstack-tripleo-heat-templates/deployment/rhsm/rhsm-baremetal-ansible.yaml
The rhsm composable service accepts a RhsmVars parameter, which you can use to define multiple sub-parameters relevant to your registration:
You can also use the RhsmVars parameter in combination with role-specific parameters, for example, ControllerParameters, to provide flexibility when enabling specific repositories for different nodes types.
11.2. RhsmVars sub-parameters
Use the following sub-parameters as part of the RhsmVars parameter when you configure the rhsm composable service. For more information about the Ansible parameters that are available, see the role documentation.
rhsm | Description |
|---|---|
|
|
Choose the registration method. Either |
|
|
The organization that you want to use for registration. To locate this ID, run |
|
|
The subscription pool ID that you want to use. Use this parameter if you do not want to auto-attach subscriptions. To locate this ID, run |
|
| The activation key that you want to use for registration. |
|
|
Use this parameter to attach compatible subscriptions to this system automatically. Set the value to |
|
| The base URL for obtaining content. The default URL is the Red Hat Content Delivery Network. If you use a Satellite server, change this value to the base URL of your Satellite server content repositories. |
|
| The hostname of the subscription management service for registration. The default is the Red Hat Subscription Management hostname. If you use a Satellite server, change this value to your Satellite server hostname. |
|
| A list of repositories that you want to enable. |
|
| The username for registration. If possible, use activation keys for registration. |
|
| The password for registration. If possible, use activation keys for registration. |
|
| Red Hat Enterprise Linux release for pinning the repositories. This is set to 8.2 for Red Hat OpenStack Platform |
|
|
The hostname for the HTTP proxy. For example: |
|
|
The port for HTTP proxy communication. For example: |
|
| The username to access the HTTP proxy. |
|
| The password to access the HTTP proxy. |
You can use rhsm_activation_key and rhsm_repos together only if rhsm_method is set to portal. If rhsm_method is set to 'satellite', you can only use either rhsm_activation_key or rhsm_repos.
11.3. Switching to the rhsm composable service
The previous rhel-registration method runs a bash script to handle the overcloud registration. The scripts and environment files for this method are located in the core heat template collection at /usr/share/openstack-tripleo-heat-templates/extraconfig/pre_deploy/rhel-registration/.
Complete the following steps to switch from the rhel-registration method to the rhsm composable service.
Procedure
Exclude the
rhel-registrationenvironment files from future deployments operations. In most cases, exclude the following files:-
rhel-registration/environment-rhel-registration.yaml -
rhel-registration/rhel-registration-resource-registry.yaml
-
If you use a custom
roles_datafile, ensure that each role in yourroles_datafile contains theOS::TripleO::Services::Rhsmcomposable service. For example:Copy to Clipboard Copied! Toggle word wrap Toggle overflow -
Add the environment file for
rhsmcomposable service parameters to future deployment operations.
This method replaces the rhel-registration parameters with the rhsm service parameters and changes the heat resource that enables the service from:
resource_registry:
  OS::TripleO::NodeExtraConfig: rhel-registration.yaml
resource_registry:
OS::TripleO::NodeExtraConfig: rhel-registration.yamlTo:
resource_registry:
  OS::TripleO::Services::Rhsm: /usr/share/openstack-tripleo-heat-templates/deployment/rhsm/rhsm-baremetal-ansible.yaml
resource_registry:
  OS::TripleO::Services::Rhsm: /usr/share/openstack-tripleo-heat-templates/deployment/rhsm/rhsm-baremetal-ansible.yaml
You can also include the /usr/share/openstack-tripleo-heat-templates/environments/rhsm.yaml environment file with your deployment to enable the service.
11.4. rhel-registration to rhsm mappings
To help transition your details from the rhel-registration method to the rhsm method, use the following table to map your parameters and values.
rhel-registration | rhsm / RhsmVars |
|---|---|
|
|
|
|
|
|
|
|
|
|
|
|
|
|
|
|
|
|
|
|
|
|
|
|
|
|
|
|
|
|
|
|
|
|
|
|
|
|
|
|
|
|
11.5. Registering the overcloud to Red Hat Satellite Server
Create an environment file that enables and configures the rhsm composable service to register nodes to Red Hat Satellite instead of the Red Hat Customer Portal.
Procedure
-
Create an environment file named
templates/rhsm.ymlto store the configuration. Include your configuration in the environment file. For example:
Copy to Clipboard Copied! Toggle word wrap Toggle overflow The
resource_registryassociates therhsmcomposable service with theOS::TripleO::Services::Rhsmresource, which is available on each role.The
RhsmVarsvariable passes parameters to Ansible for configuring your Red Hat registration.- Save the environment file.
11.6. Preparing Leapp to use Satellite Server
If you use Satellite Server 6 to host RPM content, complete these preparation steps to ensure a successful Leapp upgrade with Satellite.
Prerequisites
- Create a Satellite Server activation key that is linked to repositories for Red Hat OpenStack Platform 16.1 and Red Hat Enterprise Linux 8.2.
- Generate an Ansible inventory file for your overcloud nodes.
- On your Satellite Server, create and promote a content view for Red Hat OpenStack Platform 16.1 upgrade and include the repositories that required for the upgrade. For more information, see Red Hat Satellite Server 6 considerations.
If you use a Ceph subscription and have configured director to use the
overcloud-minimalimage for Ceph storage nodes, on your Satellite Server you must create a Content View and add the following Red Hat Enterprise Linux (RHEL) 8.2 repositories to it:Red Hat Enterprise Linux 8 for x86_64 - AppStream (RPMs)
rhel-8-for-x86_64-appstream-rpms
x86_64 8.2
rhel-8-for-x86_64-appstream-rpms
x86_64 8.2
Copy to Clipboard Copied! Toggle word wrap Toggle overflow Red Hat Enterprise Linux 8 for x86_64 - BaseOS (RPMs)
rhel-8-for-x86_64-baseos-rpms
x86_64 8.2
rhel-8-for-x86_64-baseos-rpms
x86_64 8.2
Copy to Clipboard Copied! Toggle word wrap Toggle overflow For more information, see Importing Red Hat Content and Managing Content Views in the Red Hat Satellite Content Management Guide.
Procedure
-
Log in to the undercloud as the
stackuser. Create a file called
playbook-satellite.yamland paste the following content in the file:Copy to Clipboard Copied! Toggle word wrap Toggle overflow Modify the
redhat_subscriptionvariables to suit your Satellite Server.Run the playbook:
ansible-playbook -i ~/inventory.yaml playbook-satellite.yaml
$ ansible-playbook -i ~/inventory.yaml playbook-satellite.yamlCopy to Clipboard Copied! Toggle word wrap Toggle overflow
Chapter 12. Preparing for a director-deployed Ceph Storage upgrade
If your deployment uses a director-deployed Red Hat Ceph Storage cluster, you must complete the procedures included in this section.
RHOSP 16.1 is supported on RHEL 8.2. However, hosts that are mapped to the Ceph Storage role update to the latest major RHEL release. For more information, see Red Hat Ceph Storage: Supported configurations.
If you are upgrading with external Ceph deployments, you must skip the procedures included in this section and continue to Chapter 13, Preparing for upgrading with external Ceph deployments.
The upgrade process maintains the use of Red Hat Ceph Storage 3 containerized services during the upgrade to Red Hat OpenStack Platform 16.1. After you complete the Red Hat OpenStack Platform 16.1 upgrade, you upgrade the Ceph Storage services to Red Hat Ceph Storage 4.
You cannot provision new shares with the Shared File Systems service (manila) until you complete both the Red Hat OpenStack Platform 16.1 upgrade and the Ceph Storage services upgrade to Red Hat Ceph Storage 4.
12.1. Understanding the Ceph Storage node upgrade process at a high level
The director-deployed Ceph Storage nodes continue to use Red Hat Ceph Storage 3 containers during the overcloud upgrade process. To understand how Ceph Storage nodes and services are impacted during the upgrade process, read the following summaries for each aspect of the Ceph Storage upgrade process.
ceph-ansible
ceph-ansible is a collection of roles and playbooks that director uses to install, maintain, and upgrade Ceph Storage services. When you upgraded the undercloud, you ran certain commands that ensured ceph-ansible remained at the latest version 3 collection after the transition to Red Hat Enterprise Linux 8.2. Version 3 of ceph-ansible keeps the containerized Ceph Storage services on version 3 through the duration of the overcloud upgrade. After you complete the upgrade, you enable the Red Hat Ceph Storage update the Red Hat Ceph Storage Tools 4 for RHEL 8 repository and update ceph-ansible to version 4.
Migration to Podman
During the overcloud upgrade, you must run the openstack overcloud external-upgrade run --tags ceph_systemd command to change the systemd services that control Ceph Storage containerized services to use Podman instead of Docker. You run this command before performing the operating system upgrade on any node that contains Ceph Storage containerized services.
After you change the systemd services to use Podman on a node, you perform the operating system upgrade and the OpenStack Platform service upgrade. The Ceph Storage containers on that node will run again after the OpenStack Platform service upgrade.
Ceph Storage operating system upgrade
You follow the same workflow on Ceph Storage nodes as you do on overcloud nodes in general. When you run the openstack overcloud upgrade run --tags system_upgrade command against a Ceph Storage node, director runs Leapp on Ceph Storage node and upgrades the operating system to Red Hat Enterprise Linux 8.2. You then run the untagged openstack overcloud upgrade run command against the Ceph Storage node, which runs the following containers:
- Red Hat Ceph Storage 3 containerized services
- Red Hat OpenStack Platform 16.1 containerized services
Upgrading to Red Hat Ceph Storage 4
After you complete the Leapp upgrade and Red Hat OpenStack Platform upgrade, the Ceph Storage containerized services will still use version 3 containers. At this point, you must upgrade ceph-ansible to version 4 and then run the openstack overcloud external-upgrade run --tags ceph command that performs an upgrade of all Red Hat Ceph Storage services on all nodes to version 4.
Summary of the Ceph Storage workflow
The following list is a high level workflow for the Red Hat Ceph Storage upgrade. This workflow is integrated into the general Red Hat OpenStack Platform workflow and you run upgrade framework commands on the undercloud to perform the operations in this workflow.
-
Upgrade the undercloud but retain version 3 of
ceph-ansible - Start the overcloud upgrade
Perform the following tasks for each node that hosts Ceph Storage containerized services:
- Migrate the Ceph Storage containerized services to Podman
- Upgrade the operating system
- Upgrade the OpenStack Platform services, which relaunches Ceph Storage version 3 containerized services
- Complete the overcloud upgrade
-
Upgrade
ceph-ansibleto version 4 on the undercloud - Upgrade to Red Hat Ceph Storage 4 on the overcloud
This list does not capture all steps in the complete Red Hat OpenStack Platform 16.1 upgrade process but focuses only on the aspects relevant to Red Hat Ceph Storage to describe what occurs to Ceph Storage services during the upgrade process.
12.2. Checking your ceph-ansible version
During the undercloud upgrade, you retained the Ceph Storage 3 version of the ceph-ansible package. This helps maintain the compatibility of the Ceph Storage 3 containers on your Ceph Storage nodes. Verify that this package remains on your undercloud.
Procedure
-
Log in to the undercloud as the
stackuser. Run the
dnfcommand to check the version of theceph-ansiblepackage:sudo dnf info ceph-ansible
$ sudo dnf info ceph-ansibleCopy to Clipboard Copied! Toggle word wrap Toggle overflow The command output shows version 3 of the
ceph-ansiblepackage:Installed Packages Name : ceph-ansible Version : 3.xx.xx.xx ...
Installed Packages Name : ceph-ansible Version : 3.xx.xx.xx ...Copy to Clipboard Copied! Toggle word wrap Toggle overflow
If the ceph-ansible package is missing or not a version 3 package, download the latest version 3 package from the Red Hat Package Browser and manually install the package on your undercloud. Note that the ceph-ansible version 3 package is only available from Red Hat Enterprise Linux 7 repositories and is not available in Red Hat Enterprise Linux 8 repositories. ceph-ansible version 3 is not supported on Red Hat Enterprise Linux 8 outside the context of the Red Hat OpenStack Platform framework for upgrades.
12.3. Setting the ceph-ansible repository
The Red Hat OpenStack Platform 16.1 validation framework tests that ceph-ansible is installed correctly before director upgrades the overcloud to Red Hat Ceph Storage 4. The framework uses the CephAnsibleRepo parameter to check that you installed ceph-ansible from the correct repository. Director disables the test after you run the openstack overcloud upgrade prepare command and this test remains disabled through the duration of the Red Hat OpenStack Platform 16.1 overcloud upgrade. Director re-enables this test after running the openstack overcloud upgrade converge command. However, to prepare for this validation, you must set the CephAnsibleRepo parameter to the Red Hat Ceph Storage Tools 4 for RHEL 8 repository.
Procedure
-
Log in to the undercloud as the
stackuser. Edit the environment file that contains your overcloud Ceph Storage configuration. This file is usually named
ceph-config.yamland you can find it in yourtemplatesdirectory:vi /home/stack/templates/ceph-config.yaml
$ vi /home/stack/templates/ceph-config.yamlCopy to Clipboard Copied! Toggle word wrap Toggle overflow Add the
CephAnsibleRepoparameter to theparameter_defaultssection:parameter_defaults: ... CephAnsibleRepo: rhceph-4-tools-for-rhel-8-x86_64-rpms ...
parameter_defaults: ... CephAnsibleRepo: rhceph-4-tools-for-rhel-8-x86_64-rpms ...Copy to Clipboard Copied! Toggle word wrap Toggle overflow CephAnsibleReposets the repository that includesceph-ansible. The validation framework uses this parameter to check that you have installedceph-ansibleon the undercloud.-
Save the
ceph-config.yamlfile.
12.4. Checking Ceph cluster status before an upgrade
Before you can proceed with the overcloud upgrade, you must verify that the Ceph cluster is functioning as expected.
Procedure
-
Log in to the node that is running the
ceph-monservice. This node is usually a Controller node or a standalone Ceph Monitor node. Enter the following command to view the status of the Ceph cluster:
docker exec ceph-mon-$HOSTNAME ceph -s
$ docker exec ceph-mon-$HOSTNAME ceph -sCopy to Clipboard Copied! Toggle word wrap Toggle overflow -
Confirm that the health status of the cluster is
HEALTH_OKand that all of the OSDs areup.
Chapter 13. Preparing for upgrading with external Ceph deployments
If you are upgrading with external Ceph deployments, you must complete the procedures included in this section.
If your deployment does not use an external Ceph Storage cluster, you must skip the procedures included in this section and continue to the next section.
13.1. Installing ceph-ansible
If you are upgrading with external Ceph deployments, you must complete this procedure.
The ceph-ansible package is required when you use Ceph Storage with Red Hat OpenStack Platform.
Procedure
Enable the Ceph Tools repository:
sudo subscription-manager repos --enable=rhceph-4-tools-for-rhel-8-x86_64-rpms
[stack@director ~]$ sudo subscription-manager repos --enable=rhceph-4-tools-for-rhel-8-x86_64-rpmsCopy to Clipboard Copied! Toggle word wrap Toggle overflow Install the
ceph-ansiblepackage:sudo dnf install -y ceph-ansible
[stack@director ~]$ sudo dnf install -y ceph-ansibleCopy to Clipboard Copied! Toggle word wrap Toggle overflow
13.2. Setting the ceph-ansible repository
The Red Hat OpenStack Platform 16.1 validation framework tests that ceph-ansible is installed correctly before director upgrades the overcloud to Red Hat Ceph Storage 4. The framework uses the CephAnsibleRepo parameter to check that you installed ceph-ansible from the correct repository. Director disables the test after you run the openstack overcloud upgrade prepare command and this test remains disabled through the duration of the Red Hat OpenStack Platform 16.1 overcloud upgrade. Director re-enables this test after running the openstack overcloud upgrade converge command. However, to prepare for this validation, you must set the CephAnsibleRepo parameter to the Red Hat Ceph Storage Tools 4 for RHEL 8 repository.
Procedure
-
Log in to the undercloud as the
stackuser. Edit the environment file that contains your overcloud Ceph Storage configuration. This file is usually named
ceph-config.yamland you can find it in yourtemplatesdirectory:vi /home/stack/templates/ceph-config.yaml
$ vi /home/stack/templates/ceph-config.yamlCopy to Clipboard Copied! Toggle word wrap Toggle overflow Add the
CephAnsibleRepoparameter to theparameter_defaultssection:parameter_defaults: ... CephAnsibleRepo: rhceph-4-tools-for-rhel-8-x86_64-rpms ...
parameter_defaults:
  ...
  CephAnsibleRepo: rhceph-4-tools-for-rhel-8-x86_64-rpms
  ...
Copy to Clipboard Copied! Toggle word wrap Toggle overflow CephAnsibleReposets the repository that includesceph-ansible. The validation framework uses this parameter to check that you have installedceph-ansibleon the undercloud.-
Save the
ceph-config.yamlfile.
Chapter 14. Updating network configuration
You must complete some network configuration to prepare for the overcloud upgrade.
14.1. Updating network interface templates
Red Hat OpenStack Platform includes a script to automatically add the missing parameters to your NIC template files.
Procedure
-
Log in to the undercloud as the
stackuser. Source the
stackrcfile.source ~/stackrc
$ source ~/stackrcCopy to Clipboard Copied! Toggle word wrap Toggle overflow On the undercloud, create a file called
update-nic-templates.shand include the following content in the file:Copy to Clipboard Copied! Toggle word wrap Toggle overflow -
If you use a custom overcloud name, Set the
STACK_NAMEvariable to the name of your overcloud. The default name for an overcloud stack isovercloud. -
If you use a custom
roles_datafile, set theROLES_DATAvariable to the location of the custom file. If you use the defaultroles_datafile, leave the variable as/usr/share/openstack-tripleo-heat-templates/roles_data.yaml -
If you use a custom
network_datafile, set theNETWORK_DATAvariable to the location of the custom file. If you use the defaultnetwork_datafile, leave the variable as/usr/share/openstack-tripleo-heat-templates/network_data.yaml -
Run
/usr/share/openstack-tripleo-heat-templates/tools/merge-new-params-nic-config-script.py -hto see a list of options to add to the script.
-
If you use a custom overcloud name, Set the
Add executable permissions to the script:
chmod +x update-nic-templates.sh
$ chmod +x update-nic-templates.shCopy to Clipboard Copied! Toggle word wrap Toggle overflow -
Optional: If you use a spine-leaf network topology for your RHOSP environment, check the
roles_data.yamlfile and ensure that it uses the correct role names for the NIC templates for your deployment. The script uses the value of thedeprecated_nic_config_nameparameter in theroles_data.yamlfile. Run the script:
./update-nic-templates.sh
$ ./update-nic-templates.shCopy to Clipboard Copied! Toggle word wrap Toggle overflow The script saves a copy of each custom NIC template and updates each template with the missing parameters. The script also skips any roles that do not have a custom template:
Copy to Clipboard Copied! Toggle word wrap Toggle overflow
14.2. Maintaining Open vSwitch compatibility during the upgrade
Red Hat OpenStack Platform 13 uses Open vSwitch (OVS) as the default ML2 back end for OpenStack Networking (neutron). Newer versions of Red Hat OpenStack Platform use Open Virtual Network (OVN), which expands upon OVS capabilities. However, to ensure a stable upgrade, you must maintain OVS functionality during the duration of the upgrade and then migrate to OVN after you complete the upgrade.
To maintain OVS compatibility during the upgrade, include the following environment file as part of your environment file collection:
/usr/share/openstack-tripleo-heat-templates/environments/services/neutron-ovs.yaml- NOTE
-
When you include the
neutron-ovs.yamlenvironment file, check if theneutron-ovs-dvr.yamlenvironment file is included in your environment file collection. You must include theneutron-ovs.yamlenvironment file before theneutron-ovs-dvr.yamlfile, to avoid failures during the upgrade.
Treat this file as part of your deployment until you have completed the migration to OVN. Include the file with all overcloud upgrade and deployment commands:
-
openstack overcloud upgrade prepare -
openstack overcloud upgrade converge -
openstack overcloud deploy -
openstack overcloud update prepare -
openstack overcloud update converge - Any other command that uses environment files.
Troubleshooting OVS compatibility
If the upgrade process fails because the parameters defined in the neutron-ovs.yaml file are overwriting the parameters defined in the neutron-ovs-dvr.yaml, change the order in which you include these files and run the openstack overcloud upgrade prepare and openstack overcloud upgrade run again on the affected nodes. If one of the affected nodes is a Compute node, remove the openstack-neutron* packages from that node.
14.3. Maintaining composable network compatibility during the upgrade
The network_data file format for Red Hat OpenStack Platform 16.1 includes new sections that you can use to define additional subnets and routes within a network. However, if you use a custom network_data file, you can still use the network_data file format from Red Hat OpenStack Platform 13.
-
When you upgrade from Red Hat OpenStack Platform 13 to 16.1, use the Red Hat OpenStack Platform 13
network_datafile format during and after the upgrade. For more information about Red Hat OpenStack Platform 13 composable network syntax, see Custom composable networks. -
When you create new overclouds on Red Hat OpenStack Platform 16.1, use the Red Hat OpenStack Platform 16.1
network_datafile format. For more information about Red Hat OpenStack Platform 16.1 composable network syntax, see Custom composable networks.
Chapter 15. Preparing network functions virtualization (NFV)
If you use network functions virtualization (NFV), you must complete some preparation for the overcloud upgrade.
15.1. Network functions virtualization (NFV) environment files
In a typical NFV-based environment, you can enable services such as the following:
- Single-root input/output virtualization (SR-IOV)
- Data Plane Development Kit (DPDK)
You do not require any specific reconfiguration to these services to accommodate the upgrade to Red Hat OpenStack Platform 16.1. However, ensure that the environment files that enable your NFV functionality meet the following requirements:
The default environment files to enable NFV features are located in the
environments/servicesdirectory of the Red Hat OpenStack Platform 16.1openstack-tripleo-heat-templatescollection. If you include the default NFV environment files fromopenstack-tripleo-heat-templateswith your Red Hat OpenStack Platform 13 deployment, verify the correct environment file location for the respective feature in Red Hat OpenStack Platform 16.1:-
Open vSwitch (OVS) networking and SR-IOV:
/usr/share/openstack-tripleo-heat-templates/environments/services/neutron-sriov.yaml -
Open vSwitch (OVS) networking and DPDK:
/usr/share/openstack-tripleo-heat-templates/environments/services/neutron-ovs-dpdk.yaml
-
Open vSwitch (OVS) networking and SR-IOV:
-
To maintain OVS compatibility during the upgrade from Red Hat OpenStack Platform 13 to Red Hat OpenStack Platform 16.1, you must include the
/usr/share/openstack-tripleo-heat-templates/environments/services/neutron-ovs.yamlenvironment file. When running deployment and upgrade commands that involve environment files, you must include any NFV-related environment files after theneutron-ovs.yamlfile. For example, when runningopenstack overcloud upgrade preparewith OVS and NFV environment files, include the files in the following order: - The OVS environment file
- The SR-IOV environment file
The DPDK environment file
Copy to Clipboard Copied! Toggle word wrap Toggle overflow
During an upgrade, you can migrate instances between RHOSP 13 and RHOSP 16.1.x Compute nodes only when the RHOSP 13 Compute nodes are in the hybrid state. For more information, see Migration constraints in the Configuring the Compute Service for Instance Creation guide.
There is an additional migration constraint for NFV workloads: you cannot live migrate instances from OVS-DPDK Compute nodes during an upgrade. Alternatively, you can cold migrate instances from OVS-DPDK Compute nodes during an upgrade.
Chapter 16. Final review before upgrade
Complete a final check of all preparation steps before you begin the upgrade.
16.1. Custom files to include in your deployment
If any overcloud nodes in your deployment are dedicated Object Storage (swift) nodes, you must copy the default roles_data.yaml file and edit ObjectStorage to remove deprecated_server_resource_name: 'SwiftStorage'. Then use the --roles-file option to pass the file to the openstack overcloud upgrade prepare or the openstack overcloud upgrade converge command.
16.2. New environment files to include with your deployment
In addition to your regular overcloud environment files, you must include new environment files to facilitate the upgrade to Red Hat OpenStack Platform (RHOSP) 16.1.
| File | Notes |
|---|---|
|
|
This file contains the parameters specific to the upgrade. This file is necessary only for the duration of the upgrade. Discard this file after you run |
|
| This file contains registration and subscription information for the overcloud. This file registers your systems either to the Red Hat Customer Portal or Red Hat Satellite Server. |
|
| The file that contains the source and preparation steps. This is the same file that you use with the undercloud upgrade. |
|
| OpenStack Platform 16.1 uses Open Virtual Network (OVN) as the default networking backend. However, OpenStack Platform 13 used Open vSwitch (OVS). Include this file to retain OVS compatibility during the upgrade. The OpenStack Platform 16.1 documentation includes instructions on migrating from OVS to OVN after the upgrade. |
Add these files to the end of your environment file listing when you run the following commands:
-
openstack overcloud upgrade prepare -
openstack overcloud upgrade converge -
openstack overcloud deploy
16.3. Environment files to remove from your deployment
Remove any environment files specific to your OpenStack Platform Red Hat OpenStack Platform 13:
- Red Hat OpenStack Platform 13 container image list
-
Red Hat OpenStack Platform 13 Customer Portal or Satellite
rhel-registrationscripts
Remove these files from the list of environment files you include when you run the following commands:
-
openstack overcloud upgrade prepare -
openstack overcloud upgrade converge -
openstack overcloud deploy
16.4. Upgrade checklist
Use the following checklist to determine your readiness to upgrade the overcloud:
| Item | Complete |
|---|---|
| Validated a working overcloud. | Y / N |
| Performed a Relax-and-Recover (ReaR) backup of the overcloud control plane. For more information, see Red Hat OpenStack Platform 13 Undercloud and Control Plane Back Up and Restore. | Y / N |
| Created a backup of the database that runs on the undercloud node. For more information, see Creating a database backup of the undercloud node in the Red Hat OpenStack Platform 16.1 Backing up and restoring the undercloud and control plane nodes guide. | Y / N |
| Implemented all preparation for Leapp, including:
| Y / N |
| Updated your registration details to Red Hat OpenStack Platform 16.1 repositories and covnerted your environment file to use the Ansible-based method. | Y / N |
| Updated your network configuration templates. | Y / N |
| Updated your environment file list with new environment files for Red Hat OpenStack Platform 16.1. | Y / N |
|
Optional: If your deployment includes dedicated Object Storage (swift) nodes: Copied the | Y / N |
| Removed old environment files only relevant to Red Hat OpenStack Platform 13, such as old Red Hat registration and container image location files. | Y / N |
Chapter 17. Upgrade command overview
The upgrade process involves different commands that you run at certain stages of process.
This section only contains information about each command. You must run these commands in a specific order and provide options specific to your overcloud. Wait until you receive instructions to run these commands at the appropriate step.
17.1. openstack overcloud upgrade prepare
This command performs the initial preparation steps for the overcloud upgrade, which includes replacing the current overcloud plan on the undercloud with the new OpenStack Platform 16.1 overcloud plan and your updated environment files. This command functions similar to the openstack overcloud deploy command and uses many of the same options.
17.2. openstack overcloud upgrade run
This command performs the upgrade process. Director creates a set of Ansible playbooks based on the new OpenStack Platform 16.1 overcloud plan and runs the fast forward tasks on the entire overcloud. This includes running the upgrade process through each OpenStack Platform version from 13 to 16.1.
In addition to the standard upgrade process, this command can perform a Leapp upgrade of the operating system on overcloud nodes. Run these tasks using the --tags option.
Upgrade task tags for Leapp
system_upgrade-
Task that combines tasks from
system_upgrade_prepare,system_upgrade_run, andsystem_upgrade_reboot. system_upgrade_prepare- Tasks to prepare for the operating system upgrade with Leapp.
system_upgrade_run- Tasks to run Leapp and upgrade the operating system.
system_upgrade_reboot- Tasks to reboot a system and complete the operating system upgrade.
Upgrade task tags for workload migration
nova_hybrid_state- Task that sets up temporary OpenStack Platform 16.1 containers on Compute nodes to facilitate workload migration during the upgrade.
17.3. openstack overcloud external-upgrade run
This command performs upgrade tasks outside the standard upgrade process. Director creates a set of Ansible playbooks based on the new OpenStack Platform 16.1 overcloud plan and you run specific tasks using the --tags option.
External task tags for container management
container_image_prepare- Tasks for pulling container images to the undercloud registry and preparing the images for the overcloud to use.
External task tags for Ceph Storage upgrades
If your deployment uses a Red Hat Ceph Storage cluster that was deployed using director, you can use the following tags:
ceph-
Tasks to install Red Hat Ceph Storage using
ceph-ansibleplaybooks. ceph_systemd-
Tasks to convert Red Hat Ceph Storage systemd unit files to use
podmanmanagement.
-
If you are upgrading with external Ceph deployments, you can skip the tasks that use the
cephandceph_systemdtags.
External task tags for database transfer
system_upgrade_cleanup-
Tasks to clean storage directories related to
system_upgrade_transfer_datatasks. system_upgrade_stop_services- Tasks to shut down all services.
system_upgrade_transfer_data- Tasks to shut down all services and perform a database transfer to the bootstrap node.
17.4. openstack overcloud upgrade converge
This command performs the final step in the overcloud upgrade. This final step synchronizes the overcloud heat stack with the OpenStack Platform 16.1 overcloud plan and your updated environment files. This process ensures that the resulting overcloud matches the configuration of a new OpenStack Platform 16.1 overcloud. This command is similar to the openstack overcloud deploy command and uses many of the same options.
17.5. Overcloud node upgrade workflow
When you perform an upgrade on each overcloud node, you must consider the following aspects to determine the correct commands to run at the relevant stage in the upgrade:
Controller Services
- Does the node contain Pacemaker services? You must first upgrade the bootstrap node in order to start a database transfer and launch temporary containers that facilitate migration during the transition from Red Hat OpenStack 13 to 16.1. During the bootstrap Controller node upgrade process, a new Pacemaker cluster is created and new Red Hat OpenStack 16.1 containers are started on the node, while the remaining Controller nodes are still running on Red Hat OpenStack 13. After upgrading the bootstrap node, you must upgrade each additional node with Pacemaker services and ensure that each node joins the new Pacemaker cluster started with the bootstrap node. The process for upgrading split-service Controller nodes without Pacemaker does not require these additional steps.
Compute Services
Is the node a Compute node? If the node does contain Compute services, you must migrate virtual machines from the node to ensure maximum availability. A Compute node in this situation includes any node designed to host virtual machines. This definition includes the follow Compute nodes types:
- Regular Compute nodes
- Compute nodes with Hyper-Converged Infrastructure (HCI)
- Compute nodes with Network Function Virtualization technologies such as Data Plane Development Kit (DPDK) or Single Root Input/Output Virtualization (SR-IOV)
- Real Time Compute nodes
Ceph Storage Services
Does the node contain any Ceph Storage services? You must convert the
systemdunit files for any containerized Ceph Storage services on the node to usepodmaninstead ofdocker. This applies to the following node types:- Ceph Storage OSD nodes
- Controller nodes with Ceph MON services
- Split-Controller Ceph MON nodes
- Compute nodes with Hyper-Converged Infrastructure (HCI)
Workflow
Use the following workflow diagram to identify the correct update path for specific nodes:
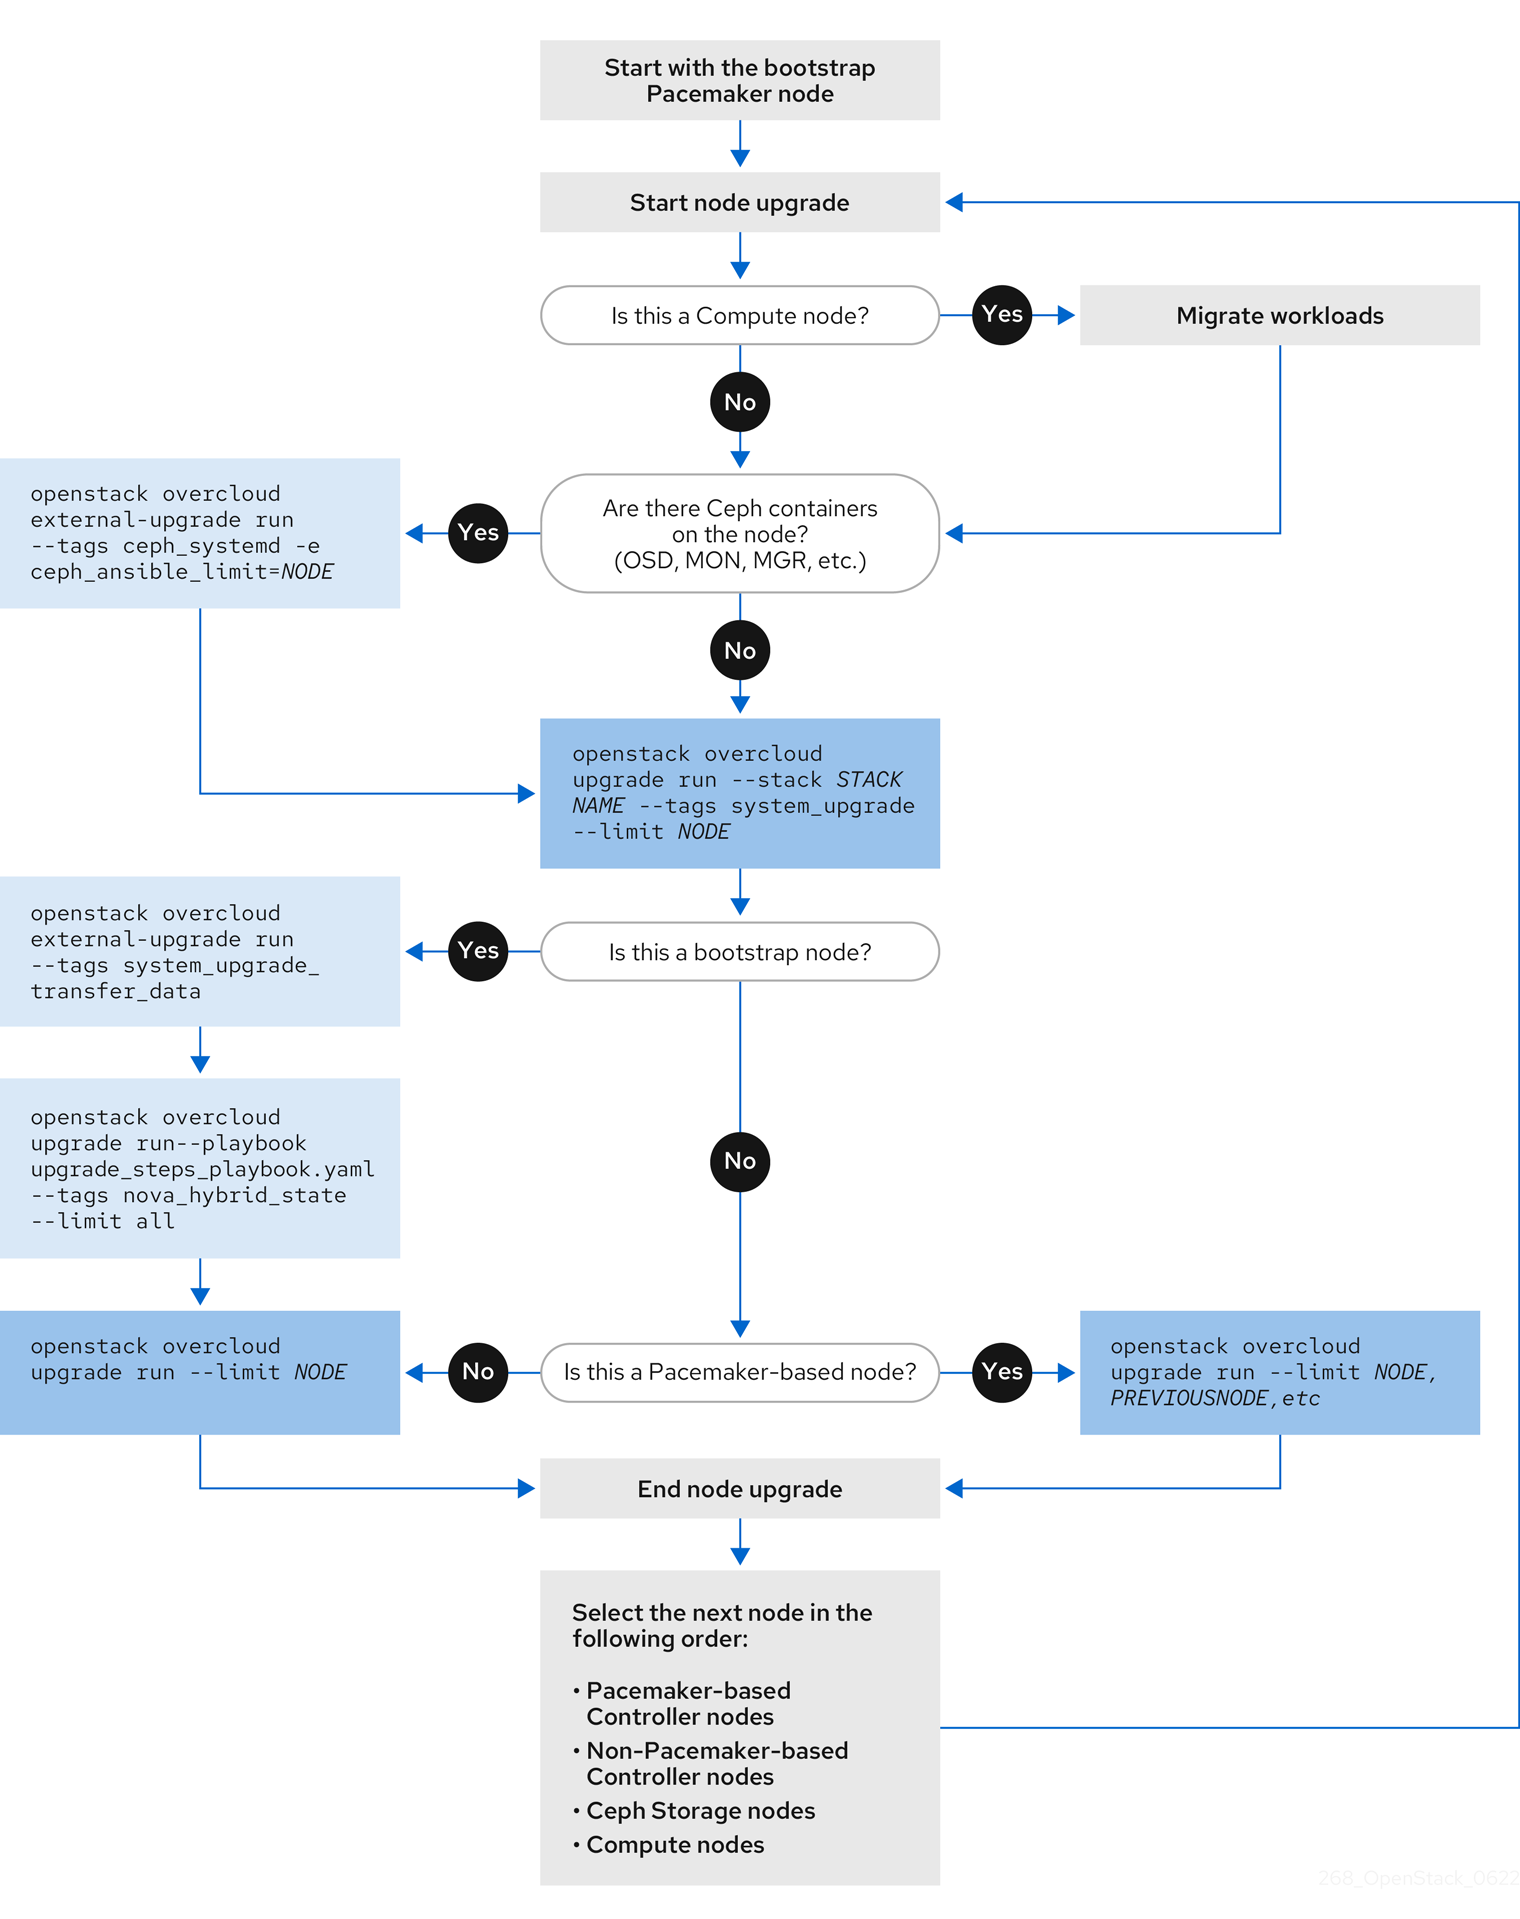
Chapter 18. Upgrading a standard overcloud
This scenario contains an example upgrade process for a standard overcloud environment, which includes the following node types:
- Three Controller nodes
- Three Ceph Storage nodes
- Multiple Compute nodes
18.1. Running the overcloud upgrade preparation
The upgrade requires running openstack overcloud upgrade prepare command, which performs the following tasks:
- Updates the overcloud plan to OpenStack Platform 16.1
- Prepares the nodes for the upgrade
If you are not using the default stack name (overcloud), set your stack name with the --stack STACK NAME option replacing STACK NAME with the name of your stack.
Procedure
Source the
stackrcfile:source ~/stackrc
$ source ~/stackrcCopy to Clipboard Copied! Toggle word wrap Toggle overflow Run the upgrade preparation command:
Copy to Clipboard Copied! Toggle word wrap Toggle overflow Include the following options relevant to your environment:
-
The environment file (
upgrades-environment.yaml) with the upgrade-specific parameters (-e). -
The environment file (
rhsm.yaml) with the registration and subscription parameters (-e). -
The environment file (
containers-prepare-parameter.yaml) with your new container image locations (-e). In most cases, this is the same environment file that the undercloud uses. -
The environment file (
neutron-ovs.yaml) to maintain OVS compatibility. -
Any custom configuration environment files (
-e) relevant to your deployment. -
If applicable, your custom roles (
roles_data) file using--roles-file. -
If applicable, your composable network (
network_data) file using--networks-file. -
If you use a custom stack name, pass the name with the
--stackoption.
-
The environment file (
- Wait until the upgrade preparation completes.
Download the container images:
openstack overcloud external-upgrade run --stack STACK NAME --tags container_image_prepare
$ openstack overcloud external-upgrade run --stack STACK NAME --tags container_image_prepareCopy to Clipboard Copied! Toggle word wrap Toggle overflow
18.2. Upgrading Controller nodes with director-deployed Ceph Storage
If your deployment uses a Red Hat Ceph Storage cluster that was deployed using director, you must complete this procedure.
To upgrade all the Controller nodes to OpenStack Platform 16.1, you must upgrade each Controller node starting with the bootstrap Controller node.
During the bootstrap Controller node upgrade process, a new Pacemaker cluster is created and new Red Hat OpenStack 16.1 containers are started on the node, while the remaining Controller nodes are still running on Red Hat OpenStack 13.
After upgrading the bootstrap node, you must upgrade each additional node with Pacemaker services and ensure that each node joins the new Pacemaker cluster started with the bootstrap node. For more information, see Overcloud node upgrade workflow.
In this example, the controller nodes are named using the default overcloud-controller-NODEID convention. This includes the following three controller nodes:
-
overcloud-controller-0 -
overcloud-controller-1 -
overcloud-controller-2
Substitute these values for your own node names where applicable.
If you are not using the overcloud default stack name, set your stack name with the --stack STACK NAME option replacing STACK NAME with the name of your stack.
Procedure
Source the
stackrcfile:source ~/stackrc
$ source ~/stackrcCopy to Clipboard Copied! Toggle word wrap Toggle overflow Identify the bootstrap Controller node by running the following command on the undercloud node:
tripleo-ansible-inventory --list --stack overcloud |jq .overcloud_Controller.hosts[0]
$ tripleo-ansible-inventory --list --stack overcloud |jq .overcloud_Controller.hosts[0]Copy to Clipboard Copied! Toggle word wrap Toggle overflow Upgrade the bootstrap Controller node:
Run the external upgrade command with the
ceph_systemdtag:openstack overcloud external-upgrade run --stack <stack_name> --tags ceph_systemd -e ceph_ansible_limit=overcloud-controller-0
$ openstack overcloud external-upgrade run --stack <stack_name> --tags ceph_systemd -e ceph_ansible_limit=overcloud-controller-0Copy to Clipboard Copied! Toggle word wrap Toggle overflow Replace
<stack_name>with the name of your stack.This command performs the following functions:
- Changes the systemd units that control the Ceph Storage containers to use Podman management.
-
Limits actions to the selected Controller node using the
ceph_ansible_limitvariable.
This step is a preliminary measure to prepare the Ceph Storage services for The
leappupgrade.Run the upgrade command with the
system_upgradetag:openstack overcloud upgrade run --stack STACK NAME --tags system_upgrade --limit overcloud-controller-0
$ openstack overcloud upgrade run --stack STACK NAME --tags system_upgrade --limit overcloud-controller-0Copy to Clipboard Copied! Toggle word wrap Toggle overflow This command performs the following actions:
- Performs a Leapp upgrade of the operating system.
Performs a reboot as a part of the Leapp upgrade.
ImportantThe next command causes an outage on the control plane. You cannot perform any standard operations on the overcloud during the next few steps.
Run the external upgrade command with the
system_upgrade_transfer_datatag:openstack overcloud external-upgrade run --stack STACK NAME --tags system_upgrade_transfer_data
$ openstack overcloud external-upgrade run --stack STACK NAME --tags system_upgrade_transfer_dataCopy to Clipboard Copied! Toggle word wrap Toggle overflow This command copies the latest version of the database from an existing node to the bootstrap node.
Run the upgrade command with the
nova_hybrid_statetag and run only theupgrade_steps_playbook.yamlplaybook:openstack overcloud upgrade run --stack STACK NAME --playbook upgrade_steps_playbook.yaml --tags nova_hybrid_state --limit all
$ openstack overcloud upgrade run --stack STACK NAME --playbook upgrade_steps_playbook.yaml --tags nova_hybrid_state --limit allCopy to Clipboard Copied! Toggle word wrap Toggle overflow This command launches temporary 16.1 containers on Compute nodes to help facilitate workload migration when you upgrade Compute nodes at a later step.
Run the upgrade command with no tags:
openstack overcloud upgrade run --stack STACK NAME --limit overcloud-controller-0
$ openstack overcloud upgrade run --stack STACK NAME --limit overcloud-controller-0Copy to Clipboard Copied! Toggle word wrap Toggle overflow This command performs the Red Hat OpenStack Platform upgrade.
ImportantThe control plane becomes active when this command finishes. You can perform standard operations on the overcloud again.
Verify that after the upgrade, the new Pacemaker cluster is started and that the control plane services such as galera, rabbit, haproxy, and redis are running:
sudo pcs status
$ sudo pcs statusCopy to Clipboard Copied! Toggle word wrap Toggle overflow
Upgrade the next Controller node:
Verify that the old cluster is no longer running:
sudo pcs status
$ sudo pcs statusCopy to Clipboard Copied! Toggle word wrap Toggle overflow An error similar to the following is displayed when the cluster is not running:
Error: cluster is not currently running on this node
Error: cluster is not currently running on this nodeCopy to Clipboard Copied! Toggle word wrap Toggle overflow Run the external upgrade command with the
ceph_systemdtag:openstack overcloud external-upgrade run --stack STACK NAME --tags ceph_systemd -e ceph_ansible_limit=overcloud-controller-1
$ openstack overcloud external-upgrade run --stack STACK NAME --tags ceph_systemd -e ceph_ansible_limit=overcloud-controller-1Copy to Clipboard Copied! Toggle word wrap Toggle overflow This command performs the following functions:
- Changes the systemd units that control the Ceph Storage containers to use Podman management.
-
Limits actions to the selected Controller node using the
ceph_ansible_limitvariable.
This step is a preliminary measure to prepare the Ceph Storage services for The
leappupgrade.Run the upgrade command with the
system_upgradetag on the next Controller node:openstack overcloud upgrade run --stack STACK NAME --tags system_upgrade --limit overcloud-controller-1
$ openstack overcloud upgrade run --stack STACK NAME --tags system_upgrade --limit overcloud-controller-1Copy to Clipboard Copied! Toggle word wrap Toggle overflow This command performs the following actions:
- Performs a Leapp upgrade of the operating system.
- Performs a reboot as a part of the Leapp upgrade.
Run the upgrade command with no tags:
openstack overcloud upgrade run --stack STACK NAME --limit overcloud-controller-0,overcloud-controller-1
$ openstack overcloud upgrade run --stack STACK NAME --limit overcloud-controller-0,overcloud-controller-1Copy to Clipboard Copied! Toggle word wrap Toggle overflow This command performs the Red Hat OpenStack Platform upgrade. In addition to this node, include the previously upgraded bootstrap node in the
--limitoption.
Upgrade the final Controller node:
Verify that the old cluster is no longer running:
sudo pcs status
$ sudo pcs statusCopy to Clipboard Copied! Toggle word wrap Toggle overflow An error similar to the following is displayed when the cluster is not running:
Error: cluster is not currently running on this node
Error: cluster is not currently running on this nodeCopy to Clipboard Copied! Toggle word wrap Toggle overflow Run the external upgrade command with the
ceph_systemdtag:openstack overcloud external-upgrade run --stack STACK NAME --tags ceph_systemd -e ceph_ansible_limit=overcloud-controller-2
$ openstack overcloud external-upgrade run --stack STACK NAME --tags ceph_systemd -e ceph_ansible_limit=overcloud-controller-2Copy to Clipboard Copied! Toggle word wrap Toggle overflow This command performs the following functions:
- Changes the systemd units that control the Ceph Storage containers to use Podman management.
-
Limits actions to the selected Controller node using the
ceph_ansible_limitvariable.
This step is a preliminary measure to prepare the Ceph Storage services for The
leappupgrade.Run the upgrade command with the
system_upgradetag:openstack overcloud upgrade run --stack STACK NAME --tags system_upgrade --limit overcloud-controller-2
$ openstack overcloud upgrade run --stack STACK NAME --tags system_upgrade --limit overcloud-controller-2Copy to Clipboard Copied! Toggle word wrap Toggle overflow This command performs the following actions:
- Performs a Leapp upgrade of the operating system.
- Performs a reboot as a part of the Leapp upgrade.
Run the upgrade command with no tags:
openstack overcloud upgrade run --stack STACK NAME --limit overcloud-controller-0,overcloud-controller-1,overcloud-controller-2
$ openstack overcloud upgrade run --stack STACK NAME --limit overcloud-controller-0,overcloud-controller-1,overcloud-controller-2Copy to Clipboard Copied! Toggle word wrap Toggle overflow This command performs the Red Hat OpenStack Platform upgrade. Include all Controller nodes in the
--limitoption.
18.3. Upgrading the operating system for Ceph Storage nodes
If your deployment uses a Red Hat Ceph Storage cluster that was deployed using director, you must upgrade the operating system for each Ceph Storage nodes.
If you are not using the default stack name (overcloud), set your stack name with the --stack STACK NAME option replacing STACK NAME with the name of your stack.
Procedure
Source the
stackrcfile:source ~/stackrc
$ source ~/stackrcCopy to Clipboard Copied! Toggle word wrap Toggle overflow Select a Ceph Storage node and upgrade the operating system:
Run the external upgrade command with the
ceph_systemdtag:openstack overcloud external-upgrade run --stack STACK NAME --tags ceph_systemd -e ceph_ansible_limit=overcloud-cephstorage-0
$ openstack overcloud external-upgrade run --stack STACK NAME --tags ceph_systemd -e ceph_ansible_limit=overcloud-cephstorage-0Copy to Clipboard Copied! Toggle word wrap Toggle overflow This command performs the following functions:
- Changes the systemd units that control the Ceph Storage containers to use Podman management.
-
Limits actions to the selected node using the
ceph_ansible_limitvariable.
This step is a preliminary measure to prepare the Ceph Storage services for The
leappupgrade.Run the upgrade command with the
system_upgradetag:openstack overcloud upgrade run --stack STACK NAME --tags system_upgrade --limit overcloud-cephstorage-0
$ openstack overcloud upgrade run --stack STACK NAME --tags system_upgrade --limit overcloud-cephstorage-0Copy to Clipboard Copied! Toggle word wrap Toggle overflow This command performs the following actions:
- Performs a Leapp upgrade of the operating system.
- Performs a reboot as a part of the Leapp upgrade.
Optional: If you use a Ceph subscription and have configured director to use the
overcloud-minimalimage for Ceph storage nodes, you must complete the following steps:Log in to the node and unset the Red Hat Enterprise Linux (RHEL) minor release version:
sudo subscription-manager release --unset
$ sudo subscription-manager release --unsetCopy to Clipboard Copied! Toggle word wrap Toggle overflow On the node, perform a system update:
sudo dnf -y update
$ sudo dnf -y updateCopy to Clipboard Copied! Toggle word wrap Toggle overflow Reboot the node:
sudo reboot
$ sudo rebootCopy to Clipboard Copied! Toggle word wrap Toggle overflow
Run the upgrade command with no tags:
openstack overcloud upgrade run --stack STACK NAME --limit overcloud-cephstorage-0
$ openstack overcloud upgrade run --stack STACK NAME --limit overcloud-cephstorage-0Copy to Clipboard Copied! Toggle word wrap Toggle overflow This command runs the
config-downloadplaybooks and configures the composable services on the Ceph Storage node. This step does not upgrade the Ceph Storage nodes to Red Hat Ceph Storage 4. The Red Hat Ceph Storage 4 upgrade occurs in a later procedure.
Select the next Ceph Storage node and upgrade the operating system:
Run the external upgrade command with the
ceph_systemdtag:openstack overcloud external-upgrade run --stack STACK NAME --tags ceph_systemd -e ceph_ansible_limit=overcloud-cephstorage-1
$ openstack overcloud external-upgrade run --stack STACK NAME --tags ceph_systemd -e ceph_ansible_limit=overcloud-cephstorage-1Copy to Clipboard Copied! Toggle word wrap Toggle overflow This command performs the following functions:
- Changes the systemd units that control the Ceph Storage containers to use Podman management.
-
Limits actions to the selected node using the
ceph_ansible_limitvariable.
This step is a preliminary measure to prepare the Ceph Storage services for The
leappupgrade.Run the upgrade command with the
system_upgradetag:openstack overcloud upgrade run --stack STACK NAME --tags system_upgrade --limit overcloud-cephstorage-1
$ openstack overcloud upgrade run --stack STACK NAME --tags system_upgrade --limit overcloud-cephstorage-1Copy to Clipboard Copied! Toggle word wrap Toggle overflow This command performs the following actions:
- Performs a Leapp upgrade of the operating system.
- Performs a reboot as a part of the Leapp upgrade.
Run the upgrade command with no tags:
openstack overcloud upgrade run --stack STACK NAME --limit overcloud-cephstorage-1
$ openstack overcloud upgrade run --stack STACK NAME --limit overcloud-cephstorage-1Copy to Clipboard Copied! Toggle word wrap Toggle overflow This command runs the
config-downloadplaybooks and configures the composable services on the Ceph Storage node. This step does not upgrade the Ceph Storage nodes to Red Hat Ceph Storage 4. The Red Hat Ceph Storage 4 upgrade occurs in a later procedure.
Select the final Ceph Storage node and upgrade the operating system:
Run the external upgrade command with the
ceph_systemdtag:openstack overcloud external-upgrade run --stack STACK NAME --tags ceph_systemd -e ceph_ansible_limit=overcloud-cephstorage-2
$ openstack overcloud external-upgrade run --stack STACK NAME --tags ceph_systemd -e ceph_ansible_limit=overcloud-cephstorage-2Copy to Clipboard Copied! Toggle word wrap Toggle overflow This command performs the following functions:
- Changes the systemd units that control the Ceph Storage containers to use Podman management.
-
Limits actions to the selected node using the
ceph_ansible_limitvariable.
This step is a preliminary measure to prepare the Ceph Storage services for The
leappupgrade.Run the upgrade command with the
system_upgradetag:openstack overcloud upgrade run --stack STACK NAME --tags system_upgrade --limit overcloud-cephstorage-2
$ openstack overcloud upgrade run --stack STACK NAME --tags system_upgrade --limit overcloud-cephstorage-2Copy to Clipboard Copied! Toggle word wrap Toggle overflow This command performs the following actions:
- Performs a Leapp upgrade of the operating system.
- Performs a reboot as a part of the Leapp upgrade.
Run the upgrade command with no tags:
openstack overcloud upgrade run --stack STACK NAME --limit overcloud-cephstorage-2
$ openstack overcloud upgrade run --stack STACK NAME --limit overcloud-cephstorage-2Copy to Clipboard Copied! Toggle word wrap Toggle overflow This command runs the
config-downloadplaybooks and configures the composable services on the Ceph Storage node. This step does not upgrade the Ceph Storage nodes to Red Hat Ceph Storage 4. The Red Hat Ceph Storage 4 upgrade occurs in a later procedure.
18.4. Upgrading Compute nodes
Upgrade all the Compute nodes to OpenStack Platform 16.1.
If you are not using the default stack name (overcloud), set your stack name with the --stack STACK NAME option replacing STACK NAME with the name of your stack.
Procedure
Source the
stackrcfile:source ~/stackrc
$ source ~/stackrcCopy to Clipboard Copied! Toggle word wrap Toggle overflow - Migrate your instances. For more information on migration strategies, see Migrating virtual machines between Compute nodes.
Run the upgrade command with the
system_upgradetag:openstack overcloud upgrade run --stack STACK NAME --tags system_upgrade --limit overcloud-compute-0
$ openstack overcloud upgrade run --stack STACK NAME --tags system_upgrade --limit overcloud-compute-0Copy to Clipboard Copied! Toggle word wrap Toggle overflow This command performs the following actions:
- Performs a Leapp upgrade of the operating system.
- Performs a reboot as a part of the Leapp upgrade.
Run the upgrade command with no tags:
openstack overcloud upgrade run --stack STACK NAME --limit overcloud-compute-0
$ openstack overcloud upgrade run --stack STACK NAME --limit overcloud-compute-0Copy to Clipboard Copied! Toggle word wrap Toggle overflow This command performs the Red Hat OpenStack Platform upgrade.
To upgrade multiple Compute nodes in parallel, set the
--limitoption to a comma-separated list of nodes that you want to upgrade. First perform thesystem_upgradetask:openstack overcloud upgrade run --stack STACK NAME --tags system_upgrade --limit overcloud-compute-0,overcloud-compute-1,overcloud-compute-2
$ openstack overcloud upgrade run --stack STACK NAME --tags system_upgrade --limit overcloud-compute-0,overcloud-compute-1,overcloud-compute-2Copy to Clipboard Copied! Toggle word wrap Toggle overflow Then perform the standard OpenStack service upgrade:
openstack overcloud upgrade run --stack STACK NAME --limit overcloud-compute-0,overcloud-compute-1,overcloud-compute-2
$ openstack overcloud upgrade run --stack STACK NAME --limit overcloud-compute-0,overcloud-compute-1,overcloud-compute-2Copy to Clipboard Copied! Toggle word wrap Toggle overflow
18.5. Synchronizing the overcloud stack
The upgrade requires an update the overcloud stack to ensure that the stack resource structure and parameters align with a fresh deployment of OpenStack Platform 16.1.
If you are not using the default stack name (overcloud), set your stack name with the --stack STACK NAME option replacing STACK NAME with the name of your stack.
Procedure
Source the
stackrcfile:source ~/stackrc
$ source ~/stackrcCopy to Clipboard Copied! Toggle word wrap Toggle overflow Edit the
containers-prepare-parameter.yamlfile and remove the following parameters and their values:-
ceph3_namespace -
ceph3_tag -
ceph3_image -
name_prefix_stein -
name_suffix_stein -
namespace_stein -
tag_stein
-
-
To re-enable fencing in your overcloud, set the
EnableFencingparameter totruein thefencing.yamlenvironment file. Run the upgrade finalization command:
Copy to Clipboard Copied! Toggle word wrap Toggle overflow Include the following options relevant to your environment:
-
The environment file (
upgrades-environment.yaml) with the upgrade-specific parameters (-e). -
The environment file (
fencing.yaml) with theEnableFencingparameter set totrue. -
The environment file (
rhsm.yaml) with the registration and subscription parameters (-e). -
The environment file (
containers-prepare-parameter.yaml) with your new container image locations (-e). In most cases, this is the same environment file that the undercloud uses. -
The environment file (
neutron-ovs.yaml) to maintain OVS compatibility. -
Any custom configuration environment files (
-e) relevant to your deployment. -
If applicable, your custom roles (
roles_data) file using--roles-file. -
If applicable, your composable network (
network_data) file using--networks-file. -
If you use a custom stack name, pass the name with the
--stackoption.
-
The environment file (
- Wait until the stack synchronization completes.
You do not need the upgrades-environment.yaml file for any further deployment operations.
Chapter 19. Upgrading an overcloud with external Ceph deployments
This scenario contains an example upgrade process for an overcloud environment with external Ceph deployments, which includes the following node types:
- Three Controller nodes
- External Ceph Storage cluster
- Multiple Compute nodes
19.1. Running the overcloud upgrade preparation
The upgrade requires running openstack overcloud upgrade prepare command, which performs the following tasks:
- Updates the overcloud plan to OpenStack Platform 16.1
- Prepares the nodes for the upgrade
If you are not using the default stack name (overcloud), set your stack name with the --stack STACK NAME option replacing STACK NAME with the name of your stack.
Procedure
Source the
stackrcfile:source ~/stackrc
$ source ~/stackrcCopy to Clipboard Copied! Toggle word wrap Toggle overflow Run the upgrade preparation command:
Copy to Clipboard Copied! Toggle word wrap Toggle overflow Include the following options relevant to your environment:
-
The environment file (
upgrades-environment.yaml) with the upgrade-specific parameters (-e). -
The environment file (
rhsm.yaml) with the registration and subscription parameters (-e). -
The environment file (
containers-prepare-parameter.yaml) with your new container image locations (-e). In most cases, this is the same environment file that the undercloud uses. -
The environment file (
neutron-ovs.yaml) to maintain OVS compatibility. -
Any custom configuration environment files (
-e) relevant to your deployment. -
If applicable, your custom roles (
roles_data) file using--roles-file. -
If applicable, your composable network (
network_data) file using--networks-file. -
If you use a custom stack name, pass the name with the
--stackoption.
-
The environment file (
- Wait until the upgrade preparation completes.
Download the container images:
openstack overcloud external-upgrade run --stack STACK NAME --tags container_image_prepare
$ openstack overcloud external-upgrade run --stack STACK NAME --tags container_image_prepareCopy to Clipboard Copied! Toggle word wrap Toggle overflow
19.2. Upgrading Controller nodes with external Ceph deployments
If you are upgrading with external Ceph deployments, you must complete this procedure.
To upgrade all the Controller nodes to OpenStack Platform 16.1, you must upgrade each Controller node starting with the bootstrap Controller node.
During the bootstrap Controller node upgrade process, a new Pacemaker cluster is created and new Red Hat OpenStack 16.1 containers are started on the node, while the remaining Controller nodes are still running on Red Hat OpenStack 13.
After upgrading the bootstrap node, you must upgrade each additional node with Pacemaker services and ensure that each node joins the new Pacemaker cluster started with the bootstrap node. For more information, see Overcloud node upgrade workflow.
In this example, the controller nodes are named using the default overcloud-controller-NODEID convention. This includes the following three controller nodes:
-
overcloud-controller-0 -
overcloud-controller-1 -
overcloud-controller-2
Substitute these values for your own node names where applicable.
If you are not using the overcloud default stack name, set your stack name with the --stack STACK NAME option replacing STACK NAME with the name of your stack.
Procedure
Source the
stackrcfile:source ~/stackrc
$ source ~/stackrcCopy to Clipboard Copied! Toggle word wrap Toggle overflow Identify the bootstrap Controller node by running the following command on the undercloud node:
tripleo-ansible-inventory --list --stack overcloud |jq .overcloud_Controller.hosts[0]
$ tripleo-ansible-inventory --list --stack overcloud |jq .overcloud_Controller.hosts[0]Copy to Clipboard Copied! Toggle word wrap Toggle overflow Upgrade the bootstrap Controller node:
Run the upgrade command with the
system_upgradetag:openstack overcloud upgrade run --stack STACK NAME --tags system_upgrade --limit overcloud-controller-0
$ openstack overcloud upgrade run --stack STACK NAME --tags system_upgrade --limit overcloud-controller-0Copy to Clipboard Copied! Toggle word wrap Toggle overflow This command performs the following actions:
- Performs a Leapp upgrade of the operating system.
Performs a reboot as a part of the Leapp upgrade.
ImportantThe next command causes an outage on the control plane. You cannot perform any standard operations on the overcloud during the next few steps.
Run the external upgrade command with the
system_upgrade_transfer_datatag:openstack overcloud external-upgrade run --stack STACK NAME --tags system_upgrade_transfer_data
$ openstack overcloud external-upgrade run --stack STACK NAME --tags system_upgrade_transfer_dataCopy to Clipboard Copied! Toggle word wrap Toggle overflow This command copies the latest version of the database from an existing node to the bootstrap node.
Run the upgrade command with the
nova_hybrid_statetag and run only theupgrade_steps_playbook.yamlplaybook:openstack overcloud upgrade run --stack STACK NAME --playbook upgrade_steps_playbook.yaml --tags nova_hybrid_state --limit all
$ openstack overcloud upgrade run --stack STACK NAME --playbook upgrade_steps_playbook.yaml --tags nova_hybrid_state --limit allCopy to Clipboard Copied! Toggle word wrap Toggle overflow This command launches temporary 16.1 containers on Compute nodes to help facilitate workload migration when you upgrade Compute nodes at a later step.
Run the upgrade command with no tags:
openstack overcloud upgrade run --stack STACK NAME --limit overcloud-controller-0
$ openstack overcloud upgrade run --stack STACK NAME --limit overcloud-controller-0Copy to Clipboard Copied! Toggle word wrap Toggle overflow This command performs the Red Hat OpenStack Platform upgrade.
ImportantThe control plane becomes active when this command finishes. You can perform standard operations on the overcloud again.
Verify that after the upgrade, the new Pacemaker cluster is started and that the control plane services such as galera, rabbit, haproxy, and redis are running:
sudo pcs status
$ sudo pcs statusCopy to Clipboard Copied! Toggle word wrap Toggle overflow
Upgrade the next Controller node:
Verify that the old cluster is no longer running:
sudo pcs status
$ sudo pcs statusCopy to Clipboard Copied! Toggle word wrap Toggle overflow An error similar to the following is displayed when the cluster is not running:
Error: cluster is not currently running on this node
Error: cluster is not currently running on this nodeCopy to Clipboard Copied! Toggle word wrap Toggle overflow Run the upgrade command with the
system_upgradetag on the next Controller node:openstack overcloud upgrade run --stack STACK NAME --tags system_upgrade --limit overcloud-controller-1
$ openstack overcloud upgrade run --stack STACK NAME --tags system_upgrade --limit overcloud-controller-1Copy to Clipboard Copied! Toggle word wrap Toggle overflow This command performs the following actions:
- Performs a Leapp upgrade of the operating system.
- Performs a reboot as a part of the Leapp upgrade.
Run the upgrade command with no tags:
openstack overcloud upgrade run --stack STACK NAME --limit overcloud-controller-0,overcloud-controller-1
$ openstack overcloud upgrade run --stack STACK NAME --limit overcloud-controller-0,overcloud-controller-1Copy to Clipboard Copied! Toggle word wrap Toggle overflow This command performs the Red Hat OpenStack Platform upgrade. In addition to this node, include the previously upgraded bootstrap node in the
--limitoption.
Upgrade the final Controller node:
Verify that the old cluster is no longer running:
sudo pcs status
$ sudo pcs statusCopy to Clipboard Copied! Toggle word wrap Toggle overflow An error similar to the following is displayed when the cluster is not running:
Error: cluster is not currently running on this node
Error: cluster is not currently running on this nodeCopy to Clipboard Copied! Toggle word wrap Toggle overflow Run the upgrade command with the
system_upgradetag:openstack overcloud upgrade run --stack STACK NAME --tags system_upgrade --limit overcloud-controller-2
$ openstack overcloud upgrade run --stack STACK NAME --tags system_upgrade --limit overcloud-controller-2Copy to Clipboard Copied! Toggle word wrap Toggle overflow This command performs the following actions:
- Performs a Leapp upgrade of the operating system.
- Performs a reboot as a part of the Leapp upgrade.
Run the upgrade command with no tags:
openstack overcloud upgrade run --stack STACK NAME --limit overcloud-controller-0,overcloud-controller-1,overcloud-controller-2
$ openstack overcloud upgrade run --stack STACK NAME --limit overcloud-controller-0,overcloud-controller-1,overcloud-controller-2Copy to Clipboard Copied! Toggle word wrap Toggle overflow This command performs the Red Hat OpenStack Platform upgrade. Include all Controller nodes in the
--limitoption.
19.3. Upgrading Compute nodes
Upgrade all the Compute nodes to OpenStack Platform 16.1.
If you are not using the default stack name (overcloud), set your stack name with the --stack STACK NAME option replacing STACK NAME with the name of your stack.
Procedure
Source the
stackrcfile:source ~/stackrc
$ source ~/stackrcCopy to Clipboard Copied! Toggle word wrap Toggle overflow - Migrate your instances. For more information on migration strategies, see Migrating virtual machines between Compute nodes.
Run the upgrade command with the
system_upgradetag:openstack overcloud upgrade run --stack STACK NAME --tags system_upgrade --limit overcloud-compute-0
$ openstack overcloud upgrade run --stack STACK NAME --tags system_upgrade --limit overcloud-compute-0Copy to Clipboard Copied! Toggle word wrap Toggle overflow This command performs the following actions:
- Performs a Leapp upgrade of the operating system.
- Performs a reboot as a part of the Leapp upgrade.
Run the upgrade command with no tags:
openstack overcloud upgrade run --stack STACK NAME --limit overcloud-compute-0
$ openstack overcloud upgrade run --stack STACK NAME --limit overcloud-compute-0Copy to Clipboard Copied! Toggle word wrap Toggle overflow This command performs the Red Hat OpenStack Platform upgrade.
To upgrade multiple Compute nodes in parallel, set the
--limitoption to a comma-separated list of nodes that you want to upgrade. First perform thesystem_upgradetask:openstack overcloud upgrade run --stack STACK NAME --tags system_upgrade --limit overcloud-compute-0,overcloud-compute-1,overcloud-compute-2
$ openstack overcloud upgrade run --stack STACK NAME --tags system_upgrade --limit overcloud-compute-0,overcloud-compute-1,overcloud-compute-2Copy to Clipboard Copied! Toggle word wrap Toggle overflow Then perform the standard OpenStack service upgrade:
openstack overcloud upgrade run --stack STACK NAME --limit overcloud-compute-0,overcloud-compute-1,overcloud-compute-2
$ openstack overcloud upgrade run --stack STACK NAME --limit overcloud-compute-0,overcloud-compute-1,overcloud-compute-2Copy to Clipboard Copied! Toggle word wrap Toggle overflow
19.4. Synchronizing the overcloud stack
The upgrade requires an update the overcloud stack to ensure that the stack resource structure and parameters align with a fresh deployment of OpenStack Platform 16.1.
If you are not using the default stack name (overcloud), set your stack name with the --stack STACK NAME option replacing STACK NAME with the name of your stack.
Procedure
Source the
stackrcfile:source ~/stackrc
$ source ~/stackrcCopy to Clipboard Copied! Toggle word wrap Toggle overflow Edit the
containers-prepare-parameter.yamlfile and remove the following parameters and their values:-
ceph3_namespace -
ceph3_tag -
ceph3_image -
name_prefix_stein -
name_suffix_stein -
namespace_stein -
tag_stein
-
-
To re-enable fencing in your overcloud, set the
EnableFencingparameter totruein thefencing.yamlenvironment file. Run the upgrade finalization command:
Copy to Clipboard Copied! Toggle word wrap Toggle overflow Include the following options relevant to your environment:
-
The environment file (
upgrades-environment.yaml) with the upgrade-specific parameters (-e). -
The environment file (
fencing.yaml) with theEnableFencingparameter set totrue. -
The environment file (
rhsm.yaml) with the registration and subscription parameters (-e). -
The environment file (
containers-prepare-parameter.yaml) with your new container image locations (-e). In most cases, this is the same environment file that the undercloud uses. -
The environment file (
neutron-ovs.yaml) to maintain OVS compatibility. -
Any custom configuration environment files (
-e) relevant to your deployment. -
If applicable, your custom roles (
roles_data) file using--roles-file. -
If applicable, your composable network (
network_data) file using--networks-file. -
If you use a custom stack name, pass the name with the
--stackoption.
-
The environment file (
- Wait until the stack synchronization completes.
You do not need the upgrades-environment.yaml file for any further deployment operations.
Chapter 20. Speeding up an overcloud upgrade
To speed up the overcloud upgrade process, you can upgrade 1/3 of the control plane at a time, starting with the bootstrap nodes.
After the upgrade of first 1/3 of the control plane is complete, you can move your environment into mixed-mode where the control plane APIs are running and the cloud is operational. High availability operational performance can be resumed only after the entire control plane has been upgraded.
When you upgrade a large number of Compute nodes, to improve performance, you can run the openstack overcloud upgrade run command with the --limit Compute option in parallel on groups of 20 nodes. You can run multiple upgrade tasks in the background, where each task upgrades a separate group of 20 nodes.
This scenario contains an example upgrade process for an overcloud environment that includes the following node types with composable roles:
- Three Controller nodes
- Three Database nodes
- Three Networker nodes
- Three Ceph Storage nodes
- Multiple Compute nodes
20.1. Running the overcloud upgrade preparation
The upgrade requires running openstack overcloud upgrade prepare command, which performs the following tasks:
- Updates the overcloud plan to OpenStack Platform 16.1
- Prepares the nodes for the upgrade
If you are not using the default stack name (overcloud), set your stack name with the --stack STACK NAME option replacing STACK NAME with the name of your stack.
Procedure
Source the
stackrcfile:source ~/stackrc
$ source ~/stackrcCopy to Clipboard Copied! Toggle word wrap Toggle overflow Run the upgrade preparation command:
Copy to Clipboard Copied! Toggle word wrap Toggle overflow Include the following options relevant to your environment:
-
The environment file (
upgrades-environment.yaml) with the upgrade-specific parameters (-e). -
The environment file (
rhsm.yaml) with the registration and subscription parameters (-e). -
The environment file (
containers-prepare-parameter.yaml) with your new container image locations (-e). In most cases, this is the same environment file that the undercloud uses. -
The environment file (
neutron-ovs.yaml) to maintain OVS compatibility. -
Any custom configuration environment files (
-e) relevant to your deployment. -
If applicable, your custom roles (
roles_data) file using--roles-file. -
If applicable, your composable network (
network_data) file using--networks-file. -
If you use a custom stack name, pass the name with the
--stackoption.
-
The environment file (
- Wait until the upgrade preparation completes.
Download the container images:
openstack overcloud external-upgrade run --stack STACK NAME --tags container_image_prepare
$ openstack overcloud external-upgrade run --stack STACK NAME --tags container_image_prepareCopy to Clipboard Copied! Toggle word wrap Toggle overflow
20.2. Upgrading the control plane nodes
To upgrade the control plane nodes in your environment to OpenStack Platform 16.1, you must upgrade 1/3 of your control plane nodes at a time, starting with the bootstrap nodes.
During the bootstrap Controller node upgrade process, a new Pacemaker cluster is created and new Red Hat OpenStack 16.1 containers are started on the node, while the remaining Controller nodes continue to run on Red Hat OpenStack 13.
In this example, the control plane nodes are named using the default overcloud-ROLE-NODEID convention. This includes the following node types with composable roles:
-
overcloud-controller-0 -
overcloud-controller-1 -
overcloud-controller-2 -
overcloud-database-0 -
overcloud-database-1 -
overcloud-database-2 -
overcloud-networker-0 -
overcloud-networker-1 -
overcloud-networker-2 -
overcloud-ceph-0 -
overcloud-ceph-1 -
overcloud-ceph-2
Substitute these values for your own node names where applicable.
After you upgrade the overcloud-controller-0, overcloud-database-0, overcloud-networker-0, and overcloud-ceph-0 bootstrap nodes, which comprise the first 1/3 of your control plane nodes, you must upgrade each additional 1/3 of the nodes with Pacemaker services and ensure that each node joins the new Pacemaker cluster started with the bootstrap node. Therefore, you must upgrade overcloud-controller-1, overcloud-database-1, overcloud-networker-1, and overcloud-ceph-1 before you upgrade overcloud-controller-2, overcloud-database-2, overcloud-networker-2, and overcloud-ceph-2.
If you are not using the default stack name overcloud, use the --stack STACK NAME option to set your stack name and replace STACK NAME with the name of your stack.
Procedure
-
Log in to the undercloud host as the
stackuser. Source the
stackrcfile:source ~/stackrc
$ source ~/stackrcCopy to Clipboard Copied! Toggle word wrap Toggle overflow On the undercloud node, run the following command to identify the bootstrap Controller node:
tripleo-ansible-inventory --list --stack overcloud |jq .overcloud_Controller.hosts[0]
$ tripleo-ansible-inventory --list --stack overcloud |jq .overcloud_Controller.hosts[0]Copy to Clipboard Copied! Toggle word wrap Toggle overflow Upgrade the
overcloud-controller-0,overcloud-database-0,overcloud-networker-0, andovercloud-ceph-0control plane nodes:Run the external upgrade command with the
ceph_systemdtag:openstack overcloud external-upgrade run --stack <stack_name> --tags ceph_systemd -e ceph_ansible_limit=overcloud-controller-0,overcloud-database-0,overcloud-networker-0,overcloud-ceph-0
$ openstack overcloud external-upgrade run --stack <stack_name> --tags ceph_systemd -e ceph_ansible_limit=overcloud-controller-0,overcloud-database-0,overcloud-networker-0,overcloud-ceph-0Copy to Clipboard Copied! Toggle word wrap Toggle overflow Replace
<stack_name>with the name of your stack.This command performs the following actions:
- Changes the systemd units that control the Ceph Storage containers to use Podman management.
-
Limits actions to the selected nodes using the
ceph_ansible_limitvariable.
This step is a preliminary measure to prepare the Ceph Storage services for the
leappupgrade.Run the upgrade command with the
system_upgradetag:openstack overcloud upgrade run --stack STACK NAME --tags system_upgrade --limit overcloud-controller-0 & openstack overcloud upgrade run --stack STACK NAME --tags system_upgrade --limit overcloud-database-0 & openstack overcloud upgrade run --stack STACK NAME --tags system_upgrade --limit overcloud-networker-0 & openstack overcloud upgrade run --stack STACK NAME --tags system_upgrade --limit overcloud-ceph-0 &
$ openstack overcloud upgrade run --stack STACK NAME --tags system_upgrade --limit overcloud-controller-0 &
$ openstack overcloud upgrade run --stack STACK NAME --tags system_upgrade --limit overcloud-database-0 &
$ openstack overcloud upgrade run --stack STACK NAME --tags system_upgrade --limit overcloud-networker-0 &
$ openstack overcloud upgrade run --stack STACK NAME --tags system_upgrade --limit overcloud-ceph-0 &
Copy to Clipboard Copied! Toggle word wrap Toggle overflow This command performs the following actions:
- Performs a Leapp upgrade of the operating system.
Performs a reboot as a part of the Leapp upgrade.
ImportantThe next command causes an outage on the control plane. You cannot perform any standard operations on the overcloud during the next few steps.
Run the external upgrade command with the
system_upgrade_transfer_datatag:openstack overcloud external-upgrade run --stack STACK NAME --tags system_upgrade_transfer_data
$ openstack overcloud external-upgrade run --stack STACK NAME --tags system_upgrade_transfer_dataCopy to Clipboard Copied! Toggle word wrap Toggle overflow This command copies the latest version of the database from an existing node to the bootstrap node.
Run the upgrade command with the
nova_hybrid_statetag and run only theupgrade_steps_playbook.yamlplaybook:openstack overcloud upgrade run --stack STACK NAME --playbook upgrade_steps_playbook.yaml --tags nova_hybrid_state --limit all
$ openstack overcloud upgrade run --stack STACK NAME --playbook upgrade_steps_playbook.yaml --tags nova_hybrid_state --limit allCopy to Clipboard Copied! Toggle word wrap Toggle overflow This command launches temporary 16.1 containers on Compute nodes to help facilitate workload migration when you upgrade Compute nodes at a later step.
Run the upgrade command with no tags:
openstack overcloud upgrade run --stack STACK NAME --limit overcloud-controller-0,overcloud-database-0,overcloud-networker-0,overcloud-ceph-0 --playbook all
$ openstack overcloud upgrade run --stack STACK NAME --limit overcloud-controller-0,overcloud-database-0,overcloud-networker-0,overcloud-ceph-0 --playbook allCopy to Clipboard Copied! Toggle word wrap Toggle overflow This command performs the Red Hat OpenStack Platform upgrade.
ImportantThe control plane becomes active when this command finishes. You can perform standard operations on the overcloud again.
Optional: On the bootstrap Contoller node, verify that after the upgrade, the new Pacemaker cluster is started and that the control plane services such as galera, rabbit, haproxy, and redis are running:
sudo pcs status
$ sudo pcs statusCopy to Clipboard Copied! Toggle word wrap Toggle overflow
Upgrade the
overcloud-controller-1,overcloud-database-1,overcloud-networker-1, andovercloud-ceph-1control plane nodes:Log in to the
overcloud-controller-1node and verify that the old cluster is no longer running:sudo pcs status
$ sudo pcs statusCopy to Clipboard Copied! Toggle word wrap Toggle overflow An error similar to the following is displayed when the cluster is not running:
Error: cluster is not currently running on this node
Error: cluster is not currently running on this nodeCopy to Clipboard Copied! Toggle word wrap Toggle overflow Run the external upgrade command with the
ceph_systemdtag:openstack overcloud external-upgrade run --stack STACK NAME --tags ceph_systemd -e ceph_ansible_limit=overcloud-controller-1,overcloud-database-1,overcloud-networker-1,overcloud-ceph-1
$ openstack overcloud external-upgrade run --stack STACK NAME --tags ceph_systemd -e ceph_ansible_limit=overcloud-controller-1,overcloud-database-1,overcloud-networker-1,overcloud-ceph-1Copy to Clipboard Copied! Toggle word wrap Toggle overflow This command performs the following functions:
- Changes the systemd units that control the Ceph Storage containers to use Podman management.
-
Limits actions to the selected nodes using the
ceph_ansible_limitvariable.
This step is a preliminary measure to prepare the Ceph Storage services for The
leappupgrade.Run the upgrade command with the
system_upgradetag:openstack overcloud upgrade run --stack STACK NAME --tags system_upgrade --limit overcloud-controller-1,overcloud-database-1,overcloud-networker-1,overcloud-ceph-1
$ openstack overcloud upgrade run --stack STACK NAME --tags system_upgrade --limit overcloud-controller-1,overcloud-database-1,overcloud-networker-1,overcloud-ceph-1Copy to Clipboard Copied! Toggle word wrap Toggle overflow This command performs the following actions:
- Performs a Leapp upgrade of the operating system.
- Performs a reboot as a part of the Leapp upgrade.
Run the upgrade command with no tags:
openstack overcloud upgrade run --stack STACK NAME --limit overcloud-controller-0,overcloud-controller-1,overcloud-database-0,overcloud-database-1,overcloud-networker-0,overcloud-networker-1,overcloud-ceph-0,overcloud-ceph-1
$ openstack overcloud upgrade run --stack STACK NAME --limit overcloud-controller-0,overcloud-controller-1,overcloud-database-0,overcloud-database-1,overcloud-networker-0,overcloud-networker-1,overcloud-ceph-0,overcloud-ceph-1Copy to Clipboard Copied! Toggle word wrap Toggle overflow This command performs the Red Hat OpenStack Platform upgrade. In addition to this node, include the previously upgraded bootstrap nodes in the
--limitoption.
Upgrade the
overcloud-controller-2,overcloud-database-2,overcloud-networker-2, andovercloud-ceph-2control plane nodes:Log in to the
overcloud-controller-2node and verify that the old cluster is no longer running:sudo pcs status
$ sudo pcs statusCopy to Clipboard Copied! Toggle word wrap Toggle overflow An error similar to the following is displayed when the cluster is not running:
Error: cluster is not currently running on this node
Error: cluster is not currently running on this nodeCopy to Clipboard Copied! Toggle word wrap Toggle overflow Run the external upgrade command with the
ceph_systemdtag:openstack overcloud external-upgrade run --stack STACK NAME --tags ceph_systemd -e ceph_ansible_limit=overcloud-controller-2,overcloud-database-2,overcloud-networker-2,overcloud-ceph-2
$ openstack overcloud external-upgrade run --stack STACK NAME --tags ceph_systemd -e ceph_ansible_limit=overcloud-controller-2,overcloud-database-2,overcloud-networker-2,overcloud-ceph-2Copy to Clipboard Copied! Toggle word wrap Toggle overflow This command performs the following functions:
- Changes the systemd units that control the Ceph Storage containers to use Podman management.
-
Limits actions to the selected nodes using the
ceph_ansible_limitvariable.
This step is a preliminary measure to prepare the Ceph Storage services for The
leappupgrade.Run the upgrade command with the
system_upgradetag:openstack overcloud upgrade run --stack STACK NAME --tags system_upgrade --limit overcloud-controller-2,overcloud-database-2,overcloud-networker-2,overcloud-ceph-2
$ openstack overcloud upgrade run --stack STACK NAME --tags system_upgrade --limit overcloud-controller-2,overcloud-database-2,overcloud-networker-2,overcloud-ceph-2Copy to Clipboard Copied! Toggle word wrap Toggle overflow This command performs the following actions:
- Performs a Leapp upgrade of the operating system.
- Performs a reboot as a part of the Leapp upgrade.
Run the upgrade command with no tags:
openstack overcloud upgrade run --stack STACK NAME --limit overcloud-controller-0,overcloud-controller-1,overcloud-controller-2,overcloud-database-0,overcloud-database-1,overcloud-database-2,overcloud-networker-0,overcloud-networker-1,overcloud-networker-2,overcloud-ceph-0,overcloud-ceph-1,overcloud-ceph-2
$ openstack overcloud upgrade run --stack STACK NAME --limit overcloud-controller-0,overcloud-controller-1,overcloud-controller-2,overcloud-database-0,overcloud-database-1,overcloud-database-2,overcloud-networker-0,overcloud-networker-1,overcloud-networker-2,overcloud-ceph-0,overcloud-ceph-1,overcloud-ceph-2Copy to Clipboard Copied! Toggle word wrap Toggle overflow This command performs the Red Hat OpenStack Platform upgrade. Include all control plane nodes in the
--limitoption.
20.3. Upgrading Compute nodes in parallel
To upgrade a large number of Compute nodes to OpenStack Platform 16.1, you can run the openstack overcloud upgrade run command with the --limit Compute option in parallel on groups of 20 nodes.
You can run multiple upgrade tasks in the background, where each task upgrades a separate group of 20 nodes. When you use this method to upgrade Compute nodes in parallel, you cannot select which nodes you upgrade. The selection of nodes is based on the inventory file that you generate when you run the tripleo-ansible-inventory command. For example, if you have 80 Compute nodes in your deployment, you can run the following commands to update the Compute nodes in parallel:
openstack overcloud upgrade run -y --limit 'Compute[0:19]' > upgrade-compute-00-19.log 2>&1 &
openstack overcloud upgrade run -y --limit 'Compute[20:29]' > upgrade-compute-20-29.log 2>&1 &
openstack overcloud upgrade run -y --limit 'Compute[40:59]' > update-compute-40-59.log 2>&1 &
openstack overcloud upgrade run -y --limit 'Compute[60:79]' > update-compute-60-79.log 2>&1 &
$ openstack overcloud upgrade run -y --limit 'Compute[0:19]' > upgrade-compute-00-19.log 2>&1 &
$ openstack overcloud upgrade run -y --limit 'Compute[20:29]' > upgrade-compute-20-29.log 2>&1 &
$ openstack overcloud upgrade run -y --limit 'Compute[40:59]' > update-compute-40-59.log 2>&1 &
$ openstack overcloud upgrade run -y --limit 'Compute[60:79]' > update-compute-60-79.log 2>&1 &To upgrade specific Compute nodes, use a comma-separated list of nodes:
openstack overcloud upgrade run --limit <Compute0>,<Compute1>,<Compute2>,<Compute3>
$ openstack overcloud upgrade run --limit <Compute0>,<Compute1>,<Compute2>,<Compute3>
If you are not using the default stack name overcloud, use the --stack STACK NAME option and replace STACK NAME with name of your stack.
Procedure
-
Log in to the undercloud host as the
stackuser. Source the
stackrcfile:source ~/stackrc
$ source ~/stackrcCopy to Clipboard Copied! Toggle word wrap Toggle overflow - Migrate your instances. For more information on migration strategies, see Migrating virtual machines between Compute nodes.
Run the upgrade command with the
system_upgradetag:openstack overcloud upgrade run -y --stack STACK NAME --tags system_upgrade --limit 'Compute[0:19]' > upgrade-compute-00-19.log 2>&1 & openstack overcloud upgrade run -y --stack STACK NAME --tags system_upgrade --limit 'Compute[20:29]' > upgrade-compute-20-29.log 2>&1 & openstack overcloud upgrade run -y --stack STACK NAME --tags system_upgrade --limit 'Compute[40:59]' > update-compute-40-59.log 2>&1 & openstack overcloud upgrade run -y --stack STACK NAME --tags system_upgrade --limit 'Compute[60:79]' > update-compute-60-79.log 2>&1 &
$ openstack overcloud upgrade run -y --stack STACK NAME --tags system_upgrade --limit 'Compute[0:19]' > upgrade-compute-00-19.log 2>&1 &
$ openstack overcloud upgrade run -y --stack STACK NAME --tags system_upgrade --limit 'Compute[20:29]' > upgrade-compute-20-29.log 2>&1 &
$ openstack overcloud upgrade run -y --stack STACK NAME --tags system_upgrade --limit 'Compute[40:59]' > update-compute-40-59.log 2>&1 &
$ openstack overcloud upgrade run -y --stack STACK NAME --tags system_upgrade --limit 'Compute[60:79]' > update-compute-60-79.log 2>&1 &
Copy to Clipboard Copied! Toggle word wrap Toggle overflow This command performs the following actions:
- Performs a Leapp upgrade of the operating system.
- Performs a reboot as a part of the Leapp upgrade.
Run the upgrade command with no tags:
openstack overcloud upgrade run -y --stack STACK NAME --limit 'Compute[0:19]' > upgrade-compute-00-19.log 2>&1 &
openstack overcloud upgrade run -y --stack STACK NAME --limit 'Compute[20:29]' > upgrade-compute-20-29.log 2>&1 &
openstack overcloud upgrade run -y --stack STACK NAME --limit 'Compute[40:59]' > update-compute-40-59.log 2>&1 &
openstack overcloud upgrade run -y --stack STACK NAME --limit 'Compute[60:79]' > update-compute-60-79.log 2>&1 &
$ openstack overcloud upgrade run -y --stack STACK NAME --limit 'Compute[0:19]' > upgrade-compute-00-19.log 2>&1 &
$ openstack overcloud upgrade run -y --stack STACK NAME --limit 'Compute[20:29]' > upgrade-compute-20-29.log 2>&1 &
$ openstack overcloud upgrade run -y --stack STACK NAME --limit 'Compute[40:59]' > update-compute-40-59.log 2>&1 &
$ openstack overcloud upgrade run -y --stack STACK NAME --limit 'Compute[60:79]' > update-compute-60-79.log 2>&1 &
Copy to Clipboard Copied! Toggle word wrap Toggle overflow This command performs the Red Hat OpenStack Platform upgrade.
Optional: To upgrade selected Compute nodes, use the
--limitoption with a comma-separated list of nodes that you want to upgrade. The following example upgrades theovercloud-compute-0,overcloud-compute-1,overcloud-compute-2nodes in parallel.Run the upgrade command with the
system_upgradetag:openstack overcloud upgrade run --stack STACK NAME --tags system_upgrade --limit overcloud-compute-0,overcloud-compute-1,overcloud-compute-2
$ openstack overcloud upgrade run --stack STACK NAME --tags system_upgrade --limit overcloud-compute-0,overcloud-compute-1,overcloud-compute-2Copy to Clipboard Copied! Toggle word wrap Toggle overflow Run the upgrade command with no tags:
openstack overcloud upgrade run --stack STACK NAME --limit overcloud-compute-0,overcloud-compute-1,overcloud-compute-2
$ openstack overcloud upgrade run --stack STACK NAME --limit overcloud-compute-0,overcloud-compute-1,overcloud-compute-2Copy to Clipboard Copied! Toggle word wrap Toggle overflow
20.4. Synchronizing the overcloud stack
The upgrade requires an update the overcloud stack to ensure that the stack resource structure and parameters align with a fresh deployment of OpenStack Platform 16.1.
If you are not using the default stack name (overcloud), set your stack name with the --stack STACK NAME option replacing STACK NAME with the name of your stack.
Procedure
Source the
stackrcfile:source ~/stackrc
$ source ~/stackrcCopy to Clipboard Copied! Toggle word wrap Toggle overflow Edit the
containers-prepare-parameter.yamlfile and remove the following parameters and their values:-
ceph3_namespace -
ceph3_tag -
ceph3_image -
name_prefix_stein -
name_suffix_stein -
namespace_stein -
tag_stein
-
-
To re-enable fencing in your overcloud, set the
EnableFencingparameter totruein thefencing.yamlenvironment file. Run the upgrade finalization command:
Copy to Clipboard Copied! Toggle word wrap Toggle overflow Include the following options relevant to your environment:
-
The environment file (
upgrades-environment.yaml) with the upgrade-specific parameters (-e). -
The environment file (
fencing.yaml) with theEnableFencingparameter set totrue. -
The environment file (
rhsm.yaml) with the registration and subscription parameters (-e). -
The environment file (
containers-prepare-parameter.yaml) with your new container image locations (-e). In most cases, this is the same environment file that the undercloud uses. -
The environment file (
neutron-ovs.yaml) to maintain OVS compatibility. -
Any custom configuration environment files (
-e) relevant to your deployment. -
If applicable, your custom roles (
roles_data) file using--roles-file. -
If applicable, your composable network (
network_data) file using--networks-file. -
If you use a custom stack name, pass the name with the
--stackoption.
-
The environment file (
- Wait until the stack synchronization completes.
You do not need the upgrades-environment.yaml file for any further deployment operations.
Chapter 21. Upgrading a split Controller overcloud
This scenario contains an example upgrade process for an overcloud with Controller node services split on to multiple nodes. This includes the following node types:
- Multiple split high availability services using Pacemaker
- Multiple split Controller services
- Three Ceph MON nodes
- Three Ceph Storage nodes
- Multiple Compute nodes
21.1. Running the overcloud upgrade preparation
The upgrade requires running openstack overcloud upgrade prepare command, which performs the following tasks:
- Updates the overcloud plan to OpenStack Platform 16.1
- Prepares the nodes for the upgrade
If you are not using the default stack name (overcloud), set your stack name with the --stack STACK NAME option replacing STACK NAME with the name of your stack.
Procedure
Source the
stackrcfile:source ~/stackrc
$ source ~/stackrcCopy to Clipboard Copied! Toggle word wrap Toggle overflow Run the upgrade preparation command:
Copy to Clipboard Copied! Toggle word wrap Toggle overflow Include the following options relevant to your environment:
-
The environment file (
upgrades-environment.yaml) with the upgrade-specific parameters (-e). -
The environment file (
rhsm.yaml) with the registration and subscription parameters (-e). -
The environment file (
containers-prepare-parameter.yaml) with your new container image locations (-e). In most cases, this is the same environment file that the undercloud uses. -
The environment file (
neutron-ovs.yaml) to maintain OVS compatibility. -
Any custom configuration environment files (
-e) relevant to your deployment. -
If applicable, your custom roles (
roles_data) file using--roles-file. -
If applicable, your composable network (
network_data) file using--networks-file. -
If you use a custom stack name, pass the name with the
--stackoption.
-
The environment file (
- Wait until the upgrade preparation completes.
Download the container images:
openstack overcloud external-upgrade run --stack STACK NAME --tags container_image_prepare
$ openstack overcloud external-upgrade run --stack STACK NAME --tags container_image_prepareCopy to Clipboard Copied! Toggle word wrap Toggle overflow
21.2. Upgrading Pacemaker-based nodes
Upgrade all nodes that host Pacemaker services to OpenStack Platform 16.1. The following roles include Pacemaker-based services:
- Controller
- Database (MySQL, Galera)
- Messaging (RabbitMQ)
- Load Balancing (HAProxy)
Any other role that contains the following services:
-
OS::TripleO::Services::Pacemaker -
OS::TripleO::Services::PacemakerRemote
-
This process involves upgrading each node starting with the bootstrap node.
If you are not using the default stack name (overcloud), set your stack name with the --stack STACK NAME option replacing STACK NAME with the name of your stack.
Procedure
Source the
stackrcfile:source ~/stackrc
$ source ~/stackrcCopy to Clipboard Copied! Toggle word wrap Toggle overflow Identify the bootstrap node by running the following command on the undercloud node:
tripleo-ansible-inventory --list --stack overcloud |jq .overcloud_Controller.hosts[0]
$ tripleo-ansible-inventory --list --stack overcloud |jq .overcloud_Controller.hosts[0]Copy to Clipboard Copied! Toggle word wrap Toggle overflow Upgrade the bootstrap node:
If the node any contains Ceph Storage containers, run the external upgrade command with the
ceph_systemdtag:openstack overcloud external-upgrade run --stack <stack_name> --tags ceph_systemd -e ceph_ansible_limit=overcloud-controller-0
$ openstack overcloud external-upgrade run --stack <stack_name> --tags ceph_systemd -e ceph_ansible_limit=overcloud-controller-0Copy to Clipboard Copied! Toggle word wrap Toggle overflow Replace
<stack_name>with the name of your stack.This command performs the following functions:
- Changes the systemd units that control the Ceph Storage containers to use Podman management.
-
Limits actions to the selected node using the
ceph_ansible_limitvariable.
This step is a preliminary measure to prepare the Ceph Storage services for The
leappupgrade.Run the upgrade command with the
system_upgradetag:openstack overcloud upgrade run --stack STACK NAME --tags system_upgrade --limit overcloud-controller-0
$ openstack overcloud upgrade run --stack STACK NAME --tags system_upgrade --limit overcloud-controller-0Copy to Clipboard Copied! Toggle word wrap Toggle overflow This command performs the following actions:
- Performs a Leapp upgrade of the operating system.
- Performs a reboot as a part of the Leapp upgrade.
Run the external upgrade command with the
system_upgrade_transfer_datatag:openstack overcloud external-upgrade run --stack STACK NAME --tags system_upgrade_transfer_data
$ openstack overcloud external-upgrade run --stack STACK NAME --tags system_upgrade_transfer_dataCopy to Clipboard Copied! Toggle word wrap Toggle overflow This command copies the latest version of the database from an existing node to the bootstrap node.
Run the upgrade command with the
nova_hybrid_statetag and run only theupgrade_steps_playbook.yamlplaybook:openstack overcloud upgrade run --stack STACK NAME --playbook upgrade_steps_playbook.yaml --tags nova_hybrid_state --limit all
$ openstack overcloud upgrade run --stack STACK NAME --playbook upgrade_steps_playbook.yaml --tags nova_hybrid_state --limit allCopy to Clipboard Copied! Toggle word wrap Toggle overflow This command launches temporary 16.1 containers on Compute nodes to help facilitate workload migration when you upgrade Compute nodes at a later step.
Run the upgrade command with no tags:
openstack overcloud upgrade run --stack STACK NAME --limit overcloud-controller-0
$ openstack overcloud upgrade run --stack STACK NAME --limit overcloud-controller-0Copy to Clipboard Copied! Toggle word wrap Toggle overflow This command performs the Red Hat OpenStack Platform upgrade.
Upgrade each Pacemaker-based node:
If the node any contains Ceph Storage containers, run the external upgrade command with the
ceph_systemdtag:openstack overcloud external-upgrade run --stack STACK NAME --tags ceph_systemd -e ceph_ansible_limit=overcloud-database-0
$ openstack overcloud external-upgrade run --stack STACK NAME --tags ceph_systemd -e ceph_ansible_limit=overcloud-database-0Copy to Clipboard Copied! Toggle word wrap Toggle overflow This command performs the following functions:
- Changes the systemd units that control the Ceph Storage containers to use Podman management.
-
Limits actions to the selected node using the
ceph_ansible_limitvariable.
This step is a preliminary measure to prepare the Ceph Storage services for The
leappupgrade.Run the upgrade command with the
system_upgradetag on the next node:openstack overcloud upgrade run --stack STACK NAME --tags system_upgrade --limit overcloud-database-0
$ openstack overcloud upgrade run --stack STACK NAME --tags system_upgrade --limit overcloud-database-0Copy to Clipboard Copied! Toggle word wrap Toggle overflow This command performs the following actions:
- Performs a Leapp upgrade of the operating system.
- Performs a reboot as a part of the Leapp upgrade.
Run the upgrade command with no tags:
openstack overcloud upgrade run --stack STACK NAME --limit overcloud-controller-0,overcloud-database-0
$ openstack overcloud upgrade run --stack STACK NAME --limit overcloud-controller-0,overcloud-database-0Copy to Clipboard Copied! Toggle word wrap Toggle overflow This command performs the Red Hat OpenStack Platform upgrade. In addition to this node, include any previously upgraded node in the
--limitoption.
- Repeat the upgrade process on each Pacemaker-based node until you have upgraded all Pacemaker-based node.
21.3. Upgrading non-Pacemaker Controller nodes
Upgrade all nodes without Pacemaker-based services to OpenStack Platform 16.1. These nodes usually contain a specific OpenStack service. Examples of roles without Pacemaker-based services include the following:
- Networker
- Ironic Conductor
- Object Storage
- Any custom roles with services split or scaled from standard Controller nodes
Do not include the following nodes in this grouping:
- Any Compute nodes
- Any Ceph Storage nodes
This process involves upgrading each node.
If you are not using the default stack name (overcloud), set your stack name with the --stack STACK NAME option replacing STACK NAME with the name of your stack.
Procedure
Source the
stackrcfile:source ~/stackrc
$ source ~/stackrcCopy to Clipboard Copied! Toggle word wrap Toggle overflow Run the upgrade command with the
system_upgradetag:openstack overcloud upgrade run --stack STACK NAME --tags system_upgrade --limit overcloud-networker-0
$ openstack overcloud upgrade run --stack STACK NAME --tags system_upgrade --limit overcloud-networker-0Copy to Clipboard Copied! Toggle word wrap Toggle overflow This command performs the following actions:
- Performs a Leapp upgrade of the operating system.
- Performs a reboot as a part of the Leapp upgrade.
Run the upgrade command with no tags:
openstack overcloud upgrade run --stack STACK NAME --limit overcloud-networker-0
$ openstack overcloud upgrade run --stack STACK NAME --limit overcloud-networker-0Copy to Clipboard Copied! Toggle word wrap Toggle overflow This command performs the Red Hat OpenStack Platform upgrade.
- Repeat the upgrade process on each node until you have upgraded all Controller-based node.
21.4. Upgrading the operating system for Ceph MON nodes
Upgrade the operating system for each Ceph MON node. It is recommended to upgrade each Ceph MON node individually to maintain a quorum among the nodes.
If you are not using the default stack name (overcloud), set your stack name with the --stack STACK NAME option replacing STACK NAME with the name of your stack.
Procedure
Source the
stackrcfile:source ~/stackrc
$ source ~/stackrcCopy to Clipboard Copied! Toggle word wrap Toggle overflow Select a Ceph MON node and upgrade the operating system:
Run the external upgrade command with the
ceph_systemdtag:openstack overcloud external-upgrade run --stack STACK NAME --tags ceph_systemd -e ceph_ansible_limit=overcloud-cephmon-0
$ openstack overcloud external-upgrade run --stack STACK NAME --tags ceph_systemd -e ceph_ansible_limit=overcloud-cephmon-0Copy to Clipboard Copied! Toggle word wrap Toggle overflow This command performs the following functions:
- Changes the systemd units that control the Ceph Storage containers to use Podman management.
-
Limits actions to the selected node using the
ceph_ansible_limitvariable.
This step is a preliminary measure to prepare the Ceph Storage services for The
leappupgrade.Run the upgrade command with the
system_upgradetag:openstack overcloud upgrade run --stack STACK NAME --tags system_upgrade --limit overcloud-cephmon-0
$ openstack overcloud upgrade run --stack STACK NAME --tags system_upgrade --limit overcloud-cephmon-0Copy to Clipboard Copied! Toggle word wrap Toggle overflow This command performs the following actions:
- Performs a Leapp upgrade of the operating system.
- Performs a reboot as a part of the Leapp upgrade.
Run the upgrade command with no tags:
openstack overcloud upgrade run --stack STACK NAME --limit overcloud-cephmon-0
$ openstack overcloud upgrade run --stack STACK NAME --limit overcloud-cephmon-0Copy to Clipboard Copied! Toggle word wrap Toggle overflow This command runs the
config-downloadplaybooks and configures the composable services on the Ceph MON node. This step does not upgrade the Ceph MON nodes to Red Hat Ceph Storage 4. The Red Hat Ceph Storage 4 upgrade occurs in a later procedure.
Select the next Ceph MON node and upgrade the operating system:
Run the external upgrade command with the
ceph_systemdtag:openstack overcloud external-upgrade run --stack STACK NAME --tags ceph_systemd -e ceph_ansible_limit=overcloud-cephmon-1
$ openstack overcloud external-upgrade run --stack STACK NAME --tags ceph_systemd -e ceph_ansible_limit=overcloud-cephmon-1Copy to Clipboard Copied! Toggle word wrap Toggle overflow This command performs the following functions:
- Changes the systemd units that control the Ceph Storage containers to use Podman management.
-
Limits actions to the selected node using the
ceph_ansible_limitvariable.
This step is a preliminary measure to prepare the Ceph Storage services for The
leappupgrade.Run the upgrade command with the
system_upgradetag:openstack overcloud upgrade run --stack STACK NAME --tags system_upgrade --limit overcloud-cephmon-1
$ openstack overcloud upgrade run --stack STACK NAME --tags system_upgrade --limit overcloud-cephmon-1Copy to Clipboard Copied! Toggle word wrap Toggle overflow This command performs the following actions:
- Performs a Leapp upgrade of the operating system.
- Performs a reboot as a part of the Leapp upgrade.
Run the upgrade command with no tags:
openstack overcloud upgrade run --stack STACK NAME --limit overcloud-cephmon-1
$ openstack overcloud upgrade run --stack STACK NAME --limit overcloud-cephmon-1Copy to Clipboard Copied! Toggle word wrap Toggle overflow This command runs the
config-downloadplaybooks and configures the composable services on the Ceph MON node. This step does not upgrade the Ceph MON nodes to Red Hat Ceph Storage 4. The Red Hat Ceph Storage 4 upgrade occurs in a later procedure.
Select the final Ceph MON node and upgrade the operating system:
Run the external upgrade command with the
ceph_systemdtag:openstack overcloud external-upgrade run --stack STACK NAME --tags ceph_systemd -e ceph_ansible_limit=overcloud-cephmon-2
$ openstack overcloud external-upgrade run --stack STACK NAME --tags ceph_systemd -e ceph_ansible_limit=overcloud-cephmon-2Copy to Clipboard Copied! Toggle word wrap Toggle overflow This command performs the following functions:
- Changes the systemd units that control the Ceph Storage containers to use Podman management.
-
Limits actions to the selected node using the
ceph_ansible_limitvariable.
This step is a preliminary measure to prepare the Ceph Storage services for The
leappupgrade.Run the upgrade command with the
system_upgradetag:openstack overcloud upgrade run --stack STACK NAME --tags system_upgrade --limit overcloud-cephmon-2
$ openstack overcloud upgrade run --stack STACK NAME --tags system_upgrade --limit overcloud-cephmon-2Copy to Clipboard Copied! Toggle word wrap Toggle overflow This command performs the following actions:
- Performs a Leapp upgrade of the operating system.
- Performs a reboot as a part of the Leapp upgrade.
Run the upgrade command with no tags:
openstack overcloud upgrade run --stack STACK NAME --limit overcloud-cephmon-2
$ openstack overcloud upgrade run --stack STACK NAME --limit overcloud-cephmon-2Copy to Clipboard Copied! Toggle word wrap Toggle overflow This command runs the
config-downloadplaybooks and configures the composable services on the Ceph MON node. This step does not upgrade the Ceph MON nodes to Red Hat Ceph Storage 4. The Red Hat Ceph Storage 4 upgrade occurs in a later procedure.
21.5. Upgrading the operating system for Ceph Storage nodes
If your deployment uses a Red Hat Ceph Storage cluster that was deployed using director, you must upgrade the operating system for each Ceph Storage nodes.
If you are not using the default stack name (overcloud), set your stack name with the --stack STACK NAME option replacing STACK NAME with the name of your stack.
Procedure
Source the
stackrcfile:source ~/stackrc
$ source ~/stackrcCopy to Clipboard Copied! Toggle word wrap Toggle overflow Select a Ceph Storage node and upgrade the operating system:
Run the external upgrade command with the
ceph_systemdtag:openstack overcloud external-upgrade run --stack STACK NAME --tags ceph_systemd -e ceph_ansible_limit=overcloud-cephstorage-0
$ openstack overcloud external-upgrade run --stack STACK NAME --tags ceph_systemd -e ceph_ansible_limit=overcloud-cephstorage-0Copy to Clipboard Copied! Toggle word wrap Toggle overflow This command performs the following functions:
- Changes the systemd units that control the Ceph Storage containers to use Podman management.
-
Limits actions to the selected node using the
ceph_ansible_limitvariable.
This step is a preliminary measure to prepare the Ceph Storage services for The
leappupgrade.Run the upgrade command with the
system_upgradetag:openstack overcloud upgrade run --stack STACK NAME --tags system_upgrade --limit overcloud-cephstorage-0
$ openstack overcloud upgrade run --stack STACK NAME --tags system_upgrade --limit overcloud-cephstorage-0Copy to Clipboard Copied! Toggle word wrap Toggle overflow This command performs the following actions:
- Performs a Leapp upgrade of the operating system.
- Performs a reboot as a part of the Leapp upgrade.
Optional: If you use a Ceph subscription and have configured director to use the
overcloud-minimalimage for Ceph storage nodes, you must complete the following steps:Log in to the node and unset the Red Hat Enterprise Linux (RHEL) minor release version:
sudo subscription-manager release --unset
$ sudo subscription-manager release --unsetCopy to Clipboard Copied! Toggle word wrap Toggle overflow On the node, perform a system update:
sudo dnf -y update
$ sudo dnf -y updateCopy to Clipboard Copied! Toggle word wrap Toggle overflow Reboot the node:
sudo reboot
$ sudo rebootCopy to Clipboard Copied! Toggle word wrap Toggle overflow
Run the upgrade command with no tags:
openstack overcloud upgrade run --stack STACK NAME --limit overcloud-cephstorage-0
$ openstack overcloud upgrade run --stack STACK NAME --limit overcloud-cephstorage-0Copy to Clipboard Copied! Toggle word wrap Toggle overflow This command runs the
config-downloadplaybooks and configures the composable services on the Ceph Storage node. This step does not upgrade the Ceph Storage nodes to Red Hat Ceph Storage 4. The Red Hat Ceph Storage 4 upgrade occurs in a later procedure.
Select the next Ceph Storage node and upgrade the operating system:
Run the external upgrade command with the
ceph_systemdtag:openstack overcloud external-upgrade run --stack STACK NAME --tags ceph_systemd -e ceph_ansible_limit=overcloud-cephstorage-1
$ openstack overcloud external-upgrade run --stack STACK NAME --tags ceph_systemd -e ceph_ansible_limit=overcloud-cephstorage-1Copy to Clipboard Copied! Toggle word wrap Toggle overflow This command performs the following functions:
- Changes the systemd units that control the Ceph Storage containers to use Podman management.
-
Limits actions to the selected node using the
ceph_ansible_limitvariable.
This step is a preliminary measure to prepare the Ceph Storage services for The
leappupgrade.Run the upgrade command with the
system_upgradetag:openstack overcloud upgrade run --stack STACK NAME --tags system_upgrade --limit overcloud-cephstorage-1
$ openstack overcloud upgrade run --stack STACK NAME --tags system_upgrade --limit overcloud-cephstorage-1Copy to Clipboard Copied! Toggle word wrap Toggle overflow This command performs the following actions:
- Performs a Leapp upgrade of the operating system.
- Performs a reboot as a part of the Leapp upgrade.
Run the upgrade command with no tags:
openstack overcloud upgrade run --stack STACK NAME --limit overcloud-cephstorage-1
$ openstack overcloud upgrade run --stack STACK NAME --limit overcloud-cephstorage-1Copy to Clipboard Copied! Toggle word wrap Toggle overflow This command runs the
config-downloadplaybooks and configures the composable services on the Ceph Storage node. This step does not upgrade the Ceph Storage nodes to Red Hat Ceph Storage 4. The Red Hat Ceph Storage 4 upgrade occurs in a later procedure.
Select the final Ceph Storage node and upgrade the operating system:
Run the external upgrade command with the
ceph_systemdtag:openstack overcloud external-upgrade run --stack STACK NAME --tags ceph_systemd -e ceph_ansible_limit=overcloud-cephstorage-2
$ openstack overcloud external-upgrade run --stack STACK NAME --tags ceph_systemd -e ceph_ansible_limit=overcloud-cephstorage-2Copy to Clipboard Copied! Toggle word wrap Toggle overflow This command performs the following functions:
- Changes the systemd units that control the Ceph Storage containers to use Podman management.
-
Limits actions to the selected node using the
ceph_ansible_limitvariable.
This step is a preliminary measure to prepare the Ceph Storage services for The
leappupgrade.Run the upgrade command with the
system_upgradetag:openstack overcloud upgrade run --stack STACK NAME --tags system_upgrade --limit overcloud-cephstorage-2
$ openstack overcloud upgrade run --stack STACK NAME --tags system_upgrade --limit overcloud-cephstorage-2Copy to Clipboard Copied! Toggle word wrap Toggle overflow This command performs the following actions:
- Performs a Leapp upgrade of the operating system.
- Performs a reboot as a part of the Leapp upgrade.
Run the upgrade command with no tags:
openstack overcloud upgrade run --stack STACK NAME --limit overcloud-cephstorage-2
$ openstack overcloud upgrade run --stack STACK NAME --limit overcloud-cephstorage-2Copy to Clipboard Copied! Toggle word wrap Toggle overflow This command runs the
config-downloadplaybooks and configures the composable services on the Ceph Storage node. This step does not upgrade the Ceph Storage nodes to Red Hat Ceph Storage 4. The Red Hat Ceph Storage 4 upgrade occurs in a later procedure.
21.6. Upgrading Compute nodes
Upgrade all the Compute nodes to OpenStack Platform 16.1.
If you are not using the default stack name (overcloud), set your stack name with the --stack STACK NAME option replacing STACK NAME with the name of your stack.
Procedure
Source the
stackrcfile:source ~/stackrc
$ source ~/stackrcCopy to Clipboard Copied! Toggle word wrap Toggle overflow - Migrate your instances. For more information on migration strategies, see Migrating virtual machines between Compute nodes.
Run the upgrade command with the
system_upgradetag:openstack overcloud upgrade run --stack STACK NAME --tags system_upgrade --limit overcloud-compute-0
$ openstack overcloud upgrade run --stack STACK NAME --tags system_upgrade --limit overcloud-compute-0Copy to Clipboard Copied! Toggle word wrap Toggle overflow This command performs the following actions:
- Performs a Leapp upgrade of the operating system.
- Performs a reboot as a part of the Leapp upgrade.
Run the upgrade command with no tags:
openstack overcloud upgrade run --stack STACK NAME --limit overcloud-compute-0
$ openstack overcloud upgrade run --stack STACK NAME --limit overcloud-compute-0Copy to Clipboard Copied! Toggle word wrap Toggle overflow This command performs the Red Hat OpenStack Platform upgrade.
To upgrade multiple Compute nodes in parallel, set the
--limitoption to a comma-separated list of nodes that you want to upgrade. First perform thesystem_upgradetask:openstack overcloud upgrade run --stack STACK NAME --tags system_upgrade --limit overcloud-compute-0,overcloud-compute-1,overcloud-compute-2
$ openstack overcloud upgrade run --stack STACK NAME --tags system_upgrade --limit overcloud-compute-0,overcloud-compute-1,overcloud-compute-2Copy to Clipboard Copied! Toggle word wrap Toggle overflow Then perform the standard OpenStack service upgrade:
openstack overcloud upgrade run --stack STACK NAME --limit overcloud-compute-0,overcloud-compute-1,overcloud-compute-2
$ openstack overcloud upgrade run --stack STACK NAME --limit overcloud-compute-0,overcloud-compute-1,overcloud-compute-2Copy to Clipboard Copied! Toggle word wrap Toggle overflow
21.7. Synchronizing the overcloud stack
The upgrade requires an update the overcloud stack to ensure that the stack resource structure and parameters align with a fresh deployment of OpenStack Platform 16.1.
If you are not using the default stack name (overcloud), set your stack name with the --stack STACK NAME option replacing STACK NAME with the name of your stack.
Procedure
Source the
stackrcfile:source ~/stackrc
$ source ~/stackrcCopy to Clipboard Copied! Toggle word wrap Toggle overflow Edit the
containers-prepare-parameter.yamlfile and remove the following parameters and their values:-
ceph3_namespace -
ceph3_tag -
ceph3_image -
name_prefix_stein -
name_suffix_stein -
namespace_stein -
tag_stein
-
-
To re-enable fencing in your overcloud, set the
EnableFencingparameter totruein thefencing.yamlenvironment file. Run the upgrade finalization command:
Copy to Clipboard Copied! Toggle word wrap Toggle overflow Include the following options relevant to your environment:
-
The environment file (
upgrades-environment.yaml) with the upgrade-specific parameters (-e). -
The environment file (
fencing.yaml) with theEnableFencingparameter set totrue. -
The environment file (
rhsm.yaml) with the registration and subscription parameters (-e). -
The environment file (
containers-prepare-parameter.yaml) with your new container image locations (-e). In most cases, this is the same environment file that the undercloud uses. -
The environment file (
neutron-ovs.yaml) to maintain OVS compatibility. -
Any custom configuration environment files (
-e) relevant to your deployment. -
If applicable, your custom roles (
roles_data) file using--roles-file. -
If applicable, your composable network (
network_data) file using--networks-file. -
If you use a custom stack name, pass the name with the
--stackoption.
-
The environment file (
- Wait until the stack synchronization completes.
You do not need the upgrades-environment.yaml file for any further deployment operations.
Chapter 22. Upgrading an overcloud with hyper-converged infrastructure
This scenario contains an example upgrade process for an overcloud with hyper-converged infrastructure (HCI), which includes the following node types:
- Three Controller nodes
- Multiple HCI Compute nodes, which contain combined Compute and Ceph OSD services
22.1. Running the overcloud upgrade preparation
The upgrade requires running openstack overcloud upgrade prepare command, which performs the following tasks:
- Updates the overcloud plan to OpenStack Platform 16.1
- Prepares the nodes for the upgrade
If you are not using the default stack name (overcloud), set your stack name with the --stack STACK NAME option replacing STACK NAME with the name of your stack.
Procedure
Source the
stackrcfile:source ~/stackrc
$ source ~/stackrcCopy to Clipboard Copied! Toggle word wrap Toggle overflow Run the upgrade preparation command:
Copy to Clipboard Copied! Toggle word wrap Toggle overflow Include the following options relevant to your environment:
-
The environment file (
upgrades-environment.yaml) with the upgrade-specific parameters (-e). -
The environment file (
rhsm.yaml) with the registration and subscription parameters (-e). -
The environment file (
containers-prepare-parameter.yaml) with your new container image locations (-e). In most cases, this is the same environment file that the undercloud uses. -
The environment file (
neutron-ovs.yaml) to maintain OVS compatibility. -
Any custom configuration environment files (
-e) relevant to your deployment. -
If applicable, your custom roles (
roles_data) file using--roles-file. -
If applicable, your composable network (
network_data) file using--networks-file. -
If you use a custom stack name, pass the name with the
--stackoption.
-
The environment file (
- Wait until the upgrade preparation completes.
Download the container images:
openstack overcloud external-upgrade run --stack STACK NAME --tags container_image_prepare
$ openstack overcloud external-upgrade run --stack STACK NAME --tags container_image_prepareCopy to Clipboard Copied! Toggle word wrap Toggle overflow
22.2. Upgrading Controller nodes with director-deployed Ceph Storage
If your deployment uses a Red Hat Ceph Storage cluster that was deployed using director, you must complete this procedure.
To upgrade all the Controller nodes to OpenStack Platform 16.1, you must upgrade each Controller node starting with the bootstrap Controller node.
During the bootstrap Controller node upgrade process, a new Pacemaker cluster is created and new Red Hat OpenStack 16.1 containers are started on the node, while the remaining Controller nodes are still running on Red Hat OpenStack 13.
After upgrading the bootstrap node, you must upgrade each additional node with Pacemaker services and ensure that each node joins the new Pacemaker cluster started with the bootstrap node. For more information, see Overcloud node upgrade workflow.
In this example, the controller nodes are named using the default overcloud-controller-NODEID convention. This includes the following three controller nodes:
-
overcloud-controller-0 -
overcloud-controller-1 -
overcloud-controller-2
Substitute these values for your own node names where applicable.
If you are not using the overcloud default stack name, set your stack name with the --stack STACK NAME option replacing STACK NAME with the name of your stack.
Procedure
Source the
stackrcfile:source ~/stackrc
$ source ~/stackrcCopy to Clipboard Copied! Toggle word wrap Toggle overflow Identify the bootstrap Controller node by running the following command on the undercloud node:
tripleo-ansible-inventory --list --stack overcloud |jq .overcloud_Controller.hosts[0]
$ tripleo-ansible-inventory --list --stack overcloud |jq .overcloud_Controller.hosts[0]Copy to Clipboard Copied! Toggle word wrap Toggle overflow Upgrade the bootstrap Controller node:
Run the external upgrade command with the
ceph_systemdtag:openstack overcloud external-upgrade run --stack <stack_name> --tags ceph_systemd -e ceph_ansible_limit=overcloud-controller-0
$ openstack overcloud external-upgrade run --stack <stack_name> --tags ceph_systemd -e ceph_ansible_limit=overcloud-controller-0Copy to Clipboard Copied! Toggle word wrap Toggle overflow Replace
<stack_name>with the name of your stack.This command performs the following functions:
- Changes the systemd units that control the Ceph Storage containers to use Podman management.
-
Limits actions to the selected Controller node using the
ceph_ansible_limitvariable.
This step is a preliminary measure to prepare the Ceph Storage services for The
leappupgrade.Run the upgrade command with the
system_upgradetag:openstack overcloud upgrade run --stack STACK NAME --tags system_upgrade --limit overcloud-controller-0
$ openstack overcloud upgrade run --stack STACK NAME --tags system_upgrade --limit overcloud-controller-0Copy to Clipboard Copied! Toggle word wrap Toggle overflow This command performs the following actions:
- Performs a Leapp upgrade of the operating system.
Performs a reboot as a part of the Leapp upgrade.
ImportantThe next command causes an outage on the control plane. You cannot perform any standard operations on the overcloud during the next few steps.
Run the external upgrade command with the
system_upgrade_transfer_datatag:openstack overcloud external-upgrade run --stack STACK NAME --tags system_upgrade_transfer_data
$ openstack overcloud external-upgrade run --stack STACK NAME --tags system_upgrade_transfer_dataCopy to Clipboard Copied! Toggle word wrap Toggle overflow This command copies the latest version of the database from an existing node to the bootstrap node.
Run the upgrade command with the
nova_hybrid_statetag and run only theupgrade_steps_playbook.yamlplaybook:openstack overcloud upgrade run --stack STACK NAME --playbook upgrade_steps_playbook.yaml --tags nova_hybrid_state --limit all
$ openstack overcloud upgrade run --stack STACK NAME --playbook upgrade_steps_playbook.yaml --tags nova_hybrid_state --limit allCopy to Clipboard Copied! Toggle word wrap Toggle overflow This command launches temporary 16.1 containers on Compute nodes to help facilitate workload migration when you upgrade Compute nodes at a later step.
Run the upgrade command with no tags:
openstack overcloud upgrade run --stack STACK NAME --limit overcloud-controller-0
$ openstack overcloud upgrade run --stack STACK NAME --limit overcloud-controller-0Copy to Clipboard Copied! Toggle word wrap Toggle overflow This command performs the Red Hat OpenStack Platform upgrade.
ImportantThe control plane becomes active when this command finishes. You can perform standard operations on the overcloud again.
Verify that after the upgrade, the new Pacemaker cluster is started and that the control plane services such as galera, rabbit, haproxy, and redis are running:
sudo pcs status
$ sudo pcs statusCopy to Clipboard Copied! Toggle word wrap Toggle overflow
Upgrade the next Controller node:
Verify that the old cluster is no longer running:
sudo pcs status
$ sudo pcs statusCopy to Clipboard Copied! Toggle word wrap Toggle overflow An error similar to the following is displayed when the cluster is not running:
Error: cluster is not currently running on this node
Error: cluster is not currently running on this nodeCopy to Clipboard Copied! Toggle word wrap Toggle overflow Run the external upgrade command with the
ceph_systemdtag:openstack overcloud external-upgrade run --stack STACK NAME --tags ceph_systemd -e ceph_ansible_limit=overcloud-controller-1
$ openstack overcloud external-upgrade run --stack STACK NAME --tags ceph_systemd -e ceph_ansible_limit=overcloud-controller-1Copy to Clipboard Copied! Toggle word wrap Toggle overflow This command performs the following functions:
- Changes the systemd units that control the Ceph Storage containers to use Podman management.
-
Limits actions to the selected Controller node using the
ceph_ansible_limitvariable.
This step is a preliminary measure to prepare the Ceph Storage services for The
leappupgrade.Run the upgrade command with the
system_upgradetag on the next Controller node:openstack overcloud upgrade run --stack STACK NAME --tags system_upgrade --limit overcloud-controller-1
$ openstack overcloud upgrade run --stack STACK NAME --tags system_upgrade --limit overcloud-controller-1Copy to Clipboard Copied! Toggle word wrap Toggle overflow This command performs the following actions:
- Performs a Leapp upgrade of the operating system.
- Performs a reboot as a part of the Leapp upgrade.
Run the upgrade command with no tags:
openstack overcloud upgrade run --stack STACK NAME --limit overcloud-controller-0,overcloud-controller-1
$ openstack overcloud upgrade run --stack STACK NAME --limit overcloud-controller-0,overcloud-controller-1Copy to Clipboard Copied! Toggle word wrap Toggle overflow This command performs the Red Hat OpenStack Platform upgrade. In addition to this node, include the previously upgraded bootstrap node in the
--limitoption.
Upgrade the final Controller node:
Verify that the old cluster is no longer running:
sudo pcs status
$ sudo pcs statusCopy to Clipboard Copied! Toggle word wrap Toggle overflow An error similar to the following is displayed when the cluster is not running:
Error: cluster is not currently running on this node
Error: cluster is not currently running on this nodeCopy to Clipboard Copied! Toggle word wrap Toggle overflow Run the external upgrade command with the
ceph_systemdtag:openstack overcloud external-upgrade run --stack STACK NAME --tags ceph_systemd -e ceph_ansible_limit=overcloud-controller-2
$ openstack overcloud external-upgrade run --stack STACK NAME --tags ceph_systemd -e ceph_ansible_limit=overcloud-controller-2Copy to Clipboard Copied! Toggle word wrap Toggle overflow This command performs the following functions:
- Changes the systemd units that control the Ceph Storage containers to use Podman management.
-
Limits actions to the selected Controller node using the
ceph_ansible_limitvariable.
This step is a preliminary measure to prepare the Ceph Storage services for The
leappupgrade.Run the upgrade command with the
system_upgradetag:openstack overcloud upgrade run --stack STACK NAME --tags system_upgrade --limit overcloud-controller-2
$ openstack overcloud upgrade run --stack STACK NAME --tags system_upgrade --limit overcloud-controller-2Copy to Clipboard Copied! Toggle word wrap Toggle overflow This command performs the following actions:
- Performs a Leapp upgrade of the operating system.
- Performs a reboot as a part of the Leapp upgrade.
Run the upgrade command with no tags:
openstack overcloud upgrade run --stack STACK NAME --limit overcloud-controller-0,overcloud-controller-1,overcloud-controller-2
$ openstack overcloud upgrade run --stack STACK NAME --limit overcloud-controller-0,overcloud-controller-1,overcloud-controller-2Copy to Clipboard Copied! Toggle word wrap Toggle overflow This command performs the Red Hat OpenStack Platform upgrade. Include all Controller nodes in the
--limitoption.
22.3. Upgrading Compute nodes with hyper-converged infrastructure (HCI)
Upgrade HCI Compute nodes to OpenStack Platform 16.1.
If you are not using the default stack name (overcloud), set your stack name with the --stack STACK NAME option replacing STACK NAME with the name of your stack.
Procedure
Source the
stackrcfile:source ~/stackrc
$ source ~/stackrcCopy to Clipboard Copied! Toggle word wrap Toggle overflow - Migrate your instances. For more information on migration strategies, see Migrating virtual machines between Compute nodes.
- Log out of the node with Ceph MON services and return to the undercloud.
Run the external upgrade command with the
ceph_systemdtag:openstack overcloud external-upgrade run --stack STACK NAME --tags ceph_systemd -e ceph_ansible_limit=overcloud-computehci-0
$ openstack overcloud external-upgrade run --stack STACK NAME --tags ceph_systemd -e ceph_ansible_limit=overcloud-computehci-0Copy to Clipboard Copied! Toggle word wrap Toggle overflow This command performs the following functions:
- Changes the systemd units that control the Ceph Storage containers to use Podman management.
-
Limits actions to the selected Ceph Storage node using the
ceph_ansible_limitvariable.
This step is a preliminary measure to prepare the Ceph Storage services for the
leappupgrade.Run the upgrade command with the
system_upgradetag:openstack overcloud upgrade run --stack STACK NAME --tags system_upgrade --limit overcloud-computehci-0
$ openstack overcloud upgrade run --stack STACK NAME --tags system_upgrade --limit overcloud-computehci-0Copy to Clipboard Copied! Toggle word wrap Toggle overflow This command performs the following actions:
- Performs a Leapp upgrade of the operating system.
- Performs a reboot as a part of the Leapp upgrade.
Run the upgrade command with no tags:
openstack overcloud upgrade run --stack STACK NAME --limit overcloud-computehci-0
$ openstack overcloud upgrade run --stack STACK NAME --limit overcloud-computehci-0Copy to Clipboard Copied! Toggle word wrap Toggle overflow This command performs the Red Hat OpenStack Platform upgrade.
To upgrade multiple Compute nodes in parallel, set the
--limitoption to a comma-separated list of nodes that you want to upgrade. First run the external upgrade command with theceph_systemdtag:openstack overcloud external-upgrade run --stack STACK NAME --tags ceph_systemd -e ceph_ansible_limit=overcloud-computehci-0,overcloud-computehci-1,overcloud-computehci-2
$ openstack overcloud external-upgrade run --stack STACK NAME --tags ceph_systemd -e ceph_ansible_limit=overcloud-computehci-0,overcloud-computehci-1,overcloud-computehci-2Copy to Clipboard Copied! Toggle word wrap Toggle overflow Then perform the
system_upgradetask:openstack overcloud upgrade run --stack STACK NAME --tags system_upgrade --limit overcloud-computehci-0,overcloud-computehci-1,overcloud-computehci-2
$ openstack overcloud upgrade run --stack STACK NAME --tags system_upgrade --limit overcloud-computehci-0,overcloud-computehci-1,overcloud-computehci-2Copy to Clipboard Copied! Toggle word wrap Toggle overflow Then perform the standard OpenStack service upgrade:
openstack overcloud upgrade run --stack STACK NAME --limit overcloud-computehci-0,overcloud-computehci-1,overcloud-computehci-2
$ openstack overcloud upgrade run --stack STACK NAME --limit overcloud-computehci-0,overcloud-computehci-1,overcloud-computehci-2Copy to Clipboard Copied! Toggle word wrap Toggle overflow
22.4. Synchronizing the overcloud stack
The upgrade requires an update the overcloud stack to ensure that the stack resource structure and parameters align with a fresh deployment of OpenStack Platform 16.1.
If you are not using the default stack name (overcloud), set your stack name with the --stack STACK NAME option replacing STACK NAME with the name of your stack.
Procedure
Source the
stackrcfile:source ~/stackrc
$ source ~/stackrcCopy to Clipboard Copied! Toggle word wrap Toggle overflow Edit the
containers-prepare-parameter.yamlfile and remove the following parameters and their values:-
ceph3_namespace -
ceph3_tag -
ceph3_image -
name_prefix_stein -
name_suffix_stein -
namespace_stein -
tag_stein
-
-
To re-enable fencing in your overcloud, set the
EnableFencingparameter totruein thefencing.yamlenvironment file. Run the upgrade finalization command:
Copy to Clipboard Copied! Toggle word wrap Toggle overflow Include the following options relevant to your environment:
-
The environment file (
upgrades-environment.yaml) with the upgrade-specific parameters (-e). -
The environment file (
fencing.yaml) with theEnableFencingparameter set totrue. -
The environment file (
rhsm.yaml) with the registration and subscription parameters (-e). -
The environment file (
containers-prepare-parameter.yaml) with your new container image locations (-e). In most cases, this is the same environment file that the undercloud uses. -
The environment file (
neutron-ovs.yaml) to maintain OVS compatibility. -
Any custom configuration environment files (
-e) relevant to your deployment. -
If applicable, your custom roles (
roles_data) file using--roles-file. -
If applicable, your composable network (
network_data) file using--networks-file. -
If you use a custom stack name, pass the name with the
--stackoption.
-
The environment file (
- Wait until the stack synchronization completes.
You do not need the upgrades-environment.yaml file for any further deployment operations.
Chapter 23. Upgrading a director-deployed Ceph Storage cluster to Red Hat Ceph Storage 4
If your deployment uses a Red Hat Ceph Storage cluster that was deployed using director, you must complete the procedures included in this section.
When you upgrade a Red Hat Ceph Storage cluster from a previous supported version to version 4.2z2, the upgrade completes with the storage cluster in a HEALTH_WARN state with a warning message that states monitors are allowing insecure global_id reclaim. This is due to the patched CVE (CVE-2021-20288), see Ceph HEALTH_WARN with 'mons are allowing insecure global_id reclaim' after install/upgrade to RHCS 4.2z2 (or newer).
Because the HEALTH_WARN state is displayed due to the CVE, it is possible to mute health warnings temporarily. However, there is a risk that if you mute warnings you do not have visibility about potential older and unpatched clients connected to your cluster. For more information about muting health warnings, see Upgrading a Red Hat Ceph Storage cluster in the Red Hat Ceph Storage documentation.
Do not disable global_id_reclaim manually until all clients are upgraded and patched otherwise they cannot connect. You can run the following command as the root user to view a list of unpatched clients that are connected to the cluster:
ceph health detail
# ceph health detailAfter you upgrade the overcloud, upgrade your director-deployed Ceph Storage cluster to Red Hat Ceph Storage cluster to version 4.
23.1. Installing ceph-ansible
If your deployment uses a Red Hat Ceph Storage cluster that was deployed using director, you must complete this procedure.
The ceph-ansible package is required when you use Ceph Storage with Red Hat OpenStack Platform.
Procedure
Enable the Ceph Tools repository:
sudo subscription-manager repos --enable=rhceph-4-tools-for-rhel-8-x86_64-rpms
[stack@director ~]$ sudo subscription-manager repos --enable=rhceph-4-tools-for-rhel-8-x86_64-rpmsCopy to Clipboard Copied! Toggle word wrap Toggle overflow Install the
ceph-ansiblepackage:sudo dnf install -y ceph-ansible
[stack@director ~]$ sudo dnf install -y ceph-ansibleCopy to Clipboard Copied! Toggle word wrap Toggle overflow
23.2. Upgrading to Ceph Storage 4
Upgrade the Ceph Storage nodes from version 3 to version 4.
If you are not using the default stack name (overcloud), set your stack name with the --stack STACK NAME option replacing STACK NAME with the name of your stack.
Procedure
Source the
stackrcfile:source ~/stackrc
$ source ~/stackrcCopy to Clipboard Copied! Toggle word wrap Toggle overflow Run the Ceph Storage external upgrade process with the
cephtag:openstack overcloud external-upgrade run --stack STACK NAME --tags ceph
$ openstack overcloud external-upgrade run --stack STACK NAME --tags cephCopy to Clipboard Copied! Toggle word wrap Toggle overflow - Wait until the Ceph Storage upgrade completes.
Chapter 24. OSD migration from FileStore to BlueStore
After you complete and verify the upgrade process, you must migrate your FileStore OSDs to BlueStore. You must complete the migration one node at a time. The following procedure uses ceph-ansible to complete the migration. This procedure only applies if the Ceph cluster is deployed by director.
24.1. Checking that your cluster runs FileStore and therefore requires migration
Procedure
-
Log in as the
heat-adminuser on a node with Ceph MON containers, such as Controller nodes or standalone Ceph MON nodes. For example, in a standard overcloud deployment,overcloud-controller-1uses Ceph MON containers. Query the Ceph cluster to see what driver is in use by the OSDs:
sudo -i
podman exec -it ceph-mon-overcloud-controller-1 sh -c "ceph -f json osd metadata" | jq -c 'sort_by(.hostname) | .[] | ["host", .hostname, "osd_id", .id, "objectstore", .osd_objectstore]'
[heat-admin@overcloud-controller-1 ~]$ sudo -i
[root@overcloud-controller-1 ~]# podman exec -it ceph-mon-overcloud-controller-1 sh -c "ceph -f json osd metadata" | jq -c 'sort_by(.hostname) | .[] | ["host", .hostname, "osd_id", .id, "objectstore", .osd_objectstore]'
[root@overcloud-controller-1 ~]#
Copy to Clipboard Copied! Toggle word wrap Toggle overflow -
If any line returns
"objectstore": "filestore", that node requires OSD migration.
The migration time can vary depending on the size of your cluster. If you have a very large cluster, the migration time is proportional to the number of OSDs in that cluster and the amount of data stored. Ensure that you complete the migration as soon as possible so that your environment is not in a mixed architecture scenario, which can impact performance.
Because managing FileStore-based OSDs with Red Hat Ceph Storage (RHCS) 4 versions of ceph-ansible is not supported, complete the migration before you run any stack updates.
24.2. Migrating OSDs from FileStore to BlueStore
To migrate from FileStore to BlueStore, director uses Ansible to delete and recreate all OSDs on the node. Director performs a capacity check before the migration process. Finally, director redploys the OSDs with the BlueStore back end.
Prerequisites
A healthy and running Red Hat Ceph Storage (RHCS) 4 cluster. You can check the cluster by entering the following command in a ceph MON container on a Controller or Standalone Ceph MON node:
podman exec -it ceph-mon-overcloud-controller-1 sh -c "ceph -s"
[root@overcloud-controller-1 ~]# podman exec -it ceph-mon-overcloud-controller-1 sh -c "ceph -s"Copy to Clipboard Copied! Toggle word wrap Toggle overflow
Procedure
Ensure that
osd_objectstorein theCephAnsibleDisksConfigparameter does not default tofilestore. If theosd_objectstoreparameter is present in any of your custom heat environment files, you must define the valuebluestoreexplicitly or remove it:Copy to Clipboard Copied! Toggle word wrap Toggle overflow NoteIf you have any specific FileStore configuration with, for example, journals, ensure that you update the configuration accordingly. For more information about advanced configurations, see Mapping the Ceph Storage Node Disk Layout in the Deploying an overcloud with containerized Red Hat Ceph guide.
-
Log in to the undercloud as the
stackuser. Enter the
openstack overcloud external-upgrade runcommand with theceph_fstobstag. Replace<NODE_NAME>with the name of the Ceph OSD node you want to upgrade. You can use theopenstack server listcommand to find the node name.[stack@undercloud ~] $ openstack overcloud external-upgrade run --tags ceph_fstobs -e ceph_ansible_limit=<NODE_NAME> | tee oc-fstobs.log
[stack@undercloud ~] $ openstack overcloud external-upgrade run --tags ceph_fstobs -e ceph_ansible_limit=<NODE_NAME> | tee oc-fstobs.logCopy to Clipboard Copied! Toggle word wrap Toggle overflow Log in to a node that has Ceph MON services and query the Ceph cluster to check the status of the OSDs of the node you have upgraded. Before you can start the migration of the next OSD node, you must ensure that the one you have upgraded is successfully migrated:
sudo -i
podman exec -it ceph-mon-overcloud-controller-1 sh -c "ceph -f json osd metadata" | jq -c '.[] | select(.hostname == "<NODE_NAME>") | ["host", .hostname, "osd_id", .id, "objectstore", .osd_objectstore]'
exit
[heat-admin@overcloud-controller-1 ~]$ sudo -i
[root@overcloud-controller-1 ~]# podman exec -it ceph-mon-overcloud-controller-1 sh -c "ceph -f json osd metadata" | jq -c '.[] | select(.hostname == "<NODE_NAME>") | ["host", .hostname, "osd_id", .id, "objectstore", .osd_objectstore]'
[root@overcloud-controller-1 ~]# exit
Copy to Clipboard Copied! Toggle word wrap Toggle overflow Replace <NODE_NAME> with the name of the node that was migrated. If the result shows that the OSDs use BlueStore, its migration is successful.
Optional: To view additional details about a specific OSD, enter the following command:
podman exec -it ceph-mon-overcloud-controller-1 sh -c "ceph osd metadata <ID>"
[root@overcloud-controller-1 ~]# podman exec -it ceph-mon-overcloud-controller-1 sh -c "ceph osd metadata <ID>"Copy to Clipboard Copied! Toggle word wrap Toggle overflow Replace <ID> with the ID of the OSD you want to query.
Before you can start the migration process on the next node, you must wait for the cluster to synchronize.
podman exec -it ceph-mon-overcloud-controller-1 sh -c "ceph -s"
[root@overcloud-controller-1 ~]# podman exec -it ceph-mon-overcloud-controller-1 sh -c "ceph -s"Copy to Clipboard Copied! Toggle word wrap Toggle overflow Review the command output and ensure that the health of the cluster is `HEALTH_OK` and the PGs are in the `active+clean` state.
Review the command output and ensure that the health of the cluster is `HEALTH_OK` and the PGs are in the `active+clean` state.Copy to Clipboard Copied! Toggle word wrap Toggle overflow Before you can start the migration process on the next node, you must wait for the cluster rebalancing process to complete. To follow the status, run the following command:
sudo podman exec ceph-mon-<NODE_NAME> ceph -w
[heat-admin@overcloud-controller-0 ~]$ sudo podman exec ceph-mon-<NODE_NAME> ceph -wCopy to Clipboard Copied! Toggle word wrap Toggle overflow Replace <NODE_NAME> with the name of the node that was migrated.
- Repeat the migration process for each node in the storage cluster.
For more information about migration from FileStore to BlueStore, see BlueStore in the Red Hat Ceph Storage Administration Guide.
24.3. Verifying your FileStore to BlueStore migration
You can check the status of an OSD to ensure that you have successfully completed the migration.
Procedure
-
Log in as the
heat-adminuser to a ceph-mon container that is hosted on one of the Controller nodes. Query the Ceph cluster:
sudo -i
podman exec -it ceph-mon-overcloud-controller-1 sh -c "ceph -f json osd metadata" | jq -c 'sort_by(.hostname) | .[] | ["host", .hostname, "osd_id", .id, "objectstore", .osd_objectstore]'
[heat-admin@overcloud-controller-1 ~]$ sudo -i
[root@overcloud-controller-1 ~]# podman exec -it ceph-mon-overcloud-controller-1 sh -c "ceph -f json osd metadata" | jq -c 'sort_by(.hostname) | .[] | ["host", .hostname, "osd_id", .id, "objectstore", .osd_objectstore]'
[root@overcloud-controller-1 ~]#
Copy to Clipboard Copied! Toggle word wrap Toggle overflow
If the configuration shows that all the OSDs across the cluster use BlueStore, the migration is successful.
A recommended best practice is to run an idempotent stack update to ensure that the configuration definition and the actual configuration match. The stack update duration varies depending on the size of your system, so to reduce downtime you can plan to complete the migration during a maintenance window.
Chapter 25. Performing post-upgrade actions
After you have completed the overcloud upgrade, you must perform some post-upgrade configuration to ensure that your environment is fully supported and ready for future operations.
25.1. Removing unnecessary packages and directories from the undercloud
After the Leapp upgrade, remove the unnecessary packages and directories that remain on the undercloud.
Procedure
Remove the unnecessary packages
sudo dnf -y remove --exclude=python-pycadf-common python2*
$ sudo dnf -y remove --exclude=python-pycadf-common python2*Copy to Clipboard Copied! Toggle word wrap Toggle overflow Remove the content from the
/httpbootand/tftpbootdirectories that includes old images used in Red Hat OpenStack 13:sudo rm -rf /httpboot /tftpboot
$ sudo rm -rf /httpboot /tftpbootCopy to Clipboard Copied! Toggle word wrap Toggle overflow
25.2. Validating the post-upgrade functionality
Run the post-upgrade validation group to check the post-upgrade functionality.
Procedure
Source the
stackrcfile.source ~/stackrc
$ source ~/stackrcCopy to Clipboard Copied! Toggle word wrap Toggle overflow Run the
openstack tripleo validator runcommand with the --group post-upgrade option:openstack tripleo validator run --group post-upgrade
$ openstack tripleo validator run --group post-upgradeCopy to Clipboard Copied! Toggle word wrap Toggle overflow Review the results of the validation report. To view detailed output from a specific validation, run the
openstack tripleo validator show run --fullcommand against the UUID of the specific validation from the report:openstack tripleo validator show run --full <UUID>
$ openstack tripleo validator show run --full <UUID>Copy to Clipboard Copied! Toggle word wrap Toggle overflow
A FAILED validation does not prevent you from deploying or running Red Hat OpenStack Platform. However, a FAILED validation can indicate a potential issue with a production environment.
25.3. Upgrading the overcloud images
You must replace your current overcloud images with new versions. The new images ensure that the director can introspect and provision your nodes using the latest version of OpenStack Platform software.
Prerequisites
- You have upgraded the undercloud to the latest version.
Procedure
-
Log in to the undercloud as the
stackuser. Source the
stackrcfile.source ~/stackrc
$ source ~/stackrcCopy to Clipboard Copied! Toggle word wrap Toggle overflow Install the packages containing the overcloud QCOW2 archives:
sudo dnf install rhosp-director-images rhosp-director-images-ipa
$ sudo dnf install rhosp-director-images rhosp-director-images-ipaCopy to Clipboard Copied! Toggle word wrap Toggle overflow Remove any existing images from the
imagesdirectory on thestackuser’s home (/home/stack/images):rm -rf ~/images/*
$ rm -rf ~/images/*Copy to Clipboard Copied! Toggle word wrap Toggle overflow Extract the archives:
cd ~/images
for i in /usr/share/rhosp-director-images/overcloud-full-latest-16.1.tar /usr/share/rhosp-director-images/ironic-python-agent-latest-16.1.tar; do tar -xvf $i; done
cd ~
$ cd ~/images
$ for i in /usr/share/rhosp-director-images/overcloud-full-latest-16.1.tar /usr/share/rhosp-director-images/ironic-python-agent-latest-16.1.tar; do tar -xvf $i; done
$ cd ~
Copy to Clipboard Copied! Toggle word wrap Toggle overflow Import the latest images into the director:
openstack overcloud image upload --update-existing --image-path /home/stack/images/
$ openstack overcloud image upload --update-existing --image-path /home/stack/images/Copy to Clipboard Copied! Toggle word wrap Toggle overflow Configure your nodes to use the new images:
openstack overcloud node configure $(openstack baremetal node list -c UUID -f value)
$ openstack overcloud node configure $(openstack baremetal node list -c UUID -f value)Copy to Clipboard Copied! Toggle word wrap Toggle overflow
When you deploy overcloud nodes, ensure that the overcloud image version corresponds to the respective heat template version. For example, use the OpenStack Platform 16.1 images only with the OpenStack Platform 16.1 heat templates.
The new overcloud-full image replaces the old overcloud-full image. If you made changes to the old image, you must repeat the changes in the new image, especially if you want to deploy new nodes in the future.
25.4. Updating CPU pinning parameters
Red Hat OpenStack Platform 16.1 uses new parameters for CPU pinning:
NovaComputeCpuDedicatedSet- Sets the dedicated (pinned) CPUs.
NovaComputeCpuSharedSet- Sets the shared (unpinned) CPUs.
You must migrate the CPU pinning configuration from the NovaVcpuPinSet parameter to the NovaComputeCpuDedicatedSet and NovaComputeCpuSharedSet parameters after completing the upgrade to Red Hat OpenStack Platform 16.1.
Procedure
-
Log in to the undercloud as the
stackuser. If your Compute nodes support simultaneous multithreading (SMT) but you created instances with the
hw:cpu_thread_policy=isolatepolicy, you must perform one of the following options:Unset the
hw:cpu_thread_policythread policy and resize the instances:Source your overcloud authentication file:
source ~/overcloudrc
$ source ~/overcloudrcCopy to Clipboard Copied! Toggle word wrap Toggle overflow Unset the
hw:cpu_thread_policyproperty of the flavor:(overcloud) $ openstack flavor unset --property hw:cpu_thread_policy <flavor>
(overcloud) $ openstack flavor unset --property hw:cpu_thread_policy <flavor>Copy to Clipboard Copied! Toggle word wrap Toggle overflow Note-
Unsetting the
hw:cpu_thread_policyattribute sets the policy to the defaultpreferpolicy, which sets the instance to use an SMT-enabled Compute node if available. You can also set thehw:cpu_thread_policyattribute torequire, which sets a hard requirements for an SMT-enabled Compute node. -
If the Compute node does not have an SMT architecture or enough CPU cores with available thread siblings, scheduling will fail. To prevent this, set
hw:cpu_thread_policytopreferinstead ofrequire. The defaultpreferpolicy ensures that thread siblings are used when available. -
If you use
hw:cpu_thread_policy=isolate, you must have SMT disabled or use a platform that does not support SMT.
-
Unsetting the
Convert the instances to use the new thread policy.
(overcloud) $ openstack server resize --flavor <flavor> <server>
(overcloud) $ openstack server resize confirm <server>
(overcloud) $ openstack server resize --flavor <flavor> <server>
(overcloud) $ openstack server resize confirm <server>
Copy to Clipboard Copied! Toggle word wrap Toggle overflow Repeat this step for all pinned instances using the
hw:cpu_thread_policy=isolatedpolicy.
Migrate instances from the Compute node and disable SMT on the Compute node:
Source your overcloud authentication file:
source ~/overcloudrc
$ source ~/overcloudrcCopy to Clipboard Copied! Toggle word wrap Toggle overflow Disable the Compute node from accepting new virtual machines:
(overcloud) $ openstack compute service list
(overcloud) $ openstack compute service set <hostname> nova-compute --disable
(overcloud) $ openstack compute service list
(overcloud) $ openstack compute service set <hostname> nova-compute --disable
Copy to Clipboard Copied! Toggle word wrap Toggle overflow - Migrate all instances from the Compute node. For more information on instance migration, see Migrating virtual machine instances between Compute nodes.
- Reboot the Compute node and disable SMT in the BIOS of the Compute node.
- Boot the Compute node.
Re-enable the Compute node:
(overcloud) $ openstack compute service set <hostname> nova-compute --enable
(overcloud) $ openstack compute service set <hostname> nova-compute --enableCopy to Clipboard Copied! Toggle word wrap Toggle overflow
Source the
stackrcfile:source ~/stackrc
$ source ~/stackrcCopy to Clipboard Copied! Toggle word wrap Toggle overflow -
Edit the environment file that contains the
NovaVcpuPinSetparameter. Migrate the CPU pinning configuration from the
NovaVcpuPinSetparameter toNovaComputeCpuDedicatedSetandNovaComputeCpuSharedSet:-
Migrate the value of
NovaVcpuPinSettoNovaComputeCpuDedicatedSetfor hosts that were previously used for pinned instances. -
Migrate the value of
NovaVcpuPinSettoNovaComputeCpuSharedSetfor hosts that were previously used for unpinned instances. -
If there is no value set for NovaVcpuPinSet, then all Compute node cores should be assigned to either
NovaComputeCpuDedicatedSetorNovaComputeCpuSharedSet, depending on the type of instances you intend to host on the nodes.
For example, your previous environment file might contain the following pinning configuration:
parameter_defaults:
  ...
  NovaVcpuPinSet: 1,2,3,5,6,7
  ...
parameter_defaults:
  ...
  NovaVcpuPinSet: 1,2,3,5,6,7
  ...
Copy to Clipboard Copied! Toggle word wrap Toggle overflow To migrate the configuration to a pinned configuration, set the
NovaComputeCpuDedicatedSetparameter and unset theNovaVcpuPinSetparameter:parameter_defaults: ... NovaComputeCpuDedicatedSet: 1,2,3,5,6,7 NovaVcpuPinSet: "" ...
parameter_defaults: ... NovaComputeCpuDedicatedSet: 1,2,3,5,6,7 NovaVcpuPinSet: "" ...Copy to Clipboard Copied! Toggle word wrap Toggle overflow To migrate the configuration to an unpinned configuration, set the
NovaComputeCpuSharedSetparameter and unset theNovaVcpuPinSetparameter:parameter_defaults: ... NovaComputeCpuSharedSet: 1,2,3,5,6,7 NovaVcpuPinSet: "" ...
parameter_defaults: ... NovaComputeCpuSharedSet: 1,2,3,5,6,7 NovaVcpuPinSet: "" ...Copy to Clipboard Copied! Toggle word wrap Toggle overflow ImportantEnsure the configuration of either
NovaComputeCpuDedicatedSetorNovaComputeCpuSharedSetmatches the configuration defined inNovaVcpuPinSet. To change the configuration for either of these, or to configure bothNovaComputeCpuDedicatedSetorNovaComputeCpuSharedSet, ensure the Compute nodes with the pinning configuration are not running any instances before updating the configuration.-
Migrate the value of
- Save the file.
Run the deployment command to update the overcloud with the new CPU pinning parameters.
Copy to Clipboard Copied! Toggle word wrap Toggle overflow
Additional resources
25.5. Migrating users to the member role
In Red Hat OpenStack Platform 13, the default member role is called _member_.
In Red Hat OpenStack Platform 16.1, the default member role is called member.
When you complete the upgrade from Red Hat OpenStack Platform 13 to Red Hat OpenStack Platform 16.1, users that you assigned to the _member_ role still have that role. You can migrate all of the users to the member role by using the following steps.
Prerequisites
- You have upgraded the overcloud to the latest version.
Procedure
List all of the users on your cloud that have the
_member_role:openstack role assignment list --names --role _member_ --sort-column project
openstack role assignment list --names --role _member_ --sort-column projectCopy to Clipboard Copied! Toggle word wrap Toggle overflow For each user, remove the
_member_role, and apply thememberrole:openstack role remove --user <user> --project <project> _member_ openstack role add --user <user> --project <project> member
openstack role remove --user <user> --project <project> _member_ openstack role add --user <user> --project <project> memberCopy to Clipboard Copied! Toggle word wrap Toggle overflow
Chapter 26. Troubleshooting upgrade issues
If you experience any issues with during the upgrade process, refer to the advice in this section.
26.1. Correcting environment files
If you have made a mistake with any parameters in any custom environment files, you can correct the environment file and run the openstack overcloud upgrade prepare command at any time during the upgrade. This command uploads a new version of your overcloud plan to director, which will generate a new set of config-download playbooks.
This example contains a repository name mistake in the upgrades-environment.yaml file:
parameter_defaults: UpgradeLeappEnabled: true UpgradeLeappCommandOptions: "--enablerepo rhel-7-for-x86_64-baseos-eus-rpms --enablerepo rhel-8-for-x86_64-appstream-eus-rpms --enablerepo fast-datapath-for-rhel-8-x86_64-rpms" CephAnsibleRepo: rhceph-4-tools-for-rhel-8-x86_64-rpms
parameter_defaults:
UpgradeLeappEnabled: true
UpgradeLeappCommandOptions: "--enablerepo rhel-7-for-x86_64-baseos-eus-rpms --enablerepo rhel-8-for-x86_64-appstream-eus-rpms --enablerepo fast-datapath-for-rhel-8-x86_64-rpms"
CephAnsibleRepo: rhceph-4-tools-for-rhel-8-x86_64-rpms
This mistake causes an issue during the Leapp upgrade for the Controller node. To rectify this issue, correct the mistake and run the openstack overcloud upgrade prepare command.
Procedure
Correct the mistake in the file:
parameter_defaults: UpgradeLeappEnabled: true UpgradeLeappCommandOptions: "--enablerepo rhel-8-for-x86_64-baseos-tus-rpms --enablerepo rhel-8-for-x86_64-appstream-tus-rpms --enablerepo fast-datapath-for-rhel-8-x86_64-rpms" CephAnsibleRepo: rhceph-4-tools-for-rhel-8-x86_64-rpms
parameter_defaults: UpgradeLeappEnabled: true UpgradeLeappCommandOptions: "--enablerepo rhel-8-for-x86_64-baseos-tus-rpms --enablerepo rhel-8-for-x86_64-appstream-tus-rpms --enablerepo fast-datapath-for-rhel-8-x86_64-rpms" CephAnsibleRepo: rhceph-4-tools-for-rhel-8-x86_64-rpmsCopy to Clipboard Copied! Toggle word wrap Toggle overflow Run the upgrade preparation command with the corrected file:
Copy to Clipboard Copied! Toggle word wrap Toggle overflow Wait until the overcloud stack update completes.
- Continue with the upgrade operation step that failed.