Chapter 9. Examples
Use the following examples to understand how to launch a compute instance post-deployment with various network configurations.
9.1. Example 1: Launching an instance with one NIC on the project and provider networks
Use this example to understand how to launch an instance with the private project network and the provider network after you deploy the all-in-one Red Hat OpenStack Platform environment. This example is based on a single NIC configuration and requires at least three IP addresses.
Prerequisites
To complete this example successfully, you must have the following IP addresses available in your environment:
- One IP address for the OpenStack services.
- One IP address for the virtual router to provide connectivity to the project network. This IP address is assigned automatically in this example.
- At least one IP address for floating IPs on the provider network.
Procedure
Create configuration helper variables:
# standalone with project networking and provider networking
export OS_CLOUD=standalone
export GATEWAY=192.168.25.1
export STANDALONE_HOST=192.168.25.2
export PUBLIC_NETWORK_CIDR=192.168.25.0/24
export PRIVATE_NETWORK_CIDR=192.168.100.0/24
export PUBLIC_NET_START=192.168.25.4
export PUBLIC_NET_END=192.168.25.15
export DNS_SERVER=1.1.1.1
Create a basic flavor:
$ openstack flavor create --ram 512 --disk 1 --vcpu 1 --public tinyDownload CirrOS and create an OpenStack image:
$ wget https://download.cirros-cloud.net/0.4.0/cirros-0.4.0-x86_64-disk.img
$ openstack image create cirros --container-format bare --disk-format qcow2 --public --file cirros-0.4.0-x86_64-disk.img
Configure SSH:
$ ssh-keygen -m PEM -t rsa -b 2048 -f ~/.ssh/id_rsa_pem
$ openstack keypair create --public-key ~/.ssh/id_rsa_pem.pub default
Create a simple network security group:
$ openstack security group create basicConfigure the new network security group:
Enable SSH:
$ openstack security group rule create basic --protocol tcp --dst-port 22:22 --remote-ip 0.0.0.0/0Enable ping:
$ openstack security group rule create --protocol icmp basicEnable DNS:
$ openstack security group rule create --protocol udp --dst-port 53:53 basic
Create Neutron networks:
$ openstack network create --external --provider-physical-network datacentre --provider-network-type flat public
$ openstack network create --internal private
$ openstack subnet create public-net \
    --subnet-range $PUBLIC_NETWORK_CIDR \
    --no-dhcp \
    --gateway $GATEWAY \
    --allocation-pool start=$PUBLIC_NET_START,end=$PUBLIC_NET_END \
    --network public
$ openstack subnet create private-net \
    --subnet-range $PRIVATE_NETWORK_CIDR \
    --network private
Create a virtual router:
# NOTE: In this case an IP will be automatically assigned
# from the allocation pool for the subnet.
$ openstack router create vrouter
$ openstack router set vrouter --external-gateway public
$ openstack router add subnet vrouter private-net
Create a floating IP:
$ openstack floating ip create publicLaunch the instance:
$ openstack server create --flavor tiny --image cirros --key-name default --network private --security-group basic myserverAssign the floating IP:
$ openstack server add floating ip myserver <FLOATING_IP>Replace
FLOATING_IPwith the address of the floating IP that you create in a previous step.Test SSH:
ssh cirros@<FLOATING_IP>Replace
FLOATING_IPwith the address of the floating IP that you create in a previous step.
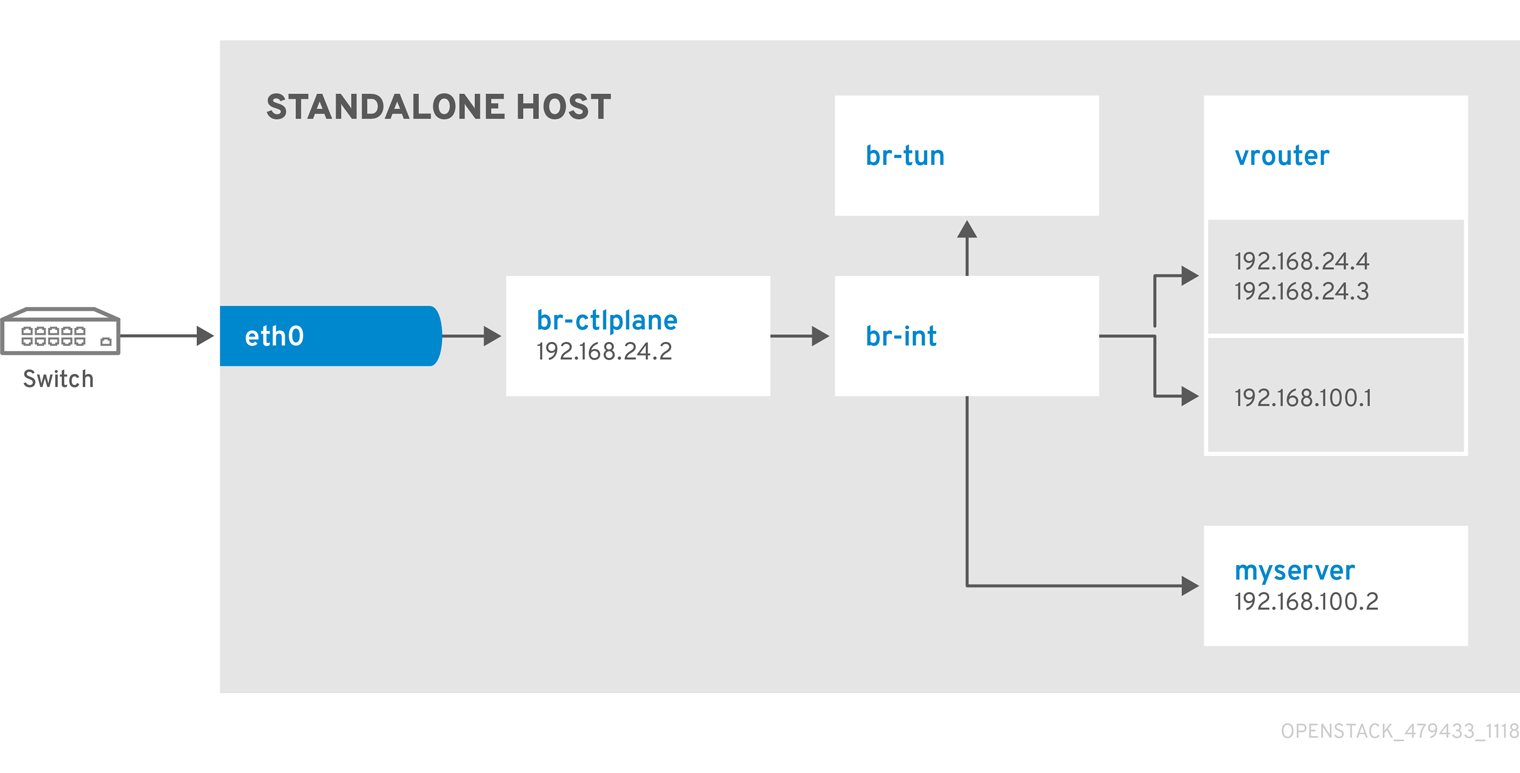
Network Architecture
9.2. Example 2: Launching an instance with one NIC on the provider network
Use this example to understand how to launch an instance with the provider network after you deploy the all-in-one Red Hat OpenStack Platform environment. This example is based on a single NIC configuration and requires at least four IP addresses.
Prerequisites
To complete this example successfully, you must have the following IP addresses available in your environment:
- One IP address for the OpenStack services.
- One IP address for the virtual router to provide connectivity to the project network. This IP address is assigned automatically in this example.
- One IP address for DHCP on the provider network.
- At least one IP address for floating IPs on the provider network.
Procedure
Create configuration helper variables:
# standalone with project networking and provider networking
export OS_CLOUD=standalone
export GATEWAY=192.168.25.1
export STANDALONE_HOST=192.168.25.2
export VROUTER_IP=192.168.25.3
export PUBLIC_NETWORK_CIDR=192.168.25.0/24
export PUBLIC_NET_START=192.168.25.4
export PUBLIC_NET_END=192.168.25.15
export DNS_SERVER=1.1.1.1
Create a basic flavor:
$ openstack flavor create --ram 512 --disk 1 --vcpu 1 --public tinyDownload CirrOS and create an OpenStack image:
$ wget https://download.cirros-cloud.net/0.4.0/cirros-0.4.0-x86_64-disk.img
$ openstack image create cirros --container-format bare --disk-format qcow2 --public --file cirros-0.4.0-x86_64-disk.img
Configure SSH:
$ ssh-keygen -m PEM -t rsa -b 2048 -f ~/.ssh/id_rsa_pem
$ openstack keypair create --public-key ~/.ssh/id_rsa_pem.pub default
Create a simple network security group:
$ openstack security group create basicConfigure the new network security group:
Enable SSH:
$ openstack security group rule create basic --protocol tcp --dst-port 22:22 --remote-ip 0.0.0.0/0Enable ping:
$ openstack security group rule create --protocol icmp basic
Create Neutron networks:
$ openstack network create --external --provider-physical-network datacentre --provider-network-type flat public
$ openstack network create --internal private
$ openstack subnet create public-net \
    --subnet-range $PUBLIC_NETWORK_CIDR \
    --gateway $GATEWAY \
    --allocation-pool start=$PUBLIC_NET_START,end=$PUBLIC_NET_END \
    --network public \
    --host-route destination=0.0.0.0/0,gateway=$GATEWAY \
    --dns-nameserver $DNS_SERVER
Launch the instance:
$ openstack server create --flavor tiny --image cirros --key-name default --network public --security-group basic myserverTest SSH:
ssh cirros@<VM_IP>Replace
VM_IPwith the address of the virtual machine that you create in the previous step.
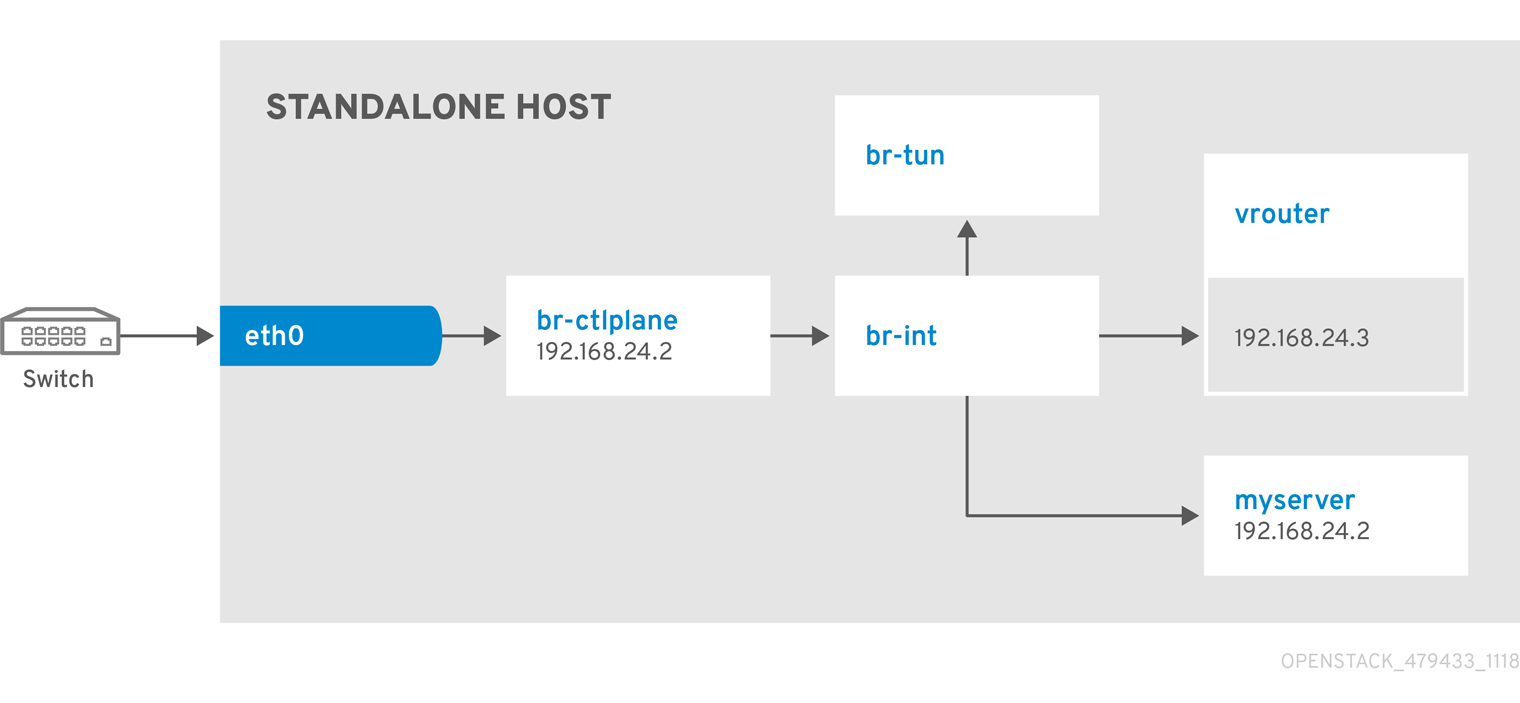
Network Architecture
9.3. Example 3: Launching an instance with two NICs on the project and provider networks
Use this example to understand how to launch an instance with the private project network and the provider network after you deploy the all-in-one Red Hat OpenStack Platform environment. This example is based on a dual NIC configuration and requires at least four IP addresses on the provider network.
Prerequisites
- One IP address for a gateway on the provider network.
- One IP address for OpenStack endpoints.
- One IP address for the virtual router to provide connectivity to the project network. This IP address is assigned automatically in this example.
- At least one IP address for floating IPs on the provider network.
Procedure
Create configuration helper variables:
# standalone with project networking and provider networking
export OS_CLOUD=standalone
export GATEWAY=192.168.25.1
export STANDALONE_HOST=192.168.0.2
export PUBLIC_NETWORK_CIDR=192.168.25.0/24
export PRIVATE_NETWORK_CIDR=192.168.100.0/24
export PUBLIC_NET_START=192.168.25.3
export PUBLIC_NET_END=192.168.25.254
export DNS_SERVER=1.1.1.1
Create a basic flavor:
$ openstack flavor create --ram 512 --disk 1 --vcpu 1 --public tinyDownload CirrOS and create an OpenStack image:
$ wget https://download.cirros-cloud.net/0.4.0/cirros-0.4.0-x86_64-disk.img
$ openstack image create cirros --container-format bare --disk-format qcow2 --public --file cirros-0.4.0-x86_64-disk.img
Configure SSH:
$ ssh-keygen -m PEM -t rsa -b 2048 -f ~/.ssh/id_rsa_pem
$ openstack keypair create --public-key ~/.ssh/id_rsa_pem.pub default
Create a simple network security group:
$ openstack security group create basicConfigure the new network security group:
Enable SSH:
$ openstack security group rule create basic --protocol tcp --dst-port 22:22 --remote-ip 0.0.0.0/0Enable ping:
$ openstack security group rule create --protocol icmp basicEnable DNS:
$ openstack security group rule create --protocol udp --dst-port 53:53 basic
Create Neutron networks:
$ openstack network create --external --provider-physical-network datacentre --provider-network-type flat public
$ openstack network create --internal private
$ openstack subnet create public-net \
    --subnet-range $PUBLIC_NETWORK_CIDR \
    --no-dhcp \
    --gateway $GATEWAY \
    --allocation-pool start=$PUBLIC_NET_START,end=$PUBLIC_NET_END \
    --network public
$ openstack subnet create private-net \
    --subnet-range $PRIVATE_NETWORK_CIDR \
    --network private
Create a virtual router:
# NOTE: In this case an IP will be automatically assigned
# from the allocation pool for the subnet.
$ openstack router create vrouter
$ openstack router set vrouter --external-gateway public
$ openstack router add subnet vrouter private-net
Create a floating IP:
$ openstack floating ip create publicLaunch the instance:
$ openstack server create --flavor tiny --image cirros --key-name default --network private --security-group basic myserverAssign the floating IP:
$ openstack server add floating ip myserver <FLOATING_IP>Replace
FLOATING_IPwith the address of the floating IP that you create in a previous step.Test SSH:
ssh cirros@<FLOATING_IP>Replace
FLOATING_IPwith the address of the floating IP that you create in a previous step.
Network Architecture
