Configuring load balancing as a service
Configuring the Load-balancing service (octavia) to manage network traffic across the data plane in a Red Hat OpenStack Services on OpenShift environment
Abstract
Providing feedback on Red Hat documentation
We appreciate your feedback. Tell us how we can improve the documentation.
To provide documentation feedback for Red Hat OpenStack Services on OpenShift (RHOSO), create a Jira issue in the OSPRH Jira project.
Procedure
- Log in to the Red Hat Atlassian Jira.
- Click the following link to open a Create Issue page: Create issue
- Select Red Hat OpenStack Services on OpenShift as the Project.
- Select Bug as the Issue Type.
- Click Next.
- Complete the Summary and Description fields. In the Description field, include the documentation URL, chapter or section number, and a detailed description of the issue.
- Select documentation as the Component.
- Click Create.
- Review the details of the bug you created.
Some features in this guide are a Technology Preview
The following Load-balancing service (octavia) features are available in this release as a Technology Preview, and therefore are not fully supported by Red Hat. They should be used only for testing, and should not be deployed in a production environment:
- IPv6 support
For more information, see Technology Preview.
Chapter 1. Introduction to the Load-balancing service
The Load-balancing service (octavia) lets you distribute traffic evenly across multiple servers to improve availability, performance, and scalability.
The Load-balancing service provides a load balancing as a service API version 2 implementation for Red Hat OpenStack Services on OpenShift (RHOSO) environments. The Load-balancing service manages multiple virtual machines, containers, or bare metal servers—collectively known as amphorae—which it launches on demand. The ability to provide on-demand, horizontal scaling makes the Load-balancing service a fully-featured load balancer that is appropriate for large RHOSO enterprise deployments.
1.1. Load-balancing service components
The Red Hat OpenStack Services on OpenShift (RHOSO) Load-balancing service (octavia) uses a set of VM instances referred to as amphorae that reside on the Compute nodes. The Load-balancing service controllers communicate with the amphorae over a load-balancing management network (lb-mgmt-net).
When using octavia, you can create load-balancer virtual IPs (VIPs) that do not require floating IPs (FIPs). Not using FIPs has the advantage of improving performance through the load balancer.
Figure 1.1. Load-balancing service components
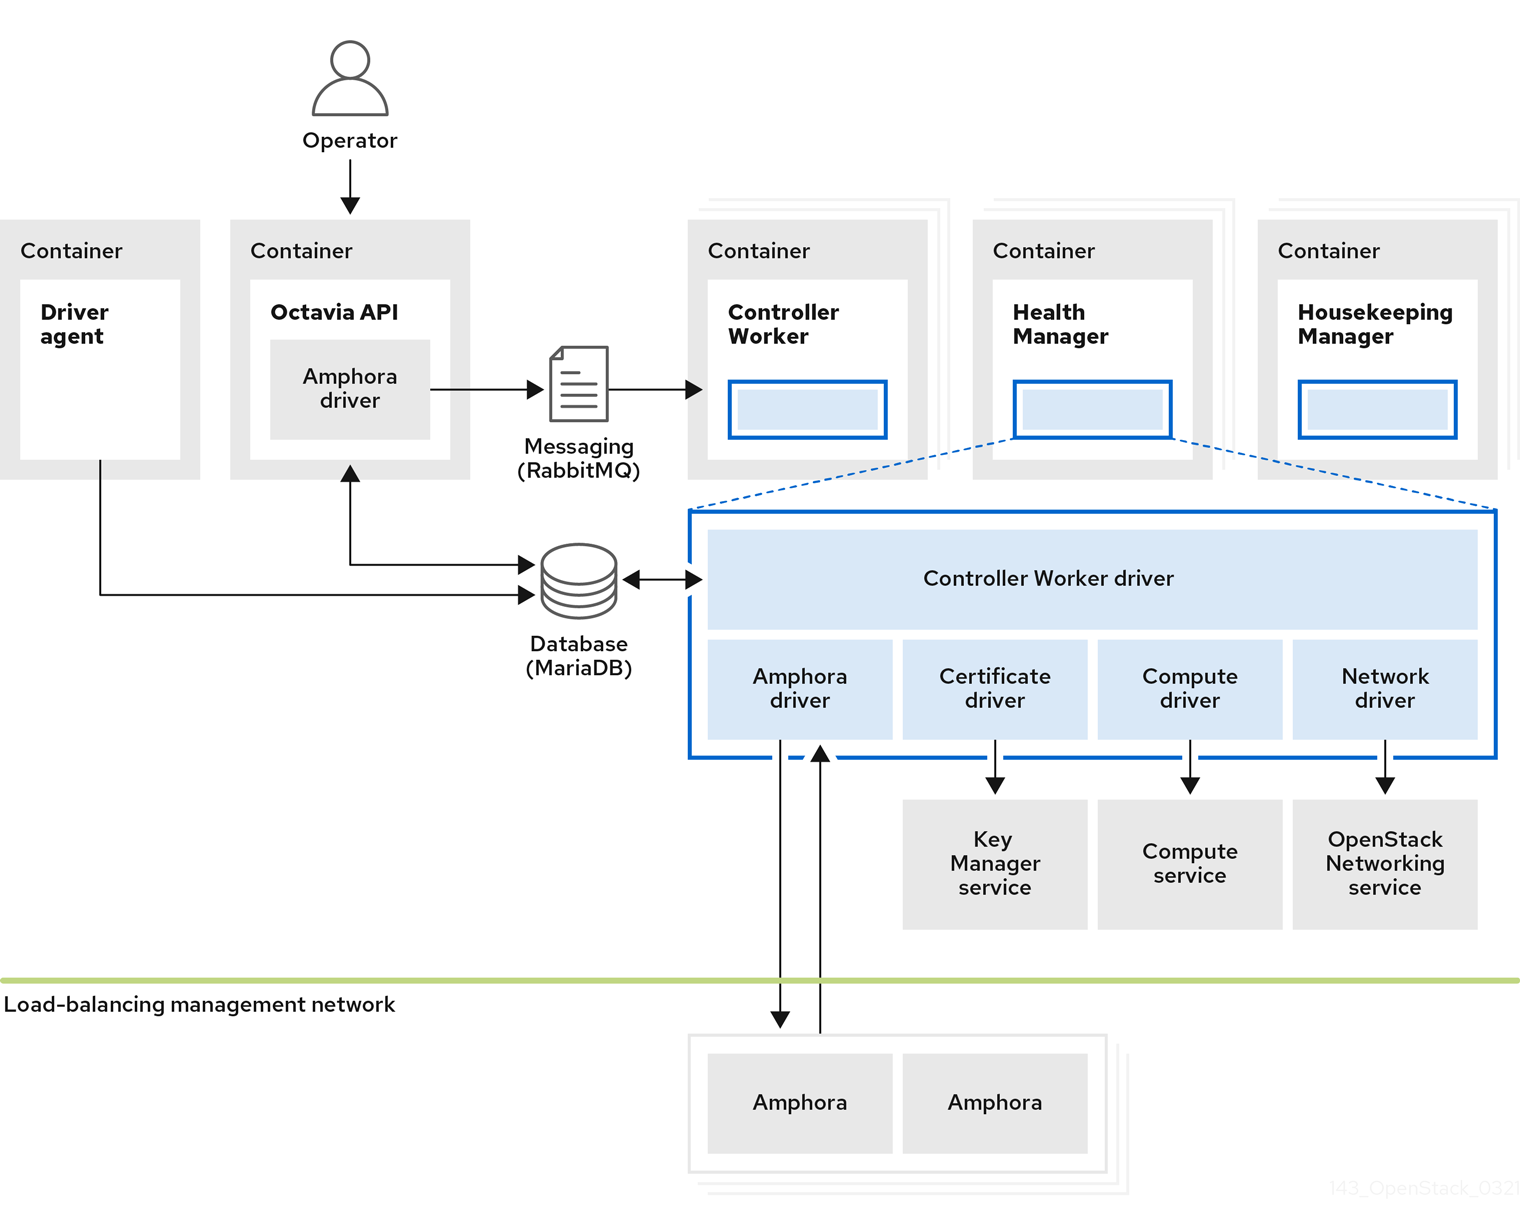
Figure 1.1 shows the components of the Load-balancing service are hosted on the same nodes as the Networking API server, which by default, is on the Red Hat OpenShift worker nodes that host the RHOSO control plane. The Load-balancing service consists of the following components:
- Octavia API (
octavia-apipods) - Provides the REST API for users to interact with octavia.
- Controller Worker (
octavia-workerpods) - Sends configuration and configuration updates to amphorae over the load-balancing management network.
- Health Manager (
octavia-healthmanagerpods) - Monitors the health of individual amphorae and handles failover events if an amphora encounters a failure.
- Housekeeping Manager (
octavia-housekeepingpods) - Cleans up deleted database records, and manages amphora certificate rotation.
- Driver agent (included within the
octavia-apipods) - Supports other provider drivers, such as OVN.
- Amphora
- Performs the load balancing. Amphorae are typically instances that run on Compute nodes that you configure with load balancing parameters according to the listener, pool, health monitor, L7 policies, and members' configuration. Amphorae send a periodic heartbeat to the Health Manager.
1.2. Octavia network
The Red Hat OpenStack Services on OpenShift (RHOSO) Load-balancing service (octavia) requires a dedicated network, the octavia network, to serve as the external provider network component of the load-balancing management network. This network links the amphorae to the Octavia amphora controller services. The octavia network also provides a dedicated address pool that RHOSO uses to create additional static IP addresses for configuring heartbeat destinations for the amphorae.
The Load-balancing service uses a bridge-type network attachment definition (NAD), octbr, to connect the RHOSO control plane pods to the load-balancing management network. A bridge attachment is required because a macvlan interface would block the bridged packet flow that the Open vSwitch (OVS) bridge depends on to serve multiple tenants. On each node, a network configuration policy creates a VLAN sub-interface and attaches it to the octbr bridge. This setup provides the layer 2 path that carries traffic between pods on different worker nodes. Within the cluster, a dedicated link router connects the provider network to the lb-mgmt-net tenant network, where the amphora instances reside. The control plane pods receive their IP addresses from the provider network through the NAD. This routing arrangement provides the Load-balancing service controllers with direct connectivity to every amphora without using source network address translation (SNAT).
To route traffic between the tenant network and the control plane pods, the Networking service (neutron) treats the octavia network attachment as an externally routed provider network. The OVN controller uses a network interface controller (NIC) mapping to associate the network attachment name with the provider network. The octavia Operator also assigns each Octavia Health Manager an additional dedicated IP address that survives pod restarts so the related configuration in the running amphorae remains valid. This setup establishes standard routing to direct traffic, such as heartbeat signals and control commands, between the amphorae and the Load-balancing service controllers. The octavia network also connects the rsyslogd pods for the Load-balancing service to perform log offloading.
1.3. Load-balancing service object model
The Red Hat OpenStack Services on OpenShift (RHOSO) Load-balancing service (octavia) uses a typical load-balancing object model.
Figure 1.2. Load-balancing service object model diagram

- Load balancer
- The top API object that represents the load-balancing entity. The VIP address is allocated when you create the load balancer. When you use the amphora provider to create the load balancer one or more amphora instances launch on one or more Compute nodes.
- Listener
- The port on which the load balancer listens, for example, TCP port 80 for HTTP. Listeners also support TLS-terminated HTTPS load balancers.
- Health Monitor
- A process that performs periodic health checks on each back-end member server to pre-emptively detect failed servers and temporarily remove them from the pool.
- Pool
- A group of members that handle client requests from the load balancer. You can associate pools with more than one listener by using the API. You can share pools with L7 policies.
- Member
- Describes how to connect to the back-end instances or services. This description consists of the IP address and network port on which the back end member is available.
- L7 Rule
- Defines the layer 7 (L7) conditions that determine whether an L7 policy applies to the connection.
- L7 Policy
- A collection of L7 rules associated with a listener, and which might also have an association to a back-end pool. Policies describe actions that the load balancer takes if all of the rules in the policy are true.
1.4. Uses of load balancing in RHOSO
Load balancing is essential for enabling simple or automatic delivery scaling and availability for cloud deployments. The Red Hat OpenStack Services on OpenShift (RHOSO) Load-balancing service (octavia) depends on other RHOSO services:
- Compute service (nova) - For managing the Load-balancing service VM instance (amphora) lifecycle, and creating compute resources on demand.
- Networking service (neutron) - For network connectivity between amphorae, tenant environments, and external networks.
- Key Manager service (barbican) - For managing TLS certificates and credentials, when TLS session termination is configured on a listener.
- Identity service (keystone) - For authentication requests to the octavia API, and for the Load-balancing service to authenticate with other RHOSO services.
- Image service (glance) - For storing the amphora virtual machine image.
The Load-balancing service interacts with the other RHOSO services through a driver interface. The driver interface avoids major restructuring of the Load-balancing service if an external component requires replacement with a functionally-equivalent service.
Chapter 2. Considerations for implementing the Load-balancing service
Before you deploy the Red Hat OpenStack Services on OpenShift (RHOSO) Load-balancing service (octavia), you must make various decisions, such as which provider to use or whether to implement a highly available environment.
For more information, see the following sections:
- Section 2.1, “Load-balancing service provider drivers”
- Section 2.2, “Load-balancing service (octavia) feature support matrix”
- Section 2.3, “Load-balancing service software requirements”
- Section 2.4, “Avoiding taskflow interruptions by using flow resumption”
- Section 2.5, “Basics of active-standby topology for Load-balancing service instances”
2.1. Load-balancing service provider drivers
The Red Hat OpenStack Services on OpenShift (RHOSO) Load-balancing service (octavia) supports enabling multiple provider drivers by using the Octavia v2 API. You can choose to use one provider driver, or multiple provider drivers simultaneously.
RHOSO provides two load-balancing providers, amphora and Open Virtual Network (OVN).
Amphora, the default, is a highly available load balancer with a feature set that scales with your compute environment. Because of this, amphora is suited for large-scale deployments.
The OVN load-balancing provider is a lightweight load balancer with a basic feature set. OVN is typical for east-west, layer 4 network traffic. OVN provisions quickly and consumes fewer resources than a full-featured load-balancing provider such as amphora.
2.2. Load-balancing service (octavia) feature support matrix
The Red Hat OpenStack Services on OpenShift (RHOSO) Load-balancing service (octavia) provides two load-balancing providers, amphora and Open Virtual Network (OVN).
Amphora is a full-featured load-balancing provider that requires a separate haproxy VM and an extra latency hop.
OVN runs on every node and does not require a separate VM nor an extra hop. However, OVN has far fewer load-balancing features than amphora.
The following table lists features in the Load-balancing service that 18.0 supports and in which maintenance release support for the feature began.
If the feature is not listed, then RHOSO 18.0 does not support the feature.
| Feature | Support level in RHOSO 18.0 | |
| Amphora Provider | OVN Provider | |
| Amphora active-standby | Full support | N/A |
| Availability zones | Full support | No support |
| Backup members | Technology Preview | No support |
| DPDK | No support | No support |
| Flow resumption (taskflow jobboard) | Full support | N/A |
| Health monitors | Full support | Technology preview |
| Listener API timeouts | Full support | No support |
| Load-balancing flavors | Full support | N/A |
| Log offloading | Full Support | No support |
| ML2/OVN DVR | Full support | Full support |
| ML2/OVN L3 HA | Full support | Full support |
| Object tags | Full support | Full support |
| SCTP | Technology Preview | Full support |
| SR-IOV | No support | No support |
| TCP | Full support | Full support |
| Terminated HTTPS load balancers (with barbican) | Full support | No support |
| TLS back end encryption | Technology Preview | No support |
| TLS client authentication | Technology Preview | No support |
| UDP | Full support | Full support |
| VIP access control list | Full support | N/A |
| Volume-based amphora | No support | N/A |
2.3. Load-balancing service software requirements
The Red Hat OpenStack Services on OpenShift (RHOSO) Load-balancing service (octavia) requires that you configure the following core OpenStack components:
- Compute (nova)
- OpenStack Networking (neutron)
- Image (glance)
- Identity (keystone)
- Key Manager (barbican)
- MariaDB
- Redis (when flow resumption is enabled)
2.4. Avoiding taskflow interruptions by using flow resumption
If the controller service abruptly shuts down during creation, modification, deletion, or failover of an amphora load balancer, the taskflow is interrupted and the instance remains in a PENDING_* state indefinitely. You can avoid these situations by configuring the Load-balancing service (octavia) to use flow resumption, also known as taskflow jobboard. When flow resumption is configured, the Load-balancing service automatically re-assigns the flow to an alternate controller if the original controller shuts down unexpectedly.
You configure flow resumption by modifying the OpenStackControlPlane custom resource (CR). For more information, see the optional steps in Deploying the Load-balancing service.
2.5. Basics of active-standby topology for Load-balancing service instances
When you deploy the Red Hat OpenStack Services on OpenShift (RHOSO) Load-balancing service (octavia), you can decide whether, by default, load balancers are highly available when users create them. If you want to give users a choice, then after RHOSO deployment, create a Load-balancing service flavor for creating highly available load balancers and a flavor for creating standalone load balancers.
By default, the amphora provider driver is configured for a single Load-balancing service (amphora) instance topology with limited support for high availability (HA). However, you can make Load-balancing service instances highly available when you implement an active-standby topology.
In this topology, the Load-balancing service boots an active and standby amphora instance for each load balancer, and maintains session persistence between each. If the active instance becomes unhealthy, the instance automatically fails over to the standby instance, making it active. The Load-balancing service health manager automatically rebuilds an instance that fails.
Chapter 3. Deploying the Load-balancing service in an existing environment
Deploying the Load-balancing service (octavia) to an existing Red Hat OpenStack Services on OpenShift (RHOSO) environment consists of creating a secret to secure communication and then deploying the Load-balancing service in the RHOSO control plane.
When your RHOSO environment was installed, the networks required for the Load-balancing service were configured and added to the control plane. For more information, see Preparing networks for Red Hat OpenStack Services on OpenShift in Deploying Red Hat OpenStack Services on OpenShift.
- Overview
You must perform the steps in the following procedures to deploy the Load-balancing service (octavia):
The steps in these procedures provide sample values that you add to the required CRs. The actual values that you provide will depend on your particular hardware configuration and local networking policies.
3.1. Creating a CA passphrase for certificate generation and signing
In Red Hat OpenStack Services on OpenShift (RHOSO) environments, you create a Secret custom resource (CR) which is used to encrypt the generated private key of the Server CA. RHOSO uses dual CAs to make communication between the Load balancing service (octavia) amphora and its controller more secure.
Prerequisites
-
You have the
occommand line tool installed on your workstation. -
You are logged on to a workstation that has access to the RHOSO control plane as a user with
cluster-adminprivileges.
Procedure
Generate a Base64, encoded password.
Retain the encoded output to use in a later step.
- Example
In this example, the password,
my_passwordis encoded using the Base64 encoding scheme:$ echo -n my_password | base64
-
Create a
SecretCR file on your workstation, for example,octavia-ca-passphrase.yaml. Add the following configuration to
octavia-ca-passphrase.yaml:apiVersion: v1 data: server-ca-passphrase: <Base64_password> kind: Secret metadata: name: octavia-ca-passphrase namespace: openstack type: Opaque- Replace the <Base64_password> with the Base64-encoded password that you created earlier.
Create the
SecretCR in the cluster:$ oc create -f octavia-ca-passphrase.yaml
Verification
Confirm that the
SecretCR exists:$ oc describe secret octavia-ca-passphrase -n openstack
Next steps
3.2. Deploying the Load-balancing service
To deploy the Red Hat OpenStack Services on OpenShift (RHOSO) Load-balancing service (octavia), you must configure the OVN controller to create a NIC mapping for the provider network as well as add it to the networkAttachments property for each Load-balancing service that controls load balancers (amphorae).
Prerequisites
-
You have the
occommand line tool installed on your workstation. -
You are logged on to a workstation that has access to the RHOSO control plane as a user with
cluster-adminprivileges.
Procedure
Using the Skopeo utility, obtain the amphora image version. You will need the image version in a SHA format for a later step:
$ podman login registry.redhat.io

$ sudo dnf install -y skopeo

$ skopeo inspect docker://registry.redhat.io/rhoso/\
octavia-amphora-image-rhel9:$(oc get openstackversion \
-o jsonpath='{.items[0].status.deployedVersion}' | \
awk -F '-' '{print $1}') --format '{{.Name}}@{{.Digest}}'
Open your
OpenStackControlPlaneCR file, and enable the Load-balancing service (octavia) by adding the following service configuration:apiVersion: core.openstack.org/v1beta1 kind: OpenStackControlPlane metadata: name: openstack-control-plane namespace: openstack spec: ... octavia: enabled: true template: octaviaHousekeeping: networkAttachments: - octavia octaviaHealthManager: networkAttachments: - octavia octaviaWorker: networkAttachments: - octavia ...With the amphora image version that you obtained in an earlier step, use the
octavia.template.amphoraImageContainerImageparameter to add the amphora image to the Image service (glance):- Example
...
    octavia:
      enabled: true
      template:
        octaviaHousekeeping:
          networkAttachments:
            - octavia
        octaviaHealthManager:
          networkAttachments:
            - octavia
        octaviaWorker:
          networkAttachments:
            - octavia
        amphoraImageContainerImage: registry.redhat.io/rhoso/\
        octavia-amphora-image-rhel9@sha256:312cd5e8ea9fe261c1929aefececbeb22afe5e433ae76ef0860d98e561db21c9
...
Optional: to enable flow resumption, perform the following steps.
For more information, see Avoiding taskflow interruptions by using flow resumption.
Create the
octavia-redisdatabase in Redis by adding the schema name,octavia-redis:, and the number of replicas,replicas: 1:apiVersion: core.openstack.org/v1beta1 kind: OpenStackControlPlane metadata: name: openstack-control-plane namespace: openstack spec: ... redis: enabled: true templates: octavia-redis: replicas: 1 ...Enable the
octavia-redisdatabase by adding the line,redisServiceName: octavia-redis:apiVersion: core.openstack.org/v1beta1 kind: OpenStackControlPlane metadata: name: openstack-control-plane namespace: openstack spec: ... octavia: enabled: true template: databaseInstance: <Galera_CR> redisServiceName: octavia-redis octaviaHousekeeping: networkAttachments: - octavia octaviaHealthManager: networkAttachments: - octavia octaviaWorker: networkAttachments: - octavia ...
Locate the service configuration for
ovn, and add the following configuration undertemplate:... ovn: template: ovnController: networkAttachment: tenant nicMappings: octavia: octbr-
networkAttachment- Note the one-character difference between the OVNnetworkAttachmentproperty and the octavianetworkAttachmentsproperty. The nametenantis an example value. -
nicMappings- The value must beoctavia: octbr.
-
Update the
OpenStackControlPlanecustom resource with the required values for the Load-balancing service.- Example
$ oc apply -f openstack_control_plane.yaml -n openstack
Verification
Wait until RHOCP creates the Load-balancing service resources. Run the following command to check the status:
$ oc wait octavia octavia --for condition=Ready- Sample output
You should see output similar to the following:
octavia.octavia.openstack.org/octavia condition met
Confirm that the Load-balancing service pods are running:
$ oc get pods | grep octavia- Sample output
You should see output similar to the following:
octavia-api-78b56bb844-ngjhc                  2/2     Running     0          12s
octavia-healthmanager-f6hpx                   1/1     Running     0          14s
octavia-housekeeping-knwpf                    1/1     Running     0          10s
octavia-redis-redis-0                         2/2     Running     0          20s
octavia-rsyslog-4nkv8                         1/1     Running     0          23s
octavia-worker-l5hs4                          1/1     Running     0          26s
Access the remote shell for the OpenStackClient pod from your workstation:
$ oc rsh -n openstack openstackclientConfirm that the networks
octavia-provider-netandlb-mgmt-netare present:$ openstack network list -f yaml- Sample output
- ID: 2e4fc309-546b-4ac8-9eae-aa8d70a27a9b
  Name: octavia-provider-net
  Subnets:
  - eea45073-6e56-47fd-9153-12f7f49bc115
- ID: 77881d3f-04b0-46cb-931f-d54003cce9f0
  Name: lb-mgmt-net
  Subnets:
  - e4ab96af-8077-4971-baa4-e0d40a16f55a
The network,
octavia-provider-net, is the external provider network, and is limited to the RHOSO control plane. Thelb-mgmt-netnetwork connects the Load-balancing service to amphora instances.
Exit the
openstackclientpod:$ exit
Chapter 4. Managing Load-balancing service instance logs
You can go to one location for administrative logs and tenant flow logs related to load-balancing service (octavia) instances (amphorae). The amphorae offload the logs to central locations on syslog receivers using a set of containers or to other syslog receivers at endpoints that you can choose.
You can also retain logs when the amphorae are rotated.
Even though log offloading is enabled by default, amphorae still continue to write administrative and tenant flow logs to the disk inside the amphorae. You can, however, disable logging locally if you choose.
When you use the TCP syslog protocol, you can specify one or more secondary endpoints for administrative and tenant log offloading in the event that the primary endpoint fails.
You can control a range of other logging features such as setting the syslog facility value, changing the tenant flow log format, and widening the scope of administrative logging to include logs from sources like the kernel and from cron.
- Section 4.1, “Configuration parameters for Load-balancing service instance logging”
- Section 4.2, “Load-balancing service instance tenant flow log format”
- Section 4.3, “Disabling Load-balancing service instance tenant flow logging”
- Section 4.4, “Disabling Load-balancing service instance local log storage”
4.1. Configuration parameters for Load-balancing service instance logging
To modify the Load-balancing service (octavia) instance (amphora) logging configuration, set values for one or more configuration parameters that control logging and apply the OpenStackControlPlane custom resource (CR) for the Load-balancing service.
These configuration parameters for amphora logging enable you to control features such as turning off log offloading, defining custom endpoints to offload logs to, setting the syslog facility value for logs, and so on.
The octavia Operator automatically enables log offloading.
- Global logging parameters
-
To set the configuration parameters for all logs, you must add a specific section to
OpenStackControlerPlaneCR for each of the octavia services: housekeeping, health manager, and worker. Add the configuration parameters for all logs underneath thecustomServiceConfig.[amphora_agent]parameters. - Usage example
  octavia:
    template:
      octaviaHousekeeping:
        customServiceConfig: |
          [amphora_agent]
          <log configuration parameters go here>
      octaviaHealthManager:
        customServiceConfig: |
          [amphora_agent]
          <log configuration parameters go here>
      octaviaWorker:
        customServiceConfig: |
          [amphora_agent]
<log configuration parameters go here>disable_local_log_storage=false-
When
true, instances do not store logs on the instance host filesystem. This includes all kernel, system, and security logs. Default:false. forward_all_logs=true-
When
true, instances forward all log messages to the administrative log endpoints, including non-load balancing related logs such as the cron and kernel logs. Default:true.
- Administrative logging parameters
-
To set the configuration parameters for administrative logging, you must add a specific section to
OpenStackControlerPlaneCR for each of the octavia services: housekeeping, health manager, and worker. With the exception ofadminLogTargets, you add the configuration parameters for administrative logging underneath thecustomServiceConfig.[amphora_agent]parameters. - Usage example
  octavia:
    template:
      octaviaRsyslog:
        adminLogTargets:
          - host: 192.168.1.1
            port: 1514
            protocol: udp
      octaviaHousekeeping:
        customServiceConfig: |
          [amphora_agent]
          <administrative logging parameters go here>
      octaviaHealthManager:
        customServiceConfig: |
          [amphora_agent]
          <administrative logging parameters go here>
      octaviaWorker:
        customServiceConfig: |
          [amphora_agent]
<administrative logging parameters go here>adminLogTargetsA list of objects describing syslog endpoints to receive administrative log messages:
-
host: <host> -
port: <port> protocol: <protocol>An endpoint can be a container, VM, or physical host that is running a process that is listening for the log messages on the specified port. Default: The default value is automatically set by the octavia Operator.
You add
adminLogTargetsunderneath theoctaviaRsyslogparameter.
-
administrative_log_facility=<number>-
A number between
0and7that is the syslogLOG_LOCALfacility to use for the administrative log messages. Default:1.
- Tenant flow logging parameters
-
To set the configuration parameters for tenant flow logging, you must add a specific section to
OpenStackControlerPlaneCR for each of the octavia services: housekeeping, health manager, and worker. With the exception oftenantLogTargets, you add the configuration parameters for tenant flow logging underneath thecustomServiceConfig.[amphora_agent]parameters. For an example of how to set these parameters, see Section 4.3, “Disabling Load-balancing service instance tenant flow logging”. - Usage example
  octavia:
    template:
      octaviaRsyslog
        tenantLogTargets:
        - host: 192.168.1.1
          port: 1514
          protocol: udp
      octaviaHousekeeping:
        customServiceConfig: |
          [amphora_agent]
          <tenant flow logging parameters go here>
          [haproxy_amphora]
          connection_login=true
      octaviaHealthManager:
        customServiceConfig: |
          [amphora_agent]
          <tenant flow logging parameters go here>
          [haproxy_amphora]
          connection_login=true
      octaviaWorker:
        customServiceConfig: |
          [amphora_agent]
          <tenant flow logging go here>
          [haproxy_amphora]
          connection_login=true
connection_login=true | false-
When
true, tenant connection flows are logged. Default:true. tenantLogTargetsA list of objects describing syslog endpoints to receive tenant traffic flow log messages:
-
host: <host> -
port: <port> protocol: <protocol>These endpoints can be a container, VM, or physical host that is running a process that is listening for the log messages on the specified port. Default: The default value is automatically set by the octavia Operator.
You add
tenantLogTargetsunderneath theoctaviaRsyslogparameter.
-
user_log_facility=<number>-
A number between 0 and 7 that is the syslog "LOG_LOCAL" facility to use for the tenant traffic flow log messages. Default:
0. user_log_format="<value>"The format for the tenant traffic flow log.
Default:
"{{ '{{' }} project_id {{ '}}' }} {{ '{{' }} lb_id {{ '}}' }} %f %ci %cp %t %{+Q}r %ST %B %U %[ssl_c_verify] %{+Q}[ssl_c_s_dn] %b %s %Tt %tsc".The alphanumerics represent specific octavia fields, and the curly braces ({}) are substitution variables.
4.2. Load-balancing service instance tenant flow log format
Tenant flow logs for Load-balancing service instances (amphorae) use the HAProxy log format. The two exceptions are the project_id and lb_id variables whose values are provided by the amphora provider driver.
- Example
- Here is an example log entry with rsyslog as the syslog receiver:
Jun 12 00:44:13 amphora-3e0239c3-5496-4215-b76c-6abbe18de573 haproxy[1644]: 5408b89aa45b48c69a53dca1aaec58db fd8f23df-960b-4b12-ba62-2b1dff661ee7 261ecfc2-9e8e-4bba-9ec2-3c903459a895 172.24.4.1 41152 12/Jun/2019:00:44:13.030 "GET / HTTP/1.1" 200 76 73 - "" e37e0e04-68a3-435b-876c-cffe4f2138a4 6f2720b3-27dc-4496-9039-1aafe2fee105 4 --- Notes
- A hyphen (-) indicates any field that is unknown or not applicable to the connection.
The prefix in the earlier sample log entry originates from the rsyslog receiver, and is not part of the syslog message from the amphora:
Jun 12 00:44:13 amphora-3e0239c3-5496-4215-b76c-6abbe18de573 haproxy[1644]:”
- Default
- The default amphora tenant flow log format is:
`"{{ '{{' }} project_id {{ '}}' }} {{ '{{' }} lb_id {{ '}}' }} %f %ci %cp %t %{+Q}r %ST %B %U %[ssl_c_verify] %{+Q}[ssl_c_s_dn] %b %s %Tt %tsc"`The following table describes the log file format details.
| Variable | Type | Field name |
|---|---|---|
|
| UUID | Project ID (substitution variable from the amphora provider driver) |
|
| UUID | Load balancer ID (substitution variable from the amphora provider driver) |
|
| string |
|
|
| IP address |
|
|
| numeric |
|
|
| date |
|
|
| numeric |
|
|
| numeric |
|
|
| numeric |
|
|
| Boolean |
|
|
| string |
|
|
| string |
|
|
| string |
|
|
| numeric |
|
|
| string |
|
4.3. Disabling Load-balancing service instance tenant flow logging
Tenant flow log offloading for Load-balancing service instances (amphorae) is enabled by default.
To disable tenant flow logging without disabling administrative log offloading, you must override the [amphora_agent].tenant_log_targets` in the customServiceConfig` field of each Load-balancing service component in the OpenstackControlPlane custom resource (CR) file.
When the OctaviaConnectionLogging parameter is false, the amphorae do not write tenant flow logs to the disk inside the amphorae, nor offload any logs to syslog receivers listening elsewhere.
Prerequisites
-
You have the
occommand line tool installed on your workstation. -
You are logged on to a workstation that has access to the RHOSO control plane as a user with
cluster-adminprivileges.
Procedure
-
Open your
OpenStackControlPlaneCR file,openstack_control_plane.yaml, on your workstation. Add the following configuration to the
octaviaservice configuration:octavia: template: octaviaHousekeeping: customServiceConfig: | [amphora_agent] tenant_log_targets = octaviaHealthManager: customServiceConfig: | [amphora_agent] tenant_log_targets = octaviaWorker: customServiceConfig: | [amphora_agent] tenant_log_targets =Update the control plane:
$ oc apply -f openstack_control_plane.yaml -n openstackWait until RHOCP creates the resources related to the
OpenStackControlPlaneCR. Run the following command to check the status:$ oc get openstackcontrolplane -n openstack NAME STATUS MESSAGE openstack-control-plane Unknown Setup startedThe
OpenStackControlPlaneresources are created when the status is "Setup complete".TipAppend the
-woption to the end of thegetcommand to track deployment progress.Confirm that the control plane is deployed by reviewing the pods in the
openstacknamespace:$ oc get pods -n openstackThe control plane is deployed when all the pods are either completed or running.
4.4. Disabling Load-balancing service instance local log storage
Even when you configure Load-balancing service instances (amphorae) to offload administrative and tenant flow logs, the amphorae continue to write these logs to the disk inside the amphorae. To improve the performance of the load balancer, you can stop logging locally.
If you disable logging locally, you also disable all log storage in the amphora, including kernel, system, and security logging.
If you disable local log storage and the OctaviaLogOffload parameter is set to false, ensure that you set OctaviaConnectionLogging to false for improved load balancing performance.
Prerequisites
-
You have the
occommand line tool installed on your workstation. -
You are logged on to a workstation that has access to the RHOSO control plane as a user with
cluster-adminprivileges.
Procedure
-
Open your
OpenStackControlPlane`custom resource (CR) file,openstack_control_plane.yaml, on your workstation. Add the following configuration to the
octaviaservice configuration:octavia: template: octaviaHousekeeping: customServiceConfig: | [amphora_agent] disable_local_log_storage=true octaviaHealthManager: customServiceConfig: | [amphora_agent] disable_local_log_storage=true octaviaWorker: customServiceConfig: | [amphora_agent] disable_local_log_storage=trueUpdate the control plane:
$ oc apply -f openstack_control_plane.yaml -n openstackWait until RHOCP creates the resources related to the
OpenStackControlPlaneCR. Run the following command to check the status:$ oc get openstackcontrolplane -n openstack NAME STATUS MESSAGE openstack-control-plane Unknown Setup startedThe
OpenStackControlPlaneresources are created when the status is "Setup complete".TipAppend the
-woption to the end of thegetcommand to track deployment progress.Confirm that the control plane is deployed by reviewing the pods in the
openstacknamespace:$ oc get pods -n openstackThe control plane is deployed when all the pods are either completed or running.
Chapter 5. Creating Load-balancing service flavors
Load-balancing service (octavia) flavors are sets of provider configuration options that the Red Hat OpenStack Services on OpenShift (RHOSO) administrator creates. When RHOSO users request load balancers, they can specify that the load balancer be built using one of the defined flavors.
The administrator can define one or more flavors for each load-balancing provider driver, which exposes the unique capabilities of the respective provider.
Load-balancing flavors are supported only on the amphora provider.
To create a new Load-balancing service flavor:
- Decide which capabilities of the load-balancing provider you want to configure in the flavor.
- Create the flavor profile with the flavor capabilities you have chosen.
Create the flavor.
The Load-balancing service ships with a pre-defined, enhanced flavor that enables cloud users to scale up their load balancing instances to 4 vCPUs, 4GB RAM, and 3GB of disk space. By performing the steps in the following sections, RHOSO administrators can create their own custom flavors that meet the unique requirements to help their site vertically scale. For more information, see Section 5.4, “Vertically scaling load balancers”.
5.1. Reviewing Load-balancing service provider capabilities
Before creating a Load-balancing service (octavia) flavor, the Red Hat OpenStack Services on OpenShift (RHOSO) administrator should know the capabilities that each provider driver exposes.
Prerequisites
-
You have the
occommand line tool installed on your workstation. -
You are logged on to a workstation that has access to the RHOSO control plane as a user with
cluster-adminprivileges. - The Load-balancing service uses the amphora provider.
Procedure
Access the remote shell for the OpenStackClient pod from your workstation:
$ oc rsh -n openstack openstackclientList the capabilities for each driver:
$ openstack loadbalancer provider capability list <provider>Replace
<provider>with the name or UUID of the provider.- Example
$ openstack loadbalancer provider capability list amphoraThe command output lists all of the capabilities that the provider supports.
- Sample output
+-----------------------+---------------------------------------------------+
| name                  | description                                       |
+-----------------------+---------------------------------------------------+
| loadbalancer_topology | The load balancer topology. One of: SINGLE - One  |
|                       | amphora per load balancer. ACTIVE_STANDBY - Two   |
|                       | amphora per load balancer.                        |
| ...                   | ...                                               |
+-----------------------+---------------------------------------------------+
- Note the names of the capabilities that you want to include in the flavor that you are creating. You will use these capability names later when you create the profile for the flavor.
Exit the
openstackclientpod:$ exit
Next step
- Proceed to Section 5.2, “Defining flavor profiles”.
5.2. Defining flavor profiles
Red Hat OpenStack Services on OpenShift (RHOSO) Load-balancing service (octavia) flavor profiles contain the provider driver name and a list of capabilities. RHOSO administrators use a flavor profile to create a flavor that RHOSO users will specify when they create a load balancer.
Prerequisites
-
You have the
occommand line tool installed on your workstation. -
You are logged on to a workstation that has access to the RHOSO control plane as a user with
cluster-adminprivileges. You must know which load-balancing provider and which of its capabilities you want to include in the flavor profile.
For more information, see Section 5.1, “Reviewing Load-balancing service provider capabilities”.
Procedure
Access the remote shell for the OpenStackClient pod from your workstation:
$ oc rsh -n openstack openstackclientCreate a flavor profile:
$ openstack loadbalancer flavorprofile create --name <profile_name> --provider <provider_name> --flavor-data '{"<capability>": "<value>"}'- Example
In this example, a flavor profile is created for the amphora provider. When this profile is specified in a flavor, the load balancer that users create by using the flavor is a single amphora load balancer.
$ openstack loadbalancer flavorprofile create --name amphora-single-profile \ --provider amphora --flavor-data '{"loadbalancer_topology": "SINGLE"}'- Sample output
+---------------+--------------------------------------+
| Field         | Value                                |
+---------------+--------------------------------------+
| id            | 72b53ac2-b191-48eb-8f73-ed012caca23a |
| name          | amphora-single-profile               |
| provider_name | amphora                              |
| flavor_data   | {"loadbalancer_topology": "SINGLE"}  |
+---------------+--------------------------------------+
Verification
- When you create a flavor profile, the Load-balancing service validates the flavor values with the provider to ensure that the provider can support the capabilities that you have specified.
Next step
5.3. Creating Load-balancing service flavors
Red Hat OpenStack Services on OpenShift (RHOSO) administrators create a user-facing flavor for the Load-balancing service (octavia) by using a flavor profile. The name that you assign to the flavor is the value that a RHOSO user will specify when they create a load balancer.
Prerequisites
-
You have the
occommand line tool installed on your workstation. -
You are logged on to a workstation that has access to the RHOSO control plane as a user with
cluster-adminprivileges. - You must have created a flavor profile.
- The Load-balancing service uses the amphora provider.
Procedure
Access the remote shell for the OpenStackClient pod from your workstation:
$ oc rsh -n openstack openstackclientCreate a flavor:
$ openstack loadbalancer flavor create --name <flavor_name> \ --flavorprofile <flavor-profile> --description "<string>"TipProvide a detailed description so that users can understand the capabilities of the flavor that you are providing.
- Example
In this example, a flavor has been defined. When users specify this flavor, they create a load balancer that uses one Load-balancing service instance (amphora) and is not highly available.
$ openstack loadbalancer flavor create --name standalone-lb --flavorprofile amphora-single-profile --description "A non-high availability load balancer for testing."- Sample output
+-------------------+--------------------------------------+ | Field | Value | +-------------------+--------------------------------------+ | id | 25cda2d8-f735-4744-b936-d30405c05359 | | name | standalone-lb | | flavor_profile_id | 72b53ac2-b191-48eb-8f73-ed012caca23a | | enabled | True | | description | A non-high availability load | | | balancer for testing. | +-------------------+--------------------------------------+NoteDisabled flavors are still visible to users, but users cannot use the disabled flavor to create a load balancer.
5.4. Vertically scaling load balancers
Red Hat OpenStack Services on OpenShift (RHOSO) users can scale-up their load balancers, increase the CPU and RAM of the load-balancing instance, to improve performance and capacity. Vertically scaling a load increases the maximum number of concurrent connections and the volume of network traffic processed.
To scale up a load balancer, use the appropriate load-balancing flavor when you create a load balancer. RHOSO ships with amphora-4vcpus which creates an instance that contains 4 vCPUs, 4GB RAM, and 3GB of disk space. The amphora-4vcpus flavor also automatically uses an amphora image that enables CPU pinning in the VM. One vCPU is dedicated to the system, and three vCPUs are dedicated to HAProxy.
Your RHOSO administrator can create other custom load-balancing flavors that meet the load-balancing needs of your particular environment.
Prerequisites
-
The administrator has created a project for you and has provided you with a
clouds.yamlfile for you to access the cloud. The
python-openstackclientpackage resides on your workstation.$ dnf list installed python-openstackclient- The Load-balancing service uses the amphora provider.
- Your RHOSO administrator has provided you with an enhanced, load-balancing flavor.
Procedure
Confirm that the system
OS_CLOUDvariable is set for your cloud:$ echo $OS_CLOUD my_cloudReset the variable if necessary:
$ export OS_CLOUD=my_other_cloudAs an alternative, you can specify the cloud name by adding the
--os-cloud <cloud_name>option each time you run anopenstackcommand.Create a load balancer using the load-balancing flavor provided.
EXAMPLE
In this example, a non-secure HTTP load balancer (
lb1) is created on a public subnet (public_subnet), using the flavor (amphora-4vcpus):$ openstack loadbalancer create --name lb1 \ --vip-subnet-id public_subnet \ --flavor amphora-4vcpus --wait
Chapter 6. Monitoring the Load-balancing service
In Red Hat OpenStack Services on OpenShift (RHOSO) environments, to keep load balancing operational, you can use the load-balancer management network and create, modify, and delete load-balancing health monitors.
For more information, see the following sections:
- Section 6.1, “The Load-balancing service networks”
- Section 6.2, “Load-balancing service instance monitoring”
- Section 6.3, “Load-balancing service pool member monitoring”
- Section 6.4, “Load balancer provisioning status monitoring”
- Section 6.5, “Load balancer functionality monitoring”
- Section 6.6, “About Load-balancing service health monitors”
- Section 6.7, “Creating Load-balancing service health monitors”
- Section 6.8, “Modifying Load-balancing service health monitors”
- Section 6.9, “Deleting Load-balancing service health monitors”
- Section 6.10, “Best practices for Load-balancing service HTTP health monitors”
6.1. The Load-balancing service networks
The Red Hat OpenStack Services on OpenShift (RHOSO) Load-balancing service (octavia) controller pods require network connectivity across the OpenStack cloud in order to monitor and manage amphora load-balancer virtual machines (VMs) and uses two OpenStack networks to achieve this:
- octavia controller network (
octavia-provider-net) - an external provider network connecting Load-balancing service (octavia) controllers running in the control plane
- Load-balancing management network (
lb-mgmt-net) - a project (tenant) network that is connected to the amphora VMs.
An OpenStack router routes packets between the management network and the controller network with both the control plane pods and load balancer VMs having routes configured to direct traffic through the router for those networks.
Running the following command, oc rsh openstack client openstack network list -f yaml yields output similar to the following:
- ID: 2e4fc309-546b-4ac8-9eae-aa8d70a27a9b
  Name: octavia-provider-net
  Subnets:
  - eea45073-6e56-47fd-9153-12f7f49bc115
- ID: 77881d3f-04b0-46cb-931f-d54003cce9f0
  Name: lb-mgmt-net
  Subnets:
  - e4ab96af-8077-4971-baa4-e0d40a16f55a
The octavia-provider-net network is the external provider network, and uses the octavia network attachment interface as the physical network. This network is limited to the OpenShift control plane. The lb-mgmt-net network is a self-serve tenant network that connects the Octavia amphora instances.
The amphora controllers do not have direct access to the lb-mgmt-net network. The controllers access the lb-mgmt-net network through the octavia network attachment and a router that the octavia-operator manages. You can view the subnets by running the command, oc rsh openstackclient subnet list -f yaml:
- ID: e4ab96af-8077-4971-baa4-e0d40a16f55a
  Name: lb-mgmt-subnet
  Network: 77881d3f-04b0-46cb-931f-d54003cce9f0
  Subnet: 172.24.0.0/16
- ID: eea45073-6e56-47fd-9153-12f7f49bc115
  Name: octavia-provider-subnet
  Network: 2e4fc309-546b-4ac8-9eae-aa8d70a27a9b
  Subnet: 172.23.0.0/24
The subnet CIDR for octavia-provider-subnet originates from the octavia network attachment. The Subnet CIDR of lb-mgmt-subnet originates from the dst field of the octavia network attachment routes.
The octavia-link-router manages the routing between the octavia-provider-net and lb-mgmt-net networks. To view the routers, run the command,oc rsh openstackclient openstack router list -f yaml:
- ID: 371d800c-c803-4210-836b-eb468654462a
  Name: octavia-link-router
  Project: dc65b54e9cba475ba0adba7f898060f2
  State: true
  Status: ACTIVE
You can view the configuration of the octavia-link-router by running the command, oc rsh openstackclient openstack router show -f yaml octavia-link-router:
admin_state_up: true
availability_zone_hints: []
availability_zones: []
created_at: '2024-06-11T17:20:57Z'
description: ''
enable_ndp_proxy: null
external_gateway_info:
  enable_snat: false
  external_fixed_ips:
  - ip_address: 172.23.0.150
    subnet_id: eea45073-6e56-47fd-9153-12f7f49bc115
  network_id: 2e4fc309-546b-4ac8-9eae-aa8d70a27a9b
flavor_id: null
id: 371d800c-c803-4210-836b-eb468654462a
interfaces_info:
- ip_address: 172.24.1.89
  port_id: 1a44e94d-f44a-4752-81db-bc5402857a08
  subnet_id: e4ab96af-8077-4971-baa4-e0d40a16f55a
name: octavia-link-router
project_id: dc65b54e9cba475ba0adba7f898060f2
revision_number: 4
routes: []
status: ACTIVE
tags: []
tenant_id: dc65b54e9cba475ba0adba7f898060f2
updated_at: '2024-06-11T17:21:01Z'
The external_gateway_info of the router corresponds to the gw field of the routes provided in the network attachment.
Notice that source network address translation is disabled. This is important as the amphora controllers communicate with the amphora using the addresses on the lb-mgmt-net network that OpenStack allocates, not a floating IP address. The routes of the network attachment direct traffic from the amphora controllers to the router, and the host routes on the lb-mgmt-net subnet establish the reverse route. This host route uses the ip_address of the port in interfaces_info as the next_hop and the Subnet of the octavia-provider-subnet as the Destination to be routed to.
To view the host routes for the lb-mgmt-subnet, run the command, oc rsh openstackclient openstack subnet show lb-mgmt-subnet -c host_routes -f yaml:
host_routes:
- destination: 172.23.0.0/24
  nexthop: 172.24.1.89
The port used to connect lb-mgmt-subnet to the router is named lb-mgmt-router-port and you can view the details by running the command, oc rsh openstackclient openstack port show lb-mgmt-router-port -f yaml. Note that the port_id in the router’s interface_info can be used instead of the port name.
admin_state_up: true
allowed_address_pairs: []
binding_host_id: ''
binding_profile: {}
binding_vif_details: {}
binding_vif_type: unbound
binding_vnic_type: normal
created_at: '2024-06-11T17:20:41Z'
data_plane_status: null
description: ''
device_id: 371d800c-c803-4210-836b-eb468654462a
device_owner: network:router_interface
device_profile: null
dns_assignment:
- fqdn: host-172-24-1-89.openstackgate.local.
  hostname: host-172-24-1-89
  ip_address: 172.24.1.89
dns_domain: ''
dns_name: ''
extra_dhcp_opts: []
fixed_ips:
- ip_address: 172.24.1.89
  subnet_id: e4ab96af-8077-4971-baa4-e0d40a16f55a
id: 1a44e94d-f44a-4752-81db-bc5402857a08
ip_allocation: immediate
mac_address: fa:16:3e:ba:be:ee
name: lb-mgmt-router-port
network_id: 77881d3f-04b0-46cb-931f-d54003cce9f0
numa_affinity_policy: null
port_security_enabled: true
project_id: dc65b54e9cba475ba0adba7f898060f2
propagate_uplink_status: null
qos_network_policy_id: null
qos_policy_id: null
resource_request: null
revision_number: 3
security_group_ids:
- 055686ce-fb2d-409b-ab74-85df9ab3a9e0
- 5c41444b-0863-4609-9335-d5a66bdbcad8
status: ACTIVE
tags: []
trunk_details: null
updated_at: '2024-06-11T17:21:03Z'
Notice the following about these fields and their values:
-
fixed_ips- matches the IP address for theinterfaces_infoof theoctavia-link-router. -
device_id- matches the ID for theoctavia-link-router. -
device_owner- indicates that OpenStack is using the port as a router interface.
6.2. Load-balancing service instance monitoring
In Red Hat OpenStack Services on OpenShift (RHOSO) environments, the Load-balancing service (octavia) monitors the load balancing instances (amphorae) and initiates failovers and replacements if the amphorae malfunction. Any time a failover occurs, the Load-balancing service logs the failover in the corresponding health manager log on the controller in /var/log/containers/octavia.
Use log analytics to monitor failover trends to address problems early. Problems such as Networking service (neutron) connectivity issues, Denial of Service attacks, and Compute service (nova) malfunctions often lead to higher failover rates for load balancers.
6.3. Load-balancing service pool member monitoring
In Red Hat OpenStack Services on OpenShift (RHOSO) environments, the Load-balancing service (octavia) uses the health information from the underlying load balancing subsystems to determine the health of members of the load-balancing pool. Health information is streamed to the Load-balancing service database, and made available by the status tree or other API methods. For critical applications, you must poll for health information in regular intervals.
6.4. Load balancer provisioning status monitoring
In Red Hat OpenStack Services on OpenShift (RHOSO) environments, you can monitor the provisioning status of a load balancer and send alerts if the provisioning status is ERROR. Do not configure an alert to trigger when an application is making regular changes to the pool and enters several PENDING stages.
The provisioning status of load balancer objects reflect the ability of the control plane to contact and successfully provision a create, update, and delete request. The operating status of a load balancer object reports on the current functionality of the load balancer.
For example, a load balancer might have a provisioning status of ERROR, but an operating status of ONLINE. This might be caused by a Networking service (neutron) failure that blocked that last requested update to the load balancer configuration from successfully completing. In this case, the load balancer continues to process traffic through the load balancer, but might not have applied the latest configuration updates yet.
6.5. Load balancer functionality monitoring
You can monitor the operational status of your load balancer and its child objects in your Red Hat OpenStack Services on OpenShift (RHOSO) environment.
You can also use an external monitoring service that connects to your load balancer listeners and monitors them from outside of the cloud. An external monitoring service indicates if there is a failure outside of the Load-balancing service (octavia) that might impact the functionality of your load balancer, such as router failures, network connectivity issues, and so on.
6.6. About Load-balancing service health monitors
A Red Hat OpenStack Services on OpenShift (RHOSO) Load-balancing service (octavia) health monitor is a process that does periodic health checks on each back end member server to pre-emptively detect failed servers and temporarily pull them out of the pool.
If the health monitor detects a failed server, it removes the server from the pool and marks the member in ERROR. After you have corrected the server and it is functional again, the health monitor automatically changes the status of the member from ERROR to ONLINE, and resumes passing traffic to it.
Always use health monitors in production load balancers. If you do not have a health monitor, failed servers are not removed from the pool. This can lead to service disruption for web clients.
There are several types of health monitors, as briefly described here:
- HTTP
-
by default, probes the
/path on the application server. - HTTPS
operates exactly like HTTP health monitors, but with TLS back end servers.
If the servers perform client certificate validation, HAProxy does not have a valid certificate. In these cases, TLS-HELLO health monitoring is an alternative.
- TLS-HELLO
ensures that the back end server responds to SSLv3-client hello messages.
A TLS-HELLO health monitor does not check any other health metrics, like status code or body contents.
- PING
sends periodic ICMP ping requests to the back end servers.
You must configure back end servers to allow PINGs so that these health checks pass.
ImportantA PING health monitor checks only if the member is reachable and responds to ICMP echo requests. PING health monitors do not detect if the application that runs on an instance is healthy. Use PING health monitors only in cases where an ICMP echo request is a valid health check.
- TCP
opens a TCP connection to the back end server protocol port.
The TCP application opens a TCP connection and, after the TCP handshake, closes the connection without sending any data.
- UDP-CONNECT
performs a basic UDP port connect.
A UDP-CONNECT health monitor might not work correctly if Destination Unreachable (ICMP type 3) is not enabled on the member server, or if it is blocked by a security rule. In these cases, a member server might be marked as having an operating status of
ONLINEwhen it is actually down.
6.7. Creating Load-balancing service health monitors
Use Load-balancing service (octavia) health monitors to avoid service disruptions for your users. The health monitors run periodic health checks on each back end server to pre-emptively detect failed servers and temporarily pull the servers out of the pool in your Red Hat OpenStack Services on OpenShift (RHOSO) environment.
Prerequisites
-
The administrator has created a project for you and has provided you with a
clouds.yamlfile for you to access the cloud. The
python-openstackclientpackage resides on your workstation.$ dnf list installed python-openstackclient
Procedure
Confirm that the system
OS_CLOUDvariable is set for your cloud:$ echo $OS_CLOUD my_cloudReset the variable if necessary:
$ export OS_CLOUD=my_other_cloudAs an alternative, you can specify the cloud name by adding the
--os-cloud <cloud_name>option each time you run anopenstackcommand.Run the
openstack loadbalancer healthmonitor createcommand, using argument values that are appropriate for your site.All health monitor types require the following configurable arguments:
<pool>- Name or ID of the pool of back-end member servers to be monitored.
--type-
The type of health monitor. One of
HTTP,HTTPS,PING,SCTP,TCP,TLS-HELLO, orUDP-CONNECT. --delay- Number of seconds to wait between health checks.
--timeout-
Number of seconds to wait for any given health check to complete.
timeoutmust always be smaller thandelay. --max-retries- Number of health checks a back-end server must fail before it is considered down. Also, the number of health checks that a failed back-end server must pass to be considered up again.
In addition, HTTP health monitor types also require the following arguments, which are set by default:
--url-path-
Path part of the URL that should be retrieved from the back-end server. By default this is
/. --http-method-
HTTP method that is used to retrieve the
url_path. By default this isGET. --expected-codes-
List of HTTP status codes that indicate an OK health check. By default this is
200. - Example
$ openstack loadbalancer healthmonitor create --name my-health-monitor --delay 10 --max-retries 4 --timeout 5 --type TCP lb-pool-1 --wait
Verification
-
Run the
openstack loadbalancer healthmonitor listcommand and verify that your health monitor is running.
6.8. Modifying Load-balancing service health monitors
You can modify the configuration for Red Hat OpenStack Services on OpenShift (RHOSO) Load-balancing service (octavia) health monitors when you want to change the interval for sending probes to members, the connection timeout interval, the HTTP method for requests, and so on.
Prerequisites
-
The administrator has created a project for you and has provided you with a
clouds.yamlfile for you to access the cloud. The
python-openstackclientpackage resides on your workstation.$ dnf list installed python-openstackclient
Procedure
Confirm that the system
OS_CLOUDvariable is set for your cloud:$ echo $OS_CLOUD my_cloudReset the variable if necessary:
$ export OS_CLOUD=my_other_cloudAs an alternative, you can specify the cloud name by adding the
--os-cloud <cloud_name>option each time you run anopenstackcommand.Modify your health monitor (
my-health-monitor).In this example, a user is changing the time in seconds that the health monitor waits between sending probes to members.
- Example
$ openstack loadbalancer healthmonitor set my_health_monitor --delay 600
Verification
Run the
openstack loadbalancer healthmonitor showcommand to confirm your configuration changes.$ openstack loadbalancer healthmonitor show my_health_monitor
6.9. Deleting Load-balancing service health monitors
You can remove a Red Hat OpenStack Services on OpenShift (RHOSO) Load-balancing service (octavia) health monitor.
An alternative to deleting a health monitor is to disable it by using the openstack loadbalancer healthmonitor set --disable command.
Prerequisites
-
The administrator has created a project for you and has provided you with a
clouds.yamlfile for you to access the cloud. The
python-openstackclientpackage resides on your workstation.$ dnf list installed python-openstackclient
Procedure
Confirm that the system
OS_CLOUDvariable is set for your cloud:$ echo $OS_CLOUD my_cloudReset the variable if necessary:
$ export OS_CLOUD=my_other_cloudAs an alternative, you can specify the cloud name by adding the
--os-cloud <cloud_name>option each time you run anopenstackcommand.Delete the health monitor (
my-health-monitor).- Example
$ openstack loadbalancer healthmonitor delete my-health-monitor
Verification
-
Run the
openstack loadbalancer healthmonitor listcommand to verify that the health monitor you deleted no longer exists.
6.10. Best practices for Load-balancing service HTTP health monitors
In Red Hat OpenStack Services on OpenShift (RHOSO) environments, when you write the code that generates the health check in your web application, use the following best practices:
-
The health monitor
url-pathdoes not require authentication to load. -
By default, the health monitor
url-pathreturns anHTTP 200 OKstatus code to indicate a healthy server unless you specify alternateexpected-codes. The health check does enough internal checks to ensure that the application is healthy and no more. Ensure that the following conditions are met for the application:
- Any required database or other external storage connections are up and running.
- The load is acceptable for the server on which the application runs.
- Your site is not in maintenance mode.
- Tests specific to your application are operational.
The page generated by the health check should be small in size:
- It returns in a sub-second interval.
- It does not induce significant load on the application server.
The page generated by the health check is never cached, although the code that runs the health check might reference cached data.
For example, you might find it useful to run a more extensive health check using cron and store the results to disk. The code that generates the page at the health monitor
url-pathincorporates the results of this cron job in the tests it performs.-
Because the Load-balancing service only processes the HTTP status code returned, and because health checks are run so frequently, you can use the
HEADorOPTIONSHTTP methods to skip processing the entire page.
Chapter 7. Creating non-secure HTTP load balancers
In Red Hat OpenStack Services on OpenShift (RHOSO) environments, you can create load balancers for non-secure HTTP network traffic.
For more information, see the following sections:
7.1. Creating an HTTP load balancer with a health monitor
For networks that are not compatible with Red Hat OpenStack Services on OpenShift (RHOSO) Networking service (neutron) floating IPs, create a load balancer to manage network traffic for non-secure HTTP applications. Create a health monitor to ensure that your back-end members remain available.
Prerequisites
- A shared external (public) subnet that you can reach from the internet.
-
The administrator has created a project for you and has provided you with a
clouds.yamlfile for you to access the cloud. The
python-openstackclientpackage resides on your workstation.$ dnf list installed python-openstackclient
Procedure
Confirm that the system
OS_CLOUDvariable is set for your cloud:$ echo $OS_CLOUD my_cloudReset the variable if necessary:
$ export OS_CLOUD=my_other_cloudAs an alternative, you can specify the cloud name by adding the
--os-cloud <cloud_name>option each time you run anopenstackcommand.Create a load balancer (
lb1) on a public subnet (public_subnet).NoteValues inside parentheses are sample values that are used in the example commands in this procedure. Substitute these sample values with values that are appropriate for your site.
- Example
$ openstack loadbalancer create --name lb1 \
--vip-subnet-id public_subnet --wait
Create a listener (
listener1) on a port (80).- Example
$ openstack loadbalancer listener create --name listener1 \
--protocol HTTP --protocol-port 80 lb1 --wait
Verify the state of the listener.
- Example
$ openstack loadbalancer listener show listener1Before going to the next step, ensure that the status is
ACTIVE.
Create the listener default pool (
pool1).- Example
$ openstack loadbalancer pool create --name pool1 \
--lb-algorithm ROUND_ROBIN --listener listener1 --protocol HTTP --wait
Create a health monitor (
healthmon1) of type (HTTP) on the pool (pool1) that connects to the back-end servers and tests the path (/).Health checks can help to avoid a false positive. If no health monitor is defined, the member server is assumed to be
ONLINE.- Example
$ openstack loadbalancer healthmonitor create --name healthmon1 \
--delay 15 --max-retries 4 --timeout 10 --type HTTP --url-path / \
pool1 --wait
Add load balancer members (
192.0.2.10and192.0.2.11) on the private subnet (private_subnet) to the default pool.- Example
In this example, the back-end servers,
192.0.2.10and192.0.2.11, are namedmember1andmember2, respectively:$ openstack loadbalancer member create --name member1 --subnet-id \ private_subnet --address 192.0.2.10 --protocol-port 80 pool1 --wait $ openstack loadbalancer member create --name member2 --subnet-id \ private_subnet --address 192.0.2.11 --protocol-port 80 pool1 --wait
Verification
View and verify the load balancer (lb1) settings:
- Example
$ openstack loadbalancer show lb1- Sample output
+---------------------+--------------------------------------+
| Field               | Value                                |
+---------------------+--------------------------------------+
| admin_state_up      | True                                 |
| created_at          | 2024-01-15T11:11:09                  |
| description         |                                      |
| flavor              |                                      |
| id                  | 788fe121-3dec-4e1b-8360-4020642238b0 |
| listeners           | 09f28053-fde8-4c78-88b9-0f191d84120e |
| name                | lb1                                  |
| operating_status    | ONLINE                               |
| pools               | 627842b3-eed8-4f5f-9f4a-01a738e64d6a |
| project_id          | dda678ca5b1241e7ad7bf7eb211a2fd7     |
| provider            | amphora                              |
| provisioning_status | ACTIVE                               |
| updated_at          | 2024-01-15T11:12:13                  |
| vip_address         | 198.51.100.12                        |
| vip_network_id      | 9bca13be-f18d-49a5-a83d-9d487827fd16 |
| vip_port_id         | 69a85edd-5b1c-458f-96f2-b4552b15b8e6 |
| vip_qos_policy_id   | None                                 |
| vip_subnet_id       | 5bd7334b-49b3-4849-b3a2-b0b83852dba1 |
+---------------------+--------------------------------------+
When a health monitor is present and functioning properly, you can check the status of each member.
A working member (
member1) has anONLINEvalue for itsoperating_status.- Example
$ openstack loadbalancer member show pool1 member1- Sample output
+---------------------+--------------------------------------+
| Field               | Value                                |
+---------------------+--------------------------------------+
| address             | 192.0.2.10                           |
| admin_state_up      | True                                 |
| created_at          | 2024-01-15T11:16:23                  |
| id                  | b85c807e-4d7c-4cbd-b725-5e8afddf80d2 |
| name                | member1                              |
| operating_status    | ONLINE                               |
| project_id          | dda678ca5b1241e7ad7bf7eb211a2fd7     |
| protocol_port       | 80                                   |
| provisioning_status | ACTIVE                               |
| subnet_id           | 5bd7334b-49b3-4849-b3a2-b0b83852dba1 |
| updated_at          | 2024-01-15T11:20:45                  |
| weight              | 1                                    |
| monitor_port        | None                                 |
| monitor_address     | None                                 |
| backup              | False                                |
+---------------------+--------------------------------------+
7.2. Creating an HTTP load balancer that uses a floating IP
To manage network traffic for non-secure HTTP applications, create a Red Hat OpenStack Services on OpenShift (RHOSO) load balancer with a virtual IP (VIP) that depends on a floating IP. The advantage of using a floating IP is that you retain control of the assigned IP, which is necessary if you need to move, destroy, or recreate your load balancer. It is a best practice to also create a health monitor to ensure that your back-end members remain available.
Floating IPs do not work with IPv6 networks.
Prerequisites
- A floating IP to use with a load balancer VIP.
- A RHOSO Networking service (neutron) shared external (public) subnet that you can reach from the internet to use for the floating IP.
-
The administrator has created a project for you and has provided you with a
clouds.yamlfile for you to access the cloud. The
python-openstackclientpackage resides on your workstation.$ dnf list installed python-openstackclient
Procedure
Confirm that the system
OS_CLOUDvariable is set for your cloud:$ echo $OS_CLOUD my_cloudReset the variable if necessary:
$ export OS_CLOUD=my_other_cloudAs an alternative, you can specify the cloud name by adding the
--os-cloud <cloud_name>option each time you run anopenstackcommand.Create a load balancer (
lb1) on a private subnet (private_subnet).NoteValues inside parentheses are sample values that are used in the example commands in this procedure. Substitute these sample values with values that are appropriate for your site.
- Example
$ openstack loadbalancer create --name lb1 \
--vip-subnet-id private_subnet --wait
-
In the output from the previous step, record the value of
load_balancer_vip_port_id, because you must provide it in a later step. Create a listener (
listener1) on a port (80).- Example
$ openstack loadbalancer listener create --name listener1 \
--protocol HTTP --protocol-port 80 lb1 --wait
Create the listener default pool (
pool1).- Example
The command in this example creates an HTTP pool that uses a private subnet containing back-end servers that host non-secure HTTP applications on TCP port 80:
$ openstack loadbalancer pool create --name pool1 \
--lb-algorithm ROUND_ROBIN --listener listener1 --protocol HTTP --wait
Create a health monitor (
healthmon1) of type (HTTP) on the pool (pool1) that connects to the back-end servers and tests the path (/).Health checks can help to avoid a false positive. If no health monitor is defined, the member server is assumed to be
ONLINE.- Example
$ openstack loadbalancer healthmonitor create --name healthmon1 \
--delay 15 --max-retries 4 --timeout 10 --type HTTP --url-path / \
pool1 --wait
Add load balancer members (
192.0.2.10and192.0.2.11) on the private subnet to the default pool.- Example
In this example, the back-end servers,
192.0.2.10and192.0.2.11, are namedmember1andmember2, respectively:$ openstack loadbalancer member create --name member1 --subnet-id \ private_subnet --address 192.0.2.10 --protocol-port 80 pool1 --wait $ openstack loadbalancer member create --name member2 --subnet-id \ private_subnet --address 192.0.2.11 --protocol-port 80 pool1 --wait
Create a floating IP address on the shared external subnet (
public).- Example
$ openstack floating ip create public
-
In the output from step 8, record the value of
floating_ip_address, because you must provide it in a later step. Associate this floating IP (
203.0.113.0) with the load balancervip_port_id(69a85edd-5b1c-458f-96f2-b4552b15b8e6).- Example
$ openstack floating ip set --port 69a85edd-5b1c-458f-96f2-b4552b15b8e6 203.0.113.0
Verification
Verify HTTP traffic flows across the load balancer by using the floating IP (
203.0.113.0).- Example
$ curl -v http://203.0.113.0 --insecure- Sample output
* About to connect() to 203.0.113.0 port 80 (#0)
*   Trying 203.0.113.0...
* Connected to 203.0.113.0 (203.0.113.0) port 80 (#0)
> GET / HTTP/1.1
> User-Agent: curl/7.29.0
> Host: 203.0.113.0
> Accept: */*
>
< HTTP/1.1 200 OK
< Content-Length: 30
<
* Connection #0 to host 203.0.113.0 left intact
When a health monitor is present and functioning properly, you can check the status of each member.
A working member (
member1) has anONLINEvalue for itsoperating_status.- Example
$ openstack loadbalancer member show pool1 member1- Sample output
+---------------------+--------------------------------------+
| Field               | Value                                |
+---------------------+--------------------------------------+
| address             | 192.0.02.10                          |
| admin_state_up      | True                                 |
| created_at          | 2024-01-15T11:11:23                  |
| id                  | b85c807e-4d7c-4cbd-b725-5e8afddf80d2 |
| name                | member1                              |
| operating_status    | ONLINE                               |
| project_id          | dda678ca5b1241e7ad7bf7eb211a2fd7     |
| protocol_port       | 80                                   |
| provisioning_status | ACTIVE                               |
| subnet_id           | 5bd7334b-49b3-4849-b3a2-b0b83852dba1 |
| updated_at          | 2024-01-15T11:28:42                  |
| weight              | 1                                    |
| monitor_port        | None                                 |
| monitor_address     | None                                 |
| backup              | False                                |
+---------------------+--------------------------------------+
7.3. Creating an HTTP load balancer with session persistence
To manage network traffic for non-secure HTTP applications, you can create Red Hat OpenStack Services on OpenShift (RHOSO) load balancers that track session persistence. Doing so ensures that when a request comes in, the load balancer directs subsequent requests from the same client to the same back-end server. Session persistence optimizes load balancing by saving time and memory.
Prerequisites
- A shared external (public) subnet that you can reach from the internet.
- The non-secure web applications whose network traffic you are load balancing have cookies enabled.
-
The administrator has created a project for you and has provided you with a
clouds.yamlfile for you to access the cloud. The
python-openstackclientpackage resides on your workstation.$ dnf list installed python-openstackclient
Procedure
Confirm that the system
OS_CLOUDvariable is set for your cloud:$ echo $OS_CLOUD my_cloudReset the variable if necessary:
$ export OS_CLOUD=my_other_cloudAs an alternative, you can specify the cloud name by adding the
--os-cloud <cloud_name>option each time you run anopenstackcommand.Create a load balancer (
lb1) on a public subnet (public_subnet).NoteValues inside parentheses are sample values that are used in the example commands in this procedure. Substitute these sample values with values that are appropriate for your site.
- Example
$ openstack loadbalancer create --name lb1 \
--vip-subnet-id public_subnet --wait
Create a listener (
listener1) on a port (80).- Example
$ openstack loadbalancer listener create --name listener1 \
--protocol HTTP --protocol-port 80 lb1 --wait
Create the listener default pool (
pool1) that defines session persistence on a cookie (PHPSESSIONID).- Example
The command in this example creates an HTTP pool that uses a private subnet containing back-end servers that host non-secure HTTP applications on TCP port 80:
$ openstack loadbalancer pool create --name pool1 \
--lb-algorithm ROUND_ROBIN --listener listener1 --protocol HTTP \
--session-persistence type=APP_COOKIE,cookie_name=PHPSESSIONID --wait
Create a health monitor (
healthmon1) of type (HTTP) on the pool (pool1) that connects to the back-end servers and tests the path (/).Health checks can help to avoid a false positive. If no health monitor is defined, the member server is assumed to be
ONLINE.- Example
$ openstack loadbalancer healthmonitor create --name healthmon1 \
--delay 15 --max-retries 4 --timeout 10 --type HTTP --url-path / \
pool1 --wait
Add load balancer members (
192.0.2.10and192.0.2.11) on the private subnet (private_subnet) to the default pool.- Example
In this example, the back-end servers,
192.0.2.10and192.0.2.11, are namedmember1andmember2, respectively:$ openstack loadbalancer member create --name member1 --subnet-id \ private_subnet --address 192.0.2.10 --protocol-port 80 pool1 --wait $ openstack loadbalancer member create --name member2 --subnet-id \ private_subnet --address 192.0.2.11 --protocol-port 80 pool1 --wait
Verification
View and verify the load balancer (
lb1) settings:- Example
$ openstack loadbalancer show lb1- Sample output
+---------------------+--------------------------------------+
| Field               | Value                                |
+---------------------+--------------------------------------+
| admin_state_up      | True                                 |
| created_at          | 2024-01-15T11:11:58                  |
| description         |                                      |
| flavor              |                                      |
| id                  | 788fe121-3dec-4e1b-8360-4020642238b0 |
| listeners           | 09f28053-fde8-4c78-88b9-0f191d84120e |
| name                | lb1                                  |
| operating_status    | ONLINE                               |
| pools               | 627842b3-eed8-4f5f-9f4a-01a738e64d6a |
| project_id          | dda678ca5b1241e7ad7bf7eb211a2fd7     |
| provider            | amphora                              |
| provisioning_status | ACTIVE                               |
| updated_at          | 2024-01-15T11:28:42                  |
| vip_address         | 198.51.100.22                        |
| vip_network_id      | 9bca13be-f18d-49a5-a83d-9d487827fd16 |
| vip_port_id         | 69a85edd-5b1c-458f-96f2-b4552b15b8e6 |
| vip_qos_policy_id   | None                                 |
| vip_subnet_id       | 5bd7334b-49b3-4849-b3a2-b0b83852dba1 |
+---------------------+--------------------------------------+
When a health monitor is present and functioning properly, you can check the status of each member.
A working member (
member1) has anONLINEvalue for itsoperating_status.- Example
$ openstack loadbalancer member show pool1 member1- Sample output
+---------------------+--------------------------------------+
| Field               | Value                                |
+---------------------+--------------------------------------+
| address             | 192.0.02.10                          |
| admin_state_up      | True                                 |
| created_at          | 2024-01-15T11:11:23                  |
| id                  | b85c807e-4d7c-4cbd-b725-5e8afddf80d2 |
| name                | member1                              |
| operating_status    | ONLINE                               |
| project_id          | dda678ca5b1241e7ad7bf7eb211a2fd7     |
| protocol_port       | 80                                   |
| provisioning_status | ACTIVE                               |
| subnet_id           | 5bd7334b-49b3-4849-b3a2-b0b83852dba1 |
| updated_at          | 2024-01-15T11:28:42                  |
| weight              | 1                                    |
| monitor_port        | None                                 |
| monitor_address     | None                                 |
| backup              | False                                |
+---------------------+--------------------------------------+
Chapter 8. Creating secure HTTP load balancers
In Red Hat OpenStack Services on OpenShift (RHOSO) environments, you can create various types of load balancers to manage secure HTTP (HTTPS) network traffic.
For more information, see the following sections:
- Section 8.1, “About non-terminated HTTPS load balancers”
- Section 8.2, “Creating a non-terminated HTTPS load balancer”
- Section 8.3, “About TLS-terminated HTTPS load balancers”
- Section 8.4, “Creating a TLS-terminated HTTPS load balancer”
- Section 8.5, “Creating a TLS-terminated HTTPS load balancer with SNI”
- Section 8.6, “Creating a TLS-terminated load balancer with an HTTP/2 listener”
- Section 8.7, “Creating HTTP and TLS-terminated HTTPS load balancing on the same IP and back-end”
- Section 8.8, “Creating a TLS-terminated HTTPS load balancer with client authentication”
8.1. About non-terminated HTTPS load balancers
A non-terminated HTTPS load balancer acts effectively like a generic TCP load balancer: the load balancer forwards the raw TCP traffic from the web client to the back-end servers where the HTTPS connection is terminated with the web clients. While non-terminated HTTPS load balancers do not support advanced load balancer features like Layer 7 functionality, they do lower load balancer resource utilization by managing the certificates and keys themselves.
8.2. Creating a non-terminated HTTPS load balancer
If your application requires HTTPS traffic to terminate on the back-end member servers, typically called HTTPS pass through, you can use the HTTPS protocol for your Red Hat OpenStack Services on OpenShift (RHOSO) load balancer listeners in a RHOSO environment.
Prerequisites
-
The administrator has created a project for you and has provided you with a
clouds.yamlfile for you to access the cloud. The
python-openstackclientpackage resides on your workstation.$ dnf list installed python-openstackclient- A shared external (public) subnet that you can reach from the internet.
Procedure
Confirm that the system
OS_CLOUDvariable is set for your cloud:$ echo $OS_CLOUD my_cloudReset the variable if necessary:
$ export OS_CLOUD=my_other_cloudAs an alternative, you can specify the cloud name by adding the
--os-cloud <cloud_name>option each time you run anopenstackcommand.Create a load balancer (
lb1) on a public subnet (public_subnet).NoteValues inside parentheses are sample values that are used in the example commands in this procedure. Substitute these sample values with values that are appropriate for your site.
- Example
$ openstack loadbalancer create --name lb1 \
--vip-subnet-id public_subnet --wait
Create a listener (
listener1) on a port (443).- Example
$ openstack loadbalancer listener create --name listener1 \
--protocol HTTPS --protocol-port 443 lb1 --wait
Create the listener default pool (
pool1).- Example
The command in this example creates an HTTPS pool that uses a private subnet containing back-end servers that host HTTPS applications configured with a TLS-encrypted web application on TCP port 443:
$ openstack loadbalancer pool create --name pool1 \
--lb-algorithm ROUND_ROBIN --listener listener1 \
--protocol HTTPS --wait
Create a health monitor (
healthmon1) on the pool (pool1) of type (TLS-HELLO) that connects to the back-end servers and tests the path (/).Health checks can help to avoid a false positive. If no health monitor is defined, the member server is assumed to be
ONLINE.- Example
$ openstack loadbalancer healthmonitor create --name healthmon1 \
--delay 15 --max-retries 4 --timeout 10 --type TLS-HELLO \
--url-path / pool1 --wait
Add load balancer members (
192.0.2.10and192.0.2.11) on the private subnet (private_subnet) to the default pool.- Example
In this example, the back-end servers,
192.0.2.10and192.0.2.11, are namedmember1andmember2, respectively:$ openstack loadbalancer member create --name member1 --subnet-id \ private_subnet --address 192.0.2.10 --protocol-port 443 pool1 --wait $ openstack loadbalancer member create --name member2 --subnet-id \ private_subnet --address 192.0.2.11 --protocol-port 443 pool1 --wait
Verification
View and verify the load balancer (
lb1) settings.- Example
$ openstack loadbalancer show lb1- Sample output
+---------------------+--------------------------------------+
| Field               | Value                                |
+---------------------+--------------------------------------+
| admin_state_up      | True                                 |
| created_at          | 2024-01-15T11:11:09                  |
| description         |                                      |
| flavor              |                                      |
| id                  | 788fe121-3dec-4e1b-8360-4020642238b0 |
| listeners           | 09f28053-fde8-4c78-88b9-0f191d84120e |
| name                | lb1                                  |
| operating_status    | ONLINE                               |
| pools               | 627842b3-eed8-4f5f-9f4a-01a738e64d6a |
| project_id          | dda678ca5b1241e7ad7bf7eb211a2fd7     |
| provider            | amphora                              |
| provisioning_status | ACTIVE                               |
| updated_at          | 2024-01-15T11:12:42                  |
| vip_address         | 198.51.100.11                        |
| vip_network_id      | 9bca13be-f18d-49a5-a83d-9d487827fd16 |
| vip_port_id         | 69a85edd-5b1c-458f-96f2-b4552b15b8e6 |
| vip_qos_policy_id   | None                                 |
| vip_subnet_id       | 5bd7334b-49b3-4849-b3a2-b0b83852dba1 |
+---------------------+--------------------------------------+
When a health monitor is present and functioning properly, you can check the status of each member.
- Example
A working member (
member1) has anONLINEvalue for itsoperating_status.$ openstack loadbalancer member show pool1 member1- Sample output
+---------------------+--------------------------------------+
| Field               | Value                                |
+---------------------+--------------------------------------+
| address             | 192.0.2.10                           |
| admin_state_up      | True                                 |
| created_at          | 2024-01-15T11:11:09                  |
| id                  | b85c807e-4d7c-4cbd-b725-5e8afddf80d2 |
| name                | member1                              |
| operating_status    | ONLINE                               |
| project_id          | dda678ca5b1241e7ad7bf7eb211a2fd7     |
| protocol_port       | 443                                  |
| provisioning_status | ACTIVE                               |
| subnet_id           | 5bd7334b-49b3-4849-b3a2-b0b83852dba1 |
| updated_at          | 2024-01-15T11:12:42                  |
| weight              | 1                                    |
| monitor_port        | None                                 |
| monitor_address     | None                                 |
| backup              | False                                |
+---------------------+--------------------------------------+
8.3. About TLS-terminated HTTPS load balancers
When a TLS-terminated HTTPS load balancer is implemented in a Red Hat OpenStack Services on OpenShift (RHOSO) environment, web clients communicate with the load balancer over Transport Layer Security (TLS) protocols. The load balancer terminates the TLS session and forwards the decrypted requests to the back-end servers. When you terminate the TLS session on the load balancer, you offload the CPU-intensive encryption operations to the load balancer, and allow the load balancer to use advanced features such as Layer 7 inspection.
8.4. Creating a TLS-terminated HTTPS load balancer
When you use TLS-terminated HTTPS load balancers, you offload the CPU-intensive encryption operations to the load balancer, and allow the load balancer to use advanced features such as Layer 7 inspection. In Red Hat OpenStack Services on OpenShift (RHOSO) environments, it is a best practice to also create a health monitor to ensure that your back-end members remain available.
Prerequisites
-
The administrator has created a project for you and has provided you with a
clouds.yamlfile for you to access the cloud. The
python-openstackclientpackage resides on your workstation.$ dnf list installed python-openstackclient- A shared external (public) subnet that you can reach from the internet.
TLS public-key cryptography is configured with the following characteristics:
-
A TLS certificate, key, and intermediate certificate chain is obtained from an external certificate authority (CA) for the DNS name that is assigned to the load balancer VIP address, for example,
www.example.com. - The certificate, key, and intermediate certificate chain reside in separate files in the current directory.
- The key and certificate are PEM-encoded.
- The intermediate certificate chain contains multiple certificates that are PEM-encoded and concatenated together.
-
A TLS certificate, key, and intermediate certificate chain is obtained from an external certificate authority (CA) for the DNS name that is assigned to the load balancer VIP address, for example,
- You must configure the Load-balancing service (octavia) to use the Key Manager service (barbican). For more information, see the _Managing secrets with the Key Manager service.
Procedure
Combine the key (
server.key), certificate (server.crt), and intermediate certificate chain (ca-chain.crt) into a single PKCS12 file (server.p12).NoteValues inside parentheses are sample values that are used in the example commands in this procedure. Substitute these sample values with values that are appropriate for your site.
- Example
$ openssl pkcs12 -export -inkey server.key -in server.crt \ -certfile ca-chain.crt -passout pass: -out server.p12NoteThe following procedure does not work if you password protect the PKCS12 file.
Confirm that the system
OS_CLOUDvariable is set for your cloud:$ echo $OS_CLOUD my_cloudReset the variable if necessary:
$ export OS_CLOUD=my_other_cloudAs an alternative, you can specify the cloud name by adding the
--os-cloud <cloud_name>option each time you run anopenstackcommand.Use the Key Manager service to create a secret resource (
tls_secret1) for the PKCS12 file.- Example
$ openstack secret store --name='tls_secret1' \
-t 'application/octet-stream' -e 'base64' \
--payload="$(base64 < server.p12)"
Create a load balancer (
lb1) on the public subnet (public_subnet).- Example
$ openstack loadbalancer create --name lb1 \
--vip-subnet-id public_subnet --wait
Create a
TERMINATED_HTTPSlistener (listener1), and reference the secret resource as the default TLS container for the listener.- Example
$ openstack loadbalancer listener create --protocol-port 443 \
--protocol TERMINATED_HTTPS \
--default-tls-container=\
$(openstack secret list | awk '/ tls_secret1 / {print $2}') lb1 --wait
Create a pool (
pool1) and make it the default pool for the listener.- Example
The command in this example creates an HTTP pool that uses a private subnet containing back-end servers that host non-secure HTTP applications on TCP port 80:
$ openstack loadbalancer pool create --name pool1 --lb-algorithm ROUND_ROBIN --listener listener1 --protocol HTTP --wait
Create a health monitor (
healthmon1) of type (HTTP) on the pool (pool1) that connects to the back-end servers and tests the path (/).Health checks can help to avoid a false positive. If no health monitor is defined, the member server is assumed to be
ONLINE.- Example
$ openstack loadbalancer healthmonitor create --name healthmon1 \
--delay 15 --max-retries 4 --timeout 10 --type HTTP --url-path / \
pool1 --wait
Add the non-secure HTTP back-end servers (
192.0.2.10and192.0.2.11) on the private subnet (private_subnet) to the pool.- Example
In this example, the back-end servers,
192.0.2.10and192.0.2.11, are namedmember1andmember2, respectively:$ openstack loadbalancer member create --name member1 --subnet-id \ private_subnet --address 192.0.2.10 --protocol-port 443 pool1 --wait $ openstack loadbalancer member create --name member2 --subnet-id \ private_subnet --address 192.0.2.11 --protocol-port 443 pool1 --wait
Verification
View and verify the load balancer (
lb1) settings.- Example
$ openstack loadbalancer show lb1- Sample output
+---------------------+--------------------------------------+
| Field               | Value                                |
+---------------------+--------------------------------------+
| admin_state_up      | True                                 |
| created_at          | 2024-01-15T11:11:09                  |
| description         |                                      |
| flavor              |                                      |
| id                  | 788fe121-3dec-4e1b-8360-4020642238b0 |
| listeners           | 09f28053-fde8-4c78-88b9-0f191d84120e |
| name                | lb1                                  |
| operating_status    | ONLINE                               |
| pools               | 627842b3-eed8-4f5f-9f4a-01a738e64d6a |
| project_id          | dda678ca5b1241e7ad7bf7eb211a2fd7     |
| provider            | amphora                              |
| provisioning_status | ACTIVE                               |
| updated_at          | 2024-01-15T11:12:42                  |
| vip_address         | 198.51.100.11                        |
| vip_network_id      | 9bca13be-f18d-49a5-a83d-9d487827fd16 |
| vip_port_id         | 69a85edd-5b1c-458f-96f2-b4552b15b8e6 |
| vip_qos_policy_id   | None                                 |
| vip_subnet_id       | 5bd7334b-49b3-4849-b3a2-b0b83852dba1 |
+---------------------+--------------------------------------+
When a health monitor is present and functioning properly, you can check the status of each member.
- Example
$ openstack loadbalancer member show pool1 member1A working member (
member1) has anONLINEvalue for itsoperating_status:- Sample output
+---------------------+--------------------------------------+
| Field               | Value                                |
+---------------------+--------------------------------------+
| address             | 192.0.2.10                           |
| admin_state_up      | True                                 |
| created_at          | 2024-01-15T11:11:09                  |
| id                  | b85c807e-4d7c-4cbd-b725-5e8afddf80d2 |
| name                | member1                              |
| operating_status    | ONLINE                               |
| project_id          | dda678ca5b1241e7ad7bf7eb211a2fd7     |
| protocol_port       | 80                                   |
| provisioning_status | ACTIVE                               |
| subnet_id           | 5bd7334b-49b3-4849-b3a2-b0b83852dba1 |
| updated_at          | 2024-01-15T11:12:42                  |
| weight              | 1                                    |
| monitor_port        | None                                 |
| monitor_address     | None                                 |
| backup              | False                                |
+---------------------+--------------------------------------+
8.5. Creating a TLS-terminated HTTPS load balancer with SNI
For TLS-terminated HTTPS load balancers that employ Server Name Indication (SNI) technology, a single listener can contain multiple TLS certificates and enable the load balancer to know which certificate to present when it uses a shared IP. In Red Hat OpenStack Services on OpenShift (RHOSO) environments, it is a best practice to also create a health monitor to ensure that your back-end members remain available.
Prerequisites
-
The administrator has created a project for you and has provided you with a
clouds.yamlfile for you to access the cloud. The
python-openstackclientpackage resides on your workstation.$ dnf list installed python-openstackclient- A shared external (public) subnet that you can reach from the internet.
TLS public-key cryptography is configured with the following characteristics:
-
Multiple TLS certificates, keys, and intermediate certificate chains have been obtained from an external certificate authority (CA) for the DNS names assigned to the load balancer VIP address, for example,
www.example.comandwww2.example.com. - The keys and certificates are PEM-encoded.
-
Multiple TLS certificates, keys, and intermediate certificate chains have been obtained from an external certificate authority (CA) for the DNS names assigned to the load balancer VIP address, for example,
- You must configure the Load-balancing service (octavia) to use the Key Manager service (barbican). For more information, see the _Managing secrets with the Key Manager service.
Procedure
For each of the TLS certificates in the SNI list, combine the key (
server.key), certificate (server.crt), and intermediate certificate chain (ca-chain.crt) into a single PKCS12 file (server.p12).In this example, you create two PKCS12 files (
server.p12andserver2.p12) one for each certificate (www.example.comandwww2.example.com).NoteValues inside parentheses are sample values that are used in the example commands in this procedure. Substitute these sample values with values that are appropriate for your site.
- Example
$ openssl pkcs12 -export -inkey server.key -in server.crt \
-certfile ca-chain.crt -passout pass: -out server.p12

$ openssl pkcs12 -export -inkey server2.key -in server2.crt \
-certfile ca-chain2.crt -passout pass: -out server2.p12
Confirm that the system
OS_CLOUDvariable is set for your cloud:$ echo $OS_CLOUD my_cloudReset the variable if necessary:
$ export OS_CLOUD=my_other_cloudAs an alternative, you can specify the cloud name by adding the
--os-cloud <cloud_name>option each time you run anopenstackcommand.Use the Key Manager service to create secret resources (
tls_secret1andtls_secret2) for the PKCS12 file.- Example
$ openstack secret store --name='tls_secret1' \
-t 'application/octet-stream' -e 'base64' \
--payload="$(base64 < server.p12)"

$ openstack secret store --name='tls_secret2' \
-t 'application/octet-stream' -e 'base64' \
--payload="$(base64 < server2.p12)"
Create a load balancer (
lb1) on the public subnet (public_subnet).- Example
$ openstack loadbalancer create --name lb1 \
--vip-subnet-id public_subnet --wait
Create a TERMINATED_HTTPS listener (
listener1), and use SNI to reference both the secret resources.(Reference
tls_secret1as the default TLS container for the listener.)- Example
$ openstack loadbalancer listener create  --name listener1 \
--protocol-port 443 --protocol TERMINATED_HTTPS \
--default-tls-container=\
$(openstack secret list | awk '/ tls_secret1 / {print $2}') \
--sni-container-refs \
$(openstack secret list | awk '/ tls_secret1 / {print $2}') \
$(openstack secret list | awk '/ tls_secret2 / {print $2}') -- lb1 --wait
Create a pool (
pool1) and make it the default pool for the listener.- Example
The command in this example creates an HTTP pool that uses a private subnet containing back-end servers that host non-secure HTTP applications on TCP port 80:
$ openstack loadbalancer pool create --name pool1 \
--lb-algorithm ROUND_ROBIN --listener listener1 --protocol HTTP --wait
Create a health monitor (
healthmon1) of type (HTTP) on the pool (pool1) that connects to the back-end servers and tests the path (/).Health checks can help to avoid a false positive. If no health monitor is defined, the member server is assumed to be
ONLINE.- Example
$ openstack loadbalancer healthmonitor create --name healthmon1 \
--delay 15 --max-retries 4 --timeout 10 --type HTTP --url-path / \
pool1 --wait
Add the non-secure HTTP back-end servers (
192.0.2.10and192.0.2.11) on the private subnet (private_subnet) to the pool.- Example
In this example, the back-end servers,
192.0.2.10and192.0.2.11, are namedmember1andmember2, respectively:$ openstack loadbalancer member create --name member1 --subnet-id \ private_subnet --address 192.0.2.10 --protocol-port 443 pool1 --wait $ openstack loadbalancer member create --name member2 --subnet-id \ private_subnet --address 192.0.2.11 --protocol-port 443 pool1 --wait
Verification
View and verify the load balancer (
lb1) settings.- Example
$ openstack loadbalancer show lb1- Sample output
+---------------------+--------------------------------------+
| Field               | Value                                |
+---------------------+--------------------------------------+
| admin_state_up      | True                                 |
| created_at          | 2024-01-15T11:11:09                  |
| description         |                                      |
| flavor              |                                      |
| id                  | 788fe121-3dec-4e1b-8360-4020642238b0 |
| listeners           | 09f28053-fde8-4c78-88b9-0f191d84120e |
| name                | lb1                                  |
| operating_status    | ONLINE                               |
| pools               | 627842b3-eed8-4f5f-9f4a-01a738e64d6a |
| project_id          | dda678ca5b1241e7ad7bf7eb211a2fd7     |
| provider            | amphora                              |
| provisioning_status | ACTIVE                               |
| updated_at          | 2024-01-15T11:12:42                  |
| vip_address         | 198.51.100.11                        |
| vip_network_id      | 9bca13be-f18d-49a5-a83d-9d487827fd16 |
| vip_port_id         | 69a85edd-5b1c-458f-96f2-b4552b15b8e6 |
| vip_qos_policy_id   | None                                 |
| vip_subnet_id       | 5bd7334b-49b3-4849-b3a2-b0b83852dba1 |
+---------------------+--------------------------------------+
When a health monitor is present and functioning properly, you can check the status of each member.
- Example
$ openstack loadbalancer member show pool1 member1- Sample output
A working member (
member1) has anONLINEvalue for itsoperating_status:+---------------------+--------------------------------------+ | Field | Value | +---------------------+--------------------------------------+ | address | 192.0.2.10 | | admin_state_up | True | | created_at | 2024-01-15T11:11:09 | | id | b85c807e-4d7c-4cbd-b725-5e8afddf80d2 | | name | member1 | | operating_status | ONLINE | | project_id | dda678ca5b1241e7ad7bf7eb211a2fd7 | | protocol_port | 80 | | provisioning_status | ACTIVE | | subnet_id | 5bd7334b-49b3-4849-b3a2-b0b83852dba1 | | updated_at | 2024-01-15T11:12:42 | | weight | 1 | | monitor_port | None | | monitor_address | None | | backup | False | +---------------------+--------------------------------------+
8.6. Creating a TLS-terminated load balancer with an HTTP/2 listener
When you use TLS-terminated HTTPS load balancers, you offload the CPU-intensive encryption operations to the load balancer, and allow the load balancer to use advanced features such as Layer 7 inspection. With the addition of an HTTP/2 listener, you can leverage the HTTP/2 protocol to improve performance by loading pages faster. Load balancers negotiate HTTP/2 with clients by using the Application-Layer Protocol Negotiation (ALPN) TLS extension.
The Load-balancing service (octavia) supports end-to-end HTTP/2 traffic, which means that the HTTP2 traffic is not translated by HAProxy from the point where the request reaches the listener until the response returns from the load balancer. To achieve end-to-end HTTP/2 traffic, you must have an HTTP pool with back-end re-encryption: pool members that are listening on a secure port and web applications that are configured for HTTPS traffic.
You can send HTTP/2 traffic to an HTTP pool without back-end re-encryption. In this situation, HAProxy translates the traffic before it reaches the pool, and the response is translated back to HTTP/2 before it returns from the load balancer.
Red Hat recommends that you create a health monitor to ensure that your back-end members remain available in your Red Hat OpenStack Services on OpenShift (RHOSO) environment.
Currently, the Load-balancing service does not support health monitoring for TLS-terminated load balancers that use HTTP/2 listeners.
Prerequisites
-
The administrator has created a project for you and has provided you with a
clouds.yamlfile for you to access the cloud. The
python-openstackclientpackage resides on your workstation.$ dnf list installed python-openstackclientTLS public-key cryptography is configured with the following characteristics:
-
A TLS certificate, key, and intermediate certificate chain is obtained from an external certificate authority (CA) for the DNS name that is assigned to the load balancer VIP address, for example,
www.example.com. - The certificate, key, and intermediate certificate chain reside in separate files in the current directory.
- The key and certificate are PEM-encoded.
- The intermediate certificate chain contains multiple certificates that are PEM-encoded and concatenated together.
-
A TLS certificate, key, and intermediate certificate chain is obtained from an external certificate authority (CA) for the DNS name that is assigned to the load balancer VIP address, for example,
- You must configure the Load-balancing service (octavia) to use the Key Manager service (barbican). For more information, see the _Managing secrets with the Key Manager service.
Procedure
Combine the key (
server.key), certificate (server.crt), and intermediate certificate chain (ca-chain.crt) into a single PKCS12 file (server.p12).NoteValues inside parentheses are sample values that are used in the example commands in this procedure. Substitute these sample values with values that are appropriate for your site.
ImportantWhen you create the PKCS12 file, do not password protect the file.
- Example
In this example, the PKCS12 file is created without a password:
$ openssl pkcs12 -export -inkey server.key -in server.crt \ -certfile ca-chain.crt -passout pass: -out server.p12
Use the Key Manager service to create a secret resource (
tls_secret1) for the PKCS12 file.- Example
$ openstack secret store --name='tls_secret1' \ -t 'application/octet-stream' -e 'base64' \ --payload="$(base64 < server.p12)"
Confirm that the system
OS_CLOUDvariable is set for your cloud:$ echo $OS_CLOUD my_cloudReset the variable if necessary:
$ export OS_CLOUD=my_other_cloudAs an alternative, you can specify the cloud name by adding the
--os-cloud <cloud_name>option each time you run anopenstackcommand.Create a load balancer (
lb1) on the public subnet (public_subnet).- Example
$ openstack loadbalancer create --name lb1 --vip-subnet-id \ public_subnet --wait
Create a
TERMINATED_HTTPSlistener (listener1) and do the following:-
reference the secret resource (
tls_secret1) as the default TLS container for the listener. -
set the ALPN protocol (
h2). set the fallback protocol if the client does not support HTTP/2 (
http/1.1).- Example
$ openstack loadbalancer listener create --name listener1 \ --protocol-port 443 --protocol TERMINATED_HTTPS --alpn-protocol h2 \ --alpn-protocol http/1.1 --default-tls-container=\ $(openstack secret list | awk '/ tls_secret1 / {print $2}') lb1 --wait
-
reference the secret resource (
Create a pool (
pool1) and make it the default pool for the listener.- Example
The command in this example creates an HTTP pool containing back-end servers that host HTTP applications configured with a web application on TCP port 80:
$ openstack loadbalancer pool create --name pool1 \ --lb-algorithm ROUND_ROBIN --listener listener1 --protocol HTTP --wait
Create a health monitor (
healthmon1) of type (TCP) on the pool (pool1) that connects to the back-end servers.Health checks can help to avoid a false positive. If no health monitor is defined, the member server is assumed to be
ONLINE.- Example
$ openstack loadbalancer healthmonitor create --name healthmon1 \ --delay 15 --max-retries 4 --timeout 10 --type TCP pool1 --wait
Add the HTTP back-end servers (
192.0.2.10and192.0.2.11) on the private subnet (private_subnet) to the pool.- Example
In this example, the back-end servers,
192.0.2.10and192.0.2.11, are namedmember1andmember2, respectively:$ openstack loadbalancer member create --name member1 --subnet-id \ private_subnet --address 192.0.2.10 --protocol-port 80 pool1 --wait $ openstack loadbalancer member create --name member2 --subnet-id \ private_subnet --address 192.0.2.11 --protocol-port 80 pool1 --wait
Verification
View and verify the load balancer (
lb1) settings.- Example
$ openstack loadbalancer status show lb1- Sample output
{ "loadbalancer": { "id": "936dad29-4c3f-4f24-84a8-c0e6f10ed810", "name": "lb1", "operating_status": "ONLINE", "provisioning_status": "ACTIVE", "listeners": [ { "id": "708b82c6-8a6b-4ec1-ae53-e619769821d4", "name": "listener1", "operating_status": "ONLINE", "provisioning_status": "ACTIVE", "pools": [ { "id": "5ad7c678-23af-4422-8edb-ac3880bd888b", "name": "pool1", "provisioning_status": "ACTIVE", "operating_status": "ONLINE", "health_monitor": { "id": "4ad786ef-6661-4e31-a325-eca07b2b3dd1", "name": "healthmon1", "type": "TCP", "provisioning_status": "ACTIVE", "operating_status": "ONLINE" }, "members": [ { "id": "facca0d3-61a7-4b46-85e8-da6994883647", "name": "member1", "operating_status": "ONLINE", "provisioning_status": "ACTIVE", "address": "192.0.2.10", "protocol_port": 80 }, { "id": "2b0d9e0b-8e0c-48b8-aa57-90b2fde2eae2", "name": "member2", "operating_status": "ONLINE", "provisioning_status": "ACTIVE", "address": "192.0.2.11", "protocol_port": 80 } ...
When a health monitor is present and functioning properly, you can check the status of each member.
- Example
$ openstack loadbalancer member show pool1 member1- Sample output
A working member (
member1) has anONLINEvalue for itsoperating_status:+---------------------+--------------------------------------+ | Field | Value | +---------------------+--------------------------------------+ | address | 192.0.2.10 | | admin_state_up | True | | created_at | 2024-08-16T20:08:01 | | id | facca0d3-61a7-4b46-85e8-da6994883647 | | name | member1 | | operating_status | ONLINE | | project_id | 9b29c91f67314bd09eda9018616851cf | | protocol_port | 80 | | provisioning_status | ACTIVE | | subnet_id | 3b459c95-64d2-4cfa-b348-01aacc4b3fa9 | | updated_at | 2024-08-16T20:25:42 | | weight | 1 | | monitor_port | None | | monitor_address | None | | backup | False | | tags | | +---------------------+--------------------------------------+
8.7. Creating HTTP and TLS-terminated HTTPS load balancing on the same IP and back-end
You can configure a non-secure listener and a TLS-terminated HTTPS listener on the same load balancer and the same IP address when you want to respond to web clients with the exact same content, regardless if the client is connected with a secure or non-secure HTTP protocol. In Red Hat OpenStack Services on OpenShift (RHOSO) environments, it is a best practice to also create a health monitor to ensure that your back-end members remain available.
Prerequisites
-
The administrator has created a project for you and has provided you with a
clouds.yamlfile for you to access the cloud. The
python-openstackclientpackage resides on your workstation.$ dnf list installed python-openstackclient- A shared external (public) subnet that you can reach from the internet.
TLS public-key cryptography is configured with the following characteristics:
- A TLS certificate, key, and optional intermediate certificate chain have been obtained from an external certificate authority (CA) for the DNS name assigned to the load balancer VIP address (for example, www.example.com).
- The certificate, key, and intermediate certificate chain reside in separate files in the current directory.
- The key and certificate are PEM-encoded.
- The intermediate certificate chain contains multiple certificates that are PEM-encoded and concatenated together.
- The non-secure HTTP listener is configured with the same pool as the HTTPS TLS-terminated load balancer.
Procedure
Combine the key (
server.key), certificate (server.crt), and intermediate certificate chain (ca-chain.crt) into a single PKCS12 file (server.p12).NoteValues inside parentheses are sample values that are used in the example commands in this procedure. Substitute these sample values with values that are appropriate for your site.
- Example
$ openssl pkcs12 -export -inkey server.key -in server.crt \ -certfile ca-chain.crt -passout pass: -out server.p12
Confirm that the system
OS_CLOUDvariable is set for your cloud:$ echo $OS_CLOUD my_cloudReset the variable if necessary:
$ export OS_CLOUD=my_other_cloudAs an alternative, you can specify the cloud name by adding the
--os-cloud <cloud_name>option each time you run anopenstackcommand.Use the Key Manager service to create a secret resource (
tls_secret1) for the PKCS12 file.- Example
$ openstack secret store --name='tls_secret1' \ -t 'application/octet-stream' -e 'base64' \ --payload="$(base64 < server.p12)"
Create a load balancer (
lb1) on the public subnet (public_subnet).- Example
$ openstack loadbalancer create --name lb1 \ --vip-subnet-id external_subnet --wait
Create a TERMINATED_HTTPS listener (
listener1), and reference the secret resource as the default TLS container for the listener.- Example
$ openstack loadbalancer listener create --name listener1 \ --protocol-port 443 --protocol TERMINATED_HTTPS \ --default-tls-container=\ $(openstack secret list | awk '/ tls_secret1 / {print $2}') lb1 --wait
Create a pool (
pool1) and make it the default pool for the listener.- Example
The command in this example creates an HTTP pool that uses a private subnet containing back-end servers that host non-secure HTTP applications on TCP port 80:
$ openstack loadbalancer pool create --name pool1 \ --lb-algorithm ROUND_ROBIN --listener listener1 --protocol HTTP --wait
Create a health monitor (
healthmon1) of type (HTTP) on the pool (pool1) that connects to the back-end servers and tests the path (/).Health checks can help to avoid a false positive. If no health monitor is defined, the member server is assumed to be
ONLINE.- Example
$ openstack loadbalancer healthmonitor create --name healthmon1 \ --delay 15 --max-retries 4 --timeout 10 --type HTTP --url-path / \ pool1 --wait
Add the non-secure HTTP back-end servers (
192.0.2.10and192.0.2.11) on the private subnet (private_subnet) to the pool.- Example
In this example, the back-end servers,
192.0.2.10and192.0.2.11, are namedmember1andmember2, respectively:$ openstack loadbalancer member create --name member1 --subnet-id \ private_subnet --address 192.0.2.10 --protocol-port 443 pool1 --wait $ openstack loadbalancer member create --name member2 --subnet-id \ private_subnet --address 192.0.2.11 --protocol-port 443 pool1 --wait
Create a non-secure, HTTP listener (
listener2), and make its default pool, the same as the secure listener.- Example
$ openstack loadbalancer listener create --name listener2 \ --protocol-port 80 --protocol HTTP --default-pool pool1 lb1 --wait
Verification
View and verify the load balancer (
lb1) settings.- Example
$ openstack loadbalancer show lb1- Sample output
+---------------------+--------------------------------------+ | Field | Value | +---------------------+--------------------------------------+ | admin_state_up | True | | created_at | 2024-01-15T11:11:09 | | description | | | flavor | | | id | 788fe121-3dec-4e1b-8360-4020642238b0 | | listeners | 09f28053-fde8-4c78-88b9-0f191d84120e | | name | lb1 | | operating_status | ONLINE | | pools | 627842b3-eed8-4f5f-9f4a-01a738e64d6a | | project_id | dda678ca5b1241e7ad7bf7eb211a2fd7 | | provider | amphora | | provisioning_status | ACTIVE | | updated_at | 2024-01-15T11:12:42 | | vip_address | 198.51.100.11 | | vip_network_id | 9bca13be-f18d-49a5-a83d-9d487827fd16 | | vip_port_id | 69a85edd-5b1c-458f-96f2-b4552b15b8e6 | | vip_qos_policy_id | None | | vip_subnet_id | 5bd7334b-49b3-4849-b3a2-b0b83852dba1 | +---------------------+--------------------------------------+
When a health monitor is present and functioning properly, you can check the status of each member.
- Example
$ openstack loadbalancer member show pool1 member1- Sample output
A working member (
member1) has anONLINEvalue for itsoperating_status:+---------------------+--------------------------------------+ | Field | Value | +---------------------+--------------------------------------+ | address | 192.0.2.10 | | admin_state_up | True | | created_at | 2024-01-15T11:11:09 | | id | b85c807e-4d7c-4cbd-b725-5e8afddf80d2 | | name | member1 | | operating_status | ONLINE | | project_id | dda678ca5b1241e7ad7bf7eb211a2fd7 | | protocol_port | 80 | | provisioning_status | ACTIVE | | subnet_id | 5bd7334b-49b3-4849-b3a2-b0b83852dba1 | | updated_at | 2024-01-15T11:12:42 | | weight | 1 | | monitor_port | None | | monitor_address | None | | backup | False | +---------------------+--------------------------------------+
8.8. Creating a TLS-terminated HTTPS load balancer with client authentication
With a TLS-terminated HTTPS load balancer, web clients communicate with the load balancer using TLS protocols. The load balancer terminates the TLS session and forwards the decrypted requests to the back-end servers. By terminating the TLS session on the load balancer, you offload the CPU-intensive encryption work to the load balancer, and enable advanced load balancer features, such as Layer 7 load balancing and header manipulation. Adding client authentication allows users to authenticate connections to the VIP using certificates. This is also known as two-way TLS authentication. In Red Hat OpenStack Services on OpenShift (RHOSO) environments, it is a best practice to also create a health monitor to ensure that your back-end members remain available.
Prerequisites
-
The administrator has created a project for you and has provided you with a
clouds.yamlfile for you to access the cloud. The
python-openstackclientpackage resides on your workstation.$ dnf list installed python-openstackclient- A shared external (public) subnet that you can reach from the internet.
TLS public-key cryptography is configured with the following characteristics:
- A TLS certificate, key, and optional intermediate certificate chain have been obtained from an external certificate authority (CA) for the DNS name assigned to the load balancer VIP address (for example, www.example.com).
- The certificate, key, and intermediate certificate chain reside in separate files in the current directory.
- The key and certificate are PEM-encoded.
- The intermediate certificate chain contains multiple certificates that are PEM-encoded and concatenated together.
- The non-secure HTTP listener is configured with the same pool as the HTTPS TLS-terminated load balancer.
Procedure
Combine the key (
server.key), certificate (server.crt), and intermediate certificate chain (ca-chain.crt) into a single PKCS12 file (server.p12).NoteValues inside parentheses are sample values that are used in the example commands in this procedure. Substitute these sample values with values that are appropriate for your site.
- Example
$ openssl pkcs12 -export -inkey server.key -in server.crt \ -certfile ca-chain.crt -passout pass: -out server.p12
Confirm that the system
OS_CLOUDvariable is set for your cloud:$ echo $OS_CLOUD my_cloudReset the variable if necessary:
$ export OS_CLOUD=my_other_cloudAs an alternative, you can specify the cloud name by adding the
--os-cloud <cloud_name>option each time you run anopenstackcommand.Use the Key Manager service to create a secret resource (
tls_secret1) for the PKCS12 file.- Example
$ openstack secret store --name='tls_secret1' \ -t 'application/octet-stream' -e 'base64' \ --payload="$(base64 < server.p12)"
Use the Key Manager service to create a secret resource (
client_ca_cert) for the client CA certificate.- Example
$ openstack secret store --name='client_ca_cert' \ -t 'application/octet-stream' -e 'base64' \ --payload="$(base64 < client_ca.pem)"
(Optional) use the Key Manager service to create a secret resource (
client_ca_crl) for the CRL file.- Example
$ openstack secret store --name='client_ca_crl' \ -t 'application/octet-stream' -e 'base64' \ --payload="$(base64 < client_ca.crl)"
Create a load balancer (
lb1) on the public subnet (public_subnet).- Example
$ openstack loadbalancer create --name lb1 \ --vip-subnet-id external_subnet --wait
Create a TERMINATED_HTTPS listener (
listener1) and do the following:-
reference the secret resource (
tls_secret1) as the default TLS container for the listener. - enable client authentication.
-
reference the secret resource (
client_ca_cert) as the default TLS container for the client CA certificate. reference the secret resource (
client_ca_crl) as the default TLS container for the client CRL file.- Example
$ openstack loadbalancer listener create --name listener1\ --protocol-port 443 --protocol TERMINATED_HTTPS \ --default-tls-container=\ $(openstack secret list | awk '/ tls_secret1 / {print $2}') \ --client-authentication=MANDATORY \ --client-ca-tls-container-ref=\ $(openstack secret list | awk '/ client_ca_cert / {print $2}') \ --client-crl-container=\ $(openstack secret list | awk '/ client_ca_crl / {print $2}') \ --wait lb1
-
reference the secret resource (
Create a pool (
pool1) and configure it as the default pool for the listener.- Example
The command in this example creates an HTTP pool that uses a private subnet containing back-end servers that host non-secure HTTP applications on TCP port 80:
$ openstack loadbalancer pool create --name pool1 \ --lb-algorithm ROUND_ROBIN --listener listener1 --protocol HTTP --wait
Create a health monitor (
healthmon1) of type (HTTP) on the pool (pool1) that connects to the back-end servers and tests the path (/).Health checks can help to avoid a false positive. If no health monitor is defined, the member server is assumed to be
ONLINE.- Example
$ openstack loadbalancer healthmonitor create --name healthmon1 \ --delay 15 --max-retries 4 --timeout 10 --type HTTP --url-path / \ --wait pool1
Add the non-secure HTTP back-end servers (
192.0.2.10and192.0.2.11) on the private subnet (private_subnet) to the pool.- Example
In this example, the back-end servers,
192.0.2.10and192.0.2.11, are namedmember1andmember2, respectively:$ openstack loadbalancer member create --name member1 --subnet-id \ private_subnet --address 192.0.2.10 --protocol-port 443 --wait pool1 \ --wait $ openstack loadbalancer member create --name member2 --subnet-id \ private_subnet --address 192.0.2.11 --protocol-port 443 --wait pool1 \ --wait
Create a non-secure, HTTP listener (
listener2), and make its default pool, the same as the secure listener.- Example
$ openstack loadbalancer listener create --name listener2 \ --protocol-port 80 --protocol HTTP --default-pool pool1 lb1 --wait
Verification
View and verify the load balancer listener (
lb1) settings.- Example
$ openstack loadbalancer listener show listener2- Sample output
The
client_authenticationvalue should readMANDATORY.---------------------------------------------------------------------------+ | Field | Value | ---------------------------------------------------------------------------+ | admin_state_up | True | | connection_limit | -1 | | created_at | 2025-06-18T14:35:45 | | default_pool_id | f43b4259-3ca2-4393-bc7f-12143f6ec015 | | default_tls_container_ref | https://barbican.openstack.svc:9311/v1/secre | | | ts/eb16233e-0cb1-4750-85af-d01931b409ca | | description | | | id | 5ab57588-6c9c-49f1-a562-6596eded84ff | | insert_headers | None | | l7policies | | | loadbalancers | 5cb69415-281a-486e-96d4-b10c67291997 | | name | listener2 | | operating_status | ONLINE | | project_id | 4676472cb1344f449b367b6ac473bf93 | | protocol | TERMINATED_HTTPS | | protocol_port | 443 | | provisioning_status | ACTIVE | | sni_container_refs | [] | | timeout_client_data | 50000 | | timeout_member_connect | 5000 | | timeout_member_data | 50000 | | timeout_tcp_inspect | 0 | | updated_at | 2025-06-18T14:41:20 | | client_ca_tls_container_ref | https://barbican.openstack.svc:9311/v1/secre | | | ts/81086194-3e51-474f-a6f6-fa9afd850939 | | client_authentication | MANDATORY | | client_crl_container_ref | https://barbican.openstack.svc:9311/v1/secre | | | ts/8e3f75e1-611d-4fa2-b7e6-83a195270a91 | | allowed_cidrs | None | | tls_ciphers | TLS_AES_256_GCM_SHA384:TLS_CHACHA20_POLY1305 | | | _SHA256:TLS_AES_128_GCM_SHA256:DHE-RSA- | | | AES256-GCM-SHA384:DHE-RSA-AES128-GCM- | | | SHA256:ECDHE-RSA-AES256-GCM-SHA384:ECDHE- | | | RSA-AES128-GCM-SHA256:DHE-RSA- | | | AES256-SHA256:DHE-RSA-AES128-SHA256:ECDHE- | | | RSA-AES256-SHA384:ECDHE-RSA-AES128-SHA256 | | tls_versions | [TLSv1.2, TLSv1.3] | | alpn_protocols | [h2, http/1.1, http/1.0] | | tags | | ---------------------------------------------------------------------------+
When a health monitor is present and functioning properly, you can check the status of each member.
- Example
$ openstack loadbalancer member show pool1 member1- Sample output
A working member (
member1) has anONLINEvalue for itsoperating_status:+---------------------+--------------------------------------+ | Field | Value | +---------------------+--------------------------------------+ | address | 192.0.2.10 | | admin_state_up | True | | created_at | 2025-06-18T14:36:28 | | id | 9da5aac4-b8c2-f113-6cef-a7f14327cb4a | | name | member1 | | operating_status | ONLINE | | project_id | dda678ca5b1241e7ad7bf7eb211a2fd7 | | protocol_port | 80 | | provisioning_status | ACTIVE | | subnet_id | 5bd7334b-49b3-4849-b3a2-b0b83852dba1 | | updated_at | 2025-06-18T14:36:49 | | weight | 1 | | monitor_port | None | | monitor_address | None | | backup | False | +---------------------+--------------------------------------+
Chapter 9. Creating other kinds of load balancers
In Red Hat OpenStack Services on OpenShift (RHOSO) environments, use the Load-balancing service (octavia) to create the type of load balancer that matches the type of non-HTTP network traffic that you want to manage.
For more information, see the following sections:
9.1. Creating a TCP load balancer
You can create a load balancer when you need to manage network traffic for non-HTTP, TCP-based services and applications. It is a best practice to also create a health monitor to ensure that your back-end members remain available.
Prerequisites
-
The administrator has created a project for you and has provided you with a
clouds.yamlfile for you to access the cloud. The
python-openstackclientpackage resides on your workstation.$ dnf list installed python-openstackclient- A shared external (public) subnet that you can reach from the internet.
Procedure
Confirm that the system
OS_CLOUDvariable is set for your cloud:$ echo $OS_CLOUD my_cloudReset the variable if necessary:
$ export OS_CLOUD=my_other_cloudAs an alternative, you can specify the cloud name by adding the
--os-cloud <cloud_name>option each time you run anopenstackcommand.Create a load balancer (
lb1) on the public subnet (public_subnet).NoteValues inside parentheses are sample values that are used in the example commands in this procedure. Substitute these sample values with values that are appropriate for your site.
- Example
$ openstack loadbalancer create --name lb1 \ --vip-subnet-id public_subnet --wait
Create a
TCPlistener (listener1) on the specified port (23456) for which the custom application is configured.- Example
$ openstack loadbalancer listener create --name listener1 \ --protocol TCP --protocol-port 23456 lb1 --wait
Create a pool (
pool1) and make it the default pool for the listener.- Example
In this example, a pool is created that uses a private subnet containing back-end servers that host a custom application on a specific TCP port:
$ openstack loadbalancer pool create --name pool1 \ --lb-algorithm ROUND_ROBIN --listener listener1 \ --protocol TCP --wait
Create a health monitor (
healthmon1) on the pool (pool1) that connects to the back-end servers and probes the TCP service port.- Example
Health checks can help to avoid a false positive. If no health monitor is defined, the member server is assumed to be
ONLINE.$ openstack loadbalancer healthmonitor create --name healthmon1 \ --delay 15 --max-retries 4 --timeout 10 --type TCP pool1 --wait
Add the back-end servers (
192.0.2.10and192.0.2.11) on the private subnet (private_subnet) to the pool.- Example
In this example, the back-end servers,
192.0.2.10and192.0.2.11, are namedmember1andmember2, respectively:$ openstack loadbalancer member create --name member1 --subnet-id \ private_subnet --address 192.0.2.10 --protocol-port 443 pool1 --wait $ openstack loadbalancer member create --name member2 --subnet-id \ private_subnet --address 192.0.2.11 --protocol-port 443 pool1 --wait
Verification
View and verify the load balancer (
lb1) settings.- Example
$ openstack loadbalancer show lb1- Sample output
+---------------------+--------------------------------------+ | Field | Value | +---------------------+--------------------------------------+ | admin_state_up | True | | created_at | 2024-01-15T11:11:09 | | description | | | flavor | | | id | 788fe121-3dec-4e1b-8360-4020642238b0 | | listeners | 09f28053-fde8-4c78-88b9-0f191d84120e | | name | lb1 | | operating_status | ONLINE | | pools | 627842b3-eed8-4f5f-9f4a-01a738e64d6a | | project_id | dda678ca5b1241e7ad7bf7eb211a2fd7 | | provider | amphora | | provisioning_status | ACTIVE | | updated_at | 2024-01-15T11:12:42 | | vip_address | 198.51.100.11 | | vip_network_id | 9bca13be-f18d-49a5-a83d-9d487827fd16 | | vip_port_id | 69a85edd-5b1c-458f-96f2-b4552b15b8e6 | | vip_qos_policy_id | None | | vip_subnet_id | 5bd7334b-49b3-4849-b3a2-b0b83852dba1 | +---------------------+--------------------------------------+
When a health monitor is present and functioning properly, you can check the status of each member. Use the following command to obtain a member ID:
- Example
$ openstack loadbalancer member list pool1A working member (
member1) has anONLINEvalue for itsoperating_status.- Example
$ openstack loadbalancer member show pool1 member1- Sample output
+---------------------+--------------------------------------+
| Field               | Value                                |
+---------------------+--------------------------------------+
| address             | 192.0.2.10                           |
| admin_state_up      | True                                 |
| created_at          | 2024-01-15T11:11:09                  |
| id                  | b85c807e-4d7c-4cbd-b725-5e8afddf80d2 |
| name                | member1                              |
| operating_status    | ONLINE                               |
| project_id          | dda678ca5b1241e7ad7bf7eb211a2fd7     |
| protocol_port       | 80                                   |
| provisioning_status | ACTIVE                               |
| subnet_id           | 5bd7334b-49b3-4849-b3a2-b0b83852dba1 |
| updated_at          | 2024-01-15T11:12:42                  |
| weight              | 1                                    |
| monitor_port        | None                                 |
| monitor_address     | None                                 |
| backup              | False                                |
+---------------------+--------------------------------------+
9.2. Creating a UDP load balancer with a health monitor
You can create a Red Hat OpenStack Services on OpenShift (RHOSO) load balancer when you need to manage network traffic on UDP ports. It is a best practice to also create a health monitor to ensure that your back-end members remain available.
Prerequisites
-
The administrator has created a project for you and has provided you with a
clouds.yamlfile for you to access the cloud. The
python-openstackclientpackage resides on your workstation.$ dnf list installed python-openstackclient- A shared external (public) subnet that you can reach from the internet.
- No security rules that block ICMP Destination Unreachable messages (ICMP type 3).
Procedure
Confirm that the system
OS_CLOUDvariable is set for your cloud:$ echo $OS_CLOUD my_cloudReset the variable if necessary:
$ export OS_CLOUD=my_other_cloudAs an alternative, you can specify the cloud name by adding the
--os-cloud <cloud_name>option each time you run anopenstackcommand.Create a load balancer (
lb1) on a private subnet (private_subnet).NoteValues inside parentheses are sample values that are used in the example commands in this procedure. Substitute these sample values with values that are appropriate for your site.
- Example
$ openstack loadbalancer create --name lb1 \ --vip-subnet-id private_subnet --wait
Create a listener (
listener1) on a port (1234).- Example
$ openstack loadbalancer listener create --name listener1 \ --protocol UDP --protocol-port 1234 lb1 --wait
Create the listener default pool (
pool1).- Example
The command in this example creates a pool that uses a private subnet containing back-end servers that host one or more applications configured to use UDP ports:
$ openstack loadbalancer pool create --name pool1 \ --lb-algorithm ROUND_ROBIN --listener listener1 --protocol UDP --wait
Create a health monitor (
healthmon1) on the pool (pool1) that connects to the back-end servers by using UDP (UDP-CONNECT).Health checks can help to avoid a false positive. If no health monitor is defined, the member server is assumed to be
ONLINE.- Example
$ openstack loadbalancer healthmonitor create --name healthmon1 \ --delay 5 --max-retries 2 --timeout 3 --type UDP-CONNECT pool1 --wait
Add the back-end servers (
192.0.2.10and192.0.2.11) on the private subnet (private_subnet) to the default pool.- Example
In this example, the back-end servers,
192.0.2.10and192.0.2.11, are namedmember1andmember2, respectively:$ openstack loadbalancer member create --name member1 --subnet-id \ private_subnet --address 192.0.2.10 --protocol-port 1234 pool1 --wait $ openstack loadbalancer member create --name member2 --subnet-id \ private_subnet --address 192.0.2.11 --protocol-port 1234 pool1 --wait
Verification
View and verify the load balancer (
lb1) settings.- Example
$ openstack loadbalancer show lb1- Sample output
+---------------------+--------------------------------------+ | Field | Value | +---------------------+--------------------------------------+ | admin_state_up | True | | created_at | 2024-01-15T11:11:09 | | description | | | flavor | | | id | 788fe121-3dec-4e1b-8360-4020642238b0 | | listeners | 09f28053-fde8-4c78-88b9-0f191d84120e | | name | lb1 | | operating_status | ONLINE | | pools | 627842b3-eed8-4f5f-9f4a-01a738e64d6a | | project_id | dda678ca5b1241e7ad7bf7eb211a2fd7 | | provider | amphora | | provisioning_status | ACTIVE | | updated_at | 2024-01-15T11:12:42 | | vip_address | 198.51.100.11 | | vip_network_id | 9bca13be-f18d-49a5-a83d-9d487827fd16 | | vip_port_id | 69a85edd-5b1c-458f-96f2-b4552b15b8e6 | | vip_qos_policy_id | None | | vip_subnet_id | 5bd7334b-49b3-4849-b3a2-b0b83852dba1 | +---------------------+--------------------------------------+
When a health monitor is present and functioning properly, you can check the status of each member.
- Example
$ openstack loadbalancer member show pool1 member1A working member (
member1) has anONLINEvalue for itsoperating_status.- Sample output
+---------------------+--------------------------------------+ | Field | Value | +---------------------+--------------------------------------+ | address | 192.0.2.10 | | admin_state_up | True | | created_at | 2024-01-15T11:11:09 | | id | b85c807e-4d7c-4cbd-b725-5e8afddf80d2 | | name | member1 | | operating_status | ONLINE | | project_id | dda678ca5b1241e7ad7bf7eb211a2fd7 | | protocol_port | 1234 | | provisioning_status | ACTIVE | | subnet_id | 5bd7334b-49b3-4849-b3a2-b0b83852dba1 | | updated_at | 2024-01-15T11:12:42 | | weight | 1 | | monitor_port | None | | monitor_address | None | | backup | False | +---------------------+--------------------------------------+
9.3. Creating a QoS-ruled load balancer
You can apply a Red Hat OpenStack Services on OpenShift (RHOSO) Networking service (neutron) Quality of Service (QoS) policy to virtual IP addresses (VIPs) that use load balancers. In this way, you can use a QoS policy to limit incoming or outgoing network traffic that the load balancer can manage. It is a best practice to also create a health monitor to ensure that your back-end members remain available.
Prerequisites
-
The administrator has created a project for you and has provided you with a
clouds.yamlfile for you to access the cloud. The
python-openstackclientpackage resides on your workstation.$ dnf list installed python-openstackclient- A shared external (public) subnet that you can reach from the internet.
- A QoS policy that contains bandwidth limit rules created for the Networking service.
Procedure
Confirm that the system
OS_CLOUDvariable is set for your cloud:$ echo $OS_CLOUD my_cloudReset the variable if necessary:
$ export OS_CLOUD=my_other_cloudAs an alternative, you can specify the cloud name by adding the
--os-cloud <cloud_name>option each time you run anopenstackcommand.Create a network bandwidth QoS policy (
qos_policy_bandwidth) with a maximum 1024 kbps and a maximum burst rate of 1024 kb.NoteValues inside parentheses are sample values that are used in the example commands in this procedure. Substitute these sample values with values that are appropriate for your site.
- Example
$ openstack network qos policy create qos_policy_bandwidth $ openstack network qos rule create --type bandwidth-limit --max-kbps 1024 --max-burst-kbits 1024 qos-policy-bandwidth
Create a load balancer (
lb1) on the public subnet (public_subnet) by using a QoS policy (qos-policy-bandwidth).- Example
$ openstack loadbalancer create --name lb1 \ --vip-subnet-id public_subnet \ --vip-qos-policy-id qos-policy-bandwidth --wait
Create a listener (
listener1) on a port (80).- Example
$ openstack loadbalancer listener create --name listener1 \ --protocol HTTP --protocol-port 80 lb1 --wait
Create the listener default pool (
pool1).- Example
The command in this example creates an HTTP pool that uses a private subnet containing back-end servers that host an HTTP application on TCP port 80:
$ openstack loadbalancer pool create --name pool1 --lb-algorithm ROUND_ROBIN --listener listener1 --protocol HTTP --wait
Create a health monitor (
healthmon1) on the pool that connects to the back-end servers and tests the path (/).Health checks can help to avoid a false positive. If no health monitor is defined, the member server is assumed to be
ONLINE.- Example
$ openstack loadbalancer healthmonitor create --name healthmon1 \
--delay 15 --max-retries 4 --timeout 10 --type HTTP --url-path / \
pool1 --wait
Add load balancer members (
192.0.2.10and192.0.2.11) on the private subnet (private_subnet) to the default pool.- Example
In this example, the back-end servers,
192.0.2.10and192.0.2.11, are namedmember1andmember2, respectively:$ openstack loadbalancer member create --name member1 --subnet-id \ private_subnet --address 192.0.2.10 --protocol-port 443 pool1 --wait $ openstack loadbalancer member create --name member2 --subnet-id \ private_subnet --address 192.0.2.11 --protocol-port 443 pool1 --wait
Verification
View and verify the listener (
listener1) settings.- Example
$ openstack loadbalancer list- Sample output
+---------------------+--------------------------------------+ | Field | Value | +---------------------+--------------------------------------+ | admin_state_up | True | | created_at | 2024-01-15T11:11:09 | | description | | | flavor | | | id | 788fe121-3dec-4e1b-8360-4020642238b0 | | listeners | 09f28053-fde8-4c78-88b9-0f191d84120e | | name | lb1 | | operating_status | ONLINE | | pools | 627842b3-eed8-4f5f-9f4a-01a738e64d6a | | project_id | dda678ca5b1241e7ad7bf7eb211a2fd7 | | provider | amphora | | provisioning_status | ACTIVE | | updated_at | 2024-01-15T11:12:42 | | vip_address | 198.51.100.11 | | vip_network_id | 9bca13be-f18d-49a5-a83d-9d487827fd16 | | vip_port_id | 69a85edd-5b1c-458f-96f2-b4552b15b8e6 | | vip_qos_policy_id | cdfc3398-997b-46eb-9db1-ebbd88f7de05 | | vip_subnet_id | 5bd7334b-49b3-4849-b3a2-b0b83852dba1 | +---------------------+--------------------------------------+In this example the parameter,
vip_qos_policy_id, contains a policy ID.
9.4. Creating a load balancer with an access control list
You can create an access control list (ACL) to limit incoming traffic to a Red Hat OpenStack Services on OpenShift (RHOSO) listener to a set of allowed source IP addresses. Any other incoming traffic is rejected. It is a best practice to also create a health monitor to ensure that your back-end members remain available.
Prerequisites
-
The administrator has created a project for you and has provided you with a
clouds.yamlfile for you to access the cloud. The
python-openstackclientpackage resides on your workstation.$ dnf list installed python-openstackclient- A shared external (public) subnet that you can reach from the internet.
Procedure
Confirm that the system
OS_CLOUDvariable is set for your cloud:$ echo $OS_CLOUD my_cloudReset the variable if necessary:
$ export OS_CLOUD=my_other_cloudAs an alternative, you can specify the cloud name by adding the
--os-cloud <cloud_name>option each time you run anopenstackcommand.Create a load balancer (
lb1) on the public subnet (public_subnet).NoteValues inside parentheses are sample values that are used in the example commands in this procedure. Substitute these sample values with values that are appropriate for your site.
- Example
$ openstack loadbalancer create --name lb1 --vip-subnet-id public_subnet --wait
Create a listener (
listener1) with the allowed CIDRs (192.0.2.0/24and198.51.100.0/24).- Example
$ openstack loadbalancer listener create --name listener1 --protocol TCP --protocol-port 80 --allowed-cidr 192.0.2.0/24 --allowed-cidr 198.51.100.0/24 lb1 --wait
Create the listener default pool (
pool1).- Example
In this example, a pool is created that uses a private subnet containing back-end servers that are configured with a custom application on TCP port 80:
$ openstack loadbalancer pool create --name pool1 --lb-algorithm ROUND_ROBIN --listener listener1 --protocol TCP --wait
Create a health monitor on the pool that connects to the back-end servers and tests the path (
/).Health checks can help to avoid a false positive. If no health monitor is defined, the member server is assumed to be
ONLINE.- Example
$ openstack loadbalancer healthmonitor create --name healthmon1 \
--delay 15 --max-retries 4 --timeout 10 --type HTTP --url-path / \
pool1 --wait
Add load balancer members (
192.0.2.10and192.0.2.11) on the private subnet (private_subnet) to the default pool.- Example
In this example, the back-end servers,
192.0.2.10and192.0.2.11, are namedmember1andmember2, respectively:$ openstack loadbalancer member create --subnet-id private_subnet --address 192.0.2.10 --protocol-port 80 pool1 --wait $ openstack loadbalancer member create --subnet-id private_subnet --address 192.0.2.11 --protocol-port 80 pool1 --wait
Verification
View and verify the listener (
listener1) settings.- Example
$ openstack loadbalancer listener show listener1- Sample output
+-----------------------------+--------------------------------------+
| Field                       | Value                                |
+-----------------------------+--------------------------------------+
| admin_state_up              | True                                 |
| connection_limit            | -1                                   |
| created_at                  | 2024-01-15T11:11:09                  |
| default_pool_id             | None                                 |
| default_tls_container_ref   | None                                 |
| description                 |                                      |
| id                          | d26ba156-03c3-4051-86e8-f8997a202d8e |
| insert_headers              | None                                 |
| l7policies                  |                                      |
| loadbalancers               | 2281487a-54b9-4c2a-8d95-37262ec679d6 |
| name                        | listener1                            |
| operating_status            | ONLINE                               |
| project_id                  | 308ca9f600064f2a8b3be2d57227ef8f     |
| protocol                    | TCP                                  |
| protocol_port               | 80                                   |
| provisioning_status         | ACTIVE                               |
| sni_container_refs          | []                                   |
| timeout_client_data         | 50000                                |
| timeout_member_connect      | 5000                                 |
| timeout_member_data         | 50000                                |
| timeout_tcp_inspect         | 0                                    |
| updated_at                  | 2024-01-15T11:12:42                  |
| client_ca_tls_container_ref | None                                 |
| client_authentication       | NONE                                 |
| client_crl_container_ref    | None                                 |
| allowed_cidrs               | 192.0.2.0/24                         |
|                             | 198.51.100.0/24                      |
+-----------------------------+--------------------------------------+
In this example the parameter,
allowed_cidrs, is set to allow traffic only from 192.0.2.0/24 and 198.51.100.0/24.
To verify that the load balancer is secure, ensure that a request to the listener from a client whose CIDR is not in the
allowed_cidrslist; the request does not succeed.- Sample output
curl: (7) Failed to connect to 203.0.113.226 port 80: Connection timed out
curl: (7) Failed to connect to 203.0.113.226 port 80: Connection timed out
curl: (7) Failed to connect to 203.0.113.226 port 80: Connection timed out
curl: (7) Failed to connect to 203.0.113.226 port 80: Connection timed out
9.5. Creating an OVN load balancer
You can use the OpenStack client to create a load balancer that manages network traffic in your Red Hat OpenStack Services on OpenShift (RHOSO) environment. The RHOSO Load-Balancing service supports the neutron Modular Layer 2 plug-in with the Open Virtual Network mechanism driver (ML2/OVN).
Prerequisites
-
The administrator has created a project for you and has provided you with a
clouds.yamlfile for you to access the cloud. The
python-openstackclientpackage resides on your workstation.$ dnf list installed python-openstackclientThe ML2/OVN provider driver must be deployed.
ImportantThe OVN provider only supports Layer 4 TCP and UDP network traffic and the
SOURCE_IP_PORTload balancer algorithm. The OVN provider does not support health monitoring.- A shared external (public) subnet that you can reach from the internet.
Procedure
Confirm that the system
OS_CLOUDvariable is set for your cloud:$ echo $OS_CLOUD my_cloudReset the variable if necessary:
$ export OS_CLOUD=my_other_cloudAs an alternative, you can specify the cloud name by adding the
--os-cloud <cloud_name>option each time you run anopenstackcommand.Create a load balancer (
lb1) on the private subnet (private_subnet) using the--provider ovnargument.NoteValues inside parentheses are sample values that are used in the example commands in this procedure. Substitute these sample values with values that are appropriate for your site.
- Example
$ openstack loadbalancer create --name lb1 --provider ovn \
--vip-subnet-id private_subnet --wait
Create a listener (
listener1) that uses the protocol (tcp) on the specified port (80) for which the custom application is configured.NoteThe OVN provider only supports Layer 4 TCP and UDP network traffic.
- Example
$ openstack loadbalancer listener create --name listener1 \
--protocol tcp --protocol-port 80 lb1 --wait
Create the listener default pool (
pool1).NoteThe only supported load-balancing algorithm for OVN is
SOURCE_IP_PORT.- Example
The command in this example creates an HTTP pool that uses a private subnet containing back-end servers that host a custom application on a specific TCP port:
$ openstack loadbalancer pool create --name pool1 --lb-algorithm \ SOURCE_IP_PORT --listener listener1 --protocol tcp --waitImportantOVN does not support the health monitor feature for load-balancing.
Add the back-end servers (
192.0.2.10and192.0.2.11) on the private subnet (private_subnet) to the pool.- Example
In this example, the back-end servers,
192.0.2.10and192.0.2.11, are namedmember1andmember2, respectively:$ openstack loadbalancer member create --name member1 --subnet-id \ private_subnet --address 192.0.2.10 --protocol-port 80 pool1 --wait $ openstack loadbalancer member create --name member2 --subnet-id \ private_subnet --address 192.0.2.11 --protocol-port 80 pool1 --wait
Verification
View and verify the load balancer (
lb1) settings.- Example
$ openstack loadbalancer show lb1- Sample output
+---------------------+--------------------------------------+
| Field               | Value                                |
+---------------------+--------------------------------------+
| admin_state_up      | True                                 |
| created_at          | 2024-01-15T11:11:09                  |
| description         |                                      |
| flavor              |                                      |
| id                  | 788fe121-3dec-4e1b-8360-4020642238b0 |
| listeners           | 09f28053-fde8-4c78-88b9-0f191d84120e |
| name                | lb1                                  |
| operating_status    | ONLINE                               |
| pools               | 627842b3-eed8-4f5f-9f4a-01a738e64d6a |
| project_id          | dda678ca5b1241e7ad7bf7eb211a2fd7     |
| provider            | ovn                                  |
| provisioning_status | ACTIVE                               |
| updated_at          | 2024-01-15T11:12:42                  |
| vip_address         | 198.51.100.11                        |
| vip_network_id      | 9bca13be-f18d-49a5-a83d-9d487827fd16 |
| vip_port_id         | 69a85edd-5b1c-458f-96f2-b4552b15b8e6 |
| vip_qos_policy_id   | None                                 |
| vip_subnet_id       | 5bd7334b-49b3-4849-b3a2-b0b83852dba1 |
+---------------------+--------------------------------------+
Run the
openstack loadbalancer listener showcommand to view the listener details.- Example
$ openstack loadbalancer listener show listener1 --wait- Sample output
+-----------------------------+--------------------------------------+
| Field                       | Value                                |
+-----------------------------+--------------------------------------+
| admin_state_up              | True                                 |
| connection_limit            | -1                                   |
| created_at                  | 2024-01-15T11:13:52                  |
| default_pool_id             | a5034e7a-7ddf-416f-9c42-866863def1f2 |
| default_tls_container_ref   | None                                 |
| description                 |                                      |
| id                          | a101caba-5573-4153-ade9-4ea63153b164 |
| insert_headers              | None                                 |
| l7policies                  |                                      |
| loadbalancers               | 653b8d79-e8a4-4ddc-81b4-e3e6b42a2fe3 |
| name                        | listener1                            |
| operating_status            | ONLINE                               |
| project_id                  | 7982a874623944d2a1b54fac9fe46f0b     |
| protocol                    | TCP                                  |
| protocol_port               | 64015                                |
| provisioning_status         | ACTIVE                               |
| sni_container_refs          | []                                   |
| timeout_client_data         | 50000                                |
| timeout_member_connect      | 5000                                 |
| timeout_member_data         | 50000                                |
| timeout_tcp_inspect         | 0                                    |
| updated_at                  | 2024-01-15T11:15:17                  |
| client_ca_tls_container_ref | None                                 |
| client_authentication       | NONE                                 |
| client_crl_container_ref    | None                                 |
| allowed_cidrs               | None                                 |
+-----------------------------+--------------------------------------+
Run the
openstack loadbalancer pool showcommand to view the pool (pool1) and load-balancer members.- Example
$ openstack loadbalancer pool show pool1- Sample output
+----------------------+--------------------------------------+
| Field                | Value                                |
+----------------------+--------------------------------------+
| admin_state_up       | True                                 |
| created_at           | 2024-01-15T11:17:34                  |
| description          |                                      |
| healthmonitor_id     |                                      |
| id                   | a5034e7a-7ddf-416f-9c42-866863def1f2 |
| lb_algorithm         | SOURCE_IP_PORT                       |
| listeners            | a101caba-5573-4153-ade9-4ea63153b164 |
| loadbalancers        | 653b8d79-e8a4-4ddc-81b4-e3e6b42a2fe3 |
| members              | 90d69170-2f73-4bfd-ad31-896191088f59 |
| name                 | pool1                                |
| operating_status     | ONLINE                               |
| project_id           | 7982a874623944d2a1b54fac9fe46f0b     |
| protocol             | TCP                                  |
| provisioning_status  | ACTIVE                               |
| session_persistence  | None                                 |
| updated_at           | 2024-01-15T11:18:59                  |
| tls_container_ref    | None                                 |
| ca_tls_container_ref | None                                 |
| crl_container_ref    | None                                 |
| tls_enabled          | False                                |
+----------------------+--------------------------------------+
Chapter 10. Implementing layer 7 load balancing
In Red Hat OpenStack Services on OpenShift (RHOSO) environments, you can use the RHOSO Load-balancing service (octavia) with layer 7 policies to redirect HTTP requests to particular application server pools.
Use the following criteria as needed:
- Section 10.1, “About layer 7 load balancing”
- Section 10.2, “Layer 7 load balancing in the Load-balancing service”
- Section 10.3, “Layer 7 load-balancing rules”
- Section 10.4, “Layer 7 load-balancing rule types”
- Section 10.5, “Layer 7 load-balancing rule comparison types”
- Section 10.6, “Layer 7 load-balancing rule result inversion”
- Section 10.7, “Layer 7 load-balancing policies”
- Section 10.8, “Layer 7 load-balancing policy logic”
- Section 10.9, “Layer 7 load-balancing policy actions”
- Section 10.10, “Layer 7 load-balancing policy position”
- Section 10.11, “Redirecting unsecure HTTP requests to secure HTTP”
- Section 10.12, “Redirecting requests based on the starting path to a pool”
- Section 10.13, “Sending subdomain requests to a specific pool”
- Section 10.14, “Sending requests based on the host name ending to a specific pool”
- Section 10.15, “Sending requests based on absence of a browser cookie to a specific pool”
- Section 10.16, “Sending requests based on absence of a browser cookie or invalid cookie value to a specific pool”
- Section 10.17, “Sending requests to a pool whose name matches the hostname and path”
- Section 10.18, “Configuring A-B testing on an existing production site by using a cookie”
10.1. About layer 7 load balancing
Layer 7 (L7) load balancing takes its name from the Open Systems Interconnection (OSI) model, indicating that the load balancer distributes requests to back end application server pools based on layer 7 (application) data. The following are different terms that all mean L7 load balancing: request switching, application load balancing, and content-based- routing, switching, or balancing. The Red Hat OpenStack Services on OpenShift (RHOSO) Load-balancing service (octavia) provides robust support for L7 load balancing.
You cannot create L7 policies and rules with UDP load balancers.
An L7 load balancer consists of a listener that accepts requests on behalf of a number of back end pools and distributes those requests based on policies that use application data to determine which pools service any given request. This allows for the application infrastructure to be specifically tuned and optimized to serve specific types of content. For example, you can tune one group of back end servers (a pool) to serve only images; another for execution of server-side scripting languages like PHP and ASP; and another for static content such as HTML, CSS, and JavaScript.
Unlike lower-level load balancing, L7 load balancing does not require that all pools behind the load balancing service have the same content. L7 load balancers can direct requests based on URI, host, HTTP headers, and other data in the application message.
10.2. Layer 7 load balancing in the Load-balancing service
Although you can implement layer 7 (L7) load balancing for any well-defined L7 application interface, L7 functionality for the Red Hat OpenStack Services on OpenShift (RHOSO) Load-balancing service (octavia) refers only to the HTTP and TERMINATED_HTTPS protocols and its semantics.
Neutron LBaaS and the Load-balancing service use L7 rules and policies for the logic of L7 load balancing. An L7 rule is a single, simple logical test that evaluates to true or false. An L7 policy is a collection of L7 rules and a defined action to take if all the rules associated with the policy match.
10.3. Layer 7 load-balancing rules
For the Red Hat OpenStack Services on OpenShift (RHOSO) Load-balancing service (octavia), a layer 7 (L7) load-balancing rule is a single, simple logical test that returns either true or false. It consists of a rule type, a comparison type, a value, and an optional key that is used depending on the rule type. An L7 rule must always be associated with an L7 policy.
You cannot create L7 policies and rules with UDP load balancers.
10.4. Layer 7 load-balancing rule types
The Red Hat OpenStack Services on OpenShift (RHOSO) Load-balancing service (octavia) has the following types of layer 7 load-balancing rules:
-
HOST_NAME: The rule compares the HTTP/1.1 hostname in the request against the value parameter in the rule. -
PATH: The rule compares the path portion of the HTTP URI against the value parameter in the rule. -
FILE_TYPE: The rule compares the last portion of the URI against the value parameter in the rule, for example, txt, jpg, and so on. -
HEADER: The rule looks for a header defined in the key parameter and compares it against the value parameter in the rule. -
COOKIE: The rule looks for a cookie named by the key parameter and compares it against the value parameter in the rule. -
SSL_CONN_HAS_CERT: The rule matches if the client has presented a certificate for TLS client authentication. This does not imply that the certificate is valid. -
SSL_VERIFY_RESULT: This rule matches the TLS client authentication certificate validation result. A value of zero (0) means the certificate was successfully validated. A value greater than zero means the certificate failed validation. This value follows theopenssl-verifyresult codes. -
SSL_DN_FIELD: The rule looks for aDistinguished Namefield defined in the key parameter and compares it against the value parameter in the rule.
10.5. Layer 7 load-balancing rule comparison types
For the Red Hat OpenStack Services on OpenShift (RHOSO) Load-balancing service (octavia), layer 7 load-balancing rules of a given type always perform comparisons. The Load-balancing service supports the following types of comparisons. Not all rule types support all comparison types:
-
REGEX: Perl type regular expression matching -
STARTS_WITH: String starts with -
ENDS_WITH: String ends with -
CONTAINS: String contains -
EQUAL_TO: String is equal to
10.6. Layer 7 load-balancing rule result inversion
To more fully express the logic that some policies require and the Red Hat OpenStack Services on OpenShift (RHOSO) Load-balancing service (octavia) uses, layer 7 load-balancing rules can have their result inverted. If the invert parameter of a given rule is true, the result of its comparison is inverted.
For example, an inverted equal to rule effectively becomes a not equal to rule. An inverted regex rule returns true only if the given regular expression does not match.
10.7. Layer 7 load-balancing policies
For the Red Hat OpenStack Services on OpenShift (RHOSO) Load-balancing service (octavia), a layer 7 (L7) load-balancing policy is a collection of L7 rules associated with a listener, and which might also have an association to a back end pool. Policies are actions that the load balancer takes if all of the rules in the policy are true.
You cannot create L7 policies and rules with UDP load balancers.
10.8. Layer 7 load-balancing policy logic
The Red Hat OpenStack Services on OpenShift (RHOSO) Load-balancing service (octavia), layer 7 load-balancing policy uses the following logic: all the rules associated with a given policy are logically AND-ed together. A request must match all of the policy rules to match the policy.
If you need to express a logical OR operation between rules, create multiple policies with the same action or, make a more elaborate regular expression).
10.9. Layer 7 load-balancing policy actions
If the layer 7 load-balancing policy matches a given request, then that policy action is executed. The following are the actions an L7 policy might take:
-
REJECT: The request is denied with an appropriate response code, and not forwarded on to any back end pool. -
REDIRECT_TO_URL: The request is sent an HTTP redirect to the URL defined in the redirect_url parameter. -
REDIRECT_PREFIX: Requests matching this policy are redirected to this prefix URL. -
REDIRECT_TO_POOL: The request is forwarded to the back-end pool associated with the L7 policy.
10.10. Layer 7 load-balancing policy position
For the Red Hat OpenStack Services on OpenShift (RHOSO) Load-balancing service (octavia), when multiple layer 7 (L7) load-balancing policies are associated with a listener, then the value of the policy position parameter becomes important. The position parameter is used when determining the order that L7 policies are evaluated. The policy position affects listener behavior in the following ways:
In the reference implementation of the Load-balancing service (haproxy amphorae), HAProxy enforces the following ordering regarding policy actions:
-
REJECTpolicies take precedence over all other policies. -
REDIRECT_TO_URLpolicies take precedence over REDIRECT_TO_POOL policies. -
REDIRECT_TO_POOLpolicies are evaluated only after all of the above, and in the order that the position of the policy specifies.
-
- L7 policies are evaluated in a specific order, as defined by the position attribute, and the first policy that matches a given request is the one whose action is followed.
- If no policy matches a given request, then the request is routed to the listener’s default pool, if it exists. If the listener has no default pool, then an error 503 is returned.
-
Policy position numbering starts with one (
1). - If a new policy is created with a position that matches that of an existing policy, then the new policy is inserted at the given position.
- If a new policy is created without specifying a position, or specifying a position that is greater than the number of policies already in the list, the new policy is appended to the list.
-
When policies are inserted, deleted, or appended to the list, the policy position values are re-ordered from one (
1) without skipping numbers. For example, if policy A, B, and C have position values of1,2and3respectively, if you delete policy B from the list, the position for policy C becomes2.
10.11. Redirecting unsecure HTTP requests to secure HTTP
You can use the Red Hat OpenStack Services on OpenShift (RHOSO) Load-balancing service (octavia) with layer 7 (L7) policies to redirect HTTP requests that are received on a non-secure TCP port to a secure TCP port.
In this example, any HTTP requests that arrive on the unsecure TCP port, 80, are redirected to the secure TCP port, 443.
Prerequisites
include::../global/shared-snippets.adoc[tag=cloud_user_prereqs
-
A TLS-terminated HTTPS load balancer (
lb1) that has a listener (listener1) and a pool (pool1). For more information, see Creating a TLS-terminated HTTPS load balancer.
Procedure
Confirm that the system
OS_CLOUDvariable is set for your cloud:$ echo $OS_CLOUD my_cloudReset the variable if necessary:
$ export OS_CLOUD=my_other_cloudAs an alternative, you can specify the cloud name by adding the
--os-cloud <cloud_name>option each time you run anopenstackcommand.Create an HTTP listener (
http_listener) on a load balancer (lb1) port (80).NoteValues inside parentheses are sample values that are used in the example commands in this procedure. Substitute these sample values with values that are appropriate for your site.
- Example
$ openstack loadbalancer listener create --name http_listener \
--protocol HTTP --protocol-port 80 lb1 --wait
Create an L7 policy (
policy1) on the listener (http_listener). The policy must contain the action (REDIRECT_TO_URL) and point to the URL (https://www.example.com/).- Example
$ openstack loadbalancer l7policy create --name policy1 \
--action REDIRECT_PREFIX --redirect-prefix https://www.example.com/ \
http_listener --wait
Add an L7 rule that matches all requests to a policy (
policy1).- Example
$ openstack loadbalancer l7rule create --compare-type STARTS_WITH \
--type PATH --value / policy1 --wait
Verification
-
Run the
openstack loadbalancer l7policy listcommand and verify that the policy,policy1, exists. Run the
openstack loadbalancer l7rule list <l7policy>command and verify that a rule with acompare_typeofSTARTS_WITHexists.- Example
$ openstack loadbalancer l7rule list policy1
10.12. Redirecting requests based on the starting path to a pool
You can use the Red Hat OpenStack Services on OpenShift (RHOSO) Load-balancing service (octavia) to redirect HTTP requests to an alternate pool of servers. You can define a layer 7 (L7) policy to match one or more starting paths in the URL of the request.
In this example, any requests that contain URLs that begin with /js or /images are redirected to an alternate pool of static content servers.
Prerequisites
-
The administrator has created a project for you and has provided you with a
clouds.yamlfile for you to access the cloud. The
python-openstackclientpackage resides on your workstation.$ dnf list installed python-openstackclient-
An HTTP load balancer (
lb1) that has a listener (listener1) and a pool (pool1). For more information, see Creating an HTTP load balancer with a health monitor.
Procedure
Confirm that the system
OS_CLOUDvariable is set for your cloud:$ echo $OS_CLOUD my_cloudReset the variable if necessary:
$ export OS_CLOUD=my_other_cloudAs an alternative, you can specify the cloud name by adding the
--os-cloud <cloud_name>option each time you run anopenstackcommand.Create a second pool (
static_pool) on a load balancer (lb1).NoteValues inside parentheses are sample values that are used in the example commands in this procedure. Substitute these sample values with values that are appropriate for your site.
- Example
$ openstack loadbalancer pool create --name static_pool \
--lb-algorithm ROUND_ROBIN --loadbalancer lb1 --protocol HTTP --wait
Add load balancer members (
192.0.2.10and192.0.2.11) on the private subnet (private_subnet) to the pool (static_pool):- Example
In this example, the back-end servers,
192.0.2.10and192.0.2.11, are namedmember1andmember2, respectively:$ openstack loadbalancer member create --name member1 --subnet-id \ private_subnet --address 192.0.2.10 --protocol-port 80 static_pool \ --wait $ openstack loadbalancer member create --name member2 --subnet-id \ private_subnet --address 192.0.2.11 --protocol-port 80 static_pool \ --wait
Create an L7 policy (
policy1) on the listener (listener1). The policy must contain the action (REDIRECT_TO_POOL) and point to the pool (static_pool).- Example
$ openstack loadbalancer l7policy create --name policy1 \
--action REDIRECT_TO_POOL --redirect-pool static_pool listener1 \
--wait
Add an L7 rule that looks for
/jsat the start of the request path to the policy.- Example
$ openstack loadbalancer l7rule create --compare-type STARTS_WITH \
--type PATH --value /js policy1 --wait
Create an L7 policy (
policy2) with an action (REDIRECT_TO_POOL) and add the listener (listener1) pointed at the pool.- Example
$ openstack loadbalancer l7policy create --name policy2 \
--action REDIRECT_TO_POOL --redirect-pool static_pool listener1 \
--wait
Add an L7 rule that looks for
/imagesat the start of the request path to the policy.- Example
$ openstack loadbalancer l7rule create --compare-type STARTS_WITH \
--type PATH --value /images policy2 --wait
Verification
-
Run the
openstack loadbalancer l7policy listcommand and verify that the policies,policy1andpolicy2, exist. Run the
openstack loadbalancer l7rule list <l7policy>command and verify that a rule with acompare_typeofSTARTS_WITHexists for each respective policy.- Example
$ openstack loadbalancer l7rule list policy1

$ openstack loadbalancer l7rule list policy2
10.13. Sending subdomain requests to a specific pool
You can use the Red Hat OpenStack Services on OpenShift (RHOSO) Load-balancing service (octavia) with layer 7 (L7) policies to redirect requests containing a specific HTTP/1.1 hostname to a different pool of application servers.
In this example, any requests that contain the HTTP/1.1 hostname, www2.example.com, are redirected to an alternate pool of application servers, pool2.
Prerequisites
-
The administrator has created a project for you and has provided you with a
clouds.yamlfile for you to access the cloud. The
python-openstackclientpackage resides on your workstation.$ dnf list installed python-openstackclientAn HTTP load balancer (
lb1) that has a listener (listener1) and a pool (pool1).For more information, see Creating an HTTP load balancer with a health monitor.
Procedure
Confirm that the system
OS_CLOUDvariable is set for your cloud:$ echo $OS_CLOUD my_cloudReset the variable if necessary:
$ export OS_CLOUD=my_other_cloudAs an alternative, you can specify the cloud name by adding the
--os-cloud <cloud_name>option each time you run anopenstackcommand.Create a second pool (
pool2) on the load balancer (lb1).NoteValues inside parentheses are sample values that are used in the example commands in this procedure. Substitute these sample values with values that are appropriate for your site.
- Example
$ openstack loadbalancer pool create --name pool2 \
--lb-algorithm ROUND_ROBIN --loadbalancer lb1 --protocol HTTP --wait
Create an L7 policy (
policy1) on the listener (listener1). The policy must contain the action (REDIRECT_TO_POOL) and point to the pool (pool2).- Example
$ openstack loadbalancer l7policy create --name policy1 \
--action REDIRECT_TO_POOL --redirect-pool pool2 listener1 --wait
Add an L7 rule to the policy that sends any requests using the HTTP/1.1 hostname, www2.example.com, to the second pool (
pool2).- Example
$ openstack loadbalancer l7rule create --compare-type EQUAL_TO \
--type HOST_NAME --value wwwexample.com policy1 --wait
Verification
-
Run the
openstack loadbalancer l7policy listcommand and verify that the policy,policy1, exists. Run the
openstack loadbalancer l7rule list <l7policy>command and verify that a rule with acompare_typeofEQUAL_TOexists for the policy.- Example
$ openstack loadbalancer l7rule list policy1
10.14. Sending requests based on the host name ending to a specific pool
You can use the Red Hat OpenStack Services on OpenShift (RHOSO) Load-balancing service (octavia) with layer 7 (L7) policies to redirect requests containing an HTTP/1.1 hostname that ends in a specific string to a different pool of application servers.
In this example, any requests that contain an HTTP/1.1 hostname that ends with, .example.com, are redirected to an alternate pool application server, pool2.
Prerequisites
-
The administrator has created a project for you and has provided you with a
clouds.yamlfile for you to access the cloud. The
python-openstackclientpackage resides on your workstation.$ dnf list installed python-openstackclientAn HTTP load balancer (
lb1) that has a listener (listener1) and a pool (pool1).For more information, see Creating an HTTP load balancer with a health monitor
Procedure
Confirm that the system
OS_CLOUDvariable is set for your cloud:$ echo $OS_CLOUD my_cloudReset the variable if necessary:
$ export OS_CLOUD=my_other_cloudAs an alternative, you can specify the cloud name by adding the
--os-cloud <cloud_name>option each time you run anopenstackcommand.Create a second pool (
pool2) on the load balancer (lb1).NoteValues inside parentheses are sample values that are used in the example commands in this procedure. Substitute these sample values with values that are appropriate for your site.
- Example
$ openstack loadbalancer pool create --name pool2 \
--lb-algorithm ROUND_ROBIN --loadbalancer lb1 --protocol HTTP --wait
Create an L7 policy (
policy1) on the listener (listener1). The policy must contain the action (REDIRECT_TO_POOL) and point to the pool (pool2).- Example
$ openstack loadbalancer l7policy create --name policy1 \
--action REDIRECT_TO_POOL --redirect-pool pool2 listener1 --wait
Add an L7 rule to the policy that sends any requests that use an HTTP/1.1 hostname (
www2.example.com) to the second pool (pool2).- Example
$ openstack loadbalancer l7rule create --compare-type ENDS_WITH \
--type HOST_NAME --value .example.com policy1 --wait
Verification
-
Run the
openstack loadbalancer l7policy listcommand and verify that the policy,policy1, exists. Run the
openstack loadbalancer l7rule list <l7policy>command and verify that a rule with acompare_typeofEQUAL_TOexists for the policy.- Example
$ openstack loadbalancer l7rule list policy1
10.15. Sending requests based on absence of a browser cookie to a specific pool
You can use the Red Hat OpenStack Services on OpenShift (RHOSO) Load-balancing service (octavia) to redirect unauthenticated web client requests to a different pool that contains one or more authentication servers. A layer 7 (L7) policy determines whether the incoming request is missing an authentication cookie.
In this example, any web client requests that lack the browser cookie, auth_token, are redirected to an alternate pool that contains an authentication server.
This procedure provides an example for how to perform L7 application routing by using a browser cookie, and does not address security concerns.
Prerequisites
-
The administrator has created a project for you and has provided you with a
clouds.yamlfile for you to access the cloud. The
python-openstackclientpackage resides on your workstation.$ dnf list installed python-openstackclientA TLS-terminated HTTPS load balancer (
lb1) that has a listener (listener1) and a pool (pool1).For more information, see Creating a TLS-terminated HTTPS load balancer.
- A second Networking service (neutron) subnet on which a secure authentication server authenticates web users.
Procedure
Confirm that the system
OS_CLOUDvariable is set for your cloud:$ echo $OS_CLOUD my_cloudReset the variable if necessary:
$ export OS_CLOUD=my_other_cloudAs an alternative, you can specify the cloud name by adding the
--os-cloud <cloud_name>option each time you run anopenstackcommand.Create a second pool (
login_pool) on the load balancer (lb1).NoteValues inside parentheses are sample values that are used in the example commands in this procedure. Substitute these sample values with values that are appropriate for your site.
- Example
$ openstack loadbalancer pool create --name login_pool \
--lb-algorithm ROUND_ROBIN --loadbalancer lb1 --protocol HTTP --wait
Add a member, the secure authentication server (
192.0.2.10) on the authenticating subnet (secure_subnet), to the second pool.- Example
In this example, the back-end server,
192.0.2.10, is namedmember1:$ openstack loadbalancer member create --name member1 \ --address 192.0.2.10 --protocol-port 80 --subnet-id secure_subnet \ login_pool --wait
Create an L7 policy (
policy1) on the listener (listener1). The policy must contain the action (REDIRECT_TO_POOL) and point to the second pool (login_pool).- Example
$ openstack loadbalancer l7policy create --name policy1 \
--action REDIRECT_TO_POOL --redirect-pool login_pool listener1 \
--wait
Add an L7 rule to the policy (
policy1) that searches for the browser cookie (auth_token) with any value, and matches if the cookie is NOT present.- Example
$ openstack loadbalancer l7rule create --compare-type REGEX \
--key auth_token --type COOKIE --value '.*' --invert policy1 --wait
Verification
-
Run the
openstack loadbalancer l7policy listcommand and verify that the policy,policy1, exists. Run the
openstack loadbalancer l7rule list <l7policy>command and verify that a rule with acompare_typeofREGEXexists.- Example
$ openstack loadbalancer l7rule list policy1
10.16. Sending requests based on absence of a browser cookie or invalid cookie value to a specific pool
You can use the Red Hat OpenStack Services on OpenShift (RHOSO) Load-balancing service (octavia) to redirect unauthenticated web client requests to a different pool that contains one or more authentication servers. A layer 7 (L7) policy determines whether the incoming request is missing an authentication cookie or contains an authentication cookie with a particular value.
In this example, any web client requests that either lacks the browser cookie, auth_token, or has auth_token with a value of INVALID, are redirected to an alternate pool that contains an authentication server.
This procedure provides an example for how to perform L7 application routing using a browser cookie, and does not address security concerns.
Prerequisites
-
The administrator has created a project for you and has provided you with a
clouds.yamlfile for you to access the cloud. The
python-openstackclientpackage resides on your workstation.$ dnf list installed python-openstackclientA TLS-terminated HTTPS load balancer (
lb1) that has a listener (listener1) and a pool (pool1).For more information, see Creating a TLS-terminated HTTPS load balancer.
- A second Networking service (neutron) subnet on which a secure authentication server authenticates web users.
Procedure
Confirm that the system
OS_CLOUDvariable is set for your cloud:$ echo $OS_CLOUD my_cloudReset the variable if necessary:
$ export OS_CLOUD=my_other_cloudAs an alternative, you can specify the cloud name by adding the
--os-cloud <cloud_name>option each time you run anopenstackcommand.Create a second pool (
login_pool) on the load balancer (lb1).NoteValues inside parentheses are sample values that are used in the example commands in this procedure. Substitute these sample values with values that are appropriate for your site.
- Example
$ openstack loadbalancer pool create --name login_pool \
--lb-algorithm ROUND_ROBIN --loadbalancer lb1 --protocol HTTP --wait
Add a member, the secure authentication server (
192.0.2.10) on the authenticating subnet (secure_subnet), to the second pool.- Example
In this example, the back-end server,
192.0.2.10, is namedmember1:$ openstack loadbalancer member create --name member1 \ --address 192.0.2.10 --protocol-port 80 --subnet-id secure_subnet \ login_pool --wait
Create an L7 policy (
policy1) on the listener (listener1). The policy must contain the action (REDIRECT_TO_POOL) and point to the second pool (login_pool).- Example
$ openstack loadbalancer l7policy create --action REDIRECT_TO_POOL \
--redirect-pool login_pool --name policy1 listener1 --wait
Add an L7 rule to the policy (
policy1) that searches for the browser cookie (auth_token) with any value, and matches if the cookie is NOT present.- Example
$ openstack loadbalancer l7rule create --compare-type REGEX \
--key auth_token --type COOKIE --value '.*' --invert policy1 --wait
Create a second L7 policy (
policy2) on the listener (listener1). The policy must contain the action (REDIRECT_TO_POOL) and point to the second pool (login_pool).- Example
$ openstack loadbalancer l7policy create --action REDIRECT_TO_POOL \
--redirect-pool login_pool --name policy2 listener1 --wait
Add an L7 rule to the second policy (
policy2) that searches for the browser cookie (auth_token) and matches if the cookie value equals the stringINVALID.- Example
$ openstack loadbalancer l7rule create --compare-type EQUAL_TO \
--key auth_token --type COOKIE --value INVALID policy2 --wait
Verification
-
Run the
openstack loadbalancer l7policy listcommand and verify that the policies,policy1andpolicy2, exist. Run the
openstack loadbalancer l7rule list <l7policy>command and verify that a rule with acompare_typeofREGEXexists forpolicy1and a rule with acompare_typeofEQUAL_TOexists forpolicy2.- Example
$ openstack loadbalancer l7rule list policy1

$ openstack loadbalancer l7rule list policy2
10.17. Sending requests to a pool whose name matches the hostname and path
You can use the Red Hat OpenStack Services on OpenShift (RHOSO) Load-balancing service (octavia) to redirect web client requests that match certain criteria to an alternate pool of application servers. The business logic criteria is performed through a layer 7 (L7) policy that attempts to match a predefined hostname and request path.
In this example, any web client requests that either match the hostname api.example.com, and have /api at the start of the request path are redirected to an alternate pool, api_pool.
Prerequisites
-
The administrator has created a project for you and has provided you with a
clouds.yamlfile for you to access the cloud. The
python-openstackclientpackage resides on your workstation.$ dnf list installed python-openstackclient-
An HTTP load balancer (
lb1) that has a listener (listener1) and a pool (pool1). For more information, see Creating an HTTP load balancer with a health monitor.
Procedure
Confirm that the system
OS_CLOUDvariable is set for your cloud:$ echo $OS_CLOUD my_cloudReset the variable if necessary:
$ export OS_CLOUD=my_other_cloudAs an alternative, you can specify the cloud name by adding the
--os-cloud <cloud_name>option each time you run anopenstackcommand.Create a second pool (
api_pool) on the load balancer (lb1).NoteValues inside parentheses are sample values that are used in the example commands in this procedure. Substitute these sample values with values that are appropriate for your site.
- Example
$ openstack loadbalancer pool create --name api_pool \
--lb-algorithm ROUND_ROBIN --loadbalancer lb1 --protocol HTTP --wait
Add load balancer members (
192.0.2.10and192.0.2.11) on the private subnet (private_subnet) to the pool (static_pool):- Example
In this example, the back-end servers,
192.0.2.10and192.0.2.11, are namedmember1andmember2, respectively:$ openstack loadbalancer member create --name member1 --subnet-id \ private_subnet --address 192.0.2.10 --protocol-port 80 static_pool \ --wait $ openstack loadbalancer member create --name member2 --subnet-id \ private_subnet --address 192.0.2.11 --protocol-port 80 static_pool \ --wait
Create an L7 policy (
policy1) on the listener (listener1). The policy must contain the action (REDIRECT_TO_POOL) and point to the pool (api_pool).- Example
$ openstack loadbalancer l7policy create --action REDIRECT_TO_POOL \
--redirect-pool api_pool --name policy1 listener1 --wait
Add an L7 rule to the policy that matches the hostname
api.example.com.- Example
$ openstack loadbalancer l7rule create --compare-type EQUAL_TO \
--type HOST_NAME --value api.example.com policy1 --wait
Add a second L7 rule to the policy that matches
/apiat the start of the request path.This rule is logically ANDed with the first rule.
- Example
$ openstack loadbalancer l7rule create --compare-type STARTS_WITH \
--type PATH --value /api policy1 --wait
Verification
-
Run the
openstack loadbalancer l7policy listcommand and verify that the policy,policy1, exists. Run the
openstack loadbalancer l7rule list <l7policy>command and verify that rules with acompare_typeofEQUAL_TOandSTARTS_WITH, respectively, both exist forpolicy1.- Example
$ openstack loadbalancer l7rule list policy1

$ openstack loadbalancer l7rule list policy2
10.18. Configuring A-B testing on an existing production site by using a cookie
You can use the Red Hat OpenStack Services on OpenShift (RHOSO) Load-balancing service (octavia) with layer 7 (L7) policies to configure A-B testing, or split testing, for your production websites.
In this example, web clients that are routed to the “B” version of the website set the cookie site_version to B by the member servers in the pool (pool1).
Prerequisites
-
The administrator has created a project for you and has provided you with a
clouds.yamlfile for you to access the cloud. The
python-openstackclientpackage resides on your workstation.$ dnf list installed python-openstackclient- Two production websites (site A and site B).
You have configured an HTTP load balancer following the instructions for "Redirecting requests based on the starting path to a pool." A summary of the required configuration is:
-
Listener (
listener1) on load balancer (lb1). -
HTTP requests with a URL that starts with either
/jsor/imagesare sent to a pool (static_pool). -
All other requests are sent to the listener default pool (
pool1). - For more information about the configuration, see Section 10.12, “Redirecting requests based on the starting path to a pool”.
-
Listener (
Procedure
Confirm that the system
OS_CLOUDvariable is set for your cloud:$ echo $OS_CLOUD my_cloudReset the variable if necessary:
$ export OS_CLOUD=my_other_cloudAs an alternative, you can specify the cloud name by adding the
--os-cloud <cloud_name>option each time you run anopenstackcommand.Create a third pool (
pool_B) on a load balancer (lb1).NoteValues inside parentheses are sample values that are used in the example commands in this procedure. Substitute these sample values with values that are appropriate for your site.
- Example
$ openstack loadbalancer pool create --name pool_B \
--lb-algorithm ROUND_ROBIN --loadbalancer lb1 --protocol HTTP --wait
Add load balancer members (
192.0.2.50and192.0.2.51) on the private subnet (private_subnet) to the pool (pool_B):- Example
In this example, the back-end servers,
192.0.2.50and192.0.2.51, are namedmember1andmember2, respectively:$ openstack loadbalancer member create --name member1 \ --address 192.0.2.50 --protocol-port 80 \ --subnet-id private_subnet pool_B --wait $ openstack loadbalancer member create --name member2 \ --address 192.0.2.51 --protocol-port 80 \ --subnet-id private_subnet pool_B --wait
Create a fourth pool (
static_pool_B) on a load balancer (lb1).- Example
$ openstack loadbalancer pool create --name static_pool_B \
--lb-algorithm ROUND_ROBIN --loadbalancer lb1 --protocol HTTP --wait
Add load balancer members (
192.0.2.100and192.0.2.101) on the private subnet (private_subnet) to the pool (static_pool_B):- Example
$ openstack loadbalancer member create --name member3 \
--address 192.0.2.100 --protocol-port 80 \
--subnet-id private_subnet static_pool_B --wait

$ openstack loadbalancer member create --name member4 \
--address 192.0.2.101 --protocol-port 80 \
--subnet-id private_subnet static_pool_B --wait
Create an L7 policy (
policy2) on the listener (listener1). The policy must contain the action (REDIRECT_TO_POOL) and point to the pool (static_pool_B). Insert the policy at position1.- Example
$ openstack loadbalancer l7policy create --action REDIRECT_TO_POOL \
--redirect-pool static_pool_B --name policy2 --position 1 listener1 \
--wait
Add an L7 rule to the policy (
policy2) that uses a regular expression to match either/jsor/imagesat the start of the request path.- Example
$ openstack loadbalancer l7rule create --compare-type REGEX \
--type PATH --value '^/(js|images)' policy2 --wait
Add a second L7 rule to the policy (
policy2) that matches the cookie (site_version) to the exact string (B).- Example
$ openstack loadbalancer l7rule create --compare-type EQUAL_TO \ --key site_version --type COOKIE --value B policy2 --wait
Create an L7 policy (
policy3) on the listener (listener1). The policy must contain the action (REDIRECT_TO_POOL) and point to the pool (pool_B). Insert the policy at position2.- Example
$ openstack loadbalancer l7policy create --action REDIRECT_TO_POOL \ --redirect-pool pool_B --name policy3 --position 2 listener1 --wait
Add an L7 rule to the policy (
policy3) that matches the cookie (site_version) to the exact string (B).- Example
$ openstack loadbalancer l7rule create --compare-type EQUAL_TO \ --key site_version --type COOKIE --value B policy3 --waitNoteIt is important to assign L7 policies with the most specific rules to a lower position, because the first policy whose rules all evaluate to True is the policy whose action is followed. In this procedure,
policy2needs to be evaluated beforepolicy3to avoid requests being sent to the incorrect pool.
Verification
-
Run the
openstack loadbalancer l7policy listcommand and verify that the policies,policy2andpolicy3, exist. Run the
openstack loadbalancer l7rule list <l7policy>command and verify that a rule with acompare_typeofSTARTS_WITHexists for each respective policy.- Example
$ openstack loadbalancer l7rule list policy2 $ openstack loadbalancer l7rule list policy3
Chapter 11. Grouping Load-balancing service objects by using tags
Tags are arbitrary strings that you can add to Red Hat OpenStack Services on OpenShift (RHOSO) Load-balancing service (octavia) objects for the purpose of classifying them into groups.
Tags do not affect the functionality of load-balancing objects: load balancers, listeners, pools, members, health monitors, rules, and polices. You can add a tag when you create the object, or add or remove a tag after the object has been created.
By associating a particular tag with load-balancing objects, you can run list commands to filter objects that belong to one or more groups. Being able to filter objects into one or more groups can be a starting point in managing usage, allocation, and maintenance of your load-balancing service resources. The ability to tag objects can also be leveraged by automated configuration management tools.
The topics included in this section are:
11.1. Adding tags when creating Load-balancing service objects
You can add a tag of your choice when you create a Red Hat OpenStack Services on OpenShift (RHOSO) Load-balancing service (octavia) object. When the tags are in place, you can filter load balancers, listeners, pools, members, health monitors, rules, and policies by using their respective loadbalancer list commands.
Prerequisites
-
The administrator has created a project for you and has provided you with a
clouds.yamlfile for you to access the cloud. The
python-openstackclientpackage resides on your workstation.$ dnf list installed python-openstackclient
Procedure
Confirm that the system
OS_CLOUDvariable is set for your cloud:$ echo $OS_CLOUD my_cloudReset the variable if necessary:
$ export OS_CLOUD=my_other_cloudAs an alternative, you can specify the cloud name by adding the
--os-cloud <cloud_name>option each time you run anopenstackcommand.Add a tag to a load-balancing object when you create it by using the
--tag <tag>option with the appropriatecreatecommand for the object:NoteA tag can be any valid unicode string with a maximum length of 255 characters.
- Example - creating and tagging a load balancer
In this example a load balancer,
lb1, is created with two tags,FinanceandSales:$ openstack loadbalancer create --name lb1 \ --vip-subnet-id public_subnet --tag Finance --tag Sales --waitNoteLoad-balancing service objects can have one or more tags. Repeat the
--tag <tag>option for each additional tag that you want to add.- Example - creating and tagging a listener
In this example a listener,
listener1, is created with a tag,Sales:$ openstack loadbalancer listener create --name listener1 --protocol HTTP --protocol-port 80 --tag Sales lb1 --wait- Example - creating and tagging a pool
In this example a pool,
pool1, is created with a tag,Sales:$ openstack loadbalancer pool create --name pool1 \ --lb-algorithm ROUND_ROBIN --listener listener1 \ --protocol HTTP --tag Sales --wait- Example - creating a member in a pool and tagging it
In this example a member,
192.0.2.10, is created inpool1with a tag,Sales:$ openstack loadbalancer member create --name member1 \ --subnet-id private_subnet --address 192.0.2.10 --protocol-port 80 \ --tag Sales pool1 --wait- Example - creating and tagging a health monitor
In this example a health monitor,
healthmon1, is created with a tag,Sales:$ openstack loadbalancer healthmonitor create --name healthmon1 \ --delay 15 --max-retries 4 --timeout 10 --type HTTP --url-path / \ --tag Sales pool1 --wait- Example - creating and tagging an L7 policy
In this example an L7 policy,
policy1, is created with a tag,Sales:$ openstack loadbalancer l7policy create --action REDIRECT_PREFIX \ --redirect-prefix https://www.example.com/ \ --name policy1 http_listener --tag Sales --wait- Example - creating and tagging an L7 rule
In this example an L7 rule,
rule1, is created with a tag,Sales:$ openstack loadbalancer l7rule create --compare-type STARTS_WITH \ --type PATH --value / --tag Sales policy1 --wait
Verification
Confirm that object that you created exists, and contains the tag that you added by using the appropriate
showcommand for the object.- Example
In this example, the
showcommand is run on the loadbalancer,lb1:$ openstack loadbalancer show lb1- Sample output
+---------------------+--------------------------------------+ | admin_state_up | True | | availability_zone | None | | created_at | 2024-08-06T19:34:15 | | description | | | flavor_id | None | | id | 7975374b-3367-4436-ab19-2d79d8c1f29b | | listeners | | | name | lb1 | | operating_status | ONLINE | | pools | | | project_id | 2eee3b86ca404cdd977281dac385fd4e | | provider | amphora | | provisioning_status | ACTIVE | | updated_at | 2024-08-07T13:30:17 | | vip_address | 172.24.3.76 | | vip_network_id | 4c241fc4-95eb-491a-affe-26c53a8805cd | | vip_port_id | 9978a598-cc34-47f7-ba28-49431d570fd1 | | vip_qos_policy_id | None | | vip_subnet_id | e999d323-bd0f-4469-974f-7f66d427e507 | | tags | Finance | | | Sales | +---------------------+--------------------------------------+
11.2. Adding or removing tags on pre-existing Load-balancing service objects
You can add and remove tags of your choice on Red Hat OpenStack Services on OpenShift (RHOSO) Load-balancing service (octavia) objects after they have been created. When the tags are in place, you can filter load balancers, listeners, pools, members, health monitors, rules, and policies by using their respective loadbalancer list commands.
You can create a new security group to apply to instances and ports within a project in a RHOSO environment.
Prerequisites
-
The administrator has created a project for you and has provided you with a
clouds.yamlfile for you to access the cloud. The
python-openstackclientpackage resides on your workstation.$ dnf list installed python-openstackclient
Procedure
Confirm that the system
OS_CLOUDvariable is set for your cloud:$ echo $OS_CLOUD my_cloudReset the variable if necessary:
$ export OS_CLOUD=my_other_cloudAs an alternative, you can specify the cloud name by adding the
--os-cloud <cloud_name>option each time you run anopenstackcommand.Do one of the following:
Add a tag to a pre-existing load-balancing object by using the
--tag <tag>option with the appropriatesetcommand for the object:-
openstack loadbalancer set --tag <tag> <load_balancer_name_or_ID> -
openstack loadbalancer listener set --tag <tag> <listener_name_or_ID> -
openstack loadbalancer pool set --tag <tag> <pool_name_or_ID> -
openstack loadbalancer member set --tag <tag> <pool_name_or_ID> <member_name_or_ID> -
openstack loadbalancer healthmonitor set --tag <tag> <healthmon_name_or_ID> -
openstack loadbalancer l7policy set --tag <tag> <l7policy_name_or_ID> openstack loadbalancer l7rule set --tag <tag> <l7policy_name_or_ID> <l7rule_ID>NoteA tag can be any valid unicode string with a maximum length of 255 characters.
- Example
In this example the tags,
FinanceandSales, are added to the load balancer,lb1:$ openstack loadbalancer set --tag Finance --tag Sales lb1NoteLoad-balancing service objects can have one or more tags. Repeat the
--tag <tag>option for each additional tag that you want to add.
-
Remove a tag from a pre-existing load-balancing object by using the
--tag <tag>option with the appropriateunsetcommand for the object:-
openstack loadbalancer unset --tag <tag> <load_balancer_name_or_ID> -
openstack loadbalancer listener unset --tag <tag> <listener_name_or_ID> -
openstack loadbalancer pool unset --tag <tag> <pool_name_or_ID> -
openstack loadbalancer member unset --tag <tag> <pool_name_or_ID> <member_name_or_ID> -
openstack loadbalancer healthmonitor unset --tag <tag> <healthmon_name_or_ID> -
openstack loadbalancer l7policy unset --tag <tag> <policy_name_or_ID> openstack loadbalancer l7rule unset --tag <tag> <policy_name_or_ID> <l7rule_ID>- Example
In this example, the tag,
Sales, is removed from the load balancer,lb1:$ openstack loadbalancer unset --tag Sales lb1
-
Remove all tags from a pre-existing load-balancing object by using the
--no-tagoption with the appropriatesetcommand for the object:-
openstack loadbalancer set --no-tag <load_balancer_name_or_ID> -
openstack loadbalancer listener set --no-tag <listener_name_or_ID> -
openstack loadbalancer pool set --no-tag <pool_name_or_ID> -
openstack loadbalancer member set --no-tag <pool_name_or_ID> <member_name_or_ID> -
openstack loadbalancer healthmonitor set --no-tag <healthmon_name_or_ID> -
openstack loadbalancer l7policy set --no-tag <l7policy_name_or_ID> openstack loadbalancer l7rule set --no-tag <l7policy_name_or_ID> <l7rule_ID>- Example
In this example, all tags are removed from the load balancer,
lb1:$ openstack loadbalancer set --no-tag lb1
-
Verification
Confirm that you have added or removed one or more tags on the load-balancing object, by using the appropriate
showcommand for the object.- Example
In this example, the
showcommand is run on the loadbalancer,lb1:$ openstack loadbalancer show lb1- Sample output
+---------------------+--------------------------------------+ | admin_state_up | True | | availability_zone | None | | created_at | 2024-08-06T19:34:15 | | description | | | flavor_id | None | | id | 7975374b-3367-4436-ab19-2d79d8c1f29b | | listeners | | | name | lb1 | | operating_status | ONLINE | | pools | | | project_id | 2eee3b86ca404cdd977281dac385fd4e | | provider | amphora | | provisioning_status | ACTIVE | | updated_at | 2024-08-07T13:30:17 | | vip_address | 172.24.3.76 | | vip_network_id | 4c241fc4-95eb-491a-affe-26c53a8805cd | | vip_port_id | 9978a598-cc34-47f7-ba28-49431d570fd1 | | vip_qos_policy_id | None | | vip_subnet_id | e999d323-bd0f-4469-974f-7f66d427e507 | | tags | Finance | | | Sales | +---------------------+--------------------------------------+
11.3. Filtering Load-balancing service objects by using tags
You can use the Red Hat OpenStack Services on OpenShift (RHOSO) Load-balancing service (octavia) to create lists of objects. For the objects that are tagged, you can create filtered lists: lists that include or exclude objects based on whether your objects contain one or more of the specified tags. Being able to filter load balancers, listeners, pools, members, health monitors, rules, and policies using tags can be a starting point in managing usage, allocation, and maintenance of your load-balancing service resources.
Prerequisites
-
The administrator has created a project for you and has provided you with a
clouds.yamlfile for you to access the cloud. The
python-openstackclientpackage resides on your workstation.$ dnf list installed python-openstackclient
Procedure
Confirm that the system
OS_CLOUDvariable is set for your cloud:$ echo $OS_CLOUD my_cloudReset the variable if necessary:
$ export OS_CLOUD=my_other_cloudAs an alternative, you can specify the cloud name by adding the
--os-cloud <cloud_name>option each time you run anopenstackcommand.Filter the objects that you want to list by running the appropriate
loadbalancer listcommand for the objects with one of the tag options:Expand Table 11.1. Tag options for filtering objects In my list, I want to… Examples include objects that match all specified tags.
$ openstack loadbalancer list --tags Sales,Finance$ openstack loadbalancer listener list --tags Sales,Finance$ openstack loadbalancer l7pool list --tags Sales,Finance$ openstack loadbalancer member list --tags Sales,Finance pool1$ openstack loadbalancer healthmonitor list --tags Sales,Finance$ openstack loadbalancer l7policy list --tags Sales,Finance$ openstack loadbalancer l7rule list --tags Sales,Finance policy1include objects that match one or more specified tags.
$ openstack loadbalancer list --any-tags Sales,Finance$ openstack loadbalancer listener list --any-tags Sales,Finance$ openstack loadbalancer l7pool list --any-tags Sales,Finance$ openstack loadbalancer member list --any-tags Sales,Finance pool1$ openstack loadbalancer healthmonitor list --any-tags Sales,Finance$ openstack loadbalancer l7policy list --any-tags Sales,Finance$ openstack loadbalancer l7rule list --any-tags Sales,Finance policy1exclude objects that match all specified tags.
$ openstack loadbalancer list --not-tags Sales,Finance$ openstack loadbalancer listener list --not-tags Sales,Finance$ openstack loadbalancer l7pool list --not-tags Sales,Finance$ openstack loadbalancer member list --not-tags Sales,Finance pool1$ openstack loadbalancer healthmonitor list --not-tags Sales,Finance$ openstack loadbalancer l7policy list --not-tags Sales,Finance$ openstack loadbalancer l7rule list --not-tags Sales,Finance policy1exclude objects that match one or more specified tags.
$ openstack loadbalancer list --not-any-tags Sales,Finance$ openstack loadbalancer listener list --not-any-tags Sales,Finance$ openstack loadbalancer l7pool list --not-any-tags Sales,Finance$ openstack loadbalancer member list --not-any-tags Sales,Finance pool1$ openstack loadbalancer healthmonitor list --not-any-tags Sales,Finance$ openstack loadbalancer l7policy list --not-any-tags Sales,Finance$ openstack loadbalancer l7rule list --not-any-tags Sales,Finance policy1NoteWhen specifying more than one tag, separate the tags by using a comma.
Chapter 12. Creating availability zones for load balancing of network traffic at the edge
You can create load balancers in availability zones (AZs) to increase traffic throughput, reduce latency, and enhance security by using the Red Hat OpenStack Services on OpenShift (RHOSO) Load-balancing service (octavia).
The RHOSO administrator creates an AZ profile and uses the profile to create the actual AZ. RHOSO users can create load balancers in these AZs in their various projects.
The topics included in this section are:
12.1. Creating availability zones for the Load-balancing service (amphora provider)
With the Red Hat OpenStack Services on OpenShift (RHOSO) Load-balancing service (octavia), RHOSO administrators can create load-balancing availability zones (AZs) that enable project users to create load balancers to increase traffic throughput and reduce latency. Common use cases for load-balancing AZs include distributed compute node (DCN) and edge environments.
There are two steps required to create a Load-balancing service AZ: RHOSO administrators must first create a load balancer AZ profile, and then use the profile to create a Load-balancing service AZ that is visible to users.
Prerequisites
-
You have the
occommand line tool installed on your workstation. -
You are logged on to a workstation that has access to the RHOSO control plane as a user with
cluster-adminprivileges. The load balancer created with the AZ must use the amphora load-balancing provider.
The OVN load-balancing provider uses another mechanism to support availability zones that is native to OVN.
-
You must have a DCN environment in which the required networking resources have been created by running the
octavia-dcn-deployment.yamlAnsible playbook.
- You have access to a Compute service (nova) AZ.
Your site has access to a management network. You have two options:
- A "stretched" Layer 2 load-balancing management network.
- A distributed Compute node (DCN) environment where you want to isolate your networks.
Procedure
Access the remote shell for the OpenStackClient pod from your workstation:
$ oc rsh -n openstack openstackclientGather the names of the Compute service AZs that you will use for your Load-balancing service AZs.
TipNaming your Load-balancing service AZs to match the names of your Compute service AZs can facilitate AZ management.
$ openstack availability zone list --compute- Sample output
+-----------+-------------+ | Zone Name | Zone Status | +-----------+-------------+ | az0 | available | | az1 | available | | az2 | available | | internal | available | +-----------+-------------+
Gather the IDs for the management networks that you will use to create your Load-balancing service AZs:
$ openstack network list -c Name -c ID- Sample output
+--------------------------------------+----------------------+ | ID | Name | +--------------------------------------+----------------------+ | 0947ddcf-d9be-4b8c-94a1-be3852e5d905 | dcn2-public | | 4f35cb1c-69d7-4582-b3a5-0cf380c56f62 | dcn1-public | | 55e761de-ef4c-4a5c-8198-89d20a06eca3 | lb-mgmt-az2-net | | a1894c48-823c-4def-bb6f-e9b7ec4d0c0a | public | | bf72ef9b-e0f1-4d4e-a8b5-7f5bb036a275 | lb-mgmt-az1-net | | ff8f3153-a74b-499c-a850-947ad199fc6d | octavia-provider-net | +--------------------------------------+----------------------+NoteEnsure that you know which networks are valid for creating VIPs for your site.
Create an AZ profile:
$ openstack loadbalancer availabilityzoneprofile create \ --name <AZ_profile_name> --provider amphora --availability-zone-data \ '{"compute_zone": "<compute_AZ_name>","management_network": \ "<lb_mgmt_AZ_net_UUID>", "valid_vip_networks": ["<valid_AZ_VIP_net_UUID>"]}'-
Replace
<AZ_profile_name>with the name of the AZ profile that you are creating. -
Replace
<compute_AZ_name>with the name of the Compute AZ where you are creating the AZ profile. -
Replace
<lb_mgmt_AZ_net_UUID>with the ID of the management network available to the AZ that will be created. (Optional) replace
<valid_AZ_VIP_net_UUID>with the network ID that is allowed for VIP use. Usevalid_vip_networksif you want to restrict the networks available for VIPs in this AZ.- Example - create profile for
az0 In this example, an AZ profile (
az0_profile) is created that uses the management network (lb-mgmt-net) on a Compute node that runs in the Compute AZ (az0):$ openstack loadbalancer availabilityzoneprofile create \ --name az0_profile --provider amphora --availability-zone-data \ '{"compute_zone": "az0","management_network": \ "662a94f5-51eb-4a4c-86c4-52dcbf471ef9"}'
- Example - create profile for
-
Replace
Repeat step 4 to create an AZ profile for each Load-balancing service AZ that you want to create.
- Example - create profile for
az1 In this example, an AZ profile (
az1-profile) is created that uses the management network (lb-mgmt-az1-net) on a Compute node that runs in the Compute AZ (az1):$ openstack loadbalancer availabilityzoneprofile create \ --name az1-profile --provider amphora --availability-zone-data \ '{"compute-zone": "az1","management-network": \ "a2884aaf-846c-4936-9982-3083f6a71d9b"}'- Example - create profile for
az2 In this example, an AZ profile (
az2-profile) is created that uses the management network (lb-mgmt-az2-net) on a Compute node that runs in the Compute AZ (az2):$ openstack loadbalancer availabilityzoneprofile create \ --name az2-profile --provider amphora --availability-zone-data \ '{"compute-zone": "az2","management-network": \ "10458d6b-e7c9-436f-92d9-711677c9d9fd"}'
- Example - create profile for
Using the AZ profile, create a Load-balancing service AZ. Repeat this step for any additional AZs, using the appropriate profile for each AZ.
- Example - create AZ:
az0 In this example, a Load-balancing service AZ (
az0) is created by using the AZ profile (az0-profile):$ openstack loadbalancer availabilityzone create --name az0 \ --availabilityzoneprofile az0-profile \ --description "AZ for Headquarters" --enable- Example - create AZ:
az1 In this example, a Load-balancing service AZ (
az1) is created by using the AZ profile (az1-profile):$ openstack loadbalancer availabilityzone create --name az1 \ --availabilityzoneprofile az1-profile \ --description "AZ for South Region" --enable- Example - create AZ:
az2 In this example, a Load-balancing service AZ (
az2) is created by using the AZ profile (az2-profile):$ openstack loadbalancer availabilityzone create --name az2 \ --availabilityzoneprofile az2-profile \ --description "AZ for North Region" --enable
- Example - create AZ:
Verification
Confirm that the AZ (
az0) was created. Repeat this step for any additional AZs, using the appropriate name for each AZ.- Example - verify
az0 $ openstack loadbalancer availabilityzone show az0- Sample output
+------------------------------+--------------------------------------+ | Field | Value | +------------------------------+--------------------------------------+ | name | az0 | | availability_zone_profile_id | 5ed25d22-52a5-48ad-85ec-255910791623 | | enabled | True | | description | AZ for Headquarters | +------------------------------+--------------------------------------+- Example - verify
az1 $ openstack loadbalancer availabilityzone show az1- Sample output
+------------------------------+--------------------------------------+ | Field | Value | +------------------------------+--------------------------------------+ | name | az1 | | availability_zone_profile_id | e0995a82-8e67-4cea-b32c-256cd61f9cf3 | | enabled | True | | description | AZ for South Region | +------------------------------+--------------------------------------+- Example - verify
az2 $ openstack loadbalancer availabilityzone show az2- Sample output
+------------------------------+--------------------------------------+ | Field | Value | +------------------------------+--------------------------------------+ | name | az2 | | availability_zone_profile_id | 306a4725-7dac-4046-8f16-f2e668ee5a8d | | enabled | True | | description | AZ for North Region | +------------------------------+--------------------------------------+
- Example - verify
12.2. Creating load balancers in availability zones
With the Red Hat OpenStack Services on OpenShift (RHOSO) Load-balancing service (octavia), you can create load balancers in availability zones (AZs) to increase traffic throughput and reduce latency. Common use cases for load-balancing AZs are distributed compute node (DCN) and edge environments.
Prerequisites
- You must have a Load-balancing service AZ provided by your administrator.
- The virtual IP (VIP) network associated with the load balancer must be available in the AZ in which your load balancer is a member.
Procedure
Confirm that the system
OS_CLOUDvariable is set for your cloud:$ echo $OS_CLOUD my_cloudReset the variable if necessary:
$ export OS_CLOUD=my_other_cloudAs an alternative, you can specify the cloud name by adding the
--os-cloud <cloud_name>option each time you run anopenstackcommand.To create a load balancer for a DCN environment, use the
loadbalancer createcommand with the--availability-zoneoption and specify the appropriate AZ.- Example
For example, to create load balancer (
lb1) on a public subnet (public_subnet) on availability zone (az1), you would enter the following command:$ openstack loadbalancer create --name lb1 --vip-subnet-id \ public_subnet --availability-zone az1 --wait
- Continue to create your load balancer by adding a listener, pool, health monitor, and load balancer members.
Verification
Confirm that the load balancer (lb1) is a member of the availability zone (
az1).- Example
$ openstack loadbalancer show lb1- Sample output
+---------------------+--------------------------------------+ | Field | Value | +---------------------+--------------------------------------+ | admin_state_up | True | | availability_zone | az1 | | created_at | 2024-07-12T16:35:05 | | description | | | flavor_id | None | | id | 85c7e567-a0a7-4fcb-af89-a0bbc9abe3aa | | listeners | | | name | lb1 | | operating_status | ONLINE | | pools | | | project_id | d303d3bda9b34d73926dc46f4d0cb4bc | | provider | amphora | | provisioning_status | ACTIVE | | updated_at | 2024-07-12T16:36:45 | | vip_address | 192.0.2.229 | | vip_network_id | d7f7de6c-0e84-49e2-9042-697fa85d2532 | | vip_port_id | 7f916764-d171-4317-9c86-a1750a54b16e | | vip_qos_policy_id | None | | vip_subnet_id | a421cbcf-c5db-4323-b7ab-1df20ee6acab | | tags | | +---------------------+--------------------------------------+
Chapter 13. Troubleshooting and maintaining the Load-balancing service
To diagnose and maintain the Red Hat OpenStack Services on OpenShift (RHOSO) Load-balancing service (octavia), use OpenStack client commands to show status, migrate instances, and access logs. For additional troubleshooting, you can SSH into one or more Load-balancing service instances (amphorae).
The topics included in this section are:
13.1. Verifying the load balancer
You can troubleshoot the Red Hat OpenStack Services on OpenShift (RHOSO) Load-balancing service (octavia) and its various components by viewing the output of the load balancer show and list commands.
Prerequisites
-
The administrator has created a project for you and has provided you with a
clouds.yamlfile for you to access the cloud. The
python-openstackclientpackage resides on your workstation.$ dnf list installed python-openstackclient
Procedure
Confirm that the system
OS_CLOUDvariable is set for your cloud:$ echo $OS_CLOUD my_cloudReset the variable if necessary:
$ export OS_CLOUD=my_other_cloudAs an alternative, you can specify the cloud name by adding the
--os-cloud <cloud_name>option each time you run anopenstackcommand.Verify the load balancer (
lb1) settings.NoteValues inside parentheses are sample values that are used in the example commands in this procedure. Substitute these sample values with values that are appropriate for your site.
- Example
$ openstack loadbalancer show lb1- Sample output
+---------------------+--------------------------------------+ | Field | Value | +---------------------+--------------------------------------+ | admin_state_up | True | | created_at | 2024-02-17T15:59:18 | | description | | | flavor_id | None | | id | 265d0b71-c073-40f4-9718-8a182c6d53ca | | listeners | 5aaa67da-350d-4125-9022-238e0f7b7f6f | | name | lb1 | | operating_status | ONLINE | | pools | 48f6664c-b192-4763-846a-da568354da4a | | project_id | 52376c9c5c2e434283266ae7cacd3a9c | | provider | amphora | | provisioning_status | ACTIVE | | updated_at | 2024-02-17T16:01:21 | | vip_address | 192.0.2.177 | | vip_network_id | afeaf55e-7128-4dff-80e2-98f8d1f2f44c | | vip_port_id | 94a12275-1505-4cdc-80c9-4432767a980f | | vip_qos_policy_id | None | | vip_subnet_id | 06ffa90e-2b86-4fe3-9731-c7839b0be6de | +---------------------+--------------------------------------+
Using the loadbalancer ID (
265d0b71-c073-40f4-9718-8a182c6d53ca) from the previous step, obtain the ID of the amphora associated with the load balancer (lb1).- Example
$ openstack loadbalancer amphora list | grep 265d0b71-c073-40f4-9718-8a182c6d53ca- Sample output
| 1afabefd-ba09-49e1-8c39-41770aa25070 | 265d0b71-c073-40f4-9718-8a182c6d53ca | ALLOCATED | STANDALONE | 198.51.100.7 | 192.0.2.177 |
Using the amphora ID (
1afabefd-ba09-49e1-8c39-41770aa25070) from the previous step, view amphora information.- Example
$ openstack loadbalancer amphora show 1afabefd-ba09-49e1-8c39-41770aa25070- Sample output
+-----------------+--------------------------------------+ | Field | Value | +-----------------+--------------------------------------+ | id | 1afabefd-ba09-49e1-8c39-41770aa25070 | | loadbalancer_id | 265d0b71-c073-40f4-9718-8a182c6d53ca | | compute_id | ba9fc1c4-8aee-47ad-b47f-98f12ea7b200 | | lb_network_ip | 198.51.100.7 | | vrrp_ip | 192.0.2.36 | | ha_ip | 192.0.2.177 | | vrrp_port_id | 07dcd894-487a-48dc-b0ec-7324fe5d2082 | | ha_port_id | 94a12275-1505-4cdc-80c9-4432767a980f | | cert_expiration | 2026-03-19T15:59:23 | | cert_busy | False | | role | STANDALONE | | status | ALLOCATED | | vrrp_interface | None | | vrrp_id | 1 | | vrrp_priority | None | | cached_zone | nova | | created_at | 2024-02-17T15:59:22 | | updated_at | 2024-02-17T16:00:50 | | image_id | 53001253-5005-4891-bb61-8784ae85e962 | | compute_flavor | 65 | +-----------------+--------------------------------------+
View the listener (
listener1) details.- Example
$ openstack loadbalancer listener show listener1- Sample output
+-----------------------------+--------------------------------------+ | Field | Value | +-----------------------------+--------------------------------------+ | admin_state_up | True | | connection_limit | -1 | | created_at | 2024-02-17T16:00:59 | | default_pool_id | 48f6664c-b192-4763-846a-da568354da4a | | default_tls_container_ref | None | | description | | | id | 5aaa67da-350d-4125-9022-238e0f7b7f6f | | insert_headers | None | | l7policies | | | loadbalancers | 265d0b71-c073-40f4-9718-8a182c6d53ca | | name | listener1 | | operating_status | ONLINE | | project_id | 52376c9c5c2e434283266ae7cacd3a9c | | protocol | HTTP | | protocol_port | 80 | | provisioning_status | ACTIVE | | sni_container_refs | [] | | timeout_client_data | 50000 | | timeout_member_connect | 5000 | | timeout_member_data | 50000 | | timeout_tcp_inspect | 0 | | updated_at | 2024-02-17T16:01:21 | | client_ca_tls_container_ref | None | | client_authentication | NONE | | client_crl_container_ref | None | | allowed_cidrs | None | +-----------------------------+--------------------------------------+
View the pool (
pool1) and load-balancer members.- Example
$ openstack loadbalancer pool show pool1- Sample output
+----------------------+--------------------------------------+ | Field | Value | +----------------------+--------------------------------------+ | admin_state_up | True | | created_at | 2024-02-17T16:01:08 | | description | | | healthmonitor_id | 4b24180f-74c7-47d2-b0a2-4783ada9a4f0 | | id | 48f6664c-b192-4763-846a-da568354da4a | | lb_algorithm | ROUND_ROBIN | | listeners | 5aaa67da-350d-4125-9022-238e0f7b7f6f | | loadbalancers | 265d0b71-c073-40f4-9718-8a182c6d53ca | | members | b92694bd-3407-461a-92f2-90fb2c4aedd1 | | | 4ccdd1cf-736d-4b31-b67c-81d5f49e528d | | name | pool1 | | operating_status | ONLINE | | project_id | 52376c9c5c2e434283266ae7cacd3a9c | | protocol | HTTP | | provisioning_status | ACTIVE | | session_persistence | None | | updated_at | 2024-02-17T16:05:21 | | tls_container_ref | None | | ca_tls_container_ref | None | | crl_container_ref | None | | tls_enabled | False | +----------------------+--------------------------------------+
Verify HTTPS traffic flows across a load balancer whose listener is configured for
HTTPSorTERMINATED_HTTPSprotocols by connecting to the VIP address (192.0.2.177) of the load balancer.TipObtain the load-balancer VIP address by using the command,
openstack loadbalancer show <load_balancer_name>.NoteSecurity groups implemented for the load balancer VIP only allow data traffic for the required protocols and ports. For this reason you cannot ping load balancer VIPs, because ICMP traffic is blocked.
- Example
$ curl -v https://192.0.2.177 --insecure- Sample output
* About to connect() to 192.0.2.177 port 443 (#0) * Trying 192.0.2.177... * Connected to 192.0.2.177 (192.0.2.177) port 443 (#0) * Initializing NSS with certpath: sql:/etc/pki/nssdb * skipping SSL peer certificate verification * SSL connection using TLS_ECDHE_RSA_WITH_AES_256_GCM_SHA384 * Server certificate: * subject: CN=www.example.com,O=Dis,L=Springfield,ST=Denial,C=US * start date: Jan 15 09:21:45 2024 GMT * expire date: Jan 15 09:21:45 2027 GMT * common name: www.example.com * issuer: CN=www.example.com,O=Dis,L=Springfield,ST=Denial,C=US > GET / HTTP/1.1 > User-Agent: curl/7.29.0 > Host: 192.0.2.177 > Accept: */* > < HTTP/1.1 200 OK < Content-Length: 30 < * Connection #0 to host 192.0.2.177 left intact
13.2. Migrating a specific Load-balancing service instance
In some cases you must migrate a Load-balancing service instance (amphora). For example, if the host is being shut down for maintenance.
Prerequisites
-
You have the
occommand line tool installed on your workstation. -
You are logged on to a workstation that has access to the RHOSO control plane as a user with
cluster-adminprivileges.
Procedure
Access the remote shell for the OpenStackClient pod from your workstation:
$ oc rsh -n openstack openstackclientLocate the ID of the amphora that you want to migrate. You need to provide the ID in a later step.
$ openstack loadbalancer amphora listTo prevent the Compute scheduler service from scheduling any new amphorae to the Compute node being evacuated, disable the Compute node (
compute-host-1).NoteValues inside parentheses are sample values that are used in the example commands in this procedure. Substitute these sample values with values that are appropriate for your site.
- Example
$ openstack compute service set compute-host-1 nova-compute --disable
Fail over the amphora by using the amphora ID (
ea17210a-1076-48ff-8a1f-ced49ccb5e53) that you obtained.- Example
$ openstack loadbalancer amphora failover ea17210a-1076-48ff-8a1f-ced49ccb5e53
Exit the
openstackclientpod:$ exit
13.3. Showing listener statistics
Using the OpenStack Client, you can obtain statistics about the listener for a particular Red Hat OpenStack Services on OpenShift (RHOSO) loadbalancer:
-
current active connections (
active_connections). -
total bytes received (
bytes_in). -
total bytes sent (
bytes_out). -
total requests that were unable to be fulfilled (
request_errors). -
total connections handled (
total_connections).
Prerequisites
-
The administrator has created a project for you and has provided you with a
clouds.yamlfile for you to access the cloud. The
python-openstackclientpackage resides on your workstation.$ dnf list installed python-openstackclient
Procedure
Confirm that the system
OS_CLOUDvariable is set for your cloud:$ echo $OS_CLOUD my_cloudReset the variable if necessary:
$ export OS_CLOUD=my_other_cloudAs an alternative, you can specify the cloud name by adding the
--os-cloud <cloud_name>option each time you run anopenstackcommand.View the stats for the listener (
listener1).NoteValues inside parentheses are sample values that are used in the example commands in this procedure. Substitute these sample values with values that are appropriate for your site.
- Example
$ openstack loadbalancer listener stats show listener1TipIf you do not know the name of the listener, enter the command
loadbalancer listener list.- Sample output
+--------------------+-------+ | Field | Value | +--------------------+-------+ | active_connections | 0 | | bytes_in | 0 | | bytes_out | 0 | | request_errors | 0 | | total_connections | 0 | +--------------------+-------+
13.4. Interpreting listener request errors
You can obtain statistics about the listener for a particular Red Hat OpenStack Services on OpenShift (RHOSO) loadbalancer. For more information, see Section 13.3, “Showing listener statistics”.
One of the statistics tracked by the RHOSO loadbalancer, request_errors, is only counting errors that occurred in the request from the end user connecting to the load balancer. The request_errors variable is not measuring errors reported by the member server.
For example, if a tenant connects through the RHOSO Load-balancing service (octavia) to a web server that returns an HTTP status code of 400 (Bad Request), this error is not collected by the Load-balancing service. Loadbalancers do not inspect the content of data traffic. In this example, the loadbalancer interprets this flow as successful because it transported information between the user and the web server correctly.
The following conditions can cause the request_errors variable to increment:
- early termination from the client, before the request has been sent.
- read error from the client.
- client timeout.
- client closed the connection.
- various bad requests from the client.
13.5. Synching load balancers with the OVN provider
In Red Hat OpenStack Services on OpenShift (RHOSO) 18.0.10, you can use a new OVN database synchronization tool to fix OVN load balancers that experience problems caused by:
- Inconsistencies between Octavia and OVN.
- Restoration or recreation of the OVN database.
- Migration or repair of Load-balancing service (octavia) resources.
- Failure of the OVN database cluster
The new tool, octavia-ovn-db-sync-util is run on the command-line to synchronize the state of Load-balancing service (octavia) resources, with the OVN databases.
The octavia-ovn-db-sync-util is designed to only work on load balancers that use the OVN provider driver. Do not use octavia-ovn-db-sync-util on load balancers that use the amphora provider driver.
Prerequisites
-
You have the
occommand line tool installed on your workstation. -
You are logged on to a workstation that has access to the RHOSO control plane as a user with
cluster-adminprivileges.
Procedure
Run
octavia-ovn-db-sync-util:$ oc exec deployments/octavia-api -- octavia-ovn-db-sync-util- Sample output
You should see output similar to the following:
INFO ovn_octavia_provider.cmd.octavia_ovn_db_sync_util [-] OVN Octavia DB sync start. INFO ovn_octavia_provider.driver [-] Starting sync OVN DB with Loadbalancer filter {'provider': 'ovn'} INFO ovn_octavia_provider.driver [-] Starting sync OVN DB with Loadbalancer lb1 DEBUG ovn_octavia_provider.driver [-] OVN loadbalancer 5bcaab92-3f8e-4460-b34d-4437a86909ef not found. Start create process. {{(pid=837681) _ensure_loadbalancer /opt/stack/ovn-octavia-provider/ovn_octavia_provider/driver.py:684}} DEBUG ovsdbapp.backend.ovs_idl.transaction [-] Running txn n=1 command(idx=0): DbCreateCommand(_result=None, table=Load_Balancer, columns={'name': '5bcaab92-3f8e-4460-b34d-4437a86909ef', 'protocol': [], 'external_ids': {'neutron:vip': '192.168.100.188', 'neutron:vip_port_id': 'e60041e8-01e8-459b-956e-a55608eb5255', 'enabled': 'True'}, 'selection_fields': ['ip_src', 'ip_dst', 'tp_src', 'tp_dst']}, row=False) {{(pid=837681) do_commit /opt/stack/ovn-octavia-provider/venv/lib/python3.12/site-packages/ovsdbapp/backend/ovs_idl/transaction.py:89}} DEBUG ovsdbapp.backend.ovs_idl.transaction [-] Running txn n=1 command(idx=0): LsLbAddCommand(_result=None, switch=000a1a3e-edff-45ad-9241-5ab8894ac0e0, lb=d69e29cd-0069-4d7f-a1ed-08c246bfb3da, may_exist=True) {{(pid=837681) do_commit /opt/stack/ovn-octavia-provider/venv/lib/python3.12/site-packages/ovsdbapp/backend/ovs_idl/transaction.py:89}} INFO ovn_octavia_provider.driver [-] Starting sync floating IP for loadbalancer 5bcaab92-3f8e-4460-b34d-4437a86909ef WARNING ovn_octavia_provider.driver [-] Floating IP not found for loadbalancer 5bcaab92-3f8e-4460-b34d-4437a86909ef ...
Verification
When you see the following output, the database synchronization for your OVN load balancers is complete:
- Sample output
INFO ovn_octavia_provider.cmd.octavia_ovn_db_sync_util [-] OVN Octavia DB sync finish.