Chapter 4. Set up Red Hat Quay services
Deploying Red Hat Quay on OpenShift requires you to create a set of yaml files. Although the oc command is used to configure the Red Hat Quay registry here, you could use the OpenShift web UI instead, if you prefer.
Refer to Appendix A for the contents of these yaml files.
Here are a few things to keep in mind:
- Your OpenShift account must have permission to create namespaces at the cluster scope.
-
Red Hat Quay runs under its own namespace inside a Kubernetes cluster, so that needs to be created first. You can create it through the
New projectin the OpenShift web console or using quay-enterprise-namespace.yaml (as described here). - You need a working enterprise-quality database. In our example, we illustrate PostgreSQL (version 9.4 or above is required, although we recommend 9.6).
- You can use an existing Redis service (needed for build logs and the Red Hat Quay tutorial) or start one as described in this procedure.
Here are the major steps, detailed below, to complete a Red Hat Quay deployment on OpenShift:
- Set up the Red Hat Quay namespace and secrets
- Create the Red Hat Quay database
- Create Red Hat Quay roles and privileges
- Create the Redis deployment
- Prepare to configure Red Hat Quay
- Start the Red Hat Quay configuration user interface
- Deploy the Red Hat Quay configuration
- Add Clair image scanning
- Add repository mirroring
4.1. Set up Red Hat Quay namespaces and secrets
-
Get Red Hat Quay yaml files: Create a set of yaml files in a directory on your local system from the contents shown in Appendix A. Study each file to determine where you might need to make modifications. You will use
oc createto create the needed resources from those files. Log in with oc cli. Login as a user with cluster scope permissions to the OpenShift cluster. For example:
oc login -u system:admin
$ oc login -u system:adminCopy to Clipboard Copied! Toggle word wrap Toggle overflow Create namespace. Run
oc createquay-enterprise-namespace.yamland then makequay-enterprisethe current project. All objects will be deployed to this namespace/project:oc create -f quay-enterprise-namespace.yaml namespace "quay-enterprise" created oc project quay-enterprise
$ oc create -f quay-enterprise-namespace.yaml
namespace "quay-enterprise" created
$ oc project quay-enterprise
Copy to Clipboard Copied! Toggle word wrap Toggle overflow Create the secret for the Red Hat Quay configuration and app: Create the following secrets. During Red Hat Quay configuration, the config.yaml, and optionally the ssl.cert and ssl.key, files are added to the application’s secret, so they can be included with the resulting Red Hat Quay application:
oc create -f quay-enterprise-config-secret.yaml
secret/quay-enterprise-config-secret created
oc create secret generic quay-enterprise-secret
$ oc create -f quay-enterprise-config-secret.yaml
secret/quay-enterprise-config-secret created
$ oc create secret generic quay-enterprise-secret
Copy to Clipboard Copied! Toggle word wrap Toggle overflow Create the secret for quay.io. This pull secret provides credentials to pull containers from the Quay.io registry. Refer to Accessing Red Hat Red Hat Quay to get the credentials you need to add to the quay-enterprise-redhat-quay-pull-secret.yaml file, then run
oc create:oc create -f quay-enterprise-redhat-quay-pull-secret.yaml secret/redhat-quay-pull-secret created
$ oc create -f quay-enterprise-redhat-quay-pull-secret.yaml
secret/redhat-quay-pull-secret created
Copy to Clipboard Copied! Toggle word wrap Toggle overflow Create the database. If you are not using your own enterprise-quality database (recommended), this procedure illustrates how to set up a Postgresql database on an OpenShift cluster. This entails creating AWS storage, a postgres deployment, and postgres service, then adding an extension to the database (see the description of
quay-storageclass.yamlin Appendix A for information on adding encryption to your volumes):Copy to Clipboard Copied! Toggle word wrap Toggle overflow oc get pods -n quay-enterprise NAME READY STATUS RESTARTS AGE postgres-xxxxxxxxxx-xxxxx 1/1 Running 0 3m26s
$ oc get pods -n quay-enterprise
NAME                        READY   STATUS    RESTARTS   AGE
postgres-xxxxxxxxxx-xxxxx   1/1     Running   0          3m26s
Copy to Clipboard Copied! Toggle word wrap Toggle overflow Run the following command, replacing the name of the postgres pod with your pod:
oc exec -it postgres-xxxxxxxxxx-xxxxx -n quay-enterprise -- /bin/bash -c 'echo "CREATE EXTENSION IF NOT EXISTS pg_trgm" | /opt/rh/rh-postgresql10/root/usr/bin/psql -d quay'
$ oc exec -it postgres-xxxxxxxxxx-xxxxx -n quay-enterprise -- /bin/bash -c 'echo "CREATE EXTENSION IF NOT EXISTS pg_trgm" | /opt/rh/rh-postgresql10/root/usr/bin/psql -d quay'Copy to Clipboard Copied! Toggle word wrap Toggle overflow NoteThe
-d database_namemust not be omitted. If it is, the extension will be created on the default PostgreSQL database.Create a serviceaccount for the database: Create a serviceaccount and grant it anyuid privilege. Running the PostgreSQL deployment under anyuid lets you add persistent storage to the deployment and allow it to store db metadata.
oc create serviceaccount postgres -n quay-enterprise
serviceaccount/postgres created
oc adm policy add-scc-to-user anyuid -z system:serviceaccount:quay-enterprise:postgres \
scc "anyuid" added to: ["system:serviceaccount:quay-enterprise:system:serviceaccount:quay-enterprise:postgres"]
# oc create serviceaccount postgres -n quay-enterprise
serviceaccount/postgres created
# oc adm policy add-scc-to-user anyuid -z system:serviceaccount:quay-enterprise:postgres \
scc "anyuid" added to: ["system:serviceaccount:quay-enterprise:system:serviceaccount:quay-enterprise:postgres"]
Copy to Clipboard Copied! Toggle word wrap Toggle overflow Create the role and the role binding: Red Hat Quay has native Kubernetes integrations. These integrations require Service Account to have access to the Kubernetes API. When Kubernetes RBAC is enabled, Role Based Access Control policy manifests also have to be deployed. This role will be used to run Red Hat Quay and also to write the config.yaml file that Red Hat Quay creates at the end of the web interface setup:
oc create -f quay-servicetoken-role-k8s1-6.yaml
oc create -f quay-servicetoken-role-binding-k8s1-6.yaml
$ oc create -f quay-servicetoken-role-k8s1-6.yaml
$ oc create -f quay-servicetoken-role-binding-k8s1-6.yaml
Copy to Clipboard Copied! Toggle word wrap Toggle overflow Add privilege: Make sure that the service account has root privileges, because Red Hat Quay runs strictly under root (this will be changed in the future versions). Throughout this example, the namespace is
quay-enterprise:oc adm policy add-scc-to-user anyuid \ system:serviceaccount:quay-enterprise:default$ oc adm policy add-scc-to-user anyuid \ system:serviceaccount:quay-enterprise:defaultCopy to Clipboard Copied! Toggle word wrap Toggle overflow Create Redis deployment: If you haven’t already deployed Redis, create a
quay-enterprise-redis.yamlfile and deploy it:oc create -f quay-enterprise-redis.yaml
$ oc create -f quay-enterprise-redis.yamlCopy to Clipboard Copied! Toggle word wrap Toggle overflow Set up to configure Red Hat Quay: Red Hat Quay V3 added a tool for configuring the Red Hat Quay service before deploying it. Although the config tool is in the same container as the full Red Hat Quay service, it is deployed in a different way, as follows:
oc create -f quay-enterprise-config.yaml
oc create -f quay-enterprise-config-service-clusterip.yaml
oc create -f quay-enterprise-config-route.yaml
$ oc create -f quay-enterprise-config.yaml
$ oc create -f quay-enterprise-config-service-clusterip.yaml
$ oc create -f quay-enterprise-config-route.yaml
Copy to Clipboard Copied! Toggle word wrap Toggle overflow The quay configuration container is now set up to be accessed from port 443 from your Web browser. Before creating the configuration, however, you need to create a route to the permanent Red Hat Quay service. This is because we need the Red Hat Quay service’s publicly available FQDN when setting up the application.
Start the Red Hat Quay application: Identify the Red Hat Quay Kubernetes service and create a route for it, then start the Red Hat Quay application as follows:
Copy to Clipboard Copied! Toggle word wrap Toggle overflow NoteThe creation of the Red Hat Quay application (quay-enterprise-app pod) will not complete until you have finished configuring the application. So don’t worry if you see that pod remain in "ContainerCreating" status until the configuration is done. At that point, the new configuration is fed to the application and it will change to the "Running" state.
You will need to know the route to the Red Hat Quay application when you do the configuration step.
Begin to configure Red Hat Quay: Open the public route to the Red Hat Quay configuration container in a Web browser. To see the route to the quay configuration service, type the following:
oc get route -n quay-enterprise quay-enterprise-config
NAME                   HOST/PORT                                                                          PATH   SERVICES                    PORT    TERMINATION   WILDCARD
quay-enterprise-config quay-enterprise-config-quay-enterprise.apps.test.example.com quay-enterprise-config    <all> passthrough  None
$ oc get route -n quay-enterprise quay-enterprise-config
NAME                   HOST/PORT                                                                          PATH   SERVICES                    PORT    TERMINATION   WILDCARD
quay-enterprise-config quay-enterprise-config-quay-enterprise.apps.test.example.com quay-enterprise-config    <all> passthrough  None
Copy to Clipboard Copied! Toggle word wrap Toggle overflow For this example, you would open this URL in your web browser: https://quay-enterprise-config-quay-enterprise.apps.test.example.com
Log in as quayconfig: When prompted, enter the username and password (the password was set as an argument to the quay config container in:
quay-enterprise-config.yaml):- User Name: quayconfig
- Password: secret
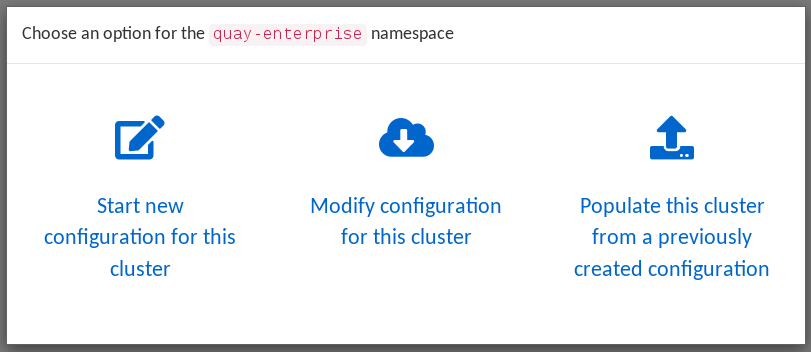
You are prompted to select a configuration mode, as shown in the following figure:
+

-
Choose configuration mode: Select "Start new configuration for this cluster" The result of this selection is the creation of a new configuration file (
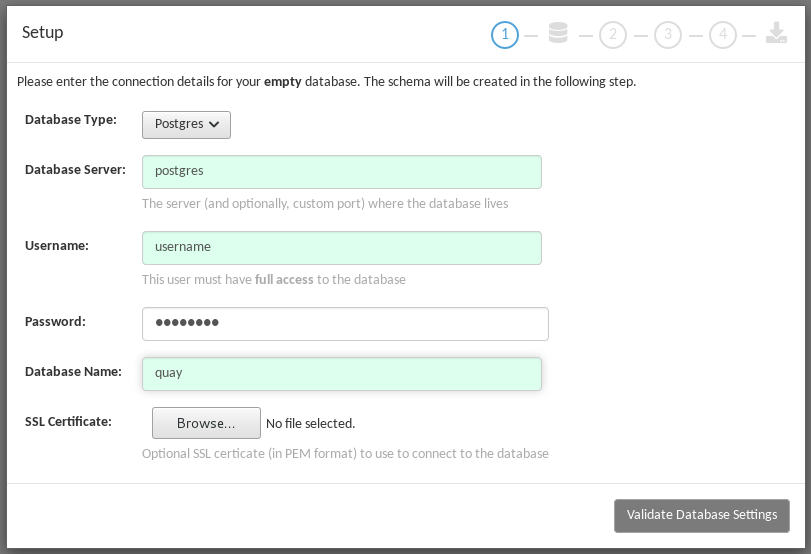
config.yaml) that you will use later for your Red Hat Quay deployment. Identify the database: For the initial setup, add the following information about the type and location of the database to be used by Red Hat Quay:
- Database Type: Choose MySQL or PostgreSQL. PostgreSQL is used with the example shown here.
- Database Server: Identify the IP address or hostname of the database, along with the port number if it is different from 3306.
- Username: Identify a user with full access to the database.
- Password: Enter the password you assigned to the selected user.
- Database Name: Enter the database name you assigned when you started the database server.
SSL Certificate: For production environments, you should provide an SSL certificate to connect to the database.
To verify the NAME of the service (postgres), type the following:
oc get services -n quay-enterprise postgres
NAME      TYPE      CLUSTER-IP     EXTERNAL-IP   PORT(S)          AGE
postgres  NodePort  172.30.127.41  <none>        5432:32212/TCP   19h
$ oc get services -n quay-enterprise postgres
NAME      TYPE      CLUSTER-IP     EXTERNAL-IP   PORT(S)          AGE
postgres  NodePort  172.30.127.41  <none>        5432:32212/TCP   19h
Copy to Clipboard Copied! Toggle word wrap Toggle overflow The following figure shows an example of the screen for identifying the database used by Red Hat Quay. The example yaml file sets the database server to
postgres, the user name tousername, the password topassword, and the database toquay:
-
Validate database: Select
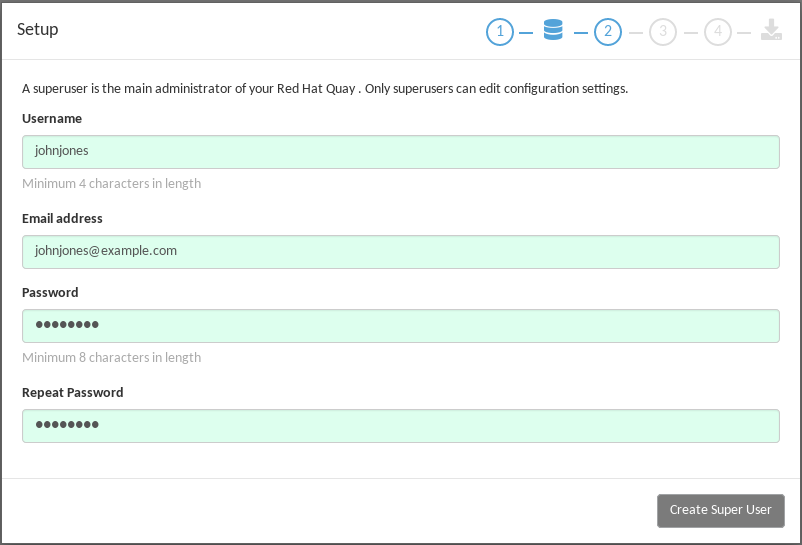
Validate Database Settingsand proceed to the next screen. Create Red Hat Quay superuser: You need to set up an account with superuser privileges to Red Hat Quay, to use for editing Red Hat Quay configuration settings. That information includes a Username, Email address, and Password (entered twice).
The following figure shows an example of the Red Hat Quay Setup screen for setting up a Red Hat Quay superuser account:

Select
Create Super User, and proceed to the next screen.Identify settings: Go through each of the following settings. The minimum you must enter includes:
- Server hostname: The URL to the Red Hat Quay service is required.
Redis hostname: The URL or IP address to the Redis service is required.
Here are all the settings you need to consider:
Custom SSL Certificates: Upload custom or self-signed SSL certificates for use by Red Hat Quay. See Using SSL to protect connections to Red Hat Quay for details. Recommended for high availability.
ImportantUsing SSL certificates is recommended for both basic and high availability deployments. If you decide to not use SSL, you must configure your container clients to use your new Red Hat Quay setup as an insecure registry as described in Test an Insecure Registry.
- Basic Configuration: Upload a company logo to rebrand your Red Hat Quay registry.
Server Configuration: Hostname or IP address to reach the Red Hat Quay service, along with TLS indication (recommended for production installations). To get the route to the permanent Red Hat Quay service, type the following:
oc get route -n quay-enterprise quay-enterprise
NAME            HOST/PORT                                                               PATH SERVICES                  PORT TERMINATION WILDCARD
quay-enterprise quay-enterprise-quay-enterprise.apps.cnegus-ocp.devcluster.openshift.com     quay-enterprise-clusterip <all>            None
$ oc get route -n quay-enterprise quay-enterprise
NAME            HOST/PORT                                                               PATH SERVICES                  PORT TERMINATION WILDCARD
quay-enterprise quay-enterprise-quay-enterprise.apps.cnegus-ocp.devcluster.openshift.com     quay-enterprise-clusterip <all>            None
Copy to Clipboard Copied! Toggle word wrap Toggle overflow See Using SSL to protect connections to Red Hat Quay. TLS termination can be done in two different ways:
- On the instance itself, with all TLS traffic governed by the nginx server in the quay container (recommended).
- On the load balancer. This is not recommended. Access to Red Hat Quay could be lost if the TLS setup is not done correctly on the load balancer.
- Data Consistency Settings: Select to relax logging consistency guarantees to improve performance and availability.
- Time Machine: Allow older image tags to remain in the repository for set periods of time and allow users to select their own tag expiration times.
redis: Identify the hostname or IP address (and optional password) to connect to the redis service used by Red Hat Quay. To find the address of the redis service, type the following:
oc get services -n quay-enterprise quay-enterprise-redis
NAME                  TYPE       CLUSTER-IP    EXTERNAL-IP PORT(S)  AGE
quay-enterprise-redis ClusterIP  172.30.207.35 <none>      6379/TCP 40m
$ oc get services -n quay-enterprise quay-enterprise-redis
NAME                  TYPE       CLUSTER-IP    EXTERNAL-IP PORT(S)  AGE
quay-enterprise-redis ClusterIP  172.30.207.35 <none>      6379/TCP 40m
Copy to Clipboard Copied! Toggle word wrap Toggle overflow - Repository Mirroring: Choose the checkbox to Enable Repository Mirroring. With this enabled, you can create repositories in your Red Hat Quay cluster that mirror selected repositories from remote registries. Before you can enable repository mirroring, start the repository mirroring worker as described later in this procedure.
- Registry Storage: Identify the location of storage. A variety of cloud and local storage options are available. Remote storage is required for high availability. Identify the Ceph storage location if you are following the example for Red Hat Quay high availability storage. On OpenShift, the example uses Amazon S3 storage.
- Action Log Rotation and Archiving: Select to enable log rotation, which moves logs older than 30 days into storage, then indicate storage area.
- Security Scanner: We recommend setting up the Clair security scanner after you have completed the initial Red Hat Quay deployment. Clair setup is described after the end of this procedure.
- Application Registry: Enable an additional application registry that includes things like Kubernetes manifests or Helm charts (see the App Registry specification).
-
BitTorrent-based download: Allow all registry images to be downloaded using BitTorrent protocol (using the
quayctltool). -
rkt Conversion: Allow
rkt fetchto be used to fetch images from the Red Hat Quay registry. Public and private GPG2 keys are needed (see Generating signing keys for ACI conversion for details. This field is deprecated. - E-mail: Enable e-mail to use for notifications and user password resets.
- Internal Authentication: Change default authentication for the registry from Local Database to LDAP, Keystone (OpenStack), JWT Custom Authentication, or External Application Token.
- External Authorization (OAuth): Enable to allow GitHub or GitHub Enterprise to authenticate to the registry.
- Google Authentication: Enable to allow Google to authenticate to the registry.
Access settings: Basic username/password authentication is enabled by default. Other authentication types that can be enabled include: external application tokens (user-generated tokens used with docker or rkt commands), anonymous access (enable for public access to anyone who can get to the registry), user creation (let users create their own accounts), encrypted client password (require command-line user access to include encrypted passwords), and prefix username autocompletion (disable to require exact username matches on autocompletion).
-
Registry Protocol Settings: Leave the
Restrict V1 Push Supportcheckbox enabled to restrict access to Docker V1 protocol pushes. Although Red Hat recommends against enabling Docker V1 push protocol, if you do allow it, you must explicitly whitelist the namespaces for which it is enabled.
-
Registry Protocol Settings: Leave the
- Dockerfile Build Support: Enable to allow users to submit Dockerfiles to be built and pushed to Red Hat Quay. This is not recommended for multitenant environments.
Save the changes: Select
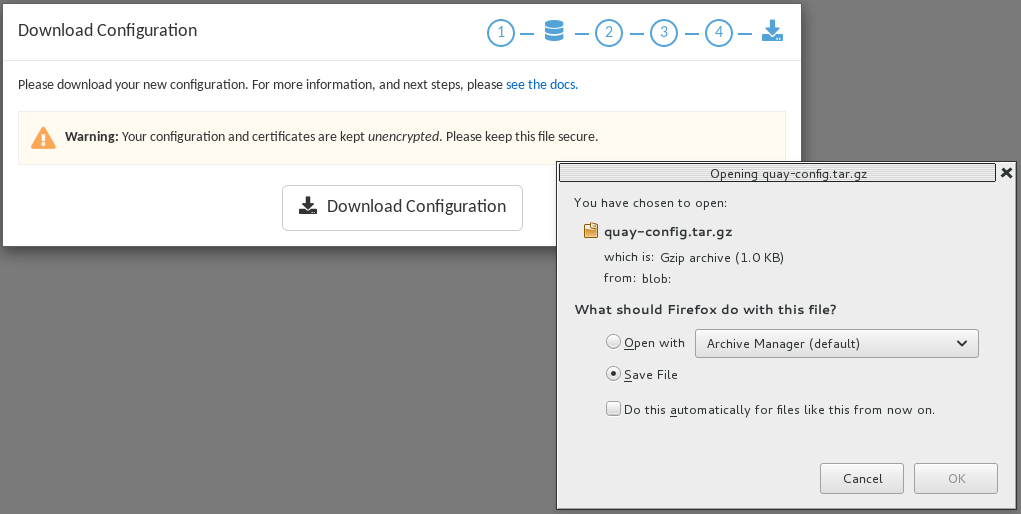
Save Configuration Changes. You are presented with the following Download Configuration screen:
-
Download configuration: Select the
Download Configurationbutton and save the tarball (quay-config.tar.gz) to a local directory. Save this file in case you want to deploy the config files inside manually or just want a record of what you deployed. Deploy configuration: Select to rollout the deployment. When prompted, click
Populate configuration to deploymentsto deploy the configuration to the Red Hat Quay application. In a few minutes, you should see a green checkmark and the message "Configuration successfully rolled out and deployed!"NoteIf for some reason the deployment doesn’t complete, try deleting the quay-enterprise-app pod. OpenShift should create a new pod and pick up the needed configuration. If that doesn’t work, unpack the configuration files (
tar xvf quay-config.tar.gz) and add them manually to the secret:oc create secret generic quay-enterprise-config-secret -n quay-enterprise \ --from-file=config.yaml=/path/to/config.yaml \ --from-file=ssl.key=/path/to/ssl.key \ --from-file=ssl.cert=/path/to/ssl.cert$ oc create secret generic quay-enterprise-config-secret -n quay-enterprise \ --from-file=config.yaml=/path/to/config.yaml \ --from-file=ssl.key=/path/to/ssl.key \ --from-file=ssl.cert=/path/to/ssl.certCopy to Clipboard Copied! Toggle word wrap Toggle overflow Check pods: In a couple of minutes (depending on your connection speed), Red Hat Quay should be up and running and the following pods should be visible in the quay-enterprise namespace You might get a mount error at first, but that should resolve itself:
Copy to Clipboard Copied! Toggle word wrap Toggle overflow Get the URL for Red Hat Quay: Type the following to get the hostname of the new Red Hat Quay installation:
oc get routes -n quay-enterprise quay-enterprise
NAME            HOST/PORT                                             PATH SERVICES                  PORT  TERMINATION WILDCARD
quay-enterprise quay-enterprise-quay-enterprise.apps.test.example.com      quay-enterprise-clusterip <all>             None
$ oc get routes -n quay-enterprise quay-enterprise
NAME            HOST/PORT                                             PATH SERVICES                  PORT  TERMINATION WILDCARD
quay-enterprise quay-enterprise-quay-enterprise.apps.test.example.com      quay-enterprise-clusterip <all>             None
Copy to Clipboard Copied! Toggle word wrap Toggle overflow - Start using Red Hat Quay: Open the hostname in a web browser to start using Red Hat Quay.
4.2. Add Clair image scanning to Red Hat Quay
Setting up and deploying Clair image scanning for your Red Hat Quay deployment requires the following basic steps:
- Setting up a database for Clair
- Creating authentication keys for Clair
- Deploying Clair
The following procedure assumes you already have a running Red Hat Quay cluster on an OpenShift platform with the Red Hat Quay Setup container running in your browser:
Create the Clair database: This example configures a postgresql database to use with the Clair image scanner. With the yaml files in the current directory, review those files for possible modifications, then run the following:
oc create -f postgres-clair-storage.yaml
oc create -f postgres-clair-deployment.yaml
oc create -f postgres-clair-service.yaml
$ oc create -f postgres-clair-storage.yaml
$ oc create -f postgres-clair-deployment.yaml
$ oc create -f postgres-clair-service.yaml
Copy to Clipboard Copied! Toggle word wrap Toggle overflow Check Clair database objects: To view the Clair database objects, type:
oc get all | grep -i clair
pod/postgres-clair-xxxxxxxxx-xxxx 1/1      Running       0                     3m45s
deployment.apps/postgres-clair    1/1      1             1                     3m45s
service/postgres-clair            NodePort 172.30.193.64 <none> 5432:30680/TCP 159m
replicaset.apps/postgres-clair-xx 1        1             1                     3m45s
$ oc get all | grep -i clair
pod/postgres-clair-xxxxxxxxx-xxxx 1/1      Running       0                     3m45s
deployment.apps/postgres-clair    1/1      1             1                     3m45s
service/postgres-clair            NodePort 172.30.193.64 <none> 5432:30680/TCP 159m
replicaset.apps/postgres-clair-xx 1        1             1                     3m45s
Copy to Clipboard Copied! Toggle word wrap Toggle overflow The output shows that the postgres-clair pod is running, postgres-clair was successfully deployed, the postgres-clair service is available on the address and port shown, and 1 replica set of postgres-clair is active.
- Open the Red Hat Quay Setup UI: Reload the Red Hat Quay Setup UI and select "Modify configuration for this cluster."
Enable Security Scanning: Scroll to the Security Scanner section and select the "Enable Security Scanning" checkbox. From the fields that appear you need to create an authentication key and enter the security scanner endpoint. Here’s how:
- Generate key: Click "Create Key" and then type a name for the Clair private key and an optional expiration date (if blank, the key never expires). Then select Generate Key.
- Copy the Clair key and PEM file: Save the Key ID (to a notepad or similar) and download a copy of the Private Key PEM file (named security_scanner.pem) by selecting "Download Private Key" (if you lose this key, you will need to generate a new one).
Modify clair-config.yaml: Return to the shell and the directory holding your yaml files. Edit the
clair-config.yamlfile and modify the following values:- database.options.source: Make sure the host, port, dbname, user, password, and ssl mode match those values you set when you create the postgres database for Clair.
- key_id: Search for KEY_ID_HERE in this file and replace it with the contents of the key you generated from the Red Hat Quay Setup screen in the Security Scanner section (security_scanner.pam file).
- private_key_path: Identify the full path to the security_scanner.pem file you saved earlier.
Create the Clair config secret and service: Run the following commands, identifying the paths to your
clair-config.yamlandsecurity_scanner.pemfiles.oc create secret generic clair-scanner-config-secret \ --from-file=config.yaml=/path/to/clair-config.yaml \ --from-file=security_scanner.pem=/path/to/security_scanner.pem oc create -f clair-service.yaml oc create -f clair-deployment.yaml
$ oc create secret generic clair-scanner-config-secret \
   --from-file=config.yaml=/path/to/clair-config.yaml \
   --from-file=security_scanner.pem=/path/to/security_scanner.pem
$ oc create -f clair-service.yaml
$ oc create -f clair-deployment.yaml
Copy to Clipboard Copied! Toggle word wrap Toggle overflow Get the clair-service endpoint: In this example, the endpoint of of clair-service would be http://172.30.133.227:6060:
oc get service clair-service
NAME            TYPE        CLUSTER-IP       EXTERNAL-IP   PORT(S)             AGE
clair-service   ClusterIP   172.30.133.227   <none>        6060/TCP,6061/TCP   76s
$ oc get service clair-service
NAME            TYPE        CLUSTER-IP       EXTERNAL-IP   PORT(S)             AGE
clair-service   ClusterIP   172.30.133.227   <none>        6060/TCP,6061/TCP   76s
Copy to Clipboard Copied! Toggle word wrap Toggle overflow - Enter Security Scanner Endpoint: Return to the Red Hat Quay Setup screen and fill in the clair-service endpoint. For example, http://clair-service:6060
- Deploy configuration: Select to save the configuration, then deploy it when prompted.
A green check mark will appear on the screen when the deployment is done. You can now start using Clair image scanning with Red Hat Quay. For information on the data sources available with the Clair image scanner, see Using Clair data sources.
4.3. Add repository mirroring Red Hat Quay
Enabling repository mirroring allows you to create container image repositories on your Red Hat Quay cluster that exactly match the content of a selected external registry, then sync the contents of those repositories on a regular schedule and on demand.
To add the repository mirroring feature to your Red Hat Quay cluster:
-
Run the repository mirroring worker. To do this, you start a quay pod with the
repomirroroption. - Select "Enable Repository Mirroring in the Red Hat Quay Setup tool.
- Log into your Red Hat Quay Web UI and begin creating mirrored repositories as described in Repository Mirroring in Red Hat Quay.
The following procedure assumes you already have a running Red Hat Quay cluster on an OpenShift platform, with the Red Hat Quay Setup container running in your browser:
Instead of running repository mirroring in its own container, you could start the quay application pod with the environment variable QUAY_OVERRIDE_SERVICES=repomirrorworker=true. This causes the repomirror worker to run inside the quay application pod instead of as a separate container.
Start the repo mirroring worker: Start the quay container in
repomirrormode as follows:oc create -f quay-enterprise-mirror.yaml
$ oc create -f quay-enterprise-mirror.yamlCopy to Clipboard Copied! Toggle word wrap Toggle overflow - Log into config tool: Log into the Red Hat Quay Setup Web UI (config tool).
- Enable repository mirroring: Scroll down the the Repository Mirroring section and select the Enable Repository Mirroring check box, as shown here:
-
Select HTTPS and cert verification: If you want to require HTTPS communications and verify certificates during mirroring, select this check box.

- Save configuration: Select the Save Configuration Changes button. Repository mirroring should now be enabled on your Red Hat Quay cluster. Refer to Repository Mirroring in Red Hat Quay for details on setting up your own mirrored container image repositories.
The server hostname you set with the config tools may not represent and endpoint that can be used to copy images to a mirror configured for that server. In that case, you can set a REPO_MIRROR_SERVER_HOSTNAME environment variable to identify the server’s URL in a way that it can be reached by a skopeo copy command.