Chapter 6. Quay Operator features
6.1. Helm OCI Support and Red Hat Quay
Container registries such as Red Hat Quay were originally designed to support container images in the Docker image format. To promote the use of additional runtimes apart from Docker, the Open Container Initiative (OCI) was created to provide a standardization surrounding container runtimes and image formats. Most container registries support the OCI standardization as it is based on the Docker image manifest V2, Schema 2 format.
In addition to container images, a variety of artifacts have emerged that support not just individual applications, but the Kubernetes platform as a whole. These range from Open Policy Agent (OPA) policies for security and governance to Helm charts and Operators to aid in application deployment.
Red Hat Quay is a private container registry that not only stores container images, but supports an entire ecosystem of tooling to aid in the management of containers. With the release of Red Hat Quay 3.5, support for the use of OCI based artifacts, and specifically Helm Charts, has graduated from Technical Preview (TP) and now has General Availability (GA) status.
When Red Hat Quay 3.5 is deployed using the OpenShift Operator, support for Helm and OCI artifacts is now enabled by default. If you need to explicitly enable the feature, for example, if it has previously been disabled or if you have upgraded from a version where it is not enabled by default, see the section Explicitly enabling OCI and Helm support.
6.1.1. Helm and OCI prerequisites
Trusted certificates: Communication between the Helm client and Quay is facilitated over HTTPS and as of Helm 3.5, support is only available for registries communicating over HTTPS with trusted certificates. In addition, the operating system must trust the certificates exposed by the registry. Support in future Helm releases will allow for communicating with remote registries insecurely. With that in mind, ensure that your operating system has been configured to trust the certificates used by Quay, for example:
sudo cp rootCA.pem   /etc/pki/ca-trust/source/anchors/
sudo update-ca-trust extract
$ sudo cp rootCA.pem   /etc/pki/ca-trust/source/anchors/
$ sudo update-ca-trust extract
Copy to Clipboard Copied! Toggle word wrap Toggle overflow -
Experimental feature: Many of the commands for interacting with Helm and OCI registries make use of the
helm chartsubcommand. At the time of writing, OCI support in Helm is still marked as an “experimental” feature and must be enabled explicitly. This is accomplished by setting the environment variableHELM_EXPERIMENTAL_OCI=1. Install Helm client: Download your desired version from https://github.com/helm/helm/releases, for example, https://get.helm.sh/helm-v3.5.3-linux-amd64.tar.gz. Unpack it and move the helm binary to its desired destination:
tar -zxvf helm-v3.5.3-linux-amd64.tar.gz
mv linux-amd64/helm /usr/local/bin/helm
$ tar -zxvf helm-v3.5.3-linux-amd64.tar.gz
$ mv linux-amd64/helm /usr/local/bin/helm
Copy to Clipboard Copied! Toggle word wrap Toggle overflow -
Create organization in Quay: Create a new organization for storing the Helm charts, using the Quay registry UI. For example, create an organization named
helm.
6.1.2. Using Helm charts with Quay
Helm, as a graduated project of the Cloud Native Computing Foundation (CNCF), has become the de facto package manager for Kubernetes as it simplifies how applications are packaged and deployed. Helm uses a packaging format called Charts which contain the Kubernetes resources representing an application. Charts can be made available for general distribution and consumption in repositories. A Helm repository is an HTTP server that serves an index.yaml metadata file and optionally a set of packaged charts. Beginning with Helm version 3, support was made available for distributing charts in OCI registries as an alternative to a traditional repository. To demonstrate how Quay can be used as a registry for Helm charts, an existing chart from a Helm repository will be used to showcase the interaction with OCI registries for chart developers and users.
In the following example, a sample etherpad chart is downloaded from from the Red Community of Practice (CoP) repository and pushed to a local Red Hat Quay repository using the following steps:
- Add the appropriate repository
- Update the repository with the latest metadata
-
Download and untar the chart to create a local directory called
etherpad
For example:
helm repo add redhat-cop https://redhat-cop.github.io/helm-charts
helm repo update
helm pull redhat-cop/etherpad --version=0.0.4 --untar
$ helm repo add redhat-cop https://redhat-cop.github.io/helm-charts
$ helm repo update
$ helm pull redhat-cop/etherpad --version=0.0.4 --untar
Tagging the chart requires use of the helm chart save command - this corresponds to using podman tag for tagging images.
Use the helm chart list command to see the local instance of the chart:
helm chart list

REF                                                                               NAME     VERSION DIGEST SIZE   CREATED
example-registry-quay-quay-enterprise.apps.user1.example.com/helm/etherpad:0.0.4 etherpad 0.0.4   ce0233f 3.5 KiB 23 seconds
helm chart list

REF                                                                               NAME     VERSION DIGEST SIZE   CREATED
example-registry-quay-quay-enterprise.apps.user1.example.com/helm/etherpad:0.0.4 etherpad 0.0.4   ce0233f 3.5 KiB 23 seconds
Before pushing the chart, log in to the repository using the helm registry login command:
helm registry login example-registry-quay-quay-enterprise.apps.user1.example.com
$ helm registry login example-registry-quay-quay-enterprise.apps.user1.example.com
Username: quayadmin
Password:
Login succeeded
Push the chart to your local Quay repository using the helm chart push command:
To test that the push worked, delete the local copy and then pull the chart from the repository:
Use the helm chart export command to extract the chart files:
6.1.3. OCI and Helm configuration
Support for Helm and OCI artifacts is now enabled by default in Red Hat Quay 3.5. If you need to explicitly enable the feature, for example, if it has previously been disabled or if you have upgraded from a version where it is not enabled by default, you need to add two properties in the Quay configuration to enable the use of OCI artifacts:
FEATURE_GENERAL_OCI_SUPPORT: true
FEATURE_HELM_OCI_SUPPORT: true
FEATURE_GENERAL_OCI_SUPPORT: true
FEATURE_HELM_OCI_SUPPORT: true| Field | Type | Description |
|---|---|---|
| FEATURE_GENERAL_OCI_SUPPORT | Boolean |
Enable support for OCI artifacts |
| FEATURE_HELM_OCI_SUPPORT | Boolean |
Enable support for Helm artifacts |
6.1.4. Configuring OCI and Helm with the Operator
Customizations to the configuration of Quay can be provided in a secret containing the configuration bundle. Execute the following command which will create a new secret called quay-config-bundle, in the appropriate namespace, containing the necessary properties to enable OCI support.
quay-config-bundle.yaml
Create the secret in the appropriate namespace, in this example quay-enterprise:
oc create -n quay-enterprise -f quay-config-bundle.yaml
$ oc create -n quay-enterprise -f quay-config-bundle.yaml
Specify the secret for the spec.configBundleSecret field:
quay-registry.yaml
Create the registry with the specified configuration:
oc create -n quay-enterprise -f quay-registry.yaml
$ oc create -n quay-enterprise -f quay-registry.yaml6.2. Console monitoring and alerting
Red Hat Quay 3.5 provides support for monitoring Quay instances that were deployed using the Operator, from inside the OpenShift console. The new monitoring features include a Grafana dashboard, access to individual metrics, and alerting to notify for frequently restarting Quay pods.
To automatically enable the monitoring features, the Operator must be installed in "all namespaces" mode.
If the Operator is installed in a single namespace, the monitoring component must be set to unmanaged. In this instance, you will need to enable monitoring in OpenShift Container Platform (OCP) for the specific namespace. For more information, see the OCP documentation at https://docs.openshift.com/container-platform/4.7/monitoring/enabling-monitoring-for-user-defined-projects.html
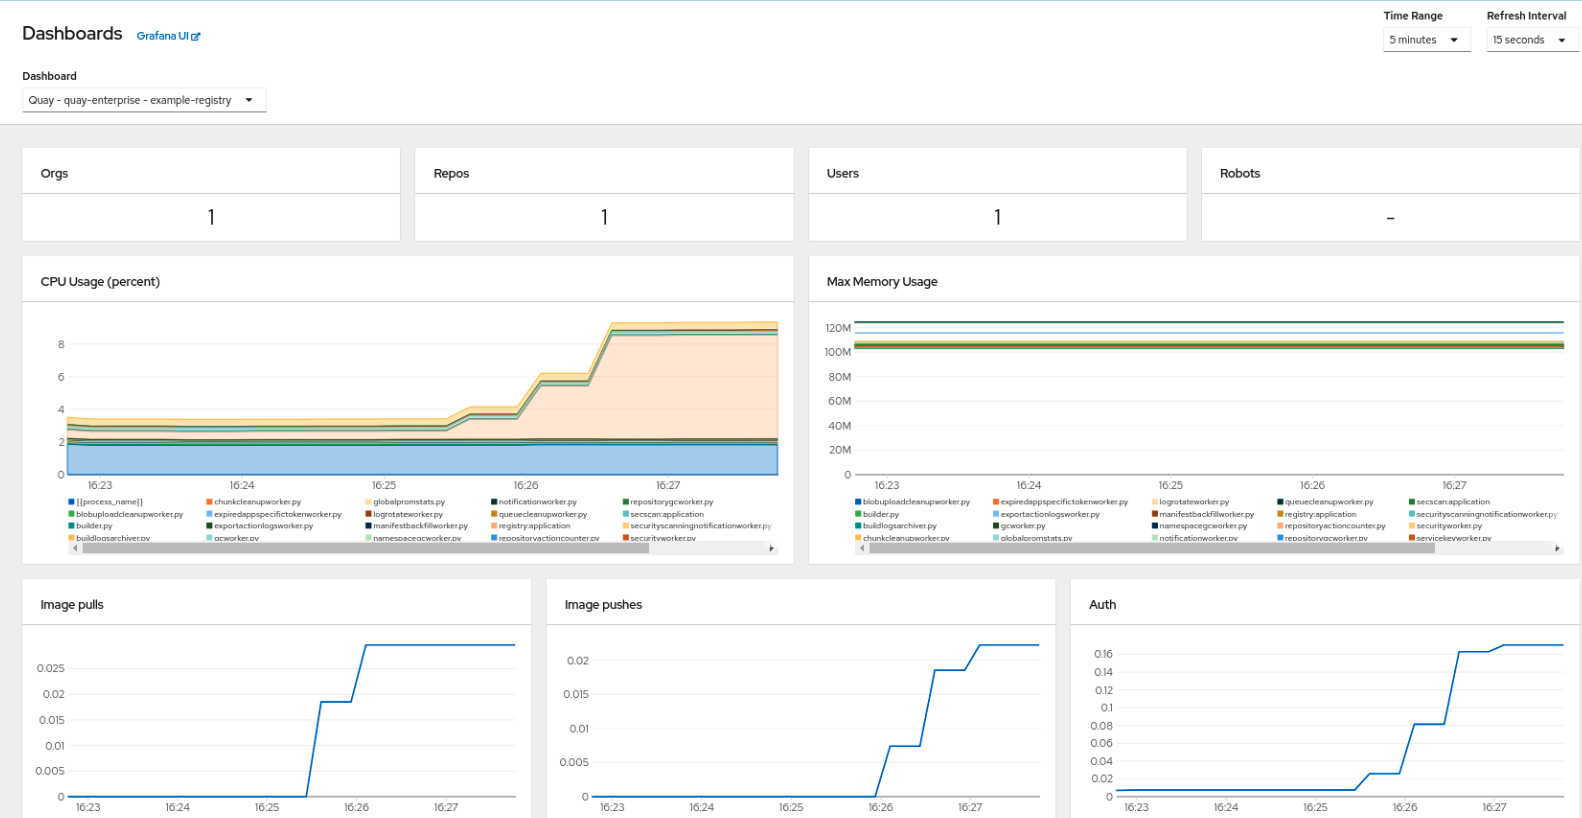
6.2.1. Dashboard
In the OpenShift console, navigate to Monitoring
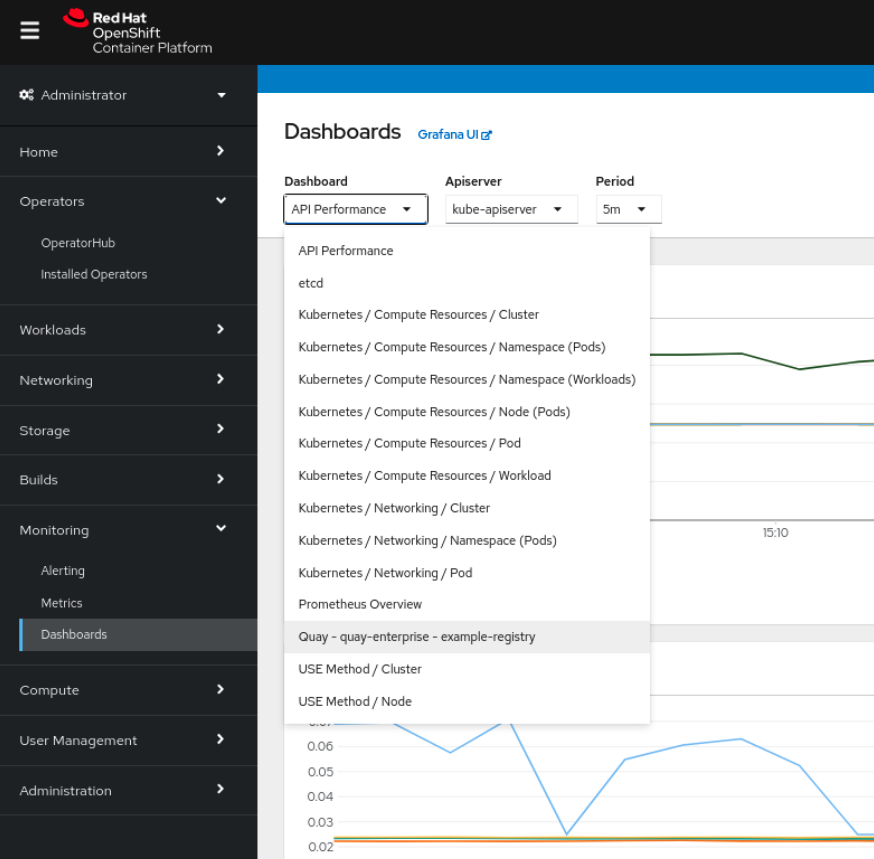
The dashboard shows various statistics including:
- The number of Organizations, Repositories, Users and Robot accounts
- CPU Usage and Max Memory Usage
- Rates of Image Pulls and Pushes, and Authentication requests
- API request rate
- Latencies
6.2.2. Metrics
You can see the underlying metrics behind the Quay dashboard, by accessing Monitoring quay_ to see the list of metrics available:
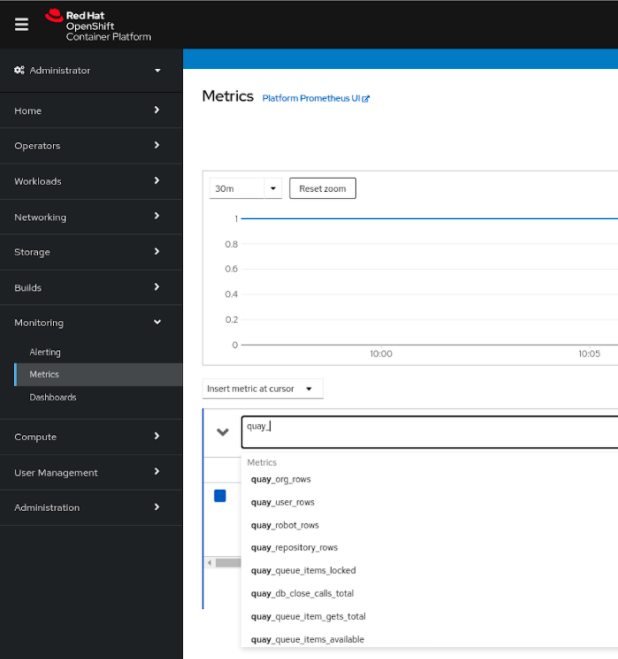
Select a sample metric, for example, quay_org_rows:

This metric shows the number of organizations in the registry, and it is directly surfaced in the dashboard as well.
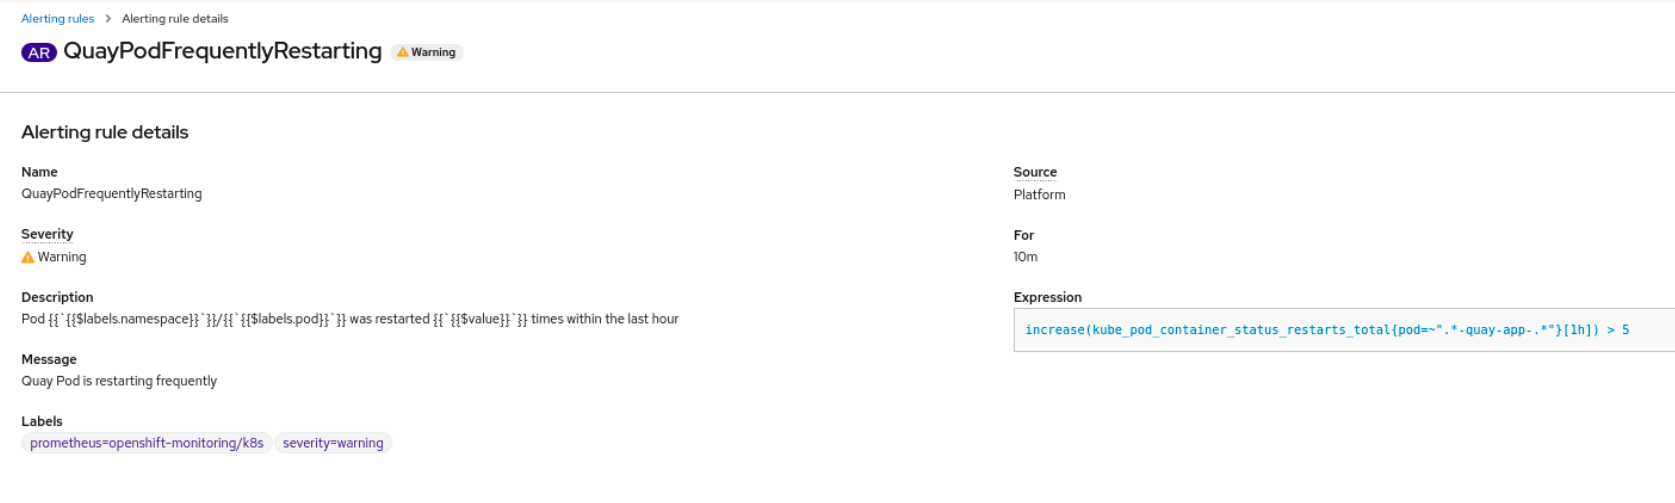
6.2.3. Alerting
An alert is raised if the Quay pods restart too often. The alert can be configured by accessing the Alerting rules tab from Monitoring
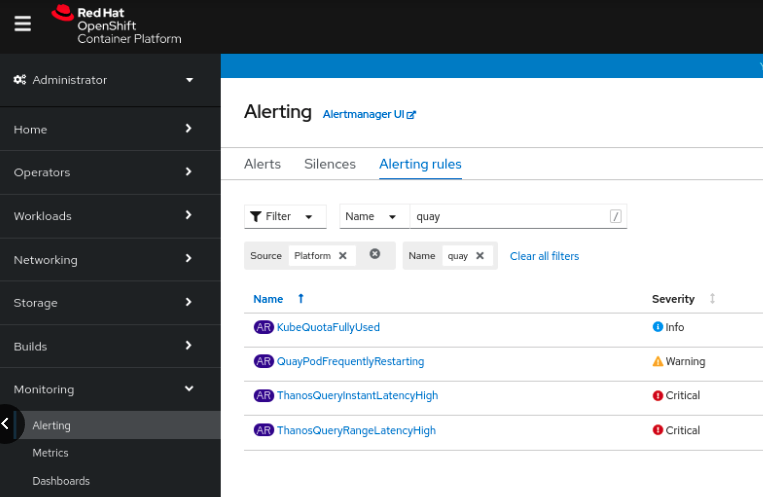
Select the QuayPodFrequentlyRestarting rule detail to configure the alert:
6.3. Manually updating the vulnerability databases for Clair in an air-gapped OpenShift cluster
Clair utilizes packages called updaters that encapsulate the logic of fetching and parsing different vulnerability databases. Clair supports running updaters in a different environment and importing the results. This is aimed at supporting installations that disallow the Clair cluster from talking to the Internet directly.
To manually update the vulnerability databases for Clair in an air-gapped OpenShift cluster, use the following steps:
-
Obtain the
clairctlprogram - Retrieve the Clair config
-
Use
clairctlto export the updaters bundle from a Clair instance that has access to the internet - Update the Clair config in the air-gapped OpenShift cluster to allow access to the Clair database
- Transfer the updaters bundle from the system with internet access, to make it available inside the air-gapped environment
-
Use
clairctlto import the updaters bundle into the Clair instance for the air-gapped OpenShift cluster
6.3.1. Obtaining clairctl
To obtain the clairctl program from a Clair deployment in an OpenShift cluster, use the oc cp command, for example:
oc -n quay-enterprise cp example-registry-clair-app-64dd48f866-6ptgw:/usr/bin/clairctl ./clairctl
chmod u+x ./clairctl
$ oc -n quay-enterprise cp example-registry-clair-app-64dd48f866-6ptgw:/usr/bin/clairctl ./clairctl
$ chmod u+x ./clairctl
For a standalone Clair deployment, use the podman cp command, for example:
sudo podman cp clairv4:/usr/bin/clairctl ./clairctl
chmod u+x ./clairctl
$ sudo podman cp clairv4:/usr/bin/clairctl ./clairctl
$ chmod u+x ./clairctl6.3.2. Retrieving the Clair config
6.3.2.1. Clair on OpenShift config
To retrieve the configuration file for a Clair instance deployed using the OpenShift Operator, retrieve and decode the config secret using the appropriate namespace, and save it to file, for example:
kubectl get secret -n quay-enterprise example-registry-clair-config-secret -o "jsonpath={$.data['config\.yaml']}" | base64 -d > clair-config.yaml
$ kubectl get secret -n quay-enterprise example-registry-clair-config-secret -o "jsonpath={$.data['config\.yaml']}" | base64 -d > clair-config.yamlAn excerpt from a Clair configuration file is shown below:
clair-config.yaml
6.3.2.2. Standalone Clair config
For standalone Clair deployments, the config file is the one specified in CLAIR_CONF environment variable in the podman run command, for example:
sudo podman run -d --rm --name clairv4 \
  -p 8081:8081 -p 8089:8089 \
  -e CLAIR_CONF=/clair/config.yaml -e CLAIR_MODE=combo \
  -v /etc/clairv4/config:/clair:Z \
  registry.redhat.io/quay/clair-rhel8:v3.5.7
sudo podman run -d --rm --name clairv4 \
  -p 8081:8081 -p 8089:8089 \
  -e CLAIR_CONF=/clair/config.yaml -e CLAIR_MODE=combo \
  -v /etc/clairv4/config:/clair:Z \
registry.redhat.io/quay/clair-rhel8:v3.5.76.3.3. Exporting the updaters bundle
From a Clair instance that has access to the internet, use clairctl with the appropriate configuration file to export the updaters bundle:
./clairctl --config ./config.yaml export-updaters updates.gz
$ ./clairctl --config ./config.yaml export-updaters updates.gz6.3.4. Configuring access to the Clair database in the air-gapped OpenShift cluster
Use
kubectlto determine the Clair database service:Copy to Clipboard Copied! Toggle word wrap Toggle overflow Forward the Clair database port so that it is accessible from the local machine, for example:
kubectl port-forward -n quay-enterprise service/example-registry-clair-postgres 5432:5432
$ kubectl port-forward -n quay-enterprise service/example-registry-clair-postgres 5432:5432Copy to Clipboard Copied! Toggle word wrap Toggle overflow Update the Clair configuration file, replacing the value of the
hostin the multipleconnstringfields withlocalhost, for example:clair-config.yaml
    ...
    connstring: host=localhost port=5432 dbname=postgres user=postgres password=postgres sslmode=disable
    ...
... connstring: host=localhost port=5432 dbname=postgres user=postgres password=postgres sslmode=disable ...Copy to Clipboard Copied! Toggle word wrap Toggle overflow
As an alternative to using kubectl port-forward, you can use kubefwd instead. With this method, there is no need to modify the connstring field in the Clair configuration file to use localhost.
6.3.5. Importing the updaters bundle into the air-gapped environment
After transferring the updaters bundle to the air-gapped environment, use clairctl to import the bundle into the Clair database deployed by the OpenShift Operator:
./clairctl --config ./clair-config.yaml import-updaters updates.gz
$ ./clairctl --config ./clair-config.yaml import-updaters updates.gz6.4. FIPS readiness and compliance
FIPS (the Federal Information Processing Standard developed by the National Institute of Standards and Technology, NIST) is regarded as the gold standard for securing and encrypting sensitive data, particularly in heavily regulated areas such as banking, healthcare and the public sector. Red Hat Enterprise Linux and Red Hat OpenShift Container Platform support this standard by providing a FIPS mode in which the system would only allow usage of certain, FIPS-validated cryptographic modules, like openssl. This ensures FIPS compliance.
Red Hat Quay supports running on RHEL and OCP in FIPS mode in production since version 3.5. Furthermore, Red Hat Quay itself also commits to exclusively using cryptography libraries that are validated or are in the process of being validated by NIST. Red Hat Quay 3.5 has pending FIPS 140-2 validation based on the RHEL 8.3 cryptography libraries. As soon as that validation is finalized, Red Hat Quay will be officially FIPS compliant.