 Red Hat Summit
Chapter 8. Access management for Red Hat Quay
As a Quay.io user, you can create your own repositories and make them accessible to other users that are part of your instance. Alternatively, you can create an organization and associate a set of repositories directly to that organization, referred to as an organization repository.
Organization repositories differ from basic repositories in that the organization is intended to set up shared repositories through groups of users. In Quay.io, groups of users can be either Teams, or sets of users with the same permissions, or individual users. You can also allow access to user repositories and organization repositories by creating credentials associated with Robot Accounts. Robot Accounts make it easy for a variety of container clients, such as Docker or Podman, to access your repositories without requiring that the client have a Quay.io user account.
8.1. Red Hat Quay teams overview
In Red Hat Quay a team is a group of users with shared permissions, allowing for efficient management and collaboration on projects. Teams can help streamline access control and project management within organizations and repositories. They can be assigned designated permissions and help ensure that members have the appropriate level of access to their repositories based on their roles and responsibilities.
8.1.1. Creating a team by using the UI
When you create a team for your organization you can select the team name, choose which repositories to make available to the team, and decide the level of access to the team.
Use the following procedure to create a team for your organization repository.
Prerequisites
- You have created an organization.
Procedure
- On the Red Hat Quay v2 UI, click the name of an organization.
- On your organization’s page, click Teams and membership.
- Click the Create new team box.
- In the Create team popup window, provide a name for your new team.
- Optional. Provide a description for your new team.
- Click Proceed. A new popup window appears.
Optional. Add this team to a repository, and set the permissions to one of the following:
- None. Team members have no permission to the repository.
- Read. Team members can view and pull from the repository.
- Write. Team members can read (pull) from and write (push) to the repository.
- Admin. Full access to pull from, and push to, the repository, plus the ability to do administrative tasks associated with the repository.
- Optional. Add a team member or robot account. To add a team member, enter the name of their Red Hat Quay account.
- Review and finish the information, then click Review and Finish. The new team appears under the Teams and membership page.
8.1.2. Managing a team by using the UI
After you have created a team, you can use the UI to manage team members, set repository permissions, delete the team, or view more general information about the team.
8.1.2.1. Adding users to a team by using the UI
With administrative privileges to an Organization, you can add users and robot accounts to a team. When you add a user, Quay.io sends an email to that user. The user remains pending until they accept the invitation.
Use the following procedure to add users or robot accounts to a team.
Procedure
- On the Red Hat Quay landing page, click the name of your Organization.
- In the navigation pane, click Teams and Membership.
- Select the menu kebab of the team that you want to add users or robot accounts to. Then, click Manage team members.
- Click Add new member.
In the textbox, enter information for one of the following:
- A username from an account on the registry.
- The email address for a user account on the registry.
The name of a robot account. The name must be in the form of <organization_name>+<robot_name>.
NoteRobot Accounts are immediately added to the team. For user accounts, an invitation to join is mailed to the user. Until the user accepts that invitation, the user remains in the INVITED TO JOIN state. After the user accepts the email invitation to join the team, they move from the INVITED TO JOIN list to the MEMBERS list for the Organization.
- Click Add member.
8.1.2.2. Setting a team role by using the UI
After you have created a team, you can set the role of that team within the Organization.
Prerequisites
- You have created a team.
Procedure
- On the Red Hat Quay landing page, click the name of your Organization.
- In the navigation pane, click Teams and Membership.
Select the TEAM ROLE drop-down menu, as shown in the following figure:
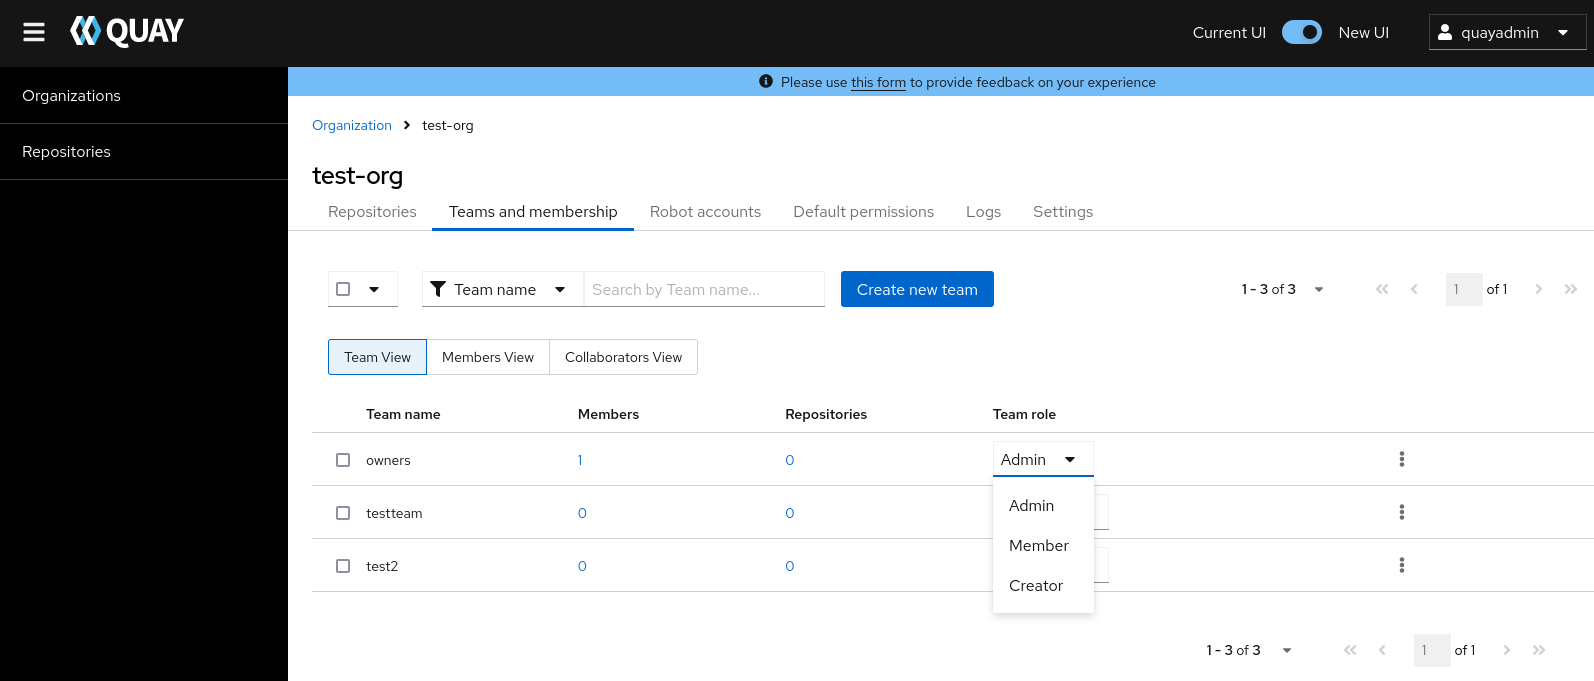
For the selected team, choose one of the following roles:
- Admin. Full administrative access to the organization, including the ability to create teams, add members, and set permissions.
- Member. Inherits all permissions set for the team.
- Creator. All member permissions, plus the ability to create new repositories.
8.1.2.2.1. Managing team members and repository permissions
Use the following procedure to manage team members and set repository permissions.
On the Teams and membership page of your organization, you can also manage team members and set repository permissions.
- Click the kebab menu, and select one of the following options:
- Manage Team Members. On this page, you can view all members, team members, robot accounts, or users who have been invited. You can also add a new team member by clicking Add new member.
Set repository permissions. On this page, you can set the repository permissions to one of the following:
- None. Team members have no permission to the repository.
- Read. Team members can view and pull from the repository.
- Write. Team members can read (pull) from and write (push) to the repository.
- Admin. Full access to pull from, and push to, the repository, plus the ability to do administrative tasks associated with the repository.
- Delete. This popup windows allows you to delete the team by clicking Delete.
8.1.2.2.2. Viewing additional information about a team
Use the following procedure to view general information about the team.
Procedure
On the Teams and membership page of your organization, you can click the one of the following options to reveal more information about teams, members, and collaborators:
- Team View. This menu shows all team names, the number of members, the number of repositories, and the role for each team.
- Members View. This menu shows all usernames of team members, the teams that they are part of, the repository permissions of the user.
- Collaborators View. This menu shows repository collaborators. Collaborators are users that do not belong to any team in the organization, but who have direct permissions on one or more repositories belonging to the organization.
8.1.3. Managing a team by using the Red Hat Quay API
After you have created a team, you can use the API to obtain information about team permissions or team members, add, update, or delete team members (including by email), or delete an organization team.
The following procedures show you how to how to manage a team using the Red Hat Quay API.
8.1.3.1. Setting the role of a team within an organization by using the API
Use the following procedure to view and set the role a team within an organization using the API.
Prerequisites
- You have Created an OAuth access token.
Procedure
Enter the following
GET /api/v1/organization/{orgname}/team/{teamname}/permissionscommand to return a list of repository permissions for the organization’s team. Note that your team must have been added to a repository for this command to return information.$ curl -X GET \ -H "Authorization: Bearer <your_access_token>" \ "<quay-server.example.com>/api/v1/organization/<organization_name>/team/<team_name>/permissions"Example output
{"permissions": [{"repository": {"name": "api-repo", "is_public": true}, "role": "admin"}]}You can create or update a team within an organization to have a specified role of admin, member, or creator using the
PUT /api/v1/organization/{orgname}/team/{teamname}command. For example:$ curl -X PUT \ -H "Authorization: Bearer <your_access_token>" \ -H "Content-Type: application/json" \ -d '{ "role": "<role>" }' \ "<quay-server.example.com>/api/v1/organization/<organization_name>/team/<team_name>"Example output
{"name": "testteam", "description": "", "can_view": true, "role": "creator", "avatar": {"name": "testteam", "hash": "827f8c5762148d7e85402495b126e0a18b9b168170416ed04b49aae551099dc8", "color": "#ff7f0e", "kind": "team"}, "new_team": false}
8.2. Creating and managing default permissions by using the UI
Default permissions define permissions that should be granted automatically to a repository when it is created, in addition to the default of the repository’s creator. Permissions are assigned based on the user who created the repository.
Use the following procedure to create default permissions using the Red Hat Quay v2 UI.
Procedure
- Click the name of an organization.
- Click Default permissions.
- Click Create default permissions. A toggle drawer appears.
Select either Anyone or Specific user to create a default permission when a repository is created.
If selecting Anyone, the following information must be provided:
- Applied to. Search, invite, or add a user/robot/team.
- Permission. Set the permission to one of Read, Write, or Admin.
If selecting Specific user, the following information must be provided:
- Repository creator. Provide either a user or robot account.
- Applied to. Provide a username, robot account, or team name.
- Permission. Set the permission to one of Read, Write, or Admin.
- Click Create default permission. A confirmation box appears, returning the following alert: Successfully created default permission for creator.
8.3. Adjusting access settings for a repository by using the UI
Use the following procedure to adjust access settings for a user or robot account for a repository using the v2 UI.
Prerequisites
- You have created a user account or robot account.
Procedure
- Log into Quay.io.
- On the v2 UI, click Repositories.
-
Click the name of a repository, for example,
quayadmin/busybox. - Click the Settings tab.
Optional. Click User and robot permissions. You can adjust the settings for a user or robot account by clicking the dropdown menu option under Permissions. You can change the settings to Read, Write, or Admin.
- Read. The User or Robot Account can view and pull from the repository.
- Write. The User or Robot Account can read (pull) from and write (push) to the repository.
- Admin. The User or Robot account has access to pull from, and push to, the repository, plus the ability to do administrative tasks associated with the repository.

'%20d='M201.5%20305.5c-13.8%200-24.9-11.1-24.9-24.6%200-13.8%2011.1-24.9%2024.9-24.9%2013.6%200%2024.6%2011.1%2024.6%2024.9%200%2013.6-11.1%2024.6-24.6%2024.6zM504%20256c0%20137-111%20248-248%20248S8%20393%208%20256%20119%208%20256%208s248%20111%20248%20248zm-132.3-41.2c-9.4%200-17.7%203.9-23.8%2010-22.4-15.5-52.6-25.5-86.1-26.6l17.4-78.3%2055.4%2012.5c0%2013.6%2011.1%2024.6%2024.6%2024.6%2013.8%200%2024.9-11.3%2024.9-24.9s-11.1-24.9-24.9-24.9c-9.7%200-18%205.8-22.1%2013.8l-61.2-13.6c-3-.8-6.1%201.4-6.9%204.4l-19.1%2086.4c-33.2%201.4-63.1%2011.3-85.5%2026.8-6.1-6.4-14.7-10.2-24.1-10.2-34.9%200-46.3%2046.9-14.4%2062.8-1.1%205-1.7%2010.2-1.7%2015.5%200%2052.6%2059.2%2095.2%20132%2095.2%2073.1%200%20132.3-42.6%20132.3-95.2%200-5.3-.6-10.8-1.9-15.8%2031.3-16%2019.8-62.5-14.9-62.5zM302.8%20331c-18.2%2018.2-76.1%2017.9-93.6%200-2.2-2.2-6.1-2.2-8.3%200-2.5%202.5-2.5%206.4%200%208.6%2022.8%2022.8%2087.3%2022.8%20110.2%200%202.5-2.2%202.5-6.1%200-8.6-2.2-2.2-6.1-2.2-8.3%200zm7.7-75c-13.6%200-24.6%2011.1-24.6%2024.9%200%2013.6%2011.1%2024.6%2024.6%2024.6%2013.8%200%2024.9-11.1%2024.9-24.6%200-13.8-11-24.9-24.9-24.9z'/%3e%3c/svg%3e)