Chapter 15. Red Hat Quay auto-pruning overview
Red Hat Quay administrators can set up multiple auto-pruning policies on organizations and repositories; administrators can also set up auto-pruning policies at the registry level so that they apply to all organizations, including all newly created organizations. This feature allows for image tags to be automatically deleted within an organization or a repository based on specified criteria, which allows Red Hat Quay organization owners to stay below the storage quota by automatically pruning content.
Currently, two policies have been added:
- Prune images by the number of tags. For this policy, when the actual number of tags exceeds the desired number of tags, the oldest tags are deleted by their creation date until the desired number of tags is achieved.
- Prune image tags by creation date. For this policy, any tags with a creation date older than the given time span, for example, 10 days, are deleted.
After tags are automatically pruned, they go into the Red Hat Quay time machine, or the amount of time, after a tag is deleted, that the tag is accessible before being garbage collected. The expiration time of an image tag is dependent on your organization’s settings. For more information, see Red Hat Quay garbage collection.
Users can configure multiple policies per namespace or repository; this can be done through the Red Hat Quay v2 UI. Policies can also be set by using the API endpoints through the command-line interface (CLI).
15.1. Prerequisites and limitations for auto-pruning and multiple policies
The following prerequisites and limitations apply to the auto-pruning feature:
- Auto-pruning is not available when using the Red Hat Quay legacy UI. You must use the v2 UI to create, view, or modify auto-pruning policies.
-
Auto-pruning is only supported in databases that support the
FOR UPDATE SKIP LOCKEDSQL command. - Auto-pruning is unavailable on mirrored repositories and read-only repositories.
If you are configuring multiple auto-prune policies, rules are processed without particular order, and individual result sets are processed immediately before moving on to the next rule.
- For example, if an image is already subject for garbage collection by one rule, it cannot be excluded from pruning by another rule.
- If you have both an auto-pruning policy for an organization and a repository, the auto-pruning policies set at the organization level are executed first.
15.2. Regular expressions with auto-pruning
Red Hat Quay administrators can leverage regular expressions, or regex, to match a subset of tags for both organization- and repository-level auto-pruning policies. This provides more granular auto-pruning policies to target only certain image tags for removal. Consider the following when using regular expressions with the auto-pruning feature:
- Regular expressions are optional.
- If a regular expression is not provided, the auto-pruner defaults to pruning all image tags in the organization or the repository. These are user-supplied and must be protected against ReDOS attacks.
- Registry-wide policies do not currently support regular expressions. Only organization- and repository-level auto-pruning policies support regular expressions.
- Regular expressions can be configured to prune images that either do, or do not, match the provided regex pattern.
Some of the following procedures provide example auto-pruning policies using regular expressions that you can use as a reference when creating an auto-prune policy.
15.3. Managing auto-pruning policies using the Red Hat Quay UI
All auto-pruning policies, with the exception of a registry-wide auto pruning policy, are created using the Red Hat Quay v2 UI or by using the API. This can be done after you have configured your Red Hat Quay config.yaml file to enable the auto-pruning feature and the v2 UI.
15.3.1. Enabling image pull activity tracking
Red Hat Quay administrators can enable image pull activity tracking, which provides clear visibility into how often and when image tags are pulled, giving users valuable insight into image usage and popularity across repositories. The following procedure shows you how to enable this feature.
Procedure
In your Red Hat Quay
config.yamlfile, setFEATURE_IMAGE_PULL_STATS: true. For example:Copy to Clipboard Copied! Toggle word wrap Toggle overflow -
FEATURE_IMAGE_PULL_STATSenables image pull tracking activity. -
REDIS_FLUSH_INTERVAL_SECONDSdefines the time, in seconds, at which the Redis flush worker clears old data. Shorter intervals keep data fresher and help prevent Redis from bloating, while longer intervals reduce flush frequency. -
PULL_METRICS_REDISSpecifies the connection settings for the Redis database used to store image pull metrics.
-
- Restart your Red Hat Quay deployment.
Verification
Push an image to your registry by entering the following command. Following this step, you can use your browser to see the tagged image in your repository.
podman push <quay-server.example.com>/<organization>/<image>:<tag>
$ podman push <quay-server.example.com>/<organization>/<image>:<tag>Copy to Clipboard Copied! Toggle word wrap Toggle overflow Pull the image from your Red Hat Quay registry by entering the following command:
podman pull <quay-server.example.com>/<organization>/<image>:<tag>
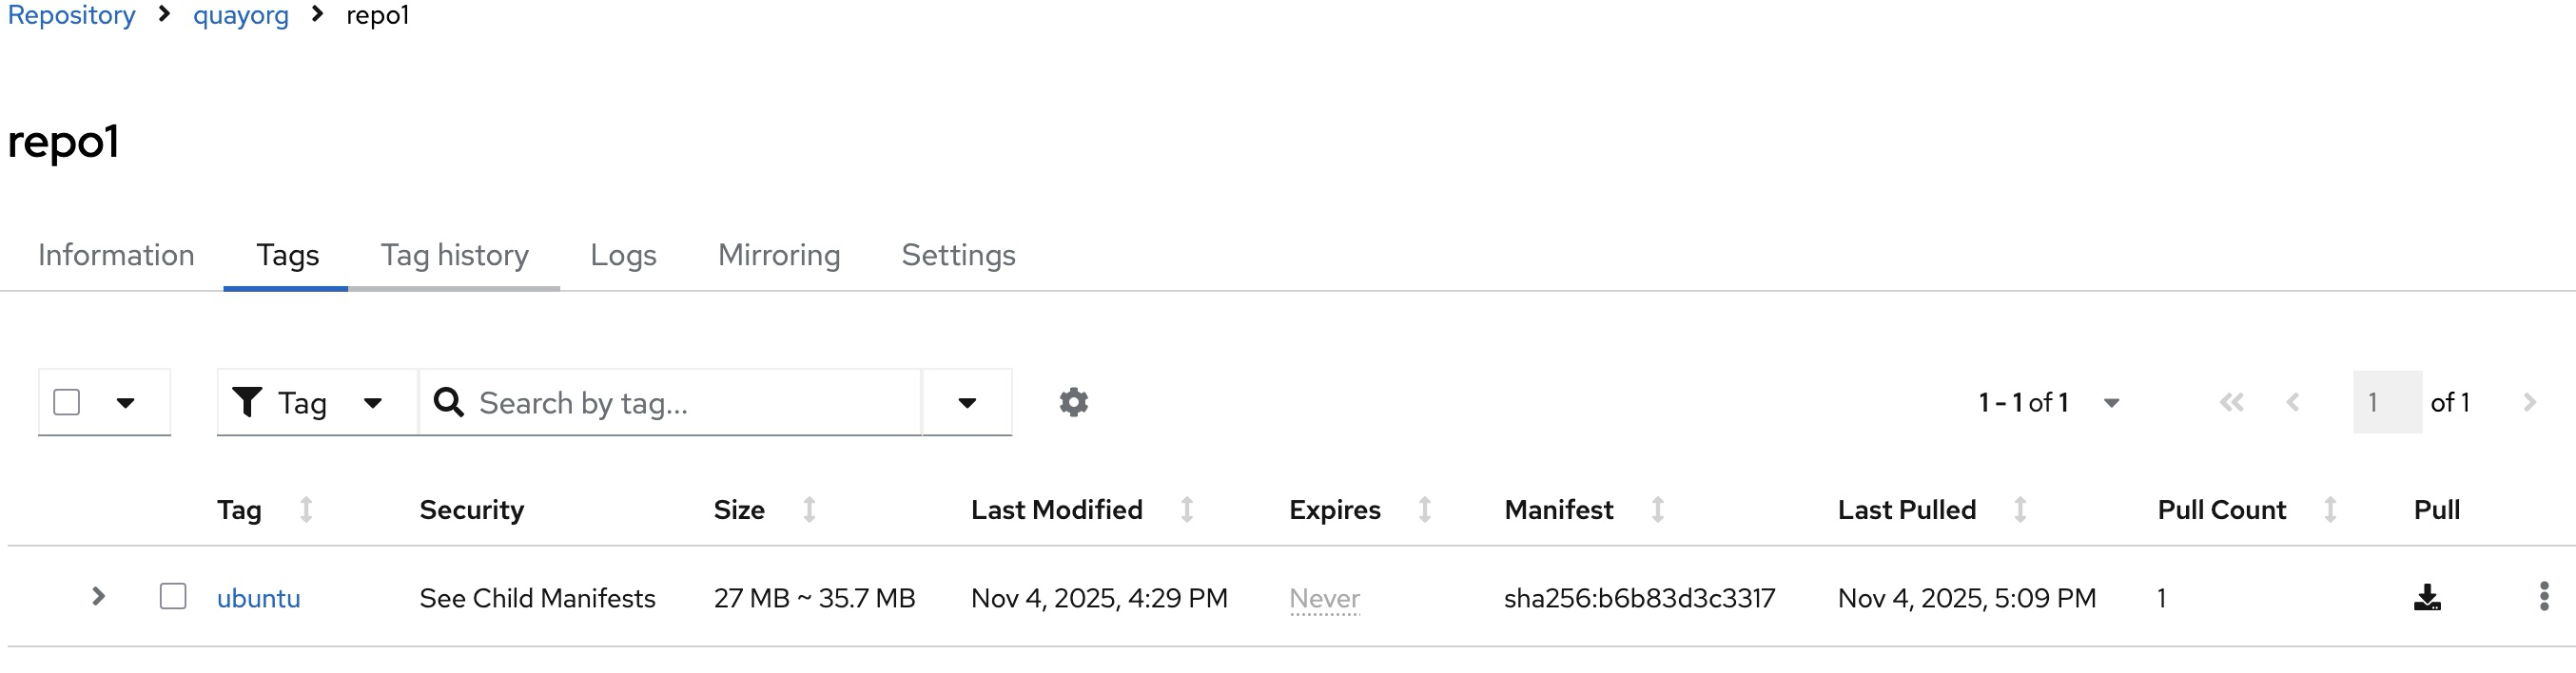
$ podman pull <quay-server.example.com>/<organization>/<image>:<tag>Copy to Clipboard Copied! Toggle word wrap Toggle overflow - On the Red Hat Quay UI, navigate to Repositories, and then click the name of your repository.
Click Tags. The Last Pulled and Pull Count categories show you information about when the image was last pull, and how many time it has been pulled, respectively. For example:
15.3.2. Configuring the Red Hat Quay auto-pruning feature
Use the following procedure to configure your Red Hat Quay config.yaml file to enable the auto-pruning feature.
Prerequisites
-
You have set
FEATURE_UI_V2toTruein yourconfig.yamlfile.
Procedure
In your Red Hat Quay
config.yamlfile, add, and set, theFEATURE_AUTO_PRUNEenvironment variable toTrue. For example:# ... FEATURE_AUTO_PRUNE: true # ...
# ... FEATURE_AUTO_PRUNE: true # ...Copy to Clipboard Copied! Toggle word wrap Toggle overflow
15.3.3. Creating a registry-wide auto-pruning policy
Registry-wide auto-pruning policies can be configured on new and existing organizations. This feature saves Red Hat Quay administrators time, effort, and storage by enforcing registry-wide rules.
Red Hat Quay administrators must enable this feature by updating their config.yaml file through the inclusion of DEFAULT_NAMESPACE_AUTOPRUNE_POLICY configuration field, and one of number_of_tags or creation_date methods. Currently, this feature cannot be enabled by using the v2 UI or the API.
Use the following procedure to create an auto-prune policy for your Red Hat Quay registry.
Prerequisites
-
You have enabled the
FEATURE_AUTO_PRUNEfeature.
Procedure
Update your
config.yamlfile to add theDEFAULT_NAMESPACE_AUTOPRUNE_POLICYconfiguration field:To set the policy method to remove the oldest tags by their creation date until the number of tags provided is left, use the
number_of_tagsmethod:# ... DEFAULT_NAMESPACE_AUTOPRUNE_POLICY: method: number_of_tags value: 2 # ...
# ...
DEFAULT_NAMESPACE_AUTOPRUNE_POLICY:
  method: number_of_tags
  value: 2
1 # ...Copy to Clipboard Copied! Toggle word wrap Toggle overflow - 1
- In this scenario, two tags remain.
To set the policy method to remove tags with a creation date older than the provided time span, for example,
5d, use thecreation_datemethod:DEFAULT_NAMESPACE_AUTOPRUNE_POLICY: method: creation_date value: 5d
DEFAULT_NAMESPACE_AUTOPRUNE_POLICY: method: creation_date value: 5dCopy to Clipboard Copied! Toggle word wrap Toggle overflow
- Restart your Red Hat Quay deployment.
Optional. If you need to tag and push images to test this feature:
Tag four sample images that will be pushed to a Red Hat Quay registry. For example:
podman tag docker.io/library/busybox <quay-server.example.com>/<quayadmin>/busybox:test
$ podman tag docker.io/library/busybox <quay-server.example.com>/<quayadmin>/busybox:testCopy to Clipboard Copied! Toggle word wrap Toggle overflow podman tag docker.io/library/busybox <quay-server.example.com>/<quayadmin>/busybox:test2
$ podman tag docker.io/library/busybox <quay-server.example.com>/<quayadmin>/busybox:test2Copy to Clipboard Copied! Toggle word wrap Toggle overflow podman tag docker.io/library/busybox <quay-server.example.com>/<quayadmin>/busybox:test3
$ podman tag docker.io/library/busybox <quay-server.example.com>/<quayadmin>/busybox:test3Copy to Clipboard Copied! Toggle word wrap Toggle overflow podman tag docker.io/library/busybox <quay-server.example.com>/<quayadmin>/busybox:test4
$ podman tag docker.io/library/busybox <quay-server.example.com>/<quayadmin>/busybox:test4Copy to Clipboard Copied! Toggle word wrap Toggle overflow Push the four sample images to the registry with auto-pruning enabled by entering the following commands:
podman push <quay-server.example.com>/quayadmin/busybox:test
$ podman push <quay-server.example.com>/quayadmin/busybox:testCopy to Clipboard Copied! Toggle word wrap Toggle overflow podman push <quay-server.example.com>/<quayadmin>/busybox:test2
$ podman push <quay-server.example.com>/<quayadmin>/busybox:test2Copy to Clipboard Copied! Toggle word wrap Toggle overflow podman push <quay-server.example.com>/<quayadmin>/busybox:test3
$ podman push <quay-server.example.com>/<quayadmin>/busybox:test3Copy to Clipboard Copied! Toggle word wrap Toggle overflow podman push <quay-server.example.com>/<quayadmin>/busybox:test4
$ podman push <quay-server.example.com>/<quayadmin>/busybox:test4Copy to Clipboard Copied! Toggle word wrap Toggle overflow
- Check that there are four tags in the registry that you pushed the images to.
-
By default, the auto-pruner worker at the registry level runs every 24 hours. After 24 hours, the two oldest image tags are removed, leaving the
test3andtest4tags if you followed these instructions. Check your Red Hat Quay organization to ensure that the two oldest tags were removed.
15.3.4. Creating an auto-prune policy for an organization by using the Red Hat Quay v2 UI
Use the following procedure to create an auto-prune policy for an organization using the Red Hat Quay v2 UI.
Prerequisites
-
You have enabled the
FEATURE_AUTO_PRUNEfeature. - Your organization has image tags that have been pushed to it.
Procedure
- On the Red Hat Quay v2 UI, click Organizations in the navigation pane.
-
Select the name of an organization that you will apply the auto-pruning feature to, for example,
test_organization. - Click Settings.
Click Auto-Prune Policies. For example:
- Click the drop down menu and select the desired policy, for example, By number of tags.
- Select the desired number of tags to keep. By default, this is set at 20 tags. For this example, the number of tags to keep is set at 3.
Optional. With the introduction of regular expressions, you are provided the following options to fine-grain your auto-pruning policy:
- Match: When selecting this option, the auto-pruner prunes all tags that match the given regex pattern.
Does not match: When selecting this option, the auto-pruner prunes all tags that do not match the regex pattern.
If you do not select an option, the auto-pruner defaults to pruning all image tags.
For this example, click the Tag pattern box and select match. In the regex box, enter a pattern to match tags against. For example, to automatically prune all
testtags, enter^test.*.
- Optional. You can create a second auto-prune policy by clicking Add Policy and entering the required information.
Click Save. A notification that your auto-prune policy has been updated appears.
With this example, the organization is configured to keep the three latest tags that are named
^test.*.
Verification
Navigate to the Tags page of your Organization’s repository. After a few minutes, the auto-pruner worker removes tags that no longer fit within the established criteria. In this example, it removes the
busybox:testtag, and keeps thebusybox:test2,busybox:test3, andbusybox:test4tag.After tags are automatically pruned, they go into the Red Hat Quay time machine, or the amount of time after a tag is deleted that the tag is accessible before being garbage collected. The expiration time of an image tag is dependent on your organization’s settings. For more information, see Red Hat Quay garbage collection.
15.3.5. Creating an auto-prune policy for a namespace by using the Red Hat Quay API
You can use Red Hat Quay API endpoints to manage auto-pruning policies for an namespace.
Prerequisites
- You have created an OAuth access token.
- You have logged into Red Hat Quay.
Procedure
Enter the following
POST /api/v1/organization/{orgname}/autoprunepolicy/command create a new policy that limits the number of tags allowed in an organization:curl -X POST -H "Authorization: Bearer <access_token>" -H "Content-Type: application/json" -d '{"method": "number_of_tags", "value": 10}' http://<quay-server.example.com>/api/v1/organization/<organization_name>/autoprunepolicy/$ curl -X POST -H "Authorization: Bearer <access_token>" -H "Content-Type: application/json" -d '{"method": "number_of_tags", "value": 10}' http://<quay-server.example.com>/api/v1/organization/<organization_name>/autoprunepolicy/Copy to Clipboard Copied! Toggle word wrap Toggle overflow Alternatively, you can can set tags to expire for a specified time after their creation date:
curl -X POST -H "Authorization: Bearer <access_token>" -H "Content-Type: application/json" -d '{
"method": "creation_date", "value": "7d"}' http://<quay-server.example.com>/api/v1/organization/<organization_name>/autoprunepolicy/
$ curl -X POST -H "Authorization: Bearer <access_token>" -H "Content-Type: application/json" -d '{ "method": "creation_date", "value": "7d"}' http://<quay-server.example.com>/api/v1/organization/<organization_name>/autoprunepolicy/Copy to Clipboard Copied! Toggle word wrap Toggle overflow Example output
{"uuid": "73d64f05-d587-42d9-af6d-e726a4a80d6e"}{"uuid": "73d64f05-d587-42d9-af6d-e726a4a80d6e"}Copy to Clipboard Copied! Toggle word wrap Toggle overflow Optional. You can add an additional policy to an organization and pass in the
tagPatternandtagPatternMatchesfields to prune only tags that match the given regex pattern. For example:Copy to Clipboard Copied! Toggle word wrap Toggle overflow - 1
- Setting
tagPatternMatchestoTruemakes it so that tags that match the given regex pattern will be pruned. In this example, tags that match^v*are pruned.
Example output
{"uuid": "ebf7448b-93c3-4f14-bf2f-25aa6857c7b0"}{"uuid": "ebf7448b-93c3-4f14-bf2f-25aa6857c7b0"}Copy to Clipboard Copied! Toggle word wrap Toggle overflow You can update your organization’s auto-prune policy by using the
PUT /api/v1/organization/{orgname}/autoprunepolicy/{policy_uuid}command. For example:Copy to Clipboard Copied! Toggle word wrap Toggle overflow This command does not return output. Continue to the next step.
Check your auto-prune policy by entering the following command:
curl -X GET -H "Authorization: Bearer <access_token>" http://<quay-server.example.com>/api/v1/organization/<organization_name>/autoprunepolicy/
$ curl -X GET -H "Authorization: Bearer <access_token>" http://<quay-server.example.com>/api/v1/organization/<organization_name>/autoprunepolicy/Copy to Clipboard Copied! Toggle word wrap Toggle overflow Example output
{"policies": [{"uuid": "ebf7448b-93c3-4f14-bf2f-25aa6857c7b0", "method": "creation_date", "value": "4d", "tagPattern": "^v*", "tagPatternMatches": true}, {"uuid": "da4d0ad7-3c2d-4be8-af63-9c51f9a501bc", "method": "number_of_tags", "value": 10, "tagPattern": null, "tagPatternMatches": true}, {"uuid": "17b9fd96-1537-4462-a830-7f53b43f94c2", "method": "creation_date", "value": "7d", "tagPattern": "^v*", "tagPatternMatches": true}]}{"policies": [{"uuid": "ebf7448b-93c3-4f14-bf2f-25aa6857c7b0", "method": "creation_date", "value": "4d", "tagPattern": "^v*", "tagPatternMatches": true}, {"uuid": "da4d0ad7-3c2d-4be8-af63-9c51f9a501bc", "method": "number_of_tags", "value": 10, "tagPattern": null, "tagPatternMatches": true}, {"uuid": "17b9fd96-1537-4462-a830-7f53b43f94c2", "method": "creation_date", "value": "7d", "tagPattern": "^v*", "tagPatternMatches": true}]}Copy to Clipboard Copied! Toggle word wrap Toggle overflow You can delete the auto-prune policy for your organization by entering the following command. Note that deleting the policy requires the UUID.
curl -X DELETE -H "Authorization: Bearer <access_token>" http://<quay-server.example.com>/api/v1/organization/<organization_name>/autoprunepolicy/73d64f05-d587-42d9-af6d-e726a4a80d6e
$ curl -X DELETE -H "Authorization: Bearer <access_token>" http://<quay-server.example.com>/api/v1/organization/<organization_name>/autoprunepolicy/73d64f05-d587-42d9-af6d-e726a4a80d6eCopy to Clipboard Copied! Toggle word wrap Toggle overflow
15.3.6. Creating an auto-prune policy for a namespace for the current user by using the API
You can use Red Hat Quay API endpoints to manage auto-pruning policies for your account.
The use of /user/ in the following commands represents the user that is currently logged into Red Hat Quay.
Prerequisites
- You have created an OAuth access token.
- You have logged into Red Hat Quay.
Procedure
Enter the following
POSTcommand create a new policy that limits the number of tags for the current user:curl -X POST -H "Authorization: Bearer <access_token>" -H "Content-Type: application/json" -d '{"method": "number_of_tags", "value": 10}' http://<quay-server.example.com>/api/v1/user/autoprunepolicy/$ curl -X POST -H "Authorization: Bearer <access_token>" -H "Content-Type: application/json" -d '{"method": "number_of_tags", "value": 10}' http://<quay-server.example.com>/api/v1/user/autoprunepolicy/Copy to Clipboard Copied! Toggle word wrap Toggle overflow Example output
{"uuid": "8c03f995-ca6f-4928-b98d-d75ed8c14859"}{"uuid": "8c03f995-ca6f-4928-b98d-d75ed8c14859"}Copy to Clipboard Copied! Toggle word wrap Toggle overflow Check your auto-prune policy by entering the following command:
curl -X GET -H "Authorization: Bearer <access_token>" http://<quay-server.example.com>/api/v1/user/autoprunepolicy/
$ curl -X GET -H "Authorization: Bearer <access_token>" http://<quay-server.example.com>/api/v1/user/autoprunepolicy/Copy to Clipboard Copied! Toggle word wrap Toggle overflow Alternatively, you can include the UUID:
curl -X GET -H "Authorization: Bearer <access_token>" http://<quay-server.example.com>/api/v1/user/autoprunepolicy/8c03f995-ca6f-4928-b98d-d75ed8c14859
$ curl -X GET -H "Authorization: Bearer <access_token>" http://<quay-server.example.com>/api/v1/user/autoprunepolicy/8c03f995-ca6f-4928-b98d-d75ed8c14859Copy to Clipboard Copied! Toggle word wrap Toggle overflow Example output
{"policies": [{"uuid": "8c03f995-ca6f-4928-b98d-d75ed8c14859", "method": "number_of_tags", "value": 10}]}{"policies": [{"uuid": "8c03f995-ca6f-4928-b98d-d75ed8c14859", "method": "number_of_tags", "value": 10}]}Copy to Clipboard Copied! Toggle word wrap Toggle overflow You can delete the auto-prune policy by entering the following command. Note that deleting the policy requires the UUID.
curl -X DELETE -H "Authorization: Bearer <access_token>" http://<quay-server.example.com>/api/v1/user/autoprunepolicy/8c03f995-ca6f-4928-b98d-d75ed8c14859
$ curl -X DELETE -H "Authorization: Bearer <access_token>" http://<quay-server.example.com>/api/v1/user/autoprunepolicy/8c03f995-ca6f-4928-b98d-d75ed8c14859Copy to Clipboard Copied! Toggle word wrap Toggle overflow Example output
{"uuid": "8c03f995-ca6f-4928-b98d-d75ed8c14859"}{"uuid": "8c03f995-ca6f-4928-b98d-d75ed8c14859"}Copy to Clipboard Copied! Toggle word wrap Toggle overflow
15.3.7. Creating an auto-prune policy for a repository using the Red Hat Quay v2 UI
Use the following procedure to create an auto-prune policy for a repository using the Red Hat Quay v2 UI.
Prerequisites
-
You have enabled the
FEATURE_AUTO_PRUNEfeature. - You have pushed image tags to your repository.
Procedure
- On the Red Hat Quay v2 UI, click Repository in the navigation pane.
-
Select the name of an organization that you will apply the auto-pruning feature to, for example,
<organization_name>/<repository_name>. - Click Settings.
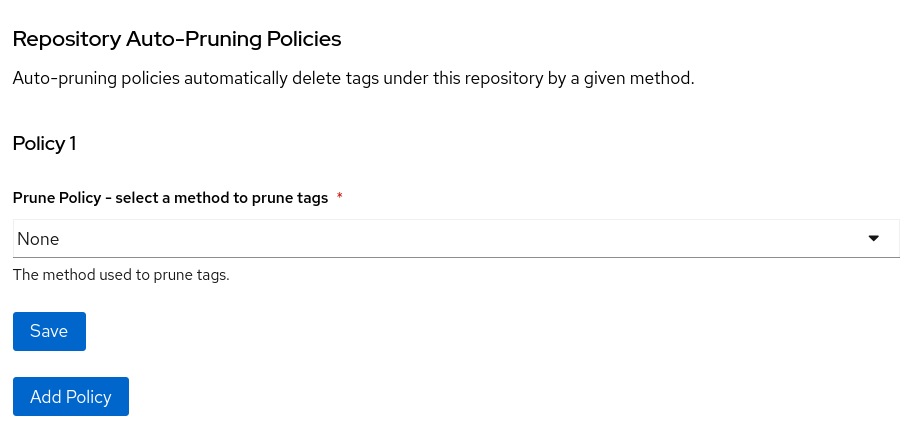
- Click Repository Auto-Prune Policies.
- Click the drop down menu and select the desired policy, for example, By age of tags.
-
Set a time, for example,
5and an interval, for exampleminutesto delete tags older than the specified time frame. For this example, tags older than 5 minutes are marked for deletion. Optional. With the introduction of regular expressions, you are provided the following options to fine-grain your auto-pruning policy:
- Match: When selecting this option, the auto-pruner prunes all tags that match the given regex pattern.
Does not match: When selecting this option, the auto-pruner prunes all tags that do not match the regex pattern.
If you do not select an option, the auto-pruner defaults to pruning all image tags.
For this example, click the Tag pattern box and select Does not match. In the regex box, enter a pattern to match tags against. For example, to automatically prune all tags that do not match the
testtag, enter^test.*.
- Optional. You can create a second auto-prune policy by clicking Add Policy and entering the required information.
- Click Save. A notification that your auto-prune policy has been updated appears.
Verification
Navigate to the Tags page of your Organization’s repository. With this example, Tags that are older than 5 minutes that do not match the
^test.*regex tag are automatically pruned when the pruner runs.After tags are automatically pruned, they go into the Red Hat Quay time machine, or the amount of time after a tag is deleted that the tag is accessible before being garbage collected. The expiration time of an image tag is dependent on your organization’s settings. For more information, see Red Hat Quay garbage collection.
15.3.8. Creating an auto-prune policy for a repository using the Red Hat Quay API
You can use Red Hat Quay API endpoints to manage auto-pruning policies for an repository.
Prerequisites
- You have created an OAuth access token.
- You have logged into Red Hat Quay.
Procedure
Enter the following
POST /api/v1/repository/{repository}/autoprunepolicy/command create a new policy that limits the number of tags allowed in an organization:curl -X POST -H "Authorization: Bearer <access_token>" -H "Content-Type: application/json" -d '{"method": "number_of_tags","value": 2}' http://<quay-server.example.com>/api/v1/repository/<organization_name>/<repository_name>/autoprunepolicy/$ curl -X POST -H "Authorization: Bearer <access_token>" -H "Content-Type: application/json" -d '{"method": "number_of_tags","value": 2}' http://<quay-server.example.com>/api/v1/repository/<organization_name>/<repository_name>/autoprunepolicy/Copy to Clipboard Copied! Toggle word wrap Toggle overflow Alternatively, you can can set tags to expire for a specified time after their creation date:
curl -X POST -H "Authorization: Bearer <access_token>" -H "Content-Type: application/json" -d '{"method": "creation_date", "value": "7d"}' http://<quay-server.example.com>/api/v1/repository/<organization_name>/<repository_name>/autoprunepolicy/$ curl -X POST -H "Authorization: Bearer <access_token>" -H "Content-Type: application/json" -d '{"method": "creation_date", "value": "7d"}' http://<quay-server.example.com>/api/v1/repository/<organization_name>/<repository_name>/autoprunepolicy/Copy to Clipboard Copied! Toggle word wrap Toggle overflow Example output
{"uuid": "ce2bdcc0-ced2-4a1a-ac36-78a9c1bed8c7"}{"uuid": "ce2bdcc0-ced2-4a1a-ac36-78a9c1bed8c7"}Copy to Clipboard Copied! Toggle word wrap Toggle overflow Optional. You can add an additional policy and pass in the
tagPatternandtagPatternMatchesfields to prune only tags that match the given regex pattern. For example:Copy to Clipboard Copied! Toggle word wrap Toggle overflow - 1
- Setting
tagPatternMatchestoFalsemakes it so that tags that all tags that do not match the given regex pattern are pruned. In this example, all tags but^test.are pruned.
Example output
{"uuid": "b53d8d3f-2e73-40e7-96ff-736d372cd5ef"}{"uuid": "b53d8d3f-2e73-40e7-96ff-736d372cd5ef"}Copy to Clipboard Copied! Toggle word wrap Toggle overflow You can update your policy for the repository by using the
PUT /api/v1/repository/{repository}/autoprunepolicy/{policy_uuid}command and passing in the UUID. For example:Copy to Clipboard Copied! Toggle word wrap Toggle overflow This command does not return output. Continue to the next step to check your auto-prune policy.
Check your auto-prune policy by entering the following command:
curl -X GET -H "Authorization: Bearer <access_token>" http://<quay-server.example.com>/api/v1/repository/<organization_name>/<repository_name>/autoprunepolicy/
$ curl -X GET -H "Authorization: Bearer <access_token>" http://<quay-server.example.com>/api/v1/repository/<organization_name>/<repository_name>/autoprunepolicy/Copy to Clipboard Copied! Toggle word wrap Toggle overflow Alternatively, you can include the UUID:
curl -X GET -H "Authorization: Bearer <access_token>" http://<quay-server.example.com>/api/v1/repository/<organization_name>/<repository_name>/autoprunepolicy/ce2bdcc0-ced2-4a1a-ac36-78a9c1bed8c7
$ curl -X GET -H "Authorization: Bearer <access_token>" http://<quay-server.example.com>/api/v1/repository/<organization_name>/<repository_name>/autoprunepolicy/ce2bdcc0-ced2-4a1a-ac36-78a9c1bed8c7Copy to Clipboard Copied! Toggle word wrap Toggle overflow Example output
{"policies": [{"uuid": "ce2bdcc0-ced2-4a1a-ac36-78a9c1bed8c7", "method": "number_of_tags", "value": 10}]}{"policies": [{"uuid": "ce2bdcc0-ced2-4a1a-ac36-78a9c1bed8c7", "method": "number_of_tags", "value": 10}]}Copy to Clipboard Copied! Toggle word wrap Toggle overflow You can delete the auto-prune policy by entering the following command. Note that deleting the policy requires the UUID.
curl -X DELETE -H "Authorization: Bearer <access_token>" http://<quay-server.example.com>/api/v1/repository/<organization_name>/<repository_name>/autoprunepolicy/ce2bdcc0-ced2-4a1a-ac36-78a9c1bed8c7
$ curl -X DELETE -H "Authorization: Bearer <access_token>" http://<quay-server.example.com>/api/v1/repository/<organization_name>/<repository_name>/autoprunepolicy/ce2bdcc0-ced2-4a1a-ac36-78a9c1bed8c7Copy to Clipboard Copied! Toggle word wrap Toggle overflow Example output
{"uuid": "ce2bdcc0-ced2-4a1a-ac36-78a9c1bed8c7"}{"uuid": "ce2bdcc0-ced2-4a1a-ac36-78a9c1bed8c7"}Copy to Clipboard Copied! Toggle word wrap Toggle overflow
15.3.9. Creating an auto-prune policy on a repository for a user with the API
You can use Red Hat Quay API endpoints to manage auto-pruning policies on a repository for user accounts that are not your own, so long as you have admin privileges on the repository.
Prerequisites
- You have created an OAuth access token.
- You have logged into Red Hat Quay.
-
You have
adminprivileges on the repository that you are creating the policy for.
Procedure
Enter the following
POST /api/v1/repository/<user_account>/<user_repository>/autoprunepolicy/command create a new policy that limits the number of tags for the user:curl -X POST -H "Authorization: Bearer <access_token>" -H "Content-Type: application/json" -d '{"method": "number_of_tags","value": 2}' https://<quay-server.example.com>/api/v1/repository/<user_account>/<user_repository>/autoprunepolicy/$ curl -X POST -H "Authorization: Bearer <access_token>" -H "Content-Type: application/json" -d '{"method": "number_of_tags","value": 2}' https://<quay-server.example.com>/api/v1/repository/<user_account>/<user_repository>/autoprunepolicy/Copy to Clipboard Copied! Toggle word wrap Toggle overflow Example output
{"uuid": "7726f79c-cbc7-490e-98dd-becdc6fefce7"}{"uuid": "7726f79c-cbc7-490e-98dd-becdc6fefce7"}Copy to Clipboard Copied! Toggle word wrap Toggle overflow Optional. You can add an additional policy for the current user and pass in the
tagPatternandtagPatternMatchesfields to prune only tags that match the given regex pattern. For example:Copy to Clipboard Copied! Toggle word wrap Toggle overflow Example output
{"uuid": "b3797bcd-de72-4b71-9b1e-726dabc971be"}{"uuid": "b3797bcd-de72-4b71-9b1e-726dabc971be"}Copy to Clipboard Copied! Toggle word wrap Toggle overflow You can update your policy for the current user by using the
PUT /api/v1/repository/<user_account>/<user_repository>/autoprunepolicy/<policy_uuid>command. For example:Copy to Clipboard Copied! Toggle word wrap Toggle overflow Updating a policy does not return output in the CLI.
Check your auto-prune policy by entering the following command:
curl -X GET -H "Authorization: Bearer <access_token>" http://<quay-server.example.com>/api/v1/repository/<user_account>/<user_repository>/autoprunepolicy/
$ curl -X GET -H "Authorization: Bearer <access_token>" http://<quay-server.example.com>/api/v1/repository/<user_account>/<user_repository>/autoprunepolicy/Copy to Clipboard Copied! Toggle word wrap Toggle overflow Alternatively, you can include the UUID:
curl -X GET -H "Authorization: Bearer <access_token>" http://<quay-server.example.com>/api/v1/repository/<user_account>/<user_repository>/autoprunepolicy/7726f79c-cbc7-490e-98dd-becdc6fefce7
$ curl -X GET -H "Authorization: Bearer <access_token>" http://<quay-server.example.com>/api/v1/repository/<user_account>/<user_repository>/autoprunepolicy/7726f79c-cbc7-490e-98dd-becdc6fefce7Copy to Clipboard Copied! Toggle word wrap Toggle overflow Example output
{"uuid": "81ee77ec-496a-4a0a-9241-eca49437d15b", "method": "creation_date", "value": "7d", "tagPattern": "^v*", "tagPatternMatches": true}{"uuid": "81ee77ec-496a-4a0a-9241-eca49437d15b", "method": "creation_date", "value": "7d", "tagPattern": "^v*", "tagPatternMatches": true}Copy to Clipboard Copied! Toggle word wrap Toggle overflow You can delete the auto-prune policy by entering the following command. Note that deleting the policy requires the UUID.
curl -X DELETE -H "Authorization: Bearer <access_token>" http://<quay-server.example.com>/api/v1/repository/<user_account>/<user_repository>/autoprunepolicy/<policy_uuid>
$ curl -X DELETE -H "Authorization: Bearer <access_token>" http://<quay-server.example.com>/api/v1/repository/<user_account>/<user_repository>/autoprunepolicy/<policy_uuid>Copy to Clipboard Copied! Toggle word wrap Toggle overflow Example output
{"uuid": "7726f79c-cbc7-490e-98dd-becdc6fefce7"}{"uuid": "7726f79c-cbc7-490e-98dd-becdc6fefce7"}Copy to Clipboard Copied! Toggle word wrap Toggle overflow