Chapter 3. Clair security scanner
Clair is an open source security scanner that analyzes container images and reports vulnerabilities. You can use Clair to automatically scan images and identify security issues in your container registry.
3.1. Clair vulnerability databases
Clair uses multiple vulnerability databases to identify security issues in container images. These databases provide comprehensive coverage across different operating systems and programming languages.
Clair uses the following vulnerability databases to report for issues in your images:
- Ubuntu Oval database
- Debian Security Tracker
- Red Hat Enterprise Linux (RHEL) Oval database
- SUSE Oval database
- Oracle Oval database
- Alpine SecDB database
- VMware Photon OS database
- Amazon Web Services (AWS) UpdateInfo
- Open Source Vulnerability (OSV) Database
For information about how Clair does security mapping with the different databases, see Claircore Severity Mapping.
3.1.1. Information about Open Source Vulnerability (OSV) database for Clair
Open Source Vulnerability (OSV) is a vulnerability database and monitoring service that focuses on tracking and managing security vulnerabilities in open source software.
OSV provides a comprehensive and up-to-date database of known security vulnerabilities in open source projects. It covers a wide range of open source software, including libraries, frameworks, and other components that are used in software development. For a full list of included ecosystems, see defined ecosystems.
Clair also reports vulnerability and security information for golang, java, and ruby ecosystems through the Open Source Vulnerability (OSV) database.
By leveraging OSV, developers and organizations can proactively monitor and address security vulnerabilities in open source components that they use, which helps to reduce the risk of security breaches and data compromises in projects.
For more information about OSV, see the OSV website.
3.2. Clair on OpenShift Container Platform
The Red Hat Quay Operator automatically installs and configures Clair when you deploy Red Hat Quay on OpenShift Container Platform. This simplifies setup by eliminating the need for manual Clair configuration.
3.3. Testing Clair
To verify that Clair is working correctly on your Red Hat Quay deployment, you can pull, tag, and push a sample image to your registry, then view the vulnerability report in the UI.
Prerequisites
- You have deployed the Clair container image.
Procedure
Pull a sample image by entering the following command:
$ podman pull ubuntu:20.04Tag the image to your registry by entering the following command:
$ sudo podman tag docker.io/library/ubuntu:20.04 <quay-server.example.com>/<user-name>/ubuntu:20.04Push the image to your Red Hat Quay registry by entering the following command:
$ sudo podman push --tls-verify=false quay-server.example.com/quayadmin/ubuntu:20.04- Log in to your Red Hat Quay deployment through the UI.
- Click the repository name, for example, quayadmin/ubuntu.
In the navigation pane, click Tags.
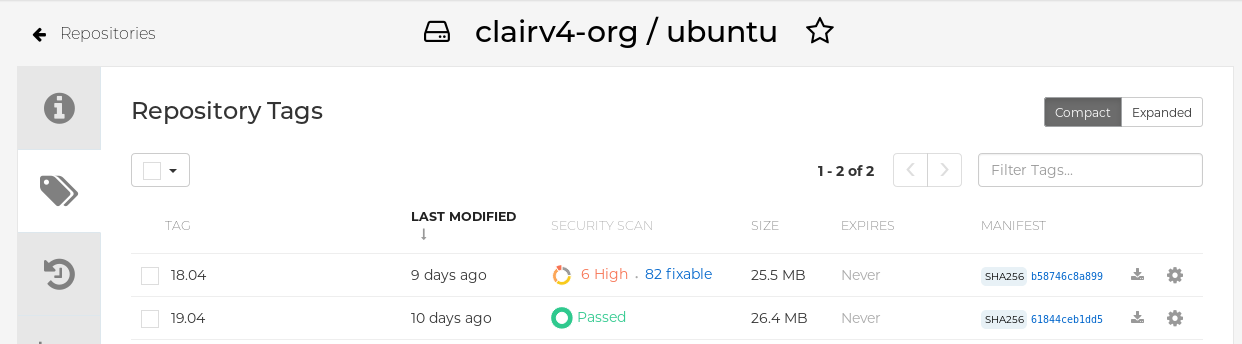
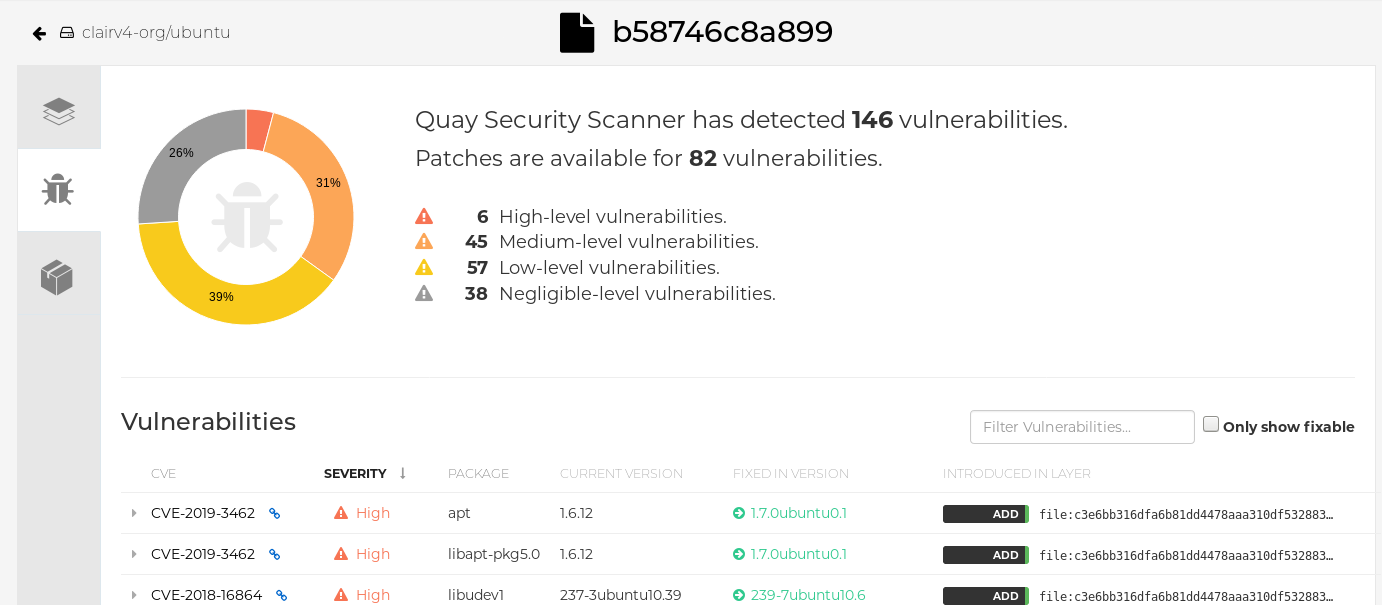
Click the image report, for example, 45 medium, to show a more detailed report:
 Note
NoteIn some cases, Clair shows duplicate reports on images, for example,
ubi8/nodejs-12orubi8/nodejs-16. This occurs because vulnerabilities with same name are for different packages. This behavior is expected with Clair vulnerability reporting and will not be addressed as a bug.
3.4. Advanced Clair configuration
Advanced Clair configuration lets you customize Clair settings beyond the default installation. You can use these options to adjust scanning behavior, database connections, and other advanced features to meet specific security and performance requirements.
3.4.1. Unmanaged Clair configuration
Unmanaged Clair configuration lets you run a custom Clair setup or use an external Clair database with the Red Hat Quay Operator. You can use this configuration for geo-replicated environments where multiple Operator instances share the same database, or when you need a highly available database outside your cluster.
3.4.1.1. Running a custom Clair configuration with an unmanaged Clair database
To run a custom Clair configuration with an unmanaged Clair database, you can set the clairpostgres component to unmanaged in your QuayRegistry custom resource. This lets you use an external database for geo-replicated environments or highly available setups outside your cluster.
You must not use the same externally managed PostgreSQL database for both Red Hat Quay and Clair deployments. Your PostgreSQL database must also not be shared with other workloads, as it might exhaust the natural connection limit on the PostgreSQL side when connection-intensive workloads, like Red Hat Quay or Clair, contend for resources. Additionally, pgBouncer is not supported with Red Hat Quay or Clair, so it is not an option to resolve this issue.
Procedure
In the Quay Operator, set the
clairpostgrescomponent of theQuayRegistrycustom resource tomanaged: false:apiVersion: quay.redhat.com/v1 kind: QuayRegistry metadata: name: quay370 spec: configBundleSecret: config-bundle-secret components: - kind: objectstorage managed: false - kind: route managed: true - kind: tls managed: false - kind: clairpostgres managed: false
3.4.1.2. Configuring a custom Clair database with an unmanaged Clair database
To configure a custom Clair database with SSL/TLS certificates for your Red Hat Quay deployment, you can create a Quay configuration bundle secret that includes the clair-config.yaml file. This lets you use your own external database with secure connections for Clair vulnerability scanning.
The following procedure sets up Clair with SSL/TLS certifications. To view a similar procedure that does not set up Clair with SSL/TLS certifications, see "Configuring a custom Clair database with a managed Clair configuration".
Procedure
Create a Quay configuration bundle secret that includes the
clair-config.yamlby entering the following command:$ oc create secret generic --from-file config.yaml=./config.yaml --from-file extra_ca_cert_rds-ca-2019-root.pem=./rds-ca-2019-root.pem --from-file clair-config.yaml=./clair-config.yaml --from-file ssl.cert=./ssl.cert --from-file ssl.key=./ssl.key config-bundle-secretExample Clair
config.yamlfileindexer: connstring: host=quay-server.example.com port=5432 dbname=quay user=quayrdsdb password=quayrdsdb sslrootcert=/run/certs/rds-ca-2019-root.pem sslmode=verify-ca layer_scan_concurrency: 6 migrations: true scanlock_retry: 11 log_level: debug matcher: connstring: host=quay-server.example.com port=5432 dbname=quay user=quayrdsdb password=quayrdsdb sslrootcert=/run/certs/rds-ca-2019-root.pem sslmode=verify-ca migrations: true metrics: name: prometheus notifier: connstring: host=quay-server.example.com port=5432 dbname=quay user=quayrdsdb password=quayrdsdb sslrootcert=/run/certs/rds-ca-2019-root.pem sslmode=verify-ca migrations: trueNote-
The database certificate is mounted under
/run/certs/rds-ca-2019-root.pemon the Clair application pod in theclair-config.yaml. It must be specified when configuring yourclair-config.yaml. -
An example
clair-config.yamlcan be found at Clair on OpenShift config.
-
The database certificate is mounted under
Add the
clair-config.yamlfile to your bundle secret, for example:apiVersion: v1 kind: Secret metadata: name: config-bundle-secret namespace: quay-enterprise data: config.yaml: <base64 encoded Quay config> clair-config.yaml: <base64 encoded Clair config> extra_ca_cert_<name>: <base64 encoded ca cert> ssl.crt: <base64 encoded SSL certificate> ssl.key: <base64 encoded SSL private key>NoteWhen updated, the provided
clair-config.yamlfile is mounted into the Clair pod. Any fields not provided are automatically populated with defaults using the Clair configuration module.You can check the status of your Clair pod by clicking the commit in the Build History page, or by running
oc get pods -n <namespace>. For example:$ oc get pods -n <namespace>Example output
NAME                                               READY   STATUS    RESTARTS   AGE
f192fe4a-c802-4275-bcce-d2031e635126-9l2b5-25lg2   1/1     Running   0          7s
3.4.2. Running a custom Clair configuration with a managed Clair database
Running a custom Clair configuration with a managed Clair database lets you customize Clair settings while the Operator manages the database. You can use this approach to disable specific updater resources or configure Clair for disconnected environments.
-
If you are running Red Hat Quay in an disconnected environment, the
airgapparameter of yourclair-config.yamlmust be set toTrue. - If you are running Red Hat Quay in an disconnected environment, you should disable all updater components.
3.4.2.1. Setting a Clair database to managed
To have the Red Hat Quay Operator manage your Clair database, you can set the clairpostgres component to managed in your QuayRegistry custom resource. This simplifies deployment and maintenance by letting the Operator handle database provisioning and configuration.
Procedure
In the Quay Operator, set the
clairpostgrescomponent of theQuayRegistrycustom resource tomanaged: true:apiVersion: quay.redhat.com/v1 kind: QuayRegistry metadata: name: quay370 spec: configBundleSecret: config-bundle-secret components: - kind: objectstorage managed: false - kind: route managed: true - kind: tls managed: false - kind: clairpostgres managed: true
3.4.2.2. Configuring a custom Clair database with a managed Clair configuration
To configure a custom Clair database while keeping the Clair configuration managed by the Operator, you can create a Quay configuration bundle secret that includes the clair-config.yaml file. This lets you use your own external database while the Operator continues to manage Clair settings.
Procedure
Create a Quay configuration bundle secret that includes the
clair-config.yamlby entering the following command:$ oc create secret generic --from-file config.yaml=./config.yaml --from-file extra_ca_cert_rds-ca-2019-root.pem=./rds-ca-2019-root.pem --from-file clair-config.yaml=./clair-config.yaml config-bundle-secretExample Clair
config.yamlfileindexer: connstring: host=quay-server.example.com port=5432 dbname=quay user=quayrdsdb password=quayrdsdb sslmode=disable layer_scan_concurrency: 6 migrations: true scanlock_retry: 11 log_level: debug matcher: connstring: host=quay-server.example.com port=5432 dbname=quay user=quayrdsdb password=quayrdsdb sslmode=disable migrations: true metrics: name: prometheus notifier: connstring: host=quay-server.example.com port=5432 dbname=quay user=quayrdsdb password=quayrdsdb sslmode=disable migrations: trueNote-
The database certificate is mounted under
/run/certs/rds-ca-2019-root.pemon the Clair application pod in theclair-config.yaml. It must be specified when configuring yourclair-config.yaml. -
An example
clair-config.yamlcan be found at Clair on OpenShift config.
-
The database certificate is mounted under
Add the
clair-config.yamlfile to your bundle secret, for example:apiVersion: v1 kind: Secret metadata: name: config-bundle-secret namespace: quay-enterprise data: config.yaml: <base64 encoded Quay config> clair-config.yaml: <base64 encoded Clair config>Note-
When updated, the provided
clair-config.yamlfile is mounted into the Clair pod. Any fields not provided are automatically populated with defaults using the Clair configuration module.
-
When updated, the provided
You can check the status of your Clair pod by clicking the commit in the Build History page, or by running
oc get pods -n <namespace>. For example:$ oc get pods -n <namespace>Example output
NAME                                               READY   STATUS    RESTARTS   AGE
f192fe4a-c802-4275-bcce-d2031e635126-9l2b5-25lg2   1/1     Running   0          7s
3.4.3. Clair in disconnected environments
Clair supports disconnected environments where your Red Hat Quay deployment has no direct internet access. You can use the clairctl tool to transfer vulnerability database updates from an open host to your isolated environment, enabling Clair to scan images without internet connectivity.
Clair uses a set of components called updaters to handle the fetching and parsing of data from various vulnerability databases. Updaters are set up by default to pull vulnerability data directly from the internet and work for immediate use.
Currently, Clair enrichment data is CVSS data. Enrichment data is currently unsupported in disconnected environments.
For more information about Clair updaters, see "Clair updaters".
3.4.3.1. Setting up Clair in a disconnected OpenShift Container Platform cluster
To install the clairctl command line utility for disconnected OpenShift Container Platform deployments, you can extract the tool from a running Clair pod and set its execution permissions. This lets you use clairctl to manage vulnerability database updates in disconnected environments.
Procedure
Install the
clairctlprogram for a Clair deployment in an OpenShift Container Platform cluster by entering the following command:$ oc -n quay-enterprise exec example-registry-clair-app-64dd48f866-6ptgw -- cat /usr/bin/clairctl > clairctlNoteUnofficially, the
clairctltool can be downloadedSet the permissions of the
clairctlfile so that it can be executed and run by the user, for example:$ chmod u+x ./clairctl
3.4.3.1.1. Retrieving and decoding the Clair configuration secret for Clair deployments on OpenShift Container Platform
To configure Clair for disconnected environments on OpenShift Container Platform, you can retrieve and decode the Clair configuration secret, then update the clair-config.yaml file to set disable_updaters and airgap parameters to True. This prepares Clair to work without direct internet access.
Prerequisites
-
You have installed the
clairctlcommand line utility tool.
Procedure
Enter the following command to retrieve and decode the configuration secret, and then save it to a Clair configuration YAML:
$ oc get secret -n quay-enterprise example-registry-clair-config-secret -o "jsonpath={$.data['config\.yaml']}" | base64 -d > clair-config.yamlUpdate the
clair-config.yamlfile so that thedisable_updatersandairgapparameters are set toTrue, for example:# ... indexer: airgap: true # ... matcher: disable_updaters: true # ...
3.4.3.1.2. Exporting the updaters bundle from a connected Clair instance
To export vulnerability database updates from a connected Clair instance for use in disconnected environments, you can use the clairctl tool with your configuration file to export the updaters bundle. This creates a bundle file that you can transfer to your isolated environment.
Prerequisites
-
You have installed the
clairctlcommand line utility tool. -
You have retrieved and decoded the Clair configuration secret, and saved it to a Clair
config.yamlfile. -
The
disable_updatersandairgapparameters are set toTruein your Clairconfig.yamlfile.
Procedure
From a Clair instance that has access to the internet, use the
clairctlCLI tool with your configuration file to export the updaters bundle. For example:$ ./clairctl --config ./config.yaml export-updaters updates.gz
3.4.3.1.3. Configuring access to the Clair database in the disconnected OpenShift Container Platform cluster
To configure access to the Clair database in your disconnected OpenShift Container Platform cluster, you can determine the database service, forward the database port, and update your Clair config.yaml file to use localhost. This lets you import the updaters bundle into the database using the clairctl tool.
Prerequisites
-
You have installed the
clairctlcommand line utility tool. -
You have retrieved and decoded the Clair configuration secret, and saved it to a Clair
config.yamlfile. -
The
disable_updatersandairgapparameters are set toTruein your Clairconfig.yamlfile. - You have exported the updaters bundle from a Clair instance that has access to the internet.
Procedure
Determine your Clair database service by using the
ocCLI tool, for example:$ oc get svc -n quay-enterpriseExample output
NAME                                  TYPE           CLUSTER-IP       EXTERNAL-IP   PORT(S)                             AGE
example-registry-clair-app            ClusterIP      172.30.224.93    <none>        80/TCP,8089/TCP                     4d21h
example-registry-clair-postgres       ClusterIP      172.30.246.88    <none>        5432/TCP                            4d21h
...
Forward the Clair database port so that it is accessible from the local machine. For example:
$ oc port-forward -n quay-enterprise service/example-registry-clair-postgres 5432:5432Update your Clair
config.yamlfile, for example:indexer: connstring: host=localhost port=5432 dbname=postgres user=postgres password=postgres sslmode=disable layer_scan_concurrency: 5 migrations: true scanlock_retry: 10 airgap: true scanner: repo: rhel-repository-scanner: repo2cpe_mapping_file: /data/repository-to-cpe.json package: rhel_containerscanner: name2repos_mapping_file: /data/container-name-repos-map.jsonwhere:
connstring::Specifies the connection string for the database.rhel-repository-scanner::Specifies the repository scanner configuration.rhel_containerscanner::Specifies the container scanner configuration.
3.4.3.1.4. Importing the updaters bundle into the disconnected OpenShift Container Platform cluster
To import vulnerability database updates into your disconnected OpenShift Container Platform cluster, you can use the clairctl tool with your Clair configuration file to import the updaters bundle. This populates the Clair database with vulnerability data so Clair can scan images without internet access.
Prerequisites
-
You have installed the
clairctlcommand line utility tool. -
You have retrieved and decoded the Clair configuration secret, and saved it to a Clair
config.yamlfile. -
The
disable_updatersandairgapparameters are set toTruein your Clairconfig.yamlfile. - You have exported the updaters bundle from a Clair instance that has access to the internet.
- You have transferred the updaters bundle into your disconnected environment.
Procedure
Use the
clairctlCLI tool to import the updaters bundle into the Clair database that is deployed by OpenShift Container Platform. For example:$ ./clairctl --config ./clair-config.yaml import-updaters updates.gz
3.4.3.2. Setting up a self-managed deployment of Clair for a disconnected OpenShift Container Platform cluster
To install the clairctl command line utility for a self-managed Clair deployment on OpenShift Container Platform, you can copy the tool from a Clair container using podman and set its execution permissions. This lets you use clairctl to manage vulnerability database updates in disconnected environments.
Procedure
Install the
clairctlprogram for a self-managed Clair deployment by using thepodman cpcommand, for example:$ sudo podman cp clairv4:/usr/bin/clairctl ./clairctlSet the permissions of the
clairctlfile so that it can be executed and run by the user, for example:$ chmod u+x ./clairctl
3.4.3.2.1. Deploying a self-managed Clair container for disconnected OpenShift Container Platform clusters
To deploy a self-managed Clair container for disconnected OpenShift Container Platform clusters, you can create a configuration directory, configure a Clair configuration file with disable_updaters enabled, and start the container using podman. This lets you run Clair independently in environments without direct internet access.
Prerequisites
-
You have installed the
clairctlcommand line utility tool.
Procedure
Create a folder for your Clair configuration file, for example:
$ mkdir /etc/clairv4/config/Create a Clair configuration file with the
disable_updatersparameter set toTrue, for example:--- indexer: airgap: true --- matcher: disable_updaters: true ---Start Clair by using the container image, mounting in the configuration from the file you created:
$ sudo podman run -it --rm --name clairv4 \
-p 8081:8081 -p 8088:8088 \
-e CLAIR_CONF=/clair/config.yaml \
-e CLAIR_MODE=combo \
-v /etc/clairv4/config:/clair:Z \
registry.redhat.io/quay/clair-rhel9:v3.17.0
3.4.3.2.2. Exporting the updaters bundle from a connected Clair instance
To export vulnerability database updates from a connected self-managed Clair instance for use in disconnected environments, you can use the clairctl tool with your configuration file to export the updaters bundle. This creates a bundle file that you can transfer to your isolated environment.
Prerequisites
-
You have installed the
clairctlcommand line utility tool. - You have deployed Clair.
-
The
disable_updatersandairgapparameters are set toTruein your Clairconfig.yamlfile.
Procedure
From a Clair instance that has access to the internet, use the
clairctlCLI tool with your configuration file to export the updaters bundle. For example:$ ./clairctl --config ./config.yaml export-updaters updates.gz
3.4.3.2.3. Configuring access to the Clair database in the disconnected OpenShift Container Platform cluster
To configure access to the Clair database in your disconnected OpenShift Container Platform cluster for a self-managed deployment, you can determine the database service, forward the database port, and update your Clair config.yaml file to use localhost. This lets you import the updaters bundle into the database using the clairctl tool.
Prerequisites
-
You have installed the
clairctlcommand line utility tool. - You have deployed Clair.
-
The
disable_updatersandairgapparameters are set toTruein your Clairconfig.yamlfile. - You have exported the updaters bundle from a Clair instance that has access to the internet.
Procedure
Determine your Clair database service by using the
ocCLI tool, for example:$ oc get svc -n quay-enterpriseExample output
NAME                                  TYPE           CLUSTER-IP       EXTERNAL-IP   PORT(S)                             AGE
example-registry-clair-app            ClusterIP      172.30.224.93    <none>        80/TCP,8089/TCP                     4d21h
example-registry-clair-postgres       ClusterIP      172.30.246.88    <none>        5432/TCP                            4d21h
...
Forward the Clair database port so that it is accessible from the local machine. For example:
$ oc port-forward -n quay-enterprise service/example-registry-clair-postgres 5432:5432Update your Clair
config.yamlfile, for example:indexer: connstring: host=localhost port=5432 dbname=postgres user=postgres password=postgres sslmode=disable layer_scan_concurrency: 5 migrations: true scanlock_retry: 10 airgap: true scanner: repo: rhel-repository-scanner: repo2cpe_mapping_file: /data/repository-to-cpe.json package: rhel_containerscanner: name2repos_mapping_file: /data/container-name-repos-map.jsonwhere:
connstring::Specifies the connection string for the database.rhel-repository-scanner::Specifies the repository scanner configuration.rhel_containerscanner::Specifies the container scanner configuration.
3.4.3.2.4. Importing the updaters bundle into the disconnected OpenShift Container Platform cluster
To import vulnerability database updates into your disconnected OpenShift Container Platform cluster for a self-managed deployment, you can use the clairctl tool with your Clair configuration file to import the updaters bundle. This populates the Clair database with vulnerability data so Clair can scan images without internet access.
Prerequisites
-
You have installed the
clairctlcommand line utility tool. - You have deployed Clair.
-
The
disable_updatersandairgapparameters are set toTruein your Clairconfig.yamlfile. - You have exported the updaters bundle from a Clair instance that has access to the internet.
- You have transferred the updaters bundle into your disconnected environment.
Procedure
Use the
clairctlCLI tool to import the updaters bundle into the Clair database that is deployed by OpenShift Container Platform:$ ./clairctl --config ./clair-config.yaml import-updaters updates.gz
3.4.4. Common Product Enumeration mapping in Clair
Clair uses Common Product Enumeration (CPE) mapping files to map RPM packages to security data for accurate vulnerability scanning of Red Hat Enterprise Linux (RHEL) container images. Understanding how Clair utilizes these files ensures that your vulnerability reports remain accurate and comprehensive.
The scanner requires the CPE file to be present and accessible to process RPM packages properly. If these files are missing or inaccessible, RPM packages installed in the container image are skipped during the scanning process.
By default, the Clair indexer includes the repos2cpe and names2repos data files within the Clair container. This allows you to reference local paths such as /data/repository-to-cpe.json without additional external configuration.
While Red Hat Product Security updates CPE files regularly, the versions bundled within the Clair container are only updated during Red Hat Quay releases. This can lead to temporary discrepancies between the latest security data and the versions bundled with your current installation.
Additional resources
3.4.4.1. CPE mapping configuration reference
Common Product Enumeration (CPE) mapping configuration defines the fields and file paths used by Clair to associate packages with standardized product identifiers.
| CPE Type | Link to JSON mapping file |
|---|---|
|
| |
|
|
Example configuration
indexer:
  scanner:
    repo:
      rhel-repository-scanner:
        repo2cpe_mapping_file: /data/repository-to-cpe.json
    package:
      rhel_containerscanner:
        name2repos_mapping_file: /data/container-name-repos-map.json
where:
repo2cpe_mapping_file- Specifies the path to the JSON file mapping Red Hat repositories to CPEs.
name2repos_mapping_file- Specifies the path to the JSON file mapping container names to repositories.
3.5. Resizing Managed Storage
To expand storage capacity for your Red Hat Quay on OpenShift Container Platform deployment, you can use the OpenShift Container Platform console to resize the PostgreSQL and Clair PostgreSQL persistent volume claims. This lets you increase storage beyond the default 50 GiB allocation when your registry needs more space.
When deploying Red Hat Quay on OpenShift Container Platform, three distinct persistent volume claims (PVCs) are deployed:
- One for the PostgreSQL 15 registry.
- One for the Clair PostgreSQL 15 registry.
- One that uses NooBaa as a backend storage.
The connection between Red Hat Quay and NooBaa is done through the S3 API and ObjectBucketClaim API in OpenShift Container Platform. Red Hat Quay leverages that API group to create a bucket in NooBaa, obtain access keys, and automatically set everything up. On the backend, or NooBaa, side, that bucket is creating inside of the backing store. As a result, NooBaa PVCs are not mounted or connected to Red Hat Quay pods.
Prerequisites
- You have cluster admin privileges on OpenShift Container Platform.
Procedure
-
Log into the OpenShift Container Platform console and select Storage
Persistent Volume Claims. -
Select the desired
PersistentVolumeClaimfor either PostgreSQL 13 or Clair PostgreSQL 13, for example,example-registry-quay-postgres-13. - From the Action menu, select Expand PVC.
Enter the new size of the Persistent Volume Claim and select Expand.
After a few minutes, the expanded size should reflect in the PVC’s Capacity field.
3.6. Customizing Default Operator Images
Currently, customizing default Operator images is not supported on IBM Power and IBM Z.
Customizing default Operator images lets you override the default container images used by the Red Hat Quay Operator by setting environment variables in the ClusterServiceVersion object.
Customizing default Operator images is not supported for production Red Hat Quay environments and is only recommended for development or testing purposes. There is no guarantee your deployment will work correctly when using non-default images with the Red Hat Quay Operator.
3.6.1. Environment Variables
The Red Hat Quay Operator uses environment variables to override default container images for components such as base, clair, postgres, and redis. You can set these variables in the ClusterServiceVersion object to customize which images the Operator uses for each component.
| Environment Variable | Component |
|
|
|
|
|
|
|
|
|
|
|
|
Overridden images must be referenced by manifest (@sha256:) and not by tag (:latest).
3.6.2. Applying overrides to a running Operator
To override container images for a running Red Hat Quay Operator, you can modify the ClusterServiceVersion object to add environment variables that point to your custom images. This applies the overrides at the Operator level, so all QuayRegistry instances use the same custom images.
Procedure
The
ClusterServiceVersionobject is Operator Lifecycle Manager’s representation of a running Operator in the cluster. Find the Red Hat Quay Operator’sClusterServiceVersionby using a Kubernetes UI or thekubectl/ocCLI tool. For example:$ oc get clusterserviceversions -n <namespace>Using the UI,
oc edit, or another method, modify theClusterServiceVersionobject to include the environment variables outlined above to point to the override images:JSONPath:
spec.install.spec.deployments[0].spec.template.spec.containers[0].env- name: RELATED_IMAGE_COMPONENT_QUAY value: quay.io/projectquay/quay@sha256:c35f5af964431673f4ff5c9e90bdf45f19e38b8742b5903d41c10cc7f6339a6d - name: RELATED_IMAGE_COMPONENT_CLAIR value: quay.io/projectquay/clair@sha256:70c99feceb4c0973540d22e740659cd8d616775d3ad1c1698ddf71d0221f3ce6 - name: RELATED_IMAGE_COMPONENT_POSTGRES value: centos/postgresql-10-centos7@sha256:de1560cb35e5ec643e7b3a772ebaac8e3a7a2a8e8271d9e91ff023539b4dfb33 - name: RELATED_IMAGE_COMPONENT_REDIS value: centos/redis-32-centos7@sha256:06dbb609484330ec6be6090109f1fa16e936afcf975d1cbc5fff3e6c7cae7542
3.7. AWS S3 CloudFront
To configure AWS S3 CloudFront for your Red Hat Quay backend registry storage, you can create a secret that includes your config.yaml file and the CloudFront signing key. This enables CloudFront content delivery for your registry storage.
Procedure
Create a secret that includes your
config.yamlfile and the CloudFront signing key by entering the following command:$ oc create secret generic --from-file config.yaml=./config_awss3cloudfront.yaml --from-file default-cloudfront-signing-key.pem=./default-cloudfront-signing-key.pem test-config-bundle