Chapter 3. Performing Additional Configuration on Satellite Server
3.1. How to Configure Inter-Satellite Synchronization
Red Hat Satellite uses Inter-Satellite Synchronization (ISS) to synchronize content between two Satellite Servers including those that are air-gapped.
You can use ISS in cases such as:
- If you want to copy some but not all content from your Satellite Server to other Satellite Servers. For example, you have Content Views that your IT department consumes from Satellite Server, and you want to copy content from those Content Views to other Satellite Servers.
- If you want to copy all Library content from your Satellite Server to other Satellite Servers. For example, you have Products and repositories that your IT department consumes from Satellite Server in the Library, and you want to copy all Products and repositories in that organization to other Satellite Servers.
You cannot use ISS to synchronize content from Satellite Server to Capsule Server. Capsule Server supports synchronization natively. For more information, see Capsule Server Overview in Planning for Red Hat Satellite.
There are different ways of using ISS. The way you can use depends on your multi-server setup that can fall to one of the following scenarios.
3.1.1. ISS Network Sync in a Disconnected Scenario
In a disconnected scenario, there is the following setup:
- The upstream Satellite Server is connected to the Internet. This server consumes content from the Red Hat Content Delivery Network (CDN) or custom sources.
- The downstream Satellite Server is completely isolated from all external networks.
- The downstream Satellite Server can communicate with a connected upstream Satellite Server over an internal network.
Figure 3.1. The Satellite ISS Disconnected Scenario
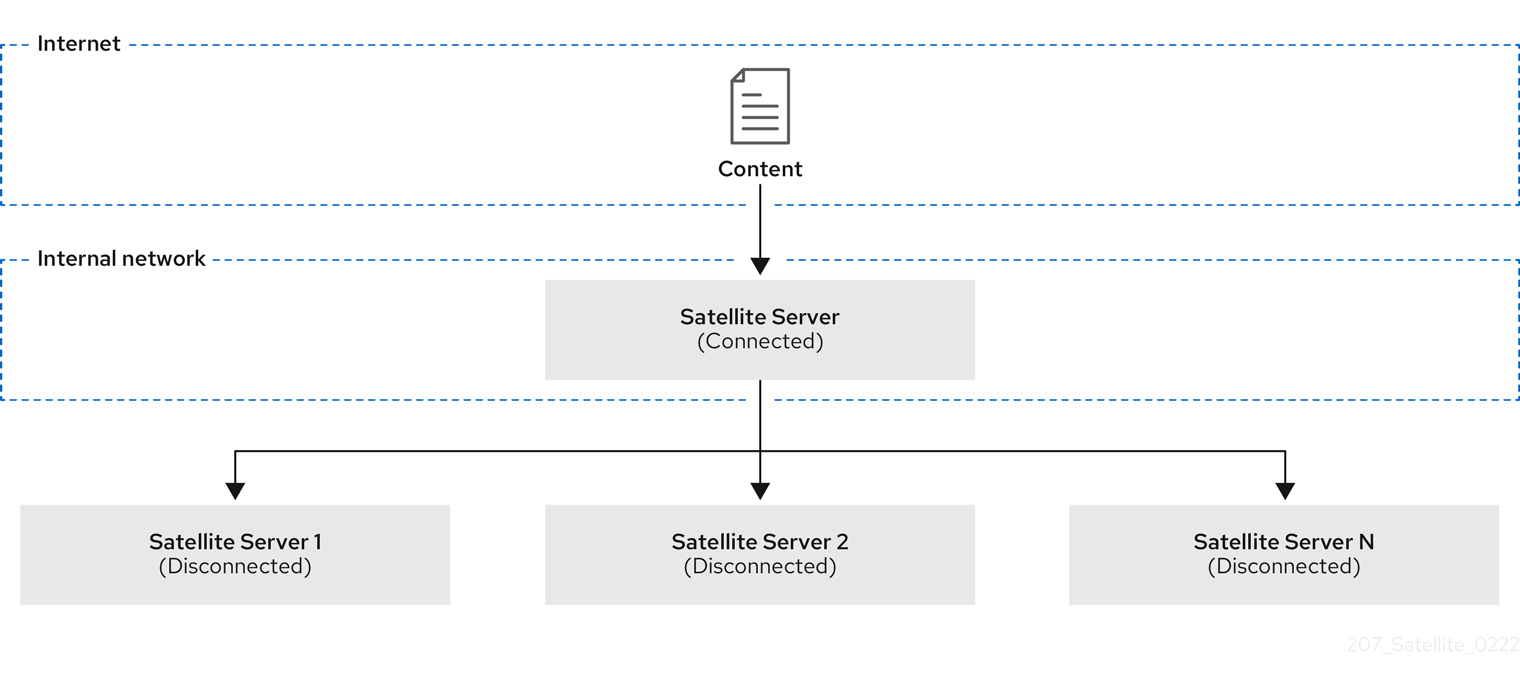
You can configure your downstream Satellite Server to synchronize content from the upstream Satellite Server over the network. See Section 3.2, “Configuring Satellite Server to Synchronize Content over a Network”.
3.1.2. ISS Export Sync in an Air-Gapped Scenario
In an air-gapped scenario, there is the following setup:
- The upstream Satellite Server is connected to the Internet. This server consumes content from the Red Hat CDN or custom sources.
- The downstream Satellite Server is completely isolated from all external networks.
- The downstream Satellite Server does not have a network connection to a connected upstream Satellite Server.
Figure 3.2. The Satellite ISS Air-Gapped Scenario

The only way for an air-gapped downstream Satellite Server to receive content updates is by exporting payload from the upstream Satellite Server, bringing it physically to the downstream Satellite Server, and importing the payload. For more information, see Synchronizing Content Between Satellite Servers in the Content Management Guide.
Configure your downstream Satellite Server to synchronize content using exports. See Section 3.3, “Configuring Satellite Server to Synchronize Content Using Exports”.
3.2. Configuring Satellite Server to Synchronize Content over a Network
Configure a downstream Satellite Server to synchronize repositories from a connected upstream Satellite Server over HTTPS.
Prerequisites
- A network connection exists between the upstream Satellite Server and the downstream Satellite Server.
- You imported the subscription manifest on both the upstream and downstream Satellite Server.
- On the upstream Satellite Server, you enabled the required repositories for the organization.
The upstream user is an admin or has the following permissions:
-
view_organizations -
view_products -
edit_organizations(to download the CA certificate) -
view_lifecycle_environments -
view_content_views
-
-
On the downstream Satellite Server, you have imported the SSL certificate of the upstream Satellite Server using the contents of
http://upstream-satellite.example.com/pub/katello-server-ca.crt. For more information, see Importing SSL Certificates in the Content Management Guide. - The downstream user is an admin or has the permissions to create product repositories and organizations.
Procedure
- Navigate to Content > Subscriptions.
- Click the Manage Manifest button.
- Navigate to the CDN Configuration tab.
- Select the Network Sync tab.
- In the URL field, enter the address of the upstream Satellite Server.
- In the Username, enter your username for upstream login.
- In the Password, enter your password or personal access token for upstream login.
- In the Organization label field, enter the label of the upstream organization.
-
Optional: In the Lifecycle Environment Label field, enter the label of the upstream lifecycle environment. Default is
Library. -
Optional: In the Content view label field, enter the label of the upstream Content View. Default is
Default_Organization_View. - From the SSL CA Content Credential menu, select a CA certificate used by the upstream Satellite Server.
- Click Update.
- In the Satellite web UI, navigate to Content > Products.
Click Sync Now to synchronize the repositories.
You can also create a synchronization plan to ensure updates on a regular basis. For more information, see Creating a Synchronization Plan in the Content Management Guide.
CLI Procedure
- Connect to your downstream Satellite Server using SSH.
View information about the upstream CA certificate:
# hammer content-credential show \
--name="My_Upstream_CA_Cert" \
--organization="My_Downstream_Organization"
Note the ID of the CA certificate for the next step.
Set CDN configuration to an upstream Satellite Server:
# hammer organization configure-cdn --name="My_Downstream_Organization" \
--type=network_sync \
--url https://upstream-satellite.example.com \
--username upstream_username --password upstream_password \
--ssl-ca-credential-id "My_Upstream_CA_Cert_ID" \ --upstream-organization-label="_My_Upstream_Organization" \
[--upstream-lifecycle-environment-label="My_Lifecycle_Environment"] \
[--upstream-content-view-label="My_Content_View"]
The default lifecycle environment label is
Library. The default Content View label isDefault_Organization_View.
3.3. Configuring Satellite Server to Synchronize Content Using Exports
If you deployed your downstream Satellite Server as air-gapped, configure your Satellite Server as such to avoid attempts to consume content from a network.
Procedure
- In the Satellite web UI, navigate to Content > Subscriptions.
- Click the Manage Manifest button.
- Switch to the CDN Configuration tab.
- Select the Export Sync tab.
- Click Update.
CLI Procedure
- Log in to your Satellite Server using SSH.
Set CDN configuration to sync using exports:
# hammer organization configure-cdn --name="My_Organization" --type=export_sync
Additional Resources
For more information about synchronizing content using exports, see How to Synchronize Content Using Export and Import in the Content Management Guide.
3.4. Importing Kickstart Repositories
Kickstart repositories are not provided by the Content ISO image. To use Kickstart repositories in your disconnected Satellite, you must download a binary DVD ISO file for the version of Red Hat Enterprise Linux that you want to use and copy the Kickstart files to Satellite.
To import Kickstart repositories for Red Hat Enterprise Linux 7, complete Section 3.4.1, “Importing Kickstart Repositories for Red Hat Enterprise Linux 7”.
To import Kickstart repositories for Red Hat Enterprise Linux 8, complete Section 3.4.2, “Importing Kickstart Repositories for Red Hat Enterprise Linux 8”.
3.4.1. Importing Kickstart Repositories for Red Hat Enterprise Linux 7
To import Kickstart repositories for Red Hat Enterprise Linux 7, complete the following steps on Satellite.
Procedure
- Navigate to the Red Hat Customer Portal at access.redhat.com and log in.
- In the upper left of the window, click Downloads.
- To the right of Red Hat Enterprise Linux 7, click Versions 7 and below.
- From the Version list, select the required version of the Red Hat Enterprise Linux 7, for example 7.7.
- In the Download Red Hat Enterprise Linux window, locate the binary DVD version of the ISO image, for example, Red Hat Enterprise Linux 7.7 Binary DVD, and click Download Now.
- When the download completes, copy the ISO image to Satellite Server.
On Satellite Server, create a mount point and temporarily mount the ISO image at that location:
# mkdir /mnt/iso
# mount -o loop rhel-binary-dvd.iso /mnt/iso
Create Kickstart directories:
# mkdir --parents /var/www/html/pub/sat-import/content/dist/rhel/server/7/7.7/x86_64/kickstart/Copy the
kickstartfiles from the ISO image:# cp -a /mnt/iso/* /var/www/html/pub/sat-import/content/dist/rhel/server/7/7.7/x86_64/kickstart/Add the following entries to the listing files:
To the
/var/www/html/pub/sat-import/content/dist/rhel/server/7/listingfile, append the version number with a new line. For example, for the RHEL 7.7 ISO, append7.7.To the
/var/www/html/pub/sat-import/content/dist/rhel/server/7/7.7/listingfile, append the architecture with a new line. For example,x86_64.To the
/var/www/html/pub/sat-import/content/dist/rhel/server/7/7.7/x86_64/listingfile, appendkickstartwith a new line.Copy the
.treeinfofiles from the ISO image:# cp /mnt/iso/.treeinfo /var/www/html/pub/sat-import/content/dist/rhel/server/7/7.7/x86_64/kickstart/treeinfoIf you do not plan to use the mounted binary DVD ISO image, unmount and remove the directory:
# umount /mnt/iso # rmdir /mnt/iso- In the Satellite web UI, enable the Kickstart repositories.
3.4.2. Importing Kickstart Repositories for Red Hat Enterprise Linux 8
To import Kickstart repositories for Red Hat Enterprise Linux 8, complete the following steps on Satellite.
Procedure
- Navigate to the Red Hat Customer Portal at access.redhat.com and log in.
- In the upper left of the window, click Downloads.
- Click Red Hat Enterprise Linux 8.
- In the Download Red Hat Enterprise Linux window, locate the binary DVD version of the ISO image, for example, Red Hat Enterprise Linux 8.1 Binary DVD, and click Download Now.
- When the download completes, copy the ISO image to Satellite Server.
On Satellite Server, create a mount point and temporarily mount the ISO image at that location:
# mkdir /mnt/iso
# mount -o loop rhel-binary-dvd.iso /mnt/iso
Create directories for Red Hat Enterprise Linux 8 AppStream and BaseOS Kickstart repositories:
# mkdir --parents /var/www/html/pub/sat-import/content/dist/rhel8/8.1/x86_64/appstream/kickstart
# mkdir --parents /var/www/html/pub/sat-import/content/dist/rhel8/8.1/x86_64/baseos/kickstart
Copy the
kickstartfiles from the ISO image:# cp -a /mnt/iso/AppStream/* /var/www/html/pub/sat-import/content/dist/rhel8/8.1/x86_64/appstream/kickstart # cp -a /mnt/iso/BaseOS/* /mnt/iso/images/ /var/www/html/pub/sat-import/content/dist/rhel8/8.1/x86_64/baseos/kickstartNote that for BaseOS, you must also copy the contents of the
/mnt/iso/images/directory.Add the following entries to the listing files:
To the
/var/www/html/pub/sat-import/content/dist/rhel8/8.1/x86_64/appstream/listingfile, appendkickstartwith a new line.To the
/var/www/html/pub/sat-import/content/dist/rhel8/8.1/x86_64/baseos/listingfile, appendkickstartwith a new line:To the
/var/www/html/pub/sat-import/content/dist/rhel8/listingfile, append the version number with a new line. For example, for the RHEL 8.1 binary ISO, append8.1.Copy the
.treeinfofiles from the ISO image:# cp /mnt/iso/.treeinfo /var/www/html/pub/sat-import/content/dist/rhel8/8.1/x86_64/appstream/kickstart/treeinfo # cp /mnt/iso/.treeinfo /var/www/html/pub/sat-import/content/dist/rhel8/8.1/x86_64/baseos/kickstart/treeinfo-
Open the
/var/www/html/pub/sat-import/content/dist/rhel8/8.1/x86_64/baseos/kickstart/treeinfofile for editing. In the
[general]section, make the following changes:-
Change
packagedir = AppStream/Packagestopackagedir = Packages -
Change
repository = AppStreamtorepository = . -
Change
variant = AppStreamtovariant = BaseOS -
Change
variants = AppStream,BaseOStovariants = BaseOS
-
Change
-
In the
[tree]section, changevariants = AppStream,BaseOStovariants = BaseOS. In the
[variant-BaseOS]section, make the following changes:-
Change
packages = BaseOS/Packagestopackages = Packages -
Change
repository = BaseOStorepository = .
-
Change
-
Delete the
[media]and[variant-AppStream]sections. - Save and close the file.
Verify that the
/var/www/html/pub/sat-import/content/dist/rhel8/8.1/x86_64/baseos/kickstart/treeinfofile has the following format:[checksums] images/efiboot.img = sha256:9ad9beee4c906cd05d227a1be7a499c8d2f20b3891c79831325844c845262bb6 images/install.img = sha256:e246bf4aedfff3bb54ae9012f959597cdab7387aadb3a504f841bdc2c35fe75e images/pxeboot/initrd.img = sha256:a66e3c158f02840b19c372136a522177a2ab4bd91cb7269fb5bfdaaf7452efef images/pxeboot/vmlinuz = sha256:789028335b64ddad343f61f2abfdc9819ed8e9dfad4df43a2694c0a0ba780d16 [general] ; WARNING.0 = This section provides compatibility with pre-productmd treeinfos. ; WARNING.1 = Read productmd documentation for details about new format. arch = x86_64 family = Red Hat Enterprise Linux name = Red Hat Enterprise Linux 8.1.0 packagedir = Packages platforms = x86_64,xen repository = . timestamp = 1571146127 variant = BaseOS variants = BaseOS version = 8.1.0 [header] type = productmd.treeinfo version = 1.2 [images-x86_64] efiboot.img = images/efiboot.img initrd = images/pxeboot/initrd.img kernel = images/pxeboot/vmlinuz [images-xen] initrd = images/pxeboot/initrd.img kernel = images/pxeboot/vmlinuz [release] name = Red Hat Enterprise Linux short = RHEL version = 8.1.0 [stage2] mainimage = images/install.img [tree] arch = x86_64 build_timestamp = 1571146127 platforms = x86_64,xen variants = BaseOS [variant-BaseOS] id = BaseOS name = BaseOS packages = Packages repository = . type = variant uid = BaseOS-
Open the
/var/www/html/pub/sat-import/content/dist/rhel8/8.1/x86_64/appstream/kickstart/treeinfofile for editing. In the
[general]section, make the following changes:-
Change
packagedir = AppStream/Packagestopackagedir = Packages -
Change
repository = AppStreamtorepository = . -
Change
variants = AppStream,BaseOStovariants = AppStream
-
Change
-
In the
[tree]section, changevariants = AppStream,BaseOStovariants = AppStream In the
[variant-AppStream]section, make the following changes:-
Change
packages = AppStream/Packagestopackages = Packages -
Change
repository = AppStreamtorepository = .
-
Change
-
Delete the following sections from the file:
[checksums],[images-x86_64],[images-xen],[media],[stage2],[variant-BaseOS]. - Save and close the file.
Verify that the
/var/www/html/pub/sat-import/content/dist/rhel8/8.1/x86_64/appstream/kickstart/treeinfofile has the following format:[general] ; WARNING.0 = This section provides compatibility with pre-productmd treeinfos. ; WARNING.1 = Read productmd documentation for details about new format. arch = x86_64 family = Red Hat Enterprise Linux name = Red Hat Enterprise Linux 8.1.0 packagedir = Packages platforms = x86_64,xen repository = . timestamp = 1571146127 variant = AppStream variants = AppStream version = 8.1.0 [header] type = productmd.treeinfo version = 1.2 [release] name = Red Hat Enterprise Linux short = RHEL version = 8.1.0 [tree] arch = x86_64 build_timestamp = 1571146127 platforms = x86_64,xen variants = AppStream [variant-AppStream] id = AppStream name = AppStream packages = Packages repository = . type = variant uid = AppStreamIf you do not plan to use the mounted binary DVD ISO image, unmount and remove the directory:
# umount /mnt/iso # rmdir /mnt/iso- In the Satellite web UI, enable the Kickstart repositories.
3.5. Enabling the Satellite Client 6 Repository
The Satellite Client 6 repository provides the katello-agent, katello-host-tools, and puppet packages for clients registered to Satellite Server. You must enable the repository for each Red Hat Enterprise Linux version that you need to manage hosts. Continue with a procedure below according to the operating system version for which you want to enable the Satellite Client 6 repository.
3.5.1. Red Hat Enterprise Linux 9 & Red Hat Enterprise Linux 8
To use the CLI instead of the Satellite web UI, see the procedure relevant for your Red Hat Enterprise Linux version:
Prerequisites
- Ensure that you import all content ISO images that you require into Satellite Server.
Procedure
- In the Satellite web UI, navigate to Content > Red Hat Repositories.
- In the Available Repositories pane, enable the Recommended Repositories to get the list of repositories.
- Click Red Hat Satellite Client 6 for RHEL 9 x86_64 (RPMs) or Red Hat Satellite Client 6 for RHEL 8 x86_64 (RPMs) to expand the repository set.
For the x86_64 architecture, click the + icon to enable the repository.
If the Satellite Client 6 items are not visible, it may be because they are not included in the Red Hat Subscription Manifest obtained from the Customer Portal. To correct that, log in to the Customer Portal, add these repositories, download the Red Hat Subscription Manifest and import it into Satellite. For more information, see Managing Red Hat Subscriptions in Managing Content.
Enable the Satellite Client 6 repository for every supported major version of Red Hat Enterprise Linux running on your hosts. After enabling a Red Hat repository, a Product for this repository is automatically created.
CLI procedure for Red Hat Enterprise Linux 9
Enable the Satellite Client 6 repository using the
hammer repository-set enablecommand:# hammer repository-set enable \ --basearch="x86_64" \ --name "Red Hat Satellite Client 6 for RHEL 9 x86_64 (RPMs)" \ --organization "My_Organization" \ --product "Red Hat Enterprise Linux for x86_64"
CLI procedure for Red Hat Enterprise Linux 8
Enable the Satellite Client 6 repository using the
hammer repository-set enablecommand:# hammer repository-set enable \ --basearch="x86_64" \ --name "Red Hat Satellite Client 6 for RHEL 8 x86_64 (RPMs)" \ --organization "My_Organization" \ --product "Red Hat Enterprise Linux for x86_64"
3.5.2. Red Hat Enterprise Linux 7 & Red Hat Enterprise Linux 6
You require Red Hat Enterprise Linux Extended Life Cycle Support (ELS) Add-on subscription to enable the repositories of Red Hat Enterprise Linux 6. For more information, see Red Hat Enterprise Linux Extended Life Cycle Support (ELS) Add-on guide.
To use the CLI instead of the Satellite web UI, see the procedure relevant for your Red Hat Enterprise Linux version:
Prerequisites
Ensure that you import all content ISO images that you require into Satellite Server. .Procedure
- In the Satellite web UI, navigate to Content > Red Hat Repositories.
- In the Available Repositories pane, enable the Recommended Repositories to get the list of repositories.
In the Available Repositories pane, click on Satellite Client 6 (for RHEL 7 Server) (RPMs) or Satellite Client 6 (for RHEL 6 Server - ELS) (RPMs) to expand the repository set.
If the Satellite Client 6 items are not visible, it may be because they are not included in the Red Hat Subscription Manifest obtained from the Customer Portal. To correct that, log in to the Customer Portal, add these repositories, download the Red Hat Subscription Manifest and import it into Satellite. For more information, see Managing Red Hat Subscriptions in Managing Content.
- For the x86_64 architecture, click the + icon to enable the repository. Enable the Satellite Client 6 repository for every supported major version of Red Hat Enterprise Linux running on your hosts. After enabling a Red Hat repository, a Product for this repository is automatically created.
CLI procedure for Red Hat Enterprise Linux 7
Enable the Satellite Client 6 repository using the
hammer repository-set enablecommand:# hammer repository-set enable \ --basearch="x86_64" \ --name "Red Hat Satellite Client 6 (for RHEL 7 Server) (RPMs)" \ --organization "My_Organization" \ --product "Red Hat Enterprise Linux Server"
CLI procedure for Red Hat Enterprise Linux 6
Enable the Satellite Client 6 repository using the
hammer repository-set enablecommand:# hammer repository-set enable \ --basearch="x86_64" \ --name "Red Hat Satellite Client 6 (for RHEL 6 Server - ELS) (RPMs)" \ --organization "My_Organization" \ --product "Red Hat Enterprise Linux Server - Extended Life Cycle Support"
3.6. Synchronizing the Satellite Client 6 Repository
Use this section to synchronize the Satellite Client 6 repository from the Red Hat Content Delivery Network (CDN) to your Satellite. This repository provides the katello-agent, katello-host-tools, and puppet packages for clients registered to Satellite Server. Continue with a procedure below according to the operating system version for which you want to synchronize the Satellite Client 6 repository.
3.6.1. Red Hat Enterprise Linux 9 & Red Hat Enterprise Linux 8
To use the CLI instead of the Satellite web UI, see the procedure relevant for your Red Hat Enterprise Linux version:
Procedure
- In the Satellite web UI, navigate to Content > Sync Status.
- Click the arrow next to the Red Hat Enterprise Linux for x86_64 product to view available content.
- Select Red Hat Satellite Client 6 for RHEL 9 x86_64 RPMs or Red Hat Satellite Client 6 for RHEL 8 x86_64 RPMs whichever is applicable.
- Click Synchronize Now.
CLI procedure for Red Hat Enterprise Linux 9
Synchronize your Satellite Client 6 repository using the
hammer repository synchronizecommand:# hammer repository synchronize \ --name "Red Hat Satellite Client 6 for RHEL 9 x86_64 RPMs" \ --organization "My_Organization" \ --product "Red Hat Enterprise Linux for x86_64"
CLI procedure for Red Hat Enterprise Linux 8
Synchronize your Satellite Client 6 repository using the
hammer repository synchronizecommand:# hammer repository synchronize \ --name "Red Hat Satellite Client 6 for RHEL 8 x86_64 RPMs" \ --organization "My_Organization" \ --product "Red Hat Enterprise Linux for x86_64"
3.6.2. Red Hat Enterprise Linux 7 & Red Hat Enterprise Linux 6
You require Red Hat Enterprise Linux Extended Life Cycle Support (ELS) Add-on subscription to synchronize the repositories of Red Hat Enterprise Linux 6. For more information, see Red Hat Enterprise Linux Extended Life Cycle Support (ELS) Add-on guide.
To use the CLI instead of the Satellite web UI, see the procedure relevant for your Red Hat Enterprise Linux version:
Procedure
- In the Satellite web UI, navigate to Content > Sync Status.
- Click the arrow next to the Red Hat Enterprise Linux Server or Red Hat Enterprise Linux Server - Extended Life Cycle Support whichever product is applicable to view available content.
- Select Red Hat Satellite Client 6 (for RHEL 7 Server) RPMs x86_64 or Red Hat Satellite Client 6 for RHEL 6 Server - ELS RPMs x86_64 based on your operating system version.
- Click Synchronize Now.
CLI procedure for Red Hat Enterprise Linux 7
Synchronize your Satellite Client 6 repository using the
hammer repository synchronizecommand:# hammer repository synchronize \ --async \ --name "Red Hat Satellite Client 6 for RHEL 7 Server RPMs x86_64" \ --organization "My_Organization" \ --product "Red Hat Enterprise Linux Server"
CLI procedure for Red Hat Enterprise Linux 6
Synchronize your Satellite Client 6 repository using the
hammer repository synchronizecommand:# hammer repository synchronize \ --async \ --name "Red Hat Satellite Client 6 for RHEL 6 Server - ELS RPMs x86_64" \ --organization "My_Organization" \ --product "Red Hat Enterprise Linux Server - Extended Life Cycle Support"
3.7. Enabling Power Management on Managed Hosts
To perform power management tasks on managed hosts using the intelligent platform management interface (IPMI) or a similar protocol, you must enable the baseboard management controller (BMC) module on Satellite Server.
Prerequisites
- All managed hosts must have a network interface of BMC type. Satellite Server uses this NIC to pass the appropriate credentials to the host. For more information, see Adding a Baseboard Management Controller (BMC) Interface in the Managing Hosts guide.
Procedure
To enable BMC, enter the following command:
# satellite-installer --foreman-proxy-bmc "true" \
--foreman-proxy-bmc-default-provider "freeipmi"
3.8. Configuring DNS, DHCP, and TFTP on Satellite Server
To configure the DNS, DHCP, and TFTP services on Satellite Server, use the satellite-installer command with the options appropriate for your environment. To view a complete list of configurable options, enter the satellite-installer --scenario satellite --help command.
Any changes to the settings require entering the satellite-installer command again. You can enter the command multiple times and each time it updates all configuration files with the changed values.
To use external DNS, DHCP, and TFTP services instead, see Chapter 4, Configuring Satellite Server with External Services.
Adding Multihomed DHCP details
If you want to use Multihomed DHCP, you must inform the installer.
Prerequisites
Ensure that the following information is available to you:
- DHCP IP address ranges
- DHCP gateway IP address
- DHCP nameserver IP address
- DNS information
- TFTP server name
- Use the FQDN instead of the IP address where possible in case of network changes.
- Contact your network administrator to ensure that you have the correct settings.
Procedure
Enter the
satellite-installercommand with the options appropriate for your environment. The following example shows configuring full provisioning services:# satellite-installer --scenario satellite \ --foreman-proxy-dns true \ --foreman-proxy-dns-managed true \ --foreman-proxy-dns-interface eth0 \ --foreman-proxy-dns-zone example.com \ --foreman-proxy-dns-reverse 2.0.192.in-addr.arpa \ --foreman-proxy-dhcp true \ --foreman-proxy-dhcp-managed true \ --foreman-proxy-dhcp-interface eth0 \ --foreman-proxy-dhcp-additional-interfaces eth1 \ --foreman-proxy-dhcp-additional-interfaces eth2 \ --foreman-proxy-dhcp-range "192.0.2.100 192.0.2.150" \ --foreman-proxy-dhcp-gateway 192.0.2.1 \ --foreman-proxy-dhcp-nameservers 192.0.2.2 \ --foreman-proxy-tftp true \ --foreman-proxy-tftp-managed true \ --foreman-proxy-tftp-servername 192.0.2.3
You can monitor the progress of the satellite-installer command displayed in your prompt. You can view the logs in /var/log/foreman-installer/satellite.log. You can view the settings used, including the initial_admin_password parameter, in the /etc/foreman-installer/scenarios.d/satellite-answers.yaml file.
For more information about configuring DHCP, DNS, and TFTP services, see Configuring Network Services in the Provisioning guide.
3.9. Disabling DNS, DHCP, and TFTP for Unmanaged Networks
If you want to manage TFTP, DHCP, and DNS services manually, you must prevent Satellite from maintaining these services on the operating system and disable orchestration to avoid DHCP and DNS validation errors. However, Satellite does not remove the back-end services on the operating system.
Procedure
On Satellite Server, enter the following command:
# satellite-installer --foreman-proxy-dhcp false \ --foreman-proxy-dns false \ --foreman-proxy-tftp false- In the Satellite web UI, navigate to Infrastructure > Subnets and select a subnet.
- Click the Capsules tab and clear the DHCP Capsule, TFTP Capsule, and Reverse DNS Capsule fields.
- In the Satellite web UI, navigate to Infrastructure > Domains and select a domain.
- Clear the DNS Capsule field.
Optional: If you use a DHCP service supplied by a third party, configure your DHCP server to pass the following options:
Option 66: IP address of Satellite or Capsule
Option 67: /pxelinux.0
For more information about DHCP options, see RFC 2132.
Satellite does not perform orchestration when a Capsule is not set for a given subnet and domain. When enabling or disabling Capsule associations, orchestration commands for existing hosts can fail if the expected records and configuration files are not present. When associating a Capsule to turn orchestration on, ensure the required DHCP and DNS records as well as the TFTP files are in place for the existing Satellite hosts in order to prevent host deletion failures in the future.
3.10. Configuring Satellite Server for Outgoing Emails
To send email messages from Satellite Server, you can use either an SMTP server, or the sendmail command.
Prerequisite
-
Some SMTP servers with anti-spam protection or grey-listing features are known to cause problems. To setup outgoing email with such a service either install and configure a vanilla SMTP service on Satellite Server for relay or use the
sendmailcommand instead.
Procedure
- In the Satellite web UI, navigate to Administer > Settings.
Click the Email tab and set the configuration options to match your preferred delivery method. The changes have an immediate effect.
The following example shows the configuration options for using an SMTP server:
Expand Table 3.1. Using an SMTP server as a delivery method Name Example value Delivery method
SMTP
SMTP address
smtp.example.com
SMTP authentication
login
SMTP HELO/EHLO domain
example.com
SMTP password
password
SMTP port
25
SMTP username
user@example.com
The
SMTP usernameandSMTP passwordspecify the login credentials for the SMTP server.The following example uses gmail.com as an SMTP server:
Expand Table 3.2. Using gmail.com as an SMTP server Name Example value Delivery method
SMTP
SMTP address
smtp.gmail.com
SMTP authentication
plain
SMTP HELO/EHLO domain
smtp.gmail.com
SMTP enable StartTLS auto
Yes
SMTP password
password
SMTP port
587
SMTP username
user@gmail.com
The following example uses the
sendmailcommand as a delivery method:Expand Table 3.3. Using sendmail as a delivery method Name Example value Delivery method
Sendmail
Sendmail location
/usr/sbin/sendmail
Sendmail arguments
-i
For security reasons, both Sendmail location and Sendmail argument settings are read-only and can be only set in
/etc/foreman/settings.yaml. Both settings currently cannot be set viasatellite-installer. For more information see the sendmail 1 man page.
If you decide to send email using an SMTP server which uses TLS authentication, also perform one of the following steps:
Mark the CA certificate of the SMTP server as trusted. To do so, execute the following commands on Satellite Server:
# cp mailca.crt /etc/pki/ca-trust/source/anchors/
# update-ca-trust enable
# update-ca-trust
Where
mailca.crtis the CA certificate of the SMTP server.-
Alternatively, in the Satellite web UI, set the
SMTP enable StartTLS autooption toNo.
-
Click Test email to send a test message to the user’s email address to confirm the configuration is working. If a message fails to send, the Satellite web UI displays an error. See the log at
/var/log/foreman/production.logfor further details.
For information on configuring email notifications for individual users or user groups, see Configuring Email Notifications in Administering Red Hat Satellite.
3.11. Configuring Satellite Server with a Custom SSL Certificate
By default, Red Hat Satellite uses a self-signed SSL certificate to enable encrypted communications between Satellite Server, external Capsule Servers, and all hosts. If you cannot use a Satellite self-signed certificate, you can configure Satellite Server to use an SSL certificate signed by an external certificate authority (CA).
When you configure Red Hat Satellite with custom SSL certificates, you must fulfill the following requirements:
- You must use the privacy-enhanced mail (PEM) encoding for the SSL certificates.
- You must not use the same SSL certificate for both Satellite Server and Capsule Server.
- The same CA must sign certificates for Satellite Server and Capsule Server.
- An SSL certificate must not also be a CA certificate.
- An SSL certificate must include a subject alt name (SAN) entry that matches the common name (CN).
- An SSL certificate must be allowed for Key Encipherment using a Key Usage extension.
- An SSL certificate must not have a shortname as the CN.
- You must not set a passphrase for the private key.
To configure your Satellite Server with a custom certificate, complete the following procedures:
- Section 3.11.1, “Creating a Custom SSL Certificate for Satellite Server”
- Section 3.11.2, “Deploying a Custom SSL Certificate to Satellite Server”
- Section 3.11.3, “Deploying a Custom SSL Certificate to Hosts”
- If you have external Capsule Servers registered to Satellite Server, configure them with custom SSL certificates. For more information, see Configuring Capsule Server with a Custom SSL Certificate in Installing Capsule Server.
3.11.1. Creating a Custom SSL Certificate for Satellite Server
Use this procedure to create a custom SSL certificate for Satellite Server. If you already have a custom SSL certificate for Satellite Server, skip this procedure.
Procedure
To store all the source certificate files, create a directory that is accessible only to the
rootuser:# mkdir /root/satellite_certCreate a private key with which to sign the certificate signing request (CSR).
Note that the private key must be unencrypted. If you use a password-protected private key, remove the private key password.
If you already have a private key for this Satellite Server, skip this step.
# openssl genrsa -out /root/satellite_cert/satellite_cert_key.pem 4096Create the
/root/satellite_cert/openssl.cnfconfiguration file for the CSR and include the following content:[ req ] req_extensions = v3_req distinguished_name = req_distinguished_name x509_extensions = usr_cert prompt = no [ req_distinguished_name ] CN = satellite.example.com [ v3_req ] basicConstraints = CA:FALSE keyUsage = digitalSignature, nonRepudiation, keyEncipherment, dataEncipherment extendedKeyUsage = serverAuth, clientAuth, codeSigning, emailProtection subjectAltName = @alt_names [ usr_cert ] basicConstraints=CA:FALSE nsCertType = client, server, email keyUsage = nonRepudiation, digitalSignature, keyEncipherment extendedKeyUsage = serverAuth, clientAuth, codeSigning, emailProtection nsComment = "OpenSSL Generated Certificate" subjectKeyIdentifier=hash authorityKeyIdentifier=keyid,issuer [ alt_names ] DNS.1 = satellite.example.comGenerate CSR:
# openssl req -new \
-key /root/satellite_cert/satellite_cert_key.pem \
1 -config /root/satellite_cert/openssl.cnf \2 -out /root/satellite_cert/satellite_cert_csr.pem3 Send the certificate signing request to the certificate authority (CA). The same CA must sign certificates for Satellite Server and Capsule Server.
When you submit the request, specify the lifespan of the certificate. The method for sending the certificate request varies, so consult the CA for the preferred method. In response to the request, you can expect to receive a CA bundle and a signed certificate, in separate files.
3.11.2. Deploying a Custom SSL Certificate to Satellite Server
Use this procedure to configure your Satellite Server to use a custom SSL certificate signed by a Certificate Authority. The katello-certs-check command validates the input certificate files and returns the commands necessary to deploy a custom SSL certificate to Satellite Server.
Do not store the SSL certificates or .tar bundles in /tmp or /var/tmp directory. The operating system removes files from these directories periodically. As a result, satellite-installer fails to execute while enabling features or upgrading Satellite Server.
Procedure
Validate the custom SSL certificate input files. Note that for the
katello-certs-checkcommand to work correctly, Common Name (CN) in the certificate must match the FQDN of Satellite Server.# katello-certs-check \ -c /root/satellite_cert/satellite_cert.pem \1 -k /root/satellite_cert/satellite_cert_key.pem \2 -b /root/satellite_cert/ca_cert_bundle.pem3 If the command is successful, it returns two
satellite-installercommands, one of which you must use to deploy a certificate to Satellite Server.Example output of
katello-certs-checkValidation succeeded. To install the Red Hat Satellite Server with the custom certificates, run: satellite-installer --scenario satellite \ --certs-server-cert "/root/satellite_cert/satellite_cert.pem" \ --certs-server-key "/root/satellite_cert/satellite_cert_key.pem" \ --certs-server-ca-cert "/root/satellite_cert/ca_cert_bundle.pem" To update the certificates on a currently running Red Hat Satellite installation, run: satellite-installer --scenario satellite \ --certs-server-cert "/root/satellite_cert/satellite_cert.pem" \ --certs-server-key "/root/satellite_cert/satellite_cert_key.pem" \ --certs-server-ca-cert "/root/satellite_cert/ca_cert_bundle.pem" \ --certs-update-server --certs-update-server-caNote that you must not access or modify
/root/ssl-build.From the output of the
katello-certs-checkcommand, depending on your requirements, enter thesatellite-installercommand that installs a new Satellite with custom SSL certificates or updates certificates on a currently running Satellite.If you are unsure which command to run, you can verify that Satellite is installed by checking if the file
/etc/foreman-installer/scenarios.d/.installedexists. If the file exists, run the secondsatellite-installercommand that updates certificates.Importantsatellite-installerneeds the certificate archive file after you deploy the certificate. Do not modify or delete it. It is required, for example, when upgrading Satellite Server.-
On a computer with network access to Satellite Server, navigate to the following URL:
https://satellite.example.com. - In your browser, view the certificate details to verify the deployed certificate.
3.11.3. Deploying a Custom SSL Certificate to Hosts
After you configure Satellite Server to use a custom SSL certificate, you must also install the katello-ca-consumer package on every host that is registered to this Satellite Server.
Procedure
On each host, install the
katello-ca-consumerpackage:# yum localinstall \ http://satellite.example.com/pub/katello-ca-consumer-latest.noarch.rpm
3.12. Using External Databases with Satellite
As part of the installation process for Red Hat Satellite, the satellite-installer command installs PostgreSQL databases on the same server as Satellite. In certain Satellite deployments, using external databases instead of the default local databases can help with the server load.
Red Hat does not provide support or tools for external database maintenance. This includes backups, upgrades, and database tuning. You must have your own database administrator to support and maintain external databases.
To create and use external databases for Satellite, you must complete the following procedures:
- Section 3.12.2, “Preparing a Host for External Databases”. Prepare a Red Hat Enterprise Linux 8 or Red Hat Enterprise Linux 7 server to host the external databases.
- Section 3.12.3, “Installing PostgreSQL”. Prepare PostgreSQL with databases for Satellite, Candlepin and Pulp with dedicated users owning them.
-
Section 3.12.4, “Configuring Satellite Server to use External Databases”. Edit the parameters of
satellite-installerto point to the new databases, and runsatellite-installer.
3.12.1. PostgreSQL as an External Database Considerations
Foreman, Katello, and Candlepin use the PostgreSQL database. If you want to use PostgreSQL as an external database, the following information can help you decide if this option is right for your Satellite configuration. Satellite supports PostgreSQL version 12.
Advantages of External PostgreSQL:
- Increase in free memory and free CPU on Satellite
-
Flexibility to set
shared_bufferson the PostgreSQL database to a high number without the risk of interfering with other services on Satellite - Flexibility to tune the PostgreSQL server’s system without adversely affecting Satellite operations
Disadvantages of External PostgreSQL
- Increase in deployment complexity that can make troubleshooting more difficult
- The external PostgreSQL server is an additional system to patch and maintain
- If either Satellite or the PostgreSQL database server suffers a hardware or storage failure, Satellite is not operational
- If there is latency between the Satellite server and database server, performance can suffer
If you suspect that the PostgreSQL database on your Satellite is causing performance problems, use the information in Satellite 6: How to enable postgres query logging to detect slow running queries to determine if you have slow queries. Queries that take longer than one second are typically caused by performance issues with large installations, and moving to an external database might not help. If you have slow queries, contact Red Hat Support.
3.12.2. Preparing a Host for External Databases
Install a freshly provisioned system with the latest Red Hat Enterprise Linux 8 or Red Hat Enterprise Linux 7 server to host the external databases.
Subscriptions for Red Hat Software Collections and Red Hat Enterprise Linux do not provide the correct service level agreement for using Satellite with external databases. You must also attach a Satellite subscription to the base operating system that you want to use for the external databases.
Prerequisites
- The prepared host must meet Satellite’s Storage Requirements.
Procedure
- Use the instructions in Attaching the Satellite Infrastructure Subscription to attach a Satellite subscription to your server.
Disable all repositories and enable only the following repositories:
For Red Hat Enterprise Linux 7:
# subscription-manager repos --disable '*'
# subscription-manager repos --enable=rhel-server-rhscl-7-rpms \
--enable=rhel-7-server-rpms --enable=rhel-7-server-satellite-6.11-rpms
For Red Hat Enterprise Linux 8:
# subscription-manager repos --disable '*'
# subscription-manager repos \
--enable=satellite-6.11-for-rhel-8-x86_64-rpms \
--enable=rhel-8-for-x86_64-baseos-rpms \
--enable=rhel-8-for-x86_64-appstream-rpms
On Red Hat Enterprise Linux 8, enable the following modules:
# dnf module enable satellite:el8NoteEnablement of the module
satellite:el8warns about a conflict withpostgresql:10andruby:2.5as these modules are set to the default module versions on Red Hat Enterprise Linux 8. The modulesatellite:el8has a dependency for the modulespostgresql:12andruby:2.7that will be enabled with thesatellite:el8module. These warnings do not cause installation process failure, hence can be ignored safely. For more information about modules and lifecycle streams on Red Hat Enterprise Linux 8, see Red Hat Enterprise Linux Application Streams Life Cycle.
3.12.3. Installing PostgreSQL
You can install only the same version of PostgreSQL that is installed with the satellite-installer tool during an internal database installation. You can install PostgreSQL using Red Hat Enterprise Linux 8 or Red Hat Enterprise Linux Server 7 repositories. Satellite supports PostgreSQL version 12.
3.12.3.1. Installing PostgreSQL on Red Hat Enterprise Linux 8
Procedure
To install PostgreSQL, enter the following command:
# dnf install postgresql-server postgresql-evrTo initialize PostgreSQL, enter the following command:
# postgresql-setup initdbEdit the
/var/lib/pgsql/data/postgresql.conffile:# vi /var/lib/pgsql/data/postgresql.confRemove the
#and edit to listen to inbound connections:listen_addresses = '*'Edit the
/var/lib/pgsql/data/pg_hba.conffile:# vi /var/lib/pgsql/data/pg_hba.confAdd the following line to the file:
host all all Satellite_ip/24 md5To start, and enable PostgreSQL service, enter the following commands:
# systemctl start postgresql
# systemctl enable postgresql
Open the postgresql port on the external PostgreSQL server:
# firewall-cmd --add-service=postgresql
# firewall-cmd --runtime-to-permanent
Switch to the
postgresuser and start the PostgreSQL client:$ su - postgres -c psqlCreate three databases and dedicated roles: one for Satellite, one for Candlepin, and one for Pulp:
CREATE USER "foreman" WITH PASSWORD 'Foreman_Password';
CREATE USER "candlepin" WITH PASSWORD 'Candlepin_Password';
CREATE USER "pulp" WITH PASSWORD 'Pulpcore_Password';
CREATE DATABASE foreman OWNER foreman;
CREATE DATABASE candlepin OWNER candlepin;
CREATE DATABASE pulpcore OWNER pulp;
Exit the
postgresuser:# \qFrom Satellite Server, test that you can access the database. If the connection succeeds, the commands return
1.# PGPASSWORD='Foreman_Password' psql -h postgres.example.com -p 5432 -U foreman -d foreman -c "SELECT 1 as ping" # PGPASSWORD='Candlepin_Password' psql -h postgres.example.com -p 5432 -U candlepin -d candlepin -c "SELECT 1 as ping" # PGPASSWORD='Pulpcore_Password' psql -h postgres.example.com -p 5432 -U pulp -d pulpcore -c "SELECT 1 as ping"
3.12.3.2. Installing PostgreSQL on Red Hat Enterprise Linux 7
Procedure
To install PostgreSQL, enter the following command:
# yum install rh-postgresql12-postgresql-server \
rh-postgresql12-syspaths \
rh-postgresql12-postgresql-evr
To initialize PostgreSQL, enter the following command:
# postgresql-setup initdbEdit the
/var/opt/rh/rh-postgresql12/lib/pgsql/data/postgresql.conffile:# vi /var/opt/rh/rh-postgresql12/lib/pgsql/data/postgresql.confRemove the
#and edit to listen to inbound connections:listen_addresses = '*'Edit the
/var/opt/rh/rh-postgresql12/lib/pgsql/data/pg_hba.conffile:# vi /var/opt/rh/rh-postgresql12/lib/pgsql/data/pg_hba.confAdd the following line to the file:
host all all Satellite_ip/24 md5To start, and enable PostgreSQL service, enter the following commands:
# systemctl start postgresql
# systemctl enable postgresql
Open the postgresql port on the external PostgreSQL server:
# firewall-cmd --add-service=postgresql
# firewall-cmd --runtime-to-permanent
Switch to the
postgresuser and start the PostgreSQL client:$ su - postgres -c psqlCreate three databases and dedicated roles: one for Satellite, one for Candlepin, and one for Pulp:
CREATE USER "foreman" WITH PASSWORD 'Foreman_Password';
CREATE USER "candlepin" WITH PASSWORD 'Candlepin_Password';
CREATE USER "pulp" WITH PASSWORD 'Pulpcore_Password';
CREATE DATABASE foreman OWNER foreman;
CREATE DATABASE candlepin OWNER candlepin;
CREATE DATABASE pulpcore OWNER pulp;
Exit the
postgresuser:# \qFrom Satellite Server, test that you can access the database. If the connection succeeds, the commands return
1.# PGPASSWORD='Foreman_Password' psql -h postgres.example.com -p 5432 -U foreman -d foreman -c "SELECT 1 as ping" # PGPASSWORD='Candlepin_Password' psql -h postgres.example.com -p 5432 -U candlepin -d candlepin -c "SELECT 1 as ping" # PGPASSWORD='Pulpcore_Password' psql -h postgres.example.com -p 5432 -U pulp -d pulpcore -c "SELECT 1 as ping"
3.12.4. Configuring Satellite Server to use External Databases
Use the satellite-installer command to configure Satellite to connect to an external PostgreSQL database.
Prerequisite
- You have installed and configured a PostgreSQL database on a Red Hat Enterprise Linux server.
Procedure
To configure the external databases for Satellite, enter the following command:
satellite-installer --scenario satellite \
  --foreman-db-host postgres.example.com \
  --foreman-db-password Foreman_Password \
  --foreman-db-database foreman \
  --foreman-db-manage false \
  --katello-candlepin-db-host postgres.example.com \
  --katello-candlepin-db-name candlepin \
  --katello-candlepin-db-password Candlepin_Password \
  --katello-candlepin-manage-db false \
  --foreman-proxy-content-pulpcore-manage-postgresql false \
  --foreman-proxy-content-pulpcore-postgresql-host postgres.example.com \
  --foreman-proxy-content-pulpcore-postgresql-db-name pulpcore \
  --foreman-proxy-content-pulpcore-postgresql-password Pulpcore_Password
  --foreman-proxy-content-pulpcore-postgresql-user pulp
To enable the Secure Sockets Layer (SSL) protocol for these external databases, add the following options:
--foreman-db-sslmode verify-full
--foreman-db-root-cert <path_to_CA>
--katello-candlepin-db-ssl true
--katello-candlepin-db-ssl-verify true
--katello-candlepin-db-ssl-ca <path_to_CA>
--foreman-proxy-content-pulpcore-postgresql-ssl true
--foreman-proxy-content-pulpcore-postgresql-ssl-root-ca <path_to_CA>