Deploying and Managing Streams for Apache Kafka on OpenShift
Deploy and manage Streams for Apache Kafka 2.7 on OpenShift Container Platform
Abstract
Preface
Providing feedback on Red Hat documentation
We appreciate your feedback on our documentation.
To propose improvements, open a Jira issue and describe your suggested changes. Provide as much detail as possible to enable us to address your request quickly.
Prerequisite
-
You have a Red Hat Customer Portal account. This account enables you to log in to the Red Hat Jira Software instance.
If you do not have an account, you will be prompted to create one.
Procedure
- Click the following: Create issue.
- In the Summary text box, enter a brief description of the issue.
In the Description text box, provide the following information:
- The URL of the page where you found the issue.
-
A detailed description of the issue.
You can leave the information in any other fields at their default values.
- Add a reporter name.
- Click Create to submit the Jira issue to the documentation team.
Thank you for taking the time to provide feedback.
Chapter 1. Deployment overview
Streams for Apache Kafka simplifies the process of running Apache Kafka in an OpenShift cluster.
This guide provides instructions for deploying and managing Streams for Apache Kafka. Deployment options and steps are covered using the example installation files included with Streams for Apache Kafka. While the guide highlights important configuration considerations, it does not cover all available options. For a deeper understanding of the Kafka component configuration options, refer to the Streams for Apache Kafka Custom Resource API Reference.
In addition to deployment instructions, the guide offers pre- and post-deployment guidance. It covers setting up and securing client access to your Kafka cluster. Furthermore, it explores additional deployment options such as metrics integration, distributed tracing, and cluster management tools like Cruise Control and the Streams for Apache Kafka Drain Cleaner. You’ll also find recommendations on managing Streams for Apache Kafka and fine-tuning Kafka configuration for optimal performance.
Upgrade instructions are provided for both Streams for Apache Kafka and Kafka, to help keep your deployment up to date.
Streams for Apache Kafka is designed to be compatible with all types of OpenShift clusters, irrespective of their distribution. Whether your deployment involves public or private clouds, or if you are setting up a local development environment, the instructions in this guide are applicable in all cases.
1.1. Streams for Apache Kafka custom resources
The deployment of Kafka components onto an OpenShift cluster using Streams for Apache Kafka is highly configurable through the use of custom resources. These resources are created as instances of APIs introduced by Custom Resource Definitions (CRDs), which extend OpenShift resources.
CRDs act as configuration instructions to describe the custom resources in an OpenShift cluster, and are provided with Streams for Apache Kafka for each Kafka component used in a deployment, as well as users and topics. CRDs and custom resources are defined as YAML files. Example YAML files are provided with the Streams for Apache Kafka distribution.
CRDs also allow Streams for Apache Kafka resources to benefit from native OpenShift features like CLI accessibility and configuration validation.
1.1.1. Streams for Apache Kafka custom resource example
CRDs require a one-time installation in a cluster to define the schemas used to instantiate and manage Streams for Apache Kafka-specific resources.
After a new custom resource type is added to your cluster by installing a CRD, you can create instances of the resource based on its specification.
Depending on the cluster setup, installation typically requires cluster admin privileges.
Access to manage custom resources is limited to Streams for Apache Kafka administrators. For more information, see Section 4.6, “Designating Streams for Apache Kafka administrators”.
A CRD defines a new kind of resource, such as kind:Kafka, within an OpenShift cluster.
The Kubernetes API server allows custom resources to be created based on the kind and understands from the CRD how to validate and store the custom resource when it is added to the OpenShift cluster.
Each Streams for Apache Kafka-specific custom resource conforms to the schema defined by the CRD for the resource’s kind. The custom resources for Streams for Apache Kafka components have common configuration properties, which are defined under spec.
To understand the relationship between a CRD and a custom resource, let’s look at a sample of the CRD for a Kafka topic.
Kafka topic CRD
apiVersion: kafka.strimzi.io/v1beta2
kind: CustomResourceDefinition
metadata:
name: kafkatopics.kafka.strimzi.io
labels:
app: strimzi
spec:
group: kafka.strimzi.io
versions:
v1beta2
scope: Namespaced
names:
# ...
singular: kafkatopic
plural: kafkatopics
shortNames:
- kt
additionalPrinterColumns:
# ...
subresources:
status: {}
validation:
openAPIV3Schema:
properties:
spec:
type: object
properties:
partitions:
type: integer
minimum: 1
replicas:
type: integer
minimum: 1
maximum: 32767
# ...- 1
- The metadata for the topic CRD, its name and a label to identify the CRD.
- 2
- The specification for this CRD, including the group (domain) name, the plural name and the supported schema version, which are used in the URL to access the API of the topic. The other names are used to identify instance resources in the CLI. For example,
oc get kafkatopic my-topicoroc get kafkatopics. - 3
- The shortname can be used in CLI commands. For example,
oc get ktcan be used as an abbreviation instead ofoc get kafkatopic. - 4
- The information presented when using a
getcommand on the custom resource. - 5
- The current status of the CRD as described in the schema reference for the resource.
- 6
- openAPIV3Schema validation provides validation for the creation of topic custom resources. For example, a topic requires at least one partition and one replica.
You can identify the CRD YAML files supplied with the Streams for Apache Kafka installation files, because the file names contain an index number followed by ‘Crd’.
Here is a corresponding example of a KafkaTopic custom resource.
Kafka topic custom resource
apiVersion: kafka.strimzi.io/v1beta2
kind: KafkaTopic
metadata:
name: my-topic
labels:
strimzi.io/cluster: my-cluster
spec:
partitions: 1
replicas: 1
config:
retention.ms: 7200000
segment.bytes: 1073741824
status:
conditions:
lastTransitionTime: "2019-08-20T11:37:00.706Z"
status: "True"
type: Ready
observedGeneration: 1
/ ...- 1
- The
kindandapiVersionidentify the CRD of which the custom resource is an instance. - 2
- A label, applicable only to
KafkaTopicandKafkaUserresources, that defines the name of the Kafka cluster (which is same as the name of theKafkaresource) to which a topic or user belongs. - 3
- The spec shows the number of partitions and replicas for the topic as well as the configuration parameters for the topic itself. In this example, the retention period for a message to remain in the topic and the segment file size for the log are specified.
- 4
- Status conditions for the
KafkaTopicresource. Thetypecondition changed toReadyat thelastTransitionTime.
Custom resources can be applied to a cluster through the platform CLI. When the custom resource is created, it uses the same validation as the built-in resources of the Kubernetes API.
After a KafkaTopic custom resource is created, the Topic Operator is notified and corresponding Kafka topics are created in Streams for Apache Kafka.
1.1.2. Performing oc operations on custom resources
You can use oc commands to retrieve information and perform other operations on Streams for Apache Kafka custom resources. Use oc commands, such as get, describe, edit, or delete, to perform operations on resource types. For example, oc get kafkatopics retrieves a list of all Kafka topics and oc get kafkas retrieves all deployed Kafka clusters.
When referencing resource types, you can use both singular and plural names: oc get kafkas gets the same results as oc get kafka.
You can also use the short name of the resource. Learning short names can save you time when managing Streams for Apache Kafka. The short name for Kafka is k, so you can also run oc get k to list all Kafka clusters.
Listing Kafka clusters
oc get k
NAME DESIRED KAFKA REPLICAS DESIRED ZK REPLICAS
my-cluster 3 3| Streams for Apache Kafka resource | Long name | Short name |
|---|---|---|
| Kafka | kafka | k |
| Kafka Node Pool | kafkanodepool | knp |
| Kafka Topic | kafkatopic | kt |
| Kafka User | kafkauser | ku |
| Kafka Connect | kafkaconnect | kc |
| Kafka Connector | kafkaconnector | kctr |
| Kafka Mirror Maker | kafkamirrormaker | kmm |
| Kafka Mirror Maker 2 | kafkamirrormaker2 | kmm2 |
| Kafka Bridge | kafkabridge | kb |
| Kafka Rebalance | kafkarebalance | kr |
1.1.2.1. Resource categories
Categories of custom resources can also be used in oc commands.
All Streams for Apache Kafka custom resources belong to the category strimzi, so you can use strimzi to get all the Streams for Apache Kafka resources with one command.
For example, running oc get strimzi lists all Streams for Apache Kafka custom resources in a given namespace.
Listing all custom resources
oc get strimzi
NAME DESIRED KAFKA REPLICAS DESIRED ZK REPLICAS
kafka.kafka.strimzi.io/my-cluster 3 3
NAME PARTITIONS REPLICATION FACTOR
kafkatopic.kafka.strimzi.io/kafka-apps 3 3
NAME AUTHENTICATION AUTHORIZATION
kafkauser.kafka.strimzi.io/my-user tls simple
The oc get strimzi -o name command returns all resource types and resource names. The -o name option fetches the output in the type/name format
Listing all resource types and names
oc get strimzi -o name
kafka.kafka.strimzi.io/my-cluster
kafkatopic.kafka.strimzi.io/kafka-apps
kafkauser.kafka.strimzi.io/my-user
You can combine this strimzi command with other commands. For example, you can pass it into a oc delete command to delete all resources in a single command.
Deleting all custom resources
oc delete $(oc get strimzi -o name)
kafka.kafka.strimzi.io "my-cluster" deleted
kafkatopic.kafka.strimzi.io "kafka-apps" deleted
kafkauser.kafka.strimzi.io "my-user" deletedDeleting all resources in a single operation might be useful, for example, when you are testing new Streams for Apache Kafka features.
1.1.2.2. Querying the status of sub-resources
There are other values you can pass to the -o option. For example, by using -o yaml you get the output in YAML format. Using -o json will return it as JSON.
You can see all the options in oc get --help.
One of the most useful options is the JSONPath support, which allows you to pass JSONPath expressions to query the Kubernetes API. A JSONPath expression can extract or navigate specific parts of any resource.
For example, you can use the JSONPath expression {.status.listeners[?(@.name=="tls")].bootstrapServers} to get the bootstrap address from the status of the Kafka custom resource and use it in your Kafka clients.
Here, the command retrieves the bootstrapServers value of the listener named tls:
Retrieving the bootstrap address
oc get kafka my-cluster -o=jsonpath='{.status.listeners[?(@.name=="tls")].bootstrapServers}{"\n"}'
my-cluster-kafka-bootstrap.myproject.svc:9093By changing the name condition you can also get the address of the other Kafka listeners.
You can use jsonpath to extract any other property or group of properties from any custom resource.
1.1.3. Streams for Apache Kafka custom resource status information
Status properties provide status information for certain custom resources.
The following table lists the custom resources that provide status information (when deployed) and the schemas that define the status properties.
For more information on the schemas, see the Streams for Apache Kafka Custom Resource API Reference.
| Streams for Apache Kafka resource | Schema reference | Publishes status information on… |
|---|---|---|
|
|
| The Kafka cluster, its listeners, and node pools |
|
|
| The nodes in the node pool, their roles, and the associated Kafka cluster |
|
|
| Kafka topics in the Kafka cluster |
|
|
| Kafka users in the Kafka cluster |
|
|
| The Kafka Connect cluster and connector plugins |
|
|
|
|
|
|
| The Kafka MirrorMaker 2 cluster and internal connectors |
|
|
| The Kafka MirrorMaker cluster |
|
|
| The Streams for Apache Kafka Bridge |
|
|
| The status and results of a rebalance |
|
|
| The number of pods: being managed, using the current version, and in a ready state |
The status property of a resource provides information on the state of the resource. The status.conditions and status.observedGeneration properties are common to all resources.
status.conditions-
Status conditions describe the current state of a resource. Status condition properties are useful for tracking progress related to the resource achieving its desired state, as defined by the configuration specified in its
spec. Status condition properties provide the time and reason the state of the resource changed, and details of events preventing or delaying the operator from realizing the desired state. status.observedGeneration-
Last observed generation denotes the latest reconciliation of the resource by the Cluster Operator. If the value of
observedGenerationis different from the value ofmetadata.generation(the current version of the deployment), the operator has not yet processed the latest update to the resource. If these values are the same, the status information reflects the most recent changes to the resource.
The status properties also provide resource-specific information. For example, KafkaStatus provides information on listener addresses, and the ID of the Kafka cluster.
KafkaStatus also provides information on the Kafka and Streams for Apache Kafka versions being used. You can check the values of operatorLastSuccessfulVersion and kafkaVersion to determine whether an upgrade of Streams for Apache Kafka or Kafka has completed
Streams for Apache Kafka creates and maintains the status of custom resources, periodically evaluating the current state of the custom resource and updating its status accordingly. When performing an update on a custom resource using oc edit, for example, its status is not editable. Moreover, changing the status would not affect the configuration of the Kafka cluster.
Here we see the status properties for a Kafka custom resource.
Kafka custom resource status
apiVersion: kafka.strimzi.io/v1beta2
kind: Kafka
metadata:
spec:
# ...
status:
clusterId: XP9FP2P-RByvEy0W4cOEUA
conditions:
- lastTransitionTime: '2023-01-20T17:56:29.396588Z'
status: 'True'
type: Ready
kafkaMetadataState: KRaft
kafkaVersion: 3.7.0
kafkaNodePools:
- name: broker
- name: controller
listeners:
- addresses:
- host: my-cluster-kafka-bootstrap.prm-project.svc
port: 9092
bootstrapServers: 'my-cluster-kafka-bootstrap.prm-project.svc:9092'
name: plain
- addresses:
- host: my-cluster-kafka-bootstrap.prm-project.svc
port: 9093
bootstrapServers: 'my-cluster-kafka-bootstrap.prm-project.svc:9093'
certificates:
- |
-----BEGIN CERTIFICATE-----
-----END CERTIFICATE-----
name: tls
- addresses:
- host: >-
2054284155.us-east-2.elb.amazonaws.com
port: 9095
bootstrapServers: >-
2054284155.us-east-2.elb.amazonaws.com:9095
certificates:
- |
-----BEGIN CERTIFICATE-----
-----END CERTIFICATE-----
name: external3
- addresses:
- host: ip-10-0-172-202.us-east-2.compute.internal
port: 31644
bootstrapServers: 'ip-10-0-172-202.us-east-2.compute.internal:31644'
certificates:
- |
-----BEGIN CERTIFICATE-----
-----END CERTIFICATE-----
name: external4
observedGeneration: 3
operatorLastSuccessfulVersion: 2.7 - 1
- The Kafka cluster ID.
- 2
- Status
conditionsdescribe the current state of the Kafka cluster. - 3
- The
Readycondition indicates that the Cluster Operator considers the Kafka cluster able to handle traffic. - 4
- Kafka metadata state that shows the mechanism used (KRaft or ZooKeeper) to manage Kafka metadata and coordinate operations.
- 5
- The version of Kafka being used by the Kafka cluster.
- 6
- The node pools belonging to the Kafka cluster.
- 7
- The
listenersdescribe Kafka bootstrap addresses by type. - 8
- The
observedGenerationvalue indicates the last reconciliation of theKafkacustom resource by the Cluster Operator. - 9
- The version of the operator that successfully completed the last reconciliation.
The Kafka bootstrap addresses listed in the status do not signify that those endpoints or the Kafka cluster is in a Ready state.
1.1.4. Finding the status of a custom resource
Use oc with the status subresource of a custom resource to retrieve information about the resource.
Prerequisites
- An OpenShift cluster.
- The Cluster Operator is running.
Procedure
Specify the custom resource and use the
-o jsonpathoption to apply a standard JSONPath expression to select thestatusproperty:oc get kafka <kafka_resource_name> -o jsonpath='{.status}' | jqThis expression returns all the status information for the specified custom resource. You can use dot notation, such as
status.listenersorstatus.observedGeneration, to fine-tune the status information you wish to see.Using the
jqcommand line JSON parser tool makes it easier to read the output.
1.2. Streams for Apache Kafka operators
Streams for Apache Kafka operators are purpose-built with specialist operational knowledge to effectively manage Kafka on OpenShift. Each operator performs a distinct function.
- Cluster Operator
- The Cluster Operator handles the deployment and management of Apache Kafka clusters on OpenShift. It automates the setup of Kafka brokers, and other Kafka components and resources.
- Topic Operator
- The Topic Operator manages the creation, configuration, and deletion of topics within Kafka clusters.
- User Operator
- The User Operator manages Kafka users that require access to Kafka brokers.
When you deploy Streams for Apache Kafka, you first deploy the Cluster Operator. The Cluster Operator is then ready to handle the deployment of Kafka. You can also deploy the Topic Operator and User Operator using the Cluster Operator (recommended) or as standalone operators. You would use a standalone operator with a Kafka cluster that is not managed by the Cluster Operator.
The Topic Operator and User Operator are part of the Entity Operator. The Cluster Operator can deploy one or both operators based on the Entity Operator configuration.
To deploy the standalone operators, you need to set environment variables to connect to a Kafka cluster. These environment variables do not need to be set if you are deploying the operators using the Cluster Operator as they will be set by the Cluster Operator.
1.2.1. Watching Streams for Apache Kafka resources in OpenShift namespaces
Operators watch and manage Streams for Apache Kafka resources in OpenShift namespaces. The Cluster Operator can watch a single namespace, multiple namespaces, or all namespaces in an OpenShift cluster. The Topic Operator and User Operator can watch a single namespace.
-
The Cluster Operator watches for
Kafkaresources -
The Topic Operator watches for
KafkaTopicresources -
The User Operator watches for
KafkaUserresources
The Topic Operator and the User Operator can only watch a single Kafka cluster in a namespace. And they can only be connected to a single Kafka cluster.
If multiple Topic Operators watch the same namespace, name collisions and topic deletion can occur. This is because each Kafka cluster uses Kafka topics that have the same name (such as __consumer_offsets). Make sure that only one Topic Operator watches a given namespace.
When using multiple User Operators with a single namespace, a user with a given username can exist in more than one Kafka cluster.
If you deploy the Topic Operator and User Operator using the Cluster Operator, they watch the Kafka cluster deployed by the Cluster Operator by default. You can also specify a namespace using watchedNamespace in the operator configuration.
For a standalone deployment of each operator, you specify a namespace and connection to the Kafka cluster to watch in the configuration.
1.2.2. Managing RBAC resources
The Cluster Operator creates and manages role-based access control (RBAC) resources for Streams for Apache Kafka components that need access to OpenShift resources.
For the Cluster Operator to function, it needs permission within the OpenShift cluster to interact with Kafka resources, such as Kafka and KafkaConnect, as well as managed resources like ConfigMap, Pod, Deployment, and Service.
Permission is specified through the following OpenShift RBAC resources:
-
ServiceAccount -
RoleandClusterRole -
RoleBindingandClusterRoleBinding
1.2.2.1. Delegating privileges to Streams for Apache Kafka components
The Cluster Operator runs under a service account called strimzi-cluster-operator. It is assigned cluster roles that give it permission to create the RBAC resources for Streams for Apache Kafka components. Role bindings associate the cluster roles with the service account.
OpenShift prevents components operating under one ServiceAccount from granting another ServiceAccount privileges that the granting ServiceAccount does not have. Because the Cluster Operator creates the RoleBinding and ClusterRoleBinding RBAC resources needed by the resources it manages, it requires a role that gives it the same privileges.
The following sections describe the RBAC resources required by the Cluster Operator.
1.2.2.2. ClusterRole resources
The Cluster Operator uses ClusterRole resources to provide the necessary access to resources. Depending on the OpenShift cluster setup, a cluster administrator might be needed to create the cluster roles.
Cluster administrator rights are only needed for the creation of ClusterRole resources. The Cluster Operator will not run under a cluster admin account.
The RBAC resources follow the principle of least privilege and contain only those privileges needed by the Cluster Operator to operate the cluster of the Kafka component.
All cluster roles are required by the Cluster Operator in order to delegate privileges.
| Name | Description |
|---|---|
|
| Access rights for namespace-scoped resources used by the Cluster Operator to deploy and manage the operands. |
|
| Access rights for cluster-scoped resources used by the Cluster Operator to deploy and manage the operands. |
|
| Access rights used by the Cluster Operator for leader election. |
|
| Access rights used by the Cluster Operator to watch and manage the Streams for Apache Kafka custom resources. |
|
| Access rights to allow Kafka brokers to get the topology labels from OpenShift worker nodes when rack-awareness is used. |
|
| Access rights used by the Topic and User Operators to manage Kafka users and topics. |
|
| Access rights to allow Kafka Connect, MirrorMaker (1 and 2), and Kafka Bridge to get the topology labels from OpenShift worker nodes when rack-awareness is used. |
1.2.2.3. ClusterRoleBinding resources
The Cluster Operator uses ClusterRoleBinding and RoleBinding resources to associate its ClusterRole with its ServiceAccount. Cluster role bindings are required by cluster roles containing cluster-scoped resources.
| Name | Description |
|---|---|
|
|
Grants the Cluster Operator the rights from the |
|
|
Grants the Cluster Operator the rights from the |
|
|
Grants the Cluster Operator the rights from the |
| Name | Description |
|---|---|
|
|
Grants the Cluster Operator the rights from the |
|
|
Grants the Cluster Operator the rights from the |
|
|
Grants the Cluster Operator the rights from the |
|
|
Grants the Cluster Operator the rights from the |
1.2.2.4. ServiceAccount resources
The Cluster Operator runs using the strimzi-cluster-operator ServiceAccount. This service account grants it the privileges it requires to manage the operands. The Cluster Operator creates additional ClusterRoleBinding and RoleBinding resources to delegate some of these RBAC rights to the operands.
Each of the operands uses its own service account created by the Cluster Operator. This allows the Cluster Operator to follow the principle of least privilege and give the operands only the access rights that are really need.
| Name | Used by |
|---|---|
|
| ZooKeeper pods |
|
| Kafka broker pods |
|
| Entity Operator |
|
| Cruise Control pods |
|
| Kafka Exporter pods |
|
| Kafka Connect pods |
|
| MirrorMaker pods |
|
| MirrorMaker 2 pods |
|
| Kafka Bridge pods |
1.2.3. Managing pod resources
The StrimziPodSet custom resource is used by Streams for Apache Kafka to create and manage Kafka, Kafka Connect, and MirrorMaker 2 pods. If you are using ZooKeeper, ZooKeeper pods are also created and managed using StrimziPodSet resources.
You must not create, update, or delete StrimziPodSet resources. The StrimziPodSet custom resource is used internally and resources are managed solely by the Cluster Operator. As a consequence, the Cluster Operator must be running properly to avoid the possibility of pods not starting and Kafka clusters not being available.
OpenShift Deployment resources are used for creating and managing the pods of other components: Kafka Bridge, Kafka Exporter, Cruise Control, (deprecated) MirrorMaker 1, User Operator and Topic Operator.
1.3. Using the Kafka Bridge to connect with a Kafka cluster
You can use the Streams for Apache Kafka Bridge API to create and manage consumers and send and receive records over HTTP rather than the native Kafka protocol.
When you set up the Kafka Bridge you configure HTTP access to the Kafka cluster. You can then use the Kafka Bridge to produce and consume messages from the cluster, as well as performing other operations through its REST interface.
1.4. Seamless FIPS support
Federal Information Processing Standards (FIPS) are standards for computer security and interoperability. When running Streams for Apache Kafka on a FIPS-enabled OpenShift cluster, the OpenJDK used in Streams for Apache Kafka container images automatically switches to FIPS mode. From version 2.3, Streams for Apache Kafka can run on FIPS-enabled OpenShift clusters without any changes or special configuration. It uses only the FIPS-compliant security libraries from the OpenJDK.
If you are using FIPS-enabled OpenShift clusters, you may experience higher memory consumption compared to regular OpenShift clusters. To avoid any issues, we suggest increasing the memory request to at least 512Mi.
For more information about the NIST validation program and validated modules, see Cryptographic Module Validation Program on the NIST website.
Compatibility with the technology previews of Streams for Apache Kafka Proxy and Streams for Apache Kafka Console has not been tested regarding FIPS support. While they are expected to function properly, we cannot guarantee full support at this time.
1.4.1. Minimum password length
When running in the FIPS mode, SCRAM-SHA-512 passwords need to be at least 32 characters long. From Streams for Apache Kafka 2.3, the default password length in Streams for Apache Kafka User Operator is set to 32 characters as well. If you have a Kafka cluster with custom configuration that uses a password length that is less than 32 characters, you need to update your configuration. If you have any users with passwords shorter than 32 characters, you need to regenerate a password with the required length. You can do that, for example, by deleting the user secret and waiting for the User Operator to create a new password with the appropriate length.
1.5. Document Conventions
User-replaced values
User-replaced values, also known as replaceables, are shown in with angle brackets (< >). Underscores ( _ ) are used for multi-word values. If the value refers to code or commands, monospace is also used.
For example, the following code shows that <my_namespace> must be replaced by the correct namespace name:
sed -i 's/namespace: .*/namespace: <my_namespace>/' install/cluster-operator/*RoleBinding*.yamlChapter 2. Streams for Apache Kafka installation methods
You can install Streams for Apache Kafka on OpenShift 4.12 to 4.16 in two ways.
| Installation method | Description |
|---|---|
|
Download Red Hat Streams for Apache Kafka 2.7 OpenShift Installation and Example Files from the Streams for Apache Kafka software downloads page. Deploy the YAML installation artifacts to your OpenShift cluster using
You can also use the
| |
| Use the Streams for Apache Kafka operator in the OperatorHub to deploy Streams for Apache Kafka to a single namespace or all namespaces. |
For the greatest flexibility, choose the installation artifacts method. The OperatorHub method provides a standard configuration and allows you to take advantage of automatic updates.
Installation of Streams for Apache Kafka using Helm is not supported.
Chapter 3. What is deployed with Streams for Apache Kafka
Apache Kafka components are provided for deployment to OpenShift with the Streams for Apache Kafka distribution. The Kafka components are generally run as clusters for availability.
A typical deployment incorporating Kafka components might include:
- Kafka cluster of broker nodes
- ZooKeeper cluster of replicated ZooKeeper instances
- Kafka Connect cluster for external data connections
- Kafka MirrorMaker cluster to mirror the Kafka cluster in a secondary cluster
- Kafka Exporter to extract additional Kafka metrics data for monitoring
- Kafka Bridge to make HTTP-based requests to the Kafka cluster
- Cruise Control to rebalance topic partitions across broker nodes
Not all of these components are mandatory, though you need Kafka and ZooKeeper as a minimum. Some components can be deployed without Kafka, such as MirrorMaker or Kafka Connect.
3.1. Order of deployment
The required order of deployment to an OpenShift cluster is as follows:
- Deploy the Cluster Operator to manage your Kafka cluster
- Deploy the Kafka cluster with the ZooKeeper cluster, and include the Topic Operator and User Operator in the deployment
Optionally deploy:
- The Topic Operator and User Operator standalone if you did not deploy them with the Kafka cluster
- Kafka Connect
- Kafka MirrorMaker
- Kafka Bridge
- Components for the monitoring of metrics
The Cluster Operator creates OpenShift resources for the components, such as Deployment, Service, and Pod resources. The names of the OpenShift resources are appended with the name specified for a component when it’s deployed. For example, a Kafka cluster named my-kafka-cluster has a service named my-kafka-cluster-kafka.
3.2. (Preview) Deploying the Streams for Apache Kafka Proxy
Streams for Apache Kafka Proxy is an Apache Kafka protocol-aware proxy designed to enhance Kafka-based systems. Through its filter mechanism it allows additional behavior to be introduced into a Kafka-based system without requiring changes to either your applications or the Kafka cluster itself.
For more information on connecting to and using the Streams for Apache Kafka Proxy, see the proxy guide in the Streams for Apache Kafka documentation.
The Streams for Apache Kafka Proxy is currently available as a technology preview.
3.3. (Preview) Deploying the Streams for Apache Kafka Console
After you have deployed a Kafka cluster that’s managed by Streams for Apache Kafka, you can deploy the Streams for Apache Kafka Console and connect your cluster. The Streams for Apache Kafka Console facilitates the administration of Kafka clusters, providing real-time insights for monitoring, managing, and optimizing each cluster from its user interface.
For more information on connecting to and using the Streams for Apache Kafka Console, see the console guide in the Streams for Apache Kafka documentation.
The Streams for Apache Kafka Console is currently available as a technology preview.
Chapter 4. Preparing for your Streams for Apache Kafka deployment
Prepare for a deployment of Streams for Apache Kafka by completing any necessary pre-deployment tasks. Take the necessary preparatory steps according to your specific requirements, such as the following:
- Ensuring you have the necessary prerequisites before deploying Streams for Apache Kafka
- Downloading the Streams for Apache Kafka release artifacts to facilitate your deployment
- Pushing the Streams for Apache Kafka container images into your own registry (if required)
- Setting up admin roles to enable configuration of custom resources used in the deployment
To run the commands in this guide, your cluster user must have the rights to manage role-based access control (RBAC) and CRDs.
4.1. Deployment prerequisites
To deploy Streams for Apache Kafka, you will need the following:
An OpenShift 4.12 to 4.16 cluster.
Streams for Apache Kafka is based on Strimzi 0.40.x.
-
The
occommand-line tool is installed and configured to connect to the running cluster.
4.2. Operator deployment best practices
Potential issues can arise from installing more than one Streams for Apache Kafka operator in the same OpenShift cluster, especially when using different versions. Each Streams for Apache Kafka operator manages a set of resources in an OpenShift cluster. When you install multiple Streams for Apache Kafka operators, they may attempt to manage the same resources concurrently. This can lead to conflicts and unpredictable behavior within your cluster. Conflicts can still occur even if you deploy Streams for Apache Kafka operators in different namespaces within the same OpenShift cluster. Although namespaces provide some degree of resource isolation, certain resources managed by the Streams for Apache Kafka operator, such as Custom Resource Definitions (CRDs) and roles, have a cluster-wide scope.
Additionally, installing multiple operators with different versions can result in compatibility issues between the operators and the Kafka clusters they manage. Different versions of Streams for Apache Kafka operators may introduce changes, bug fixes, or improvements that are not backward-compatible.
To avoid the issues associated with installing multiple Streams for Apache Kafka operators in an OpenShift cluster, the following guidelines are recommended:
- Install the Streams for Apache Kafka operator in a separate namespace from the Kafka cluster and other Kafka components it manages, to ensure clear separation of resources and configurations.
- Use a single Streams for Apache Kafka operator to manage all your Kafka instances within an OpenShift cluster.
- Update the Streams for Apache Kafka operator and the supported Kafka version as often as possible to reflect the latest features and enhancements.
By following these best practices and ensuring consistent updates for a single Streams for Apache Kafka operator, you can enhance the stability of managing Kafka instances in an OpenShift cluster. This approach also enables you to make the most of Streams for Apache Kafka’s latest features and capabilities.
As Streams for Apache Kafka is based on Strimzi, the same issues can also arise when combining Streams for Apache Kafka operators with Strimzi operators in an OpenShift cluster.
4.3. Downloading Streams for Apache Kafka release artifacts
To use deployment files to install Streams for Apache Kafka, download and extract the files from the Streams for Apache Kafka software downloads page.
Streams for Apache Kafka release artifacts include sample YAML files to help you deploy the components of Streams for Apache Kafka to OpenShift, perform common operations, and configure your Kafka cluster.
Use oc to deploy the Cluster Operator from the install/cluster-operator folder of the downloaded ZIP file. For more information about deploying and configuring the Cluster Operator, see Section 6.2, “Deploying the Cluster Operator”.
In addition, if you want to use standalone installations of the Topic and User Operators with a Kafka cluster that is not managed by the Streams for Apache Kafka Cluster Operator, you can deploy them from the install/topic-operator and install/user-operator folders.
Streams for Apache Kafka container images are also available through the Red Hat Ecosystem Catalog. However, we recommend that you use the YAML files provided to deploy Streams for Apache Kafka.
4.4. Pushing container images to your own registry
Container images for Streams for Apache Kafka are available in the Red Hat Ecosystem Catalog. The installation YAML files provided by Streams for Apache Kafka will pull the images directly from the Red Hat Ecosystem Catalog.
If you do not have access to the Red Hat Ecosystem Catalog or want to use your own container repository, do the following:
- Pull all container images listed here
- Push them into your own registry
- Update the image names in the installation YAML files
Each Kafka version supported for the release has a separate image.
| Container image | Namespace/Repository | Description |
|---|---|---|
| Kafka |
| Streams for Apache Kafka image for running Kafka, including:
|
| Operator |
| Streams for Apache Kafka image for running the operators:
|
| Kafka Bridge |
| Streams for Apache Kafka image for running the Streams for Apache Kafka Bridge |
| Streams for Apache Kafka Drain Cleaner |
| Streams for Apache Kafka image for running the Streams for Apache Kafka Drain Cleaner |
| Streams for Apache Kafka Proxy |
| Streams for Apache Kafka image for running the Streams for Apache Kafka Proxy |
| Streams for Apache Kafka Console |
| Streams for Apache Kafka image for running the Streams for Apache Kafka Console |
4.5. Creating a pull secret for authentication to the container image registry
The installation YAML files provided by Streams for Apache Kafka pull container images directly from the Red Hat Ecosystem Catalog. If a Streams for Apache Kafka deployment requires authentication, configure authentication credentials in a secret and add it to the installation YAML.
Authentication is not usually required, but might be requested on certain platforms.
Prerequisites
- You need your Red Hat username and password or the login details from your Red Hat registry service account.
You can use your Red Hat subscription to create a registry service account from the Red Hat Customer Portal.
Procedure
Create a pull secret containing your login details and the container registry where the Streams for Apache Kafka image is pulled from:
oc create secret docker-registry <pull_secret_name> \ --docker-server=registry.redhat.io \ --docker-username=<user_name> \ --docker-password=<password> \ --docker-email=<email>Add your user name and password. The email address is optional.
Edit the
install/cluster-operator/060-Deployment-strimzi-cluster-operator.yamldeployment file to specify the pull secret using theSTRIMZI_IMAGE_PULL_SECRETSenvironment variable:apiVersion: apps/v1 kind: Deployment metadata: name: strimzi-cluster-operator spec: # ... template: spec: serviceAccountName: strimzi-cluster-operator containers: # ... env: - name: STRIMZI_IMAGE_PULL_SECRETS value: "<pull_secret_name>" # ...The secret applies to all pods created by the Cluster Operator.
4.6. Designating Streams for Apache Kafka administrators
Streams for Apache Kafka provides custom resources for configuration of your deployment. By default, permission to view, create, edit, and delete these resources is limited to OpenShift cluster administrators. Streams for Apache Kafka provides two cluster roles that you can use to assign these rights to other users:
-
strimzi-viewallows users to view and list Streams for Apache Kafka resources. -
strimzi-adminallows users to also create, edit or delete Streams for Apache Kafka resources.
When you install these roles, they will automatically aggregate (add) these rights to the default OpenShift cluster roles. strimzi-view aggregates to the view role, and strimzi-admin aggregates to the edit and admin roles. Because of the aggregation, you might not need to assign these roles to users who already have similar rights.
The following procedure shows how to assign a strimzi-admin role that allows non-cluster administrators to manage Streams for Apache Kafka resources.
A system administrator can designate Streams for Apache Kafka administrators after the Cluster Operator is deployed.
Prerequisites
- The Streams for Apache Kafka Custom Resource Definitions (CRDs) and role-based access control (RBAC) resources to manage the CRDs have been deployed with the Cluster Operator.
Procedure
Create the
strimzi-viewandstrimzi-admincluster roles in OpenShift.oc create -f install/strimzi-adminIf needed, assign the roles that provide access rights to users that require them.
oc create clusterrolebinding strimzi-admin --clusterrole=strimzi-admin --user=user1 --user=user2
Chapter 5. Installing Streams for Apache Kafka from the OperatorHub using the web console
Install the Streams for Apache Kafka operator from the OperatorHub in the OpenShift Container Platform web console.
The procedures in this section show how to:
5.1. Installing the Streams for Apache Kafka operator from the OperatorHub
You can install and subscribe to the Streams for Apache Kafka operator using the OperatorHub in the OpenShift Container Platform web console.
This procedure describes how to create a project and install the Streams for Apache Kafka operator to that project. A project is a representation of a namespace. For manageability, it is a good practice to use namespaces to separate functions.
Make sure you use the appropriate update channel. If you are on a supported version of OpenShift, installing Streams for Apache Kafka from the default stable channel is generally safe. However, we do not recommend enabling automatic updates on the stable channel. An automatic upgrade will skip any necessary steps prior to upgrade. Use automatic upgrades only on version-specific channels.
Prerequisites
-
Access to an OpenShift Container Platform web console using an account with
cluster-adminorstrimzi-adminpermissions.
Procedure
Navigate in the OpenShift web console to the Home > Projects page and create a project (namespace) for the installation.
We use a project named
amq-streams-kafkain this example.- Navigate to the Operators > OperatorHub page.
Scroll or type a keyword into the Filter by keyword box to find the Streams for Apache Kafka operator.
The operator is located in the Streaming & Messaging category.
- Click Streams for Apache Kafka to display the operator information.
- Read the information about the operator and click Install.
On the Install Operator page, choose from the following installation and update options:
Update Channel: Choose the update channel for the operator.
- The (default) stable channel contains all the latest updates and releases, including major, minor, and micro releases, which are assumed to be well tested and stable.
- An amq-streams-X.x channel contains the minor and micro release updates for a major release, where X is the major release version number.
- An amq-streams-X.Y.x channel contains the micro release updates for a minor release, where X is the major release version number and Y is the minor release version number.
Installation Mode: Choose the project you created to install the operator on a specific namespace.
You can install the Streams for Apache Kafka operator to all namespaces in the cluster (the default option) or a specific namespace. We recommend that you dedicate a specific namespace to the Kafka cluster and other Streams for Apache Kafka components.
- Update approval: By default, the Streams for Apache Kafka operator is automatically upgraded to the latest Streams for Apache Kafka version by the Operator Lifecycle Manager (OLM). Optionally, select Manual if you want to manually approve future upgrades. For more information on operators, see the OpenShift documentation.
Click Install to install the operator to your selected namespace.
The Streams for Apache Kafka operator deploys the Cluster Operator, CRDs, and role-based access control (RBAC) resources to the selected namespace.
After the operator is ready for use, navigate to Operators > Installed Operators to verify that the operator has installed to the selected namespace.
The status will show as Succeeded.
You can now use the Streams for Apache Kafka operator to deploy Kafka components, starting with a Kafka cluster.
If you navigate to Workloads > Deployments, you can see the deployment details for the Cluster Operator and Entity Operator. The name of the Cluster Operator includes a version number: amq-streams-cluster-operator-<version>. The name is different when deploying the Cluster Operator using the Streams for Apache Kafka installation artifacts. In this case, the name is strimzi-cluster-operator.
5.2. Deploying Kafka components using the Streams for Apache Kafka operator
When installed on Openshift, the Streams for Apache Kafka operator makes Kafka components available for installation from the user interface.
The following Kafka components are available for installation:
- Kafka
- Kafka Connect
- Kafka MirrorMaker
- Kafka MirrorMaker 2
- Kafka Topic
- Kafka User
- Kafka Bridge
- Kafka Connector
- Kafka Rebalance
You select the component and create an instance. As a minimum, you create a Kafka instance. This procedure describes how to create a Kafka instance using the default settings. You can configure the default installation specification before you perform the installation.
The process is the same for creating instances of other Kafka components.
Prerequisites
- The Streams for Apache Kafka operator is installed on the OpenShift cluster.
Procedure
Navigate in the web console to the Operators > Installed Operators page and click Streams for Apache Kafka to display the operator details.
From Provided APIs, you can create instances of Kafka components.
Click Create instance under Kafka to create a Kafka instance.
By default, you’ll create a Kafka cluster called
my-clusterwith three Kafka broker nodes and three ZooKeeper nodes. The cluster uses ephemeral storage.Click Create to start the installation of Kafka.
Wait until the status changes to Ready.
Chapter 6. Deploying Streams for Apache Kafka using installation artifacts
Having prepared your environment for a deployment of Streams for Apache Kafka, you can deploy Streams for Apache Kafka to an OpenShift cluster. Use the installation files provided with the release artifacts.
Streams for Apache Kafka is based on Strimzi 0.40.x. You can deploy Streams for Apache Kafka 2.7 on OpenShift 4.12 to 4.16.
The steps to deploy Streams for Apache Kafka using the installation files are as follows:
- Deploy the Cluster Operator
Use the Cluster Operator to deploy the following:
Optionally, deploy the following Kafka components according to your requirements:
To run the commands in this guide, an OpenShift user must have the rights to manage role-based access control (RBAC) and CRDs.
6.1. Basic deployment path
You can set up a deployment where Streams for Apache Kafka manages a single Kafka cluster in the same namespace. You might use this configuration for development or testing. Or you can use Streams for Apache Kafka in a production environment to manage a number of Kafka clusters in different namespaces.
The first step for any deployment of Streams for Apache Kafka is to install the Cluster Operator using the install/cluster-operator files.
A single command applies all the installation files in the cluster-operator folder: oc apply -f ./install/cluster-operator.
The command sets up everything you need to be able to create and manage a Kafka deployment, including the following:
-
Cluster Operator (
Deployment,ConfigMap) -
Streams for Apache Kafka CRDs (
CustomResourceDefinition) -
RBAC resources (
ClusterRole,ClusterRoleBinding,RoleBinding) -
Service account (
ServiceAccount)
The basic deployment path is as follows:
- Download the release artifacts
- Create an OpenShift namespace in which to deploy the Cluster Operator
-
Update the
install/cluster-operatorfiles to use the namespace created for the Cluster Operator - Install the Cluster Operator to watch one, multiple, or all namespaces
-
Update the
- Create a Kafka cluster
After which, you can deploy other Kafka components and set up monitoring of your deployment.
6.2. Deploying the Cluster Operator
The Cluster Operator is responsible for deploying and managing Kafka clusters within an OpenShift cluster.
When the Cluster Operator is running, it starts to watch for updates of Kafka resources.
By default, a single replica of the Cluster Operator is deployed. You can add replicas with leader election so that additional Cluster Operators are on standby in case of disruption. For more information, see Section 9.5.4, “Running multiple Cluster Operator replicas with leader election”.
6.2.1. Specifying the namespaces the Cluster Operator watches
The Cluster Operator watches for updates in the namespaces where the Kafka resources are deployed. When you deploy the Cluster Operator, you specify which namespaces to watch in the OpenShift cluster. You can specify the following namespaces:
- A single selected namespace (the same namespace containing the Cluster Operator)
- Multiple selected namespaces
- All namespaces in the cluster
Watching multiple selected namespaces has the most impact on performance due to increased processing overhead. To optimize performance for namespace monitoring, it is generally recommended to either watch a single namespace or monitor the entire cluster. Watching a single namespace allows for focused monitoring of namespace-specific resources, while monitoring all namespaces provides a comprehensive view of the cluster’s resources across all namespaces.
The Cluster Operator watches for changes to the following resources:
-
Kafkafor the Kafka cluster. -
KafkaConnectfor the Kafka Connect cluster. -
KafkaConnectorfor creating and managing connectors in a Kafka Connect cluster. -
KafkaMirrorMakerfor the Kafka MirrorMaker instance. -
KafkaMirrorMaker2for the Kafka MirrorMaker 2 instance. -
KafkaBridgefor the Kafka Bridge instance. -
KafkaRebalancefor the Cruise Control optimization requests.
When one of these resources is created in the OpenShift cluster, the operator gets the cluster description from the resource and starts creating a new cluster for the resource by creating the necessary OpenShift resources, such as Deployments, Pods, Services and ConfigMaps.
Each time a Kafka resource is updated, the operator performs corresponding updates on the OpenShift resources that make up the cluster for the resource.
Resources are either patched or deleted, and then recreated in order to make the cluster for the resource reflect the desired state of the cluster. This operation might cause a rolling update that might lead to service disruption.
When a resource is deleted, the operator undeploys the cluster and deletes all related OpenShift resources.
While the Cluster Operator can watch one, multiple, or all namespaces in an OpenShift cluster, the Topic Operator and User Operator watch for KafkaTopic and KafkaUser resources in a single namespace. For more information, see Section 1.2.1, “Watching Streams for Apache Kafka resources in OpenShift namespaces”.
6.2.2. Deploying the Cluster Operator to watch a single namespace
This procedure shows how to deploy the Cluster Operator to watch Streams for Apache Kafka resources in a single namespace in your OpenShift cluster.
Prerequisites
-
You need an account with permission to create and manage
CustomResourceDefinitionand RBAC (ClusterRole, andRoleBinding) resources.
Procedure
Edit the Streams for Apache Kafka installation files to use the namespace the Cluster Operator is going to be installed into.
For example, in this procedure the Cluster Operator is installed into the namespace
my-cluster-operator-namespace.On Linux, use:
sed -i 's/namespace: .*/namespace: my-cluster-operator-namespace/' install/cluster-operator/*RoleBinding*.yamlOn MacOS, use:
sed -i '' 's/namespace: .*/namespace: my-cluster-operator-namespace/' install/cluster-operator/*RoleBinding*.yamlDeploy the Cluster Operator:
oc create -f install/cluster-operator -n my-cluster-operator-namespaceCheck the status of the deployment:
oc get deployments -n my-cluster-operator-namespaceOutput shows the deployment name and readiness
NAME READY UP-TO-DATE AVAILABLE strimzi-cluster-operator 1/1 1 1READYshows the number of replicas that are ready/expected. The deployment is successful when theAVAILABLEoutput shows1.
6.2.3. Deploying the Cluster Operator to watch multiple namespaces
This procedure shows how to deploy the Cluster Operator to watch Streams for Apache Kafka resources across multiple namespaces in your OpenShift cluster.
Prerequisites
-
You need an account with permission to create and manage
CustomResourceDefinitionand RBAC (ClusterRole, andRoleBinding) resources.
Procedure
Edit the Streams for Apache Kafka installation files to use the namespace the Cluster Operator is going to be installed into.
For example, in this procedure the Cluster Operator is installed into the namespace
my-cluster-operator-namespace.On Linux, use:
sed -i 's/namespace: .*/namespace: my-cluster-operator-namespace/' install/cluster-operator/*RoleBinding*.yamlOn MacOS, use:
sed -i '' 's/namespace: .*/namespace: my-cluster-operator-namespace/' install/cluster-operator/*RoleBinding*.yamlEdit the
install/cluster-operator/060-Deployment-strimzi-cluster-operator.yamlfile to add a list of all the namespaces the Cluster Operator will watch to theSTRIMZI_NAMESPACEenvironment variable.For example, in this procedure the Cluster Operator will watch the namespaces
watched-namespace-1,watched-namespace-2,watched-namespace-3.apiVersion: apps/v1 kind: Deployment spec: # ... template: spec: serviceAccountName: strimzi-cluster-operator containers: - name: strimzi-cluster-operator image: registry.redhat.io/amq-streams/strimzi-rhel9-operator:2.7.0 imagePullPolicy: IfNotPresent env: - name: STRIMZI_NAMESPACE value: watched-namespace-1,watched-namespace-2,watched-namespace-3For each namespace listed, install the
RoleBindings.In this example, we replace
watched-namespacein these commands with the namespaces listed in the previous step, repeating them forwatched-namespace-1,watched-namespace-2,watched-namespace-3:oc create -f install/cluster-operator/020-RoleBinding-strimzi-cluster-operator.yaml -n <watched_namespace> oc create -f install/cluster-operator/023-RoleBinding-strimzi-cluster-operator.yaml -n <watched_namespace> oc create -f install/cluster-operator/031-RoleBinding-strimzi-cluster-operator-entity-operator-delegation.yaml -n <watched_namespace>Deploy the Cluster Operator:
oc create -f install/cluster-operator -n my-cluster-operator-namespaceCheck the status of the deployment:
oc get deployments -n my-cluster-operator-namespaceOutput shows the deployment name and readiness
NAME READY UP-TO-DATE AVAILABLE strimzi-cluster-operator 1/1 1 1READYshows the number of replicas that are ready/expected. The deployment is successful when theAVAILABLEoutput shows1.
6.2.4. Deploying the Cluster Operator to watch all namespaces
This procedure shows how to deploy the Cluster Operator to watch Streams for Apache Kafka resources across all namespaces in your OpenShift cluster.
When running in this mode, the Cluster Operator automatically manages clusters in any new namespaces that are created.
Prerequisites
-
You need an account with permission to create and manage
CustomResourceDefinitionand RBAC (ClusterRole, andRoleBinding) resources.
Procedure
Edit the Streams for Apache Kafka installation files to use the namespace the Cluster Operator is going to be installed into.
For example, in this procedure the Cluster Operator is installed into the namespace
my-cluster-operator-namespace.On Linux, use:
sed -i 's/namespace: .*/namespace: my-cluster-operator-namespace/' install/cluster-operator/*RoleBinding*.yamlOn MacOS, use:
sed -i '' 's/namespace: .*/namespace: my-cluster-operator-namespace/' install/cluster-operator/*RoleBinding*.yamlEdit the
install/cluster-operator/060-Deployment-strimzi-cluster-operator.yamlfile to set the value of theSTRIMZI_NAMESPACEenvironment variable to*.apiVersion: apps/v1 kind: Deployment spec: # ... template: spec: # ... serviceAccountName: strimzi-cluster-operator containers: - name: strimzi-cluster-operator image: registry.redhat.io/amq-streams/strimzi-rhel9-operator:2.7.0 imagePullPolicy: IfNotPresent env: - name: STRIMZI_NAMESPACE value: "*" # ...Create
ClusterRoleBindingsthat grant cluster-wide access for all namespaces to the Cluster Operator.oc create clusterrolebinding strimzi-cluster-operator-namespaced --clusterrole=strimzi-cluster-operator-namespaced --serviceaccount my-cluster-operator-namespace:strimzi-cluster-operator oc create clusterrolebinding strimzi-cluster-operator-watched --clusterrole=strimzi-cluster-operator-watched --serviceaccount my-cluster-operator-namespace:strimzi-cluster-operator oc create clusterrolebinding strimzi-cluster-operator-entity-operator-delegation --clusterrole=strimzi-entity-operator --serviceaccount my-cluster-operator-namespace:strimzi-cluster-operatorDeploy the Cluster Operator to your OpenShift cluster.
oc create -f install/cluster-operator -n my-cluster-operator-namespaceCheck the status of the deployment:
oc get deployments -n my-cluster-operator-namespaceOutput shows the deployment name and readiness
NAME READY UP-TO-DATE AVAILABLE strimzi-cluster-operator 1/1 1 1READYshows the number of replicas that are ready/expected. The deployment is successful when theAVAILABLEoutput shows1.
6.3. Deploying Kafka
To be able to manage a Kafka cluster with the Cluster Operator, you must deploy it as a Kafka resource. Streams for Apache Kafka provides example deployment files to do this. You can use these files to deploy the Topic Operator and User Operator at the same time.
After you have deployed the Cluster Operator, use a Kafka resource to deploy the following components:
A Kafka cluster that uses KRaft or ZooKeeper:
- Topic Operator
- User Operator
Node pools provide configuration for a set of Kafka nodes. By using node pools, nodes can have different configuration within the same Kafka cluster.
If you haven’t deployed a Kafka cluster as a Kafka resource, you can’t use the Cluster Operator to manage it. This applies, for example, to a Kafka cluster running outside of OpenShift. However, you can use the Topic Operator and User Operator with a Kafka cluster that is not managed by Streams for Apache Kafka, by deploying them as standalone components. You can also deploy and use other Kafka components with a Kafka cluster not managed by Streams for Apache Kafka.
6.3.1. Deploying a Kafka cluster with node pools
This procedure shows how to deploy Kafka with node pools to your OpenShift cluster using the Cluster Operator. Node pools represent a distinct group of Kafka nodes within a Kafka cluster that share the same configuration. For each Kafka node in the node pool, any configuration not defined in node pool is inherited from the cluster configuration in the kafka resource.
The deployment uses a YAML file to provide the specification to create a KafkaNodePool resource. You can use node pools with Kafka clusters that use KRaft (Kafka Raft metadata) mode or ZooKeeper for cluster management. To deploy a Kafka cluster in KRaft mode, you must use the KafkaNodePool resources.
Streams for Apache Kafka provides the following example files that you can use to create a Kafka cluster that uses node pools:
kafka-with-dual-role-kraft-nodes.yaml- Deploys a Kafka cluster with one pool of KRaft nodes that share the broker and controller roles.
kafka-with-kraft.yaml- Deploys a persistent Kafka cluster with one pool of controller nodes and one pool of broker nodes.
kafka-with-kraft-ephemeral.yaml- Deploys an ephemeral Kafka cluster with one pool of controller nodes and one pool of broker nodes.
kafka.yaml- Deploys ZooKeeper with 3 nodes, and 2 different pools of Kafka brokers. Each of the pools has 3 brokers. The pools in the example use different storage configuration.
You can perform the steps outlined here to deploy a new Kafka cluster with KafkaNodePool resources or migrate your existing Kafka cluster.
Prerequisites
Procedure
Deploy a KRaft-based Kafka cluster.
To deploy a Kafka cluster in KRaft mode with a single node pool that uses dual-role nodes:
oc apply -f examples/kafka/kraft/kafka-with-dual-role-nodes.yamlTo deploy a persistent Kafka cluster in KRaft mode with separate node pools for broker and controller nodes:
oc apply -f examples/kafka/kraft/kafka.yamlTo deploy an ephemeral Kafka cluster in KRaft mode with separate node pools for broker and controller nodes:
oc apply -f examples/kafka/kraft/kafka-ephemeral.yamlTo deploy a Kafka cluster and ZooKeeper cluster with two node pools of three brokers:
oc apply -f examples/kafka/kafka-with-node-pools.yaml
Check the status of the deployment:
oc get pods -n <my_cluster_operator_namespace>Output shows the node pool names and readiness
NAME READY STATUS RESTARTS my-cluster-entity-operator 3/3 Running 0 my-cluster-pool-a-0 1/1 Running 0 my-cluster-pool-a-1 1/1 Running 0 my-cluster-pool-a-4 1/1 Running 0-
my-clusteris the name of the Kafka cluster. pool-ais the name of the node pool.A sequential index number starting with
0identifies each Kafka pod created. If you are using ZooKeeper, you’ll also see the ZooKeeper pods.READYshows the number of replicas that are ready/expected. The deployment is successful when theSTATUSdisplays asRunning.Information on the deployment is also shown in the status of the
KafkaNodePoolresource, including a list of IDs for nodes in the pool.NoteNode IDs are assigned sequentially starting at 0 (zero) across all node pools within a cluster. This means that node IDs might not run sequentially within a specific node pool. If there are gaps in the sequence of node IDs across the cluster, the next node to be added is assigned an ID that fills the gap. When scaling down, the node with the highest node ID within a pool is removed.
-
6.3.2. Deploying a ZooKeeper-based Kafka cluster without node pools
This procedure shows how to deploy a ZooKeeper-based Kafka cluster to your OpenShift cluster using the Cluster Operator.
The deployment uses a YAML file to provide the specification to create a Kafka resource.
Streams for Apache Kafka provides the following example files to create a Kafka cluster that uses ZooKeeper for cluster management:
kafka-persistent.yaml- Deploys a persistent cluster with three ZooKeeper and three Kafka nodes.
kafka-jbod.yaml- Deploys a persistent cluster with three ZooKeeper and three Kafka nodes (each using multiple persistent volumes).
kafka-persistent-single.yaml- Deploys a persistent cluster with a single ZooKeeper node and a single Kafka node.
kafka-ephemeral.yaml- Deploys an ephemeral cluster with three ZooKeeper and three Kafka nodes.
kafka-ephemeral-single.yaml- Deploys an ephemeral cluster with three ZooKeeper nodes and a single Kafka node.
In this procedure, we use the examples for an ephemeral and persistent Kafka cluster deployment.
- Ephemeral cluster
-
In general, an ephemeral (or temporary) Kafka cluster is suitable for development and testing purposes, not for production. This deployment uses
emptyDirvolumes for storing broker information (for ZooKeeper) and topics or partitions (for Kafka). Using anemptyDirvolume means that its content is strictly related to the pod life cycle and is deleted when the pod goes down. - Persistent cluster
A persistent Kafka cluster uses persistent volumes to store ZooKeeper and Kafka data. A
PersistentVolumeis acquired using aPersistentVolumeClaimto make it independent of the actual type of thePersistentVolume. ThePersistentVolumeClaimcan use aStorageClassto trigger automatic volume provisioning. When noStorageClassis specified, OpenShift will try to use the defaultStorageClass.The following examples show some common types of persistent volumes:
- If your OpenShift cluster runs on Amazon AWS, OpenShift can provision Amazon EBS volumes
- If your OpenShift cluster runs on Microsoft Azure, OpenShift can provision Azure Disk Storage volumes
- If your OpenShift cluster runs on Google Cloud, OpenShift can provision Persistent Disk volumes
- If your OpenShift cluster runs on bare metal, OpenShift can provision local persistent volumes
The example YAML files specify the latest supported Kafka version, and configuration for its supported log message format version and inter-broker protocol version. The inter.broker.protocol.version property for the Kafka config must be the version supported by the specified Kafka version (spec.kafka.version). The property represents the version of Kafka protocol used in a Kafka cluster.
From Kafka 3.0.0, when the inter.broker.protocol.version is set to 3.0 or higher, the log.message.format.version option is ignored and doesn’t need to be set.
The example clusters are named my-cluster by default. The cluster name is defined by the name of the resource and cannot be changed after the cluster has been deployed. To change the cluster name before you deploy the cluster, edit the Kafka.metadata.name property of the Kafka resource in the relevant YAML file.
Default cluster name and specified Kafka versions
apiVersion: kafka.strimzi.io/v1beta2
kind: Kafka
metadata:
name: my-cluster
spec:
kafka:
version: 3.7.0
#...
config:
#...
log.message.format.version: "3.7"
inter.broker.protocol.version: "3.7"
# ...Prerequisites
Procedure
Deploy a ZooKeeper-based Kafka cluster.
To deploy an ephemeral cluster:
oc apply -f examples/kafka/kafka-ephemeral.yamlTo deploy a persistent cluster:
oc apply -f examples/kafka/kafka-persistent.yaml
Check the status of the deployment:
oc get pods -n <my_cluster_operator_namespace>Output shows the pod names and readiness
NAME READY STATUS RESTARTS my-cluster-entity-operator 3/3 Running 0 my-cluster-kafka-0 1/1 Running 0 my-cluster-kafka-1 1/1 Running 0 my-cluster-kafka-2 1/1 Running 0 my-cluster-zookeeper-0 1/1 Running 0 my-cluster-zookeeper-1 1/1 Running 0 my-cluster-zookeeper-2 1/1 Running 0my-clusteris the name of the Kafka cluster.A sequential index number starting with
0identifies each Kafka and ZooKeeper pod created.With the default deployment, you create an Entity Operator cluster, 3 Kafka pods, and 3 ZooKeeper pods.
READYshows the number of replicas that are ready/expected. The deployment is successful when theSTATUSdisplays asRunning.
6.3.3. Deploying the Topic Operator using the Cluster Operator
This procedure describes how to deploy the Topic Operator using the Cluster Operator. The Topic Operator can be deployed for use in either bidirectional mode or unidirectional mode. To learn more about bidirectional and unidirectional topic management, see Section 10.1, “Topic management modes”.
You configure the entityOperator property of the Kafka resource to include the topicOperator. By default, the Topic Operator watches for KafkaTopic resources in the namespace of the Kafka cluster deployed by the Cluster Operator. You can also specify a namespace using watchedNamespace in the Topic Operator spec. A single Topic Operator can watch a single namespace. One namespace should be watched by only one Topic Operator.
If you use Streams for Apache Kafka to deploy multiple Kafka clusters into the same namespace, enable the Topic Operator for only one Kafka cluster or use the watchedNamespace property to configure the Topic Operators to watch other namespaces.
If you want to use the Topic Operator with a Kafka cluster that is not managed by Streams for Apache Kafka, you must deploy the Topic Operator as a standalone component.
For more information about configuring the entityOperator and topicOperator properties, see Configuring the Entity Operator.
Prerequisites
Procedure
Edit the
entityOperatorproperties of theKafkaresource to includetopicOperator:apiVersion: kafka.strimzi.io/v1beta2 kind: Kafka metadata: name: my-cluster spec: #... entityOperator: topicOperator: {} userOperator: {}Configure the Topic Operator
specusing the properties described in theEntityTopicOperatorSpecschema reference.Use an empty object (
{}) if you want all properties to use their default values.Create or update the resource:
oc apply -f <kafka_configuration_file>Check the status of the deployment:
oc get pods -n <my_cluster_operator_namespace>Output shows the pod name and readiness
NAME READY STATUS RESTARTS my-cluster-entity-operator 3/3 Running 0 # ...my-clusteris the name of the Kafka cluster.READYshows the number of replicas that are ready/expected. The deployment is successful when theSTATUSdisplays asRunning.
6.3.4. Deploying the User Operator using the Cluster Operator
This procedure describes how to deploy the User Operator using the Cluster Operator.
You configure the entityOperator property of the Kafka resource to include the userOperator. By default, the User Operator watches for KafkaUser resources in the namespace of the Kafka cluster deployment. You can also specify a namespace using watchedNamespace in the User Operator spec. A single User Operator can watch a single namespace. One namespace should be watched by only one User Operator.
If you want to use the User Operator with a Kafka cluster that is not managed by Streams for Apache Kafka, you must deploy the User Operator as a standalone component.
For more information about configuring the entityOperator and userOperator properties, see Configuring the Entity Operator.
Prerequisites
Procedure
Edit the
entityOperatorproperties of theKafkaresource to includeuserOperator:apiVersion: kafka.strimzi.io/v1beta2 kind: Kafka metadata: name: my-cluster spec: #... entityOperator: topicOperator: {} userOperator: {}Configure the User Operator
specusing the properties described inEntityUserOperatorSpecschema reference.Use an empty object (
{}) if you want all properties to use their default values.Create or update the resource:
oc apply -f <kafka_configuration_file>Check the status of the deployment:
oc get pods -n <my_cluster_operator_namespace>Output shows the pod name and readiness
NAME READY STATUS RESTARTS my-cluster-entity-operator 3/3 Running 0 # ...my-clusteris the name of the Kafka cluster.READYshows the number of replicas that are ready/expected. The deployment is successful when theSTATUSdisplays asRunning.
6.3.5. Connecting to ZooKeeper from a terminal
ZooKeeper services are secured with encryption and authentication and are not intended to be used by external applications that are not part of Streams for Apache Kafka.
However, if you want to use CLI tools that require a connection to ZooKeeper, you can use a terminal inside a ZooKeeper pod and connect to localhost:12181 as the ZooKeeper address.
Prerequisites
- An OpenShift cluster is available.
- A Kafka cluster is running.
- The Cluster Operator is running.
Procedure
Open the terminal using the OpenShift console or run the
execcommand from your CLI.For example:
oc exec -ti my-cluster-zookeeper-0 -- bin/zookeeper-shell.sh localhost:12181 ls /Be sure to use
localhost:12181.
6.3.6. List of Kafka cluster resources
The following resources are created by the Cluster Operator in the OpenShift cluster.
Shared resources
<kafka_cluster_name>-cluster-ca- Secret with the Cluster CA private key used to encrypt the cluster communication.
<kafka_cluster_name>-cluster-ca-cert- Secret with the Cluster CA public key. This key can be used to verify the identity of the Kafka brokers.
<kafka_cluster_name>-clients-ca- Secret with the Clients CA private key used to sign user certificates
<kafka_cluster_name>-clients-ca-cert- Secret with the Clients CA public key. This key can be used to verify the identity of the Kafka users.
<kafka_cluster_name>-cluster-operator-certs- Secret with Cluster operators keys for communication with Kafka and ZooKeeper.
ZooKeeper nodes
<kafka_cluster_name>-zookeeperName given to the following ZooKeeper resources:
- StrimziPodSet for managing the ZooKeeper node pods.
- Service account used by the ZooKeeper nodes.
- PodDisruptionBudget configured for the ZooKeeper nodes.
<kafka_cluster_name>-zookeeper-<pod_id>- Pods created by the StrimziPodSet.
<kafka_cluster_name>-zookeeper-nodes- Headless Service needed to have DNS resolve the ZooKeeper pods IP addresses directly.
<kafka_cluster_name>-zookeeper-client- Service used by Kafka brokers to connect to ZooKeeper nodes as clients.
<kafka_cluster_name>-zookeeper-config- ConfigMap that contains the ZooKeeper ancillary configuration, and is mounted as a volume by the ZooKeeper node pods.
<kafka_cluster_name>-zookeeper-nodes- Secret with ZooKeeper node keys.
<kafka_cluster_name>-network-policy-zookeeper- Network policy managing access to the ZooKeeper services.
data-<kafka_cluster_name>-zookeeper-<pod_id>- Persistent Volume Claim for the volume used for storing data for a specific ZooKeeper node. This resource will be created only if persistent storage is selected for provisioning persistent volumes to store data.
Kafka brokers
<kafka_cluster_name>-kafkaName given to the following Kafka resources:
- StrimziPodSet for managing the Kafka broker pods.
- Service account used by the Kafka pods.
- PodDisruptionBudget configured for the Kafka brokers.
<kafka_cluster_name>-kafka-<pod_id>Name given to the following Kafka resources:
- Pods created by the StrimziPodSet.
- ConfigMaps with Kafka broker configuration.
<kafka_cluster_name>-kafka-brokers- Service needed to have DNS resolve the Kafka broker pods IP addresses directly.
<kafka_cluster_name>-kafka-bootstrap- Service can be used as bootstrap servers for Kafka clients connecting from within the OpenShift cluster.
<kafka_cluster_name>-kafka-external-bootstrap-
Bootstrap service for clients connecting from outside the OpenShift cluster. This resource is created only when an external listener is enabled. The old service name will be used for backwards compatibility when the listener name is
externaland port is9094. <kafka_cluster_name>-kafka-<pod_id>-
Service used to route traffic from outside the OpenShift cluster to individual pods. This resource is created only when an external listener is enabled. The old service name will be used for backwards compatibility when the listener name is
externaland port is9094. <kafka_cluster_name>-kafka-external-bootstrap-
Bootstrap route for clients connecting from outside the OpenShift cluster. This resource is created only when an external listener is enabled and set to type
route. The old route name will be used for backwards compatibility when the listener name isexternaland port is9094. <kafka_cluster_name>-kafka-<pod_id>-
Route for traffic from outside the OpenShift cluster to individual pods. This resource is created only when an external listener is enabled and set to type
route. The old route name will be used for backwards compatibility when the listener name isexternaland port is9094. <kafka_cluster_name>-kafka-<listener_name>-bootstrap- Bootstrap service for clients connecting from outside the OpenShift cluster. This resource is created only when an external listener is enabled. The new service name will be used for all other external listeners.
<kafka_cluster_name>-kafka-<listener_name>-<pod_id>- Service used to route traffic from outside the OpenShift cluster to individual pods. This resource is created only when an external listener is enabled. The new service name will be used for all other external listeners.
<kafka_cluster_name>-kafka-<listener_name>-bootstrap-
Bootstrap route for clients connecting from outside the OpenShift cluster. This resource is created only when an external listener is enabled and set to type
route. The new route name will be used for all other external listeners. <kafka_cluster_name>-kafka-<listener_name>-<pod_id>-
Route for traffic from outside the OpenShift cluster to individual pods. This resource is created only when an external listener is enabled and set to type
route. The new route name will be used for all other external listeners. <kafka_cluster_name>-kafka-config-
ConfigMap containing the Kafka ancillary configuration, which is mounted as a volume by the broker pods when the
UseStrimziPodSetsfeature gate is disabled. <kafka_cluster_name>-kafka-brokers- Secret with Kafka broker keys.
<kafka_cluster_name>-network-policy-kafka- Network policy managing access to the Kafka services.
strimzi-namespace-name-<kafka_cluster_name>-kafka-init- Cluster role binding used by the Kafka brokers.
<kafka_cluster_name>-jmx- Secret with JMX username and password used to secure the Kafka broker port. This resource is created only when JMX is enabled in Kafka.
data-<kafka_cluster_name>-kafka-<pod_id>- Persistent Volume Claim for the volume used for storing data for a specific Kafka broker. This resource is created only if persistent storage is selected for provisioning persistent volumes to store data.
data-<id>-<kafka_cluster_name>-kafka-<pod_id>-
Persistent Volume Claim for the volume
idused for storing data for a specific Kafka broker. This resource is created only if persistent storage is selected for JBOD volumes when provisioning persistent volumes to store data.
Kafka node pools
If you are using Kafka node pools, the resources created apply to the nodes managed in the node pools whether they are operating as brokers, controllers, or both. The naming convention includes the name of the Kafka cluster and the node pool: <kafka_cluster_name>-<pool_name>.
<kafka_cluster_name>-<pool_name>- Name given to the StrimziPodSet for managing the Kafka node pool.
<kafka_cluster_name>-<pool_name>-<pod_id>Name given to the following Kafka node pool resources:
- Pods created by the StrimziPodSet.
- ConfigMaps with Kafka node configuration.
data-<kafka_cluster_name>-<pool_name>-<pod_id>- Persistent Volume Claim for the volume used for storing data for a specific node. This resource is created only if persistent storage is selected for provisioning persistent volumes to store data.
data-<id>-<kafka_cluster_name>-<pool_name>-<pod_id>-
Persistent Volume Claim for the volume
idused for storing data for a specific node. This resource is created only if persistent storage is selected for JBOD volumes when provisioning persistent volumes to store data.
Entity Operator
These resources are only created if the Entity Operator is deployed using the Cluster Operator.
<kafka_cluster_name>-entity-operatorName given to the following Entity Operator resources:
- Deployment with Topic and User Operators.
- Service account used by the Entity Operator.
- Network policy managing access to the Entity Operator metrics.
<kafka_cluster_name>-entity-operator-<random_string>- Pod created by the Entity Operator deployment.
<kafka_cluster_name>-entity-topic-operator-config- ConfigMap with ancillary configuration for Topic Operators.
<kafka_cluster_name>-entity-user-operator-config- ConfigMap with ancillary configuration for User Operators.
<kafka_cluster_name>-entity-topic-operator-certs- Secret with Topic Operator keys for communication with Kafka and ZooKeeper.
<kafka_cluster_name>-entity-user-operator-certs- Secret with User Operator keys for communication with Kafka and ZooKeeper.
strimzi-<kafka_cluster_name>-entity-topic-operator- Role binding used by the Entity Topic Operator.
strimzi-<kafka_cluster_name>-entity-user-operator- Role binding used by the Entity User Operator.
Kafka Exporter
These resources are only created if the Kafka Exporter is deployed using the Cluster Operator.
<kafka_cluster_name>-kafka-exporterName given to the following Kafka Exporter resources:
- Deployment with Kafka Exporter.
- Service used to collect consumer lag metrics.
- Service account used by the Kafka Exporter.
- Network policy managing access to the Kafka Exporter metrics.
<kafka_cluster_name>-kafka-exporter-<random_string>- Pod created by the Kafka Exporter deployment.
Cruise Control
These resources are only created if Cruise Control was deployed using the Cluster Operator.
<kafka_cluster_name>-cruise-controlName given to the following Cruise Control resources:
- Deployment with Cruise Control.
- Service used to communicate with Cruise Control.
- Service account used by the Cruise Control.
<kafka_cluster_name>-cruise-control-<random_string>- Pod created by the Cruise Control deployment.
<kafka_cluster_name>-cruise-control-config- ConfigMap that contains the Cruise Control ancillary configuration, and is mounted as a volume by the Cruise Control pods.
<kafka_cluster_name>-cruise-control-certs- Secret with Cruise Control keys for communication with Kafka and ZooKeeper.
<kafka_cluster_name>-network-policy-cruise-control- Network policy managing access to the Cruise Control service.
6.4. Deploying Kafka Connect
Kafka Connect is an integration toolkit for streaming data between Kafka brokers and other systems using connector plugins. Kafka Connect provides a framework for integrating Kafka with an external data source or target, such as a database or messaging system, for import or export of data using connectors. Connectors are plugins that provide the connection configuration needed.
In Streams for Apache Kafka, Kafka Connect is deployed in distributed mode. Kafka Connect can also work in standalone mode, but this is not supported by Streams for Apache Kafka.
Using the concept of connectors, Kafka Connect provides a framework for moving large amounts of data into and out of your Kafka cluster while maintaining scalability and reliability.
The Cluster Operator manages Kafka Connect clusters deployed using the KafkaConnect resource and connectors created using the KafkaConnector resource.
In order to use Kafka Connect, you need to do the following.
The term connector is used interchangeably to mean a connector instance running within a Kafka Connect cluster, or a connector class. In this guide, the term connector is used when the meaning is clear from the context.
6.4.1. Deploying Kafka Connect to your OpenShift cluster
This procedure shows how to deploy a Kafka Connect cluster to your OpenShift cluster using the Cluster Operator.
A Kafka Connect cluster deployment is implemented with a configurable number of nodes (also called workers) that distribute the workload of connectors as tasks so that the message flow is highly scalable and reliable.
The deployment uses a YAML file to provide the specification to create a KafkaConnect resource.
Streams for Apache Kafka provides example configuration files. In this procedure, we use the following example file:
-
examples/connect/kafka-connect.yaml
If deploying Kafka Connect clusters to run in parallel, each instance must use unique names for internal Kafka Connect topics. To do this, configure each Kafka Connect instance to replace the defaults.
Prerequisites
Procedure
Deploy Kafka Connect to your OpenShift cluster. Use the
examples/connect/kafka-connect.yamlfile to deploy Kafka Connect.oc apply -f examples/connect/kafka-connect.yamlCheck the status of the deployment:
oc get pods -n <my_cluster_operator_namespace>Output shows the deployment name and readiness
NAME READY STATUS RESTARTS my-connect-cluster-connect-<pod_id> 1/1 Running 0my-connect-clusteris the name of the Kafka Connect cluster.A pod ID identifies each pod created.
With the default deployment, you create a single Kafka Connect pod.
READYshows the number of replicas that are ready/expected. The deployment is successful when theSTATUSdisplays asRunning.
6.4.2. List of Kafka Connect cluster resources
The following resources are created by the Cluster Operator in the OpenShift cluster:
- <connect_cluster_name>-connect
Name given to the following Kafka Connect resources:
- StrimziPodSet that creates the Kafka Connect worker node pods.
- Headless service that provides stable DNS names to the Kafka Connect pods.
- Service account used by the Kafka Connect pods.
- Pod disruption budget configured for the Kafka Connect worker nodes.
- Network policy managing access to the Kafka Connect REST API.
- <connect_cluster_name>-connect-<pod_id>
- Pods created by the Kafka Connect StrimziPodSet.
- <connect_cluster_name>-connect-api
- Service which exposes the REST interface for managing the Kafka Connect cluster.
- <connect_cluster_name>-connect-config
- ConfigMap which contains the Kafka Connect ancillary configuration and is mounted as a volume by the Kafka Connect pods.
- strimzi-<namespace-name>-<connect_cluster_name>-connect-init
- Cluster role binding used by the Kafka Connect cluster.
- <connect_cluster_name>-connect-build
- Pod used to build a new container image with additional connector plugins (only when Kafka Connect Build feature is used).
- <connect_cluster_name>-connect-dockerfile
- ConfigMap with the Dockerfile generated to build the new container image with additional connector plugins (only when the Kafka Connect build feature is used).
6.5. Adding Kafka Connect connectors
Kafka Connect uses connectors to integrate with other systems to stream data. A connector is an instance of a Kafka Connector class, which can be one of the following type:
- Source connector
- A source connector is a runtime entity that fetches data from an external system and feeds it to Kafka as messages.
- Sink connector
- A sink connector is a runtime entity that fetches messages from Kafka topics and feeds them to an external system.
Kafka Connect uses a plugin architecture to provide the implementation artifacts for connectors. Plugins allow connections to other systems and provide additional configuration to manipulate data. Plugins include connectors and other components, such as data converters and transforms. A connector operates with a specific type of external system. Each connector defines a schema for its configuration. You supply the configuration to Kafka Connect to create a connector instance within Kafka Connect. Connector instances then define a set of tasks for moving data between systems.
Add connector plugins to Kafka Connect in one of the following ways:
- Configure Kafka Connect to build a new container image with plugins automatically
- Create a Docker image from the base Kafka Connect image (manually or using continuous integration)
After plugins have been added to the container image, you can start, stop, and manage connector instances in the following ways:
You can also create new connector instances using these options.
6.5.1. Building a new container image with connector plugins automatically
Configure Kafka Connect so that Streams for Apache Kafka automatically builds a new container image with additional connectors. You define the connector plugins using the .spec.build.plugins property of the KafkaConnect custom resource. Streams for Apache Kafka will automatically download and add the connector plugins into a new container image. The container is pushed into the container repository specified in .spec.build.output and automatically used in the Kafka Connect deployment.
Prerequisites
- The Cluster Operator must be deployed.
- A container registry.
You need to provide your own container registry where images can be pushed to, stored, and pulled from. Streams for Apache Kafka supports private container registries as well as public registries such as Quay or Docker Hub.
Procedure
Configure the
KafkaConnectcustom resource by specifying the container registry in.spec.build.output, and additional connectors in.spec.build.plugins:apiVersion: kafka.strimzi.io/v1beta2 kind: KafkaConnect metadata: name: my-connect-cluster spec:1 #... build: output:2 type: docker image: my-registry.io/my-org/my-connect-cluster:latest pushSecret: my-registry-credentials plugins:3 - name: connector-1 artifacts: - type: tgz url: <url_to_download_connector_1_artifact> sha512sum: <SHA-512_checksum_of_connector_1_artifact> - name: connector-2 artifacts: - type: jar url: <url_to_download_connector_2_artifact> sha512sum: <SHA-512_checksum_of_connector_2_artifact> #...Create or update the resource:
$ oc apply -f <kafka_connect_configuration_file>- Wait for the new container image to build, and for the Kafka Connect cluster to be deployed.
-
Use the Kafka Connect REST API or
KafkaConnectorcustom resources to use the connector plugins you added.
6.5.2. Building a new container image with connector plugins from the Kafka Connect base image
Create a custom Docker image with connector plugins from the Kafka Connect base image. Add the custom image to the /opt/kafka/plugins directory.
You can use the Kafka container image on Red Hat Ecosystem Catalog as a base image for creating your own custom image with additional connector plugins.
At startup, the Streams for Apache Kafka version of Kafka Connect loads any third-party connector plugins contained in the /opt/kafka/plugins directory.
Prerequisites
Procedure
Create a new
Dockerfileusingregistry.redhat.io/amq-streams/kafka-37-rhel9:2.7.0as the base image:FROM registry.redhat.io/amq-streams/kafka-37-rhel9:2.7.0 USER root:root COPY ./my-plugins/ /opt/kafka/plugins/ USER 1001Example plugins file
$ tree ./my-plugins/ ./my-plugins/ ├── debezium-connector-mongodb │ ├── bson-<version>.jar │ ├── CHANGELOG.md │ ├── CONTRIBUTE.md │ ├── COPYRIGHT.txt │ ├── debezium-connector-mongodb-<version>.jar │ ├── debezium-core-<version>.jar │ ├── LICENSE.txt │ ├── mongodb-driver-core-<version>.jar │ ├── README.md │ └── # ... ├── debezium-connector-mysql │ ├── CHANGELOG.md │ ├── CONTRIBUTE.md │ ├── COPYRIGHT.txt │ ├── debezium-connector-mysql-<version>.jar │ ├── debezium-core-<version>.jar │ ├── LICENSE.txt │ ├── mysql-binlog-connector-java-<version>.jar │ ├── mysql-connector-java-<version>.jar │ ├── README.md │ └── # ... └── debezium-connector-postgres ├── CHANGELOG.md ├── CONTRIBUTE.md ├── COPYRIGHT.txt ├── debezium-connector-postgres-<version>.jar ├── debezium-core-<version>.jar ├── LICENSE.txt ├── postgresql-<version>.jar ├── protobuf-java-<version>.jar ├── README.md └── # ...The COPY command points to the plugin files to copy to the container image.
This example adds plugins for Debezium connectors (MongoDB, MySQL, and PostgreSQL), though not all files are listed for brevity. Debezium running in Kafka Connect looks the same as any other Kafka Connect task.
- Build the container image.
- Push your custom image to your container registry.
Point to the new container image.
You can point to the image in one of the following ways:
Edit the
KafkaConnect.spec.imageproperty of theKafkaConnectcustom resource.If set, this property overrides the
STRIMZI_KAFKA_CONNECT_IMAGESenvironment variable in the Cluster Operator.apiVersion: kafka.strimzi.io/v1beta2 kind: KafkaConnect metadata: name: my-connect-cluster spec:1 #... image: my-new-container-image2 config:3 #...-
Edit the
STRIMZI_KAFKA_CONNECT_IMAGESenvironment variable in theinstall/cluster-operator/060-Deployment-strimzi-cluster-operator.yamlfile to point to the new container image, and then reinstall the Cluster Operator.
6.5.3. Deploying KafkaConnector resources
Deploy KafkaConnector resources to manage connectors. The KafkaConnector custom resource offers an OpenShift-native approach to management of connectors by the Cluster Operator. You don’t need to send HTTP requests to manage connectors, as with the Kafka Connect REST API. You manage a running connector instance by updating its corresponding KafkaConnector resource, and then applying the updates. The Cluster Operator updates the configurations of the running connector instances. You remove a connector by deleting its corresponding KafkaConnector.
KafkaConnector resources must be deployed to the same namespace as the Kafka Connect cluster they link to.
In the configuration shown in this procedure, the autoRestart feature is enabled (enabled: true) for automatic restarts of failed connectors and tasks. You can also annotate the KafkaConnector resource to restart a connector or restart a connector task manually.
Example connectors
You can use your own connectors or try the examples provided by Streams for Apache Kafka. Up until Apache Kafka 3.1.0, example file connector plugins were included with Apache Kafka. Starting from the 3.1.1 and 3.2.0 releases of Apache Kafka, the examples need to be added to the plugin path as any other connector.
Streams for Apache Kafka provides an example KafkaConnector configuration file (examples/connect/source-connector.yaml) for the example file connector plugins, which creates the following connector instances as KafkaConnector resources:
-
A
FileStreamSourceConnectorinstance that reads each line from the Kafka license file (the source) and writes the data as messages to a single Kafka topic. -
A
FileStreamSinkConnectorinstance that reads messages from the Kafka topic and writes the messages to a temporary file (the sink).
We use the example file to create connectors in this procedure.
The example connectors are not intended for use in a production environment.
Prerequisites
- A Kafka Connect deployment
- The Cluster Operator is running
Procedure
Add the
FileStreamSourceConnectorandFileStreamSinkConnectorplugins to Kafka Connect in one of the following ways:- Configure Kafka Connect to build a new container image with plugins automatically
- Create a Docker image from the base Kafka Connect image (manually or using continuous integration)
Set the
strimzi.io/use-connector-resources annotationtotruein the Kafka Connect configuration.apiVersion: kafka.strimzi.io/v1beta2 kind: KafkaConnect metadata: name: my-connect-cluster annotations: strimzi.io/use-connector-resources: "true" spec: # ...With the
KafkaConnectorresources enabled, the Cluster Operator watches for them.Edit the
examples/connect/source-connector.yamlfile:Example KafkaConnector source connector configuration
apiVersion: kafka.strimzi.io/v1beta2 kind: KafkaConnector metadata: name: my-source-connector1 labels: strimzi.io/cluster: my-connect-cluster2 spec: class: org.apache.kafka.connect.file.FileStreamSourceConnector3 tasksMax: 24 autoRestart:5 enabled: true config:6 file: "/opt/kafka/LICENSE"7 topic: my-topic8 # ...- 1
- Name of the
KafkaConnectorresource, which is used as the name of the connector. Use any name that is valid for an OpenShift resource. - 2
- Name of the Kafka Connect cluster to create the connector instance in. Connectors must be deployed to the same namespace as the Kafka Connect cluster they link to.
- 3
- Full name of the connector class. This should be present in the image being used by the Kafka Connect cluster.
- 4
- Maximum number of Kafka Connect tasks that the connector can create.
- 5
- Enables automatic restarts of failed connectors and tasks. By default, the number of restarts is indefinite, but you can set a maximum on the number of automatic restarts using the
maxRestartsproperty. - 6
- Connector configuration as key-value pairs.
- 7
- Location of the external data file. In this example, we’re configuring the
FileStreamSourceConnectorto read from the/opt/kafka/LICENSEfile. - 8
- Kafka topic to publish the source data to.
Create the source
KafkaConnectorin your OpenShift cluster:oc apply -f examples/connect/source-connector.yamlCreate an
examples/connect/sink-connector.yamlfile:touch examples/connect/sink-connector.yamlPaste the following YAML into the
sink-connector.yamlfile:apiVersion: kafka.strimzi.io/v1beta2 kind: KafkaConnector metadata: name: my-sink-connector labels: strimzi.io/cluster: my-connect spec: class: org.apache.kafka.connect.file.FileStreamSinkConnector1 tasksMax: 2 config:2 file: "/tmp/my-file"3 topics: my-topic4 - 1
- Full name or alias of the connector class. This should be present in the image being used by the Kafka Connect cluster.
- 2
- Connector configuration as key-value pairs.
- 3
- Temporary file to publish the source data to.
- 4
- Kafka topic to read the source data from.
Create the sink
KafkaConnectorin your OpenShift cluster:oc apply -f examples/connect/sink-connector.yamlCheck that the connector resources were created:
oc get kctr --selector strimzi.io/cluster=<my_connect_cluster> -o name my-source-connector my-sink-connectorReplace <my_connect_cluster> with the name of your Kafka Connect cluster.
In the container, execute
kafka-console-consumer.shto read the messages that were written to the topic by the source connector:oc exec <my_kafka_cluster>-kafka-0 -i -t -- bin/kafka-console-consumer.sh --bootstrap-server <my_kafka_cluster>-kafka-bootstrap.NAMESPACE.svc:9092 --topic my-topic --from-beginningReplace <my_kafka_cluster> with the name of your Kafka cluster.
Source and sink connector configuration options
The connector configuration is defined in the spec.config property of the KafkaConnector resource.
The FileStreamSourceConnector and FileStreamSinkConnector classes support the same configuration options as the Kafka Connect REST API. Other connectors support different configuration options.
| Name | Type | Default value | Description |
|---|---|---|---|
|
| String | Null | Source file to write messages to. If not specified, the standard input is used. |
|
| List | Null | The Kafka topic to publish data to. |
| Name | Type | Default value | Description |
|---|---|---|---|
|
| String | Null | Destination file to write messages to. If not specified, the standard output is used. |
|
| List | Null | One or more Kafka topics to read data from. |
|
| String | Null | A regular expression matching one or more Kafka topics to read data from. |
6.5.4. Exposing the Kafka Connect API
Use the Kafka Connect REST API as an alternative to using KafkaConnector resources to manage connectors. The Kafka Connect REST API is available as a service running on <connect_cluster_name>-connect-api:8083, where <connect_cluster_name> is the name of your Kafka Connect cluster. The service is created when you create a Kafka Connect instance.
The operations supported by the Kafka Connect REST API are described in the Apache Kafka Connect API documentation.
The strimzi.io/use-connector-resources annotation enables KafkaConnectors. If you applied the annotation to your KafkaConnect resource configuration, you need to remove it to use the Kafka Connect API. Otherwise, manual changes made directly using the Kafka Connect REST API are reverted by the Cluster Operator.
You can add the connector configuration as a JSON object.
Example curl request to add connector configuration
curl -X POST \
http://my-connect-cluster-connect-api:8083/connectors \
-H 'Content-Type: application/json' \
-d '{ "name": "my-source-connector",
"config":
{
"connector.class":"org.apache.kafka.connect.file.FileStreamSourceConnector",
"file": "/opt/kafka/LICENSE",
"topic":"my-topic",
"tasksMax": "4",
"type": "source"
}
}'The API is only accessible within the OpenShift cluster. If you want to make the Kafka Connect API accessible to applications running outside of the OpenShift cluster, you can expose it manually by creating one of the following features:
-
LoadBalancerorNodePorttype services -
Ingressresources (Kubernetes only) - OpenShift routes (OpenShift only)
The connection is insecure, so allow external access advisedly.
If you decide to create services, use the labels from the selector of the <connect_cluster_name>-connect-api service to configure the pods to which the service will route the traffic:
Selector configuration for the service
# ...
selector:
strimzi.io/cluster: my-connect-cluster
strimzi.io/kind: KafkaConnect
strimzi.io/name: my-connect-cluster-connect
#...
You must also create a NetworkPolicy that allows HTTP requests from external clients.
Example NetworkPolicy to allow requests to the Kafka Connect API
apiVersion: networking.k8s.io/v1
kind: NetworkPolicy
metadata:
name: my-custom-connect-network-policy
spec:
ingress:
- from:
- podSelector:
matchLabels:
app: my-connector-manager
ports:
- port: 8083
protocol: TCP
podSelector:
matchLabels:
strimzi.io/cluster: my-connect-cluster
strimzi.io/kind: KafkaConnect
strimzi.io/name: my-connect-cluster-connect
policyTypes:
- Ingress- 1
- The label of the pod that is allowed to connect to the API.
To add the connector configuration outside the cluster, use the URL of the resource that exposes the API in the curl command.
6.5.5. Limiting access to the Kafka Connect API
It is crucial to restrict access to the Kafka Connect API only to trusted users to prevent unauthorized actions and potential security issues. The Kafka Connect API provides extensive capabilities for altering connector configurations, which makes it all the more important to take security precautions. Someone with access to the Kafka Connect API could potentially obtain sensitive information that an administrator may assume is secure.
The Kafka Connect REST API can be accessed by anyone who has authenticated access to the OpenShift cluster and knows the endpoint URL, which includes the hostname/IP address and port number.
For example, suppose an organization uses a Kafka Connect cluster and connectors to stream sensitive data from a customer database to a central database. The administrator uses a configuration provider plugin to store sensitive information related to connecting to the customer database and the central database, such as database connection details and authentication credentials. The configuration provider protects this sensitive information from being exposed to unauthorized users. However, someone who has access to the Kafka Connect API can still obtain access to the customer database without the consent of the administrator. They can do this by setting up a fake database and configuring a connector to connect to it. They then modify the connector configuration to point to the customer database, but instead of sending the data to the central database, they send it to the fake database. By configuring the connector to connect to the fake database, the login details and credentials for connecting to the customer database are intercepted, even though they are stored securely in the configuration provider.
If you are using the KafkaConnector custom resources, then by default the OpenShift RBAC rules permit only OpenShift cluster administrators to make changes to connectors. You can also designate non-cluster administrators to manage Streams for Apache Kafka resources. With KafkaConnector resources enabled in your Kafka Connect configuration, changes made directly using the Kafka Connect REST API are reverted by the Cluster Operator. If you are not using the KafkaConnector resource, the default RBAC rules do not limit access to the Kafka Connect API. If you want to limit direct access to the Kafka Connect REST API using OpenShift RBAC, you need to enable and use the KafkaConnector resources.
For improved security, we recommend configuring the following properties for the Kafka Connect API:
org.apache.kafka.disallowed.login.modules(Kafka 3.4 or later) Set the
org.apache.kafka.disallowed.login.modulesJava system property to prevent the use of insecure login modules. For example, specifyingcom.sun.security.auth.module.JndiLoginModuleprevents the use of the KafkaJndiLoginModule.Example configuration for disallowing login modules
apiVersion: kafka.strimzi.io/v1beta2 kind: KafkaConnect metadata: name: my-connect-cluster annotations: strimzi.io/use-connector-resources: "true" spec: # ... jvmOptions: javaSystemProperties: - name: org.apache.kafka.disallowed.login.modules value: com.sun.security.auth.module.JndiLoginModule, org.apache.kafka.common.security.kerberos.KerberosLoginModule # ...Only allow trusted login modules and follow the latest advice from Kafka for the version you are using. As a best practice, you should explicitly disallow insecure login modules in your Kafka Connect configuration by using the
org.apache.kafka.disallowed.login.modulessystem property.connector.client.config.override.policySet the
connector.client.config.override.policyproperty toNoneto prevent connector configurations from overriding the Kafka Connect configuration and the consumers and producers it uses.Example configuration to specify connector override policy
apiVersion: kafka.strimzi.io/v1beta2 kind: KafkaConnect metadata: name: my-connect-cluster annotations: strimzi.io/use-connector-resources: "true" spec: # ... config: connector.client.config.override.policy: None # ...
6.5.6. Switching from using the Kafka Connect API to using KafkaConnector custom resources
You can switch from using the Kafka Connect API to using KafkaConnector custom resources to manage your connectors. To make the switch, do the following in the order shown:
-
Deploy
KafkaConnectorresources with the configuration to create your connector instances. -
Enable
KafkaConnectorresources in your Kafka Connect configuration by setting thestrimzi.io/use-connector-resourcesannotation totrue.
If you enable KafkaConnector resources before creating them, you delete all connectors.
To switch from using KafkaConnector resources to using the Kafka Connect API, first remove the annotation that enables the KafkaConnector resources from your Kafka Connect configuration. Otherwise, manual changes made directly using the Kafka Connect REST API are reverted by the Cluster Operator.
When making the switch, check the status of the KafkaConnect resource. The value of metadata.generation (the current version of the deployment) must match status.observedGeneration (the latest reconciliation of the resource). When the Kafka Connect cluster is Ready, you can delete the KafkaConnector resources.
6.6. Deploying Kafka MirrorMaker
Kafka MirrorMaker replicates data between two or more Kafka clusters, within or across data centers. This process is called mirroring to avoid confusion with the concept of Kafka partition replication. MirrorMaker consumes messages from a source cluster and republishes those messages to a target cluster.
Data replication across clusters supports scenarios that require the following:
- Recovery of data in the event of a system failure
- Consolidation of data from multiple source clusters for centralized analysis
- Restriction of data access to a specific cluster
- Provision of data at a specific location to improve latency
6.6.1. Deploying Kafka MirrorMaker to your OpenShift cluster
This procedure shows how to deploy a Kafka MirrorMaker cluster to your OpenShift cluster using the Cluster Operator.
The deployment uses a YAML file to provide the specification to create a KafkaMirrorMaker or KafkaMirrorMaker2 resource depending on the version of MirrorMaker deployed. MirrorMaker 2 is based on Kafka Connect and uses its configuration properties.
Kafka MirrorMaker 1 (referred to as just MirrorMaker in the documentation) has been deprecated in Apache Kafka 3.0.0 and will be removed in Apache Kafka 4.0.0. As a result, the KafkaMirrorMaker custom resource which is used to deploy Kafka MirrorMaker 1 has been deprecated in Streams for Apache Kafka as well. The KafkaMirrorMaker resource will be removed from Streams for Apache Kafka when we adopt Apache Kafka 4.0.0. As a replacement, use the KafkaMirrorMaker2 custom resource with the IdentityReplicationPolicy.
Streams for Apache Kafka provides example configuration files. In this procedure, we use the following example files:
-
examples/mirror-maker/kafka-mirror-maker.yaml -
examples/mirror-maker/kafka-mirror-maker-2.yaml
If deploying MirrorMaker 2 clusters to run in parallel, using the same target Kafka cluster, each instance must use unique names for internal Kafka Connect topics. To do this, configure each MirrorMaker 2 instance to replace the defaults.
Prerequisites
Procedure
Deploy Kafka MirrorMaker to your OpenShift cluster:
For MirrorMaker:
oc apply -f examples/mirror-maker/kafka-mirror-maker.yamlFor MirrorMaker 2:
oc apply -f examples/mirror-maker/kafka-mirror-maker-2.yamlCheck the status of the deployment:
oc get pods -n <my_cluster_operator_namespace>Output shows the deployment name and readiness
NAME READY STATUS RESTARTS my-mirror-maker-mirror-maker-<pod_id> 1/1 Running 1 my-mm2-cluster-mirrormaker2-<pod_id> 1/1 Running 1my-mirror-makeris the name of the Kafka MirrorMaker cluster.my-mm2-clusteris the name of the Kafka MirrorMaker 2 cluster.A pod ID identifies each pod created.
With the default deployment, you install a single MirrorMaker or MirrorMaker 2 pod.
READYshows the number of replicas that are ready/expected. The deployment is successful when theSTATUSdisplays asRunning.
6.6.2. List of Kafka MirrorMaker 2 cluster resources
The following resources are created by the Cluster Operator in the OpenShift cluster:
- <mirrormaker2_cluster_name>-mirrormaker2
Name given to the following MirrorMaker 2 resources:
- StrimziPodSet that creates the MirrorMaker 2 worker node pods.
- Headless service that provides stable DNS names to the MirrorMaker 2 pods.
- Service account used by the MirrorMaker 2 pods.
- Pod disruption budget configured for the MirrorMaker 2 worker nodes.
- Network Policy managing access to the MirrorMaker 2 REST API.
- <mirrormaker2_cluster_name>-mirrormaker2-<pod_id>
- Pods created by the MirrorMaker 2 StrimziPodSet.
- <mirrormaker2_cluster_name>-mirrormaker2-api
- Service which exposes the REST interface for managing the MirrorMaker 2 cluster.
- <mirrormaker2_cluster_name>-mirrormaker2-config
- ConfigMap which contains the MirrorMaker 2 ancillary configuration and is mounted as a volume by the MirrorMaker 2 pods.
- strimzi-<namespace-name>-<mirrormaker2_cluster_name>-mirrormaker2-init
- Cluster role binding used by the MirrorMaker 2 cluster.
6.6.3. List of Kafka MirrorMaker cluster resources
The following resources are created by the Cluster Operator in the OpenShift cluster:
- <mirrormaker_cluster_name>-mirror-maker
Name given to the following MirrorMaker resources:
- Deployment which is responsible for creating the MirrorMaker pods.
- Service account used by the MirrorMaker nodes.
- Pod Disruption Budget configured for the MirrorMaker worker nodes.
- <mirrormaker_cluster_name>-mirror-maker-config
- ConfigMap which contains ancillary configuration for MirrorMaker, and is mounted as a volume by the MirrorMaker pods.
6.7. Deploying Kafka Bridge
Kafka Bridge provides an API for integrating HTTP-based clients with a Kafka cluster.
6.7.1. Deploying Kafka Bridge to your OpenShift cluster
This procedure shows how to deploy a Kafka Bridge cluster to your OpenShift cluster using the Cluster Operator.
The deployment uses a YAML file to provide the specification to create a KafkaBridge resource.
Streams for Apache Kafka provides example configuration files. In this procedure, we use the following example file:
-
examples/bridge/kafka-bridge.yaml
Prerequisites
Procedure
Deploy Kafka Bridge to your OpenShift cluster:
oc apply -f examples/bridge/kafka-bridge.yamlCheck the status of the deployment:
oc get pods -n <my_cluster_operator_namespace>Output shows the deployment name and readiness
NAME READY STATUS RESTARTS my-bridge-bridge-<pod_id> 1/1 Running 0my-bridgeis the name of the Kafka Bridge cluster.A pod ID identifies each pod created.
With the default deployment, you install a single Kafka Bridge pod.
READYshows the number of replicas that are ready/expected. The deployment is successful when theSTATUSdisplays asRunning.
6.7.2. Exposing the Kafka Bridge service to your local machine
Use port forwarding to expose the Streams for Apache Kafka Bridge service to your local machine on http://localhost:8080.
Port forwarding is only suitable for development and testing purposes.
Procedure
List the names of the pods in your OpenShift cluster:
oc get pods -o name pod/kafka-consumer # ... pod/my-bridge-bridge-<pod_id>Connect to the Kafka Bridge pod on port
8080:oc port-forward pod/my-bridge-bridge-<pod_id> 8080:8080 &NoteIf port 8080 on your local machine is already in use, use an alternative HTTP port, such as
8008.
API requests are now forwarded from port 8080 on your local machine to port 8080 in the Kafka Bridge pod.
6.7.3. Accessing the Kafka Bridge outside of OpenShift
After deployment, the Streams for Apache Kafka Bridge can only be accessed by applications running in the same OpenShift cluster. These applications use the <kafka_bridge_name>-bridge-service service to access the API.
If you want to make the Kafka Bridge accessible to applications running outside of the OpenShift cluster, you can expose it manually by creating one of the following features:
-
LoadBalancerorNodePorttype services -
Ingressresources (Kubernetes only) - OpenShift routes (OpenShift only)
If you decide to create Services, use the labels from the selector of the <kafka_bridge_name>-bridge-service service to configure the pods to which the service will route the traffic:
# ...
selector:
strimzi.io/cluster: kafka-bridge-name
strimzi.io/kind: KafkaBridge
#...- 1
- Name of the Kafka Bridge custom resource in your OpenShift cluster.
6.7.4. List of Kafka Bridge cluster resources
The following resources are created by the Cluster Operator in the OpenShift cluster:
- <bridge_cluster_name>-bridge
- Deployment which is in charge to create the Kafka Bridge worker node pods.
- <bridge_cluster_name>-bridge-service
- Service which exposes the REST interface of the Kafka Bridge cluster.
- <bridge_cluster_name>-bridge-config
- ConfigMap which contains the Kafka Bridge ancillary configuration and is mounted as a volume by the Kafka broker pods.
- <bridge_cluster_name>-bridge
- Pod Disruption Budget configured for the Kafka Bridge worker nodes.
6.8. Alternative standalone deployment options for Streams for Apache Kafka operators
You can perform a standalone deployment of the Topic Operator and User Operator. Consider a standalone deployment of these operators if you are using a Kafka cluster that is not managed by the Cluster Operator.
You deploy the operators to OpenShift. Kafka can be running outside of OpenShift. For example, you might be using a Kafka as a managed service. You adjust the deployment configuration for the standalone operator to match the address of your Kafka cluster.
6.8.1. Deploying the standalone Topic Operator
This procedure shows how to deploy the Topic Operator in unidirectional mode as a standalone component for topic management. You can use a standalone Topic Operator with a Kafka cluster that is not managed by the Cluster Operator. Unidirectional topic management maintains topics solely through KafkaTopic resources. For more information on unidirectional topic management, see Section 10.1, “Topic management modes”. Alternate configuration is also shown for deploying the Topic Operator in bidirectional mode.
Standalone deployment files are provided with Streams for Apache Kafka. Use the 05-Deployment-strimzi-topic-operator.yaml deployment file to deploy the Topic Operator. Add or set the environment variables needed to make a connection to a Kafka cluster.
The Topic Operator watches for KafkaTopic resources in a single namespace. You specify the namespace to watch, and the connection to the Kafka cluster, in the Topic Operator configuration. A single Topic Operator can watch a single namespace. One namespace should be watched by only one Topic Operator. If you want to use more than one Topic Operator, configure each of them to watch different namespaces. In this way, you can use Topic Operators with multiple Kafka clusters.
Prerequisites
You are running a Kafka cluster for the Topic Operator to connect to.
As long as the standalone Topic Operator is correctly configured for connection, the Kafka cluster can be running on a bare-metal environment, a virtual machine, or as a managed cloud application service.
Procedure
Edit the
envproperties in theinstall/topic-operator/05-Deployment-strimzi-topic-operator.yamlstandalone deployment file.Example standalone Topic Operator deployment configuration
apiVersion: apps/v1 kind: Deployment metadata: name: strimzi-topic-operator labels: app: strimzi spec: # ... template: # ... spec: # ... containers: - name: strimzi-topic-operator # ... env: - name: STRIMZI_NAMESPACE1 valueFrom: fieldRef: fieldPath: metadata.namespace - name: STRIMZI_KAFKA_BOOTSTRAP_SERVERS2 value: my-kafka-bootstrap-address:9092 - name: STRIMZI_RESOURCE_LABELS3 value: "strimzi.io/cluster=my-cluster" - name: STRIMZI_FULL_RECONCILIATION_INTERVAL_MS4 value: "120000" - name: STRIMZI_LOG_LEVEL5 value: INFO - name: STRIMZI_TLS_ENABLED6 value: "false" - name: STRIMZI_JAVA_OPTS7 value: "-Xmx=512M -Xms=256M" - name: STRIMZI_JAVA_SYSTEM_PROPERTIES8 value: "-Djavax.net.debug=verbose -DpropertyName=value" - name: STRIMZI_PUBLIC_CA9 value: "false" - name: STRIMZI_TLS_AUTH_ENABLED10 value: "false" - name: STRIMZI_SASL_ENABLED11 value: "false" - name: STRIMZI_SASL_USERNAME12 value: "admin" - name: STRIMZI_SASL_PASSWORD13 value: "password" - name: STRIMZI_SASL_MECHANISM14 value: "scram-sha-512" - name: STRIMZI_SECURITY_PROTOCOL15 value: "SSL" - name: STRIMZI_USE_FINALIZERS value: "false"16 - 1
- The OpenShift namespace for the Topic Operator to watch for
KafkaTopicresources. Specify the namespace of the Kafka cluster. - 2
- The host and port pair of the bootstrap broker address to discover and connect to all brokers in the Kafka cluster. Use a comma-separated list to specify two or three broker addresses in case a server is down.
- 3
- The label to identify the
KafkaTopicresources managed by the Topic Operator. This does not have to be the name of the Kafka cluster. It can be the label assigned to theKafkaTopicresource. If you deploy more than one Topic Operator, the labels must be unique for each. That is, the operators cannot manage the same resources. - 4
- The interval between periodic reconciliations, in milliseconds. The default is
120000(2 minutes). - 5
- The level for printing logging messages. You can set the level to
ERROR,WARNING,INFO,DEBUG, orTRACE. - 6
- Enables TLS support for encrypted communication with the Kafka brokers.
- 7
- (Optional) The Java options used by the JVM running the Topic Operator.
- 8
- (Optional) The debugging (
-D) options set for the Topic Operator. - 9
- (Optional) Skips the generation of trust store certificates if TLS is enabled through
STRIMZI_TLS_ENABLED. If this environment variable is enabled, the brokers must use a public trusted certificate authority for their TLS certificates. The default isfalse. - 10
- (Optional) Generates key store certificates for mTLS authentication. Setting this to
falsedisables client authentication with mTLS to the Kafka brokers. The default istrue. - 11
- (Optional) Enables SASL support for client authentication when connecting to Kafka brokers. The default is
false. - 12
- (Optional) The SASL username for client authentication. Mandatory only if SASL is enabled through
STRIMZI_SASL_ENABLED. - 13
- (Optional) The SASL password for client authentication. Mandatory only if SASL is enabled through
STRIMZI_SASL_ENABLED. - 14
- (Optional) The SASL mechanism for client authentication. Mandatory only if SASL is enabled through
STRIMZI_SASL_ENABLED. You can set the value toplain,scram-sha-256, orscram-sha-512. - 15
- (Optional) The security protocol used for communication with Kafka brokers. The default value is "PLAINTEXT". You can set the value to
PLAINTEXT,SSL,SASL_PLAINTEXT, orSASL_SSL. - 16
-
If you want to connect to Kafka brokers that are using certificates from a public certificate authority, set
STRIMZI_PUBLIC_CAtotrue. Set this property totrue, for example, if you are using Amazon AWS MSK service. If you enabled mTLS with the
STRIMZI_TLS_ENABLEDenvironment variable, specify the keystore and truststore used to authenticate connection to the Kafka cluster.Example mTLS configuration
# .... env: - name: STRIMZI_TRUSTSTORE_LOCATION1 value: "/path/to/truststore.p12" - name: STRIMZI_TRUSTSTORE_PASSWORD2 value: "TRUSTSTORE-PASSWORD" - name: STRIMZI_KEYSTORE_LOCATION3 value: "/path/to/keystore.p12" - name: STRIMZI_KEYSTORE_PASSWORD4 value: "KEYSTORE-PASSWORD" # ...-
Apply the changes to the
Deploymentconfiguration to deploy the Topic Operator. Check the status of the deployment:
oc get deploymentsOutput shows the deployment name and readiness
NAME READY UP-TO-DATE AVAILABLE strimzi-topic-operator 1/1 1 1READYshows the number of replicas that are ready/expected. The deployment is successful when theAVAILABLEoutput shows1.
6.8.1.1. Deploying the standalone Topic Operator for bidirectional topic management
Bidirectional topic management requires ZooKeeper for cluster management, and maintains topics through KafkaTopic resources and within the Kafka cluster. If you want to switch to using the Topic Operator in this mode, follow these steps to deploy the standalone Topic Operator.
As the feature gate enabling the Topic Operator to run in unidirectional mode progresses to General Availability, bidirectional mode will be phased out. This transition is aimed at enhancing the user experience, particularly in supporting Kafka in KRaft mode.
Undeploy the current standalone Topic Operator.
Retain the
KafkaTopicresources, which are picked up by the Topic Operator when it is deployed again.Edit the
Deploymentconfiguration for the standalone Topic Operator to include ZooKeeper-related environment variables:-
STRIMZI_ZOOKEEPER_CONNECT -
STRIMZI_ZOOKEEPER_SESSION_TIMEOUT_MS -
TC_ZK_CONNECTION_TIMEOUT_MS STRIMZI_USE_ZOOKEEPER_TOPIC_STOREIt is the presence or absence of the ZooKeeper variables that defines whether the bidirectional Topic Operator is used. Unidirectional topic management does not use ZooKeeper. If ZooKeeper environment variables are not present, the unidirectional Topic Operator is used. Otherwise, the bidirectional Topic Operator is used.
Other environment variables that are not used in unidirectional mode can be added if required:
-
STRIMZI_REASSIGN_THROTTLE -
STRIMZI_REASSIGN_VERIFY_INTERVAL_MS -
STRIMZI_TOPIC_METADATA_MAX_ATTEMPTS -
STRIMZI_TOPICS_PATH -
STRIMZI_STORE_TOPIC -
STRIMZI_STORE_NAME -
STRIMZI_APPLICATION_ID STRIMZI_STALE_RESULT_TIMEOUT_MSExample standalone Topic Operator deployment configuration for bidirectional topic management
apiVersion: apps/v1 kind: Deployment metadata: name: strimzi-topic-operator labels: app: strimzi spec: # ... template: # ... spec: # ... containers: - name: strimzi-topic-operator # ... env: - name: STRIMZI_NAMESPACE valueFrom: fieldRef: fieldPath: metadata.namespace - name: STRIMZI_KAFKA_BOOTSTRAP_SERVERS value: my-kafka-bootstrap-address:9092 - name: STRIMZI_RESOURCE_LABELS value: "strimzi.io/cluster=my-cluster" - name: STRIMZI_ZOOKEEPER_CONNECT1 value: my-cluster-zookeeper-client:2181 - name: STRIMZI_ZOOKEEPER_SESSION_TIMEOUT_MS2 value: "18000" - name: STRIMZI_TOPIC_METADATA_MAX_ATTEMPTS3 value: "6" - name: STRIMZI_FULL_RECONCILIATION_INTERVAL_MS value: "120000" - name: STRIMZI_LOG_LEVEL value: INFO - name: STRIMZI_TLS_ENABLED value: "false" - name: STRIMZI_JAVA_OPTS value: "-Xmx=512M -Xms=256M" - name: STRIMZI_JAVA_SYSTEM_PROPERTIES value: "-Djavax.net.debug=verbose -DpropertyName=value" - name: STRIMZI_PUBLIC_CA value: "false" - name: STRIMZI_TLS_AUTH_ENABLED value: "false" - name: STRIMZI_SASL_ENABLED value: "false" - name: STRIMZI_SASL_USERNAME value: "admin" - name: STRIMZI_SASL_PASSWORD value: "password" - name: STRIMZI_SASL_MECHANISM value: "scram-sha-512" - name: STRIMZI_SECURITY_PROTOCOL value: "SSL"- 1
- (ZooKeeper) The host and port pair of the address to connect to the ZooKeeper cluster. This must be the same ZooKeeper cluster that your Kafka cluster is using.
- 2
- (ZooKeeper) The ZooKeeper session timeout, in milliseconds. The default is
18000(18 seconds). - 3
- The number of attempts at getting topic metadata from Kafka. The time between each attempt is defined as an exponential backoff. Consider increasing this value when topic creation takes more time due to the number of partitions or replicas. The default is
6attempts.
-
-
Apply the changes to the
Deploymentconfiguration to deploy the Topic Operator.
6.8.2. Deploying the standalone User Operator
This procedure shows how to deploy the User Operator as a standalone component for user management. You can use a standalone User Operator with a Kafka cluster that is not managed by the Cluster Operator.
A standalone deployment can operate with any Kafka cluster.
Standalone deployment files are provided with Streams for Apache Kafka. Use the 05-Deployment-strimzi-user-operator.yaml deployment file to deploy the User Operator. Add or set the environment variables needed to make a connection to a Kafka cluster.
The User Operator watches for KafkaUser resources in a single namespace. You specify the namespace to watch, and the connection to the Kafka cluster, in the User Operator configuration. A single User Operator can watch a single namespace. One namespace should be watched by only one User Operator. If you want to use more than one User Operator, configure each of them to watch different namespaces. In this way, you can use the User Operator with multiple Kafka clusters.
Prerequisites
You are running a Kafka cluster for the User Operator to connect to.
As long as the standalone User Operator is correctly configured for connection, the Kafka cluster can be running on a bare-metal environment, a virtual machine, or as a managed cloud application service.
Procedure
Edit the following
envproperties in theinstall/user-operator/05-Deployment-strimzi-user-operator.yamlstandalone deployment file.Example standalone User Operator deployment configuration
apiVersion: apps/v1 kind: Deployment metadata: name: strimzi-user-operator labels: app: strimzi spec: # ... template: # ... spec: # ... containers: - name: strimzi-user-operator # ... env: - name: STRIMZI_NAMESPACE1 valueFrom: fieldRef: fieldPath: metadata.namespace - name: STRIMZI_KAFKA_BOOTSTRAP_SERVERS2 value: my-kafka-bootstrap-address:9092 - name: STRIMZI_CA_CERT_NAME3 value: my-cluster-clients-ca-cert - name: STRIMZI_CA_KEY_NAME4 value: my-cluster-clients-ca - name: STRIMZI_LABELS5 value: "strimzi.io/cluster=my-cluster" - name: STRIMZI_FULL_RECONCILIATION_INTERVAL_MS6 value: "120000" - name: STRIMZI_WORK_QUEUE_SIZE7 value: 10000 - name: STRIMZI_CONTROLLER_THREAD_POOL_SIZE8 value: 10 - name: STRIMZI_USER_OPERATIONS_THREAD_POOL_SIZE9 value: 4 - name: STRIMZI_LOG_LEVEL10 value: INFO - name: STRIMZI_GC_LOG_ENABLED11 value: "true" - name: STRIMZI_CA_VALIDITY12 value: "365" - name: STRIMZI_CA_RENEWAL13 value: "30" - name: STRIMZI_JAVA_OPTS14 value: "-Xmx=512M -Xms=256M" - name: STRIMZI_JAVA_SYSTEM_PROPERTIES15 value: "-Djavax.net.debug=verbose -DpropertyName=value" - name: STRIMZI_SECRET_PREFIX16 value: "kafka-" - name: STRIMZI_ACLS_ADMIN_API_SUPPORTED17 value: "true" - name: STRIMZI_MAINTENANCE_TIME_WINDOWS18 value: '* * 8-10 * * ?;* * 14-15 * * ?' - name: STRIMZI_KAFKA_ADMIN_CLIENT_CONFIGURATION19 value: | default.api.timeout.ms=120000 request.timeout.ms=60000- 1
- The OpenShift namespace for the User Operator to watch for
KafkaUserresources. Only one namespace can be specified. - 2
- The host and port pair of the bootstrap broker address to discover and connect to all brokers in the Kafka cluster. Use a comma-separated list to specify two or three broker addresses in case a server is down.
- 3
- The OpenShift
Secretthat contains the public key (ca.crt) value of the CA (certificate authority) that signs new user certificates for mTLS authentication. - 4
- The OpenShift
Secretthat contains the private key (ca.key) value of the CA that signs new user certificates for mTLS authentication. - 5
- The label to identify the
KafkaUserresources managed by the User Operator. This does not have to be the name of the Kafka cluster. It can be the label assigned to theKafkaUserresource. If you deploy more than one User Operator, the labels must be unique for each. That is, the operators cannot manage the same resources. - 6
- The interval between periodic reconciliations, in milliseconds. The default is
120000(2 minutes). - 7
- The size of the controller event queue. The size of the queue should be at least as big as the maximal amount of users you expect the User Operator to operate. The default is
1024. - 8
- The size of the worker pool for reconciling the users. Bigger pool might require more resources, but it will also handle more
KafkaUserresources The default is50. - 9
- The size of the worker pool for Kafka Admin API and OpenShift operations. Bigger pool might require more resources, but it will also handle more
KafkaUserresources The default is4. - 10
- The level for printing logging messages. You can set the level to
ERROR,WARNING,INFO,DEBUG, orTRACE. - 11
- Enables garbage collection (GC) logging. The default is
true. - 12
- The validity period for the CA. The default is
365days. - 13
- The renewal period for the CA. The renewal period is measured backwards from the expiry date of the current certificate. The default is
30days to initiate certificate renewal before the old certificates expire. - 14
- (Optional) The Java options used by the JVM running the User Operator
- 15
- (Optional) The debugging (
-D) options set for the User Operator - 16
- (Optional) Prefix for the names of OpenShift secrets created by the User Operator.
- 17
- (Optional) Indicates whether the Kafka cluster supports management of authorization ACL rules using the Kafka Admin API. When set to
false, the User Operator will reject all resources withsimpleauthorization ACL rules. This helps to avoid unnecessary exceptions in the Kafka cluster logs. The default istrue. - 18
- (Optional) Semi-colon separated list of Cron Expressions defining the maintenance time windows during which the expiring user certificates will be renewed.
- 19
- (Optional) Configuration options for configuring the Kafka Admin client used by the User Operator in the properties format.
If you are using mTLS to connect to the Kafka cluster, specify the secrets used to authenticate connection. Otherwise, go to the next step.
Example mTLS configuration
# .... env: - name: STRIMZI_CLUSTER_CA_CERT_SECRET_NAME1 value: my-cluster-cluster-ca-cert - name: STRIMZI_EO_KEY_SECRET_NAME2 value: my-cluster-entity-operator-certs # ..."- 1
- The OpenShift
Secretthat contains the public key (ca.crt) value of the CA that signs Kafka broker certificates. - 2
- The OpenShift
Secretthat contains the certificate public key (entity-operator.crt) and private key (entity-operator.key) that is used for mTLS authentication against the Kafka cluster.
Deploy the User Operator.
oc create -f install/user-operatorCheck the status of the deployment:
oc get deploymentsOutput shows the deployment name and readiness
NAME READY UP-TO-DATE AVAILABLE strimzi-user-operator 1/1 1 1READYshows the number of replicas that are ready/expected. The deployment is successful when theAVAILABLEoutput shows1.
Chapter 7. Feature gates
Streams for Apache Kafka operators use feature gates to enable or disable specific features and functions. Enabling a feature gate alters the behavior of the associated operator, introducing the corresponding feature to your Streams for Apache Kafka deployment.
The purpose of feature gates is to facilitate the trial and testing of a feature before it is fully adopted. The state (enabled or disabled) of a feature gate may vary by default, depending on its maturity level.
As a feature gate graduates and reaches General Availability (GA), it transitions to an enabled state by default and becomes a permanent part of the Streams for Apache Kafka deployment. A feature gate at the GA stage cannot be disabled.
7.1. Graduated feature gates (GA)
Graduated feature gates have reached General Availability (GA) and are permanently enabled features.
7.1.1. ControlPlaneListener feature gate
The ControlPlaneListener feature gate separates listeners for data replication and coordination:
- Connections between the Kafka controller and brokers use an internal control plane listener on port 9090.
- Replication of data between brokers, as well as internal connections from Streams for Apache Kafka operators, Cruise Control, or the Kafka Exporter use a replication listener on port 9091.
With the ControlPlaneListener feature gate permanently enabled, direct upgrades or downgrades between Streams for Apache Kafka 1.7 and earlier and Streams for Apache Kafka 2.3 and newer are not possible. You must first upgrade or downgrade through one of the Streams for Apache Kafka versions in-between, disable the ControlPlaneListener feature gate, and then downgrade or upgrade (with the feature gate enabled) to the target version.
7.1.2. ServiceAccountPatching feature gate
The ServiceAccountPatching feature gate ensures that the Cluster Operator always reconciles service accounts and updates them when needed. For example, when you change service account labels or annotations using the template property of a custom resource, the operator automatically updates them on the existing service account resources.
7.1.3. UseStrimziPodSets feature gate
The UseStrimziPodSets feature gate introduced the StrimziPodSet custom resource for managing Kafka and ZooKeeper pods, replacing the use of OpenShift StatefulSet resources.
With the UseStrimziPodSets feature gate permanently enabled, direct downgrades from Streams for Apache Kafka 2.5 and newer to Streams for Apache Kafka 2.0 or earlier are not possible. You must first downgrade through one of the Streams for Apache Kafka versions in-between, disable the UseStrimziPodSets feature gate, and then downgrade to Streams for Apache Kafka 2.0 or earlier.
7.1.4. StableConnectIdentities feature gate
The StableConnectIdentities feature gate introduced the StrimziPodSet custom resource for managing Kafka Connect and Kafka MirrorMaker 2 pods, replacing the use of OpenShift Deployment resources.
StrimziPodSet resources give the pods stable names and stable addresses, which do not change during rolling upgrades, replacing the use of OpenShift Deployment resources.
With the StableConnectIdentities feature gate permanently enabled, direct downgrades from Streams for Apache Kafka 2.7 and newer to Streams for Apache Kafka 2.3 or earlier are not possible. You must first downgrade through one of the Streams for Apache Kafka versions in-between, disable the StableConnectIdentities feature gate, and then downgrade to Streams for Apache Kafka 2.3 or earlier.
7.2. Stable feature gates (Beta)
Stable feature gates have reached a beta level of maturity, and are generally enabled by default for all users. Stable feature gates are production-ready, but they can still be disabled.
7.2.1. UseKRaft feature gate
The UseKRaft feature gate has a default state of enabled.
The UseKRaft feature gate deploys a Kafka cluster in KRaft (Kafka Raft metadata) mode without ZooKeeper. ZooKeeper and KRaft are mechanisms used to manage metadata and coordinate operations in Kafka clusters. KRaft mode eliminates the need for an external coordination service like ZooKeeper. In KRaft mode, Kafka nodes take on the roles of brokers, controllers, or both. They collectively manage the metadata, which is replicated across partitions. Controllers are responsible for coordinating operations and maintaining the cluster’s state.
Using the UseKRaft feature gate requires the KafkaNodePools feature gate to be enabled as well. To deploy a Kafka cluster in KRaft mode, you must use the KafkaNodePool resources. For more details and examples, see Section 6.3.1, “Deploying a Kafka cluster with node pools”. The Kafka custom resource using KRaft mode must also have the annotation strimzi.io/kraft="enabled".
Currently, the KRaft mode in Streams for Apache Kafka has the following major limitations:
-
Only the Unidirectional Topic Operator is supported in KRaft mode. The Bidirectional Topic Operator is not supported and when the
UnidirectionalTopicOperatorfeature gate is disabled, thespec.entityOperator.topicOperatorproperty must be removed from theKafkacustom resource. -
JBOD storage is not supported. The
type: jbodstorage can be used, but the JBOD array can contain only one disk. - Scaling of KRaft controller-only nodes up or down is not supported.
- Unregistering Kafka nodes removed from the Kafka cluster.
Disabling the UseKRaft feature gate
To disable the UseKRaft feature gate, specify -UseKRaft in the STRIMZI_FEATURE_GATES environment variable in the Cluster Operator configuration.
7.2.2. KafkaNodePools feature gate
The KafkaNodePools feature gate has a default state of enabled.
The KafkaNodePools feature gate introduces a new KafkaNodePool custom resource that enables the configuration of different pools of Apache Kafka nodes.
A node pool refers to a distinct group of Kafka nodes within a Kafka cluster. Each pool has its own unique configuration, which includes mandatory settings such as the number of replicas, storage configuration, and a list of assigned roles. You can assign the controller role, broker role, or both roles to all nodes in the pool in the .spec.roles field. When used with a ZooKeeper-based Apache Kafka cluster, it must be set to the broker role. When used with the UseKRaft feature gate, it can be set to broker, controller, or both.
In addition, a node pool can have its own configuration of resource requests and limits, Java JVM options, and resource templates. Configuration options not set in the KafkaNodePool resource are inherited from the Kafka custom resource.
The KafkaNodePool resources use a strimzi.io/cluster label to indicate to which Kafka cluster they belong. The label must be set to the name of the Kafka custom resource.
Examples of the KafkaNodePool resources can be found in the example configuration files provided by Streams for Apache Kafka.
Disabling the KafkaNodePools feature gate
To disable the KafkaNodePools feature gate, specify -KafkaNodePools in the STRIMZI_FEATURE_GATES environment variable in the Cluster Operator configuration. The Kafka custom resource using the node pools must also have the annotation strimzi.io/node-pools: enabled.
Downgrading from KafkaNodePools
If your cluster already uses KafkaNodePool custom resources, and you wish to downgrade to an older version of Streams for Apache Kafka that does not support them or with the KafkaNodePools feature gate disabled, you must first migrate from KafkaNodePool custom resources to managing Kafka nodes using only Kafka custom resources.
7.2.3. UnidirectionalTopicOperator feature gate
The UnidirectionalTopicOperator feature gate has a default state of enabled.
The UnidirectionalTopicOperator feature gate introduces a unidirectional topic management mode for creating Kafka topics using the KafkaTopic resource. Unidirectional mode is compatible with using KRaft for cluster management. With unidirectional mode, you create Kafka topics using the KafkaTopic resource, which are then managed by the Topic Operator. Any configuration changes to a topic outside the KafkaTopic resource are reverted. For more information on topic management, see Section 10.1, “Topic management modes”.
Disabling the UnidirectionalTopicOperator feature gate
To disable the UnidirectionalTopicOperator feature gate, specify -UnidirectionalTopicOperator in the STRIMZI_FEATURE_GATES environment variable in the Cluster Operator configuration.
7.3. Early access feature gates (Alpha)
Early access feature gates have not yet reached the beta stage, and are disabled by default. An early access feature gate provides an opportunity for assessment before its functionality is permanently incorporated into Streams for Apache Kafka.
Currently, there are no feature gates in alpha stage.
7.4. Enabling feature gates
To modify a feature gate’s default state, use the STRIMZI_FEATURE_GATES environment variable in the operator’s configuration. You can modify multiple feature gates using this single environment variable. Specify a comma-separated list of feature gate names and prefixes. A + prefix enables the feature gate and a - prefix disables it.
Example feature gate configuration that enables FeatureGate1 and disables FeatureGate2
env:
- name: STRIMZI_FEATURE_GATES
value: +FeatureGate1,-FeatureGate27.5. Feature gate releases
Feature gates have three stages of maturity:
- Alpha — typically disabled by default
- Beta — typically enabled by default
- General Availability (GA) — typically always enabled
Alpha stage features might be experimental or unstable, subject to change, or not sufficiently tested for production use. Beta stage features are well tested and their functionality is not likely to change. GA stage features are stable and should not change in the future. Alpha and beta stage features are removed if they do not prove to be useful.
-
The
ControlPlaneListenerfeature gate moved to GA stage in Streams for Apache Kafka 2.3. It is now permanently enabled and cannot be disabled. -
The
ServiceAccountPatchingfeature gate moved to GA stage in Streams for Apache Kafka 2.3. It is now permanently enabled and cannot be disabled. -
The
UseStrimziPodSetsfeature gate moved to GA stage in Streams for Apache Kafka 2.5 and the support for StatefulSets is completely removed. It is now permanently enabled and cannot be disabled. -
The
StableConnectIdentitiesfeature gate moved to GA stage in Streams for Apache Kafka 2.7. It is now permanently enabled and cannot be disabled. -
The
UseKRaftfeature gate is in beta stage and is enabled by default. -
The
KafkaNodePoolsfeature gate is in beta stage and is enabled by default. -
The
UnidirectionalTopicOperatorfeature gate is in beta stage and is enabled by default.
Feature gates might be removed when they reach GA. This means that the feature was incorporated into the Streams for Apache Kafka core features and can no longer be disabled.
| Feature gate | Alpha | Beta | GA |
|---|---|---|---|
|
| 1.8 | 2.0 | 2.3 |
|
| 1.8 | 2.0 | 2.3 |
|
| 2.1 | 2.3 | 2.5 |
|
| 2.2 | 2.7 | - |
|
| 2.4 | 2.6 | 2.7 |
|
| 2.5 | 2.7 | - |
|
| 2.5 | 2.7 | - |
If a feature gate is enabled, you may need to disable it before upgrading or downgrading from a specific Streams for Apache Kafka version (or first upgrade / downgrade to a version of Streams for Apache Kafka where it can be disabled). The following table shows which feature gates you need to disable when upgrading or downgrading Streams for Apache Kafka versions.
| Disable Feature gate | Upgrading from Streams for Apache Kafka version | Downgrading to Streams for Apache Kafka version |
|---|---|---|
|
| 1.7 and earlier | 1.7 and earlier |
|
| - | 2.0 and earlier |
|
| - | 2.3 and earlier |
Chapter 8. Migrating to KRaft mode
If you are using ZooKeeper for metadata management in your Kafka cluster, you can migrate to using Kafka in KRaft mode. KRaft mode replaces ZooKeeper for distributed coordination, offering enhanced reliability, scalability, and throughput.
During the migration, you install a quorum of controller nodes as a node pool, which replaces ZooKeeper for management of your cluster. You enable KRaft migration in the cluster configuration by applying the strimzi.io/kraft="migration" annotation. After the migration is complete, you switch the brokers to using KRaft and the controllers out of migration mode using the strimzi.io/kraft="enabled" annotation.
Before starting the migration, verify that your environment can support Kafka in KRaft mode, as there are limitations. Note also, the following:
- Migration is only supported on dedicated controller nodes, not on nodes with dual roles as brokers and controllers.
- Throughout the migration process, ZooKeeper and controller nodes operate in parallel for a period, requiring sufficient compute resources in the cluster.
Prerequisites
- You must be using Streams for Apache Kafka 2.7 or later with Kafka 3.7.0 or later. If you are using a version earlier than Streams for Apache Kafka 2.7, upgrade before migrating to KRaft.
- If you plan to upgrade to Streams for Apache Kafka 3.x from Streams for Apache Kafka 2.7, upgrade to Streams for Apache Kafka 2.8 and then to Streams for Apache Kafka 2.9. Complete the ZooKeeper to KRaft migration on Streams for Apache Kafka 2.9 before upgrading to Streams for Apache Kafka 3.x.
Verify that the ZooKeeper-based deployment is operating without the following, as they are not supported in KRaft mode:
- The Topic Operator running in bidirectional mode. It should either be in unidirectional mode or disabled.
-
JBOD storage. While the
jbodstorage type can be used, the JBOD array must contain only one disk.
- The Cluster Operator that manages the Kafka cluster is running.
The Kafka cluster deployment uses Kafka node pools.
If your ZooKeeper-based cluster is already using node pools, it is ready to migrate. If not, you can migrate the cluster to use node pools. To migrate when the cluster is not using node pools, brokers must be contained in a
KafkaNodePoolresource configuration that is assigned abrokerrole and has the namekafka. Support for node pools is enabled in theKafkaresource configuration using thestrimzi.io/node-pools: enabledannotation.
In this procedure, the Kafka cluster name is my-cluster, which is located in the my-project namespace. The name of the controller node pool created is controller. The node pool for the brokers is called kafka.
To upgrade to Streams for Apache Kafka 3.x, upgrade to Streams for Apache Kafka 2.9 and complete the ZooKeeper to KRaft migration on that release.
Procedure
For the Kafka cluster, create a node pool with a
controllerrole.The node pool adds a quorum of controller nodes to the cluster.
Example configuration for a controller node pool
apiVersion: kafka.strimzi.io/v1beta2 kind: KafkaNodePool metadata: name: controller labels: strimzi.io/cluster: my-cluster spec: replicas: 3 roles: - controller storage: type: jbod volumes: - id: 0 type: persistent-claim size: 20Gi deleteClaim: false resources: requests: memory: 64Gi cpu: "8" limits: memory: 64Gi cpu: "12"NoteFor the migration, you cannot use a node pool of nodes that share the broker and controller roles.
Apply the new
KafkaNodePoolresource to create the controllers.Errors related to using controllers in a ZooKeeper-based environment are expected in the Cluster Operator logs. The errors can block reconciliation. To prevent this, perform the next step immediately.
Enable KRaft migration in the
Kafkaresource by setting thestrimzi.io/kraftannotation tomigration:oc annotate kafka my-cluster strimzi.io/kraft="migration" --overwriteEnabling KRaft migration
apiVersion: kafka.strimzi.io/v1beta2 kind: Kafka metadata: name: my-cluster namespace: my-project annotations: strimzi.io/kraft="migration" # ...Applying the annotation to the
Kafkaresource configuration starts the migration.Check the controllers have started and the brokers have rolled:
oc get pods -n my-projectOutput shows nodes in broker and controller node pools
NAME READY STATUS RESTARTS my-cluster-kafka-0 1/1 Running 0 my-cluster-kafka-1 1/1 Running 0 my-cluster-kafka-2 1/1 Running 0 my-cluster-controller-3 1/1 Running 0 my-cluster-controller-4 1/1 Running 0 my-cluster-controller-5 1/1 Running 0 # ...Check the status of the migration:
oc get kafka my-cluster -n my-project -wUpdates to the metadata state
NAME ... METADATA STATE my-cluster ... Zookeeper my-cluster ... KRaftMigration my-cluster ... KRaftDualWriting my-cluster ... KRaftPostMigrationMETADATA STATEshows the mechanism used to manage Kafka metadata and coordinate operations. At the start of the migration this isZooKeeper.-
ZooKeeperis the initial state when metadata is only stored in ZooKeeper. -
KRaftMigrationis the state when the migration is in progress. The flag to enable ZooKeeper to KRaft migration (zookeeper.metadata.migration.enable) is added to the brokers and they are rolled to register with the controllers. The migration can take some time at this point depending on the number of topics and partitions in the cluster. -
KRaftDualWritingis the state when the Kafka cluster is working as a KRaft cluster, but metadata are being stored in both Kafka and ZooKeeper. Brokers are rolled a second time to remove the flag to enable migration. -
KRaftPostMigrationis the state when KRaft mode is enabled for brokers. Metadata are still being stored in both Kafka and ZooKeeper.
The migration status is also represented in the
status.kafkaMetadataStateproperty of theKafkaresource.WarningYou can roll back to using ZooKeeper from this point. The next step is to enable KRaft. Rollback cannot be performed after enabling KRaft.
-
When the metadata state has reached
KRaftPostMigration, enable KRaft in theKafkaresource configuration by setting thestrimzi.io/kraftannotation toenabled:oc annotate kafka my-cluster strimzi.io/kraft="enabled" --overwriteEnabling KRaft migration
apiVersion: kafka.strimzi.io/v1beta2 kind: Kafka metadata: name: my-cluster namespace: my-project annotations: strimzi.io/kraft="enabled" # ...Check the status of the move to full KRaft mode:
oc get kafka my-cluster -n my-project -wUpdates to the metadata state
NAME ... METADATA STATE my-cluster ... Zookeeper my-cluster ... KRaftMigration my-cluster ... KRaftDualWriting my-cluster ... KRaftPostMigration my-cluster ... PreKRaft my-cluster ... KRaft-
PreKRaftis the state when all ZooKeeper-related resources have been automatically deleted. -
KRaftis the final state (after the controllers have rolled) when the KRaft migration is finalized.
NoteDepending on how
deleteClaimis configured for ZooKeeper, its Persistent Volume Claims (PVCs) and persistent volumes (PVs) may not be deleted.deleteClaimspecifies whether the PVC is deleted when the cluster is uninstalled. The default isfalse.-
Remove any ZooKeeper-related configuration from the
Kafkaresource.If present, you can remove the following:
-
log.message.format.version -
inter.broker.protocol.version spec.zookeeper.*propertiesRemoving
log.message.format.versionandinter.broker.protocol.versioncauses the brokers and controllers to roll again. Removing ZooKeeper properties removes any warning messages related to ZooKeeper configuration being present in a KRaft-operated cluster.
-
Performing a rollback on the migration
Before the migration is finalized by enabling KRaft in the Kafka resource, and the state has moved to the KRaft state, you can perform a rollback operation as follows:
Apply the
strimzi.io/kraft="rollback"annotation to theKafkaresource to roll back the brokers.oc annotate kafka my-cluster strimzi.io/kraft="rollback" --overwriteRolling back KRaft migration
apiVersion: kafka.strimzi.io/v1beta2 kind: Kafka metadata: name: my-cluster namespace: my-project annotations: strimzi.io/kraft="rollback" # ...The migration process must be in the
KRaftPostMigrationstate to do this. The brokers are rolled back so that they can be connected to ZooKeeper again and the state returns toKRaftDualWriting.Delete the controllers node pool:
oc delete KafkaNodePool controller -n my-projectApply the
strimzi.io/kraft="disabled"annotation to theKafkaresource to return the metadata state toZooKeeper.oc annotate kafka my-cluster strimzi.io/kraft="disabled" --overwriteSwitching back to using ZooKeeper
apiVersion: kafka.strimzi.io/v1beta2 kind: Kafka metadata: name: my-cluster namespace: my-project annotations: strimzi.io/kraft="disabled" # ...
Chapter 9. Configuring a deployment
Configure and manage a Streams for Apache Kafka deployment to your precise needs using Streams for Apache Kafka custom resources. Streams for Apache Kafka provides example custom resources with each release, allowing you to configure and create instances of supported Kafka components. Fine-tune your deployment by configuring custom resources to include additional features according to your specific requirements. For specific areas of configuration, namely metrics, logging, and external configuration for Kafka Connect connectors, you can also use ConfigMap resources. By using a ConfigMap resource to incorporate configuration, you centralize maintenance. You can also use configuration providers to load configuration from external sources, which we recommend for supplying the credentials for Kafka Connect connector configuration.
Use custom resources to configure and create instances of the following components:
- Kafka clusters
- Kafka Connect clusters
- Kafka MirrorMaker
- Kafka Bridge
- Cruise Control
You can also use custom resource configuration to manage your instances or modify your deployment to introduce additional features. This might include configuration that supports the following:
- Specifying node pools
- Securing client access to Kafka brokers
- Accessing Kafka brokers from outside the cluster
- Creating topics
- Creating users (clients)
- Controlling feature gates
- Changing logging frequency
- Allocating resource limits and requests
- Introducing features, such as Streams for Apache Kafka Drain Cleaner, Cruise Control, or distributed tracing.
The Streams for Apache Kafka Custom Resource API Reference describes the properties you can use in your configuration.
Labels applied to a custom resource are also applied to the OpenShift resources making up its cluster. This provides a convenient mechanism for resources to be labeled as required.
Applying changes to a custom resource configuration file
You add configuration to a custom resource using spec properties. After adding the configuration, you can use oc to apply the changes to a custom resource configuration file:
oc apply -f <kafka_configuration_file>9.1. Using example configuration files
Further enhance your deployment by incorporating additional supported configuration. Example configuration files are provided with the downloadable release artifacts from the Streams for Apache Kafka software downloads page.
The example files include only the essential properties and values for custom resources by default. You can download and apply the examples using the oc command-line tool. The examples can serve as a starting point when building your own Kafka component configuration for deployment.
If you installed Streams for Apache Kafka using the Operator, you can still download the example files and use them to upload configuration.
The release artifacts include an examples directory that contains the configuration examples.
Example configuration files provided with Streams for Apache Kafka
examples
├── user
├── topic
├── security
│ ├── tls-auth
│ ├── scram-sha-512-auth
│ └── keycloak-authorization
├── mirror-maker
├── metrics
├── kafka
│ └── nodepools
├── cruise-control
├── connect
└── bridge - 1
KafkaUsercustom resource configuration, which is managed by the User Operator.- 2
KafkaTopiccustom resource configuration, which is managed by Topic Operator.- 3
- Authentication and authorization configuration for Kafka components. Includes example configuration for TLS and SCRAM-SHA-512 authentication. The Red Hat Single Sign-On example includes
Kafkacustom resource configuration and a Red Hat Single Sign-On realm specification. You can use the example to try Red Hat Single Sign-On authorization services. There is also an example with enabledoauthauthentication andkeycloakauthorization metrics. - 4
Kafkacustom resource configuration for a deployment of Mirror Maker. Includes example configuration for replication policy and synchronization frequency.- 5
- Metrics configuration, including Prometheus installation and Grafana dashboard files.
- 6
Kafkacustom resource configuration for a deployment of Kafka. Includes example configuration for an ephemeral or persistent single or multi-node deployment.- 7
KafkaNodePoolconfiguration for Kafka nodes in a Kafka cluster. Includes example configuration for nodes in clusters that use KRaft (Kafka Raft metadata) mode or ZooKeeper.- 8
Kafkacustom resource with a deployment configuration for Cruise Control. IncludesKafkaRebalancecustom resources to generate optimization proposals from Cruise Control, with example configurations to use the default or user optimization goals.- 9
KafkaConnectandKafkaConnectorcustom resource configuration for a deployment of Kafka Connect. Includes example configurations for a single or multi-node deployment.- 10
KafkaBridgecustom resource configuration for a deployment of Kafka Bridge.
9.2. Configuring Kafka
Update the spec properties of the Kafka custom resource to configure your Kafka deployment.
As well as configuring Kafka, you can add configuration for ZooKeeper and the Streams for Apache Kafka Operators. Common configuration properties, such as logging and healthchecks, are configured independently for each component.
Configuration options that are particularly important include the following:
- Resource requests (CPU / Memory)
- JVM options for maximum and minimum memory allocation
- Listeners for connecting clients to Kafka brokers (and authentication of clients)
- Authentication
- Storage
- Rack awareness
- Metrics
- Cruise Control for cluster rebalancing
- Metadata version for KRaft-based Kafka clusters
- Inter-broker protocol version for ZooKeeper-based Kafka clusters
The .spec.kafka.metadataVersion property or the inter.broker.protocol.version property in config must be a version supported by the specified Kafka version (spec.kafka.version). The property represents the Kafka metadata or inter-broker protocol version used in a Kafka cluster. If either of these properties is not set in the configuration, the Cluster Operator updates the version to the default for the Kafka version used.
The oldest supported metadata version is 3.3. Using a metadata version that is older than the Kafka version might cause some features to be disabled.
For a deeper understanding of the Kafka cluster configuration options, refer to the Streams for Apache Kafka Custom Resource API Reference.
Managing TLS certificates
When deploying Kafka, the Cluster Operator automatically sets up and renews TLS certificates to enable encryption and authentication within your cluster. If required, you can manually renew the cluster and clients CA certificates before their renewal period starts. You can also replace the keys used by the cluster and clients CA certificates. For more information, see Renewing CA certificates manually and Replacing private keys.
Example Kafka custom resource configuration
apiVersion: kafka.strimzi.io/v1beta2
kind: Kafka
metadata:
name: my-cluster
spec:
kafka:
replicas: 3
version: 3.7.0
logging:
type: inline
loggers:
kafka.root.logger.level: INFO
resources:
requests:
memory: 64Gi
cpu: "8"
limits:
memory: 64Gi
cpu: "12"
readinessProbe:
initialDelaySeconds: 15
timeoutSeconds: 5
livenessProbe:
initialDelaySeconds: 15
timeoutSeconds: 5
jvmOptions:
-Xms: 8192m
-Xmx: 8192m
image: my-org/my-image:latest
listeners:
- name: plain
port: 9092
type: internal
tls: false
configuration:
useServiceDnsDomain: true
- name: tls
port: 9093
type: internal
tls: true
authentication:
type: tls
- name: external1
port: 9094
type: route
tls: true
configuration:
brokerCertChainAndKey:
secretName: my-secret
certificate: my-certificate.crt
key: my-key.key
authorization:
type: simple
config:
auto.create.topics.enable: "false"
offsets.topic.replication.factor: 3
transaction.state.log.replication.factor: 3
transaction.state.log.min.isr: 2
default.replication.factor: 3
min.insync.replicas: 2
inter.broker.protocol.version: "3.7"
storage:
type: persistent-claim
size: 10000Gi
rack:
topologyKey: topology.kubernetes.io/zone
metricsConfig:
type: jmxPrometheusExporter
valueFrom:
configMapKeyRef:
name: my-config-map
key: my-key
# ...
zookeeper:
replicas: 3
logging:
type: inline
loggers:
zookeeper.root.logger: INFO
resources:
requests:
memory: 8Gi
cpu: "2"
limits:
memory: 8Gi
cpu: "2"
jvmOptions:
-Xms: 4096m
-Xmx: 4096m
storage:
type: persistent-claim
size: 1000Gi
metricsConfig:
# ...
entityOperator:
tlsSidecar:
resources:
requests:
cpu: 200m
memory: 64Mi
limits:
cpu: 500m
memory: 128Mi
topicOperator:
watchedNamespace: my-topic-namespace
reconciliationIntervalSeconds: 60
logging:
type: inline
loggers:
rootLogger.level: INFO
resources:
requests:
memory: 512Mi
cpu: "1"
limits:
memory: 512Mi
cpu: "1"
userOperator:
watchedNamespace: my-topic-namespace
reconciliationIntervalSeconds: 60
logging:
type: inline
loggers:
rootLogger.level: INFO
resources:
requests:
memory: 512Mi
cpu: "1"
limits:
memory: 512Mi
cpu: "1"
kafkaExporter:
# ...
cruiseControl:
# ...- 1
- The number of replica nodes.
- 2
- Kafka version, which can be changed to a supported version by following the upgrade procedure.
- 3
- Kafka loggers and log levels added directly (
inline) or indirectly (external) through a ConfigMap. A custom Log4j configuration must be placed under thelog4j.propertieskey in the ConfigMap. For the Kafkakafka.root.logger.levellogger, you can set the log level to INFO, ERROR, WARN, TRACE, DEBUG, FATAL or OFF. - 4
- Requests for reservation of supported resources, currently
cpuandmemory, and limits to specify the maximum resources that can be consumed. - 5
- Healthchecks to know when to restart a container (liveness) and when a container can accept traffic (readiness).
- 6
- JVM configuration options to optimize performance for the Virtual Machine (VM) running Kafka.
- 7
- ADVANCED OPTION: Container image configuration, which is recommended only in special situations.
- 8
- Listeners configure how clients connect to the Kafka cluster via bootstrap addresses. Listeners are configured as internal or external listeners for connection from inside or outside the OpenShift cluster.
- 9
- Name to identify the listener. Must be unique within the Kafka cluster.
- 10
- Port number used by the listener inside Kafka. The port number has to be unique within a given Kafka cluster. Allowed port numbers are 9092 and higher with the exception of ports 9404 and 9999, which are already used for Prometheus and JMX. Depending on the listener type, the port number might not be the same as the port number that connects Kafka clients.
- 11
- Listener type specified as
internalorcluster-ip(to expose Kafka using per-brokerClusterIPservices), or for external listeners, asroute(OpenShift only),loadbalancer,nodeportoringress(Kubernetes only). - 12
- Enables or disables TLS encryption for each listener. For
routeandingresstype listeners, TLS encryption must always be enabled by setting it totrue. - 13
- Defines whether the fully-qualified DNS names including the cluster service suffix (usually
.cluster.local) are assigned. - 14
- Listener authentication mechanism specified as mTLS, SCRAM-SHA-512, or token-based OAuth 2.0.
- 15
- External listener configuration specifies how the Kafka cluster is exposed outside OpenShift, such as through a
route,loadbalancerornodeport. - 16
- Optional configuration for a Kafka listener certificate managed by an external CA (certificate authority). The
brokerCertChainAndKeyspecifies aSecretthat contains a server certificate and a private key. You can configure Kafka listener certificates on any listener with enabled TLS encryption. - 17
- Authorization enables simple, OAUTH 2.0, or OPA authorization on the Kafka broker. Simple authorization uses the
AclAuthorizerandStandardAuthorizerKafka plugins. - 18
- Broker configuration. Standard Apache Kafka configuration may be provided, restricted to those properties not managed directly by Streams for Apache Kafka.
- 19
- Storage size for persistent volumes may be increased and additional volumes may be added to JBOD storage.
- 20
- Persistent storage has additional configuration options, such as a storage
idandclassfor dynamic volume provisioning. - 21
- Rack awareness configuration to spread replicas across different racks, data centers, or availability zones. The
topologyKeymust match a node label containing the rack ID. The example used in this configuration specifies a zone using the standardtopology.kubernetes.io/zonelabel. - 22
- Prometheus metrics enabled. In this example, metrics are configured for the Prometheus JMX Exporter (the default metrics exporter).
- 23
- Rules for exporting metrics in Prometheus format to a Grafana dashboard through the Prometheus JMX Exporter, which are enabled by referencing a ConfigMap containing configuration for the Prometheus JMX exporter. You can enable metrics without further configuration using a reference to a ConfigMap containing an empty file under
metricsConfig.valueFrom.configMapKeyRef.key. - 24
- ZooKeeper-specific configuration, which contains properties similar to the Kafka configuration.
- 25
- The number of ZooKeeper nodes. ZooKeeper clusters or ensembles usually run with an odd number of nodes, typically three, five, or seven. The majority of nodes must be available in order to maintain an effective quorum. If the ZooKeeper cluster loses its quorum, it will stop responding to clients and the Kafka brokers will stop working. Having a stable and highly available ZooKeeper cluster is crucial for Streams for Apache Kafka.
- 26
- ZooKeeper loggers and log levels.
- 27
- Entity Operator configuration, which specifies the configuration for the Topic Operator and User Operator.
- 28
- Entity Operator TLS sidecar configuration. Entity Operator uses the TLS sidecar for secure communication with ZooKeeper.
- 29
- Specified Topic Operator loggers and log levels. This example uses
inlinelogging. - 30
- Specified User Operator loggers and log levels.
- 31
- Kafka Exporter configuration. Kafka Exporter is an optional component for extracting metrics data from Kafka brokers, in particular consumer lag data. For Kafka Exporter to be able to work properly, consumer groups need to be in use.
- 32
- Optional configuration for Cruise Control, which is used to rebalance the Kafka cluster.
9.2.1. Setting limits on brokers using the Kafka Static Quota plugin
Use the Kafka Static Quota plugin to set throughput and storage limits on brokers in your Kafka cluster. You enable the plugin and set limits by configuring the Kafka resource. You can set a byte-rate threshold and storage quotas to put limits on the clients interacting with your brokers.
You can set byte-rate thresholds for producer and consumer bandwidth. The total limit is distributed across all clients accessing the broker. For example, you can set a byte-rate threshold of 40 MBps for producers. If two producers are running, they are each limited to a throughput of 20 MBps.
Storage quotas throttle Kafka disk storage limits between a soft limit and hard limit. The limits apply to all available disk space. Producers are slowed gradually between the soft and hard limit. The limits prevent disks filling up too quickly and exceeding their capacity. Full disks can lead to issues that are hard to rectify. The hard limit is the maximum storage limit.
For JBOD storage, the limit applies across all disks. If a broker is using two 1 TB disks and the quota is 1.1 TB, one disk might fill and the other disk will be almost empty.
Prerequisites
- The Cluster Operator that manages the Kafka cluster is running.
Procedure
Add the plugin properties to the
configof theKafkaresource.The plugin properties are shown in this example configuration.
Example Kafka Static Quota plugin configuration
apiVersion: kafka.strimzi.io/v1beta2 kind: Kafka metadata: name: my-cluster spec: kafka: # ... config: client.quota.callback.class: io.strimzi.kafka.quotas.StaticQuotaCallback1 client.quota.callback.static.produce: 10000002 client.quota.callback.static.fetch: 10000003 client.quota.callback.static.storage.soft: 4000000000004 client.quota.callback.static.storage.hard: 5000000000005 client.quota.callback.static.storage.check-interval: 56 - 1
- Loads the Kafka Static Quota plugin.
- 2
- Sets the producer byte-rate threshold. 1 MBps in this example.
- 3
- Sets the consumer byte-rate threshold. 1 MBps in this example.
- 4
- Sets the lower soft limit for storage. 400 GB in this example.
- 5
- Sets the higher hard limit for storage. 500 GB in this example.
- 6
- Sets the interval in seconds between checks on storage. 5 seconds in this example. You can set this to 0 to disable the check.
Update the resource.
oc apply -f <kafka_configuration_file>
9.2.2. Default ZooKeeper configuration values
When deploying ZooKeeper with Streams for Apache Kafka, some of the default configuration set by Streams for Apache Kafka differs from the standard ZooKeeper defaults. This is because Streams for Apache Kafka sets a number of ZooKeeper properties with values that are optimized for running ZooKeeper within an OpenShift environment.
The default configuration for key ZooKeeper properties in Streams for Apache Kafka is as follows:
| Property | Default value | Description |
|---|---|---|
|
| 2000 | The length of a single tick in milliseconds, which determines the length of a session timeout. |
|
| 5 | The maximum number of ticks that a follower is allowed to fall behind the leader in a ZooKeeper cluster. |
|
| 2 | The maximum number of ticks that a follower is allowed to be out of sync with the leader in a ZooKeeper cluster. |
|
| 1 |
Enables the |
|
| false | Flag to disable the ZooKeeper admin server. The admin server is not used by Streams for Apache Kafka. |
Modifying these default values as zookeeper.config in the Kafka custom resource may impact the behavior and performance of your ZooKeeper cluster.
9.2.3. Deleting Kafka nodes using annotations
This procedure describes how to delete an existing Kafka node by using an OpenShift annotation. Deleting a Kafka node consists of deleting both the Pod on which the Kafka broker is running and the related PersistentVolumeClaim (if the cluster was deployed with persistent storage). After deletion, the Pod and its related PersistentVolumeClaim are recreated automatically.
Deleting a PersistentVolumeClaim can cause permanent data loss and the availability of your cluster cannot be guaranteed. The following procedure should only be performed if you have encountered storage issues.
Prerequisites
- A running Cluster Operator
Procedure
Find the name of the
Podthat you want to delete.Kafka broker pods are named
<cluster_name>-kafka-<index_number>, where<index_number>starts at zero and ends at the total number of replicas minus one. For example,my-cluster-kafka-0.Use
oc annotateto annotate thePodresource in OpenShift:oc annotate pod <cluster_name>-kafka-<index_number> strimzi.io/delete-pod-and-pvc="true"- Wait for the next reconciliation, when the annotated pod with the underlying persistent volume claim will be deleted and then recreated.
9.2.4. Deleting ZooKeeper nodes using annotations
This procedure describes how to delete an existing ZooKeeper node by using an OpenShift annotation. Deleting a ZooKeeper node consists of deleting both the Pod on which ZooKeeper is running and the related PersistentVolumeClaim (if the cluster was deployed with persistent storage). After deletion, the Pod and its related PersistentVolumeClaim are recreated automatically.
Deleting a PersistentVolumeClaim can cause permanent data loss and the availability of your cluster cannot be guaranteed. The following procedure should only be performed if you have encountered storage issues.
Prerequisites
- A running Cluster Operator
Procedure
Find the name of the
Podthat you want to delete.ZooKeeper pods are named
<cluster_name>-zookeeper-<index_number>, where<index_number>starts at zero and ends at the total number of replicas minus one. For example,my-cluster-zookeeper-0.Use
oc annotateto annotate thePodresource in OpenShift:oc annotate pod <cluster_name>-zookeeper-<index_number> strimzi.io/delete-pod-and-pvc="true"- Wait for the next reconciliation, when the annotated pod with the underlying persistent volume claim will be deleted and then recreated.
9.3. Configuring node pools
Update the spec properties of the KafkaNodePool custom resource to configure a node pool deployment.
A node pool refers to a distinct group of Kafka nodes within a Kafka cluster. Each pool has its own unique configuration, which includes mandatory settings for the number of replicas, roles, and storage allocation.
Optionally, you can also specify values for the following properties:
-
resourcesto specify memory and cpu requests and limits -
templateto specify custom configuration for pods and other OpenShift resources -
jvmOptionsto specify custom JVM configuration for heap size, runtime and other options
The Kafka resource represents the configuration for all nodes in the Kafka cluster. The KafkaNodePool resource represents the configuration for nodes only in the node pool. If a configuration property is not specified in KafkaNodePool, it is inherited from the Kafka resource. Configuration specified in the KafkaNodePool resource takes precedence if set in both resources. For example, if both the node pool and Kafka configuration includes jvmOptions, the values specified in the node pool configuration are used. When -Xmx: 1024m is set in KafkaNodePool.spec.jvmOptions and -Xms: 512m is set in Kafka.spec.kafka.jvmOptions, the node uses the value from its node pool configuration.
Properties from Kafka and KafkaNodePool schemas are not combined. To clarify, if KafkaNodePool.spec.template includes only podSet.metadata.labels, and Kafka.spec.kafka.template includes podSet.metadata.annotations and pod.metadata.labels, the template values from the Kafka configuration are ignored since there is a template value in the node pool configuration.
For a deeper understanding of the node pool configuration options, refer to the Streams for Apache Kafka Custom Resource API Reference.
Example configuration for a node pool in a cluster using KRaft mode
apiVersion: kafka.strimzi.io/v1beta2
kind: KafkaNodePool
metadata:
name: kraft-dual-role
labels:
strimzi.io/cluster: my-cluster
spec:
replicas: 3
roles:
- controller
- broker
storage:
type: jbod
volumes:
- id: 0
type: persistent-claim
size: 100Gi
deleteClaim: false
resources:
requests:
memory: 64Gi
cpu: "8"
limits:
memory: 64Gi
cpu: "12"- 1
- Unique name for the node pool.
- 2
- The Kafka cluster the node pool belongs to. A node pool can only belong to a single cluster.
- 3
- Number of replicas for the nodes.
- 4
- Roles for the nodes in the node pool. In this example, the nodes have dual roles as controllers and brokers.
- 5
- Storage specification for the nodes.
- 6
- Requests for reservation of supported resources, currently
cpuandmemory, and limits to specify the maximum resources that can be consumed.
The configuration for the Kafka resource must be suitable for KRaft mode. Currently, KRaft mode has a number of limitations.
Example configuration for a node pool in a cluster using ZooKeeper
apiVersion: kafka.strimzi.io/v1beta2
kind: KafkaNodePool
metadata:
name: pool-a
labels:
strimzi.io/cluster: my-cluster
spec:
replicas: 3
roles:
- broker
storage:
type: jbod
volumes:
- id: 0
type: persistent-claim
size: 100Gi
deleteClaim: false
resources:
requests:
memory: 64Gi
cpu: "8"
limits:
memory: 64Gi
cpu: "12"- 1
- Roles for the nodes in the node pool, which can only be
brokerwhen using Kafka with ZooKeeper.
9.3.1. Assigning IDs to node pools for scaling operations
This procedure describes how to use annotations for advanced node ID handling by the Cluster Operator when performing scaling operations on node pools. You specify the node IDs to use, rather than the Cluster Operator using the next ID in sequence. Management of node IDs in this way gives greater control.
To add a range of IDs, you assign the following annotations to the KafkaNodePool resource:
-
strimzi.io/next-node-idsto add a range of IDs that are used for new brokers -
strimzi.io/remove-node-idsto add a range of IDs for removing existing brokers
You can specify an array of individual node IDs, ID ranges, or a combination of both. For example, you can specify the following range of IDs: [0, 1, 2, 10-20, 30] for scaling up the Kafka node pool. This format allows you to specify a combination of individual node IDs (0, 1, 2, 30) as well as a range of IDs (10-20).
In a typical scenario, you might specify a range of IDs for scaling up and a single node ID to remove a specific node when scaling down.
In this procedure, we add the scaling annotations to node pools as follows:
-
pool-ais assigned a range of IDs for scaling up -
pool-bis assigned a range of IDs for scaling down
During the scaling operation, IDs are used as follows:
- Scale up picks up the lowest available ID in the range for the new node.
- Scale down removes the node with the highest available ID in the range.
If there are gaps in the sequence of node IDs assigned in the node pool, the next node to be added is assigned an ID that fills the gap.
The annotations don’t need to be updated after every scaling operation. Any unused IDs are still valid for the next scaling event.
The Cluster Operator allows you to specify a range of IDs in either ascending or descending order, so you can define them in the order the nodes are scaled. For example, when scaling up, you can specify a range such as [1000-1999], and the new nodes are assigned the next lowest IDs: 1000, 1001, 1002, 1003, and so on. Conversely, when scaling down, you can specify a range like [1999-1000], ensuring that nodes with the next highest IDs are removed: 1003, 1002, 1001, 1000, and so on.
If you don’t specify an ID range using the annotations, the Cluster Operator follows its default behavior for handling IDs during scaling operations. Node IDs start at 0 (zero) and run sequentially across the Kafka cluster. The next lowest ID is assigned to a new node. Gaps to node IDs are filled across the cluster. This means that they might not run sequentially within a node pool. The default behavior for scaling up is to add the next lowest available node ID across the cluster; and for scaling down, it is to remove the node in the node pool with the highest available node ID. The default approach is also applied if the assigned range of IDs is misformatted, the scaling up range runs out of IDs, or the scaling down range does not apply to any in-use nodes.
Prerequisites
- The Cluster Operator must be deployed.
-
(Optional) Use the
reserved.broker-max.idconfiguration property to extend the allowable range for node IDs within your node pools.
By default, Apache Kafka restricts node IDs to numbers ranging from 0 to 999. To use node ID values greater than 999, add the reserved.broker-max.id configuration property to the Kafka custom resource and specify the required maximum node ID value.
In this example, the maximum node ID is set at 10000. Node IDs can then be assigned up to that value.
Example configuration for the maximum node ID number
apiVersion: kafka.strimzi.io/v1beta2
kind: Kafka
metadata:
name: my-cluster
spec:
kafka:
config:
reserved.broker.max.id: 10000
# ...Procedure
Annotate the node pool with the IDs to use when scaling up or scaling down, as shown in the following examples.
IDs for scaling up are assigned to node pool
pool-a:Assigning IDs for scaling up
oc annotate kafkanodepool pool-a strimzi.io/next-node-ids="[0,1,2,10-20,30]"The lowest available ID from this range is used when adding a node to
pool-a.IDs for scaling down are assigned to node pool
pool-b:Assigning IDs for scaling down
oc annotate kafkanodepool pool-b strimzi.io/remove-node-ids="[60-50,9,8,7]"The highest available ID from this range is removed when scaling down
pool-b.NoteIf you want to remove a specific node, you can assign a single node ID to the scaling down annotation:
oc annotate kafkanodepool pool-b strimzi.io/remove-node-ids="[3]".You can now scale the node pool.
For more information, see the following:
On reconciliation, a warning is given if the annotations are misformatted.
After you have performed the scaling operation, you can remove the annotation if it’s no longer needed.
Removing the annotation for scaling up
oc annotate kafkanodepool pool-a strimzi.io/next-node-ids-Removing the annotation for scaling down
oc annotate kafkanodepool pool-b strimzi.io/remove-node-ids-
9.3.2. Impact on racks when moving nodes from node pools
If rack awareness is enabled on a Kafka cluster, replicas can be spread across different racks, data centers, or availability zones. When moving nodes from node pools, consider the implications on the cluster topology, particularly regarding rack awareness. Removing specific pods from node pools, especially out of order, may break the cluster topology or cause an imbalance in distribution across racks. An imbalance can impact both the distribution of nodes themselves and the partition replicas within the cluster. An uneven distribution of nodes and partitions across racks can affect the performance and resilience of the Kafka cluster.
Plan the removal of nodes strategically to maintain the required balance and resilience across racks. Use the strimzi.io/remove-node-ids annotation to move nodes with specific IDs with caution. Ensure that configuration to spread partition replicas across racks and for clients to consume from the closest replicas is not broken.
Use Cruise Control and the KafkaRebalance resource with the RackAwareGoal to make sure that replicas remain distributed across different racks.
9.3.3. Adding nodes to a node pool
This procedure describes how to scale up a node pool to add new nodes. Currently, scale up is only possible for broker-only node pools containing nodes that run as dedicated brokers.
In this procedure, we start with three nodes for node pool pool-a:
Kafka nodes in the node pool
NAME READY STATUS RESTARTS
my-cluster-pool-a-0 1/1 Running 0
my-cluster-pool-a-1 1/1 Running 0
my-cluster-pool-a-2 1/1 Running 0
Node IDs are appended to the name of the node on creation. We add node my-cluster-pool-a-3, which has a node ID of 3.
During this process, the ID of the node that holds the partition replicas changes. Consider any dependencies that reference the node ID.
Prerequisites
- The Cluster Operator must be deployed.
- Cruise Control is deployed with Kafka.
(Optional) For scale up operations, you can specify the node IDs to use in the operation.
If you have assigned a range of node IDs for the operation, the ID of the node being added is determined by the sequence of nodes given. If you have assigned a single node ID, a node is added with the specified ID. Otherwise, the lowest available node ID across the cluster is used.
Procedure
Create a new node in the node pool.
For example, node pool
pool-ahas three replicas. We add a node by increasing the number of replicas:oc scale kafkanodepool pool-a --replicas=4Check the status of the deployment and wait for the pods in the node pool to be created and ready (
1/1).oc get pods -n <my_cluster_operator_namespace>Output shows four Kafka nodes in the node pool
NAME READY STATUS RESTARTS my-cluster-pool-a-0 1/1 Running 0 my-cluster-pool-a-1 1/1 Running 0 my-cluster-pool-a-2 1/1 Running 0 my-cluster-pool-a-3 1/1 Running 0Reassign the partitions after increasing the number of nodes in the node pool.
After scaling up a node pool, use the Cruise Control
add-brokersmode to move partition replicas from existing brokers to the newly added brokers.Using Cruise Control to reassign partition replicas
apiVersion: kafka.strimzi.io/v1beta2 kind: KafkaRebalance metadata: # ... spec: mode: add-brokers brokers: [3]We are reassigning partitions to node
my-cluster-pool-a-3. The reassignment can take some time depending on the number of topics and partitions in the cluster.
9.3.4. Removing nodes from a node pool
This procedure describes how to scale down a node pool to remove nodes. Currently, scale down is only possible for broker-only node pools containing nodes that run as dedicated brokers.
In this procedure, we start with four nodes for node pool pool-a:
Kafka nodes in the node pool
NAME READY STATUS RESTARTS
my-cluster-pool-a-0 1/1 Running 0
my-cluster-pool-a-1 1/1 Running 0
my-cluster-pool-a-2 1/1 Running 0
my-cluster-pool-a-3 1/1 Running 0
Node IDs are appended to the name of the node on creation. We remove node my-cluster-pool-a-3, which has a node ID of 3.
During this process, the ID of the node that holds the partition replicas changes. Consider any dependencies that reference the node ID.
Prerequisites
- The Cluster Operator must be deployed.
- Cruise Control is deployed with Kafka.
(Optional) For scale down operations, you can specify the node IDs to use in the operation.
If you have assigned a range of node IDs for the operation, the ID of the node being removed is determined by the sequence of nodes given. If you have assigned a single node ID, the node with the specified ID is removed. Otherwise, the node with the highest available ID in the node pool is removed.
Procedure
Reassign the partitions before decreasing the number of nodes in the node pool.
Before scaling down a node pool, use the Cruise Control
remove-brokersmode to move partition replicas off the brokers that are going to be removed.Using Cruise Control to reassign partition replicas
apiVersion: kafka.strimzi.io/v1beta2 kind: KafkaRebalance metadata: # ... spec: mode: remove-brokers brokers: [3]We are reassigning partitions from node
my-cluster-pool-a-3. The reassignment can take some time depending on the number of topics and partitions in the cluster.After the reassignment process is complete, and the node being removed has no live partitions, reduce the number of Kafka nodes in the node pool.
For example, node pool
pool-ahas four replicas. We remove a node by decreasing the number of replicas:oc scale kafkanodepool pool-a --replicas=3Output shows three Kafka nodes in the node pool
NAME READY STATUS RESTARTS my-cluster-pool-b-kafka-0 1/1 Running 0 my-cluster-pool-b-kafka-1 1/1 Running 0 my-cluster-pool-b-kafka-2 1/1 Running 0
9.3.5. Moving nodes between node pools
This procedure describes how to move nodes between source and target Kafka node pools without downtime. You create a new node on the target node pool and reassign partitions to move data from the old node on the source node pool. When the replicas on the new node are in-sync, you can delete the old node.
In this procedure, we start with two node pools:
-
pool-awith three replicas is the target node pool -
pool-bwith four replicas is the source node pool
We scale up pool-a, and reassign partitions and scale down pool-b, which results in the following:
-
pool-awith four replicas -
pool-bwith three replicas
During this process, the ID of the node that holds the partition replicas changes. Consider any dependencies that reference the node ID.
Prerequisites
- The Cluster Operator must be deployed.
- Cruise Control is deployed with Kafka.
(Optional) For scale up and scale down operations, you can specify the range of node IDs to use.
If you have assigned node IDs for the operation, the ID of the node being added or removed is determined by the sequence of nodes given. Otherwise, the lowest available node ID across the cluster is used when adding nodes; and the node with the highest available ID in the node pool is removed.
Procedure
Create a new node in the target node pool.
For example, node pool
pool-ahas three replicas. We add a node by increasing the number of replicas:oc scale kafkanodepool pool-a --replicas=4Check the status of the deployment and wait for the pods in the node pool to be created and ready (
1/1).oc get pods -n <my_cluster_operator_namespace>Output shows four Kafka nodes in the source and target node pools
NAME READY STATUS RESTARTS my-cluster-pool-a-0 1/1 Running 0 my-cluster-pool-a-1 1/1 Running 0 my-cluster-pool-a-4 1/1 Running 0 my-cluster-pool-a-7 1/1 Running 0 my-cluster-pool-b-2 1/1 Running 0 my-cluster-pool-b-3 1/1 Running 0 my-cluster-pool-b-5 1/1 Running 0 my-cluster-pool-b-6 1/1 Running 0Node IDs are appended to the name of the node on creation. We add node
my-cluster-pool-a-7, which has a node ID of7.Reassign the partitions from the old node to the new node.
Before scaling down the source node pool, use the Cruise Control
remove-brokersmode to move partition replicas off the brokers that are going to be removed.Using Cruise Control to reassign partition replicas
apiVersion: kafka.strimzi.io/v1beta2 kind: KafkaRebalance metadata: # ... spec: mode: remove-brokers brokers: [6]We are reassigning partitions from node
my-cluster-pool-b-6. The reassignment can take some time depending on the number of topics and partitions in the cluster.After the reassignment process is complete, reduce the number of Kafka nodes in the source node pool.
For example, node pool
pool-bhas four replicas. We remove a node by decreasing the number of replicas:oc scale kafkanodepool pool-b --replicas=3The node with the highest ID (
6) within the pool is removed.Output shows three Kafka nodes in the source node pool
NAME READY STATUS RESTARTS my-cluster-pool-b-kafka-2 1/1 Running 0 my-cluster-pool-b-kafka-3 1/1 Running 0 my-cluster-pool-b-kafka-5 1/1 Running 0
9.3.6. Changing node pool roles
Node pools can be used with Kafka clusters that operate in KRaft mode (using Kafka Raft metadata) or use ZooKeeper for metadata management. If you are using KRaft mode, you can specify roles for all nodes in the node pool to operate as brokers, controllers, or both. If you are using ZooKeeper, nodes must be set as brokers only.
In certain circumstances you might want to change the roles assigned to a node pool. For example, you may have a node pool that contains nodes that perform dual broker and controller roles, and then decide to split the roles between two node pools. In this case, you create a new node pool with nodes that act only as brokers, and then reassign partitions from the dual-role nodes to the new brokers. You can then switch the old node pool to a controller-only role.
You can also perform the reverse operation by moving from node pools with controller-only and broker-only roles to a node pool that contains nodes that perform dual broker and controller roles. In this case, you add the broker role to the existing controller-only node pool, reassign partitions from the broker-only nodes to the dual-role nodes, and then delete the broker-only node pool.
When removing broker roles in the node pool configuration, keep in mind that Kafka does not automatically reassign partitions. Before removing the broker role, ensure that nodes changing to controller-only roles do not have any assigned partitions. If partitions are assigned, the change is prevented. No replicas must be left on the node before removing the broker role. The best way to reassign partitions before changing roles is to apply a Cruise Control optimization proposal in remove-brokers mode. For more information, see Section 19.6, “Generating optimization proposals”.
9.3.7. Transitioning to separate broker and controller roles
This procedure describes how to transition to using node pools with separate roles. If your Kafka cluster is using a node pool with combined controller and broker roles, you can transition to using two node pools with separate roles. To do this, rebalance the cluster to move partition replicas to a node pool with a broker-only role, and then switch the old node pool to a controller-only role.
In this procedure, we start with node pool pool-a, which has controller and broker roles:
Dual-role node pool
apiVersion: kafka.strimzi.io/v1beta2
kind: KafkaNodePool
metadata:
name: pool-a
labels:
strimzi.io/cluster: my-cluster
spec:
replicas: 3
roles:
- controller
- broker
storage:
type: jbod
volumes:
- id: 0
type: persistent-claim
size: 20Gi
deleteClaim: false
# ...The node pool has three nodes:
Kafka nodes in the node pool
NAME READY STATUS RESTARTS
my-cluster-pool-a-0 1/1 Running 0
my-cluster-pool-a-1 1/1 Running 0
my-cluster-pool-a-2 1/1 Running 0
Each node performs a combined role of broker and controller. We create a second node pool called pool-b, with three nodes that act as brokers only.
During this process, the ID of the node that holds the partition replicas changes. Consider any dependencies that reference the node ID.
Procedure
Create a node pool with a
brokerrole.Example node pool configuration
apiVersion: kafka.strimzi.io/v1beta2 kind: KafkaNodePool metadata: name: pool-b labels: strimzi.io/cluster: my-cluster spec: replicas: 3 roles: - broker storage: type: jbod volumes: - id: 0 type: persistent-claim size: 100Gi deleteClaim: false # ...The new node pool also has three nodes. If you already have a broker-only node pool, you can skip this step.
-
Apply the new
KafkaNodePoolresource to create the brokers. Check the status of the deployment and wait for the pods in the node pool to be created and ready (
1/1).oc get pods -n <my_cluster_operator_namespace>Output shows pods running in two node pools
NAME READY STATUS RESTARTS my-cluster-pool-a-0 1/1 Running 0 my-cluster-pool-a-1 1/1 Running 0 my-cluster-pool-a-2 1/1 Running 0 my-cluster-pool-b-3 1/1 Running 0 my-cluster-pool-b-4 1/1 Running 0 my-cluster-pool-b-5 1/1 Running 0Node IDs are appended to the name of the node on creation.
Use the Cruise Control
remove-brokersmode to reassign partition replicas from the dual-role nodes to the newly added brokers.Using Cruise Control to reassign partition replicas
apiVersion: kafka.strimzi.io/v1beta2 kind: KafkaRebalance metadata: # ... spec: mode: remove-brokers brokers: [0, 1, 2]The reassignment can take some time depending on the number of topics and partitions in the cluster.
NoteIf nodes changing to controller-only roles have any assigned partitions, the change is prevented. The
status.conditionsof theKafkaresource provide details of events preventing the change.Remove the
brokerrole from the node pool that originally had a combined role.Dual-role nodes switched to controllers
apiVersion: kafka.strimzi.io/v1beta2 kind: KafkaNodePool metadata: name: pool-a labels: strimzi.io/cluster: my-cluster spec: replicas: 3 roles: - controller storage: type: jbod volumes: - id: 0 type: persistent-claim size: 20Gi deleteClaim: false # ...- Apply the configuration change so that the node pool switches to a controller-only role.
9.3.8. Transitioning to dual-role nodes
This procedure describes how to transition from separate node pools with broker-only and controller-only roles to using a dual-role node pool. If your Kafka cluster is using node pools with dedicated controller and broker nodes, you can transition to using a single node pool with both roles. To do this, add the broker role to the controller-only node pool, rebalance the cluster to move partition replicas to the dual-role node pool, and then delete the old broker-only node pool.
In this procedure, we start with two node pools pool-a, which has only the controller role and pool-b which has only the broker role:
Single role node pools
apiVersion: kafka.strimzi.io/v1beta2
kind: KafkaNodePool
metadata:
name: pool-a
labels:
strimzi.io/cluster: my-cluster
spec:
replicas: 3
roles:
- controller
storage:
type: jbod
volumes:
- id: 0
type: persistent-claim
size: 100Gi
deleteClaim: false
# ...
---
apiVersion: kafka.strimzi.io/v1beta2
kind: KafkaNodePool
metadata:
name: pool-b
labels:
strimzi.io/cluster: my-cluster
spec:
replicas: 3
roles:
- broker
storage:
type: jbod
volumes:
- id: 0
type: persistent-claim
size: 100Gi
deleteClaim: false
# ...The Kafka cluster has six nodes:
Kafka nodes in the node pools
NAME READY STATUS RESTARTS
my-cluster-pool-a-0 1/1 Running 0
my-cluster-pool-a-1 1/1 Running 0
my-cluster-pool-a-2 1/1 Running 0
my-cluster-pool-b-3 1/1 Running 0
my-cluster-pool-b-4 1/1 Running 0
my-cluster-pool-b-5 1/1 Running 0
The pool-a nodes perform the role of controller. The pool-b nodes perform the role of broker.
During this process, the ID of the node that holds the partition replicas changes. Consider any dependencies that reference the node ID.
Procedure
Edit the node pool
pool-aand add thebrokerrole to it.Example node pool configuration
apiVersion: kafka.strimzi.io/v1beta2 kind: KafkaNodePool metadata: name: pool-a labels: strimzi.io/cluster: my-cluster spec: replicas: 3 roles: - controller - broker storage: type: jbod volumes: - id: 0 type: persistent-claim size: 100Gi deleteClaim: false # ...Check the status and wait for the pods in the node pool to be restarted and ready (
1/1).oc get pods -n <my_cluster_operator_namespace>Output shows pods running in two node pools
NAME READY STATUS RESTARTS my-cluster-pool-a-0 1/1 Running 0 my-cluster-pool-a-1 1/1 Running 0 my-cluster-pool-a-2 1/1 Running 0 my-cluster-pool-b-3 1/1 Running 0 my-cluster-pool-b-4 1/1 Running 0 my-cluster-pool-b-5 1/1 Running 0Node IDs are appended to the name of the node on creation.
Use the Cruise Control
remove-brokersmode to reassign partition replicas from the broker-only nodes to the dual-role nodes.Using Cruise Control to reassign partition replicas
apiVersion: kafka.strimzi.io/v1beta2 kind: KafkaRebalance metadata: # ... spec: mode: remove-brokers brokers: [3, 4, 5]The reassignment can take some time depending on the number of topics and partitions in the cluster.
Remove the
pool-bnode pool that has the old broker-only nodes.oc delete kafkanodepool pool-b -n <my_cluster_operator_namespace>
9.3.9. Managing storage using node pools
Storage management in Streams for Apache Kafka is usually straightforward, and requires little change when set up, but there might be situations where you need to modify your storage configurations. Node pools simplify this process, because you can set up separate node pools that specify your new storage requirements.
In this procedure we create and manage storage for a node pool called pool-a containing three nodes. We show how to change the storage class (volumes.class) that defines the type of persistent storage it uses. You can use the same steps to change the storage size (volumes.size).
We strongly recommend using block storage. Streams for Apache Kafka is only tested for use with block storage.
Prerequisites
- The Cluster Operator must be deployed.
- Cruise Control is deployed with Kafka.
- For storage that uses persistent volume claims for dynamic volume allocation, storage classes are defined and available in the OpenShift cluster that correspond to the storage solutions you need.
Procedure
Create the node pool with its own storage settings.
For example, node pool
pool-auses JBOD storage with persistent volumes:apiVersion: kafka.strimzi.io/v1beta2 kind: KafkaNodePool metadata: name: pool-a labels: strimzi.io/cluster: my-cluster spec: replicas: 3 storage: type: jbod volumes: - id: 0 type: persistent-claim size: 500Gi class: gp2-ebs # ...Nodes in
pool-aare configured to use Amazon EBS (Elastic Block Store) GP2 volumes.-
Apply the node pool configuration for
pool-a. Check the status of the deployment and wait for the pods in
pool-ato be created and ready (1/1).oc get pods -n <my_cluster_operator_namespace>Output shows three Kafka nodes in the node pool
NAME READY STATUS RESTARTS my-cluster-pool-a-0 1/1 Running 0 my-cluster-pool-a-1 1/1 Running 0 my-cluster-pool-a-2 1/1 Running 0To migrate to a new storage class, create a new node pool with the required storage configuration:
apiVersion: kafka.strimzi.io/v1beta2 kind: KafkaNodePool metadata: name: pool-b labels: strimzi.io/cluster: my-cluster spec: roles: - broker replicas: 3 storage: type: jbod volumes: - id: 0 type: persistent-claim size: 1Ti class: gp3-ebs # ...Nodes in
pool-bare configured to use Amazon EBS (Elastic Block Store) GP3 volumes.-
Apply the node pool configuration for
pool-b. -
Check the status of the deployment and wait for the pods in
pool-bto be created and ready. Reassign the partitions from
pool-atopool-b.When migrating to a new storage configuration, use the Cruise Control
remove-brokersmode to move partition replicas off the brokers that are going to be removed.Using Cruise Control to reassign partition replicas
apiVersion: kafka.strimzi.io/v1beta2 kind: KafkaRebalance metadata: # ... spec: mode: remove-brokers brokers: [0, 1, 2]We are reassigning partitions from
pool-a. The reassignment can take some time depending on the number of topics and partitions in the cluster.After the reassignment process is complete, delete the old node pool:
oc delete kafkanodepool pool-a
9.3.10. Managing storage affinity using node pools
In situations where storage resources, such as local persistent volumes, are constrained to specific worker nodes, or availability zones, configuring storage affinity helps to schedule pods to use the right nodes.
Node pools allow you to configure affinity independently. In this procedure, we create and manage storage affinity for two availability zones: zone-1 and zone-2.
You can configure node pools for separate availability zones, but use the same storage class. We define an all-zones persistent storage class representing the storage resources available in each zone.
We also use the .spec.template.pod properties to configure the node affinity and schedule Kafka pods on zone-1 and zone-2 worker nodes.
The storage class and affinity is specified in node pools representing the nodes in each availability zone:
-
pool-zone-1 -
pool-zone-2.
Prerequisites
- The Cluster Operator must be deployed.
- If you are not familiar with the concepts of affinity, see the Kubernetes node and pod affinity documentation.
Procedure
Define the storage class for use with each availability zone:
apiVersion: storage.k8s.io/v1 kind: StorageClass metadata: name: all-zones provisioner: kubernetes.io/my-storage parameters: type: ssd volumeBindingMode: WaitForFirstConsumerCreate node pools representing the two availability zones, specifying the
all-zonesstorage class and the affinity for each zone:Node pool configuration for zone-1
apiVersion: kafka.strimzi.io/v1beta2 kind: KafkaNodePool metadata: name: pool-zone-1 labels: strimzi.io/cluster: my-cluster spec: replicas: 3 storage: type: jbod volumes: - id: 0 type: persistent-claim size: 500Gi class: all-zones template: pod: affinity: nodeAffinity: requiredDuringSchedulingIgnoredDuringExecution: nodeSelectorTerms: - matchExpressions: - key: topology.kubernetes.io/zone operator: In values: - zone-1 # ...Node pool configuration for zone-2
apiVersion: kafka.strimzi.io/v1beta2 kind: KafkaNodePool metadata: name: pool-zone-2 labels: strimzi.io/cluster: my-cluster spec: replicas: 4 storage: type: jbod volumes: - id: 0 type: persistent-claim size: 500Gi class: all-zones template: pod: affinity: nodeAffinity: requiredDuringSchedulingIgnoredDuringExecution: nodeSelectorTerms: - matchExpressions: - key: topology.kubernetes.io/zone operator: In values: - zone-2 # ...- Apply the node pool configuration.
Check the status of the deployment and wait for the pods in the node pools to be created and ready (
1/1).oc get pods -n <my_cluster_operator_namespace>Output shows 3 Kafka nodes in
pool-zone-1and 4 Kafka nodes inpool-zone-2NAME READY STATUS RESTARTS my-cluster-pool-zone-1-kafka-0 1/1 Running 0 my-cluster-pool-zone-1-kafka-1 1/1 Running 0 my-cluster-pool-zone-1-kafka-2 1/1 Running 0 my-cluster-pool-zone-2-kafka-3 1/1 Running 0 my-cluster-pool-zone-2-kafka-4 1/1 Running 0 my-cluster-pool-zone-2-kafka-5 1/1 Running 0 my-cluster-pool-zone-2-kafka-6 1/1 Running 0
9.3.11. Migrating existing Kafka clusters to use Kafka node pools
This procedure describes how to migrate existing Kafka clusters to use Kafka node pools. After you have updated the Kafka cluster, you can use the node pools to manage the configuration of nodes within each pool.
Currently, replica and storage configuration in the KafkaNodePool resource must also be present in the Kafka resource. The configuration is ignored when node pools are being used.
Prerequisites
Procedure
Create a new
KafkaNodePoolresource.-
Name the resource
kafka. -
Point a
strimzi.io/clusterlabel to your existingKafkaresource. - Set the replica count and storage configuration to match your current Kafka cluster.
-
Set the roles to
broker.
Example configuration for a node pool used in migrating a Kafka cluster
apiVersion: kafka.strimzi.io/v1beta2 kind: KafkaNodePool metadata: name: kafka labels: strimzi.io/cluster: my-cluster spec: replicas: 3 roles: - broker storage: type: jbod volumes: - id: 0 type: persistent-claim size: 100Gi deleteClaim: falseWarningTo preserve cluster data and the names of its nodes and resources, the node pool name must be
kafka, and thestrimzi.io/clusterlabel must match the Kafka resource name. Otherwise, nodes and resources are created with new names, including the persistent volume storage used by the nodes. Consequently, your previous data may not be available.-
Name the resource
Apply the
KafkaNodePoolresource:oc apply -f <node_pool_configuration_file>By applying this resource, you switch Kafka to using node pools.
There is no change or rolling update and resources are identical to how they were before.
Enable support for node pools in the
Kafkaresource using thestrimzi.io/node-pools: enabledannotation.Example configuration for a node pool in a cluster using ZooKeeper
apiVersion: kafka.strimzi.io/v1beta2 kind: Kafka metadata: name: my-cluster annotations: strimzi.io/node-pools: enabled spec: kafka: # ... zookeeper: # ...Apply the
Kafkaresource:oc apply -f <kafka_configuration_file>There is no change or rolling update. The resources remain identical to how they were before.
-
Remove the replicated properties from the
Kafkacustom resource. When theKafkaNodePoolresource is in use, you can remove the properties that you copied to theKafkaNodePoolresource, such as the.spec.kafka.replicasand.spec.kafka.storageproperties.
Reversing the migration
To revert to managing Kafka nodes using only Kafka custom resources:
-
If you have multiple node pools, consolidate them into a single
KafkaNodePoolnamedkafkawith node IDs from 0 to N (where N is the number of replicas). -
Ensure that the
.spec.kafkaconfiguration in theKafkaresource matches theKafkaNodePoolconfiguration, including storage, resources, and replicas. -
Disable support for node pools in the
Kafkaresource using thestrimzi.io/node-pools: disabledannotation. -
Delete the Kafka node pool named
kafka.
9.4. Configuring the Entity Operator
Use the entityOperator property in Kafka.spec to configure the Entity Operator. The Entity Operator is responsible for managing Kafka-related entities in a running Kafka cluster. It comprises the following operators:
- Topic Operator to manage Kafka topics
- User Operator to manage Kafka users
By configuring the Kafka resource, the Cluster Operator can deploy the Entity Operator, including one or both operators. Once deployed, the operators are automatically configured to handle the topics and users of the Kafka cluster.
Each operator can only monitor a single namespace. For more information, see Section 1.2.1, “Watching Streams for Apache Kafka resources in OpenShift namespaces”.
The entityOperator property supports several sub-properties:
-
tlsSidecar -
topicOperator -
userOperator -
template
The tlsSidecar property contains the configuration of the TLS sidecar container, which is used to communicate with ZooKeeper.
The template property contains the configuration of the Entity Operator pod, such as labels, annotations, affinity, and tolerations. For more information on configuring templates, see Section 9.16, “Customizing OpenShift resources”.
The topicOperator property contains the configuration of the Topic Operator. When this option is missing, the Entity Operator is deployed without the Topic Operator.
The userOperator property contains the configuration of the User Operator. When this option is missing, the Entity Operator is deployed without the User Operator.
For more information on the properties used to configure the Entity Operator, see the EntityOperatorSpec schema reference.
Example of basic configuration enabling both operators
apiVersion: kafka.strimzi.io/v1beta2
kind: Kafka
metadata:
name: my-cluster
spec:
kafka:
# ...
zookeeper:
# ...
entityOperator:
topicOperator: {}
userOperator: {}
If an empty object ({}) is used for the topicOperator and userOperator, all properties use their default values.
When both topicOperator and userOperator properties are missing, the Entity Operator is not deployed.
9.4.1. Configuring the Topic Operator
Use topicOperator properties in Kafka.spec.entityOperator to configure the Topic Operator.
If you are using unidirectional topic management, which is enabled by default, the following properties are not used and are ignored: Kafka.spec.entityOperator.topicOperator.zookeeperSessionTimeoutSeconds and Kafka.spec.entityOperator.topicOperator.topicMetadataMaxAttempts. For more information on unidirectional topic management, refer to Section 10.1, “Topic management modes”.
The following properties are supported:
watchedNamespace-
The OpenShift namespace in which the Topic Operator watches for
KafkaTopicresources. Default is the namespace where the Kafka cluster is deployed. reconciliationIntervalSeconds-
The interval between periodic reconciliations in seconds. Default
120. zookeeperSessionTimeoutSeconds-
The ZooKeeper session timeout in seconds. Default
18. topicMetadataMaxAttempts-
The number of attempts at getting topic metadata from Kafka. The time between each attempt is defined as an exponential back-off. Consider increasing this value when topic creation might take more time due to the number of partitions or replicas. Default
6. image-
The
imageproperty can be used to configure the container image which is used. To learn more, refer to the information provided on configuring theimageproperty`. resources-
The
resourcesproperty configures the amount of resources allocated to the Topic Operator. You can specify requests and limits formemoryandcpuresources. The requests should be enough to ensure a stable performance of the operator. logging-
The
loggingproperty configures the logging of the Topic Operator. To learn more, refer to the information provided on Topic Operator logging.
Example Topic Operator configuration
apiVersion: kafka.strimzi.io/v1beta2
kind: Kafka
metadata:
name: my-cluster
spec:
kafka:
# ...
zookeeper:
# ...
entityOperator:
# ...
topicOperator:
watchedNamespace: my-topic-namespace
reconciliationIntervalSeconds: 60
resources:
requests:
cpu: "1"
memory: 500Mi
limits:
cpu: "1"
memory: 500Mi
# ...9.4.2. Configuring the User Operator
Use userOperator properties in Kafka.spec.entityOperator to configure the User Operator. The following properties are supported:
watchedNamespace-
The OpenShift namespace in which the User Operator watches for
KafkaUserresources. Default is the namespace where the Kafka cluster is deployed. reconciliationIntervalSeconds-
The interval between periodic reconciliations in seconds. Default
120. image-
The
imageproperty can be used to configure the container image which will be used. To learn more, refer to the information provided on configuring theimageproperty`. resources-
The
resourcesproperty configures the amount of resources allocated to the User Operator. You can specify requests and limits formemoryandcpuresources. The requests should be enough to ensure a stable performance of the operator. logging-
The
loggingproperty configures the logging of the User Operator. To learn more, refer to the information provided on User Operator logging. secretPrefix-
The
secretPrefixproperty adds a prefix to the name of all Secrets created from the KafkaUser resource. For example,secretPrefix: kafka-would prefix all Secret names withkafka-. So a KafkaUser namedmy-userwould create a Secret namedkafka-my-user.
Example User Operator configuration
apiVersion: kafka.strimzi.io/v1beta2
kind: Kafka
metadata:
name: my-cluster
spec:
kafka:
# ...
zookeeper:
# ...
entityOperator:
# ...
userOperator:
watchedNamespace: my-user-namespace
reconciliationIntervalSeconds: 60
resources:
requests:
cpu: "1"
memory: 500Mi
limits:
cpu: "1"
memory: 500Mi
# ...9.5. Configuring the Cluster Operator
Use environment variables to configure the Cluster Operator. Specify the environment variables for the container image of the Cluster Operator in its Deployment configuration file. You can use the following environment variables to configure the Cluster Operator. If you are running Cluster Operator replicas in standby mode, there are additional environment variables for enabling leader election.
Kafka, Kafka Connect, and Kafka MirrorMaker support multiple versions. Use their STRIMZI_<COMPONENT_NAME>_IMAGES environment variables to configure the default container images used for each version. The configuration provides a mapping between a version and an image. The required syntax is whitespace or comma-separated <version> = <image> pairs, which determine the image to use for a given version. For example, 3.7.0=registry.redhat.io/amq-streams/kafka-37-rhel9:2.7.0. Theses default images are overridden if image property values are specified in the configuration of a component. For more information on image configuration of components, see the Streams for Apache Kafka Custom Resource API Reference.
The Deployment configuration file provided with the Streams for Apache Kafka release artifacts is install/cluster-operator/060-Deployment-strimzi-cluster-operator.yaml.
STRIMZI_NAMESPACEA comma-separated list of namespaces that the operator operates in. When not set, set to empty string, or set to
*, the Cluster Operator operates in all namespaces.The Cluster Operator deployment might use the downward API to set this automatically to the namespace the Cluster Operator is deployed in.
Example configuration for Cluster Operator namespaces
env: - name: STRIMZI_NAMESPACE valueFrom: fieldRef: fieldPath: metadata.namespaceSTRIMZI_FULL_RECONCILIATION_INTERVAL_MS- Optional, default is 120000 ms. The interval between periodic reconciliations, in milliseconds.
STRIMZI_OPERATION_TIMEOUT_MS- Optional, default 300000 ms. The timeout for internal operations, in milliseconds. Increase this value when using Streams for Apache Kafka on clusters where regular OpenShift operations take longer than usual (due to factors such as prolonged download times for container images, for example).
STRIMZI_ZOOKEEPER_ADMIN_SESSION_TIMEOUT_MS-
Optional, default 10000 ms. The session timeout for the Cluster Operator’s ZooKeeper admin client, in milliseconds. Increase the value if ZooKeeper requests from the Cluster Operator are regularly failing due to timeout issues. There is a maximum allowed session time set on the ZooKeeper server side via the
maxSessionTimeoutconfig. By default, the maximum session timeout value is 20 times the defaulttickTime(whose default is 2000) at 40000 ms. If you require a higher timeout, change themaxSessionTimeoutZooKeeper server configuration value. STRIMZI_OPERATIONS_THREAD_POOL_SIZE- Optional, default 10. The worker thread pool size, which is used for various asynchronous and blocking operations that are run by the Cluster Operator.
STRIMZI_OPERATOR_NAME- Optional, defaults to the pod’s hostname. The operator name identifies the Streams for Apache Kafka instance when emitting OpenShift events.
STRIMZI_OPERATOR_NAMESPACEThe name of the namespace where the Cluster Operator is running. Do not configure this variable manually. Use the downward API.
env: - name: STRIMZI_OPERATOR_NAMESPACE valueFrom: fieldRef: fieldPath: metadata.namespaceSTRIMZI_OPERATOR_NAMESPACE_LABELSOptional. The labels of the namespace where the Streams for Apache Kafka Cluster Operator is running. Use namespace labels to configure the namespace selector in network policies. Network policies allow the Streams for Apache Kafka Cluster Operator access only to the operands from the namespace with these labels. When not set, the namespace selector in network policies is configured to allow access to the Cluster Operator from any namespace in the OpenShift cluster.
env: - name: STRIMZI_OPERATOR_NAMESPACE_LABELS value: label1=value1,label2=value2STRIMZI_LABELS_EXCLUSION_PATTERNOptional, default regex pattern is
^app.kubernetes.io/(?!part-of).*. The regex exclusion pattern used to filter labels propagation from the main custom resource to its subresources. The labels exclusion filter is not applied to labels in template sections such asspec.kafka.template.pod.metadata.labels.env: - name: STRIMZI_LABELS_EXCLUSION_PATTERN value: "^key1.*"STRIMZI_CUSTOM_<COMPONENT_NAME>_LABELSOptional. One or more custom labels to apply to all the pods created by the custom resource of the component. The Cluster Operator labels the pods when the custom resource is created or is next reconciled.
Labels can be applied to the following components:
-
KAFKA -
KAFKA_CONNECT -
KAFKA_CONNECT_BUILD -
ZOOKEEPER -
ENTITY_OPERATOR -
KAFKA_MIRROR_MAKER2 -
KAFKA_MIRROR_MAKER -
CRUISE_CONTROL -
KAFKA_BRIDGE -
KAFKA_EXPORTER
-
STRIMZI_CUSTOM_RESOURCE_SELECTOROptional. The label selector to filter the custom resources handled by the Cluster Operator. The operator will operate only on those custom resources that have the specified labels set. Resources without these labels will not be seen by the operator. The label selector applies to
Kafka,KafkaConnect,KafkaBridge,KafkaMirrorMaker, andKafkaMirrorMaker2resources.KafkaRebalanceandKafkaConnectorresources are operated only when their corresponding Kafka and Kafka Connect clusters have the matching labels.env: - name: STRIMZI_CUSTOM_RESOURCE_SELECTOR value: label1=value1,label2=value2STRIMZI_KAFKA_IMAGES-
Required. The mapping from the Kafka version to the corresponding image containing a Kafka broker for that version. For example
3.6.0=registry.redhat.io/amq-streams/kafka-36-rhel9:2.7.0, 3.7.0=registry.redhat.io/amq-streams/kafka-37-rhel9:2.7.0. STRIMZI_KAFKA_CONNECT_IMAGES-
Required. The mapping from the Kafka version to the corresponding image of Kafka Connect for that version. For example
3.6.0=registry.redhat.io/amq-streams/kafka-36-rhel9:2.7.0, 3.7.0=registry.redhat.io/amq-streams/kafka-37-rhel9:2.7.0. STRIMZI_KAFKA_MIRROR_MAKER2_IMAGES-
Required. The mapping from the Kafka version to the corresponding image of MirrorMaker 2 for that version. For example
3.6.0=registry.redhat.io/amq-streams/kafka-36-rhel9:2.7.0, 3.7.0=registry.redhat.io/amq-streams/kafka-37-rhel9:2.7.0. - (Deprecated)
STRIMZI_KAFKA_MIRROR_MAKER_IMAGES -
Required. The mapping from the Kafka version to the corresponding image of MirrorMaker for that version. For example
3.6.0=registry.redhat.io/amq-streams/kafka-36-rhel9:2.7.0, 3.7.0=registry.redhat.io/amq-streams/kafka-37-rhel9:2.7.0. STRIMZI_DEFAULT_TOPIC_OPERATOR_IMAGE-
Optional. The default is
registry.redhat.io/amq-streams/strimzi-rhel9-operator:2.7.0. The image name to use as the default when deploying the Topic Operator if no image is specified as theKafka.spec.entityOperator.topicOperator.imagein theKafkaresource. STRIMZI_DEFAULT_USER_OPERATOR_IMAGE-
Optional. The default is
registry.redhat.io/amq-streams/strimzi-rhel9-operator:2.7.0. The image name to use as the default when deploying the User Operator if no image is specified as theKafka.spec.entityOperator.userOperator.imagein theKafkaresource. STRIMZI_DEFAULT_TLS_SIDECAR_ENTITY_OPERATOR_IMAGE-
Optional. The default is
registry.redhat.io/amq-streams/kafka-37-rhel9:2.7.0. The image name to use as the default when deploying the sidecar container for the Entity Operator if no image is specified as theKafka.spec.entityOperator.tlsSidecar.imagein theKafkaresource. The sidecar provides TLS support. STRIMZI_DEFAULT_KAFKA_EXPORTER_IMAGE-
Optional. The default is
registry.redhat.io/amq-streams/kafka-37-rhel9:2.7.0. The image name to use as the default when deploying the Kafka Exporter if no image is specified as theKafka.spec.kafkaExporter.imagein theKafkaresource. STRIMZI_DEFAULT_CRUISE_CONTROL_IMAGE-
Optional. The default is
registry.redhat.io/amq-streams/kafka-37-rhel9:2.7.0. The image name to use as the default when deploying Cruise Control if no image is specified as theKafka.spec.cruiseControl.imagein theKafkaresource. STRIMZI_DEFAULT_KAFKA_BRIDGE_IMAGE-
Optional. The default is
registry.redhat.io/amq-streams/bridge-rhel9:2.7.0. The image name to use as the default when deploying the Kafka Bridge if no image is specified as theKafka.spec.kafkaBridge.imagein theKafkaresource. STRIMZI_DEFAULT_KAFKA_INIT_IMAGE-
Optional. The default is
registry.redhat.io/amq-streams/strimzi-rhel9-operator:2.7.0. The image name to use as the default for the Kafka initializer container if no image is specified in thebrokerRackInitImageof theKafkaresource or theclientRackInitImageof the Kafka Connect resource. The init container is started before the Kafka cluster for initial configuration work, such as rack support. STRIMZI_IMAGE_PULL_POLICY-
Optional. The
ImagePullPolicythat is applied to containers in all pods managed by the Cluster Operator. The valid values areAlways,IfNotPresent, andNever. If not specified, the OpenShift defaults are used. Changing the policy will result in a rolling update of all your Kafka, Kafka Connect, and Kafka MirrorMaker clusters. STRIMZI_IMAGE_PULL_SECRETS-
Optional. A comma-separated list of
Secretnames. The secrets referenced here contain the credentials to the container registries where the container images are pulled from. The secrets are specified in theimagePullSecretsproperty for all pods created by the Cluster Operator. Changing this list results in a rolling update of all your Kafka, Kafka Connect, and Kafka MirrorMaker clusters. STRIMZI_KUBERNETES_VERSIONOptional. Overrides the OpenShift version information detected from the API server.
Example configuration for OpenShift version override
env: - name: STRIMZI_KUBERNETES_VERSION value: | major=1 minor=16 gitVersion=v1.16.2 gitCommit=c97fe5036ef3df2967d086711e6c0c405941e14b gitTreeState=clean buildDate=2019-10-15T19:09:08Z goVersion=go1.12.10 compiler=gc platform=linux/amd64KUBERNETES_SERVICE_DNS_DOMAINOptional. Overrides the default OpenShift DNS domain name suffix.
By default, services assigned in the OpenShift cluster have a DNS domain name that uses the default suffix
cluster.local.For example, for broker kafka-0:
<cluster-name>-kafka-0.<cluster-name>-kafka-brokers.<namespace>.svc.cluster.localThe DNS domain name is added to the Kafka broker certificates used for hostname verification.
If you are using a different DNS domain name suffix in your cluster, change the
KUBERNETES_SERVICE_DNS_DOMAINenvironment variable from the default to the one you are using in order to establish a connection with the Kafka brokers.STRIMZI_CONNECT_BUILD_TIMEOUT_MS- Optional, default 300000 ms. The timeout for building new Kafka Connect images with additional connectors, in milliseconds. Consider increasing this value when using Streams for Apache Kafka to build container images containing many connectors or using a slow container registry.
STRIMZI_NETWORK_POLICY_GENERATIONOptional, default
true. Network policy for resources. Network policies allow connections between Kafka components.Set this environment variable to
falseto disable network policy generation. You might do this, for example, if you want to use custom network policies. Custom network policies allow more control over maintaining the connections between components.STRIMZI_DNS_CACHE_TTL-
Optional, default
30. Number of seconds to cache successful name lookups in local DNS resolver. Any negative value means cache forever. Zero means do not cache, which can be useful for avoiding connection errors due to long caching policies being applied. STRIMZI_POD_SET_RECONCILIATION_ONLY-
Optional, default
false. When set totrue, the Cluster Operator reconciles only theStrimziPodSetresources and any changes to the other custom resources (Kafka,KafkaConnect, and so on) are ignored. This mode is useful for ensuring that your pods are recreated if needed, but no other changes happen to the clusters. STRIMZI_FEATURE_GATES- Optional. Enables or disables the features and functionality controlled by feature gates.
STRIMZI_POD_SECURITY_PROVIDER_CLASS-
Optional. Configuration for the pluggable
PodSecurityProviderclass, which can be used to provide the security context configuration for Pods and containers.
9.5.1. Restricting access to the Cluster Operator using network policy
Use the STRIMZI_OPERATOR_NAMESPACE_LABELS environment variable to establish network policy for the Cluster Operator using namespace labels.
The Cluster Operator can run in the same namespace as the resources it manages, or in a separate namespace. By default, the STRIMZI_OPERATOR_NAMESPACE environment variable is configured to use the downward API to find the namespace the Cluster Operator is running in. If the Cluster Operator is running in the same namespace as the resources, only local access is required and allowed by Streams for Apache Kafka.
If the Cluster Operator is running in a separate namespace to the resources it manages, any namespace in the OpenShift cluster is allowed access to the Cluster Operator unless network policy is configured. By adding namespace labels, access to the Cluster Operator is restricted to the namespaces specified.
Network policy configured for the Cluster Operator deployment
#...
env:
# ...
- name: STRIMZI_OPERATOR_NAMESPACE_LABELS
value: label1=value1,label2=value2
#...9.5.2. Setting periodic reconciliation of custom resources
Use the STRIMZI_FULL_RECONCILIATION_INTERVAL_MS variable to set the time interval for periodic reconciliations by the Cluster Operator. Replace its value with the required interval in milliseconds.
Reconciliation period configured for the Cluster Operator deployment
#...
env:
# ...
- name: STRIMZI_FULL_RECONCILIATION_INTERVAL_MS
value: "120000"
#...The Cluster Operator reacts to all notifications about applicable cluster resources received from the OpenShift cluster. If the operator is not running, or if a notification is not received for any reason, resources will get out of sync with the state of the running OpenShift cluster. In order to handle failovers properly, a periodic reconciliation process is executed by the Cluster Operator so that it can compare the state of the resources with the current cluster deployments in order to have a consistent state across all of them.
9.5.3. Pausing reconciliation of custom resources using annotations
Sometimes it is useful to pause the reconciliation of custom resources managed by Streams for Apache Kafka operators, so that you can perform fixes or make updates. If reconciliations are paused, any changes made to custom resources are ignored by the operators until the pause ends.
If you want to pause reconciliation of a custom resource, set the strimzi.io/pause-reconciliation annotation to true in its configuration. This instructs the appropriate operator to pause reconciliation of the custom resource. For example, you can apply the annotation to the KafkaConnect resource so that reconciliation by the Cluster Operator is paused.
You can also create a custom resource with the pause annotation enabled. The custom resource is created, but it is ignored.
Prerequisites
- The Streams for Apache Kafka Operator that manages the custom resource is running.
Procedure
Annotate the custom resource in OpenShift, setting
pause-reconciliationtotrue:oc annotate <kind_of_custom_resource> <name_of_custom_resource> strimzi.io/pause-reconciliation="true"For example, for the
KafkaConnectcustom resource:oc annotate KafkaConnect my-connect strimzi.io/pause-reconciliation="true"Check that the status conditions of the custom resource show a change to
ReconciliationPaused:oc describe <kind_of_custom_resource> <name_of_custom_resource>The
typecondition changes toReconciliationPausedat thelastTransitionTime.Example custom resource with a paused reconciliation condition type
apiVersion: kafka.strimzi.io/v1beta2 kind: KafkaConnect metadata: annotations: strimzi.io/pause-reconciliation: "true" strimzi.io/use-connector-resources: "true" creationTimestamp: 2021-03-12T10:47:11Z #... spec: # ... status: conditions: - lastTransitionTime: 2021-03-12T10:47:41.689249Z status: "True" type: ReconciliationPaused
Resuming from pause
-
To resume reconciliation, you can set the annotation to
false, or remove the annotation.
9.5.4. Running multiple Cluster Operator replicas with leader election
The default Cluster Operator configuration enables leader election to run multiple parallel replicas of the Cluster Operator. One replica is elected as the active leader and operates the deployed resources. The other replicas run in standby mode. When the leader stops or fails, one of the standby replicas is elected as the new leader and starts operating the deployed resources.
By default, Streams for Apache Kafka runs with a single Cluster Operator replica that is always the leader replica. When a single Cluster Operator replica stops or fails, OpenShift starts a new replica.
Running the Cluster Operator with multiple replicas is not essential. But it’s useful to have replicas on standby in case of large-scale disruptions caused by major failure. For example, suppose multiple worker nodes or an entire availability zone fails. This failure might cause the Cluster Operator pod and many Kafka pods to go down at the same time. If subsequent pod scheduling causes congestion through lack of resources, this can delay operations when running a single Cluster Operator.
9.5.4.1. Enabling leader election for Cluster Operator replicas
Configure leader election environment variables when running additional Cluster Operator replicas. The following environment variables are supported:
STRIMZI_LEADER_ELECTION_ENABLED-
Optional, disabled (
false) by default. Enables or disables leader election, which allows additional Cluster Operator replicas to run on standby.
Leader election is disabled by default. It is only enabled when applying this environment variable on installation.
STRIMZI_LEADER_ELECTION_LEASE_NAME-
Required when leader election is enabled. The name of the OpenShift
Leaseresource that is used for the leader election. STRIMZI_LEADER_ELECTION_LEASE_NAMESPACERequired when leader election is enabled. The namespace where the OpenShift
Leaseresource used for leader election is created. You can use the downward API to configure it to the namespace where the Cluster Operator is deployed.env: - name: STRIMZI_LEADER_ELECTION_LEASE_NAMESPACE valueFrom: fieldRef: fieldPath: metadata.namespaceSTRIMZI_LEADER_ELECTION_IDENTITYRequired when leader election is enabled. Configures the identity of a given Cluster Operator instance used during the leader election. The identity must be unique for each operator instance. You can use the downward API to configure it to the name of the pod where the Cluster Operator is deployed.
env: - name: STRIMZI_LEADER_ELECTION_IDENTITY valueFrom: fieldRef: fieldPath: metadata.nameSTRIMZI_LEADER_ELECTION_LEASE_DURATION_MS- Optional, default 15000 ms. Specifies the duration the acquired lease is valid.
STRIMZI_LEADER_ELECTION_RENEW_DEADLINE_MS- Optional, default 10000 ms. Specifies the period the leader should try to maintain leadership.
STRIMZI_LEADER_ELECTION_RETRY_PERIOD_MS- Optional, default 2000 ms. Specifies the frequency of updates to the lease lock by the leader.
9.5.4.2. Configuring Cluster Operator replicas
To run additional Cluster Operator replicas in standby mode, you will need to increase the number of replicas and enable leader election. To configure leader election, use the leader election environment variables.
To make the required changes, configure the following Cluster Operator installation files located in install/cluster-operator/:
- 060-Deployment-strimzi-cluster-operator.yaml
- 022-ClusterRole-strimzi-cluster-operator-role.yaml
- 022-RoleBinding-strimzi-cluster-operator.yaml
Leader election has its own ClusterRole and RoleBinding RBAC resources that target the namespace where the Cluster Operator is running, rather than the namespace it is watching.
The default deployment configuration creates a Lease resource called strimzi-cluster-operator in the same namespace as the Cluster Operator. The Cluster Operator uses leases to manage leader election. The RBAC resources provide the permissions to use the Lease resource. If you use a different Lease name or namespace, update the ClusterRole and RoleBinding files accordingly.
Prerequisites
-
You need an account with permission to create and manage
CustomResourceDefinitionand RBAC (ClusterRole, andRoleBinding) resources.
Procedure
Edit the Deployment resource that is used to deploy the Cluster Operator, which is defined in the 060-Deployment-strimzi-cluster-operator.yaml file.
Change the
replicasproperty from the default (1) to a value that matches the required number of replicas.Increasing the number of Cluster Operator replicas
apiVersion: apps/v1 kind: Deployment metadata: name: strimzi-cluster-operator labels: app: strimzi spec: replicas: 3Check that the leader election
envproperties are set.If they are not set, configure them.
To enable leader election,
STRIMZI_LEADER_ELECTION_ENABLEDmust be set totrue(default).In this example, the name of the lease is changed to
my-strimzi-cluster-operator.Configuring leader election environment variables for the Cluster Operator
# ... spec containers: - name: strimzi-cluster-operator # ... env: - name: STRIMZI_LEADER_ELECTION_ENABLED value: "true" - name: STRIMZI_LEADER_ELECTION_LEASE_NAME value: "my-strimzi-cluster-operator" - name: STRIMZI_LEADER_ELECTION_LEASE_NAMESPACE valueFrom: fieldRef: fieldPath: metadata.namespace - name: STRIMZI_LEADER_ELECTION_IDENTITY valueFrom: fieldRef: fieldPath: metadata.nameFor a description of the available environment variables, see Section 9.5.4.1, “Enabling leader election for Cluster Operator replicas”.
If you specified a different name or namespace for the
Leaseresource used in leader election, update the RBAC resources.(optional) Edit the
ClusterRoleresource in the022-ClusterRole-strimzi-cluster-operator-role.yamlfile.Update
resourceNameswith the name of theLeaseresource.Updating the ClusterRole references to the lease
apiVersion: rbac.authorization.k8s.io/v1 kind: ClusterRole metadata: name: strimzi-cluster-operator-leader-election labels: app: strimzi rules: - apiGroups: - coordination.k8s.io resourceNames: - my-strimzi-cluster-operator # ...(optional) Edit the
RoleBindingresource in the022-RoleBinding-strimzi-cluster-operator.yamlfile.Update
subjects.nameandsubjects.namespacewith the name of theLeaseresource and the namespace where it was created.Updating the RoleBinding references to the lease
apiVersion: rbac.authorization.k8s.io/v1 kind: RoleBinding metadata: name: strimzi-cluster-operator-leader-election labels: app: strimzi subjects: - kind: ServiceAccount name: my-strimzi-cluster-operator namespace: myproject # ...Deploy the Cluster Operator:
oc create -f install/cluster-operator -n myprojectCheck the status of the deployment:
oc get deployments -n myprojectOutput shows the deployment name and readiness
NAME READY UP-TO-DATE AVAILABLE strimzi-cluster-operator 3/3 3 3READYshows the number of replicas that are ready/expected. The deployment is successful when theAVAILABLEoutput shows the correct number of replicas.
9.5.5. Configuring Cluster Operator HTTP proxy settings
If you are running a Kafka cluster behind a HTTP proxy, you can still pass data in and out of the cluster. For example, you can run Kafka Connect with connectors that push and pull data from outside the proxy. Or you can use a proxy to connect with an authorization server.
Configure the Cluster Operator deployment to specify the proxy environment variables. The Cluster Operator accepts standard proxy configuration (HTTP_PROXY, HTTPS_PROXY and NO_PROXY) as environment variables. The proxy settings are applied to all Streams for Apache Kafka containers.
The format for a proxy address is http://<ip_address>:<port_number>. To set up a proxy with a name and password, the format is http://<username>:<password>@<ip-address>:<port_number>.
Prerequisites
-
You need an account with permission to create and manage
CustomResourceDefinitionand RBAC (ClusterRole, andRoleBinding) resources.
Procedure
To add proxy environment variables to the Cluster Operator, update its
Deploymentconfiguration (install/cluster-operator/060-Deployment-strimzi-cluster-operator.yaml).Example proxy configuration for the Cluster Operator
apiVersion: apps/v1 kind: Deployment spec: # ... template: spec: serviceAccountName: strimzi-cluster-operator containers: # ... env: # ... - name: "HTTP_PROXY" value: "http://proxy.com"1 - name: "HTTPS_PROXY" value: "https://proxy.com"2 - name: "NO_PROXY" value: "internal.com, other.domain.com"3 # ...Alternatively, edit the
Deploymentdirectly:oc edit deployment strimzi-cluster-operatorIf you updated the YAML file instead of editing the
Deploymentdirectly, apply the changes:oc create -f install/cluster-operator/060-Deployment-strimzi-cluster-operator.yaml
9.5.6. Disabling FIPS mode using Cluster Operator configuration
Streams for Apache Kafka automatically switches to FIPS mode when running on a FIPS-enabled OpenShift cluster. Disable FIPS mode by setting the FIPS_MODE environment variable to disabled in the deployment configuration for the Cluster Operator. With FIPS mode disabled, Streams for Apache Kafka automatically disables FIPS in the OpenJDK for all components. With FIPS mode disabled, Streams for Apache Kafka is not FIPS compliant. The Streams for Apache Kafka operators, as well as all operands, run in the same way as if they were running on an OpenShift cluster without FIPS enabled.
Procedure
To disable the FIPS mode in the Cluster Operator, update its
Deploymentconfiguration (install/cluster-operator/060-Deployment-strimzi-cluster-operator.yaml) and add theFIPS_MODEenvironment variable.Example FIPS configuration for the Cluster Operator
apiVersion: apps/v1 kind: Deployment spec: # ... template: spec: serviceAccountName: strimzi-cluster-operator containers: # ... env: # ... - name: "FIPS_MODE" value: "disabled"1 # ...- 1
- Disables the FIPS mode.
Alternatively, edit the
Deploymentdirectly:oc edit deployment strimzi-cluster-operatorIf you updated the YAML file instead of editing the
Deploymentdirectly, apply the changes:oc apply -f install/cluster-operator/060-Deployment-strimzi-cluster-operator.yaml
9.6. Configuring Kafka Connect
Update the spec properties of the KafkaConnect custom resource to configure your Kafka Connect deployment.
Use Kafka Connect to set up external data connections to your Kafka cluster. Use the properties of the KafkaConnect resource to configure your Kafka Connect deployment.
For a deeper understanding of the Kafka Connect cluster configuration options, refer to the Streams for Apache Kafka Custom Resource API Reference.
KafkaConnector configuration
KafkaConnector resources allow you to create and manage connector instances for Kafka Connect in an OpenShift-native way.
In your Kafka Connect configuration, you enable KafkaConnectors for a Kafka Connect cluster by adding the strimzi.io/use-connector-resources annotation. You can also add a build configuration so that Streams for Apache Kafka automatically builds a container image with the connector plugins you require for your data connections. External configuration for Kafka Connect connectors is specified through the externalConfiguration property.
To manage connectors, you can use use KafkaConnector custom resources or the Kafka Connect REST API. KafkaConnector resources must be deployed to the same namespace as the Kafka Connect cluster they link to. For more information on using these methods to create, reconfigure, or delete connectors, see Adding connectors.
Connector configuration is passed to Kafka Connect as part of an HTTP request and stored within Kafka itself. ConfigMaps and Secrets are standard OpenShift resources used for storing configurations and confidential data. You can use ConfigMaps and Secrets to configure certain elements of a connector. You can then reference the configuration values in HTTP REST commands, which keeps the configuration separate and more secure, if needed. This method applies especially to confidential data, such as usernames, passwords, or certificates.
Handling high volumes of messages
You can tune the configuration to handle high volumes of messages. For more information, see Handling high volumes of messages.
Example KafkaConnect custom resource configuration
apiVersion: kafka.strimzi.io/v1beta2
kind: KafkaConnect
metadata:
name: my-connect-cluster
annotations:
strimzi.io/use-connector-resources: "true"
spec:
replicas: 3
authentication:
type: tls
certificateAndKey:
certificate: source.crt
key: source.key
secretName: my-user-source
bootstrapServers: my-cluster-kafka-bootstrap:9092
tls:
trustedCertificates:
- secretName: my-cluster-cluster-cert
certificate: ca.crt
- secretName: my-cluster-cluster-cert
certificate: ca2.crt
config:
group.id: my-connect-cluster
offset.storage.topic: my-connect-cluster-offsets
config.storage.topic: my-connect-cluster-configs
status.storage.topic: my-connect-cluster-status
key.converter: org.apache.kafka.connect.json.JsonConverter
value.converter: org.apache.kafka.connect.json.JsonConverter
key.converter.schemas.enable: true
value.converter.schemas.enable: true
config.storage.replication.factor: 3
offset.storage.replication.factor: 3
status.storage.replication.factor: 3
build:
output:
type: docker
image: my-registry.io/my-org/my-connect-cluster:latest
pushSecret: my-registry-credentials
plugins:
- name: connector-1
artifacts:
- type: tgz
url: <url_to_download_connector_1_artifact>
sha512sum: <SHA-512_checksum_of_connector_1_artifact>
- name: connector-2
artifacts:
- type: jar
url: <url_to_download_connector_2_artifact>
sha512sum: <SHA-512_checksum_of_connector_2_artifact>
externalConfiguration:
env:
- name: AWS_ACCESS_KEY_ID
valueFrom:
secretKeyRef:
name: aws-creds
key: awsAccessKey
- name: AWS_SECRET_ACCESS_KEY
valueFrom:
secretKeyRef:
name: aws-creds
key: awsSecretAccessKey
resources:
requests:
cpu: "1"
memory: 2Gi
limits:
cpu: "2"
memory: 2Gi
logging:
type: inline
loggers:
log4j.rootLogger: INFO
readinessProbe:
initialDelaySeconds: 15
timeoutSeconds: 5
livenessProbe:
initialDelaySeconds: 15
timeoutSeconds: 5
metricsConfig:
type: jmxPrometheusExporter
valueFrom:
configMapKeyRef:
name: my-config-map
key: my-key
jvmOptions:
"-Xmx": "1g"
"-Xms": "1g"
image: my-org/my-image:latest
rack:
topologyKey: topology.kubernetes.io/zone
template:
pod:
affinity:
podAntiAffinity:
requiredDuringSchedulingIgnoredDuringExecution:
- labelSelector:
matchExpressions:
- key: application
operator: In
values:
- postgresql
- mongodb
topologyKey: "kubernetes.io/hostname"
connectContainer:
env:
- name: OTEL_SERVICE_NAME
value: my-otel-service
- name: OTEL_EXPORTER_OTLP_ENDPOINT
value: "http://otlp-host:4317"
tracing:
type: opentelemetry - 1
- Use
KafkaConnect. - 2
- Enables KafkaConnectors for the Kafka Connect cluster.
- 3
- The number of replica nodes for the workers that run tasks.
- 4
- Authentication for the Kafka Connect cluster, specified as mTLS, token-based OAuth, SASL-based SCRAM-SHA-256/SCRAM-SHA-512, or PLAIN. By default, Kafka Connect connects to Kafka brokers using a plain text connection.
- 5
- Bootstrap server for connection to the Kafka cluster.
- 6
- TLS encryption with key names under which TLS certificates are stored in X.509 format for the cluster. If certificates are stored in the same secret, it can be listed multiple times.
- 7
- Kafka Connect configuration of workers (not connectors). Standard Apache Kafka configuration may be provided, restricted to those properties not managed directly by Streams for Apache Kafka.
- 8
- Build configuration properties for building a container image with connector plugins automatically.
- 9
- (Required) Configuration of the container registry where new images are pushed.
- 10
- (Required) List of connector plugins and their artifacts to add to the new container image. Each plugin must be configured with at least one
artifact. - 11
- External configuration for connectors using environment variables, as shown here, or volumes. You can also use configuration provider plugins to load configuration values from external sources.
- 12
- Requests for reservation of supported resources, currently
cpuandmemory, and limits to specify the maximum resources that can be consumed. - 13
- Specified Kafka Connect loggers and log levels added directly (
inline) or indirectly (external) through a ConfigMap. A custom Log4j configuration must be placed under thelog4j.propertiesorlog4j2.propertieskey in the ConfigMap. For the Kafka Connectlog4j.rootLoggerlogger, you can set the log level to INFO, ERROR, WARN, TRACE, DEBUG, FATAL or OFF. - 14
- Healthchecks to know when to restart a container (liveness) and when a container can accept traffic (readiness).
- 15
- Prometheus metrics, which are enabled by referencing a ConfigMap containing configuration for the Prometheus JMX exporter in this example. You can enable metrics without further configuration using a reference to a ConfigMap containing an empty file under
metricsConfig.valueFrom.configMapKeyRef.key. - 16
- JVM configuration options to optimize performance for the Virtual Machine (VM) running Kafka Connect.
- 17
- ADVANCED OPTION: Container image configuration, which is recommended only in special situations.
- 18
- SPECIALIZED OPTION: Rack awareness configuration for the deployment. This is a specialized option intended for a deployment within the same location, not across regions. Use this option if you want connectors to consume from the closest replica rather than the leader replica. In certain cases, consuming from the closest replica can improve network utilization or reduce costs . The
topologyKeymust match a node label containing the rack ID. The example used in this configuration specifies a zone using the standardtopology.kubernetes.io/zonelabel. To consume from the closest replica, enable theRackAwareReplicaSelectorin the Kafka broker configuration. - 19
- Template customization. Here a pod is scheduled with anti-affinity, so the pod is not scheduled on nodes with the same hostname.
- 20
- Environment variables are set for distributed tracing.
- 21
- Distributed tracing is enabled by using OpenTelemetry.
9.6.1. Configuring Kafka Connect for multiple instances
By default, Streams for Apache Kafka configures the group ID and names of the internal topics used by Kafka Connect. When running multiple instances of Kafka Connect, you must change these default settings using the following config properties:
apiVersion: kafka.strimzi.io/v1beta2
kind: KafkaConnect
metadata:
name: my-connect
spec:
config:
group.id: my-connect-cluster
offset.storage.topic: my-connect-cluster-offsets
config.storage.topic: my-connect-cluster-configs
status.storage.topic: my-connect-cluster-status
# ...
# ...
Values for the three topics must be the same for all instances with the same group.id.
Unless you modify these default settings, each instance connecting to the same Kafka cluster is deployed with the same values. In practice, this means all instances form a cluster and use the same internal topics.
Multiple instances attempting to use the same internal topics will cause unexpected errors, so you must change the values of these properties for each instance.
9.6.2. Configuring Kafka Connect user authorization
When using authorization in Kafka, a Kafka Connect user requires read/write access to the cluster group and internal topics of Kafka Connect. This procedure outlines how access is granted using simple authorization and ACLs.
Properties for the Kafka Connect cluster group ID and internal topics are configured by Streams for Apache Kafka by default. Alternatively, you can define them explicitly in the spec of the KafkaConnect resource. This is useful when configuring Kafka Connect for multiple instances, as the values for the group ID and topics must differ when running multiple Kafka Connect instances.
Simple authorization uses ACL rules managed by the Kafka AclAuthorizer and StandardAuthorizer plugins to ensure appropriate access levels. For more information on configuring a KafkaUser resource to use simple authorization, see the AclRule schema reference.
Prerequisites
- An OpenShift cluster
- A running Cluster Operator
Procedure
Edit the
authorizationproperty in theKafkaUserresource to provide access rights to the user.Access rights are configured for the Kafka Connect topics and cluster group using
literalname values. The following table shows the default names configured for the topics and cluster group ID.Expand Table 9.2. Names for the access rights configuration Property Name offset.storage.topicconnect-cluster-offsetsstatus.storage.topicconnect-cluster-statusconfig.storage.topicconnect-cluster-configsgroupconnect-clusterIn this example configuration, the default names are used to specify access rights. If you are using different names for a Kafka Connect instance, use those names in the ACLs configuration.
Example configuration for simple authorization
apiVersion: kafka.strimzi.io/v1beta2 kind: KafkaUser metadata: name: my-user labels: strimzi.io/cluster: my-cluster spec: # ... authorization: type: simple acls: # access to offset.storage.topic - resource: type: topic name: connect-cluster-offsets patternType: literal operations: - Create - Describe - Read - Write host: "*" # access to status.storage.topic - resource: type: topic name: connect-cluster-status patternType: literal operations: - Create - Describe - Read - Write host: "*" # access to config.storage.topic - resource: type: topic name: connect-cluster-configs patternType: literal operations: - Create - Describe - Read - Write host: "*" # cluster group - resource: type: group name: connect-cluster patternType: literal operations: - Read host: "*"Create or update the resource.
oc apply -f KAFKA-USER-CONFIG-FILE
9.6.3. Manually stopping or pausing Kafka Connect connectors
If you are using KafkaConnector resources to configure connectors, use the state configuration to either stop or pause a connector. In contrast to the paused state, where the connector and tasks remain instantiated, stopping a connector retains only the configuration, with no active processes. Stopping a connector from running may be more suitable for longer durations than just pausing. While a paused connector is quicker to resume, a stopped connector has the advantages of freeing up memory and resources.
The state configuration replaces the (deprecated) pause configuration in the KafkaConnectorSpec schema, which allows pauses on connectors. If you were previously using the pause configuration to pause connectors, we encourage you to transition to using the state configuration only to avoid conflicts.
Prerequisites
- The Cluster Operator is running.
Procedure
Find the name of the
KafkaConnectorcustom resource that controls the connector you want to pause or stop:oc get KafkaConnectorEdit the
KafkaConnectorresource to stop or pause the connector.Example configuration for stopping a Kafka Connect connector
apiVersion: kafka.strimzi.io/v1beta2 kind: KafkaConnector metadata: name: my-source-connector labels: strimzi.io/cluster: my-connect-cluster spec: class: org.apache.kafka.connect.file.FileStreamSourceConnector tasksMax: 2 config: file: "/opt/kafka/LICENSE" topic: my-topic state: stopped # ...Change the
stateconfiguration tostoppedorpaused. The default state for the connector when this property is not set isrunning.Apply the changes to the
KafkaConnectorconfiguration.You can resume the connector by changing
statetorunningor removing the configuration.
Alternatively, you can expose the Kafka Connect API and use the stop and pause endpoints to stop a connector from running. For example, PUT /connectors/<connector_name>/stop. You can then use the resume endpoint to restart it.
9.6.4. Manually restarting Kafka Connect connectors
If you are using KafkaConnector resources to manage connectors, use the strimzi.io/restart annotation to manually trigger a restart of a connector.
Prerequisites
- The Cluster Operator is running.
Procedure
Find the name of the
KafkaConnectorcustom resource that controls the Kafka connector you want to restart:oc get KafkaConnectorRestart the connector by annotating the
KafkaConnectorresource in OpenShift:oc annotate KafkaConnector <kafka_connector_name> strimzi.io/restart="true"The
restartannotation is set totrue.Wait for the next reconciliation to occur (every two minutes by default).
The Kafka connector is restarted, as long as the annotation was detected by the reconciliation process. When Kafka Connect accepts the restart request, the annotation is removed from the
KafkaConnectorcustom resource.
9.6.5. Manually restarting Kafka Connect connector tasks
If you are using KafkaConnector resources to manage connectors, use the strimzi.io/restart-task annotation to manually trigger a restart of a connector task.
Prerequisites
- The Cluster Operator is running.
Procedure
Find the name of the
KafkaConnectorcustom resource that controls the Kafka connector task you want to restart:oc get KafkaConnectorFind the ID of the task to be restarted from the
KafkaConnectorcustom resource:oc describe KafkaConnector <kafka_connector_name>Task IDs are non-negative integers, starting from 0.
Use the ID to restart the connector task by annotating the
KafkaConnectorresource in OpenShift:oc annotate KafkaConnector <kafka_connector_name> strimzi.io/restart-task="0"In this example, task
0is restarted.Wait for the next reconciliation to occur (every two minutes by default).
The Kafka connector task is restarted, as long as the annotation was detected by the reconciliation process. When Kafka Connect accepts the restart request, the annotation is removed from the
KafkaConnectorcustom resource.
9.7. Configuring Kafka MirrorMaker 2
Update the spec properties of the KafkaMirrorMaker2 custom resource to configure your MirrorMaker 2 deployment. MirrorMaker 2 uses source cluster configuration for data consumption and target cluster configuration for data output.
MirrorMaker 2 is based on the Kafka Connect framework, connectors managing the transfer of data between clusters.
You configure MirrorMaker 2 to define the Kafka Connect deployment, including the connection details of the source and target clusters, and then run a set of MirrorMaker 2 connectors to make the connection.
MirrorMaker 2 supports topic configuration synchronization between the source and target clusters. You specify source topics in the MirrorMaker 2 configuration. MirrorMaker 2 monitors the source topics. MirrorMaker 2 detects and propagates changes to the source topics to the remote topics. Changes might include automatically creating missing topics and partitions.
In most cases you write to local topics and read from remote topics. Though write operations are not prevented on remote topics, they should be avoided.
The configuration must specify:
- Each Kafka cluster
- Connection information for each cluster, including authentication
The replication flow and direction
- Cluster to cluster
- Topic to topic
For a deeper understanding of the Kafka MirrorMaker 2 cluster configuration options, refer to the Streams for Apache Kafka Custom Resource API Reference.
MirrorMaker 2 resource configuration differs from the previous version of MirrorMaker, which is now deprecated. There is currently no legacy support, so any resources must be manually converted into the new format.
Default configuration
MirrorMaker 2 provides default configuration values for properties such as replication factors. A minimal configuration, with defaults left unchanged, would be something like this example:
Minimal configuration for MirrorMaker 2
apiVersion: kafka.strimzi.io/v1beta2
kind: KafkaMirrorMaker2
metadata:
name: my-mirror-maker2
spec:
version: 3.7.0
connectCluster: "my-cluster-target"
clusters:
- alias: "my-cluster-source"
bootstrapServers: my-cluster-source-kafka-bootstrap:9092
- alias: "my-cluster-target"
bootstrapServers: my-cluster-target-kafka-bootstrap:9092
mirrors:
- sourceCluster: "my-cluster-source"
targetCluster: "my-cluster-target"
sourceConnector: {}You can configure access control for source and target clusters using mTLS or SASL authentication. This procedure shows a configuration that uses TLS encryption and mTLS authentication for the source and target cluster.
You can specify the topics and consumer groups you wish to replicate from a source cluster in the KafkaMirrorMaker2 resource. You use the topicsPattern and groupsPattern properties to do this. You can provide a list of names or use a regular expression. By default, all topics and consumer groups are replicated if you do not set the topicsPattern and groupsPattern properties. You can also replicate all topics and consumer groups by using ".*" as a regular expression. However, try to specify only the topics and consumer groups you need to avoid causing any unnecessary extra load on the cluster.
Handling high volumes of messages
You can tune the configuration to handle high volumes of messages. For more information, see Handling high volumes of messages.
Example KafkaMirrorMaker2 custom resource configuration
apiVersion: kafka.strimzi.io/v1beta2
kind: KafkaMirrorMaker2
metadata:
name: my-mirror-maker2
spec:
version: 3.7.0
replicas: 3
connectCluster: "my-cluster-target"
clusters:
- alias: "my-cluster-source"
authentication:
certificateAndKey:
certificate: source.crt
key: source.key
secretName: my-user-source
type: tls
bootstrapServers: my-cluster-source-kafka-bootstrap:9092
tls:
trustedCertificates:
- certificate: ca.crt
secretName: my-cluster-source-cluster-ca-cert
- alias: "my-cluster-target"
authentication:
certificateAndKey:
certificate: target.crt
key: target.key
secretName: my-user-target
type: tls
bootstrapServers: my-cluster-target-kafka-bootstrap:9092
config:
config.storage.replication.factor: 1
offset.storage.replication.factor: 1
status.storage.replication.factor: 1
tls:
trustedCertificates:
- certificate: ca.crt
secretName: my-cluster-target-cluster-ca-cert
mirrors:
- sourceCluster: "my-cluster-source"
targetCluster: "my-cluster-target"
sourceConnector:
tasksMax: 10
autoRestart:
enabled: true
config
replication.factor: 1
offset-syncs.topic.replication.factor: 1
sync.topic.acls.enabled: "false"
refresh.topics.interval.seconds: 60
replication.policy.class: "org.apache.kafka.connect.mirror.IdentityReplicationPolicy"
heartbeatConnector:
autoRestart:
enabled: true
config:
heartbeats.topic.replication.factor: 1
replication.policy.class: "org.apache.kafka.connect.mirror.IdentityReplicationPolicy"
checkpointConnector:
autoRestart:
enabled: true
config:
checkpoints.topic.replication.factor: 1
refresh.groups.interval.seconds: 600
sync.group.offsets.enabled: true
sync.group.offsets.interval.seconds: 60
emit.checkpoints.interval.seconds: 60
replication.policy.class: "org.apache.kafka.connect.mirror.IdentityReplicationPolicy"
topicsPattern: "topic1|topic2|topic3"
groupsPattern: "group1|group2|group3"
resources:
requests:
cpu: "1"
memory: 2Gi
limits:
cpu: "2"
memory: 2Gi
logging:
type: inline
loggers:
connect.root.logger.level: INFO
readinessProbe:
initialDelaySeconds: 15
timeoutSeconds: 5
livenessProbe:
initialDelaySeconds: 15
timeoutSeconds: 5
jvmOptions:
"-Xmx": "1g"
"-Xms": "1g"
image: my-org/my-image:latest
rack:
topologyKey: topology.kubernetes.io/zone
template:
pod:
affinity:
podAntiAffinity:
requiredDuringSchedulingIgnoredDuringExecution:
- labelSelector:
matchExpressions:
- key: application
operator: In
values:
- postgresql
- mongodb
topologyKey: "kubernetes.io/hostname"
connectContainer:
env:
- name: OTEL_SERVICE_NAME
value: my-otel-service
- name: OTEL_EXPORTER_OTLP_ENDPOINT
value: "http://otlp-host:4317"
tracing:
type: opentelemetry
externalConfiguration:
env:
- name: AWS_ACCESS_KEY_ID
valueFrom:
secretKeyRef:
name: aws-creds
key: awsAccessKey
- name: AWS_SECRET_ACCESS_KEY
valueFrom:
secretKeyRef:
name: aws-creds
key: awsSecretAccessKey- 1
- The Kafka Connect and MirrorMaker 2 version, which will always be the same.
- 2
- The number of replica nodes for the workers that run tasks.
- 3
- Kafka cluster alias for Kafka Connect, which must specify the target Kafka cluster. The Kafka cluster is used by Kafka Connect for its internal topics.
- 4
- Specification for the Kafka clusters being synchronized.
- 5
- Cluster alias for the source Kafka cluster.
- 6
- Authentication for the source cluster, specified as mTLS, token-based OAuth, SASL-based SCRAM-SHA-256/SCRAM-SHA-512, or PLAIN.
- 7
- Bootstrap server for connection to the source Kafka cluster.
- 8
- TLS encryption with key names under which TLS certificates are stored in X.509 format for the source Kafka cluster. If certificates are stored in the same secret, it can be listed multiple times.
- 9
- Cluster alias for the target Kafka cluster.
- 10
- Authentication for the target Kafka cluster is configured in the same way as for the source Kafka cluster.
- 11
- Bootstrap server for connection to the target Kafka cluster.
- 12
- Kafka Connect configuration. Standard Apache Kafka configuration may be provided, restricted to those properties not managed directly by Streams for Apache Kafka.
- 13
- TLS encryption for the target Kafka cluster is configured in the same way as for the source Kafka cluster.
- 14
- MirrorMaker 2 connectors.
- 15
- Cluster alias for the source cluster used by the MirrorMaker 2 connectors.
- 16
- Cluster alias for the target cluster used by the MirrorMaker 2 connectors.
- 17
- Configuration for the
MirrorSourceConnectorthat creates remote topics. Theconfigoverrides the default configuration options. - 18
- The maximum number of tasks that the connector may create. Tasks handle the data replication and run in parallel. If the infrastructure supports the processing overhead, increasing this value can improve throughput. Kafka Connect distributes the tasks between members of the cluster. If there are more tasks than workers, workers are assigned multiple tasks. For sink connectors, aim to have one task for each topic partition consumed. For source connectors, the number of tasks that can run in parallel may also depend on the external system. The connector creates fewer than the maximum number of tasks if it cannot achieve the parallelism.
- 19
- Enables automatic restarts of failed connectors and tasks. By default, the number of restarts is indefinite, but you can set a maximum on the number of automatic restarts using the
maxRestartsproperty. - 20
- Replication factor for mirrored topics created at the target cluster.
- 21
- Replication factor for the
MirrorSourceConnectoroffset-syncsinternal topic that maps the offsets of the source and target clusters. - 22
- When ACL rules synchronization is enabled, ACLs are applied to synchronized topics. The default is
true. This feature is not compatible with the User Operator. If you are using the User Operator, set this property tofalse. - 23
- Optional setting to change the frequency of checks for new topics. The default is for a check every 10 minutes.
- 24
- Adds a policy that overrides the automatic renaming of remote topics. Instead of prepending the name with the name of the source cluster, the topic retains its original name. This optional setting is useful for active/passive backups and data migration. The property must be specified for all connectors. For bidirectional (active/active) replication, use the
DefaultReplicationPolicyclass to automatically rename remote topics and specify thereplication.policy.separatorproperty for all connectors to add a custom separator. - 25
- Configuration for the
MirrorHeartbeatConnectorthat performs connectivity checks. Theconfigoverrides the default configuration options. - 26
- Replication factor for the heartbeat topic created at the target cluster.
- 27
- Configuration for the
MirrorCheckpointConnectorthat tracks offsets. Theconfigoverrides the default configuration options. - 28
- Replication factor for the checkpoints topic created at the target cluster.
- 29
- Optional setting to change the frequency of checks for new consumer groups. The default is for a check every 10 minutes.
- 30
- Optional setting to synchronize consumer group offsets, which is useful for recovery in an active/passive configuration. Synchronization is not enabled by default.
- 31
- If the synchronization of consumer group offsets is enabled, you can adjust the frequency of the synchronization.
- 32
- Adjusts the frequency of checks for offset tracking. If you change the frequency of offset synchronization, you might also need to adjust the frequency of these checks.
- 33
- Topic replication from the source cluster defined as a comma-separated list or regular expression pattern. The source connector replicates the specified topics. The checkpoint connector tracks offsets for the specified topics. Here we request three topics by name.
- 34
- Consumer group replication from the source cluster defined as a comma-separated list or regular expression pattern. The checkpoint connector replicates the specified consumer groups. Here we request three consumer groups by name.
- 35
- Requests for reservation of supported resources, currently
cpuandmemory, and limits to specify the maximum resources that can be consumed. - 36
- Specified Kafka Connect loggers and log levels added directly (
inline) or indirectly (external) through a ConfigMap. A custom Log4j configuration must be placed under thelog4j.propertiesorlog4j2.propertieskey in the ConfigMap. For the Kafka Connectlog4j.rootLoggerlogger, you can set the log level to INFO, ERROR, WARN, TRACE, DEBUG, FATAL or OFF. - 37
- Healthchecks to know when to restart a container (liveness) and when a container can accept traffic (readiness).
- 38
- JVM configuration options to optimize performance for the Virtual Machine (VM) running Kafka MirrorMaker.
- 39
- ADVANCED OPTION: Container image configuration, which is recommended only in special situations.
- 40
- SPECIALIZED OPTION: Rack awareness configuration for the deployment. This is a specialized option intended for a deployment within the same location, not across regions. Use this option if you want connectors to consume from the closest replica rather than the leader replica. In certain cases, consuming from the closest replica can improve network utilization or reduce costs . The
topologyKeymust match a node label containing the rack ID. The example used in this configuration specifies a zone using the standardtopology.kubernetes.io/zonelabel. To consume from the closest replica, enable theRackAwareReplicaSelectorin the Kafka broker configuration. - 41
- Template customization. Here a pod is scheduled with anti-affinity, so the pod is not scheduled on nodes with the same hostname.
- 42
- Environment variables are set for distributed tracing.
- 43
- Distributed tracing is enabled by using OpenTelemetry.
- 44
- External configuration for an OpenShift Secret mounted to Kafka MirrorMaker as an environment variable. You can also use configuration provider plugins to load configuration values from external sources.
9.7.1. Configuring active/active or active/passive modes
You can use MirrorMaker 2 in active/passive or active/active cluster configurations.
- active/active cluster configuration
- An active/active configuration has two active clusters replicating data bidirectionally. Applications can use either cluster. Each cluster can provide the same data. In this way, you can make the same data available in different geographical locations. As consumer groups are active in both clusters, consumer offsets for replicated topics are not synchronized back to the source cluster.
- active/passive cluster configuration
- An active/passive configuration has an active cluster replicating data to a passive cluster. The passive cluster remains on standby. You might use the passive cluster for data recovery in the event of system failure.
The expectation is that producers and consumers connect to active clusters only. A MirrorMaker 2 cluster is required at each target destination.
9.7.1.1. Bidirectional replication (active/active)
The MirrorMaker 2 architecture supports bidirectional replication in an active/active cluster configuration.
Each cluster replicates the data of the other cluster using the concept of source and remote topics. As the same topics are stored in each cluster, remote topics are automatically renamed by MirrorMaker 2 to represent the source cluster. The name of the originating cluster is prepended to the name of the topic.
Figure 9.1. Topic renaming
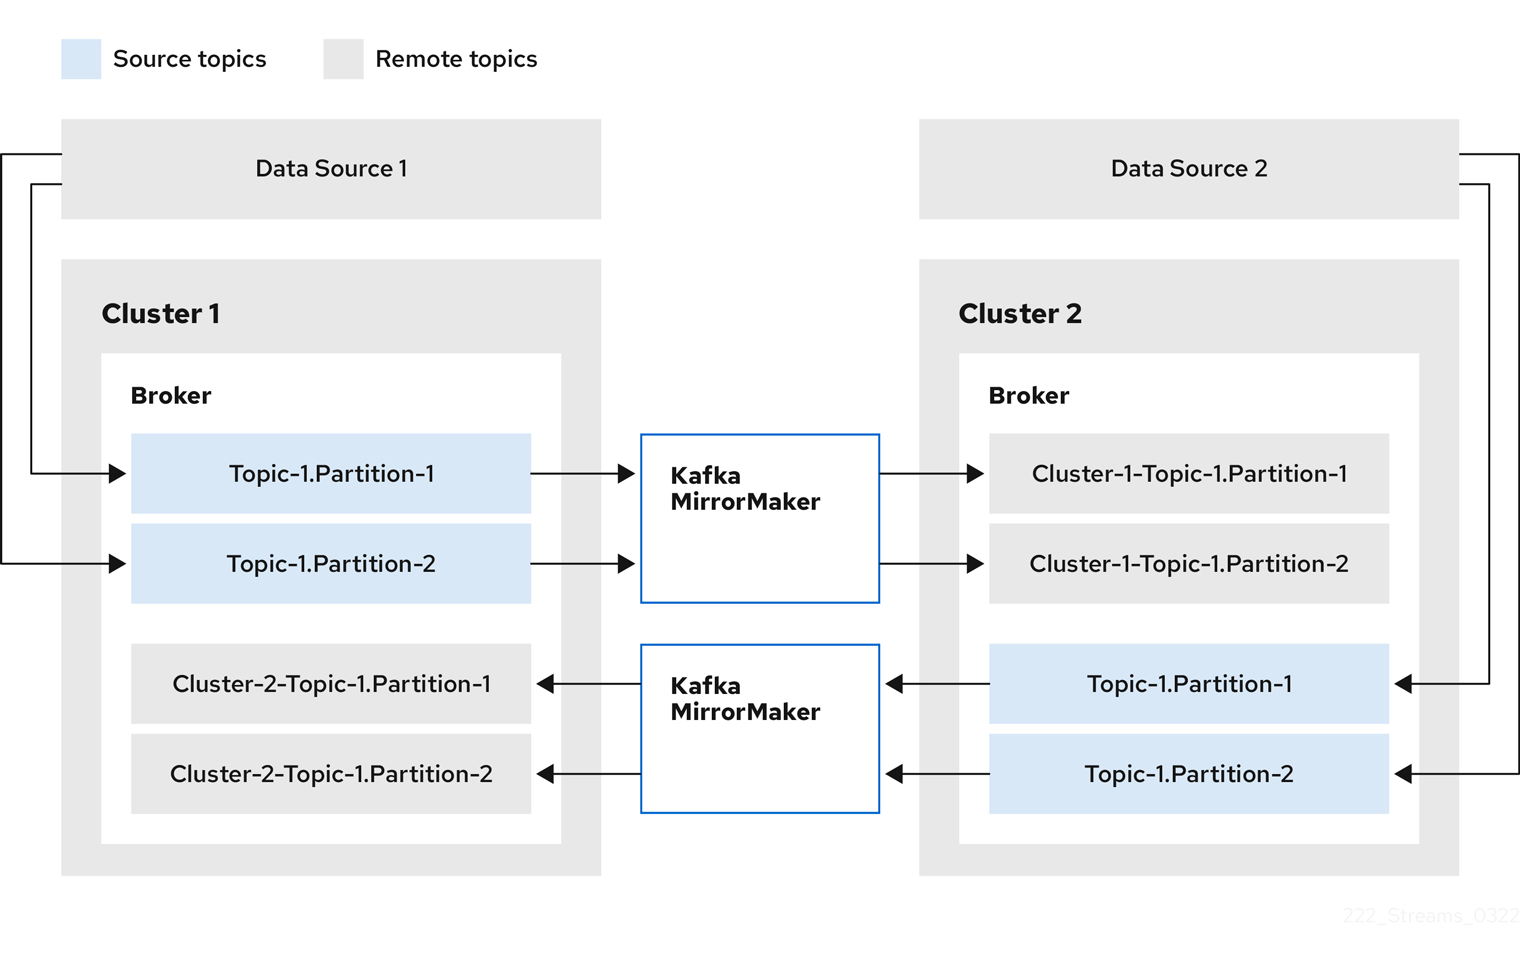
By flagging the originating cluster, topics are not replicated back to that cluster.
The concept of replication through remote topics is useful when configuring an architecture that requires data aggregation. Consumers can subscribe to source and remote topics within the same cluster, without the need for a separate aggregation cluster.
9.7.1.2. Unidirectional replication (active/passive)
The MirrorMaker 2 architecture supports unidirectional replication in an active/passive cluster configuration.
You can use an active/passive cluster configuration to make backups or migrate data to another cluster. In this situation, you might not want automatic renaming of remote topics.
You can override automatic renaming by adding IdentityReplicationPolicy to the source connector configuration. With this configuration applied, topics retain their original names.
9.7.2. Configuring MirrorMaker 2 for multiple instances
By default, Streams for Apache Kafka configures the group ID and names of the internal topics used by the Kafka Connect framework that MirrorMaker 2 runs on. When running multiple instances of MirrorMaker 2, and they share the same connectCluster value, you must change these default settings using the following config properties:
apiVersion: kafka.strimzi.io/v1beta2
kind: KafkaMirrorMaker2
metadata:
name: my-mirror-maker2
spec:
connectCluster: "my-cluster-target"
clusters:
- alias: "my-cluster-target"
config:
group.id: my-connect-cluster
offset.storage.topic: my-connect-cluster-offsets
config.storage.topic: my-connect-cluster-configs
status.storage.topic: my-connect-cluster-status
# ...
# ...
Values for the three topics must be the same for all instances with the same group.id.
The connectCluster setting specifies the alias of the target Kafka cluster used by Kafka Connect for its internal topics. As a result, modifications to the connectCluster, group ID, and internal topic naming configuration are specific to the target Kafka cluster. You don’t need to make changes if two MirrorMaker 2 instances are using the same source Kafka cluster or in an active-active mode where each MirrorMaker 2 instance has a different connectCluster setting and target cluster.
However, if multiple MirrorMaker 2 instances share the same connectCluster, each instance connecting to the same target Kafka cluster is deployed with the same values. In practice, this means all instances form a cluster and use the same internal topics.
Multiple instances attempting to use the same internal topics will cause unexpected errors, so you must change the values of these properties for each instance.
9.7.3. Configuring MirrorMaker 2 connectors
Use MirrorMaker 2 connector configuration for the internal connectors that orchestrate the synchronization of data between Kafka clusters.
MirrorMaker 2 consists of the following connectors:
MirrorSourceConnector-
The source connector replicates topics from a source cluster to a target cluster. It also replicates ACLs and is necessary for the
MirrorCheckpointConnectorto run. MirrorCheckpointConnector- The checkpoint connector periodically tracks offsets. If enabled, it also synchronizes consumer group offsets between the source and target cluster.
MirrorHeartbeatConnector- The heartbeat connector periodically checks connectivity between the source and target cluster.
The following table describes connector properties and the connectors you configure to use them.
| Property | sourceConnector | checkpointConnector | heartbeatConnector |
|---|---|---|---|
| ✓ | ✓ | ✓ |
| ✓ | ✓ | ✓ |
| ✓ | ✓ | ✓ |
| ✓ | ✓ | |
| ✓ | ✓ | |
| ✓ | ✓ | |
| ✓ | ||
| ✓ | ||
| ✓ | ||
| ✓ | ||
| ✓ | ||
| ✓ | ||
| ✓ | ||
| ✓ | ||
| ✓ | ||
| ✓ | ||
| ✓ | ||
| ✓ | ||
| ✓ | ||
| ✓ | ||
| ✓ | ||
| ✓ | ||
| ✓ | ||
| ✓ | ||
| ✓ | ||
| ✓ | ||
| ✓ | ||
| ✓ |
9.7.3.1. Changing the location of the consumer group offsets topic
MirrorMaker 2 tracks offsets for consumer groups using internal topics.
offset-syncstopic-
The
offset-syncstopic maps the source and target offsets for replicated topic partitions from record metadata. checkpointstopic-
The
checkpointstopic maps the last committed offset in the source and target cluster for replicated topic partitions in each consumer group.
As they are used internally by MirrorMaker 2, you do not interact directly with these topics.
MirrorCheckpointConnector emits checkpoints for offset tracking. Offsets for the checkpoints topic are tracked at predetermined intervals through configuration. Both topics enable replication to be fully restored from the correct offset position on failover.
The location of the offset-syncs topic is the source cluster by default. You can use the offset-syncs.topic.location connector configuration to change this to the target cluster. You need read/write access to the cluster that contains the topic. Using the target cluster as the location of the offset-syncs topic allows you to use MirrorMaker 2 even if you have only read access to the source cluster.
9.7.3.2. Synchronizing consumer group offsets
The __consumer_offsets topic stores information on committed offsets for each consumer group. Offset synchronization periodically transfers the consumer offsets for the consumer groups of a source cluster into the consumer offsets topic of a target cluster.
Offset synchronization is particularly useful in an active/passive configuration. If the active cluster goes down, consumer applications can switch to the passive (standby) cluster and pick up from the last transferred offset position.
To use topic offset synchronization, enable the synchronization by adding sync.group.offsets.enabled to the checkpoint connector configuration, and setting the property to true. Synchronization is disabled by default.
When using the IdentityReplicationPolicy in the source connector, it also has to be configured in the checkpoint connector configuration. This ensures that the mirrored consumer offsets will be applied for the correct topics.
Consumer offsets are only synchronized for consumer groups that are not active in the target cluster. If the consumer groups are in the target cluster, the synchronization cannot be performed and an UNKNOWN_MEMBER_ID error is returned.
If enabled, the synchronization of offsets from the source cluster is made periodically. You can change the frequency by adding sync.group.offsets.interval.seconds and emit.checkpoints.interval.seconds to the checkpoint connector configuration. The properties specify the frequency in seconds that the consumer group offsets are synchronized, and the frequency of checkpoints emitted for offset tracking. The default for both properties is 60 seconds. You can also change the frequency of checks for new consumer groups using the refresh.groups.interval.seconds property, which is performed every 10 minutes by default.
Because the synchronization is time-based, any switchover by consumers to a passive cluster will likely result in some duplication of messages.
If you have an application written in Java, you can use the RemoteClusterUtils.java utility to synchronize offsets through the application. The utility fetches remote offsets for a consumer group from the checkpoints topic.
9.7.3.3. Deciding when to use the heartbeat connector
The heartbeat connector emits heartbeats to check connectivity between source and target Kafka clusters. An internal heartbeat topic is replicated from the source cluster, which means that the heartbeat connector must be connected to the source cluster. The heartbeat topic is located on the target cluster, which allows it to do the following:
- Identify all source clusters it is mirroring data from
- Verify the liveness and latency of the mirroring process
This helps to make sure that the process is not stuck or has stopped for any reason. While the heartbeat connector can be a valuable tool for monitoring the mirroring processes between Kafka clusters, it’s not always necessary to use it. For example, if your deployment has low network latency or a small number of topics, you might prefer to monitor the mirroring process using log messages or other monitoring tools. If you decide not to use the heartbeat connector, simply omit it from your MirrorMaker 2 configuration.
9.7.3.4. Aligning the configuration of MirrorMaker 2 connectors
To ensure that MirrorMaker 2 connectors work properly, make sure to align certain configuration settings across connectors. Specifically, ensure that the following properties have the same value across all applicable connectors:
-
replication.policy.class -
replication.policy.separator -
offset-syncs.topic.location -
topic.filter.class
For example, the value for replication.policy.class must be the same for the source, checkpoint, and heartbeat connectors. Mismatched or missing settings cause issues with data replication or offset syncing, so it’s essential to keep all relevant connectors configured with the same settings.
9.7.4. Configuring MirrorMaker 2 connector producers and consumers
MirrorMaker 2 connectors use internal producers and consumers. If needed, you can configure these producers and consumers to override the default settings.
For example, you can increase the batch.size for the source producer that sends topics to the target Kafka cluster to better accommodate large volumes of messages.
Producer and consumer configuration options depend on the MirrorMaker 2 implementation, and may be subject to change.
The following tables describe the producers and consumers for each of the connectors and where you can add configuration.
| Type | Description | Configuration |
|---|---|---|
| Producer | Sends topic messages to the target Kafka cluster. Consider tuning the configuration of this producer when it is handling large volumes of data. |
|
| Producer |
Writes to the |
|
| Consumer | Retrieves topic messages from the source Kafka cluster. |
|
| Type | Description | Configuration |
|---|---|---|
| Producer | Emits consumer offset checkpoints. |
|
| Consumer |
Loads the |
|
You can set offset-syncs.topic.location to target to use the target Kafka cluster as the location of the offset-syncs topic.
| Type | Description | Configuration |
|---|---|---|
| Producer | Emits heartbeats. |
|
The following example shows how you configure the producers and consumers.
Example configuration for connector producers and consumers
apiVersion: kafka.strimzi.io/v1beta2
kind: KafkaMirrorMaker2
metadata:
name: my-mirror-maker2
spec:
version: 3.7.0
# ...
mirrors:
- sourceCluster: "my-cluster-source"
targetCluster: "my-cluster-target"
sourceConnector:
tasksMax: 5
config:
producer.override.batch.size: 327680
producer.override.linger.ms: 100
producer.request.timeout.ms: 30000
consumer.fetch.max.bytes: 52428800
# ...
checkpointConnector:
config:
producer.override.request.timeout.ms: 30000
consumer.max.poll.interval.ms: 300000
# ...
heartbeatConnector:
config:
producer.override.request.timeout.ms: 30000
# ...9.7.5. Specifying a maximum number of data replication tasks
Connectors create the tasks that are responsible for moving data in and out of Kafka. Each connector comprises one or more tasks that are distributed across a group of worker pods that run the tasks. Increasing the number of tasks can help with performance issues when replicating a large number of partitions or synchronizing the offsets of a large number of consumer groups.
Tasks run in parallel. Workers are assigned one or more tasks. A single task is handled by one worker pod, so you don’t need more worker pods than tasks. If there are more tasks than workers, workers handle multiple tasks.
You can specify the maximum number of connector tasks in your MirrorMaker configuration using the tasksMax property. Without specifying a maximum number of tasks, the default setting is a single task.
The heartbeat connector always uses a single task.
The number of tasks that are started for the source and checkpoint connectors is the lower value between the maximum number of possible tasks and the value for tasksMax. For the source connector, the maximum number of tasks possible is one for each partition being replicated from the source cluster. For the checkpoint connector, the maximum number of tasks possible is one for each consumer group being replicated from the source cluster. When setting a maximum number of tasks, consider the number of partitions and the hardware resources that support the process.
If the infrastructure supports the processing overhead, increasing the number of tasks can improve throughput and latency. For example, adding more tasks reduces the time taken to poll the source cluster when there is a high number of partitions or consumer groups.
Increasing the number of tasks for the source connector is useful when you have a large number of partitions.
Increasing the number of tasks for the source connector
apiVersion: kafka.strimzi.io/v1beta2
kind: KafkaMirrorMaker2
metadata:
name: my-mirror-maker2
spec:
# ...
mirrors:
- sourceCluster: "my-cluster-source"
targetCluster: "my-cluster-target"
sourceConnector:
tasksMax: 10
# ...Increasing the number of tasks for the checkpoint connector is useful when you have a large number of consumer groups.
Increasing the number of tasks for the checkpoint connector
apiVersion: kafka.strimzi.io/v1beta2
kind: KafkaMirrorMaker2
metadata:
name: my-mirror-maker2
spec:
# ...
mirrors:
- sourceCluster: "my-cluster-source"
targetCluster: "my-cluster-target"
checkpointConnector:
tasksMax: 10
# ...
By default, MirrorMaker 2 checks for new consumer groups every 10 minutes. You can adjust the refresh.groups.interval.seconds configuration to change the frequency. Take care when adjusting lower. More frequent checks can have a negative impact on performance.
9.7.5.1. Checking connector task operations
If you are using Prometheus and Grafana to monitor your deployment, you can check MirrorMaker 2 performance. The example MirrorMaker 2 Grafana dashboard provided with Streams for Apache Kafka shows the following metrics related to tasks and latency.
- The number of tasks
- Replication latency
- Offset synchronization latency
9.7.6. Synchronizing ACL rules for remote topics
When using MirrorMaker 2 with Streams for Apache Kafka, it is possible to synchronize ACL rules for remote topics. However, this feature is only available if you are not using the User Operator.
If you are using type: simple authorization without the User Operator, the ACL rules that manage access to brokers also apply to remote topics. This means that users who have read access to a source topic can also read its remote equivalent.
OAuth 2.0 authorization does not support access to remote topics in this way.
9.7.7. Securing a Kafka MirrorMaker 2 deployment
This procedure describes in outline the configuration required to secure a MirrorMaker 2 deployment.
You need separate configuration for the source Kafka cluster and the target Kafka cluster. You also need separate user configuration to provide the credentials required for MirrorMaker to connect to the source and target Kafka clusters.
For the Kafka clusters, you specify internal listeners for secure connections within an OpenShift cluster and external listeners for connections outside the OpenShift cluster.
You can configure authentication and authorization mechanisms. The security options implemented for the source and target Kafka clusters must be compatible with the security options implemented for MirrorMaker 2.
After you have created the cluster and user authentication credentials, you specify them in your MirrorMaker configuration for secure connections.
In this procedure, the certificates generated by the Cluster Operator are used, but you can replace them by installing your own certificates. You can also configure your listener to use a Kafka listener certificate managed by an external CA (certificate authority).
Before you start
Before starting this procedure, take a look at the example configuration files provided by Streams for Apache Kafka. They include examples for securing a deployment of MirrorMaker 2 using mTLS or SCRAM-SHA-512 authentication. The examples specify internal listeners for connecting within an OpenShift cluster.
The examples also provide the configuration for full authorization, including the ACLs that allow user operations on the source and target Kafka clusters.
When configuring user access to source and target Kafka clusters, ACLs must grant access rights to internal MirrorMaker 2 connectors and read/write access to the cluster group and internal topics used by the underlying Kafka Connect framework in the target cluster. If you’ve renamed the cluster group or internal topics, such as when configuring MirrorMaker 2 for multiple instances, use those names in the ACLs configuration.
Simple authorization uses ACL rules managed by the Kafka AclAuthorizer and StandardAuthorizer plugins to ensure appropriate access levels. For more information on configuring a KafkaUser resource to use simple authorization, see the AclRule schema reference.
Prerequisites
- Streams for Apache Kafka is running
- Separate namespaces for source and target clusters
The procedure assumes that the source and target Kafka clusters are installed to separate namespaces. If you want to use the Topic Operator, you’ll need to do this. The Topic Operator only watches a single cluster in a specified namespace.
By separating the clusters into namespaces, you will need to copy the cluster secrets so they can be accessed outside the namespace. You need to reference the secrets in the MirrorMaker configuration.
Procedure
Configure two
Kafkaresources, one to secure the source Kafka cluster and one to secure the target Kafka cluster.You can add listener configuration for authentication and enable authorization.
In this example, an internal listener is configured for a Kafka cluster with TLS encryption and mTLS authentication. Kafka
simpleauthorization is enabled.Example source Kafka cluster configuration with TLS encryption and mTLS authentication
apiVersion: kafka.strimzi.io/v1beta2 kind: Kafka metadata: name: my-source-cluster spec: kafka: version: 3.7.0 replicas: 1 listeners: - name: tls port: 9093 type: internal tls: true authentication: type: tls authorization: type: simple config: offsets.topic.replication.factor: 1 transaction.state.log.replication.factor: 1 transaction.state.log.min.isr: 1 default.replication.factor: 1 min.insync.replicas: 1 inter.broker.protocol.version: "3.7" storage: type: jbod volumes: - id: 0 type: persistent-claim size: 100Gi deleteClaim: false zookeeper: replicas: 1 storage: type: persistent-claim size: 100Gi deleteClaim: false entityOperator: topicOperator: {} userOperator: {}Example target Kafka cluster configuration with TLS encryption and mTLS authentication
apiVersion: kafka.strimzi.io/v1beta2 kind: Kafka metadata: name: my-target-cluster spec: kafka: version: 3.7.0 replicas: 1 listeners: - name: tls port: 9093 type: internal tls: true authentication: type: tls authorization: type: simple config: offsets.topic.replication.factor: 1 transaction.state.log.replication.factor: 1 transaction.state.log.min.isr: 1 default.replication.factor: 1 min.insync.replicas: 1 inter.broker.protocol.version: "3.7" storage: type: jbod volumes: - id: 0 type: persistent-claim size: 100Gi deleteClaim: false zookeeper: replicas: 1 storage: type: persistent-claim size: 100Gi deleteClaim: false entityOperator: topicOperator: {} userOperator: {}Create or update the
Kafkaresources in separate namespaces.oc apply -f <kafka_configuration_file> -n <namespace>The Cluster Operator creates the listeners and sets up the cluster and client certificate authority (CA) certificates to enable authentication within the Kafka cluster.
The certificates are created in the secret
<cluster_name>-cluster-ca-cert.Configure two
KafkaUserresources, one for a user of the source Kafka cluster and one for a user of the target Kafka cluster.-
Configure the same authentication and authorization types as the corresponding source and target Kafka cluster. For example, if you used
tlsauthentication and thesimpleauthorization type in theKafkaconfiguration for the source Kafka cluster, use the same in theKafkaUserconfiguration. - Configure the ACLs needed by MirrorMaker 2 to allow operations on the source and target Kafka clusters.
Example source user configuration for mTLS authentication
apiVersion: kafka.strimzi.io/v1beta2 kind: KafkaUser metadata: name: my-source-user labels: strimzi.io/cluster: my-source-cluster spec: authentication: type: tls authorization: type: simple acls: # MirrorSourceConnector - resource: # Not needed if offset-syncs.topic.location=target type: topic name: mm2-offset-syncs.my-target-cluster.internal operations: - Create - DescribeConfigs - Read - Write - resource: # Needed for every topic which is mirrored type: topic name: "*" operations: - DescribeConfigs - Read # MirrorCheckpointConnector - resource: type: cluster operations: - Describe - resource: # Needed for every group for which offsets are synced type: group name: "*" operations: - Describe - resource: # Not needed if offset-syncs.topic.location=target type: topic name: mm2-offset-syncs.my-target-cluster.internal operations: - ReadExample target user configuration for mTLS authentication
apiVersion: kafka.strimzi.io/v1beta2 kind: KafkaUser metadata: name: my-target-user labels: strimzi.io/cluster: my-target-cluster spec: authentication: type: tls authorization: type: simple acls: # cluster group - resource: type: group name: mirrormaker2-cluster operations: - Read # access to config.storage.topic - resource: type: topic name: mirrormaker2-cluster-configs operations: - Create - Describe - DescribeConfigs - Read - Write # access to status.storage.topic - resource: type: topic name: mirrormaker2-cluster-status operations: - Create - Describe - DescribeConfigs - Read - Write # access to offset.storage.topic - resource: type: topic name: mirrormaker2-cluster-offsets operations: - Create - Describe - DescribeConfigs - Read - Write # MirrorSourceConnector - resource: # Needed for every topic which is mirrored type: topic name: "*" operations: - Create - Alter - AlterConfigs - Write # MirrorCheckpointConnector - resource: type: cluster operations: - Describe - resource: type: topic name: my-source-cluster.checkpoints.internal operations: - Create - Describe - Read - Write - resource: # Needed for every group for which the offset is synced type: group name: "*" operations: - Read - Describe # MirrorHeartbeatConnector - resource: type: topic name: heartbeats operations: - Create - Describe - WriteNoteYou can use a certificate issued outside the User Operator by setting
typetotls-external. For more information, see theKafkaUserSpecschema reference.-
Configure the same authentication and authorization types as the corresponding source and target Kafka cluster. For example, if you used
Create or update a
KafkaUserresource in each of the namespaces you created for the source and target Kafka clusters.oc apply -f <kafka_user_configuration_file> -n <namespace>The User Operator creates the users representing the client (MirrorMaker), and the security credentials used for client authentication, based on the chosen authentication type.
The User Operator creates a new secret with the same name as the
KafkaUserresource. The secret contains a private and public key for mTLS authentication. The public key is contained in a user certificate, which is signed by the clients CA.Configure a
KafkaMirrorMaker2resource with the authentication details to connect to the source and target Kafka clusters.Example MirrorMaker 2 configuration with TLS encryption and mTLS authentication
apiVersion: kafka.strimzi.io/v1beta2 kind: KafkaMirrorMaker2 metadata: name: my-mirror-maker-2 spec: version: 3.7.0 replicas: 1 connectCluster: "my-target-cluster" clusters: - alias: "my-source-cluster" bootstrapServers: my-source-cluster-kafka-bootstrap:9093 tls:1 trustedCertificates: - secretName: my-source-cluster-cluster-ca-cert certificate: ca.crt authentication:2 type: tls certificateAndKey: secretName: my-source-user certificate: user.crt key: user.key - alias: "my-target-cluster" bootstrapServers: my-target-cluster-kafka-bootstrap:9093 tls:3 trustedCertificates: - secretName: my-target-cluster-cluster-ca-cert certificate: ca.crt authentication:4 type: tls certificateAndKey: secretName: my-target-user certificate: user.crt key: user.key config: # -1 means it will use the default replication factor configured in the broker config.storage.replication.factor: -1 offset.storage.replication.factor: -1 status.storage.replication.factor: -1 mirrors: - sourceCluster: "my-source-cluster" targetCluster: "my-target-cluster" sourceConnector: config: replication.factor: 1 offset-syncs.topic.replication.factor: 1 sync.topic.acls.enabled: "false" heartbeatConnector: config: heartbeats.topic.replication.factor: 1 checkpointConnector: config: checkpoints.topic.replication.factor: 1 sync.group.offsets.enabled: "true" topicsPattern: "topic1|topic2|topic3" groupsPattern: "group1|group2|group3"- 1
- The TLS certificates for the source Kafka cluster. If they are in a separate namespace, copy the cluster secrets from the namespace of the Kafka cluster.
- 2
- The user authentication for accessing the source Kafka cluster using the TLS mechanism.
- 3
- The TLS certificates for the target Kafka cluster.
- 4
- The user authentication for accessing the target Kafka cluster.
Create or update the
KafkaMirrorMaker2resource in the same namespace as the target Kafka cluster.oc apply -f <mirrormaker2_configuration_file> -n <namespace_of_target_cluster>
9.7.8. Manually stopping or pausing MirrorMaker 2 connectors
If you are using KafkaMirrorMaker2 resources to configure internal MirrorMaker connectors, use the state configuration to either stop or pause a connector. In contrast to the paused state, where the connector and tasks remain instantiated, stopping a connector retains only the configuration, with no active processes. Stopping a connector from running may be more suitable for longer durations than just pausing. While a paused connector is quicker to resume, a stopped connector has the advantages of freeing up memory and resources.
The state configuration replaces the (deprecated) pause configuration in the KafkaMirrorMaker2ConnectorSpec schema, which allows pauses on connectors. If you were previously using the pause configuration to pause connectors, we encourage you to transition to using the state configuration only to avoid conflicts.
Prerequisites
- The Cluster Operator is running.
Procedure
Find the name of the
KafkaMirrorMaker2custom resource that controls the MirrorMaker 2 connector you want to pause or stop:oc get KafkaMirrorMaker2Edit the
KafkaMirrorMaker2resource to stop or pause the connector.Example configuration for stopping a MirrorMaker 2 connector
apiVersion: kafka.strimzi.io/v1beta2 kind: KafkaMirrorMaker2 metadata: name: my-mirror-maker2 spec: version: 3.7.0 replicas: 3 connectCluster: "my-cluster-target" clusters: # ... mirrors: - sourceCluster: "my-cluster-source" targetCluster: "my-cluster-target" sourceConnector: tasksMax: 10 autoRestart: enabled: true state: stopped # ...Change the
stateconfiguration tostoppedorpaused. The default state for the connector when this property is not set isrunning.Apply the changes to the
KafkaMirrorMaker2configuration.You can resume the connector by changing
statetorunningor removing the configuration.
Alternatively, you can expose the Kafka Connect API and use the stop and pause endpoints to stop a connector from running. For example, PUT /connectors/<connector_name>/stop. You can then use the resume endpoint to restart it.
9.7.9. Manually restarting MirrorMaker 2 connectors
Use the strimzi.io/restart-connector annotation to manually trigger a restart of a MirrorMaker 2 connector.
Prerequisites
- The Cluster Operator is running.
Procedure
Find the name of the
KafkaMirrorMaker2custom resource that controls the Kafka MirrorMaker 2 connector you want to restart:oc get KafkaMirrorMaker2Find the name of the Kafka MirrorMaker 2 connector to be restarted from the
KafkaMirrorMaker2custom resource:oc describe KafkaMirrorMaker2 <mirrormaker_cluster_name>Use the name of the connector to restart the connector by annotating the
KafkaMirrorMaker2resource in OpenShift:oc annotate KafkaMirrorMaker2 <mirrormaker_cluster_name> "strimzi.io/restart-connector=<mirrormaker_connector_name>"In this example, connector
my-connectorin themy-mirror-maker-2cluster is restarted:oc annotate KafkaMirrorMaker2 my-mirror-maker-2 "strimzi.io/restart-connector=my-connector"Wait for the next reconciliation to occur (every two minutes by default).
The MirrorMaker 2 connector is restarted, as long as the annotation was detected by the reconciliation process. When MirrorMaker 2 accepts the request, the annotation is removed from the
KafkaMirrorMaker2custom resource.
9.7.10. Manually restarting MirrorMaker 2 connector tasks
Use the strimzi.io/restart-connector-task annotation to manually trigger a restart of a MirrorMaker 2 connector.
Prerequisites
- The Cluster Operator is running.
Procedure
Find the name of the
KafkaMirrorMaker2custom resource that controls the MirrorMaker 2 connector task you want to restart:oc get KafkaMirrorMaker2Find the name of the connector and the ID of the task to be restarted from the
KafkaMirrorMaker2custom resource:oc describe KafkaMirrorMaker2 <mirrormaker_cluster_name>Task IDs are non-negative integers, starting from 0.
Use the name and ID to restart the connector task by annotating the
KafkaMirrorMaker2resource in OpenShift:oc annotate KafkaMirrorMaker2 <mirrormaker_cluster_name> "strimzi.io/restart-connector-task=<mirrormaker_connector_name>:<task_id>"In this example, task
0for connectormy-connectorin themy-mirror-maker-2cluster is restarted:oc annotate KafkaMirrorMaker2 my-mirror-maker-2 "strimzi.io/restart-connector-task=my-connector:0"Wait for the next reconciliation to occur (every two minutes by default).
The MirrorMaker 2 connector task is restarted, as long as the annotation was detected by the reconciliation process. When MirrorMaker 2 accepts the request, the annotation is removed from the
KafkaMirrorMaker2custom resource.
9.8. Configuring Kafka MirrorMaker (deprecated)
Update the spec properties of the KafkaMirrorMaker custom resource to configure your Kafka MirrorMaker deployment.
You can configure access control for producers and consumers using TLS or SASL authentication. This procedure shows a configuration that uses TLS encryption and mTLS authentication on the consumer and producer side.
For a deeper understanding of the Kafka MirrorMaker cluster configuration options, refer to the Streams for Apache Kafka Custom Resource API Reference.
Kafka MirrorMaker 1 (referred to as just MirrorMaker in the documentation) has been deprecated in Apache Kafka 3.0.0 and will be removed in Apache Kafka 4.0.0. As a result, the KafkaMirrorMaker custom resource which is used to deploy Kafka MirrorMaker 1 has been deprecated in Streams for Apache Kafka as well. The KafkaMirrorMaker resource will be removed from Streams for Apache Kafka when we adopt Apache Kafka 4.0.0. As a replacement, use the KafkaMirrorMaker2 custom resource with the IdentityReplicationPolicy.
Example KafkaMirrorMaker custom resource configuration
apiVersion: kafka.strimzi.io/v1beta2
kind: KafkaMirrorMaker
metadata:
name: my-mirror-maker
spec:
replicas: 3
consumer:
bootstrapServers: my-source-cluster-kafka-bootstrap:9092
groupId: "my-group"
numStreams: 2
offsetCommitInterval: 120000
tls:
trustedCertificates:
- secretName: my-source-cluster-ca-cert
certificate: ca.crt
authentication:
type: tls
certificateAndKey:
secretName: my-source-secret
certificate: public.crt
key: private.key
config:
max.poll.records: 100
receive.buffer.bytes: 32768
producer:
bootstrapServers: my-target-cluster-kafka-bootstrap:9092
abortOnSendFailure: false
tls:
trustedCertificates:
- secretName: my-target-cluster-ca-cert
certificate: ca.crt
authentication:
type: tls
certificateAndKey:
secretName: my-target-secret
certificate: public.crt
key: private.key
config:
compression.type: gzip
batch.size: 8192
include: "my-topic|other-topic"
resources:
requests:
cpu: "1"
memory: 2Gi
limits:
cpu: "2"
memory: 2Gi
logging:
type: inline
loggers:
mirrormaker.root.logger: INFO
readinessProbe:
initialDelaySeconds: 15
timeoutSeconds: 5
livenessProbe:
initialDelaySeconds: 15
timeoutSeconds: 5
metricsConfig:
type: jmxPrometheusExporter
valueFrom:
configMapKeyRef:
name: my-config-map
key: my-key
jvmOptions:
"-Xmx": "1g"
"-Xms": "1g"
image: my-org/my-image:latest
template:
pod:
affinity:
podAntiAffinity:
requiredDuringSchedulingIgnoredDuringExecution:
- labelSelector:
matchExpressions:
- key: application
operator: In
values:
- postgresql
- mongodb
topologyKey: "kubernetes.io/hostname"
mirrorMakerContainer:
env:
- name: OTEL_SERVICE_NAME
value: my-otel-service
- name: OTEL_EXPORTER_OTLP_ENDPOINT
value: "http://otlp-host:4317"
tracing:
type: opentelemetry- 1
- The number of replica nodes.
- 2
- Bootstrap servers for consumer and producer.
- 3
- Group ID for the consumer.
- 4
- The number of consumer streams.
- 5
- The offset auto-commit interval in milliseconds.
- 6
- TLS encryption with key names under which TLS certificates are stored in X.509 format for consumer or producer. If certificates are stored in the same secret, it can be listed multiple times.
- 7
- Authentication for consumer or producer, specified as mTLS, token-based OAuth, SASL-based SCRAM-SHA-256/SCRAM-SHA-512, or PLAIN.
- 8
- Kafka configuration options for consumer and producer.
- 9
- If the
abortOnSendFailureproperty is set totrue, Kafka MirrorMaker will exit and the container will restart following a send failure for a message. - 10
- A list of included topics mirrored from source to target Kafka cluster.
- 11
- Requests for reservation of supported resources, currently
cpuandmemory, and limits to specify the maximum resources that can be consumed. - 12
- Specified loggers and log levels added directly (
inline) or indirectly (external) through a ConfigMap. A custom Log4j configuration must be placed under thelog4j.propertiesorlog4j2.propertieskey in the ConfigMap. MirrorMaker has a single logger calledmirrormaker.root.logger. You can set the log level to INFO, ERROR, WARN, TRACE, DEBUG, FATAL or OFF. - 13
- Healthchecks to know when to restart a container (liveness) and when a container can accept traffic (readiness).
- 14
- Prometheus metrics, which are enabled by referencing a ConfigMap containing configuration for the Prometheus JMX exporter in this example. You can enable metrics without further configuration using a reference to a ConfigMap containing an empty file under
metricsConfig.valueFrom.configMapKeyRef.key. - 15
- JVM configuration options to optimize performance for the Virtual Machine (VM) running Kafka MirrorMaker.
- 16
- ADVANCED OPTION: Container image configuration, which is recommended only in special situations.
- 17
- Template customization. Here a pod is scheduled with anti-affinity, so the pod is not scheduled on nodes with the same hostname.
- 18
- Environment variables are set for distributed tracing.
- 19
- Distributed tracing is enabled by using OpenTelemetry.Warning
With the
abortOnSendFailureproperty set tofalse, the producer attempts to send the next message in a topic. The original message might be lost, as there is no attempt to resend a failed message.
9.9. Configuring the Kafka Bridge
Update the spec properties of the KafkaBridge custom resource to configure your Kafka Bridge deployment.
In order to prevent issues arising when client consumer requests are processed by different Kafka Bridge instances, address-based routing must be employed to ensure that requests are routed to the right Kafka Bridge instance. Additionally, each independent Kafka Bridge instance must have a replica. A Kafka Bridge instance has its own state which is not shared with another instances.
For a deeper understanding of the Kafka Bridge cluster configuration options, refer to the Streams for Apache Kafka Custom Resource API Reference.
Example KafkaBridge custom resource configuration
apiVersion: kafka.strimzi.io/v1beta2
kind: KafkaBridge
metadata:
name: my-bridge
spec:
replicas: 3
bootstrapServers: <cluster_name>-cluster-kafka-bootstrap:9092
tls:
trustedCertificates:
- secretName: my-cluster-cluster-cert
certificate: ca.crt
- secretName: my-cluster-cluster-cert
certificate: ca2.crt
authentication:
type: tls
certificateAndKey:
secretName: my-secret
certificate: public.crt
key: private.key
http:
port: 8080
cors:
allowedOrigins: "https://strimzi.io"
allowedMethods: "GET,POST,PUT,DELETE,OPTIONS,PATCH"
consumer:
config:
auto.offset.reset: earliest
producer:
config:
delivery.timeout.ms: 300000
resources:
requests:
cpu: "1"
memory: 2Gi
limits:
cpu: "2"
memory: 2Gi
logging:
type: inline
loggers:
logger.bridge.level: INFO
# enabling DEBUG just for send operation
logger.send.name: "http.openapi.operation.send"
logger.send.level: DEBUG
jvmOptions:
"-Xmx": "1g"
"-Xms": "1g"
readinessProbe:
initialDelaySeconds: 15
timeoutSeconds: 5
livenessProbe:
initialDelaySeconds: 15
timeoutSeconds: 5
image: my-org/my-image:latest
template:
pod:
affinity:
podAntiAffinity:
requiredDuringSchedulingIgnoredDuringExecution:
- labelSelector:
matchExpressions:
- key: application
operator: In
values:
- postgresql
- mongodb
topologyKey: "kubernetes.io/hostname"
bridgeContainer:
env:
- name: OTEL_SERVICE_NAME
value: my-otel-service
- name: OTEL_EXPORTER_OTLP_ENDPOINT
value: "http://otlp-host:4317"
tracing:
type: opentelemetry - 1
- The number of replica nodes.
- 2
- Bootstrap server for connection to the target Kafka cluster. Use the name of the Kafka cluster as the <cluster_name>.
- 3
- TLS encryption with key names under which TLS certificates are stored in X.509 format for the source Kafka cluster. If certificates are stored in the same secret, it can be listed multiple times.
- 4
- Authentication for the Kafka Bridge cluster, specified as mTLS, token-based OAuth, SASL-based SCRAM-SHA-256/SCRAM-SHA-512, or PLAIN. By default, the Kafka Bridge connects to Kafka brokers without authentication.
- 5
- HTTP access to Kafka brokers.
- 6
- CORS access specifying selected resources and access methods. Additional HTTP headers in requests describe the origins that are permitted access to the Kafka cluster.
- 7
- Consumer configuration options.
- 8
- Producer configuration options.
- 9
- Requests for reservation of supported resources, currently
cpuandmemory, and limits to specify the maximum resources that can be consumed. - 10
- Specified Kafka Bridge loggers and log levels added directly (
inline) or indirectly (external) through a ConfigMap. A custom Log4j configuration must be placed under thelog4j.propertiesorlog4j2.propertieskey in the ConfigMap. For the Kafka Bridge loggers, you can set the log level to INFO, ERROR, WARN, TRACE, DEBUG, FATAL or OFF. - 11
- JVM configuration options to optimize performance for the Virtual Machine (VM) running the Kafka Bridge.
- 12
- Healthchecks to know when to restart a container (liveness) and when a container can accept traffic (readiness).
- 13
- Optional: Container image configuration, which is recommended only in special situations.
- 14
- Template customization. Here a pod is scheduled with anti-affinity, so the pod is not scheduled on nodes with the same hostname.
- 15
- Environment variables are set for distributed tracing.
- 16
- Distributed tracing is enabled by using OpenTelemetry.
9.10. Configuring Kafka and ZooKeeper storage
Streams for Apache Kafka provides flexibility in configuring the data storage options of Kafka and ZooKeeper.
The supported storage types are:
- Ephemeral (Recommended for development only)
- Persistent
- JBOD (Kafka only; not available for ZooKeeper)
- Tiered storage (Early access)
To configure storage, you specify storage properties in the custom resource of the component. The storage type is set using the storage.type property. When using node pools, you can specify storage configuration unique to each node pool used in a Kafka cluster. The same storage properties available to the Kafka resource are also available to the KafkaNodePool pool resource.
Tiered storage provides more flexibility for data management by leveraging the parallel use of storage types with different characteristics. For example, tiered storage might include the following:
- Higher performance and higher cost block storage
- Lower performance and lower cost object storage
Tiered storage is an early access feature in Kafka. To configure tiered storage, you specify tieredStorage properties. Tiered storage is configured only at the cluster level using the Kafka custom resource.
The storage-related schema references provide more information on the storage configuration properties:
The storage type cannot be changed after a Kafka cluster is deployed.
9.10.1. Data storage considerations
For Streams for Apache Kafka to work well, an efficient data storage infrastructure is essential. We strongly recommend using block storage. Streams for Apache Kafka is only tested for use with block storage. File storage, such as NFS, is not tested and there is no guarantee it will work.
Choose one of the following options for your block storage:
- A cloud-based block storage solution, such as Amazon Elastic Block Store (EBS)
- Persistent storage using local persistent volumes
- Storage Area Network (SAN) volumes accessed by a protocol such as Fibre Channel or iSCSI
Streams for Apache Kafka does not require OpenShift raw block volumes.
9.10.1.1. File systems
Kafka uses a file system for storing messages. Streams for Apache Kafka is compatible with the XFS and ext4 file systems, which are commonly used with Kafka. Consider the underlying architecture and requirements of your deployment when choosing and setting up your file system.
For more information, refer to Filesystem Selection in the Kafka documentation.
9.10.1.2. Disk usage
Use separate disks for Apache Kafka and ZooKeeper.
Solid-state drives (SSDs), though not essential, can improve the performance of Kafka in large clusters where data is sent to and received from multiple topics asynchronously. SSDs are particularly effective with ZooKeeper, which requires fast, low latency data access.
You do not need to provision replicated storage because Kafka and ZooKeeper both have built-in data replication.
9.10.2. Ephemeral storage
Ephemeral data storage is transient. All pods on a node share a local ephemeral storage space. Data is retained for as long as the pod that uses it is running. The data is lost when a pod is deleted. Although a pod can recover data in a highly available environment.
Because of its transient nature, ephemeral storage is only recommended for development and testing.
Ephemeral storage uses emptyDir volumes to store data. An emptyDir volume is created when a pod is assigned to a node. You can set the total amount of storage for the emptyDir using the sizeLimit property .
Ephemeral storage is not suitable for single-node ZooKeeper clusters or Kafka topics with a replication factor of 1.
To use ephemeral storage, you set the storage type configuration in the Kafka or ZooKeeper resource to ephemeral. If you are using node pools, you can also specify ephemeral in the storage configuration of individual node pools.
Example ephemeral storage configuration
apiVersion: kafka.strimzi.io/v1beta2
kind: Kafka
metadata:
name: my-cluster
spec:
kafka:
storage:
type: ephemeral
# ...
zookeeper:
storage:
type: ephemeral
# ...9.10.2.1. Mount path of Kafka log directories
The ephemeral volume is used by Kafka brokers as log directories mounted into the following path:
/var/lib/kafka/data/kafka-logIDX
Where IDX is the Kafka broker pod index. For example /var/lib/kafka/data/kafka-log0.
9.10.3. Persistent storage
Persistent data storage retains data in the event of system disruption. For pods that use persistent data storage, data is persisted across pod failures and restarts. Because of its permanent nature, persistent storage is recommended for production environments.
To use persistent storage in Streams for Apache Kafka, you specify persistent-claim in the storage configuration of the Kafka or ZooKeeper resources. If you are using node pools, you can also specify persistent-claim in the storage configuration of individual node pools.
You configure the resource so that pods use Persistent Volume Claims (PVCs) to make storage requests on persistent volumes (PVs). PVs represent storage volumes that are created on demand and are independent of the pods that use them. The PVC requests the amount of storage required when a pod is being created. The underlying storage infrastructure of the PV does not need to be understood. If a PV matches the storage criteria, the PVC is bound to the PV.
You have two options for specifying the storage type:
storage.type: persistent-claim-
If you choose
persistent-claimas the storage type, a single persistent storage volume is defined. storage.type: jbod-
When you select
jbodas the storage type, you have the flexibility to define an array of persistent storage volumes using unique IDs.
In a production environment, it is recommended to configure the following:
-
For Kafka or node pools, set
storage.typetojbodwith one or more persistent volumes. -
For ZooKeeper, set
storage.typeaspersistent-claimfor a single persistent volume.
Persistent storage also has the following configuration options:
id(optional)-
A storage identification number. This option is mandatory for storage volumes defined in a JBOD storage declaration. Default is
0. size(required)- The size of the persistent volume claim, for example, "1000Gi".
class(optional)- PVCs can request different types of persistent storage by specifying a StorageClass. Storage classes define storage profiles and dynamically provision PVs based on that profile. If a storage class is not specified, the storage class marked as default in the OpenShift cluster is used. Persistent storage options might include SAN storage types or local persistent volumes.
selector(optional)- Configuration to specify a specific PV. Provides key:value pairs representing the labels of the volume selected.
deleteClaim(optional)-
Boolean value to specify whether the PVC is deleted when the cluster is uninstalled. Default is
false.
Increasing the size of persistent volumes in an existing Streams for Apache Kafka cluster is only supported in OpenShift versions that support persistent volume resizing. The persistent volume to be resized must use a storage class that supports volume expansion. For other versions of OpenShift and storage classes that do not support volume expansion, you must decide the necessary storage size before deploying the cluster. Decreasing the size of existing persistent volumes is not possible.
Example persistent storage configuration for Kafka and ZooKeeper
apiVersion: kafka.strimzi.io/v1beta2
kind: Kafka
metadata:
name: my-cluster
spec:
kafka:
storage:
type: jbod
volumes:
- id: 0
type: persistent-claim
size: 100Gi
deleteClaim: false
- id: 1
type: persistent-claim
size: 100Gi
deleteClaim: false
- id: 2
type: persistent-claim
size: 100Gi
deleteClaim: false
# ...
zookeeper:
storage:
type: persistent-claim
size: 1000Gi
# ...Example persistent storage configuration with specific storage class
# ...
storage:
type: persistent-claim
size: 500Gi
class: my-storage-class
# ...
Use a selector to specify a labeled persistent volume that provides certain features, such as an SSD.
Example persistent storage configuration with selector
# ...
storage:
type: persistent-claim
size: 1Gi
selector:
hdd-type: ssd
deleteClaim: true
# ...9.10.3.1. Storage class overrides
Instead of using the default storage class, you can specify a different storage class for one or more Kafka or ZooKeeper nodes. This is useful, for example, when storage classes are restricted to different availability zones or data centers. You can use the overrides field for this purpose.
In this example, the default storage class is named my-storage-class:
Example storage configuration with class overrides
apiVersion: kafka.strimzi.io/v1beta2
kind: Kafka
metadata:
labels:
app: my-cluster
name: my-cluster
namespace: myproject
spec:
# ...
kafka:
replicas: 3
storage:
type: jbod
volumes:
- id: 0
type: persistent-claim
size: 100Gi
deleteClaim: false
class: my-storage-class
overrides:
- broker: 0
class: my-storage-class-zone-1a
- broker: 1
class: my-storage-class-zone-1b
- broker: 2
class: my-storage-class-zone-1c
# ...
# ...
zookeeper:
replicas: 3
storage:
deleteClaim: true
size: 100Gi
type: persistent-claim
class: my-storage-class
overrides:
- broker: 0
class: my-storage-class-zone-1a
- broker: 1
class: my-storage-class-zone-1b
- broker: 2
class: my-storage-class-zone-1c
# ...
As a result of the configured overrides property, the volumes use the following storage classes:
-
The persistent volumes of ZooKeeper node 0 use
my-storage-class-zone-1a. -
The persistent volumes of ZooKeeper node 1 use
my-storage-class-zone-1b. -
The persistent volumes of ZooKeeper node 2 use
my-storage-class-zone-1c. -
The persistent volumes of Kafka broker 0 use
my-storage-class-zone-1a. -
The persistent volumes of Kafka broker 1 use
my-storage-class-zone-1b. -
The persistent volumes of Kafka broker 2 use
my-storage-class-zone-1c.
The overrides property is currently used only to override the storage class. Overrides for other storage configuration properties is not currently supported.
9.10.3.2. PVC resources for persistent storage
When persistent storage is used, it creates PVCs with the following names:
data-cluster-name-kafka-idx-
PVC for the volume used for storing data for the Kafka broker pod
idx. data-cluster-name-zookeeper-idx-
PVC for the volume used for storing data for the ZooKeeper node pod
idx.
9.10.3.3. Mount path of Kafka log directories
The persistent volume is used by the Kafka brokers as log directories mounted into the following path:
/var/lib/kafka/data/kafka-logIDX
Where IDX is the Kafka broker pod index. For example /var/lib/kafka/data/kafka-log0.
9.10.4. Resizing persistent volumes
Persistent volumes used by a cluster can be resized without any risk of data loss, as long as the storage infrastructure supports it. Following a configuration update to change the size of the storage, Streams for Apache Kafka instructs the storage infrastructure to make the change. Storage expansion is supported in Streams for Apache Kafka clusters that use persistent-claim volumes.
Storage reduction is only possible when using multiple disks per broker. You can remove a disk after moving all partitions on the disk to other volumes within the same broker (intra-broker) or to other brokers within the same cluster (intra-cluster).
You cannot decrease the size of persistent volumes because it is not currently supported in OpenShift.
Prerequisites
- An OpenShift cluster with support for volume resizing.
- The Cluster Operator is running.
- A Kafka cluster using persistent volumes created using a storage class that supports volume expansion.
Procedure
Edit the
Kafkaresource for your cluster.Change the
sizeproperty to increase the size of the persistent volume allocated to a Kafka cluster, a ZooKeeper cluster, or both.-
For Kafka clusters, update the
sizeproperty underspec.kafka.storage. -
For ZooKeeper clusters, update the
sizeproperty underspec.zookeeper.storage.
Kafka configuration to increase the volume size to
2000GiapiVersion: kafka.strimzi.io/v1beta2 kind: Kafka metadata: name: my-cluster spec: kafka: # ... storage: type: persistent-claim size: 2000Gi class: my-storage-class # ... zookeeper: # ...-
For Kafka clusters, update the
Create or update the resource:
oc apply -f <kafka_configuration_file>OpenShift increases the capacity of the selected persistent volumes in response to a request from the Cluster Operator. When the resizing is complete, the Cluster Operator restarts all pods that use the resized persistent volumes. This happens automatically.
Verify that the storage capacity has increased for the relevant pods on the cluster:
oc get pvKafka broker pods with increased storage
NAME CAPACITY CLAIM pvc-0ca459ce-... 2000Gi my-project/data-my-cluster-kafka-2 pvc-6e1810be-... 2000Gi my-project/data-my-cluster-kafka-0 pvc-82dc78c9-... 2000Gi my-project/data-my-cluster-kafka-1The output shows the names of each PVC associated with a broker pod.
9.10.5. JBOD storage
JBOD storage allows you to configure your Kafka cluster to use multiple disks or volumes. This approach provides increased data storage capacity for Kafka brokers, and can lead to performance improvements. A JBOD configuration is defined by one or more volumes, each of which can be either ephemeral or persistent. The rules and constraints for JBOD volume declarations are the same as those for ephemeral and persistent storage. For example, you cannot decrease the size of a persistent storage volume after it has been provisioned, nor can you change the value of sizeLimit when the type is ephemeral.
JBOD storage is supported for Kafka only, not for ZooKeeper.
To use JBOD storage, you set the storage type configuration in the Kafka resource to jbod. If you are using node pools, you can also specify jbod in the storage configuration of individual node pools.
The volumes property allows you to describe the disks that make up your JBOD storage array or configuration.
Example JBOD storage configuration
apiVersion: kafka.strimzi.io/v1beta2
kind: Kafka
metadata:
name: my-cluster
spec:
kafka:
storage:
type: jbod
volumes:
- id: 0
type: persistent-claim
size: 100Gi
deleteClaim: false
- id: 1
type: persistent-claim
size: 100Gi
deleteClaim: false
# ...The IDs cannot be changed once the JBOD volumes are created. You can add or remove volumes from the JBOD configuration.
9.10.5.1. PVC resource for JBOD storage
When persistent storage is used to declare JBOD volumes, it creates a PVC with the following name:
data-id-cluster-name-kafka-idx-
PVC for the volume used for storing data for the Kafka broker pod
idx. Theidis the ID of the volume used for storing data for Kafka broker pod.
9.10.5.2. Mount path of Kafka log directories
The JBOD volumes are used by Kafka brokers as log directories mounted into the following path:
/var/lib/kafka/data-id/kafka-logidx
Where id is the ID of the volume used for storing data for Kafka broker pod idx. For example /var/lib/kafka/data-0/kafka-log0.
9.10.6. Adding volumes to JBOD storage
This procedure describes how to add volumes to a Kafka cluster configured to use JBOD storage. It cannot be applied to Kafka clusters configured to use any other storage type.
When adding a new volume under an id which was already used in the past and removed, you have to make sure that the previously used PersistentVolumeClaims have been deleted.
Prerequisites
- An OpenShift cluster
- A running Cluster Operator
- A Kafka cluster with JBOD storage
Procedure
Edit the
spec.kafka.storage.volumesproperty in theKafkaresource. Add the new volumes to thevolumesarray. For example, add the new volume with id2:apiVersion: kafka.strimzi.io/v1beta2 kind: Kafka metadata: name: my-cluster spec: kafka: # ... storage: type: jbod volumes: - id: 0 type: persistent-claim size: 100Gi deleteClaim: false - id: 1 type: persistent-claim size: 100Gi deleteClaim: false - id: 2 type: persistent-claim size: 100Gi deleteClaim: false # ... zookeeper: # ...Create or update the resource:
oc apply -f <kafka_configuration_file>Create new topics or reassign existing partitions to the new disks.
TipCruise Control is an effective tool for reassigning partitions. To perform an intra-broker disk balance, you set
rebalanceDisktotrueunder theKafkaRebalance.spec.
9.10.7. Removing volumes from JBOD storage
This procedure describes how to remove volumes from Kafka cluster configured to use JBOD storage. It cannot be applied to Kafka clusters configured to use any other storage type. The JBOD storage always has to contain at least one volume.
To avoid data loss, you have to move all partitions before removing the volumes.
Prerequisites
- An OpenShift cluster
- A running Cluster Operator
- A Kafka cluster with JBOD storage with two or more volumes
Procedure
Reassign all partitions from the disks which are you going to remove. Any data in partitions still assigned to the disks which are going to be removed might be lost.
TipYou can use the
kafka-reassign-partitions.shtool to reassign the partitions.Edit the
spec.kafka.storage.volumesproperty in theKafkaresource. Remove one or more volumes from thevolumesarray. For example, remove the volumes with ids1and2:apiVersion: kafka.strimzi.io/v1beta2 kind: Kafka metadata: name: my-cluster spec: kafka: # ... storage: type: jbod volumes: - id: 0 type: persistent-claim size: 100Gi deleteClaim: false # ... zookeeper: # ...Create or update the resource:
oc apply -f <kafka_configuration_file>
9.10.8. Tiered storage (early access)
Tiered storage introduces a flexible approach to managing Kafka data whereby log segments are moved to a separate storage system. For example, you can combine the use of block storage on brokers for frequently accessed data and offload older or less frequently accessed data from the block storage to more cost-effective, scalable remote storage solutions, such as Amazon S3, without compromising data accessibility and durability.
Tiered storage is an early access Kafka feature, which is also available in Streams for Apache Kafka. Due to its current limitations, it is not recommended for production environments.
Tiered storage requires an implementation of Kafka’s RemoteStorageManager interface to handle communication between Kafka and the remote storage system, which is enabled through configuration of the Kafka resource. Streams for Apache Kafka uses Kafka’s TopicBasedRemoteLogMetadataManager for Remote Log Metadata Management (RLMM) when custom tiered storage is enabled. The RLMM manages the metadata related to remote storage.
To use custom tiered storage, do the following:
- Include a tiered storage plugin for Kafka in the Streams for Apache Kafka image by building a custom container image. The plugin must provide the necessary functionality for a Kafka cluster managed by Streams for Apache Kafka to interact with the tiered storage solution.
-
Configure Kafka for tiered storage using
tieredStorageproperties in theKafkaresource. Specify the class name and path for the customRemoteStorageManagerimplementation, as well as any additional configuration. - If required, specify RLMM-specific tiered storage configuration.
Example custom tiered storage configuration for Kafka
apiVersion: kafka.strimzi.io/v1beta2
kind: Kafka
metadata:
name: my-cluster
spec:
kafka:
tieredStorage:
type: custom
remoteStorageManager:
className: com.example.kafka.tiered.storage.s3.S3RemoteStorageManager
classPath: /opt/kafka/plugins/tiered-storage-s3/*
config:
storage.bucket.name: my-bucket
# ...
config:
rlmm.config.remote.log.metadata.topic.replication.factor: 1
# ...- 1
- The
typemust be set tocustom. - 2
- The configuration for the custom
RemoteStorageManagerimplementation, including class name and path. - 3
- Configuration to pass to the custom
RemoteStorageManagerimplementation, which Streams for Apache Kafka automatically prefixes withrsm.config.. - 4
- Tiered storage configuration to pass to the RLMM, which requires an
rlmm.config.prefix. For more information on tiered storage configuration, see the Apache Kafka documentation.
9.11. Configuring CPU and memory resource limits and requests
By default, the Streams for Apache Kafka Cluster Operator does not specify CPU and memory resource requests and limits for its deployed operands. Ensuring an adequate allocation of resources is crucial for maintaining stability and achieving optimal performance in Kafka. The ideal resource allocation depends on your specific requirements and use cases.
It is recommended to configure CPU and memory resources for each container by setting appropriate requests and limits.
9.12. Configuring pod scheduling
To avoid performance degradation caused by resource conflicts between applications scheduled on the same OpenShift node, you can schedule Kafka pods separately from critical workloads. This can be achieved by either selecting specific nodes or dedicating a set of nodes exclusively for Kafka.
9.12.1. Specifying affinity, tolerations, and topology spread constraints
Use affinity, tolerations and topology spread constraints to schedule the pods of kafka resources onto nodes. Affinity, tolerations and topology spread constraints are configured using the affinity, tolerations, and topologySpreadConstraint properties in following resources:
-
Kafka.spec.kafka.template.pod -
Kafka.spec.zookeeper.template.pod -
Kafka.spec.entityOperator.template.pod -
KafkaConnect.spec.template.pod -
KafkaBridge.spec.template.pod -
KafkaMirrorMaker.spec.template.pod -
KafkaMirrorMaker2.spec.template.pod
The format of the affinity, tolerations, and topologySpreadConstraint properties follows the OpenShift specification. The affinity configuration can include different types of affinity:
- Pod affinity and anti-affinity
- Node affinity
9.12.1.1. Use pod anti-affinity to avoid critical applications sharing nodes
Use pod anti-affinity to ensure that critical applications are never scheduled on the same disk. When running a Kafka cluster, it is recommended to use pod anti-affinity to ensure that the Kafka brokers do not share nodes with other workloads, such as databases.
9.12.1.2. Use node affinity to schedule workloads onto specific nodes
The OpenShift cluster usually consists of many different types of worker nodes. Some are optimized for CPU heavy workloads, some for memory, while other might be optimized for storage (fast local SSDs) or network. Using different nodes helps to optimize both costs and performance. To achieve the best possible performance, it is important to allow scheduling of Streams for Apache Kafka components to use the right nodes.
OpenShift uses node affinity to schedule workloads onto specific nodes. Node affinity allows you to create a scheduling constraint for the node on which the pod will be scheduled. The constraint is specified as a label selector. You can specify the label using either the built-in node label like beta.kubernetes.io/instance-type or custom labels to select the right node.
9.12.1.3. Use node affinity and tolerations for dedicated nodes
Use taints to create dedicated nodes, then schedule Kafka pods on the dedicated nodes by configuring node affinity and tolerations.
Cluster administrators can mark selected OpenShift nodes as tainted. Nodes with taints are excluded from regular scheduling and normal pods will not be scheduled to run on them. Only services which can tolerate the taint set on the node can be scheduled on it. The only other services running on such nodes will be system services such as log collectors or software defined networks.
Running Kafka and its components on dedicated nodes can have many advantages. There will be no other applications running on the same nodes which could cause disturbance or consume the resources needed for Kafka. That can lead to improved performance and stability.
9.12.2. Configuring pod anti-affinity to schedule each Kafka broker on a different worker node
Many Kafka brokers or ZooKeeper nodes can run on the same OpenShift worker node. If the worker node fails, they will all become unavailable at the same time. To improve reliability, you can use podAntiAffinity configuration to schedule each Kafka broker or ZooKeeper node on a different OpenShift worker node.
Prerequisites
- An OpenShift cluster
- A running Cluster Operator
Procedure
Edit the
affinityproperty in the resource specifying the cluster deployment. To make sure that no worker nodes are shared by Kafka brokers or ZooKeeper nodes, use thestrimzi.io/namelabel. Set thetopologyKeytokubernetes.io/hostnameto specify that the selected pods are not scheduled on nodes with the same hostname. This will still allow the same worker node to be shared by a single Kafka broker and a single ZooKeeper node. For example:apiVersion: kafka.strimzi.io/v1beta2 kind: Kafka spec: kafka: # ... template: pod: affinity: podAntiAffinity: requiredDuringSchedulingIgnoredDuringExecution: - labelSelector: matchExpressions: - key: strimzi.io/name operator: In values: - CLUSTER-NAME-kafka topologyKey: "kubernetes.io/hostname" # ... zookeeper: # ... template: pod: affinity: podAntiAffinity: requiredDuringSchedulingIgnoredDuringExecution: - labelSelector: matchExpressions: - key: strimzi.io/name operator: In values: - CLUSTER-NAME-zookeeper topologyKey: "kubernetes.io/hostname" # ...Where
CLUSTER-NAMEis the name of your Kafka custom resource.If you even want to make sure that a Kafka broker and ZooKeeper node do not share the same worker node, use the
strimzi.io/clusterlabel. For example:apiVersion: kafka.strimzi.io/v1beta2 kind: Kafka spec: kafka: # ... template: pod: affinity: podAntiAffinity: requiredDuringSchedulingIgnoredDuringExecution: - labelSelector: matchExpressions: - key: strimzi.io/cluster operator: In values: - CLUSTER-NAME topologyKey: "kubernetes.io/hostname" # ... zookeeper: # ... template: pod: affinity: podAntiAffinity: requiredDuringSchedulingIgnoredDuringExecution: - labelSelector: matchExpressions: - key: strimzi.io/cluster operator: In values: - CLUSTER-NAME topologyKey: "kubernetes.io/hostname" # ...Where
CLUSTER-NAMEis the name of your Kafka custom resource.Create or update the resource.
oc apply -f <kafka_configuration_file>
9.12.3. Configuring pod anti-affinity in Kafka components
Pod anti-affinity configuration helps with the stability and performance of Kafka brokers. By using podAntiAffinity, OpenShift will not schedule Kafka brokers on the same nodes as other workloads. Typically, you want to avoid Kafka running on the same worker node as other network or storage intensive applications such as databases, storage or other messaging platforms.
Prerequisites
- An OpenShift cluster
- A running Cluster Operator
Procedure
Edit the
affinityproperty in the resource specifying the cluster deployment. Use labels to specify the pods which should not be scheduled on the same nodes. ThetopologyKeyshould be set tokubernetes.io/hostnameto specify that the selected pods should not be scheduled on nodes with the same hostname. For example:apiVersion: kafka.strimzi.io/v1beta2 kind: Kafka spec: kafka: # ... template: pod: affinity: podAntiAffinity: requiredDuringSchedulingIgnoredDuringExecution: - labelSelector: matchExpressions: - key: application operator: In values: - postgresql - mongodb topologyKey: "kubernetes.io/hostname" # ... zookeeper: # ...Create or update the resource.
This can be done using
oc apply:oc apply -f <kafka_configuration_file>
9.12.4. Configuring node affinity in Kafka components
Prerequisites
- An OpenShift cluster
- A running Cluster Operator
Procedure
Label the nodes where Streams for Apache Kafka components should be scheduled.
This can be done using
oc label:oc label node NAME-OF-NODE node-type=fast-networkAlternatively, some of the existing labels might be reused.
Edit the
affinityproperty in the resource specifying the cluster deployment. For example:apiVersion: kafka.strimzi.io/v1beta2 kind: Kafka spec: kafka: # ... template: pod: affinity: nodeAffinity: requiredDuringSchedulingIgnoredDuringExecution: nodeSelectorTerms: - matchExpressions: - key: node-type operator: In values: - fast-network # ... zookeeper: # ...Create or update the resource.
This can be done using
oc apply:oc apply -f <kafka_configuration_file>
9.12.5. Setting up dedicated nodes and scheduling pods on them
Prerequisites
- An OpenShift cluster
- A running Cluster Operator
Procedure
- Select the nodes which should be used as dedicated.
- Make sure there are no workloads scheduled on these nodes.
Set the taints on the selected nodes:
This can be done using
oc adm taint:oc adm taint node NAME-OF-NODE dedicated=Kafka:NoScheduleAdditionally, add a label to the selected nodes as well.
This can be done using
oc label:oc label node NAME-OF-NODE dedicated=KafkaEdit the
affinityandtolerationsproperties in the resource specifying the cluster deployment.For example:
apiVersion: kafka.strimzi.io/v1beta2 kind: Kafka spec: kafka: # ... template: pod: tolerations: - key: "dedicated" operator: "Equal" value: "Kafka" effect: "NoSchedule" affinity: nodeAffinity: requiredDuringSchedulingIgnoredDuringExecution: nodeSelectorTerms: - matchExpressions: - key: dedicated operator: In values: - Kafka # ... zookeeper: # ...Create or update the resource.
This can be done using
oc apply:oc apply -f <kafka_configuration_file>
9.13. Configuring logging levels
Configure logging levels in the custom resources of Kafka components and Streams for Apache Kafka operators. You can specify the logging levels directly in the spec.logging property of the custom resource. Or you can define the logging properties in a ConfigMap that’s referenced in the custom resource using the configMapKeyRef property.
The advantages of using a ConfigMap are that the logging properties are maintained in one place and are accessible to more than one resource. You can also reuse the ConfigMap for more than one resource. If you are using a ConfigMap to specify loggers for Streams for Apache Kafka Operators, you can also append the logging specification to add filters.
You specify a logging type in your logging specification:
-
inlinewhen specifying logging levels directly -
externalwhen referencing a ConfigMap
Example inline logging configuration
# ...
logging:
type: inline
loggers:
kafka.root.logger.level: INFO
# ...Example external logging configuration
# ...
logging:
type: external
valueFrom:
configMapKeyRef:
name: my-config-map
key: my-config-map-key
# ...
Values for the name and key of the ConfigMap are mandatory. Default logging is used if the name or key is not set.
9.13.1. Logging options for Kafka components and operators
For more information on configuring logging for specific Kafka components or operators, see the following sections.
Kafka component logging
Operator logging
9.13.2. Creating a ConfigMap for logging
To use a ConfigMap to define logging properties, you create the ConfigMap and then reference it as part of the logging definition in the spec of a resource.
The ConfigMap must contain the appropriate logging configuration.
-
log4j.propertiesfor Kafka components, ZooKeeper, and the Kafka Bridge -
log4j2.propertiesfor the Topic Operator and User Operator
The configuration must be placed under these properties.
In this procedure a ConfigMap defines a root logger for a Kafka resource.
Procedure
Create the ConfigMap.
You can create the ConfigMap as a YAML file or from a properties file.
ConfigMap example with a root logger definition for Kafka:
kind: ConfigMap apiVersion: v1 metadata: name: logging-configmap data: log4j.properties: kafka.root.logger.level="INFO"If you are using a properties file, specify the file at the command line:
oc create configmap logging-configmap --from-file=log4j.propertiesThe properties file defines the logging configuration:
# Define the logger kafka.root.logger.level="INFO" # ...Define external logging in the
specof the resource, setting thelogging.valueFrom.configMapKeyRef.nameto the name of the ConfigMap andlogging.valueFrom.configMapKeyRef.keyto the key in this ConfigMap.# ... logging: type: external valueFrom: configMapKeyRef: name: logging-configmap key: log4j.properties # ...Create or update the resource.
oc apply -f <kafka_configuration_file>
9.13.3. Configuring Cluster Operator logging
Cluster Operator logging is configured through a ConfigMap named strimzi-cluster-operator. A ConfigMap containing logging configuration is created when installing the Cluster Operator. This ConfigMap is described in the file install/cluster-operator/050-ConfigMap-strimzi-cluster-operator.yaml. You configure Cluster Operator logging by changing the data.log4j2.properties values in this ConfigMap.
To update the logging configuration, you can edit the 050-ConfigMap-strimzi-cluster-operator.yaml file and then run the following command:
oc create -f install/cluster-operator/050-ConfigMap-strimzi-cluster-operator.yaml
Alternatively, edit the ConfigMap directly:
oc edit configmap strimzi-cluster-operator
With this ConfigMap, you can control various aspects of logging, including the root logger level, log output format, and log levels for different components. The monitorInterval setting, determines how often the logging configuration is reloaded. You can also control the logging levels for the Kafka AdminClient, ZooKeeper ZKTrustManager, Netty, and the OkHttp client. Netty is a framework used in Streams for Apache Kafka for network communication, and OkHttp is a library used for making HTTP requests.
If the ConfigMap is missing when the Cluster Operator is deployed, the default logging values are used.
If the ConfigMap is accidentally deleted after the Cluster Operator is deployed, the most recently loaded logging configuration is used. Create a new ConfigMap to load a new logging configuration.
Do not remove the monitorInterval option from the ConfigMap.
9.13.4. Adding logging filters to Streams for Apache Kafka operators
If you are using a ConfigMap to configure the (log4j2) logging levels for Streams for Apache Kafka operators, you can also define logging filters to limit what’s returned in the log.
Logging filters are useful when you have a large number of logging messages. Suppose you set the log level for the logger as DEBUG (rootLogger.level="DEBUG"). Logging filters reduce the number of logs returned for the logger at that level, so you can focus on a specific resource. When the filter is set, only log messages matching the filter are logged.
Filters use markers to specify what to include in the log. You specify a kind, namespace and name for the marker. For example, if a Kafka cluster is failing, you can isolate the logs by specifying the kind as Kafka, and use the namespace and name of the failing cluster.
This example shows a marker filter for a Kafka cluster named my-kafka-cluster.
Basic logging filter configuration
rootLogger.level="INFO"
appender.console.filter.filter1.type=MarkerFilter
appender.console.filter.filter1.onMatch=ACCEPT
appender.console.filter.filter1.onMismatch=DENY
appender.console.filter.filter1.marker=Kafka(my-namespace/my-kafka-cluster) You can create one or more filters. Here, the log is filtered for two Kafka clusters.
Multiple logging filter configuration
appender.console.filter.filter1.type=MarkerFilter
appender.console.filter.filter1.onMatch=ACCEPT
appender.console.filter.filter1.onMismatch=DENY
appender.console.filter.filter1.marker=Kafka(my-namespace/my-kafka-cluster-1)
appender.console.filter.filter2.type=MarkerFilter
appender.console.filter.filter2.onMatch=ACCEPT
appender.console.filter.filter2.onMismatch=DENY
appender.console.filter.filter2.marker=Kafka(my-namespace/my-kafka-cluster-2)Adding filters to the Cluster Operator
To add filters to the Cluster Operator, update its logging ConfigMap YAML file (install/cluster-operator/050-ConfigMap-strimzi-cluster-operator.yaml).
Procedure
Update the
050-ConfigMap-strimzi-cluster-operator.yamlfile to add the filter properties to the ConfigMap.In this example, the filter properties return logs only for the
my-kafka-clusterKafka cluster:kind: ConfigMap apiVersion: v1 metadata: name: strimzi-cluster-operator data: log4j2.properties: #... appender.console.filter.filter1.type=MarkerFilter appender.console.filter.filter1.onMatch=ACCEPT appender.console.filter.filter1.onMismatch=DENY appender.console.filter.filter1.marker=Kafka(my-namespace/my-kafka-cluster)Alternatively, edit the
ConfigMapdirectly:oc edit configmap strimzi-cluster-operatorIf you updated the YAML file instead of editing the
ConfigMapdirectly, apply the changes by deploying the ConfigMap:oc create -f install/cluster-operator/050-ConfigMap-strimzi-cluster-operator.yaml
Adding filters to the Topic Operator or User Operator
To add filters to the Topic Operator or User Operator, create or edit a logging ConfigMap.
In this procedure a logging ConfigMap is created with filters for the Topic Operator. The same approach is used for the User Operator.
Procedure
Create the ConfigMap.
You can create the ConfigMap as a YAML file or from a properties file.
In this example, the filter properties return logs only for the
my-topictopic:kind: ConfigMap apiVersion: v1 metadata: name: logging-configmap data: log4j2.properties: rootLogger.level="INFO" appender.console.filter.filter1.type=MarkerFilter appender.console.filter.filter1.onMatch=ACCEPT appender.console.filter.filter1.onMismatch=DENY appender.console.filter.filter1.marker=KafkaTopic(my-namespace/my-topic)If you are using a properties file, specify the file at the command line:
oc create configmap logging-configmap --from-file=log4j2.propertiesThe properties file defines the logging configuration:
# Define the logger rootLogger.level="INFO" # Set the filters appender.console.filter.filter1.type=MarkerFilter appender.console.filter.filter1.onMatch=ACCEPT appender.console.filter.filter1.onMismatch=DENY appender.console.filter.filter1.marker=KafkaTopic(my-namespace/my-topic) # ...Define external logging in the
specof the resource, setting thelogging.valueFrom.configMapKeyRef.nameto the name of the ConfigMap andlogging.valueFrom.configMapKeyRef.keyto the key in this ConfigMap.For the Topic Operator, logging is specified in the
topicOperatorconfiguration of theKafkaresource.spec: # ... entityOperator: topicOperator: logging: type: external valueFrom: configMapKeyRef: name: logging-configmap key: log4j2.properties- Apply the changes by deploying the Cluster Operator:
create -f install/cluster-operator -n my-cluster-operator-namespace9.14. Using ConfigMaps to add configuration
Add specific configuration to your Streams for Apache Kafka deployment using ConfigMap resources. ConfigMaps use key-value pairs to store non-confidential data. Configuration data added to ConfigMaps is maintained in one place and can be reused amongst components.
ConfigMaps can only store the following types of configuration data:
- Logging configuration
- Metrics configuration
- External configuration for Kafka Connect connectors
You can’t use ConfigMaps for other areas of configuration.
When you configure a component, you can add a reference to a ConfigMap using the configMapKeyRef property.
For example, you can use configMapKeyRef to reference a ConfigMap that provides configuration for logging. You might use a ConfigMap to pass a Log4j configuration file. You add the reference to the logging configuration.
Example ConfigMap for logging
# ...
logging:
type: external
valueFrom:
configMapKeyRef:
name: my-config-map
key: my-config-map-key
# ...
To use a ConfigMap for metrics configuration, you add a reference to the metricsConfig configuration of the component in the same way.
ExternalConfiguration properties make data from a ConfigMap (or Secret) mounted to a pod available as environment variables or volumes. You can use external configuration data for the connectors used by Kafka Connect. The data might be related to an external data source, providing the values needed for the connector to communicate with that data source.
For example, you can use the configMapKeyRef property to pass configuration data from a ConfigMap as an environment variable.
Example ConfigMap providing environment variable values
apiVersion: kafka.strimzi.io/v1beta2
kind: KafkaConnect
metadata:
name: my-connect
spec:
# ...
externalConfiguration:
env:
- name: MY_ENVIRONMENT_VARIABLE
valueFrom:
configMapKeyRef:
name: my-config-map
key: my-keyIf you are using ConfigMaps that are managed externally, use configuration providers to load the data in the ConfigMaps.
9.14.1. Naming custom ConfigMaps
Streams for Apache Kafka creates its own ConfigMaps and other resources when it is deployed to OpenShift. The ConfigMaps contain data necessary for running components. The ConfigMaps created by Streams for Apache Kafka must not be edited.
Make sure that any custom ConfigMaps you create do not have the same name as these default ConfigMaps. If they have the same name, they will be overwritten. For example, if your ConfigMap has the same name as the ConfigMap for the Kafka cluster, it will be overwritten when there is an update to the Kafka cluster.
9.15. Loading configuration values from external sources
Use configuration providers to load configuration data from external sources. The providers operate independently of Streams for Apache Kafka. You can use them to load configuration data for all Kafka components, including producers and consumers. You reference the external source in the configuration of the component and provide access rights. The provider loads data without needing to restart the Kafka component or extracting files, even when referencing a new external source. For example, use providers to supply the credentials for the Kafka Connect connector configuration. The configuration must include any access rights to the external source.
9.15.1. Enabling configuration providers
You can enable one or more configuration providers using the config.providers properties in the spec configuration of a component.
Example configuration to enable a configuration provider
apiVersion: kafka.strimzi.io/v1beta2
kind: KafkaConnect
metadata:
name: my-connect
annotations:
strimzi.io/use-connector-resources: "true"
spec:
# ...
config:
# ...
config.providers: env
config.providers.env.class: org.apache.kafka.common.config.provider.EnvVarConfigProvider
# ...- KubernetesSecretConfigProvider
- Loads configuration data from OpenShift secrets. You specify the name of the secret and the key within the secret where the configuration data is stored. This provider is useful for storing sensitive configuration data like passwords or other user credentials.
- KubernetesConfigMapConfigProvider
- Loads configuration data from OpenShift config maps. You specify the name of the config map and the key within the config map where the configuration data is stored. This provider is useful for storing non-sensitive configuration data.
- EnvVarConfigProvider
- Loads configuration data from environment variables. You specify the name of the environment variable where the configuration data is stored. This provider is useful for configuring applications running in containers, for example, to load certificates or JAAS configuration from environment variables mapped from secrets.
- FileConfigProvider
- Loads configuration data from a file. You specify the path to the file where the configuration data is stored. This provider is useful for loading configuration data from files that are mounted into containers.
- DirectoryConfigProvider
- Loads configuration data from files within a directory. You specify the path to the directory where the configuration files are stored. This provider is useful for loading multiple configuration files and for organizing configuration data into separate files.
To use KubernetesSecretConfigProvider and KubernetesConfigMapConfigProvider, which are part of the OpenShift Configuration Provider plugin, you must set up access rights to the namespace that contains the configuration file.
You can use the other providers without setting up access rights. You can supply connector configuration for Kafka Connect or MirrorMaker 2 in this way by doing the following:
- Mount config maps or secrets into the Kafka Connect pod as environment variables or volumes
-
Enable
EnvVarConfigProvider,FileConfigProvider, orDirectoryConfigProviderin the Kafka Connect or MirrorMaker 2 configuration -
Pass connector configuration using the
externalConfigurationproperty in thespecof theKafkaConnectorKafkaMirrorMaker2resource
Using providers help prevent the passing of restricted information through the Kafka Connect REST interface. You can use this approach in the following scenarios:
- Mounting environment variables with the values a connector uses to connect and communicate with a data source
- Mounting a properties file with values that are used to configure Kafka Connect connectors
- Mounting files in a directory that contains values for the TLS truststore and keystore used by a connector
A restart is required when using a new Secret or ConfigMap for a connector, which can disrupt other connectors.
9.15.2. Loading configuration values from secrets or config maps
Use the KubernetesSecretConfigProvider to provide configuration properties from a secret or the KubernetesConfigMapConfigProvider to provide configuration properties from a config map.
In this procedure, a config map provides configuration properties for a connector. The properties are specified as key values of the config map. The config map is mounted into the Kafka Connect pod as a volume.
Prerequisites
- A Kafka cluster is running.
- The Cluster Operator is running.
- You have a config map containing the connector configuration.
Example config map with connector properties
apiVersion: v1
kind: ConfigMap
metadata:
name: my-connector-configuration
data:
option1: value1
option2: value2Procedure
Configure the
KafkaConnectresource.-
Enable the
KubernetesConfigMapConfigProvider
The specification shown here can support loading values from config maps and secrets.
Example Kafka Connect configuration to use config maps and secrets
apiVersion: kafka.strimzi.io/v1beta2 kind: KafkaConnect metadata: name: my-connect annotations: strimzi.io/use-connector-resources: "true" spec: # ... config: # ... config.providers: secrets,configmaps1 config.providers.configmaps.class: io.strimzi.kafka.KubernetesConfigMapConfigProvider2 config.providers.secrets.class: io.strimzi.kafka.KubernetesSecretConfigProvider3 # ...- 1
- The alias for the configuration provider is used to define other configuration parameters. The provider parameters use the alias from
config.providers, taking the formconfig.providers.${alias}.class. - 2
KubernetesConfigMapConfigProviderprovides values from config maps.- 3
KubernetesSecretConfigProviderprovides values from secrets.
-
Enable the
Create or update the resource to enable the provider.
oc apply -f <kafka_connect_configuration_file>Create a role that permits access to the values in the external config map.
Example role to access values from a config map
apiVersion: rbac.authorization.k8s.io/v1 kind: Role metadata: name: connector-configuration-role rules: - apiGroups: [""] resources: ["configmaps"] resourceNames: ["my-connector-configuration"] verbs: ["get"] # ...The rule gives the role permission to access the
my-connector-configurationconfig map.Create a role binding to permit access to the namespace that contains the config map.
Example role binding to access the namespace that contains the config map
apiVersion: rbac.authorization.k8s.io/v1 kind: RoleBinding metadata: name: connector-configuration-role-binding subjects: - kind: ServiceAccount name: my-connect-connect namespace: my-project roleRef: kind: Role name: connector-configuration-role apiGroup: rbac.authorization.k8s.io # ...The role binding gives the role permission to access the
my-projectnamespace.The service account must be the same one used by the Kafka Connect deployment. The service account name format is
<cluster_name>-connect, where<cluster_name>is the name of theKafkaConnectcustom resource.Reference the config map in the connector configuration.
Example connector configuration referencing the config map
apiVersion: kafka.strimzi.io/v1beta2 kind: KafkaConnector metadata: name: my-connector labels: strimzi.io/cluster: my-connect spec: # ... config: option: ${configmaps:my-project/my-connector-configuration:option1} # ... # ...The placeholder structure is
configmaps:<path_and_file_name>:<property>.KubernetesConfigMapConfigProviderreads and extracts theoption1property value from the external config map.
9.15.3. Loading configuration values from environment variables
Use the EnvVarConfigProvider to provide configuration properties as environment variables. Environment variables can contain values from config maps or secrets.
In this procedure, environment variables provide configuration properties for a connector to communicate with Amazon AWS. The connector must be able to read the AWS_ACCESS_KEY_ID and AWS_SECRET_ACCESS_KEY. The values of the environment variables are derived from a secret mounted into the Kafka Connect pod.
The names of user-defined environment variables cannot start with KAFKA_ or STRIMZI_.
Prerequisites
- A Kafka cluster is running.
- The Cluster Operator is running.
- You have a secret containing the connector configuration.
Example secret with values for environment variables
apiVersion: v1
kind: Secret
metadata:
name: aws-creds
type: Opaque
data:
awsAccessKey: QUtJQVhYWFhYWFhYWFhYWFg=
awsSecretAccessKey: Ylhsd1lYTnpkMjl5WkE=Procedure
Configure the
KafkaConnectresource.-
Enable the
EnvVarConfigProvider -
Specify the environment variables using the
externalConfigurationproperty.
Example Kafka Connect configuration to use external environment variables
apiVersion: kafka.strimzi.io/v1beta2 kind: KafkaConnect metadata: name: my-connect annotations: strimzi.io/use-connector-resources: "true" spec: # ... config: # ... config.providers: env1 config.providers.env.class: org.apache.kafka.common.config.provider.EnvVarConfigProvider2 # ... externalConfiguration: env: - name: AWS_ACCESS_KEY_ID3 valueFrom: secretKeyRef: name: aws-creds4 key: awsAccessKey5 - name: AWS_SECRET_ACCESS_KEY valueFrom: secretKeyRef: name: aws-creds key: awsSecretAccessKey # ...- 1
- The alias for the configuration provider is used to define other configuration parameters. The provider parameters use the alias from
config.providers, taking the formconfig.providers.${alias}.class. - 2
EnvVarConfigProviderprovides values from environment variables.- 3
- The environment variable takes a value from the secret.
- 4
- The name of the secret containing the environment variable.
- 5
- The name of the key stored in the secret.
NoteThe
secretKeyRefproperty references keys in a secret. If you are using a config map instead of a secret, use theconfigMapKeyRefproperty.-
Enable the
Create or update the resource to enable the provider.
oc apply -f <kafka_connect_configuration_file>Reference the environment variable in the connector configuration.
Example connector configuration referencing the environment variable
apiVersion: kafka.strimzi.io/v1beta2 kind: KafkaConnector metadata: name: my-connector labels: strimzi.io/cluster: my-connect spec: # ... config: option: ${env:AWS_ACCESS_KEY_ID} option: ${env:AWS_SECRET_ACCESS_KEY} # ... # ...The placeholder structure is
env:<environment_variable_name>.EnvVarConfigProviderreads and extracts the environment variable values from the mounted secret.
9.15.4. Loading configuration values from a file within a directory
Use the FileConfigProvider to provide configuration properties from a file within a directory. Files can be config maps or secrets.
In this procedure, a file provides configuration properties for a connector. A database name and password are specified as properties of a secret. The secret is mounted to the Kafka Connect pod as a volume. Volumes are mounted on the path /opt/kafka/external-configuration/<volume-name>.
Prerequisites
- A Kafka cluster is running.
- The Cluster Operator is running.
- You have a secret containing the connector configuration.
Example secret with database properties
apiVersion: v1
kind: Secret
metadata:
name: mysecret
type: Opaque
stringData:
connector.properties: |-
dbUsername: my-username
dbPassword: my-passwordProcedure
Configure the
KafkaConnectresource.-
Enable the
FileConfigProvider -
Specify the file using the
externalConfigurationproperty.
Example Kafka Connect configuration to use an external property file
apiVersion: kafka.strimzi.io/v1beta2 kind: KafkaConnect metadata: name: my-connect spec: # ... config: config.providers: file1 config.providers.file.class: org.apache.kafka.common.config.provider.FileConfigProvider2 #... externalConfiguration: volumes: - name: connector-config3 secret: secretName: mysecret4 - 1
- The alias for the configuration provider is used to define other configuration parameters.
- 2
FileConfigProviderprovides values from properties files. The parameter uses the alias fromconfig.providers, taking the formconfig.providers.${alias}.class.- 3
- The name of the volume containing the secret.
- 4
- The name of the secret.
-
Enable the
Create or update the resource to enable the provider.
oc apply -f <kafka_connect_configuration_file>Reference the file properties in the connector configuration as placeholders.
Example connector configuration referencing the file
apiVersion: kafka.strimzi.io/v1beta2 kind: KafkaConnector metadata: name: my-source-connector labels: strimzi.io/cluster: my-connect-cluster spec: class: io.debezium.connector.mysql.MySqlConnector tasksMax: 2 config: database.hostname: 192.168.99.1 database.port: "3306" database.user: "${file:/opt/kafka/external-configuration/connector-config/mysecret:dbUsername}" database.password: "${file:/opt/kafka/external-configuration/connector-config/mysecret:dbPassword}" database.server.id: "184054" #...The placeholder structure is
file:<path_and_file_name>:<property>.FileConfigProviderreads and extracts the database username and password property values from the mounted secret.
9.15.5. Loading configuration values from multiple files within a directory
Use the DirectoryConfigProvider to provide configuration properties from multiple files within a directory. Files can be config maps or secrets.
In this procedure, a secret provides the TLS keystore and truststore user credentials for a connector. The credentials are in separate files. The secrets are mounted into the Kafka Connect pod as volumes. Volumes are mounted on the path /opt/kafka/external-configuration/<volume-name>.
Prerequisites
- A Kafka cluster is running.
- The Cluster Operator is running.
- You have a secret containing the user credentials.
Example secret with user credentials
apiVersion: v1
kind: Secret
metadata:
name: my-user
labels:
strimzi.io/kind: KafkaUser
strimzi.io/cluster: my-cluster
type: Opaque
data:
ca.crt: <public_key> # Public key of the clients CA
user.crt: <user_certificate> # Public key of the user
user.key: <user_private_key> # Private key of the user
user.p12: <store> # PKCS #12 store for user certificates and keys
user.password: <password_for_store> # Protects the PKCS #12 store
The my-user secret provides the keystore credentials (user.crt and user.key) for the connector.
The <cluster_name>-cluster-ca-cert secret generated when deploying the Kafka cluster provides the cluster CA certificate as truststore credentials (ca.crt).
Procedure
Configure the
KafkaConnectresource.-
Enable the
DirectoryConfigProvider -
Specify the files using the
externalConfigurationproperty.
Example Kafka Connect configuration to use external property files
apiVersion: kafka.strimzi.io/v1beta2 kind: KafkaConnect metadata: name: my-connect spec: # ... config: config.providers: directory1 config.providers.directory.class: org.apache.kafka.common.config.provider.DirectoryConfigProvider2 #... externalConfiguration: volumes:3 - name: cluster-ca4 secret: secretName: my-cluster-cluster-ca-cert5 - name: my-user secret: secretName: my-user6 - 1
- The alias for the configuration provider is used to define other configuration parameters.
- 2
DirectoryConfigProviderprovides values from files in a directory. The parameter uses the alias fromconfig.providers, taking the formconfig.providers.${alias}.class.- 3
- The names of the volumes containing the secrets.
- 4
- The name of the secret for the cluster CA certificate to supply truststore configuration.
- 5
- The name of the secret for the user to supply keystore configuration.
-
Enable the
Create or update the resource to enable the provider.
oc apply -f <kafka_connect_configuration_file>Reference the file properties in the connector configuration as placeholders.
Example connector configuration referencing the files
apiVersion: kafka.strimzi.io/v1beta2 kind: KafkaConnector metadata: name: my-source-connector labels: strimzi.io/cluster: my-connect-cluster spec: class: io.debezium.connector.mysql.MySqlConnector tasksMax: 2 config: # ... database.history.producer.security.protocol: SSL database.history.producer.ssl.truststore.type: PEM database.history.producer.ssl.truststore.certificates: "${directory:/opt/kafka/external-configuration/cluster-ca:ca.crt}" database.history.producer.ssl.keystore.type: PEM database.history.producer.ssl.keystore.certificate.chain: "${directory:/opt/kafka/external-configuration/my-user:user.crt}" database.history.producer.ssl.keystore.key: "${directory:/opt/kafka/external-configuration/my-user:user.key}" #...The placeholder structure is
directory:<path>:<file_name>.DirectoryConfigProviderreads and extracts the credentials from the mounted secrets.
9.16. Customizing OpenShift resources
A Streams for Apache Kafka deployment creates OpenShift resources, such as Deployment, Pod, and Service resources. These resources are managed by Streams for Apache Kafka operators. Only the operator that is responsible for managing a particular OpenShift resource can change that resource. If you try to manually change an operator-managed OpenShift resource, the operator will revert your changes back.
Changing an operator-managed OpenShift resource can be useful if you want to perform certain tasks, such as the following:
-
Adding custom labels or annotations that control how
Podsare treated by Istio or other services -
Managing how
Loadbalancer-type Services are created by the cluster
To make the changes to an OpenShift resource, you can use the template property within the spec section of various Streams for Apache Kafka custom resources.
Here is a list of the custom resources where you can apply the changes:
-
Kafka.spec.kafka -
Kafka.spec.zookeeper -
Kafka.spec.entityOperator -
Kafka.spec.kafkaExporter -
Kafka.spec.cruiseControl -
KafkaNodePool.spec -
KafkaConnect.spec -
KafkaMirrorMaker.spec -
KafkaMirrorMaker2.spec -
KafkaBridge.spec -
KafkaUser.spec
For more information about these properties, see the Streams for Apache Kafka Custom Resource API Reference.
The Streams for Apache Kafka Custom Resource API Reference provides more details about the customizable fields.
In the following example, the template property is used to modify the labels in a Kafka broker’s pod.
Example template customization
apiVersion: kafka.strimzi.io/v1beta2
kind: Kafka
metadata:
name: my-cluster
labels:
app: my-cluster
spec:
kafka:
# ...
template:
pod:
metadata:
labels:
mylabel: myvalue
# ...9.16.1. Customizing the image pull policy
Streams for Apache Kafka allows you to customize the image pull policy for containers in all pods deployed by the Cluster Operator. The image pull policy is configured using the environment variable STRIMZI_IMAGE_PULL_POLICY in the Cluster Operator deployment. The STRIMZI_IMAGE_PULL_POLICY environment variable can be set to three different values:
Always- Container images are pulled from the registry every time the pod is started or restarted.
IfNotPresent- Container images are pulled from the registry only when they were not pulled before.
Never- Container images are never pulled from the registry.
Currently, the image pull policy can only be customized for all Kafka, Kafka Connect, and Kafka MirrorMaker clusters at once. Changing the policy will result in a rolling update of all your Kafka, Kafka Connect, and Kafka MirrorMaker clusters.
9.16.2. Applying a termination grace period
Apply a termination grace period to give a Kafka cluster enough time to shut down cleanly.
Specify the time using the terminationGracePeriodSeconds property. Add the property to the template.pod configuration of the Kafka custom resource.
The time you add will depend on the size of your Kafka cluster. The OpenShift default for the termination grace period is 30 seconds. If you observe that your clusters are not shutting down cleanly, you can increase the termination grace period.
A termination grace period is applied every time a pod is restarted. The period begins when OpenShift sends a term (termination) signal to the processes running in the pod. The period should reflect the amount of time required to transfer the processes of the terminating pod to another pod before they are stopped. After the period ends, a kill signal stops any processes still running in the pod.
The following example adds a termination grace period of 120 seconds to the Kafka custom resource. You can also specify the configuration in the custom resources of other Kafka components.
Example termination grace period configuration
apiVersion: kafka.strimzi.io/v1beta2
kind: Kafka
metadata:
name: my-cluster
spec:
kafka:
# ...
template:
pod:
terminationGracePeriodSeconds: 120
# ...
# ...Chapter 10. Using the Topic Operator to manage Kafka topics
The KafkaTopic resource configures topics, including partition and replication factor settings. When you create, modify, or delete a topic using KafkaTopic, the Topic Operator ensures that these changes are reflected in the Kafka cluster.
For more information on the KafkaTopic resource, see the KafkaTopic schema reference.
10.1. Topic management modes
The KafkaTopic resource is responsible for managing a single topic within a Kafka cluster. The Topic Operator provides two modes for managing KafkaTopic resources and Kafka topics:
- Unidirectional mode (default)
- Unidirectional mode does not require ZooKeeper for cluster management. It is compatible with using Streams for Apache Kafka in KRaft mode.
- Bidirectional mode
- Bidirectional mode requires ZooKeeper for cluster management. It is not compatible with using Streams for Apache Kafka in KRaft mode.
As the feature gate enabling the Topic Operator to run in unidirectional mode progresses to General Availability, bidirectional mode will be phased out. This transition is aimed at enhancing the user experience, particularly in supporting Kafka in KRaft mode.
10.1.1. Unidirectional topic management
In unidirectional mode, the Topic Operator operates as follows:
-
When a
KafkaTopicis created, deleted, or changed, the Topic Operator performs the corresponding operation on the Kafka topic.
If a topic is created, deleted, or modified directly within the Kafka cluster, without the presence of a corresponding KafkaTopic resource, the Topic Operator does not manage that topic. The Topic Operator will only manage Kafka topics associated with KafkaTopic resources and does not interfere with topics managed independently within the Kafka cluster. If a KafkaTopic does exist for a Kafka topic, any configuration changes made outside the resource are reverted.
The Topic Operator can detect cases where where multiple KafkaTopic resources are attempting to manage a Kafka topic using the same .spec.topicName. Only the oldest resource is reconciled, while the other resources fail with a resource conflict error.
10.1.2. Bidirectional topic management
In bidirectional mode, the Topic Operator operates as follows:
-
When a
KafkaTopicis created, deleted, or changed, the Topic Operator performs the corresponding operation on the Kafka topic. -
Similarly, when a topic is created, deleted, or changed within the Kafka cluster, the Topic Operator performs the corresponding operation on the
KafkaTopicresource.
Try to stick to one method of managing topics, either through the KafkaTopic resources or directly in Kafka. Avoid routinely switching between both methods for a given topic.
10.2. Topic naming conventions
A KafkaTopic resource includes a name for the topic and a label that identifies the name of the Kafka cluster it belongs to.
Label identifying a Kafka cluster for topic handling
apiVersion: kafka.strimzi.io/v1beta2
kind: KafkaTopic
metadata:
name: topic-name-1
labels:
strimzi.io/cluster: my-cluster
spec:
topicName: topic-name-1
The label provides the cluster name of the Kafka resource. The Topic Operator uses the label as a mechanism for determining which KafkaTopic resources to manage. If the label does not match the Kafka cluster, the Topic Operator cannot see the KafkaTopic, and the topic is not created.
Kafka and OpenShift have their own naming validation rules, and a Kafka topic name might not be a valid resource name in OpenShift. If possible, try and stick to a naming convention that works for both.
Consider the following guidelines:
- Use topic names that reflect the nature of the topic
- Be concise and keep the name under 63 characters
- Use all lower case and hyphens
- Avoid special characters, spaces or symbols
The KafkaTopic resource allows you to specify the Kafka topic name using the metadata.name field. However, if the desired Kafka topic name is not a valid OpenShift resource name, you can use the spec.topicName property to specify the actual name. The spec.topicName field is optional, and when it’s absent, the Kafka topic name defaults to the metadata.name of the topic. When a topic is created, the topic name cannot be changed later.
Example of supplying a valid Kafka topic name
apiVersion: kafka.strimzi.io/v1beta2
kind: KafkaTopic
metadata:
name: my-topic-1
spec:
topicName: My.Topic.1
# ...
If more than one KafkaTopic resource refers to the same Kafka topic, the resource that was created first is considered to be the one managing the topic. The status of the newer resources is updated to indicate a conflict, and their Ready status is changed to False.
If a Kafka client application, such as Kafka Streams, automatically creates topics with invalid OpenShift resource names, the Topic Operator generates a valid metadata.name when used in bidirectional mode. It replaces invalid characters and appends a hash to the name. However, this behavior does not apply in unidirectional mode.
Example of replacing an invalid topic name
apiVersion: kafka.strimzi.io/v1beta2
kind: KafkaTopic
metadata:
name: my-topic---c55e57fe2546a33f9e603caf57165db4072e827e
# ...For more information on the requirements for identifiers and names in a cluster, refer to the OpenShift documentation Object Names and IDs.
10.3. Handling changes to topics
How the Topic Operator handles changes to topics depends on the mode of topic management.
-
For unidirectional topic management, configuration changes only go in one direction: from the
KafkaTopicresource to the Kafka topic. Any changes to a Kafka topic managed outside theKafkaTopicresource are reverted. -
For bidirectional topic management, configuration changes are synchronized between the Kafka topic and the
KafkaTopicresource in both directions. Incompatible changes prioritize the Kafka configuration, and theKafkaTopicresource is adjusted accordingly.
10.3.1. Topic store for bidirectional topic management
For bidirectional topic management, the Topic Operator is capable of handling changes to topics when there is no single source of truth. The KafkaTopic resource and the Kafka topic can undergo independent modifications, where real-time observation of changes may not always be feasible, particularly when the Topic Operator is not operational. To handle this, the Topic Operator maintains a topic store that stores topic configuration information about each topic. It compares the state of the Kafka cluster and OpenShift with the topic store to determine the necessary changes for synchronization. This evaluation takes place during startup and at regular intervals while the Topic Operator is active.
For example, if the Topic Operator is inactive, and a new KafkaTopic named my-topic is created, upon restart, the Topic Operator recognizes the absence of my-topic in the topic store. It recognizes that the KafkaTopic was created after its last operation. Consequently, the Topic Operator generates the corresponding Kafka topic and saves the metadata in the topic store.
The topic store enables the Topic Operator to manage situations where the topic configuration is altered in both Kafka topics and KafkaTopic resources, as long as the changes are compatible. When Kafka topic configuration is updated or changes are made to the KafkaTopic custom resource, the topic store is updated after reconciling with the Kafka cluster, as long as the changes are compatible.
The topic store is based on the Kafka Streams key-value mechanism, which uses Kafka topics to persist the state. Topic metadata is cached in-memory and accessed locally within the Topic Operator. Updates from operations applied to the local in-memory cache are persisted to a backup topic store on disk. The topic store is continually synchronized with updates from Kafka topics or OpenShift KafkaTopic custom resources. Operations are handled rapidly with the topic store set up this way, but should the in-memory cache crash it is automatically repopulated from the persistent storage.
Internal topics support the handling of topic metadata in the topic store.
__strimzi_store_topic- Input topic for storing the topic metadata
__strimzi-topic-operator-kstreams-topic-store-changelog- Retains a log of compacted topic store values
Do not delete these topics, as they are essential to the running of the Topic Operator.
10.3.2. Migrating topic metadata from ZooKeeper to the topic store
In previous releases of Streams for Apache Kafka, topic metadata was stored in ZooKeeper. The topic store removes this requirement, bringing the metadata into the Kafka cluster, and under the control of the Topic Operator.
When upgrading to Streams for Apache Kafka 2.7, the transition to Topic Operator control of the topic store is seamless. Metadata is found and migrated from ZooKeeper, and the old store is deleted.
10.3.3. Downgrading to a Streams for Apache Kafka version that uses ZooKeeper to store topic metadata
If you are reverting back to a version of Streams for Apache Kafka earlier than 1.7, which uses ZooKeeper for the storage of topic metadata, you still downgrade your Cluster Operator to the previous version, then downgrade Kafka brokers and client applications to the previous Kafka version as standard.
However, you must also delete the topics that were created for the topic store using a kafka-topics command, specifying the bootstrap address of the Kafka cluster. For example:
oc run kafka-admin -ti --image=registry.redhat.io/amq-streams/kafka-37-rhel9:2.7.0 --rm=true --restart=Never -- ./bin/kafka-topics.sh --bootstrap-server localhost:9092 --topic __strimzi-topic-operator-kstreams-topic-store-changelog --delete && ./bin/kafka-topics.sh --bootstrap-server localhost:9092 --topic __strimzi_store_topic --deleteThe command must correspond to the type of listener and authentication used to access the Kafka cluster.
The Topic Operator will reconstruct the ZooKeeper topic metadata from the state of the topics in Kafka.
10.3.4. Automatic creation of topics
Applications can trigger the automatic creation of topics in the Kafka cluster. By default, the Kafka broker configuration auto.create.topics.enable is set to true, allowing the broker to create topics automatically when an application attempts to produce or consume from a non-existing topic. Applications might also use the Kafka AdminClient to automatically create topics. When an application is deployed along with its KafkaTopic resources, it is possible that automatic topic creation in the cluster happens before the Topic Operator can react to the KafkaTopic.
For bidirectional topic management, the Topic Operator synchronizes the changes between the topics and KafkaTopic resources.
If you are using unidirectional topic management, this can mean that the topics created for an application deployment are initially created with default topic configuration. If the Topic Operator attempts to reconfigure the topics based on KafkaTopic resource specifications included with the application deployment, the operation might fail because the required change to the configuration is not allowed. For example, if the change means lowering the number of topic partitions. For this reason, it is recommended to disable auto.create.topics.enable in the Kafka cluster configuration when using unidirectional topic management.
10.4. Configuring Kafka topics
Use the properties of the KafkaTopic resource to configure Kafka topics. Changes made to topic configuration in the KafkaTopic are propagated to Kafka.
You can use oc apply to create or modify topics, and oc delete to delete existing topics.
For example:
-
oc apply -f <topic_config_file> -
oc delete KafkaTopic <topic_name>
To be able to delete topics, delete.topic.enable must be set to true (default) in the spec.kafka.config of the Kafka resource.
This procedure shows how to create a topic with 10 partitions and 2 replicas.
The procedure is the same for the unidirectional and bidirectional modes of topic management.
Before you begin
The KafkaTopic resource does not allow the following changes:
-
Renaming the topic defined in
spec.topicName. A mismatch betweenspec.topicNameandstatus.topicNamewill be detected. -
Decreasing the number of partitions using
spec.partitions(not supported by Kafka). -
Modifying the number of replicas specified in
spec.replicas.
Increasing spec.partitions for topics with keys will alter the partitioning of records, which can cause issues, especially when the topic uses semantic partitioning.
Prerequisites
- A running Kafka cluster configured with a Kafka broker listener using mTLS authentication and TLS encryption.
- A running Topic Operator (typically deployed with the Entity Operator).
-
For deleting a topic,
delete.topic.enable=true(default) in thespec.kafka.configof theKafkaresource.
Procedure
Configure the
KafkaTopicresource.Example Kafka topic configuration
apiVersion: kafka.strimzi.io/v1beta2 kind: KafkaTopic metadata: name: my-topic-1 labels: strimzi.io/cluster: my-cluster spec: partitions: 10 replicas: 2TipWhen modifying a topic, you can get the current version of the resource using
oc get kafkatopic my-topic-1 -o yaml.Create the
KafkaTopicresource in OpenShift.oc apply -f <topic_config_file>Wait for the ready status of the topic to change to
True:oc get kafkatopics -o wide -w -n <namespace>Kafka topic status
NAME CLUSTER PARTITIONS REPLICATION FACTOR READY my-topic-1 my-cluster 10 3 True my-topic-2 my-cluster 10 3 my-topic-3 my-cluster 10 3 TrueTopic creation is successful when the
READYoutput showsTrue.If the
READYcolumn stays blank, get more details on the status from the resource YAML or from the Topic Operator logs.Status messages provide details on the reason for the current status.
oc get kafkatopics my-topic-2 -o yamlDetails on a topic with a
NotReadystatus# ... status: conditions: - lastTransitionTime: "2022-06-13T10:14:43.351550Z" message: Number of partitions cannot be decreased reason: PartitionDecreaseException status: "True" type: NotReadyIn this example, the reason the topic is not ready is because the original number of partitions was reduced in the
KafkaTopicconfiguration. Kafka does not support this.After resetting the topic configuration, the status shows the topic is ready.
oc get kafkatopics my-topic-2 -o wide -w -n <namespace>Status update of the topic
NAME CLUSTER PARTITIONS REPLICATION FACTOR READY my-topic-2 my-cluster 10 3 TrueFetching the details shows no messages
oc get kafkatopics my-topic-2 -o yamlDetails on a topic with a
READYstatus# ... status: conditions: - lastTransitionTime: '2022-06-13T10:15:03.761084Z' status: 'True' type: Ready
10.5. Configuring topics for replication and number of partitions
The recommended configuration for topics managed by the Topic Operator is a topic replication factor of 3, and a minimum of 2 in-sync replicas.
apiVersion: kafka.strimzi.io/v1beta2
kind: KafkaTopic
metadata:
name: my-topic
labels:
strimzi.io/cluster: my-cluster
spec:
partitions: 10
replicas: 3
config:
min.insync.replicas: 2
#...- 1
- The number of partitions for the topic.
- 2
- The number of replica topic partitions. Currently, this cannot be changed in the
KafkaTopicresource, but it can be changed using thekafka-reassign-partitions.shtool. - 3
- The minimum number of replica partitions that a message must be successfully written to, or an exception is raised.
In-sync replicas are used in conjunction with the acks configuration for producer applications. The acks configuration determines the number of follower partitions a message must be replicated to before the message is acknowledged as successfully received. The bidirectional Topic Operator runs with acks=all for its internal topics whereby messages must be acknowledged by all in-sync replicas.
When scaling Kafka clusters by adding or removing brokers, replication factor configuration is not changed and replicas are not reassigned automatically. However, you can use the kafka-reassign-partitions.sh tool to change the replication factor, and manually reassign replicas to brokers.
Alternatively, though the integration of Cruise Control for Streams for Apache Kafka cannot change the replication factor for topics, the optimization proposals it generates for rebalancing Kafka include commands that transfer partition replicas and change partition leadership.
10.6. Managing KafkaTopic resources without impacting Kafka topics
This procedure describes how to convert Kafka topics that are currently managed through the KafkaTopic resource into non-managed topics. This capability can be useful in various scenarios. For instance, you might want to update the metadata.name of a KafkaTopic resource. You can only do that by deleting the original KafkaTopic resource and recreating a new one.
By annotating a KafkaTopic resource with strimzi.io/managed=false, you indicate that the Topic Operator should no longer manage that particular topic. This allows you to retain the Kafka topic while making changes to the resource’s configuration or other administrative tasks.
You can perform this task if you are using unidirectional topic management.
Prerequisites
Procedure
Annotate the
KafkaTopicresource in OpenShift, settingstrimzi.io/managedtofalse:oc annotate kafkatopic my-topic-1 strimzi.io/managed="false"Specify the
metadata.nameof the topic in yourKafkaTopicresource, which ismy-topic-1in this example.Check the status of the
KafkaTopicresource to make sure the request was successful:oc get kafkatopics my-topic-1 -o yamlExample topic with a
ReadystatusapiVersion: kafka.strimzi.io/v1beta2 kind: KafkaTopic metadata: generation: 124 name: my-topic-1 finalizer: strimzi.io/topic-operator labels: strimzi.io/cluster: my-cluster spec: partitions: 10 replicas: 2 # ... status: observedGeneration: 1241 topicName: my-topic-1 conditions: - type: Ready status: True lastTransitionTime: 20230301T103000Z- 1
- Successful reconciliation of the resource means the topic is no longer managed.
The value of
metadata.generation(the current version of the deployment) mustmatch status.observedGeneration(the latest reconciliation of the resource).You can now make changes to the
KafkaTopicresource without it affecting the Kafka topic it was managing.For example, to change the
metadata.name, do as follows:Delete the original
KafkTopicresource:oc delete kafkatopic <kafka_topic_name>-
Recreate the
KafkTopicresource with a differentmetadata.name, but usespec.topicNameto refer to the same topic that was managed by the original
-
If you haven’t deleted the original
KafkaTopicresource, and you wish to resume management of the Kafka topic again, set thestrimzi.io/managedannotation totrueor remove the annotation.
10.7. Enabling topic management for existing Kafka topics
This procedure describes how to enable topic management for topics that are not currently managed through the KafkaTopic resource. You do this by creating a matching KafkaTopic resource.
You can perform this task if you are using unidirectional topic management.
Prerequisites
Procedure
Create a
KafkaTopicresource with ametadata.namethat is the same as the Kafka topic.Or use
spec.topicNameif the name of the topic in Kafka would not be a legal OpenShift resource name.Example Kafka topic configuration
apiVersion: kafka.strimzi.io/v1beta2 kind: KafkaTopic metadata: name: my-topic-1 labels: strimzi.io/cluster: my-cluster spec: partitions: 10 replicas: 2In this example, the Kafka topic is named
my-topic-1.The Topic Operator checks whether the topic is managed by another
KafkaTopicresource. If it is, the older resource takes precedence and a resource conflict error is returned in the status of the new resource.Apply the
KafkaTopicresource:oc apply -f <topic_configuration_file>Wait for the operator to update the topic in Kafka.
The operator updates the Kafka topic with the
specof theKafkaTopicthat has the same name.Check the status of the
KafkaTopicresource to make sure the request was successful:oc get kafkatopics my-topic-1 -o yamlExample topic with a
ReadystatusapiVersion: kafka.strimzi.io/v1beta2 kind: KafkaTopic metadata: generation: 1 name: my-topic-1 labels: strimzi.io/cluster: my-cluster spec: partitions: 10 replicas: 2 # ... status: observedGeneration: 11 topicName: my-topic-1 conditions: - type: Ready status: True lastTransitionTime: 20230301T103000Z- 1
- Successful reconciliation of the resource means the topic is now managed.
The value of
metadata.generation(the current version of the deployment) mustmatch status.observedGeneration(the latest reconciliation of the resource).
10.8. Deleting managed topics
Unidirectional topic management supports the deletion of topics managed through the KafkaTopic resource with or without OpenShift finalizers. This is determined by the STRIMZI_USE_FINALIZERS Topic Operator environment variable. By default, this is set to true, though it can be set to false in the Topic Operator env configuration if you do not want the Topic Operator to add finalizers.
Finalizers ensure orderly and controlled deletion of KafkaTopic resources. A finalizer for the Topic Operator is added to the metadata of the KafkaTopic resource:
Finalizer to control topic deletion
apiVersion: kafka.strimzi.io/v1beta2
kind: KafkaTopic
metadata:
generation: 1
name: my-topic-1
finalizers:
- strimzi.io/topic-operator
labels:
strimzi.io/cluster: my-cluster
In this example, the finalizer is added for topic my-topic-1. The finalizer prevents the topic from being fully deleted until the finalization process is complete. If you then delete the topic using oc delete kafkatopic my-topic-1, a timestamp is added to the metadata:
Finalizer timestamp on deletion
apiVersion: kafka.strimzi.io/v1beta2
kind: KafkaTopic
metadata:
generation: 1
name: my-topic-1
finalizers:
- strimzi.io/topic-operator
labels:
strimzi.io/cluster: my-cluster
deletionTimestamp: 20230301T000000.000The resource is still present. If the deletion fails, it is shown in the status of the resource.
When the finalization tasks are successfully executed, the finalizer is removed from the metadata, and the resource is fully deleted.
Finalizers also serve to prevent related resources from being deleted. If the unidirectional Topic Operator is not running, it won’t be able to remove its finalizer from the metadata.finalizers. And any attempt to directly delete the KafkaTopic resources or the namespace will fail or timeout, leaving the namespace in a stuck terminating state. If this happens, you can bypass the finalization process by removing the finalizers on topics.
10.9. Switching between Topic Operator modes
You can switch between topic management modes when upgrading or downgrading Streams for Apache Kafka, or when using the same version of Streams for Apache Kafka, as long as the mode is supported for that version.
Switching from bidirectional to unidirectional topic management mode
Enable the
UnidirectionalTopicOperatorfeature gate.The Cluster Operator deploys the Entity Operator with the Topic Operator in unidirectional topic management mode.
The internal topics that support the Topic Operator running in bidirectional topic management mode are no longer required, so you can delete the
KafkaTopicresources to manage them:oc delete $(oc get kt -n <namespace_name> -o name | grep strimzi-store-topic) \ && oc delete $(oc get kt -n <namespace_name> -o name | grep strimzi-topic-operator)This command deletes the internal topics, which have names starting
strimzi-store-topicandstrimzi-topic-operator.The internal topics for storing consumer offsets and transaction states must be retained in Kafka. So, you must first discontinue their management by the Topic Operator before deleting the
KafkaTopicresources.Discontinue management of the topics:
oc annotate $(oc get kt -n <namespace_name> -o name | grep consumer-offsets) strimzi.io/managed="false" \ && oc annotate $(oc get kt -n <namespace_name> -o name | grep transaction-state) strimzi.io/managed="false"By annotating the
KafkaTopicresources withstrimzi.io/managed="false", you indicate that the Topic Operator should no longer manage those topics. In this case, we are adding the annotation to resources for managing the internal topics with names startingconsumer-offsetsandtransaction-state.When their management is discontinued, delete the
KafkaTopicresources (without deleting the topics inside Kafka):oc delete $(oc get kt -n <namespace_name> -o name | grep consumer-offsets) \ && oc delete $(oc get kt -n <namespace_name> -o name | grep transaction-state)
Switching from unidirectional to bidirectional topic management mode
Disable the
UnidirectionalTopicOperatorfeature gate.The Cluster Operator deploys the Entity Operator with the Topic Operator in bidirectional topic management mode.
The internal topics required by the Topic Operator running in bidirectional topic management mode are created.
Check whether finalizers are being used to control topic deletion. If
KafkaTopicresources are using finalizers, ensure that you do one of the following after making the switch:- Remove all finalizers from topics.
Disable the finalizers by setting the
STRIMZI_USE_FINALIZERSenvironment variable tofalsein the Topic Operatorenvconfiguration.Use the same configuration for a Topic Operator running in a Streams for Apache Kafka-managed cluster or as a standalone deployment.
Disabling topic finalizers in a Streams for Apache Kafka-managed cluster
apiVersion: kafka.strimzi.io/v1beta2 kind: Kafka metadata: name: my-cluster spec: # ... entityOperator: topicOperator: {} userOperator: {} template: topicOperatorContainer: env: - name: STRIMZI_USE_FINALIZERS value: "false" # ...Disabling topic finalizers in a standalone deployment
apiVersion: apps/v1 kind: Deployment metadata: name: strimzi-topic-operator spec: template: spec: containers: - name: STRIMZI_USE_FINALIZERS value: "false" # ...The Topic Operator does not use finalizers in bidirectional mode. If they are retained after making the switch from unidirectional mode, you won’t be able to delete
KafkaTopicand related resources.
After switching between between Topic Operator modes, try creating a topic to make sure the operator is running correctly. For more information, see Section 10.4, “Configuring Kafka topics”.
10.10. Removing finalizers on topics
If the unidirectional Topic Operator is not running, and you want to bypass the finalization process when deleting managed topics, you have to remove the finalizers. You can do this manually by editing the resources directly or by using a command.
To remove finalizers on all topics, use the following command:
Removing finalizers on topics
oc get kt -o=json | jq '.items[].metadata.finalizers = null' | oc apply -f -
The command uses the jq command line JSON parser tool to modify the KafkaTopic (kt) resources by setting the finalizers to null. You can also use the command for a specific topic:
Removing a finalizer on a specific topic
oc get kt <topic_name> -o=json | jq '.metadata.finalizers = null' | oc apply -f -After running the command, you can go ahead and delete the topics. Alternatively, if the topics were already being deleted but were blocked due to outstanding finalizers then their deletion should complete.
Be careful when removing finalizers, as any cleanup operations associated with the finalization process are not performed if the Topic Operator is not running. For example, if you remove the finalizer from a KafkaTopic resource and subsequently delete the resource, the related Kafka topic won’t be deleted.
10.11. Considerations when disabling topic deletion
When the delete.topic.enable configuration in Kafka is set to false, topics cannot be deleted. This might be required in certain scenarios, but it introduces a consideration when using the Topic Operator in unidirectional mode.
As topics cannot be deleted, finalizers added to the metadata of a KafkaTopic resource to control topic deletion are never removed by the Topic Operator (though they can be removed manually). Similarly, any Custom Resource Definitions (CRDs) or namespaces associated with topics cannot be deleted.
Before configuring delete.topic.enable=false, assess these implications to ensure it aligns with your specific requirements.
To avoid using finalizers, you can set the STRIMZI_USE_FINALIZERS Topic Operator environment variable to false.
10.12. Tuning request batches for topic operations
In unidirectional mode, the Topic Operator uses the request batching capabilities of the Kafka Admin API for operations on topic resources. You can fine-tune the batching mechanism using the following operator configuration properties:
-
STRIMZI_MAX_QUEUE_SIZEto set the maximum size of the topic event queue. The default value is 1024. -
STRIMZI_MAX_BATCH_SIZEto set the maximum number of topic events allowed in a single batch. The default value is 100. -
MAX_BATCH_LINGER_MSto specify the maximum time to wait for a batch to accumulate items before processing. The default is 100 milliseconds.
If the maximum size of the request batching queue is exceeded, the Topic Operator shuts down and is restarted. To prevent frequent restarts, consider adjusting the STRIMZI_MAX_QUEUE_SIZE property to accommodate the typical load.
Chapter 11. Using the User Operator to manage Kafka users
When you create, modify or delete a user using the KafkaUser resource, the User Operator ensures that these changes are reflected in the Kafka cluster.
For more information on the KafkaUser resource, see the KafkaUser schema reference.
11.1. Configuring Kafka users
Use the properties of the KafkaUser resource to configure Kafka users.
You can use oc apply to create or modify users, and oc delete to delete existing users.
For example:
-
oc apply -f <user_config_file> -
oc delete KafkaUser <user_name>
Users represent Kafka clients. When you configure Kafka users, you enable the user authentication and authorization mechanisms required by clients to access Kafka. The mechanism used must match the equivalent Kafka configuration. For more information on using Kafka and KafkaUser resources to secure access to Kafka brokers, see Securing access to Kafka brokers.
Prerequisites
- A running Kafka cluster configured with a Kafka broker listener using mTLS authentication and TLS encryption.
- A running User Operator (typically deployed with the Entity Operator).
Procedure
Configure the
KafkaUserresource.This example specifies mTLS authentication and simple authorization using ACLs.
Example Kafka user configuration
apiVersion: kafka.strimzi.io/v1beta2 kind: KafkaUser metadata: name: my-user-1 labels: strimzi.io/cluster: my-cluster spec: authentication: type: tls authorization: type: simple acls: # Example consumer Acls for topic my-topic using consumer group my-group - resource: type: topic name: my-topic patternType: literal operations: - Describe - Read host: "*" - resource: type: group name: my-group patternType: literal operations: - Read host: "*" # Example Producer Acls for topic my-topic - resource: type: topic name: my-topic patternType: literal operations: - Create - Describe - Write host: "*"Create the
KafkaUserresource in OpenShift.oc apply -f <user_config_file>Wait for the ready status of the user to change to
True:oc get kafkausers -o wide -w -n <namespace>Kafka user status
NAME CLUSTER AUTHENTICATION AUTHORIZATION READY my-user-1 my-cluster tls simple True my-user-2 my-cluster tls simple my-user-3 my-cluster tls simple TrueUser creation is successful when the
READYoutput showsTrue.If the
READYcolumn stays blank, get more details on the status from the resource YAML or User Operator logs.Messages provide details on the reason for the current status.
oc get kafkausers my-user-2 -o yamlDetails on a user with a
NotReadystatus# ... status: conditions: - lastTransitionTime: "2022-06-10T10:07:37.238065Z" message: Simple authorization ACL rules are configured but not supported in the Kafka cluster configuration. reason: InvalidResourceException status: "True" type: NotReadyIn this example, the reason the user is not ready is because simple authorization is not enabled in the
Kafkaconfiguration.Kafka configuration for simple authorization
apiVersion: kafka.strimzi.io/v1beta2 kind: Kafka metadata: name: my-cluster spec: kafka: # ... authorization: type: simpleAfter updating the Kafka configuration, the status shows the user is ready.
oc get kafkausers my-user-2 -o wide -w -n <namespace>Status update of the user
NAME CLUSTER AUTHENTICATION AUTHORIZATION READY my-user-2 my-cluster tls simple TrueFetching the details shows no messages.
oc get kafkausers my-user-2 -o yamlDetails on a user with a
READYstatus# ... status: conditions: - lastTransitionTime: "2022-06-10T10:33:40.166846Z" status: "True" type: Ready
Chapter 12. Validating schemas with the Red Hat build of Apicurio Registry
You can use the Red Hat build of Apicurio Registry with Streams for Apache Kafka.
Apicurio Registry is a datastore for sharing standard event schemas and API designs across API and event-driven architectures. You can use Apicurio Registry to decouple the structure of your data from your client applications, and to share and manage your data types and API descriptions at runtime using a REST interface.
Apicurio Registry stores schemas used to serialize and deserialize messages, which can then be referenced from your client applications to ensure that the messages that they send and receive are compatible with those schemas. Apicurio Registry provides Kafka client serializers/deserializers for Kafka producer and consumer applications. Kafka producer applications use serializers to encode messages that conform to specific event schemas. Kafka consumer applications use deserializers, which validate that the messages have been serialized using the correct schema, based on a specific schema ID.
You can enable your applications to use a schema from the registry. This ensures consistent schema usage and helps to prevent data errors at runtime.
Chapter 13. Integrating with the Red Hat build of Debezium for change data capture
The Red Hat build of Debezium is a distributed change data capture platform. It captures row-level changes in databases, creates change event records, and streams the records to Kafka topics. Debezium is built on Apache Kafka. You can deploy and integrate the Red Hat build of Debezium with Streams for Apache Kafka. Following a deployment of Streams for Apache Kafka, you deploy Debezium as a connector configuration through Kafka Connect. Debezium passes change event records to Streams for Apache Kafka on OpenShift. Applications can read these change event streams and access the change events in the order in which they occurred.
Debezium has multiple uses, including:
- Data replication
- Updating caches and search indexes
- Simplifying monolithic applications
- Data integration
- Enabling streaming queries
To capture database changes, deploy Kafka Connect with a Debezium database connector. You configure a KafkaConnector resource to define the connector instance.
For more information on deploying the Red Hat build of Debezium with Streams for Apache Kafka, refer to the product documentation. The documentation includes a Getting Started with Debezium guide that guides you through the process of setting up the services and connector required to view change event records for database updates.
Chapter 14. Setting up client access to a Kafka cluster
After you have deployed Streams for Apache Kafka, you can set up client access to your Kafka cluster. To verify the deployment, you can deploy example producer and consumer clients. Otherwise, create listeners that provide client access within or outside the OpenShift cluster.
14.1. Deploying example clients
Deploy example producer and consumer clients to send and receive messages. You can use these clients to verify a deployment of Streams for Apache Kafka.
Prerequisites
- The Kafka cluster is available for the clients.
Procedure
Deploy a Kafka producer.
oc run kafka-producer -ti --image=registry.redhat.io/amq-streams/kafka-37-rhel9:2.7.0 --rm=true --restart=Never -- bin/kafka-console-producer.sh --bootstrap-server cluster-name-kafka-bootstrap:9092 --topic my-topic- Type a message into the console where the producer is running.
- Press Enter to send the message.
Deploy a Kafka consumer.
oc run kafka-consumer -ti --image=registry.redhat.io/amq-streams/kafka-37-rhel9:2.7.0 --rm=true --restart=Never -- bin/kafka-console-consumer.sh --bootstrap-server cluster-name-kafka-bootstrap:9092 --topic my-topic --from-beginning- Confirm that you see the incoming messages in the consumer console.
14.2. Configuring listeners to connect to Kafka brokers
Use listeners for client connection to Kafka brokers. Streams for Apache Kafka provides a generic GenericKafkaListener schema with properties to configure listeners through the Kafka resource. The GenericKafkaListener provides a flexible approach to listener configuration. You can specify properties to configure internal listeners for connecting within the OpenShift cluster or external listeners for connecting outside the OpenShift cluster.
Specify a connection type to expose Kafka in the listener configuration. The type chosen depends on your requirements, and your environment and infrastructure. The following listener types are supported:
- Internal listeners
-
internalto connect within the same OpenShift cluster -
cluster-ipto expose Kafka using per-brokerClusterIPservices
-
- External listeners
-
nodeportto use ports on OpenShift nodes -
loadbalancerto use loadbalancer services -
ingressto use KubernetesIngressand the Ingress NGINX Controller for Kubernetes (Kubernetes only) -
routeto use OpenShiftRouteand the default HAProxy router (OpenShift only)
-
Do not use ingress on OpenShift, use the route type instead. The Ingress NGINX Controller is only intended for use on Kubernetes. The route type is only supported on OpenShift.
An internal type listener configuration uses a headless service and the DNS names given to the broker pods. You might want to join your OpenShift network to an outside network. In which case, you can configure an internal type listener (using the useServiceDnsDomain property) so that the OpenShift service DNS domain (typically .cluster.local) is not used. You can also configure a cluster-ip type of listener that exposes a Kafka cluster based on per-broker ClusterIP services. This is a useful option when you can’t route through the headless service or you wish to incorporate a custom access mechanism. For example, you might use this listener when building your own type of external listener for a specific Ingress controller or the OpenShift Gateway API.
External listeners handle access to a Kafka cluster from networks that require different authentication mechanisms. You can configure external listeners for client access outside an OpenShift environment using a specified connection mechanism, such as a loadbalancer or route. For example, loadbalancers might not be suitable for certain infrastructure, such as bare metal, where node ports provide a better option.
Each listener is defined as an array in the Kafka resource.
Example listener configuration
apiVersion: kafka.strimzi.io/v1beta2
kind: Kafka
metadata:
name: my-cluster
spec:
kafka:
# ...
listeners:
- name: plain
port: 9092
type: internal
tls: false
configuration:
useServiceDnsDomain: true
- name: tls
port: 9093
type: internal
tls: true
authentication:
type: tls
- name: external1
port: 9094
type: route
tls: true
configuration:
brokerCertChainAndKey:
secretName: my-secret
certificate: my-certificate.crt
key: my-key.key
# ...You can configure as many listeners as required, as long as their names and ports are unique. You can also configure listeners for secure connection using authentication.
If you want to know more about the pros and cons of each connection type, refer to Accessing Apache Kafka in Strimzi.
If you scale your Kafka cluster while using external listeners, it might trigger a rolling update of all Kafka brokers. This depends on the configuration.
14.3. Listener naming conventions
From the listener configuration, the resulting listener bootstrap and per-broker service names are structured according to the following naming conventions:
| Listener type | Bootstrap service name | Per-Broker service name |
|---|---|---|
|
| <cluster_name>-kafka-bootstrap | Not applicable |
|
| <cluster_name>-kafka-<listener-name>-bootstrap | <cluster_name>-kafka-<listener-name>-<idx> |
For example, my-cluster-kafka-bootstrap, my-cluster-kafka-external1-bootstrap, and my-cluster-kafka-external1-0. The names are assigned to the services, routes, load balancers, and ingresses created through the listener configuration.
You can use certain backwards compatible names and port numbers to transition listeners initially configured under the retired KafkaListeners schema. The resulting external listener naming convention varies slightly. These specific combinations of listener name and port configuration values are backwards compatible:
| Listener name | Port | Bootstrap service name | Per-Broker service name |
|---|---|---|---|
|
|
| <cluster_name>-kafka-bootstrap | Not applicable |
|
|
| <cluster-name>-kafka-bootstrap | Not applicable |
|
|
| <cluster_name>-kafka-bootstrap | <cluster_name>-kafka-bootstrap-<idx> |
14.4. Setting up client access to a Kafka cluster using listeners
Using the address of the Kafka cluster, you can provide access to a client in the same OpenShift cluster; or provide external access to a client on a different OpenShift namespace or outside OpenShift entirely. This procedure shows how to configure client access to a Kafka cluster from outside OpenShift or from another OpenShift cluster.
A Kafka listener provides access to the Kafka cluster. Client access is secured using the following configuration:
-
An external listener is configured for the Kafka cluster, with TLS encryption and mTLS authentication, and Kafka
simpleauthorization enabled. -
A
KafkaUseris created for the client, with mTLS authentication, and Access Control Lists (ACLs) defined forsimpleauthorization.
You can configure your listener to use mutual tls, scram-sha-512, or oauth authentication. mTLS always uses encryption, but encryption is also recommended when using SCRAM-SHA-512 and OAuth 2.0 authentication.
You can configure simple, oauth, opa, or custom authorization for Kafka brokers. When enabled, authorization is applied to all enabled listeners.
When you configure the KafkaUser authentication and authorization mechanisms, ensure they match the equivalent Kafka configuration:
-
KafkaUser.spec.authenticationmatchesKafka.spec.kafka.listeners[*].authentication -
KafkaUser.spec.authorizationmatchesKafka.spec.kafka.authorization
You should have at least one listener supporting the authentication you want to use for the KafkaUser.
Authentication between Kafka users and Kafka brokers depends on the authentication settings for each. For example, it is not possible to authenticate a user with mTLS if it is not also enabled in the Kafka configuration.
Streams for Apache Kafka operators automate the configuration process and create the certificates required for authentication:
- The Cluster Operator creates the listeners and sets up the cluster and client certificate authority (CA) certificates to enable authentication with the Kafka cluster.
- The User Operator creates the user representing the client and the security credentials used for client authentication, based on the chosen authentication type.
You add the certificates to your client configuration.
In this procedure, the CA certificates generated by the Cluster Operator are used, but you can replace them by installing your own certificates. You can also configure your listener to use a Kafka listener certificate managed by an external CA (certificate authority).
Certificates are available in PEM (.crt) and PKCS #12 (.p12) formats. This procedure uses PEM certificates. Use PEM certificates with clients that use certificates in X.509 format.
For internal clients in the same OpenShift cluster and namespace, you can mount the cluster CA certificate in the pod specification. For more information, see Configuring internal clients to trust the cluster CA.
Prerequisites
- The Kafka cluster is available for connection by a client running outside the OpenShift cluster
- The Cluster Operator and User Operator are running in the cluster
Procedure
Configure the Kafka cluster with a Kafka listener.
- Define the authentication required to access the Kafka broker through the listener.
Enable authorization on the Kafka broker.
Example listener configuration
apiVersion: kafka.strimzi.io/v1beta2 kind: Kafka metadata: name: my-cluster namespace: myproject spec: kafka: # ... listeners:1 - name: external12 port: 90943 type: <listener_type>4 tls: true5 authentication: type: tls6 configuration:7 #... authorization:8 type: simple superUsers: - super-user-name9 # ...- 1
- Configuration options for enabling external listeners are described in the Generic Kafka listener schema reference.
- 2
- Name to identify the listener. Must be unique within the Kafka cluster.
- 3
- Port number used by the listener inside Kafka. The port number has to be unique within a given Kafka cluster. Allowed port numbers are 9092 and higher with the exception of ports 9404 and 9999, which are already used for Prometheus and JMX. Depending on the listener type, the port number might not be the same as the port number that connects Kafka clients.
- 4
- External listener type specified as
route(OpenShift only),loadbalancer,nodeportoringress(Kubernetes only). An internal listener is specified asinternalorcluster-ip. - 5
- Required. TLS encryption on the listener. For
routeandingresstype listeners it must be set totrue. For mTLS authentication, also use theauthenticationproperty. - 6
- Client authentication mechanism on the listener. For server and client authentication using mTLS, you specify
tls: trueandauthentication.type: tls. - 7
- (Optional) Depending on the requirements of the listener type, you can specify additional listener configuration.
- 8
- Authorization specified as
simple, which uses theAclAuthorizerandStandardAuthorizerKafka plugins. - 9
- (Optional) Super users can access all brokers regardless of any access restrictions defined in ACLs.
WarningAn OpenShift route address comprises the Kafka cluster name, the listener name, the project name, and the domain of the router. For example,
my-cluster-kafka-external1-bootstrap-my-project.domain.com(<cluster_name>-kafka-<listener_name>-bootstrap-<namespace>.<domain>). Each DNS label (between periods “.”) must not exceed 63 characters, and the total length of the address must not exceed 255 characters.
Create or update the
Kafkaresource.oc apply -f <kafka_configuration_file>The Kafka cluster is configured with a Kafka broker listener using mTLS authentication.
A service is created for each Kafka broker pod.
A service is created to serve as the bootstrap address for connection to the Kafka cluster.
A service is also created as the external bootstrap address for external connection to the Kafka cluster using
nodeportlisteners.The cluster CA certificate to verify the identity of the kafka brokers is also created in the secret
<cluster_name>-cluster-ca-cert.NoteIf you scale your Kafka cluster while using external listeners, it might trigger a rolling update of all Kafka brokers. This depends on the configuration.
Retrieve the bootstrap address you can use to access the Kafka cluster from the status of the
Kafkaresource.oc get kafka <kafka_cluster_name> -o=jsonpath='{.status.listeners[?(@.name=="<listener_name>")].bootstrapServers}{"\n"}'For example:
oc get kafka my-cluster -o=jsonpath='{.status.listeners[?(@.name=="external")].bootstrapServers}{"\n"}'Use the bootstrap address in your Kafka client to connect to the Kafka cluster.
Create or modify a user representing the client that requires access to the Kafka cluster.
-
Specify the same authentication type as the
Kafkalistener. Specify the authorization ACLs for
simpleauthorization.Example user configuration
apiVersion: kafka.strimzi.io/v1beta2 kind: KafkaUser metadata: name: my-user labels: strimzi.io/cluster: my-cluster1 spec: authentication: type: tls2 authorization: type: simple acls:3 - resource: type: topic name: my-topic patternType: literal operations: - Describe - Read - resource: type: group name: my-group patternType: literal operations: - Read
-
Specify the same authentication type as the
Create or modify the
KafkaUserresource.oc apply -f USER-CONFIG-FILEThe user is created, as well as a secret with the same name as the
KafkaUserresource. The secret contains a public and private key for mTLS authentication.Example secret
apiVersion: v1 kind: Secret metadata: name: my-user labels: strimzi.io/kind: KafkaUser strimzi.io/cluster: my-cluster type: Opaque data: ca.crt: <public_key> # Public key of the clients CA user.crt: <user_certificate> # Public key of the user user.key: <user_private_key> # Private key of the user user.p12: <store> # PKCS #12 store for user certificates and keys user.password: <password_for_store> # Protects the PKCS #12 storeExtract the cluster CA certificate from the
<cluster_name>-cluster-ca-certsecret of the Kafka cluster.oc get secret <cluster_name>-cluster-ca-cert -o jsonpath='{.data.ca\.crt}' | base64 -d > ca.crtExtract the user CA certificate from the
<user_name>secret.oc get secret <user_name> -o jsonpath='{.data.user\.crt}' | base64 -d > user.crtExtract the private key of the user from the
<user_name>secret.oc get secret <user_name> -o jsonpath='{.data.user\.key}' | base64 -d > user.keyConfigure your client with the bootstrap address hostname and port for connecting to the Kafka cluster:
props.put(ConsumerConfig.BOOTSTRAP_SERVERS_CONFIG, "<hostname>:<port>");Configure your client with the truststore credentials to verify the identity of the Kafka cluster.
Specify the public cluster CA certificate.
Example truststore configuration
props.put(CommonClientConfigs.SECURITY_PROTOCOL_CONFIG, "SSL"); props.put(SslConfigs.SSL_TRUSTSTORE_TYPE_CONFIG, "PEM"); props.put(SslConfigs.SSL_TRUSTSTORE_CERTIFICATES_CONFIG, "<ca.crt_file_content>");SSL is the specified security protocol for mTLS authentication. Specify
SASL_SSLfor SCRAM-SHA-512 authentication over TLS. PEM is the file format of the truststore.Configure your client with the keystore credentials to verify the user when connecting to the Kafka cluster.
Specify the public certificate and private key.
Example keystore configuration
props.put(CommonClientConfigs.SECURITY_PROTOCOL_CONFIG, "SSL"); props.put(SslConfigs.SSL_KEYSTORE_TYPE_CONFIG, "PEM"); props.put(SslConfigs.SSL_KEYSTORE_CERTIFICATE_CHAIN_CONFIG, "<user.crt_file_content>"); props.put(SslConfigs.SSL_KEYSTORE_KEY_CONFIG, "<user.key_file_content>");Add the keystore certificate and the private key directly to the configuration. Add as a single-line format. Between the
BEGIN CERTIFICATEandEND CERTIFICATEdelimiters, start with a newline character (\n). End each line from the original certificate with\ntoo.Example keystore configuration
props.put(SslConfigs.SSL_KEYSTORE_CERTIFICATE_CHAIN_CONFIG, "-----BEGIN CERTIFICATE----- \n<user_certificate_content_line_1>\n<user_certificate_content_line_n>\n-----END CERTIFICATE---"); props.put(SslConfigs.SSL_KEYSTORE_KEY_CONFIG, "----BEGIN PRIVATE KEY-----\n<user_key_content_line_1>\n<user_key_content_line_n>\n-----END PRIVATE KEY-----");
14.5. Accessing Kafka using node ports
Use node ports to access a Streams for Apache Kafka cluster from an external client outside the OpenShift cluster.
To connect to a broker, you specify a hostname and port number for the Kafka bootstrap address, as well as the certificate used for TLS encryption.
The procedure shows basic nodeport listener configuration. You can use listener properties to enable TLS encryption (tls) and specify a client authentication mechanism (authentication). Add additional configuration using configuration properties. For example, you can use the following configuration properties with nodeport listeners:
preferredNodePortAddressType- Specifies the first address type that’s checked as the node address.
externalTrafficPolicy- Specifies whether the service routes external traffic to node-local or cluster-wide endpoints.
nodePort- Overrides the assigned node port numbers for the bootstrap and broker services.
For more information on listener configuration, see the GenericKafkaListener schema reference.
Prerequisites
- A running Cluster Operator
In this procedure, the Kafka cluster name is my-cluster. The name of the listener is external4.
Procedure
Configure a
Kafkaresource with an external listener set to thenodeporttype.For example:
apiVersion: kafka.strimzi.io/v1beta2 kind: Kafka metadata: labels: app: my-cluster name: my-cluster namespace: myproject spec: kafka: # ... listeners: - name: external4 port: 9094 type: nodeport tls: true authentication: type: tls # ... # ... zookeeper: # ...Create or update the resource.
oc apply -f <kafka_configuration_file>A cluster CA certificate to verify the identity of the kafka brokers is created in the secret
my-cluster-cluster-ca-cert.NodePorttype services are created for each Kafka broker, as well as an external bootstrap service.Node port services created for the bootstrap and brokers
NAME TYPE CLUSTER-IP PORT(S) my-cluster-kafka-external4-0 NodePort 172.30.55.13 9094:31789/TCP my-cluster-kafka-external4-1 NodePort 172.30.250.248 9094:30028/TCP my-cluster-kafka-external4-2 NodePort 172.30.115.81 9094:32650/TCP my-cluster-kafka-external4-bootstrap NodePort 172.30.30.23 9094:32650/TCPThe bootstrap address used for client connection is propagated to the
statusof theKafkaresource.Example status for the bootstrap address
status: clusterId: Y_RJQDGKRXmNF7fEcWldJQ conditions: - lastTransitionTime: '2023-01-31T14:59:37.113630Z' status: 'True' type: Ready kafkaVersion: 3.7.0 listeners: # ... - addresses: - host: ip-10-0-224-199.us-west-2.compute.internal port: 32650 bootstrapServers: 'ip-10-0-224-199.us-west-2.compute.internal:32650' certificates: - | -----BEGIN CERTIFICATE----- -----END CERTIFICATE----- name: external4 observedGeneration: 2 operatorLastSuccessfulVersion: 2.7 # ...Retrieve the bootstrap address you can use to access the Kafka cluster from the status of the
Kafkaresource.oc get kafka my-cluster -o=jsonpath='{.status.listeners[?(@.name=="external4")].bootstrapServers}{"\n"}' ip-10-0-224-199.us-west-2.compute.internal:32650Extract the cluster CA certificate.
oc get secret my-cluster-cluster-ca-cert -o jsonpath='{.data.ca\.crt}' | base64 -d > ca.crtConfigure your client to connect to the brokers.
-
Specify the bootstrap host and port in your Kafka client as the bootstrap address to connect to the Kafka cluster. For example,
ip-10-0-224-199.us-west-2.compute.internal:32650. Add the extracted certificate to the truststore of your Kafka client to configure a TLS connection.
If you enabled a client authentication mechanism, you will also need to configure it in your client.
-
Specify the bootstrap host and port in your Kafka client as the bootstrap address to connect to the Kafka cluster. For example,
If you are using your own listener certificates, check whether you need to add the CA certificate to the client’s truststore configuration. If it is a public (external) CA, you usually won’t need to add it.
14.6. Accessing Kafka using loadbalancers
Use loadbalancers to access a Streams for Apache Kafka cluster from an external client outside the OpenShift cluster.
To connect to a broker, you specify a hostname and port number for the Kafka bootstrap address, as well as the certificate used for TLS encryption.
The procedure shows basic loadbalancer listener configuration. You can use listener properties to enable TLS encryption (tls) and specify a client authentication mechanism (authentication). Add additional configuration using configuration properties. For example, you can use the following configuration properties with loadbalancer listeners:
loadBalancerSourceRanges- Restricts traffic to a specified list of CIDR (Classless Inter-Domain Routing) ranges.
externalTrafficPolicy- Specifies whether the service routes external traffic to node-local or cluster-wide endpoints.
loadBalancerIP- Requests a specific IP address when creating a loadbalancer.
For more information on listener configuration, see the GenericKafkaListener schema reference.
Prerequisites
- A running Cluster Operator
In this procedure, the Kafka cluster name is my-cluster. The name of the listener is external3.
Procedure
Configure a
Kafkaresource with an external listener set to theloadbalancertype.For example:
apiVersion: kafka.strimzi.io/v1beta2 kind: Kafka metadata: labels: app: my-cluster name: my-cluster namespace: myproject spec: kafka: # ... listeners: - name: external3 port: 9094 type: loadbalancer tls: true authentication: type: tls # ... # ... zookeeper: # ...Create or update the resource.
oc apply -f <kafka_configuration_file>A cluster CA certificate to verify the identity of the kafka brokers is also created in the secret
my-cluster-cluster-ca-cert.loadbalancertype services and loadbalancers are created for each Kafka broker, as well as an external bootstrap service.Loadbalancer services and loadbalancers created for the bootstraps and brokers
NAME TYPE CLUSTER-IP PORT(S) my-cluster-kafka-external3-0 LoadBalancer 172.30.204.234 9094:30011/TCP my-cluster-kafka-external3-1 LoadBalancer 172.30.164.89 9094:32544/TCP my-cluster-kafka-external3-2 LoadBalancer 172.30.73.151 9094:32504/TCP my-cluster-kafka-external3-bootstrap LoadBalancer 172.30.30.228 9094:30371/TCP NAME EXTERNAL-IP (loadbalancer) my-cluster-kafka-external3-0 a8a519e464b924000b6c0f0a05e19f0d-1132975133.us-west-2.elb.amazonaws.com my-cluster-kafka-external3-1 ab6adc22b556343afb0db5ea05d07347-611832211.us-west-2.elb.amazonaws.com my-cluster-kafka-external3-2 a9173e8ccb1914778aeb17eca98713c0-777597560.us-west-2.elb.amazonaws.com my-cluster-kafka-external3-bootstrap a8d4a6fb363bf447fb6e475fc3040176-36312313.us-west-2.elb.amazonaws.comThe bootstrap address used for client connection is propagated to the
statusof theKafkaresource.Example status for the bootstrap address
status: clusterId: Y_RJQDGKRXmNF7fEcWldJQ conditions: - lastTransitionTime: '2023-01-31T14:59:37.113630Z' status: 'True' type: Ready kafkaVersion: 3.7.0 listeners: # ... - addresses: - host: >- a8d4a6fb363bf447fb6e475fc3040176-36312313.us-west-2.elb.amazonaws.com port: 9094 bootstrapServers: >- a8d4a6fb363bf447fb6e475fc3040176-36312313.us-west-2.elb.amazonaws.com:9094 certificates: - | -----BEGIN CERTIFICATE----- -----END CERTIFICATE----- name: external3 observedGeneration: 2 operatorLastSuccessfulVersion: 2.7 # ...The DNS addresses used for client connection are propagated to the
statusof each loadbalancer service.Example status for the bootstrap loadbalancer
status: loadBalancer: ingress: - hostname: >- a8d4a6fb363bf447fb6e475fc3040176-36312313.us-west-2.elb.amazonaws.com # ...Retrieve the bootstrap address you can use to access the Kafka cluster from the status of the
Kafkaresource.oc get kafka my-cluster -o=jsonpath='{.status.listeners[?(@.name=="external3")].bootstrapServers}{"\n"}' a8d4a6fb363bf447fb6e475fc3040176-36312313.us-west-2.elb.amazonaws.com:9094Extract the cluster CA certificate.
oc get secret my-cluster-cluster-ca-cert -o jsonpath='{.data.ca\.crt}' | base64 -d > ca.crtConfigure your client to connect to the brokers.
-
Specify the bootstrap host and port in your Kafka client as the bootstrap address to connect to the Kafka cluster. For example,
a8d4a6fb363bf447fb6e475fc3040176-36312313.us-west-2.elb.amazonaws.com:9094. Add the extracted certificate to the truststore of your Kafka client to configure a TLS connection.
If you enabled a client authentication mechanism, you will also need to configure it in your client.
-
Specify the bootstrap host and port in your Kafka client as the bootstrap address to connect to the Kafka cluster. For example,
If you are using your own listener certificates, check whether you need to add the CA certificate to the client’s truststore configuration. If it is a public (external) CA, you usually won’t need to add it.
14.7. Accessing Kafka using OpenShift routes
Use OpenShift routes to access a Streams for Apache Kafka cluster from clients outside the OpenShift cluster.
To be able to use routes, add configuration for a route type listener in the Kafka custom resource. When applied, the configuration creates a dedicated route and service for an external bootstrap and each broker in the cluster. Clients connect to the bootstrap route, which routes them through the bootstrap service to connect to a broker. Per-broker connections are then established using DNS names, which route traffic from the client to the broker through the broker-specific routes and services.
To connect to a broker, you specify a hostname for the route bootstrap address, as well as the certificate used for TLS encryption. For access using routes, the port is always 443.
An OpenShift route address comprises the Kafka cluster name, the listener name, the project name, and the domain of the router. For example, my-cluster-kafka-external1-bootstrap-my-project.domain.com (<cluster_name>-kafka-<listener_name>-bootstrap-<namespace>.<domain>). Each DNS label (between periods “.”) must not exceed 63 characters, and the total length of the address must not exceed 255 characters.
The procedure shows basic listener configuration. TLS encryption (tls) must be enabled. You can also specify a client authentication mechanism (authentication). Add additional configuration using configuration properties. For example, you can use the host configuration property with route listeners to specify the hostnames used by the bootstrap and per-broker services.
For more information on listener configuration, see the GenericKafkaListener schema reference.
TLS passthrough
TLS passthrough is enabled for routes created by Streams for Apache Kafka. Kafka uses a binary protocol over TCP, but routes are designed to work with a HTTP protocol. To be able to route TCP traffic through routes, Streams for Apache Kafka uses TLS passthrough with Server Name Indication (SNI).
SNI helps with identifying and passing connection to Kafka brokers. In passthrough mode, TLS encryption is always used. Because the connection passes to the brokers, the listeners use TLS certificates signed by the internal cluster CA and not the ingress certificates. To configure listeners to use your own listener certificates, use the brokerCertChainAndKey property.
Prerequisites
- A running Cluster Operator
In this procedure, the Kafka cluster name is my-cluster. The name of the listener is external1.
Procedure
Configure a
Kafkaresource with an external listener set to theroutetype.For example:
apiVersion: kafka.strimzi.io/v1beta2 kind: Kafka metadata: labels: app: my-cluster name: my-cluster namespace: myproject spec: kafka: # ... listeners: - name: external1 port: 9094 type: route tls: true1 authentication: type: tls # ... # ... zookeeper: # ...- 1
- For
routetype listeners, TLS encryption must be enabled (true).
Create or update the resource.
oc apply -f <kafka_configuration_file>A cluster CA certificate to verify the identity of the kafka brokers is created in the secret
my-cluster-cluster-ca-cert.ClusterIPtype services are created for each Kafka broker, as well as an external bootstrap service.A
routeis also created for each service, with a DNS address (host/port) to expose them using the default OpenShift HAProxy router.The routes are preconfigured with TLS passthrough.
Routes created for the bootstraps and brokers
NAME HOST/PORT SERVICES PORT TERMINATION my-cluster-kafka-external1-0 my-cluster-kafka-external1-0-my-project.router.com my-cluster-kafka-external1-0 9094 passthrough my-cluster-kafka-external1-1 my-cluster-kafka-external1-1-my-project.router.com my-cluster-kafka-external1-1 9094 passthrough my-cluster-kafka-external1-2 my-cluster-kafka-external1-2-my-project.router.com my-cluster-kafka-external1-2 9094 passthrough my-cluster-kafka-external1-bootstrap my-cluster-kafka-external1-bootstrap-my-project.router.com my-cluster-kafka-external1-bootstrap 9094 passthroughThe DNS addresses used for client connection are propagated to the
statusof each route.Example status for the bootstrap route
status: ingress: - host: >- my-cluster-kafka-external1-bootstrap-my-project.router.com # ...Use a target broker to check the client-server TLS connection on port 443 using the OpenSSL
s_client.openssl s_client -connect my-cluster-kafka-external1-0-my-project.router.com:443 -servername my-cluster-kafka-external1-0-my-project.router.com -showcertsThe server name is the Server Name Indication (SNI) for passing the connection to the broker.
If the connection is successful, the certificates for the broker are returned.
Certificates for the broker
Certificate chain 0 s:O = io.strimzi, CN = my-cluster-kafka i:O = io.strimzi, CN = cluster-ca v0Retrieve the address of the bootstrap service from the status of the
Kafkaresource.oc get kafka my-cluster -o=jsonpath='{.status.listeners[?(@.name=="external1")].bootstrapServers}{"\n"}' my-cluster-kafka-external1-bootstrap-my-project.router.com:443The address comprises the Kafka cluster name, the listener name, the project name and the domain of the router (
router.comin this example).Extract the cluster CA certificate.
oc get secret my-cluster-cluster-ca-cert -o jsonpath='{.data.ca\.crt}' | base64 -d > ca.crtConfigure your client to connect to the brokers.
- Specify the address for the bootstrap service and port 443 in your Kafka client as the bootstrap address to connect to the Kafka cluster.
Add the extracted certificate to the truststore of your Kafka client to configure a TLS connection.
If you enabled a client authentication mechanism, you will also need to configure it in your client.
If you are using your own listener certificates, check whether you need to add the CA certificate to the client’s truststore configuration. If it is a public (external) CA, you usually won’t need to add it.
14.8. Returning connection details for services
Service discovery makes it easier for client applications running in the same OpenShift cluster as Streams for Apache Kafka to interact with a Kafka cluster.
A service discovery label and annotation are generated for services used to access the Kafka cluster:
- Internal Kafka bootstrap service
- Kafka Bridge service
The label helps to make the service discoverable, while the annotation provides connection details for client applications to establish connections.
The service discovery label, strimzi.io/discovery, is set as true for the Service resources. The service discovery annotation has the same key, providing connection details in JSON format for each service.
Example internal Kafka bootstrap service
apiVersion: v1
kind: Service
metadata:
annotations:
strimzi.io/discovery: |-
[ {
"port" : 9092,
"tls" : false,
"protocol" : "kafka",
"auth" : "scram-sha-512"
}, {
"port" : 9093,
"tls" : true,
"protocol" : "kafka",
"auth" : "tls"
} ]
labels:
strimzi.io/cluster: my-cluster
strimzi.io/discovery: "true"
strimzi.io/kind: Kafka
strimzi.io/name: my-cluster-kafka-bootstrap
name: my-cluster-kafka-bootstrap
spec:
#...Example Kafka Bridge service
apiVersion: v1
kind: Service
metadata:
annotations:
strimzi.io/discovery: |-
[ {
"port" : 8080,
"tls" : false,
"auth" : "none",
"protocol" : "http"
} ]
labels:
strimzi.io/cluster: my-bridge
strimzi.io/discovery: "true"
strimzi.io/kind: KafkaBridge
strimzi.io/name: my-bridge-bridge-serviceFind services by specifying the discovery label when fetching services from the command line or a corresponding API call.
Returning services using the discovery label
oc get service -l strimzi.io/discovery=trueConnection details are returned when retrieving the service discovery label.
Chapter 15. Securing access to Kafka
Secure your Kafka cluster by managing the access a client has to Kafka brokers. A secure connection between Kafka brokers and clients can encompass the following:
- Encryption for data exchange
- Authentication to prove identity
- Authorization to allow or decline actions executed by users
In Streams for Apache Kafka, securing a connection involves configuring listeners and user accounts:
- Listener configuration
Use the
Kafkaresource to configure listeners for client connections to Kafka brokers. Listeners define how clients authenticate, such as using mTLS, SCRAM-SHA-512, OAuth 2.0, or custom authentication methods. To enhance security, configure TLS encryption to secure communication between Kafka brokers and clients. You can further secure TLS-based communication by specifying the supported TLS versions and cipher suites in the Kafka broker configuration.For an added layer of protection, use the
Kafkaresource to specify authorization methods for the Kafka cluster, such as simple, OAuth 2.0, OPA, or custom authorization.- User accounts
Set up user accounts and credentials with
KafkaUserresources in Streams for Apache Kafka. Users represent your clients and determine how they should authenticate and authorize with the Kafka cluster. The authentication and authorization mechanisms specified in the user configuration must match the Kafka configuration. Additionally, define Access Control Lists (ACLs) to control user access to specific topics and actions for more fine-grained authorization. To further enhance security, specify user quotas to limit client access to Kafka brokers based on byte rates or CPU utilization.You can also add producer or consumer configuration to your clients if you wish to limit the TLS versions and cipher suites they use. The configuration on the clients must only use protocols and cipher suites that are enabled on the broker.
If you are using an OAuth 2.0 to manage client access, user authentication and authorization credentials are managed through the authorization server.
Streams for Apache Kafka operators automate the configuration process and create the certificates required for authentication. The Cluster Operator automatically sets up TLS certificates for data encryption and authentication within your cluster.
15.1. Security options for Kafka
Use the Kafka resource to configure the mechanisms used for Kafka authentication and authorization.
15.1.1. Listener authentication
Configure client authentication for Kafka brokers when creating listeners. Specify the listener authentication type using the Kafka.spec.kafka.listeners.authentication property in the Kafka resource.
For clients inside the OpenShift cluster, you can create plain (without encryption) or tls internal listeners. The internal listener type use a headless service and the DNS names given to the broker pods. As an alternative to the headless service, you can also create a cluster-ip type of internal listener to expose Kafka using per-broker ClusterIP services. For clients outside the OpenShift cluster, you create external listeners and specify a connection mechanism, which can be nodeport, loadbalancer, ingress (Kubernetes only), or route (OpenShift only).
For more information on the configuration options for connecting an external client, see Chapter 14, Setting up client access to a Kafka cluster.
Supported authentication options:
- mTLS authentication (only on the listeners with TLS enabled encryption)
- SCRAM-SHA-512 authentication
- OAuth 2.0 token-based authentication
- Custom authentication
- TLS versions and cipher suites
The authentication option you choose depends on how you wish to authenticate client access to Kafka brokers.
Try exploring the standard authentication options before using custom authentication. Custom authentication allows for any type of Kafka-supported authentication. It can provide more flexibility, but also adds complexity.
Figure 15.1. Kafka listener authentication options
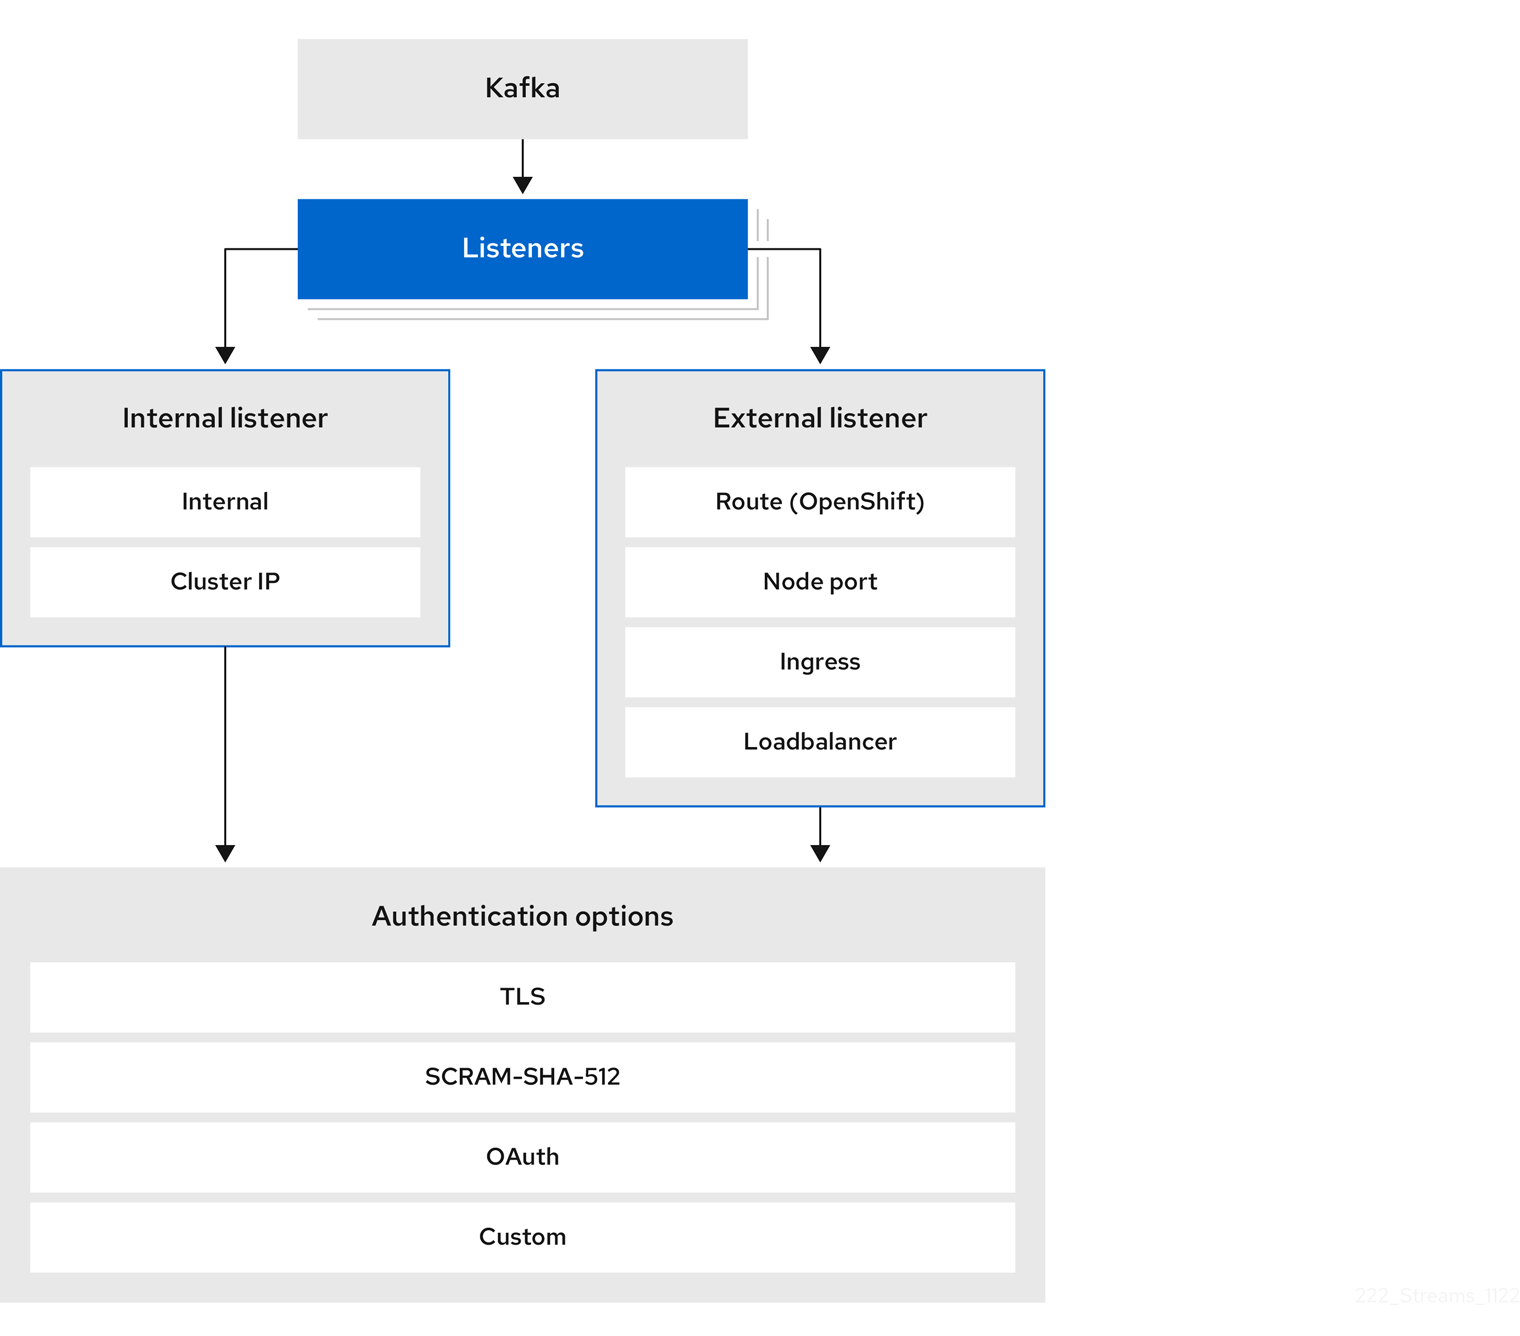
The listener authentication property is used to specify an authentication mechanism specific to that listener.
If no authentication property is specified then the listener does not authenticate clients which connect through that listener. The listener will accept all connections without authentication.
Authentication must be configured when using the User Operator to manage KafkaUsers.
The following example shows:
-
A
plainlistener configured for SCRAM-SHA-512 authentication -
A
tlslistener with mTLS authentication -
An
externallistener with mTLS authentication
Each listener is configured with a unique name and port within a Kafka cluster.
When configuring listeners for client access to brokers, you can use port 9092 or higher (9093, 9094, and so on), but with a few exceptions. The listeners cannot be configured to use the ports reserved for interbroker communication (9090 and 9091), Prometheus metrics (9404), and JMX (Java Management Extensions) monitoring (9999).
Example listener authentication configuration
apiVersion: kafka.strimzi.io/v1beta2
kind: Kafka
metadata:
name: my-cluster
namespace: myproject
spec:
kafka:
# ...
listeners:
- name: plain
port: 9092
type: internal
tls: true
authentication:
type: scram-sha-512
- name: tls
port: 9093
type: internal
tls: true
authentication:
type: tls
- name: external3
port: 9094
type: loadbalancer
tls: true
authentication:
type: tls
# ...15.1.1.1. mTLS authentication
mTLS authentication is always used for the communication between Kafka brokers and ZooKeeper pods.
Streams for Apache Kafka can configure Kafka to use TLS (Transport Layer Security) to provide encrypted communication between Kafka brokers and clients either with or without mutual authentication. For mutual, or two-way, authentication, both the server and the client present certificates. When you configure mTLS authentication, the broker authenticates the client (client authentication) and the client authenticates the broker (server authentication).
mTLS listener configuration in the Kafka resource requires the following:
-
tls: trueto specify TLS encryption and server authentication -
authentication.type: tlsto specify the client authentication
When a Kafka cluster is created by the Cluster Operator, it creates a new secret with the name <cluster_name>-cluster-ca-cert. The secret contains a CA certificate. The CA certificate is in PEM and PKCS #12 format. To verify a Kafka cluster, add the CA certificate to the truststore in your client configuration. To verify a client, add a user certificate and key to the keystore in your client configuration. For more information on configuring a client for mTLS, see Section 15.2.2, “User authentication”.
TLS authentication is more commonly one-way, with one party authenticating the identity of another. For example, when HTTPS is used between a web browser and a web server, the browser obtains proof of the identity of the web server.
15.1.1.2. SCRAM-SHA-512 authentication
SCRAM (Salted Challenge Response Authentication Mechanism) is an authentication protocol that can establish mutual authentication using passwords. Streams for Apache Kafka can configure Kafka to use SASL (Simple Authentication and Security Layer) SCRAM-SHA-512 to provide authentication on both unencrypted and encrypted client connections.
When SCRAM-SHA-512 authentication is used with a TLS connection, the TLS protocol provides the encryption, but is not used for authentication.
The following properties of SCRAM make it safe to use SCRAM-SHA-512 even on unencrypted connections:
- The passwords are not sent in the clear over the communication channel. Instead the client and the server are each challenged by the other to offer proof that they know the password of the authenticating user.
- The server and client each generate a new challenge for each authentication exchange. This means that the exchange is resilient against replay attacks.
When KafkaUser.spec.authentication.type is configured with scram-sha-512 the User Operator will generate a random 12-character password consisting of upper and lowercase ASCII letters and numbers.
15.1.1.3. Network policies
By default, Streams for Apache Kafka automatically creates a NetworkPolicy resource for every listener that is enabled on a Kafka broker. This NetworkPolicy allows applications to connect to listeners in all namespaces. Use network policies as part of the listener configuration.
If you want to restrict access to a listener at the network level to only selected applications or namespaces, use the networkPolicyPeers property. Each listener can have a different networkPolicyPeers configuration. For more information on network policy peers, refer to the NetworkPolicyPeer API reference.
If you want to use custom network policies, you can set the STRIMZI_NETWORK_POLICY_GENERATION environment variable to false in the Cluster Operator configuration. For more information, see Section 9.5, “Configuring the Cluster Operator”.
Your configuration of OpenShift must support ingress NetworkPolicies in order to use network policies in Streams for Apache Kafka.
15.1.1.4. Providing listener certificates
You can provide your own server certificates, called Kafka listener certificates, for TLS listeners or external listeners which have TLS encryption enabled. For more information, see Section 15.3.4, “Providing your own Kafka listener certificates for TLS encryption”.
15.1.2. Kafka authorization
Configure authorization for Kafka brokers using the Kafka.spec.kafka.authorization property in the Kafka resource. If the authorization property is missing, no authorization is enabled and clients have no restrictions. When enabled, authorization is applied to all enabled listeners. The authorization method is defined in the type field.
Supported authorization options:
- Simple authorization
- OAuth 2.0 authorization (if you are using OAuth 2.0 token based authentication)
- Open Policy Agent (OPA) authorization
- Custom authorization
Figure 15.2. Kafka cluster authorization options
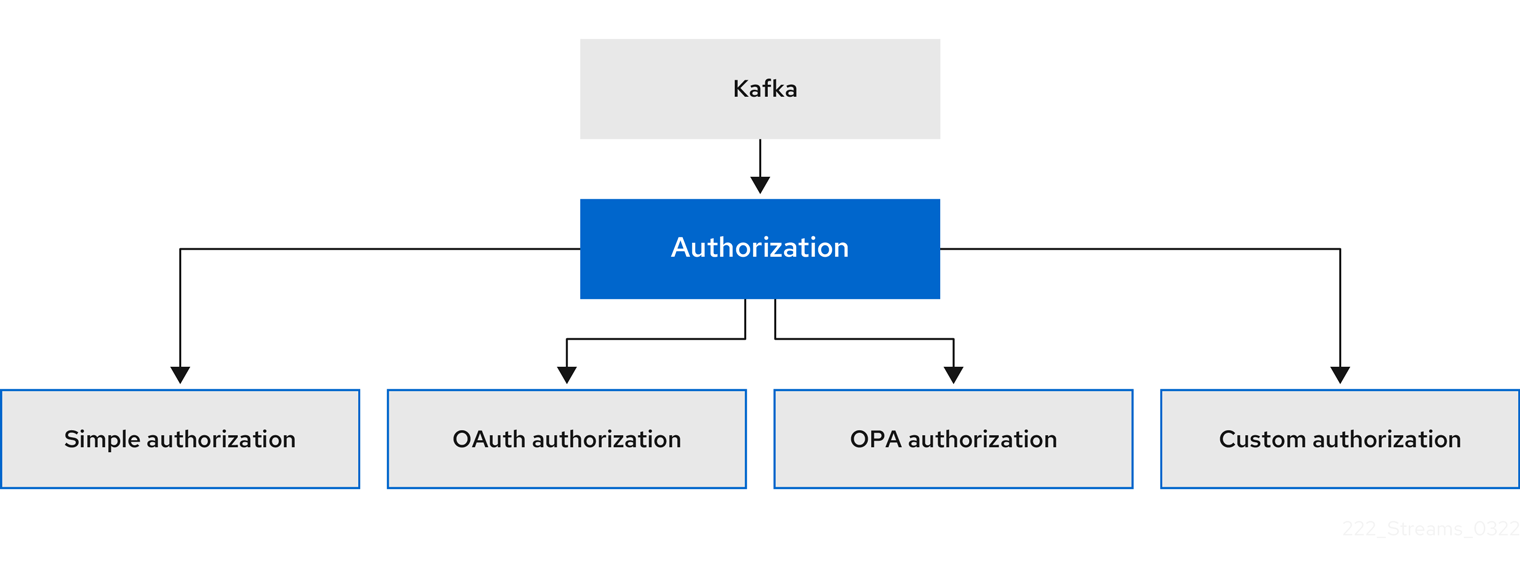
15.1.2.1. Super users
Super users can access all resources in your Kafka cluster regardless of any access restrictions, and are supported by all authorization mechanisms.
To designate super users for a Kafka cluster, add a list of user principals to the superUsers property. If a user uses mTLS authentication, the username is the common name from the TLS certificate subject prefixed with CN=. If you are not using the User Operator and using your own certificates for mTLS, the username is the full certificate subject. A full certificate subject can have the following fields: CN=user,OU=my_ou,O=my_org,L=my_location,ST=my_state,C=my_country_code. Omit any fields that are not present.
An example configuration with super users
apiVersion: kafka.strimzi.io/v1beta2
kind: Kafka
metadata:
name: my-cluster
namespace: myproject
spec:
kafka:
# ...
authorization:
type: simple
superUsers:
- CN=client_1
- user_2
- CN=client_3
- CN=client_4,OU=my_ou,O=my_org,L=my_location,ST=my_state,C=US
- CN=client_5,OU=my_ou,O=my_org,C=GB
- CN=client_6,O=my_org
# ...15.2. Security options for Kafka clients
Use the KafkaUser resource to configure the authentication mechanism, authorization mechanism, and access rights for Kafka clients. In terms of configuring security, clients are represented as users.
You can authenticate and authorize user access to Kafka brokers. Authentication permits access, and authorization constrains the access to permissible actions.
You can also create super users that have unconstrained access to Kafka brokers.
The authentication and authorization mechanisms must match the specification for the listener used to access the Kafka brokers.
For more information on configuring a KafkaUser resource to access Kafka brokers securely, see Section 14.4, “Setting up client access to a Kafka cluster using listeners”.
15.2.1. Identifying a Kafka cluster for user handling
A KafkaUser resource includes a label that defines the appropriate name of the Kafka cluster (derived from the name of the Kafka resource) to which it belongs.
apiVersion: kafka.strimzi.io/v1beta2
kind: KafkaUser
metadata:
name: my-user
labels:
strimzi.io/cluster: my-cluster
The label is used by the User Operator to identify the KafkaUser resource and create a new user, and also in subsequent handling of the user.
If the label does not match the Kafka cluster, the User Operator cannot identify the KafkaUser and the user is not created.
If the status of the KafkaUser resource remains empty, check your label.
15.2.2. User authentication
Use the KafkaUser custom resource to configure authentication credentials for users (clients) that require access to a Kafka cluster. Configure the credentials using the authentication property in KafkaUser.spec. By specifying a type, you control what credentials are generated.
Supported authentication types:
-
tlsfor mTLS authentication -
tls-externalfor mTLS authentication using external certificates -
scram-sha-512for SCRAM-SHA-512 authentication
If tls or scram-sha-512 is specified, the User Operator creates authentication credentials when it creates the user. If tls-external is specified, the user still uses mTLS, but no authentication credentials are created. Use this option when you’re providing your own certificates. When no authentication type is specified, the User Operator does not create the user or its credentials.
You can use tls-external to authenticate with mTLS using a certificate issued outside the User Operator. The User Operator does not generate a TLS certificate or a secret. You can still manage ACL rules and quotas through the User Operator in the same way as when you’re using the tls mechanism. This means that you use the CN=USER-NAME format when specifying ACL rules and quotas. USER-NAME is the common name given in a TLS certificate.
15.2.2.1. mTLS authentication
To use mTLS authentication, you set the type field in the KafkaUser resource to tls.
Example user with mTLS authentication enabled
apiVersion: kafka.strimzi.io/v1beta2
kind: KafkaUser
metadata:
name: my-user
labels:
strimzi.io/cluster: my-cluster
spec:
authentication:
type: tls
# ...
The authentication type must match the equivalent configuration for the Kafka listener used to access the Kafka cluster.
When the user is created by the User Operator, it creates a new secret with the same name as the KafkaUser resource. The secret contains a private and public key for mTLS. The public key is contained in a user certificate, which is signed by a clients CA (certificate authority) when it is created. All keys are in X.509 format.
If you are using the clients CA generated by the Cluster Operator, the user certificates generated by the User Operator are also renewed when the clients CA is renewed by the Cluster Operator.
The user secret provides keys and certificates in PEM and PKCS #12 formats.
Example secret with user credentials
apiVersion: v1
kind: Secret
metadata:
name: my-user
labels:
strimzi.io/kind: KafkaUser
strimzi.io/cluster: my-cluster
type: Opaque
data:
ca.crt: <public_key> # Public key of the clients CA
user.crt: <user_certificate> # Public key of the user
user.key: <user_private_key> # Private key of the user
user.p12: <store> # PKCS #12 store for user certificates and keys
user.password: <password_for_store> # Protects the PKCS #12 storeWhen you configure a client, you specify the following:
- Truststore properties for the public cluster CA certificate to verify the identity of the Kafka cluster
- Keystore properties for the user authentication credentials to verify the client
The configuration depends on the file format (PEM or PKCS #12). This example uses PKCS #12 stores, and the passwords required to access the credentials in the stores.
Example client configuration using mTLS in PKCS #12 format
bootstrap.servers=<kafka_cluster_name>-kafka-bootstrap:9093
security.protocol=SSL
ssl.truststore.location=/tmp/ca.p12
ssl.truststore.password=<truststore_password>
ssl.keystore.location=/tmp/user.p12
ssl.keystore.password=<keystore_password> - 1
- The bootstrap server address to connect to the Kafka cluster.
- 2
- The security protocol option when using TLS for encryption.
- 3
- The truststore location contains the public key certificate (
ca.p12) for the Kafka cluster. A cluster CA certificate and password is generated by the Cluster Operator in the<cluster_name>-cluster-ca-certsecret when the Kafka cluster is created. - 4
- The password (
ca.password) for accessing the truststore. - 5
- The keystore location contains the public key certificate (
user.p12) for the Kafka user. - 6
- The password (
user.password) for accessing the keystore.
15.2.2.2. mTLS authentication using a certificate issued outside the User Operator
To use mTLS authentication using a certificate issued outside the User Operator, you set the type field in the KafkaUser resource to tls-external. A secret and credentials are not created for the user.
Example user with mTLS authentication that uses a certificate issued outside the User Operator
apiVersion: kafka.strimzi.io/v1beta2
kind: KafkaUser
metadata:
name: my-user
labels:
strimzi.io/cluster: my-cluster
spec:
authentication:
type: tls-external
# ...15.2.2.3. SCRAM-SHA-512 authentication
To use the SCRAM-SHA-512 authentication mechanism, you set the type field in the KafkaUser resource to scram-sha-512.
Example user with SCRAM-SHA-512 authentication enabled
apiVersion: kafka.strimzi.io/v1beta2
kind: KafkaUser
metadata:
name: my-user
labels:
strimzi.io/cluster: my-cluster
spec:
authentication:
type: scram-sha-512
# ...
When the user is created by the User Operator, it creates a new secret with the same name as the KafkaUser resource. The secret contains the generated password in the password key, which is encoded with base64. In order to use the password, it must be decoded.
Example secret with user credentials
apiVersion: v1
kind: Secret
metadata:
name: my-user
labels:
strimzi.io/kind: KafkaUser
strimzi.io/cluster: my-cluster
type: Opaque
data:
password: Z2VuZXJhdGVkcGFzc3dvcmQ=
sasl.jaas.config: b3JnLmFwYWNoZS5rYWZrYS5jb21tb24uc2VjdXJpdHkuc2NyYW0uU2NyYW1Mb2dpbk1vZHVsZSByZXF1aXJlZCB1c2VybmFtZT0ibXktdXNlciIgcGFzc3dvcmQ9ImdlbmVyYXRlZHBhc3N3b3JkIjsK Decoding the generated password:
echo "Z2VuZXJhdGVkcGFzc3dvcmQ=" | base64 --decode15.2.2.3.1. Custom password configuration
When a user is created, Streams for Apache Kafka generates a random password. You can use your own password instead of the one generated by Streams for Apache Kafka. To do so, create a secret with the password and reference it in the KafkaUser resource.
Example user with a password set for SCRAM-SHA-512 authentication
apiVersion: kafka.strimzi.io/v1beta2
kind: KafkaUser
metadata:
name: my-user
labels:
strimzi.io/cluster: my-cluster
spec:
authentication:
type: scram-sha-512
password:
valueFrom:
secretKeyRef:
name: my-secret
key: my-password
# ...15.2.3. User authorization
Use the KafkaUser custom resource to configure authorization rules for users (clients) that require access to a Kafka cluster. Configure the rules using the authorization property in KafkaUser.spec. By specifying a type, you control what rules are used.
To use simple authorization, you set the type property to simple in KafkaUser.spec.authorization. The simple authorization uses the Kafka Admin API to manage the ACL rules inside your Kafka cluster. Whether ACL management in the User Operator is enabled or not depends on your authorization configuration in the Kafka cluster.
- For simple authorization, ACL management is always enabled.
- For OPA authorization, ACL management is always disabled. Authorization rules are configured in the OPA server.
- For Red Hat Single Sign-On authorization, you can manage the ACL rules directly in Red Hat Single Sign-On. You can also delegate authorization to the simple authorizer as a fallback option in the configuration. When delegation to the simple authorizer is enabled, the User Operator will enable management of ACL rules as well.
-
For custom authorization using a custom authorization plugin, use the
supportsAdminApiproperty in the.spec.kafka.authorizationconfiguration of theKafkacustom resource to enable or disable the support.
Authorization is cluster-wide. The authorization type must match the equivalent configuration in the Kafka custom resource.
If ACL management is not enabled, Streams for Apache Kafka rejects a resource if it contains any ACL rules.
If you’re using a standalone deployment of the User Operator, ACL management is enabled by default. You can disable it using the STRIMZI_ACLS_ADMIN_API_SUPPORTED environment variable.
If no authorization is specified, the User Operator does not provision any access rights for the user. Whether such a KafkaUser can still access resources depends on the authorizer being used. For example, for simple authorization, this is determined by the allow.everyone.if.no.acl.found configuration in the Kafka cluster.
15.2.3.1. ACL rules
simple authorization uses ACL rules to manage access to Kafka brokers.
ACL rules grant access rights to the user, which you specify in the acls property.
For more information about the AclRule object, see the AclRule schema reference.
15.2.3.2. Super user access to Kafka brokers
If a user is added to a list of super users in a Kafka broker configuration, the user is allowed unlimited access to the cluster regardless of any authorization constraints defined in ACLs in KafkaUser.
For more information on configuring super user access to brokers, see Kafka authorization.
15.2.3.3. User quotas
You can configure the spec for the KafkaUser resource to enforce quotas so that a user does not exceed a configured level of access to Kafka brokers. You can set size-based network usage and time-based CPU utilization thresholds. You can also add a partition mutation quota to control the rate at which requests to change partitions are accepted for user requests.
An example KafkaUser with user quotas
apiVersion: kafka.strimzi.io/v1beta2
kind: KafkaUser
metadata:
name: my-user
labels:
strimzi.io/cluster: my-cluster
spec:
# ...
quotas:
producerByteRate: 1048576
consumerByteRate: 2097152
requestPercentage: 55
controllerMutationRate: 10 - 1
- Byte-per-second quota on the amount of data the user can push to a Kafka broker
- 2
- Byte-per-second quota on the amount of data the user can fetch from a Kafka broker
- 3
- CPU utilization limit as a percentage of time for a client group
- 4
- Number of concurrent partition creation and deletion operations (mutations) allowed per second
For more information on these properties, see the KafkaUserQuotas schema reference.
15.3. Securing access to Kafka brokers
To establish secure access to Kafka brokers, you configure and apply:
A
Kafkaresource to:- Create listeners with a specified authentication type
- Configure authorization for the whole Kafka cluster
-
A
KafkaUserresource to access the Kafka brokers securely through the listeners
Configure the Kafka resource to set up:
- Listener authentication
- Network policies that restrict access to Kafka listeners
- Kafka authorization
- Super users for unconstrained access to brokers
Authentication is configured independently for each listener. Authorization is always configured for the whole Kafka cluster.
The Cluster Operator creates the listeners and sets up the cluster and client certificate authority (CA) certificates to enable authentication within the Kafka cluster.
You can replace the certificates generated by the Cluster Operator by installing your own certificates.
You can also provide your own server certificates and private keys for any listener with TLS encryption enabled. These user-provided certificates are called Kafka listener certificates. Providing Kafka listener certificates allows you to leverage existing security infrastructure, such as your organization’s private CA or a public CA. Kafka clients will need to trust the CA which was used to sign the listener certificate. You must manually renew Kafka listener certificates when needed. Certificates are available in PKCS #12 format (.p12) and PEM (.crt) formats.
Use KafkaUser to enable the authentication and authorization mechanisms that a specific client uses to access Kafka.
Configure the KafkaUser resource to set up:
- Authentication to match the enabled listener authentication
- Authorization to match the enabled Kafka authorization
- Quotas to control the use of resources by clients
The User Operator creates the user representing the client and the security credentials used for client authentication, based on the chosen authentication type.
Refer to the schema reference for more information on access configuration properties:
15.3.1. Securing Kafka brokers
This procedure shows the steps involved in securing Kafka brokers when running Streams for Apache Kafka.
The security implemented for Kafka brokers must be compatible with the security implemented for the clients requiring access.
-
Kafka.spec.kafka.listeners[*].authenticationmatchesKafkaUser.spec.authentication -
Kafka.spec.kafka.authorizationmatchesKafkaUser.spec.authorization
The steps show the configuration for simple authorization and a listener using mTLS authentication. For more information on listener configuration, see the GenericKafkaListener schema reference.
Alternatively, you can use SCRAM-SHA or OAuth 2.0 for listener authentication, and OAuth 2.0 or OPA for Kafka authorization.
Procedure
Configure the
Kafkaresource.-
Configure the
authorizationproperty for authorization. Configure the
listenersproperty to create a listener with authentication.For example:
apiVersion: kafka.strimzi.io/v1beta2 kind: Kafka spec: kafka: # ... authorization:1 type: simple superUsers:2 - CN=client_1 - user_2 - CN=client_3 listeners: - name: tls port: 9093 type: internal tls: true authentication: type: tls3 # ... zookeeper: # ...- 1
- 2
- List of user principals with unlimited access to Kafka. CN is the common name from the client certificate when mTLS authentication is used.
- 3
- Listener authentication mechanisms may be configured for each listener, and specified as mTLS, SCRAM-SHA-512, or token-based OAuth 2.0.
If you are configuring an external listener, the configuration is dependent on the chosen connection mechanism.
-
Configure the
Create or update the
Kafkaresource.oc apply -f <kafka_configuration_file>The Kafka cluster is configured with a Kafka broker listener using mTLS authentication.
A service is created for each Kafka broker pod.
A service is created to serve as the bootstrap address for connection to the Kafka cluster.
The cluster CA certificate to verify the identity of the kafka brokers is also created in the secret
<cluster_name>-cluster-ca-cert.
15.3.2. Securing user access to Kafka
Create or modify a KafkaUser to represent a client that requires secure access to the Kafka cluster.
When you configure the KafkaUser authentication and authorization mechanisms, ensure they match the equivalent Kafka configuration:
-
KafkaUser.spec.authenticationmatchesKafka.spec.kafka.listeners[*].authentication -
KafkaUser.spec.authorizationmatchesKafka.spec.kafka.authorization
This procedure shows how a user is created with mTLS authentication. You can also create a user with SCRAM-SHA authentication.
The authentication required depends on the type of authentication configured for the Kafka broker listener.
Authentication between Kafka users and Kafka brokers depends on the authentication settings for each. For example, it is not possible to authenticate a user with mTLS if it is not also enabled in the Kafka configuration.
Prerequisites
- A running Kafka cluster configured with a Kafka broker listener using mTLS authentication and TLS encryption.
- A running User Operator (typically deployed with the Entity Operator).
The authentication type in KafkaUser should match the authentication configured in Kafka brokers.
Procedure
Configure the
KafkaUserresource.For example:
apiVersion: kafka.strimzi.io/v1beta2 kind: KafkaUser metadata: name: my-user labels: strimzi.io/cluster: my-cluster spec: authentication:1 type: tls authorization: type: simple2 acls: - resource: type: topic name: my-topic patternType: literal operations: - Describe - Read - resource: type: group name: my-group patternType: literal operations: - ReadCreate or update the
KafkaUserresource.oc apply -f <user_config_file>The user is created, as well as a Secret with the same name as the
KafkaUserresource. The Secret contains a private and public key for mTLS authentication.
For information on configuring a Kafka client with properties for secure connection to Kafka brokers, see Section 14.4, “Setting up client access to a Kafka cluster using listeners”.
15.3.3. Restricting access to Kafka listeners using network policies
You can restrict access to a listener to only selected applications by using the networkPolicyPeers property.
Prerequisites
- An OpenShift cluster with support for Ingress NetworkPolicies.
- The Cluster Operator is running.
Procedure
-
Open the
Kafkaresource. In the
networkPolicyPeersproperty, define the application pods or namespaces that will be allowed to access the Kafka cluster.For example, to configure a
tlslistener to allow connections only from application pods with the labelappset tokafka-client:apiVersion: kafka.strimzi.io/v1beta2 kind: Kafka spec: kafka: # ... listeners: - name: tls port: 9093 type: internal tls: true authentication: type: tls networkPolicyPeers: - podSelector: matchLabels: app: kafka-client # ... zookeeper: # ...Create or update the resource.
Use
oc apply:oc apply -f your-file
15.3.4. Providing your own Kafka listener certificates for TLS encryption
Listeners provide client access to Kafka brokers. Configure listeners in the Kafka resource, including the configuration required for client access using TLS.
By default, the listeners use certificates signed by the internal CA (certificate authority) certificates generated by Streams for Apache Kafka. A CA certificate is generated by the Cluster Operator when it creates a Kafka cluster. When you configure a client for TLS, you add the CA certificate to its truststore configuration to verify the Kafka cluster. You can also install and use your own CA certificates. Or you can configure a listener using brokerCertChainAndKey properties and use a custom server certificate.
The brokerCertChainAndKey properties allow you to access Kafka brokers using your own custom certificates at the listener-level. You create a secret with your own private key and server certificate, then specify the key and certificate in the listener’s brokerCertChainAndKey configuration. You can use a certificate signed by a public (external) CA or a private CA. If signed by a public CA, you usually won’t need to add it to a client’s truststore configuration. Custom certificates are not managed by Streams for Apache Kafka, so you need to renew them manually.
Listener certificates are used for TLS encryption and server authentication only. They are not used for TLS client authentication. If you want to use your own certificate for TLS client authentication as well, you must install and use your own clients CA.
Prerequisites
- The Cluster Operator is running.
Each listener requires the following:
A compatible server certificate signed by an external CA. (Provide an X.509 certificate in PEM format.)
You can use one listener certificate for multiple listeners.
- Subject Alternative Names (SANs) are specified in the certificate for each listener. For more information, see Section 15.3.5, “Alternative subjects in server certificates for Kafka listeners”.
If you are not using a self-signed certificate, you can provide a certificate that includes the whole CA chain in the certificate.
You can only use the brokerCertChainAndKey properties if TLS encryption (tls: true) is configured for the listener.
Streams for Apache Kafka does not support the use of encrypted private keys for TLS. The private key stored in the secret must be unencrypted for this to work.
Procedure
Create a
Secretcontaining your private key and server certificate:oc create secret generic my-secret --from-file=my-listener-key.key --from-file=my-listener-certificate.crtEdit the
Kafkaresource for your cluster.Configure the listener to use your
Secret, certificate file, and private key file in theconfiguration.brokerCertChainAndKeyproperty.Example configuration for a
loadbalancerexternal listener with TLS encryption enabled# ... listeners: - name: plain port: 9092 type: internal tls: false - name: external3 port: 9094 type: loadbalancer tls: true configuration: brokerCertChainAndKey: secretName: my-secret certificate: my-listener-certificate.crt key: my-listener-key.key # ...Example configuration for a TLS listener
# ... listeners: - name: plain port: 9092 type: internal tls: false - name: tls port: 9093 type: internal tls: true configuration: brokerCertChainAndKey: secretName: my-secret certificate: my-listener-certificate.crt key: my-listener-key.key # ...Apply the new configuration to create or update the resource:
oc apply -f kafka.yamlThe Cluster Operator starts a rolling update of the Kafka cluster, which updates the configuration of the listeners.
NoteA rolling update is also started if you update a Kafka listener certificate in a
Secretthat is already used by a listener.
15.3.5. Alternative subjects in server certificates for Kafka listeners
In order to use TLS hostname verification with your own Kafka listener certificates, you must use the correct Subject Alternative Names (SANs) for each listener. The certificate SANs must specify hostnames for the following:
- All of the Kafka brokers in your cluster
- The Kafka cluster bootstrap service
You can use wildcard certificates if they are supported by your CA.
15.3.5.1. Examples of SANs for internal listeners
Use the following examples to help you specify hostnames of the SANs in your certificates for your internal listeners.
Replace <cluster-name> with the name of the Kafka cluster and <namespace> with the OpenShift namespace where the cluster is running.
Wildcards example for a type: internal listener
//Kafka brokers
*.<cluster-name>-kafka-brokers
*.<cluster-name>-kafka-brokers.<namespace>.svc
// Bootstrap service
<cluster-name>-kafka-bootstrap
<cluster-name>-kafka-bootstrap.<namespace>.svcNon-wildcards example for a type: internal listener
// Kafka brokers
<cluster-name>-kafka-0.<cluster-name>-kafka-brokers
<cluster-name>-kafka-0.<cluster-name>-kafka-brokers.<namespace>.svc
<cluster-name>-kafka-1.<cluster-name>-kafka-brokers
<cluster-name>-kafka-1.<cluster-name>-kafka-brokers.<namespace>.svc
# ...
// Bootstrap service
<cluster-name>-kafka-bootstrap
<cluster-name>-kafka-bootstrap.<namespace>.svcNon-wildcards example for a type: cluster-ip listener
// Kafka brokers
<cluster-name>-kafka-<listener-name>-0
<cluster-name>-kafka-<listener-name>-0.<namespace>.svc
<cluster-name>-kafka-<listener-name>-1
<cluster-name>-kafka-<listener-name>-1.<namespace>.svc
# ...
// Bootstrap service
<cluster-name>-kafka-<listener-name>-bootstrap
<cluster-name>-kafka-<listener-name>-bootstrap.<namespace>.svc15.3.5.2. Examples of SANs for external listeners
For external listeners which have TLS encryption enabled, the hostnames you need to specify in certificates depends on the external listener type.
| External listener type | In the SANs, specify… |
|---|---|
|
|
Addresses of all Kafka broker You can use a matching wildcard name. |
|
|
Addresses of all Kafka broker You can use a matching wildcard name. |
|
|
Addresses of all Kafka broker You can use a matching wildcard name. |
|
| Addresses of all OpenShift worker nodes that the Kafka broker pods might be scheduled to. You can use a matching wildcard name. |
15.4. Using OAuth 2.0 token-based authentication
Streams for Apache Kafka supports the use of OAuth 2.0 authentication using the OAUTHBEARER and PLAIN mechanisms.
OAuth 2.0 enables standardized token-based authentication and authorization between applications, using a central authorization server to issue tokens that grant limited access to resources.
You can configure OAuth 2.0 authentication, then OAuth 2.0 authorization.
Kafka brokers and clients both need to be configured to use OAuth 2.0. OAuth 2.0 authentication can also be used in conjunction with simple or OPA-based Kafka authorization.
Using OAuth 2.0 token-based authentication, application clients can access resources on application servers (called resource servers) without exposing account credentials.
The application client passes an access token as a means of authenticating, which application servers can also use to determine the level of access to grant. The authorization server handles the granting of access and inquiries about access.
In the context of Streams for Apache Kafka:
- Kafka brokers act as OAuth 2.0 resource servers
- Kafka clients act as OAuth 2.0 application clients
Kafka clients authenticate to Kafka brokers. The brokers and clients communicate with the OAuth 2.0 authorization server, as necessary, to obtain or validate access tokens.
For a deployment of Streams for Apache Kafka, OAuth 2.0 integration provides:
- Server-side OAuth 2.0 support for Kafka brokers
- Client-side OAuth 2.0 support for Kafka MirrorMaker, Kafka Connect and the Kafka Bridge
15.4.1. OAuth 2.0 authentication mechanisms
Streams for Apache Kafka supports the OAUTHBEARER and PLAIN mechanisms for OAuth 2.0 authentication. Both mechanisms allow Kafka clients to establish authenticated sessions with Kafka brokers. The authentication flow between clients, the authorization server, and Kafka brokers is different for each mechanism.
We recommend that you configure clients to use OAUTHBEARER whenever possible. OAUTHBEARER provides a higher level of security than PLAIN because client credentials are never shared with Kafka brokers. Consider using PLAIN only with Kafka clients that do not support OAUTHBEARER.
You configure Kafka broker listeners to use OAuth 2.0 authentication for connecting clients. If necessary, you can use the OAUTHBEARER and PLAIN mechanisms on the same oauth listener. The properties to support each mechanism must be explicitly specified in the oauth listener configuration.
OAUTHBEARER overview
OAUTHBEARER is automatically enabled in the oauth listener configuration for the Kafka broker. You can set the enableOauthBearer property to true, though this is not required.
# ...
authentication:
type: oauth
# ...
enableOauthBearer: trueMany Kafka client tools use libraries that provide basic support for OAUTHBEARER at the protocol level. To support application development, Streams for Apache Kafka provides an OAuth callback handler for the upstream Kafka Client Java libraries (but not for other libraries). Therefore, you do not need to write your own callback handlers. An application client can use the callback handler to provide the access token. Clients written in other languages, such as Go, must use custom code to connect to the authorization server and obtain the access token.
With OAUTHBEARER, the client initiates a session with the Kafka broker for credentials exchange, where credentials take the form of a bearer token provided by the callback handler. Using the callbacks, you can configure token provision in one of three ways:
- Client ID and Secret (by using the OAuth 2.0 client credentials mechanism)
- A long-lived access token, obtained manually at configuration time
- A long-lived refresh token, obtained manually at configuration time
OAUTHBEARER authentication can only be used by Kafka clients that support the OAUTHBEARER mechanism at the protocol level.
PLAIN overview
To use PLAIN, you must enable it in the oauth listener configuration for the Kafka broker.
In the following example, PLAIN is enabled in addition to OAUTHBEARER, which is enabled by default. If you want to use PLAIN only, you can disable OAUTHBEARER by setting enableOauthBearer to false.
# ...
authentication:
type: oauth
# ...
enablePlain: true
tokenEndpointUri: https://OAUTH-SERVER-ADDRESS/auth/realms/external/protocol/openid-connect/tokenPLAIN is a simple authentication mechanism used by all Kafka client tools. To enable PLAIN to be used with OAuth 2.0 authentication, Streams for Apache Kafka provides OAuth 2.0 over PLAIN server-side callbacks.
With the Streams for Apache Kafka implementation of PLAIN, the client credentials are not stored in ZooKeeper. Instead, client credentials are handled centrally behind a compliant authorization server, similar to when OAUTHBEARER authentication is used.
When used with the OAuth 2.0 over PLAIN callbacks, Kafka clients authenticate with Kafka brokers using either of the following methods:
- Client ID and secret (by using the OAuth 2.0 client credentials mechanism)
- A long-lived access token, obtained manually at configuration time
For both methods, the client must provide the PLAIN username and password properties to pass credentials to the Kafka broker. The client uses these properties to pass a client ID and secret or username and access token.
Client IDs and secrets are used to obtain access tokens.
Access tokens are passed as password property values. You pass the access token with or without an $accessToken: prefix.
-
If you configure a token endpoint (
tokenEndpointUri) in the listener configuration, you need the prefix. -
If you don’t configure a token endpoint (
tokenEndpointUri) in the listener configuration, you don’t need the prefix. The Kafka broker interprets the password as a raw access token.
If the password is set as the access token, the username must be set to the same principal name that the Kafka broker obtains from the access token. You can specify username extraction options in your listener using the userNameClaim, fallbackUserNameClaim, fallbackUsernamePrefix, and userInfoEndpointUri properties. The username extraction process also depends on your authorization server; in particular, how it maps client IDs to account names.
OAuth over PLAIN does not support password grant mechanism. You can only 'proxy' through SASL PLAIN mechanism the client credentials (clientId + secret) or the access token as described above.
15.4.2. OAuth 2.0 Kafka broker configuration
Kafka broker configuration for OAuth 2.0 involves:
- Creating the OAuth 2.0 client in the authorization server
- Configuring OAuth 2.0 authentication in the Kafka custom resource
In relation to the authorization server, Kafka brokers and Kafka clients are both regarded as OAuth 2.0 clients.
15.4.2.1. OAuth 2.0 client configuration on an authorization server
To configure a Kafka broker to validate the token received during session initiation, the recommended approach is to create an OAuth 2.0 client definition in an authorization server, configured as confidential, with the following client credentials enabled:
-
Client ID of
kafka(for example) - Client ID and Secret as the authentication mechanism
You only need to use a client ID and secret when using a non-public introspection endpoint of the authorization server. The credentials are not typically required when using public authorization server endpoints, as with fast local JWT token validation.
15.4.2.2. OAuth 2.0 authentication configuration in the Kafka cluster
To use OAuth 2.0 authentication in the Kafka cluster, you specify, for example, a tls listener configuration for your Kafka cluster custom resource with the authentication method oauth:
Assigining the authentication method type for OAuth 2.0
apiVersion: kafka.strimzi.io/v1beta2
kind: Kafka
spec:
kafka:
# ...
listeners:
- name: tls
port: 9093
type: internal
tls: true
authentication:
type: oauth
#...
You can configure OAuth 2.0 authentication in your listeners. We recommend using OAuth 2.0 authentication together with TLS encryption (tls: true). Without encryption, the connection is vulnerable to network eavesdropping and unauthorized access through token theft.
You configure an external listener with type: oauth for a secure transport layer to communicate with the client.
Using OAuth 2.0 with an external listener
# ...
listeners:
- name: external3
port: 9094
type: loadbalancer
tls: true
authentication:
type: oauth
#...
The tls property is false by default, so it must be enabled.
When you have defined the type of authentication as OAuth 2.0, you add configuration based on the type of validation, either as fast local JWT validation or token validation using an introspection endpoint.
The procedure to configure OAuth 2.0 for listeners, with descriptions and examples, is described in Configuring OAuth 2.0 support for Kafka brokers.
15.4.2.3. Fast local JWT token validation configuration
Fast local JWT token validation checks a JWT token signature locally.
The local check ensures that a token:
-
Conforms to type by containing a (typ) claim value of
Bearerfor an access token - Is valid (not expired)
-
Has an issuer that matches a
validIssuerURI
You specify a validIssuerURI attribute when you configure the listener, so that any tokens not issued by the authorization server are rejected.
The authorization server does not need to be contacted during fast local JWT token validation. You activate fast local JWT token validation by specifying a jwksEndpointUri attribute, the endpoint exposed by the OAuth 2.0 authorization server. The endpoint contains the public keys used to validate signed JWT tokens, which are sent as credentials by Kafka clients.
All communication with the authorization server should be performed using TLS encryption.
You can configure a certificate truststore as an OpenShift Secret in your Streams for Apache Kafka project namespace, and use a tlsTrustedCertificates attribute to point to the OpenShift Secret containing the truststore file.
You might want to configure a userNameClaim to properly extract a username from the JWT token. If required, you can use a JsonPath expression like "['user.info'].['user.id']" to retrieve the username from nested JSON attributes within a token.
If you want to use Kafka ACL authorization, you need to identify the user by their username during authentication. (The sub claim in JWT tokens is typically a unique ID, not a username.)
Example configuration for fast local JWT token validation
apiVersion: kafka.strimzi.io/v1beta2
kind: Kafka
spec:
kafka:
#...
listeners:
- name: tls
port: 9093
type: internal
tls: true
authentication:
type: oauth
validIssuerUri: <https://<auth_server_address>/auth/realms/tls>
jwksEndpointUri: <https://<auth_server_address>/auth/realms/tls/protocol/openid-connect/certs>
userNameClaim: preferred_username
maxSecondsWithoutReauthentication: 3600
tlsTrustedCertificates:
- secretName: oauth-server-cert
certificate: ca.crt
#...15.4.2.4. OAuth 2.0 introspection endpoint configuration
Token validation using an OAuth 2.0 introspection endpoint treats a received access token as opaque. The Kafka broker sends an access token to the introspection endpoint, which responds with the token information necessary for validation. Importantly, it returns up-to-date information if the specific access token is valid, and also information about when the token expires.
To configure OAuth 2.0 introspection-based validation, you specify an introspectionEndpointUri attribute rather than the jwksEndpointUri attribute specified for fast local JWT token validation. Depending on the authorization server, you typically have to specify a clientId and clientSecret, because the introspection endpoint is usually protected.
Example configuration for an introspection endpoint
apiVersion: kafka.strimzi.io/v1beta2
kind: Kafka
spec:
kafka:
listeners:
- name: tls
port: 9093
type: internal
tls: true
authentication:
type: oauth
clientId: kafka-broker
clientSecret:
secretName: my-cluster-oauth
key: clientSecret
validIssuerUri: <https://<auth_server_-_address>/auth/realms/tls>
introspectionEndpointUri: <https://<auth_server_address>/auth/realms/tls/protocol/openid-connect/token/introspect>
userNameClaim: preferred_username
maxSecondsWithoutReauthentication: 3600
tlsTrustedCertificates:
- secretName: oauth-server-cert
certificate: ca.crt15.4.3. Session re-authentication for Kafka brokers
You can configure oauth listeners to use Kafka session re-authentication for OAuth 2.0 sessions between Kafka clients and Kafka brokers. This mechanism enforces the expiry of an authenticated session between the client and the broker after a defined period of time. When a session expires, the client immediately starts a new session by reusing the existing connection rather than dropping it.
Session re-authentication is disabled by default. To enable it, you set a time value for maxSecondsWithoutReauthentication in the oauth listener configuration. The same property is used to configure session re-authentication for OAUTHBEARER and PLAIN authentication. For an example configuration, see Section 15.4.6.2, “Configuring OAuth 2.0 support for Kafka brokers”.
Session re-authentication must be supported by the Kafka client libraries used by the client.
Session re-authentication can be used with fast local JWT or introspection endpoint token validation.
Client re-authentication
When the broker’s authenticated session expires, the client must re-authenticate to the existing session by sending a new, valid access token to the broker, without dropping the connection.
If token validation is successful, a new client session is started using the existing connection. If the client fails to re-authenticate, the broker will close the connection if further attempts are made to send or receive messages. Java clients that use Kafka client library 2.2 or later automatically re-authenticate if the re-authentication mechanism is enabled on the broker.
Session re-authentication also applies to refresh tokens, if used. When the session expires, the client refreshes the access token by using its refresh token. The client then uses the new access token to re-authenticate to the existing session.
Session expiry for OAUTHBEARER and PLAIN
When session re-authentication is configured, session expiry works differently for OAUTHBEARER and PLAIN authentication.
For OAUTHBEARER and PLAIN, using the client ID and secret method:
-
The broker’s authenticated session will expire at the configured
maxSecondsWithoutReauthentication. - The session will expire earlier if the access token expires before the configured time.
For PLAIN using the long-lived access token method:
-
The broker’s authenticated session will expire at the configured
maxSecondsWithoutReauthentication. - Re-authentication will fail if the access token expires before the configured time. Although session re-authentication is attempted, PLAIN has no mechanism for refreshing tokens.
If maxSecondsWithoutReauthentication is not configured, OAUTHBEARER and PLAIN clients can remain connected to brokers indefinitely, without needing to re-authenticate. Authenticated sessions do not end with access token expiry. However, this can be considered when configuring authorization, for example, by using keycloak authorization or installing a custom authorizer.
15.4.4. OAuth 2.0 Kafka client configuration
A Kafka client is configured with either:
- The credentials required to obtain a valid access token from an authorization server (client ID and Secret)
- A valid long-lived access token or refresh token, obtained using tools provided by an authorization server
The only information ever sent to the Kafka broker is an access token. The credentials used to authenticate with the authorization server to obtain the access token are never sent to the broker.
When a client obtains an access token, no further communication with the authorization server is needed.
The simplest mechanism is authentication with a client ID and Secret. Using a long-lived access token, or a long-lived refresh token, adds more complexity because there is an additional dependency on authorization server tools.
If you are using long-lived access tokens, you may need to configure the client in the authorization server to increase the maximum lifetime of the token.
If the Kafka client is not configured with an access token directly, the client exchanges credentials for an access token during Kafka session initiation by contacting the authorization server. The Kafka client exchanges either:
- Client ID and Secret
- Client ID, refresh token, and (optionally) a secret
- Username and password, with client ID and (optionally) a secret
15.4.5. OAuth 2.0 client authentication flows
OAuth 2.0 authentication flows depend on the underlying Kafka client and Kafka broker configuration. The flows must also be supported by the authorization server used.
The Kafka broker listener configuration determines how clients authenticate using an access token. The client can pass a client ID and secret to request an access token.
If a listener is configured to use PLAIN authentication, the client can authenticate with a client ID and secret or username and access token. These values are passed as the username and password properties of the PLAIN mechanism.
Listener configuration supports the following token validation options:
- You can use fast local token validation based on JWT signature checking and local token introspection, without contacting an authorization server. The authorization server provides a JWKS endpoint with public certificates that are used to validate signatures on the tokens.
- You can use a call to a token introspection endpoint provided by an authorization server. Each time a new Kafka broker connection is established, the broker passes the access token received from the client to the authorization server. The Kafka broker checks the response to confirm whether or not the token is valid.
An authorization server might only allow the use of opaque access tokens, which means that local token validation is not possible.
Kafka client credentials can also be configured for the following types of authentication:
- Direct local access using a previously generated long-lived access token
- Contact with the authorization server for a new access token to be issued (using a client ID and a secret, or a refresh token, or a username and a password)
15.4.5.1. Example client authentication flows using the SASL OAUTHBEARER mechanism
You can use the following communication flows for Kafka authentication using the SASL OAUTHBEARER mechanism.
- Client using client ID and secret, with broker delegating validation to authorization server
- Client using client ID and secret, with broker performing fast local token validation
- Client using long-lived access token, with broker delegating validation to authorization server
- Client using long-lived access token, with broker performing fast local validation
Client using client ID and secret, with broker delegating validation to authorization server
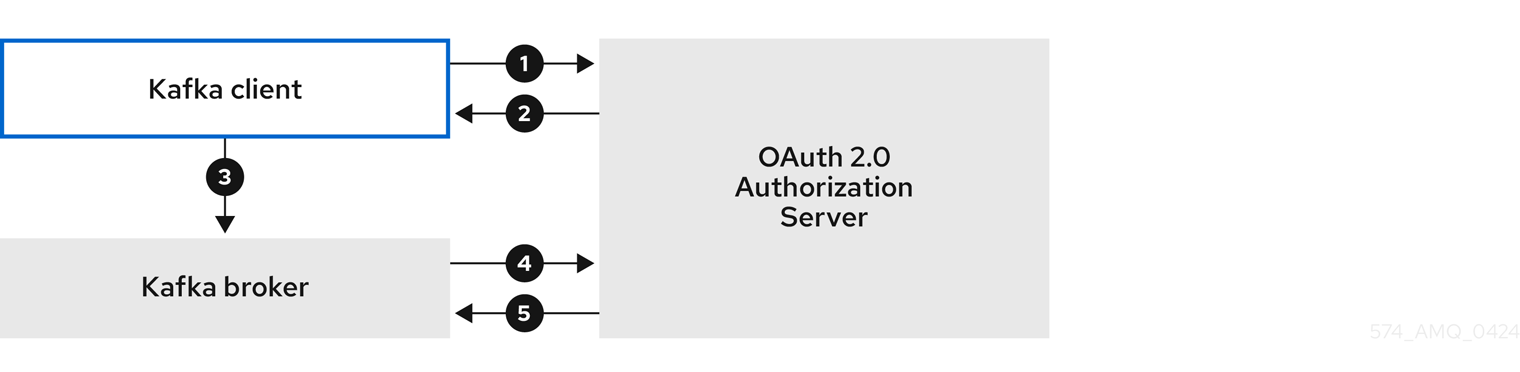
- The Kafka client requests an access token from the authorization server using a client ID and secret, and optionally a refresh token. Alternatively, the client may authenticate using a username and a password.
- The authorization server generates a new access token.
- The Kafka client authenticates with the Kafka broker using the SASL OAUTHBEARER mechanism to pass the access token.
- The Kafka broker validates the access token by calling a token introspection endpoint on the authorization server using its own client ID and secret.
- A Kafka client session is established if the token is valid.
Client using client ID and secret, with broker performing fast local token validation
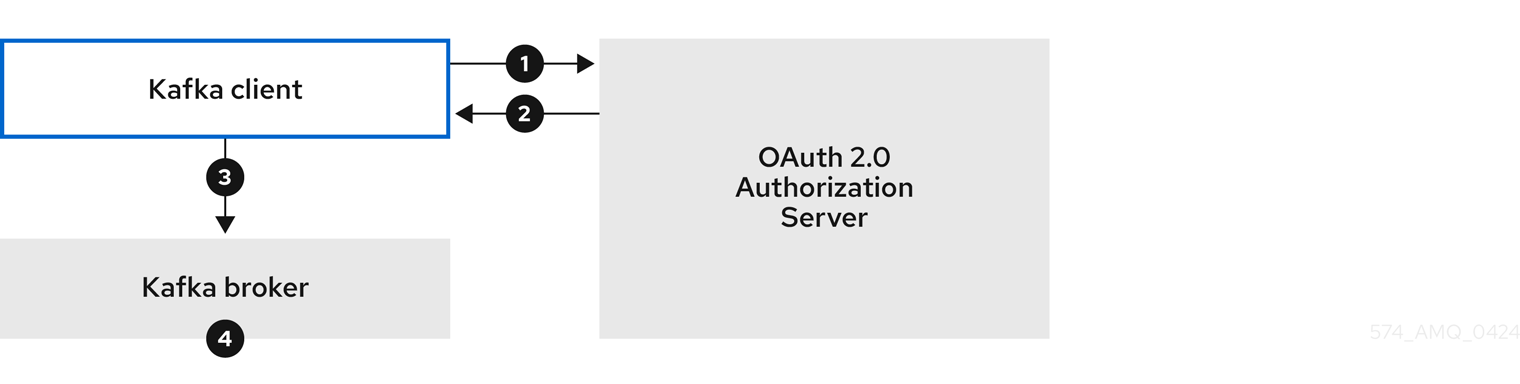
- The Kafka client authenticates with the authorization server from the token endpoint, using a client ID and secret, and optionally a refresh token. Alternatively, the client may authenticate using a username and a password.
- The authorization server generates a new access token.
- The Kafka client authenticates with the Kafka broker using the SASL OAUTHBEARER mechanism to pass the access token.
- The Kafka broker validates the access token locally using a JWT token signature check, and local token introspection.
Client using long-lived access token, with broker delegating validation to authorization server

- The Kafka client authenticates with the Kafka broker using the SASL OAUTHBEARER mechanism to pass the long-lived access token.
- The Kafka broker validates the access token by calling a token introspection endpoint on the authorization server, using its own client ID and secret.
- A Kafka client session is established if the token is valid.
Client using long-lived access token, with broker performing fast local validation
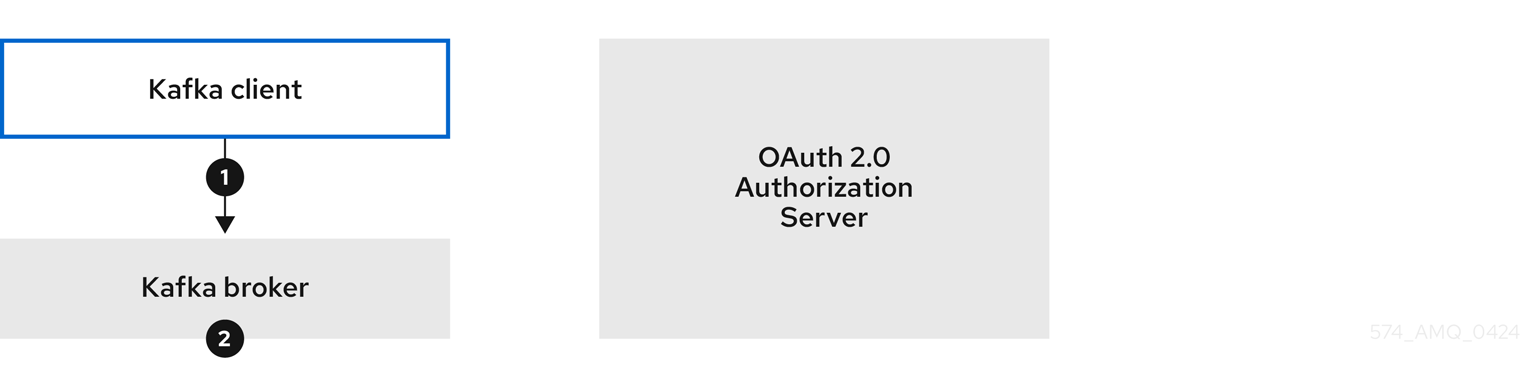
- The Kafka client authenticates with the Kafka broker using the SASL OAUTHBEARER mechanism to pass the long-lived access token.
- The Kafka broker validates the access token locally using a JWT token signature check and local token introspection.
Fast local JWT token signature validation is suitable only for short-lived tokens as there is no check with the authorization server if a token has been revoked. Token expiration is written into the token, but revocation can happen at any time, so cannot be accounted for without contacting the authorization server. Any issued token would be considered valid until it expires.
15.4.5.2. Example client authentication flows using the SASL PLAIN mechanism
You can use the following communication flows for Kafka authentication using the OAuth PLAIN mechanism.
Client using a client ID and secret, with the broker obtaining the access token for the client

-
The Kafka client passes a
clientIdas a username and asecretas a password. -
The Kafka broker uses a token endpoint to pass the
clientIdandsecretto the authorization server. - The authorization server returns a fresh access token or an error if the client credentials are not valid.
The Kafka broker validates the token in one of the following ways:
- If a token introspection endpoint is specified, the Kafka broker validates the access token by calling the endpoint on the authorization server. A session is established if the token validation is successful.
- If local token introspection is used, a request is not made to the authorization server. The Kafka broker validates the access token locally using a JWT token signature check.
Client using a long-lived access token without a client ID and secret

- The Kafka client passes a username and password. The password provides the value of an access token that was obtained manually and configured before running the client.
The password is passed with or without an
$accessToken:string prefix depending on whether or not the Kafka broker listener is configured with a token endpoint for authentication.-
If the token endpoint is configured, the password should be prefixed by
$accessToken:to let the broker know that the password parameter contains an access token rather than a client secret. The Kafka broker interprets the username as the account username. -
If the token endpoint is not configured on the Kafka broker listener (enforcing a
no-client-credentials mode), the password should provide the access token without the prefix. The Kafka broker interprets the username as the account username. In this mode, the client doesn’t use a client ID and secret, and thepasswordparameter is always interpreted as a raw access token.
-
If the token endpoint is configured, the password should be prefixed by
The Kafka broker validates the token in one of the following ways:
- If a token introspection endpoint is specified, the Kafka broker validates the access token by calling the endpoint on the authorization server. A session is established if token validation is successful.
- If local token introspection is used, there is no request made to the authorization server. Kafka broker validates the access token locally using a JWT token signature check.
15.4.6. Configuring OAuth 2.0 authentication
OAuth 2.0 is used for interaction between Kafka clients and Streams for Apache Kafka components.
In order to use OAuth 2.0 for Streams for Apache Kafka, you must:
15.4.6.1. Configuring an OAuth 2.0 authorization server
This procedure describes in general what you need to do to configure an authorization server for integration with Streams for Apache Kafka.
These instructions are not product specific.
The steps are dependent on the chosen authorization server. Consult the product documentation for the authorization server for information on how to set up OAuth 2.0 access.
If you already have an authorization server deployed, you can skip the deployment step and use your current deployment.
Procedure
- Deploy the authorization server to your cluster.
Access the CLI or admin console for the authorization server to configure OAuth 2.0 for Streams for Apache Kafka.
Now prepare the authorization server to work with Streams for Apache Kafka.
-
Configure a
kafka-brokerclient. - Configure clients for each Kafka client component of your application.
What to do next
After deploying and configuring the authorization server, configure the Kafka brokers to use OAuth 2.0.
15.4.6.2. Configuring OAuth 2.0 support for Kafka brokers
This procedure describes how to configure Kafka brokers so that the broker listeners are enabled to use OAuth 2.0 authentication using an authorization server.
We advise use of OAuth 2.0 over an encrypted interface through through a listener with tls: true. Plain listeners are not recommended.
If the authorization server is using certificates signed by the trusted CA and matching the OAuth 2.0 server hostname, TLS connection works using the default settings. Otherwise, you may need to configure the truststore with proper certificates or disable the certificate hostname validation.
When configuring the Kafka broker you have two options for the mechanism used to validate the access token during OAuth 2.0 authentication of the newly connected Kafka client:
Before you start
For more information on the configuration of OAuth 2.0 authentication for Kafka broker listeners, see:
Prerequisites
- Streams for Apache Kafka and Kafka are running
- An OAuth 2.0 authorization server is deployed
Procedure
Update the Kafka broker configuration (
Kafka.spec.kafka) of yourKafkaresource in an editor.oc edit kafka my-clusterConfigure the Kafka broker
listenersconfiguration.The configuration for each type of listener does not have to be the same, as they are independent.
The examples here show the configuration options as configured for external listeners.
Example 1: Configuring fast local JWT token validation
#... - name: external3 port: 9094 type: loadbalancer tls: true authentication: type: oauth1 validIssuerUri: https://<auth_server_address>/auth/realms/external2 jwksEndpointUri: https://<auth_server_address>/auth/realms/external/protocol/openid-connect/certs3 userNameClaim: preferred_username4 maxSecondsWithoutReauthentication: 36005 tlsTrustedCertificates:6 - secretName: oauth-server-cert certificate: ca.crt disableTlsHostnameVerification: true7 jwksExpirySeconds: 3608 jwksRefreshSeconds: 3009 jwksMinRefreshPauseSeconds: 110 - 1
- Listener type set to
oauth. - 2
- URI of the token issuer used for authentication.
- 3
- URI of the JWKS certificate endpoint used for local JWT validation.
- 4
- The token claim (or key) that contains the actual username used to identify the user. Its value depends on the authorization server. If necessary, a JsonPath expression like
"['user.info'].['user.id']"can be used to retrieve the username from nested JSON attributes within a token. - 5
- (Optional) Activates the Kafka re-authentication mechanism that enforces session expiry to the same length of time as the access token. If the specified value is less than the time left for the access token to expire, then the client will have to re-authenticate before the actual token expiry. By default, the session does not expire when the access token expires, and the client does not attempt re-authentication.
- 6
- (Optional) Trusted certificates for TLS connection to the authorization server.
- 7
- (Optional) Disable TLS hostname verification. Default is
false. - 8
- The duration the JWKS certificates are considered valid before they expire. Default is
360seconds. If you specify a longer time, consider the risk of allowing access to revoked certificates. - 9
- The period between refreshes of JWKS certificates. The interval must be at least 60 seconds shorter than the expiry interval. Default is
300seconds. - 10
- The minimum pause in seconds between consecutive attempts to refresh JWKS public keys. When an unknown signing key is encountered, the JWKS keys refresh is scheduled outside the regular periodic schedule with at least the specified pause since the last refresh attempt. The refreshing of keys follows the rule of exponential backoff, retrying on unsuccessful refreshes with ever increasing pause, until it reaches
jwksRefreshSeconds. The default value is 1.
Example 2: Configuring token validation using an introspection endpoint
- name: external3 port: 9094 type: loadbalancer tls: true authentication: type: oauth validIssuerUri: https://<auth_server_address>/auth/realms/external introspectionEndpointUri: https://<auth_server_address>/auth/realms/external/protocol/openid-connect/token/introspect1 clientId: kafka-broker2 clientSecret:3 secretName: my-cluster-oauth key: clientSecret userNameClaim: preferred_username4 maxSecondsWithoutReauthentication: 36005 - 1
- URI of the token introspection endpoint.
- 2
- Client ID to identify the client.
- 3
- Client Secret and client ID is used for authentication.
- 4
- The token claim (or key) that contains the actual username used to identify the user. Its value depends on the authorization server. If necessary, a JsonPath expression like
"['user.info'].['user.id']"can be used to retrieve the username from nested JSON attributes within a token. - 5
- (Optional) Activates the Kafka re-authentication mechanism that enforces session expiry to the same length of time as the access token. If the specified value is less than the time left for the access token to expire, then the client will have to re-authenticate before the actual token expiry. By default, the session does not expire when the access token expires, and the client does not attempt re-authentication.
Depending on how you apply OAuth 2.0 authentication, and the type of authorization server, there are additional (optional) configuration settings you can use:
# ... authentication: type: oauth # ... checkIssuer: false1 checkAudience: true2 fallbackUserNameClaim: client_id3 fallbackUserNamePrefix: client-account-4 validTokenType: bearer5 userInfoEndpointUri: https://<auth_server_address>/auth/realms/external/protocol/openid-connect/userinfo6 enableOauthBearer: false7 enablePlain: true8 tokenEndpointUri: https://<auth_server_address>/auth/realms/external/protocol/openid-connect/token9 customClaimCheck: "@.custom == 'custom-value'"10 clientAudience: audience11 clientScope: scope12 connectTimeoutSeconds: 6013 readTimeoutSeconds: 6014 httpRetries: 215 httpRetryPauseMs: 30016 groupsClaim: "$.groups"17 groupsClaimDelimiter: ","18 includeAcceptHeader: false19 - 1
- If your authorization server does not provide an
issclaim, it is not possible to perform an issuer check. In this situation, setcheckIssuertofalseand do not specify avalidIssuerUri. Default istrue. - 2
- If your authorization server provides an
aud(audience) claim, and you want to enforce an audience check, setcheckAudiencetotrue. Audience checks identify the intended recipients of tokens. As a result, the Kafka broker will reject tokens that do not have itsclientIdin theiraudclaim. Default isfalse. - 3
- An authorization server may not provide a single attribute to identify both regular users and clients. When a client authenticates in its own name, the server might provide a client ID. When a user authenticates using a username and password to obtain a refresh token or an access token, the server might provide a username attribute in addition to a client ID. Use this fallback option to specify the username claim (attribute) to use if a primary user ID attribute is not available. If necessary, a JsonPath expression like
"['client.info'].['client.id']"can be used to retrieve the fallback username to retrieve the username from nested JSON attributes within a token. - 4
- In situations where
fallbackUserNameClaimis applicable, it may also be necessary to prevent name collisions between the values of the username claim, and those of the fallback username claim. Consider a situation where a client calledproducerexists, but also a regular user calledproducerexists. In order to differentiate between the two, you can use this property to add a prefix to the user ID of the client. - 5
- (Only applicable when using
introspectionEndpointUri) Depending on the authorization server you are using, the introspection endpoint may or may not return the token type attribute, or it may contain different values. You can specify a valid token type value that the response from the introspection endpoint has to contain. - 6
- (Only applicable when using
introspectionEndpointUri) The authorization server may be configured or implemented in such a way to not provide any identifiable information in an Introspection Endpoint response. In order to obtain the user ID, you can configure the URI of theuserinfoendpoint as a fallback. TheuserNameClaim,fallbackUserNameClaim, andfallbackUserNamePrefixsettings are applied to the response ofuserinfoendpoint. - 7
- Set this to
falseto disable the OAUTHBEARER mechanism on the listener. At least one of PLAIN or OAUTHBEARER has to be enabled. Default istrue. - 8
- Set to
trueto enable PLAIN authentication on the listener, which is supported for clients on all platforms. - 9
- Additional configuration for the PLAIN mechanism. If specified, clients can authenticate over PLAIN by passing an access token as the
passwordusing an$accessToken:prefix. For production, always usehttps://urls. - 10
- Additional custom rules can be imposed on the JWT access token during validation by setting this to a JsonPath filter query. If the access token does not contain the necessary data, it is rejected. When using the
introspectionEndpointUri, the custom check is applied to the introspection endpoint response JSON. - 11
- An
audienceparameter passed to the token endpoint. An audience is used when obtaining an access token for inter-broker authentication. It is also used in the name of a client for OAuth 2.0 over PLAIN client authentication using aclientIdandsecret. This only affects the ability to obtain the token, and the content of the token, depending on the authorization server. It does not affect token validation rules by the listener. - 12
- A
scopeparameter passed to the token endpoint. A scope is used when obtaining an access token for inter-broker authentication. It is also used in the name of a client for OAuth 2.0 over PLAIN client authentication using aclientIdandsecret. This only affects the ability to obtain the token, and the content of the token, depending on the authorization server. It does not affect token validation rules by the listener. - 13
- The connect timeout in seconds when connecting to the authorization server. The default value is 60.
- 14
- The read timeout in seconds when connecting to the authorization server. The default value is 60.
- 15
- The maximum number of times to retry a failed HTTP request to the authorization server. The default value is
0, meaning that no retries are performed. To use this option effectively, consider reducing the timeout times for theconnectTimeoutSecondsandreadTimeoutSecondsoptions. However, note that retries may prevent the current worker thread from being available to other requests, and if too many requests stall, it could make the Kafka broker unresponsive. - 16
- The time to wait before attempting another retry of a failed HTTP request to the authorization server. By default, this time is set to zero, meaning that no pause is applied. This is because many issues that cause failed requests are per-request network glitches or proxy issues that can be resolved quickly. However, if your authorization server is under stress or experiencing high traffic, you may want to set this option to a value of 100 ms or more to reduce the load on the server and increase the likelihood of successful retries.
- 17
- A JsonPath query that is used to extract groups information from either the JWT token or the introspection endpoint response. This option is not set by default. By configuring this option, a custom authorizer can make authorization decisions based on user groups.
- 18
- A delimiter used to parse groups information when it is returned as a single delimited string. The default value is ',' (comma).
- 19
- Some authorization servers have issues with client sending
Accept: application/jsonheader. By settingincludeAcceptHeader: falsethe header will not be sent. Default istrue.
- Save and exit the editor, then wait for rolling updates to complete.
Check the update in the logs or by watching the pod state transitions:
oc logs -f ${POD_NAME} -c ${CONTAINER_NAME} oc get pod -wThe rolling update configures the brokers to use OAuth 2.0 authentication.
What to do next
15.4.6.3. Configuring Kafka Java clients to use OAuth 2.0
Configure Kafka producer and consumer APIs to use OAuth 2.0 for interaction with Kafka brokers. Add a callback plugin to your client pom.xml file, then configure your client for OAuth 2.0.
Specify the following in your client configuration:
A SASL (Simple Authentication and Security Layer) security protocol:
-
SASL_SSLfor authentication over TLS encrypted connections SASL_PLAINTEXTfor authentication over unencrypted connectionsUse
SASL_SSLfor production andSASL_PLAINTEXTfor local development only. When usingSASL_SSL, additionalssl.truststoreconfiguration is needed. The truststore configuration is required for secure connection (https://) to the OAuth 2.0 authorization server. To verify the OAuth 2.0 authorization server, add the CA certificate for the authorization server to the truststore in your client configuration. You can configure a truststore in PEM or PKCS #12 format.
-
A Kafka SASL mechanism:
-
OAUTHBEARERfor credentials exchange using a bearer token -
PLAINto pass client credentials (clientId + secret) or an access token
-
A JAAS (Java Authentication and Authorization Service) module that implements the SASL mechanism:
-
org.apache.kafka.common.security.oauthbearer.OAuthBearerLoginModuleimplements the OAuthbearer mechanism -
org.apache.kafka.common.security.plain.PlainLoginModuleimplements the plain mechanism
To be able to use the OAuthbearer mechanism, you must also add the custom
io.strimzi.kafka.oauth.client.JaasClientOauthLoginCallbackHandlerclass as the callback handler.JaasClientOauthLoginCallbackHandlerhandles OAuth callbacks to the authorization server for access tokens during client login. This enables automatic token renewal, ensuring continuous authentication without user intervention. Additionally, it handles login credentials for clients using the OAuth 2.0 password grant method.-
SASL authentication properties, which support the following authentication methods:
- OAuth 2.0 client credentials
- OAuth 2.0 password grant (deprecated)
- Access token
- Refresh token
Add the SASL authentication properties as JAAS configuration (
sasl.jaas.configandsasl.login.callback.handler.class). How you configure the authentication properties depends on the authentication method you are using to access the OAuth 2.0 authorization server. In this procedure, the properties are specified in a properties file, then loaded into the client configuration.
You can also specify authentication properties as environment variables, or as Java system properties. For Java system properties, you can set them using setProperty and pass them on the command line using the -D option.
Prerequisites
- Streams for Apache Kafka and Kafka are running
- An OAuth 2.0 authorization server is deployed and configured for OAuth access to Kafka brokers
- Kafka brokers are configured for OAuth 2.0
Procedure
Add the client library with OAuth 2.0 support to the
pom.xmlfile for the Kafka client:<dependency> <groupId>io.strimzi</groupId> <artifactId>kafka-oauth-client</artifactId> <version>0.15.0.redhat-00007</version> </dependency>Configure the client properties by specifying the following configuration in a properties file:
- The security protocol
- The SASL mechanism
The JAAS module and authentication properties according to the method being used
For example, we can add the following to a
client.propertiesfile:Client credentials mechanism properties
security.protocol=SASL_SSL1 sasl.mechanism=OAUTHBEARER2 ssl.truststore.location=/tmp/truststore.p123 ssl.truststore.password=$STOREPASS ssl.truststore.type=PKCS12 sasl.jaas.config=org.apache.kafka.common.security.oauthbearer.OAuthBearerLoginModule required \ oauth.token.endpoint.uri="<token_endpoint_url>" \4 oauth.client.id="<client_id>" \5 oauth.client.secret="<client_secret>" \6 oauth.ssl.truststore.location="/tmp/oauth-truststore.p12" \7 oauth.ssl.truststore.password="$STOREPASS" \8 oauth.ssl.truststore.type="PKCS12" \9 oauth.scope="<scope>" \10 oauth.audience="<audience>" ;11 sasl.login.callback.handler.class=io.strimzi.kafka.oauth.client.JaasClientOauthLoginCallbackHandler- 1
SASL_SSLsecurity protocol for TLS-encrypted connections. UseSASL_PLAINTEXTover unencrypted connections for local development only.- 2
- The SASL mechanism specified as
OAUTHBEARERorPLAIN. - 3
- The truststore configuration for secure access to the Kafka cluster.
- 4
- URI of the authorization server token endpoint.
- 5
- Client ID, which is the name used when creating the client in the authorization server.
- 6
- Client secret created when creating the client in the authorization server.
- 7
- The location contains the public key certificate (
truststore.p12) for the authorization server. - 8
- The password for accessing the truststore.
- 9
- The truststore type.
- 10
- (Optional) The
scopefor requesting the token from the token endpoint. An authorization server may require a client to specify the scope. - 11
- (Optional) The
audiencefor requesting the token from the token endpoint. An authorization server may require a client to specify the audience.
Password grants mechanism properties
security.protocol=SASL_SSL sasl.mechanism=OAUTHBEARER ssl.truststore.location=/tmp/truststore.p12 ssl.truststore.password=$STOREPASS ssl.truststore.type=PKCS12 sasl.jaas.config=org.apache.kafka.common.security.oauthbearer.OAuthBearerLoginModule required \ oauth.token.endpoint.uri="<token_endpoint_url>" \ oauth.client.id="<client_id>" \1 oauth.client.secret="<client_secret>" \2 oauth.password.grant.username="<username>" \3 oauth.password.grant.password="<password>" \4 oauth.ssl.truststore.location="/tmp/oauth-truststore.p12" \ oauth.ssl.truststore.password="$STOREPASS" \ oauth.ssl.truststore.type="PKCS12" \ oauth.scope="<scope>" \ oauth.audience="<audience>" ; sasl.login.callback.handler.class=io.strimzi.kafka.oauth.client.JaasClientOauthLoginCallbackHandler- 1
- Client ID, which is the name used when creating the client in the authorization server.
- 2
- (Optional) Client secret created when creating the client in the authorization server.
- 3
- Username for password grant authentication. OAuth password grant configuration (username and password) uses the OAuth 2.0 password grant method. To use password grants, create a user account for a client on your authorization server with limited permissions. The account should act like a service account. Use in environments where user accounts are required for authentication, but consider using a refresh token first.
- 4
- Password for password grant authentication.Note
SASL PLAIN does not support passing a username and password (password grants) using the OAuth 2.0 password grant method.
Access token properties
security.protocol=SASL_SSL sasl.mechanism=OAUTHBEARER ssl.truststore.location=/tmp/truststore.p12 ssl.truststore.password=$STOREPASS ssl.truststore.type=PKCS12 sasl.jaas.config=org.apache.kafka.common.security.oauthbearer.OAuthBearerLoginModule required \ oauth.token.endpoint.uri="<token_endpoint_url>" \ oauth.access.token="<access_token>" \1 oauth.ssl.truststore.location="/tmp/oauth-truststore.p12" \ oauth.ssl.truststore.password="$STOREPASS" \ oauth.ssl.truststore.type="PKCS12" ; sasl.login.callback.handler.class=io.strimzi.kafka.oauth.client.JaasClientOauthLoginCallbackHandler- 1
- Long-lived access token for Kafka clients.
Refresh token properties
security.protocol=SASL_SSL sasl.mechanism=OAUTHBEARER ssl.truststore.location=/tmp/truststore.p12 ssl.truststore.password=$STOREPASS ssl.truststore.type=PKCS12 sasl.jaas.config=org.apache.kafka.common.security.oauthbearer.OAuthBearerLoginModule required \ oauth.token.endpoint.uri="<token_endpoint_url>" \ oauth.client.id="<client_id>" \1 oauth.client.secret="<client_secret>" \2 oauth.refresh.token="<refresh_token>" \3 oauth.ssl.truststore.location="/tmp/oauth-truststore.p12" \ oauth.ssl.truststore.password="$STOREPASS" \ oauth.ssl.truststore.type="PKCS12" ; sasl.login.callback.handler.class=io.strimzi.kafka.oauth.client.JaasClientOauthLoginCallbackHandler
Input the client properties for OAUTH 2.0 authentication into the Java client code.
Example showing input of client properties
Properties props = new Properties(); try (FileReader reader = new FileReader("client.properties", StandardCharsets.UTF_8)) { props.load(reader); }- Verify that the Kafka client can access the Kafka brokers.
15.4.6.4. Configuring OAuth 2.0 for Kafka components
This procedure describes how to configure Kafka components to use OAuth 2.0 authentication using an authorization server.
You can configure authentication for:
- Kafka Connect
- Kafka MirrorMaker
- Kafka Bridge
In this scenario, the Kafka component and the authorization server are running in the same cluster.
Before you start
For more information on the configuration of OAuth 2.0 authentication for Kafka components, see the KafkaClientAuthenticationOAuth schema reference. The schema reference includes examples of configuration options.
Prerequisites
- Streams for Apache Kafka and Kafka are running
- An OAuth 2.0 authorization server is deployed and configured for OAuth access to Kafka brokers
- Kafka brokers are configured for OAuth 2.0
Procedure
Create a client secret and mount it to the component as an environment variable.
For example, here we are creating a client
Secretfor the Kafka Bridge:apiVersion: kafka.strimzi.io/v1beta2 kind: Secret metadata: name: my-bridge-oauth type: Opaque data: clientSecret: MGQ1OTRmMzYtZTllZS00MDY2LWI5OGEtMTM5MzM2NjdlZjQw1 - 1
- The
clientSecretkey must be in base64 format.
Create or edit the resource for the Kafka component so that OAuth 2.0 authentication is configured for the authentication property.
For OAuth 2.0 authentication, you can use the following options:
- Client ID and secret
- Client ID and refresh token
- Access token
- Username and password
- TLS
For example, here OAuth 2.0 is assigned to the Kafka Bridge client using a client ID and secret, and TLS:
apiVersion: kafka.strimzi.io/v1beta2 kind: KafkaBridge metadata: name: my-bridge spec: # ... authentication: type: oauth1 tokenEndpointUri: https://<auth-server-address>/auth/realms/master/protocol/openid-connect/token2 clientId: kafka-bridge clientSecret: secretName: my-bridge-oauth key: clientSecret tlsTrustedCertificates:3 - secretName: oauth-server-cert certificate: tls.crtDepending on how you apply OAuth 2.0 authentication, and the type of authorization server, there are additional configuration options you can use:
# ... spec: # ... authentication: # ... disableTlsHostnameVerification: true1 checkAccessTokenType: false2 accessTokenIsJwt: false3 scope: any4 audience: kafka5 connectTimeoutSeconds: 606 readTimeoutSeconds: 607 httpRetries: 28 httpRetryPauseMs: 3009 includeAcceptHeader: false10 - 1
- (Optional) Disable TLS hostname verification. Default is
false. - 2
- If the authorization server does not return a
typ(type) claim inside the JWT token, you can applycheckAccessTokenType: falseto skip the token type check. Default istrue. - 3
- If you are using opaque tokens, you can apply
accessTokenIsJwt: falseso that access tokens are not treated as JWT tokens. - 4
- (Optional) The
scopefor requesting the token from the token endpoint. An authorization server may require a client to specify the scope. In this case it isany. - 5
- (Optional) The
audiencefor requesting the token from the token endpoint. An authorization server may require a client to specify the audience. In this case it iskafka. - 6
- (Optional) The connect timeout in seconds when connecting to the authorization server. The default value is 60.
- 7
- (Optional) The read timeout in seconds when connecting to the authorization server. The default value is 60.
- 8
- (Optional) The maximum number of times to retry a failed HTTP request to the authorization server. The default value is
0, meaning that no retries are performed. To use this option effectively, consider reducing the timeout times for theconnectTimeoutSecondsandreadTimeoutSecondsoptions. However, note that retries may prevent the current worker thread from being available to other requests, and if too many requests stall, it could make the Kafka broker unresponsive. - 9
- (Optional) The time to wait before attempting another retry of a failed HTTP request to the authorization server. By default, this time is set to zero, meaning that no pause is applied. This is because many issues that cause failed requests are per-request network glitches or proxy issues that can be resolved quickly. However, if your authorization server is under stress or experiencing high traffic, you may want to set this option to a value of 100 ms or more to reduce the load on the server and increase the likelihood of successful retries.
- 10
- (Optional) Some authorization servers have issues with client sending
Accept: application/jsonheader. By settingincludeAcceptHeader: falsethe header will not be sent. Default istrue.
Apply the changes to the deployment of your Kafka resource.
oc apply -f your-fileCheck the update in the logs or by watching the pod state transitions:
oc logs -f ${POD_NAME} -c ${CONTAINER_NAME} oc get pod -wThe rolling updates configure the component for interaction with Kafka brokers using OAuth 2.0 authentication.
15.5. Using OAuth 2.0 token-based authorization
Streams for Apache Kafka supports the use of OAuth 2.0 token-based authorization through Red Hat Single Sign-On Authorization Services, which allows you to manage security policies and permissions centrally.
Security policies and permissions defined in Red Hat Single Sign-On are used to grant access to resources on Kafka brokers. Users and clients are matched against policies that permit access to perform specific actions on Kafka brokers.
Kafka allows all users full access to brokers by default, and also provides the AclAuthorizer and StandardAuthorizer plugins to configure authorization based on Access Control Lists (ACLs). The ACL rules managed by these plugins are used to grant or deny access to resources based on the username, and these rules are stored within the Kafka cluster itself. However, OAuth 2.0 token-based authorization with Red Hat Single Sign-On offers far greater flexibility on how you wish to implement access control to Kafka brokers. In addition, you can configure your Kafka brokers to use OAuth 2.0 authorization and ACLs.
15.5.1. OAuth 2.0 authorization mechanism
OAuth 2.0 authorization in Streams for Apache Kafka uses Red Hat Single Sign-On server Authorization Services REST endpoints to extend token-based authentication with Red Hat Single Sign-On by applying defined security policies on a particular user, and providing a list of permissions granted on different resources for that user. Policies use roles and groups to match permissions to users. OAuth 2.0 authorization enforces permissions locally based on the received list of grants for the user from Red Hat Single Sign-On Authorization Services.
15.5.1.1. Kafka broker custom authorizer
A Red Hat Single Sign-On authorizer (KeycloakAuthorizer) is provided with Streams for Apache Kafka. To be able to use the Red Hat Single Sign-On REST endpoints for Authorization Services provided by Red Hat Single Sign-On, you configure a custom authorizer on the Kafka broker.
The authorizer fetches a list of granted permissions from the authorization server as needed, and enforces authorization locally on the Kafka Broker, making rapid authorization decisions for each client request.
15.5.2. Configuring OAuth 2.0 authorization support
This procedure describes how to configure Kafka brokers to use OAuth 2.0 authorization using Red Hat Single Sign-On Authorization Services.
Before you begin
Consider the access you require or want to limit for certain users. You can use a combination of Red Hat Single Sign-On groups, roles, clients, and users to configure access in Red Hat Single Sign-On.
Typically, groups are used to match users based on organizational departments or geographical locations. And roles are used to match users based on their function.
With Red Hat Single Sign-On, you can store users and groups in LDAP, whereas clients and roles cannot be stored this way. Storage and access to user data may be a factor in how you choose to configure authorization policies.
Super users always have unconstrained access to a Kafka broker regardless of the authorization implemented on the Kafka broker.
Prerequisites
- Streams for Apache Kafka must be configured to use OAuth 2.0 with Red Hat Single Sign-On for token-based authentication. You use the same Red Hat Single Sign-On server endpoint when you set up authorization.
-
OAuth 2.0 authentication must be configured with the
maxSecondsWithoutReauthenticationoption to enable re-authentication.
Procedure
- Access the Red Hat Single Sign-On Admin Console or use the Red Hat Single Sign-On Admin CLI to enable Authorization Services for the Kafka broker client you created when setting up OAuth 2.0 authentication.
- Use Authorization Services to define resources, authorization scopes, policies, and permissions for the client.
- Bind the permissions to users and clients by assigning them roles and groups.
Configure the Kafka brokers to use Red Hat Single Sign-On authorization by updating the Kafka broker configuration (
Kafka.spec.kafka) of yourKafkaresource in an editor.oc edit kafka my-clusterConfigure the Kafka broker
kafkaconfiguration to usekeycloakauthorization, and to be able to access the authorization server and Authorization Services.For example:
apiVersion: kafka.strimzi.io/v1beta2 kind: Kafka metadata: name: my-cluster spec: kafka: # ... authorization: type: keycloak1 tokenEndpointUri: <https://<auth-server-address>/auth/realms/external/protocol/openid-connect/token>2 clientId: kafka3 delegateToKafkaAcls: false4 disableTlsHostnameVerification: false5 superUsers:6 - CN=fred - sam - CN=edward tlsTrustedCertificates:7 - secretName: oauth-server-cert certificate: ca.crt grantsRefreshPeriodSeconds: 608 grantsRefreshPoolSize: 59 grantsMaxIdleSeconds: 30010 grantsGcPeriodSeconds: 30011 grantsAlwaysLatest: false12 connectTimeoutSeconds: 6013 readTimeoutSeconds: 6014 httpRetries: 215 enableMetrics: false16 includeAcceptHeader: false17 #...- 1
- Type
keycloakenables Red Hat Single Sign-On authorization. - 2
- URI of the Red Hat Single Sign-On token endpoint. For production, always use
https://urls. When you configure token-basedoauthauthentication, you specify ajwksEndpointUrias the URI for local JWT validation. The hostname for thetokenEndpointUriURI must be the same. - 3
- The client ID of the OAuth 2.0 client definition in Red Hat Single Sign-On that has Authorization Services enabled. Typically,
kafkais used as the ID. - 4
- (Optional) Delegate authorization to Kafka
AclAuthorizerandStandardAuthorizerif access is denied by Red Hat Single Sign-On Authorization Services policies. Default isfalse. - 5
- (Optional) Disable TLS hostname verification. Default is
false. - 6
- (Optional) Designated super users.
- 7
- (Optional) Trusted certificates for TLS connection to the authorization server.
- 8
- (Optional) The time between two consecutive grants refresh runs. That is the maximum time for active sessions to detect any permissions changes for the user on Red Hat Single Sign-On. The default value is 60.
- 9
- (Optional) The number of threads to use to refresh (in parallel) the grants for the active sessions. The default value is 5.
- 10
- (Optional) The time, in seconds, after which an idle grant in the cache can be evicted. The default value is 300.
- 11
- (Optional) The time, in seconds, between consecutive runs of a job that cleans stale grants from the cache. The default value is 300.
- 12
- (Optional) Controls whether the latest grants are fetched for a new session. When enabled, grants are retrieved from Red Hat Single Sign-On and cached for the user. The default value is
false. - 13
- (Optional) The connect timeout in seconds when connecting to the Red Hat Single Sign-On token endpoint. The default value is 60.
- 14
- (Optional) The read timeout in seconds when connecting to the Red Hat Single Sign-On token endpoint. The default value is 60.
- 15
- (Optional) The maximum number of times to retry (without pausing) a failed HTTP request to the authorization server. The default value is
0, meaning that no retries are performed. To use this option effectively, consider reducing the timeout times for theconnectTimeoutSecondsandreadTimeoutSecondsoptions. However, note that retries may prevent the current worker thread from being available to other requests, and if too many requests stall, it could make the Kafka broker unresponsive. - 16
- (Optional) Enable or disable OAuth metrics. The default value is
false. - 17
- (Optional) Some authorization servers have issues with client sending
Accept: application/jsonheader. By settingincludeAcceptHeader: falsethe header will not be sent. Default istrue.
- Save and exit the editor, then wait for rolling updates to complete.
Check the update in the logs or by watching the pod state transitions:
oc logs -f ${POD_NAME} -c kafka oc get pod -wThe rolling update configures the brokers to use OAuth 2.0 authorization.
- Verify the configured permissions by accessing Kafka brokers as clients or users with specific roles, making sure they have the necessary access, or do not have the access they are not supposed to have.
15.5.3. Managing policies and permissions in Red Hat Single Sign-On Authorization Services
This section describes the authorization models used by Red Hat Single Sign-On Authorization Services and Kafka, and defines the important concepts in each model.
To grant permissions to access Kafka, you can map Red Hat Single Sign-On Authorization Services objects to Kafka resources by creating an OAuth client specification in Red Hat Single Sign-On. Kafka permissions are granted to user accounts or service accounts using Red Hat Single Sign-On Authorization Services rules.
Examples are shown of the different user permissions required for common Kafka operations, such as creating and listing topics.
15.5.3.1. Kafka and Red Hat Single Sign-On authorization models overview
Kafka and Red Hat Single Sign-On Authorization Services use different authorization models.
Kafka authorization model
Kafka’s authorization model uses resource types. When a Kafka client performs an action on a broker, the broker uses the configured KeycloakAuthorizer to check the client’s permissions, based on the action and resource type.
Kafka uses five resource types to control access: Topic, Group, Cluster, TransactionalId, and DelegationToken. Each resource type has a set of available permissions.
Topic
-
Create -
Write -
Read -
Delete -
Describe -
DescribeConfigs -
Alter -
AlterConfigs
Group
-
Read -
Describe -
Delete
Cluster
-
Create -
Describe -
Alter -
DescribeConfigs -
AlterConfigs -
IdempotentWrite -
ClusterAction
TransactionalId
-
Describe -
Write
DelegationToken
-
Describe
Red Hat Single Sign-On Authorization Services model
The Red Hat Single Sign-On Authorization Services model has four concepts for defining and granting permissions: resources, authorization scopes, policies, and permissions.
- Resources
- A resource is a set of resource definitions that are used to match resources with permitted actions. A resource might be an individual topic, for example, or all topics with names starting with the same prefix. A resource definition is associated with a set of available authorization scopes, which represent a set of all actions available on the resource. Often, only a subset of these actions is actually permitted.
- Authorization scopes
- An authorization scope is a set of all the available actions on a specific resource definition. When you define a new resource, you add scopes from the set of all scopes.
- Policies
A policy is an authorization rule that uses criteria to match against a list of accounts. Policies can match:
- Service accounts based on client ID or roles
- User accounts based on username, groups, or roles.
- Permissions
- A permission grants a subset of authorization scopes on a specific resource definition to a set of users.
15.5.3.2. Map Red Hat Single Sign-On Authorization Services to the Kafka authorization model
The Kafka authorization model is used as a basis for defining the Red Hat Single Sign-On roles and resources that will control access to Kafka.
To grant Kafka permissions to user accounts or service accounts, you first create an OAuth client specification in Red Hat Single Sign-On for the Kafka broker. You then specify Red Hat Single Sign-On Authorization Services rules on the client. Typically, the client id of the OAuth client that represents the broker is kafka. The example configuration files provided with Streams for Apache Kafka use kafka as the OAuth client id.
If you have multiple Kafka clusters, you can use a single OAuth client (kafka) for all of them. This gives you a single, unified space in which to define and manage authorization rules. However, you can also use different OAuth client ids (for example, my-cluster-kafka or cluster-dev-kafka) and define authorization rules for each cluster within each client configuration.
The kafka client definition must have the Authorization Enabled option enabled in the Red Hat Single Sign-On Admin Console.
All permissions exist within the scope of the kafka client. If you have different Kafka clusters configured with different OAuth client IDs, they each need a separate set of permissions even though they’re part of the same Red Hat Single Sign-On realm.
When the Kafka client uses OAUTHBEARER authentication, the Red Hat Single Sign-On authorizer (KeycloakAuthorizer) uses the access token of the current session to retrieve a list of grants from the Red Hat Single Sign-On server. To retrieve the grants, the authorizer evaluates the Red Hat Single Sign-On Authorization Services policies and permissions.
Authorization scopes for Kafka permissions
An initial Red Hat Single Sign-On configuration usually involves uploading authorization scopes to create a list of all possible actions that can be performed on each Kafka resource type. This step is performed once only, before defining any permissions. You can add authorization scopes manually instead of uploading them.
Authorization scopes must contain all the possible Kafka permissions regardless of the resource type:
-
Create -
Write -
Read -
Delete -
Describe -
Alter -
DescribeConfig -
AlterConfig -
ClusterAction -
IdempotentWrite
If you’re certain you won’t need a permission (for example, IdempotentWrite), you can omit it from the list of authorization scopes. However, that permission won’t be available to target on Kafka resources.
Resource patterns for permissions checks
Resource patterns are used for pattern matching against the targeted resources when performing permission checks. The general pattern format is RESOURCE-TYPE:PATTERN-NAME.
The resource types mirror the Kafka authorization model. The pattern allows for two matching options:
-
Exact matching (when the pattern does not end with
*) -
Prefix matching (when the pattern ends with
*)
Example patterns for resources
Topic:my-topic
Topic:orders-*
Group:orders-*
Cluster:*
Additionally, the general pattern format can be prefixed by kafka-cluster:CLUSTER-NAME followed by a comma, where CLUSTER-NAME refers to the metadata.name in the Kafka custom resource.
Example patterns for resources with cluster prefix
kafka-cluster:my-cluster,Topic:*
kafka-cluster:*,Group:b_*
When the kafka-cluster prefix is missing, it is assumed to be kafka-cluster:*.
When defining a resource, you can associate it with a list of possible authorization scopes which are relevant to the resource. Set whatever actions make sense for the targeted resource type.
Though you may add any authorization scope to any resource, only the scopes supported by the resource type are considered for access control.
Policies for applying access permission
Policies are used to target permissions to one or more user accounts or service accounts. Targeting can refer to:
- Specific user or service accounts
- Realm roles or client roles
- User groups
- JavaScript rules to match a client IP address
A policy is given a unique name and can be reused to target multiple permissions to multiple resources.
Permissions to grant access
Use fine-grained permissions to pull together the policies, resources, and authorization scopes that grant access to users.
The name of each permission should clearly define which permissions it grants to which users. For example, Dev Team B can read from topics starting with x.
15.5.3.3. Example permissions required for Kafka operations
The following examples demonstrate the user permissions required for performing common operations on Kafka.
Create a topic
To create a topic, the Create permission is required for the specific topic, or for Cluster:kafka-cluster.
bin/kafka-topics.sh --create --topic my-topic \
--bootstrap-server my-cluster-kafka-bootstrap:9092 --command-config=/tmp/config.propertiesList topics
If a user has the Describe permission on a specified topic, the topic is listed.
bin/kafka-topics.sh --list \
--bootstrap-server my-cluster-kafka-bootstrap:9092 --command-config=/tmp/config.propertiesDisplay topic details
To display a topic’s details, Describe and DescribeConfigs permissions are required on the topic.
bin/kafka-topics.sh --describe --topic my-topic \
--bootstrap-server my-cluster-kafka-bootstrap:9092 --command-config=/tmp/config.propertiesProduce messages to a topic
To produce messages to a topic, Describe and Write permissions are required on the topic.
If the topic hasn’t been created yet, and topic auto-creation is enabled, the permissions to create a topic are required.
bin/kafka-console-producer.sh --topic my-topic \
--bootstrap-server my-cluster-kafka-bootstrap:9092 --producer.config=/tmp/config.propertiesConsume messages from a topic
To consume messages from a topic, Describe and Read permissions are required on the topic. Consuming from the topic normally relies on storing the consumer offsets in a consumer group, which requires additional Describe and Read permissions on the consumer group.
Two resources are needed for matching. For example:
Topic:my-topic
Group:my-group-*bin/kafka-console-consumer.sh --topic my-topic --group my-group-1 --from-beginning \
--bootstrap-server my-cluster-kafka-bootstrap:9092 --consumer.config /tmp/config.propertiesProduce messages to a topic using an idempotent producer
As well as the permissions for producing to a topic, an additional IdempotentWrite permission is required on the Cluster:kafka-cluster resource.
Two resources are needed for matching. For example:
Topic:my-topic
Cluster:kafka-clusterbin/kafka-console-producer.sh --topic my-topic \
--bootstrap-server my-cluster-kafka-bootstrap:9092 --producer.config=/tmp/config.properties --producer-property enable.idempotence=true --request-required-acks -1List consumer groups
When listing consumer groups, only the groups on which the user has the Describe permissions are returned. Alternatively, if the user has the Describe permission on the Cluster:kafka-cluster, all the consumer groups are returned.
bin/kafka-consumer-groups.sh --list \
--bootstrap-server my-cluster-kafka-bootstrap:9092 --command-config=/tmp/config.propertiesDisplay consumer group details
To display a consumer group’s details, the Describe permission is required on the group and the topics associated with the group.
bin/kafka-consumer-groups.sh --describe --group my-group-1 \
--bootstrap-server my-cluster-kafka-bootstrap:9092 --command-config=/tmp/config.propertiesChange topic configuration
To change a topic’s configuration, the Describe and Alter permissions are required on the topic.
bin/kafka-topics.sh --alter --topic my-topic --partitions 2 \
--bootstrap-server my-cluster-kafka-bootstrap:9092 --command-config=/tmp/config.propertiesDisplay Kafka broker configuration
In order to use kafka-configs.sh to get a broker’s configuration, the DescribeConfigs permission is required on the Cluster:kafka-cluster.
bin/kafka-configs.sh --entity-type brokers --entity-name 0 --describe --all \
--bootstrap-server my-cluster-kafka-bootstrap:9092 --command-config=/tmp/config.propertiesChange Kafka broker configuration
To change a Kafka broker’s configuration, DescribeConfigs and AlterConfigs permissions are required on Cluster:kafka-cluster.
bin/kafka-configs --entity-type brokers --entity-name 0 --alter --add-config log.cleaner.threads=2 \
--bootstrap-server my-cluster-kafka-bootstrap:9092 --command-config=/tmp/config.propertiesDelete a topic
To delete a topic, the Describe and Delete permissions are required on the topic.
bin/kafka-topics.sh --delete --topic my-topic \
--bootstrap-server my-cluster-kafka-bootstrap:9092 --command-config=/tmp/config.propertiesSelect a lead partition
To run leader selection for topic partitions, the Alter permission is required on the Cluster:kafka-cluster.
bin/kafka-leader-election.sh --topic my-topic --partition 0 --election-type PREFERRED /
--bootstrap-server my-cluster-kafka-bootstrap:9092 --admin.config /tmp/config.propertiesReassign partitions
To generate a partition reassignment file, Describe permissions are required on the topics involved.
bin/kafka-reassign-partitions.sh --topics-to-move-json-file /tmp/topics-to-move.json --broker-list "0,1" --generate \
--bootstrap-server my-cluster-kafka-bootstrap:9092 --command-config /tmp/config.properties > /tmp/partition-reassignment.json
To execute the partition reassignment, Describe and Alter permissions are required on Cluster:kafka-cluster. Also, Describe permissions are required on the topics involved.
bin/kafka-reassign-partitions.sh --reassignment-json-file /tmp/partition-reassignment.json --execute \
--bootstrap-server my-cluster-kafka-bootstrap:9092 --command-config /tmp/config.properties
To verify partition reassignment, Describe, and AlterConfigs permissions are required on Cluster:kafka-cluster, and on each of the topics involved.
bin/kafka-reassign-partitions.sh --reassignment-json-file /tmp/partition-reassignment.json --verify \
--bootstrap-server my-cluster-kafka-bootstrap:9092 --command-config /tmp/config.properties15.5.4. Trying Red Hat Single Sign-On Authorization Services
This example explains how to use Red Hat Single Sign-On Authorization Services with keycloak authorization. Use Red Hat Single Sign-On Authorization Services to enforce access restrictions on Kafka clients. Red Hat Single Sign-On Authorization Services use authorization scopes, policies and permissions to define and apply access control to resources.
Red Hat Single Sign-On Authorization Services REST endpoints provide a list of granted permissions on resources for authenticated users. The list of grants (permissions) is fetched from the Red Hat Single Sign-On server as the first action after an authenticated session is established by the Kafka client. The list is refreshed in the background so that changes to the grants are detected. Grants are cached and enforced locally on the Kafka broker for each user session to provide fast authorization decisions.
Streams for Apache Kafka provides example configuration files. These include the following example files for setting up Red Hat Single Sign-On:
kafka-ephemeral-oauth-single-keycloak-authz.yaml-
An example
Kafkacustom resource configured for OAuth 2.0 token-based authorization using Red Hat Single Sign-On. You can use the custom resource to deploy a Kafka cluster that useskeycloakauthorization and token-basedoauthauthentication. kafka-authz-realm.json- An example Red Hat Single Sign-On realm configured with sample groups, users, roles and clients. You can import the realm into a Red Hat Single Sign-On instance to set up fine-grained permissions to access Kafka.
If you want to try the example with Red Hat Single Sign-On, use these files to perform the tasks outlined in this section in the order shown.
Authentication
When you configure token-based oauth authentication, you specify a jwksEndpointUri as the URI for local JWT validation. When you configure keycloak authorization, you specify a tokenEndpointUri as the URI of the Red Hat Single Sign-On token endpoint. The hostname for both URIs must be the same.
Targeted permissions with group or role policies
In Red Hat Single Sign-On, confidential clients with service accounts enabled can authenticate to the server in their own name using a client ID and a secret. This is convenient for microservices that typically act in their own name, and not as agents of a particular user (like a web site). Service accounts can have roles assigned like regular users. They cannot, however, have groups assigned. As a consequence, if you want to target permissions to microservices using service accounts, you cannot use group policies, and should instead use role policies. Conversely, if you want to limit certain permissions only to regular user accounts where authentication with a username and password is required, you can achieve that as a side effect of using the group policies rather than the role policies. This is what is used in this example for permissions that start with ClusterManager. Performing cluster management is usually done interactively using CLI tools. It makes sense to require the user to log in before using the resulting access token to authenticate to the Kafka broker. In this case, the access token represents the specific user, rather than the client application.
15.5.4.1. Accessing the Red Hat Single Sign-On Admin Console
Set up Red Hat Single Sign-On, then connect to its Admin Console and add the preconfigured realm. Use the example kafka-authz-realm.json file to import the realm. You can check the authorization rules defined for the realm in the Admin Console. The rules grant access to the resources on the Kafka cluster configured to use the example Red Hat Single Sign-On realm.
Prerequisites
- A running OpenShift cluster.
-
The Streams for Apache Kafka
examples/security/keycloak-authorization/kafka-authz-realm.jsonfile that contains the preconfigured realm.
Procedure
- Install the Red Hat Single Sign-On server using the Red Hat Single Sign-On Operator as described in Server Installation and Configuration in the Red Hat Single Sign-On documentation.
- Wait until the Red Hat Single Sign-On instance is running.
Get the external hostname to be able to access the Admin Console.
NS=sso oc get ingress keycloak -n $NSIn this example, we assume the Red Hat Single Sign-On server is running in the
ssonamespace.Get the password for the
adminuser.oc get -n $NS pod keycloak-0 -o yaml | lessThe password is stored as a secret, so get the configuration YAML file for the Red Hat Single Sign-On instance to identify the name of the secret (
secretKeyRef.name).Use the name of the secret to obtain the clear text password.
SECRET_NAME=credential-keycloak oc get -n $NS secret $SECRET_NAME -o yaml | grep PASSWORD | awk '{print $2}' | base64 -DIn this example, we assume the name of the secret is
credential-keycloak.Log in to the Admin Console with the username
adminand the password you obtained.Use
https://HOSTNAMEto access the KubernetesIngress.You can now upload the example realm to Red Hat Single Sign-On using the Admin Console.
- Click Add Realm to import the example realm.
Add the
examples/security/keycloak-authorization/kafka-authz-realm.jsonfile, and then click Create.You now have
kafka-authzas your current realm in the Admin Console.The default view displays the Master realm.
In the Red Hat Single Sign-On Admin Console, go to Clients > kafka > Authorization > Settings and check that Decision Strategy is set to Affirmative.
An affirmative policy means that at least one policy must be satisfied for a client to access the Kafka cluster.
In the Red Hat Single Sign-On Admin Console, go to Groups, Users, Roles and Clients to view the realm configuration.
- Groups
-
Groupsare used to create user groups and set user permissions. Groups are sets of users with a name assigned. They are used to compartmentalize users into geographical, organizational or departmental units. Groups can be linked to an LDAP identity provider. You can make a user a member of a group through a custom LDAP server admin user interface, for example, to grant permissions on Kafka resources. - Users
-
Usersare used to create users. For this example,aliceandbobare defined.aliceis a member of theClusterManagergroup andbobis a member ofClusterManager-my-clustergroup. Users can be stored in an LDAP identity provider. - Roles
-
Rolesmark users or clients as having certain permissions. Roles are a concept analogous to groups. They are usually used to tag users with organizational roles and have the requisite permissions. Roles cannot be stored in an LDAP identity provider. If LDAP is a requirement, you can use groups instead, and add Red Hat Single Sign-On roles to the groups so that when users are assigned a group they also get a corresponding role. - Clients
Clientscan have specific configurations. For this example,kafka,kafka-cli,team-a-client, andteam-b-clientclients are configured.-
The
kafkaclient is used by Kafka brokers to perform the necessary OAuth 2.0 communication for access token validation. This client also contains the authorization services resource definitions, policies, and authorization scopes used to perform authorization on the Kafka brokers. The authorization configuration is defined in thekafkaclient from the Authorization tab, which becomes visible when Authorization Enabled is switched on from the Settings tab. -
The
kafka-cliclient is a public client that is used by the Kafka command line tools when authenticating with username and password to obtain an access token or a refresh token. -
The
team-a-clientandteam-b-clientclients are confidential clients representing services with partial access to certain Kafka topics.
-
The
In the Red Hat Single Sign-On Admin Console, go to Authorization > Permissions to see the granted permissions that use the resources and policies defined for the realm.
For example, the
kafkaclient has the following permissions:Dev Team A can write to topics that start with x_ on any cluster Dev Team B can read from topics that start with x_ on any cluster Dev Team B can update consumer group offsets that start with x_ on any cluster ClusterManager of my-cluster Group has full access to cluster config on my-cluster ClusterManager of my-cluster Group has full access to consumer groups on my-cluster ClusterManager of my-cluster Group has full access to topics on my-cluster- Dev Team A
-
The Dev Team A realm role can write to topics that start with
x_on any cluster. This combines a resource calledTopic:x_*,DescribeandWritescopes, and theDev Team Apolicy. TheDev Team Apolicy matches all users that have a realm role calledDev Team A. - Dev Team B
-
The Dev Team B realm role can read from topics that start with
x_on any cluster. This combinesTopic:x_*,Group:x_*resources,DescribeandReadscopes, and theDev Team Bpolicy. TheDev Team Bpolicy matches all users that have a realm role calledDev Team B. Matching users and clients have the ability to read from topics, and update the consumed offsets for topics and consumer groups that have names starting withx_.
15.5.4.2. Deploying a Kafka cluster with Red Hat Single Sign-On authorization
Deploy a Kafka cluster configured to connect to the Red Hat Single Sign-On server. Use the example kafka-ephemeral-oauth-single-keycloak-authz.yaml file to deploy the Kafka cluster as a Kafka custom resource. The example deploys a single-node Kafka cluster with keycloak authorization and oauth authentication.
Prerequisites
- The Red Hat Single Sign-On authorization server is deployed to your OpenShift cluster and loaded with the example realm.
- The Cluster Operator is deployed to your OpenShift cluster.
-
The Streams for Apache Kafka
examples/security/keycloak-authorization/kafka-ephemeral-oauth-single-keycloak-authz.yamlcustom resource.
Procedure
Use the hostname of the Red Hat Single Sign-On instance you deployed to prepare a truststore certificate for Kafka brokers to communicate with the Red Hat Single Sign-On server.
SSO_HOST=SSO-HOSTNAME SSO_HOST_PORT=$SSO_HOST:443 STOREPASS=storepass echo "Q" | openssl s_client -showcerts -connect $SSO_HOST_PORT 2>/dev/null | awk ' /BEGIN CERTIFICATE/,/END CERTIFICATE/ { print $0 } ' > /tmp/sso.pemThe certificate is required as Kubernetes
Ingressis used to make a secure (HTTPS) connection.Usually there is not one single certificate, but a certificate chain. You only have to provide the top-most issuer CA, which is listed last in the
/tmp/sso.pemfile. You can extract it manually or using the following commands:Example command to extract the top CA certificate in a certificate chain
split -p "-----BEGIN CERTIFICATE-----" sso.pem sso- for f in $(ls sso-*); do mv $f $f.pem; done cp $(ls sso-* | sort -r | head -n 1) sso-ca.crtNoteA trusted CA certificate is normally obtained from a trusted source, and not by using the
opensslcommand.Deploy the certificate to OpenShift as a secret.
oc create secret generic oauth-server-cert --from-file=/tmp/sso-ca.crt -n $NSSet the hostname as an environment variable
SSO_HOST=SSO-HOSTNAMECreate and deploy the example Kafka cluster.
cat examples/security/keycloak-authorization/kafka-ephemeral-oauth-single-keycloak-authz.yaml | sed -E 's#\${SSO_HOST}'"#$SSO_HOST#" | oc create -n $NS -f -
15.5.4.3. Preparing TLS connectivity for a CLI Kafka client session
Create a new pod for an interactive CLI session. Set up a truststore with a Red Hat Single Sign-On certificate for TLS connectivity. The truststore is to connect to Red Hat Single Sign-On and the Kafka broker.
Prerequisites
The Red Hat Single Sign-On authorization server is deployed to your OpenShift cluster and loaded with the example realm.
In the Red Hat Single Sign-On Admin Console, check the roles assigned to the clients are displayed in Clients > Service Account Roles.
- The Kafka cluster configured to connect with Red Hat Single Sign-On is deployed to your OpenShift cluster.
Procedure
Run a new interactive pod container using the Streams for Apache Kafka image to connect to a running Kafka broker.
NS=sso oc run -ti --restart=Never --image=registry.redhat.io/amq-streams/kafka-37-rhel9:2.7.0 kafka-cli -n $NS -- /bin/shNoteIf
octimes out waiting on the image download, subsequent attempts may result in an AlreadyExists error.Attach to the pod container.
oc attach -ti kafka-cli -n $NSUse the hostname of the Red Hat Single Sign-On instance to prepare a certificate for client connection using TLS.
SSO_HOST=SSO-HOSTNAME SSO_HOST_PORT=$SSO_HOST:443 STOREPASS=storepass echo "Q" | openssl s_client -showcerts -connect $SSO_HOST_PORT 2>/dev/null | awk ' /BEGIN CERTIFICATE/,/END CERTIFICATE/ { print $0 } ' > /tmp/sso.pemUsually there is not one single certificate, but a certificate chain. You only have to provide the top-most issuer CA, which is listed last in the
/tmp/sso.pemfile. You can extract it manually or using the following command:Example command to extract the top CA certificate in a certificate chain
split -p "-----BEGIN CERTIFICATE-----" sso.pem sso- for f in $(ls sso-*); do mv $f $f.pem; done cp $(ls sso-* | sort -r | head -n 1) sso-ca.crtNoteA trusted CA certificate is normally obtained from a trusted source, and not by using the
opensslcommand.Create a truststore for TLS connection to the Kafka brokers.
keytool -keystore /tmp/truststore.p12 -storetype pkcs12 -alias sso -storepass $STOREPASS -import -file /tmp/sso-ca.crt -nopromptUse the Kafka bootstrap address as the hostname of the Kafka broker and the
tlslistener port (9093) to prepare a certificate for the Kafka broker.KAFKA_HOST_PORT=my-cluster-kafka-bootstrap:9093 STOREPASS=storepass echo "Q" | openssl s_client -showcerts -connect $KAFKA_HOST_PORT 2>/dev/null | awk ' /BEGIN CERTIFICATE/,/END CERTIFICATE/ { print $0 } ' > /tmp/my-cluster-kafka.pemThe obtained
.pemfile is usually not one single certificate, but a certificate chain. You only have to provide the top-most issuer CA, which is listed last in the/tmp/my-cluster-kafka.pemfile. You can extract it manually or using the following command:Example command to extract the top CA certificate in a certificate chain
split -p "-----BEGIN CERTIFICATE-----" /tmp/my-cluster-kafka.pem kafka- for f in $(ls kafka-*); do mv $f $f.pem; done cp $(ls kafka-* | sort -r | head -n 1) my-cluster-kafka-ca.crtNoteA trusted CA certificate is normally obtained from a trusted source, and not by using the
opensslcommand. For this example we assume the client is running in a pod in the same namespace where the Kafka cluster was deployed. If the client is accessing the Kafka cluster from outside the OpenShift cluster, you would have to first determine the bootstrap address. In that case you can also get the cluster certificate directly from the OpenShift secret, and there is no need foropenssl. For more information, see Chapter 14, Setting up client access to a Kafka cluster.Add the certificate for the Kafka broker to the truststore.
keytool -keystore /tmp/truststore.p12 -storetype pkcs12 -alias my-cluster-kafka -storepass $STOREPASS -import -file /tmp/my-cluster-kafka-ca.crt -nopromptKeep the session open to check authorized access.
15.5.4.4. Checking authorized access to Kafka using a CLI Kafka client session
Check the authorization rules applied through the Red Hat Single Sign-On realm using an interactive CLI session. Apply the checks using Kafka’s example producer and consumer clients to create topics with user and service accounts that have different levels of access.
Use the team-a-client and team-b-client clients to check the authorization rules. Use the alice admin user to perform additional administrative tasks on Kafka.
The Streams for Apache Kafka image used in this example contains Kafka producer and consumer binaries.
Prerequisites
- ZooKeeper and Kafka are running in the OpenShift cluster to be able to send and receive messages.
The interactive CLI Kafka client session is started.
Setting up client and admin user configuration
Prepare a Kafka configuration file with authentication properties for the
team-a-clientclient.SSO_HOST=SSO-HOSTNAME cat > /tmp/team-a-client.properties << EOF security.protocol=SASL_SSL ssl.truststore.location=/tmp/truststore.p12 ssl.truststore.password=$STOREPASS ssl.truststore.type=PKCS12 sasl.mechanism=OAUTHBEARER sasl.jaas.config=org.apache.kafka.common.security.oauthbearer.OAuthBearerLoginModule required \ oauth.client.id="team-a-client" \ oauth.client.secret="team-a-client-secret" \ oauth.ssl.truststore.location="/tmp/truststore.p12" \ oauth.ssl.truststore.password="$STOREPASS" \ oauth.ssl.truststore.type="PKCS12" \ oauth.token.endpoint.uri="https://$SSO_HOST/auth/realms/kafka-authz/protocol/openid-connect/token" ; sasl.login.callback.handler.class=io.strimzi.kafka.oauth.client.JaasClientOauthLoginCallbackHandler EOFThe SASL OAUTHBEARER mechanism is used. This mechanism requires a client ID and client secret, which means the client first connects to the Red Hat Single Sign-On server to obtain an access token. The client then connects to the Kafka broker and uses the access token to authenticate.
Prepare a Kafka configuration file with authentication properties for the
team-b-clientclient.cat > /tmp/team-b-client.properties << EOF security.protocol=SASL_SSL ssl.truststore.location=/tmp/truststore.p12 ssl.truststore.password=$STOREPASS ssl.truststore.type=PKCS12 sasl.mechanism=OAUTHBEARER sasl.jaas.config=org.apache.kafka.common.security.oauthbearer.OAuthBearerLoginModule required \ oauth.client.id="team-b-client" \ oauth.client.secret="team-b-client-secret" \ oauth.ssl.truststore.location="/tmp/truststore.p12" \ oauth.ssl.truststore.password="$STOREPASS" \ oauth.ssl.truststore.type="PKCS12" \ oauth.token.endpoint.uri="https://$SSO_HOST/auth/realms/kafka-authz/protocol/openid-connect/token" ; sasl.login.callback.handler.class=io.strimzi.kafka.oauth.client.JaasClientOauthLoginCallbackHandler EOFAuthenticate admin user
aliceby usingcurland performing a password grant authentication to obtain a refresh token.USERNAME=alice PASSWORD=alice-password GRANT_RESPONSE=$(curl -X POST "https://$SSO_HOST/auth/realms/kafka-authz/protocol/openid-connect/token" -H 'Content-Type: application/x-www-form-urlencoded' -d "grant_type=password&username=$USERNAME&password=$PASSWORD&client_id=kafka-cli&scope=offline_access" -s -k) REFRESH_TOKEN=$(echo $GRANT_RESPONSE | awk -F "refresh_token\":\"" '{printf $2}' | awk -F "\"" '{printf $1}')The refresh token is an offline token that is long-lived and does not expire.
Prepare a Kafka configuration file with authentication properties for the admin user
alice.cat > /tmp/alice.properties << EOF security.protocol=SASL_SSL ssl.truststore.location=/tmp/truststore.p12 ssl.truststore.password=$STOREPASS ssl.truststore.type=PKCS12 sasl.mechanism=OAUTHBEARER sasl.jaas.config=org.apache.kafka.common.security.oauthbearer.OAuthBearerLoginModule required \ oauth.refresh.token="$REFRESH_TOKEN" \ oauth.client.id="kafka-cli" \ oauth.ssl.truststore.location="/tmp/truststore.p12" \ oauth.ssl.truststore.password="$STOREPASS" \ oauth.ssl.truststore.type="PKCS12" \ oauth.token.endpoint.uri="https://$SSO_HOST/auth/realms/kafka-authz/protocol/openid-connect/token" ; sasl.login.callback.handler.class=io.strimzi.kafka.oauth.client.JaasClientOauthLoginCallbackHandler EOFThe
kafka-clipublic client is used for theoauth.client.idin thesasl.jaas.config. Since it’s a public client it does not require a secret. The client authenticates with the refresh token that was authenticated in the previous step. The refresh token requests an access token behind the scenes, which is then sent to the Kafka broker for authentication.
Producing messages with authorized access
Use the team-a-client configuration to check that you can produce messages to topics that start with a_ or x_.
Write to topic
my-topic.bin/kafka-console-producer.sh --bootstrap-server my-cluster-kafka-bootstrap:9093 --topic my-topic \ --producer.config=/tmp/team-a-client.properties First messageThis request returns a
Not authorized to access topics: [my-topic]error.team-a-clienthas aDev Team Arole that gives it permission to perform any supported actions on topics that start witha_, but can only write to topics that start withx_. The topic namedmy-topicmatches neither of those rules.Write to topic
a_messages.bin/kafka-console-producer.sh --bootstrap-server my-cluster-kafka-bootstrap:9093 --topic a_messages \ --producer.config /tmp/team-a-client.properties First message Second messageMessages are produced to Kafka successfully.
- Press CTRL+C to exit the CLI application.
Check the Kafka container log for a debug log of
Authorization GRANTEDfor the request.oc logs my-cluster-kafka-0 -f -n $NS
Consuming messages with authorized access
Use the team-a-client configuration to consume messages from topic a_messages.
Fetch messages from topic
a_messages.bin/kafka-console-consumer.sh --bootstrap-server my-cluster-kafka-bootstrap:9093 --topic a_messages \ --from-beginning --consumer.config /tmp/team-a-client.propertiesThe request returns an error because the
Dev Team Arole forteam-a-clientonly has access to consumer groups that have names starting witha_.Update the
team-a-clientproperties to specify the custom consumer group it is permitted to use.bin/kafka-console-consumer.sh --bootstrap-server my-cluster-kafka-bootstrap:9093 --topic a_messages \ --from-beginning --consumer.config /tmp/team-a-client.properties --group a_consumer_group_1The consumer receives all the messages from the
a_messagestopic.
Administering Kafka with authorized access
The team-a-client is an account without any cluster-level access, but it can be used with some administrative operations.
List topics.
bin/kafka-topics.sh --bootstrap-server my-cluster-kafka-bootstrap:9093 --command-config /tmp/team-a-client.properties --listThe
a_messagestopic is returned.List consumer groups.
bin/kafka-consumer-groups.sh --bootstrap-server my-cluster-kafka-bootstrap:9093 --command-config /tmp/team-a-client.properties --listThe
a_consumer_group_1consumer group is returned.Fetch details on the cluster configuration.
bin/kafka-configs.sh --bootstrap-server my-cluster-kafka-bootstrap:9093 --command-config /tmp/team-a-client.properties \ --entity-type brokers --describe --entity-defaultThe request returns an error because the operation requires cluster level permissions that
team-a-clientdoes not have.
Using clients with different permissions
Use the team-b-client configuration to produce messages to topics that start with b_.
Write to topic
a_messages.bin/kafka-console-producer.sh --bootstrap-server my-cluster-kafka-bootstrap:9093 --topic a_messages \ --producer.config /tmp/team-b-client.properties Message 1This request returns a
Not authorized to access topics: [a_messages]error.Write to topic
b_messages.bin/kafka-console-producer.sh --bootstrap-server my-cluster-kafka-bootstrap:9093 --topic b_messages \ --producer.config /tmp/team-b-client.properties Message 1 Message 2 Message 3Messages are produced to Kafka successfully.
Write to topic
x_messages.bin/kafka-console-producer.sh --bootstrap-server my-cluster-kafka-bootstrap:9093 --topic x_messages \ --producer.config /tmp/team-b-client.properties Message 1A
Not authorized to access topics: [x_messages]error is returned, Theteam-b-clientcan only read from topicx_messages.Write to topic
x_messagesusingteam-a-client.bin/kafka-console-producer.sh --bootstrap-server my-cluster-kafka-bootstrap:9093 --topic x_messages \ --producer.config /tmp/team-a-client.properties Message 1This request returns a
Not authorized to access topics: [x_messages]error. Theteam-a-clientcan write to thex_messagestopic, but it does not have a permission to create a topic if it does not yet exist. Beforeteam-a-clientcan write to thex_messagestopic, an admin power user must create it with the correct configuration, such as the number of partitions and replicas.
Managing Kafka with an authorized admin user
Use admin user alice to manage Kafka. alice has full access to manage everything on any Kafka cluster.
Create the
x_messagestopic asalice.bin/kafka-topics.sh --bootstrap-server my-cluster-kafka-bootstrap:9093 --command-config /tmp/alice.properties \ --topic x_messages --create --replication-factor 1 --partitions 1The topic is created successfully.
List all topics as
alice.bin/kafka-topics.sh --bootstrap-server my-cluster-kafka-bootstrap:9093 --command-config /tmp/alice.properties --list bin/kafka-topics.sh --bootstrap-server my-cluster-kafka-bootstrap:9093 --command-config /tmp/team-a-client.properties --list bin/kafka-topics.sh --bootstrap-server my-cluster-kafka-bootstrap:9093 --command-config /tmp/team-b-client.properties --listAdmin user
alicecan list all the topics, whereasteam-a-clientandteam-b-clientcan only list the topics they have access to.The
Dev Team AandDev Team Broles both haveDescribepermission on topics that start withx_, but they cannot see the other team’s topics because they do not haveDescribepermissions on them.Use the
team-a-clientto produce messages to thex_messagestopic:bin/kafka-console-producer.sh --bootstrap-server my-cluster-kafka-bootstrap:9093 --topic x_messages \ --producer.config /tmp/team-a-client.properties Message 1 Message 2 Message 3As
alicecreated thex_messagestopic, messages are produced to Kafka successfully.Use the
team-b-clientto produce messages to thex_messagestopic.bin/kafka-console-producer.sh --bootstrap-server my-cluster-kafka-bootstrap:9093 --topic x_messages \ --producer.config /tmp/team-b-client.properties Message 4 Message 5This request returns a
Not authorized to access topics: [x_messages]error.Use the
team-b-clientto consume messages from thex_messagestopic:bin/kafka-console-consumer.sh --bootstrap-server my-cluster-kafka-bootstrap:9093 --topic x_messages \ --from-beginning --consumer.config /tmp/team-b-client.properties --group x_consumer_group_bThe consumer receives all the messages from the
x_messagestopic.Use the
team-a-clientto consume messages from thex_messagestopic.bin/kafka-console-consumer.sh --bootstrap-server my-cluster-kafka-bootstrap:9093 --topic x_messages \ --from-beginning --consumer.config /tmp/team-a-client.properties --group x_consumer_group_aThis request returns a
Not authorized to access topics: [x_messages]error.Use the
team-a-clientto consume messages from a consumer group that begins witha_.bin/kafka-console-consumer.sh --bootstrap-server my-cluster-kafka-bootstrap:9093 --topic x_messages \ --from-beginning --consumer.config /tmp/team-a-client.properties --group a_consumer_group_aThis request returns a
Not authorized to access topics: [x_messages]error.Dev Team Ahas noReadaccess on topics that start with ax_.Use
aliceto produce messages to thex_messagestopic.bin/kafka-console-consumer.sh --bootstrap-server my-cluster-kafka-bootstrap:9093 --topic x_messages \ --from-beginning --consumer.config /tmp/alice.propertiesMessages are produced to Kafka successfully.
alicecan read from or write to any topic.Use
aliceto read the cluster configuration.bin/kafka-configs.sh --bootstrap-server my-cluster-kafka-bootstrap:9093 --command-config /tmp/alice.properties \ --entity-type brokers --describe --entity-defaultThe cluster configuration for this example is empty.
Chapter 16. Managing TLS certificates
Streams for Apache Kafka supports TLS for encrypted communication between Kafka and Streams for Apache Kafka components.
Streams for Apache Kafka establishes encrypted TLS connections for communication between the following components when using Kafka in KRaft mode:
- Kafka brokers
- Kafka controllers
- Kafka brokers and controllers
- Streams for Apache Kafka operators and Kafka
- Cruise Control and Kafka brokers
- Kafka Exporter and Kafka brokers
Connections between clients and Kafka brokers use listeners that you must configure to use TLS-encrypted communication. You configure these listeners in the Kafka custom resource and each listener name and port number must be unique within the cluster. Communication between Kafka brokers and Kafka clients is encrypted according to how the tls property is configured for the listener. For more information, see Chapter 14, Setting up client access to a Kafka cluster.
The following diagram shows the connections for secure communication.
Figure 16.1. KRaft-based Kafka communication secured by TLS encryption

The ports shown in the diagram are used as follows:
- Control plane listener (9090)
- The internal control plane listener on port 9090 facilitates interbroker communication between Kafka controllers and broker-to-controller communication. Additionally, the Cluster Operator communicates with the controllers through the listener. This listener is not accessible to Kafka clients.
- Replication listener (9091)
- Data replication between brokers, as well as internal connections to the brokers from Streams for Apache Kafka operators, Cruise Control, and the Kafka Exporter, use the replication listener on port 9091. This listener is not accessible to Kafka clients.
- Listeners for client connections (9092 or higher)
- For TLS-encrypted communication (through configuration of the listener), internal and external clients connect to Kafka brokers. External clients (producers and consumers) connect to the Kafka brokers through the advertised listener port.
When configuring listeners for client access to brokers, you can use port 9092 or higher (9093, 9094, and so on), but with a few exceptions. The listeners cannot be configured to use the ports reserved for interbroker communication (9090 and 9091), Prometheus metrics (9404), and JMX (Java Management Extensions) monitoring (9999).
If you are using ZooKeeper for cluster management, there are TLS connections between ZooKeeper and Kafka brokers and Streams for Apache Kafka operators.
The following diagram shows the connections for secure communication when using ZooKeeper.
Figure 16.2. Kafka and ZooKeeper communication secured by TLS encryption
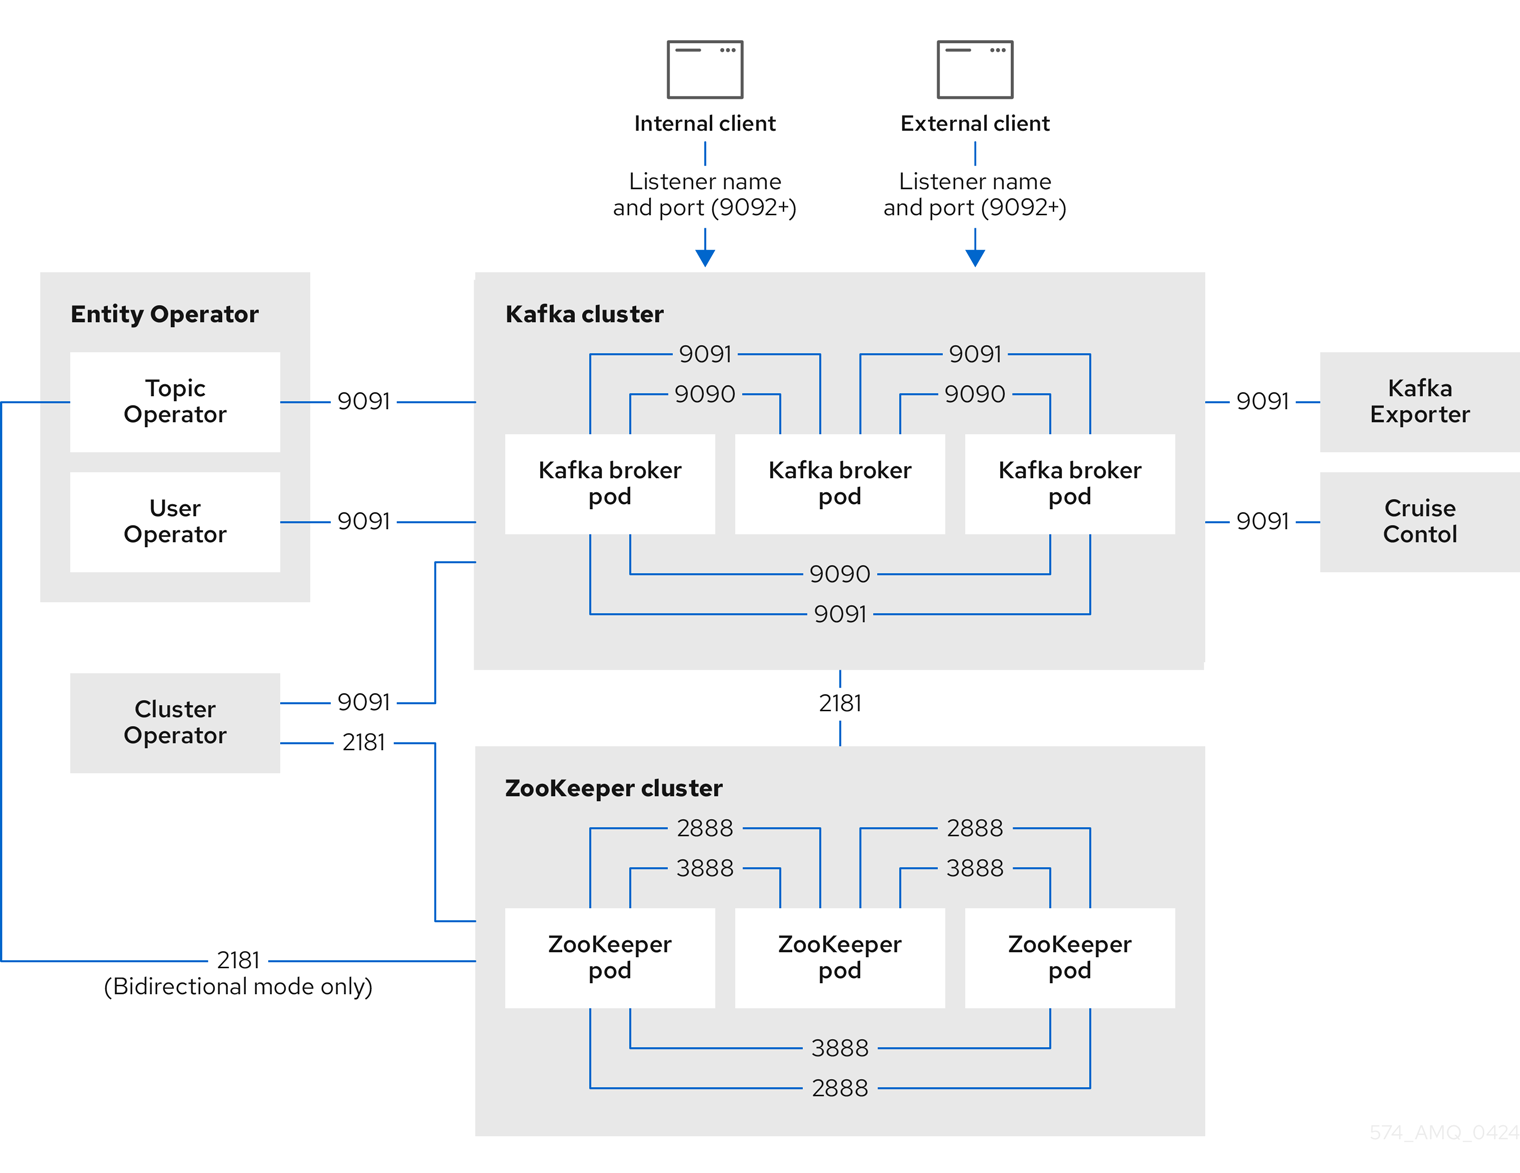
The ZooKeeper ports are used as follows:
- ZooKeeper Port (2181)
- ZooKeeper port for connection to Kafka brokers. Additionally, the Cluster Operator communicates with ZooKeeper through this port. If you are using the Topic Operator in bidirectional mode, it also communicates with ZooKeeper through this port.
- ZooKeeper internodal communication port (2888)
- ZooKeeper port for internodal communication between ZooKeeper nodes.
- ZooKeeper leader election port (3888)
- ZooKeeper port for leader election among ZooKeeper nodes in a ZooKeeper cluster.
16.1. Internal cluster CA and clients CA
To support encryption, each Streams for Apache Kafka component needs its own private keys and public key certificates. All component certificates are signed by an internal CA (certificate authority) called the cluster CA.
CA (Certificate Authority) certificates are generated by the Cluster Operator to verify the identities of components and clients.
Similarly, each Kafka client application connecting to Streams for Apache Kafka using mTLS needs to use private keys and certificates. A second internal CA, named the clients CA, is used to sign certificates for the Kafka clients.
Both the cluster CA and clients CA have a self-signed public key certificate.
Kafka brokers are configured to trust certificates signed by either the cluster CA or clients CA. Components that clients do not need to connect to, such as ZooKeeper, only trust certificates signed by the cluster CA. Unless TLS encryption for external listeners is disabled, client applications must trust certificates signed by the cluster CA. This is also true for client applications that perform mTLS authentication.
By default, Streams for Apache Kafka automatically generates and renews CA certificates issued by the cluster CA or clients CA. You can configure the management of these CA certificates using Kafka.spec.clusterCa and Kafka.spec.clientsCa properties.
If you don’t want to use the CAs generated by the Cluster Operator, you can install your own cluster and clients CA certificates. Any certificates you provide are not renewed by the Cluster Operator.
16.2. Secrets generated by the operators
The Cluster Operator automatically sets up and renews TLS certificates to enable encryption and authentication within a cluster. It also sets up other TLS certificates if you want to enable encryption or mTLS authentication between Kafka brokers and clients.
Secrets are created when custom resources are deployed, such as Kafka and KafkaUser. Streams for Apache Kafka uses these secrets to store private and public key certificates for Kafka clusters, clients, and users. The secrets are used for establishing TLS encrypted connections between Kafka brokers, and between brokers and clients. They are also used for mTLS authentication.
Cluster and clients secrets are always pairs: one contains the public key and one contains the private key.
- Cluster secret
- A cluster secret contains the cluster CA to sign Kafka broker certificates. Connecting clients use the certificate to establish a TLS encrypted connection with a Kafka cluster. The certificate verifies broker identity.
- Client secret
- A client secret contains the clients CA for a user to sign its own client certificate. This allows mutual authentication against the Kafka cluster. The broker validates a client’s identity through the certificate.
- User secret
- A user secret contains a private key and certificate. The secret is created and signed by the clients CA when a new user is created. The key and certificate are used to authenticate and authorize the user when accessing the cluster.
You can provide Kafka listener certificates for TLS listeners or external listeners that have TLS encryption enabled. Use Kafka listener certificates to incorporate the security infrastructure you already have in place.
16.2.1. TLS authentication using keys and certificates in PEM or PKCS #12 format
The secrets created by Streams for Apache Kafka provide private keys and certificates in PEM (Privacy Enhanced Mail) and PKCS #12 (Public-Key Cryptography Standards) formats. PEM and PKCS #12 are OpenSSL-generated key formats for TLS communications using the SSL protocol.
You can configure mutual TLS (mTLS) authentication that uses the credentials contained in the secrets generated for a Kafka cluster and user.
To set up mTLS, you must first do the following:
When you deploy a Kafka cluster, a <cluster_name>-cluster-ca-cert secret is created with public key to verify the cluster. You use the public key to configure a truststore for the client.
When you create a KafkaUser, a <kafka_user_name> secret is created with the keys and certificates to verify the user (client). Use these credentials to configure a keystore for the client.
With the Kafka cluster and client set up to use mTLS, you extract credentials from the secrets and add them to your client configuration.
- PEM keys and certificates
For PEM, you add the following to your client configuration:
- Truststore
-
ca.crtfrom the<cluster_name>-cluster-ca-certsecret, which is the CA certificate for the cluster.
-
- Keystore
-
user.crtfrom the<kafka_user_name>secret, which is the public certificate of the user. -
user.keyfrom the<kafka_user_name>secret, which is the private key of the user.
-
- PKCS #12 keys and certificates
For PKCS #12, you add the following to your client configuration:
- Truststore
-
ca.p12from the<cluster_name>-cluster-ca-certsecret, which is the CA certificate for the cluster. -
ca.passwordfrom the<cluster_name>-cluster-ca-certsecret, which is the password to access the public cluster CA certificate.
-
- Keystore
-
user.p12from the<kafka_user_name>secret, which is the public key certificate of the user. -
user.passwordfrom the<kafka_user_name>secret, which is the password to access the public key certificate of the Kafka user.
-
PKCS #12 is supported by Java, so you can add the values of the certificates directly to your Java client configuration. You can also reference the certificates from a secure storage location. With PEM files, you must add the certificates directly to the client configuration in single-line format. Choose a format that’s suitable for establishing TLS connections between your Kafka cluster and client. Use PKCS #12 if you are unfamiliar with PEM.
All keys are 2048 bits in size and, by default, are valid for 365 days from the initial generation. You can change the validity period.
16.2.2. Secrets generated by the Cluster Operator
The Cluster Operator generates the following certificates, which are saved as secrets in the OpenShift cluster. Streams for Apache Kafka uses these secrets by default.
The cluster CA and clients CA have separate secrets for the private key and public key.
<cluster_name>-cluster-ca- Contains the private key of the cluster CA. Streams for Apache Kafka and Kafka components use the private key to sign server certificates.
<cluster_name>-cluster-ca-cert- Contains the public key of the cluster CA. Kafka clients use the public key to verify the identity of the Kafka brokers they are connecting to with TLS server authentication.
<cluster_name>-clients-ca- Contains the private key of the clients CA. Kafka clients use the private key to sign new user certificates for mTLS authentication when connecting to Kafka brokers.
<cluster_name>-clients-ca-cert- Contains the public key of the clients CA. Kafka brokers use the public key to verify the identity of clients accessing the Kafka brokers when mTLS authentication is used.
Secrets for communication between Streams for Apache Kafka components contain a private key and a public key certificate signed by the cluster CA.
<cluster_name>-kafka-brokers- Contains the private and public keys for Kafka brokers.
<cluster_name>-zookeeper-nodes- Contains the private and public keys for ZooKeeper nodes.
<cluster_name>-cluster-operator-certs- Contains the private and public keys for encrypting communication between the Cluster Operator and Kafka or ZooKeeper.
<cluster_name>-entity-topic-operator-certs- Contains the private and public keys for encrypting communication between the Topic Operator and Kafka or ZooKeeper.
<cluster_name>-entity-user-operator-certs- Contains the private and public keys for encrypting communication between the User Operator and Kafka or ZooKeeper.
<cluster_name>-cruise-control-certs- Contains the private and public keys for encrypting communication between Cruise Control and Kafka or ZooKeeper.
<cluster_name>-kafka-exporter-certs- Contains the private and public keys for encrypting communication between Kafka Exporter and Kafka or ZooKeeper.
You can provide your own server certificates and private keys to connect to Kafka brokers using Kafka listener certificates rather than certificates signed by the cluster CA.
16.2.3. Cluster CA secrets
Cluster CA secrets are managed by the Cluster Operator in a Kafka cluster.
Only the <cluster_name>-cluster-ca-cert secret is required by clients. All other cluster secrets are accessed by Streams for Apache Kafka components. You can enforce this using OpenShift role-based access controls, if necessary.
The CA certificates in <cluster_name>-cluster-ca-cert must be trusted by Kafka client applications so that they validate the Kafka broker certificates when connecting to Kafka brokers over TLS.
| Field | Description |
|---|---|
|
| The current private key for the cluster CA. |
| Field | Description |
|---|---|
|
| PKCS #12 store for storing certificates and keys. |
|
| Password for protecting the PKCS #12 store. |
|
| The current certificate for the cluster CA. |
| Field | Description |
|---|---|
|
| PKCS #12 store for storing certificates and keys. |
|
| Password for protecting the PKCS #12 store. |
|
|
Certificate for a Kafka broker pod <num>. Signed by a current or former cluster CA private key in |
|
|
Private key for a Kafka broker pod |
| Field | Description |
|---|---|
|
| PKCS #12 store for storing certificates and keys. |
|
| Password for protecting the PKCS #12 store. |
|
|
Certificate for ZooKeeper node <num>. Signed by a current or former cluster CA private key in |
|
|
Private key for ZooKeeper pod |
| Field | Description |
|---|---|
|
| PKCS #12 store for storing certificates and keys. |
|
| Password for protecting the PKCS #12 store. |
|
|
Certificate for mTLS communication between the Cluster Operator and Kafka or ZooKeeper. Signed by a current or former cluster CA private key in |
|
| Private key for mTLS communication between the Cluster Operator and Kafka or ZooKeeper. |
| Field | Description |
|---|---|
|
| PKCS #12 store for storing certificates and keys. |
|
| Password for protecting the PKCS #12 store. |
|
|
Certificate for mTLS communication between the Topic Operator and Kafka or ZooKeeper. Signed by a current or former cluster CA private key in |
|
| Private key for mTLS communication between the Topic Operator and Kafka or ZooKeeper. |
| Field | Description |
|---|---|
|
| PKCS #12 store for storing certificates and keys. |
|
| Password for protecting the PKCS #12 store. |
|
|
Certificate for mTLS communication between the User Operator and Kafka or ZooKeeper. Signed by a current or former cluster CA private key in |
|
| Private key for mTLS communication between the User Operator and Kafka or ZooKeeper. |
| Field | Description |
|---|---|
|
| PKCS #12 store for storing certificates and keys. |
|
| Password for protecting the PKCS #12 store. |
|
|
Certificate for mTLS communication between Cruise Control and Kafka or ZooKeeper. Signed by a current or former cluster CA private key in |
|
| Private key for mTLS communication between the Cruise Control and Kafka or ZooKeeper. |
| Field | Description |
|---|---|
|
| PKCS #12 store for storing certificates and keys. |
|
| Password for protecting the PKCS #12 store. |
|
|
Certificate for mTLS communication between Kafka Exporter and Kafka or ZooKeeper. Signed by a current or former cluster CA private key in |
|
| Private key for mTLS communication between the Kafka Exporter and Kafka or ZooKeeper. |
16.2.4. Clients CA secrets
Clients CA secrets are managed by the Cluster Operator in a Kafka cluster.
The certificates in <cluster_name>-clients-ca-cert are those which the Kafka brokers trust.
The <cluster_name>-clients-ca secret is used to sign the certificates of client applications. This secret must be accessible to the Streams for Apache Kafka components and for administrative access if you are intending to issue application certificates without using the User Operator. You can enforce this using OpenShift role-based access controls, if necessary.
| Field | Description |
|---|---|
|
| The current private key for the clients CA. |
| Field | Description |
|---|---|
|
| PKCS #12 store for storing certificates and keys. |
|
| Password for protecting the PKCS #12 store. |
|
| The current certificate for the clients CA. |
16.2.5. User secrets generated by the User Operator
User secrets are managed by the User Operator.
When a user is created using the User Operator, a secret is generated using the name of the user.
| Secret name | Field within secret | Description |
|---|---|---|
|
|
| PKCS #12 store for storing certificates and keys. |
|
| Password for protecting the PKCS #12 store. | |
|
| Certificate for the user, signed by the clients CA | |
|
| Private key for the user |
16.2.6. Adding labels and annotations to cluster CA secrets
By configuring the clusterCaCert template property in the Kafka custom resource, you can add custom labels and annotations to the Cluster CA secrets created by the Cluster Operator. Labels and annotations are useful for identifying objects and adding contextual information. You configure template properties in Streams for Apache Kafka custom resources.
Example template customization to add labels and annotations to secrets
apiVersion: kafka.strimzi.io/v1beta2
kind: Kafka
metadata:
name: my-cluster
spec:
kafka:
# ...
template:
clusterCaCert:
metadata:
labels:
label1: value1
label2: value2
annotations:
annotation1: value1
annotation2: value2
# ...16.2.7. Disabling ownerReference in the CA secrets
By default, the cluster and clients CA secrets are created with an ownerReference property that is set to the Kafka custom resource. This means that, when the Kafka custom resource is deleted, the CA secrets are also deleted (garbage collected) by OpenShift.
If you want to reuse the CA for a new cluster, you can disable the ownerReference by setting the generateSecretOwnerReference property for the cluster and clients CA secrets to false in the Kafka configuration. When the ownerReference is disabled, CA secrets are not deleted by OpenShift when the corresponding Kafka custom resource is deleted.
Example Kafka configuration with disabled ownerReference for cluster and clients CAs
apiVersion: kafka.strimzi.io/v1beta2
kind: Kafka
# ...
spec:
# ...
clusterCa:
generateSecretOwnerReference: false
clientsCa:
generateSecretOwnerReference: false
# ...16.3. Certificate renewal and validity periods
Cluster CA and clients CA certificates are only valid for a limited time period, known as the validity period. This is usually defined as a number of days since the certificate was generated.
For CA certificates automatically created by the Cluster Operator, you can configure the validity period of:
-
Cluster CA certificates in
Kafka.spec.clusterCa.validityDays -
Clients CA certificates in
Kafka.spec.clientsCa.validityDays
The default validity period for both certificates is 365 days. Manually-installed CA certificates should have their own validity periods defined.
When a CA certificate expires, components and clients that still trust that certificate will not accept connections from peers whose certificates were signed by the CA private key. The components and clients need to trust the new CA certificate instead.
To allow the renewal of CA certificates without a loss of service, the Cluster Operator initiates certificate renewal before the old CA certificates expire.
You can configure the renewal period of the certificates created by the Cluster Operator:
-
Cluster CA certificates in
Kafka.spec.clusterCa.renewalDays -
Clients CA certificates in
Kafka.spec.clientsCa.renewalDays
The default renewal period for both certificates is 30 days.
The renewal period is measured backwards, from the expiry date of the current certificate.
Validity period against renewal period
Not Before Not After
| |
|<--------------- validityDays --------------->|
<--- renewalDays --->|
To make a change to the validity and renewal periods after creating the Kafka cluster, you configure and apply the Kafka custom resource, and manually renew the CA certificates. If you do not manually renew the certificates, the new periods will be used the next time the certificate is renewed automatically.
Example Kafka configuration for certificate validity and renewal periods
apiVersion: kafka.strimzi.io/v1beta2
kind: Kafka
# ...
spec:
# ...
clusterCa:
renewalDays: 30
validityDays: 365
generateCertificateAuthority: true
clientsCa:
renewalDays: 30
validityDays: 365
generateCertificateAuthority: true
# ...
The behavior of the Cluster Operator during the renewal period depends on the settings for the generateCertificateAuthority certificate generation properties for the cluster CA and clients CA.
true-
If the properties are set to
true, a CA certificate is generated automatically by the Cluster Operator, and renewed automatically within the renewal period. false-
If the properties are set to
false, a CA certificate is not generated by the Cluster Operator. Use this option if you are installing your own certificates.
16.3.1. Renewal process with automatically generated CA certificates
The Cluster Operator performs the following processes in this order when renewing CA certificates:
Generates a new CA certificate, but retains the existing key.
The new certificate replaces the old one with the name
ca.crtwithin the correspondingSecret.Generates new client certificates (for ZooKeeper nodes, Kafka brokers, and the Entity Operator).
This is not strictly necessary because the signing key has not changed, but it keeps the validity period of the client certificate in sync with the CA certificate.
- Restarts ZooKeeper nodes so that they will trust the new CA certificate and use the new client certificates.
- Restarts Kafka brokers so that they will trust the new CA certificate and use the new client certificates.
Restarts the Topic and User Operators so that they will trust the new CA certificate and use the new client certificates.
User certificates are signed by the clients CA. User certificates generated by the User Operator are renewed when the clients CA is renewed.
16.3.2. Client certificate renewal
The Cluster Operator is not aware of the client applications using the Kafka cluster.
When connecting to the cluster, and to ensure they operate correctly, client applications must:
- Trust the cluster CA certificate published in the <cluster>-cluster-ca-cert Secret.
Use the credentials published in their <user-name> Secret to connect to the cluster.
The User Secret provides credentials in PEM and PKCS #12 format, or it can provide a password when using SCRAM-SHA authentication. The User Operator creates the user credentials when a user is created.
You must ensure clients continue to work after certificate renewal. The renewal process depends on how the clients are configured.
If you are provisioning client certificates and keys manually, you must generate new client certificates and ensure the new certificates are used by clients within the renewal period. Failure to do this by the end of the renewal period could result in client applications being unable to connect to the cluster.
For workloads running inside the same OpenShift cluster and namespace, Secrets can be mounted as a volume so the client Pods construct their keystores and truststores from the current state of the Secrets. For more details on this procedure, see Configuring internal clients to trust the cluster CA.
16.3.3. Manually renewing Cluster Operator-managed CA certificates
Cluster and clients CA certificates generated by the Cluster Operator auto-renew at the start of their respective certificate renewal periods. However, you can use the strimzi.io/force-renew annotation to manually renew one or both of these certificates before the certificate renewal period starts. You might do this for security reasons, or if you have changed the renewal or validity periods for the certificates.
A renewed certificate uses the same private key as the old certificate.
If you are using your own CA certificates, the force-renew annotation cannot be used. Instead, follow the procedure for renewing your own CA certificates.
Prerequisites
- The Cluster Operator must be deployed.
- A Kafka cluster in which CA certificates and private keys are installed.
- The OpenSSL TLS management tool to check the period of validity for CA certificates.
In this procedure, we use a Kafka cluster named my-cluster within the my-project namespace.
Procedure
Apply the
strimzi.io/force-renewannotation to the secret that contains the CA certificate that you want to renew.Renewing the Cluster CA secret
oc annotate secret my-cluster-cluster-ca-cert -n my-project strimzi.io/force-renew="true"Renewing the Clients CA secret
oc annotate secret my-cluster-clients-ca-cert -n my-project strimzi.io/force-renew="true"At the next reconciliation, the Cluster Operator generates new certificates.
If maintenance time windows are configured, the Cluster Operator generates the new CA certificate at the first reconciliation within the next maintenance time window.
Check the period of validity for the new CA certificates.
Checking the period of validity for the new cluster CA certificate
oc get secret my-cluster-cluster-ca-cert -n my-project -o=jsonpath='{.data.ca\.crt}' | base64 -d | openssl x509 -noout -datesChecking the period of validity for the new clients CA certificate
oc get secret my-cluster-clients-ca-cert -n my-project -o=jsonpath='{.data.ca\.crt}' | base64 -d | openssl x509 -noout -datesThe command returns a
notBeforeandnotAfterdate, which is the valid start and end date for the CA certificate.Update client configurations to trust the new cluster CA certificate.
See:
16.3.4. Manually recovering from expired Cluster Operator-managed CA certificates
The Cluster Operator automatically renews the cluster and clients CA certificates when their renewal periods begin. Nevertheless, unexpected operational problems or disruptions may prevent the renewal process, such as prolonged downtime of the Cluster Operator or unavailability of the Kafka cluster. If CA certificates expire, Kafka cluster components cannot communicate with each other and the Cluster Operator cannot renew the CA certificates without manual intervention.
To promptly perform a recovery, follow the steps outlined in this procedure in the order given. You can recover from expired cluster and clients CA certificates. The process involves deleting the secrets containing the expired certificates so that new ones are generated by the Cluster Operator. For more information on the secrets managed in Streams for Apache Kafka, see Section 16.2.2, “Secrets generated by the Cluster Operator”.
If you are using your own CA certificates and they expire, the process is similar, but you need to renew the CA certificates rather than use certificates generated by the Cluster Operator.
Prerequisites
- The Cluster Operator must be deployed.
- A Kafka cluster in which CA certificates and private keys are installed.
- The OpenSSL TLS management tool to check the period of validity for CA certificates.
In this procedure, we use a Kafka cluster named my-cluster within the my-project namespace.
Procedure
Delete the secret containing the expired CA certificate.
Deleting the Cluster CA secret
oc delete secret my-cluster-cluster-ca-cert -n my-projectDeleting the Clients CA secret
oc delete secret my-cluster-clients-ca-cert -n my-projectWait for the Cluster Operator to generate new certificates.
-
A new CA cluster certificate to verify the identity of the Kafka brokers is created in a secret of the same name (
my-cluster-cluster-ca-cert). -
A new CA clients certificate to verify the identity of Kafka users is created in a secret of the same name (
my-cluster-clients-ca-cert).
-
A new CA cluster certificate to verify the identity of the Kafka brokers is created in a secret of the same name (
Check the period of validity for the new CA certificates.
Checking the period of validity for the new cluster CA certificate
oc get secret my-cluster-cluster-ca-cert -n my-project -o=jsonpath='{.data.ca\.crt}' | base64 -d | openssl x509 -noout -datesChecking the period of validity for the new clients CA certificate
oc get secret my-cluster-clients-ca-cert -n my-project -o=jsonpath='{.data.ca\.crt}' | base64 -d | openssl x509 -noout -datesThe command returns a
notBeforeandnotAfterdate, which is the valid start and end date for the CA certificate.Delete the component pods and secrets that use the CA certificates.
- Delete the ZooKeeper secret.
- Wait for the Cluster Operator to detect the missing ZooKeeper secret and recreate it.
- Delete all ZooKeeper pods.
- Delete the Kafka secret.
- Wait for the Cluster Operator to detect the missing Kafka secret and recreate it.
- Delete all Kafka pods.
If you are only recovering the clients CA certificate, you only need to delete the Kafka secret and pods.
You can use the following
occommand to find resources and also verify that they have been removed.oc get <resource_type> --all-namespaces | grep <kafka_cluster_name>Replace
<resource_type>with the type of the resource, such asPodorSecret.Wait for the Cluster Operator to detect the missing Kafka and ZooKeeper pods and recreate them with the updated CA certificates.
On reconciliation, the Cluster Operator automatically updates other components to trust the new CA certificates.
- Verify that there are no issues related to certificate validation in the Cluster Operator log.
Update client configurations to trust the new cluster CA certificate.
See:
16.3.5. Replacing private keys used by Cluster Operator-managed CA certificates
You can replace the private keys used by the cluster CA and clients CA certificates generated by the Cluster Operator. When a private key is replaced, the Cluster Operator generates a new CA certificate for the new private key.
If you are using your own CA certificates, the force-replace annotation cannot be used. Instead, follow the procedure for renewing your own CA certificates.
Prerequisites
- The Cluster Operator is running.
- A Kafka cluster in which CA certificates and private keys are installed.
Procedure
Apply the
strimzi.io/force-replaceannotation to theSecretthat contains the private key that you want to renew.Expand Table 16.13. Commands for replacing private keys Private key for Secret Annotate command Cluster CA
<cluster_name>-cluster-ca
oc annotate secret <cluster_name>-cluster-ca strimzi.io/force-replace="true"Clients CA
<cluster_name>-clients-ca
oc annotate secret <cluster_name>-clients-ca strimzi.io/force-replace="true"
At the next reconciliation the Cluster Operator will:
-
Generate a new private key for the
Secretthat you annotated - Generate a new CA certificate
If maintenance time windows are configured, the Cluster Operator will generate the new private key and CA certificate at the first reconciliation within the next maintenance time window.
Client applications must reload the cluster and clients CA certificates that were renewed by the Cluster Operator.
16.4. Configuring internal clients to trust the cluster CA
This procedure describes how to configure a Kafka client that resides inside the OpenShift cluster — connecting to a TLS listener — to trust the cluster CA certificate.
The easiest way to achieve this for an internal client is to use a volume mount to access the Secrets containing the necessary certificates and keys.
Follow the steps to configure trust certificates that are signed by the cluster CA for Java-based Kafka Producer, Consumer, and Streams APIs.
Choose the steps to follow according to the certificate format of the cluster CA: PKCS #12 (.p12) or PEM (.crt).
The steps describe how to mount the Cluster Secret that verifies the identity of the Kafka cluster to the client pod.
Prerequisites
- The Cluster Operator must be running.
-
There needs to be a
Kafkaresource within the OpenShift cluster. - You need a Kafka client application inside the OpenShift cluster that will connect using TLS, and needs to trust the cluster CA certificate.
-
The client application must be running in the same namespace as the
Kafkaresource.
Using PKCS #12 format (.p12)
Mount the cluster Secret as a volume when defining the client pod.
For example:
kind: Pod apiVersion: v1 metadata: name: client-pod spec: containers: - name: client-name image: client-name volumeMounts: - name: secret-volume mountPath: /data/p12 env: - name: SECRET_PASSWORD valueFrom: secretKeyRef: name: my-secret key: my-password volumes: - name: secret-volume secret: secretName: my-cluster-cluster-ca-certHere we’re mounting the following:
- The PKCS #12 file into an exact path, which can be configured
- The password into an environment variable, where it can be used for Java configuration
Configure the Kafka client with the following properties:
A security protocol option:
-
security.protocol: SSLwhen using TLS for encryption (with or without mTLS authentication). -
security.protocol: SASL_SSLwhen using SCRAM-SHA authentication over TLS.
-
-
ssl.truststore.locationwith the truststore location where the certificates were imported. -
ssl.truststore.passwordwith the password for accessing the truststore. -
ssl.truststore.type=PKCS12to identify the truststore type.
Using PEM format (.crt)
Mount the cluster Secret as a volume when defining the client pod.
For example:
kind: Pod apiVersion: v1 metadata: name: client-pod spec: containers: - name: client-name image: client-name volumeMounts: - name: secret-volume mountPath: /data/crt volumes: - name: secret-volume secret: secretName: my-cluster-cluster-ca-cert- Use the extracted certificate to configure a TLS connection in clients that use certificates in X.509 format.
16.5. Configuring external clients to trust the cluster CA
This procedure describes how to configure a Kafka client that resides outside the OpenShift cluster – connecting to an external listener – to trust the cluster CA certificate. Follow this procedure when setting up the client and during the renewal period, when the old clients CA certificate is replaced.
Follow the steps to configure trust certificates that are signed by the cluster CA for Java-based Kafka Producer, Consumer, and Streams APIs.
Choose the steps to follow according to the certificate format of the cluster CA: PKCS #12 (.p12) or PEM (.crt).
The steps describe how to obtain the certificate from the Cluster Secret that verifies the identity of the Kafka cluster.
The <cluster_name>-cluster-ca-cert secret contains more than one CA certificate during the CA certificate renewal period. Clients must add all of them to their truststores.
Prerequisites
- The Cluster Operator must be running.
-
There needs to be a
Kafkaresource within the OpenShift cluster. - You need a Kafka client application outside the OpenShift cluster that will connect using TLS, and needs to trust the cluster CA certificate.
Using PKCS #12 format (.p12)
Extract the cluster CA certificate and password from the
<cluster_name>-cluster-ca-certSecret of the Kafka cluster.oc get secret <cluster_name>-cluster-ca-cert -o jsonpath='{.data.ca\.p12}' | base64 -d > ca.p12oc get secret <cluster_name>-cluster-ca-cert -o jsonpath='{.data.ca\.password}' | base64 -d > ca.passwordReplace <cluster_name> with the name of the Kafka cluster.
Configure the Kafka client with the following properties:
A security protocol option:
-
security.protocol: SSLwhen using TLS. -
security.protocol: SASL_SSLwhen using SCRAM-SHA authentication over TLS.
-
-
ssl.truststore.locationwith the truststore location where the certificates were imported. -
ssl.truststore.passwordwith the password for accessing the truststore. This property can be omitted if it is not needed by the truststore. -
ssl.truststore.type=PKCS12to identify the truststore type.
Using PEM format (.crt)
Extract the cluster CA certificate from the
<cluster_name>-cluster-ca-certsecret of the Kafka cluster.oc get secret <cluster_name>-cluster-ca-cert -o jsonpath='{.data.ca\.crt}' | base64 -d > ca.crt- Use the extracted certificate to configure a TLS connection in clients that use certificates in X.509 format.
16.6. Using your own CA certificates and private keys
Install and use your own CA certificates and private keys instead of using the defaults generated by the Cluster Operator. You can replace the cluster and clients CA certificates and private keys.
You can switch to using your own CA certificates and private keys in the following ways:
- Install your own CA certificates and private keys before deploying your Kafka cluster
- Replace the default CA certificates and private keys with your own after deploying a Kafka cluster
The steps to replace the default CA certificates and private keys after deploying a Kafka cluster are the same as those used to renew your own CA certificates and private keys.
If you use your own certificates, they won’t be renewed automatically. You need to renew the CA certificates and private keys before they expire.
Renewal options:
- Renew the CA certificates only
- Renew CA certificates and private keys (or replace the defaults)
16.6.1. Installing your own CA certificates and private keys
Install your own CA certificates and private keys instead of using the cluster and clients CA certificates and private keys generated by the Cluster Operator.
By default, Streams for Apache Kafka uses the following cluster CA and clients CA secrets, which are renewed automatically.
Cluster CA secrets
-
<cluster_name>-cluster-ca -
<cluster_name>-cluster-ca-cert
-
Clients CA secrets
-
<cluster_name>-clients-ca -
<cluster_name>-clients-ca-cert
-
To install your own certificates, use the same names.
Prerequisites
- The Cluster Operator is running.
A Kafka cluster is not yet deployed.
If you have already deployed a Kafka cluster, you can replace the default CA certificates with your own.
Your own X.509 certificates and keys in PEM format for the cluster CA or clients CA.
If you want to use a cluster or clients CA which is not a Root CA, you have to include the whole chain in the certificate file. The chain should be in the following order:
- The cluster or clients CA
- One or more intermediate CAs
- The root CA
- All CAs in the chain should be configured using the X509v3 Basic Constraints extension. Basic Constraints limit the path length of a certificate chain.
- The OpenSSL TLS management tool for converting certificates.
Before you begin
The Cluster Operator generates keys and certificates in PEM (Privacy Enhanced Mail) and PKCS #12 (Public-Key Cryptography Standards) formats. You can add your own certificates in either format.
Some applications cannot use PEM certificates and support only PKCS #12 certificates. If you don’t have a cluster certificate in PKCS #12 format, use the OpenSSL TLS management tool to generate one from your ca.crt file.
Example certificate generation command
openssl pkcs12 -export -in ca.crt -nokeys -out ca.p12 -password pass:<P12_password> -caname ca.crtReplace <P12_password> with your own password.
Procedure
Create a new secret that contains the CA certificate.
Client secret creation with a certificate in PEM format only
oc create secret generic <cluster_name>-clients-ca-cert --from-file=ca.crt=ca.crtCluster secret creation with certificates in PEM and PKCS #12 format
oc create secret generic <cluster_name>-cluster-ca-cert \ --from-file=ca.crt=ca.crt \ --from-file=ca.p12=ca.p12 \ --from-literal=ca.password=P12-PASSWORDReplace <cluster_name> with the name of your Kafka cluster.
Create a new secret that contains the private key.
oc create secret generic <ca_key_secret> --from-file=ca.key=ca.keyLabel the secrets.
oc label secret <ca_certificate_secret> strimzi.io/kind=Kafka strimzi.io/cluster="<cluster_name>"oc label secret <ca_key_secret> strimzi.io/kind=Kafka strimzi.io/cluster="<cluster_name>"-
Label
strimzi.io/kind=Kafkaidentifies the Kafka custom resource. -
Label
strimzi.io/cluster="<cluster_name>"identifies the Kafka cluster.
-
Label
Annotate the secrets
oc annotate secret <ca_certificate_secret> strimzi.io/ca-cert-generation="<ca_certificate_generation>"oc annotate secret <ca_key_secret> strimzi.io/ca-key-generation="<ca_key_generation>"-
Annotation
strimzi.io/ca-cert-generation="<ca_certificate_generation>"defines the generation of a new CA certificate. Annotation
strimzi.io/ca-key-generation="<ca_key_generation>"defines the generation of a new CA key.Start from 0 (zero) as the incremental value (
strimzi.io/ca-cert-generation=0) for your own CA certificate. Set a higher incremental value when you renew the certificates.
-
Annotation
Create the
Kafkaresource for your cluster, configuring either theKafka.spec.clusterCaor theKafka.spec.clientsCaobject to not use generated CAs.Example fragment
Kafkaresource configuring the cluster CA to use certificates you supply for yourselfkind: Kafka version: kafka.strimzi.io/v1beta2 spec: # ... clusterCa: generateCertificateAuthority: false
16.6.2. Renewing your own CA certificates
If you are using your own CA certificates, you need to renew them manually. The Cluster Operator will not renew them automatically. Renew the CA certificates in the renewal period before they expire.
Perform the steps in this procedure when you are renewing CA certificates and continuing with the same private key. If you are renewing your own CA certificates and private keys, see Section 16.6.3, “Renewing or replacing CA certificates and private keys with your own”.
The procedure describes the renewal of CA certificates in PEM format.
Prerequisites
- The Cluster Operator is running.
- You have new cluster or clients X.509 certificates in PEM format.
Procedure
Update the
Secretfor the CA certificate.Edit the existing secret to add the new CA certificate and update the certificate generation annotation value.
oc edit secret <ca_certificate_secret_name><ca_certificate_secret_name> is the name of the
Secret, which is<kafka_cluster_name>-cluster-ca-certfor the cluster CA certificate and<kafka_cluster_name>-clients-ca-certfor the clients CA certificate.The following example shows a secret for a cluster CA certificate that’s associated with a Kafka cluster named
my-cluster.Example secret configuration for a cluster CA certificate
apiVersion: v1 kind: Secret data: ca.crt: LS0tLS1CRUdJTiBDRVJUSUZJQ0F...1 metadata: annotations: strimzi.io/ca-cert-generation: "0"2 labels: strimzi.io/cluster: my-cluster strimzi.io/kind: Kafka name: my-cluster-cluster-ca-cert #... type: OpaqueEncode your new CA certificate into base64.
cat <path_to_new_certificate> | base64Update the CA certificate.
Copy the base64-encoded CA certificate from the previous step as the value for the
ca.crtproperty underdata.Increase the value of the CA certificate generation annotation.
Update the
strimzi.io/ca-cert-generationannotation with a higher incremental value. For example, changestrimzi.io/ca-cert-generation=0tostrimzi.io/ca-cert-generation=1. If theSecretis missing the annotation, the value is treated as0, so add the annotation with a value of1.When Streams for Apache Kafka generates certificates, the certificate generation annotation is automatically incremented by the Cluster Operator. For your own CA certificates, set the annotations with a higher incremental value. The annotation needs a higher value than the one from the current secret so that the Cluster Operator can roll the pods and update the certificates. The
strimzi.io/ca-cert-generationhas to be incremented on each CA certificate renewal.Save the secret with the new CA certificate and certificate generation annotation value.
Example secret configuration updated with a new CA certificate
apiVersion: v1 kind: Secret data: ca.crt: GCa6LS3RTHeKFiFDGBOUDYFAZ0F...1 metadata: annotations: strimzi.io/ca-cert-generation: "1"2 labels: strimzi.io/cluster: my-cluster strimzi.io/kind: Kafka name: my-cluster-cluster-ca-cert #... type: Opaque
On the next reconciliation, the Cluster Operator performs a rolling update of ZooKeeper, Kafka, and other components to trust the new CA certificate.
If maintenance time windows are configured, the Cluster Operator will roll the pods at the first reconciliation within the next maintenance time window.
16.6.3. Renewing or replacing CA certificates and private keys with your own
If you are using your own CA certificates and private keys, you need to renew them manually. The Cluster Operator will not renew them automatically. Renew the CA certificates in the renewal period before they expire. You can also use the same procedure to replace the CA certificates and private keys generated by the Streams for Apache Kafka operators with your own.
Perform the steps in this procedure when you are renewing or replacing CA certificates and private keys. If you are only renewing your own CA certificates, see Section 16.6.2, “Renewing your own CA certificates”.
The procedure describes the renewal of CA certificates and private keys in PEM format.
Before going through the following steps, make sure that the CN (Common Name) of the new CA certificate is different from the current one. For example, when the Cluster Operator renews certificates automatically it adds a v<version_number> suffix to identify a version. Do the same with your own CA certificate by adding a different suffix on each renewal. By using a different key to generate a new CA certificate, you retain the current CA certificate stored in the Secret.
Prerequisites
- The Cluster Operator is running.
- You have new cluster or clients X.509 certificates and keys in PEM format.
Procedure
Pause the reconciliation of the
Kafkacustom resource.Annotate the custom resource in OpenShift, setting the
pause-reconciliationannotation totrue:oc annotate Kafka <name_of_custom_resource> strimzi.io/pause-reconciliation="true"For example, for a
Kafkacustom resource namedmy-cluster:oc annotate Kafka my-cluster strimzi.io/pause-reconciliation="true"Check that the status conditions of the custom resource show a change to
ReconciliationPaused:oc describe Kafka <name_of_custom_resource>The
typecondition changes toReconciliationPausedat thelastTransitionTime.
Check the settings for the
generateCertificateAuthorityproperties in yourKafkacustom resource.If a property is set to
false, a CA certificate is not generated by the Cluster Operator. You require this setting if you are using your own certificates.If needed, edit the existing
Kafkacustom resource and set thegenerateCertificateAuthorityproperties tofalse.oc edit Kafka <name_of_custom_resource>The following example shows a
Kafkacustom resource with both cluster and clients CA certificates generation delegated to the user.Example
Kafkaconfiguration using your own CA certificatesapiVersion: kafka.strimzi.io/v1beta2 kind: Kafka # ... spec: # ... clusterCa: generateCertificateAuthority: false1 clientsCa: generateCertificateAuthority: false2 # ...Update the
Secretfor the CA certificate.Edit the existing secret to add the new CA certificate and update the certificate generation annotation value.
oc edit secret <ca_certificate_secret_name><ca_certificate_secret_name> is the name of the
Secret, which is<kafka_cluster_name>-cluster-ca-certfor the cluster CA certificate and<kafka_cluster_name>-clients-ca-certfor the clients CA certificate.The following example shows a secret for a cluster CA certificate that’s associated with a Kafka cluster named
my-cluster.Example secret configuration for a cluster CA certificate
apiVersion: v1 kind: Secret data: ca.crt: LS0tLS1CRUdJTiBDRVJUSUZJQ0F...1 metadata: annotations: strimzi.io/ca-cert-generation: "0"2 labels: strimzi.io/cluster: my-cluster strimzi.io/kind: Kafka name: my-cluster-cluster-ca-cert #... type: OpaqueRename the current CA certificate to retain it.
Rename the current
ca.crtproperty underdataasca-<date>.crt, where <date> is the certificate expiry date in the format YEAR-MONTH-DAYTHOUR-MINUTE-SECONDZ. For exampleca-2023-01-26T17-32-00Z.crt:. Leave the value for the property as it is to retain the current CA certificate.Encode your new CA certificate into base64.
cat <path_to_new_certificate> | base64Update the CA certificate.
Create a new
ca.crtproperty underdataand copy the base64-encoded CA certificate from the previous step as the value forca.crtproperty.Increase the value of the CA certificate generation annotation.
Update the
strimzi.io/ca-cert-generationannotation with a higher incremental value. For example, changestrimzi.io/ca-cert-generation=0tostrimzi.io/ca-cert-generation=1. If theSecretis missing the annotation, the value is treated as0, so add the annotation with a value of1.When Streams for Apache Kafka generates certificates, the certificate generation annotation is automatically incremented by the Cluster Operator. For your own CA certificates, set the annotations with a higher incremental value. The annotation needs a higher value than the one from the current secret so that the Cluster Operator can roll the pods and update the certificates. The
strimzi.io/ca-cert-generationhas to be incremented on each CA certificate renewal.Save the secret with the new CA certificate and certificate generation annotation value.
Example secret configuration updated with a new CA certificate
apiVersion: v1 kind: Secret data: ca.crt: GCa6LS3RTHeKFiFDGBOUDYFAZ0F...1 ca-2023-01-26T17-32-00Z.crt: LS0tLS1CRUdJTiBDRVJUSUZJQ0F...2 metadata: annotations: strimzi.io/ca-cert-generation: "1"3 labels: strimzi.io/cluster: my-cluster strimzi.io/kind: Kafka name: my-cluster-cluster-ca-cert #... type: Opaque
Update the
Secretfor the CA key used to sign your new CA certificate.Edit the existing secret to add the new CA key and update the key generation annotation value.
oc edit secret <ca_key_name><ca_key_name> is the name of CA key, which is
<kafka_cluster_name>-cluster-cafor the cluster CA key and<kafka_cluster_name>-clients-cafor the clients CA key.The following example shows a secret for a cluster CA key that’s associated with a Kafka cluster named
my-cluster.Example secret configuration for a cluster CA key
apiVersion: v1 kind: Secret data: ca.key: SA1cKF1GFDzOIiPOIUQBHDNFGDFS...1 metadata: annotations: strimzi.io/ca-key-generation: "0"2 labels: strimzi.io/cluster: my-cluster strimzi.io/kind: Kafka name: my-cluster-cluster-ca #... type: OpaqueEncode the CA key into base64.
cat <path_to_new_key> | base64Update the CA key.
Copy the base64-encoded CA key from the previous step as the value for the
ca.keyproperty underdata.Increase the value of the CA key generation annotation.
Update the
strimzi.io/ca-key-generationannotation with a higher incremental value. For example, changestrimzi.io/ca-key-generation=0tostrimzi.io/ca-key-generation=1. If theSecretis missing the annotation, it is treated as0, so add the annotation with a value of1.When Streams for Apache Kafka generates certificates, the key generation annotation is automatically incremented by the Cluster Operator. For your own CA certificates together with a new CA key, set the annotation with a higher incremental value. The annotation needs a higher value than the one from the current secret so that the Cluster Operator can roll the pods and update the certificates and keys. The
strimzi.io/ca-key-generationhas to be incremented on each CA certificate renewal.Save the secret with the new CA key and key generation annotation value.
Example secret configuration updated with a new CA key
apiVersion: v1 kind: Secret data: ca.key: AB0cKF1GFDzOIiPOIUQWERZJQ0F...1 metadata: annotations: strimzi.io/ca-key-generation: "1"2 labels: strimzi.io/cluster: my-cluster strimzi.io/kind: Kafka name: my-cluster-cluster-ca #... type: Opaque
Resume from the pause.
To resume the
Kafkacustom resource reconciliation, set thepause-reconciliationannotation tofalse.oc annotate --overwrite Kafka <name_of_custom_resource> strimzi.io/pause-reconciliation="false"You can also do the same by removing the
pause-reconciliationannotation.oc annotate Kafka <name_of_custom_resource> strimzi.io/pause-reconciliation-On the next reconciliation, the Cluster Operator performs a rolling update of ZooKeeper, Kafka, and other components to trust the new CA certificate. When the rolling update is complete, the Cluster Operator will start a new one to generate new server certificates signed by the new CA key.
If maintenance time windows are configured, the Cluster Operator will roll the pods at the first reconciliation within the next maintenance time window.
- Wait until the rolling updates to move to the new CA certificate are complete.
Remove any outdated certificates from the secret configuration to ensure that the cluster no longer trusts them.
oc edit secret <ca_certificate_secret_name>Example secret configuration with the old certificate removed
apiVersion: v1 kind: Secret data: ca.crt: GCa6LS3RTHeKFiFDGBOUDYFAZ0F... metadata: annotations: strimzi.io/ca-cert-generation: "1" labels: strimzi.io/cluster: my-cluster strimzi.io/kind: Kafka name: my-cluster-cluster-ca-cert #... type: OpaqueStart a manual rolling update of your cluster to pick up the changes made to the secret configuration.
See Section 29.2, “Starting rolling updates of Kafka and other operands using annotations”.
Chapter 17. Applying security context to Streams for Apache Kafka pods and containers
Security context defines constraints on pods and containers. By specifying a security context, pods and containers only have the permissions they need. For example, permissions can control runtime operations or access to resources.
17.1. Handling of security context by OpenShift platform
Handling of security context depends on the tooling of the OpenShift platform you are using.
For example, OpenShift uses built-in security context constraints (SCCs) to control permissions. SCCs are the settings and strategies that control the security features a pod has access to.
By default, OpenShift injects security context configuration automatically. In most cases, this means you don’t need to configure security context for the pods and containers created by the Cluster Operator. Although you can still create and manage your own SCCs.
For more information, see the OpenShift documentation.
Chapter 18. Scaling clusters by adding or removing brokers
Scaling Kafka clusters by adding brokers can increase the performance and reliability of the cluster. Adding more brokers increases available resources, allowing the cluster to handle larger workloads and process more messages. It can also improve fault tolerance by providing more replicas and backups. Conversely, removing underutilized brokers can reduce resource consumption and improve efficiency. Scaling must be done carefully to avoid disruption or data loss. By redistributing partitions across all brokers in the cluster, the resource utilization of each broker is reduced, which can increase the overall throughput of the cluster.
To increase the throughput of a Kafka topic, you can increase the number of partitions for that topic. This allows the load of the topic to be shared between different brokers in the cluster. However, if every broker is constrained by a specific resource (such as I/O), adding more partitions will not increase the throughput. In this case, you need to add more brokers to the cluster.
Adjusting the Kafka.spec.kafka.replicas configuration affects the number of brokers in the cluster that act as replicas. The actual replication factor for topics is determined by settings for the default.replication.factor and min.insync.replicas, and the number of available brokers. For example, a replication factor of 3 means that each partition of a topic is replicated across three brokers, ensuring fault tolerance in the event of a broker failure.
Example replica configuration
apiVersion: kafka.strimzi.io/v1beta2
kind: Kafka
metadata:
name: my-cluster
spec:
kafka:
replicas: 3
# ...
config:
# ...
default.replication.factor: 3
min.insync.replicas: 2
# ...
When adding brokers through the Kafka resource configuration, node IDs start at 0 (zero) and the Cluster Operator assigns the next lowest ID to a new node. The broker removal process starts from the broker pod with the highest ID in the cluster.
If you are managing nodes in the cluster using node pools, adjust the KafkaNodePool.spec.replicas configuration to change the number of nodes in the node pool. Additionally, when scaling existing clusters with node pools, you can assign node IDs for the scaling operations.
When you add add or remove brokers, Kafka does not automatically reassign partitions. The best way to do this is using Cruise Control. You can use Cruise Control’s add-brokers and remove-brokers modes when scaling a cluster up or down.
-
Use the
add-brokersmode after scaling up a Kafka cluster to move partition replicas from existing brokers to the newly added brokers. -
Use the
remove-brokersmode before scaling down a Kafka cluster to move partition replicas off the brokers that are going to be removed.
18.1. Skipping checks on scale-down operations
By default, Streams for Apache Kafka performs a check to ensure that there are no partition replicas on brokers before initiating a scale-down operation on a Kafka cluster. The check applies to nodes in node pools that perform the role of broker only or a dual role of broker and controller.
If replicas are found, the scale-down is not done in order to prevent potential data loss. To scale-down the cluster, no replicas must be left on the broker before trying to scale it down again.
However, there may be scenarios where you want to bypass this mechanism. Disabling the check might be necessary on busy clusters, for example, because new topics keep generating replicas for the broker. This situation can indefinitely block the scale-down, even when brokers are nearly empty. Overriding the blocking mechanism in this way has an impact: the presence of topics on the broker being scaled down will likely cause a reconciliation failure for the Kafka cluster.
You can bypass the blocking mechanism by annotating the Kafka resource for the Kafka cluster. Annotate the resource by setting the strimzi.io/skip-broker-scaledown-check annotation to true:
Adding the annotation to skip checks on scale-down operations
oc annotate Kafka my-kafka-cluster strimzi.io/skip-broker-scaledown-check="true"
This annotation instructs Streams for Apache Kafka to skip the scale-down check. Replace my-kafka-cluster with the name of your specific Kafka resource.
To restore the check for scale-down operations, remove the annotation:
Removing the annotation to skip checks on scale-down operations
oc annotate Kafka my-kafka-cluster strimzi.io/skip-broker-scaledown-check-Chapter 19. Rebalancing clusters using Cruise Control
Cruise Control is an open source system that supports the following Kafka operations:
- Monitoring cluster workload
- Rebalancing a cluster based on predefined constraints
The operations help with running a more balanced Kafka cluster that uses broker pods more efficiently.
A typical cluster can become unevenly loaded over time. Partitions that handle large amounts of message traffic might not be evenly distributed across the available brokers. To rebalance the cluster, administrators must monitor the load on brokers and manually reassign busy partitions to brokers with spare capacity.
Cruise Control automates the cluster rebalancing process. It constructs a workload model of resource utilization for the cluster—based on CPU, disk, and network load—and generates optimization proposals (that you can approve or reject) for more balanced partition assignments. A set of configurable optimization goals is used to calculate these proposals.
You can generate optimization proposals in specific modes. The default full mode rebalances partitions across all brokers. You can also use the add-brokers and remove-brokers modes to accommodate changes when scaling a cluster up or down.
When you approve an optimization proposal, Cruise Control applies it to your Kafka cluster. You configure and generate optimization proposals using a KafkaRebalance resource. You can configure the resource using an annotation so that optimization proposals are approved automatically or manually.
Streams for Apache Kafka provides example configuration files for Cruise Control.
19.1. Cruise Control components and features
Cruise Control consists of four main components—the Load Monitor, the Analyzer, the Anomaly Detector, and the Executor—and a REST API for client interactions. Streams for Apache Kafka utilizes the REST API to support the following Cruise Control features:
- Generating optimization proposals from optimization goals.
- Rebalancing a Kafka cluster based on an optimization proposal.
- Optimization goals
An optimization goal describes a specific objective to achieve from a rebalance. For example, a goal might be to distribute topic replicas across brokers more evenly. You can change what goals to include through configuration. A goal is defined as a hard goal or soft goal. You can add hard goals through Cruise Control deployment configuration. You also have main, default, and user-provided goals that fit into each of these categories.
- Hard goals are preset and must be satisfied for an optimization proposal to be successful.
- Soft goals do not need to be satisfied for an optimization proposal to be successful. They can be set aside if it means that all hard goals are met.
- Main goals are inherited from Cruise Control. Some are preset as hard goals. Main goals are used in optimization proposals by default.
- Default goals are the same as the main goals by default. You can specify your own set of default goals.
- User-provided goals are a subset of default goals that are configured for generating a specific optimization proposal.
- Optimization proposals
Optimization proposals comprise the goals you want to achieve from a rebalance. You generate an optimization proposal to create a summary of proposed changes and the results that are possible with the rebalance. The goals are assessed in a specific order of priority. You can then choose to approve or reject the proposal. You can reject the proposal to run it again with an adjusted set of goals.
You can generate an optimization proposal in one of three modes.
-
fullis the default mode and runs a full rebalance. -
add-brokersis the mode you use after adding brokers when scaling up a Kafka cluster. -
remove-brokersis the mode you use before removing brokers when scaling down a Kafka cluster.
-
Other Cruise Control features are not currently supported, including self healing, notifications, write-your-own goals, and changing the topic replication factor.
19.2. Optimization goals overview
Optimization goals are constraints on workload redistribution and resource utilization across a Kafka cluster. To rebalance a Kafka cluster, Cruise Control uses optimization goals to generate optimization proposals, which you can approve or reject.
19.2.1. Goals order of priority
Streams for Apache Kafka supports most of the optimization goals developed in the Cruise Control project. The supported goals, in the default descending order of priority, are as follows:
- Rack-awareness
- Minimum number of leader replicas per broker for a set of topics
- Replica capacity
Capacity goals
- Disk capacity
- Network inbound capacity
- Network outbound capacity
- CPU capacity
- Replica distribution
- Potential network output
Resource distribution goals
- Disk utilization distribution
- Network inbound utilization distribution
- Network outbound utilization distribution
- CPU utilization distribution
- Leader bytes-in rate distribution
- Topic replica distribution
- Leader replica distribution
- Preferred leader election
- Intra-broker disk capacity
- Intra-broker disk usage distribution
For more information on each optimization goal, see Goals in the Cruise Control Wiki.
"Write your own" goals and Kafka assigner goals are not yet supported.
19.2.2. Goals configuration in Streams for Apache Kafka custom resources
You configure optimization goals in Kafka and KafkaRebalance custom resources. Cruise Control has configurations for hard optimization goals that must be satisfied, as well as main, default, and user-provided optimization goals.
You can specify optimization goals in the following configuration:
-
Main goals —
Kafka.spec.cruiseControl.config.goals -
Hard goals —
Kafka.spec.cruiseControl.config.hard.goals -
Default goals —
Kafka.spec.cruiseControl.config.default.goals -
User-provided goals —
KafkaRebalance.spec.goals
Resource distribution goals are subject to capacity limits on broker resources.
19.2.3. Hard and soft optimization goals
Hard goals are goals that must be satisfied in optimization proposals. Goals that are not defined as hard goals in the Cruise Control code are known as soft goals. You can think of soft goals as best effort goals: they do not need to be satisfied in optimization proposals, but are included in optimization calculations. An optimization proposal that violates one or more soft goals, but satisfies all hard goals, is valid.
Cruise Control will calculate optimization proposals that satisfy all the hard goals and as many soft goals as possible (in their priority order). An optimization proposal that does not satisfy all the hard goals is rejected by Cruise Control and not sent to the user for approval.
For example, you might have a soft goal to distribute a topic’s replicas evenly across the cluster (the topic replica distribution goal). Cruise Control will ignore this goal if doing so enables all the configured hard goals to be met.
In Cruise Control, the following main optimization goals are hard goals:
RackAwareGoal; ReplicaCapacityGoal; DiskCapacityGoal; NetworkInboundCapacityGoal; NetworkOutboundCapacityGoal; CpuCapacityGoal
In your Cruise Control deployment configuration, you can specify which hard goals to enforce using the hard.goals property in Kafka.spec.cruiseControl.config.
-
To enforce execution of all hard goals, simply omit the
hard.goalsproperty. -
To change which hard goals Cruise Control enforces, specify the required goals in the
hard.goalsproperty using their fully-qualified domain names. -
To prevent execution of a specific hard goal, ensure that the goal is not included in both the
default.goalsandhard.goalslist configurations.
It is not possible to configure which goals are considered soft or hard goals. This distinction is determined by the Cruise Control code.
Example Kafka configuration for hard optimization goals
apiVersion: kafka.strimzi.io/v1beta2
kind: Kafka
metadata:
name: my-cluster
spec:
kafka:
# ...
zookeeper:
# ...
entityOperator:
topicOperator: {}
userOperator: {}
cruiseControl:
brokerCapacity:
inboundNetwork: 10000KB/s
outboundNetwork: 10000KB/s
config:
# Note that `default.goals` (superset) must also include all `hard.goals` (subset)
default.goals: >
com.linkedin.kafka.cruisecontrol.analyzer.goals.NetworkInboundCapacityGoal,
com.linkedin.kafka.cruisecontrol.analyzer.goals.NetworkOutboundCapacityGoal
hard.goals: >
com.linkedin.kafka.cruisecontrol.analyzer.goals.NetworkInboundCapacityGoal,
com.linkedin.kafka.cruisecontrol.analyzer.goals.NetworkOutboundCapacityGoal
# ...Increasing the number of configured hard goals will reduce the likelihood of Cruise Control generating valid optimization proposals.
If skipHardGoalCheck: true is specified in the KafkaRebalance custom resource, Cruise Control does not check that the list of user-provided optimization goals (in KafkaRebalance.spec.goals) contains all the configured hard goals (hard.goals). Therefore, if some, but not all, of the user-provided optimization goals are in the hard.goals list, Cruise Control will still treat them as hard goals even if skipHardGoalCheck: true is specified.
19.2.4. Main optimization goals
The main optimization goals are available to all users. Goals that are not listed in the main optimization goals are not available for use in Cruise Control operations.
Unless you change the Cruise Control deployment configuration, Streams for Apache Kafka will inherit the following main optimization goals from Cruise Control, in descending priority order:
RackAwareGoal; MinTopicLeadersPerBrokerGoal; ReplicaCapacityGoal; DiskCapacityGoal; NetworkInboundCapacityGoal; NetworkOutboundCapacityGoal; CpuCapacityGoal; ReplicaDistributionGoal; PotentialNwOutGoal; DiskUsageDistributionGoal; NetworkInboundUsageDistributionGoal; NetworkOutboundUsageDistributionGoal; CpuUsageDistributionGoal; TopicReplicaDistributionGoal; LeaderReplicaDistributionGoal; LeaderBytesInDistributionGoal; PreferredLeaderElectionGoalSome of these goals are preset as hard goals.
To reduce complexity, we recommend that you use the inherited main optimization goals, unless you need to completely exclude one or more goals from use in KafkaRebalance resources. The priority order of the main optimization goals can be modified, if desired, in the configuration for default optimization goals.
You configure main optimization goals, if necessary, in the Cruise Control deployment configuration: Kafka.spec.cruiseControl.config.goals
-
To accept the inherited main optimization goals, do not specify the
goalsproperty inKafka.spec.cruiseControl.config. -
If you need to modify the inherited main optimization goals, specify a list of goals, in descending priority order, in the
goalsconfiguration option.
To avoid errors when generating optimization proposals, make sure that any changes you make to the goals or default.goals in Kafka.spec.cruiseControl.config include all of the hard goals specified for the hard.goals property. To clarify, the hard goals must also be specified (as a subset) for the main optimization goals and default goals.
19.2.5. Default optimization goals
Cruise Control uses the default optimization goals to generate the cached optimization proposal. For more information about the cached optimization proposal, see Section 19.3, “Optimization proposals overview”.
You can override the default optimization goals by setting user-provided optimization goals in a KafkaRebalance custom resource.
Unless you specify default.goals in the Cruise Control deployment configuration, the main optimization goals are used as the default optimization goals. In this case, the cached optimization proposal is generated using the main optimization goals.
-
To use the main optimization goals as the default goals, do not specify the
default.goalsproperty inKafka.spec.cruiseControl.config. -
To modify the default optimization goals, edit the
default.goalsproperty inKafka.spec.cruiseControl.config. You must use a subset of the main optimization goals.
Example Kafka configuration for default optimization goals
apiVersion: kafka.strimzi.io/v1beta2
kind: Kafka
metadata:
name: my-cluster
spec:
kafka:
# ...
zookeeper:
# ...
entityOperator:
topicOperator: {}
userOperator: {}
cruiseControl:
brokerCapacity:
inboundNetwork: 10000KB/s
outboundNetwork: 10000KB/s
config:
# Note that `default.goals` (superset) must also include all `hard.goals` (subset)
default.goals: >
com.linkedin.kafka.cruisecontrol.analyzer.goals.RackAwareGoal,
com.linkedin.kafka.cruisecontrol.analyzer.goals.ReplicaCapacityGoal,
com.linkedin.kafka.cruisecontrol.analyzer.goals.DiskCapacityGoal
hard.goals: >
com.linkedin.kafka.cruisecontrol.analyzer.goals.RackAwareGoal
# ...If no default optimization goals are specified, the cached proposal is generated using the main optimization goals.
19.2.6. User-provided optimization goals
User-provided optimization goals narrow down the configured default goals for a particular optimization proposal. You can set them, as required, in spec.goals in a KafkaRebalance custom resource:
KafkaRebalance.spec.goals
User-provided optimization goals can generate optimization proposals for different scenarios. For example, you might want to optimize leader replica distribution across the Kafka cluster without considering disk capacity or disk utilization. So, you create a KafkaRebalance custom resource containing a single user-provided goal for leader replica distribution.
User-provided optimization goals must:
- Include all configured hard goals, or an error occurs
- Be a subset of the main optimization goals
To ignore the configured hard goals when generating an optimization proposal, add the skipHardGoalCheck: true property to the KafkaRebalance custom resource. See Section 19.6, “Generating optimization proposals”.
19.3. Optimization proposals overview
Configure a KafkaRebalance resource to generate optimization proposals and apply the suggested changes. An optimization proposal is a summary of proposed changes that would produce a more balanced Kafka cluster, with partition workloads distributed more evenly among the brokers.
Each optimization proposal is based on the set of optimization goals that was used to generate it, subject to any configured capacity limits on broker resources.
All optimization proposals are estimates of the impact of a proposed rebalance. You can approve or reject a proposal. You cannot approve a cluster rebalance without first generating the optimization proposal.
You can run optimization proposals in one of the following rebalancing modes:
-
full -
add-brokers -
remove-brokers
19.3.1. Rebalancing modes
You specify a rebalancing mode using the spec.mode property of the KafkaRebalance custom resource.
full-
The
fullmode runs a full rebalance by moving replicas across all the brokers in the cluster. This is the default mode if thespec.modeproperty is not defined in theKafkaRebalancecustom resource. add-brokers-
The
add-brokersmode is used after scaling up a Kafka cluster by adding one or more brokers. Normally, after scaling up a Kafka cluster, new brokers are used to host only the partitions of newly created topics. If no new topics are created, the newly added brokers are not used and the existing brokers remain under the same load. By using theadd-brokersmode immediately after adding brokers to the cluster, the rebalancing operation moves replicas from existing brokers to the newly added brokers. You specify the new brokers as a list using thespec.brokersproperty of theKafkaRebalancecustom resource. remove-brokers-
The
remove-brokersmode is used before scaling down a Kafka cluster by removing one or more brokers. If you scale down a Kafka cluster, brokers are shut down even if they host replicas. This can lead to under-replicated partitions and possibly result in some partitions being under their minimum ISR (in-sync replicas). To avoid this potential problem, theremove-brokersmode moves replicas off the brokers that are going to be removed. When these brokers are not hosting replicas anymore, you can safely run the scaling down operation. You specify the brokers you’re removing as a list in thespec.brokersproperty in theKafkaRebalancecustom resource.
In general, use the full rebalance mode to rebalance a Kafka cluster by spreading the load across brokers. Use the add-brokers and remove-brokers modes only if you want to scale your cluster up or down and rebalance the replicas accordingly.
The procedure to run a rebalance is actually the same across the three different modes. The only difference is with specifying a mode through the spec.mode property and, if needed, listing brokers that have been added or will be removed through the spec.brokers property.
19.3.2. The results of an optimization proposal
When an optimization proposal is generated, a summary and broker load is returned.
- Summary
-
The summary is contained in the
KafkaRebalanceresource. The summary provides an overview of the proposed cluster rebalance and indicates the scale of the changes involved. A summary of a successfully generated optimization proposal is contained in theStatus.OptimizationResultproperty of theKafkaRebalanceresource. The information provided is a summary of the full optimization proposal. - Broker load
- The broker load is stored in a ConfigMap that contains data as a JSON string. The broker load shows before and after values for the proposed rebalance, so you can see the impact on each of the brokers in the cluster.
19.3.3. Manually approving or rejecting an optimization proposal
An optimization proposal summary shows the proposed scope of changes.
You can use the name of the KafkaRebalance resource to return a summary from the command line.
Returning an optimization proposal summary
oc describe kafkarebalance <kafka_rebalance_resource_name> -n <namespace>
You can also use the jq command line JSON parser tool.
Returning an optimization proposal summary using jq
oc get kafkarebalance -o json | jq <jq_query>.Use the summary to decide whether to approve or reject an optimization proposal.
- Approving an optimization proposal
-
You approve the optimization proposal by setting the
strimzi.io/rebalanceannotation of theKafkaRebalanceresource toapprove. Cruise Control applies the proposal to the Kafka cluster and starts a cluster rebalance operation. - Rejecting an optimization proposal
-
If you choose not to approve an optimization proposal, you can change the optimization goals or update any of the rebalance performance tuning options, and then generate another proposal. You can generate a new optimization proposal for a
KafkaRebalanceresource by setting thestrimzi.io/rebalanceannotation torefresh.
Use optimization proposals to assess the movements required for a rebalance. For example, a summary describes inter-broker and intra-broker movements. Inter-broker rebalancing moves data between separate brokers. Intra-broker rebalancing moves data between disks on the same broker when you are using a JBOD storage configuration. Such information can be useful even if you don’t go ahead and approve the proposal.
You might reject an optimization proposal, or delay its approval, because of the additional load on a Kafka cluster when rebalancing.
In the following example, the proposal suggests the rebalancing of data between separate brokers. The rebalance involves the movement of 55 partition replicas, totaling 12MB of data, across the brokers. Though the inter-broker movement of partition replicas has a high impact on performance, the total amount of data is not large. If the total data was much larger, you could reject the proposal, or time when to approve the rebalance to limit the impact on the performance of the Kafka cluster.
Rebalance performance tuning options can help reduce the impact of data movement. If you can extend the rebalance period, you can divide the rebalance into smaller batches. Fewer data movements at a single time reduces the load on the cluster.
Example optimization proposal summary
Name: my-rebalance
Namespace: myproject
Labels: strimzi.io/cluster=my-cluster
Annotations: API Version: kafka.strimzi.io/v1alpha1
Kind: KafkaRebalance
Metadata:
# ...
Status:
Conditions:
Last Transition Time: 2022-04-05T14:36:11.900Z
Status: ProposalReady
Type: State
Observed Generation: 1
Optimization Result:
Data To Move MB: 0
Excluded Brokers For Leadership:
Excluded Brokers For Replica Move:
Excluded Topics:
Intra Broker Data To Move MB: 12
Monitored Partitions Percentage: 100
Num Intra Broker Replica Movements: 0
Num Leader Movements: 24
Num Replica Movements: 55
On Demand Balancedness Score After: 82.91290759174306
On Demand Balancedness Score Before: 78.01176356230222
Recent Windows: 5
Session Id: a4f833bd-2055-4213-bfdd-ad21f95bf184The proposal will also move 24 partition leaders to different brokers. This requires a change to the ZooKeeper configuration, which has a low impact on performance.
The balancedness scores are measurements of the overall balance of the Kafka cluster before and after the optimization proposal is approved. A balancedness score is based on optimization goals. If all goals are satisfied, the score is 100. The score is reduced for each goal that will not be met. Compare the balancedness scores to see whether the Kafka cluster is less balanced than it could be following a rebalance.
19.3.4. Automatically approving an optimization proposal
To save time, you can automate the process of approving optimization proposals. With automation, when you generate an optimization proposal it goes straight into a cluster rebalance.
To enable the optimization proposal auto-approval mechanism, create the KafkaRebalance resource with the strimzi.io/rebalance-auto-approval annotation set to true. If the annotation is not set or set to false, the optimization proposal requires manual approval.
Example rebalance request with auto-approval mechanism enabled
apiVersion: kafka.strimzi.io/v1beta2
kind: KafkaRebalance
metadata:
name: my-rebalance
labels:
strimzi.io/cluster: my-cluster
annotations:
strimzi.io/rebalance-auto-approval: "true"
spec:
mode: # any mode
# ...
You can still check the status when automatically approving an optimization proposal. The status of the KafkaRebalance resource moves to Ready when the rebalance is complete.
19.3.5. Optimization proposal summary properties
The following table explains the properties contained in the optimization proposal’s summary section.
| JSON property | Description |
|---|---|
|
| The total number of partition replicas that will be transferred between the disks of the cluster’s brokers.
Performance impact during rebalance operation: Relatively high, but lower than |
|
| Not yet supported. An empty list is returned. |
|
| The number of partition replicas that will be moved between separate brokers. Performance impact during rebalance operation: Relatively high. |
|
| A measurement of the overall balancedness of a Kafka Cluster, before and after the optimization proposal was generated.
The score is calculated by subtracting the sum of the
The |
|
|
The sum of the size of each partition replica that will be moved between disks on the same broker (see also
Performance impact during rebalance operation: Variable. The larger the number, the longer the cluster rebalance will take to complete. Moving a large amount of data between disks on the same broker has less impact than between separate brokers (see |
|
| The number of metrics windows upon which the optimization proposal is based. |
|
|
The sum of the size of each partition replica that will be moved to a separate broker (see also Performance impact during rebalance operation: Variable. The larger the number, the longer the cluster rebalance will take to complete. |
|
|
The percentage of partitions in the Kafka cluster covered by the optimization proposal. Affected by the number of |
|
|
If you specified a regular expression in the |
|
| The number of partitions whose leaders will be switched to different replicas. This involves a change to ZooKeeper configuration. Performance impact during rebalance operation: Relatively low. |
|
| Not yet supported. An empty list is returned. |
19.3.6. Broker load properties
The broker load is stored in a ConfigMap (with the same name as the KafkaRebalance custom resource) as a JSON formatted string. This JSON string consists of a JSON object with keys for each broker IDs linking to a number of metrics for each broker. Each metric consist of three values. The first is the metric value before the optimization proposal is applied, the second is the expected value of the metric after the proposal is applied, and the third is the difference between the first two values (after minus before).
The ConfigMap appears when the KafkaRebalance resource is in the ProposalReady state and remains after the rebalance is complete.
You can use the name of the ConfigMap to view its data from the command line.
Returning ConfigMap data
oc describe configmaps <my_rebalance_configmap_name> -n <namespace>
You can also use the jq command line JSON parser tool to extract the JSON string from the ConfigMap.
Extracting the JSON string from the ConfigMap using jq
oc get configmaps <my_rebalance_configmap_name> -o json | jq '.["data"]["brokerLoad.json"]|fromjson|.'The following table explains the properties contained in the optimization proposal’s broker load ConfigMap:
| JSON property | Description |
|---|---|
|
| The number of replicas on this broker that are partition leaders. |
|
| The number of replicas on this broker. |
|
| The CPU utilization as a percentage of the defined capacity. |
|
| The disk utilization as a percentage of the defined capacity. |
|
| The absolute disk usage in MB. |
|
| The total network output rate for the broker. |
|
| The network input rate for all partition leader replicas on this broker. |
|
| The network input rate for all follower replicas on this broker. |
|
| The hypothetical maximum network output rate that would be realized if this broker became the leader of all the replicas it currently hosts. |
19.3.7. Cached optimization proposal
Cruise Control maintains a cached optimization proposal based on the configured default optimization goals. Generated from the workload model, the cached optimization proposal is updated every 15 minutes to reflect the current state of the Kafka cluster. If you generate an optimization proposal using the default optimization goals, Cruise Control returns the most recent cached proposal.
To change the cached optimization proposal refresh interval, edit the proposal.expiration.ms setting in the Cruise Control deployment configuration. Consider a shorter interval for fast changing clusters, although this increases the load on the Cruise Control server.
19.4. Rebalance performance tuning overview
You can adjust several performance tuning options for cluster rebalances. These options control how partition replicas and leadership movements in a rebalance are executed, as well as the bandwidth that is allocated to a rebalance operation.
19.4.1. Partition reassignment commands
Optimization proposals are comprised of separate partition reassignment commands. When you approve a proposal, the Cruise Control server applies these commands to the Kafka cluster.
A partition reassignment command consists of either of the following types of operations:
Partition movement: Involves transferring the partition replica and its data to a new location. Partition movements can take one of two forms:
- Inter-broker movement: The partition replica is moved to a log directory on a different broker.
- Intra-broker movement: The partition replica is moved to a different log directory on the same broker.
- Leadership movement: This involves switching the leader of the partition’s replicas.
Cruise Control issues partition reassignment commands to the Kafka cluster in batches. The performance of the cluster during the rebalance is affected by the number of each type of movement contained in each batch.
19.4.2. Replica movement strategies
Cluster rebalance performance is also influenced by the replica movement strategy that is applied to the batches of partition reassignment commands. By default, Cruise Control uses the BaseReplicaMovementStrategy, which simply applies the commands in the order they were generated. However, if there are some very large partition reassignments early in the proposal, this strategy can slow down the application of the other reassignments.
Cruise Control provides four alternative replica movement strategies that can be applied to optimization proposals:
-
PrioritizeSmallReplicaMovementStrategy: Order reassignments in order of ascending size. -
PrioritizeLargeReplicaMovementStrategy: Order reassignments in order of descending size. -
PostponeUrpReplicaMovementStrategy: Prioritize reassignments for replicas of partitions which have no out-of-sync replicas. -
PrioritizeMinIsrWithOfflineReplicasStrategy: Prioritize reassignments with (At/Under)MinISR partitions with offline replicas. This strategy will only work ifcruiseControl.config.concurrency.adjuster.min.isr.check.enabledis set totruein theKafkacustom resource’s spec.
These strategies can be configured as a sequence. The first strategy attempts to compare two partition reassignments using its internal logic. If the reassignments are equivalent, then it passes them to the next strategy in the sequence to decide the order, and so on.
19.4.3. Intra-broker disk balancing
Moving a large amount of data between disks on the same broker has less impact than between separate brokers. If you are running a Kafka deployment that uses JBOD storage with multiple disks on the same broker, Cruise Control can balance partitions between the disks.
If you are using JBOD storage with a single disk, intra-broker disk balancing will result in a proposal with 0 partition movements since there are no disks to balance between.
To perform an intra-broker disk balance, set rebalanceDisk to true under the KafkaRebalance.spec. When setting rebalanceDisk to true, do not set a goals field in the KafkaRebalance.spec, as Cruise Control will automatically set the intra-broker goals and ignore the inter-broker goals. Cruise Control does not perform inter-broker and intra-broker balancing at the same time.
19.4.4. Rebalance tuning options
Cruise Control provides several configuration options for tuning the rebalance parameters discussed above. You can set these tuning options when configuring and deploying Cruise Control with Kafka or optimization proposal levels:
-
The Cruise Control server setting can be set in the Kafka custom resource under
Kafka.spec.cruiseControl.config. -
The individual rebalance performance configurations can be set under
KafkaRebalance.spec.
The relevant configurations are summarized in the following table.
| Cruise Control properties | KafkaRebalance properties | Default | Description |
|---|---|---|---|
|
|
| 5 | The maximum number of inter-broker partition movements in each partition reassignment batch |
|
|
| 2 | The maximum number of intra-broker partition movements in each partition reassignment batch |
|
|
| 1000 | The maximum number of partition leadership changes in each partition reassignment batch |
|
|
| Null (no limit) | The bandwidth (in bytes per second) to assign to partition reassignment |
|
|
|
|
The list of strategies (in priority order) used to determine the order in which partition reassignment commands are executed for generated proposals. For the server setting, use a comma separated string with the fully qualified names of the strategy class (add |
| - |
| false | Enables intra-broker disk balancing, which balances disk space utilization between disks on the same broker. Only applies to Kafka deployments that use JBOD storage with multiple disks. |
Changing the default settings affects the length of time that the rebalance takes to complete, as well as the load placed on the Kafka cluster during the rebalance. Using lower values reduces the load but increases the amount of time taken, and vice versa.
19.5. Configuring and deploying Cruise Control with Kafka
Configure a Kafka resource to deploy Cruise Control alongside a Kafka cluster. You can use the cruiseControl properties of the Kafka resource to configure the deployment. Deploy one instance of Cruise Control per Kafka cluster.
Use goals configuration in the Cruise Control config to specify optimization goals for generating optimization proposals. You can use brokerCapacity to change the default capacity limits for goals related to resource distribution. If brokers are running on nodes with heterogeneous network resources, you can use overrides to set network capacity limits for each broker.
If an empty object ({}) is used for the cruiseControl configuration, all properties use their default values.
For more information on the configuration options for Cruise Control, see the Streams for Apache Kafka Custom Resource API Reference.
Prerequisites
- An OpenShift cluster
- A running Cluster Operator
Procedure
Edit the
cruiseControlproperty for theKafkaresource.The properties you can configure are shown in this example configuration:
apiVersion: kafka.strimzi.io/v1beta2 kind: Kafka metadata: name: my-cluster spec: # ... cruiseControl: brokerCapacity:1 inboundNetwork: 10000KB/s outboundNetwork: 10000KB/s overrides:2 - brokers: [0] inboundNetwork: 20000KiB/s outboundNetwork: 20000KiB/s - brokers: [1, 2] inboundNetwork: 30000KiB/s outboundNetwork: 30000KiB/s # ... config:3 # Note that `default.goals` (superset) must also include all `hard.goals` (subset) default.goals: >4 com.linkedin.kafka.cruisecontrol.analyzer.goals.RackAwareGoal, com.linkedin.kafka.cruisecontrol.analyzer.goals.ReplicaCapacityGoal, com.linkedin.kafka.cruisecontrol.analyzer.goals.DiskCapacityGoal # ... hard.goals: > com.linkedin.kafka.cruisecontrol.analyzer.goals.RackAwareGoal # ... cpu.balance.threshold: 1.1 metadata.max.age.ms: 300000 send.buffer.bytes: 131072 webserver.http.cors.enabled: true5 webserver.http.cors.origin: "*" webserver.http.cors.exposeheaders: "User-Task-ID,Content-Type" # ... resources:6 requests: cpu: 1 memory: 512Mi limits: cpu: 2 memory: 2Gi logging:7 type: inline loggers: rootLogger.level: INFO template:8 pod: metadata: labels: label1: value1 securityContext: runAsUser: 1000001 fsGroup: 0 terminationGracePeriodSeconds: 120 readinessProbe:9 initialDelaySeconds: 15 timeoutSeconds: 5 livenessProbe: initialDelaySeconds: 15 timeoutSeconds: 5 metricsConfig:10 type: jmxPrometheusExporter valueFrom: configMapKeyRef: name: cruise-control-metrics key: metrics-config.yml # ...- 1
- Capacity limits for broker resources.
- 2
- Overrides set network capacity limits for specific brokers when running on nodes with heterogeneous network resources.
- 3
- Cruise Control configuration. Standard Cruise Control configuration may be provided, restricted to those properties not managed directly by Streams for Apache Kafka.
- 4
- Optimization goals configuration, which can include configuration for default optimization goals (
default.goals), main optimization goals (goals), and hard goals (hard.goals). - 5
- CORS enabled and configured for read-only access to the Cruise Control API.
- 6
- Requests for reservation of supported resources, currently
cpuandmemory, and limits to specify the maximum resources that can be consumed. - 7
- Cruise Control loggers and log levels added directly (
inline) or indirectly (external) through a ConfigMap. A custom Log4j configuration must be placed under thelog4j.propertieskey in the ConfigMap. Cruise Control has a single logger namedrootLogger.level. You can set the log level to INFO, ERROR, WARN, TRACE, DEBUG, FATAL or OFF. - 8
- Template customization. Here a pod is scheduled with additional security attributes.
- 9
- Healthchecks to know when to restart a container (liveness) and when a container can accept traffic (readiness).
- 10
- Prometheus metrics enabled. In this example, metrics are configured for the Prometheus JMX Exporter (the default metrics exporter).
Create or update the resource:
oc apply -f <kafka_configuration_file>Check the status of the deployment:
oc get deployments -n <my_cluster_operator_namespace>Output shows the deployment name and readiness
NAME READY UP-TO-DATE AVAILABLE my-cluster-cruise-control 1/1 1 1my-clusteris the name of the Kafka cluster.READYshows the number of replicas that are ready/expected. The deployment is successful when theAVAILABLEoutput shows1.
Auto-created topics
The following table shows the three topics that are automatically created when Cruise Control is deployed. These topics are required for Cruise Control to work properly and must not be deleted or changed. You can change the name of the topic using the specified configuration option.
| Auto-created topic configuration | Default topic name | Created by | Function |
|---|---|---|---|
|
|
| Streams for Apache Kafka Metrics Reporter | Stores the raw metrics from the Metrics Reporter in each Kafka broker. |
|
|
| Cruise Control | Stores the derived metrics for each partition. These are created by the Metric Sample Aggregator. |
|
|
| Cruise Control | Stores the metrics samples used to create the Cluster Workload Model. |
To prevent the removal of records that are needed by Cruise Control, log compaction is disabled in the auto-created topics.
If the names of the auto-created topics are changed in a Kafka cluster that already has Cruise Control enabled, the old topics will not be deleted and should be manually removed.
What to do next
After configuring and deploying Cruise Control, you can generate optimization proposals.
19.6. Generating optimization proposals
When you create or update a KafkaRebalance resource, Cruise Control generates an optimization proposal for the Kafka cluster based on the configured optimization goals. Analyze the information in the optimization proposal and decide whether to approve it. You can use the results of the optimization proposal to rebalance your Kafka cluster.
You can run the optimization proposal in one of the following modes:
-
full(default) -
add-brokers -
remove-brokers
The mode you use depends on whether you are rebalancing across all the brokers already running in the Kafka cluster; or you want to rebalance after scaling up or before scaling down your Kafka cluster. For more information, see Rebalancing modes with broker scaling.
Prerequisites
- You have deployed Cruise Control to your Streams for Apache Kafka cluster.
- You have configured optimization goals and, optionally, capacity limits on broker resources.
For more information on configuring Cruise Control, see Section 19.5, “Configuring and deploying Cruise Control with Kafka”.
Procedure
Create a
KafkaRebalanceresource and specify the appropriate mode.fullmode (default)To use the default optimization goals defined in the
Kafkaresource, leave thespecproperty empty. Cruise Control rebalances a Kafka cluster infullmode by default.Example configuration with full rebalancing by default
apiVersion: kafka.strimzi.io/v1beta2 kind: KafkaRebalance metadata: name: my-rebalance labels: strimzi.io/cluster: my-cluster spec: {}You can also run a full rebalance by specifying the
fullmode through thespec.modeproperty.Example configuration specifying
fullmodeapiVersion: kafka.strimzi.io/v1beta2 kind: KafkaRebalance metadata: name: my-rebalance labels: strimzi.io/cluster: my-cluster spec: mode: fulladd-brokersmodeIf you want to rebalance a Kafka cluster after scaling up, specify the
add-brokersmode.In this mode, existing replicas are moved to the newly added brokers. You need to specify the brokers as a list.
Example configuration specifying
add-brokersmodeapiVersion: kafka.strimzi.io/v1beta2 kind: KafkaRebalance metadata: name: my-rebalance labels: strimzi.io/cluster: my-cluster spec: mode: add-brokers brokers: [3, 4]1 - 1
- List of newly added brokers added by the scale up operation. This property is mandatory.
remove-brokersmodeIf you want to rebalance a Kafka cluster before scaling down, specify the
remove-brokersmode.In this mode, replicas are moved off the brokers that are going to be removed. You need to specify the brokers that are being removed as a list.
Example configuration specifying
remove-brokersmodeapiVersion: kafka.strimzi.io/v1beta2 kind: KafkaRebalance metadata: name: my-rebalance labels: strimzi.io/cluster: my-cluster spec: mode: remove-brokers brokers: [3, 4]1 - 1
- List of brokers to be removed by the scale down operation. This property is mandatory.
NoteThe following steps and the steps to approve or stop a rebalance are the same regardless of the rebalance mode you are using.
To configure user-provided optimization goals instead of using the default goals, add the
goalsproperty and enter one or more goals.In the following example, rack awareness and replica capacity are configured as user-provided optimization goals:
apiVersion: kafka.strimzi.io/v1beta2 kind: KafkaRebalance metadata: name: my-rebalance labels: strimzi.io/cluster: my-cluster spec: goals: - RackAwareGoal - ReplicaCapacityGoalTo ignore the configured hard goals, add the
skipHardGoalCheck: trueproperty:apiVersion: kafka.strimzi.io/v1beta2 kind: KafkaRebalance metadata: name: my-rebalance labels: strimzi.io/cluster: my-cluster spec: goals: - RackAwareGoal - ReplicaCapacityGoal skipHardGoalCheck: true(Optional) To approve the optimization proposal automatically, set the
strimzi.io/rebalance-auto-approvalannotation totrue:apiVersion: kafka.strimzi.io/v1beta2 kind: KafkaRebalance metadata: name: my-rebalance labels: strimzi.io/cluster: my-cluster annotations: strimzi.io/rebalance-auto-approval: "true" spec: goals: - RackAwareGoal - ReplicaCapacityGoal skipHardGoalCheck: trueCreate or update the resource:
oc apply -f <kafka_rebalance_configuration_file>The Cluster Operator requests the optimization proposal from Cruise Control. This might take a few minutes depending on the size of the Kafka cluster.
If you used the automatic approval mechanism, wait for the status of the optimization proposal to change to
Ready. If you haven’t enabled the automatic approval mechanism, wait for the status of the optimization proposal to change toProposalReady:oc get kafkarebalance -o wide -w -n <namespace>PendingProposal-
A
PendingProposalstatus means the rebalance operator is polling the Cruise Control API to check if the optimization proposal is ready. ProposalReady-
A
ProposalReadystatus means the optimization proposal is ready for review and approval.
When the status changes to
ProposalReady, the optimization proposal is ready to approve.Review the optimization proposal.
The optimization proposal is contained in the
Status.Optimization Resultproperty of theKafkaRebalanceresource.oc describe kafkarebalance <kafka_rebalance_resource_name>Example optimization proposal
Status: Conditions: Last Transition Time: 2020-05-19T13:50:12.533Z Status: ProposalReady Type: State Observed Generation: 1 Optimization Result: Data To Move MB: 0 Excluded Brokers For Leadership: Excluded Brokers For Replica Move: Excluded Topics: Intra Broker Data To Move MB: 0 Monitored Partitions Percentage: 100 Num Intra Broker Replica Movements: 0 Num Leader Movements: 0 Num Replica Movements: 26 On Demand Balancedness Score After: 81.8666802863978 On Demand Balancedness Score Before: 78.01176356230222 Recent Windows: 1 Session Id: 05539377-ca7b-45ef-b359-e13564f1458cThe properties in the
Optimization Resultsection describe the pending cluster rebalance operation. For descriptions of each property, see Contents of optimization proposals.
Insufficient CPU capacity
If a Kafka cluster is overloaded in terms of CPU utilization, you might see an insufficient CPU capacity error in the KafkaRebalance status. It’s worth noting that this utilization value is unaffected by the excludedTopics configuration. Although optimization proposals will not reassign replicas of excluded topics, their load is still considered in the utilization calculation.
Example CPU utilization error
com.linkedin.kafka.cruisecontrol.exception.OptimizationFailureException:
[CpuCapacityGoal] Insufficient capacity for cpu (Utilization 615.21, Allowed Capacity 420.00, Threshold: 0.70). Add at least 3 brokers with the same cpu capacity (100.00) as broker-0. Add at least 3 brokers with the same cpu capacity (100.00) as broker-0.
The error shows CPU capacity as a percentage rather than the number of CPU cores. For this reason, it does not directly map to the number of CPUs configured in the Kafka custom resource. It is like having a single virtual CPU per broker, which has the cycles of the CPUs configured in Kafka.spec.kafka.resources.limits.cpu. This has no effect on the rebalance behavior, since the ratio between CPU utilization and capacity remains the same.
What to do next
19.7. Approving an optimization proposal
You can approve an optimization proposal generated by Cruise Control, if its status is ProposalReady. Cruise Control will then apply the optimization proposal to the Kafka cluster, reassigning partitions to brokers and changing partition leadership.
This is not a dry run. Before you approve an optimization proposal, you must:
- Refresh the proposal in case it has become out of date.
- Carefully review the contents of the proposal.
Prerequisites
- You have generated an optimization proposal from Cruise Control.
-
The
KafkaRebalancecustom resource status isProposalReady.
Procedure
Perform these steps for the optimization proposal that you want to approve.
Unless the optimization proposal is newly generated, check that it is based on current information about the state of the Kafka cluster. To do so, refresh the optimization proposal to make sure it uses the latest cluster metrics:
Annotate the
KafkaRebalanceresource in OpenShift withstrimzi.io/rebalance=refresh:oc annotate kafkarebalance <kafka_rebalance_resource_name> strimzi.io/rebalance="refresh"
Wait for the status of the optimization proposal to change to
ProposalReady:oc get kafkarebalance -o wide -w -n <namespace>PendingProposal-
A
PendingProposalstatus means the rebalance operator is polling the Cruise Control API to check if the optimization proposal is ready. ProposalReady-
A
ProposalReadystatus means the optimization proposal is ready for review and approval.
When the status changes to
ProposalReady, the optimization proposal is ready to approve.Approve the optimization proposal that you want Cruise Control to apply.
Annotate the
KafkaRebalanceresource in OpenShift withstrimzi.io/rebalance=approve:oc annotate kafkarebalance <kafka_rebalance_resource_name> strimzi.io/rebalance="approve"- The Cluster Operator detects the annotated resource and instructs Cruise Control to rebalance the Kafka cluster.
Wait for the status of the optimization proposal to change to
Ready:oc get kafkarebalance -o wide -w -n <namespace>Rebalancing-
A
Rebalancingstatus means the rebalancing is in progress. Ready-
A
Readystatus means the rebalance is complete. NotReady-
A
NotReadystatus means an error occurred—see Fixing problems with aKafkaRebalanceresource.
When the status changes to
Ready, the rebalance is complete.To use the same
KafkaRebalancecustom resource to generate another optimization proposal, apply therefreshannotation to the custom resource. This moves the custom resource to thePendingProposalorProposalReadystate. You can then review the optimization proposal and approve it, if desired.
19.8. Stopping a cluster rebalance
Once started, a cluster rebalance operation might take some time to complete and affect the overall performance of the Kafka cluster.
If you want to stop a cluster rebalance operation that is in progress, apply the stop annotation to the KafkaRebalance custom resource. This instructs Cruise Control to finish the current batch of partition reassignments and then stop the rebalance. When the rebalance has stopped, completed partition reassignments have already been applied; therefore, the state of the Kafka cluster is different when compared to prior to the start of the rebalance operation. If further rebalancing is required, you should generate a new optimization proposal.
The performance of the Kafka cluster in the intermediate (stopped) state might be worse than in the initial state.
Prerequisites
-
You have approved the optimization proposal by annotating the
KafkaRebalancecustom resource withapprove. -
The status of the
KafkaRebalancecustom resource isRebalancing.
Procedure
Annotate the
KafkaRebalanceresource in OpenShift:oc annotate kafkarebalance rebalance-cr-name strimzi.io/rebalance="stop"Check the status of the
KafkaRebalanceresource:oc describe kafkarebalance rebalance-cr-name-
Wait until the status changes to
Stopped.
19.9. Fixing problems with a KafkaRebalance resource
If an issue occurs when creating a KafkaRebalance resource or interacting with Cruise Control, the error is reported in the resource status, along with details of how to fix it. The resource also moves to the NotReady state.
To continue with the cluster rebalance operation, you must fix the problem in the KafkaRebalance resource itself or with the overall Cruise Control deployment. Problems might include the following:
-
A misconfigured parameter in the
KafkaRebalanceresource. -
The
strimzi.io/clusterlabel for specifying the Kafka cluster in theKafkaRebalanceresource is missing. -
The Cruise Control server is not deployed as the
cruiseControlproperty in theKafkaresource is missing. - The Cruise Control server is not reachable.
After fixing the issue, you need to add the refresh annotation to the KafkaRebalance resource. During a “refresh”, a new optimization proposal is requested from the Cruise Control server.
Prerequisites
- You have approved an optimization proposal.
-
The status of the
KafkaRebalancecustom resource for the rebalance operation isNotReady.
Procedure
Get information about the error from the
KafkaRebalancestatus:oc describe kafkarebalance rebalance-cr-name-
Attempt to resolve the issue in the
KafkaRebalanceresource. Annotate the
KafkaRebalanceresource in OpenShift:oc annotate kafkarebalance rebalance-cr-name strimzi.io/rebalance="refresh"Check the status of the
KafkaRebalanceresource:oc describe kafkarebalance rebalance-cr-name-
Wait until the status changes to
PendingProposal, or directly toProposalReady.
Chapter 20. Using the partition reassignment tool
When scaling a Kafka cluster, you may need to add or remove brokers and update the distribution of partitions or the replication factor of topics. To update partitions and topics, you can use the kafka-reassign-partitions.sh tool.
Neither the Streams for Apache Kafka Cruise Control integration nor the Topic Operator support changing the replication factor of a topic. However, you can change the replication factor of a topic using the kafka-reassign-partitions.sh tool.
The tool can also be used to reassign partitions and balance the distribution of partitions across brokers to improve performance. However, it is recommended to use Cruise Control for automated partition reassignments and cluster rebalancing. Cruise Control can move topics from one broker to another without any downtime, and it is the most efficient way to reassign partitions.
It is recommended to run the kafka-reassign-partitions.sh tool as a separate interactive pod rather than within the broker container. Running the Kafka bin/ scripts within the broker container may cause a JVM to start with the same settings as the Kafka broker, which can potentially cause disruptions. By running the kafka-reassign-partitions.sh tool in a separate pod, you can avoid this issue. Running a pod with the -ti option creates an interactive pod with a terminal for running shell commands inside the pod.
Running an interactive pod with a terminal
oc run helper-pod -ti --image=registry.redhat.io/amq-streams/kafka-37-rhel9:2.7.0 --rm=true --restart=Never -- bash20.1. Partition reassignment tool overview
The partition reassignment tool provides the following capabilities for managing Kafka partitions and brokers:
- Redistributing partition replicas
- Scale your cluster up and down by adding or removing brokers, and move Kafka partitions from heavily loaded brokers to under-utilized brokers. To do this, you must create a partition reassignment plan that identifies which topics and partitions to move and where to move them. Cruise Control is recommended for this type of operation as it automates the cluster rebalancing process.
- Scaling topic replication factor up and down
- Increase or decrease the replication factor of your Kafka topics. To do this, you must create a partition reassignment plan that identifies the existing replication assignment across partitions and an updated assignment with the replication factor changes.
- Changing the preferred leader
- Change the preferred leader of a Kafka partition. This can be useful if the current preferred leader is unavailable or if you want to redistribute load across the brokers in the cluster. To do this, you must create a partition reassignment plan that specifies the new preferred leader for each partition by changing the order of replicas.
- Changing the log directories to use a specific JBOD volume
- Change the log directories of your Kafka brokers to use a specific JBOD volume. This can be useful if you want to move your Kafka data to a different disk or storage device. To do this, you must create a partition reassignment plan that specifies the new log directory for each topic.
20.1.1. Generating a partition reassignment plan
The partition reassignment tool (kafka-reassign-partitions.sh) works by generating a partition assignment plan that specifies which partitions should be moved from their current broker to a new broker.
If you are satisfied with the plan, you can execute it. The tool then does the following:
- Migrates the partition data to the new broker
- Updates the metadata on the Kafka brokers to reflect the new partition assignments
- Triggers a rolling restart of the Kafka brokers to ensure that the new assignments take effect
The partition reassignment tool has three different modes:
--generate- Takes a set of topics and brokers and generates a reassignment JSON file which will result in the partitions of those topics being assigned to those brokers. Because this operates on whole topics, it cannot be used when you only want to reassign some partitions of some topics.
--execute- Takes a reassignment JSON file and applies it to the partitions and brokers in the cluster. Brokers that gain partitions as a result become followers of the partition leader. For a given partition, once the new broker has caught up and joined the ISR (in-sync replicas) the old broker will stop being a follower and will delete its replica.
--verify-
Using the same reassignment JSON file as the
--executestep,--verifychecks whether all the partitions in the file have been moved to their intended brokers. If the reassignment is complete,--verifyalso removes any traffic throttles (--throttle) that are in effect. Unless removed, throttles will continue to affect the cluster even after the reassignment has finished.
It is only possible to have one reassignment running in a cluster at any given time, and it is not possible to cancel a running reassignment. If you must cancel a reassignment, wait for it to complete and then perform another reassignment to revert the effects of the first reassignment. The kafka-reassign-partitions.sh will print the reassignment JSON for this reversion as part of its output. Very large reassignments should be broken down into a number of smaller reassignments in case there is a need to stop in-progress reassignment.
20.1.2. Specifying topics in a partition reassignment JSON file
The kafka-reassign-partitions.sh tool uses a reassignment JSON file that specifies the topics to reassign. You can generate a reassignment JSON file or create a file manually if you want to move specific partitions.
A basic reassignment JSON file has the structure presented in the following example, which describes three partitions belonging to two Kafka topics. Each partition is reassigned to a new set of replicas, which are identified by their broker IDs. The version, topic, partition, and replicas properties are all required.
Example partition reassignment JSON file structure
{
"version": 1,
"partitions": [
{
"topic": "example-topic-1",
"partition": 0,
"replicas": [1, 2, 3]
},
{
"topic": "example-topic-1",
"partition": 1,
"replicas": [2, 3, 4]
},
{
"topic": "example-topic-2",
"partition": 0,
"replicas": [3, 4, 5]
}
]
}- 1
- The version of the reassignment JSON file format. Currently, only version 1 is supported, so this should always be 1.
- 2
- An array that specifies the partitions to be reassigned.
- 3
- The name of the Kafka topic that the partition belongs to.
- 4
- The ID of the partition being reassigned.
- 5
- An ordered array of the IDs of the brokers that should be assigned as replicas for this partition. The first broker in the list is the leader replica.
Partitions not included in the JSON are not changed.
If you specify only topics using a topics array, the partition reassignment tool reassigns all the partitions belonging to the specified topics.
Example reassignment JSON file structure for reassigning all partitions for a topic
{
"version": 1,
"topics": [
{ "topic": "my-topic"}
]
}20.1.3. Reassigning partitions between JBOD volumes
When using JBOD storage in your Kafka cluster, you can reassign the partitions between specific volumes and their log directories (each volume has a single log directory).
To reassign a partition to a specific volume, add log_dirs values for each partition in the reassignment JSON file. Each log_dirs array contains the same number of entries as the replicas array, since each replica should be assigned to a specific log directory. The log_dirs array contains either an absolute path to a log directory or the special value any. The any value indicates that Kafka can choose any available log directory for that replica, which can be useful when reassigning partitions between JBOD volumes.
Example reassignment JSON file structure with log directories
{
"version": 1,
"partitions": [
{
"topic": "example-topic-1",
"partition": 0,
"replicas": [1, 2, 3]
"log_dirs": ["/var/lib/kafka/data-0/kafka-log1", "any", "/var/lib/kafka/data-1/kafka-log2"]
},
{
"topic": "example-topic-1",
"partition": 1,
"replicas": [2, 3, 4]
"log_dirs": ["any", "/var/lib/kafka/data-2/kafka-log3", "/var/lib/kafka/data-3/kafka-log4"]
},
{
"topic": "example-topic-2",
"partition": 0,
"replicas": [3, 4, 5]
"log_dirs": ["/var/lib/kafka/data-4/kafka-log5", "any", "/var/lib/kafka/data-5/kafka-log6"]
}
]
}20.1.4. Throttling partition reassignment
Partition reassignment can be a slow process because it involves transferring large amounts of data between brokers. To avoid a detrimental impact on clients, you can throttle the reassignment process. Use the --throttle parameter with the kafka-reassign-partitions.sh tool to throttle a reassignment. You specify a maximum threshold in bytes per second for the movement of partitions between brokers. For example, --throttle 5000000 sets a maximum threshold for moving partitions of 50 MBps.
Throttling might cause the reassignment to take longer to complete.
- If the throttle is too low, the newly assigned brokers will not be able to keep up with records being published and the reassignment will never complete.
- If the throttle is too high, clients will be impacted.
For example, for producers, this could manifest as higher than normal latency waiting for acknowledgment. For consumers, this could manifest as a drop in throughput caused by higher latency between polls.
20.2. Generating a reassignment JSON file to reassign partitions
Generate a reassignment JSON file with the kafka-reassign-partitions.sh tool to reassign partitions after scaling a Kafka cluster. Adding or removing brokers does not automatically redistribute the existing partitions. To balance the partition distribution and take full advantage of the new brokers, you can reassign the partitions using the kafka-reassign-partitions.sh tool.
You run the tool from an interactive pod container connected to the Kafka cluster.
The following procedure describes a secure reassignment process that uses mTLS. You’ll need a Kafka cluster that uses TLS encryption and mTLS authentication.
You’ll need the following to establish a connection:
- The cluster CA certificate and password generated by the Cluster Operator when the Kafka cluster is created
- The user CA certificate and password generated by the User Operator when a user is created for client access to the Kafka cluster
In this procedure, the CA certificates and corresponding passwords are extracted from the cluster and user secrets that contain them in PKCS #12 (.p12 and .password) format. The passwords allow access to the .p12 stores that contain the certificates. You use the .p12 stores to specify a truststore and keystore to authenticate connection to the Kafka cluster.
Prerequisites
- You have a running Cluster Operator.
You have a running Kafka cluster based on a
Kafkaresource configured with internal TLS encryption and mTLS authentication.Kafka configuration with TLS encryption and mTLS authentication
apiVersion: kafka.strimzi.io/v1beta2 kind: Kafka metadata: name: my-cluster spec: kafka: # ... listeners: # ... - name: tls port: 9093 type: internal tls: true1 authentication: type: tls2 # ...The running Kafka cluster contains a set of topics and partitions to reassign.
Example topic configuration for
my-topicapiVersion: kafka.strimzi.io/v1beta2 kind: KafkaTopic metadata: name: my-topic labels: strimzi.io/cluster: my-cluster spec: partitions: 10 replicas: 3 config: retention.ms: 7200000 segment.bytes: 1073741824 # ...You have a
KafkaUserconfigured with ACL rules that specify permission to produce and consume topics from the Kafka brokers.Example Kafka user configuration with ACL rules to allow operations on
my-topicandmy-clusterapiVersion: kafka.strimzi.io/v1beta2 kind: KafkaUser metadata: name: my-user labels: strimzi.io/cluster: my-cluster spec: authentication:1 type: tls authorization: type: simple2 acls: # access to the topic - resource: type: topic name: my-topic operations: - Create - Describe - Read - AlterConfigs host: "*" # access to the cluster - resource: type: cluster operations: - Alter - AlterConfigs host: "*" # ... # ...
Procedure
Extract the cluster CA certificate and password from the
<cluster_name>-cluster-ca-certsecret of the Kafka cluster.oc get secret <cluster_name>-cluster-ca-cert -o jsonpath='{.data.ca\.p12}' | base64 -d > ca.p12oc get secret <cluster_name>-cluster-ca-cert -o jsonpath='{.data.ca\.password}' | base64 -d > ca.passwordReplace <cluster_name> with the name of the Kafka cluster. When you deploy Kafka using the
Kafkaresource, a secret with the cluster CA certificate is created with the Kafka cluster name (<cluster_name>-cluster-ca-cert). For example,my-cluster-cluster-ca-cert.Run a new interactive pod container using the Streams for Apache Kafka image to connect to a running Kafka broker.
oc run --restart=Never --image=registry.redhat.io/amq-streams/kafka-37-rhel9:2.7.0 <interactive_pod_name> -- /bin/sh -c "sleep 3600"Replace <interactive_pod_name> with the name of the pod.
Copy the cluster CA certificate to the interactive pod container.
oc cp ca.p12 <interactive_pod_name>:/tmpExtract the user CA certificate and password from the secret of the Kafka user that has permission to access the Kafka brokers.
oc get secret <kafka_user> -o jsonpath='{.data.user\.p12}' | base64 -d > user.p12oc get secret <kafka_user> -o jsonpath='{.data.user\.password}' | base64 -d > user.passwordReplace <kafka_user> with the name of the Kafka user. When you create a Kafka user using the
KafkaUserresource, a secret with the user CA certificate is created with the Kafka user name. For example,my-user.Copy the user CA certificate to the interactive pod container.
oc cp user.p12 <interactive_pod_name>:/tmpThe CA certificates allow the interactive pod container to connect to the Kafka broker using TLS.
Create a
config.propertiesfile to specify the truststore and keystore used to authenticate connection to the Kafka cluster.Use the certificates and passwords you extracted in the previous steps.
bootstrap.servers=<kafka_cluster_name>-kafka-bootstrap:90931 security.protocol=SSL2 ssl.truststore.location=/tmp/ca.p123 ssl.truststore.password=<truststore_password>4 ssl.keystore.location=/tmp/user.p125 ssl.keystore.password=<keystore_password>6 - 1
- The bootstrap server address to connect to the Kafka cluster. Use your own Kafka cluster name to replace <kafka_cluster_name>.
- 2
- The security protocol option when using TLS for encryption.
- 3
- The truststore location contains the public key certificate (
ca.p12) for the Kafka cluster. - 4
- The password (
ca.password) for accessing the truststore. - 5
- The keystore location contains the public key certificate (
user.p12) for the Kafka user. - 6
- The password (
user.password) for accessing the keystore.
Copy the
config.propertiesfile to the interactive pod container.oc cp config.properties <interactive_pod_name>:/tmp/config.propertiesPrepare a JSON file named
topics.jsonthat specifies the topics to move.Specify topic names as a comma-separated list.
Example JSON file to reassign all the partitions of
my-topic{ "version": 1, "topics": [ { "topic": "my-topic"} ] }You can also use this file to change the replication factor of a topic.
Copy the
topics.jsonfile to the interactive pod container.oc cp topics.json <interactive_pod_name>:/tmp/topics.jsonStart a shell process in the interactive pod container.
oc exec -n <namespace> -ti <interactive_pod_name> /bin/bashReplace <namespace> with the OpenShift namespace where the pod is running.
Use the
kafka-reassign-partitions.shcommand to generate the reassignment JSON.Example command to move the partitions of
my-topicto specified brokersbin/kafka-reassign-partitions.sh --bootstrap-server my-cluster-kafka-bootstrap:9093 \ --command-config /tmp/config.properties \ --topics-to-move-json-file /tmp/topics.json \ --broker-list 0,1,2,3,4 \ --generate
20.3. Reassigning partitions after adding brokers
Use a reassignment file generated by the kafka-reassign-partitions.sh tool to reassign partitions after increasing the number of brokers in a Kafka cluster. The reassignment file should describe how partitions are reassigned to brokers in the enlarged Kafka cluster. You apply the reassignment specified in the file to the brokers and then verify the new partition assignments.
This procedure describes a secure scaling process that uses TLS. You’ll need a Kafka cluster that uses TLS encryption and mTLS authentication.
The kafka-reassign-partitions.sh tool can be used to reassign partitions within a Kafka cluster, regardless of whether you are managing all nodes through the cluster or using the node pools to manage groups of nodes within the cluster.
Though you can use the kafka-reassign-partitions.sh tool, Cruise Control is recommended for automated partition reassignments and cluster rebalancing. Cruise Control can move topics from one broker to another without any downtime, and it is the most efficient way to reassign partitions.
Prerequisites
-
You have a running Kafka cluster based on a
Kafkaresource configured with internal TLS encryption and mTLS authentication. -
You have generated a reassignment JSON file named
reassignment.json. - You are running an interactive pod container that is connected to the running Kafka broker.
-
You are connected as a
KafkaUserconfigured with ACL rules that specify permission to manage the Kafka cluster and its topics.
Procedure
-
Add as many new brokers as you need by increasing the
Kafka.spec.kafka.replicasconfiguration option. - Verify that the new broker pods have started.
-
If you haven’t done so, run an interactive pod container to generate a reassignment JSON file named
reassignment.json. Copy the
reassignment.jsonfile to the interactive pod container.oc cp reassignment.json <interactive_pod_name>:/tmp/reassignment.jsonReplace <interactive_pod_name> with the name of the pod.
Start a shell process in the interactive pod container.
oc exec -n <namespace> -ti <interactive_pod_name> /bin/bashReplace <namespace> with the OpenShift namespace where the pod is running.
Run the partition reassignment using the
kafka-reassign-partitions.shscript from the interactive pod container.bin/kafka-reassign-partitions.sh --bootstrap-server <cluster_name>-kafka-bootstrap:9093 \ --command-config /tmp/config.properties \ --reassignment-json-file /tmp/reassignment.json \ --executeReplace <cluster_name> with the name of your Kafka cluster. For example,
my-cluster-kafka-bootstrap:9093If you are going to throttle replication, you can also pass the
--throttleoption with an inter-broker throttled rate in bytes per second. For example:bin/kafka-reassign-partitions.sh --bootstrap-server <cluster_name>-kafka-bootstrap:9093 \ --command-config /tmp/config.properties \ --reassignment-json-file /tmp/reassignment.json \ --throttle 5000000 \ --executeThis command will print out two reassignment JSON objects. The first records the current assignment for the partitions being moved. You should save this to a local file (not a file in the pod) in case you need to revert the reassignment later on. The second JSON object is the target reassignment you have passed in your reassignment JSON file.
If you need to change the throttle during reassignment, you can use the same command with a different throttled rate. For example:
bin/kafka-reassign-partitions.sh --bootstrap-server <cluster_name>-kafka-bootstrap:9093 \ --command-config /tmp/config.properties \ --reassignment-json-file /tmp/reassignment.json \ --throttle 10000000 \ --executeVerify that the reassignment has completed using the
kafka-reassign-partitions.shcommand line tool from any of the broker pods. This is the same command as the previous step, but with the--verifyoption instead of the--executeoption.bin/kafka-reassign-partitions.sh --bootstrap-server <cluster_name>-kafka-bootstrap:9093 \ --command-config /tmp/config.properties \ --reassignment-json-file /tmp/reassignment.json \ --verifyThe reassignment has finished when the
--verifycommand reports that each of the partitions being moved has completed successfully. This final--verifywill also have the effect of removing any reassignment throttles.- You can now delete the revert file if you saved the JSON for reverting the assignment to their original brokers.
20.4. Reassigning partitions before removing brokers
Use a reassignment file generated by the kafka-reassign-partitions.sh tool to reassign partitions before decreasing the number of brokers in a Kafka cluster. The reassignment file must describe how partitions are reassigned to the remaining brokers in the Kafka cluster. You apply the reassignment specified in the file to the brokers and then verify the new partition assignments. Brokers in the highest numbered pods are removed first.
This procedure describes a secure scaling process that uses TLS. You’ll need a Kafka cluster that uses TLS encryption and mTLS authentication.
The kafka-reassign-partitions.sh tool can be used to reassign partitions within a Kafka cluster, regardless of whether you are managing all nodes through the cluster or using the node pools to manage groups of nodes within the cluster.
Though you can use the kafka-reassign-partitions.sh tool, Cruise Control is recommended for automated partition reassignments and cluster rebalancing. Cruise Control can move topics from one broker to another without any downtime, and it is the most efficient way to reassign partitions.
Prerequisites
-
You have a running Kafka cluster based on a
Kafkaresource configured with internal TLS encryption and mTLS authentication. -
You have generated a reassignment JSON file named
reassignment.json. - You are running an interactive pod container that is connected to the running Kafka broker.
-
You are connected as a
KafkaUserconfigured with ACL rules that specify permission to manage the Kafka cluster and its topics.
Procedure
-
If you haven’t done so, run an interactive pod container to generate a reassignment JSON file named
reassignment.json. Copy the
reassignment.jsonfile to the interactive pod container.oc cp reassignment.json <interactive_pod_name>:/tmp/reassignment.jsonReplace <interactive_pod_name> with the name of the pod.
Start a shell process in the interactive pod container.
oc exec -n <namespace> -ti <interactive_pod_name> /bin/bashReplace <namespace> with the OpenShift namespace where the pod is running.
Run the partition reassignment using the
kafka-reassign-partitions.shscript from the interactive pod container.bin/kafka-reassign-partitions.sh --bootstrap-server <cluster_name>-kafka-bootstrap:9093 \ --command-config /tmp/config.properties \ --reassignment-json-file /tmp/reassignment.json \ --executeReplace <cluster_name> with the name of your Kafka cluster. For example,
my-cluster-kafka-bootstrap:9093If you are going to throttle replication, you can also pass the
--throttleoption with an inter-broker throttled rate in bytes per second. For example:bin/kafka-reassign-partitions.sh --bootstrap-server <cluster_name>-kafka-bootstrap:9093 \ --command-config /tmp/config.properties \ --reassignment-json-file /tmp/reassignment.json \ --throttle 5000000 \ --executeThis command will print out two reassignment JSON objects. The first records the current assignment for the partitions being moved. You should save this to a local file (not a file in the pod) in case you need to revert the reassignment later on. The second JSON object is the target reassignment you have passed in your reassignment JSON file.
If you need to change the throttle during reassignment, you can use the same command with a different throttled rate. For example:
bin/kafka-reassign-partitions.sh --bootstrap-server <cluster_name>-kafka-bootstrap:9093 \ --command-config /tmp/config.properties \ --reassignment-json-file /tmp/reassignment.json \ --throttle 10000000 \ --executeVerify that the reassignment has completed using the
kafka-reassign-partitions.shcommand line tool from any of the broker pods. This is the same command as the previous step, but with the--verifyoption instead of the--executeoption.bin/kafka-reassign-partitions.sh --bootstrap-server <cluster_name>-kafka-bootstrap:9093 \ --command-config /tmp/config.properties \ --reassignment-json-file /tmp/reassignment.json \ --verifyThe reassignment has finished when the
--verifycommand reports that each of the partitions being moved has completed successfully. This final--verifywill also have the effect of removing any reassignment throttles.- You can now delete the revert file if you saved the JSON for reverting the assignment to their original brokers.
When all the partition reassignments have finished, the brokers being removed should not have responsibility for any of the partitions in the cluster. You can verify this by checking that the broker’s data log directory does not contain any live partition logs. If the log directory on the broker contains a directory that does not match the extended regular expression
[a-zA-Z0-9.-]+\.[a-z0-9]+-delete$, the broker still has live partitions and should not be stopped.You can check this by executing the command:
oc exec my-cluster-kafka-0 -c kafka -it -- \ /bin/bash -c \ "ls -l /var/lib/kafka/kafka-log_<n>_ | grep -E '^d' | grep -vE '[a-zA-Z0-9.-]+\.[a-z0-9]+-delete$'"where n is the number of the pods being deleted.
If the above command prints any output then the broker still has live partitions. In this case, either the reassignment has not finished or the reassignment JSON file was incorrect.
-
When you have confirmed that the broker has no live partitions, you can edit the
Kafka.spec.kafka.replicasproperty of yourKafkaresource to reduce the number of brokers.
20.5. Changing the replication factor of topics
To change the replication factor of topics in a Kafka cluster, use the kafka-reassign-partitions.sh tool. This can be done by running the tool from an interactive pod container that is connected to the Kafka cluster, and using a reassignment file to describe how the topic replicas should be changed.
This procedure describes a secure process that uses TLS. You’ll need a Kafka cluster that uses TLS encryption and mTLS authentication.
Prerequisites
-
You have a running Kafka cluster based on a
Kafkaresource configured with internal TLS encryption and mTLS authentication. - You are running an interactive pod container that is connected to the running Kafka broker.
-
You have generated a reassignment JSON file named
reassignment.json. -
You are connected as a
KafkaUserconfigured with ACL rules that specify permission to manage the Kafka cluster and its topics.
See Generating reassignment JSON files.
In this procedure, a topic called my-topic has 4 replicas and we want to reduce it to 3. A JSON file named topics.json specifies the topic, and was used to generate the reassignment.json file.
Example JSON file specifies my-topic
{
"version": 1,
"topics": [
{ "topic": "my-topic"}
]
}Procedure
If you haven’t done so, run an interactive pod container to generate a reassignment JSON file named
reassignment.json.Example reassignment JSON file showing the current and proposed replica assignment
Current partition replica assignment {"version":1,"partitions":[{"topic":"my-topic","partition":0,"replicas":[3,4,2,0],"log_dirs":["any","any","any","any"]},{"topic":"my-topic","partition":1,"replicas":[0,2,3,1],"log_dirs":["any","any","any","any"]},{"topic":"my-topic","partition":2,"replicas":[1,3,0,4],"log_dirs":["any","any","any","any"]}]} Proposed partition reassignment configuration {"version":1,"partitions":[{"topic":"my-topic","partition":0,"replicas":[0,1,2,3],"log_dirs":["any","any","any","any"]},{"topic":"my-topic","partition":1,"replicas":[1,2,3,4],"log_dirs":["any","any","any","any"]},{"topic":"my-topic","partition":2,"replicas":[2,3,4,0],"log_dirs":["any","any","any","any"]}]}Save a copy of this file locally in case you need to revert the changes later on.
Edit the
reassignment.jsonto remove a replica from each partition.For example use the
jqcommand line JSON parser tool to remove the last replica in the list for each partition of the topic:Removing the last topic replica for each partition
jq '.partitions[].replicas |= del(.[-1])' reassignment.json > reassignment.jsonExample reassignment file showing the updated replicas
{"version":1,"partitions":[{"topic":"my-topic","partition":0,"replicas":[0,1,2],"log_dirs":["any","any","any","any"]},{"topic":"my-topic","partition":1,"replicas":[1,2,3],"log_dirs":["any","any","any","any"]},{"topic":"my-topic","partition":2,"replicas":[2,3,4],"log_dirs":["any","any","any","any"]}]}Copy the
reassignment.jsonfile to the interactive pod container.oc cp reassignment.json <interactive_pod_name>:/tmp/reassignment.jsonReplace <interactive_pod_name> with the name of the pod.
Start a shell process in the interactive pod container.
oc exec -n <namespace> -ti <interactive_pod_name> /bin/bashReplace <namespace> with the OpenShift namespace where the pod is running.
Make the topic replica change using the
kafka-reassign-partitions.shscript from the interactive pod container.bin/kafka-reassign-partitions.sh --bootstrap-server <cluster_name>-kafka-bootstrap:9093 \ --command-config /tmp/config.properties \ --reassignment-json-file /tmp/reassignment.json \ --executeNoteRemoving replicas from a broker does not require any inter-broker data movement, so there is no need to throttle replication. If you are adding replicas, then you may want to change the throttle rate.
Verify that the change to the topic replicas has completed using the
kafka-reassign-partitions.shcommand line tool from any of the broker pods. This is the same command as the previous step, but with the--verifyoption instead of the--executeoption.bin/kafka-reassign-partitions.sh --bootstrap-server <cluster_name>-kafka-bootstrap:9093 \ --command-config /tmp/config.properties \ --reassignment-json-file /tmp/reassignment.json \ --verifyThe reassignment has finished when the
--verifycommand reports that each of the partitions being moved has completed successfully. This final--verifywill also have the effect of removing any reassignment throttles.Run the
bin/kafka-topics.shcommand with the--describeoption to see the results of the change to the topics.bin/kafka-topics.sh --bootstrap-server <cluster_name>-kafka-bootstrap:9093 \ --command-config /tmp/config.properties \ --describeResults of reducing the number of replicas for a topic
my-topic Partition: 0 Leader: 0 Replicas: 0,1,2 Isr: 0,1,2 my-topic Partition: 1 Leader: 2 Replicas: 1,2,3 Isr: 1,2,3 my-topic Partition: 2 Leader: 3 Replicas: 2,3,4 Isr: 2,3,4Finally, edit the
KafkaTopiccustom resource to change.spec.replicasto 3, and then wait the reconciliation.apiVersion: kafka.strimzi.io/v1beta2 kind: KafkaTopic metadata: name: my-topic labels: strimzi.io/cluster: my-cluster spec: partitions: 3 replicas: 3
Chapter 21. Setting up metrics and dashboards for Streams for Apache Kafka
Collecting metrics is critical for understanding the health and performance of your Kafka deployment. By monitoring metrics, you can actively identify issues before they become critical and make informed decisions about resource allocation and capacity planning. Without metrics, you may be left with limited visibility into the behavior of your Kafka deployment, which can make troubleshooting more difficult and time-consuming. Setting up metrics can save you time and resources in the long run, and help ensure the reliability of your Kafka deployment.
Metrics are available for each component in Streams for Apache Kafka, providing valuable insights into their individual performance. While other components require configuration to expose metrics metric exposure, Streams for Apache Kafka operators automatically expose Prometheus metrics by default. These metrics include:
- Reconciliation count
- Custom Resource count being processed
- Reconciliation duration
- JVM metrics
You can also collect metrics specific to oauth authentication and opa or keycloak authorization by enabling the enableMetrics property in the listener or authorization configuration of the Kafka resource. Similarly, you can enable metrics for oauth authentication in custom resources such as KafkaBridge, KafkaConnect, KafkaMirrorMaker, and KafkaMirrorMaker2.
The Streams for Apache Kafka Console provides a user interface for monitoring metrics in a Kafka cluster. By connecting a Kafka cluster managed by Streams for Apache Kafka to the Streams for Apache Kafka Console, you can access detailed information on components such as brokers, topics, partitions, and consumer groups.
The Streams for Apache Kafka Console is currently available as a technology preview.
You can also use Prometheus and Grafana to monitor Streams for Apache Kafka. Prometheus consumes metrics from the running pods in your cluster when configured with Prometheus rules. Grafana visualizes these metrics on dashboards, providing an intuitive interface for monitoring.
To facilitate metrics integration, Streams for Apache Kafka provides example Prometheus rules and Grafana dashboards for Streams for Apache Kafka components. You can customize the example Grafana dashboards to suit your specific deployment requirements. You can use rules to define conditions that trigger alerts based on specific metrics.
Depending on your monitoring requirements, you can do the following:
Additionally, you can configure your deployment to track messages end-to-end by setting up distributed tracing, or retrieve troubleshooting data using the diagnostics tool (report.sh).
Streams for Apache Kafka provides example installation files for Prometheus and Grafana, which can serve as a starting point for monitoring your Streams for Apache Kafka deployment. For further support, try engaging with the Prometheus and Grafana developer communities.
Supporting documentation for metrics and monitoring tools
For more information on the metrics and monitoring tools, refer to the supporting documentation:
- Prometheus
- Prometheus configuration
- Kafka Exporter
- Grafana Labs
- Apache Kafka Monitoring describes JMX metrics exposed by Apache Kafka
- ZooKeeper JMX describes JMX metrics exposed by Apache ZooKeeper
21.1. Monitoring consumer lag with Kafka Exporter
Kafka Exporter is an open source project to enhance monitoring of Apache Kafka brokers and clients. You can configure the Kafka resource to deploy Kafka Exporter with your Kafka cluster. Kafka Exporter extracts additional metrics data from Kafka brokers related to offsets, consumer groups, consumer lag, and topics. The metrics data is used, for example, to help identify slow consumers. Lag data is exposed as Prometheus metrics, which can then be presented in Grafana for analysis.
Kafka Exporter reads from the __consumer_offsets topic, which stores information on committed offsets for consumer groups. For Kafka Exporter to be able to work properly, consumer groups needs to be in use.
A Grafana dashboard for Kafka Exporter is one of a number of example Grafana dashboards provided by Streams for Apache Kafka.
Kafka Exporter provides only additional metrics related to consumer lag and consumer offsets. For regular Kafka metrics, you have to configure the Prometheus metrics in Kafka brokers.
Consumer lag indicates the difference in the rate of production and consumption of messages. Specifically, consumer lag for a given consumer group indicates the delay between the last message in the partition and the message being currently picked up by that consumer.
The lag reflects the position of the consumer offset in relation to the end of the partition log.
Consumer lag between the producer and consumer offset
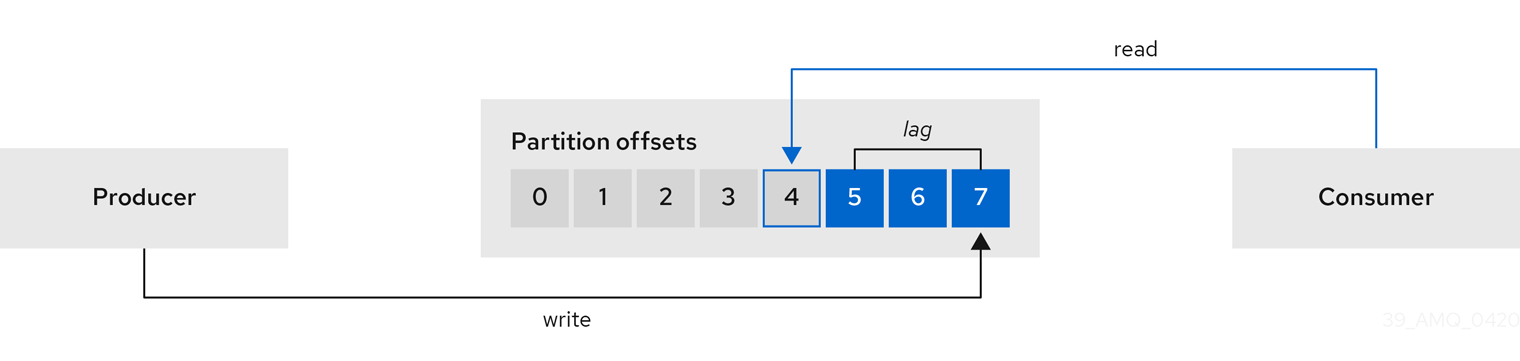
This difference is sometimes referred to as the delta between the producer offset and consumer offset: the read and write positions in the Kafka broker topic partitions.
Suppose a topic streams 100 messages a second. A lag of 1000 messages between the producer offset (the topic partition head) and the last offset the consumer has read means a 10-second delay.
The importance of monitoring consumer lag
For applications that rely on the processing of (near) real-time data, it is critical to monitor consumer lag to check that it does not become too big. The greater the lag becomes, the further the process moves from the real-time processing objective.
Consumer lag, for example, might be a result of consuming too much old data that has not been purged, or through unplanned shutdowns.
Reducing consumer lag
Use the Grafana charts to analyze lag and to check if actions to reduce lag are having an impact on an affected consumer group. If, for example, Kafka brokers are adjusted to reduce lag, the dashboard will show the Lag by consumer group chart going down and the Messages consumed per minute chart going up.
Typical actions to reduce lag include:
- Scaling-up consumer groups by adding new consumers
- Increasing the retention time for a message to remain in a topic
- Adding more disk capacity to increase the message buffer
Actions to reduce consumer lag depend on the underlying infrastructure and the use cases Streams for Apache Kafka is supporting. For instance, a lagging consumer is less likely to benefit from the broker being able to service a fetch request from its disk cache. And in certain cases, it might be acceptable to automatically drop messages until a consumer has caught up.
21.2. Monitoring Cruise Control operations
Cruise Control monitors Kafka brokers in order to track the utilization of brokers, topics, and partitions. Cruise Control also provides a set of metrics for monitoring its own performance.
The Cruise Control metrics reporter collects raw metrics data from Kafka brokers. The data is produced to topics that are automatically created by Cruise Control. The metrics are used to generate optimization proposals for Kafka clusters.
Cruise Control metrics are available for real-time monitoring of Cruise Control operations. For example, you can use Cruise Control metrics to monitor the status of rebalancing operations that are running or provide alerts on any anomalies that are detected in an operation’s performance.
You expose Cruise Control metrics by enabling the Prometheus JMX Exporter in the Cruise Control configuration.
For a full list of available Cruise Control metrics, which are known as sensors, see the Cruise Control documentation
21.2.1. Monitoring balancedness scores
Cruise Control metrics include a balancedness score. Balancedness is the measure of how evenly a workload is distributed in a Kafka cluster.
The Cruise Control metric for balancedness score (balancedness-score) might differ from the balancedness score in the KafkaRebalance resource. Cruise Control calculates each score using anomaly.detection.goals which might not be the same as the default.goals used in the KafkaRebalance resource. The anomaly.detection.goals are specified in the spec.cruiseControl.config of the Kafka custom resource.
Refreshing the KafkaRebalance resource fetches an optimization proposal. The latest cached optimization proposal is fetched if one of the following conditions applies:
-
KafkaRebalance
goalsmatch the goals configured in thedefault.goalssection of theKafkaresource -
KafkaRebalance
goalsare not specified
Otherwise, Cruise Control generates a new optimization proposal based on KafkaRebalance goals. If new proposals are generated with each refresh, this can impact performance monitoring.
21.2.2. Setting up alerts for anomaly detection
Cruise control’s anomaly detector provides metrics data for conditions that block the generation of optimization goals, such as broker failures. If you want more visibility, you can use the metrics provided by the anomaly detector to set up alerts and send out notifications. You can set up Cruise Control’s anomaly notifier to route alerts based on these metrics through a specified notification channel. Alternatively, you can set up Prometheus to scrape the metrics data provided by the anomaly detector and generate alerts. Prometheus Alertmanager can then route the alerts generated by Prometheus.
The Cruise Control documentation provides information on AnomalyDetector metrics and the anomaly notifier.
21.3. Example metrics files
You can find example Grafana dashboards and other metrics configuration files in the example configuration files provided by Streams for Apache Kafka.
Example metrics files provided with Streams for Apache Kafka
metrics
├── grafana-dashboards
│ ├── strimzi-cruise-control.json
│ ├── strimzi-kafka-bridge.json
│ ├── strimzi-kafka-connect.json
│ ├── strimzi-kafka-exporter.json
│ ├── strimzi-kafka-mirror-maker-2.json
│ ├── strimzi-kafka.json
│ ├── strimzi-operators.json
│ └── strimzi-zookeeper.json
├── grafana-install
│ └── grafana.yaml
├── prometheus-additional-properties
│ └── prometheus-additional.yaml
├── prometheus-alertmanager-config
│ └── alert-manager-config.yaml
├── prometheus-install
│ ├── alert-manager.yaml
│ ├── prometheus-rules.yaml
│ ├── prometheus.yaml
│ └── strimzi-pod-monitor.yaml
├── kafka-bridge-metrics.yaml
├── kafka-connect-metrics.yaml
├── kafka-cruise-control-metrics.yaml
├── kafka-metrics.yaml
└── kafka-mirror-maker-2-metrics.yaml - 1
- Example Grafana dashboards for the different Streams for Apache Kafka components.
- 2
- Installation file for the Grafana image.
- 3
- Additional configuration to scrape metrics for CPU, memory and disk volume usage, which comes directly from the OpenShift cAdvisor agent and kubelet on the nodes.
- 4
- Hook definitions for sending notifications through Alertmanager.
- 5
- Resources for deploying and configuring Alertmanager.
- 6
- Alerting rules examples for use with Prometheus Alertmanager (deployed with Prometheus).
- 7
- Installation resource file for the Prometheus image.
- 8
- PodMonitor definitions translated by the Prometheus Operator into jobs for the Prometheus server to be able to scrape metrics data directly from pods.
- 9
- Kafka Bridge resource with metrics enabled.
- 10
- Metrics configuration that defines Prometheus JMX Exporter relabeling rules for Kafka Connect.
- 11
- Metrics configuration that defines Prometheus JMX Exporter relabeling rules for Cruise Control.
- 12
- Metrics configuration that defines Prometheus JMX Exporter relabeling rules for Kafka and ZooKeeper.
- 13
- Metrics configuration that defines Prometheus JMX Exporter relabeling rules for Kafka MirrorMaker 2.
21.3.1. Example Prometheus metrics configuration
Streams for Apache Kafka uses the Prometheus JMX Exporter to expose metrics through an HTTP endpoint, which can be scraped by the Prometheus server.
Grafana dashboards are dependent on Prometheus JMX Exporter relabeling rules, which are defined for Streams for Apache Kafka components in the custom resource configuration.
A label is a name-value pair. Relabeling is the process of writing a label dynamically. For example, the value of a label may be derived from the name of a Kafka server and client ID.
Streams for Apache Kafka provides example custom resource configuration YAML files with relabeling rules. When deploying Prometheus metrics configuration, you can can deploy the example custom resource or copy the metrics configuration to your own custom resource definition.
| Component | Custom resource | Example YAML file |
|---|---|---|
| Kafka and ZooKeeper |
|
|
| Kafka Connect |
|
|
| Kafka MirrorMaker 2 |
|
|
| Kafka Bridge |
|
|
| Cruise Control |
|
|
21.3.2. Example Prometheus rules for alert notifications
Example Prometheus rules for alert notifications are provided with the example metrics configuration files provided by Streams for Apache Kafka. The rules are specified in the example prometheus-rules.yaml file for use in a Prometheus deployment.
The prometheus-rules.yaml file contains example rules for the following components:
- Kafka
- ZooKeeper
- Entity Operator
- Kafka Connect
- Kafka Bridge
- MirrorMaker
- Kafka Exporter
A description of each of the example rules is provided in the file.
Alerting rules provide notifications about specific conditions observed in metrics. Rules are declared on the Prometheus server, but Prometheus Alertmanager is responsible for alert notifications.
Prometheus alerting rules describe conditions using PromQL expressions that are continuously evaluated.
When an alert expression becomes true, the condition is met and the Prometheus server sends alert data to the Alertmanager. Alertmanager then sends out a notification using the communication method configured for its deployment.
General points about the alerting rule definitions:
-
A
forproperty is used with the rules to determine the period of time a condition must persist before an alert is triggered. -
A tick is a basic ZooKeeper time unit, which is measured in milliseconds and configured using the
tickTimeparameter ofKafka.spec.zookeeper.config. For example, if ZooKeepertickTime=3000, 3 ticks (3 x 3000) equals 9000 milliseconds. -
The availability of the
ZookeeperRunningOutOfSpacemetric and alert is dependent on the OpenShift configuration and storage implementation used. Storage implementations for certain platforms may not be able to supply the information on available space required for the metric to provide an alert.
Alertmanager can be configured to use email, chat messages or other notification methods. Adapt the default configuration of the example rules according to your specific needs.
21.3.3. Example Grafana dashboards
If you deploy Prometheus to provide metrics, you can use the example Grafana dashboards provided with Streams for Apache Kafka to monitor Streams for Apache Kafka components.
Example dashboards are provided in the examples/metrics/grafana-dashboards directory as JSON files.
All dashboards provide JVM metrics, as well as metrics specific to the component. For example, the Grafana dashboard for Streams for Apache Kafka operators provides information on the number of reconciliations or custom resources they are processing.
The example dashboards don’t show all the metrics supported by Kafka. The dashboards are populated with a representative set of metrics for monitoring.
| Component | Example JSON file |
|---|---|
| Streams for Apache Kafka operators |
|
| Kafka |
|
| ZooKeeper |
|
| Kafka Connect |
|
| Kafka MirrorMaker 2 |
|
| Kafka Bridge |
|
| Cruise Control |
|
| Kafka Exporter |
|
When metrics are not available to the Kafka Exporter, because there is no traffic in the cluster yet, the Kafka Exporter Grafana dashboard will show N/A for numeric fields and No data to show for graphs.
21.4. Enabling Prometheus metrics through configuration
To enable and expose metrics in Streams for Apache Kafka for Prometheus, use metrics configuration properties.
The following components require metricsConfig configuration to expose metrics:
- Kafka
- KafkaConnect
- MirrorMaker
- Cruise Control
- ZooKeeper
This configuration enables the Prometheus JMX Exporter to expose metrics through an HTTP endpoint. The port for the JMX exporter HTTP endpoint is 9404. Prometheus scrapes this endpoint to collect Kafka metrics.
You set the enableMetrics property to true in order to expose metrics for these components:
- Kafka Bridge
- OAuth 2.0 authentication and authorization framework
- Open Policy Agent (OPA) for authorization
To deploy Prometheus metrics configuration in Streams for Apache Kafka, you can use your own configuration or the example custom resource configuration files provided with Streams for Apache Kafka:
-
kafka-metrics.yaml -
kafka-connect-metrics.yaml -
kafka-mirror-maker-2-metrics.yaml -
kafka-bridge-metrics.yaml -
kafka-cruise-control-metrics.yaml -
oauth-metrics.yaml
These files contain the necessary relabeling rules and configuration to enable Prometheus metrics. They are a good starting point for trying Prometheus with Streams for Apache Kafka.
This procedure shows how to deploy example Prometheus metrics configuration in the Kafka resource. The process is the same when deploying the example files for other resources.
If you wish to include Kafka Exporter metrics, add kafkaExporter configuration to your Kafka resource.
Kafka Exporter only provides additional metrics related to consumer lag and consumer offsets. For regular Kafka metrics, you must configure the Prometheus metrics in Kafka brokers.
Procedure
Deploy the example custom resource with the Prometheus configuration.
For example, for each
Kafkaresource you can apply thekafka-metrics.yamlfile.Deploying the example configuration
oc apply -f kafka-metrics.yamlAlternatively, you can copy the example configuration in
kafka-metrics.yamlto your ownKafkaresource.Copying the example configuration
oc edit kafka <kafka_configuration_file>Copy the
metricsConfigproperty and theConfigMapit references to yourKafkaresource.Example metrics configuration for Kafka
apiVersion: kafka.strimzi.io/v1beta2 kind: Kafka metadata: name: my-cluster spec: kafka: # ... metricsConfig:1 type: jmxPrometheusExporter valueFrom: configMapKeyRef: name: kafka-metrics key: kafka-metrics-config.yml --- kind: ConfigMap2 apiVersion: v1 metadata: name: kafka-metrics labels: app: strimzi data: kafka-metrics-config.yml: | # metrics configuration...To deploy Kafka Exporter, add
kafkaExporterconfiguration.kafkaExporterconfiguration is only specified in theKafkaresource.Example configuration for deploying Kafka Exporter
apiVersion: kafka.strimzi.io/v1beta2 kind: Kafka metadata: name: my-cluster spec: # ... kafkaExporter: image: my-registry.io/my-org/my-exporter-cluster:latest1 groupRegex: ".*"2 topicRegex: ".*"3 groupExcludeRegex: "^excluded-.*"4 topicExcludeRegex: "^excluded-.*"5 resources:6 requests: cpu: 200m memory: 64Mi limits: cpu: 500m memory: 128Mi logging: debug7 enableSaramaLogging: true8 template:9 pod: metadata: labels: label1: value1 imagePullSecrets: - name: my-docker-credentials securityContext: runAsUser: 1000001 fsGroup: 0 terminationGracePeriodSeconds: 120 readinessProbe:10 initialDelaySeconds: 15 timeoutSeconds: 5 livenessProbe:11 initialDelaySeconds: 15 timeoutSeconds: 5 # ...- 1
- ADVANCED OPTION: Container image configuration, which is recommended only in special situations.
- 2
- A regular expression to specify the consumer groups to include in the metrics.
- 3
- A regular expression to specify the topics to include in the metrics.
- 4
- A regular expression to specify the consumer groups to exclude in the metrics.
- 5
- A regular expression to specify the topics to exclude in the metrics.
- 6
- CPU and memory resources to reserve.
- 7
- Logging configuration, to log messages with a given severity (debug, info, warn, error, fatal) or above.
- 8
- Boolean to enable Sarama logging, a Go client library used by Kafka Exporter.
- 9
- Customization of deployment templates and pods.
- 10
- Healthcheck readiness probes.
- 11
- Healthcheck liveness probes.
For Kafka Exporter to be able to work properly, consumer groups need to be in use.
Enabling metrics for Kafka Bridge
To expose metrics for Kafka Bridge, set the enableMetrics property to true in the KafkaBridge resource.
Example metrics configuration for Kafka Bridge
apiVersion: kafka.strimzi.io/v1beta2
kind: KafkaBridge
metadata:
name: my-bridge
spec:
# ...
bootstrapServers: my-cluster-kafka:9092
http:
# ...
enableMetrics: true
# ...Enabling metrics for OAuth 2.0 and OPA
To expose metrics for OAuth 2.0 or OPA, set the enableMetrics property to true in the appropriate custom resource.
- OAuth 2.0 metrics
Enable metrics for Kafka cluster authorization and Kafka listener authentication in the
Kafkaresource.You can also enable metrics for OAuth 2.0 authentication in the custom resource of other supported components.
- OPA metrics
-
Enable metrics for Kafka cluster authorization the
Kafkaresource in the same way as for OAuth 2.0.
In the following example, metrics are enabled for OAuth 2.0 listener authentication and OAuth 2.0 (keycloak) cluster authorization.
Example cluster configuration with metrics enabled for OAuth 2.0
apiVersion: kafka.strimzi.io/v1beta2
kind: Kafka
metadata:
name: my-cluster
namespace: myproject
spec:
kafka:
# ...
listeners:
- name: external3
port: 9094
type: loadbalancer
tls: true
authentication:
type: oauth
enableMetrics: true
configuration:
#...
authorization:
type: keycloak
enableMetrics: true
# ...
To use the OAuth 2.0 metrics with Prometheus, you can use the oauth-metrics.yaml file to deploy example Prometheus metrics configuration. Copy the ConfigMap configuration the oauth-metrics.yaml file contains to the same Kafka resource configuration file where you enabled metrics for OAuth 2.0.
21.5. Viewing Kafka metrics and dashboards in OpenShift
When Streams for Apache Kafka is deployed to OpenShift Container Platform, metrics are provided through monitoring for user-defined projects. This OpenShift feature gives developers access to a separate Prometheus instance for monitoring their own projects (for example, a Kafka project).
If monitoring for user-defined projects is enabled, the openshift-user-workload-monitoring project contains the following components:
- A Prometheus operator
- A Prometheus instance (automatically deployed by the Prometheus Operator)
- A Thanos Ruler instance
Streams for Apache Kafka uses these components to consume metrics.
A cluster administrator must enable monitoring for user-defined projects and then grant developers and other users permission to monitor applications within their own projects.
Grafana deployment
You can deploy a Grafana instance to the project containing your Kafka cluster. The example Grafana dashboards can then be used to visualize Prometheus metrics for Streams for Apache Kafka in the Grafana user interface.
The openshift-monitoring project provides monitoring for core platform components. Do not use the Prometheus and Grafana components in this project to configure monitoring for Streams for Apache Kafka on OpenShift Container Platform 4.x.
Procedure outline
To set up Streams for Apache Kafka monitoring in OpenShift Container Platform, follow these procedures in order:
21.5.1. Prerequisites
- You have deployed the Prometheus metrics configuration using the example YAML files.
-
Monitoring for user-defined projects is enabled. A cluster administrator has created a
cluster-monitoring-configconfig map in your OpenShift cluster. -
A cluster administrator has assigned you a
monitoring-rules-editormonitoring-editrole.
For more information on creating a cluster-monitoring-config config map and granting users permission to monitor user-defined projects, see the OpenShift documentation.
21.5.2. Deploying the Prometheus resources
Use Prometheus to obtain monitoring data in your Kafka cluster.
You can use your own Prometheus deployment or deploy Prometheus using the example metrics configuration files provided by Streams for Apache Kafka. To use the example files, you configure and deploy the PodMonitor resources. The PodMonitors scrape data directly from pods for Apache Kafka, ZooKeeper, Operators, the Kafka Bridge, and Cruise Control.
You then deploy the example alerting rules for Alertmanager.
Prerequisites
- A running Kafka cluster.
- Check the example alerting rules provided with Streams for Apache Kafka.
Procedure
Check that monitoring for user-defined projects is enabled:
oc get pods -n openshift-user-workload-monitoringIf enabled, pods for the monitoring components are returned. For example:
NAME READY STATUS RESTARTS AGE prometheus-operator-5cc59f9bc6-kgcq8 1/1 Running 0 25s prometheus-user-workload-0 5/5 Running 1 14s prometheus-user-workload-1 5/5 Running 1 14s thanos-ruler-user-workload-0 3/3 Running 0 14s thanos-ruler-user-workload-1 3/3 Running 0 14sIf no pods are returned, monitoring for user-defined projects is disabled. See the Prerequisites in Section 21.5, “Viewing Kafka metrics and dashboards in OpenShift”.
Multiple
PodMonitorresources are defined inexamples/metrics/prometheus-install/strimzi-pod-monitor.yaml.For each
PodMonitorresource, edit thespec.namespaceSelector.matchNamesproperty:apiVersion: monitoring.coreos.com/v1 kind: PodMonitor metadata: name: cluster-operator-metrics labels: app: strimzi spec: selector: matchLabels: strimzi.io/kind: cluster-operator namespaceSelector: matchNames: - <project-name>1 podMetricsEndpoints: - path: /metrics port: http # ...- 1
- The project where the pods to scrape the metrics from are running, for example,
Kafka.
Deploy the
strimzi-pod-monitor.yamlfile to the project where your Kafka cluster is running:oc apply -f strimzi-pod-monitor.yaml -n MY-PROJECTDeploy the example Prometheus rules to the same project:
oc apply -f prometheus-rules.yaml -n MY-PROJECT
21.5.3. Creating a service account for Grafana
A Grafana instance for Streams for Apache Kafka needs to run with a service account that is assigned the cluster-monitoring-view role.
Create a service account if you are using Grafana to present metrics for monitoring.
Prerequisites
Procedure
Create a
ServiceAccountfor Grafana in the project containing your Kafka cluster:oc create sa grafana-service-account -n my-projectIn this example, a service account named
grafana-service-accountis created in themy-projectnamespace.Create a
ClusterRoleBindingresource that assigns thecluster-monitoring-viewrole to the GrafanaServiceAccount. Here the resource is namedgrafana-cluster-monitoring-binding.apiVersion: rbac.authorization.k8s.io/v1 kind: ClusterRoleBinding metadata: name: grafana-cluster-monitoring-binding labels: app: strimzi subjects: - kind: ServiceAccount name: grafana-service-account namespace: my-project roleRef: kind: ClusterRole name: cluster-monitoring-view apiGroup: rbac.authorization.k8s.ioDeploy the
ClusterRoleBindingto the same project:oc apply -f grafana-cluster-monitoring-binding.yaml -n my-projectCreate a token secret for the service account:
apiVersion: v1 kind: Secret metadata: name: secret-sa annotations: kubernetes.io/service-account.name: "grafana-service-account"1 type: kubernetes.io/service-account-token2 Create the
Secretobject and access token:oc create -f <secret_configuration>.yamlYou need the access token when deploying Grafana.
21.5.4. Deploying Grafana with a Prometheus datasource
Deploy Grafana to present Prometheus metrics. A Grafana application requires configuration for the OpenShift Container Platform monitoring stack.
OpenShift Container Platform includes a Thanos Querier instance in the openshift-monitoring project. Thanos Querier is used to aggregate platform metrics.
To consume the required platform metrics, your Grafana instance requires a Prometheus data source that can connect to Thanos Querier. To configure this connection, you create a config map that authenticates, by using a token, to the oauth-proxy sidecar that runs alongside Thanos Querier. A datasource.yaml file is used as the source of the config map.
Finally, you deploy the Grafana application with the config map mounted as a volume to the project containing your Kafka cluster.
Prerequisites
Procedure
Get the access token of the Grafana
ServiceAccount:oc describe sa/grafana-service-account | grep Tokens: oc describe secret grafana-service-account-token-mmlp9 | grep token:In this example, the service account is named
grafana-service-account. Copy the access token to use in the next step.Create a
datasource.yamlfile containing the Thanos Querier configuration for Grafana.Paste the access token into the
httpHeaderValue1property as indicated.apiVersion: 1 datasources: - name: Prometheus type: prometheus url: https://thanos-querier.openshift-monitoring.svc.cluster.local:9091 access: proxy basicAuth: false withCredentials: false isDefault: true jsonData: timeInterval: 5s tlsSkipVerify: true httpHeaderName1: "Authorization" secureJsonData: httpHeaderValue1: "Bearer ${GRAFANA-ACCESS-TOKEN}"1 editable: true- 1
GRAFANA-ACCESS-TOKEN: The value of the access token for the GrafanaServiceAccount.
Create a config map named
grafana-configfrom thedatasource.yamlfile:oc create configmap grafana-config --from-file=datasource.yaml -n MY-PROJECTCreate a Grafana application consisting of a
Deploymentand aService.The
grafana-configconfig map is mounted as a volume for the datasource configuration.apiVersion: apps/v1 kind: Deployment metadata: name: grafana labels: app: strimzi spec: replicas: 1 selector: matchLabels: name: grafana template: metadata: labels: name: grafana spec: serviceAccountName: grafana-service-account containers: - name: grafana image: grafana/grafana:10.4.2 ports: - name: grafana containerPort: 3000 protocol: TCP volumeMounts: - name: grafana-data mountPath: /var/lib/grafana - name: grafana-logs mountPath: /var/log/grafana - name: grafana-config mountPath: /etc/grafana/provisioning/datasources/datasource.yaml readOnly: true subPath: datasource.yaml readinessProbe: httpGet: path: /api/health port: 3000 initialDelaySeconds: 5 periodSeconds: 10 livenessProbe: httpGet: path: /api/health port: 3000 initialDelaySeconds: 15 periodSeconds: 20 volumes: - name: grafana-data emptyDir: {} - name: grafana-logs emptyDir: {} - name: grafana-config configMap: name: grafana-config --- apiVersion: v1 kind: Service metadata: name: grafana labels: app: strimzi spec: ports: - name: grafana port: 3000 targetPort: 3000 protocol: TCP selector: name: grafana type: ClusterIPDeploy the Grafana application to the project containing your Kafka cluster:
oc apply -f <grafana-application> -n <my-project>
21.5.5. Creating a route to the Grafana Service
You can access the Grafana user interface through a Route that exposes the Grafana service.
Prerequisites
Procedure
Create an edge route to the
grafanaservice:oc create route edge <my-grafana-route> --service=grafana --namespace=KAFKA-NAMESPACE
21.5.6. Importing the example Grafana dashboards
Use Grafana to provide visualizations of Prometheus metrics on customizable dashboards.
Streams for Apache Kafka provides example dashboard configuration files for Grafana in JSON format.
-
examples/metrics/grafana-dashboards
This procedure uses the example Grafana dashboards.
The example dashboards are a good starting point for monitoring key metrics, but they don’t show all the metrics supported by Kafka. You can modify the example dashboards or add other metrics, depending on your infrastructure.
Prerequisites
Procedure
Get the details of the Route to the Grafana Service. For example:
oc get routes NAME HOST/PORT PATH SERVICES MY-GRAFANA-ROUTE MY-GRAFANA-ROUTE-amq-streams.net grafana- In a web browser, access the Grafana login screen using the URL for the Route host and port.
Enter your user name and password, and then click Log In.
The default Grafana user name and password are both
admin. After logging in for the first time, you can change the password.- In Configuration > Data Sources, check that the Prometheus data source was created. The data source was created in Section 21.5.4, “Deploying Grafana with a Prometheus datasource”.
- Click the + icon and then click Import.
-
In
examples/metrics/grafana-dashboards, copy the JSON of the dashboard to import. - Paste the JSON into the text box, and then click Load.
- Repeat steps 5-7 for the other example Grafana dashboards.
The imported Grafana dashboards are available to view from the Dashboards home page.
Chapter 22. Introducing distributed tracing
Distributed tracing tracks the progress of transactions between applications in a distributed system. In a microservices architecture, tracing tracks the progress of transactions between services. Trace data is useful for monitoring application performance and investigating issues with target systems and end-user applications.
In Streams for Apache Kafka, tracing facilitates the end-to-end tracking of messages: from source systems to Kafka, and then from Kafka to target systems and applications. Distributed tracing complements the monitoring of metrics in Grafana dashboards, as well as the component loggers.
Support for tracing is built in to the following Kafka components:
- MirrorMaker to trace messages from a source cluster to a target cluster
- Kafka Connect to trace messages consumed and produced by Kafka Connect
- Kafka Bridge to trace messages between Kafka and HTTP client applications
Tracing is not supported for Kafka brokers.
You enable and configure tracing for these components through their custom resources. You add tracing configuration using spec.template properties.
You enable tracing by specifying a tracing type using the spec.tracing.type property:
opentelemetry-
Specify
type: opentelemetryto use OpenTelemetry. By Default, OpenTelemetry uses the OTLP (OpenTelemetry Protocol) exporter and endpoint to get trace data. You can specify other tracing systems supported by OpenTelemetry, including Jaeger tracing. To do this, you change the OpenTelemetry exporter and endpoint in the tracing configuration.
Streams for Apache Kafka no longer supports OpenTracing. If you were previously using OpenTracing with the type: jaeger option, we encourage you to transition to using OpenTelemetry instead.
22.1. Tracing options
Use OpenTelemetry with the Jaeger tracing system.
OpenTelemetry provides an API specification that is independent from the tracing or monitoring system.
You use the APIs to instrument application code for tracing.
- Instrumented applications generate traces for individual requests across the distributed system.
- Traces are composed of spans that define specific units of work over time.
Jaeger is a tracing system for microservices-based distributed systems.
- The Jaeger user interface allows you to query, filter, and analyze trace data.
The Jaeger user interface showing a simple query

22.2. Environment variables for tracing
Use environment variables when you are enabling tracing for Kafka components or initializing a tracer for Kafka clients.
Tracing environment variables are subject to change. For the latest information, see the OpenTelemetry documentation.
The following tables describe the key environment variables for setting up a tracer.
| Property | Required | Description |
|---|---|---|
|
| Yes | The name of the Jaeger tracing service for OpenTelemetry. |
|
| Yes | The exporter used for tracing. |
|
| Yes |
The exporter used for tracing. Set to |
22.3. Setting up distributed tracing
Enable distributed tracing in Kafka components by specifying a tracing type in the custom resource. Instrument tracers in Kafka clients for end-to-end tracking of messages.
To set up distributed tracing, follow these procedures in order:
- Enable tracing for MirrorMaker, Kafka Connect, and the Kafka Bridge
Set up tracing for clients:
Instrument clients with tracers:
22.3.1. Prerequisites
Before setting up distributed tracing, make sure Jaeger backend components are deployed to your OpenShift cluster. We recommend using the Jaeger operator for deploying Jaeger on your OpenShift cluster.
For deployment instructions, see the Jaeger documentation.
Setting up tracing for applications and systems beyond Streams for Apache Kafka is outside the scope of this content.
22.3.2. Enabling tracing in MirrorMaker, Kafka Connect, and Kafka Bridge resources
Distributed tracing is supported for MirrorMaker, MirrorMaker 2, Kafka Connect, and the Streams for Apache Kafka Bridge. Configure the custom resource of the component to specify and enable a tracer service.
Enabling tracing in a resource triggers the following events:
- Interceptor classes are updated in the integrated consumers and producers of the component.
- For MirrorMaker, MirrorMaker 2, and Kafka Connect, the tracing agent initializes a tracer based on the tracing configuration defined in the resource.
- For the Kafka Bridge, a tracer based on the tracing configuration defined in the resource is initialized by the Kafka Bridge itself.
You can enable tracing that uses OpenTelemetry.
Tracing in MirrorMaker and MirrorMaker 2
For MirrorMaker and MirrorMaker 2, messages are traced from the source cluster to the target cluster. The trace data records messages entering and leaving the MirrorMaker or MirrorMaker 2 component.
Tracing in Kafka Connect
For Kafka Connect, only messages produced and consumed by Kafka Connect are traced. To trace messages sent between Kafka Connect and external systems, you must configure tracing in the connectors for those systems.
Tracing in the Kafka Bridge
For the Kafka Bridge, messages produced and consumed by the Kafka Bridge are traced. Incoming HTTP requests from client applications to send and receive messages through the Kafka Bridge are also traced. To have end-to-end tracing, you must configure tracing in your HTTP clients.
Procedure
Perform these steps for each KafkaMirrorMaker, KafkaMirrorMaker2, KafkaConnect, and KafkaBridge resource.
In the
spec.templateproperty, configure the tracer service.- Use the tracing environment variables as template configuration properties.
-
For OpenTelemetry, set the
spec.tracing.typeproperty toopentelemetry.
Example tracing configuration for Kafka Connect using OpenTelemetry
apiVersion: kafka.strimzi.io/v1beta2 kind: KafkaConnect metadata: name: my-connect-cluster spec: #... template: connectContainer: env: - name: OTEL_SERVICE_NAME value: my-otel-service - name: OTEL_EXPORTER_OTLP_ENDPOINT value: "http://otlp-host:4317" tracing: type: opentelemetry #...Example tracing configuration for MirrorMaker using OpenTelemetry
apiVersion: kafka.strimzi.io/v1beta2 kind: KafkaMirrorMaker metadata: name: my-mirror-maker spec: #... template: mirrorMakerContainer: env: - name: OTEL_SERVICE_NAME value: my-otel-service - name: OTEL_EXPORTER_OTLP_ENDPOINT value: "http://otlp-host:4317" tracing: type: opentelemetry #...Example tracing configuration for MirrorMaker 2 using OpenTelemetry
apiVersion: kafka.strimzi.io/v1beta2 kind: KafkaMirrorMaker2 metadata: name: my-mm2-cluster spec: #... template: connectContainer: env: - name: OTEL_SERVICE_NAME value: my-otel-service - name: OTEL_EXPORTER_OTLP_ENDPOINT value: "http://otlp-host:4317" tracing: type: opentelemetry #...Example tracing configuration for the Kafka Bridge using OpenTelemetry
apiVersion: kafka.strimzi.io/v1beta2 kind: KafkaBridge metadata: name: my-bridge spec: #... template: bridgeContainer: env: - name: OTEL_SERVICE_NAME value: my-otel-service - name: OTEL_EXPORTER_OTLP_ENDPOINT value: "http://otlp-host:4317" tracing: type: opentelemetry #...Create or update the resource:
oc apply -f <resource_configuration_file>
22.3.3. Initializing tracing for Kafka clients
Initialize a tracer for OpenTelemetry, then instrument your client applications for distributed tracing. You can instrument Kafka producer and consumer clients, and Kafka Streams API applications.
Configure and initialize a tracer using a set of tracing environment variables.
Procedure
In each client application add the dependencies for the tracer:
Add the Maven dependencies to the
pom.xmlfile for the client application:Dependencies for OpenTelemetry
<dependency> <groupId>io.opentelemetry.semconv</groupId> <artifactId>opentelemetry-semconv</artifactId> <version>1.21.0-alpha</version> </dependency> <dependency> <groupId>io.opentelemetry</groupId> <artifactId>opentelemetry-exporter-otlp</artifactId> <version>1.34.1</version> <exclusions> <exclusion> <groupId>io.opentelemetry</groupId> <artifactId>opentelemetry-exporter-sender-okhttp</artifactId> </exclusion> </exclusions> </dependency> <dependency> <groupId>io.opentelemetry</groupId> <artifactId>opentelemetry-exporter-sender-grpc-managed-channel</artifactId> <version>1.34.1</version> <scope>runtime</scope> </dependency> <dependency> <groupId>io.opentelemetry</groupId> <artifactId>opentelemetry-sdk-extension-autoconfigure</artifactId> <version>1.34.1</version> </dependency> <dependency> <groupId>io.opentelemetry.instrumentation</groupId> <artifactId>opentelemetry-kafka-clients-2.6</artifactId> <version>1.32.0-alpha</version> </dependency> <dependency> <groupId>io.opentelemetry</groupId> <artifactId>opentelemetry-sdk</artifactId> <version>1.34.1</version> </dependency> <dependency> <groupId>io.opentelemetry</groupId> <artifactId>opentelemetry-exporter-sender-jdk</artifactId> <version>1.34.1-alpha</version> <scope>runtime</scope> </dependency> <dependency> <groupId>io.grpc</groupId> <artifactId>grpc-netty-shaded</artifactId> <version>1.61.0</version> </dependency>- Define the configuration of the tracer using the tracing environment variables.
Create a tracer, which is initialized with the environment variables:
Creating a tracer for OpenTelemetry
OpenTelemetry ot = GlobalOpenTelemetry.get();Register the tracer as a global tracer:
GlobalTracer.register(tracer);Instrument your client:
22.3.4. Instrumenting producers and consumers for tracing
Instrument application code to enable tracing in Kafka producers and consumers. Use a decorator pattern or interceptors to instrument your Java producer and consumer application code for tracing. You can then record traces when messages are produced or retrieved from a topic.
OpenTelemetry instrumentation project provides classes that support instrumentation of producers and consumers.
- Decorator instrumentation
- For decorator instrumentation, create a modified producer or consumer instance for tracing.
- Interceptor instrumentation
- For interceptor instrumentation, add the tracing capability to the consumer or producer configuration.
Prerequisites
You have initialized tracing for the client.
You enable instrumentation in producer and consumer applications by adding the tracing JARs as dependencies to your project.
Procedure
Perform these steps in the application code of each producer and consumer application. Instrument your client application code using either a decorator pattern or interceptors.
To use a decorator pattern, create a modified producer or consumer instance to send or receive messages.
You pass the original
KafkaProducerorKafkaConsumerclass.Example decorator instrumentation for OpenTelemetry
// Producer instance Producer < String, String > op = new KafkaProducer < > ( configs, new StringSerializer(), new StringSerializer() ); Producer < String, String > producer = tracing.wrap(op); KafkaTracing tracing = KafkaTracing.create(GlobalOpenTelemetry.get()); producer.send(...); //consumer instance Consumer<String, String> oc = new KafkaConsumer<>( configs, new StringDeserializer(), new StringDeserializer() ); Consumer<String, String> consumer = tracing.wrap(oc); consumer.subscribe(Collections.singleton("mytopic")); ConsumerRecords<Integer, String> records = consumer.poll(1000); ConsumerRecord<Integer, String> record = ... SpanContext spanContext = TracingKafkaUtils.extractSpanContext(record.headers(), tracer);To use interceptors, set the interceptor class in the producer or consumer configuration.
You use the
KafkaProducerandKafkaConsumerclasses in the usual way. TheTracingProducerInterceptorandTracingConsumerInterceptorinterceptor classes take care of the tracing capability.Example producer configuration using interceptors
senderProps.put(ProducerConfig.INTERCEPTOR_CLASSES_CONFIG, TracingProducerInterceptor.class.getName()); KafkaProducer<Integer, String> producer = new KafkaProducer<>(senderProps); producer.send(...);Example consumer configuration using interceptors
consumerProps.put(ConsumerConfig.INTERCEPTOR_CLASSES_CONFIG, TracingConsumerInterceptor.class.getName()); KafkaConsumer<Integer, String> consumer = new KafkaConsumer<>(consumerProps); consumer.subscribe(Collections.singletonList("messages")); ConsumerRecords<Integer, String> records = consumer.poll(1000); ConsumerRecord<Integer, String> record = ... SpanContext spanContext = TracingKafkaUtils.extractSpanContext(record.headers(), tracer);
22.3.5. Instrumenting Kafka Streams applications for tracing
Instrument application code to enable tracing in Kafka Streams API applications. Use a decorator pattern or interceptors to instrument your Kafka Streams API applications for tracing. You can then record traces when messages are produced or retrieved from a topic.
- Decorator instrumentation
-
For decorator instrumentation, create a modified Kafka Streams instance for tracing. For OpenTelemetry, you need to create a custom
TracingKafkaClientSupplierclass to provide tracing instrumentation for Kafka Streams. - Interceptor instrumentation
- For interceptor instrumentation, add the tracing capability to the Kafka Streams producer and consumer configuration.
Prerequisites
You have initialized tracing for the client.
You enable instrumentation in Kafka Streams applications by adding the tracing JARs as dependencies to your project.
-
To instrument Kafka Streams with OpenTelemetry, you’ll need to write a custom
TracingKafkaClientSupplier. The custom
TracingKafkaClientSuppliercan extend Kafka’sDefaultKafkaClientSupplier, overriding the producer and consumer creation methods to wrap the instances with the telemetry-related code.Example custom
TracingKafkaClientSupplierprivate class TracingKafkaClientSupplier extends DefaultKafkaClientSupplier { @Override public Producer<byte[], byte[]> getProducer(Map<String, Object> config) { KafkaTelemetry telemetry = KafkaTelemetry.create(GlobalOpenTelemetry.get()); return telemetry.wrap(super.getProducer(config)); } @Override public Consumer<byte[], byte[]> getConsumer(Map<String, Object> config) { KafkaTelemetry telemetry = KafkaTelemetry.create(GlobalOpenTelemetry.get()); return telemetry.wrap(super.getConsumer(config)); } @Override public Consumer<byte[], byte[]> getRestoreConsumer(Map<String, Object> config) { return this.getConsumer(config); } @Override public Consumer<byte[], byte[]> getGlobalConsumer(Map<String, Object> config) { return this.getConsumer(config); } }
Procedure
Perform these steps for each Kafka Streams API application.
To use a decorator pattern, create an instance of the
TracingKafkaClientSuppliersupplier interface, then provide the supplier interface toKafkaStreams.Example decorator instrumentation
KafkaClientSupplier supplier = new TracingKafkaClientSupplier(tracer); KafkaStreams streams = new KafkaStreams(builder.build(), new StreamsConfig(config), supplier); streams.start();To use interceptors, set the interceptor class in the Kafka Streams producer and consumer configuration.
The
TracingProducerInterceptorandTracingConsumerInterceptorinterceptor classes take care of the tracing capability.Example producer and consumer configuration using interceptors
props.put(StreamsConfig.PRODUCER_PREFIX + ProducerConfig.INTERCEPTOR_CLASSES_CONFIG, TracingProducerInterceptor.class.getName()); props.put(StreamsConfig.CONSUMER_PREFIX + ConsumerConfig.INTERCEPTOR_CLASSES_CONFIG, TracingConsumerInterceptor.class.getName());
22.3.6. Introducing a different OpenTelemetry tracing system
Instead of the default OTLP system, you can specify other tracing systems that are supported by OpenTelemetry. You do this by adding the required artifacts to the Kafka image provided with Streams for Apache Kafka. Any required implementation specific environment variables must also be set. You then enable the new tracing implementation using the OTEL_TRACES_EXPORTER environment variable.
This procedure shows how to implement Zipkin tracing.
Procedure
Add the tracing artifacts to the
/opt/kafka/libs/directory of the Streams for Apache Kafka image.You can use the Kafka container image on the Red Hat Ecosystem Catalog as a base image for creating a new custom image.
OpenTelemetry artifact for Zipkin
io.opentelemetry:opentelemetry-exporter-zipkinSet the tracing exporter and endpoint for the new tracing implementation.
Example Zikpin tracer configuration
apiVersion: kafka.strimzi.io/v1beta2 kind: KafkaMirrorMaker2 metadata: name: my-mm2-cluster spec: #... template: connectContainer: env: - name: OTEL_SERVICE_NAME value: my-zipkin-service - name: OTEL_EXPORTER_ZIPKIN_ENDPOINT value: http://zipkin-exporter-host-name:9411/api/v2/spans1 - name: OTEL_TRACES_EXPORTER value: zipkin2 tracing: type: opentelemetry #...
22.3.7. Specifying custom span names for OpenTelemetry
A tracing span is a logical unit of work in Jaeger, with an operation name, start time, and duration. Spans have built-in names, but you can specify custom span names in your Kafka client instrumentation where used.
Specifying custom span names is optional and only applies when using a decorator pattern in producer and consumer client instrumentation or Kafka Streams instrumentation.
Custom span names cannot be specified directly with OpenTelemetry. Instead, you retrieve span names by adding code to your client application to extract additional tags and attributes.
Example code to extract attributes
//Defines attribute extraction for a producer
private static class ProducerAttribExtractor implements AttributesExtractor < ProducerRecord < ? , ? > , Void > {
@Override
public void onStart(AttributesBuilder attributes, ProducerRecord < ? , ? > producerRecord) {
set(attributes, AttributeKey.stringKey("prod_start"), "prod1");
}
@Override
public void onEnd(AttributesBuilder attributes, ProducerRecord < ? , ? > producerRecord, @Nullable Void unused, @Nullable Throwable error) {
set(attributes, AttributeKey.stringKey("prod_end"), "prod2");
}
}
//Defines attribute extraction for a consumer
private static class ConsumerAttribExtractor implements AttributesExtractor < ConsumerRecord < ? , ? > , Void > {
@Override
public void onStart(AttributesBuilder attributes, ConsumerRecord < ? , ? > producerRecord) {
set(attributes, AttributeKey.stringKey("con_start"), "con1");
}
@Override
public void onEnd(AttributesBuilder attributes, ConsumerRecord < ? , ? > producerRecord, @Nullable Void unused, @Nullable Throwable error) {
set(attributes, AttributeKey.stringKey("con_end"), "con2");
}
}
//Extracts the attributes
public static void main(String[] args) throws Exception {
Map < String, Object > configs = new HashMap < > (Collections.singletonMap(ProducerConfig.BOOTSTRAP_SERVERS_CONFIG, "localhost:9092"));
System.setProperty("otel.traces.exporter", "jaeger");
System.setProperty("otel.service.name", "myapp1");
KafkaTracing tracing = KafkaTracing.newBuilder(GlobalOpenTelemetry.get())
.addProducerAttributesExtractors(new ProducerAttribExtractor())
.addConsumerAttributesExtractors(new ConsumerAttribExtractor())
.build();Chapter 23. Evicting pods with the Streams for Apache Kafka Drain Cleaner
Kafka and ZooKeeper pods might be evicted during OpenShift upgrades, maintenance, or pod rescheduling. If your Kafka and ZooKeeper pods were deployed by Streams for Apache Kafka, you can use the Streams for Apache Kafka Drain Cleaner tool to handle the pod evictions. The Streams for Apache Kafka Drain Cleaner handles the eviction instead of OpenShift.
By deploying the Streams for Apache Kafka Drain Cleaner, you can use the Cluster Operator to move Kafka pods instead of OpenShift. The Cluster Operator ensures that topics are never under-replicated and Kafka can remain operational during the eviction process. The Cluster Operator waits for topics to synchronize, as the OpenShift worker nodes drain consecutively.
An admission webhook notifies the Streams for Apache Kafka Drain Cleaner of pod eviction requests to the Kubernetes API. The Streams for Apache Kafka Drain Cleaner then adds a rolling update annotation to the pods to be drained. This informs the Cluster Operator to perform a rolling update of an evicted pod.
If you are not using the Streams for Apache Kafka Drain Cleaner, you can add pod annotations to perform rolling updates manually.
Webhook configuration
The Streams for Apache Kafka Drain Cleaner deployment files include a ValidatingWebhookConfiguration resource file. The resource provides the configuration for registering the webhook with the Kubernetes API.
The configuration defines the rules for the Kubernetes API to follow in the event of a pod eviction request. The rules specify that only CREATE operations related to pods/eviction sub-resources are intercepted. If these rules are met, the API forwards the notification.
The clientConfig points to the Streams for Apache Kafka Drain Cleaner service and /drainer endpoint that exposes the webhook. The webhook uses a secure TLS connection, which requires authentication. The caBundle property specifies the certificate chain to validate HTTPS communication. Certificates are encoded in Base64.
Webhook configuration for pod eviction notifications
apiVersion: admissionregistration.k8s.io/v1
kind: ValidatingWebhookConfiguration
# ...
webhooks:
- name: strimzi-drain-cleaner.strimzi.io
rules:
- apiGroups: [""]
apiVersions: ["v1"]
operations: ["CREATE"]
resources: ["pods/eviction"]
scope: "Namespaced"
clientConfig:
service:
namespace: "strimzi-drain-cleaner"
name: "strimzi-drain-cleaner"
path: /drainer
port: 443
caBundle: Cg==
# ...23.1. Downloading the Streams for Apache Kafka Drain Cleaner deployment files
To deploy and use the Streams for Apache Kafka Drain Cleaner, you need to download the deployment files.
The Streams for Apache Kafka Drain Cleaner deployment files are available from the Streams for Apache Kafka software downloads page.
23.2. Deploying the Streams for Apache Kafka Drain Cleaner using installation files
Deploy the Streams for Apache Kafka Drain Cleaner to the OpenShift cluster where the Cluster Operator and Kafka cluster are running.
Streams for Apache Kafka Drain Cleaner can run in two different modes. By default, the Drain Cleaner denies (blocks) the OpenShift eviction request to prevent OpenShift from evicting the pods and instead uses the Cluster Operator to move the pod. This mode has better compatibility with various cluster autoscaling tools and does not require any specific PodDisuptionBudget configuration. Alternatively, you can enable the legacy mode where it allows the eviction request while also instructing the Cluster Operator to move the pod. For the legacy mode to work, you have to configure the PodDisruptionBudget to not allow any pod evictions by setting the maxUnavailable option to 0.
Prerequisites
- You have downloaded the Streams for Apache Kafka Drain Cleaner deployment files.
- You have a highly available Kafka cluster deployment running with OpenShift worker nodes that you would like to update.
Topics are replicated for high availability.
Topic configuration specifies a replication factor of at least 3 and a minimum number of in-sync replicas to 1 less than the replication factor.
Kafka topic replicated for high availability
apiVersion: kafka.strimzi.io/v1beta2 kind: KafkaTopic metadata: name: my-topic labels: strimzi.io/cluster: my-cluster spec: partitions: 1 replicas: 3 config: # ... min.insync.replicas: 2 # ...
Excluding Kafka or ZooKeeper
If you don’t want to include Kafka or ZooKeeper pods in Drain Cleaner operations, or if you prefer to use the Drain Cleaner in legacy mode, change the default environment variables in the Drain Cleaner Deployment configuration file:
-
Set
STRIMZI_DENY_EVICTIONtofalseto use the legacy mode relying on thePodDisruptionBudgetconfiguration -
Set
STRIMZI_DRAIN_KAFKAtofalseto exclude Kafka pods -
Set
STRIMZI_DRAIN_ZOOKEEPERtofalseto exclude ZooKeeper pods
Example configuration to exclude ZooKeeper pods
apiVersion: apps/v1
kind: Deployment
spec:
# ...
template:
spec:
serviceAccountName: strimzi-drain-cleaner
containers:
- name: strimzi-drain-cleaner
# ...
env:
- name: STRIMZI_DENY_EVICTION
value: "true"
- name: STRIMZI_DRAIN_KAFKA
value: "true"
- name: STRIMZI_DRAIN_ZOOKEEPER
value: "false"
# ...Procedure
If you are using the legacy mode activated by setting the
STRIMZI_DENY_EVICTIONenvironment variable tofalse, you must also configure thePodDisruptionBudgetresource. SetmaxUnavailableto0(zero) in the Kafka and ZooKeeper sections of theKafkaresource usingtemplatesettings.Specifying a pod disruption budget
apiVersion: kafka.strimzi.io/v1beta2 kind: Kafka metadata: name: my-cluster namespace: myproject spec: kafka: template: podDisruptionBudget: maxUnavailable: 0 # ... zookeeper: template: podDisruptionBudget: maxUnavailable: 0 # ...This setting prevents the automatic eviction of pods in case of planned disruptions, leaving the Streams for Apache Kafka Drain Cleaner and Cluster Operator to roll the pods on different worker nodes.
Add the same configuration for ZooKeeper if you want to use Streams for Apache Kafka Drain Cleaner to drain ZooKeeper nodes.
Update the
Kafkaresource:oc apply -f <kafka_configuration_file>Deploy the Streams for Apache Kafka Drain Cleaner.
To run the Drain Cleaner on OpenShift, apply the resources in the
/install/drain-cleaner/openshiftdirectory.oc apply -f ./install/drain-cleaner/openshift
23.3. Using the Streams for Apache Kafka Drain Cleaner
Use the Streams for Apache Kafka Drain Cleaner in combination with the Cluster Operator to move Kafka broker or ZooKeeper pods from nodes that are being drained. When you run the Streams for Apache Kafka Drain Cleaner, it annotates pods with a rolling update pod annotation. The Cluster Operator performs rolling updates based on the annotation.
Prerequisites
Considerations when using anti-affinity configuration
When using anti-affinity with your Kafka or ZooKeeper pods, consider adding a spare worker node to your cluster. Including spare nodes ensures that your cluster has the capacity to reschedule pods during node draining or temporary unavailability of other nodes. When a worker node is drained, and anti-affinity rules restrict pod rescheduling on alternative nodes, spare nodes help prevent restarted pods from becoming unschedulable. This mitigates the risk of the draining operation failing.
Procedure
Drain a specified OpenShift node hosting the Kafka broker or ZooKeeper pods.
oc get nodes oc drain <name-of-node> --delete-emptydir-data --ignore-daemonsets --timeout=6000s --forceCheck the eviction events in the Streams for Apache Kafka Drain Cleaner log to verify that the pods have been annotated for restart.
Streams for Apache Kafka Drain Cleaner log show annotations of pods
INFO ... Received eviction webhook for Pod my-cluster-zookeeper-2 in namespace my-project INFO ... Pod my-cluster-zookeeper-2 in namespace my-project will be annotated for restart INFO ... Pod my-cluster-zookeeper-2 in namespace my-project found and annotated for restart INFO ... Received eviction webhook for Pod my-cluster-kafka-0 in namespace my-project INFO ... Pod my-cluster-kafka-0 in namespace my-project will be annotated for restart INFO ... Pod my-cluster-kafka-0 in namespace my-project found and annotated for restartCheck the reconciliation events in the Cluster Operator log to verify the rolling updates.
Cluster Operator log shows rolling updates
INFO PodOperator:68 - Reconciliation #13(timer) Kafka(my-project/my-cluster): Rolling Pod my-cluster-zookeeper-2 INFO PodOperator:68 - Reconciliation #13(timer) Kafka(my-project/my-cluster): Rolling Pod my-cluster-kafka-0 INFO AbstractOperator:500 - Reconciliation #13(timer) Kafka(my-project/my-cluster): reconciled
23.4. Watching the TLS certificates used by the Streams for Apache Kafka Drain Cleaner
By default, the Drain Cleaner deployment watches the secret containing the TLS certificates its uses for authentication. The Drain Cleaner watches for changes, such as certificate renewals. If it detects a change, it restarts to reload the TLS certificates. The Drain Cleaner installation files enable this behavior by default. But you can disable the watching of certificates by setting the STRIMZI_CERTIFICATE_WATCH_ENABLED environment variable to false in the Deployment configuration (060-Deployment.yaml) of the Drain Cleaner installation files.
With STRIMZI_CERTIFICATE_WATCH_ENABLED enabled, you can also use the following environment variables for watching TLS certificates.
| Environment Variable | Description | Default |
|---|---|---|
|
| Enables or disables the certificate watch |
|
|
| The namespace where the Drain Cleaner is deployed and where the certificate secret exists |
|
|
| The Drain Cleaner pod name | - |
|
| The name of the secret containing TLS certificates |
|
|
| The list of fields inside the secret that contain the TLS certificates |
|
Example environment variable configuration to control watch operations
apiVersion: apps/v1
kind: Deployment
metadata:
name: strimzi-drain-cleaner
labels:
app: strimzi-drain-cleaner
namespace: strimzi-drain-cleaner
spec:
# ...
spec:
serviceAccountName: strimzi-drain-cleaner
containers:
- name: strimzi-drain-cleaner
# ...
env:
- name: STRIMZI_DRAIN_KAFKA
value: "true"
- name: STRIMZI_DRAIN_ZOOKEEPER
value: "true"
- name: STRIMZI_CERTIFICATE_WATCH_ENABLED
value: "true"
- name: STRIMZI_CERTIFICATE_WATCH_NAMESPACE
valueFrom:
fieldRef:
fieldPath: metadata.namespace
- name: STRIMZI_CERTIFICATE_WATCH_POD_NAME
valueFrom:
fieldRef:
fieldPath: metadata.name
# ...
Use the Downward API mechanism to configure STRIMZI_CERTIFICATE_WATCH_NAMESPACE and STRIMZI_CERTIFICATE_WATCH_POD_NAME.
Chapter 24. Retrieving diagnostic and troubleshooting data
The report.sh diagnostics tool is a script provided by Red Hat to gather essential data for troubleshooting Streams for Apache Kafka deployments on OpenShift. It collects relevant logs, configuration files, and other diagnostic data to assist in identifying and resolving issues. When you run the script, you can specify additional parameters to retrieve specific data.
Prerequisites
- Bash 4 or newer to run the script.
-
The OpenShift
occommand-line tool is installed and configured to connect to the running cluster.
This establishes the necessary authentication for the oc command-line tool to interact with your cluster and retrieve the required diagnostic data.
Procedure
Download and extract the tool.
The diagnostics tool is available from Streams for Apache Kafka software downloads page.
From the directory where you extracted the tool, open a terminal and run the reporting tool:
./report.sh --namespace=<cluster_namespace> --cluster=<cluster_name> --out-dir=<local_output_directory>Replace
<cluster_namespace>with the actual OpenShift namespace of your Streams for Apache Kafka deployment,<cluster_name>with the name of your Kafka cluster, and<local_output_directory>with the path to the local directory where you want to save the generated report. If you don’t specify a directory, a temporary directory is created.Include other optional reporting options, as necessary:
- --bridge=<string>
- Specify the name of the Kafka Bridge cluster to get data on its pods and logs.
- --connect=<string>
- Specify the name of the Kafka Connect cluster to get data on its pods and logs.
- --mm2=<string>
- Specify the name of the Mirror Maker 2 cluster to get data on its pods and logs.
- --secrets=(off|hidden|all)
Specify the secret verbosity level. The default is
hidden. The available options are as follows:-
all: Secret keys and data values are reported. -
hidden: Secrets with only keys are reported. Data values, such as passwords, are removed. -
off: Secrets are not reported at all.
-
Example request with data collection options
./report.sh --namespace=my-amq-streams-namespace --cluster=my-kafka-cluster --bridge=my-bridge-component --secrets=all --out-dir=~/reportsNoteIf required, assign execute permissions on the script to your user with the
chmodcommand. For example,chmod +x report.sh.
After the script has finished executing, the output directory contains files and directories of logs, configurations, and other diagnostic data collected for each component of your Streams for Apache Kafka deployment.
Data collected by the reporting diagnostics tool
Data on the following components is returned if present:
Cluster Operator
- Deployment YAML and logs
- All related pods and their logs
- YAML files for resources related to the cluster operator (ClusterRoles, ClusterRoleBindings)
Drain Cleaner (if present)
- Deployment YAML and logs
- Pod logs
Custom Resources
- Custom Resource Definitions (CRD) YAML
- YAML files for all related Custom Resources (CR)
Events
- Events related to the specified namespace
Configurations
-
Kafka pod logs and configuration file (
strimzi.properties) -
Zookeeper pod logs and configuration file (
zookeeper.properties) - Entity Operator (Topic Operator, User Operator) pod logs
- Cruise Control pod logs
- Kafka Exporter pod logs
- Bridge pod logs if specified in the options
- Connect pod logs if specified in the options
- MirrorMaker 2 pod logs if specified in the options
Secrets (if requested in the options)
- YAML files for all secrets related to the specified Kafka cluster
Chapter 25. Upgrading Streams for Apache Kafka
Upgrade your Streams for Apache Kafka installation to version 2.7 and benefit from new features, performance improvements, and enhanced security options. During the upgrade, Kafka is also be updated to the latest supported version, introducing additional features and bug fixes to your Streams for Apache Kafka deployment.
Use the same method to upgrade the Cluster Operator as the initial method of deployment. For example, if you used the Streams for Apache Kafka installation files, modify those files to perform the upgrade. After you have upgraded your Cluster Operator to 2.7, the next step is to upgrade all Kafka nodes to the latest supported version of Kafka. Kafka upgrades are performed by the Cluster Operator through rolling updates of the Kafka nodes.
If you encounter any issues with the new version, Streams for Apache Kafka can be downgraded to the previous version.
Released Streams for Apache Kafka versions can be found at Streams for Apache Kafka software downloads page.
Upgrade without downtime
For topics configured with high availability (replication factor of at least 3 and evenly distributed partitions), the upgrade process should not cause any downtime for consumers and producers.
The upgrade triggers rolling updates, where brokers are restarted one by one at different stages of the process. During this time, overall cluster availability is temporarily reduced, which may increase the risk of message loss in the event of a broker failure.
25.1. Required upgrade sequence
To upgrade brokers and clients without downtime, you must complete the Streams for Apache Kafka upgrade procedures in the following order:
Make sure your OpenShift cluster version is supported.
Streams for Apache Kafka 2.7 requires OpenShift 4.12 to 4.16.
- Upgrade the Cluster Operator.
Upgrade Kafka depending on the cluster configuration:
-
If using Kafka in KRaft mode, update the Kafka version and
spec.kafka.metadataVersionto upgrade all Kafka brokers and client applications. -
If using ZooKeeper-based Kafka, update the Kafka version and
inter.broker.protocol.versionto upgrade all Kafka brokers and client applications.
-
If using Kafka in KRaft mode, update the Kafka version and
From Streams for Apache Kafka 2.7, upgrades and downgrades between KRaft-based clusters are supported.
25.2. Streams for Apache Kafka upgrade paths
Two upgrade paths are available for Streams for Apache Kafka.
- Incremental upgrade
- An incremental upgrade involves upgrading Streams for Apache Kafka from the previous minor version to version 2.7.
- Multi-version upgrade
- A multi-version upgrade involves upgrading an older version of Streams for Apache Kafka to version 2.7 within a single upgrade, skipping one or more intermediate versions. For example, upgrading directly from Streams for Apache Kafka 2.3.0 to Streams for Apache Kafka 2.7 is possible.
25.2.1. Support for Kafka versions when upgrading
When upgrading Streams for Apache Kafka, it is important to ensure compatibility with the Kafka version being used.
Multi-version upgrades are possible even if the supported Kafka versions differ between the old and new versions. However, if you attempt to upgrade to a new Streams for Apache Kafka version that does not support the current Kafka version, an error indicating that the Kafka version is not supported is generated. In this case, you must upgrade the Kafka version as part of the Streams for Apache Kafka upgrade by changing the spec.kafka.version in the Kafka custom resource to the supported version for the new Streams for Apache Kafka version.
25.2.2. Upgrading from a Streams for Apache Kafka version earlier than 1.7
If you are upgrading to the latest version of Streams for Apache Kafka from a version prior to version 1.7, do the following:
- Upgrade Streams for Apache Kafka to version 1.7 following the standard sequence.
-
Convert Streams for Apache Kafka custom resources to
v1beta2using the API conversion tool provided with Streams for Apache Kafka. Do one of the following:
-
Upgrade Streams for Apache Kafka to version 1.8 (where the
ControlPlaneListenerfeature gate is disabled by default). -
Upgrade Streams for Apache Kafka to a version between 2.0 and 2.2 (where the
ControlPlaneListenerfeature gate is enabled by default) with theControlPlaneListenerfeature gate disabled.
-
Upgrade Streams for Apache Kafka to version 1.8 (where the
-
Enable the
ControlPlaneListenerfeature gate. - Upgrade to Streams for Apache Kafka 2.7 following the standard sequence.
Streams for Apache Kafka custom resources started using the v1beta2 API version in release 1.7. CRDs and custom resources must be converted before upgrading to Streams for Apache Kafka 1.8 or newer. For information on using the API conversion tool, see the Streams for Apache Kafka 1.7 upgrade documentation.
As an alternative to first upgrading to version 1.7, you can install the custom resources from version 1.7 and then convert the resources.
The ControlPlaneListener feature is now permanently enabled in Streams for Apache Kafka. You must upgrade to a version of Streams for Apache Kafka where it is disabled, then enable it using the STRIMZI_FEATURE_GATES environment variable in the Cluster Operator configuration.
Disabling the ControlPlaneListener feature gate
env:
- name: STRIMZI_FEATURE_GATES
value: -ControlPlaneListenerEnabling the ControlPlaneListener feature gate
env:
- name: STRIMZI_FEATURE_GATES
value: +ControlPlaneListener25.2.3. Kafka version and image mappings
When upgrading Kafka, consider your settings for the STRIMZI_KAFKA_IMAGES environment variable and the Kafka.spec.kafka.version property.
-
Each
Kafkaresource can be configured with aKafka.spec.kafka.version, which defaults to the latest supported Kafka version (3.7.0) if not specified. The Cluster Operator’s
STRIMZI_KAFKA_IMAGESenvironment variable provides a mapping (<kafka_version>=<image>) between a Kafka version and the image to be used when a specific Kafka version is requested in a givenKafkaresource. For example, 3.7.0=registry.redhat.io/amq-streams/kafka-37-rhel9:2.7.0.-
If
Kafka.spec.kafka.imageis not configured, the default image for the given version is used. -
If
Kafka.spec.kafka.imageis configured, the default image is overridden.
-
If
The Cluster Operator cannot validate that an image actually contains a Kafka broker of the expected version. Take care to ensure that the given image corresponds to the given Kafka version.
25.3. Strategies for upgrading clients
Upgrading Kafka clients ensures that they benefit from the features, fixes, and improvements that are introduced in new versions of Kafka. Upgraded clients maintain compatibility with other upgraded Kafka components. The performance and stability of the clients might also be improved.
Consider the best approach for upgrading Kafka clients and brokers to ensure a smooth transition. The chosen upgrade strategy depends on whether you are upgrading brokers or clients first. Since Kafka 3.0, you can upgrade brokers and client independently and in any order. The decision to upgrade clients or brokers first depends on several factors, such as the number of applications that need to be upgraded and how much downtime is tolerable.
If you upgrade clients before brokers, some new features may not work as they are not yet supported by brokers. However, brokers can handle producers and consumers running with different versions and supporting different log message versions.
25.4. Upgrading OpenShift with minimal downtime
If you are upgrading OpenShift, refer to the OpenShift upgrade documentation to check the upgrade path and the steps to upgrade your nodes correctly. Before upgrading OpenShift, check the supported versions for your version of Streams for Apache Kafka.
When performing your upgrade, ensure the availability of your Kafka clusters by following these steps:
- Configure pod disruption budgets
Roll pods using one of these methods:
- Use the Streams for Apache Kafka Drain Cleaner (recommended)
- Apply an annotation to your pods to roll them manually
For Kafka to stay operational, topics must also be replicated for high availability. This requires topic configuration that specifies a replication factor of at least 3 and a minimum number of in-sync replicas to 1 less than the replication factor.
Kafka topic replicated for high availability
apiVersion: kafka.strimzi.io/v1beta2
kind: KafkaTopic
metadata:
name: my-topic
labels:
strimzi.io/cluster: my-cluster
spec:
partitions: 1
replicas: 3
config:
# ...
min.insync.replicas: 2
# ...In a highly available environment, the Cluster Operator maintains a minimum number of in-sync replicas for topics during the upgrade process so that there is no downtime.
25.4.1. Rolling pods using Drain Cleaner
When using the Streams for Apache Kafka Drain Cleaner to evict nodes during OpenShift upgrade, it annotates pods with a manual rolling update annotation to inform the Cluster Operator to perform a rolling update of the pod that should be evicted and have it moved away from the OpenShift node that is being upgraded.
For more information, see Chapter 23, Evicting pods with the Streams for Apache Kafka Drain Cleaner.
25.4.2. Rolling pods manually (alternative to Drain Cleaner)
As an alternative to using the Drain Cleaner to roll pods, you can trigger a manual rolling update of pods through the Cluster Operator. Using Pod resources, rolling updates restart the pods of resources with new pods. To replicate the operation of the Drain Cleaner by keeping topics available, you must also set the maxUnavailable value to zero for the pod disruption budget. Reducing the pod disruption budget to zero prevents OpenShift from evicting pods automatically.
Specifying a pod disruption budget
apiVersion: kafka.strimzi.io/v1beta2
kind: Kafka
metadata:
name: my-cluster
namespace: myproject
spec:
kafka:
# ...
template:
podDisruptionBudget:
maxUnavailable: 0
# ...You need to watch the pods that need to be drained. You then add a pod annotation to make the update.
Here, the annotation updates a Kafka pod named my-cluster-pool-a-1.
Performing a manual rolling update on a Kafka pod
oc annotate pod my-cluster-pool-a-1 strimzi.io/manual-rolling-update="true"25.5. Upgrading the Cluster Operator
Use the same method to upgrade the Cluster Operator as the initial method of deployment.
25.5.1. Upgrading the Cluster Operator using installation files
This procedure describes how to upgrade a Cluster Operator deployment to use Streams for Apache Kafka 2.7.
Follow this procedure if you deployed the Cluster Operator using the installation YAML files.
The availability of Kafka clusters managed by the Cluster Operator is not affected by the upgrade operation.
Refer to the documentation supporting a specific version of Streams for Apache Kafka for information on how to upgrade to that version.
Prerequisites
- An existing Cluster Operator deployment is available.
- You have downloaded the release artifacts for Streams for Apache Kafka 2.7.
Procedure
-
Take note of any configuration changes made to the existing Cluster Operator resources (in the
/install/cluster-operatordirectory). Any changes will be overwritten by the new version of the Cluster Operator. - Update your custom resources to reflect the supported configuration options available for Streams for Apache Kafka version 2.7.
Update the Cluster Operator.
Modify the installation files for the new Cluster Operator version according to the namespace the Cluster Operator is running in.
On Linux, use:
sed -i 's/namespace: .*/namespace: my-cluster-operator-namespace/' install/cluster-operator/*RoleBinding*.yamlOn MacOS, use:
sed -i '' 's/namespace: .*/namespace: my-cluster-operator-namespace/' install/cluster-operator/*RoleBinding*.yaml-
If you modified one or more environment variables in your existing Cluster Operator
Deployment, edit theinstall/cluster-operator/060-Deployment-strimzi-cluster-operator.yamlfile to use those environment variables.
When you have an updated configuration, deploy it along with the rest of the installation resources:
oc replace -f install/cluster-operatorWait for the rolling updates to complete.
If the new Operator version no longer supports the Kafka version you are upgrading from, the Cluster Operator returns an error message to say the version is not supported. Otherwise, no error message is returned.
If the error message is returned, upgrade to a Kafka version that is supported by the new Cluster Operator version:
-
Edit the
Kafkacustom resource. -
Change the
spec.kafka.versionproperty to a supported Kafka version.
-
Edit the
- If the error message is not returned, go to the next step. You will upgrade the Kafka version later.
Get the image for the Kafka pod to ensure the upgrade was successful:
oc get pods my-cluster-kafka-0 -o jsonpath='{.spec.containers[0].image}'The image tag shows the new Streams for Apache Kafka version followed by the Kafka version:
registry.redhat.io/amq-streams/strimzi-kafka-37-rhel9:2.7.0You can also check the upgrade has completed successfully from the status of the
Kafkaresource.
The Cluster Operator is upgraded to version 2.7, but the version of Kafka running in the cluster it manages is unchanged.
25.5.2. Upgrading the Cluster Operator using the OperatorHub
If you deployed Streams for Apache Kafka from OperatorHub, use the Operator Lifecycle Manager (OLM) to change the update channel for the Streams for Apache Kafka operators to a new Streams for Apache Kafka version.
Updating the channel starts one of the following types of upgrade, depending on your chosen upgrade strategy:
- An automatic upgrade is initiated
- A manual upgrade that requires approval before installation begins
If you subscribe to the stable channel, you can get automatic updates without changing channels. However, enabling automatic updates is not recommended because of the potential for missing any pre-installation upgrade steps. Use automatic upgrades only on version-specific channels.
For more information on using OperatorHub to upgrade Operators, see the Upgrading installed Operators (OpenShift documentation).
25.5.3. Migrating to unidirectional topic management
When deploying the Topic Operator to manage topics, the Cluster Operator enables unidirectional topic management by default. If you are switching from a version of Streams for Apache Kafka that used bidirectional topic management, there are some cleanup tasks to perform after upgrading the Cluster Operator. For more information, see Section 10.9, “Switching between Topic Operator modes”.
25.5.4. Upgrading the Cluster Operator returns Kafka version error
If you upgrade the Cluster Operator to a version that does not support the current version of Kafka you are using, you get an unsupported Kafka version error. This error applies to all installation methods and means that you must upgrade Kafka to a supported Kafka version. Change the spec.kafka.version in the Kafka resource to the supported version.
You can use oc to check for error messages like this in the status of the Kafka resource.
Checking the Kafka status for errors
oc get kafka <kafka_cluster_name> -n <namespace> -o jsonpath='{.status.conditions}'Replace <kafka_cluster_name> with the name of your Kafka cluster and <namespace> with the OpenShift namespace where the pod is running.
25.5.5. Upgrading from Streams for Apache Kafka 1.7 or earlier using the OperatorHub
Action required if upgrading from Streams for Apache Kafka 1.7 or earlier using the OperatorHub
Before you upgrade the Streams for Apache Kafka Operator to version 2.7, you need to make the following changes:
-
Convert custom resources and CRDs to
v1beta2 -
Upgrade to a version of Streams for Apache Kafka where the
ControlPlaneListenerfeature gate is disabled
These requirements are described in Section 25.2.2, “Upgrading from a Streams for Apache Kafka version earlier than 1.7”.
If you are upgrading from Streams for Apache Kafka 1.7 or earlier, do the following:
- Upgrade to Streams for Apache Kafka 1.7.
- Download the Red Hat Streams for Apache Kafka API Conversion Tool provided with Streams for Apache Kafka 1.8 from the Streams for Apache Kafka software downloads page.
Convert custom resources and CRDs to
v1beta2.For more information, see the Streams for Apache Kafka 1.7 upgrade documentation.
- In the OperatorHub, delete version 1.7 of the Streams for Apache Kafka Operator.
If it also exists, delete version 2.7 of the Streams for Apache Kafka Operator.
If it does not exist, go to the next step.
If the Approval Strategy for the Streams for Apache Kafka Operator was set to Automatic, version 2.7 of the operator might already exist in your cluster. If you did not convert custom resources and CRDs to the
v1beta2API version before release, the operator-managed custom resources and CRDs will be using the old API version. As a result, the 2.7 Operator is stuck in Pending status. In this situation, you need to delete version 2.7 of the Streams for Apache Kafka Operator as well as version 1.7.If you delete both operators, reconciliations are paused until the new operator version is installed. Follow the next steps immediately so that any changes to custom resources are not delayed.
In the OperatorHub, do one of the following:
-
Upgrade to version 1.8 of the Streams for Apache Kafka Operator (where the
ControlPlaneListenerfeature gate is disabled by default). -
Upgrade to version 2.0 or 2.2 of the Streams for Apache Kafka Operator (where the
ControlPlaneListenerfeature gate is enabled by default) with theControlPlaneListenerfeature gate disabled.
-
Upgrade to version 1.8 of the Streams for Apache Kafka Operator (where the
Upgrade to version 2.7 of the Streams for Apache Kafka Operator immediately.
The installed 2.7 operator begins to watch the cluster and performs rolling updates. You might notice a temporary decrease in cluster performance during this process.
25.6. Upgrading KRaft-based Kafka clusters and client applications
Upgrade a KRaft-based Streams for Apache Kafka cluster to a newer supported Kafka version and KRaft metadata version.
You should also choose a strategy for upgrading clients. Kafka clients are upgraded in step 6 of this procedure.
Refer to the Apache Kafka documentation for the latest on support for KRaft-based upgrades.
Prerequisites
- The Cluster Operator is up and running.
-
Before you upgrade the Streams for Apache Kafka cluster, check that the properties of the
Kafkaresource do not contain configuration options that are not supported in the new Kafka version.
Procedure
Update the Kafka cluster configuration:
oc edit kafka <kafka_configuration_file>If configured, check that the current
spec.kafka.metadataVersionis set to a version supported by the version of Kafka you are upgrading to.For example, the current version is 3.6-IV2 if upgrading from Kafka version 3.6.0 to 3.7.0:
apiVersion: kafka.strimzi.io/v1beta2 kind: Kafka metadata: name: my-cluster spec: kafka: replicas: 3 metadataVersion: 3.6-IV2 version: 3.6.0 # ...If
metadataVersionis not configured, Streams for Apache Kafka automatically updates it to the current default after the update to the Kafka version in the next step.NoteThe value of
metadataVersionmust be a string to prevent it from being interpreted as a floating point number.Change the
Kafka.spec.kafka.versionto specify the new Kafka version; leave themetadataVersionat the default for the current Kafka version.NoteChanging the
kafka.versionensures that all brokers in the cluster are upgraded to start using the new broker binaries. During this process, some brokers are using the old binaries while others have already upgraded to the new ones. Leaving themetadataVersionunchanged at the current setting ensures that the Kafka brokers and controllers can continue to communicate with each other throughout the upgrade.For example, if upgrading from Kafka 3.6.0 to 3.7.0:
apiVersion: kafka.strimzi.io/v1beta2 kind: Kafka metadata: name: my-cluster spec: kafka: replicas: 3 metadataVersion: 3.6-IV21 version: 3.7.02 # ...If the image for the Kafka cluster is defined in
Kafka.spec.kafka.imageof theKafkacustom resource, update theimageto point to a container image with the new Kafka version.Save and exit the editor, then wait for the rolling updates to upgrade the Kafka nodes to complete.
Check the progress of the rolling updates by watching the pod state transitions:
oc get pods my-cluster-kafka-0 -o jsonpath='{.spec.containers[0].image}'The rolling updates ensure that each pod is using the broker binaries for the new version of Kafka.
Depending on your chosen strategy for upgrading clients, upgrade all client applications to use the new version of the client binaries.
If required, set the
versionproperty for Kafka Connect and MirrorMaker as the new version of Kafka:-
For Kafka Connect, update
KafkaConnect.spec.version. -
For MirrorMaker, update
KafkaMirrorMaker.spec.version. For MirrorMaker 2, update
KafkaMirrorMaker2.spec.version.NoteIf you are using custom images that are built manually, you must rebuild those images to ensure that they are up-to-date with the latest Streams for Apache Kafka base image. For example, if you created a container image from the base Kafka Connect image, update the Dockerfile to point to the latest base image and build configuration.
-
For Kafka Connect, update
- Verify that the upgraded client applications work correctly with the new Kafka brokers.
If configured, update the Kafka resource to use the new
metadataVersionversion. Otherwise, go to step 9.For example, if upgrading to Kafka 3.7.0:
apiVersion: kafka.strimzi.io/v1beta2 kind: Kafka metadata: name: my-cluster spec: kafka: replicas: 3 metadataVersion: 3.7-IV2 version: 3.7.0 # ...WarningExercise caution when changing the
metadataVersion, as downgrading may not be possible. You cannot downgrade Kafka if themetadataVersionfor the new Kafka version is higher than the Kafka version you wish to downgrade to. However, understand the potential implications on support and compatibility when maintaining an older version.Wait for the Cluster Operator to update the cluster.
You can check the upgrade has completed successfully from the status of the
Kafkaresource.
25.7. Upgrading Kafka when using ZooKeeper
If you are using a ZooKeeper-based Kafka cluster, an upgrade requires an update to the Kafka version and the inter-broker protocol version.
If you want to switch a Kafka cluster from using ZooKeeper for metadata management to operating in KRaft mode, the steps must be performed separately from the upgrade. For information on migrating to a KRaft-based cluster, see Chapter 8, Migrating to KRaft mode.
25.7.1. Updating Kafka versions
Upgrading Kafka when using ZooKeeper for cluster management requires updates to the Kafka version (Kafka.spec.kafka.version) and its inter-broker protocol version (inter.broker.protocol.version) in the configuration of the Kafka resource. Each version of Kafka has a compatible version of the inter-broker protocol. The inter-broker protocol is used for inter-broker communication. The minor version of the protocol typically increases to match the minor version of Kafka, as shown in the preceding table. The inter-broker protocol version is set cluster wide in the Kafka resource. To change it, you edit the inter.broker.protocol.version property in Kafka.spec.kafka.config.
The following table shows the differences between Kafka versions:
| Streams for Apache Kafka version | Kafka version | Inter-broker protocol version | Log message format version | ZooKeeper version |
|---|---|---|---|---|
| 2.7 | 3.7.0 | 3.7 | 3.7 | 3.8.3 |
| 2.6 | 3.6.0 | 3.6 | 3.6 | 3.8.3 |
- Kafka 3.7.0 is supported for production use.
- Kafka 3.6.0 is supported only for the purpose of upgrading to Streams for Apache Kafka 2.7.
Log message format version
When a producer sends a message to a Kafka broker, the message is encoded using a specific format. The format can change between Kafka releases, so messages specify which version of the message format they were encoded with.
The properties used to set a specific message format version are as follows:
-
message.format.versionproperty for topics -
log.message.format.versionproperty for Kafka brokers
From Kafka 3.0.0, the message format version values are assumed to match the inter.broker.protocol.version and don’t need to be set. The values reflect the Kafka version used.
When upgrading to Kafka 3.0.0 or higher, you can remove these settings when you update the inter.broker.protocol.version. Otherwise, you can set the message format version based on the Kafka version you are upgrading to.
The default value of message.format.version for a topic is defined by the log.message.format.version that is set on the Kafka broker. You can manually set the message.format.version of a topic by modifying its topic configuration.
Rolling updates from Kafka version changes
The Cluster Operator initiates rolling updates to Kafka brokers when the Kafka version is updated. Further rolling updates depend on the configuration for inter.broker.protocol.version and log.message.format.version.
If Kafka.spec.kafka.config contains… | The Cluster Operator initiates… |
|---|---|
|
Both the |
A single rolling update. After the update, the |
|
Either the | Two rolling updates. |
|
No configuration for the | Two rolling updates. |
From Kafka 3.0.0, when the inter.broker.protocol.version is set to 3.0 or higher, the log.message.format.version option is ignored and doesn’t need to be set. The log.message.format.version property for brokers and the message.format.version property for topics are deprecated and will be removed in a future release of Kafka.
As part of the Kafka upgrade, the Cluster Operator initiates rolling updates for ZooKeeper.
- A single rolling update occurs even if the ZooKeeper version is unchanged.
- Additional rolling updates occur if the new version of Kafka requires a new ZooKeeper version.
25.7.2. Upgrading clients with older message formats
Before Kafka 3.0, you could configure a specific message format for brokers using the log.message.format.version property (or the message.format.version property at the topic level). This allowed brokers to accommodate older Kafka clients that were using an outdated message format. Though Kafka inherently supports older clients without explicitly setting this property, brokers would then need to convert the messages from the older clients, which came with a significant performance cost.
Apache Kafka Java clients have supported the latest message format version since version 0.11. If all of your clients are using the latest message version, you can remove the log.message.format.version or message.format.version overrides when upgrading your brokers.
However, if you still have clients that are using an older message format version, we recommend upgrading your clients first. Start with the consumers, then upgrade the producers before removing the log.message.format.version or message.format.version overrides when upgrading your brokers. This will ensure that all of your clients can support the latest message format version and that the upgrade process goes smoothly.
You can track Kafka client names and versions using this metric:
-
kafka.server:type=socket-server-metrics,clientSoftwareName=<name>,clientSoftwareVersion=<version>,listener=<listener>,networkProcessor=<processor>
The following Kafka broker metrics help monitor the performance of message down-conversion:
-
kafka.network:type=RequestMetrics,name=MessageConversionsTimeMs,request={Produce|Fetch}provides metrics on the time taken to perform message conversion. -
kafka.server:type=BrokerTopicMetrics,name={Produce|Fetch}MessageConversionsPerSec,topic=([-.\w]+)provides metrics on the number of messages converted over a period of time.
25.7.3. Upgrading ZooKeeper-based Kafka clusters and client applications
Upgrade a ZooKeeper-based Streams for Apache Kafka cluster to a newer supported Kafka version and inter-broker protocol version.
You should also choose a strategy for upgrading clients. Kafka clients are upgraded in step 6 of this procedure.
Prerequisites
- The Cluster Operator is up and running.
-
Before you upgrade the Streams for Apache Kafka cluster, check that the properties of the
Kafkaresource do not contain configuration options that are not supported in the new Kafka version.
Procedure
Update the Kafka cluster configuration:
oc edit kafka <kafka_configuration_file>If configured, check that the
inter.broker.protocol.versionandlog.message.format.versionproperties are set to the current version.For example, the current version is 3.6 if upgrading from Kafka version 3.6.0 to 3.7.0:
kind: Kafka spec: # ... kafka: version: 3.6.0 config: log.message.format.version: "3.6" inter.broker.protocol.version: "3.6" # ...If
log.message.format.versionandinter.broker.protocol.versionare not configured, Streams for Apache Kafka automatically updates these versions to the current defaults after the update to the Kafka version in the next step.NoteThe value of
log.message.format.versionandinter.broker.protocol.versionmust be strings to prevent them from being interpreted as floating point numbers.Change the
Kafka.spec.kafka.versionto specify the new Kafka version; leave thelog.message.format.versionandinter.broker.protocol.versionat the defaults for the current Kafka version.NoteChanging the
kafka.versionensures that all brokers in the cluster are upgraded to start using the new broker binaries. During this process, some brokers are using the old binaries while others have already upgraded to the new ones. Leaving theinter.broker.protocol.versionunchanged at the current setting ensures that the brokers can continue to communicate with each other throughout the upgrade.For example, if upgrading from Kafka 3.6.0 to 3.7.0:
apiVersion: kafka.strimzi.io/v1beta2 kind: Kafka spec: # ... kafka: version: 3.7.01 config: log.message.format.version: "3.6"2 inter.broker.protocol.version: "3.6"3 # ...WarningYou cannot downgrade Kafka if the
inter.broker.protocol.versionfor the new Kafka version changes. The inter-broker protocol version determines the schemas used for persistent metadata stored by the broker, including messages written to__consumer_offsets. The downgraded cluster will not understand the messages.If the image for the Kafka cluster is defined in
Kafka.spec.kafka.imageof theKafkacustom resource, update theimageto point to a container image with the new Kafka version.Save and exit the editor, then wait for rolling updates to complete.
Check the progress of the rolling updates by watching the pod state transitions:
oc get pods my-cluster-kafka-0 -o jsonpath='{.spec.containers[0].image}'The rolling updates ensure that each pod is using the broker binaries for the new version of Kafka.
Depending on your chosen strategy for upgrading clients, upgrade all client applications to use the new version of the client binaries.
If required, set the
versionproperty for Kafka Connect and MirrorMaker as the new version of Kafka:-
For Kafka Connect, update
KafkaConnect.spec.version. -
For MirrorMaker, update
KafkaMirrorMaker.spec.version. For MirrorMaker 2, update
KafkaMirrorMaker2.spec.version.NoteIf you are using custom images that are built manually, you must rebuild those images to ensure that they are up-to-date with the latest Streams for Apache Kafka base image. For example, if you created a container image from the base Kafka Connect image, update the Dockerfile to point to the latest base image and build configuration.
-
For Kafka Connect, update
- Verify that the upgraded client applications work correctly with the new Kafka brokers.
If configured, update the Kafka resource to use the new
inter.broker.protocol.versionversion. Otherwise, go to step 9.For example, if upgrading to Kafka 3.7.0:
apiVersion: kafka.strimzi.io/v1beta2 kind: Kafka spec: # ... kafka: version: 3.7.0 config: log.message.format.version: "3.6" inter.broker.protocol.version: "3.7" # ...- Wait for the Cluster Operator to update the cluster.
If configured, update the Kafka resource to use the new
log.message.format.versionversion. Otherwise, go to step 10.For example, if upgrading to Kafka 3.7.0:
apiVersion: kafka.strimzi.io/v1beta2 kind: Kafka spec: # ... kafka: version: 3.7.0 config: log.message.format.version: "3.7" inter.broker.protocol.version: "3.7" # ...ImportantFrom Kafka 3.0.0, when the
inter.broker.protocol.versionis set to3.0or higher, thelog.message.format.versionoption is ignored and doesn’t need to be set.Wait for the Cluster Operator to update the cluster.
You can check the upgrade has completed successfully from the status of the
Kafkaresource.
25.8. Checking the status of an upgrade
When performing an upgrade (or downgrade), you can check it completed successfully in the status of the Kafka custom resource. The status provides information on the Streams for Apache Kafka and Kafka versions being used.
To ensure that you have the correct versions after completing an upgrade, verify the kafkaVersion and operatorLastSuccessfulVersion values in the Kafka status.
-
operatorLastSuccessfulVersionis the version of the Streams for Apache Kafka operator that last performed a successful reconciliation. -
kafkaVersionis the the version of Kafka being used by the Kafka cluster. -
kafkaMetadataVersionis the metadata version used by KRaft-based Kafka clusters
You can use these values to check an upgrade of Streams for Apache Kafka or Kafka has completed.
Checking an upgrade from the Kafka status
apiVersion: kafka.strimzi.io/v1beta2
kind: Kafka
metadata:
spec:
# ...
status:
# ...
kafkaVersion: 3.7.0
operatorLastSuccessfulVersion: 2.7
kafkaMetadataVersion: 3.725.9. Switching to FIPS mode when upgrading Streams for Apache Kafka
Upgrade Streams for Apache Kafka to run in FIPS mode on FIPS-enabled OpenShift clusters. Until Streams for Apache Kafka 2.3, running on FIPS-enabled OpenShift clusters was possible only by disabling FIPS mode using the FIPS_MODE environment variable. From release 2.3, Streams for Apache Kafka supports FIPS mode. If you run Streams for Apache Kafka on a FIPS-enabled OpenShift cluster with the FIPS_MODE set to disabled, you can enable it by following this procedure.
Prerequisites
- FIPS-enabled OpenShift cluster
-
An existing Cluster Operator deployment with the
FIPS_MODEenvironment variable set todisabled
Procedure
-
Upgrade the Cluster Operator to version 2.3 or newer but keep the
FIPS_MODEenvironment variable set todisabled. If you initially deployed a Streams for Apache Kafka version older than 2.3, it might use old encryption and digest algorithms in its PKCS #12 stores, which are not supported with FIPS enabled. To recreate the certificates with updated algorithms, renew the cluster and clients CA certificates.
-
To renew the CAs generated by the Cluster Operator, add the
force-renewannotation to the CA secrets to trigger a renewal. -
To renew your own CAs, add the new certificate to the CA secret and update the
ca-cert-generationannotation with a higher incremental value to capture the update.
-
To renew the CAs generated by the Cluster Operator, add the
If you use SCRAM-SHA-512 authentication, check the password length of your users. If they are less than 32 characters long, generate a new password in one of the following ways:
- Delete the user secret so that the User Operator generates a new one with a new password of sufficient length.
-
If you provided your password using the
.spec.authentication.passwordproperties of theKafkaUsercustom resource, update the password in the OpenShift secret referenced in the same password configuration. Don’t forget to update your clients to use the new passwords.
- Ensure that the CA certificates are using the correct algorithms and the SCRAM-SHA-512 passwords are of sufficient length. You can then enable the FIPS mode.
-
Remove the
FIPS_MODEenvironment variable from the Cluster Operator deployment. This restarts the Cluster Operator and rolls all the operands to enable the FIPS mode. After the restart is complete, all Kafka clusters now run with FIPS mode enabled.
Chapter 26. Downgrading Streams for Apache Kafka
If you are encountering issues with the version of Streams for Apache Kafka you upgraded to, you can revert your installation to the previous version.
If you used the YAML installation files to install Streams for Apache Kafka, you can use the YAML installation files from the previous release to perform the downgrade procedures. You can downgrade Streams for Apache Kafka by updating the Cluster Operator and the version of Kafka you are using. Kafka version downgrades are performed by the Cluster Operator.
The following downgrade instructions are only suitable if you installed Streams for Apache Kafka using the installation files. If you installed Streams for Apache Kafka using another method, like OperatorHub, downgrade may not be supported by that method unless specified in their documentation. To ensure a successful downgrade process, it is essential to use a supported approach.
26.1. Downgrading the Cluster Operator to a previous version
If you are encountering issues with Streams for Apache Kafka, you can revert your installation.
This procedure describes how to downgrade a Cluster Operator deployment to a previous version.
Prerequisites
- An existing Cluster Operator deployment is available.
- You have downloaded the installation files for the previous version.
Before you begin
Check the downgrade requirements of the Streams for Apache Kafka feature gates. If a feature gate is permanently enabled, you may need to downgrade to a version that allows you to disable it before downgrading to your target version.
Procedure
-
Take note of any configuration changes made to the existing Cluster Operator resources (in the
/install/cluster-operatordirectory). Any changes will be overwritten by the previous version of the Cluster Operator. - Revert your custom resources to reflect the supported configuration options available for the version of Streams for Apache Kafka you are downgrading to.
Update the Cluster Operator.
Modify the installation files for the previous version according to the namespace the Cluster Operator is running in.
On Linux, use:
sed -i 's/namespace: .*/namespace: my-cluster-operator-namespace/' install/cluster-operator/*RoleBinding*.yamlOn MacOS, use:
sed -i '' 's/namespace: .*/namespace: my-cluster-operator-namespace/' install/cluster-operator/*RoleBinding*.yaml-
If you modified one or more environment variables in your existing Cluster Operator
Deployment, edit theinstall/cluster-operator/060-Deployment-strimzi-cluster-operator.yamlfile to use those environment variables.
When you have an updated configuration, deploy it along with the rest of the installation resources:
oc replace -f install/cluster-operatorWait for the rolling updates to complete.
Get the image for the Kafka pod to ensure the downgrade was successful:
oc get pod my-cluster-kafka-0 -o jsonpath='{.spec.containers[0].image}'The image tag shows the new Streams for Apache Kafka version followed by the Kafka version. For example,
<strimzi_version>-kafka-<kafka_version>.You can also check the downgrade has completed successfully from the status of the
Kafkaresource.
26.2. Downgrading KRaft-based Kafka clusters and client applications
Downgrade a KRaft-based Streams for Apache Kafka cluster to an earlier version. When downgrading a KRaft-based Streams for Apache Kafka cluster to a lower version, like moving from 3.7.0 to 3.6.0, ensure that the metadata version used by the Kafka cluster is a version supported by the Kafka version you want to downgrade to. The metadata version for the Kafka version you are downgrading from must not be higher than the version you are downgrading to.
Consult the Apache Kafka documentation for information regarding the support and limitations associated with KRaft-based downgrades.
Prerequisites
- The Cluster Operator is up and running.
Before you downgrade the Streams for Apache Kafka cluster, check the following for the
Kafkaresource:-
The
Kafkacustom resource does not contain options that are not supported by the Kafka version being downgraded to. -
spec.kafka.metadataVersionis set to a version that is supported by the Kafka version being downgraded to.
-
The
Procedure
Update the Kafka cluster configuration.
oc edit kafka <kafka_configuration_file>Change the
metadataVersionversion to a version supported by the Kafka version you are downgrading to; leave theKafka.spec.kafka.versionunchanged at the current Kafka version.For example, if downgrading from Kafka 3.7.0 to 3.6.0:
apiVersion: kafka.strimzi.io/v1beta2 kind: Kafka metadata: name: my-cluster spec: kafka: replicas: 3 metadataVersion: 3.6-IV21 version: 3.7.02 # ...NoteThe value of
metadataVersionmust be a string to prevent it from being interpreted as a floating point number.-
Save the change, and wait for Cluster Operator to update
.status.kafkaMetadataVersionfor theKafkaresource. Change the
Kafka.spec.kafka.versionto the previous version.For example, if downgrading from Kafka 3.7.0 to 3.6.0:
apiVersion: kafka.strimzi.io/v1beta2 kind: Kafka metadata: name: my-cluster spec: kafka: replicas: 3 metadataVersion: 3.6-IV21 version: 3.6.02 # ...If the image for the Kafka version is different from the image defined in
STRIMZI_KAFKA_IMAGESfor the Cluster Operator, updateKafka.spec.kafka.image.Wait for the Cluster Operator to update the cluster.
You can check the downgrade has completed successfully from the status of the
Kafkaresource.Downgrade all client applications (consumers) to use the previous version of the client binaries.
The Kafka cluster and clients are now using the previous Kafka version.
26.3. Downgrading Kafka when using ZooKeeper
If you are using Kafka in ZooKeeper mode, the downgrade process involves changing the Kafka version and the related log.message.format.version and inter.broker.protocol.version properties.
26.3.1. Kafka version compatibility for downgrades
Kafka downgrades are dependent on compatible current and target Kafka versions, and the state at which messages have been logged.
You cannot revert to the previous Kafka version if that version does not support any of the inter.broker.protocol.version settings which have ever been used in that cluster, or messages have been added to message logs that use a newer log.message.format.version.
The inter.broker.protocol.version determines the schemas used for persistent metadata stored by the broker, such as the schema for messages written to __consumer_offsets. If you downgrade to a version of Kafka that does not understand an inter.broker.protocol.version that has ever been previously used in the cluster the broker will encounter data it cannot understand.
If the target downgrade version of Kafka has:
-
The same
log.message.format.versionas the current version, the Cluster Operator downgrades by performing a single rolling restart of the brokers. A different
log.message.format.version, downgrading is only possible if the running cluster has always hadlog.message.format.versionset to the version used by the downgraded version. This is typically only the case if the upgrade procedure was aborted before thelog.message.format.versionwas changed. In this case, the downgrade requires:- Two rolling restarts of the brokers if the interbroker protocol of the two versions is different
- A single rolling restart if they are the same
Downgrading is not possible if the new version has ever used a log.message.format.version that is not supported by the previous version, including when the default value for log.message.format.version is used. For example, this resource can be downgraded to Kafka version 3.6.0 because the log.message.format.version has not been changed:
apiVersion: kafka.strimzi.io/v1beta2
kind: Kafka
spec:
# ...
kafka:
version: 3.7.0
config:
log.message.format.version: "3.6"
# ...
The downgrade would not be possible if the log.message.format.version was set at "3.7" or a value was absent, so that the parameter took the default value for a 3.7.0 broker of 3.7.
From Kafka 3.0.0, when the inter.broker.protocol.version is set to 3.0 or higher, the log.message.format.version option is ignored and doesn’t need to be set.
26.3.2. Downgrading ZooKeeper-based Kafka clusters and client applications
Downgrade a ZooKeeper-based Streams for Apache Kafka cluster to an earlier version. When downgrading a ZooKeeper-based Streams for Apache Kafka cluster to a lower version, like moving from 3.7.0 to 3.6.0, ensure that the inter-broker protocol version used by the Kafka cluster is a version supported by the Kafka version you want to downgrade to. The inter-broker protocol version for the Kafka version you are downgrading from must not be higher than the version you are downgrading to.
Consult the Apache Kafka documentation for information regarding the support and limitations associated with ZooKeeper-based downgrades.
Prerequisites
- The Cluster Operator is up and running.
Before you downgrade the Streams for Apache Kafka cluster, check the following for the
Kafkaresource:- IMPORTANT: Compatibility of Kafka versions.
-
The
Kafkacustom resource does not contain options that are not supported by the Kafka version being downgraded to. Kafka.spec.kafka.confighas alog.message.format.versionandinter.broker.protocol.versionthat is supported by the Kafka version being downgraded to.From Kafka 3.0.0, when the
inter.broker.protocol.versionis set to3.0or higher, thelog.message.format.versionoption is ignored and doesn’t need to be set.
Procedure
Update the Kafka cluster configuration.
oc edit kafka <kafka_configuration_file>Change the
inter.broker.protocol.versionversion (andlog.message.format.version, if applicable) to a version supported by the Kafka version you are downgrading to; leave theKafka.spec.kafka.versionunchanged at the current Kafka version.For example, if downgrading from Kafka 3.7.0 to 3.6.0:
apiVersion: kafka.strimzi.io/v1beta2 kind: Kafka metadata: name: my-cluster spec: # ... kafka: version: 3.7.01 config: inter.broker.protocol.version: "3.6"2 log.message.format.version: "3.6" # ...NoteThe value of
log.message.format.versionandinter.broker.protocol.versionmust be strings to prevent them from being interpreted as floating point numbers.Save and exit the editor, then wait for rolling updates to complete.
Check the progress of the rolling updates by watching the pod state transitions:
oc get pods my-cluster-kafka-0 -o jsonpath='{.spec.containers[0].image}'The rolling updates ensure that each pod is using the specified Kafka inter-broker protocol version.
Change the
Kafka.spec.kafka.versionto the previous version.For example, if downgrading from Kafka 3.7.0 to 3.6.0:
apiVersion: kafka.strimzi.io/v1beta2 kind: Kafka metadata: name: my-cluster spec: # ... kafka: version: 3.6.01 config: inter.broker.protocol.version: "3.6"2 log.message.format.version: "3.6" # ...If the image for the Kafka version is different from the image defined in
STRIMZI_KAFKA_IMAGESfor the Cluster Operator, updateKafka.spec.kafka.image.Wait for the Cluster Operator to update the cluster.
You can check the downgrade has completed successfully from the status of the
Kafkaresource.Downgrade all client applications (consumers) to use the previous version of the client binaries.
The Kafka cluster and clients are now using the previous Kafka version.
If you are reverting back to a version of Streams for Apache Kafka earlier than 1.7, which uses ZooKeeper for the storage of topic metadata, delete the internal topic store topics from the Kafka cluster.
oc run kafka-admin -ti --image=registry.redhat.io/amq-streams/kafka-37-rhel9:2.7.0 --rm=true --restart=Never -- ./bin/kafka-topics.sh --bootstrap-server localhost:9092 --topic __strimzi-topic-operator-kstreams-topic-store-changelog --delete && ./bin/kafka-topics.sh --bootstrap-server localhost:9092 --topic __strimzi_store_topic --delete
Chapter 27. Uninstalling Streams for Apache Kafka
You can uninstall Streams for Apache Kafka on OpenShift 4.12 to 4.16 from the OperatorHub using the OpenShift Container Platform web console or CLI.
Use the same approach you used to install Streams for Apache Kafka.
When you uninstall Streams for Apache Kafka, you will need to identify resources created specifically for a deployment and referenced from the Streams for Apache Kafka resource.
Such resources include:
- Secrets (Custom CAs and certificates, Kafka Connect secrets, and other Kafka secrets)
-
Logging
ConfigMaps(of typeexternal)
These are resources referenced by Kafka, KafkaConnect, KafkaMirrorMaker, or KafkaBridge configuration.
Deleting CRDs and related custom resources
When a CustomResourceDefinition is deleted, custom resources of that type are also deleted. This includes the Kafka, KafkaConnect, KafkaMirrorMaker, and KafkaBridge resources managed by Streams for Apache Kafka, as well as the StrimziPodSet resource Streams for Apache Kafka uses to manage the pods of the Kafka components. In addition, any OpenShift resources created by these custom resources, such as Deployment, Pod, Service, and ConfigMap resources, are also removed. Always exercise caution when deleting these resources to avoid unintended data loss.
27.1. Uninstalling Streams for Apache Kafka from the OperatorHub using the web console
This procedure describes how to uninstall Streams for Apache Kafka from the OperatorHub and remove resources related to the deployment.
You can perform the steps from the console or use alternative CLI commands.
Prerequisites
-
Access to an OpenShift Container Platform web console using an account with
cluster-adminorstrimzi-adminpermissions. You have identified the resources to be deleted.
You can use the following
ocCLI command to find resources and also verify that they have been removed when you have uninstalled Streams for Apache Kafka.Command to find resources related to a Streams for Apache Kafka deployment
oc get <resource_type> --all-namespaces | grep <kafka_cluster_name>Replace <resource_type> with the type of the resource you are checking, such as
secretorconfigmap.
Procedure
- Navigate in the OpenShift web console to Operators > Installed Operators.
For the installed Streams for Apache Kafka operator, select the options icon (three vertical dots) and click Uninstall Operator.
The operator is removed from Installed Operators.
- Navigate to Home > Projects and select the project where you installed Streams for Apache Kafka and the Kafka components.
Click the options under Inventory to delete related resources.
Resources include the following:
- Deployments
- StatefulSets
- Pods
- Services
- ConfigMaps
- Secrets
TipUse the search to find related resources that begin with the name of the Kafka cluster. You can also find the resources under Workloads.
Alternative CLI commands
You can use CLI commands to uninstall Streams for Apache Kafka from the OperatorHub.
Delete the Streams for Apache Kafka subscription.
oc delete subscription amq-streams -n openshift-operatorsDelete the cluster service version (CSV).
oc delete csv amqstreams.<version> -n openshift-operatorsRemove related CRDs.
oc get crd -l app=strimzi -o name | xargs oc delete
27.2. Uninstalling Streams for Apache Kafka using the CLI
This procedure describes how to use the oc command-line tool to uninstall Streams for Apache Kafka and remove resources related to the deployment.
Prerequisites
-
Access to an OpenShift cluster using an account with
cluster-adminorstrimzi-adminpermissions. You have identified the resources to be deleted.
You can use the following
ocCLI command to find resources and also verify that they have been removed when you have uninstalled Streams for Apache Kafka.Command to find resources related to a Streams for Apache Kafka deployment
oc get <resource_type> --all-namespaces | grep <kafka_cluster_name>Replace <resource_type> with the type of the resource you are checking, such as
secretorconfigmap.
Procedure
Delete the Cluster Operator
Deployment, relatedCustomResourceDefinitions, andRBACresources.Specify the installation files used to deploy the Cluster Operator.
oc delete -f install/cluster-operatorDelete the resources you identified in the prerequisites.
oc delete <resource_type> <resource_name> -n <namespace>Replace <resource_type> with the type of resource you are deleting and <resource_name> with the name of the resource.
Example to delete a secret
oc delete secret my-cluster-clients-ca-cert -n my-project
Chapter 28. Finding information on Kafka restarts
After the Cluster Operator restarts a Kafka pod in an OpenShift cluster, it emits an OpenShift event into the pod’s namespace explaining why the pod restarted. For help in understanding cluster behavior, you can check restart events from the command line.
You can export and monitor restart events using metrics collection tools like Prometheus. Use the metrics tool with an event exporter that can export the output in a suitable format.
28.1. Reasons for a restart event
The Cluster Operator initiates a restart event for a specific reason. You can check the reason by fetching information on the restart event.
| Event | Description |
|---|---|
| CaCertHasOldGeneration | The pod is still using a server certificate signed with an old CA, so needs to be restarted as part of the certificate update. |
| CaCertRemoved | Expired CA certificates have been removed, and the pod is restarted to run with the current certificates. |
| CaCertRenewed | CA certificates have been renewed, and the pod is restarted to run with the updated certificates. |
| ClientCaCertKeyReplaced | The key used to sign clients CA certificates has been replaced, and the pod is being restarted as part of the CA renewal process. |
| ClusterCaCertKeyReplaced | The key used to sign the cluster’s CA certificates has been replaced, and the pod is being restarted as part of the CA renewal process. |
| ConfigChangeRequiresRestart | Some Kafka configuration properties are changed dynamically, but others require that the broker be restarted. |
| FileSystemResizeNeeded | The file system size has been increased, and a restart is needed to apply it. |
| KafkaCertificatesChanged | One or more TLS certificates used by the Kafka broker have been updated, and a restart is needed to use them. |
| ManualRollingUpdate |
A user annotated the pod, or the |
| PodForceRestartOnError | An error occurred that requires a pod restart to rectify. |
| PodHasOldRevision |
A disk was added or removed from the Kafka volumes, and a restart is needed to apply the change. When using |
| PodHasOldRevision |
The |
| PodStuck | The pod is still pending, and is not scheduled or cannot be scheduled, so the operator has restarted the pod in a final attempt to get it running. |
| PodUnresponsive | Streams for Apache Kafka was unable to connect to the pod, which can indicate a broker not starting correctly, so the operator restarted it in an attempt to resolve the issue. |
28.2. Restart event filters
When checking restart events from the command line, you can specify a field-selector to filter on OpenShift event fields.
The following fields are available when filtering events with field-selector.
regardingObject.kind-
The object that was restarted, and for restart events, the kind is always
Pod. regarding.namespace- The namespace that the pod belongs to.
regardingObject.name-
The pod’s name, for example,
strimzi-cluster-kafka-0. regardingObject.uid- The unique ID of the pod.
reason-
The reason the pod was restarted, for example,
JbodVolumesChanged. reportingController-
The reporting component is always
strimzi.io/cluster-operatorfor Streams for Apache Kafka restart events. source-
sourceis an older version ofreportingController. The reporting component is alwaysstrimzi.io/cluster-operatorfor Streams for Apache Kafka restart events. type-
The event type, which is either
WarningorNormal. For Streams for Apache Kafka restart events, the type isNormal.
In older versions of OpenShift, the fields using the regarding prefix might use an involvedObject prefix instead. reportingController was previously called reportingComponent.
28.3. Checking Kafka restarts
Use a oc command to list restart events initiated by the Cluster Operator. Filter restart events emitted by the Cluster Operator by setting the Cluster Operator as the reporting component using the reportingController or source event fields.
Prerequisites
- The Cluster Operator is running in the OpenShift cluster.
Procedure
Get all restart events emitted by the Cluster Operator:
oc -n kafka get events --field-selector reportingController=strimzi.io/cluster-operatorExample showing events returned
LAST SEEN TYPE REASON OBJECT MESSAGE 2m Normal CaCertRenewed pod/strimzi-cluster-kafka-0 CA certificate renewed 58m Normal PodForceRestartOnError pod/strimzi-cluster-kafka-1 Pod needs to be forcibly restarted due to an error 5m47s Normal ManualRollingUpdate pod/strimzi-cluster-kafka-2 Pod was manually annotated to be rolledYou can also specify a
reasonor otherfield-selectoroptions to constrain the events returned.Here, a specific reason is added:
oc -n kafka get events --field-selector reportingController=strimzi.io/cluster-operator,reason=PodForceRestartOnErrorUse an output format, such as YAML, to return more detailed information about one or more events.
oc -n kafka get events --field-selector reportingController=strimzi.io/cluster-operator,reason=PodForceRestartOnError -o yamlExample showing detailed events output
apiVersion: v1 items: - action: StrimziInitiatedPodRestart apiVersion: v1 eventTime: "2022-05-13T00:22:34.168086Z" firstTimestamp: null involvedObject: kind: Pod name: strimzi-cluster-kafka-1 namespace: kafka kind: Event lastTimestamp: null message: Pod needs to be forcibly restarted due to an error metadata: creationTimestamp: "2022-05-13T00:22:34Z" generateName: strimzi-event name: strimzi-eventwppk6 namespace: kafka resourceVersion: "432961" uid: 29fcdb9e-f2cf-4c95-a165-a5efcd48edfc reason: PodForceRestartOnError reportingController: strimzi.io/cluster-operator reportingInstance: strimzi-cluster-operator-6458cfb4c6-6bpdp source: {} type: Normal kind: List metadata: resourceVersion: "" selfLink: ""
The following fields are deprecated, so they are not populated for these events:
-
firstTimestamp -
lastTimestamp -
source
Chapter 29. Managing Streams for Apache Kafka
Managing Streams for Apache Kafka requires performing various tasks to keep the Kafka clusters and associated resources running smoothly. Use oc commands to check the status of resources, configure maintenance windows for rolling updates, and leverage tools such as the Streams for Apache Kafka Drain Cleaner and Kafka Static Quota plugin to manage your deployment effectively.
29.1. Maintenance time windows for rolling updates
Maintenance time windows allow you to schedule certain rolling updates of your Kafka and ZooKeeper clusters to start at a convenient time.
29.1.1. Maintenance time windows overview
In most cases, the Cluster Operator only updates your Kafka or ZooKeeper clusters in response to changes to the corresponding Kafka resource. This enables you to plan when to apply changes to a Kafka resource to minimize the impact on Kafka client applications.
However, some updates to your Kafka and ZooKeeper clusters can happen without any corresponding change to the Kafka resource. For example, the Cluster Operator will need to perform a rolling restart if a CA (certificate authority) certificate that it manages is close to expiry.
While a rolling restart of the pods should not affect availability of the service (assuming correct broker and topic configurations), it could affect performance of the Kafka client applications. Maintenance time windows allow you to schedule such spontaneous rolling updates of your Kafka and ZooKeeper clusters to start at a convenient time. If maintenance time windows are not configured for a cluster then it is possible that such spontaneous rolling updates will happen at an inconvenient time, such as during a predictable period of high load.
29.1.2. Maintenance time window definition
You configure maintenance time windows by entering an array of strings in the Kafka.spec.maintenanceTimeWindows property. Each string is a cron expression interpreted as being in UTC (Coordinated Universal Time, which for practical purposes is the same as Greenwich Mean Time).
The following example configures a single maintenance time window that starts at midnight and ends at 01:59am (UTC), on Sundays, Mondays, Tuesdays, Wednesdays, and Thursdays:
# ...
maintenanceTimeWindows:
- "* * 0-1 ? * SUN,MON,TUE,WED,THU *"
# ...
In practice, maintenance windows should be set in conjunction with the Kafka.spec.clusterCa.renewalDays and Kafka.spec.clientsCa.renewalDays properties of the Kafka resource, to ensure that the necessary CA certificate renewal can be completed in the configured maintenance time windows.
Streams for Apache Kafka does not schedule maintenance operations exactly according to the given windows. Instead, for each reconciliation, it checks whether a maintenance window is currently "open". This means that the start of maintenance operations within a given time window can be delayed by up to the Cluster Operator reconciliation interval. Maintenance time windows must therefore be at least this long.
29.1.3. Configuring a maintenance time window
You can configure a maintenance time window for rolling updates triggered by supported processes.
Prerequisites
- An OpenShift cluster.
- The Cluster Operator is running.
Procedure
Add or edit the
maintenanceTimeWindowsproperty in theKafkaresource. For example to allow maintenance between 0800 and 1059 and between 1400 and 1559 you would set themaintenanceTimeWindowsas shown below:apiVersion: kafka.strimzi.io/v1beta2 kind: Kafka metadata: name: my-cluster spec: kafka: # ... zookeeper: # ... maintenanceTimeWindows: - "* * 8-10 * * ?" - "* * 14-15 * * ?"Create or update the resource:
oc apply -f <kafka_configuration_file>
29.2. Starting rolling updates of Kafka and other operands using annotations
Streams for Apache Kafka supports the use of annotations to manually trigger a rolling update of Kafka and other operands through the Cluster Operator. Use annotations to initiate rolling updates of Kafka, Kafka Connect, MirrorMaker 2, and ZooKeeper clusters.
Manually performing a rolling update on a specific pod or set of pods is usually only required in exceptional circumstances. However, rather than deleting the pods directly, if you perform the rolling update through the Cluster Operator you ensure the following:
- The manual deletion of the pod does not conflict with simultaneous Cluster Operator operations, such as deleting other pods in parallel.
- The Cluster Operator logic handles the Kafka configuration specifications, such as the number of in-sync replicas.
29.2.1. Performing a rolling update using a pod management annotation
This procedure describes how to trigger a rolling update of Kafka, Kafka Connect, MirrorMaker 2, or ZooKeeper clusters. To trigger the update, you add an annotation to the StrimziPodSet that manages the pods running on the cluster.
Prerequisites
To perform a manual rolling update, you need a running Cluster Operator. The cluster for the component you are updating, whether it’s Kafka, Kafka Connect, MirrorMaker 2, or ZooKeeper, must also be running.
Procedure
Find the name of the resource that controls the pods you want to manually update.
For example, if your Kafka cluster is named my-cluster, the corresponding names are my-cluster-kafka and my-cluster-zookeeper. For a Kafka Connect cluster named my-connect-cluster, the corresponding name is my-connect-cluster-connect. And for a MirrorMaker 2 cluster named my-mm2-cluster, the corresponding name is my-mm2-cluster-mirrormaker2.
Use
oc annotateto annotate the appropriate resource in OpenShift.Annotating a StrimziPodSet
oc annotate strimzipodset <cluster_name>-kafka strimzi.io/manual-rolling-update="true" oc annotate strimzipodset <cluster_name>-zookeeper strimzi.io/manual-rolling-update="true" oc annotate strimzipodset <cluster_name>-connect strimzi.io/manual-rolling-update="true" oc annotate strimzipodset <cluster_name>-mirrormaker2 strimzi.io/manual-rolling-update="true"- Wait for the next reconciliation to occur (every two minutes by default). A rolling update of all pods within the annotated resource is triggered, as long as the annotation was detected by the reconciliation process. When the rolling update of all the pods is complete, the annotation is automatically removed from the resource.
29.2.2. Performing a rolling update using a pod annotation
This procedure describes how to manually trigger a rolling update of existing Kafka, Kafka Connect, MirrorMaker 2, or ZooKeeper clusters using an OpenShift Pod annotation. When multiple pods are annotated, consecutive rolling updates are performed within the same reconciliation run.
Prerequisites
To perform a manual rolling update, you need a running Cluster Operator. The cluster for the component you are updating, whether it’s Kafka, Kafka Connect, MirrorMaker 2, or ZooKeeper, must also be running.
You can perform a rolling update on a Kafka cluster regardless of the topic replication factor used. But for Kafka to stay operational during the update, you’ll need the following:
- A highly available Kafka cluster deployment running with nodes that you wish to update.
Topics replicated for high availability.
Topic configuration specifies a replication factor of at least 3 and a minimum number of in-sync replicas to 1 less than the replication factor.
Kafka topic replicated for high availability
apiVersion: kafka.strimzi.io/v1beta2 kind: KafkaTopic metadata: name: my-topic labels: strimzi.io/cluster: my-cluster spec: partitions: 1 replicas: 3 config: # ... min.insync.replicas: 2 # ...
Procedure
Find the name of the
Podyou want to manually update.Pod naming conventions are as follows:
-
<cluster_name>-kafka-<index_number>for a Kafka cluster -
<cluster_name>-zookeeper-<index_number>for a ZooKeeper cluster -
<cluster_name>-connect-<index_number>for a Kafka Connect cluster -
<cluster_name>-mirrormaker2-<index_number>for a MirrorMaker 2 cluster
The
<index_number>assigned to a pod starts at zero and ends at the total number of replicas minus one.-
Use
oc annotateto annotate thePodresource in OpenShift:oc annotate pod <cluster_name>-kafka-<index_number> strimzi.io/manual-rolling-update="true" oc annotate pod <cluster_name>-zookeeper-<index_number> strimzi.io/manual-rolling-update="true" oc annotate pod <cluster_name>-connect-<index_number> strimzi.io/manual-rolling-update="true" oc annotate pod <cluster_name>-mirrormaker2-<index_number> strimzi.io/manual-rolling-update="true"-
Wait for the next reconciliation to occur (every two minutes by default). A rolling update of the annotated
Podis triggered, as long as the annotation was detected by the reconciliation process. When the rolling update of a pod is complete, the annotation is automatically removed from thePod.
29.3. Recovering a cluster from persistent volumes
You can recover a Kafka cluster from persistent volumes (PVs) if they are still present.
You might want to do this, for example, after:
- A namespace was deleted unintentionally
- A whole OpenShift cluster is lost, but the PVs remain in the infrastructure
29.3.1. Recovery from namespace deletion
Recovery from namespace deletion is possible because of the relationship between persistent volumes and namespaces. A PersistentVolume (PV) is a storage resource that lives outside of a namespace. A PV is mounted into a Kafka pod using a PersistentVolumeClaim (PVC), which lives inside a namespace.
The reclaim policy for a PV tells a cluster how to act when a namespace is deleted. If the reclaim policy is set as:
- Delete (default), PVs are deleted when PVCs are deleted within a namespace
- Retain, PVs are not deleted when a namespace is deleted
To ensure that you can recover from a PV if a namespace is deleted unintentionally, the policy must be reset from Delete to Retain in the PV specification using the persistentVolumeReclaimPolicy property:
apiVersion: v1
kind: PersistentVolume
# ...
spec:
# ...
persistentVolumeReclaimPolicy: RetainAlternatively, PVs can inherit the reclaim policy of an associated storage class. Storage classes are used for dynamic volume allocation.
By configuring the reclaimPolicy property for the storage class, PVs that use the storage class are created with the appropriate reclaim policy. The storage class is configured for the PV using the storageClassName property.
apiVersion: v1
kind: StorageClass
metadata:
name: gp2-retain
parameters:
# ...
# ...
reclaimPolicy: RetainapiVersion: v1
kind: PersistentVolume
# ...
spec:
# ...
storageClassName: gp2-retainIf you are using Retain as the reclaim policy, but you want to delete an entire cluster, you need to delete the PVs manually. Otherwise they will not be deleted, and may cause unnecessary expenditure on resources.
29.3.2. Recovery from loss of an OpenShift cluster
When a cluster is lost, you can use the data from disks/volumes to recover the cluster if they were preserved within the infrastructure. The recovery procedure is the same as with namespace deletion, assuming PVs can be recovered and they were created manually.
29.3.3. Recovering a deleted cluster from persistent volumes
This procedure describes how to recover a deleted cluster from persistent volumes (PVs).
In this situation, the Topic Operator identifies that topics exist in Kafka, but the KafkaTopic resources do not exist.
When you get to the step to recreate your cluster, you have two options:
Use Option 1 when you can recover all
KafkaTopicresources.The
KafkaTopicresources must therefore be recovered before the cluster is started so that the corresponding topics are not deleted by the Topic Operator.Use Option 2 when you are unable to recover all
KafkaTopicresources.In this case, you deploy your cluster without the Topic Operator, delete the Topic Operator topic store metadata, and then redeploy the Kafka cluster with the Topic Operator so it can recreate the
KafkaTopicresources from the corresponding topics.
If the Topic Operator is not deployed, you only need to recover the PersistentVolumeClaim (PVC) resources.
Before you begin
In this procedure, it is essential that PVs are mounted into the correct PVC to avoid data corruption. A volumeName is specified for the PVC and this must match the name of the PV.
For more information, see Persistent storage.
The procedure does not include recovery of KafkaUser resources, which must be recreated manually. If passwords and certificates need to be retained, secrets must be recreated before creating the KafkaUser resources.
Procedure
Check information on the PVs in the cluster:
oc get pvInformation is presented for PVs with data.
Example output showing columns important to this procedure:
NAME RECLAIMPOLICY CLAIM pvc-5e9c5c7f-3317-11ea-a650-06e1eadd9a4c ... Retain ... myproject/data-my-cluster-zookeeper-1 pvc-5e9cc72d-3317-11ea-97b0-0aef8816c7ea ... Retain ... myproject/data-my-cluster-zookeeper-0 pvc-5ead43d1-3317-11ea-97b0-0aef8816c7ea ... Retain ... myproject/data-my-cluster-zookeeper-2 pvc-7e1f67f9-3317-11ea-a650-06e1eadd9a4c ... Retain ... myproject/data-0-my-cluster-kafka-0 pvc-7e21042e-3317-11ea-9786-02deaf9aa87e ... Retain ... myproject/data-0-my-cluster-kafka-1 pvc-7e226978-3317-11ea-97b0-0aef8816c7ea ... Retain ... myproject/data-0-my-cluster-kafka-2- NAME shows the name of each PV.
- RECLAIM POLICY shows that PVs are retained.
- CLAIM shows the link to the original PVCs.
Recreate the original namespace:
oc create namespace myprojectRecreate the original PVC resource specifications, linking the PVCs to the appropriate PV:
For example:
apiVersion: v1 kind: PersistentVolumeClaim metadata: name: data-0-my-cluster-kafka-0 spec: accessModes: - ReadWriteOnce resources: requests: storage: 100Gi storageClassName: gp2-retain volumeMode: Filesystem volumeName: pvc-7e1f67f9-3317-11ea-a650-06e1eadd9a4cEdit the PV specifications to delete the
claimRefproperties that bound the original PVC.For example:
apiVersion: v1 kind: PersistentVolume metadata: annotations: kubernetes.io/createdby: aws-ebs-dynamic-provisioner pv.kubernetes.io/bound-by-controller: "yes" pv.kubernetes.io/provisioned-by: kubernetes.io/aws-ebs creationTimestamp: "<date>" finalizers: - kubernetes.io/pv-protection labels: failure-domain.beta.kubernetes.io/region: eu-west-1 failure-domain.beta.kubernetes.io/zone: eu-west-1c name: pvc-7e226978-3317-11ea-97b0-0aef8816c7ea resourceVersion: "39431" selfLink: /api/v1/persistentvolumes/pvc-7e226978-3317-11ea-97b0-0aef8816c7ea uid: 7efe6b0d-3317-11ea-a650-06e1eadd9a4c spec: accessModes: - ReadWriteOnce awsElasticBlockStore: fsType: xfs volumeID: aws://eu-west-1c/vol-09db3141656d1c258 capacity: storage: 100Gi claimRef: apiVersion: v1 kind: PersistentVolumeClaim name: data-0-my-cluster-kafka-2 namespace: myproject resourceVersion: "39113" uid: 54be1c60-3319-11ea-97b0-0aef8816c7ea nodeAffinity: required: nodeSelectorTerms: - matchExpressions: - key: failure-domain.beta.kubernetes.io/zone operator: In values: - eu-west-1c - key: failure-domain.beta.kubernetes.io/region operator: In values: - eu-west-1 persistentVolumeReclaimPolicy: Retain storageClassName: gp2-retain volumeMode: FilesystemIn the example, the following properties are deleted:
claimRef: apiVersion: v1 kind: PersistentVolumeClaim name: data-0-my-cluster-kafka-2 namespace: myproject resourceVersion: "39113" uid: 54be1c60-3319-11ea-97b0-0aef8816c7eaDeploy the Cluster Operator.
oc create -f install/cluster-operator -n my-projectRecreate your cluster.
Follow the steps depending on whether or not you have all the
KafkaTopicresources needed to recreate your cluster.Option 1: If you have all the
KafkaTopicresources that existed before you lost your cluster, including internal topics such as committed offsets from__consumer_offsets:Recreate all
KafkaTopicresources.It is essential that you recreate the resources before deploying the cluster, or the Topic Operator will delete the topics.
Deploy the Kafka cluster.
For example:
oc apply -f kafka.yaml
Option 2: If you do not have all the
KafkaTopicresources that existed before you lost your cluster:Deploy the Kafka cluster, as with the first option, but without the Topic Operator by removing the
topicOperatorproperty from the Kafka resource before deploying.If you include the Topic Operator in the deployment, the Topic Operator will delete all the topics.
Delete the internal topic store topics from the Kafka cluster:
oc run kafka-admin -ti --image=registry.redhat.io/amq-streams/kafka-37-rhel9:2.7.0 --rm=true --restart=Never -- ./bin/kafka-topics.sh --bootstrap-server localhost:9092 --topic __strimzi-topic-operator-kstreams-topic-store-changelog --delete && ./bin/kafka-topics.sh --bootstrap-server localhost:9092 --topic __strimzi_store_topic --deleteThe command must correspond to the type of listener and authentication used to access the Kafka cluster.
Enable the Topic Operator by redeploying the Kafka cluster with the
topicOperatorproperty to recreate theKafkaTopicresources.For example:
apiVersion: kafka.strimzi.io/v1beta2 kind: Kafka metadata: name: my-cluster spec: #... entityOperator: topicOperator: {}1 #...
- 1
- Here we show the default configuration, which has no additional properties. You specify the required configuration using the properties described in the
EntityTopicOperatorSpecschema reference.
Verify the recovery by listing the
KafkaTopicresources:oc get KafkaTopic
29.4. Frequently asked questions
Chapter 30. Using Metering on Streams for Apache Kafka
You can use the Metering tool that is available on OpenShift to generate metering reports from different data sources. As a cluster administrator, you can use metering to analyze what is happening in your cluster. You can either write your own, or use predefined SQL queries to define how you want to process data from the different data sources you have available. Using Prometheus as a default data source, you can generate reports on pods, namespaces, and most other OpenShift resources.
You can also use the OpenShift Metering operator to analyze your installed Streams for Apache Kafka components to determine whether you are in compliance with your Red Hat subscription.
To use metering with Streams for Apache Kafka, you must first install and configure the Metering operator on OpenShift Container Platform.
30.1. Metering resources
Metering has many resources which can be used to manage the deployment and installation of metering, as well as the reporting functionality metering provides. Metering is managed using the following CRDs:
| Name | Description |
|---|---|
|
| Configures the metering stack for deployment. Contains customizations and configuration options to control each component that makes up the metering stack. |
|
| Controls what query to use, when, and how often the query should be run, and where to store the results. |
|
|
Contains the SQL queries used to perform analysis on the data contained within |
|
| Controls the data available to ReportQueries and Reports. Allows configuring access to different databases for use within metering. |
30.2. Metering labels for Streams for Apache Kafka
The following table lists the metering labels for Streams for Apache Kafka infrastructure components and integrations.
| Label | Possible values |
|---|---|
|
|
|
|
|
|
|
|
|
|
|
|
|
|
|
|
| Infrastructure
|
| Application
| |
|
|
|
Examples
Infrastructure example (where the infrastructure component is entity-operator)
com.company=Red_Hat rht.prod_name=Red_Hat_Application_Foundations rht.prod_ver=2024.Q2 rht.comp=AMQ_Streams rht.comp_ver=2.7 rht.subcomp=entity-operator rht.subcomp_t=infrastructureApplication example (where the integration deployment name is kafka-bridge)
com.company=Red_Hat rht.prod_name=Red_Hat_Application_Foundations rht.prod_ver=2024.Q2 rht.comp=AMQ_Streams rht.comp_ver=2.7 rht.subcomp=kafka-bridge rht.subcomp_t=application
Appendix A. Using your subscription
Streams for Apache Kafka is provided through a software subscription. To manage your subscriptions, access your account at the Red Hat Customer Portal.
Accessing Your Account
- Go to access.redhat.com.
- If you do not already have an account, create one.
- Log in to your account.
Activating a Subscription
- Go to access.redhat.com.
- Navigate to My Subscriptions.
- Navigate to Activate a subscription and enter your 16-digit activation number.
Downloading Zip and Tar Files
To access zip or tar files, use the customer portal to find the relevant files for download. If you are using RPM packages, this step is not required.
- Open a browser and log in to the Red Hat Customer Portal Product Downloads page at access.redhat.com/downloads.
- Locate the Streams for Apache Kafka for Apache Kafka entries in the INTEGRATION AND AUTOMATION category.
- Select the desired Streams for Apache Kafka product. The Software Downloads page opens.
- Click the Download link for your component.
Installing packages with DNF
To install a package and all the package dependencies, use:
dnf install <package_name>To install a previously-downloaded package from a local directory, use:
dnf install <path_to_download_package>Revised on 2026-02-09 10:00:56 UTC