Configuring and Managing Red Hat Update Infrastructure
Setting up and revising Red Hat Update Infrastructure 4
Abstract
Making open source more inclusive
Red Hat is committed to replacing problematic language in our code, documentation, and web properties. We are beginning with these four terms: master, slave, blacklist, and whitelist. Because of the enormity of this endeavor, these changes will be implemented gradually over several upcoming releases. For more details, see our CTO Chris Wright’s message.
Chapter 1. About Red Hat Update Infrastructure 4
Red Hat Update Infrastructure 4 (Red Hat Update Infrastructure 4) is a highly scalable, highly redundant framework that enables you to manage repositories and content. It also enables cloud providers to deliver content and updates to Red Hat Enterprise Linux (RHEL) instances. Based on the upstream Pulp project, RHUI allows cloud providers to locally mirror Red Hat-hosted repository content, create custom repositories with their own content, and make those repositories available to a large group of end users through a load-balanced content delivery system.
As a system administrator, you can prepare your infrastructure for participation in the Red Hat Certified Cloud and Service Provider program by installing and configuring the Red Hat Update Appliance (RHUA), content delivery servers (CDS), repositories, shared storage, and load balancing.
Configuring RHUI comprises the following tasks:
- Creating and synchronizing a Red Hat repository
- Creating client entitlement certificates and client configuration RPMs
- Creating client profiles for the RHUI servers
Experienced RHEL system administrators are the target audience. System administrators with limited RHEL skills should consider engaging Red Hat Consulting to provide a Red Hat Certified Cloud Provider Architecture Service.
Learn about configuring, managing, and updating RHUI with the following topics:
- the RHUI components
- content provider types
- the command line interface (CLI) used to manage the components
- utility commands
- certificate management
- content management
1.1. Installation options
The following table presents the various Red Hat Update Infrastructure 4 components.
| Component | Acronym | Function | Alternative |
|---|---|---|---|
| Red Hat Update Appliance | RHUA | Downloads content from the Red Hat content delivery network and stores it on the shared storage | None |
| Content Delivery Server | CDS |
Provides the | None |
| HAProxy | None | Provides load balancing across CDS nodes | Existing load balancing solution |
| Shared storage | None | Provides shared storage | Existing storage solution |
The following table describes how to perform installation tasks.
| Installation Task | Performed on |
|---|---|
| Install RHEL 8 | RHUA, CDS, and HAProxy |
| Register the system with the RHUI consumer type | RHUA |
| Register the system with the default consumer type | CDS and HAProxy |
| Apply updates | RHUA, CDS and HAProxy |
|
Install | RHUA |
|
Run | RHUA |
1.1.1. Option 1: Full installation
- A RHUA with shared storage
- Two or more CDS nodes with this shared storage
- One or more HAProxy load-balancers
1.1.2. Option 2: Installation with an existing storage solution
- A RHUA with an existing storage solution
- Two or more CDS nodes with this existing storage solution
- One or more HAProxy load-balancers
1.1.3. Option 3: Installation with an existing load-balancer solution
- A RHUA with shared storage
- Two or more CDS nodes with this shared storage
- An existing load-balancer
1.1.4. Option 4: Installation with existing storage and load-balancer solutions
- A RHUA with an existing storage solution
- Two or more CDS nodes with this existing shared storage
- An existing load-balancer
Red Hat Update Infrastructure must be used with at least two CDS nodes and a load-balancer node. Installation without any load-balancer node and with a single CDS node is unsupported.
The following figure depicts a high-level view of how the various Red Hat Update Infrastructure 4 components interact.
Figure 1.1. Red Hat Update Infrastructure 4 overview
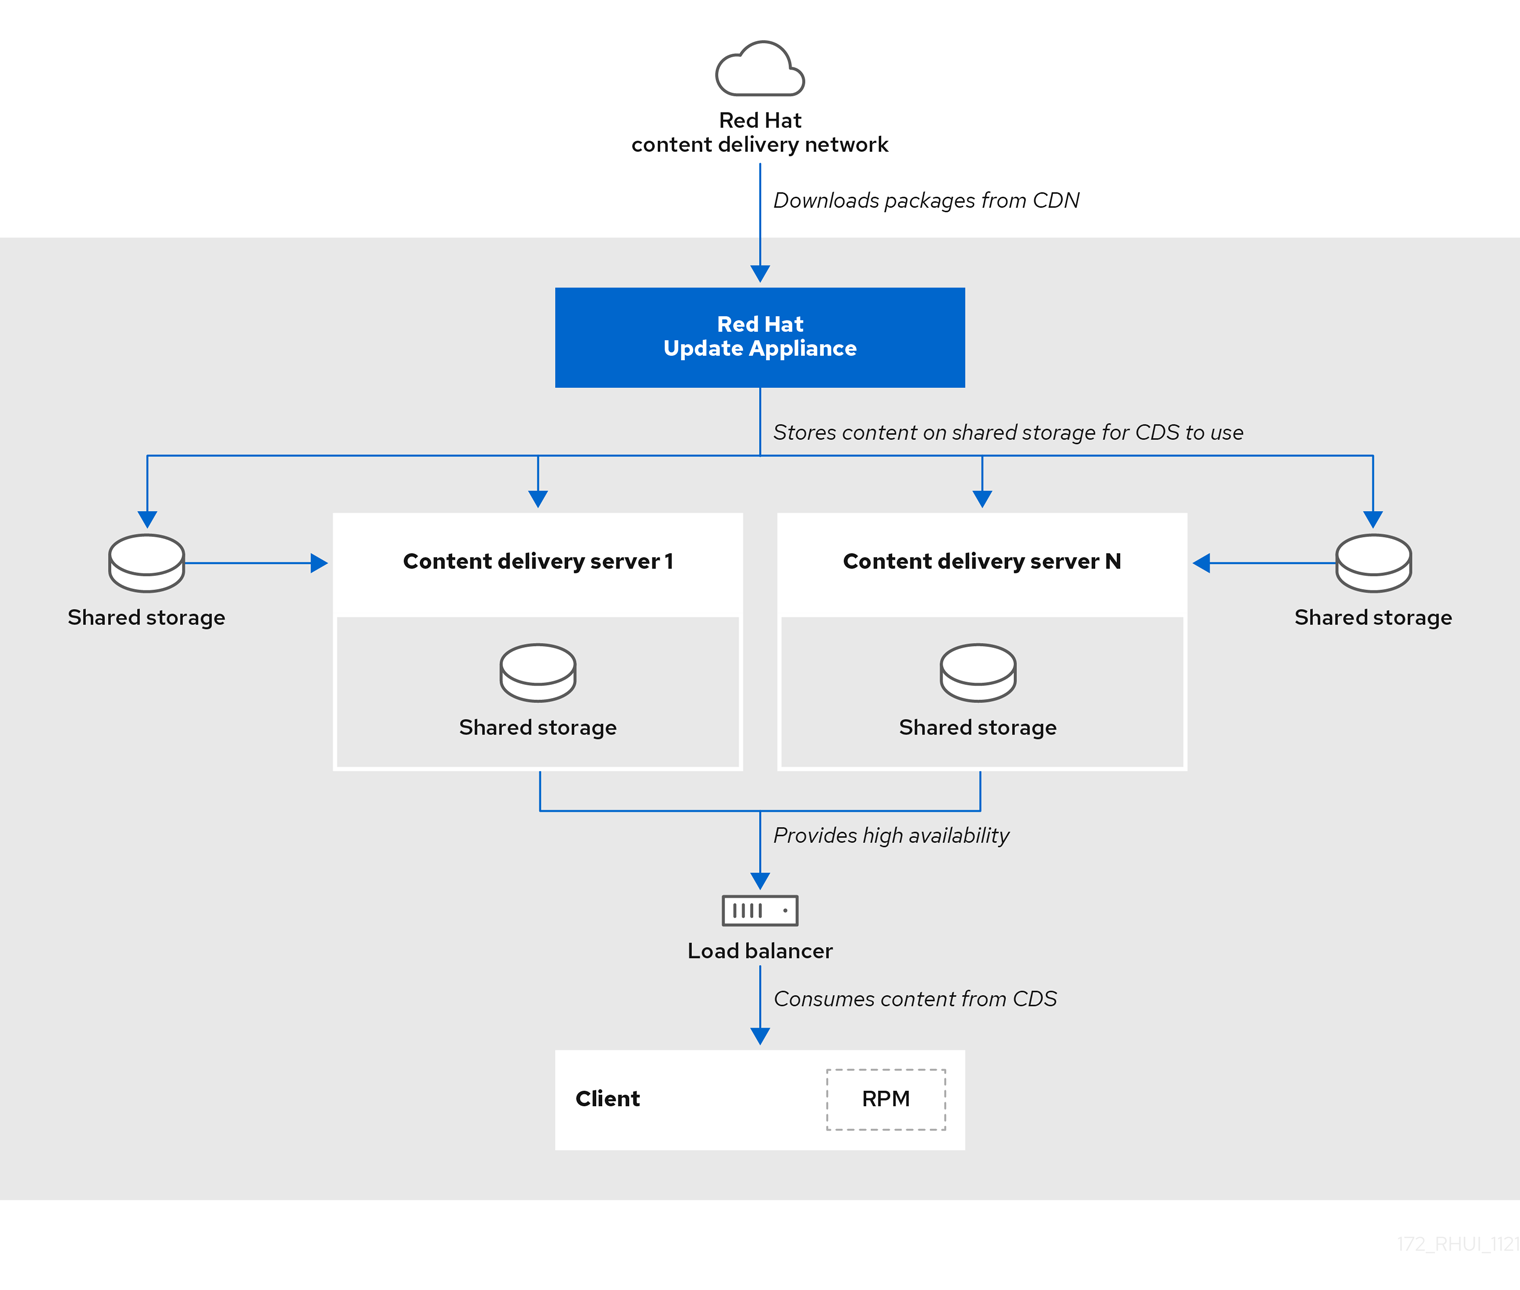
Install the RHUA and CDS nodes on separate x86_64 servers (bare metal or virtual machines). Ensure all the servers and networks that connect to RHUI can access the Red Hat Subscription Management service.
1.2. RHUI 4 components
Understanding how each RHUI component interacts with other components will make your job as a system administrator a little easier.
1.2.1. Red Hat Update Appliance
There is one RHUA per RHUI installation, though in many cloud environments there will be one RHUI installation per region or data center, for example, Amazon’s EC2 cloud comprises several regions. In every region, there is a separate RHUI set up with its own RHUA node.
The RHUA allows you to perform the following tasks:
- Download new packages from the Red Hat content delivery network (CDN).
- Copy new packages to the shared network storage.
- Verify the RHUI installation’s health and write the results to a file located on the RHUA. Monitoring solutions use this file to determine the RHUI installation’s health.
- Provide a human-readable view of the RHUI installation’s health through a CLI tool.
RHUI uses two main configuration files: /etc/rhui/rhui-tools.conf and /etc/rhui/rhui-subscription-sync.conf.
The /etc/rhui/rhui-tools.conf configuration file contains general options used by the RHUA, such as the default file locations for certificates, and default configuration parameters for the Red Hat CDN synchronization. This file normally does not require editing.
The /etc/rhui/rhui-subscription-sync.conf configuration file contains the credentials for the Pulp database. These credentials must be used when logging in to the rhui-manager interface.
The RHUA employs several services to synchronize, organize, and distribute content for easy delivery.
RHUA services
- Pulp
- The service that manages the repositories.
- PostgreSQL
- The database that Pulp uses to keep track of currently synchronized repositories, packages, and other crucial metadata.
1.2.2. Content delivery server
The CDS nodes provide the repositories that clients connect to for the updated content. There can be as few as one CDS. Because RHUI provides a load-balancer with failover capabilities, we recommended that you use multiple CDS nodes.
The CDS nodes host content to end-user RHEL systems. While there is no required number of systems, the CDS works in a round-robin style load-balanced fashion (A, B, C, A, B, C) to deliver content to end-user systems. The CDS uses HTTP to host content to end-user systems via yum repositories.
During configuration, you specify the CDS directory where packages are synchronized. Similar to the RHUA, the only requirement is that you mount the directory on the CDS. It is up to the cloud provider to determine the best course of action when allocating the necessary devices. The Red Hat Update Infrastructure Management Tool configuration RPM linked the package directory with the NGINX configuration to serve it.
Currently, RHUI supports the following shared storage solutions:
- NFS
If NFS is used,
rhui-installercan configure an NFS share on the RHUA to store the content as well as a directory on the CDS nodes to mount the NFS share. The followingrhui-installeroptions control these settings:-
--remote-fs-mountpointis the file system location where the remote file system share should be mounted (default:/var/lib/rhui/remote_share) -
--remote-fs-serveris the remote mount point for a shared file system to use, for example,nfs.example.com:/path/to/share(no default value)
-
- CephFS
If using CephFS, you must configure CephFS separately and then use it with RHUI as a mount point. The following
rhui-installeroptions control these settings:-
--remote-fs-serveris the remote mount point for a shared file system to use, for example,ceph.example.com:/path/to/share(no default value)
-
This document does not provide instructions to set up or configure Ceph shared file storage. For any Ceph related tasks, consult your system administrator, or see the Ceph documentation.
The expected usage is that you use one shared network file system on the RHUA and all CDS nodes, for example, NFS. It is possible the cloud provider will use some form of shared storage that the RHUA writes packages to and each CDS reads from.
The storage solution must provide an NFS or CephFS endpoint for mounting on the RHUA and CDS nodes. Do not set up the shared file storage on any of the RHUI nodes. You must use an independent storage server.
The only nonstandard logic that takes place on each CDS is the entitlement certificate checking. This checking ensures that the client making requests on the yum repositories is authorized by the cloud provider to access those repositories. The check ensures the following conditions:
- The entitlement certificate was signed by the cloud provider’s Certificate Authority (CA) Certificate. The CA Certificate is installed on the CDS as part of its configuration to facilitate this verification.
- The requested URI matches an entitlement found in the client’s entitlement certificate.
If the CA verification fails, the client sees an SSL error. See the CDS node’s NGINX logs under /var/log/nginx/ for more information.
[root@cds01 ~]# ls -1 /var/log/nginx/
access.log
error.log
gunicorn-auth.log
gunicorn-content_manager.log
gunicorn-mirror.log
ssl-access.log----
The NGINX configuration is handled through the /etc/nginx/conf.d/ssl.conf file, which is created during the CDS installation.
1.2.3. HAProxy load-balancer
A load-balancing solution must be in place to spread client HTTPS requests across all CDS servers. RHUI uses HAProxy by default, but it is up to you to choose what load-balancing solution (for example, the one from the cloud provider) to use during the installation. If HAProxy is used, you must also decide how many nodes to bring in.
Clients are not configured to go directly to a CDS; their repository files are configured to point to HAProxy, the RHUI load-balancer. HAProxy is a TCP/HTTP reverse proxy particularly suited for high-availability environments.
If you use an existing load-balancer, ensure port 443 is configured in the load-balancer and that all CDSs in the cluster are in the load-balancer’s pool.
The exact configuration depends on the particular load-balancer software you use. See the following configuration, taken from a typical HAProxy setup, to understand how you should configure your load-balancer:
[root@rhui4proxy ~]# cat /etc/haproxy/haproxy.cfg
global
  chroot  /var/lib/haproxy
  daemon
  group  haproxy
  log  10.10.153.149 local0
  maxconn  4000
  pidfile  /run/haproxy.pid
  stats  socket /var/lib/haproxy/stats
  user  haproxy

defaults
  log  global
  maxconn  8000
  option  redispatch
  retries  3
  stats  enable
  timeout  http-request 10s
  timeout  queue 1m
  timeout  connect 10s
  timeout  client 1m
  timeout  server 1m
  timeout  check 10s

listen https00
  bind 10.10.153.149:443
  balance roundrobin
  option tcplog
  option tcp-check
    server cds01.example.com cds01.example.com:443 check
    server cds02.example.com cds02.example.com:443 check
Keep in mind that when clients fail to connect, it is important to review the nginx logs on the CDS under /var/log/nginx/ to ensure that any request reached the CDS. If requests do not reach the CDS, issues such as DNS or general network connectivity may be at fault.
1.2.4. Repositories and content
A repository is a storage location for software packages (RPMs). RHEL uses yum commands to search a repository, download, install, and update the RPMs. The RPMs contain all the dependencies needed to run an application.
Content, as it relates to RHUI, is the software (such as RPMs) that you download from the Red Hat CDN for use on the RHUA and the CDS nodes. The RPMs provide the files necessary to run specific applications and tools. Clients are granted access by a set of SSL content certificates and keys provided by an rpm package, which also provides a set of generated yum repository files.
1.3. Content provider types
There are three types of cloud computing environments:
- public cloud
- private cloud
- hybrid cloud
This guide focuses on public and private clouds. We assume the audience understands the implications of using public, private, and hybrid clouds.
1.4. Component communications
All RHUI components use the HTTPS communication protocol over port 443.
| Source | Destination | Protocol | Purpose |
|---|---|---|---|
| Red Hat Update Appliance | Red Hat Content Delivery Network | HTTPS | Downloads packages from Red Hat |
| Load-Balancer | Content Delivery Server | HTTPS | Forwards the clients' requests for repository metadata and packages |
| Client | Load-Balancer | HTTPS | Used by yum on the clients to download content |
| Content Delivery Server | Red Hat Update Appliance | HTTPS | Might request information from Pulp API about content |
RHUI nodes require the following network access to communicate with each other.
Make sure that the network port is open and that network access is restricted to only those nodes that you plan to use.
| Node | Port | Access |
|---|---|---|
| RHUA | 443 | RHUA, CDS01, CDS02, … CDSn |
| HAProxy | 443 | Clients |
1.5. Changing the admin password
The rhui-installer sets the initial RHUI login password. It is also written in the /etc/rhui/rhui-subscription-sync.conf file. You can override the initial password with the --rhui-manager-password option.
If you want to change the initial password later, you can change it through the rhui-manager tool or through rhui-installer. Run the rhui-installer --help command to see the full list of rhui-installer options.
Procedure
Navigate to the Red Hat Update Infrastructure Management Tool home screen:
[root@rhua ~]# rhui-manager-
Press
uto select manage RHUI users. From the User Manager screen, press
pto select change admin’s password (followed by logout):-= User Manager =- p change admin's password (followed by logout) rhui (users) => p Warning: After password change you will be logged out. Use ctrl-c to cancel password change. New Password:Enter your new password; reenter it to confirm the change.
New Password:
Re-enter Password:

[localhost] env PULP_SETTINGS=/etc/pulp/settings.py /usr/bin/pulpcore-manager reset-admin-password -p ********
Verification
The following message displays after you change the admin password:
Password successfully updated. For security reasons you have been logged out.
Chapter 2. Managing repositories
2.1. Available repositories
Certified Cloud and Service Provider (CCSP) partners control what repositories and packages are delivered through their service. For the most current information regarding what repositories are available for the various operating system versions but are not yet added in your RHUI, run the following command on the RHUA:
# rhui-manager --noninteractive repo unused --by_repo_id2.2. Adding a new Red Hat content repository
Your CCSP account enables you to access selected Red Hat repositories and make them available in your Red Hat Update Infrastructure environment.
Procedure
Navigate to the Red Hat Update Infrastructure Management Tool home screen:
[root@rhua ~]# rhui-manager-
Press
rto select manage repositories. -
From the Repository Management screen, press
ato select add a new Red Hat content repository. Wait for the Red Hat Update Infrastructure Management Tool to determine the entitled repositories. This might take several minutes:
rhui (repo) => a

Loading latest entitled products from Red Hat...
... listings loaded
Determining undeployed products...
... product list calculated
The Red Hat Update Infrastructure Management Tool prompts for a selection method:
Import Repositories: 1 - All in Certificate 2 - By Product 3 - By Repository Enter value (1-3) or 'b' to abort:-
To add several repositories bundled together as a product—usually all the minor versions of it in one step—press
2to select the By Product method. Alternatively, you can add particular repositories by using the By Repository method. Select which repositories to add by typing the number of the repository at the prompt. You can also choose the range of repositories, for instance, by entering
1-5.Enter value (1-620) to toggle selection, 'c' to confirm selections, or '?' for more commands:- Continue until all repositories you want to add are checked.
Press
cwhen you are finished selecting the repositories. The Red Hat Update Infrastructure Management Tool displays the repositories for deployment and prompts for confirmation:The following products will be deployed: Red Hat Enterprise Linux 8 for ARM 64 - BaseOS (Debug RPMs) from RHUI Red Hat Enterprise Linux 8 for ARM 64 - BaseOS (RPMs) from RHUI Proceed? (y/n)Press
yto proceed. A message indicates each successful deployment:Importing Red Hat Enterprise Linux 8 for ARM 64 - BaseOS (Debug RPMs) from RHUI... Importing product repository Red Hat Enterprise Linux 8 for ARM 64 - BaseOS (Debug RPMs) from RHUI (8.4)... Importing product repository Red Hat Enterprise Linux 8 for ARM 64 - BaseOS (Debug RPMs) from RHUI (8.3)... Importing product repository Red Hat Enterprise Linux 8 for ARM 64 - BaseOS (Debug RPMs) from RHUI (8.2)... Importing product repository Red Hat Enterprise Linux 8 for ARM 64 - BaseOS (Debug RPMs) from RHUI (8.1)... Importing product repository Red Hat Enterprise Linux 8 for ARM 64 - BaseOS (Debug RPMs) from RHUI (8.0)... Importing product repository Red Hat Enterprise Linux 8 for ARM 64 - BaseOS (Debug RPMs) from RHUI (8)... Importing Red Hat Enterprise Linux 8 for ARM 64 - BaseOS (RPMs) from RHUI... Importing product repository Red Hat Enterprise Linux 8 for ARM 64 - BaseOS (RPMs) from RHUI (8.4)... Importing product repository Red Hat Enterprise Linux 8 for ARM 64 - BaseOS (RPMs) from RHUI (8.3)... Importing product repository Red Hat Enterprise Linux 8 for ARM 64 - BaseOS (RPMs) from RHUI (8.2)... Importing product repository Red Hat Enterprise Linux 8 for ARM 64 - BaseOS (RPMs) from RHUI (8.1)... Importing product repository Red Hat Enterprise Linux 8 for ARM 64 - BaseOS (RPMs) from RHUI (8.0)... Importing product repository Red Hat Enterprise Linux 8 for ARM 64 - BaseOS (RPMs) from RHUI (8)... Content will not be downloaded to the newly imported repositories until the next sync is run.
Verification
-
From the Repository Management screen, press
lto check that the correct repositories have been installed.
2.3. Listing repositories currently managed by RHUI 4
A repository contains downloadable software for a Linux distribution. You use yum to search for, install, or only download RPMs from the repository.
Procedure
Navigate to the Red Hat Update Infrastructure Management Tool home screen:
[root@rhua ~]# rhui-manager-
Press
rto select manage repositories. From the Repository Management screen, press
lto select list repositories currently managed by the RHUI:... Red Hat Enterprise Linux 8 for ARM 64 - AppStream (RPMs) from RHUI (8) Red Hat Enterprise Linux 8 for ARM 64 - AppStream (RPMs) from RHUI (8.0) Red Hat Enterprise Linux 8 for ARM 64 - AppStream (RPMs) from RHUI (8.1) Red Hat Enterprise Linux 8 for ARM 64 - AppStream (RPMs) from RHUI (8.2) Red Hat Enterprise Linux 8 for ARM 64 - AppStream (RPMs) from RHUI (8.3) Red Hat Enterprise Linux 8 for ARM 64 - AppStream (RPMs) from RHUI (8.4) Red Hat Enterprise Linux 8 for ARM 64 - AppStream (Source RPMs) from RHUI (8) Red Hat Enterprise Linux 8 for ARM 64 - AppStream (Source RPMs) from RHUI (8.0) Red Hat Enterprise Linux 8 for ARM 64 - AppStream (Source RPMs) from RHUI (8.1) Red Hat Enterprise Linux 8 for ARM 64 - AppStream (Source RPMs) from RHUI (8.2) Red Hat Enterprise Linux 8 for ARM 64 - AppStream (Source RPMs) from RHUI (8.3) Red Hat Enterprise Linux 8 for ARM 64 - AppStream (Source RPMs) from RHUI (8.4) Red Hat Enterprise Linux 8 for ARM 64 - BaseOS (Debug RPMs) from RHUI (8) Red Hat Enterprise Linux 8 for ARM 64 - BaseOS (Debug RPMs) from RHUI (8.0) Red Hat Enterprise Linux 8 for ARM 64 - BaseOS (Debug RPMs) from RHUI (8.1) Red Hat Enterprise Linux 8 for ARM 64 - BaseOS (Debug RPMs) from RHUI (8.2) Red Hat Enterprise Linux 8 for ARM 64 - BaseOS (Debug RPMs) from RHUI (8.3) Red Hat Enterprise Linux 8 for ARM 64 - BaseOS (Debug RPMs) from RHUI (8.4) ...
2.4. Displaying detailed information on a repository
You can use the Repository Management screen to display information about a particular repository.
Procedure
Navigate to the Red Hat Update Infrastructure Management Tool home screen:
[root@rhua ~]# rhui-manager-
Press
rto select manage repositories. From the Repository Management screen, press
i:Enter value (1-1631) to toggle selection, 'c' to confirm selections, or '?' for more commands:- Select the repository by entering the value beside the repository name. Enter one repository selection at a time before confirming your product selection.
Press
cto confirm:Name: Red Hat Enterprise Linux 8 for ARM 64 - AppStream (Debug RPMs) from RHUI (8.4) ID: rhel-8-for-aarch64-appstream-debug-rhui-rpms-8.4 Type: Red Hat Version: 0 Relative Path: content/dist/rhel8/rhui/8.4/aarch64/appstream/debug GPG Check: Yes Custom GPG Keys: (None) Red Hat GPG Key: Yes Content Unit Count: Last Sync: 2021-11-15 15:56:06 Next Sync: 2021-11-15 22:00:00 Name: Red Hat Enterprise Linux 8 for ARM 64 - AppStream (RPMs) from RHUI (8.4) ID: rhel-8-for-aarch64-appstream-rhui-rpms-8.4 Type: Red Hat Version: 0 Relative Path: content/dist/rhel8/rhui/8.4/aarch64/appstream/os GPG Check: Yes Custom GPG Keys: (None) Red Hat GPG Key: Yes Content Unit Count: Last Sync: 2021-11-15 19:50:20 Next Sync: 2021-11-16 01:55:00 Name: Red Hat Enterprise Linux 8 for ARM 64 - AppStream (Source RPMs) from RHUI (8.4) ID: rhel-8-for-aarch64-appstream-source-rhui-rpms-8.4 Type: Red Hat Version: 0 Relative Path: content/dist/rhel8/rhui/8.4/aarch64/appstream/source/SRPMS GPG Check: Yes Custom GPG Keys: (None) Red Hat GPG Key: Yes Content Unit Count: Last Sync: 2021-11-15 15:56:51 Next Sync: 2021-11-15 22:00:00
Verification
- A similar output displays for your selections.
2.5. Generating a repository status file
You can generate a machine-readable JSON file that displays the status of all RHUI repositories as well as provides some additional information. This is useful, for example, if you want to passively monitor the status of the repositories.
2.5.1. Generating a status file for RHUI repositories
You can use the rhui-manager command to obtain the status of each repository in a machine-readable format.
Procedure
On the RHUA node, run the following command.
rhui-manager --non-interactive status --repo_json <output file>A JSON file is generated containing a list of dictionaries for all custom and Red Hat repositories. For a list of available dictionaries, see Section 2.5.2, “List of dictionary keys in the repository status JSON file”.
2.5.2. List of dictionary keys in the repository status JSON file
A machine-readable JSON file is created when you run the command to get the status of each RHUI repository. The JSON file contains a list of dictionaries with one dictionary for each repository.
List of dictionary keys for custom repositories
| Key | Description |
|---|---|
| base_path | The path of the repository. |
| description | The name of the repository. |
| group |
The group the repository belongs to. It is always set to the string, |
| id | The repository ID. |
| name | The name of the repository. It is the same as the repository ID. |
List of dictionary keys for Red Hat repositories
| Key | Description |
|---|---|
| base_path | The path of the repository. |
| description | The name of the repository. |
| group |
The group the repository belongs to. It is always set to the string, |
| id | The repository ID. |
| last_sync_date |
The date and time the repository was last synchronized. The value is |
| last_sync_exception |
The exception raised if the repository failed to synchronize. The value is |
| last_sync_result | The result of the synchronization task. The values are:
|
| last_sync_traceback |
The traceback that was logged if the repository failed to synchronize. The value is |
| metadata_available | A boolean value denoting whether metadata is available for the repository. |
| name | The name of the repository. It is the same as the repository ID. |
| next_sync_date |
The date and time of the next scheduled synchronization of the repository. If a synchronization task is currently running, the value is |
| repo_published | A boolean value denoting whether this repository has been published in RHUI. Note that, by default, RHUI is configured to automatically publish repositories. |
2.6. Setting Up On-Demand Syncing of Repositories
RHUI allows you to minimize the amount of content downloaded to storage in advance by setting certain repositories to on_demand sync mode. This way, RHUI will only download and store content when it is requested by client machines, which can result in reduced storage usage and lower costs. However, the downside of this approach is that RHUI’s performance will depend on the connection speed to the Red Hat CDN network.
Repository Content Types
There are three types of repository content:
- Binary RPM repositories
- Source RPM repositories
- Debug RPM repositories
Synchronization Strategies
You can set each of these repository types to one of two synchronization policies:
- immediate
- on_demand
By default, all policies are set to immediate.
Setting the Sync Policy
By default, the /etc/rhui/rhui-tools.conf file on the RHUA node contains the following lines in the [rhui] section:
# Sync policy can be immediate or on_demand
default_sync_policy: immediate
The default_sync_policy option applies to all three types of content repositories.
Although you can change the policy by editing this file, keep in mind that your changes will be lost when you rerun the installer for any reason. Therefore, configure the sync policies in the custom configuration file instead. The custom configuration file is located at /root/.rhui/rhui-tools-custom.conf but does not exist by default. To use this file, create it and put the [rhui] section there. Then you can add specific overrides to this section to customize the behavior for particular content types. The options available are:
-
rpm_sync_policy -
source_sync_policy -
debug_sync_policy
Examples
The most common usage of the on_demand policy is to set Binary RPMs to sync immediately while setting Source and Debug repositories to on_demand, as the general population of clients usually does not require these content types. You can configure this in several ways:
[rhui]
default_sync_policy: on_demand
rpm_sync_policy: immediate
or
[rhui]
default_sync_policy: immediate
source_sync_policy: on_demand
debug_sync_policy: on_demand
or
[rhui]
default_sync_policy: immediate
rpm_sync_policy: immediate
source_sync_policy: on_demand
debug_sync_policy: on_demand
All three configurations are valid; it is simply a matter of preference.
Applying the Policy
After updating the configuration file, the next repository synchronization will apply the new policy.
If you switch from on_demand to immediate, the next sync will begin downloading all content for the specified type.
If you switch from immediate to on_demand, the next sync will only download repository metadata. RHUI will then download content as requested by client machines.
Tips and Tricks
- Setting all repositories to on_demand right after installing RHUI can lead to faster deployment and quicker delivery for end-users, as only metadata needs to be initially synced.
-
Utilizing a "martyr client" strategy can be beneficial if you have a new installation and do not need to support older versions of RHEL clients. By using a client that mirrors end-user configurations and running
dnf update, you can pre-download content to RHUI’s storage.
2.7. Adding a new Red Hat content repository using an input file
In Red Hat Update Infrastructure 4.2 and later, you can add custom repositories using a configured YAML input file. You can find an example template of the YAML file on the RHUA node in the /usr/share/rhui-tools/examples/repo_add_by_file.yaml directory.
This functionality is only available in the command-line interface (CLI).
Prerequisites
- Ensure that you have root access to the RHUA node.
Procedure
On the RHUA node, create a YAML input file in the following format:
# cat /root/example.yaml
name: Example_YAML_File
repo_ids:
    - rhel-8-for-x86_64-baseos-eus-rhui-rpms-8.1
    - rhel-8-for-x86_64-baseos-eus-rhui-rpms-8.2
    - rhel-8-for-x86_64-baseos-eus-rhui-rpms-8.4
    - rhel-8-for-x86_64-baseos-eus-rhui-rpms-8.6
Add the repositories listed in the input file using the
rhui-managerutility:# rhui-manager repo add_by_file --file /root/example.yaml --sync_now The name of the repos being added: Example_YAML_File Loading latest entitled products from Red Hat... ... listings loaded Successfully added Red Hat Enterprise Linux 8 for x86_64 - BaseOS - Extended Update Support from RHUI (RPMs) (8.1) (Yum) Successfully added Red Hat Enterprise Linux 8 for x86_64 - BaseOS - Extended Update Support from RHUI (RPMs) (8.2) (Yum) Successfully added Red Hat Enterprise Linux 8 for x86_64 - BaseOS - Extended Update Support from RHUI (RPMs) (8.4) (Yum) Successfully added Red Hat Enterprise Linux 8 for x86_64 - BaseOS - Extended Update Support from RHUI (RPMs) (8.6) (Yum) ... successfully scheduled for the next available timeslot. ... successfully scheduled for the next available timeslot. ... successfully scheduled for the next available timeslot. ... successfully scheduled for the next available timeslot.
Verification
In the CLI, use the following command to list all the installed repositories and check whether the correct repositories have been installed:
# rhui-manager repo list-
In the RHUI Management Tool, on the Repository Management screen, press
lto list all the installed repositories and check whether the correct repositories have been installed.
2.8. Creating a new custom repository (RPM content only)
You can create custom repositories that can be used to distribute updated client configuration packages or other non-Red Hat software to the RHUI clients. A protected repository for 64-bit RHUI servers (for example, client-rhui-x86_64) will be the preferred vehicle for distributing new non-Red Hat packages, such as an updated client configuration package, to the RHUI clients.
Like Red Hat content repositories, all of which are protected, protected custom repositories that differ only in processor architecture (i386 versus AMD64) are consolidated into a single entitlement within an entitlement certificate, using the $basearch yum variable.
In the event of certificate problems, an unprotected repository for RHUI servers can be used as a fallback method for distributing updated RPMs to the RHUI clients.
Procedure
Navigate to the Red Hat Update Infrastructure Management Tool home screen:
[root@rhua ~]# rhui-manager-
Press
rto select manage repositories. -
From the Repository Management screen, press
cto select create a new custom repository (RPM content only). Enter a unique ID for the repository. Only alphanumeric characters, _ (underscore), and - (hyphen) are permitted. You cannot use spaces in the unique ID. For example,
repo1,repo_1, andrepo-1are valid entries.Unique ID for the custom repository (alphanumerics, _, and - only):Enter a display name for the repository. This name can contain spaces and other characters that could not be used in the ID. The name defaults to the ID.
Display name for the custom repository [repo_1]:Specify the path that will host the repository. The path must be unique across all repositories hosted by RHUI. For example, if you specify the path at this step as
internal/rhel/9/repo_1, then the repository will be located at:https://<yourLB>/pulp/content/protected/internal/rhel/9/repo_1.Unique path at which the repository will be served [repo_1]:Choose whether to protect the new repository. If you answer no to this question, any client can access the repository. If you answer yes, only clients with an appropriate entitlement certificate can access the repository.
WarningAs the name implies, the content in an unprotected repository is available to any system that requests it, without any need for a client entitlement certificate. Be careful when using an unprotected repository to distribute any content, particularly content such as updated client configuration RPMs, which will then provide access to protected repositories.
Answer yes or no to the following questions as they appear:
Should the repository require clients to perform a GPG check and verify packages are signed by a GPG key? (y/n) Will the repository be used to host any Red Hat GPG signed content? (y/n) Will the repository be used to host any custom GPG signed content? (y/n) Enter the absolute path to the public key of the GPG key pair: Would you like to enter another public key? (y/n) Enter the absolute path to the public key of the GPG key pair: Would you like to enter another public key? (y/n)-
The details of the new repository displays. Press
yat the prompt to confirm the information and create the repository.
Verification
-
From the Repository Management screen, press
lto check that the correct repositories have been installed.
2.9. Deleting a repository from RHUI 4
When the Red Hat Update Infrastructure Management Tool deletes a Red Hat repository, it deletes the repository from the RHUA and all applicable CDS nodes.
Procedure
Navigate to the Red Hat Update Infrastructure Management Tool home screen:
[root@rhua ~]# rhui-manager-
Press
rto select manage repositories. -
From the Repository Management screen, press
dat the prompt to delete a Red Hat repository. A list of all repositories currently being managed by RHUI displays. -
Select which repositories to delete by typing the number of the repository at the prompt. Typing the number of a repository places a checkmark next to the name of that repository. You can also choose the range of repositories, for instance, by entering
1-5. - Continue until all repositories you want to delete are checked.
Press
cat the prompt to confirm.NoteAfter you delete the repositories, the client configuration RPMs that refer to the deleted repositories will not be available to be used by
yum.
2.10. Uploading content to a custom repository (RPM content only)
You can upload multiple packages and upload to more than one repository at a time. Packages are uploaded to the RHUA immediately but are not available on the CDS node until the next time the CDS node synchronizes.
Procedure
Navigate to the Red Hat Update Infrastructure Management Tool home screen:
[root@rhua ~]# rhui-manager-
Press
rto select manage repositories. From the Repository Management screen, press
u:Select the repositories to upload the package into: - 1: test- Enter the value (1-1) to toggle the selection.
-
Press
cto confirm your selection. Enter the location of the packages to upload. If the location is an RPM, the file will be uploaded. If the location is a directory, all RPMs in that directory will be uploaded:
/root/bear-4.1-1.noarch.rpm

The following RPMs will be uploaded:
  bear-4.1-1.noarch.rpm
Press
yto proceed ornto cancel:Copying RPMs to a temporary directory: /tmp/rhui.rpmupload.jsqdub22.tmp .. 1 RPMs copied. Creating repository metadata for 1 packages ... .. repository metadata created for 1 packages. The packages upload task for repo: client-config-rhel-8-x86_64 has been queued: /pulp/api/v3/tasks/01937826-8654-77c1-84f7-e9e07c7a7aeb/ You can inspect its progress via (S)ync screen/(RR) menu option in rhui-manager TUI.
2.11. Uploading content from a remote web site (RPM content only)
You can upload packages that are stored on a remote server without having to manually download them first. The packages must be accessible by HTTP, HTTPS, or FTP.
Procedure
Navigate to the Red Hat Update Infrastructure Management Tool home screen:
[root@rhua ~]# rhui-manager-
Press
rto select manage repositories. From the Repository Management screen, press
ur:Select the repositories to upload the package into: - 1: test- Enter the value (1-1) to toggle the selection.
Press
cto confirm your selection:### WARNING ### WARNING ### WARNING ### WARNING ### WARNING ### WARNING ### # # # Content retrieved from non-Red Hat arbitrary places can contain # # unsupported or malicious software. Proceed at your own risk. # # # ###########################################################################Enter the remote URL of the packages to upload. If the location is an RPM, the file will be uploaded. If the location is a web page, all RPMs linked off that page will be uploaded:
https://repos.fedorapeople.org/pulp/pulp/demo_repos/zoo/bear-4.1-1.noarch.rpm
Retrieving https://repos.fedorapeople.org/pulp/pulp/demo_repos/zoo/bear-4.1-1.noarch.rpm

The following RPMs will be uploaded:
  bear-4.1-1.noarch.rpm
Press
yto proceed ornto cancel:Copying RPMs to a temporary directory: /tmp/rhui.rpmupload.dwux8rq7.tmp .. 1 RPMs copied. Creating repository metadata for 1 packages ... .. repository metadata created for 1 packages. The packages upload task for repo: test has been queued: /pulp/api/v3/tasks/0193770c-6523-7363-ae5e-8c6429728b4f/ You can inspect its progress via (S)ync screen/(RR) menu option in rhui-manager TUI.
2.12. Importing package group metadata to a custom repository
To allow RHUI users to view and install package groups or language packs from a custom repository, you can import a comps.xml or a comps.xml.gz file to the custom repository.
Red Hat repositories contain these files provided by Red Hat. You can not override them. You can only upload these files to your custom repositories.
This functionality is only available in the command-line interface.
Prerequisites
-
Ensure that you have a valid
comps.xmlorcomps.xml.gzfile relevant to the custom repository. - Ensure you have root access to the RHUA node.
Procedure
On the RHUA node, import data from a
compsfile to your custom repository using therhui-managerutility:# rhui-manager repo add_comps --repo_id Example_Custom_Repo --comps /root/Example-Comps.xml
Verification
On a client system that uses the custom repository:
Refresh the repository data:
# yum clean metadataList the repository data and verify that the
compsfile has been updated:# yum grouplist
2.13. Removing content from a custom repository (Custom RPM content only)
You can remove packages from custom repositories using RHUI’s Text User Interface (TUI).
For the command-line interface (CLI) command, see Section 10.1, “Using RHUI 4 CLI options”.
Procedure
Navigate to the Red Hat Update Infrastructure Management Tool home screen:
[root@rhua ~]# rhui-manager-
Enter
rto select manage repositories. On the Repository Management screen, enter
rto select packages to remove from a repository (Custom RPM content only):-= Repository Management =- l list repositories currently managed by the RHUI i display detailed information on a repository a add a new Red Hat content repository ac add a new Red Hat container c create a new custom repository (RPM content only) d delete a repository from the RHUI u upload content to a custom repository (RPM content only) ur upload content from a remote web site (RPM content only) p list packages in a repository (RPM content only) r select packages to remove from a repository (Custom RPM content only)Enter the value to select the repository:
Choose a repository to delete packages from:
    1 - Test-RPM-1
    2 - Test-RPM-2
Enter the value to select the packages to delete.
Select the packages to remove:
  -    1: example-package-1.noarch.rpm
  -    2: example-package-2.noarch.rpm
Enter
cto confirm selection.The following packages will be removed: example-package-1.noarch.rpmEnter
yto proceed ornto cancel:Removed example-package-1.noarch.rpm
2.14. Listing the packages in a repository (RPM content only)
When listing repositories within the Red Hat Update Infrastructure Management Tool, only repositories that contain fewer than 100 packages display their contents. Results with more than 100 packages only display a package count.
Procedure
Navigate to the Red Hat Update Infrastructure Management Tool home screen:
[root@rhua ~]# rhui-manager-
Press
rto select manage repositories. -
From the Repository Management screen, press
p. Select the number of the repository you want to view. The Red Hat Update Infrastructure Management Tool asks if you want to filter the results. Leave the line blank to see the results without a filter.
Enter value (1-1631) or 'b' to abort: 1

Enter the first few characters (case insensitive) of an RPM to filter the results
(blank line for no filter):

Only filtered results that contain less than 100 packages will have their
contents displayed. Results with more than 100 packages will display
a package count only.

Packages:
  bear-4.1-1.noarch.rpm
Verification
One of three types of messages displays:
Packages:
  bear-4.1-1.noarch.rpm
Package Count: 8001No packages in the repository.
2.15. Limiting the number of repository versions
In Pulp 3, which is used in Red Hat Update Infrastructure 4, repositories are versioned. When a repository is updated in Red Hat CDN and synchronized in Red Hat Update Infrastructure, Pulp creates a new version.
By default, repositories added using Red Hat Update Infrastructure version 4.6 and earlier were configured to retain all repository versions. This resulted in data accumulating in the database indefinitely, taking up disk space and, in the worst case, the inability to delete a repository. With version 4.7 and newer, repositories are added with a version limit of 5. This means only the latest five versions are kept at all times, and any older version is automatically deleted. However, you may want to set the version limit for existing repositories added earlier and have any older versions deleted. You can do this for all your repositories at once or process one repository at a time.
The command to do this is as follows:
[root@rhua ~]# rhui-manager repo set_retain_versions [--repo_id <ID> or --all] --versions <NUMBER>For example, to limit the number of versions for all repositories to 5, one would run:
[root@rhua ~]# rhui-manager repo set_retain_versions --all --versions 5
Depending on the number of repositories and existing repository versions, It can take more than an hour for all the necessary tasks to be scheduled, and up to a few days for the versions older than the limit to be deleted. You can watch the progress in the rhui-manager text user interface, on the synchronization screen, under running tasks.
2.16. Removing orphaned artifacts
RPM packages, repodata files, and other relates files are kept on the disk even if they are no longer part of a repository; for example, after a repository is deleted and the files do not belong to another repository, or when an update is made available and a new set of repodata files is synchronized.
To remove this obsolete content, one can run the following command:
[root@rhua ~]# rhui-manager repo orphan_cleanup
Depending on the number of files, it can take up to several days for this task to complete. You can watch the progress in the rhui-manager text user interface, on the synchronization screen, under running tasks.
Chapter 3. Creating an entitlement certificate and a client configuration RPM
RHUI uses entitlement certificates to ensure that the client making requests on the repositories is authorized by the cloud provider to access those repositories. The entitlement certificate must be signed by the cloud provider’s Certificate Authority (CA) Certificate. The CA Certificate is installed on the CDS as part of its configuration.
3.1. Creating a client entitlement certificate with the Red Hat Update Infrastructure Management Tool
When Red Hat issues the original entitlement certificate, it grants access to the repositories you requested. When you create client entitlement certificates, you decide how to subdivide your clients and create a separate certificate for each one. Each certificate can then be used to create individual RPMs.
Prerequisites
- The entitlement certificate must be signed by the cloud provider’s CA Certificate.
Procedure
Navigate to the Red Hat Update Infrastructure Management Tool home screen:
[root@rhua ~]# rhui-manager-
Press
eto select create entitlement certificates and client configuration RPMs. -
Press
eto select generate an entitlement certificate. Select which repositories to include in the entitlement certificate by typing the number of the repository at the prompt. Typing the number of a repository places an x next to the name of that repository. Continue until all repositories you want to add have been checked.
ImportantInclude only repositories for a single RHEL version in a single entitlement. Adding repositories for multiple RHEL versions leads to an unusable
yumconfiguration file.-
Press
cat the prompt to confirm. Enter a name for the certificate. This name helps identify the certificate within the Red Hat Update Infrastructure Management Tool and generate the name of the certificate and key files.
Name of the certificate. This will be used as the name of the certificate file (name.crt) and its associated private key (name.key). Choose something that will help identify the products contained with it.- Enter a path to save the certificate. Leave the field blank to save it to the current working directory.
Enter the number of days the certificate should be valid for. Leave the field blank for 365 days. The details of the repositories to be included in the certificate display.
Repositories to be included in the entitlement certificate: Red Hat Repositories Red Hat Enterprise Linux 8 for ARM 64 - AppStream (Debug RPMs) from RHUI Red Hat Enterprise Linux 8 for ARM 64 - AppStream (RPMs) from RHUI Red Hat Enterprise Linux 8 for ARM 64 - AppStream (Source RPMs) from RHUI Proceed? (y/n)-
Press
yat the prompt to confirm the information and create the entitlement certificate.
Verification
You will see a similar message if the entitlement certificate was created:
..........................+++++
....+++++
Entitlement certificate created at ./rhel8-for-rhui4.crt

------------------------------------------------------------------------------
3.2. Creating a client entitlement certificate with the CLI
When Red Hat issues the original entitlement certificate, it grants access to the repositories you requested. When you create client entitlement certificates, you decide how to subdivide your clients and create a separate certificate for each one. Each certificate can then be used to create individual RPMs.
Prerequisites
- The entitlement certificate must be signed by the cloud provider’s CA Certificate.
Procedure
Use the following command to create an entitlement certificate from the RHUI CLI:
# rhui-manager client cert --repo_label rhel-8-for-x86_64-appstream-eus-rhui-source-rpms --name rhuiclientexample --days 365 --dir /root/clientcert .............................................+++++ ...............................................................................+++++ Entitlement certificate created at /root/clientcert/rhuiclientexample.crtNoteUse Red Hat repository labels, not IDs. To get a list of all labels, run the
rhui-manager client labelscommand. If you include a protected custom repository in the certificate, use the repository’s ID instead.
Verification
A similar message displays if you successfully created and entitlement certificate:
Entitlement certificate created at /root/clientcert/rhuiclientexample.crt
3.3. Verifying whether the client entitlement certificate is compliant with the FUTURE cryptographic policy
You can verify which cryptographic policies your instance of RHUI is compliant with by checking the client entitlement certificate:
-
Certificates that are generated by RHUI versions 3.1 to 4.0 are compliant with
FIPSandDEFAULTcryptographic policies. -
Certificates that are generated by RHUI versions 4.1 and later are compliant with
FIPS,DEFAULTandFUTUREcryptographic policy.
Prerequisites
Ensure that you know the location of the client entitlement certificate.
The default location is
/etc/pki/rhui/product/content.crt.
Procedure
In your client RPM, or on the machine where the RPM is installed, run the following command specifying the path where the client entitlement certificate is stored:
# openssl x509 -noout -text -in /etc/pki/rhui/product/content.crt | grep bitCheck the RSA key length:
-
If the length is 2048 bits, then the client entitlement certificate is not compliant with the
FUTUREpolicy. -
If the length is 4096 bits, then the client entitlement certificate is compliant with the
FUTUREpolicy.
-
If the length is 2048 bits, then the client entitlement certificate is not compliant with the
3.4. Changing the repository ID prefix in a client configuration RPM using the CLI
When creating RPMs, you can either set a custom repository ID prefix or remove it entirely. By default, the prefix is rhui-.
Procedure
On the RHUA node, use the RHUI installer command to set or remove the prefix:
Set a custom prefix:
rhui-installer --rerun --client-repo-prefix CUSTOM_PREFIXRemove the prefix entirely by using two quotation marks instead of the prefix.
rhui-installer --rerun --client-repo-prefix ""
3.5. Creating a client configuration RPM with the Red Hat Update Infrastructure Management Tool
When Red Hat issues the original entitlement certificate, it grants access to the repositories you requested. When you create client entitlement certificates, you need to decide how to subdivide your clients and create a separate certificate for each one. You can then use each certificate to create individual RPMs for installation on the appropriate guest images.
Use this procedure to create RPMs with the RHUI Management Tool.
Procedure
Navigate to the Red Hat Update Infrastructure Management Tool home screen:
[root@rhua ~]# rhui-manager-
Press
eto select create entitlement certificates and client configuration RPMs. -
From the Client Entitlement Management screen, press
cto select create a client configuration RPM from an entitlement certificate. Enter the full path of a local directory to save the configuration files to:
Full path to local directory in which the client configuration files generated by this tool should be stored (if this directory does not exist, it will be created):- Enter the name of the RPM.
- Enter the version of the configuration RPM. The default version is 2.0.
- Enter the release of the configuration RPM. The default release is 1.
- Enter the full path to the entitlement certificate authorizing the client to access specific repositories.
- Enter the full path to the private key for the entitlement certificate.
- Select any unprotected custom repositories to be included in the client configuration.
-
Press
cto confirm selections or?for more commands.
Verification
A similar message displays if the RPM was successfully created:
Successfully created client configuration RPM.
Location: /tmp/clientrpmtest-2.0/build/RPMS/noarch/clientrpmtest-2.0-1.noarch.rpm
3.6. Creating a client configuration RPM with the CLI
When Red Hat issues the original entitlement certificate, it grants access to the repositories you requested. When you create client entitlement certificates, you need to decide how to subdivide your clients and create a separate certificate for each one. You can then use each certificate to create individual RPMs for installation on the appropriate guest images.
Use this procedure to create RPMs with the CLI.
Procedure
Use the following command to create an RPM with the RHUI CLI:
# rhui-manager client rpm --entitlement_cert /root/clientcert/rhuiclientexample.crt --private_key /root/clientcert/rhuiclientexample.key --rpm_name clientrpmtest --dir /tmp --unprotected_repos unprotected_repo1 Successfully created client configuration RPM. Location: /tmp/clientrpmtest-2.0/build/RPMS/noarch/clientrpmtest-2.0-1.noarch.rpmNoteWhen using the CLI, you can also specify the URL of the proxy server to use with RHUI repositories, or you can use
_none_(including the underscores) to override any globalyumsettings on a client machine. To specify a proxy, use the--proxyparameter.
Verification
A similar message displays if you successfully created a client configuration RPM:
Successfully created client configuration RPM.
Location: /tmp/clientrpmtest-2.0/build/RPMS/noarch/clientrpmtest-2.0-1.noarch.rpm
3.7. Typical client RPM workflow
As a CCSP, you can offer various versions of Red Hat Enterprise Linux and a variety of layered products available on top of it. In addition to the Red Hat repositories that provide this content, you will need custom repositories to provide updates to client configuration RPMs for these Red Hat Enterprise Linux versions and layered products. You must create a custom repository for each Red Hat Enterprise Linux version and each layered product sold separately. For example, you will need separate custom repositories for the base Red Hat Enterprise Linux 8 offering and for SAP on Red Hat Enterprise Linux. These custom repositories will store the corresponding client configuration RPMs. Whenever you update these RPMs—for example, to add a new repository or to update an expiring certificate—you will upload newer versions to the corresponding custom repositories.
It is good practice to sign all RPMs with a GPG key, ensuring that users are installing official packages from you that have not been tampered with. However, signing packages is outside the scope of RHUI, so you need to sign your client configuration RPMs using tools available in your company. To create the custom repository, you only need the public GPG key on the RHUA to configure it for use with the custom repository. Note that rhui-manager will automatically include the key in the client configuration RPM and use it for the custom repository in dnf configuration.
Procedure
In the following example, you will create a custom repository for the client configuration RPM for base Red Hat Enterprise Linux 8 on the x86_64 architecture:
# rhui-manager repo create_custom --protected --repo_id client-config-rhel-8-x86_64 --display_name "RHUI Client Configuration for RHEL 8 on x86_64" --gpg_public_keys /root/RPM-GPG-KEY-my-cloudYou can use a different repository ID and display name if desired, and ensure you specify the actual GPG key file.
Add the relevant Red Hat repositories. The following YAML file contains the typical set of repositories for base Red Hat Enterprise Linux 8 on the x86_64 architecture, using unversioned repositories:
# cat rhel-8-x86_64.yaml
name: Red Hat Enterprise Linux 8 on x86_64
repo_ids:
  - codeready-builder-for-rhel-8-x86_64-rhui-debug-rpms-8
  - codeready-builder-for-rhel-8-x86_64-rhui-rpms-8
  - codeready-builder-for-rhel-8-x86_64-rhui-source-rpms-8
  - rhel-8-for-x86_64-appstream-rhui-debug-rpms-8
  - rhel-8-for-x86_64-appstream-rhui-rpms-8
  - rhel-8-for-x86_64-appstream-rhui-source-rpms-8
  - rhel-8-for-x86_64-baseos-rhui-debug-rpms-8
  - rhel-8-for-x86_64-baseos-rhui-rpms-8
  - rhel-8-for-x86_64-baseos-rhui-source-rpms-8
  - rhel-8-for-x86_64-supplementary-rhui-debug-rpms-8
  - rhel-8-for-x86_64-supplementary-rhui-rpms-8
  - rhel-8-for-x86_64-supplementary-rhui-source-rpms-8
To add and synchronize all these repositories using the YAML file above, run the following command:
# rhui-manager repo add_by_file --file rhel-8-x86_64.yaml --sync_nowCreate an entitlement certificate. You will need a list of repository labels that are to be allowed in the certificate. Repository labels are often identical to repository IDs, except when the repository ID contains a specific Red Hat Enterprise Linux minor version, in which case the label does not contain the minor version but only the major version. In the case of base Red Hat Enterprise Linux repositories, the IDs are identical, so you can extract them from the YAML file above, using the following Python code:
import yaml
with open("rhel-8-x86_64.yaml") as repoyaml:
    repodata = yaml.safe_load(repoyaml)
    print(",".join(repodata["repo_ids"]))
Copy the output to the clipboard and store it as an environment variable; for example, $labels:
# labels=<paste the contents of the clipboard here>In addition to the Red Hat Enterprise Linux repository labels, you also need to add the custom repository to the comma-separated list of labels when creating the entitlement certificate. Run the following command to create the entitlement certificate allowing access to both the Red Hat Enterprise Linux repositories and the custom repository:
# rhui-manager client cert --name rhel-8-x86_64 --dir /root --days 3650 --repo_label $labels,client-config-rhel-8-x86_64If your company’s policy allows certificates to be valid for only one year, two years, etc., change the value of the
--daysargument accordingly.This command creates the files
/root/rhel-8-x86_64.crtand/root/rhel-8-x86_64.key. You will need them in the next step.Create a client configuration RPM:
# rhui-manager client rpm --dir /tmp --rpm_name rhui-client-rhel-8-x86_64 --rpm_version 1.0 --entitlement_cert /root/rhel-8-x86_64.crt --private_key /root/rhel-8-x86_64.keyUse an RPM name or version of your choice. With the values above, the command creates the RPM and prints its location, which is:
/tmp/rhui-client-rhel-8-x86_64-1.0/build/RPMS/noarch/rhui-client-rhel-8-x86_64-1.0-1.noarch.rpmTransfer this RPM from the RHUA to your system and sign it with the appropriate GPG key—the private key that corresponds to the public key that you used as the
--gpg_public_keysparameter when you created the custom repository. You can then, for example, have the signed RPM preinstalled on Red Hat Enterprise Linux 8 x86_64 images in your cloud environment. You also need to transfer the signed RPM back to the RHUA and upload it to the custom repository for Red Hat Enterprise Linux 8 on x86_64:# rhui-manager packages upload --repo_id client-config-rhel-8-x86_64 --packages /root/signed/rhui-client-rhel-8-x86_64-1.0-1.noarch.rpm
Verification
Check the contents of the custom repository:
# rhui-manager packages list --repo_id client-config-rhel-8-x86_64This command is supposed to print the RPM file that you have uploaded.
Once you have configured your CDS and HAProxy nodes, which is described later in this guide, you can also install the client configuration RPM on a test VM and verify access to all the relevant repositories by running the following command on the test VM:
# yum -v repolistThis command is supposed to print the configured Red Hat Enterprise Linux 8 repositories and the custom repository for client configuration RPMs.
Updating the client configuration RPM
When it is necessary to rebuild the client configuration RPM, increase the version number.
If you used
1.0in the previous invocation, use e.g.2.0now, and keep the rest of the parameters:# rhui-manager client rpm --dir /tmp --rpm_name rhui-client-rhel-8-x86_64 --rpm_version 2.0 ...Then, again, sign the newer RPM, transfer it to the RHUA, and upload it to the custom repository:
# rhui-manager packages upload --repo_id client-config-rhel-8-x86_64 --packages /root/signed/rhui-client-rhel-8-x86_64-2.0-1.noarch.rpm- Client VMs on which the previous version of the RPM is installed will now be able to update to the newer version. Note that it may be necessary to clean the dnf cache on the client VM to make dnf reload the repodata, which was updated when the newer RPM was uploaded.
Do not combine x86_64 and ARM64 repositories in one entitlement certificate. The client configuration RPM created by rhui-manager using such a certificate would provide access to both architectures on the target client VM, which might cause conflicts. You would have to modify the rh-cloud.repo file and rebuild the RPM outside of rhui-manager. Note that, as long as you used --dir /tmp when creating the client configuration RPM, the artifacts are now stored in /tmp/rhui-client-rhel-8-x86_64-1.0/build/. For detailed information about rebuilding RPMs, see Packaging and distributing software in the Red Hat Enterprise Linux documentation.
It is currently impossible to make rhui-manager create the rh-cloud.repo file with certain repositories—for example, -debug and -source repositories—disabled by default. You would have to modify the rh-cloud.repo file and rebuild the RPM outside of rhui-manager. This issue is tracked in BZ#1772156.
Chapter 4. Managing Red Hat entitlement certificates
4.1. Red Hat Update Appliance certificates
The RHUA in RHUI uses the following certificates and keys:
- Content certificate and private key
- Entitlement certificate and private key
- SSL certificate and private key
- Cloud provider’s CA certificate
The RHUA is configured with the content certificate and the entitlement certificate. The RHUA uses the content certificate to connect to the Red Hat CDN. It also uses the Red Hat CA certificate to verify the connection to the Red Hat CDN. As the RHUA is the only component that connects to the Red Hat CDN, it is the only RHUI component that has this certificate deployed. It should be noted that multiple RHUI installations can use the same content certificate. For instance, the Amazon EC2 cloud runs multiple RHUI installations (one per region), but each RHUI installation uses the same content certificate.
Clients use the entitlement certificate to permit access to packages in RHUI. To perform an environment health check, the RHUA attempts a yum request against each CDS. To succeed, the yum request must specify a valid entitlement certificate.
4.2. Content delivery server certificates
Each CDS node in RHUI uses the following certificates and keys:
- SSL certificate and private key
- Cloud provider’s CA certificate
The only certificate necessary for the CDS is an SSL certificate, which permits HTTPS communications between the client and the CDS. The SSL certificates are scoped to a specific hostname, so a unique SSL certificate is required for each CDS node. If SSL errors occur when connecting to a CDS, verify that the certificate’s common name is set to the fully qualified domain name (FQDN) of the CDS on which it is installed.
The CA certificate is used to verify that the entitlement certificate sent by the client as part of a yum request was signed by the cloud provider. This prevents a rogue instance from generating its own entitlement certificate for unauthorized use within RHUI.
4.3. Client certificates
Each client in the RHUI uses an entitlement certificate and private key as well as the cloud provider’s CA certificate.
The entitlement certificate and its private key enable information encryption from the CDS back to the client. Each client uses the entitlement certificate when connecting to the CDS to prove it has permission to download its packages. All clients use a single entitlement certificate.
The cloud provider’s CA certificate is used to verify the CDS’s SSL certificate when connecting to it. This ensures that a rogue instance is not impersonating the CDS and introducing potentially malicious packages into the client.
The CA certificate verifies the SSL certificate, not the entitlement certificate. The reverse is true for the CDS node. The SSL certificate and private key are used to encrypt data from the client to the CDS. The CA certificate present on the CDS verifies that the CDS node should trust the entitlement certificate sent by the client.
4.3.1. Listing the entitled products for a certificate
The Entitlements Manager screen is used to list entitled products in the current Red Hat content certificates and to upload new certificates.
Procedure
Navigate to the Red Hat Update Infrastructure Management Tool home screen:
[root@rhua ~]# rhui-manager-
Press
nto select manage Red Hat entitlement certificates. From the Entitlements Manager screen, press
lto list data about the current content certificate:rhui (entitlements) => l Red Hat Enterprise Linux 8 for ARM 64 - AppStream (Debug RPMs) from RHUI Expiration: 02-27-2022 Certificate: c885597492374720bb5d398c3f65d1ed.pem Red Hat Enterprise Linux 8 for ARM 64 - AppStream (RPMs) from RHUI Expiration: 02-27-2022 Certificate: c885597492374720bb5d398c3f65d1ed.pem Red Hat Enterprise Linux 8 for ARM 64 - AppStream (Source RPMs) from RHUI Expiration: 02-27-2022 Certificate: c885597492374720bb5d398c3f65d1ed.pem Red Hat Enterprise Linux 8 for ARM 64 - BaseOS (Debug RPMs) from RHUI Expiration: 02-27-2022 Certificate: c885597492374720bb5d398c3f65d1ed.pem Red Hat Enterprise Linux 8 for ARM 64 - BaseOS (RPMs) from RHUI Expiration: 02-27-2022 Certificate: c885597492374720bb5d398c3f65d1ed.pem Red Hat Enterprise Linux 8 for ARM 64 - BaseOS (Source RPMs) from RHUI Expiration: 02-27-2022 Certificate: c885597492374720bb5d398c3f65d1ed.pem
Verification
- You will see a list of the entitled products in the current Red Hat content certificates.
4.3.2. Listing custom repository entitlements
You can use the Entitlements Manager screen to list custom repository entitlements.
Procedure
Navigate to the Red Hat Update Infrastructure Management Tool home screen:
[root@rhua ~]# rhui-manager-
Press
nto select manage Red Hat entitlement certificates. From the Entitlements Manager screen, press
cto list data about the custom repository entitlements:rhui (entitlements) => c Custom Repository Entitlements For each entitlement URL listed, the corresponding repositories that are configured with that entitlement are listed. /protected/$basearch/os Name: Repo 1 URL: protected/i386/os Name: Repo 2 URL: protected/x86_64/os
Chapter 5. Checking synchronization status and scheduling
A repository is a storage location for software packages (RPMs). RHEL uses yum commands to search a repository, download, install, and update the RPMs. The RPMs contain all the dependencies needed to run an application.
The length of the initial synchronization of Red Hat content can vary. If you choose to synchronize repositories as soon as possible, you can synchronize all repositories in Red Hat Update Infrastructure 4 by running rhui-manager repo sync_all in the CLI.
5.1. Displaying repository synchronization summary
You can use the Synchronization Status screen to display information about a particular repository.
Procedure
Navigate to the Red Hat Update Infrastructure Management Tool home screen:
[root@rhua ~]# rhui-manager-
Press
sto select synchronization status and scheduling. From the Synchronization Status screen, press
dr:-= Repository Summary Synchronization Status =- Last Refreshed: 02:01:22 (updated every 5 seconds, ctrl+c to exit) Last Sync Last Result ------------------------------------------------- Red Hat Enterprise Linux 8 for ARM 64 - BaseOS (Debug RPMs) from RHUI (8) Never None .... .... Red Hat Enterprise Linux 8 for x86_64 - AppStream from RHUI (Debug RPMs) (8.2) 2021-07-29 17:45:41 Running Associating Content: 11001 (97%) Downloading Artifacts: 7376
5.2. Displaying running synchronizations
You can use the Synchronization Status screen to check the status on running synchronization tasks.
Procedure
Navigate to the Red Hat Update Infrastructure Management Tool home screen:
[root@rhua ~]# rhui-manager-
Press
sto select synchronization status and scheduling. From the Synchronization Status screen, press
rr:Last Refreshed: 02:06:46 (updated every 5 seconds, ctrl+c to exit) Current Sync Result ------------------------------------------------- Red Hat Enterprise Linux 8 for x86_64 - AppStream from RHUI (Debug RPMs) (8.2) 2021-07-29 17:45:41 Running Associating Content: 11001 (97%) Downloading Artifacts: 7376
5.3. Viewing the details of the last repository synchronization
You can use the Synchronization Status screen to view the details of the last repository synchronization.
Procedure
Navigate to the Red Hat Update Infrastructure Management Tool home screen:
[root@rhua ~]# rhui-manager-
Press
sto select synchronization status and scheduling. -
From the Synchronization Status screen, press
vr. Enter the number for the repository that you want to see details for:
Enter value (1-66) or 'b' to abort:
Verification
A similar message displays if the selected repository has not been synchronized:
Repo: Red Hat Enterprise Linux 8 for x86_64 - AppStream from RHUI (Debug RPMs) (8.2)
No syncs have been completed for this repository.
5.4. Synchronizing an individual repository immediately
The initial synchronization of content can take a while, typically 10 to 20 minutes. If you choose to synchronize repositories as soon as possible, you can synchronize all repositories in Red Hat Update Infrastructure 4 by running rhui-manager repo sync_all in the CLI.
Procedure
Navigate to the Red Hat Update Infrastructure Management Tool home screen:
[root@rhua ~]# rhui-manager-
Press
sto select synchronization status and scheduling. From the Synchronization Status screen, press
sr:Select one or more repositories to schedule to be synchronized before its scheduled time. The sync will happen as soon as possible depending on other tasks that may be executing in the RHUI. Sync requests for repositories with tasks in running or pending state will be ignored. Last Result Next Sync Repository -------------------------------------------------Select the repository by entering the value beside the repository name. Enter one repository selection at a time before confirming your product selection:
x 714: Error 2021-11-17 20:30:00 Red Hat Enterprise Linux 8 for ARM 64 - AppStream (RPMs) from RHUI (8.4)Press
cto confirm:The following repositories will be scheduled for synchronization: Red Hat Enterprise Linux 8 for ARM 64 - AppStream (RPMs) from RHUI (8.4) Proceed? (y/n) yPress
yto proceed:Scheduling sync for Red Hat Enterprise Linux 8 for ARM 64 - AppStream (RPMs) from RHUI (8.4)... ... successfully scheduled for the next available timeslot.NoteThis message displays if a task for the selected repository is running.
Ignoring sync request for Red Hat Enterprise Linux 8 for x86_64 - AppStream from RHUI (Debug RPMs) (8.2) as the repo is currently reserved by a running task.
5.5. Canceling active synchronization tasks
Most environments synchronize repositories on a scheduled basis. You may encounter a situation where you need to cancel active synchronization tasks.
Prerequisites
- There are existing repositories.
- There are active synchronization tasks.
Procedure
Navigate to the Red Hat Update Infrastructure Management Tool home screen:
[root@rhua ~]# rhui-manager-
Press
sto select synchronization status and scheduling. -
From the Synchronization Status screen, press
cato select cancel active sync tasks. Enter the value for the task or tasks that you want to cancel:
Select one or more repositories for which you want to cancel their active tasks. - 1: Red Hat Enterprise Linux 8 for x86_64 - AppStream from RHUI (Debug RPMs) (8.2) Enter value (1-1) to toggle selection, 'c' to confirm selections, or '?' for more commands:-
Press
cto confirm your selection. Press
yto cancel the synchronization task or tasks:The active tasks will be canceled for the following repositories: Red Hat Enterprise Linux 8 for x86_64 - AppStream from RHUI (Debug RPMs) (8.2) Proceed? (y/n)
Verification
A similar message displays if you cancel an active synchronization task:
Canceling active task for repo Red Hat Enterprise Linux 8 for x86_64 - AppStream from RHUI (Debug RPMs) (8.2) ...
... done
5.6. Canceling waiting synchronization tasks
Most environments synchronize repositories on a scheduled basis. You may encounter a situation where you need to cancel pending synchronization tasks.
Prerequisites
- There are existing repositories.
- There are scheduled synchronization tasks.
Procedure
Navigate to the Red Hat Update Infrastructure Management Tool home screen:
[root@rhua ~]# rhui-manager-
Press
sto select synchronization status and scheduling. -
From the Synchronization Status screen, press
cwto select cancel waiting sync tasks. Enter the value for the task or tasks that you want to cancel:
Select one or more repositories for which you want to cancel their pending tasks.
  -    1: Single Sign-On 7.4 for RHEL 8 x86_64 (Source RPMs) from RHUI
Enter value (1-1) to toggle selection, 'c' to confirm selections, or '?' for more commands: 1
Press
cto confirm your selection:Select one or more repositories for which you want to cancel their pending tasks. x 1: Single Sign-On 7.4 for RHEL 8 x86_64 (Source RPMs) from RHUI Enter value (1-1) to toggle selection, 'c' to confirm selections, or '?' for more commands: cPress
yto proceed:The pending tasks will be canceled for the following repositories: Single Sign-On 7.4 for RHEL 8 x86_64 (Source RPMs) from RHUI Proceed? (y/n) y
Verification
A similar message displays if the cancellation is successful:
Canceling pending task for repo Single Sign-On 7.4 for RHEL 8 x86_64 (Source RPMs) from RHUI ...
... done
The following message displays if there are no pending synchronization tasks:
There are no repositories with pending sync related tasks.
5.7. Viewing and changing a repository auto-publish status
You can use the Synchronization Status screen to look at and modify a repository’s auto-publish status.
Procedure
Navigate to the Red Hat Update Infrastructure Management Tool home screen:
[root@rhua ~]# rhui-manager-
Press
sto select synchronization status and scheduling. From the Synchronization Status screen, press
ap:rhui (sync) => ap Select one or more repositories to toggle the auto-publish status. The operation will be executed as soon as possible depending on other tasks that may be executing in the RHUI. Status | Repository -------------------------------------------------------------------------- Select one or more repositories: Custom Repositories Red Hat Repositories: yum - 713: AUTO Red Hat Enterprise Linux 8 for ARM 64 - AppStream (RPMs) from RHUI (8.3) - 714: AUTO Red Hat Enterprise Linux 8 for ARM 64 - AppStream (RPMs) from RHUI (8.4) - 719: AUTO Red Hat Enterprise Linux 8 for ARM 64 - AppStream (Source RPMs) from RHUI (8.3) - 720: AUTO Red Hat Enterprise Linux 8 for ARM 64 - AppStream (Source RPMs) from RHUI (8.4)Enter a value (
1-1631) to toggle the selection,cto confirm selections, or?for more commands:The following repositories will have their auto-publish status changed: Red Hat Repositories yum Red Hat Enterprise Linux 8 for ARM 64 - AppStream (RPMs) from RHUI (8)-
Press
cto confirm your selection. -
Press
yto proceed.
Verification
A similar message displays when you make and confirm a selection:
Scheduling a task to turn off auto-publish status of repository Red Hat Enterprise Linux 8 for ARM 64 - AppStream (RPMs) from RHUI (8)
5.8. Viewing and advancing repository workflow
You can use the Synchronization Status screen to look at and change a repository’s workflow.
Procedure
Navigate to the Red Hat Update Infrastructure Management Tool home screen:
[root@rhua ~]# rhui-manager-
Press
sto select synchronization status and scheduling. -
From the Synchronization Status screen, press
wf. Enter a value (
1-1631) to toggle the selection,cto confirm selections, or?for more commands:The following repositories will be scheduled for workflow push: Red Hat Repositories yum Red Hat Enterprise Linux 8 for ARM 64 - AppStream (RPMs) from RHUI (8.4)-
Press
yto proceed:
Verification
A similar message displays if the scheduling was successful:
Scheduling a task for generating metadata version 0 for repo Red Hat Enterprise Linux 8 for ARM 64 - AppStream (RPMs) from RHUI (8.4) ...
  ... task scheduled.
5.9. Exporting a repository to the file system
Repositories are exported automatically after the latest synchronization that updated their contents.
You can use the Synchronization Status screen to forcibly export a repository to a file system at any time.
Procedure
Navigate to the Red Hat Update Infrastructure Management Tool home screen:
[root@rhua ~]# rhui-manager-
Press
sto select synchronization status and scheduling. -
From the Synchronization Status screen, press
ex. - Enter a value to toggle the selection.
Press
cto confirm the selection:The following repositories will be exported: Red Hat Repositories yum Red Hat Enterprise Linux 8 for ARM 64 - AppStream (Source RPMs) from RHUI (8)-
Press
yto proceed.
Verification
A similar message displays if the repository is exported to a file system:
[1/1] Exporting version 1 of the repo Red Hat Enterprise Linux 8 for ARM 64 - AppStream (Source RPMs) from RHUI (8).
Chapter 6. Managing content delivery servers
CDS nodes provide content to RHUI clients.
You can use the Content Delivery Server (CDS) Management screen to list, add, delete, and reinstall CDS nodes.
6.1. Registering a new CDS
The Red Hat Update Infrastructure Management Tool provides several options for configuring a CDS within the RHUI.
Prerequisites
-
Make sure
sshdis running on the CDS node and thatport 443is open.
Answering yes (y) to the below question: Update instance(s) after reinstalling? (y/n): will result in a dnf update being run on the instance after it is registered. This may require a reboot of the instance. Answering no (n) to this question will result in the dnf update not being run.
Procedure
Navigate to the Red Hat Update Infrastructure Management Tool home screen:
[root@rhua ~]# rhui-manager-
Press
cto select manage content delivery servers (CDS). -
From the Content Delivery Server (CDS) Management screen, press
ato add a new CDS instance. Enter the hostname of the CDS to add:
Hostname of the CDS instance to register:
cds1.example.com
Enter the user name that will have SSH access to the CDS and have sudo privileges.
Username with SSH access to <cds1.example.com> and sudo privileges:
<cloud-user>
Enter the absolute path to the SSH private key for logging in to the CDS and press
Enter.Absolute path to an SSH private key to log into <cds1.example.com> as <cloud-user>: /home/<cloud-user>/.ssh/id_rsa_rhuaUpdate the instance with the latest versions of available packages
Update instance after registering? (y/n): yOptional: If you wish to use custom SSL certificates, enter the absolute path to the custom SSL certificate, SSL Key, and SSL crt files.
NoteIf you do not provide an SSL certificate, it will be automatically generated.
Optional absolute path to user supplied SSL key file: /home/<cloud-user>/custom_ssl.key Optional absolute path to user supplied SSL crt file: /home/<cloud-user>/custom_ssl.crt ......................................................................... The following CDS has been successfully added: Hostname: <cds1.example.com> SSH Username: <cloud-user> SSH Private Key: /home/<cloud-user>/.ssh/id_rsa_rhua The CDS will now be configured: .................................................................... The CDS was successfully configured.- If adding the content delivery server fails, check that the firewall rules permit access between the RHUA and the CDS.
Run the
mountcommand to see if shared storage is mounted as read-write.[root@rhua ~]# mount | grep rhui nfs.example.com:/export on /var/lib/rhui/remote_share type nfs4 (rw,relatime,vers=4.2,rsize=1048576,wsize=1048576,namlen=255,hard,proto=tcp,timeo=600,retrans=2,sec=sys,clientaddr=10.8.41.163,local_lock=none,addr=10.8.41.163)- After successful configuration, repeat these steps for all remaining CDS nodes.
6.2. Listing all known CDS instances managed by RHUI 4
You can use the Content Delivery Server (CDS) Management screen to list all CDS nodes managed by Red Hat Update Infrastructure 4.
Procedure
Navigate to the Red Hat Update Infrastructure Management Tool home screen:
[root@rhua ~]# rhui-manager-
Press
cto select manage content delivery servers (CDS): From the Content Delivery Server (CDS) Management screen, press
lto list all known CDS nodes that Red Hat Update Infrastructure 4 manages:Hostname: <cds1.example.com> SSH Username: <cloud-user> SSH Private Key: /<cloud-user>/.ssh/id_rsa_rhua
6.3. Reinstalling and reapplying configuration to a CDS
You may encounter a situation where you need to reinstall and reapply the configuration for a CDS. The Red Hat Update Infrastructure Management Tool provides an easy way to accomplish this task.
Prerequisites
- At least one installed CDS
Answering yes (y) to the below question: Update instance(s) after reinstalling? (y/n): will result in a dnf update being run on the instance after it is reinstalled. This may require a reboot of the instance. Answering no (n) to this question will result in the dnf update not being run.
Procedure
Navigate to the Red Hat Update Infrastructure Management Tool home screen:
[root@rhua ~]# rhui-manager-
Press
cto select manage content delivery servers (CDS). -
From the Content Delivery Server (CDS) Management screen, press
rto select reinstall and reapply configuration to an existing CDS instance. The Red Hat Update Infrastructure Management Tool automatically performs all reinstallation and reconfiguration tasks. Select the CDS to reinstall:
1 - Hostname: <cds1.example.com> SSH Username: <cloud-user> SSH Private Key: /<cloud-user>/.ssh/id_rsa_rhua-
Enter a value or
bto abort: 1: 1 Update instance(s) after reinstalling? (y/n): y
Checking that the RHUA services are reachable from the instance...
Done.


Installing and configuring the CDS...

PLAY [Registering a CDS instance] **********************************************

...

TASK [Update CDS instance] *****************************************************
ok: [cds1.example.com]

PLAY RECAP *********************************************************************
cloud-user@cds1.example.com : ok=24   changed=10   unreachable=0    failed=0    skipped=2    rescued=0    ignored=0

Done.
Verification
Check that you successfully reinstalled and reconfigured the CDS by viewing the code output:
Ensuring that instance ports are reachable ...
Done.
6.4. Configuring a CDS to accept legacy CAs
By default, a content delivery server (CDS) node only accepts entitlement certificates signed by the Certificate Authority (CA) that is currently configured on your RHUI system. However, you might want to accept previously created CAs so that clients can continue to work in case you change your main CA or when the CA certificate expires.
This procedure provides instructions to support legacy CAs on RHUI by installing CA certificates on your CDS nodes.
Prerequisites
Ensure you are running the latest version of RHUI.
NoteIf you have installed an older version of RHUI, you must reinstall your CDS nodes in
rhui-manager.
Procedure
On the CDS node, create the
/etc/pki/rhui/legacydirectory if it does not already exist:# mkdir /etc/pki/rhui/legacy- Save the legacy CA certificate in the directory.
Verification
- The CDS node starts accepting legacy CAs as soon as you store the CA certificate in the directory.
6.5. Configuring a CDS to stop accepting legacy CAs
To limit your content delivery servers (CDS) nodes from accepting legacy certificate authorities (CAs), remove the respective CA certificates.
Prerequisites
- Clients are no longer using the CA.
Procedure
On the CDS node, navigate to the
/etc/pki/rhui/legacy/directory:# cd /etc/pki/rhui/legacy/- Optional: Back up the existing CA certificates:
Delete the CA certificate that corresponds to the CA you want to limit:
# rm example-legacy.crt
Verification
- The CDS node stops accepting legacy CAs as soon as you delete the CA certificate.
6.6. Unregistering a CDS
You can unregister (delete) a CDS instance that you are not going to use.
Procedure
Navigate to the Red Hat Update Infrastructure Management Tool home screen:
[root@rhua ~]# rhui-manager-
Press
cto select manage content delivery servers (CDS). -
From the Content Delivery Server (CDS) Management screen, press
dto delete a CDS instance. Enter the hostname of the CDS to delete:
Hostname of the CDS instance to unregister:
cds1.example.com
Chapter 7. Managing an HAProxy load-balancer instance
A load-balancing solution must be in place to spread client HTTPS requests across all CDS servers. Red Hat Update Infrastructure 4 uses HAProxy by default, but it is up to you to choose what load-balancing solution (for example, the one from the cloud provider) to use during the installation. If HAProxy is used, you must also decide how many nodes to bring in.
7.1. Registering a new HAProxy load-balancer
Red Hat Update Infrastructure 4 uses DNS to reach the CDN. In most cases, your instance should be preconfigured to talk to the proper DNS servers hosted as part of the cloud’s infrastructure. If you run your own DNS servers or update your client DNS configuration, there is a chance you will see errors similar to yum Could not contact any CDS load balancers. In these cases, check that your DNS server is forwarding to the cloud’s DNS servers for the request or that your DNS client is configured to fall back to the cloud’s DNS server for name resolution.
Using more than one HAProxy node requires a round-robin DNS entry for the hostname used as the value of the --cds-lb-hostname parameter when rhui-installer is run (cds.example.com in this guide) that resolves to the IP addresses of all HAProxy nodes. How to Configure DNS Round Robin presents one way to configure a round-robin DNS. In the context of Red Hat Update Infrastructure 4, these will be the IP addresses of the HAProxy nodes, and they are to be mapped to the hostname specified as --cds-lb-hostname while calling rhui-installer.
Answering yes (y) to the below question: Update instance(s) after reinstalling? (y/n): will result in a dnf update being run on the instance after it is registered. This may require a reboot of the instance. Answering no (n) to this question will result in the dnf update not being run.
Prerequisites
-
Make sure
sshdis running on the HAProxy load-balancer node and thatport 443is open.
Procedure
Navigate to the Red Hat Update Infrastructure Management Tool home screen:
[root@rhua ~]# rhui-manager-
Press
lto select manage HAProxy load-balancer instances. -
From the Load-balancer (HAProxy) Management screen, press
ato add a new load-balancer instance. Enter the hostname of the new load-balancer:
Hostname of the HAProxy Load-balancer instance to register:
<haproxy1.example.com>
Enter the username that will have SSH access to the load-balancer and have sudo privileges:
Username with SSH access to cds.example.com and sudo privileges:
<cloud-user>
Enter the absolute path to the SSH private key for logging in to the load-balancer instance and press
Enter:Absolute path to an SSH private key to log into cds.example.com as <cloud-user>: /<cloud-user>/.ssh/id_rsa_rhuaUpdate the instance with the latest versions of available packages
Update instance after registering? (y/n): yOptional: Enter an optional absolute path to a user supplied HAProxy configuration file and press
Enter.If you do not specify the path to a custom configuration file, the default file,
/usr/share/rhui-tools/templates/haproxy.cfg, is used instead.Optional absolute path to user supplied HAProxy config file: ......................................................................... The following load-balancer has been successfully added: Hostname: <haproxy1.example.com> SSH Username: <cloud-user> SSH Private Key: /<cloud-user>/.ssh/id_rsa_rhua The load-balancer will now be configured:- If the load-balancer fails to add, check that the firewall rules permit access between the RHUA and the load-balancer.
- After successful configuration, repeat these steps for any remaining load-balancer instances.
Verification
The following message displays:
The HAProxy Load-balancer was successfully configured.
7.2. Listing all known HAProxy load-balancer instances managed by RHUI 4
You can use Load-balancer (HAProxy) Management screen to show all known HAProxy load-balancer instances that RHUI 4 is managing.
Procedure
Navigate to the Red Hat Update Infrastructure Management Tool home screen:
[root@rhua ~]# rhui-manager-
Press
lto select manage HAProxy load-balancer instances. From the Load-balancer (HAProxy) Management screen, press
lto list the load-balancer instances that RHUI manages:Hostname: <haproxy1.example.com> SSH Username: <cloud-user> SSH Private Key: /<cloud-user>/.ssh/id_rsa_rhua
7.3. Reinstalling and reapplying the configuration to an HAProxy load-balancer
You may encounter a situation where you need to reinstall and reapply the configuration for an HAProxy load-balancer. The Red Hat Update Infrastructure Management Tool provides an easy way to accomplish this task.
Prerequisites
-
Make sure
sshdis running on the HAProxy load-balancer node and thatport 443is open.
It is crucial that the files included in the restore retain their current attributes.
Answering yes (y) to the below question: Update instance(s) after reinstalling? (y/n): will result in a dnf update being run on the instance after it is reinstalled. This may require a reboot of the instance. Answering no (n) to this question will result in the dnf update not being run.
Procedure
Navigate to the Red Hat Update Infrastructure Management Tool home screen:
[root@rhua ~]# rhui-manager-
Press
lto select manage HAProxy load-balancer instances. From the Load-balancer (HAProxy) Management screen, press
rto reinstall and reapply the configuration to a load-balancer instance.The Red Hat Update Infrastructure Management Tool automatically performs all reinstallation and reconfiguration tasks.
Select the load-balancer to reinstall:
1 - Hostname: <haproxy1.example.com> SSH Username: <cloud-user> SSH Private Key: /<cloud-user>/.ssh/id_rsa_rhua-
Enter a value or
bto abort: 1: 1 Update instance(s) after reinstalling? (y/n): y
Installing and configuring the HAProxy Load-balancer...

PLAY [Registering a load balancer instance] ************************************

...

TASK [Update load balancer instance] *******************************************
ok: [haproxy1.example.com]

PLAY RECAP *********************************************************************
cloud-user@haproxy1.example.com : ok=8    changed=3    unreachable=0    failed=0    skipped=0    rescued=0    ignored=0

Done.
Verification
Check that you successfully reinstalled and reconfigured the load-balancer by viewing the code output:
Ensuring that HAProxy is available...
Done.
7.4. Unregistering an HAProxy load-balancer
You can unregister (delete) an HAProxy load-balancer instance that you are not going to use.
Prerequisites
-
Make sure
sshdis running on the HAProxy load-balancer node and thatport 443is open.
Procedure
Navigate to the Red Hat Update Infrastructure Management Tool home screen:
[root@rhua ~]# rhui-manager-
Press
lto select manage HAProxy load-balancer instances. -
From the Load-balancer (HAProxy) Management screen, press
dto delete a load-balancer instance. Enter the hostname of the load-balancer to delete:
Hostname of the load-balancer instance to unregister:
<haproxy1.example.com>
Chapter 8. Managing Containers
You can automate the deployment of applications inside Linux containers using RHUI. Using containers offers the following advantages:
- Requires less storage and in-memory space than VMs: Because the containers hold only what is needed to run an application, saving and sharing is more efficient with containers than it is with VMs that include entire operating systems.
- Improved performance: Because you are not running an entirely separate operating system, a container typically runs faster than an application that carries the overhead of a new VM.
- Secure: Because a container typically has its own network interfaces, file system, and memory, the application running in that container can be isolated and secured from other activities on a host computer.
- Flexible: With an application’s runtime requirements included with the application in the container, a container can run in multiple environments.
8.1. Understanding containers in Red Hat Update Infrastructure
A container is an application sandbox. Each container is based on an image that holds necessary configuration data. When you launch a container from an image, a writable layer is added on top of this image. Every time you commit a container, a new image layer is added to store your changes.
An image is a read-only layer that is never modified. All changes are made in the top-most writable layer, and the changes can be saved only by creating a new image. Each image depends on one or more parent images.
A platform image is an image that has no parent. Platform images define the runtime environment, packages, and utilities necessary for a containerized application to run. The platform image is read-only, so any changes are reflected in the copied images stacked on top of it.
8.2. Adding a container to Red Hat Update Infrastructure
You can use the rhui-manager tool to add containers using the Repository Management section.
Procedure
If you did not enable container support when you installed RHUI, run the following commands on the RHUA:
# rhui-installer --rerun --container-support-enabled True
# rhui-manager --noninteractive cds reinstall --all
Optional: Edit the
/etc/rhui/rhui-tools.conffile and set the container registry credentials in the RHUI configuration by removing the following lines in the [container] section.If you have a clean installation of RHUI 4.1.1 or newer, the last several lines contain a [container] section with podman-specific options and handy comments. If you have updated from an earlier version of RHUI, the section is available at the end of the
etc/rhui/rhui-tools.conf.rpmnewfile, and you can copy it to therhui-tools.conffile.[container] … registry_username: your_RH_login registry_password: your_RH_passwordNoteIf you normally synchronize from a registry different from
registry.redhat.io, also change the values of the registry_url and registry_auth options accordingly.On the RHUA node, run
rhui-manager:# rhui-managerPress
rto access the Repository Management screen.-= Red Hat Update Infrastructure Management Tool =- -= Repository Management =- l list repositories currently managed by the RHUI i display detailed information on a repository a add a new Red Hat content repository ac add a new Red Hat container c create a new custom repository (RPM content only) d delete a repository from the RHUI u upload content to a custom repository (RPM content only) ur upload content from a remote web site (RPM content only) p list packages in a repository (RPM content only) Connected: rhua.example.comPress
acto add a new Red Hat container.rhui (repo) => ac Specify URL of registry [https://registry.redhat.io]:-
If the container you want to add exists in a non-default registry, enter the registry URL. Press
Enterwithout entering anything to use the default registry. Enter the name of the container in the registry:
jboss-eap-6/eap64-openshiftEnter a unique ID for the container.
rhui-managerconverts the name of the container from the registry to the format that is usable in Pulp by replacing slashes and dots with underscores. You can use such a converted name by pressing Enter or by entering a name of your choice.Enter a display name for the container.
jboss-eap-6_eap64-openshift- Optional: Set your login and password in the RHUI configuration if prompted.
Verify the displayed summary.
The following container will be added:
  Registry URL: http://registry.redhat.io
  Container Id: jboss-eap-6_eap64-openshift
  Display Name: jboss-eap-6_eap64-openshift
  Upstream Container Name: jboss-eap-6/eap64-openshift
Proceed? (y/n)
Press
yto proceed and add the container.y Successfully added container jboss-eap-6_eap64-openshift
8.3. Synchronizing container repositories
After you add your container to Red Hat Update Infrastructure, you can use the rhui-manager tool to synchronize the container.
Procedure
On the RHUA node, run
rhui-manager:# rhui-manager-
Press
sto access thesynchronization status and schedulingscreen. -
Press
srto synchronize an individual repository immediately. - Enter the number of the repository that you wish to synchronize.
-
Press
cto confirm the selection. Verify the repository and press
yto synchronize ornto cancel.The following repositories will be scheduled for synchronization: jboss-eap-6_eap64-openshift Proceed? (y/n) y Scheduling sync for jboss-eap-6_eap64-openshift... ... successfully scheduled for the next available timeslot.
8.4. Generating container client configurations
RHUI clients can pull containers from RHUI using client configuration. The RPM contains the load balancer’s certificate and you can use it to add the load balancer to the container registry and to modify container configuration.
Procedure
On the RHUA node, run
rhui-manager:# rhui-manager-
Press
eto access theentitlement certificates and client configuration RPMsscreen. -
Press
dtocreate a container client configuration RPM. Enter the full path of a local directory where you want to save the configuration files.
/root/Enter the name of the RPM.
containertest-
Enter the version number of the configuration RPM. The default is
2.0. -
Enter the release number of the configuration RPM. The default is
1. Enter the number of days the certificate should be valid. The default is
365.Successfully created client configuration RPM. Location: /root/containertest-2.0/build/RPMS/noarch/containertest-2.0-1.noarch.rpm
8.5. Installing a container configuration RPM on the client
After generating the container configuration RPM, you can install it on a client by importing it to your local machine.
Procedure
Retrieve the RPM from the RHUA node to your local machine:
# scp root@rhua.example.com:/root/containertest-2.0/build/RPMS/noarch/containertest-2.0-1.noarch.rpm .Transfer the RPM from the local machine to the client.
# scp containertest-2.0-1.noarch.rpm root@cli01.example.com:.Switch to the client and install the RPM:
[root@cli01 ~]# yum install containertest-2.0-1.noarch.rpm
8.6. Testing the podman pull command on the client
You can use the podman pull command to verify the content on the container.
Procedure
Run the
podman pullcommand.[root@cli01 ~]# podman pull jboss-eap-6_eap64-openshift Resolving "jboss-eap-6_eap64-openshift" using unqualified-search registries (/etc/containers/registries.conf) Trying to pull cds.example.com/jboss-eap-6_eap64-openshift:latest... Getting image source signatures Copying blob b0e0b761a531 done Copying blob aa23ac04e287 done Copying blob 0d30ea1353f9 done Copying config 3d0728c907 done Writing manifest to image destination Storing signatures 3d0728c907d55d9faedc4d19de003f21e2a1ebdf3533b3d670a4e2f77c6b35d2If the
podman pullcommand fails, check therhui-managerstatus. The synchronization probably has not been performed yet and you have to wait until it synchronizes.Resolving "jboss-eap-6_eap64-openshift" using unqualified-search registries (/etc/containers/registries.conf) Trying to pull cds.example.com/jboss-eap-6_eap64-openshift:latest... Error: initializing source docker://cds.example.com/jboss-eap-6_eap64-openshift:latest: reading manifest latest in cds.example.com/jboss-eap-6_eap64-openshift: manifest unknown: Manifest not found.
Chapter 9. Configuration files, exit codes, and log files
The following configuration files, RHUI manager exit codes, and log files are used in Red Hat Update Infrastructure 4.
Configuration Files
| Component | File or Directory | Usage |
|---|---|---|
| Red Hat Update Appliance |
| Pulp config files |
|
| rhui-manager config files | |
|
| Certificates for Red Hat Update Infrastructure | |
|
| Used to set up the RHUA | |
|
| Configuration for the subscription synchronization script | |
| Content Delivery Server |
| Certificates for CDS |
| HAProxy |
| HAProxy configuration file |
RHUI Manager Exit Codes
RHUI Manager uses the following codes to indicate the result of running the rhui-manager status command and running the rhui-manager CLI commands.
| Status Code | Description |
|---|---|
| 0 | Success |
| 1 | General error or a repository synchronization error |
| 2 | SSL certificate error on a CDS |
| 32 | Entitlement CA or SSL certificate expiration warning |
| 64 | Entitlement CA or SSL certificate expiration error |
| 128 | One or more RHUI services is not running on the RHUA, CDS, or HAProxy nodes |
| 239 | A repository could not be deleted because it does not exist. |
| 240 | There was an issue with a required resource. For example, it was impossible to build a client configuration RPM because no valid repository was found. |
| 241 | A synchronization task could not be scheduled because an unknown repository was specified. To troubleshoot * Check the spelling * Add the repository first * Check logs for Pulp issues |
| 242 | A custom repository could not be created due to a Pulp issue. Check the message and logs for details. |
| 243 | Red Hat repositories could not be added because some of them already exist in RHUI and some of them were not available in the entitlement. |
| 244 | A custom repository could not be created because it already exists in RHUI. |
| 245 | A Red Hat repository could not be added because it already exists in RHUI. |
| 246 |
A Red Hat repository could not be added because it is not available in the entitlement. Check the spelling or remove the repository mapping cache using the command |
| 247 | A Red Hat repository could not be added due to a Pulp issue. Check the message and logs for details. |
| 248 |
Migration from RHUI 3 to RHUI 4 was stopped because one or more Red Hat repositories are already present in RHUI 4. You must remove the repositories or use the |
| 249 |
The RHUI configuration, |
| 250 | The entitlement certificate is not writable. |
| 251 | The entitlement certificate has expired. |
| 252 | The entitlement certificate is invalid because it does not contain RHUI repositories. |
| 253 | The entitlement certificate file is not a valid certificate. |
| 254 | Command-line Error: The RHUI CLI could not run due to a network issue. |
| 255 | Argument Error: A required argument was not supplied. |
Log Files
| Component | File or Directory | Usage |
|---|---|---|
| Red Hat Update Appliance |
| Red Hat Update Infrastructure Management Tool logs |
|
| Pulp logs; for example, repository synchronization | |
|
| nginx logs | |
|
| CDS and HAproxy management log, service status log | |
|
| Subscription synchronization log | |
|
| Repository export log | |
|
| Temporary directory cleanup log | |
|
| Repository version mapping log | |
| Content Delivery Server |
| nginx logs |
|
| clients' requests for content | |
|
| CDS authorizer plug-in logs; by default, requests without an entitlment certificate | |
|
| CDS content manager plug-in logs; for example, on-demand package downloads | |
|
| CDS mirror plug-in logs; by default, only logs from starting and stopping the plug-in | |
| Client |
| yum command logs |
| Client |
| dnf command logs |
|
| Client syslog |
See also older logs saved with a number or a time stamp as an extension, possibly compressed by gzip.
Chapter 10. Working with RHUI 4 commands
Red Hat Update Infrastructure provides a powerful, scriptable interface to manage the RHUI nodes, repositories, and client configurations.
10.1. Using RHUI 4 CLI options
The majority of administrative tasks for Red Hat Update Infrastructure 4 are in its installation. After installation, it runs on its own, periodically getting updated packages from the Red Hat CDN and automatically making those packages available to clients.
A command line interface called Red Hat Update Infrastructure Management Tool (run with rhui-manager) facilitates the installation. This tool provides interactive prompts for the necessary configuration elements for each RHUI component: RHUA, CDS, and load-balancer. This tool also provides a means for taking the content certificate provided by Red Hat for use when connecting to the Red Hat CDN and generating internal, cloud-specific certificates that clients use to connect to RHUI. The Red Hat Update Infrastructure Management Tool allows the cloud provider to generate a client configuration bundle to install on client RHEL instances. This bundle allows the clients to get updates from the RHUI installation.
Red Hat Update Infrastructure Management Tool uses an interactive shell; some functions can also run from a shell prompt. The Red Hat Update Infrastructure Management Tool uses seven main commands. For each command’s subcommand, a list of options is provided if the subcommand expects one or more options other than -h and --help.
View all options and commands.
# rhui-manager --help
Usage: rhui-manager [options]

  OPTIONS
    -h/--help  show this help message and exit
    --debug    enables debug logging
    --noninteractive prevents console input, used for scripting
    --config   absolute path to the configuration file; defaults to /etc/rhui/rhui-tools.conf
    --server   location of the RHUA server (overrides the config file)
    --username if specified, previously saved authentication credentials are ignored and this username is used to login
    --password used in conjunction with --username
    --logout   logout from the active session

  COMMANDS
    cert      : Red Hat content certificate management
    packages  : package manipulation on repositories
    repo      : repository listing and manipulation
    cds       : CDS listing and manipulation
    migrate : Migrate from {RHUI3}
    haproxy   : Load balancer listing and manipulation
    status    : RHUI status and health information
    client    : Red Hat client management
10.1.1. cert
Red Hat content certificate management
    upload    : uploads a new content certificate
    info      : display information about the current content certificate
# rhui-manager cert upload
upload: uploads a new content certificate
--cert - full path to the new content certificate (required)
--key - full path to the new content certificate's key10.1.2. packages
package manipulation on repositories
    list      : lists all packages in a repository
    remove    : removes a package from a custom repository
    upload    : uploads a package or directory of packages to a custom repository
    remote    : uploads RPM content from a remote URL to a custom repository
list: lists all packages in a repository
--repo_id - id of the repository to list packages for (required)remove: removes a package from a custom repository
--repo_id - id of the custom repository to remove a package from (required)
--package - name of the package to be removed (required)
--vr - if specified, only the supplied version-release of the package will be removed
--force - don't ask for confirmationupload: uploads a package or directory of packages to a custom repository
--repo_id - id of the custom repository where the packages will be uploaded (required)
--packages - path to an .rpm file or directory of RPMs that will be uploaded (required)remote: uploads RPM content from a remote URL to a custom repository
--repo_id - id of the custom repository where the packages will be uploaded (required)
--url - remote URL of the package or a web page that will be scraped for RPM content (required)10.1.3. repo
repository listing and manipulation
    list      : lists all repositories in the RHUI
    info      : displays information on an individual repo
    add       : add a Red Hat repository to the RHUA
    add_by_repo: add Red Hat repositories to the RHUA via repo ID
    add_by_file: add Red Hat repositories to the RHUA using an input file
    add_errata: associate errata metadata with a repository
    add_comps : associate comps metadata (group/category/environment/langpacks) with a repository
    delete    : delete a repository
    sync      : sync a repository
    set_retain_versions: limits the number of older repository versions kept in database
    orphan_cleanup: submits a background task to remove orphaned artifacts from storage
    export	  : export a repository to the filesystem
    enable_sync: enable scheduled synchronization of a repository
    disable_sync: disable scheduled synchronization of a repository
    sync_all  : sync all repositories
    metadata : ensure metadata is generated for the latest version of repositories
    enable_autopublish: enable automatic publishing of a new repository version
    disable_autopublish: disable automatic publishing of a new repository version
    create_custom: create a custom repository
    unused    : list of products available but not synced to the RHUA
info: displays information on an individual repo
--repo_id - identifies the repository to display (required)add: add a Red Hat repository to the RHUA
--product_name - product to add the RHUA (required)add_by_repo: add Red Hat repositories to the RHUA via repo ID
--repo_ids - repo IDs to add, comma-separated (required)
--sync-now - Use to sync any repos that are added (optional)add_by_file: add Red Hat repositories to the RHUA using an input file
--file - file containing repo IDs to add, one per line (required)
--sync_now - Use to sync any repos that are added (optional)add_errata: associate errata metadata with a repository
--repo_id - repo ID to associate the metadata with (required)
--updateinfo - updateinfo file to be applied (required)add_comps: associate comps metadata (group/category/environment/langpacks) with a repository
--repo_id - repo ID to associate the metadata with (required)
--comps - comps file to be applied (required)delete: delete a repository
--repo_id - identifies the repository to delete (required)sync: sync a repository
--repo_id - identifies the repository to sync (required)set_retain_versions: limits the number of older repository versions kept in database
--repo_id - identifies the repository to operate on
--all - operate on all repositories (either --repo_id or --all must be provided, but not both)
--versions - number of versions to keep (required)
--dry_run - display what will be executed without actually executingorphan_cleanup: submits a background task to remove orphaned artifacts from storageexport: export a repository to the filesystem
--repo_id - identifies the repository to export (required)metadata : ensure metadata is generated for the latest version of repositories
--repo_id - explicit repo ID to generate metadata forenable_sync: enable scheduled synchronization of a repository
--repo_id - identifies the repository to enable scheduled synchronization for (required)
--verbose - if present, info on last/next synchronization tasks will be displayeddisable_sync: disable scheduled synchronization of a repository
--repo_id - identifies the repository to disable scheduled synchronization for (required)
--verbose - if present, info on last/next synchronization tasks will be displayedenable_autopublish: enable automatic publishing of a new repository version
--repo_id - identifies the repository to enable automatic publishing for (required)disable_autopublish: disable automatic publishing of a new repository version
--repo_id - identifies the repository to disable automatic publishing for (required)create_custom: create a custom repository
--repo_id - identifies the repository to add (required)
--path - path to the content being served by CDS; defaults to repo_id
--display_name - display name for the custom repository
--redhat_content - repository will host Red Hat GPG signed content
--protected - make the content protected by entitlement certificate
--gpg_public_keys - comma separated list of public keys used to sign the served content; the filenames must not contain commaunused: list all unused Red Hat repositories
Loading latest entitled products from Red Hat...
... listings loaded
Available Repositories
--------------------10.1.4. cds
CDS listing and manipulation
    list      : lists all cds instances in the RHUI
    add       : register a cds instance to the RHUI
    reinstall : reinstalls an already registered cds instance
    delete    : unregisters cds instances from the RHUI
add: register a cds instance to the RHUI
--hostname - The hostname of the instance to add. (required)
--ssh_user - Username with SSH access to the instance and sudo privileges. (required)
--keyfile_path - Absolute path to an SSH private key to use with the given user. (required)
--hostfile - Absolute path to a known_hosts file to use to determine the identity of the instance; if this is not provided and the instance hostkey is not in the system-wide known_hosts file, this command will fail.
--user_supplied_ssl_key - Optional absolute path to the user supplied SSL key file.
--user_supplied_ssl_crt - Optional absolute path to the user supplied SSL crt file.
--force - Add the system even if the hostname is already registered.
--unsafe - Proceed even if the instance host key is not in the known_hosts file. This is not secure!
--no_update - Use this flag to prevent the final dnf update; it must be specified every time this functionality is desired.reinstall: reinstalls an already registered cds instance
--hostname - The hostname of the instance to reinstall on; this instance must be registered already.
--all - Reinstall all the registered instances.
--no_update - Use this flag to prevent the final dnf update; it must be specified every time this functionality is desired.delete: unregisters cds instances from the RHUI
--force - Delete the system, even if it is the last of its kind.
--hostnames - Comma-separated list of hostnames to delete (unregister) from RHUI. (required)10.1.5. migrate
Migrate from RHUI3
    --force - Migrate repos even when some repos are detected locally
    --hostname - The remote RHUIv3, migration source, hostname (required)
    --password - The remote RHUIv3, migration source, rhui-manager password. (required)
    --keyfile_path - The path to an SSH private key to use with the given user. default=/root/.ssh/id_rsa_rhua
    --local_system_user - The local RHUIv4, migration destination, system username. default=<cloud-user>
    --remote_system_user - The remote RHUIv3, migration source, system username. default=<cloud-user>
    --remote_server_crt - The remote RHUIv3, migration source, server crt path. default=/etc/pki/rhui/certs/entitlement-ca.crt
    --remote_server_key - The remote RHUIv3, migration source, server key path. default=/etc/pki/rhui/private/entitlement-ca.key
    --username - The remote RHUIv3, migration source, rhui-manager username. default=admin
10.1.6. haproxy
Load balancer listing and manipulation
    list      : lists all haproxy instances in the RHUI
    add       : register a haproxy instance to the RHUI
    reinstall : reinstalls an already registered haproxy instance
    delete    : unregisters haproxy instances from the RHUI
add: register a haproxy instance to the RHUI
--hostname - The hostname of the instance to add. (required)
--ssh_user - Username with SSH access to the instance and sudo privileges. (required)
--keyfile_path - Absolute path to an SSH private key to use with the given user. (required)
--hostfile - Absolute path to a known_hosts file to use to determine the identity of the instance; if this is not provided and the instance hostkey is not in the system-wide known_hosts file, this command will fail.
--config - Optional absolute path to a user supplied HAProxy config file.
--force - Add the system even if the hostname is already registered.
--unsafe - Proceed even if the instance host key is not in the known_hosts file. This is not secure!
--no_update - Use this flag to prevent the final dnf update; it must be specified every time this functionality is desired.reinstall: reinstalls an already registered haproxy instance
--hostname - The hostname of the instance to reinstall on; this instance must be registered already.
--all - Reinstall all the registered instances.
--no_update - Use this flag to prevent the final dnf update; it must be specified every time this functionality is desired.delete: unregisters haproxy instances from the RHUI
--force - Delete the system, even if it is the last of its kind.
--hostnames - Comma-separated list of hostnames to delete (unregister) from RHUI. (required)10.1.7. status
status: RHUI status and health information
    --code - if specified, only a numeric code for the result will be displayed
    --repo_json - Name of the JSON file for a repo status
10.1.8. client
Red Hat client management
    labels    : list the labels required for client certificate creation
    cert      : create a content certificate for a rhui client
    rpm       : create a client config rpm
    content_source: create an alternate source config rpm
    acs_config: output a JSON representation of the alternate source config
cert: create a content certificate for a rhui client
--repo_label - identifies the repositories to add. Comma delimited string of repo labels (required)
--name - identifies the certificate name (required)
--days - number of days cert will be valid (required)
--dir - directory where the certificate will be stored (required)rpm: create a client config rpm
--private_key - entitlement private key
--entitlement_cert - entitlement certificate
--rpm_version - version number of the client config rpm
--rpm_release - release of rpm package. Default is 1
--rpm_name - name of the client config rpm (required)
--dir - directory where the rpm will be created (required)
--unprotected_repos - comma-separated list of unprotected repos to include
--cert - generate certificate also before building client config rpm if given
--ca_cert - full path to the certificate authority of CDS servers
--repo_label - identifies the repositories to add. Comma delimited string of repo labels
--name - identifies the certificate name if it is different from rpm name
--days - number of days cert will be valid
--proxy - url/string in case proxy option is necessary in yum repo filecontent_source: create an alternate source config rpm
--private_key - entitlement private key
--entitlement_cert - entitlement certificate
--rpm_version - version number of the client config rpm
--rpm_name - name of the client config rpm (required)
--dir - directory where the rpm will be created (required)
--unprotected_repos - comma-separated list of unprotected repos to include
--cert - generate certificate also before building client config rpm if given
--ca_cert - full path to the certificate authority of CDS servers
--repo_label - identifies the repositories to add. Comma delimited string of repo labels
--name - identifies the certificate name if it is different from rpm name
--days - number of days cert will be validacs_config: output a JSON representation of the alternate source config
--dir - directory where the JSON representation will be stored (required)
--private_key - entitlement private key
--entitlement_cert - entitlement certificate
--cert - generate certificate based on the the repos supplied via --repo_label
--ssl_ca_cert - full path to the certificate authority of CDS servers (defaults to ssl_ca_crt specified in rhui-tools.conf)
--repo_label - identifies the repositories to add. Comma delimited string of repo labels
--days - number of days cert will be valid if new cert is generatedChapter 11. Certified Cloud and Service Provider certification workflow
The Certified Cloud Provider Agreement requires that Red Hat certifies the images (templates) from which tenant instances are created to ensure a fully supported configuration for end customers.
There are two methods for certifying the images for Red Hat Enterprise Linux. The preferred method is to use the Certified Cloud and Service Provider (CCSP) image certification workflow.
After certifications have been reviewed by Red Hat, a pass/fail will be assigned and certification will be posted to the public Red Hat certification website at Red Hat Ecosystem Catalog.
Chapter 12. Backing up and restoring Red Hat Update Infrastructure
After you have installed and configured your Red Hat Update Infrastructure(RHUI) servers, you might want to back them up. Backing up RHUI is useful if you encounter any problems or do not configure RHUI correctly. In such cases, you can return to a previous working configuration by restoring RHUI.
To successfully back up RHUI, you must back up all of your RHUA, CDS, and HAProxy nodes.
12.1. Backing up Red Hat Update Appliance
To back up Red Hat Update Appliance, you must back up all the associated files and storage.
To back up RHUA, you must stop the associated services. However, stopping services does not disable any client instances from updating or installing packages because clients are connected only to the content delivery servers (CDSs). Consequently, If you have an automated monitoring solution in place, your monitoring may fail during the backup process.
Procedure
Stop
pulp-serverservices:# systemctl stop pulpcore-api pulpcore-content pulpcore-worker\*Verify whether the services have stopped:
# systemctl status pulpcore-api pulpcore-content pulpcore-worker\*Back up the following files.
# cp -a <source_files_path> <destination_files_path>ImportantEnsure that the files retain their current attributes when you back them up.
List of Files:
- /etc/pki/rhui/*
- /etc/pulp/*
- /etc/rhui/*
- /etc/rhui/rhui-tools.conf
- /etc/nginx/*
- /root/.rhui/*
- /var/log/rhui/*
- /var/log/rhui-subscription-sync.log*
Optional: /var/lib/rhui/*
NoteBacking up this directory backs up all of the downloaded content, which might be a large amount of data.
- Back up any generated client entitlement certificates and client configuration RPMs.
Restart RHUI services
# rhui-services-restart
12.2. Backing up Red Hat Update Appliance Database
Procedure
Change to the
postgresuser:# su - postgresDump the PostgreSQL database:
# pg_dump -j 4 -F d -f <pg_dump_directory> pulp
The arguments used with the pg_dump command are as follows:-j 4: Instructs pg_dump to run using 4 parallel threads.-F d: Instructs pg_dump to select a directory-format archive as the format of the output.<pg_dump_directory>: The path the directory where pg_dump output will be written.pulp: Is the name of the database.
The postgres user must be able to create and write to the pg_dump_directory and there must be enough disk space. For reference, the dump of a very large database configured with about 600 repositories takes approximately 25 GB.
This operation can take a lot of time. For reference, our example of the database with 600 repositores could take up to 5 hours.
12.3. Restoring Red Hat Update Appliance
To restore RHUA, you must create a new RHUA node and replace the associated files with the backed up versions.
Procedure
- Create a new RHUA node. For more information, see Setting up RHUA nodes.
Stop
pulp-serverservices:# systemctl stop pulpcore-api pulpcore-content pulpcore-worker\*Verify whether the services have stopped:
# systemctl status pulpcore-api pulpcore-content pulpcore-worker\*Restore the following files.
# cp -a <source_files_path> <destination_files_path>ImportantEnsure that the files retain their current attributes when you restore them.
List of Files:
- /etc/pki/rhui/*
- /etc/pulp/*
- /etc/rhui/*
- /etc/rhui/rhui-tools.conf
- /etc/nginx/*
- /root/.rhui/*
- /var/log/rhui/*
- /var/log/rhui-subscription-sync.log*
Optional: /var/lib/rhui/*
NoteRestoring this directory restores all of the downloaded content, which might be a large amount of data.
- Restore any generated client entitlement certificates and client configuration RPMs.
Restart RHUI services
# rhui-services-restart
12.4. Restoring Red Hat Update Appliance Database
Procedure
Change to the
postgresuser:# su - postgresRestore the PostgreSQL database:
# pg_restore -j 4 -F d -d pulp <pg_dump_directory>
The arguments used with the pg_restore command are as follows:-j 4: Instructs pg_restore to run using 4 parallel threads.-F d: Instructs pg_restore to select a directory-format archive as the format of the input.-d pulp: Instructs pg_restore to use the database names pulp.<pg_dump_directory>: The path the directory where pg_dump output will be read from.
The postgres user must be able to read the pg_dump_directory.
This operation can take a lot of time. For reference, our example of the database with 600 repositores could take up to 5 hours.
12.5. Backing up content delivery servers
To back up CDSs, you must back up all the associated files and storage.
To avoid complete loss of service, back up a single CDS node at a time. Clients will automatically switch to other running CDS nodes.
Procedure
Stop the
nginxservice:# systemctl stop nginxVerify that the
nginxservice has stopped:# systemctl status nginxBack up the following files.
# cp -a <source_files_path> <destination_files_path>ImportantEnsure that the files retain their current attributes when you back them up.
List of files:
- /etc/nginx/*
- /var/log/nginx/*
- /etc/pki/rhui/*
Restart RHUI services.
# rhui-services-restart
12.6. Restoring content delivery servers
To restore content delivery servers, you must create a new CDS node and replace the associated files with the backed up versions.
Procedure
- Create a new CDS node. For more information, see Setting up CDS nodes.
Stop the
nginxservice:# systemctl stop nginxVerify that the
nginxservice has stopped:# systemctl status nginxRestore the following files.
# cp -a <source_files_path> <destination_files_path>ImportantEnsure that the files retain their current attributes when you restore them.
List of files:
- /etc/nginx/*
- /var/log/nginx/*
- /etc/pki/rhui/*
Restart RHUI services.
# rhui-services-restart
12.7. Backing up HAProxy servers
To back up HAProxy servers, you must back up all the associated files and storage.
Procedure
Back up the
/etc/haproxy/haproxy.cfgfile.# cp -a <source_files_path> <destination_files_path>ImportantEnsure that the file retains its current attributes when you back it up.
12.8. Restoring HAProxy servers
To restore HAProxy servers, you must create a new HAProxy node and replace the associated files with the backed up versions.
Procedure
- Create a new HAProxy node. For more information, see Setting up HAProxy nodes.
Restore the
/etc/haproxy/haproxy.cfgfile.# cp -a <source_files_path> <destination_files_path>ImportantEnsure that the file retains its current attributes when you restore it.
Chapter 13. Changing proxy settings
RHUI can use a proxy server to sync Red Hat content through. If no proxy server is specified while installing RHUI, none is used. Otherwise, this proxy server is used with all RHUI repositories that you add. This chapter describes how the proxy server configuration can be changed.
13.1. Configuring a new proxy server or unconfiguring an existing proxy server
Follow these steps if you wish to:
- start using a proxy server in a RHUI environment that was installed with no proxy server configuration
- edit the current proxy server configuration, for example, if the server hostname has changed
- stop using the proxy server that a RHUI environment was installed with
Procedure
There are two ways to configure (or unconfigure) proxy server settings.
First option: Rerun the installer to update the global RHUI tools configuration and answers file:
rhui-installer --rerun --proxy-protocol <PROTOCOL> \
                       --proxy-hostname <HOSTNAME> \
                       --proxy-port <PORT> \
                       --proxy-username <USERNAME> \
                       --proxy-password <PASSWORD>
Second option: Create (or edit) the local overrides file,
/root/.rhui/rhui-tools-custom.conf, so that it contains:[proxy] proxy_protocol: <PROTOCOL> proxy_host: <HOSTNAME> proxy_port: <PORT> proxy_user: <USERNAME> proxy_pass: <PASSWORD>NoteThis option was introduced in RHUI 4.11.
In either case, the parameters are as follows:
PROTOCOLis eitherhttporhttpsif configuring the proxy server; if unconfiguring it:-
if rerunning the installer, do not use the
--proxy-protocolargument - if using the local file, leave the value empty
-
if rerunning the installer, do not use the
HOSTNAMEis the new proxy server hostname; if clearing the configuration:-
if rerunning the installer, use an empty string in double quotes (
"") - if using the local file, leave the value empty
-
if rerunning the installer, use an empty string in double quotes (
PORTis the TCP port where the proxy server is listening, typically3128; if clearing the configuration:-
if rerunning the installer, do not use the
--proxy-portargument - if using the local file, leave the value empty
-
if rerunning the installer, do not use the
USERNAMEis an optional parameter. Only use it if the proxy server requires credentials. If it does not or you are clearing the configuration:-
if rerunning the installer, use
"" -
if using the local file, leave the value empty or do not use the
proxy_user:option at all
-
if rerunning the installer, use
PASSWORDditto.Examples:
Start using a proxy server, and this server requires no credentials.
With the installer:
rhui-installer --rerun --proxy-protocol http --proxy-hostname squid.example.com --proxy-port 3128With the local file:
[proxy]
proxy_host: squid.example.com
proxy_protocol: http
proxy_port: 3128
Change the proxy server hostname, everything else remains the same.
With the installer:
rhui-installer --rerun --proxy-hostname newsquid.example.comWith the local file:
[proxy]
proxy_host: newsquid.example.com
Stop using the proxy server.
With the installer:
rhui-installer --rerun --proxy-hostname ""With the local file:
[proxy] proxy_protocol: proxy_host: proxy_port:ImportantThis new configuration will only affect Red Hat repositories added after the configuration is updated. To apply this new configuration to existing repositories, it is necessary to remove, add, and re-synchronize the repositories.
This will cause an outage that will last from the moment you remove them until you re-sync them. However, already synchronized packages will not have to be re-downloaded from the Red Hat CDN. RHUI will mainly have to parse all the repodata files and determine which package belongs where. This can take up to several hours.
Although there are technical means outside of
rhui-managerwhereby the proxy fields can be modified for the existing repositories—or rather, for the so-called remotes—using such means is unsupported.
Make sure you have a list (or lists) of your repositories so that you can add them again. If you do not have such a list, you can use
rhui-managerto generate a file with all your currently added Red Hat repositories.To generate a list of Red Hat repositories, first create a raw list with one ID per line:
rhui-manager --noninteractive repo list --redhat_only --ids_only > /root/rawlistThen create a YAML file with repositories. Start by creating a stub:
echo -e "name: all Red Hat repositories\nrepo_ids:" > /root/repo_list.ymlNext, append the repositories from the raw list as YAML list items:
sed "s/^/ - /" /root/rawlist >> /root/repo_list.ymlDelete all Red Hat repositories from your RHUI:
Use the text user interface, or delete them one by one on the command line. For the latter, you can use the raw list created earlier:
while read repo; do rhui-manager --noninteractive repo delete --repo_id $repo; done < /root/rawlistNoteRepositories are deleted in asynchronous background tasks: queued and executed by available Pulp workers. It may take tens of minutes, or hours, to actually delete all the repositories. Be patient.
When the repositories have been deleted, re-add them. They will be added with the new proxy settings (or with no proxy URL) this time. It is also necessary to re-synchronize the repositories. You can add and re-synchronize them in one step on the command line:
rhui-manager --noninteractive repo add_by_file --file /root/repo_list.yml --sync_nowAlternatively, use your own methods to synchronize the repositories, for example, in a specific order. Lastly, you can also simply wait for the synchronization to start automatically: in six hours, or in any other time defined as
repo_sync_frequencyin/etc/rhui/rhui-tools.conf.ImportantIn any case, the repositories will not be available in the meantime.
Verification
The rhui-manager tool does not display information about the proxy server that is used with a repository. However, you can use the pulpcore-manager tool as outlined below:
env PULP_SETTINGS=/etc/pulp/settings.py /usr/bin/pulpcore-manager shell << EOM
from pulpcore.app.models import Remote
rem = Remote.objects.get(name="rhel-8-for-x86_64-baseos-rhui-rpms-8")
print(rem.proxy_url)
EOM
The output should look like this for a configured proxy server:
http://squid.example.com:3128
or None if no proxy server is configured with the specified repository.
Chapter 14. Resolving common problems in RHUI 4
The following table lists known issues with Red Hat Update Infrastructure. If you encounter any of these issues, report the problem through Bugzilla.
| Event | Description of known issue | Recommendation |
|---|---|---|
| Installation and Configuration | You experience communication issues between the RHUA and the CDSs. | Verify the fully qualified domain name (FQDN) is set for the RHUA and CDS and is resolvable. Configure the HTTP proxy properly. |
| Synchronization | You cannot synchronize repositories with Red Hat. | Verify the RHUI SKUs are in your account. Verify the proper content certificates are loaded to the RHUA. Look for temporary CDN issues. Look for any HTTP proxy in your environment. |
| Red Hat Update Appliance/Content Delivery Network Communication | The Red Hat Update Appliance is not communicating with the Content Delivery Network. |
Use the content certificate in
|
Chapter 15. Cron jobs
Several repetitive tasks are automatically scheduled and run in Red Hat Update Infrastructure, on the RHUA node in particular.
| Job file | Purpose | Frequency | Log file |
|---|---|---|---|
|
| export synchronized content | every 5 minutes |
|
|
| clean up temporary directories from uploads to custom repositories | every 5 minutes |
|
|
| synchronize repositories, if they are due | every 5 minutes |
|
|
| update the information about available minor versions | hourly, at HH:34 |
|
|
| check for changes to the entitlement certificate, and import a new one if needed | hourly, at HH:01 |
|
The output is sent to the root user by e-mail instead of the /var/log/cron file if a Mail Transport Agent, such as Postfix, is installed and running on the RHUA. For more information, see Deploying and configuring a Postfix SMTP server.
Chapter 16. Upgrading RHUI
Red Hat recommends that you keep RHUI up to date. Only the latest released version is supported. See the list of released advisories on the Red Hat Update Infrastructure product page.
For information on how to keep RHUI up to date, see Upgrading Red Hat Update Infrastructure.
16.1. Preserving Custom Configuration After RHUI Upgrade
If you modify the rhui-tools.conf file after RHUI installation, these changes will be reset to default when you update RHUI.
To ensure your changes persist after an upgrade, create the /root/.rhui/rhui-tools-custom.conf file. Any sections specified in this file will override the default configuration.
Example: Custom Synchronization Policies
The following example demonstrates how to define custom synchronization policies in /root/.rhui/rhui-tools-custom.conf:
[rhui]
# The sync policy can be either "immediate" or "on_demand"
default_sync_policy: on_demand