Este contenido no está disponible en el idioma seleccionado.
Chapter 20. Sharing files between the host and its virtual machines
You may frequently require to share data between your host system and the virtual machines (VMs) it runs. To do so quickly and efficiently, you can set up NFS file shares on your system. Alternatively, you can also use the virtiofs to share data with your Linux and Windows VMs.
20.1. Sharing files between the host and its virtual machines by using NFS
For efficient file sharing between the RHEL 9 host system and the virtual machines (VMs), you can export an NFS share that VMs can mount and access.
However with Linux VMs, it is usually more convenient to use the virtiofs feature.
Prerequisites
The
nfs-utilspackage is installed on the host.# dnf install nfs-utils -y-
Virtual network of
NATorbridgetype is configured to connect a host to VMs. - Optional: For improved security, ensure your VMs are compatible with NFS version 4 or later.
Procedure
On the host, export a directory with the files you want to share as a network file system (NFS):
Share an existing directory with VMs. If you do not want to share any of the existing directories, create a new one:
# mkdir shared-filesObtain the IP address of each VM to share files from the host, for example, testguest1 and testguest2 :
# virsh domifaddr testguest1
Name       MAC address          Protocol     Address
----------------------------------------------------------------
vnet0      52:53:00:84:57:90    ipv4         192.0.2.2/24

# virsh domifaddr testguest2
Name       MAC address          Protocol     Address
----------------------------------------------------------------
vnet1      52:53:00:65:29:21    ipv4         192.0.2.3/24
Edit the
/etc/exportsfile on the host and add a line that includes the directory you want to share, IPs of VMs to share, and additional options:/home/<username>/Downloads/<shared_directory>/ <VM1-IP(options)> <VM2-IP(options)> ...The following example shares the
/usr/local/shared-filesdirectory on the host with testguest1 and testguest2, and enables the VMs to edit the content of the directory:/usr/local/shared-files/ 192.0.2.2(rw,sync) 192.0.2.3(rw,sync)NoteTo share a directory with a Windows VM, you need to ensure the Windows NFS client has write permissions in the shared directory. You can use the
all_squash,anonuid, andanongidoptions in the/etc/exportsfile./usr/local/shared-files/ 192.0.2.2(rw,sync,all_squash,anonuid=<directory-owner-UID>,anongid=<directory-owner-GID>)The <directory-owner-UID> and <directory-owner-GID> are the UID and GID of the local user that owns the shared directory on the host.
For other options to manage NFS client permissions, follow the Securing the NFS service guide.
Export the updated file system:
# exportfs -aStart the
nfs-serverservice:# systemctl start nfs-serverObtain the IP address of the host system to mount the shared directory on the VMs:
# ip addr
...
5: virbr0: [BROADCAST,MULTICAST,UP,LOWER_UP] mtu 1500 qdisc noqueue state UP group default qlen 1000
link/ether 52:54:00:32:ff:a5 brd ff:ff:ff:ff:ff:ff
inet 192.0.2.1/24 brd 192.0.2.255 scope global virbr0
valid_lft forever preferred_lft forever
...
Note that the relevant network connects the host with VMs to share files. Usually, this is
virbr0.
Mount the shared directory on a Linux VM that is specified in the
/etc/exportsfile:# mount 192.0.2.1:/usr/local/shared-files /mnt/host-share-
192.0.2.1: The IP address of the host. -
/usr/local/shared-files: A file-system path to the exported directory on the host. /mnt/host-share: A mount point on the VMNoteThe mount point must be an empty directory.
-
To mount the shared directory on a Windows VM as mentioned in the
/etc/exportsfile:- Open a PowerShell shell prompt as an Administrator.
Install the
NFS-Clientpackage on the Windows.To install on a server version, enter:
# Install-WindowsFeature NFS-ClientTo install on a desktop version, enter:
# Enable-WindowsOptionalFeature -FeatureName ServicesForNFS-ClientOnly, ClientForNFS-Infrastructure -Online -NoRestart
Mount the directory exported by the host on a Windows VM:
# C:\Windows\system32\mount.exe -o anon \\192.0.2.1\usr\local\shared-files Z:In this example:
-
192.0.2.1: The IP address of the host. -
/usr/local/shared-files: A file system path to the exported directory on the host. Z:: The drive letter for a mount point.NoteYou must choose a drive letter that is not in use on the system.
-
Verification
List the contents of the shared directory on the VM so that you can share files between the host and the VM:
$ ls <mount_point>
shared-file1  shared-file2  shared-file3
In this example, replace <mount_point> with a file system path to the mounted shared directory.
20.2. Sharing files between the host and its virtual machines by using virtiofs
Using virtiofs, you can share files between your host and your virtual machines (VM) as a directory tree that works the same as the local file system structure.
20.2.1. Sharing files between the host and its virtual machines by using virtiofs
When using RHEL 9 as your hypervisor, you can efficiently share files between your host system and its virtual machines (VM) using the virtiofs feature.
Prerequisites
- Virtualization is installed and enabled on your RHEL 9 host.
A directory that you want to share with your VMs. If you do not want to share any of your existing directories, create a new one, for example named shared-files.
# mkdir /root/shared-files- The VM you want to share data with is using a Linux distribution as its guest operating system.
Procedure
For each directory on the host that you want to share with your VM, set it as a virtiofs file system in the VM’s XML configuration.
Open the XML configuration of the intended VM.
# virsh edit vm-nameAdd an entry similar to the following to the
<devices>section of the VM’s XML configuration.<filesystem type='mount' accessmode='passthrough'> <driver type='virtiofs'/> <binary path='/usr/libexec/virtiofsd' xattr='on'/> <source dir='/root/shared-files'/> <target dir='host-file-share'/> </filesystem>This example sets the
/root/shared-filesdirectory on the host to be visible ashost-file-shareto the VM.
Set up shared memory for the VM. To do so, add shared memory backing to the
<domain>section of the XML configuration:<domain> [...] <memoryBacking> <access mode='shared'/> </memoryBacking> [...] </domain>Boot up the VM.
# virsh start vm-nameMount the file system in the guest operating system. The following example mounts the previously configured
host-file-sharedirectory with a Linux guest operating system.# mount -t virtiofs host-file-share /mnt
Verification
- Ensure that the shared directory became accessible on the VM and that you can now open files stored in the directory.
Known issues and limitations
-
File-system mount options related to access time, such as
noatimeandstrictatime, are not likely to work with virtiofs, and Red Hat discourages their use.
Troubleshooting
-
If
virtiofsis not optimal for your usecase or supported for your system, you can use NFS instead.
20.2.2. Sharing files between the host and Windows virtual machines by using virtiofs
When using RHEL 9 as your hypervisor, you can efficiently share files between your host system and Windows virtual machines (VM) using the virtiofs feature along with the virtio-win package.
You can run the virtiofs service in case insensitive mode on a Windows VM using the virtiofs.exe command and the -i parameter.
Prerequisites
- You have configured your VM’s XML configuration file to use virtiofs. For detailed information, see Section 20.2.1, “Sharing files between the host and its virtual machines by using virtiofs”.
-
You have attached the
virtiodriver installation media to the VM. -
You have installed the
virtio-winpackage on your Windows VM. For more information, see Installing virtio drivers on a Windows guest.
Procedure
On your Windows VM, install WinFsp. To do so, mount the
virtio-winISO image, start thewinfspMSI installer, and follow the prompts.In the Custom Setup window of the installation wizard, select the features you want to install on the VM.
Start the virtiofs service:
# sc start VirtioFsSvcNavigate to This PC:
File Explorer
This PC Virtiofs should be available on the Windows VM as the first available drive letter starting with
z:and going backwards. For example,my_viofs (Z:).ImportantYou must restart the virtiofs service after each VM reboot to access the shared directory.
Optional: To set up additional virtiofs instances:
Stop the virtiofs service:
# sc stop VirtioFsSvc
# sc config VirtioFsSvc start=demand
Configure the WinFSP.Launcher service to set up multiple virtiofs instances:
# "C:\Program Files (x86)\WinFsp\bin\fsreg.bat" virtiofs "<path to the binary>\virtiofs.exe" "-t %1 -m %2"Mount virtiofs instances to drives.
For example, to mount virtiofs with the tag
mount_tag0to theY:drive:"C:\Program Files (x86)\WinFsp\bin\launchctl-x64.exe" start virtiofs viofsY mount_tag0 Y:- Repeat the previous step to mount all of your virtiofs instances.
To unmount the virtiofs instance:
"C:\Program Files (x86)\WinFsp\bin\launchctl-x64.exe" stop virtiofs viofsY
Verification
On your Windows VM, navigate to This PC:
File Explorer
This PC -
If you did not specify a mount point when setting up the virtiofs service, it will use the first available drive letter starting with
z:and going backwards. - If you have multiple virtiofs instances set up, they will appear as drives with the letters you had assigned to the instances.
-
If you did not specify a mount point when setting up the virtiofs service, it will use the first available drive letter starting with
20.2.3. Sharing files between the host and its virtual machines by using virtiofs in the web console
You can use the RHEL web console to efficiently share files between your host system and its virtual machines (VM) using the virtiofs feature.
Prerequisites
- The web console VM plug-in is installed on your system.
A directory that you want to share with your VMs. If you do not want to share any of your existing directories, create a new one, for example named centurion.
# mkdir /home/centurion- The VM you want to share data with is using a Linux distribution as its guest operating system.
Procedure
In the interface, click the VM with which you want to share files.
A new page opens with an Overview section with basic information about the selected VM and a Console section.
Scroll to .
The Shared directories section displays information about the host files and directories shared with that VM and options to Add or Remove a shared directory.

Click .
The Share a host directory with the guest dialog appears.
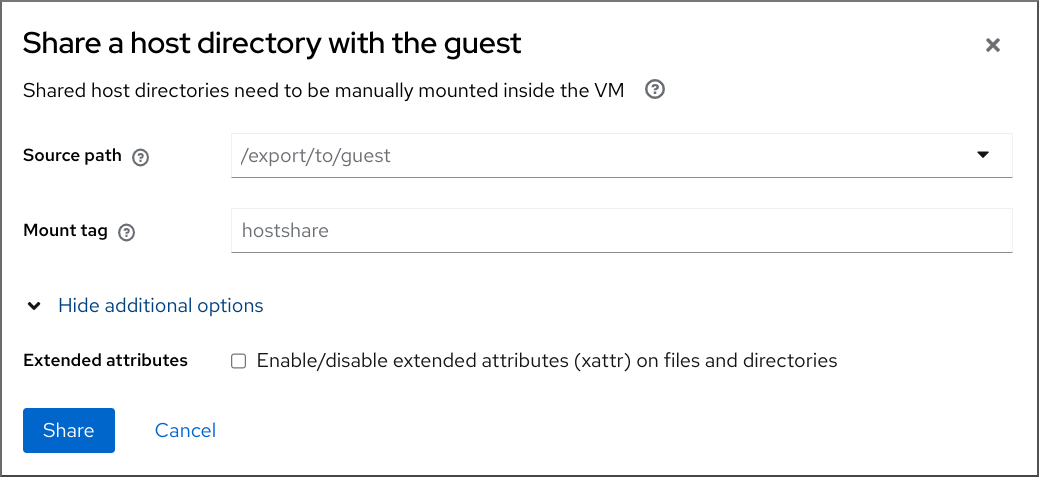
Enter the following information:
- Source path - The path to the host directory that you want to share.
- Mount tag - The tag that the VM uses to mount the directory.
Set additional options:
-
Extended attributes - Set whether to enable extended attributes,
xattr, on the shared files and directories.
-
Extended attributes - Set whether to enable extended attributes,
Click .
The selected directory is shared with the VM.
Verification
- Ensure that the shared directory is accessible on the VM and you can now open files stored in that directory.
20.2.4. Using the web console to remove shared files between the host and its virtual machines by using virtiofs
You can use the RHEL web console to remove files shared between your host system and its virtual machines (VM) using the virtiofs feature.
Prerequisites
- The web console VM plug-in is installed on your system.
- The directory is no longer being used by the VM.
Procedure
In the interface, click on the VM from which you want to remove the shared files.
A new page opens with an Overview section with basic information about the selected VM and a Console section.
Scroll to .
The Shared directories section displays information about the host files and directories shared with that VM and options to Add or Remove a shared directory.
Click next to the directory that you want to unshare with the VM.
The Remove filesystem dialog appears.

Click .
The selected directory is unshared with the VM.
Verification
- The shared directory is no longer available and accessible on the VM.