Este contenido no está disponible en el idioma seleccionado.

6.4. Creating Guests with PXE


This section provides information on creating guests with PXE.
Requirements

PXE guest installation requires a PXE server running on the same subnet as the guest virtual machines you wish to install. The method of accomplishing this depends on how the virtual machines are connected to the network. Contact Support if you require assistance setting up a PXE server.

PXE Installation with virt-install

virt-install PXE installations require both the --network=bridge:installation parameter, where installation is the name of your bridge, and the --pxe parameter.

By default, if no network is found, the guest virtual machine attempts to boot from alternative bootable devices. If there is no other bootable device found, the guest pauses. You can use the qemu-kvm boot parameter reboot-timeout to allow the guest to retry booting if no bootable device is found, like so:
# qemu-kvm -boot reboot-timeout=1000

Example 6.2. Fully-virtualized PXE installation with virt-install

# virt-install --hvm --connect qemu:///system \
--network=bridge:installation --pxe --graphics spice \
--name rhel6-machine --ram=756 --vcpus=4 \
--os-type=linux --os-variant=rhel6 \
--disk path=/var/lib/libvirt/images/rhel6-machine.img,size=10
Note that the command above cannot be executed in a text-only environment. A fully-virtualized (--hvm) guest can only be installed in a text-only environment if the --location and --extra-args "console=console_type" are provided instead of the --graphics spice parameter.

Procedure 6.2. PXE installation with virt-manager

  1. Select PXE

    Select PXE as the installation method and follow the rest of the steps to configure the OS type, memory, CPU and storage settings.
    Step 1 of 5 for creating a new virtual machine with virt-manager, with Network Boot (PXE) chosen for the method of installation.

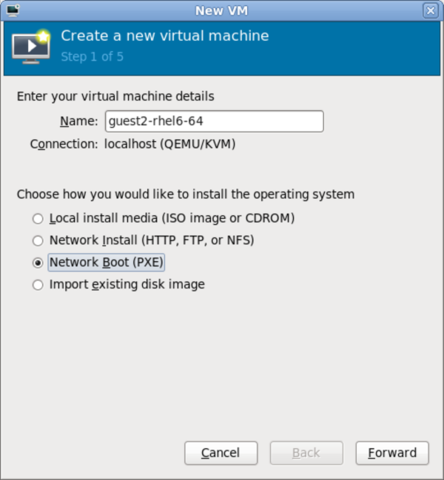
    Figure 6.8. Selecting the installation method

    Step 2 of 5 for creating a new virtual machine with virt-manager, with Linux chosen as OS Type and Red Hat Enterprise Linux 6 chosen for version.

    Figure 6.9. Selecting the installation type

    Step 3 of 5 for creating a new virtual machine with virt-manager showing memory and CPU settings, with 1024MB of RAM and 2 CPUs selected.

    Figure 6.10. Specifying virtualized hardware details

    Step 4 of 5 for creating a new virtual machine with virt-manager, with check boxes selected next to

    Figure 6.11. Specifying storage details

  2. Start the installation

    The installation is ready to start.
    Step 5 of 5 for creating a new virtual machine with virt-manager reads

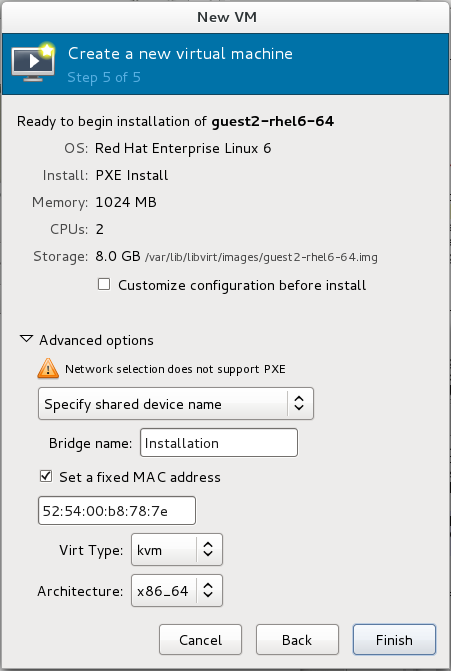
    Figure 6.12. Finalizing virtual machine details

A DHCP request is sent and if a valid PXE server is found the guest virtual machine's installation processes will start.
After the installation completes, you can connect to the guest operating system. For more information, see Section 6.5, “Connecting to Virtual Machines”
Red Hat logoGithubredditYoutubeTwitter

Aprender

Pruebe, compre y venda

Comunidades

Acerca de la documentación de Red Hat

Ayudamos a los usuarios de Red Hat a innovar y alcanzar sus objetivos con nuestros productos y servicios con contenido en el que pueden confiar. Explore nuestras recientes actualizaciones.

Hacer que el código abierto sea más inclusivo

Red Hat se compromete a reemplazar el lenguaje problemático en nuestro código, documentación y propiedades web. Para más detalles, consulte el Blog de Red Hat.

Acerca de Red Hat

Ofrecemos soluciones reforzadas que facilitan a las empresas trabajar en plataformas y entornos, desde el centro de datos central hasta el perímetro de la red.

Theme

© 2026 Red Hat
Volver arriba