Este contenido no está disponible en el idioma seleccionado.
Chapter 7. Setting up Spring Boot applications for HawtIO Online with Jolokia
If stopping a Camel route is changing the health status to DOWN and triggering a pod restart by OpenShift, a possible solution to avoid this behavior is to set:
camel.routecontroller.enabled = trueIt will enable the supervised route controller so that the route will be with status Stopped and the overall status of the health check is UP.
This section describes the enabling of monitoring of a Spring Boot application by HawtIO. It starts from first principles in setting up a simple example application.
This application runs on OpenShift and is discovered and monitored by HawtIO online.
If you already have a Spring Boot application implemented, skip to Section 7.2, “Adding Jolokia Starter dependency to the application”.
The following is based on the jolokia sample application in the Apache Camel Spring-Boot examples repository.
Prerequisites
-
Maven has been installed and
mvnis available on the Command-line (CLI).
7.1. Setting up a sample Spring Boot application
To create a new Spring Boot application, you can either create the maven project directory structure manually, or execute an archetype to generate the scaffolding for a standard java project, which you can customize for individual applications.
Customize these values as needed:
archetypeVersion- 4.14.4.redhat-00010
groupId-
io.hawtio.online.examples artifactId-
hawtio-online-example-camel-springboot-os version-
1.0.0
Run the maven archetype:
mvn archetype:generate  \
  -DarchetypeGroupId=org.apache.camel.archetypes  \
  -DarchetypeArtifactId=camel-archetype-spring-boot  \
  -DarchetypeVersion=4.14.4.redhat-00010  \
  -DgroupId=io.hawt.online.examples  \
  -DartifactId=hawtio-online-example  \
  -Dversion=1.0.0  \
  -DinteractiveMode=false \
  -Dpackage=io.hawtio
Change into the new project named
artifactId(in the above example:hawtio-online-example)An example
hello worldapplication is created, and you can compile it.At this point, the application should be executable locally.
Use the
mvn spring-boot:runmaven goal to test the application:$ mvn spring-boot:run
7.2. Adding Jolokia Starter dependency to the application
In order to allow HawtIO to monitor the Camel route in the application, you must add the camel-jolokia-starter dependency. It contains all the necessary transitive dependencies.
Add the needed dependencies to the
<dependencies>section:<dependencies> ... <!-- Camel --> ... <!-- Dependency is mandatory for exposing Jolokia endpoint --> <dependency> <groupId>org.apache.camel.springboot</groupId> <artifactId>camel-jolokia-starter</artifactId> </dependency> <!-- Optional: enables debugging support for Camel --> <dependency> <groupId>org.apache.camel</groupId> <artifactId>camel-debug</artifactId> <version>4.10.3</version> </dependency> ... </dependencies>For configuration details, see the Jolokia component documentation
To enable inflight monitoring also add the following property to the
application.propertiesfile according to the Spring Boot documentation:camel.springboot.inflight-repository-browse-enabled=true
7.3. Configuring the application for Deployment to OpenShift
The starter already manages the configuration for the Kubernetes/OpenShift environment, so no specific extra configuration is needed.
The only mandatory configuration is the name of the port exposed by the POD, it must be named jolokia.
spec:
  containers:
    - name: my-container
      ports:
        - name: jolokia
          containerPort: 8778
          protocol: TCP
          ........
      .......
7.4. Deploying the Spring Boot application to OpenShift
Prerequisites
- The appropriate project selected (see Documentation);
- All files have been configured.
Run the following maven command:
mvn clean install -DskipTests -P openshiftThe application is compiled with S2I and deployed to OpenShift.
Verify that the Spring Boot application is running correctly:
Follow the Verification steps detailed in the Deploying Red Hat build of Quarkus Java applications to OpenShift Container Platform section of the Red Hat build of Quarkus documentation.
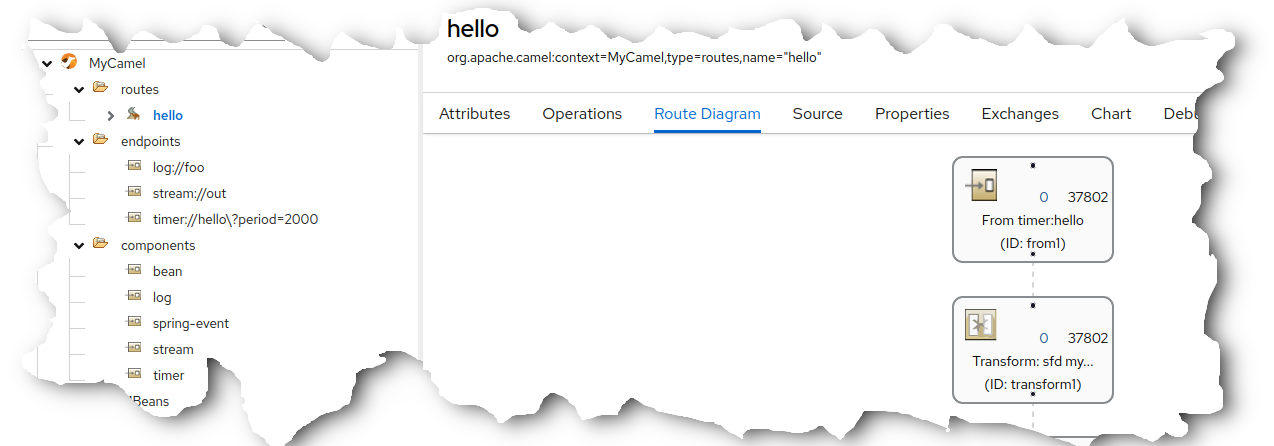
When your new Spring Boot application is running correctly, it is discovered by the HawtIO instance (depending on its mode - 'Namespace' mode requires it to be in the same project).
The new container should be displayed like in the following screenshot:

Click Connect to examine the Spring Boot application can be with HawtIO: