Este contenido no está disponible en el idioma seleccionado.
Chapter 27. Red Hat JBoss Data Grid Security: Authorization and Authentication
27.1. Red Hat JBoss Data Grid Security: Authorization and Authentication
Red Hat JBoss Data Grid is able to perform authorization on CacheManagers and Caches. JBoss Data Grid authorization is built on standard security features available in a JDK, such as JAAS and the SecurityManager.
If an application attempts to interact with a secured CacheManager and Cache, it must provide an identity which JBoss Data Grid’s security layer can validate against a set of required roles and permissions. Once validated, the client is issued a token for subsequent operations. Where access is denied, an exception indicating a security violation is thrown.
When a cache has been configured for with authorization, retrieving it returns an instance of SecureCache. SecureCache is a simple wrapper around a cache, which checks whether the "current user" has the permissions required to perform an operation. The "current user" is a Subject associated with the AccessControlContext.
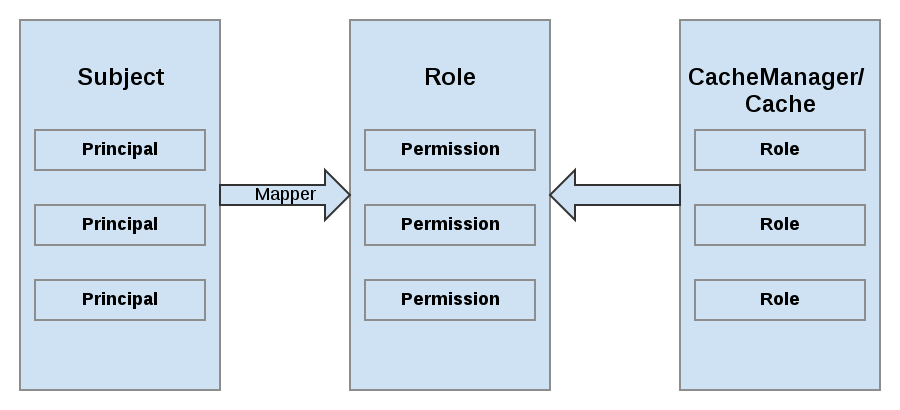
JBoss Data Grid maps Principals names to roles, which in turn, represent one or more permissions. The following diagram represents these relationships:
Figure 27.1. Roles and Permissions Mapping
27.2. Permissions
Access to a CacheManager or a Cache is controlled using a set of required permissions. Permissions control the type of action that is performed on the CacheManager or Cache, rather than the type of data being manipulated. Some of these permissions can apply to specifically name entities, such as a named cache. Different types of permissions are available depending on the entity.
| Permission | Function | Description |
|---|---|---|
| CONFIGURATION | defineConfiguration | Whether a new cache configuration can be defined. |
| LISTEN | addListener | Whether listeners can be registered against a cache manager. |
| LIFECYCLE | stop, start | Whether the cache manager can be stopped or started respectively. |
| ALL | A convenience permission which includes all of the above. |
| Permission | Function | Description |
|---|---|---|
| READ | get, contains | Whether entries can be retrieved from the cache. |
| WRITE | put, putIfAbsent, replace, remove, evict | Whether data can be written/replaced/removed/evicted from the cache. |
| EXEC | distexec, mapreduce | Whether code execution can be run against the cache. |
| LISTEN | addListener | Whether listeners can be registered against a cache. |
| BULK_READ | keySet, values, entrySet,query | Whether bulk retrieve operations can be executed. |
| BULK_WRITE | clear, putAll | Whether bulk write operations can be executed. |
| LIFECYCLE | start, stop | Whether a cache can be started / stopped. |
| ADMIN | getVersion, addInterceptor*, removeInterceptor, getInterceptorChain, getEvictionManager, getComponentRegistry, getDistributionManager, getAuthorizationManager, evict, getRpcManager, getCacheConfiguration, getCacheManager, getInvocationContextContainer, setAvailability, getDataContainer, getStats, getXAResource | Whether access to the underlying components/internal structures is allowed. |
| ALL | A convenience permission which includes all of the above. | |
| ALL_READ | Combines READ and BULK_READ. | |
| ALL_WRITE | Combines WRITE and BULK_WRITE. |
Some permissions may need to be combined with others in order to be useful. For example, EXEC with READ or with WRITE.
27.3. Role Mapping
In order to convert the Principals in a Subject into a set of roles used for authorization, a PrincipalRoleMapper must be specified in the global configuration. Red Hat JBoss Data Grid ships with three mappers, and also allows you to provide a custom mapper.
| Mapper Name | Java | XML | Description |
|---|---|---|---|
| IdentityRoleMapper | org.infinispan.security.impl.IdentityRoleMapper | <identity-role-mapper /> | Uses the Principal name as the role name. |
| CommonNameRoleMapper | org.infinispan.security.impl.CommonRoleMapper | <common-name-role-mapper /> |
If the Principal name is a Distinguished Name (DN), this mapper extracts the Common Name (CN) and uses it as a role name. For example the DN |
| ClusterRoleMapper | org.infinispan.security.impl.ClusterRoleMapper | <cluster-role-mapper /> |
Uses the |
| Custom Role Mapper | <custom-role-mapper class="a.b.c" /> |
Supply the fully-qualified class name of an implementation of |
27.4. Configuring Authentication and Role Mapping using Login Modules
When using the authentication login-module for querying roles from LDAP, you must implement your own mapping of Principals to Roles, as custom classes are in use. An example implementation of this conversion is found in the JBoss Data Grid Developer Guide , while a declarative configuration example is below:
Example of LDAP Login Module Configuration
Example of Login Module Configuration
When using GSSAPI authentication, this would typically involve using LDAP for role mapping, with the JBoss Data Grid server authenticating itself to the LDAP server via GSSAPI. For an example on configuring this authentication to an Active Directory server refer to Active Directory Authentication Using Kerberos (GSSAPI).
For information on configuring an LDAP server, or specifying users and roles in an LDAP server, refer to the Red Hat Directory Server Administration Guide .
27.5. Configuring Red Hat JBoss Data Grid for Authorization
Authorization is configured at two levels: the cache container (CacheManager), and at the single cache.
CacheManager
The following is an example configuration for authorization at the CacheManager level:
CacheManager Authorization (Declarative Configuration)
Each cache container determines:
- whether to use authorization.
- a class which will map principals to a set of roles.
- a set of named roles and the permissions they represent.
You can choose to use only a subset of the roles defined at the container level.
Roles
Roles may be applied on a cache-per-cache basis, using the roles defined at the cache-container level, as follows:
Defining Roles
<local-cache name="secured">
  <security>
    <authorization roles="admin reader writer supervisor"/>
  </security>
</local-cache>
<local-cache name="secured">
  <security>
    <authorization roles="admin reader writer supervisor"/>
  </security>
</local-cache>Any cache that is intended to require authentication must have a listing of roles defined; otherwise authentication is not enforced as the no-anonymous policy is defined by the cache’s authorization.
The REST protocol is not supported for use with authorization, and any attempts to access a cache with authorization enabled will result in a SecurityException.
27.6. Authorization Using a SecurityManager
In Red Hat JBoss Data Grid’s Remote Client-Server mode, authorization is able to work without a SecurityManager for basic cache operations. In Library mode, a SecurityManager may also be used to perform some of the more complex tasks, such as distexec and query among others.
In order to enforce access restrictions, enable the SecurityManager in your JVM using one of the following methods:
Command Line
java -Djava.security.manager ...
java -Djava.security.manager ...Programmaticaly
System.setSecurityManager(new SecurityManager());
System.setSecurityManager(new SecurityManager());
Using the JDK’s default implementation is not required; however, an appropriate policy file must be supplied. The policy file defines a set of permissions, which the SecurityManager examines when an application performs an action. If the action is allowed by the policy file, then the SecurityManager will permit the action to take place; however, if the action is not allowed by the policy then the SecurityManager denies that action.
Example policy files are below:
Library Mode Security Policy File Example
Remote Client-Server Security Policy File Example
27.7. SecurityManager in Java
27.7.1. About the Java Security Manager
Java Security Manager
The Java Security Manager is a class that manages the external boundary of the Java Virtual Machine (JVM) sandbox, controlling how code executing within the JVM can interact with resources outside the JVM. When the Java Security Manager is activated, the Java API checks with the security manager for approval before executing a wide range of potentially unsafe operations.
The Java Security Manager uses a security policy to determine whether a given action will be permitted or denied.
27.7.2. About Java Security Manager Policies
Security Policy
A set of defined permissions for different classes of code. The Java Security Manager compares actions requested by applications against the security policy. If an action is allowed by the policy, the Security Manager will permit that action to take place. If the action is not allowed by the policy, the Security Manager will deny that action. The security policy can define permissions based on the location of code, on the code’s signature, or based on the subject’s principals.
The Java Security Manager and the security policy used are configured using the Java Virtual Machine options java.security.manager and java.security.policy.
Basic Information
A security policy’s entry consists of the following configuration elements, which are connected to the policytool:
- CodeBase
- The URL location (excluding the host and domain information) where the code originates from. This parameter is optional.
- SignedBy
- The alias used in the keystore to reference the signer whose private key was used to sign the code. This can be a single value or a comma-separated list of values. This parameter is optional. If omitted, presence or lack of a signature has no impact on the Java Security Manager.
- Principals
-
A list of
principal_type/principal_namepairs, which must be present within the executing thread’s principal set. The Principals entry is optional. If it is omitted, it signifies that the principals of the executing thread will have no impact on the Java Security Manager. - Permissions
- A permission is the access which is granted to the code. Many permissions are provided as part of the Java Enterprise Edition 6 (Java EE 6) specification. This document only covers additional permissions which are provided by JBoss EAP 6.
Refer to your container documentation on how to configure the security policy, as it may differ depending on the implementation.
27.7.3. Write a Java Security Manager Policy
Introduction
An application called policytool is included with most JDK and JRE distributions, for the purpose of creating and editing Java Security Manager security policies. Detailed information about policytool is linked from http://docs.oracle.com/javase/6/docs/technotes/tools/.
Setup a new Java Security Manager Policy
Start policytool
Start the
policytooltool in one of the following ways.Red Hat Enterprise Linux
From your GUI or a command prompt, run
/usr/bin/policytool.Microsoft Windows Server
Run
policytool.exefrom your Start menu or from the bin\ of your Java installation. The location can vary.
Create a policy.
To create a policy, select Add Policy Entry. Add the parameters you need, then click Done. .
Edit an existing policy.
Select the policy from the list of existing policies, and select the Edit Policy Entry button. Edit the parameters as needed.
Delete an existing policy.
Select the policy from the list of existing policies, and select the Remove Policy Entry button.
27.7.4. Run Red Hat JBoss Data Grid Server Within the Java Security Manager
To specify a Java Security Manager policy, you need to edit the Java options passed to the server instance during the bootstrap process. For this reason, you cannot pass the parameters as options to the standalone.sh script. The following procedure guides you through the steps of configuring your instance to run within a Java Security Manager policy.
Prerequisites
Before you following this procedure, you need to write a security policy, using the policytool command which is included with your Java Development Kit (JDK). This procedure assumes that your policy is located at JDG_HOME/bin/server.policy . As an alternative, write the security policy using any text editor and manually save it as JDG_HOME/bin/server.policy * The JBoss Data Grid server must be completely stopped before you edit any configuration files.
Perform the following procedure for each physical host or instance in your environment.
Configure the Security Manager for JBoss Data Grid Server
Open the configuration file.
Open the configuration file for editing. This location of this file is listed below by OS. Note that this is not the executable file used to start the server, but a configuration file that contains runtime parameters. For Linux: JDG_HOME/bin/standalone.conf For Windows: JDG_HOME\bin\standalone.conf.bat
Add the Java options to the file.
To ensure the Java options are used, add them to the code block that begins with:
if [ "x$JAVA_OPTS" = "x" ]; then
if [ "x$JAVA_OPTS" = "x" ]; thenCopy to Clipboard Copied! Toggle word wrap Toggle overflow You can modify the
-Djava.security.policyvalue to specify the exact location of your security policy. It should go onto one line only, with no line break. Using==when setting the-Djava.security.policyproperty specifies that the security manager will use only the specified policy file. Using=specifies that the security manager will use the specified policy combined with the policy set in thepolicy.urlsection of JAVA_HOME/lib/security/java.security .ImportantJBoss Enterprise Application Platform releases from 6.2.2 onwards require that the system property
jboss.modules.policy-permissionsis set to true.standalone.conf
JAVA_OPTS="$JAVA_OPTS -Djava.security.manager -Djava.security.policy==$PWD/server.policy -Djboss.home.dir=$JBOSS_HOME -Djboss.modules.policy-permissions=true"
JAVA_OPTS="$JAVA_OPTS -Djava.security.manager -Djava.security.policy==$PWD/server.policy -Djboss.home.dir=$JBOSS_HOME -Djboss.modules.policy-permissions=true"Copy to Clipboard Copied! Toggle word wrap Toggle overflow standalone.conf.bat
set "JAVA_OPTS=%JAVA_OPTS% -Djava.security.manager -Djava.security.policy==\path\to\server.policy -Djboss.home.dir=%JBOSS_HOME% -Djboss.modules.policy-permissions=true"
set "JAVA_OPTS=%JAVA_OPTS% -Djava.security.manager -Djava.security.policy==\path\to\server.policy -Djboss.home.dir=%JBOSS_HOME% -Djboss.modules.policy-permissions=true"Copy to Clipboard Copied! Toggle word wrap Toggle overflow Start the server.
Start the server as normal.
27.8. Data Security for Remote Client Server Mode
27.8.1. About Security Realms
A security realm is a series of mappings between users and passwords, and users and roles. Security realms are a mechanism for adding authentication and authorization to your EJB and Web applications. Red Hat JBoss Data Grid Server provides two security realms by default:
-
ManagementRealmstores authentication information for the Management API, which provides the functionality for the Management CLI and web-based Management Console. It provides an authentication system for managing JBoss Data Grid Server itself. You could also use theManagementRealmif your application needed to authenticate with the same business rules you use for the Management API. -
ApplicationRealmstores user, password, and role information for Web Applications and EJBs.
Each realm is stored in two files on the filesystem:
- REALM-users.properties stores usernames and hashed passwords.
- REALM-roles.properties stores user-to-role mappings.
-
mgmt-groups.properties stores user-to-role mapping file for
ManagementRealm.
The properties files are stored in the standalone/configuration/ directories. The files are written simultaneously by the add-user.sh or add-user.bat command. When you run the command, the first decision you make is which realm to add your new user to.
27.8.2. Add a New Security Realm
Run the Management CLI
Start the cli.sh or cli.bat command and connect to the server.
Create the new security realm itself
Run the following command to create a new security realm named
MyDomainRealmon a domain controller or a standalone server./host=master/core-service=management/security-realm=MyDomainRealm:add()
/host=master/core-service=management/security-realm=MyDomainRealm:add()Copy to Clipboard Copied! Toggle word wrap Toggle overflow Create the reference to the properties file which will store information about the new realm’s users
Run the below command to define the location of the new security realm’s properties file; this file contains information regarding the users of this security realm. The following command references a file named myfile.properties in the
jboss.server.config.dir.NoteThe newly-created properties file is not managed by the included add-user.sh and add-user.bat scripts. It must be managed externally.
/host=master/core-service=management/security-realm=MyDomainRealm/authentication=properties:add(path="myfile.properties",relative-to="jboss.server.config.dir")
/host=master/core-service=management/security-realm=MyDomainRealm/authentication=properties:add(path="myfile.properties",relative-to="jboss.server.config.dir")Copy to Clipboard Copied! Toggle word wrap Toggle overflow Reload the server
Reload the server so the changes will take effect.
:reload
:reloadCopy to Clipboard Copied! Toggle word wrap Toggle overflow
Result
The new security realm is created. When you add users and roles to this new realm, the information will be stored in a separate file from the default security realms. You can manage this new file using your own applications or procedures.
27.8.3. Add a User to a Security Realm
Run the add-user.sh or add-user.bat command
Open a terminal and change directories to the JDG_HOME/bin/ directory. If you run Red Hat Enterprise Linux or another UNIX-like operating system, run add-user.sh. If you run Microsoft Windows Server, run add-user.bat.
Choose whether to add a Management User or Application User
For this procedure, type
bto add an Application User.Choose the realm this user will be added to
By default, the only available realms are the
ManagementRealmandApplicationRealm; however, if a custom realm has been added, then its name may be entered instead.Type the username, password, and roles, when prompted
Type the desired username, password, and optional roles when prompted. Verify your choice by typing
yes, or typenoto cancel the changes. The changes are written to each of the properties files for the security realm.
27.8.4. Configuring Security Realms Declaratively
In Remote Client-Server mode, a Hot Rod endpoint must specify a security realm.
The security realm declares an authentication and an authorization section.
Configuring Security Realms Declaratively
The server-identities parameter can also be used to specify certificates.
27.8.5. Loading Roles from LDAP for Authorization (Remote Client-Server Mode)
An LDAP directory contains entries for user accounts and groups, cross referenced by attributes. Depending on the LDAP server configuration, a user entity may map the groups the user belongs to through memberOf attributes; a group entity may map which users belong to it through uniqueMember attributes; or both mappings may be maintained by the LDAP server.
Users generally authenticate against the server using a simple user name. When searching for group membership information, depending on the directory server in use, searches could be performed using this simple name or using the distinguished name of the user’s entry in the directory.
The authentication step of a user connecting to the server always happens first. Once the user is successfully authenticated the server loads the user’s groups. The authentication step and the authorization step each require a connection to the LDAP server. The realm optimizes this process by reusing the authentication connection for the group loading step. As will be shown within the configuration steps below it is possible to define rules within the authorization section to convert a user’s simple user name to their distinguished name. The result of a "user name to distinguished name mapping" search during authentication is cached and reused during the authorization query when the force attribute is set to "false". When force is true, the search is performed again during authorization (while loading groups). This is typically done when different servers perform authentication and authorization.
These examples specify some attributes with their default values. This is done for demonstration. Attributes that specify their default values are removed from the configuration when it is persisted by the server. The exception is the force attribute. It is required, even when set to the default value of false.
username-to-dn
The username-to-dn element specifies how to map the user name to the distinguished name of their entry in the LDAP directory. This element is only required when both of the following are true:
- The authentication and authorization steps are against different LDAP servers.
The group search uses the distinguished name.
- 1:1 username-to-dn
- This specifies that the user name entered by the remote user is the user’s distinguished name.
<username-to-dn force="false">
   <username-is-dn />
</username-to-dn>
<username-to-dn force="false">
   <username-is-dn />
</username-to-dn>+ This defines a 1:1 mapping and there is no additional configuration.
- username-filter
- The next option is very similar to the simple option described above for the authentication step. A specified attribute is searched for a match against the supplied user name.
<username-to-dn force="true">
    <username-filter base-dn="dc=people,dc=harold,dc=example,dc=com" recursive="false" attribute="sn" user-dn-attribute="dn" />
</username-to-dn>
<username-to-dn force="true">
    <username-filter base-dn="dc=people,dc=harold,dc=example,dc=com" recursive="false" attribute="sn" user-dn-attribute="dn" />
</username-to-dn>+ The attributes that can be set here are:
-
base-dn: The distinguished name of the context to begin the search. -
recursive: Whether the search will extend to sub contexts. Defaults tofalse. -
attribute: The attribute of the users entry to try and match against the supplied user name. Defaults touid. user-dn-attribute: The attribute to read to obtain the users distinguished name. Defaults todn.- advanced-filter
- The final option is to specify an advanced filter, as in the authentication section this is an opportunity to use a custom filter to locate the users distinguished name.
<username-to-dn force="true">
    <advanced-filter base-dn="dc=people,dc=harold,dc=example,dc=com" recursive="false" filter="sAMAccountName={0}" user-dn-attribute="dn" />
</username-to-dn>
<username-to-dn force="true">
    <advanced-filter base-dn="dc=people,dc=harold,dc=example,dc=com" recursive="false" filter="sAMAccountName={0}" user-dn-attribute="dn" />
</username-to-dn>+ For the attributes that match those in the username-filter example, the meaning and default values are the same. There is one new attribute:
filter: Custom filter used to search for a user’s entry where the user name will be substituted in the{0}place holder.ImportantThe XML must remain valid after the filter is defined so if any special characters are used such as
&ensure the proper form is used. For example&for the&character.The Group Search
There are two different styles that can be used when searching for group membership information. The first style is where the user’s entry contains an attribute that references the groups the user is a member of. The second style is where the group contains an attribute referencing the users entry.
When there is a choice of which style to use Red Hat recommends that the configuration for a user’s entry referencing the group is used. This is because with this method group information can be loaded by reading attributes of known distinguished names without having to perform any searches. The other approach requires extensive searches to identify the groups that reference the user.
Before describing the configuration here are some LDIF examples to illustrate this.
Principal to Group - LDIF example.
This example illustrates where we have a user TestUserOne who is a member of GroupOne, GroupOne is in turn a member of GroupFive. The group membership is shown by the use of a memberOf attribute which is set to the distinguished name of the group of which the user (or group) is a member.
It is not shown here but a user could potentially have multiple memberOf attributes set, one for each group of which the user is directly a member.
Group to Principal - LDIF Example
This example shows the same user TestUserOne who is a member of GroupOne which is in turn a member of GroupFive - however in this case it is an attribute uniqueMember from the group to the user being used for the cross reference.
Again the attribute used for the group membership cross reference can be repeated, if you look at GroupFive there is also a reference to another user TestUserFive which is not shown here.
General Group Searching
Before looking at the examples for the two approaches shown above we first need to define the attributes common to both of these.
<group-search group-name="..." iterative="..." group-dn-attribute="..." group-name-attribute="..." >
    ...
</group-search>
<group-search group-name="..." iterative="..." group-dn-attribute="..." group-name-attribute="..." >
    ...
</group-search>-
group-name: This attribute is used to specify the form that should be used for the group name returned as the list of groups of which the user is a member. This can either be the simple form of the group name or the group’s distinguished name. If the distinguished name is required this attribute can be set toDISTINGUISHED_NAME. Defaults toSIMPLE. -
iterative: This attribute is used to indicate if, after identifying the groups a user is a member of, we should also iteratively search based on the groups to identify which groups the groups are a member of. If iterative searching is enabled we keep going until either we reach a group that is not a member if any other groups or a cycle is detected. Defaults tofalse.
Cyclic group membership is not a problem. A record of each search is kept to prevent groups that have already been searched from being searched again.
For iterative searching to work the group entries need to look the same as user entries. The same approach used to identify the groups a user is a member of is then used to identify the groups of which the group is a member. This would not be possible if for group to group membership the name of the attribute used for the cross reference changes or if the direction of the reference changes.
-
group-dn-attribute: On an entry for a group which attribute is its distinguished name. Defaults todn. -
group-name-attribute: On an entry for a group which attribute is its simple name. Defaults touid.
Principal to Group Example Configuration
Based on the example LDIF from above here is an example configuration iteratively loading a user’s groups where the attribute used to cross reference is the memberOf attribute on the user.
The most important aspect of this configuration is that the principal-to-group element has been added with a single attribute.
-
group-attribute: The name of the attribute on the user entry that matches the distinguished name of the group the user is a member of. Defaults tomemberOf.
Group to Principal Example Configuration
This example shows an iterative search for the group to principal LDIF example shown above.
Here an element group-to-principal is added. This element is used to define how searches for groups that reference the user entry will be performed. The following attributes are set:
-
base-dn: The distinguished name of the context to use to begin the search. -
recursive: Whether sub-contexts also be searched. Defaults tofalse. -
search-by: The form of the role name used in searches. Valid values areSIMPLEandDISTINGUISHED_NAME. Defaults toDISTINGUISHED_NAME.
Within the group-to-principal element there is a membership-filter element to define the cross reference.
-
principal-attribute: The name of the attribute on the group entry that references the user entry. Defaults tomember.
27.9. Securing Interfaces
27.9.1. Hot Rod Interface Security
27.9.1.1. Publish Hot Rod Endpoints as a Public Interface
Red Hat JBoss Data Grid’s Hot Rod server operates as a management interface as a default. To extend its operations to a public interface, alter the value of the interface parameter in the socket-binding element from management to public as follows:
<socket-binding name="hotrod" interface="public" port="11222" />
<socket-binding name="hotrod" interface="public" port="11222" />27.9.1.2. Encryption of communication between Hot Rod Server and Hot Rod client
Hot Rod can be encrypted using TLS/SSL, and has the option to require certificate-based client authentication.
Use the following procedure to secure the Hot Rod connector using SSL.
Secure Hot Rod Using SSL/TLS
Generate a Keystore
Create a Java Keystore using the keytool application distributed with the JDK and add your certificate to it. The certificate can be either self signed, or obtained from a trusted CA depending on your security policy.
Place the Keystore in the Configuration Directory
Put the keystore in the ~/JDG_HOME/standalone/configuration directory with the standalone-hotrod-ssl.xml file from the ~/JDG_HOME/docs/examples/configs directory.
Declare an SSL Server Identify
Declare an SSL server identity within a security realm in the management section of the configuration file. The SSL server identity must specify the path to a keystore and its secret key.
Copy to Clipboard Copied! Toggle word wrap Toggle overflow See Configure Hot Rod Authentication (X.509) for details about these parameters.
Add the Security Element
Add the security element to the Hot Rod connector as follows:
<hotrod-connector socket-binding="hotrod" cache-container="local">
    <encryption security-realm="ApplicationRealm" require-ssl-client-auth="false" />
</hotrod-connector>
<hotrod-connector socket-binding="hotrod" cache-container="local"> <encryption security-realm="ApplicationRealm" require-ssl-client-auth="false" /> </hotrod-connector>Copy to Clipboard Copied! Toggle word wrap Toggle overflow Optionally Configure Client Certificate Authentication
If you require the server to authenticate the client certificate, create a truststore that contains the valid client certificates and set the
require-ssl-client-authattribute totrue.Start the Server
Start the server using the following:
bin/standalone.sh -c standalone-hotrod-ssl.xml
bin/standalone.sh -c standalone-hotrod-ssl.xmlCopy to Clipboard Copied! Toggle word wrap Toggle overflow This will start a server with a Hot Rod endpoint on port 11222. This endpoint will only accept SSL connections.
This will start a server with a Hot Rod endpoint on port 11222. This endpoint will only accept SSL connections.Copy to Clipboard Copied! Toggle word wrap Toggle overflow
To prevent plain text passwords from appearing in configurations or source codes, plain text passwords should be changed to Vault passwords. For more information about how to set up Vault passwords, see the Password Vault section of the JBoss Enterprise Application Platform security documentation. .
27.9.1.3. Securing Hot Rod to LDAP Server using SSL
When connecting to an LDAP server with SSL enabled it may be necessary to specify a trust store or key store containing the appropriate certificates.
Encryption of communication between Hot Rod Server and Hot Rod client describes how to set up SSL for Hot Rod client-server communication. This can be used, for example, for secure Hot Rod client authentication with PLAIN username/password. When the username/password is checked against credentials in LDAP, a secure connection from the Hot Rod server to the LDAP server is also required. To enable connection from the Hot Rod server to LDAP via SSL, a security realm must be defined as follows:
Hot Rod Client Authentication to LDAP Server
To prevent plain text passwords from appearing in configurations or source codes, plain text passwords should be changed to Vault passwords. For more information about how to set up Vault passwords, see the Red Hat Enterprise Application Platform Security Guide .
27.9.1.4. User Authentication over Hot Rod Using SASL
27.9.1.4.1. User Authentication over Hot Rod Using SASL
User authentication over Hot Rod can be implemented using the following Simple Authentication and Security Layer (SASL) mechanisms:
-
PLAINis the least secure mechanism because credentials are transported in plain text format. However, it is also the simplest mechanism to implement. This mechanism can be used in conjunction with encryption (SSL) for additional security. -
DIGEST-MD5is a mechanism than hashes the credentials before transporting them. As a result, it is more secure than thePLAINmechanism. -
GSSAPIis a mechanism that uses Kerberos tickets. As a result, it requires a correctly configured Kerberos Domain Controller (for example, Microsoft Active Directory). -
EXTERNALis a mechanism that obtains the required credentials from the underlying transport (for example, from aX.509client certificate) and therefore requires client certificate encryption to work correctly.
27.9.1.4.2. Configure Hot Rod Authentication (GSSAPI/Kerberos)
Use the following steps to set up Hot Rod Authentication using the SASL GSSAPI/Kerberos mechanism:
Configure SASL GSSAPI/Kerberos Authentication - Server-side Configuration
Define a Kerberos security login module using the security domain subsystem:
Copy to Clipboard Copied! Toggle word wrap Toggle overflow - Ensure that the cache-container has authorization roles defined, and these roles are applied in the cache’s authorization block as seen in Configuring Red Hat JBoss Data Grid for Authorization.
Configure a Hot Rod connector as follows:
Copy to Clipboard Copied! Toggle word wrap Toggle overflow -
The
server-nameattribute specifies the name that the server declares to incoming clients. The client configuration must also contain the same server name value. -
The
server-context-nameattribute specifies the name of the login context used to retrieve a server subject for certain SASL mechanisms (for example, GSSAPI). -
The
mechanismsattribute specifies the authentication mechanism in use. See User Authentication over Hot Rod Using SASL for a list of supported mechanisms. -
The
qopattribute specifies the SASL quality of protection value for the configuration. Supported values for this attribute areauth(authentication),auth-int(authentication and integrity, meaning that messages are verified against checksums to detect tampering), andauth-conf(authentication, integrity, and confidentiality, meaning that messages are also encrypted). Multiple values can be specified, for example,auth-int auth-conf. The ordering implies preference, so the first value which matches both the client and server’s preference is chosen. -
The
strengthattribute specifies the SASL cipher strength. Valid values arelow,medium, andhigh. -
The
no-anonymouselement within thepolicyelement specifies whether mechanisms that accept anonymous login are permitted. Set this value tofalseto permit andtrueto deny.
-
The
- Perform the Client-Side configuration on each client. As the Hot Rod client is configured programmatically information on this configuration is found in the JBoss Data Grid Developer Guide .
27.9.1.4.3. Configure Hot Rod Authentication (MD5)
Use the following steps to set up Hot Rod Authentication using the SASL MD5 mechanism:
Configure Hot Rod Authentication (MD5)
Set up the Hot Rod Connector configuration by adding the
saslelement to theauthenticationelement (for details on theauthenticationelement, see Configuring Security Realms Declaratively) as follows:Copy to Clipboard Copied! Toggle word wrap Toggle overflow -
The
server-nameattribute specifies the name that the server declares to incoming clients. The client configuration must also contain the same server name value. -
The
mechanismsattribute specifies the authentication mechanism in use. See User Authentication over Hot Rod Using SASL for a list of supported mechanisms. -
The
qopattribute specifies the SASL quality of production value for the configuration. Supported values for this attribute areauth,auth-int, andauth-conf.
-
The
- Configure each client to be connected to the Hot Rod connector. As this step is performed programmatically instructions are found in JBoss Data Grid’s Developer Guide .
27.9.1.4.4. Configure Hot Rod Using LDAP/Active Directory
Use the following to configure authentication over Hot Rod using LDAP or Microsoft Active Directory:
The following are some details about the elements and parameters used in this configuration:
-
The
security-realmelement’snameparameter specifies the security realm to reference to use when establishing the connection. -
The
authenticationelement contains the authentication details. The
ldapelement specifies how LDAP searches are used to authenticate a user. First, a connection to LDAP is established and a search is conducted using the supplied user name to identify the distinguished name of the user. A subsequent connection to the server is established using the password supplied by the user. If the second connection succeeds, the authentication is a success.-
The
connectionparameter specifies the name of the connection to use to connect to LDAP. -
The (optional)
recursiveparameter specifies whether the filter is executed recursively. The default value for this parameter isfalse. -
The
base-dnparameter specifies the distinguished name of the context to use to begin the search from. -
The (optional)
user-dnparameter specifies which attribute to read for the user’s distinguished name after the user is located. The default value for this parameter isdn.
-
The
-
The
outbound-connectionselement specifies the name of the connection used to connect to the LDAP directory. The
ldapelement specifies the properties of the outgoing LDAP connection.-
The
nameparameter specifies the unique name used to reference this connection. -
The
urlparameter specifies the URL used to establish the LDAP connection. -
The
search-dnparameter specifies the distinguished name of the user to authenticate and to perform the searches. -
The
search-credentialparameter specifies the password required to connect to LDAP as thesearch-dn. -
The (optional)
initial-context-factoryparameter allows the overriding of the initial context factory. the default value of this parameter iscom.sun.jndi.ldap.LdapCtxFactory.
-
The
27.9.1.4.5. Configure Hot Rod Authentication (X.509)
The X.509 certificate can be installed at the node, and be made available to other nodes for authentication purposes for inbound and outbound SSL connections. This is enabled using the <server-identities/> element of a security realm definition, which defines how a server appears to external applications. This element can be used to configure a password to be used when establishing a remote connection, as well as the loading of an X.509 key.
The following example shows how to install an X.509 certificate on the node.
In the provided example, the SSL element contains the <keystore/> element, which is used to define how to load the key from the file-based keystore. The following parameters ave available for this element.
| Parameter | Mandatory/Optional | Description |
|---|---|---|
|
| Mandatory | This is the path to the keystore, this can be an absolute path or relative to the next attribute. |
|
| Optional | The name of a service representing a path the keystore is relative to. |
|
| Mandatory | The password required to open the keystore. |
|
| Optional | The alias of the entry to use from the keystore - for a keystore with multiple entries in practice the first usable entry is used but this should not be relied on and the alias should be set to guarantee which entry is used. |
|
| Optional | The password to load the key entry, if omitted the keystore-password will be used instead. |
If the following error occurs, specify a key-password as well as an alias to ensure only one key is loaded.
UnrecoverableKeyException: Cannot recover key
UnrecoverableKeyException: Cannot recover key27.9.2. REST Interface Security
27.9.2.1. Publish REST Endpoints as a Public Interface
Red Hat JBoss Data Grid’s REST server operates as a management interface by default. To extend its operations to a public interface, alter the value of the interface parameter in the socket-binding element from management to public as follows:
<socket-binding name="http"
		interface="public"
		port="8080"/>
<socket-binding name="http"
		interface="public"
port="8080"/>27.9.2.2. Enable Security for the REST Endpoint
Use the following procedure to enable security for the REST endpoint in Red Hat JBoss Data Grid.
The REST endpoint supports any of the JBoss Enterprise Application Platform security subsystem providers.
Enable Security for the REST Endpoint
To enable security for JBoss Data Grid when using the REST interface, make the following changes to standalone.xml:
Ensure that the rest endpoint defines a valid configuration for the
authenticationattribute. An example configuration is below:<subsystem xmlns="urn:infinispan:server:endpoint:8.1"> <rest-connector socket-binding="rest" cache-container="security"> <authentication security-realm="ApplicationRealm" auth-method="BASIC"/> </rest-connector> </subsystem><subsystem xmlns="urn:infinispan:server:endpoint:8.1"> <rest-connector socket-binding="rest" cache-container="security"> <authentication security-realm="ApplicationRealm" auth-method="BASIC"/> </rest-connector> </subsystem>Copy to Clipboard Copied! Toggle word wrap Toggle overflow Check Security Domain Declaration
Ensure that the security subsystem contains the corresponding security-domain declaration. For details about setting up security-domain declarations, see the JBoss Enterprise Application Platform 7 documentation.
Add an Application User
Run the relevant script and enter the configuration settings to add an application user.
Run the adduser.sh script (located in $JDG_HOME/bin ).
- On a Windows system, run the adduser.bat file (located in $JDG_HOME/bin ) instead.
-
When prompted about the type of user to add, select
Application User (application-users.properties)by enteringb. -
Accept the default value for realm (
ApplicationRealm) by pressing the return key. - Specify a username and password.
-
When prompted for a group, enter
REST. - Ensure the username and application realm information is correct when prompted and enter "yes" to continue.
Verify the Created Application User
Ensure that the created application user is correctly configured.
Check the configuration listed in the application-users.properties file (located in $JDG_HOME/standalone/configuration/ ). The following is an example of what the correct configuration looks like in this file:
user1=2dc3eacfed8cf95a4a31159167b936fc
user1=2dc3eacfed8cf95a4a31159167b936fcCopy to Clipboard Copied! Toggle word wrap Toggle overflow Check the configuration listed in the application-roles.properties file (located in $JDG_HOME/standalone/configuration/ ). The following is an example of what the correct configuration looks like in this file:
user1=REST
user1=RESTCopy to Clipboard Copied! Toggle word wrap Toggle overflow
Test the Server
Start the server and enter the following link in a browser window to access the REST endpoint:
http://localhost:8080/rest/namedCache
http://localhost:8080/rest/namedCacheCopy to Clipboard Copied! Toggle word wrap Toggle overflow NoteIf testing using a GET request, a
405response code is expected and indicates that the server was successfully authenticated.
27.9.3. Memcached Interface Security
27.9.3.1. Publish Memcached Endpoints as a Public Interface
Red Hat JBoss Data Grid’s memcached server operates as a management interface by default. It is possible to extend the memcached operations to a public interface, but there is no additional security available for this interface. If security is a concern then it is recommended to keep this interface on an isolated, internal network, or to use either the REST or Hot Rod interfaces.
To configure the memcached interface as a public interface, alter the value of the interface parameter in the socket-binding element from management to public as follows:
<socket-binding name="memcached"
		interface="public"
		port="11211" />
<socket-binding name="memcached"
		interface="public"
port="11211" />27.10. Active Directory Authentication (Non-Kerberos)
See Example of LDAP Login Module Configuration for a non-Kerberos Active Directory Authentication configuration example.
27.11. Active Directory Authentication Using Kerberos (GSSAPI)
When using Red Hat JBoss Data Grid with Microsoft Active Directory, data security can be enabled via Kerberos authentication. To configure Kerberos authentication for Microsoft Active Directory, use the following procedure.
Configure Kerberos Authentication for Active Directory (Library Mode)
Configure JBoss EAP server to authenticate itself to Kerberos. This can be done by configuring a dedicated security domain, for example:
Copy to Clipboard Copied! Toggle word wrap Toggle overflow The security domain for authentication must be configured correctly for JBoss EAP, an application must have a valid Kerberos ticket. To initiate the Kerberos ticket, you must reference another security domain using
<module-option name="usernamePasswordDomain" value="krb-admin"/>
<module-option name="usernamePasswordDomain" value="krb-admin"/>Copy to Clipboard Copied! Toggle word wrap Toggle overflow This points to the standard Kerberos login module described in Step 3.
Copy to Clipboard Copied! Toggle word wrap Toggle overflow The security domain authentication configuration described in the previous step points to the following standard Kerberos login module:
Copy to Clipboard Copied! Toggle word wrap Toggle overflow
27.12. The Security Audit Logger
27.12.1. The Security Audit Logger
Red Hat JBoss Data Grid includes a logger to audit security logs for the cache, specifically whether a cache or a cache manager operation was allowed or denied for various operations.
The default audit logger is org.infinispan.security.impl.DefaultAuditLogger. This logger outputs audit logs using the available logging framework (for example, JBoss Logging) and provides results at the TRACE level and the AUDIT category.
To send the AUDIT category to either a log file, a JMS queue, or a database, use the appropriate log appender.
27.12.2. Configure the Security Audit Logger (Library Mode)
Use the following to configure the audit logger in Red Hat JBoss Data Grid:
27.12.3. Configure the Security Audit Logger (Remote Client-Server Mode)
Use the following code to configure the audit logger in Red Hat JBoss Data Grid Remote Client-Server Mode.
To use a different audit logger, specify it in the authorization element. The authorization element must be within the cache-container element in the Infinispan subsystem (in the standalone.xml configuration file).
The default audit logger for server mode is org.jboss.as.clustering.infinispan.subsystem.ServerAuditLogger which sends the log messages to the server audit log. See the Management Interface Audit Logging chapter in the JBoss Enterprise Application Platform Administration and Configuration Guide for more information.
27.12.4. Custom Audit Loggers
Users can implement custom audit loggers in Red Hat JBoss Data Grid Library and Remote Client-Server Mode. The custom logger must implement the org.infinispan.security.AuditLogger interface. If no custom logger is provided, the default logger (DefaultAuditLogger) is used.