Este contenido no está disponible en el idioma seleccionado.
Chapter 59. Defining data tables for guided rule templates
After you create a guided rule template and add template keys for field values, a data table is displayed in the Data table of the guided rule templates designer. Each column in the data table corresponds to a template key that you added in the guided rule template. Use this table to define values for each template key row by row. Each row of values that you define in the data table for that template results in a rule.
Procedure
In the guided rule templates designer, click the Data tab to view the data table. Each column in the data table corresponds to a template key that you added in the guided rule template.
NoteIf you did not add any template keys to the rule template, then this data table does not appear and the template does not function as a genuine template but essentially as an individual guided rule. For this reason, template keys are fundamental in creating guided rule templates.
- Click Add row and define the data values for each template key column to generate that rule (row).
Continue adding rows and defining data values for each rule that will be generated. You can click Add row for each new row, or click the plus icon (
 ) or minus icon to add or remove rows.
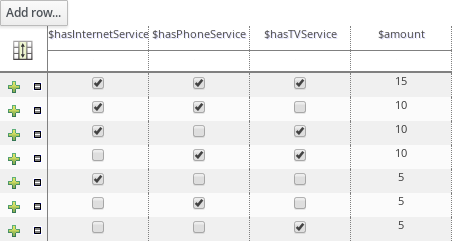
Figure 59.1. Sample data table for a guided rule template
To view the DRL code, click the Source tab in the guided rule templates designer.
Example:
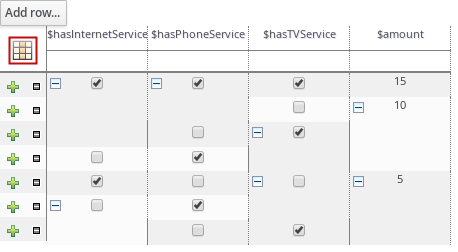
Copy to Clipboard Copied! Toggle word wrap Toggle overflow As a visual aid, click the grid icon in the upper-left corner of the data table to toggle cell merging on and off, if needed. Cells in the same column with identical values are merged into a single cell.
Figure 59.2. Merge cells in a data table
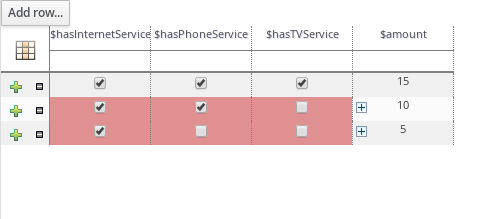
You can then use the expand/collapse icon [+/-] in the upper-left corner of each newly merged cell to collapse the rows corresponding to the merged cell, or to re-expand the collapsed rows.
Figure 59.3. Collapse merged cells
- After you define the template key data for all rules and adjust the table display as needed, click Validate in the upper-right toolbar of the guided rule templates designer to validate the guided rule template. If the rule template validation fails, address any problems described in the error message, review all components in the rule template and data defined in the data table, and try again to validate the rule template until the rule template passes.
- Click Save in the guided rule templates designer to save your work.