Este contenido no está disponible en el idioma seleccionado.
3.5. Configuring Fence Devices
Configuring fence devices consists of creating, modifying, and deleting fence devices. Creating a fence device consists of selecting a fence device type and entering parameters for that fence device (for example, name, IP address, login, and password). Modifying a fence device consists of selecting an existing fence device and changing parameters for that fence device. Deleting a fence device consists of selecting an existing fence device and deleting it.
Note
If you are creating a new cluster, you can create fence devices when you configure cluster nodes. Refer to Section 3.6, “Configuring Cluster Members”.
With Conga you can create shared and non-shared fence devices. For information on supported fence devices and their parameters, refer to Appendix B, Fence Device Parameters.
This section provides procedures for the following tasks:
- Creating shared fence devices — Refer to Section 3.5.1, “Creating a Shared Fence Device”. The procedures apply only to creating shared fence devices. You can create non-shared (and shared) fence devices while configuring nodes (refer to Section 3.6, “Configuring Cluster Members”).
- Modifying or deleting fence devices — Refer to Section 3.5.2, “Modifying or Deleting a Fence Device”. The procedures apply to both shared and non-shared fence devices.
The starting point of each procedure is at the cluster-specific page that you navigate to from Choose a cluster to administer displayed on the tab.
3.5.1. Creating a Shared Fence Device
Copiar enlaceEnlace copiado en el portapapeles!
To create a shared fence device, follow these steps:
- At the detailed menu for the cluster (below the menu), click . Clicking causes the display of the fence devices for a cluster and causes the display of menu items for fence device configuration: and .
Note
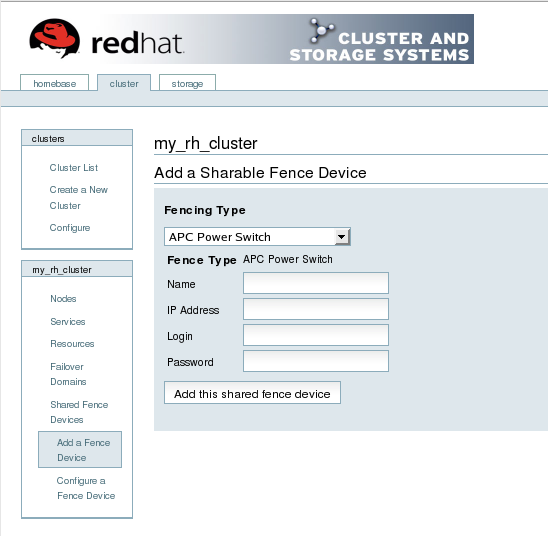
If this is an initial cluster configuration, no fence devices have been created, and therefore none are displayed. - Click . Clicking causes the Add a Sharable Fence Device page to be displayed (refer to Figure 3.1, “Fence Device Configuration”).
Figure 3.1. Fence Device Configuration
- At the Add a Sharable Fence Device page, click the drop-down box under and select the type of fence device to configure.
- Specify the information in the Fencing Type dialog box according to the type of fence device. Refer to Appendix B, Fence Device Parameters for more information about fence device parameters.
- Click .Clicking causes a progress page to be displayed temporarily. After the fence device has been added, the detailed cluster properties menu is updated with the fence device under .
3.5.2. Modifying or Deleting a Fence Device
Copiar enlaceEnlace copiado en el portapapeles!
To modify or delete a fence device, follow these steps:
- At the detailed menu for the cluster (below the menu), click . Clicking causes the display of the fence devices for a cluster and causes the display of menu items for fence device configuration: and .
- Click . Clicking causes the display of a list of fence devices under .
- Click a fence device in the list. Clicking a fence device in the list causes the display of a Fence Device Form page for the fence device selected from the list.
- Either modify or delete the fence device as follows:
- To modify the fence device, enter changes to the parameters displayed. Refer to Appendix B, Fence Device Parameters for more information about fence device parameters. Click and wait for the configuration to be updated.
- To delete the fence device, click and wait for the configuration to be updated.
Note
You can create shared fence devices on the node configuration page, also. However, you can only modify or delete a shared fence device via at the detailed menu for the cluster (below the menu).
