Este contenido no está disponible en el idioma seleccionado.
Chapter 6. Adding another route to the routing context
This tutorial shows you how to add a second route to the camel context in the ZooOrderApp project’s blueprint.xml file. The second route:
- Takes messages (valid orders) directly from the terminal end of the first route’s otherwise branch.
- Sorts the valid messages according to the customer’s country.
-
Sends each message to the corresponding
countryfolder in theZooOrderApp/target/messagesfolder. For example, an order from the Chicago zoo is copied to the USA folder.
Goals
In this tutorial you complete the following tasks:
- Reconfigure the existing route for direct connection to a second route
- Add a second route to your Camel context
- Configure the second route to take messages directly from the otherwise branch of the first route
- Add a content-based router to the second route
- Add and configure a message header, logging, and target destination to each output branch of the second route’s content-based router
Prerequisites
To start this tutorial, you need the ZooOrderApp project resulting from one of the following:
Complete the Chapter 5, Adding a Content-Based Router tutorial.
or
-
Complete the Chapter 2, Setting up your environment tutorial and replace your project’s
blueprint.xmlfile with the providedblueprintContexts/blueprint2.xmlfile, as described in the section called “About the resource files”.
Reconfiguring the existing route’s endpoint
The existing route sends all valid orders to the target/messages/validOrders folder.
In this section, you reconfigure the endpoint of the existing route’s Otherwise _elseValid branch to instead connect to a second route (which you create in the next section).
To configure the existing route for direct connection with the second route:
-
Open your
ZooOrderApp/src/main/resources/OSGI-INF/blueprint/blueprint.xmlin the route editor. - On the canvas, select the Route_route1 container to open its properties in the Properties view.
- Scroll down to the Shutdown Route property and then select Default.
- On the canvas, select the terminal file node To_Valid to display its properties in the Properties view.
-
In the Uri field, delete the existing text, and then enter
direct:OrderFulfillment. -
In the Id field, enter
_Fulfill.
Instead of repurposing the existing To_Valid terminal file node, you could have replaced it with a Components To_Valid node.
To learn more about the Direct component see the Apache Camel Component Reference.
Adding the second route
To add another route to the routing context:
-
In the Palette, open the Routing drawer and then click the Route (
 ) pattern.
In the canvas, click to the right of the
Route_route1container:
The Route pattern becomes the
Route_route2container node on the canvas.-
Click the
Route_route2container node to display its properties in the Properties view. Leave the properties as they are. - Save the file.
As your routing context grows in complexity, you might want to focus the route editor on an individual route while you work on it. To do so, in Project Explorer, double-click the route that you want the route editor to display on the canvas; for example Route_route2:

To display all routes in the routing context on the canvas, double-click the project’s .xml context file entry (src/main/resources/OSGI-INF/…) at the top of the Camel Contexts folder.
Configuring a Choice branch to process USA orders
In this section, you add a Choice branch to the route and configure the route to send USA orders to a new target/messages/validOrders/USA folder. You also set a message header and a log file component.
-
In the Palette, open the Components drawer and then select the Direct component (
 ).
).
In the canvas, click the
Route_route2container:The
Route_route2container expands to accommodate the Direct component (theFrom_from2node):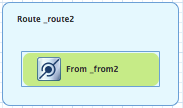
-
On the canvas, click the
From_from2node to open its properties in the Properties view. In the Uri field, replace
name(followingdirect:) withOrderFulfillment, and in the Id field, enter_direct:OrderFulfillment.
-
In the Palette, open the Routing drawer and then select the Choice (
 ) pattern.
In the canvas, click the
From _direct:OrderFulfillmentnode.The
Route_route2container expands to accommodate theChoice_choice2node: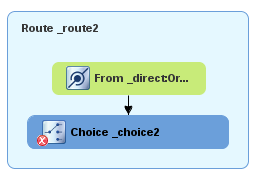
In the Properties view, leave the
Choice_choice2node’s properties as they are.-
In the Palette, open the Routing drawer and then select the When (
 ) pattern.
In the canvas, click the
Choice_choice2node.The
Choice_choice2container expands to accommodate theWhen_when2node.
-
On the canvas, select the
When_when2node to open its properties in the Properties view. Set the
When_when2node’s properties as follows:- Select xpath from the Expression drop-down list.
-
In the indented Expression field, type
/order/customer/country = 'USA'. - Leave Trim enabled.
In the second Id field, type
_when/usa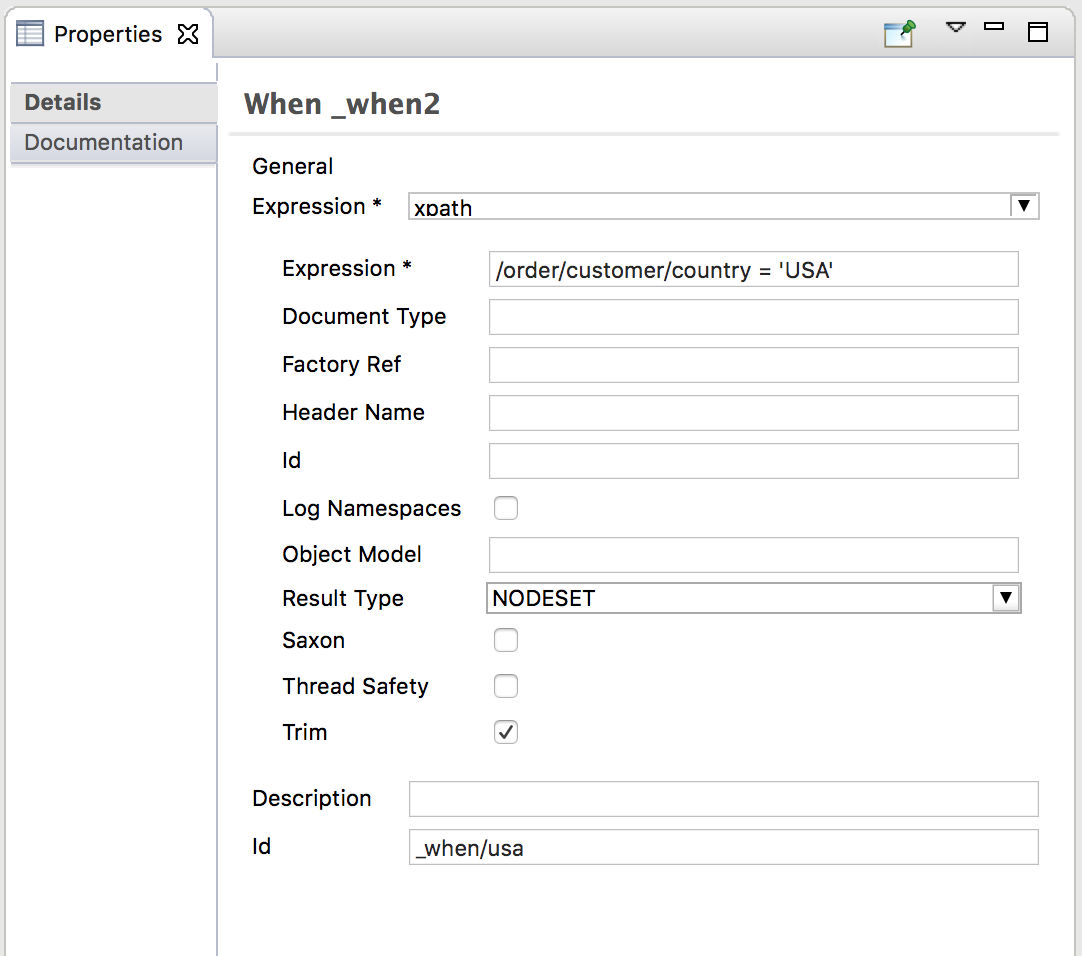
-
In the Palette, open the Components drawer and then select the File component (
 ).
).
In the canvas, click the
When_when/usacontainer.The
When_when/usacontainer expands to accommodate theTo_to1node.In the Properties view:
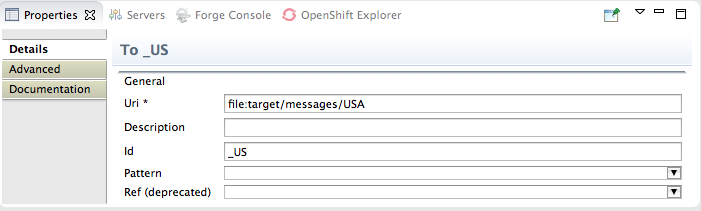
-
In the Uri field, replace
directoryNamewithtarget/messages/validOrders/USA. -
In the Id field, type
_US.
-
In the Uri field, replace
- Save the file.
To set a message header and add a log component:
- In the Palette, open the Transformation drawer and then select the Set Header pattern.
In the canvas, click the
When_when/usanode.The
When_when/usacontainer expands to accommodate theSetHeader_setHeader3node: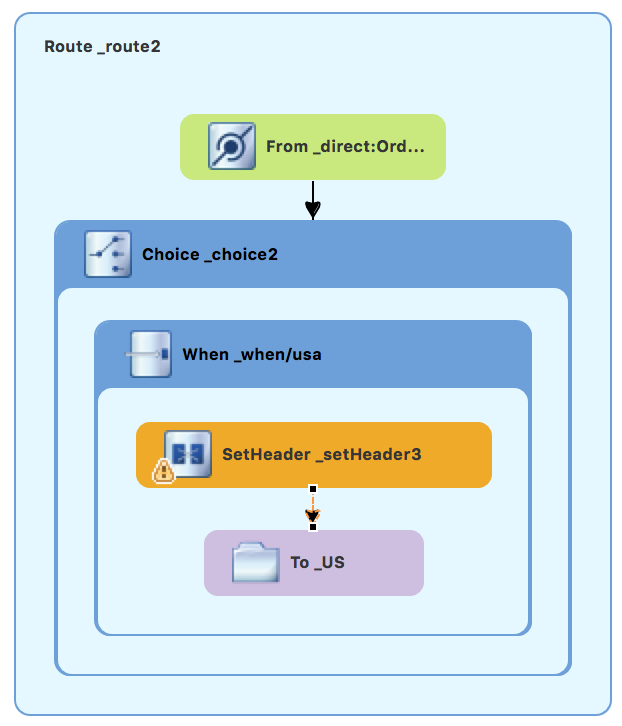
-
On the canvas, select the
SetHeader_setHeader3node to open its properties in the Properties view. Set the node’s properties as follows:
- From the Expression drop-down menu, select constant.
-
In the indented Expression field, type:
USA - Leave Trim enabled.
-
In the Header Name field, type:
Destination In the second Id field, type:
_setHead_usa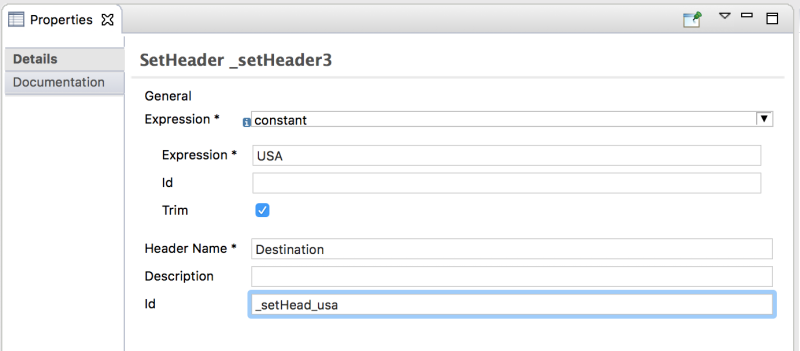
-
In the Palette, open the Components drawer and then select the Log component (
 ).
).
In the canvas, click above the
SetHeadernode.The
When_when/usacontainer expands to accommodate theLog_log3node.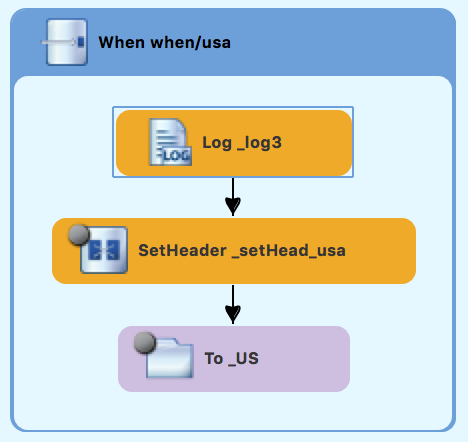
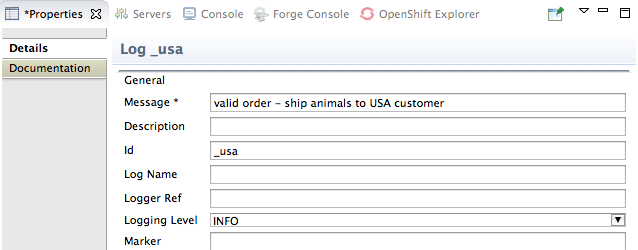
On the canvas, select the
Log_log3node to open its properties in the Properties view:
In the Properties view:
-
In the Message field, type
Valid order - ship animals to USA customer. -
In the Id field, type
_usa. Leave Logging Level as is.
-
In the Message field, type
Save the file.
The USA branch of
Route_route2should look like this: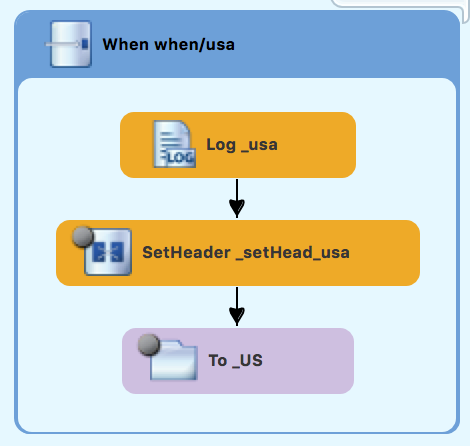
Configuring an Otherwise branch to process Germany orders
With Route_route2 displayed on the canvas:
-
In the Palette, open the Routing drawer and then select the Otherwise pattern (
).
In the canvas, click the
Choice_choice2container.The
Choice_choice2container expands to accommodate theOtherwise_otherwise1node.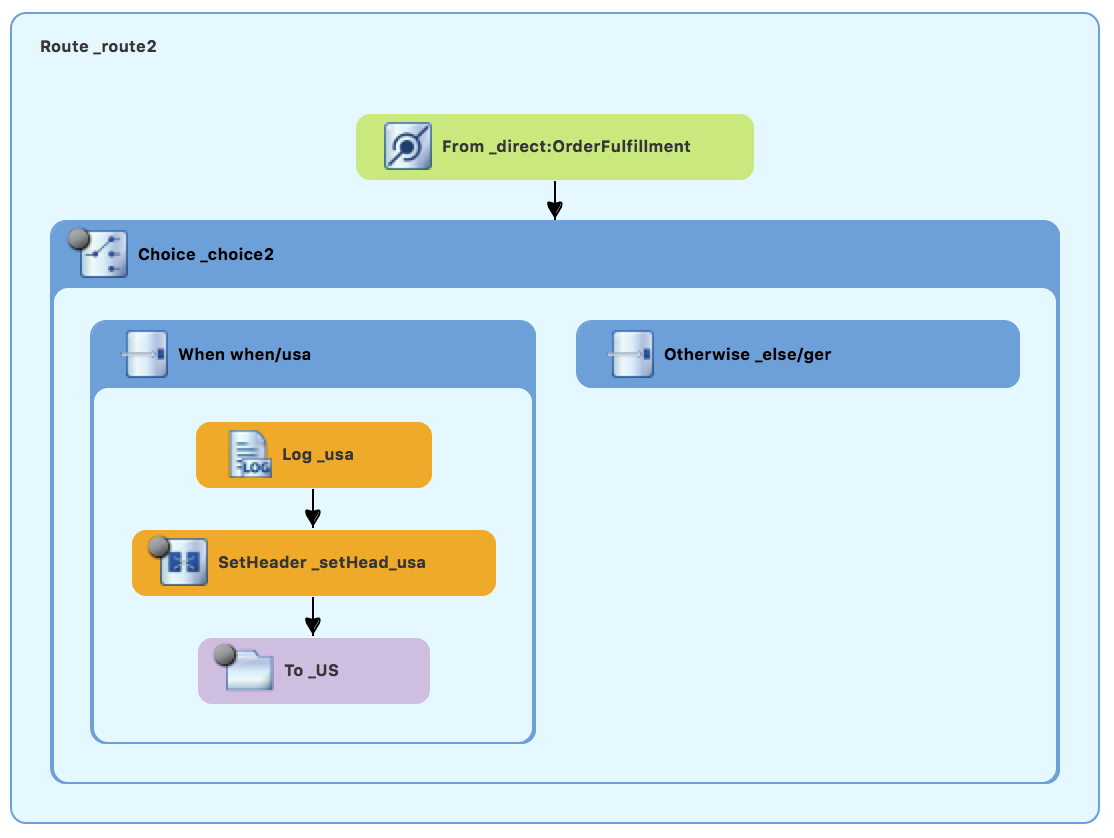
-
Select the
Otherwise_otherwise1node to open its properties in the Properties view. -
In the Properties view, enter
_else/gerfor the Id field. -
In the Palette, open the Transformation drawer and then select the Set Header pattern (
 ).
).
In the canvas, click the
Otherwise_else/gernode.The
Otherwise_else/gercontainer expands to accommodate theSetHeader_setHeader3node.
-
On the canvas, select the
SetHeader_setHeader3node to open its properties in the Properties view. In the Properties view:
- From the Expression drop-down list, select constant.
-
In the second Expression field, type
Germany. - Leave Trim as is.
-
In the Header Name field, type
Destination. -
In the second Id field, type
_setHead_ger.
-
In the Palette, open the Components drawer and then select the Log pattern (
).
In the canvas, click below the
SetHeader_setHead_gernode.The
Otherwise_else/gercontainer expands to accommodate theLog_log3node. If needed, drag the connector error from theLog_log3node to theSetHeader_setHead_gernode:
-
On the canvas, select the
Log_log3node to open its properties in the Properties view. In the Properties view:
-
In the Message field, type
Valid order - ship animals to Germany customer. -
In the Id field, type
_ger. - Leave the Logging Level as is.
-
In the Message field, type
In the Components drawer, select a File pattern (
) and then click below the Log_gernode.The
Otherwise_else/gercontainer expands to accommodate theTo_to1node. If needed, drag the connector error from theSetHeader_setHead_gernode to theTo_to1node:
-
On the canvas, select the
To_to1node to open its properties in the Properties view. In the Properties view:
-
In the Uri field, replace
directoryNamewithtarget/messages/validOrders/Germany -
In the Id field, type
_GER.
-
In the Uri field, replace
- Save the file.
The Germany branch of Route_route2 should look like this:

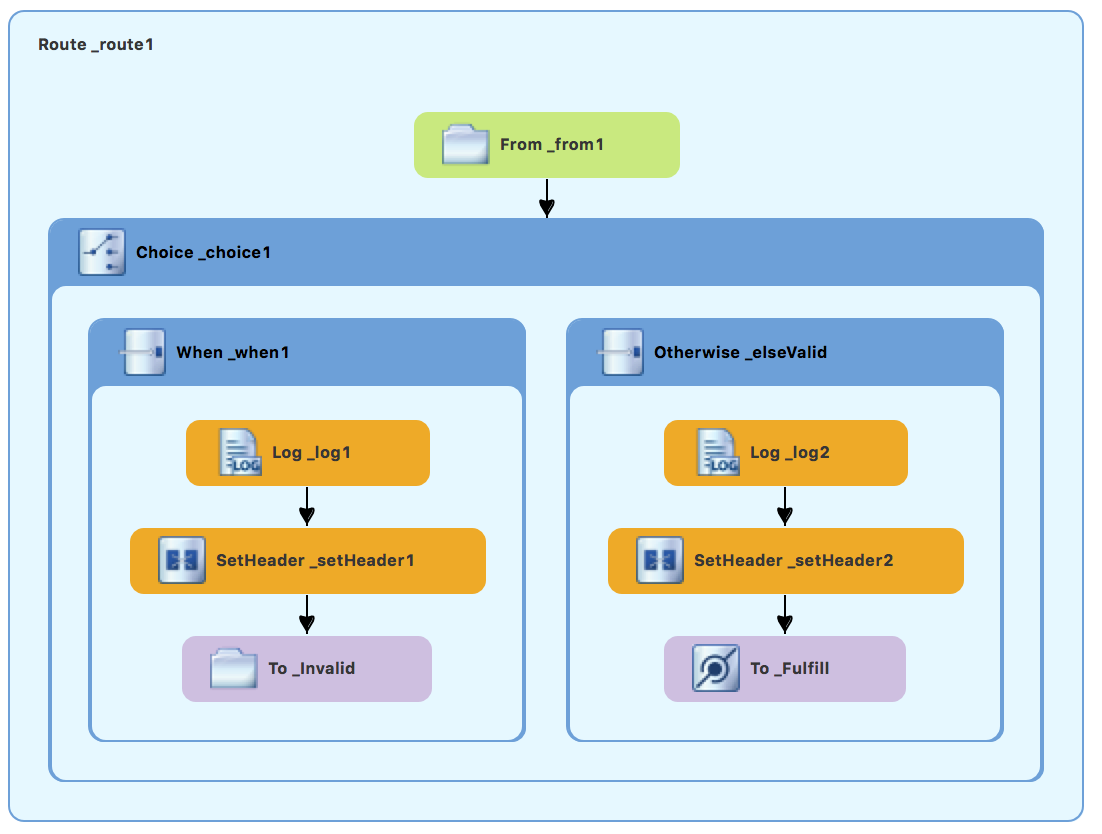
Verifying the second route
The routes on the canvas should look like this:
Completed route1
Completed route2

In the Source tab at the bottom of the canvas, the XML for the camelContext element should look like that shown in Example 6.1, “XML for dual-route content-based router”:
Example 6.1. XML for dual-route content-based router
<?xml version="1.0" encoding="UTF-8"?>
<blueprint xmlns="http://www.osgi.org/xmlns/blueprint/v1.0.0"
xmlns:xsi="http://www.w3.org/2001/XMLSchema-instance"
xsi:schemaLocation="http://www.osgi.org/xmlns/blueprint/v1.0.0
https://www.osgi.org/xmlns/blueprint/v1.0.0/blueprint.xsd
http://camel.apache.org/schema/blueprint
http://camel.apache.org/schema/blueprint/camel-blueprint.xsd">
<camelContext id="_context1" xmlns="http://camel.apache.org/schema/blueprint">
<route id="_route1" shutdownRoute="Default">
<from id="_from1" uri="file:src/data?noop=true"/>
<choice id="_choice1">
<when id="_when1">
<xpath>/order/orderline/quantity/text() > 10</xpath>
<log id="_log1" message="The quantity requested exceeds the maximum allowed - contact customer."/>
<setHeader headerName="Destination" id="_setHeader1">
<constant>Invalid</constant>
</setHeader>
<to id="_Invalid" uri="file:target/messages/invalidOrders"/>
</when>
<otherwise id="_elseValid">
<log id="_log2" message="This is a valid order - OK to process."/>
<setHeader headerName="Destination" id="_setHeader2">
<constant>ReadyForDispatcher</constant>
</setHeader>
<to id="_Fulfill" uri="direct:OrderFulfillment"/>
</otherwise>
</choice>
</route>
<route id="_route2">
<from id="_direct:OrderFulfillment" uri="direct:OrderFulfillment"/>
<choice id="_choice2">
<when id="when/usa">
<xpath>/order/customer/country = 'USA'</xpath>
<log id="_usa" message="Valid order - ship animals to USA customer"/>
<setHeader headerName="Destination" id="_setHead_usa">
<constant>USA</constant>
</setHeader>
<to id="_US" uri="file:target/messages/validOrders/USA"/>
</when>
<otherwise id="_else/ger">
<log id="_ger" message="Valid order - ship animals to Germany customer"/>
<setHeader headerName="Destination" id="_setHead_ger">
<constant>Germany</constant>
</setHeader>
<to id="_GER" uri="file:target/messages/validOrders/Germany"/>
</otherwise>
</choice>
</route>
</camelContext>
</blueprint>
If the tooling added the attribute shutdownRoute=" " to the second route element (<route id="route2">), delete that attribute. Otherwise, the ZooOrderApp project might fail to run.
To make sure that your updated project works as expected, follow these steps:
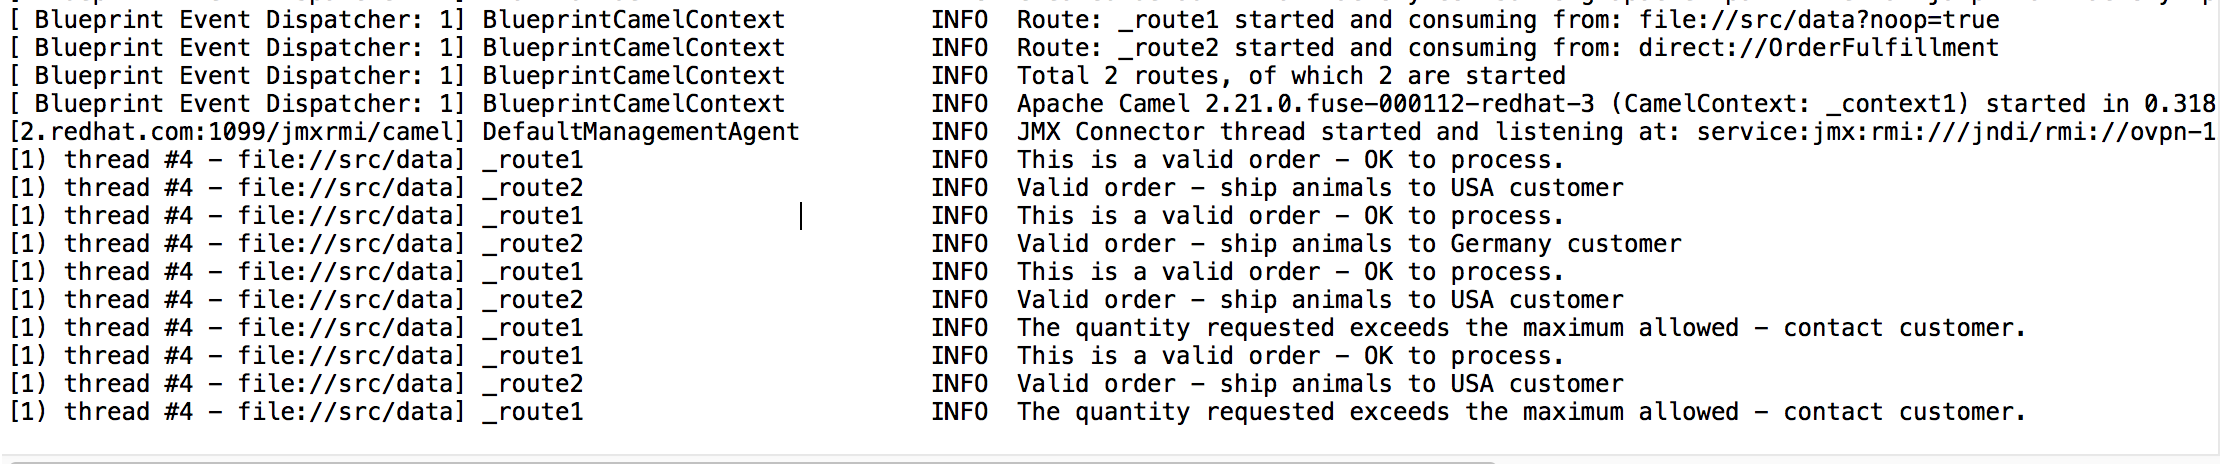
-
Run the
ZooOrderApp/Camel Contexts/blueprint.xmlas a local Camel Context (without tests). Check the end of the Console’s output. You should see these lines:
Check the target destination folders to verify that the routes executed properly:
-
In Project Explorer, right-click
ZooOrderAppand then select Refresh. Expand the
target/messages/folder.The
message*.xmlfiles should be dispersed in your the destinations as shown:Figure 6.1. Target message destinations in Project Explorer

-
In Project Explorer, right-click
Next steps
In the next tutorial, Chapter 7, Debugging a routing context, you learn how to use the Fuse Tooling debugger.