Este contenido no está disponible en el idioma seleccionado.
Chapter 9. Testing a route with JUnit
This tutorial shows you how to use the New Camel Test Case wizard to create a test case for your route and then test the route.
Overview
The New Camel Test Case wizard generates a boilerplate JUnit test case. When you create or modify a route (for example, adding more processors to it), you should create or modify the generated test case to add expectations and assertions specific to the route that you created or updated. This ensures that the test is valid for the route.
Goals
In this tutorial you complete the following tasks:
-
Create the
/src/test/folder to store the JUnit test case -
Generate the JUnit test case for the
ZooOrderAppproject - Modify the newly generated JUnit test case
-
Modify the
ZooOrderAppproject’spom.xmlfile -
Run the
ZooOrderAppwith the new JUnit test case - Observe the output
Prerequisites
To start this tutorial, you need the ZooOrderApp project resulting from one of the following:
Complete the Chapter 8, Tracing a message through a route tutorial.
or
-
Complete the Chapter 2, Setting up your environment tutorial and replace your project’s
blueprint.xmlfile with the providedblueprintContexts/blueprint3.xmlfile, as described in the section called “About the resource files”.
Delete any trace-generated messages from the
ZooOrderAppproject’s/src/data/directory and/target/messages/subdirectories in Project Explorer. Trace-generated messages begin with theID-prefix. For example, Figure 9.1, “Trace-generated messages” shows eight trace-generated messages:Figure 9.1. Trace-generated messages

Select all trace-generated messages in batch, right-click and then select Delete.
Creating the src/test folder
Before you create a JUnit test case for the ZooOrderApp project, you must create a folder for it that is included in the build path:
-
In Project Explorer, right-click the
ZooOrderAppproject and then select NewFolder. In the New Folder dialog, in the project tree pane, expand the
ZooOrderAppnode and select thesrcfolder.Make sure
ZooOrderApp/srcappears in the Enter or select the parent folder field.In Folder name, enter
/test/java:
Click Finish.
In Project Explorer, the new
src/test/javafolder appears under thesrc/main/resourcesfolder:
Verify that the new
/src/test/javafolder is included in the build path.-
In Project Explorer, right-click the
/src/test/javafolder to open the context menu. Select Build Path to see the menu options:
The menu option Remove from Build Path verifies that the
/src/test/javafolder is currently included in the build path:
-
In Project Explorer, right-click the
Creating the JUnit test case
To create a JUnit test case for the ZooOrderApp project:
-
In Project Explorer, select
src/test/java. Right-click and then select New
Camel Test Case. 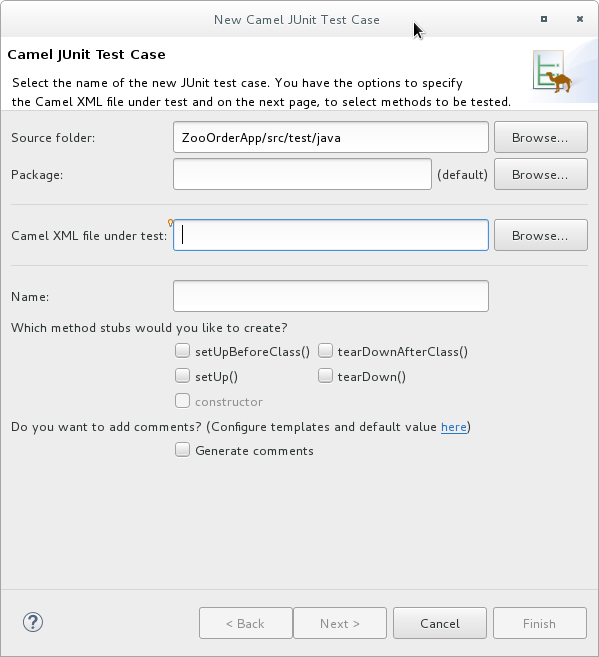
-
In the Camel JUnit Test Case wizard, make sure the
Source folderfield containsZooOrderApp/src/test/java. To find the proper folder, click .
.
-
In the Package field, enter
tutorial.zooapp.route. This package will include the new test case. In the Camel XML file under test field, click
to open a file explorer configured to filter for XML files, and then select the ZooOrderAppproject’sblueprint.xmlfile:
Click OK. The Name field defaults to BlueprintXmlTest.

Click Next to open the Test Endpoints page.
By default, all endpoints are selected and will be included in the test case.
Click Finish.
NoteIf prompted, add JUnit to the build path.
The artifacts for the test are added to your project and appear in Project Explorer under src/test/java. The class implementing the test case opens in the tooling’s Java editor:
package tutorial.zooapp.route;

import org.apache.camel.EndpointInject;
import org.apache.camel.Produce;
import org.apache.camel.ProducerTemplate;
import org.apache.camel.builder.RouteBuilder;
import org.apache.camel.component.mock.MockEndpoint;
import org.apache.camel.test.blueprint.CamelBlueprintTestSupport;
import org.junit.Test;

public class BlueprintXmlTest extends CamelBlueprintTestSupport {

	// TODO Create test message bodies that work for the route(s) being tested
	// Expected message bodies
	protected Object[] expectedBodies = { "<something id='1'>expectedBody1</something>",
			"<something id='2'>expectedBody2</something>" };
	// Templates to send to input endpoints
	@Produce(uri = "file:src/data?noop=true")
	protected ProducerTemplate inputEndpoint;
	@Produce(uri = "direct:OrderFulfillment")
	protected ProducerTemplate input2Endpoint;
	// Mock endpoints used to consume messages from the output endpoints and then perform assertions
	@EndpointInject(uri = "mock:output")
	protected MockEndpoint outputEndpoint;
	@EndpointInject(uri = "mock:output2")
	protected MockEndpoint output2Endpoint;
	@EndpointInject(uri = "mock:output3")
	protected MockEndpoint output3Endpoint;
	@EndpointInject(uri = "mock:output4")
	protected MockEndpoint output4Endpoint;

	@Test
	public void testCamelRoute() throws Exception {
		// Create routes from the output endpoints to our mock endpoints so we can assert expectations
		context.addRoutes(new RouteBuilder() {
			@Override
			public void configure() throws Exception {
				from("file:target/messages/invalidOrders").to(outputEndpoint);
				from("file:target/messages/validOrders/USA").to(output3Endpoint);
				from("file:target/messages/validOrders/Germany").to(output4Endpoint);
			}
		});

		// Define some expectations

		// TODO Ensure expectations make sense for the route(s) we're testing
		outputEndpoint.expectedBodiesReceivedInAnyOrder(expectedBodies);

		// Send some messages to input endpoints
		for (Object expectedBody : expectedBodies) {
			inputEndpoint.sendBody(expectedBody);
		}

		// Validate our expectations
		assertMockEndpointsSatisfied();
	}

	@Override
	protected String getBlueprintDescriptor() {
		return "OSGI-INF/blueprint/blueprint.xml";
	}

}
This generated JUnit test case is insufficient for the ZooOrderApp project, and it will fail to run successfully. You need to modify it and the project’s pom.xml, as described in the section called “Modifying the BlueprintXmlTest file” and the section called “Modifying the pom.xml file”.
Modifying the BlueprintXmlTest file
You must modify the BlueprintXmlTest.java file to:
- Import several classes that support required file functions
-
Create variables for holding the content of the various source
.xmlfiles -
Read the content of the source
.xmlfiles - Define appropriate expectations
Follow these steps to modify the BlueprintXmlTest.java file:
In Project Explorer, expand the
ZooOrderAppproject to expose theBlueprintXmlTest.javafile:
-
Open the
BlueprintXmlTest.javafile. -
In the Java editor, click the expand button next to
import org.apache.camel.EndpointInject;to expand the list. Add the two lines shown in bold text. Adding the first line causes an error that will be resolved when you update the
pom.xmlfile as instructed in the next section.package tutorial.zooapp.route; import org.apache.camel.EndpointInject; import org.apache.camel.Produce; import org.apache.camel.ProducerTemplate; import org.apache.camel.builder.RouteBuilder; import org.apache.camel.component.mock.MockEndpoint; import org.apache.camel.test.blueprint.CamelBlueprintTestSupport; import org.apache.commons.io.FileUtils; import org.junit.Test; import java.io.File;-
Scroll down to the lines that follow directly after
// Expected message bodies. Replace those lines —
protected Object[] expectedBodies={ …… expectedBody2</something>"};— with theseprotected String body#;lines:protected String body1; protected String body2; protected String body3; protected String body4; protected String body5; protected String body6;Scroll down to the line
public void testCamelRoute() throws Exception {, and insert directly after it the linesbody# = FileUtils.readFileToString(new File("src/data/message#.xml"), "UTF-8");shown below. These lines will indicate an error until you update thepom.xmlfile as instructed in the next section.// Valid orders body2 = FileUtils.readFileToString(new File("src/data/message2.xml"), "UTF-8"); body4 = FileUtils.readFileToString(new File("src/data/message4.xml"), "UTF-8"); body5 = FileUtils.readFileToString(new File("src/data/message5.xml"), "UTF-8"); body6 = FileUtils.readFileToString(new File("src/data/message6.xml"), "UTF-8"); // Invalid orders body1 = FileUtils.readFileToString(new File("src/data/message1.xml"), "UTF-8"); body3 = FileUtils.readFileToString(new File("src/data/message3.xml"), "UTF-8");-
Scroll down to the lines that follow directly after
// TODO Ensure expectations make sense for the route(s) we’re testing. Replace the block of code that begins with
outputEndpoint.expectedBodiesReceivedInAnyOrder(expectedBodies);and ends with …inputEndpoint.sendBody(expectedBody); }with the lines shown here:// Invalid orders outputEndpoint.expectedBodiesReceived(body1, body3); // Valid orders for USA output3Endpoint.expectedBodiesReceived(body2, body5, body6); // Valid order for Germany output4Endpoint.expectedBodiesReceived(body4);Leave the remaining code as is.
- Save the file.
Check that your updated
BlueprintXmlTest.javafile has the required modifications. It should look something like this:package tutorial.zooapp.route; import org.apache.camel.EndpointInject; import org.apache.camel.Produce; import org.apache.camel.ProducerTemplate; import org.apache.camel.builder.RouteBuilder; import org.apache.camel.component.mock.MockEndpoint; import org.apache.camel.test.blueprint.CamelBlueprintTestSupport; import org.apache.commons.io.FileUtils; import org.junit.Test; import java.io.file; public class BlueprintXmlTest extends CamelBlueprintTestSupport { // TODO Create test message bodies that work for the route(s) being tested // Expected message bodies protected String body1; protected String body2; protected String body3; protected String body4; protected String body5; protected String body6; // Templates to send to input endpoints @Produce(uri = "file:src/data?noop=true") protected ProducerTemplate inputEndpoint; @Produce(uri = "direct:OrderFulfillment") protected ProducerTemplate input2Endpoint; // Mock endpoints used to consume messages from the output endpoints and then perform assertions @EndpointInject(uri = "mock:output") protected MockEndpoint outputEndpoint; @EndpointInject(uri = "mock:output2") protected MockEndpoint output2Endpoint; @EndpointInject(uri = "mock:output3") protected MockEndpoint output3Endpoint; @EndpointInject(uri = "mock:output4") protected MockEndpoint output4Endpoint; @Test public void testCamelRoute() throws Exception { // Create routes from the output endpoints to our mock endpoints so we can assert expectations context.addRoutes(new RouteBuilder() { @Override public void configure() throws Exception { // Valid orders body2 = FileUtils.readFileToString(new File("src/data/message2.xml"), "UTF-8"); body4 = FileUtils.readFileToString(new File("src/data/message4.xml"), "UTF-8"); body5 = FileUtils.readFileToString(new File("src/data/message5.xml"), "UTF-8"); body6 = FileUtils.readFileToString(new File("src/data/message6.xml"), "UTF-8"); // Invalid orders body1 = FileUtils.readFileToString(new File("src/data/message1.xml"), "UTF-8"); body3 = FileUtils.readFileToString(new File("src/data/message3.xml"), "UTF-8"); from("file:target/messages/invalidOrders").to(outputEndpoint); from("file:target/messages/validOrders/USA").to(output3Endpoint); from("file:target/messages/validOrders/Germany").to(output4Endpoint); from("direct:OrderFulfillment").to(output2Endpoint); } }); // Define some expectations // TODO Ensure expectations make sense for the route(s) we're testing // Invalid orders outputEndpoint.expectedBodiesReceived(body1, body3); // Valid orders for USA output3Endpoint.expectedBodiesReceived(body2, body5, body6); // Valid order for Germany output4Endpoint.expectedBodiesReceived(body4); // Validate our expectations assertMockEndpointsSatisfied(); } @Override protected String getBlueprintDescriptor() { return "OSGI-INF/blueprint/blueprint.xml"; } }
Modifying the pom.xml file
You need to add a dependency on the commons-io project to the ZooOrderApp project’s pom.xml file:
-
In Project Explorer, select the
pom.xml, located below thetargetfolder, and open it in the tooling’s XML editor. -
Click the
pom.xmltab at the bottom of the page to open the file for editing. Add these lines to the end of the
<dependencies>section:<dependency> <groupId>commons-io</groupId> <artifactId>commons-io</artifactId> <version>2.5</version> <scope>test</scope> </dependency>- Save the file.
Running the JUnit test
To run the test:
- Switch to the JBoss perspective to free up more workspace.
-
In the Project Explorer, right-click the
ZooOrderAppproject. Select Run As
JUnit Test. By default, the JUnit view opens in the sidebar. (To provide a better view, drag it to the bottom, right panel that displays the Console, Servers, and Properties tabs.)
NoteSometimes the test fails the first time JUnit is run on a project. Rerunning the test ususally results in a successful outcome.
If the test runs successfully, you’ll see something like this:
Figure 9.2. Successful JUnit run

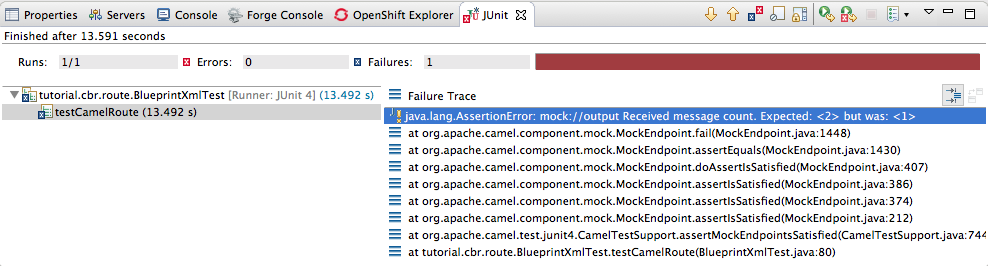
When the test does fail, you’ll see something like this:
Figure 9.3. Failed JUnit run
 Note
NoteJUnit will fail if your execution environment is not set to Java SE 8. The message bar at the top of the JUnit tab will display an error message indicating that it cannot find the correct SDK.
To resolve the issue, open the project’s context menu, and select Run As
Run Configurations JRE. Click the Environments] button next to the *Execution environment field to locate and select a Java SE 8 environment. Examine the output and take action to resolve any test failures.
To see more of the errors displayed in the JUnit panel, click
 on the panel’s menu bar to maximize the view.
Before you run the JUnit test case again, delete any JUnit-generated test messages from the ZooOrderApp project’s
/src/datafolder in Project Explorer (see Figure 9.1, “Trace-generated messages”).
Further reading
To learn more about JUnit testing see JUnit.
Next steps
In the Chapter 10, Publishing your project to Red Hat Fuse tutorial, you learn how to publish your Apache Camel project to Red Hat Fuse.