Este contenido no está disponible en el idioma seleccionado.
Chapter 2. Getting Started for administrators
If you are an OpenShift administrator, you can prepare an OpenShift cluster for Fuse on OpenShift deployments by:
- Configuring authentication to the Red Hat Container Registry.
- Installing the Fuse on OpenShift images and templates.
2.1. Configuring Red Hat Container Registry authentication
You must configure authentication to Red Hat container registry before you can import and use the Red Hat Fuse on OpenShift image streams and templates.
Procedure
Log in to the OpenShift Server as an administrator:
oc login -u system:admin
oc login -u system:adminCopy to Clipboard Copied! Toggle word wrap Toggle overflow Log in to the OpenShift project where you want to install the image streams. We recommend that you use the
openshiftproject for the Fuse on OpenShift image streams.oc project openshift
oc project openshiftCopy to Clipboard Copied! Toggle word wrap Toggle overflow Create a docker-registry secret using either your Red Hat Customer Portal account or your Red Hat Developer Program account credentials. Replace
<pull_secret_name>with the name of the secret that you wish to create.oc create secret docker-registry <pull_secret_name> \ --docker-server=registry.redhat.io \ --docker-username=CUSTOMER_PORTAL_USERNAME \ --docker-password=CUSTOMER_PORTAL_PASSWORD \ --docker-email=EMAIL_ADDRESS
oc create secret docker-registry <pull_secret_name> \ --docker-server=registry.redhat.io \ --docker-username=CUSTOMER_PORTAL_USERNAME \ --docker-password=CUSTOMER_PORTAL_PASSWORD \ --docker-email=EMAIL_ADDRESSCopy to Clipboard Copied! Toggle word wrap Toggle overflow NoteYou need to create a docker-registry secret in every new namespace where the image streams reside and in every namespace that uses registry.redhat.io.
To use the secret for pulling images for pods, add the secret to your service account. The name of the service account must match the name of the service account pod uses. Following example uses
defaultwhich is the default service account.oc secrets link default <pull_secret_name> --for=pull
oc secrets link default <pull_secret_name> --for=pullCopy to Clipboard Copied! Toggle word wrap Toggle overflow To use the secret for pushing and pulling build images, the secret must be mountable inside of a pod. To mount the secret, use following command:
oc secrets link builder <pull_secret_name>
oc secrets link builder <pull_secret_name>Copy to Clipboard Copied! Toggle word wrap Toggle overflow
If you do not want to use your Red Hat account username and password to create the secret, you should create an authentication token by using a registry service account.
For more information see:
2.2. Installing Fuse imagestreams and templates on the OpenShift 4.x server
Openshift Container Platform 4.1 uses the Samples Operator, which operates in the OpenShift namespace, installs and updates the Red Hat Enterprise Linux (RHEL)-based OpenShift Container Platform imagestreams and templates. To install the Fuse on OpenShift imagestreams and templates:
- Reconfigure the Samples Operator
Add Fuse imagestreams and templates to
Skipped Imagestreams and Skipped Templatesfields.- Skipped Imagestreams: Imagestreams that are in the Samples Operator’s inventory, but that the cluster administrator wants the Operator to ignore or not manage.
- Skipped Templates: Templates that are in the Samples Operator’s inventory, but that the cluster administrator wants the Operator to ignore or not manage.
Prerequisites
- You have access to OpenShift Server.
- You have configured authentication to the Red Hat Container Registry.
- Optionally, if you want the Fuse templates to be visible in the OpenShift dashboard after you install them, you must first install the service catalog and the template service broker as described in the OpenShift documentation (https://docs.openshift.com/container-platform/4.1/applications/service_brokers/installing-service-catalog.html).
Procedure
- Start the OpenShift 4 Server.
Log in to the OpenShift Server as an administrator.
oc login -u system:admin
oc login -u system:adminCopy to Clipboard Copied! Toggle word wrap Toggle overflow Verify that you are using the project for which you created a docker-registry secret.
oc project openshift
oc project openshiftCopy to Clipboard Copied! Toggle word wrap Toggle overflow View the current configuration of Samples operator.
oc get configs.samples.operator.openshift.io -n openshift-cluster-samples-operator -o yaml
oc get configs.samples.operator.openshift.io -n openshift-cluster-samples-operator -o yamlCopy to Clipboard Copied! Toggle word wrap Toggle overflow Configure Samples operator to ignore the fuse templates and image streams that are added.
oc edit configs.samples.operator.openshift.io -n openshift-cluster-samples-operator
oc edit configs.samples.operator.openshift.io -n openshift-cluster-samples-operatorCopy to Clipboard Copied! Toggle word wrap Toggle overflow Add the Fuse imagestreams Skipped Imagestreams section and add Fuse and Spring Boot 2 templates to Skipped Templates section.
Copy to Clipboard Copied! Toggle word wrap Toggle overflow Install Fuse on OpenShift image streams.
BASEURL=https://raw.githubusercontent.com/jboss-fuse/application-templates/application-templates-2.1.fuse-750056-redhat-00006

oc create -n openshift -f ${BASEURL}/fis-image-streams.json
BASEURL=https://raw.githubusercontent.com/jboss-fuse/application-templates/application-templates-2.1.fuse-750056-redhat-00006 oc create -n openshift -f ${BASEURL}/fis-image-streams.jsonCopy to Clipboard Copied! Toggle word wrap Toggle overflow NoteIf an error is displayed, with the message "Error from server (AlreadyExists): imagestreams.image.openshift.io <imagestreamname> already exists", use the following command to replace the existing imagestreams with the latest.
oc replace --force -n openshift -f ${BASEURL}/fis-image-streams.jsonoc replace --force -n openshift -f ${BASEURL}/fis-image-streams.jsonCopy to Clipboard Copied! Toggle word wrap Toggle overflow Install Fuse on OpenShift quickstart templates:
Copy to Clipboard Copied! Toggle word wrap Toggle overflow Install Spring Boot 2 quickstart templates:
Copy to Clipboard Copied! Toggle word wrap Toggle overflow (Optional) View the installed Fuse on OpenShift templates:
oc get template -n openshift
oc get template -n openshiftCopy to Clipboard Copied! Toggle word wrap Toggle overflow
2.2.1. Setting up the Fuse Console on OpenShift 4.x
On OpenShift 4.x, setting up the Fuse Console involves securing, installing, and deploying it.
First, you must generate a client certificate so that you can secure the Fuse Console as described in Section 2.2.1.1, “Generating a certificate to secure the Fuse Console on OpenShift 4.x”.
After you generate the client certificate, you can use the command line and one of the Fuse Console templates to install and deploy the Fuse Console so that it has access to Fuse applications in multiple namespaces on the OpenShift cluster or in a specific namespace.
- User management for the Fuse Console is handled by OpenShift.
- Role-based access control (for users accessing the Fuse Console after it is deployed) is not yet available for Fuse on OpenShift.
2.2.1.1. Generating a certificate to secure the Fuse Console on OpenShift 4.x
On OpenShift 4.x, to keep the connection between the Fuse Console proxy and the Jolokia agent secure, you must generate a client certificate before you deploy the Fuse Console. You must use the service signing certificate authority private key to sign the client certificate.
You must generate and sign a separate client certificate for each OpenShift cluster. Do not use the same certificate for more than one cluster.
Prerequisites
-
You have
cluster adminaccess to the OpenShift cluster. If you are generating certificates for more than one OpenShift cluster and you previously generated a certificate for a different cluster in the current directory, do one of the following to ensure that you generate a different certificate for the current cluster:
-
Delete the existing certificate files (for example,
ca.crt,ca.key, andca.srl) from the current directory. Change to a different working directory. For example, if your current working directory is named
cluster1, create a newcluster2directory and change your working directory to it:mkdir ../cluster2cd ../cluster2
-
Delete the existing certificate files (for example,
Procedure
Login to OpenShift as a user with cluster admin access:
oc login -u <user_with_cluster_admin_role>
oc login -u <user_with_cluster_admin_role>Copy to Clipboard Copied! Toggle word wrap Toggle overflow Retrieve the service signing certificate authority keys, by executing the following commands:
To retrieve the certificate:
oc get secrets/signing-key -n openshift-service-ca -o "jsonpath={.data['tls\.crt']}" | base64 --decode > ca.crtoc get secrets/signing-key -n openshift-service-ca -o "jsonpath={.data['tls\.crt']}" | base64 --decode > ca.crtCopy to Clipboard Copied! Toggle word wrap Toggle overflow To retrieve the private key:
oc get secrets/signing-key -n openshift-service-ca -o "jsonpath={.data['tls\.key']}" | base64 --decode > ca.keyoc get secrets/signing-key -n openshift-service-ca -o "jsonpath={.data['tls\.key']}" | base64 --decode > ca.keyCopy to Clipboard Copied! Toggle word wrap Toggle overflow
Generate the client certificate, as documented in Kubernetes certificates administration, using either
easyrsa,openssl, orcfssl.Here are the example commands using openssl:
Generate the private key:
openssl genrsa -out server.key 2048
openssl genrsa -out server.key 2048Copy to Clipboard Copied! Toggle word wrap Toggle overflow Write the CSR config file.
Copy to Clipboard Copied! Toggle word wrap Toggle overflow Generate the CSR:
openssl req -new -key server.key -out server.csr -config csr.conf
openssl req -new -key server.key -out server.csr -config csr.confCopy to Clipboard Copied! Toggle word wrap Toggle overflow Issue the signed certificate:
openssl x509 -req -in server.csr -CA ca.crt -CAkey ca.key -CAcreateserial -out server.crt -days 10000 -extensions v3_ext -extfile csr.conf
openssl x509 -req -in server.csr -CA ca.crt -CAkey ca.key -CAcreateserial -out server.crt -days 10000 -extensions v3_ext -extfile csr.confCopy to Clipboard Copied! Toggle word wrap Toggle overflow
Next steps
You need this certificate to create the secret for the Fuse Console as described in Installing and deploying the Fuse Console on OpenShift 4.x by using the command line.
2.2.1.2. Installing and deploying the Fuse Console on OpenShift 4.x by using the command line
On OpenShift 4.x, you can choose one of these deployment options to install and deploy the Fuse Console from the command line:
- cluster - The Fuse Console can discover and connect to Fuse applications deployed across multiple namespaces (projects) on the OpenShift cluster. To deploy this template, you must have the administrator role for the OpenShift cluster.
- namespace - The Fuse Console has access to a specific OpenShift project (namespace). To deploy this template, you must have the administrator role for the OpenShift project.
To view a list of the parameters for the Fuse Console templates, run the following OpenShift command:
oc process --parameters -f https://raw.githubusercontent.com/jboss-fuse/application-templates/application-templates-2.1.fuse-750056-redhat-00006/fuse-console-namespace-os4.json
oc process --parameters -f https://raw.githubusercontent.com/jboss-fuse/application-templates/application-templates-2.1.fuse-750056-redhat-00006/fuse-console-namespace-os4.jsonPrerequisites
- Before you install and deploy the Fuse Console, you must generate a client certificate that is signed with the service signing certificate authority as described in Generating a certificate to secure the Fuse Console on OpenShift 4.x.
-
You have the
cluster adminrole for the OpenShift cluster. - The Fuse Console image stream (along with the other Fuse image streams) are installed, as described in Installing Fuse imagestreams and templates on the OpenShift 4.x server.
Procedure
Verify that the Fuse Console image stream is installed by using the following command to retrieve a list of all templates:
oc get template -n openshift
oc get template -n openshiftCopy to Clipboard Copied! Toggle word wrap Toggle overflow Optionally, if you want to update the already installed image stream with new release tags, use the following command to import the Fuse Console image to the openshift namespace:
oc import-image fuse7/fuse7-console:1.5 --from=registry.redhat.io/fuse7/fuse-console:1.5 --confirm -n openshift
oc import-image fuse7/fuse7-console:1.5 --from=registry.redhat.io/fuse7/fuse-console:1.5 --confirm -n openshiftCopy to Clipboard Copied! Toggle word wrap Toggle overflow Download one of the following Fuse Console templates from
https://raw.githubusercontent.com/jboss-fuse/application-templates/application-templates-2.1.fuse-750056-redhat-00006in raw format to a local directory of your choice (for example, mytemp).-
Cluster template:
fuse-console-cluster-os4.json -
Namespace template:
fuse-console-namespace-os4.json
-
Cluster template:
For the namespace template, skip to the next step.
For the cluster template, in an editor of your choice, edit your local copy of the
fuse-console-cluster-os4.jsonfile to add the"grantMethod": "auto"attribute to theOAuthClientsection:Copy to Clipboard Copied! Toggle word wrap Toggle overflow Obtain the Fuse Console APP_NAME value by running the following command (where mytemp is the path to the local directory that contains the Fuse Console template):
For the cluster template:
oc process --parameters -f mytemp/fuse-console-cluster-os4.json
oc process --parameters -f mytemp/fuse-console-cluster-os4.jsonCopy to Clipboard Copied! Toggle word wrap Toggle overflow For the namespace template:
oc process --parameters -f mytemp/fuse-console-namespace-os4.json
oc process --parameters -f mytemp/fuse-console-namespace-os4.jsonCopy to Clipboard Copied! Toggle word wrap Toggle overflow
From the certificate that you generated in Securing the Fuse Console on OpenShift 4.x, create the secret and mount it in the Fuse Console by using the following command (where APP_NAME is the name of the Fuse Console application.
oc create secret tls APP_NAME-tls-proxying --cert server.crt --key server.key
oc create secret tls APP_NAME-tls-proxying --cert server.crt --key server.keyCopy to Clipboard Copied! Toggle word wrap Toggle overflow Create a new application based on your local copy of the Fuse Console template by running the following command (where myproject is the name of your OpenShift project, mytemp is the path to the local directory that contains the Fuse Console template, and myhost is the hostname to access the Fuse Console:
For the cluster template:
oc new-app -n myproject -f mytemp/fuse-console-cluster-os4.json -p ROUTE_HOSTNAME=myhost
oc new-app -n myproject -f mytemp/fuse-console-cluster-os4.json -p ROUTE_HOSTNAME=myhostCopy to Clipboard Copied! Toggle word wrap Toggle overflow For the namespace template:
oc new-app -n myproject -f mytemp/fuse-console-namespace-os4.json
oc new-app -n myproject -f mytemp/fuse-console-namespace-os4.jsonCopy to Clipboard Copied! Toggle word wrap Toggle overflow
Obtain the status and the URL of your Fuse Console deployment by running this command:
oc status
oc statusCopy to Clipboard Copied! Toggle word wrap Toggle overflow - To access the Fuse Console from a browser, use the URL that is returned in Step 6 (for example, https://fuse-console.192.168.64.12.nip.io).
2.2.1.3. Upgrading the Fuse Console on OpenShift 4.x
Red Hat OpenShift 4.x handles updates to operators, including the Red Hat Fuse operators. For more information see the Operators OpenShift documentation.
In turn, operator updates can trigger application upgrades. How an application upgrade occur differs according to how the application is configured.
For Fuse Console applications, you can specify when to trigger upgrades to those applications by editing the .spec.version field of the application custom resource definition.
Prerequisite
- You have OpenShift cluster admin permissions.
Procedure
To upgrade a Fuse Console application:
In a terminal window, use the following command to change the
.spec.versionfield of the application custom resource definition:oc patch <project-name> <custom-resource-name> --type='merge' -p '{"spec":{"version":"1.7.1"}}'oc patch <project-name> <custom-resource-name> --type='merge' -p '{"spec":{"version":"1.7.1"}}'Copy to Clipboard Copied! Toggle word wrap Toggle overflow For example:
oc patch myproject example-fuseconsole --type='merge' -p '{"spec":{"version":"1.7.1"}}'oc patch myproject example-fuseconsole --type='merge' -p '{"spec":{"version":"1.7.1"}}'Copy to Clipboard Copied! Toggle word wrap Toggle overflow Check that the application’s status has updated:
oc get myproject
oc get myprojectCopy to Clipboard Copied! Toggle word wrap Toggle overflow The response shows information about the application, including the version number:
NAME AGE URL IMAGE example-fuseconsole 1m https://fuseconsole.192.168.64.38.nip.io docker.io/fuseconsole/online:1.7.1
NAME AGE URL IMAGE example-fuseconsole 1m https://fuseconsole.192.168.64.38.nip.io docker.io/fuseconsole/online:1.7.1Copy to Clipboard Copied! Toggle word wrap Toggle overflow When you change the value of the
.spec.versionfield, OpenShift automatically redeploys the application.To check the status of the redeployment that is triggered by the version change:
oc rollout status deployment.v1.apps/example-fuseconsole
oc rollout status deployment.v1.apps/example-fuseconsoleCopy to Clipboard Copied! Toggle word wrap Toggle overflow A successful deployment shows this response:
deployment "example-fuseconsole" successfully rolled out
deployment "example-fuseconsole" successfully rolled outCopy to Clipboard Copied! Toggle word wrap Toggle overflow
2.2.2. Installing API Designer on OpenShift 4.x
Red Hat Fuse on OpenShift provides API Designer, a web-based API designer tool that you can use to design REST APIs. The API Designer operator simplifies the installation and upgrading of API Designer on OpenShift Container Platform 4.x.
As an OpenShift administrator, you install the API Designer operator to an OpenShift project (namespace). When the operator is installed, the operator is running in the selected namespace. However, to make the API Designer available as a service, either you , as the OpenShift administrator, or a developer must create an instance of the API Designer. The API Designer service provides the URL to access the API Designer web console.
Prerequisites
- You have administrator access to the OpenShift cluster.
- You have configured authentication to the Red Hat Container Registry.
Procedure
- Start the OpenShift 4.x Server.
- In a web browser, navigate to the OpenShift console in your browser. Log in to the console with your credentials.
- Click Catalog and then click OperatorHub.
In the search field, type API Designer.
You can see the API Designer card in the right-side panel.
- Click API Designer. The API Designer operator install window appears.
Click Install. The Create Operator Subscription form opens.
- For Installation mode, select a namespace (project) from the list of namespaces on the cluster,
For the Approval Strategy, select Automatic or Manual to configure how OpenShift handles updates to the API Designer Operator.
- If you select Automatic updates, when a new version of the API Designer operator is available, the OpenShift Operator Lifecycle Manager (OLM) automatically upgrades the running instance of the API Designer without human intervention.
- If you select Manual updates, when a newer version of an Operator is available, the OLM creates an update request. As a cluster administrator, you must then manually approve that update request to have the API Designer operator updated to the new version.
- Click Subscribe to make the API Designer Operator available to the specified namespace (project).
- To verify that the API Designer is installed in the project, click Operators and then click Installed Operators to see the API Designer in the list.
Next Steps
After the API Designer operator is installed, the API Designer must be added as a service to the OpenShift project by creating an instance of the API Designer. This task can be accomplished in two ways:
- An OpenShift administrator can follow the steps in Section 2.2.2.1, “Adding API Designer as a service to an OpenShift 4.x project”.
An OpenShift developer can follow the steps described in Designing APIs.
The API Designer service provides the URL to access the API Designer web console.
2.2.2.1. Adding API Designer as a service to an OpenShift 4.x project
After the API Designer operator is installed in an OpenShift 4.x project, you (or an OpenShift developer) can add it as a service to the OpenShift project. The API Designer service provides the URL that a developer uses to access the API Designer web console.
See Designing APIs for the steps that an OpenShift developer follows to add API Designer as a service to an OpenShift 4.x project.
Prerequisites
- You have administrator access to the OpenShift cluster.
- The API Designer operator is installed into the current OpenShift project.
Procedure
- In the OpenShift web console, click Operators and then click Installed Operators.
- In the Name column, click API Designer.
Under Provided APIs, click Create Instance.
A default form with a minimal starting template for the API Designer instance opens.
Accept the default values or optionally edit the following values:
size: The number of pods for the API Designer instance.
The default is three pods for three new resource types that contain logic specific to managing API Designer.
- image: The API Designer image. If you change this image, the API Designer operator is automatically upgraded on the cluster.
- Click Create to create a new apicurito-service. OpenShift starts up of the pods, services, and other components for the new API Designer service.
To verify that the API Designer service is available:
- Click Operators and then click Installed Operators.
In the Provided APIs column, click Apicurito CRD.
On the Operator Details page, the apicurito-service is listed.
To obtain the URL for the API Designer:
- Click Networking > Routes.
- Make sure that the correct project is selected.
- In the apicurito-service row, find the URL for the API Designer web console in the Location column.
2.2.2.2. Upgrading the API Designer on OpenShift 4.x
Red Hat OpenShift 4.x handles updates to operators, including the Red Hat Fuse operators. For more information see the Operators OpenShift documentation.
In turn, operator updates can trigger application upgrades. How an application upgrade occur differs according to how the application is configured.
For API Designer applications, when you upgrade the API Designer operator, OpenShift automatically also upgrades any API designer applications on the cluster.
2.3. Installing Fuse imagestreams and templates on the OpenShift 3.x server
After you configure authentication to the Red Hat container registry, import and use the Red Hat Fuse on OpenShift image streams and templates.
Procedure
- Start the OpenShift Server.
Log in to the OpenShift Server as an administrator.
oc login -u system:admin
oc login -u system:adminCopy to Clipboard Copied! Toggle word wrap Toggle overflow Verify that you are using the project for which you created a docker-registry secret.
oc project openshift
oc project openshiftCopy to Clipboard Copied! Toggle word wrap Toggle overflow Install the Fuse on OpenShift image streams.
BASEURL=https://raw.githubusercontent.com/jboss-fuse/application-templates/application-templates-2.1.fuse-750056-redhat-00006 oc create -n openshift -f ${BASEURL}/fis-image-streams.jsonBASEURL=https://raw.githubusercontent.com/jboss-fuse/application-templates/application-templates-2.1.fuse-750056-redhat-00006 oc create -n openshift -f ${BASEURL}/fis-image-streams.jsonCopy to Clipboard Copied! Toggle word wrap Toggle overflow Install the quickstart templates:
Copy to Clipboard Copied! Toggle word wrap Toggle overflow Install Spring Boot 2 quickstart templates:
Copy to Clipboard Copied! Toggle word wrap Toggle overflow Install the templates for the Fuse Console.
oc create -n openshift -f https://raw.githubusercontent.com/jboss-fuse/application-templates/application-templates-2.1.fuse-750056-redhat-00006/fis-console-cluster-template.json
oc create -n openshift -f https://raw.githubusercontent.com/jboss-fuse/application-templates/application-templates-2.1.fuse-750056-redhat-00006/fis-console-namespace-template.json
Copy to Clipboard Copied! Toggle word wrap Toggle overflow NoteFor information on deploying the Fuse Console, see Set up Fuse Console on OpenShift.
Install the Apicurito template:
oc create -n openshift -f ${BASEURL}/fuse-apicurito.ymloc create -n openshift -f ${BASEURL}/fuse-apicurito.ymlCopy to Clipboard Copied! Toggle word wrap Toggle overflow (Optional) View the installed Fuse on OpenShift images and templates:
oc get template -n openshift
oc get template -n openshiftCopy to Clipboard Copied! Toggle word wrap Toggle overflow
2.3.1. Set up the Fuse Console on OpenShift 3.11
On OpenShift 3.11, you can set up the Fuse Console in two ways:
- By adding the centralized Fuse Console catalog item to a project so that you can monitor all the running Fuse containers in the project.
- From a specific pod so that you can monitor that single running Fuse container.
You can deploy the Fuse Console either from the OpenShift Console or from the command line.
Prerequisites
- Install the Fuse on OpenShift image streams and the templates for the Fuse Console as described in Fuse on OpenShift Guide.
For cluster mode on OpenShift 3.11, you need the cluster admin role and the cluster mode template. Run the following command:
oc adm policy add-cluster-role-to-user cluster-admin system:serviceaccount:openshift-infra:template-instance-controller
oc adm policy add-cluster-role-to-user cluster-admin system:serviceaccount:openshift-infra:template-instance-controllerCopy to Clipboard Copied! Toggle word wrap Toggle overflow
- The cluster mode template is only available, by default, on the latest version of the OpenShift Container Platform. It is not provided with the OpenShift Online default catalog.
- The Fuse Console templates configure end-to-end encryption by default so that your Fuse Console requests are secured end-to-end, from the browser to the in-cluster services.
- User management for the Fuse Console is handled by OpenShift.
- Role-based access control (for users accessing the Fuse Console after it is deployed) is not yet available for Fuse on OpenShift.
Section 2.3.1.1, “Deploying the Fuse Console from the OpenShift 3.11 Console”
Section 2.3.1.2, “Monitoring a single Fuse pod from the Fuse Console on OpenShift 3.11”
Section 2.3.1.3, “Deploying the Fuse Console from the command line”
2.3.1.1. Deploying the Fuse Console from the OpenShift 3.11 Console
To deploy the Fuse Console on your OpenShift cluster from the OpenShift 3.11 Console, follow these steps.
Procedure
- In the OpenShift console, open an existing project or create a new project.
Add the Fuse Console to your OpenShift project:
Select Add to Project
Browse Catalog. The Select an item to add to the current project page opens.
In the Search field, type Fuse Console.
The Red Hat Fuse 7.x Console and Red Hat Fuse 7.x Console (cluster) items should appear as the search result.
If the Red Hat Fuse Console items do not appear as the search result, or if the items that appear are not the latest version, you can install the Fuse Console templates manually as described in the "Prepare the OpenShift server" section of the Fuse on OpenShift Guide.
Click one of the Red Hat Fuse Console items:
- Red Hat Fuse 7.x Console - This version of the Fuse Console discovers and connects to Fuse applications deployed in the current OpenShift project.
- Red Hat Fuse 7.x Console (cluster) - This version of the Fuse Console can discover and connect to Fuse applications deployed across multiple projects on the OpenShift cluster.
In the Red Hat Fuse Console wizard, click Next. The Configuration page of the wizard opens.
Optionally, you can change the default values of the configuration parameters.
Click Create.
The Results page of the wizard indicates that the Red Hat Fuse Console has been created.
- Click the Continue to the project overview link to verify that the Fuse Console application is added to the project.
To open the Fuse Console, click the provided URL link and then log in.
An Authorize Access page opens in the browser listing the required permissions.
Click Allow selected permissions.
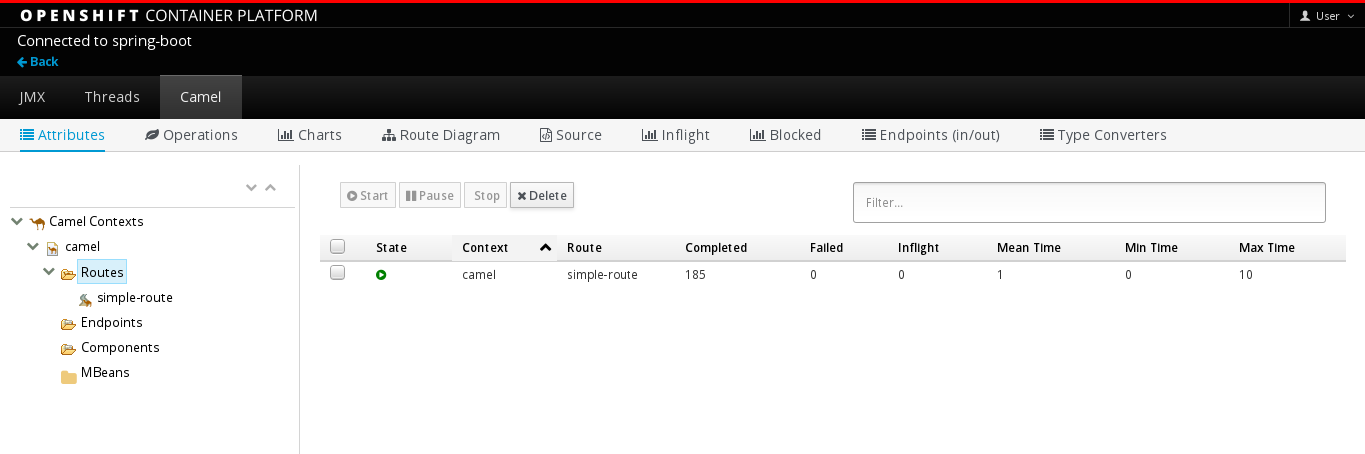
The Fuse Console opens in the browser and shows the Fuse pods running in the project.
Click Connect for the application that you want to view.
A new browser window opens showing the application in the Fuse Console.
2.3.1.2. Monitoring a single Fuse pod from the Fuse Console on OpenShift 3.11
You can open the Fuse Console for a Fuse pod running on OpenShift 3.11:
From the Applications
Pods view in your OpenShift project, click on the pod name to view the details of the running Fuse pod. On the right-hand side of this page, you see a summary of the container template: 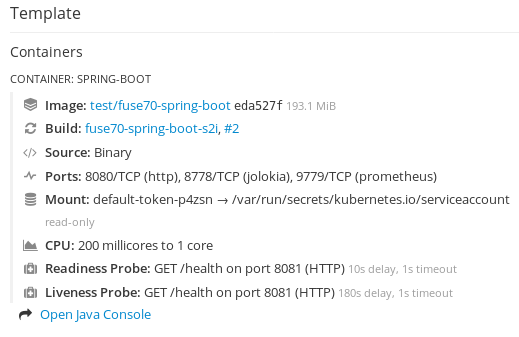
From this view, click on the Open Java Console link to open the Fuse Console.
 Note
NoteIn order to configure OpenShift to display a link to Fuse Console in the pod view, the pod running a Fuse on OpenShift image must declare a TCP port within a name attribute set to
jolokia:Copy to Clipboard Copied! Toggle word wrap Toggle overflow
2.3.1.3. Deploying the Fuse Console from the command line
Table 2.1, “Fuse Console templates” describes the OpenShift 3.1 templates that you can use to deploy the Fuse Console from the command line, depending on the type of Fuse application deployment.
| Type | Description |
|---|---|
|
| The Fuse Console can discover and connect to Fuse applications deployed across multiple namespaces or projects. To deploy this template, you must have the OpenShift cluster-admin role. |
|
| This template restricts the Fuse Console access to the current OpenShift project (namespace), and as such acts as a single tenant deployment. To deploy this template, you must have the admin role for the current OpenShift project. |
Optionally, you can view a list of the parameters for all of the templates by running this command:
oc process --parameters -f https://raw.githubusercontent.com/jboss-fuse/application-templates/application-templates-2.1.fuse-750056-redhat-00006/fis-console-namespace-template.json
oc process --parameters -f https://raw.githubusercontent.com/jboss-fuse/application-templates/application-templates-2.1.fuse-750056-redhat-00006/fis-console-namespace-template.jsonProcedure
To deploy the Fuse Console from the command line:
Create a new application based on a Fuse Console template by running one of the following commands (where myproject is the name of your project):
For the Fuse Console cluster template, where
myhostis the hostname to access the Fuse Console:oc new-app -n myproject -f https://raw.githubusercontent.com/jboss-fuse/application-templates/application-templates-2.1.fuse-750056-redhat-00006/fis-console-cluster-template.json -p ROUTE_HOSTNAME=myhost
oc new-app -n myproject -f https://raw.githubusercontent.com/jboss-fuse/application-templates/application-templates-2.1.fuse-750056-redhat-00006/fis-console-cluster-template.json -p ROUTE_HOSTNAME=myhostCopy to Clipboard Copied! Toggle word wrap Toggle overflow For the Fuse Console namespace template:
oc new-app -n myproject -f https://raw.githubusercontent.com/jboss-fuse/application-templates/application-templates-2.1.fuse-750056-redhat-00006/fis-console-namespace-template.json
oc new-app -n myproject -f https://raw.githubusercontent.com/jboss-fuse/application-templates/application-templates-2.1.fuse-750056-redhat-00006/fis-console-namespace-template.jsonCopy to Clipboard Copied! Toggle word wrap Toggle overflow NoteYou can omit the route_hostname parameter for the namespace template because OpenShift automatically generates one.
Obtain the status and the URL of your Fuse Console deployment by running this command:
oc status
oc statusCopy to Clipboard Copied! Toggle word wrap Toggle overflow - To access the Fuse Console from a browser, use the provided URL (for example, https://fuse-console.192.168.64.12.nip.io).