Este contenido no está disponible en el idioma seleccionado.
Cluster administration
Configuring Red Hat OpenShift Service on AWS clusters
Abstract
Chapter 1. Cluster notifications
Cluster notifications (sometimes referred to as service logs) are messages about the status, health, or performance of your cluster.
Cluster notifications are the primary way that Red Hat Site Reliability Engineering (SRE) communicates with you about the health of your managed cluster. Red Hat SRE may also use cluster notifications to prompt you to perform an action in order to resolve or prevent an issue with your cluster.
Cluster owners and administrators must regularly review and action cluster notifications to ensure clusters remain healthy and supported.
You can view cluster notifications in the Red Hat Hybrid Cloud Console, in the Cluster history tab for your cluster. By default, only the cluster owner receives cluster notifications as emails. If other users need to receive cluster notification emails, add each user as a notification contact for your cluster.
Use the following resources and information to understand the cluster notifications that you receive for your Red Hat OpenShift Service on AWS cluster, and to manage the recipients of cluster notification emails.
1.1. What to expect from cluster notifications
As a cluster administrator, you need to be aware of when and why cluster notifications are sent, as well as their types and severity levels, in order to effectively understand the health and administration needs of your cluster.
1.2. Cluster notification emails
By default, when a cluster notification is sent to the cluster, it is also sent as an email to the cluster owner. You can configure additional recipients for notification emails to ensure that all appropriate users remain informed about the state of the cluster.
1.3. Troubleshooting cluster notifications
If you are not receiving cluster notification emails, you can troubleshoot the issue by completing the following steps.
-
Ensure that emails sent from
@redhat.comaddresses are not filtered out of your email inbox. - Ensure that your correct email address is listed as a notification contact for the cluster.
- Ask the cluster owner or administrator to add you as a notification contact.
If your cluster does not receive notifications:
-
Ensure that your cluster can access resources at
api.openshift.com.
Chapter 2. Configuring private connections
2.1. Configuring private connections
Private cluster access can be implemented to suit the needs of your Red Hat OpenShift Service on AWS environment.
Procedure
Access your Red Hat OpenShift Service on AWS AWS account and use one or more of the following methods to establish a private connection to your cluster:
- Configuring AWS VPC peering: Enable VPC peering to route network traffic between two private IP addresses.
- Configuring AWS VPN: Establish a Virtual Private Network to securely connect your private network to your Amazon Virtual Private Cloud.
- Configuring AWS Direct Connect: Configure AWS Direct Connect to establish a dedicated network connection between your private network and an AWS Direct Connect location.
2.2. Configuring AWS VPC peering
This sample process configures an Amazon Web Services (AWS) VPC containing an Red Hat OpenShift Service on AWS cluster to peer with another AWS VPC network. For more information about creating an AWS VPC Peering connection or for other possible configurations, see the AWS VPC Peering guide.
2.2.1. VPC peering terms
When setting up a VPC peering connection between two VPCs on two separate AWS accounts, the following terms are used:
| Red Hat OpenShift Service on AWS AWS Account | The AWS account that contains the Red Hat OpenShift Service on AWS cluster. |
| Red Hat OpenShift Service on AWS Cluster VPC | The VPC that contains the Red Hat OpenShift Service on AWS cluster. |
| Customer AWS Account | Your non-Red Hat OpenShift Service on AWS AWS Account that you would like to peer with. |
| Customer VPC | The VPC in your AWS Account that you would like to peer with. |
| Customer VPC Region | The region where the customer’s VPC resides. |
As of July 2018, AWS supports inter-region VPC peering between all commercial regions excluding China.
2.2.2. Initiating the VPC peer request
You can send a VPC peering connection request from the Red Hat OpenShift Service on AWS AWS Account to the Customer AWS Account.
Prerequisites
Gather the following information about the Customer VPC required to initiate the peering request:
- Customer AWS account number
- Customer VPC ID
- Customer VPC Region
- Customer VPC CIDR
- Check the CIDR block used by the Red Hat OpenShift Service on AWS Cluster VPC. If it overlaps or matches the CIDR block for the Customer VPC, then peering between these two VPCs is not possible; see the Amazon VPC Unsupported VPC Peering Configurations documentation for details. If the CIDR blocks do not overlap, you can continue with the procedure.
Procedure
- Log in to the Web Console for the Red Hat OpenShift Service on AWS AWS Account and navigate to the VPC Dashboard in the region where the cluster is being hosted.
- Go to the Peering Connections page and click the Create Peering Connection button.
Verify the details of the account you are logged in to and the details of the account and VPC you are connecting to:
- Peering connection name tag: Set a descriptive name for the VPC Peering Connection.
- VPC (Requester): Select the Red Hat OpenShift Service on AWS Cluster VPC ID from the list.
- Account: Select Another account and provide the Customer AWS Account number *(without dashes).
- Region: If the Customer VPC Region differs from the current region, select Another Region and select the customer VPC Region from the list.
- VPC (Accepter): Set the Customer VPC ID.
- Click Create Peering Connection.
- Confirm that the request enters a Pending state. If it enters a Failed state, confirm the details and repeat the process.
2.2.3. Accepting the VPC peer request
After you create the VPC peering connection, you must accept the request in the Customer AWS Account.
Prerequisites
- Initiate the VPC peer request.
Procedure
- Log in to the AWS Web Console.
- Navigate to VPC Service.
- Go to Peering Connections.
- Click on Pending peering connection.
- Confirm the AWS Account and VPC ID that the request originated from. This should be from the Red Hat OpenShift Service on AWS AWS Account and Red Hat OpenShift Service on AWS Cluster VPC.
- Click Accept Request.
2.2.4. Configuring the routing tables
After you accept the VPC peering request, both VPCs must configure their routes to communicate across the peering connection.
Prerequisites
- Initiate and accept the VPC peer request.
Procedure
- Log in to the AWS Web Console for the Red Hat OpenShift Service on AWS AWS Account.
- Navigate to the VPC Service, then Route tables.
Select the Route Table for the Red Hat OpenShift Service on AWS Cluster VPC.
NoteOn some clusters, there may be more than one route table for a particular VPC. Select the private one that has a number of explicitly associated subnets.
- Select the Routes tab, then Edit.
- Enter the Customer VPC CIDR block in the Destination text box.
- Enter the Peering Connection ID in the Target text box.
- Click Save.
You must complete the same process with the other VPC’s CIDR block:
- Log into the Customer AWS Web Console → VPC Service → Route Tables.
- Select the Route Table for your VPC.
- Select the Routes tab, then Edit.
- Enter the Red Hat OpenShift Service on AWS Cluster VPC CIDR block in the Destination text box.
- Enter the Peering Connection ID in the Target text box.
- Click Save changes.
The VPC peering connection is now complete. Follow the verification procedure to ensure connectivity across the peering connection is working.
2.2.5. Verifying and troubleshooting VPC peering
After you set up a VPC peering connection, it is best to confirm it has been configured and is working correctly.
Prerequisites
- Initiate and accept the VPC peer request.
- Configure the routing tables.
Procedure
In the AWS console, look at the route table for the cluster VPC that is peered. Ensure that the steps for configuring the routing tables were followed and that there is a route table entry pointing the VPC CIDR range destination to the peering connection target.
If the routes look correct on both the Red Hat OpenShift Service on AWS Cluster VPC route table and Customer VPC route table, then the connection should be tested using the
netcatmethod below. If the test calls are successful, then VPC peering is working correctly.To test network connectivity to an endpoint device,
nc(ornetcat) is a helpful troubleshooting tool. It is included in the default image and provides quick and clear output if a connection can be established:Create a temporary pod using the
busyboximage, which cleans up after itself:$ oc run netcat-test \ --image=busybox -i -t \ --restart=Never --rm \ -- /bin/shCheck the connection using
nc.Example successful connection results:
/ nc -zvv 192.168.1.1 8080
10.181.3.180 (10.181.3.180:8080) open
sent 0, rcvd 0
Example failed connection results:
/ nc -zvv 192.168.1.2 8080
nc: 10.181.3.180 (10.181.3.180:8081): Connection refused
sent 0, rcvd 0
Exit the container, which automatically deletes the Pod:
/ exit
2.3. Configuring AWS VPN
This sample process configures an Amazon Web Services (AWS) Red Hat OpenShift Service on AWS cluster to use a customer’s on-site hardware VPN device.
AWS VPN does not currently provide a managed option to apply NAT to VPN traffic. See the AWS Knowledge Center for more details.
Routing all traffic, for example 0.0.0.0/0, through a private connection is not supported. This requires deleting the internet gateway, which disables SRE management traffic.
For more information about connecting an AWS VPC to remote networks using a hardware VPN device, see the Amazon VPC VPN Connections documentation.
2.3.1. Creating a VPN connection
You can configure an Amazon Web Services (AWS) Red Hat OpenShift Service on AWS cluster to use a customer’s on-site hardware VPN device using the following procedures.
Prerequisites
- Hardware VPN gateway device model and software version, for example Cisco ASA running version 8.3. See the Amazon VPC Network Administrator Guide to confirm whether your gateway device is supported by AWS.
- Public, static IP address for the VPN gateway device.
- BGP or static routing: if BGP, the ASN is required. If static routing, you must configure at least one static route.
- Optional: IP and Port/Protocol of a reachable service to test the VPN connection.
2.3.1.1. Configuring the VPN connection
Procedure
- Log in to the Red Hat OpenShift Service on AWS AWS Account Dashboard, and navigate to the VPC Dashboard.
- Under Virtual private cloud click on Your VPCs and identify the name and VPC ID for the VPC containing the Red Hat OpenShift Service on AWS cluster.
- Under Virtual private network (VPN) click Customer gateways.
- Click Create customer gateway and give it a meaningful name.
- Enter the ASN of your customer gateway device in the BGP ASN field.
- Enter the IP address for your customer gateway devices’s external interface in the IP address field.
- Click Create customer gateway.
If you do not already have a Virtual Private Gateway attached to the intended VPC:
- From the VPC Dashboard, click on Virtual Private Gateways.
- Click Create virtual private gateway, give it a meaningful name.
- Click Create virtual private gateway, leaving the Amazon default ASN.
- Select the newly created gateway.
- Select Actions from the list and click Attach to VPC.
- Select the newly created gateway under Available VPC’s and click Attach to VPC to attach it to the cluster VPC you identified earlier.
2.3.1.2. Establishing the VPN Connection
Procedure
- From the VPC dashboard, under Virtual private network (VPN) click on Site-to-Site VPN connections.
Click Create VPN connection.
- Give it a meaningful name tag.
- Select the Virtual private gateway created previously.
- For Customer gateway, select Existing.
- Select the Customer gateway id by name.
- If the VPN will use BGP, select Dynamic, otherwise select Static and enter the Static IP CIDRs. If there are multiple CIDRs, add each CIDR as Another Rule.
- Click Create VPN connection.
- Under State wait for the VPN status to change from Pending to Available, approximately 5 to 10 minutes.
Select the VPN you just created and click Download configuration.
- From the list, select the vendor, platform, and version of the customer gateway device, then click Download.
- The Generic vendor configuration is also available for retrieving information in a plain text format.
After the VPN connection has been established, be sure to set up Route Propagation or the VPN may not function as expected.
Note the VPC subnet information, which you must add to your configuration as the remote network.
2.3.1.3. Enabling VPN route propagation
After you have set up the VPN connection, you must ensure that route propagation is enabled so that the necessary routes are added to the VPC’s route table.
Procedure
- From the VPC Dashboard, under Virtual private cloud, click on Route tables.
Select the private Route table associated with the VPC that contains your Red Hat OpenShift Service on AWS cluster.
NoteOn some clusters, there may be more than one route table for a particular VPC. Select the private one that has a number of explicitly associated subnets.
- Click on the Route Propagation tab.
In the table that appears, you should see the Virtual Private Gateway you created previously. Check the value in the Propagate column.
- If Propagation is set to No, click Edit route propagation, check the Enable checkbox in Propagation and click Save.
After you configure your VPN tunnel and AWS detects it as Up, your static or BGP routes are automatically added to the route table.
2.3.2. Verifying the VPN connection
After you have set up your side of the VPN tunnel, you can verify that the tunnel is up in the AWS console and that connectivity across the tunnel is working.
Prerequisites
- Created a VPN connection.
Procedure
Verify the tunnel is up in AWS.
- From the VPC Dashboard, under Virtual private network (VPN), click on Site-to-Site VPN connections.
- Select the VPN connection you created previously and click the Tunnel details tab.
- You should see that at least one of the VPN tunnels is in an Up status.
Verify the connection.
To test network connectivity to an endpoint device,
nc(ornetcat) is a helpful troubleshooting tool. It is included in the default image and provides quick and clear output if a connection can be established:Create a temporary pod using the
busyboximage, which cleans up after itself:$ oc run netcat-test \ --image=busybox -i -t \ --restart=Never --rm \ -- /bin/shCheck the connection using
nc.Example successful connection results:
/ nc -zvv 192.168.1.1 8080
10.181.3.180 (10.181.3.180:8080) open
sent 0, rcvd 0
Example failed connection results:
/ nc -zvv 192.168.1.2 8080
nc: 10.181.3.180 (10.181.3.180:8081): Connection refused
sent 0, rcvd 0
Exit the container, which automatically deletes the Pod:
/ exit
2.3.3. Troubleshooting the VPN connection
Tunnel does not connect
If the tunnel connection is still Down, there are several things you can verify:
- The AWS tunnel will not initiate a VPN connection. The connection attempt must be initiated from the Customer Gateway.
- Ensure that your source traffic is coming from the same IP as the configured customer gateway. AWS will silently drop all traffic to the gateway whose source IP address does not match.
- Ensure that your configuration matches values supported by AWS. This includes IKE versions, DH groups, IKE lifetime, and more.
- Recheck the route table for the VPC. Ensure that propagation is enabled and that there are entries in the route table that have the virtual private gateway you created earlier as a target.
- Confirm that you do not have any firewall rules that could be causing an interruption.
- Check if you are using a policy-based VPN as this can cause complications depending on how it is configured.
- Further troubleshooting steps can be found at the AWS Knowledge Center.
Tunnel does not stay connected
If the tunnel connection has trouble staying Up consistently, know that all AWS tunnel connections must be initiated from your gateway. AWS tunnels do not initiate tunneling.
Red Hat recommends setting up an SLA Monitor (Cisco ASA) or some device on your side of the tunnel that constantly sends "interesting" traffic, for example ping, nc, or telnet, at any IP address configured within the VPC CIDR range. It does not matter whether the connection is successful, just that the traffic is being directed at the tunnel.
Secondary tunnel in Down state
When a VPN tunnel is created, AWS creates an additional failover tunnel. Depending upon the gateway device, sometimes the secondary tunnel will be seen as in the Down state.
The AWS Notification is as follows:
You have new non-redundant VPN connections

One or more of your vpn connections are not using both tunnels. This mode of
operation is not highly available and we strongly recommend you configure your
second tunnel. View your non-redundant VPN connections.
2.4. Configuring AWS Direct Connect
This process describes accepting an AWS Direct Connect virtual interface with Red Hat OpenShift Service on AWS. For more information about AWS Direct Connect types and configuration, see the AWS Direct Connect components documentation.
2.4.1. AWS Direct Connect methods
A Direct Connect connection requires a hosted Virtual Interface (VIF) connected to a Direct Connect Gateway (DXGateway), which is in turn associated to a Virtual Gateway (VGW) or a Transit Gateway in order to access a remote VPC in the same or another account.
If you do not have an existing DXGateway, the typical process involves creating the hosted VIF, with the DXGateway and VGW being created in the Red Hat OpenShift Service on AWS AWS Account.
If you have an existing DXGateway connected to one or more existing VGWs, the process involves the Red Hat OpenShift Service on AWS AWS Account sending an Association Proposal to the DXGateway owner. The DXGateway owner must ensure that the proposed CIDR will not conflict with any other VGWs they have associated.
See the following AWS documentation for more details:
When connecting to an existing DXGateway, you are responsible for the costs.
There are two configuration options available:
| Method 1 | Create the hosted VIF and then the DXGateway and VGW. |
| Method 2 | Request a connection via an existing Direct Connect Gateway that you own. |
2.4.2. Creating the hosted Virtual Interface
Prerequisites
- Gather Red Hat OpenShift Service on AWS AWS Account ID.
2.4.2.1. Determining the type of Direct Connect connection
View the Direct Connect Virtual Interface details to determine the type of connection.
Procedure
- Log in to the Red Hat OpenShift Service on AWS AWS Account Dashboard and select the correct region.
- Select Direct Connect from the Services menu.
- There will be one or more Virtual Interfaces waiting to be accepted, select one of them to view the Summary.
- View the Virtual Interface type: private or public.
- Record the Amazon side ASN value.
If the Direct Connect Virtual Interface type is Private, a Virtual Private Gateway is created. If the Direct Connect Virtual Interface is Public, a Direct Connect Gateway is created.
2.4.2.2. Creating a Private Direct Connect
A Private Direct Connect is created if the Direct Connect Virtual Interface type is Private.
Procedure
- Log in to the Red Hat OpenShift Service on AWS AWS Account Dashboard and select the correct region.
- From the AWS region, select VPC from the Services menu.
- From Virtual private network (VPN), select Virtual private gateways.
- Click Create virtual private gateway.
- Give the Virtual Private Gateway a suitable name.
- Select Custom ASN in the Enter custom ASN field enter the Amazon side ASN value gathered previously.
- Click Create virtual private gateway.
- Click the newly created Virtual Private Gateway and choose Attach to VPC from the Actions tab.
- Select the Red Hat OpenShift Service on AWS Cluster VPC from the list, and click Attach VPC.
Note: Editing the kubelet config will cause the nodes for your machine pool to be recreated. This ma???
2.4.2.3. Creating a Public Direct Connect
A Public Direct Connect is created if the Direct Connect Virtual Interface type is Public.
Procedure
- Log in to the Red Hat OpenShift Service on AWS AWS Account Dashboard and select the correct region.
- From the Red Hat OpenShift Service on AWS AWS Account region, select Direct Connect from the Services menu.
- Select Direct Connect gateways and Create Direct Connect gateway.
- Give the Direct Connect gateway a suitable name.
- In the Amazon side ASN, enter the Amazon side ASN value gathered previously.
- Click Create the Direct Connect gateway.
2.4.2.4. Verifying the Virtual Interfaces
After the Direct Connect Virtual Interfaces have been accepted, wait a short period and view the status of the Interfaces.
Procedure
- Log in to the Red Hat OpenShift Service on AWS AWS Account Dashboard and select the correct region.
- From the Red Hat OpenShift Service on AWS AWS Account region, select Direct Connect from the Services menu.
- Select one of the Direct Connect Virtual Interfaces from the list.
- Check the Interface State has become Available
- Check the Interface BGP Status has become Up.
- Repeat this verification for any remaining Direct Connect Interfaces.
After the Direct Connect Virtual Interfaces are available, you can log in to the Red Hat OpenShift Service on AWS AWS Account Dashboard and download the Direct Connect configuration file for configuration on your side.
2.4.3. Connecting to an existing Direct Connect Gateway
Prerequisites
- Confirm the CIDR range of the Red Hat OpenShift Service on AWS VPC will not conflict with any other VGWs you have associated.
Gather the following information:
- The Direct Connect Gateway ID.
- The AWS Account ID associated with the virtual interface.
- The BGP ASN assigned for the DXGateway. Optional: the Amazon default ASN may also be used.
Procedure
- Log in to the Red Hat OpenShift Service on AWS AWS Account Dashboard and select the correct region.
- From the Red Hat OpenShift Service on AWS AWS Account region, select VPC from the Services menu.
- From Virtual private network (VPN), select Virtual private gateways.
- Select Create virtual private gateway.
- Give the virtual private gateway a suitable name in the Details field.
- Click Custom ASN and enter the Amazon side ASN value gathered previously or use the Amazon Provided ASN.
- Click Create virtual private gateway.
- From the Red Hat OpenShift Service on AWS AWS Account region, select Direct Connect from the Services menu.
- Click virtual private gateways and select the virtual private gateway.
- Click View details.
- Click the Direct Connect gateway associations tab.
- Click Associate Direct Connect gateway
- Under Association account type, for Account owner, click Another account.
- Under Association settings, for Direct Connect gateway ID, enter the ID of the Direct Connect gateway.
- For Direct Connect gateway owner, enter the ID of the AWS account that owns the Direct Connect gateway.
- Optional: Add prefixes to Allowed prefixes, separating them using commas or put them on separate lines.
- Click Associate Direct Connect gateway.
- After the Association Proposal has been sent, it will be waiting for your acceptance. The final steps you must perform are available in the AWS Documentation.
2.4.4. Troubleshooting Direct Connect
Further troubleshooting can be found in the Troubleshooting AWS Direct Connect documentation.
Chapter 3. Cluster autoscaling for Red Hat OpenShift Service on AWS
Applying autoscaling to Red Hat OpenShift Service on AWS clusters involves configuring one or more machine pools with autoscaling. You can use the Cluster Autoscaler to further configure cluster-wide autoscaling that is applicable to all of the machine pools that are autoscaling.
3.1. About the cluster autoscaler
The cluster autoscaler adjusts the size of a Red Hat OpenShift Service on AWS cluster to meet its current deployment needs. It uses declarative, Kubernetes-style arguments to provide infrastructure management that does not rely on objects of a specific cloud provider. The cluster autoscaler has a cluster scope, and is not associated with a particular namespace. In Red Hat OpenShift Service on AWS, the Cluster Autoscaler is fully managed, which means it is hosted along with the control plane.
The cluster autoscaler increases the size of the cluster when there are pods that fail to schedule on any of the current worker nodes due to insufficient resources or when another node is necessary to meet deployment needs. The cluster autoscaler does not increase the cluster resources beyond the limits that you specify.
The cluster autoscaler computes the total memory, CPU, and GPU only on the nodes that belong to autoscaling machine pools. All of the machine pool nodes that are not autoscaling are excluded from this aggregation. For example, if you set the maxNodesTotal to 50 on a Red Hat OpenShift Service on AWS cluster with three machine pools in which a single machine pool is not autoscaling, the cluster autoscaler restricts the total nodes to 50 in only those two machine pools that are autoscaling. The single manually scaling machine pool can have additional nodes, making the overall cluster nodes total more than 50.
3.2. Automatic node removal
Every 10 seconds, the cluster autoscaler checks which nodes are unnecessary in the cluster and removes them.
The cluster autoscaler considers a node for removal if the following conditions apply:
-
The node utilization is less than the node utilization level threshold for the cluster. The node utilization level is the sum of the requested resources divided by the allocated resources for the node. If you do not specify a value in the
ClusterAutoscalercustom resource, the cluster autoscaler uses a default value of0.5, which corresponds to 50% utilization. - The cluster autoscaler can move all pods running on the node to the other nodes. The Kubernetes scheduler is responsible for scheduling pods on the nodes.
- The cluster autoscaler does not have scale down disabled annotation.
If the following types of pods are present on a node, the cluster autoscaler will not remove the node:
- Pods with restrictive pod disruption budgets (PDBs).
- Kube-system pods that do not run on the node by default.
- Kube-system pods that do not have a PDB or have a PDB that is too restrictive.
- Pods that are not backed by a controller object such as a deployment, replica set, or stateful set.
- Pods with local storage.
- Pods that cannot be moved elsewhere because of a lack of resources, incompatible node selectors or affinity, matching anti-affinity, and so on.
-
Unless they also have a
"cluster-autoscaler.kubernetes.io/safe-to-evict": "true"annotation, pods that have a"cluster-autoscaler.kubernetes.io/safe-to-evict": "false"annotation.
For example, you set the maximum CPU limit to 64 cores and configure the cluster autoscaler to only create machines that have 8 cores each. If your cluster starts with 30 cores, the cluster autoscaler can add up to 4 more nodes with 32 cores, for a total of 62.
3.3. Limitations
If you configure the cluster autoscaler, additional usage restrictions apply.
See the following restrictions:
- Do not modify the nodes that are in autoscaled node groups directly. All nodes within the same node group have the same capacity and labels and run the same system pods.
- Specify requests for your pods.
- If you have to prevent pods from being deleted too quickly, configure appropriate PDBs.
- Confirm that your cloud provider quota is large enough to support the maximum node pools that you configure.
- Do not run additional node group autoscalers, especially the ones offered by your cloud provider.
The cluster autoscaler only adds nodes in autoscaled node groups if doing so would result in a schedulable pod. If the available node types cannot meet the requirements for a pod request, or if the node groups that could meet these requirements are at their maximum size, the cluster autoscaler cannot scale up.
3.4. Interaction with other scheduling features
The horizontal pod autoscaler (HPA) and the cluster autoscaler modify cluster resources in different ways. The HPA changes the deployment’s or replica set’s number of replicas based on the current CPU load. If the load increases, the HPA creates new replicas, regardless of the amount of resources available to the cluster. If there are not enough resources, the cluster autoscaler adds resources so that the HPA-created pods can run. If the load decreases, the HPA stops some replicas. If this action causes some nodes to be underutilized or completely empty, the cluster autoscaler deletes the unnecessary nodes.
The cluster autoscaler takes pod priorities into account. The Pod Priority and Preemption feature enables scheduling pods based on priorities if the cluster does not have enough resources, but the cluster autoscaler ensures that the cluster has resources to run all pods. To honor the intention of both features, the cluster autoscaler includes a priority cutoff function. You can use this cutoff to schedule "best-effort" pods, which do not cause the cluster autoscaler to increase resources but instead run only when spare resources are available.
Pods with priority lower than the cutoff value do not cause the cluster to scale up or prevent the cluster from scaling down. No new nodes are added to run the pods, and nodes running these pods might be deleted to free resources.
3.5. Cluster autoscaling parameters using the ROSA CLI
You can add the following parameters to the cluster creation command to configure autoscaler parameters when using the ROSA command-line interface (CLI) (rosa).
| Setting | Description | Type or Range | Example/Instruction |
|---|---|---|---|
|
| Gives pods graceful termination time before scaling down, measured in seconds. Replace int in the command with the number of seconds you want to use. |
|
|
|
| The priority that a pod must exceed to cause the cluster autoscaler to deploy additional nodes. Replace int in the command with the number you want to use, can be negative. |
|
|
|
| Maximum time that the cluster autoscaler waits for a node to be provisioned. Replace string in the command with an integer and time unit (ns,us,µs,ms,s,m,h). |
|
|
|
| Maximum amount of nodes in the cluster, including the autoscaled nodes. Replace int in the command with the number you want to use. |
|
|
3.6. Editing autoscaling after cluster creation with the ROSA CLI
You can edit any specific parameters of the cluster autoscaler after creating the autoscaler when using the ROSA command-line interface (CLI) (rosa).
Procedure
To edit the cluster autoscaler, run the following command:
Example
$ rosa edit autoscaler --cluster=<mycluster>To edit a specific parameter, run the following command:
Example
$ rosa edit autoscaler --cluster=<mycluster> <parameter>
3.7. View autoscaler configurations with the ROSA CLI
You can view your cluster autoscaler configurations using the rosa describe autoscaler command.
Procedure
To view cluster autoscaler configurations, run the following command:
Example
$ rosa describe autoscaler -h --cluster=<mycluster>
Chapter 4. Managing compute nodes using machine pools
4.1. About machine pools
Red Hat OpenShift Service on AWS uses machine pools as an elastic, dynamic provisioning method on top of your cloud infrastructure.
The primary resources are machines, compute machine sets, and machine pools.
4.1.1. Machines
A machine is a fundamental unit that describes the host for a worker node.
4.1.2. Machine sets
MachineSet resources are groups of compute machines. If you need more machines or must scale them down, change the number of replicas in the machine pool to which the compute machine sets belong.
Machine sets are not directly modifiable in Red Hat OpenShift Service on AWS.
4.1.3. Machine pools
Machine pools are a higher level construct to compute machine sets.
A machine pool creates compute machine sets that are all clones of the same configuration across availability zones. Machine pools perform all of the host node provisioning management actions on a worker node. If you need more machines or must scale them down, change the number of replicas in the machine pool to meet your compute needs. You can manually configure scaling or set autoscaling.
In Red Hat OpenShift Service on AWS clusters, the hosted control plane spans multiple availability zones (AZ) in the installed cloud region. Each machine pool in a Red Hat OpenShift Service on AWS cluster deploys in a single subnet within a single AZ.
Worker nodes are not guaranteed longevity, and may be replaced at any time as part of the normal operation and management of OpenShift. For more details about the node lifecycle, refer to additional resources.
Multiple machine pools can exist on a single cluster, and each machine pool can contain a unique node type and node size (AWS EC2 instance type and size) configuration.
4.1.3.1. Machine pools during cluster installation
By default, a cluster has one machine pool. During cluster installation, you can define instance type or size and add labels to this machine pool as well as define the size of the root disk.
4.1.3.2. Configuring machine pools after cluster installation
After a cluster’s installation:
- You can remove or add labels to any machine pool.
- You can add additional machine pools to an existing cluster.
- You can add taints to any machine pool if there is one machine pool without any taints.
You can create or delete a machine pool if there is one machine pool without any taints and at least two replicas.
NoteYou cannot change the machine pool node type or size. The machine pool node type or size is specified during their creation only. If you need a different node type or size, you must re-create a machine pool and specify the required node type or size values.
- You can add a label to each added machine pool.
Worker nodes are not guaranteed longevity, and may be replaced at any time as part of the normal operation and management of OpenShift. For more details about the node lifecycle, refer to additional resources.
Procedure
Optional: Add a label to the default machine pool after configuration by using the default machine pool labels and running the following command:
$ rosa edit machinepool -c <cluster_name> <machinepool_name> -iExample input
$ rosa edit machinepool -c mycluster worker -i
? Enable autoscaling: No
? Replicas: 3
? Labels: mylabel=true
I: Updated machine pool 'worker' on cluster 'mycluster'
4.1.3.3. Machine pool upgrade requirements
Each machine pool in a Red Hat OpenShift Service on AWS cluster upgrades independently. Because the machine pools upgrade independently, they must remain within 2 minor (Y-stream) versions of the hosted control plane. For example, if your hosted control plane is 4.16.z, your machine pools must be at least 4.14.z.
The following image depicts how machine pools work within Red Hat OpenShift Service on AWS clusters:
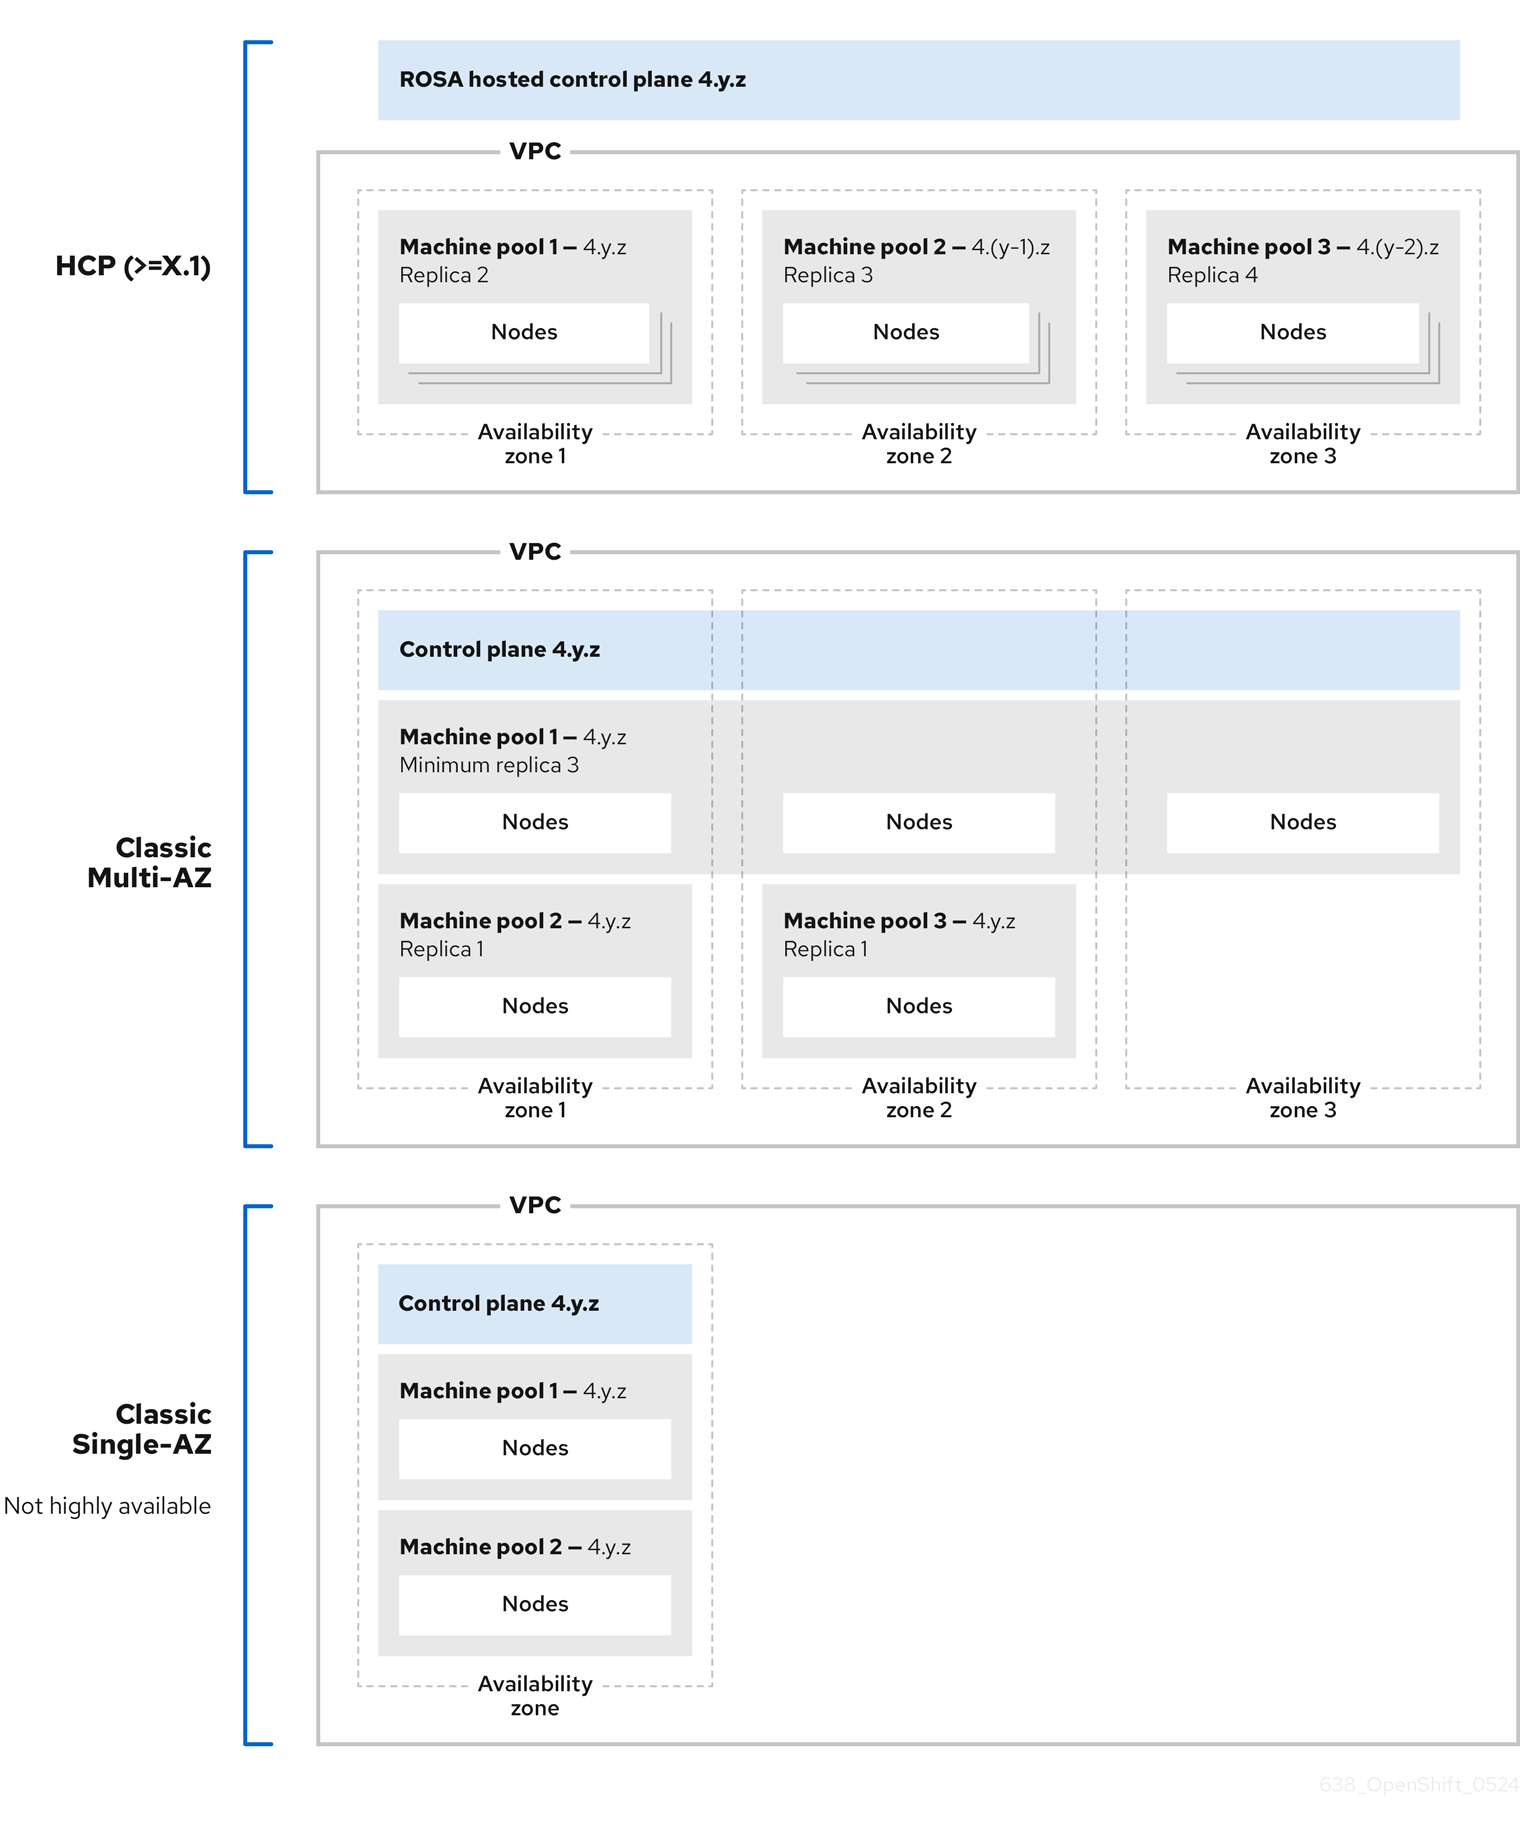
Machine pools in Red Hat OpenShift Service on AWS clusters each upgrade independently and the machine pool versions must remain within two minor (Y-stream) versions of the control plane.
4.1.4. Additional resources
4.2. Managing compute nodes
With Red Hat OpenShift Service on AWS, you can manage compute (also known as worker) nodes to create and configure optimal compute capacity for your workloads.
The majority of changes for compute nodes are configured on machine pools. A machine pool is a group of compute nodes in a cluster that have the same configuration, providing ease of management.
You can edit machine pool configuration options such as scaling, adding node labels, and adding taints.
You can also create new machine pools with Capacity Reservations.
Overview of AWS Capacity Reservations
If you have reserved compute capacity using AWS Capacity Reservations for a specific instance type and Availability Zone (AZ), you can use it for your Red Hat OpenShift Service on AWS worker nodes. Both On-Demand Capacity Reservations and Capacity Blocks for machine learning (ML) workloads are supported.
Purchase and manage a Capacity Reservation directly with AWS. After reserving the capacity, add a Capacity Reservation ID to a new machine pool when you create it in your Red Hat OpenShift Service on AWS cluster. You can also use a Capacity Reservation shared with you from another AWS account within your AWS Organization.
Once you configure Capacity Reservations in Red Hat OpenShift Service on AWS, you can use your AWS account to monitor reserved capacity usage across all workloads in the account.
Using Capacity Reservations on machine pools in Red Hat OpenShift Service on AWS clusters has the following prerequisites and limitations:
- You installed and configured the latest ROSA CLI.
- Your Red Hat OpenShift Service on AWS cluster is version 4.19 or later.
- The cluster already has a machine pool that is not using a Capacity Reservation or taints. The machine pool must have at least 2 worker nodes.
- You have purchased a Capacity Reservation for the instance type required in the AZ of the machine pool that you are creating.
- You can only add a Capacity Reservation ID to a new machine pool.
- You cannot use autoscaling with Capacity Reservations if you create a machine pool using the ROSA CLI. However, you can enable both autoscaling and Capacity Reservations on machine pools created using OpenShift Cluster Manager.
You can create a machine pool with a Capacity Reservation using either OpenShift Cluster Manager or the ROSA CLI.
4.2.1. Creating a machine pool
A machine pool is created when you install a Red Hat OpenShift Service on AWS cluster. After installation, you can create additional machine pools for your cluster by using OpenShift Cluster Manager or the ROSA command-line interface (CLI) (rosa).
For users of rosa version 1.2.25 and earlier versions, the machine pool created along with the cluster is identified as Default. For users of rosa version 1.2.26 and later, the machine pool created along with the cluster is identified as worker.
4.2.1.1. Creating a machine pool using OpenShift Cluster Manager
You can create additional machine pools for your Red Hat OpenShift Service on AWS cluster by using OpenShift Cluster Manager.
Prerequisites
- You created a Red Hat OpenShift Service on AWS cluster.
Procedure
- Navigate to OpenShift Cluster Manager and select your cluster.
- Under the Machine pools tab, click Add machine pool.
- Add a Machine pool name.
Select a Compute node instance type from the list. The instance type defines the vCPU and memory allocation for each compute node in the machine pool.
NoteYou cannot change the instance type for a machine pool after the pool is created.
Optional: If you are using OpenShift Virtualization on a Red Hat OpenShift Service on AWS cluster, you might want to run Windows VMs. In order to be license-compliant with Microsoft Windows in AWS, the hosts (x86-64 bare metal EC2 instances) running these VMs must be enabled with AWS EC2 Windows License Included. To enable the machine pool for AWS Windows License Included, select the Enable machine pool for AWS Windows License Included checkbox.
You can only select this option when the host cluster is a Red Hat OpenShift Service on AWS cluster version 4.19 and later and the instance type is x86-64 bare metal EC2.
ImportantEnabling AWS Windows LI on a machine pool applies the associated licensing fees on that specific machine pool. This includes billing for the full vCPU allocation of each AWS Windows LI enabled host in your Red Hat OpenShift Service on AWS cluster. Windows LI enabled machine pools will also deny vCPU over-allocation on OpenShift Virtualization VMs. For more information, see Microsoft Licensing on AWS and the Red Hat OpenShift Service on AWS instance types.
Optional: Configure autoscaling for the machine pool:
- Select Enable autoscaling to automatically scale the number of machines in your machine pool to meet the deployment needs.
Set the minimum and maximum node count limits for autoscaling. The cluster autoscaler does not reduce or increase the machine pool node count beyond the limits that you specify.
NoteAlternatively, you can set your autoscaling preferences for the machine pool after the machine pool is created.
- If you did not enable autoscaling, select a Compute node count from the drop-down menu. This defines the number of compute nodes to provision to the machine pool for the availability zone.
- Optional: Configure Root disk size.
Optional: Add reserved capacity to your machine pool.
Select a Reservation Preference from the list. Valid preferences include:
- None: The instance does not use a Capacity Reservation even if one is available. The instance runs as an EC2 On-Demand instance. Choose this option when you want to avoid consuming purchased reserved capacity and use it for other workloads.
-
Open: The instance can run in any
openCapacity Reservation that has matching attributes such as the instance type, platform, AZ, or tenancy. Choose this option for flexibility; if a reservation is not available, the instance can use regular unreserved EC2 capacity. - CR only (capacity reservation only): The instance can only run in a Capacity Reservation. If capacity is not available, the instance fails to launch.
-
Add a Reservation ID. You get an ID in the
cr-<capacity_reservation_id>format when you purchase a Capacity Reservation from AWS. The ID can be for both On-Demand Capacity Reservations or Capacity Blocks for ML.
Optional: Add node labels and taints for your machine pool:
- Expand the Edit node labels and taints menu.
- Under Node labels, add Key and Value entries for your node labels.
Under Taints, add Key and Value entries for your taints.
NoteCreating a machine pool with taints is only possible if the cluster already has at least one machine pool without a taint.
For each taint, select an Effect from the drop-down menu. Available options include
NoSchedule,PreferNoSchedule, andNoExecute.NoteAlternatively, you can add the node labels and taints after you create the machine pool.
Optional: Select additional custom security groups to use for nodes in this machine pool. You must have already created the security groups and associated them with the VPC that you selected for this cluster. You cannot add or edit security groups after you create the machine pool.
ImportantYou can use up to ten additional security groups for machine pools on Red Hat OpenShift Service on AWS clusters.
- Click Add machine pool to create the machine pool.
Verification
- Verify that the machine pool is visible on the Machine pools page and the configuration is as expected.
4.2.1.2. Creating a machine pool using the ROSA CLI
You can create additional machine pools for your Red Hat OpenShift Service on AWS cluster by using the ROSA command-line interface (CLI) (rosa).
To add a pre-purchased Capacity Reservation to a machine pool, see Creating a machine pool with Capacity Reservations.
Prerequisites
- You installed and configured the latest ROSA CLI on your workstation.
- You logged in to your Red Hat account using the ROSA CLI.
- You created a Red Hat OpenShift Service on AWS cluster.
Procedure
To add a machine pool that does not use autoscaling, create the machine pool and define the instance type, compute (also known as worker) node count, and node labels:
$ rosa create machinepool --cluster=<cluster-name> \
                          --name=<machine_pool_id> \
                          --replicas=<replica_count> \
                          --instance-type=<instance_type> \
                          --labels=<key>=<value>,<key>=<value> \
                          --taints=<key>=<value>:<effect>,<key>=<value>:<effect> \
                          --disk-size=<disk_size> \
                          --availability-zone=<availability_zone_name> \
                          --additional-security-group-ids <sec_group_id> \
                          --subnet <subnet_id>
where:
--name=<machine_pool_id>- Specifies the name of the machine pool.
--replicas=<replica_count>-
Specifies the number of compute nodes to provision. If you deployed Red Hat OpenShift Service on AWS using a single availability zone, this defines the number of compute nodes to provision to the machine pool for the zone. If you deployed your cluster using multiple availability zones, this defines the number of compute nodes to provision in total across all zones and the count must be a multiple of 3. The
--replicasargument is required when autoscaling is not configured. --instance-type=<instance_type>-
Optional: Sets the instance type for the compute nodes in your machine pool. The instance type defines the vCPU and memory allocation for each compute node in the pool. Replace
<instance_type>with an instance type. The default ism5.xlarge. You cannot change the instance type for a machine pool after the pool is created. --labels=<key>=<value>,<key>=<value>-
Optional: Defines the labels for the machine pool. Replace
<key>=<value>,<key>=<value>with a comma-delimited list of key-value pairs, for example--labels=key1=value1,key2=value2. --taints=<key>=<value>:<effect>,<key>=<value>:<effect>-
Optional: Defines the taints for the machine pool. Replace
<key>=<value>:<effect>,<key>=<value>:<effect>with a key, value, and effect for each taint, for example--taints=key1=value1:NoSchedule,key2=value2:NoExecute. Available effects includeNoSchedule,PreferNoSchedule, andNoExecute. --disk-size=<disk_size>-
Optional: Specifies the worker node disk size. The value can be in GB, GiB, TB, or TiB. Replace
<disk_size>with a numeric value and unit, for example--disk-size=200GiB. --availability-zone=<availability_zone_name>-
Optional: You can create a machine pool in an availability zone of your choice. Replace
<availability_zone_name>with an availability zone name. --additional-security-group-ids <sec_group_id>Optional: For machine pools in clusters that do not have Red Hat managed VPCs, you can select additional custom security groups to use in your machine pools. You must have already created the security groups and associated them with the VPC that you selected for this cluster. You cannot add or edit security groups after you create the machine pool.
ImportantYou can use up to ten additional security groups for machine pools on Red Hat OpenShift Service on AWS clusters.
--subnet <subnet_id>Optional: For BYO VPC clusters, you can select a subnet to create a Single-AZ machine pool. If the subnet is out of your cluster creation subnets, there must be a tag with a key
kubernetes.io/cluster/<infra-id>and valueshared. Customers can obtain the Infra ID by using the following command:$ rosa describe cluster -c <cluster name>|grep "Infra ID:"Example output
Infra ID: mycluster-xqvj7NoteYou cannot set both
--subnetand--availability-zoneat the same time, only 1 is allowed for a Single-AZ machine pool creation.
The following example creates a machine pool called
mymachinepoolthat uses them5.xlargeinstance type and has 2 compute node replicas. The example also adds 2 workload-specific labels:$ rosa create machinepool --cluster=mycluster --name=mymachinepool --replicas=2 --instance-type=m5.xlarge --labels=app=db,tier=backendExample output
I: Machine pool 'mymachinepool' created successfully on cluster 'mycluster'
I: To view all machine pools, run 'rosa list machinepools -c mycluster'
To add a machine pool that uses autoscaling, create the machine pool and define the autoscaling configuration, instance type and node labels:
$ rosa create machinepool --cluster=<cluster-name> \
                          --name=<machine_pool_id> \
                          --enable-autoscaling \
                          --min-replicas=<minimum_replica_count> \
                          --max-replicas=<maximum_replica_count> \
                          --instance-type=<instance_type> \
                          --labels=<key>=<value>,<key>=<value> \
                          --taints=<key>=<value>:<effect>,<key>=<value>:<effect> \
                          --availability-zone=<availability_zone_name>
where:
--name=<machine_pool_id>-
Specifies the name of the machine pool. Replace
<machine_pool_id>with the name of your machine pool. --enable-autoscaling- Enables autoscaling in the machine pool to meet the deployment needs.
--min-replicas=<minimum_replica_count>and--max-replicas=<maximum_replica_count>Defines the minimum and maximum compute node limits. The cluster autoscaler does not reduce or increase the machine pool node count beyond the limits that you specify.
The
--min-replicasand--max-replicasarguments define the autoscaling limits in the machine pool for the availability zone.--instance-type=<instance_type>-
Optional: Sets the instance type for the compute nodes in your machine pool. The instance type defines the vCPU and memory allocation for each compute node in the pool. Replace
<instance_type>with an instance type. The default ism5.xlarge. You cannot change the instance type for a machine pool after the pool is created. --labels=<key>=<value>,<key>=<value>-
Optional: Defines the labels for the machine pool. Replace
<key>=<value>,<key>=<value>with a comma-delimited list of key-value pairs, for example--labels=key1=value1,key2=value2. --taints=<key>=<value>:<effect>,<key>=<value>:<effect>-
Optional: Defines the taints for the machine pool. Replace
<key>=<value>:<effect>,<key>=<value>:<effect>with a key, value, and effect for each taint, for example--taints=key1=value1:NoSchedule,key2=value2:NoExecute. Available effects includeNoSchedule,PreferNoSchedule, andNoExecute. --availability-zone=<availability_zone_name>-
Optional: You can create a machine pool in an availability zone of your choice. Replace
<availability_zone_name>with an availability zone name.
The following example creates a machine pool called
mymachinepoolthat uses them5.xlargeinstance type and has autoscaling enabled. The minimum compute node limit is 3 and the maximum is 6 overall. The example also adds 2 workload-specific labels:$ rosa create machinepool --cluster=mycluster --name=mymachinepool --enable-autoscaling --min-replicas=3 --max-replicas=6 --instance-type=m5.xlarge --labels=app=db,tier=backendExample output
I: Machine pool 'mymachinepool' created successfully on hosted cluster 'mycluster'
I: To view all machine pools, run 'rosa list machinepools -c mycluster'
Verification
You can list all machine pools on your cluster or describe individual machine pools.
List the available machine pools on your cluster:
$ rosa list machinepools --cluster=<cluster_name>Example output
ID             AUTOSCALING  REPLICAS  INSTANCE TYPE  LABELS                  TAINTS    AVAILABILITY ZONE  SUBNET                    VERSION  AUTOREPAIR
Default        No           1/1       m5. xlarge                                       us-east-2c         subnet-00552ad67728a6ba3  4.14.34  Yes
mymachinepool  Yes          3/3-6     m5.xlarge      app=db, tier=backend              us-east-2a         subnet-0cb56f5f41880c413  4.14.34  Yes
Describe the information of a specific machine pool in your cluster:
$ rosa describe machinepool --cluster=<cluster_name> --machinepool=mymachinepoolExample output
ID: mymachinepool Cluster ID: 2d6010rjvg17anri30v84vspf7c7kr6v Autoscaling: Yes Desired replicas: 3-6 Current replicas: 3 Instance type: m5.xlarge Labels: app=db, tier=backend Taints: Availability zone: us-east-2a Subnet: subnet-0cb56f5f41880c413 Version: 4.14.34 Autorepair: Yes Tuning configs: Additional security group IDs: Node drain grace period: Message:- Verify that the machine pool is included in the output and the configuration is as expected.
4.2.1.3. Creating a machine pool with AWS Windows License Included enabled using the ROSA CLI
If you are using OpenShift Virtualization on a Red Hat OpenShift Service on AWS cluster running Windows VMs you need to be license-compliant with Microsoft Windows in AWS. The hosts (AWS x86-64 bare metal EC2 instances) running these VMs must be enabled with AWS EC2 Windows License Included (LI).
Enabling AWS Windows LI on a machine pool applies the associated licensing fees on that specific machine pool. This includes billing for the full vCPU allocation of each AWS Windows LI enabled host in your Red Hat OpenShift Service on AWS cluster. Windows LI enabled machine pools will also deny vCPU over-allocation on OpenShift Virtualization VMs. For more information, see Microsoft Licensing on AWS and the Red Hat OpenShift Service on AWS instance types.
Prerequisites
- You installed and configured the ROSA CLI version 1.2.58 or above.
- You logged in to your Red Hat account using the ROSA CLI.
- You created a Red Hat OpenShift Service on AWS cluster version 4.19 or above.
- You identified an x86-64 bare metal EC2 instance type to use OpenShift Virtualization. For more, see Amazon EC2 Instance Types.
- You are in compliance with Microsoft and AWS requirements for the Microsoft licenses and associated costs.
Procedure
To add a Windows LI enabled machine pool to a Red Hat OpenShift Service on AWS cluster, create the machine pool with the following definitions:
$ rosa create machinepool --cluster=<cluster-name> \
                          --name=<machine_pool_id> \
                          --replicas=<replica_count> \
                          --instance-type=<instance_type> \
                          --type=<image_type>
where:
--name=<machine_pool_id>-
Specifies the name of the machine pool. Replace
<machine_pool_id>with the name of your machine pool. --replicas=<replica_count>-
Specifies the number of compute nodes to provision. If you deployed Red Hat OpenShift Service on AWS using a single availability zone, this defines the number of compute nodes to provision to the machine pool for the zone. If you deployed your cluster using multiple availability zones, this defines the number of compute nodes to provision in total across all zones and the count must be a multiple of 3. The
--replicasargument is required when autoscaling is not configured. --instance-type=<instance_type>-
Specifies the instance type. You can only select an x86-64 bare metal instance type to enable Windows LI. For example, you can use
m5zn.metalori3.metal. You cannot change the instance type for a machine pool after the pool is created. --type=<type>You must specify
Windowsto ensure the machine pool is created with Windows LI enabled.The following command creates a Windows LI enabled machine pool called
mymachinepoolusing them5zn.metalinstance type with 1 compute node replica:$ rosa create machinepool --cluster=mycluster --name=mymachinepool --type=Windows --instance-type=m5zn.metal --replicas=1Example output
I: Machine pool 'mymachinepool' created successfully on cluster 'mycluster'
I: To view all machine pools, run 'rosa list machinepools -c mycluster'
Verification
List the available machine pools on your cluster by running the following command:
$ rosa list machinepools --cluster=<cluster_name>Describe the information of a specific machine pool in your cluster:
$ rosa describe machinepool --cluster=<cluster_name> --machinepool=mymachinepoolThe output has the image type set to
Windowsas shown in the following example:Example output
ID: mymachinepool Cluster ID: mycluster Autoscaling: No Desired replicas: 1 Current replicas: 1 Instance type: m5zn.metal Image type: Windows Labels: Tags: Taints: Availability zone: us-east-1a Subnet: <subnet-id> Disk Size: 300 GiB Version: 4.19.18 EC2 Metadata Http Tokens: optional Autorepair: Yes Tuning configs: Kubelet configs: Additional security group IDs: Node drain grace period:- For more information about running virtualized Windows workloads after you have set up a Windows LI enabled machine pool, see Creating a Windows VM compliant to AWS EC2 Windows License Included.
4.2.1.4. Creating a machine pool with Capacity Reservations using the ROSA CLI
You can create a new machine pool with Capacity Reservations by using the ROSA command-line interface (CLI) (rosa). Both On-Demand Capacity Reservations and Capacity Blocks for ML are supported.
Currently, autoscaling is not supported on machine pools with Capacity Reservations.
Prerequisites
- You installed and configured the latest ROSA CLI.
- You logged in to your Red Hat account using the ROSA CLI.
- You created a Red Hat OpenShift Service on AWS cluster version 4.19 or above.
- The cluster already has a machine pool that is not using a Capacity Reservation or taints. The machine pool must have at least 2 worker nodes.
- You have a Capacity Reservation ID and capacity is reserved for the instance type required in the Availability Zone (AZ) of the machine pool that you are creating.
Procedure
Create the machine pool and define the Capacity Reservation preference and ID by running the following command:
$ rosa create machinepool --cluster=<cluster_name> \
                          --name=<machine_pool_id> \
                          --replicas=<replica_count> \
                          --capacity-reservation-preference none | open | capacity-reservations-only \
                          --capacity-reservation-id cr-<capacity_reservation_id> \
                          --instance-type=<instance_type> \
                          --subnet <subnet_id>
where:
- <machine_pool_id>
- Specifies the name of the machine pool.
- <replica_count>
-
Specifies the number of provisioned compute nodes. If you deploy Red Hat OpenShift Service on AWS using a single AZ, this defines the number of compute nodes provisioned to the machine pool for the AZ. If you deploy your cluster using multiple AZs, this defines the total number of compute nodes provisioned across all AZs. For multi-zone clusters, the compute node count must be a multiple of 3. The
--replicasargument is required when autoscaling is not configured. - <capacity_reservation_preference>
Specifies the Capacity Reservation behaviour. Valid preferences include:
-
none: The instance does not use a Capacity Reservation even if one is available. The instance runs as an EC2 On-Demand instance. Choose this option when you want to avoid consuming purchased reserved capacity and use it for other workloads. -
open: The instance can run in anyopenCapacity Reservation that has matching attributes such as the instance type, platform, AZ, or tenancy. Choose this option for flexibility; if a reservation is not available, the instance can use regular unreserved EC2 capacity. -
capacity-reservations-only: The instance can only run in a Capacity Reservation. If capacity is not available, the instance fails to launch.
-
- cr-<capacity_reservation_id>
-
Specifies the reservation ID. You get an ID in the
cr-<capacity_reservation_id>format when you purchase a Capacity Reservation from AWS. The ID can be for both On-Demand Capacity Reservations or Capacity Blocks for ML, you do not need to specify the reservation type. - <instance_type>
-
Optional: Specifies the instance type for the compute nodes in your machine pool. The instance type defines the vCPU and memory allocation for each compute node in the pool. Replace
<instance_type>with an instance type. The default ism5.xlarge. You cannot change the instance type for a machine pool after the pool is created. - <subnet_id>
Optional: Specifies the subnet ID. For Bring Your Own Virtual Private Cloud (BYO VPC) clusters, you can select a subnet to create a single-AZ machine pool. If you select a subnet that was not specified during the initial cluster creation, you must tag the subnet with the
kubernetes.io/cluster/<infra_id>key andsharedvalue. Customers can obtain the Infra ID by running the following command:$ rosa describe cluster --cluster <cluster_name>|grep "Infra ID:"Example output
Infra ID: mycluster-xqvj7
Example
The following example creates a machine pool called mymachinepool that uses the c5.xlarge instance type and has 1 compute node replica. The example also adds a Capacity Reservation ID. Example input and output:
$ rosa create machinepool --cluster=mycluster --name=mymachinepool --replicas 1 --capacity-reservation-id <capacity_reservation_id> --subnet <subnet_id> --instance-type c5.xlargeI: Checking available instance types for machine pool 'mymachinepool'
I: Machine pool 'mymachinepool' created successfully on hosted cluster 'mycluster'Verification
You can list all machine pools on your cluster or describe individual machine pools.
List the available machine pools on your cluster by running the following command:
$ rosa list machinepools --cluster <cluster_name>Describe the information of a specific machine pool in your cluster by running the following command.
$ rosa describe machinepool --cluster <cluster_name> --machinepool <machine_pool_name>Example output
ID:                         <machine_pool_name>
Cluster ID:                 <cluster_id>
Autoscaling:                No
Desired replicas:           1
Current replicas:           1
Instance type:              c5.xlarge
Labels:
Tags:                       red-hat-managed=true, api.openshift.com/environment=production, api.openshift.com/id=<cluster_name>, api.openshift.com/legal-entity-id=<legal_entity_id>, api.openshift.com/name=<cluster_name>, api.openshift.com/nodepool-hypershift=<cluster_name>-<machine_pool_name>, api.openshift.com/nodepool-ocm=<machine_pool_name>, red-hat-clustertype=rosa
Taints:
Availability zone:          us-east-1a
Subnet:                     <subnet_id>
Disk Size:                  300 GiB
Version:                    4.19.10
EC2 Metadata Http Tokens:   optional
Autorepair:                 Yes
Tuning configs:
Kubelet configs:
Additional security group IDs:
Node drain grace period:
Capacity Reservation:
    - ID:                   <capacity_reservation_id>
    - Type:                 OnDemand
    - Preference:           open
Management upgrade:
    - Type:                 Replace
    - Max surge:            1
    - Max unavailable:      0
Message:                    Minimum availability requires 1 replicas, current 1 available
The output should include the Capacity Reservation ID, type, and preference.
4.2.2. Configuring machine pool disk volume
Machine pool disk volume size can be configured for additional flexibility. The default disk size is 300 GiB.
For Red Hat OpenShift Service on AWS clusters, the disk size can be configured from a minimum of 75 GiB to a maximum of 16,384 GiB.
You can configure the machine pool disk size for your cluster by using OpenShift Cluster Manager or the ROSA command-line interface (CLI) (rosa).
Existing cluster and machine pool node volumes cannot be resized.
Prerequisite for cluster creation
- You have the option to select the node disk sizing for the default machine pool during cluster installation.
Procedure for cluster creation
- From the Red Hat OpenShift Service on AWS cluster wizard, navigate to Cluster settings.
- Navigate to Machine pool step.
- Select the desired Root disk size.
- Select Next to continue creating your cluster.
Prerequisite for machine pool creation
- You have the option to select the node disk sizing for the new machine pool after the cluster has been installed.
Procedure for machine pool creation
- Navigate to OpenShift Cluster Manager and select your cluster.
- Navigate to Machine pool tab.
- Click Add machine pool.
- Select the desired Root disk size.
- Select Add machine pool to create the machine pool.
4.2.2.1. Configuring machine pool disk volume using the ROSA CLI
Prerequisite for cluster creation
- You have the option to select the root disk sizing for the default machine pool during cluster installation.
Procedure for cluster creation
Run the following command when creating your OpenShift cluster for the desired root disk size:
$ rosa create cluster --worker-disk-size=<disk_size>The value can be in GB, GiB, TB, or TiB. Replace
<disk_size>with a numeric value and unit, for example--worker-disk-size=200GiB. You cannot separate the digit and the unit. No spaces are allowed.
Prerequisite for machine pool creation
- You have the option to select the root disk sizing for the new machine pool after the cluster has been installed.
Procedure for machine pool creation
Scale up the cluster by executing the following command:
$ rosa create machinepool --cluster=<cluster_id> \1 --disk-size=<disk_size>2 - Confirm new machine pool disk volume size by logging into the AWS console and find the EC2 virtual machine root volume size.
4.2.3. Deleting a machine pool
You can delete a machine pool in the event that your workload requirements have changed and your current machine pools no longer meet your needs.
You can delete machine pools using Red Hat OpenShift Cluster Manager or the ROSA command-line interface (CLI) (rosa).
4.2.3.1. Deleting a machine pool using OpenShift Cluster Manager
You can delete a machine pool for your Red Hat OpenShift Service on AWS cluster by using Red Hat OpenShift Cluster Manager.
Prerequisites
- You created a Red Hat OpenShift Service on AWS cluster.
- The cluster is in the ready state.
- You have an existing machine pool without any taints and with at least two instances for a single-AZ cluster or three instances for a multi-AZ cluster.
Procedure
- From OpenShift Cluster Manager, navigate to the Cluster List page and select the cluster that contains the machine pool that you want to delete.
- On the selected cluster, select the Machine pools tab.
-
Under the Machine pools tab, click the Options menu
 for the machine pool that you want to delete.
Click Delete.
The selected machine pool is deleted.
4.2.3.2. Deleting a machine pool using the ROSA CLI
You can delete a machine pool for your Red Hat OpenShift Service on AWS cluster by using the ROSA command-line interface (CLI) (rosa).
For users of rosa version 1.2.25 and earlier versions, the machine pool (ID='Default') that is created along with the cluster cannot be deleted. For users of rosa version 1.2.26 and later, the machine pool (ID='worker') that is created along with the cluster can be deleted if there is one machine pool within the cluster that contains no taints, and at least two replicas for a Single-AZ cluster or three replicas for a Multi-AZ cluster.
Prerequisites
- You created a Red Hat OpenShift Service on AWS cluster.
- The cluster is in the ready state.
- You have an existing machine pool without any taints and with at least two instances for a Single-AZ cluster or three instances for a Multi-AZ cluster.
Procedure
From the ROSA CLI, run the following command:
$ rosa delete machinepool -c=<cluster_name> <machine_pool_ID>Example output
? Are you sure you want to delete machine pool <machine_pool_ID> on cluster <cluster_name>? (y/N)Enter
yto delete the machine pool.The selected machine pool is deleted.
4.2.4. Scaling compute nodes manually
If you have not enabled autoscaling for your machine pool, you can manually scale the number of compute (also known as worker) nodes in the pool to meet your deployment needs.
You must scale each machine pool separately.
Prerequisites
-
You installed and configured the latest ROSA command-line interface (CLI) (
rosa) on your workstation. - You logged in to your Red Hat account using the ROSA CLI.
- You created a Red Hat OpenShift Service on AWS cluster.
- You have an existing machine pool.
Procedure
List the machine pools in the cluster:
$ rosa list machinepools --cluster=<cluster_name>Example output
ID        AUTOSCALING   REPLICAS    INSTANCE TYPE  LABELS    TAINTS   AVAILABILITY ZONES    DISK SIZE   SG IDs
default   No            2           m5.xlarge                         us-east-1a            300GiB      sg-0e375ff0ec4a6cfa2
mp1       No            2           m5.xlarge                         us-east-1a            300GiB      sg-0e375ff0ec4a6cfa2
Increase or decrease the number of compute node replicas in a machine pool:
$ rosa edit machinepool --cluster=<cluster_name> \
                        --replicas=<replica_count> \
1 <machine_pool_id>2
Verification
List the available machine pools in your cluster:
$ rosa list machinepools --cluster=<cluster_name>Example output
ID AUTOSCALING REPLICAS INSTANCE TYPE LABELS TAINTS AVAILABILITY ZONES DISK SIZE SG IDs default No 2 m5.xlarge us-east-1a 300GiB sg-0e375ff0ec4a6cfa2 mp1 No 3 m5.xlarge us-east-1a 300GiB sg-0e375ff0ec4a6cfa2-
In the output of the preceding command, verify that the compute node replica count is as expected for your machine pool. In the example output, the compute node replica count for the
mp1machine pool is scaled to 3.
4.2.5. Node labels
A label is a key-value pair applied to a Node object. You can use labels to organize sets of objects and control the scheduling of pods.
You can add labels during cluster creation or after. Labels can be modified or updated at any time.
4.2.5.1. Adding node labels to a machine pool
Add or edit labels for compute (also known as worker) nodes at any time to manage the nodes in a manner that is relevant to you. For example, you can assign types of workloads to specific nodes.
Labels are assigned as key-value pairs. Each key must be unique to the object it is assigned to.
Prerequisites
-
You installed and configured the latest ROSA command-line interface (CLI) (
rosa) on your workstation. - You logged in to your Red Hat account using the ROSA CLI.
- You created a Red Hat OpenShift Service on AWS cluster.
- You have an existing machine pool.
Procedure
List the machine pools in the cluster:
$ rosa list machinepools --cluster=<cluster_name>Example output
ID           AUTOSCALING  REPLICAS  INSTANCE TYPE  LABELS    TAINTS    AVAILABILITY ZONE  SUBNET                    VERSION  AUTOREPAIR
workers      No           2/2       m5.xlarge                          us-east-2a         subnet-0df2ec3377847164f  4.16.6   Yes
db-nodes-mp  No           2/2       m5.xlarge                          us-east-2a         subnet-0df2ec3377847164f  4.16.6   Yes
Add or update the node labels for a machine pool:
To add or update node labels for a machine pool that does not use autoscaling, run the following command:
$ rosa edit machinepool --cluster=<cluster_name> \
                        --labels=<key>=<value>,<key>=<value> \
1 <machine_pool_id>- 1
- Replace
<key>=<value>,<key>=<value>with a comma-delimited list of key-value pairs, for example--labels=key1=value1,key2=value2. This list overwrites any modifications made to node labels on an ongoing basis.
The following example adds labels to the
db-nodes-mpmachine pool:$ rosa edit machinepool --cluster=mycluster --replicas=2 --labels=app=db,tier=backend db-nodes-mpExample output
I: Updated machine pool 'db-nodes-mp' on cluster 'mycluster'
Verification
Describe the details of the machine pool with the new labels:
$ rosa describe machinepool --cluster=<cluster_name> --machinepool=<machine-pool-name>Example output
ID: db-nodes-mp Cluster ID: <ID_of_cluster> Autoscaling: No Desired replicas: 2 Current replicas: 2 Instance type: m5.xlarge Labels: app=db, tier=backend Tags: Taints: Availability zone: us-east-2a Subnet: subnet-0df2ec3377847164f Disk size: 300 GiB Version: 4.16.6 EC2 Metadata Http Tokens: optional Autorepair: Yes Tuning configs: Kubelet configs: Additional security group IDs: Node drain grace period: Management upgrade: - Type: Replace - Max surge: 1 - Max unavailable: 0 Message:- Verify that the labels are included for your machine pool in the output.
4.2.6. Adding tags to a machine pool
You can add tags for compute nodes, also known as worker nodes, in a machine pool to introduce custom user tags for AWS resources that are generated when you provision your machine pool, noting that you can not edit the tags after you create the machine pool.
4.2.6.1. Adding tags to a machine pool using the ROSA CLI
You can add tags to a machine pool for your Red Hat OpenShift Service on AWS cluster by using the ROSA command-line interface (CLI) (rosa). You can not edit the tags after after you create the machine pool.
You must ensure that your tag keys are not aws, red-hat-managed, red-hat-clustertype, or Name. In addition, you must not set a tag key that begins with kubernetes.io/cluster/. Your tag’s key cannot be longer than 128 characters, while your tag’s value cannot be longer than 256 characters. Red Hat reserves the right to add additional reserved tags in the future.
Prerequisites
-
You installed and configured the latest AWS (
aws), ROSA (rosa), and OpenShift (oc) CLIs on your workstation. - You logged in to your Red Hat account by using the ROSA CLI.
- You created a Red Hat OpenShift Service on AWS cluster.
Procedure
Create a machine pool with a custom tag by running the following command:
$ rosa create machinepools --cluster=<name> --replicas=<replica_count> \
     --name <mp_name> --tags='<key> <value>,<key> <value>'
1 - 1
- Replace
<key> <value>,<key> <value>with a key and value for each tag.
Example output
$ rosa create machinepools --cluster=mycluster --replicas 2 --tags='tagkey1 tagvalue1,tagkey2 tagvaluev2'

I: Checking available instance types for machine pool 'mp-1'
I: Machine pool 'mp-1' created successfully on cluster 'mycluster'
I: To view the machine pool details, run 'rosa describe machinepool --cluster mycluster --machinepool mp-1'
I: To view all machine pools, run 'rosa list machinepools --cluster mycluster'
Verification
Use the
describecommand to see the details of the machine pool with the tags, and verify that the tags are included for your machine pool in the output:$ rosa describe machinepool --cluster=<cluster_name> --machinepool=<machinepool_name>Example output
ID:                            db-nodes-mp
Cluster ID:                    <ID_of_cluster>
Autoscaling:                   No
Desired replicas:              2
Current replicas:              2
Instance type:                 m5.xlarge
Labels:
Tags:                          red-hat-clustertype=rosa, red-hat-managed=true, tagkey1=tagvalue1, tagkey2=tagvaluev2
Taints:
Availability zone:             us-east-2a
...
4.2.7. Adding taints to a machine pool
You can add taints for compute (also known as worker) nodes in a machine pool to control which pods are scheduled to them. When you apply a taint to a machine pool, the scheduler cannot place a pod on the nodes in the pool unless the pod specification includes a toleration for the taint. Taints can be added to a machine pool using Red Hat OpenShift Cluster Manager or the ROSA command-line interface (CLI) (rosa).
A cluster must have at least one machine pool that does not contain any taints.
4.2.7.1. Adding taints to a machine pool using OpenShift Cluster Manager
You can add taints to a machine pool for your Red Hat OpenShift Service on AWS cluster by using Red Hat OpenShift Cluster Manager.
Prerequisites
- You created a Red Hat OpenShift Service on AWS cluster.
- You have an existing machine pool that does not contain any taints and contains at least two instances.
Procedure
- Navigate to OpenShift Cluster Manager and select your cluster.
-
Under the Machine pools tab, click the Options menu
for the machine pool that you want to add a taint to.
- Select Edit taints.
- Add Key and Value entries for your taint.
-
Select an Effect for your taint from the list. Available options include
NoSchedule,PreferNoSchedule, andNoExecute. - Optional: Select Add taint if you want to add more taints to the machine pool.
- Click Save to apply the taints to the machine pool.
Verification
- Under the Machine pools tab, select > next to your machine pool to expand the view.
- Verify that your taints are listed under Taints in the expanded view.
4.2.7.2. Adding taints to a machine pool using the ROSA CLI
You can add taints to a machine pool for your Red Hat OpenShift Service on AWS cluster by using the ROSA command-line interface (CLI) (rosa).
For users of rosa version 1.2.25 and prior versions, the number of taints cannot be changed within the machine pool (ID=Default) created along with the cluster. For users of rosa version 1.2.26 and beyond, the number of taints can be changed within the machine pool (ID=worker) created along with the cluster. There must be at least one machine pool without any taints and with at least two replicas.
Prerequisites
-
You installed and configured the latest AWS (
aws), ROSA (rosa), and OpenShift (oc) CLIs on your workstation. -
You logged in to your Red Hat account by using the
rosaCLI. - You created a Red Hat OpenShift Service on AWS cluster.
- You have an existing machine pool that does not contain any taints and contains at least two instances.
Procedure
List the machine pools in the cluster by running the following command:
$ rosa list machinepools --cluster=<cluster_name>Example output
ID           AUTOSCALING  REPLICAS  INSTANCE TYPE  LABELS    TAINTS    AVAILABILITY ZONE  SUBNET                    VERSION  AUTOREPAIR
workers      No           2/2       m5.xlarge                          us-east-2a         subnet-0df2ec3377847164f  4.16.6   Yes
db-nodes-mp  No           2/2       m5.xlarge                          us-east-2a         subnet-0df2ec3377847164f  4.16.6   Yes
Add or update the taints for a machine pool:
To add or update taints for a machine pool that does not use autoscaling, run the following command:
$ rosa edit machinepool --cluster=<cluster_name> \
                        --taints=<key>=<value>:<effect>,<key>=<value>:<effect> \
1 <machine_pool_id>- 1
- Replace
<key>=<value>:<effect>,<key>=<value>:<effect>with a key, value, and effect for each taint, for example--taints=key1=value1:NoSchedule,key2=value2:NoExecute. Available effects includeNoSchedule,PreferNoSchedule, andNoExecute.This list overwrites any modifications made to node taints on an ongoing basis.
The following example adds taints to the
db-nodes-mpmachine pool:$ rosa edit machinepool --cluster=mycluster --replicas 2 --taints=key1=value1:NoSchedule,key2=value2:NoExecute db-nodes-mpExample output
I: Updated machine pool 'db-nodes-mp' on cluster 'mycluster'
Verification
Describe the details of the machine pool with the new taints:
$ rosa describe machinepool --cluster=<cluster_name> --machinepool=<machinepool_name>Example output
ID: db-nodes-mp Cluster ID: <ID_of_cluster> Autoscaling: No Desired replicas: 2 Current replicas: 2 Instance type: m5.xlarge Labels: Tags: Taints: key1=value1:NoSchedule, key2=value2:NoExecute Availability zone: us-east-2a ...- Verify that the taints are included for your machine pool in the output.
4.2.8. Configuring machine pool AutoRepair
Red Hat OpenShift Service on AWS supports an automatic repair process for machine pools, called AutoRepair. AutoRepair is useful when you want the Red Hat OpenShift Service on AWS service to detect certain unhealthy nodes, drain the unhealthy nodes, and re-create the nodes. You can disable AutoRepair if the unhealthy nodes should not be replaced, such as in cases where the nodes should be preserved. AutoRepair is enabled by default on machine pools.
The AutoRepair process deems a node unhealthy when the state of the node is either NotReady or is in an unknown state for predefined amount of time (typically 8 minutes). Whenever two or more nodes become unhealthy simultaneously, the AutoRepair process stops repairing the nodes. Similarly, when a new node is created unhealthy even after a predefined amount of time (typically 20 minutes), the service will auto-repair.
Machine pool AutoRepair is only available for Red Hat OpenShift Service on AWS clusters.
4.2.8.1. Configuring AutoRepair on a machine pool using OpenShift Cluster Manager
You can configure machine pool AutoRepair for your Red Hat OpenShift Service on AWS cluster by using Red Hat OpenShift Cluster Manager.
Prerequisites
- You created a ROSA with HCP cluster.
- You have an existing machine pool.
Procedure
- Navigate to OpenShift Cluster Manager and select your cluster.
-
Under the Machine pools tab, click the Options menu
for the machine pool that you want to configure auto repair for.
- From the menu, select Edit.
- From the Edit Machine Pool dialog box that displays, find the AutoRepair option.
- Select or clear the box next to AutoRepair to enable or disable.
- Click Save to apply the change to the machine pool.
Verification
- Under the Machine pools tab, select > next to your machine pool to expand the view.
- Verify that your machine pool has the correct AutoRepair setting in the expanded view.
4.2.8.2. Configuring machine pool AutoRepair using the ROSA CLI
You can configure machine pool AutoRepair for your Red Hat OpenShift Service on AWS cluster by using the ROSA command-line interface (CLI) (rosa).
Prerequisites
-
You installed and configured the latest AWS (
aws) and ROSA (rosa) CLIs on your workstation. -
You logged in to your Red Hat account by using the
rosaCLI. - You created a Red Hat OpenShift Service on AWS cluster.
- You have an existing machine pool.
Procedure
List the machine pools in the cluster by running the following command:
$ rosa list machinepools --cluster=<cluster_name>Example output
ID           AUTOSCALING  REPLICAS  INSTANCE TYPE  LABELS    TAINTS    AVAILABILITY ZONE  SUBNET                    VERSION  AUTOREPAIR
workers      No           2/2       m5.xlarge                          us-east-2a         subnet-0df2ec3377847164f  4.16.6   Yes
db-nodes-mp  No           2/2       m5.xlarge                          us-east-2a         subnet-0df2ec3377847164f  4.16.6   Yes
Enable or disable AutoRepair on a machine pool:
To disable AutoRepair for a machine pool, run the following command:
$ rosa edit machinepool --cluster=mycluster --machinepool=<machinepool_name> --autorepair=falseTo enable AutoRepair for a machine pool, run the following command:
$ rosa edit machinepool --cluster=mycluster --machinepool=<machinepool_name> --autorepair=trueExample output
I: Updated machine pool 'machinepool_name' on cluster 'mycluster'
Verification
Describe the details of the machine pool:
$ rosa describe machinepool --cluster=<cluster_name> --machinepool=<machinepool_name>Example output
ID: machinepool_name Cluster ID: <ID_of_cluster> Autoscaling: No Desired replicas: 2 Current replicas: 2 Instance type: m5.xlarge Labels: Tags: Taints: Availability zone: us-east-2a ... Autorepair: Yes Tuning configs: Kubelet configs: Additional security group IDs: Node drain grace period: Management upgrade: - Type: Replace - Max surge: 1 - Max unavailable: 0- Verify that the AutoRepair setting is correct for your machine pool in the output.
4.2.9. Adding node tuning to a machine pool
You can add tunings for compute, also called worker, nodes in a machine pool to control their configuration on Red Hat OpenShift Service on AWS clusters.
Prerequisites
-
You installed and configured the latest ROSA command-line interface (CLI) (
rosa) on your workstation. - You logged in to your Red Hat account by using 'rosa'.
- You created a Red Hat OpenShift Service on AWS cluster.
- You have an existing machine pool.
- You have an existing tuning configuration.
Procedure
List all of the machine pools in the cluster:
$ rosa list machinepools --cluster=<cluster_name>Example output
ID           AUTOSCALING  REPLICAS  INSTANCE TYPE  LABELS    TAINTS    AVAILABILITY ZONE  SUBNET                    VERSION  AUTOREPAIR
db-nodes-mp  No           0/2       m5.xlarge                          us-east-2a         subnet-08d4d81def67847b6  4.14.34  Yes
workers      No           2/2       m5.xlarge                          us-east-2a         subnet-08d4d81def67847b6  4.14.34  Yes
You can add tuning configurations to an existing or new machine pool.
Add tunings when creating a machine pool:
$ rosa create machinepool -c <cluster-name> --name <machinepoolname> --tuning-configs <tuning_config_name>Example output
? Tuning configs: sample-tuning
I: Machine pool 'db-nodes-mp' created successfully on hosted cluster 'sample-cluster'
I: To view all machine pools, run 'rosa list machinepools -c sample-cluster'
Add or update the tunings for a machine pool:
$ rosa edit machinepool -c <cluster-name> --machinepool <machinepoolname> --tuning-configs <tuning_config_name>Example output
I: Updated machine pool 'db-nodes-mp' on cluster 'mycluster'
Verification
Describe the machine pool for which you added a tuning config:
$ rosa describe machinepool --cluster=<cluster_name> --machinepool=<machine_pool_name>Example output
ID: db-nodes-mp Cluster ID: <cluster_ID> Autoscaling: No Desired replicas: 2 Current replicas: 2 Instance type: m5.xlarge Labels: Tags: Taints: Availability zone: us-east-2a Subnet: subnet-08d4d81def67847b6 Version: 4.14.34 EC2 Metadata Http Tokens: optional Autorepair: Yes Tuning configs: sample-tuning ...- Verify that the tuning config is included for your machine pool in the output.
4.2.10. Configuring node drain grace periods
You can configure the node drain grace period for machine pools in your cluster. The node drain grace period for a machine pool is how long the cluster respects the Pod Disruption Budget protected workloads when upgrading or replacing the machine pool. After this grace period, all remaining workloads are forcibly evicted. The value range for the node drain grace period is from 0 to 1 week. With the default value 0, or empty value, the machine pool drains without any time limitation until complete.
Prerequisites
-
You installed and configured the latest ROSA command-line interface (CLI) (
rosa) on your workstation. - You created a Red Hat OpenShift Service on AWS cluster.
- You have an existing machine pool.
Procedure
List all of the machine pools in the cluster by running the following command:
$ rosa list machinepools --cluster=<cluster_name>Example output
ID           AUTOSCALING  REPLICAS  INSTANCE TYPE  LABELS    TAINTS    AVAILABILITY ZONE  SUBNET                    VERSION  AUTOREPAIR
db-nodes-mp  No           2/2       m5.xlarge                          us-east-2a         subnet-08d4d81def67847b6  4.14.34  Yes
workers      No           2/2       m5.xlarge                          us-east-2a         subnet-08d4d81def67847b6  4.14.34  Yes
Check the node drain grace period for a machine pool by running the following command:
$ rosa describe machinepool --cluster <cluster_name> --machinepool=<machinepool_name>Example output
ID:                                    workers
Cluster ID:                            2a90jdl0i4p9r9k9956v5ocv40se1kqs
...
Node drain grace period:
1 ...- 1
- If this value is empty, the machine pool drains without any time limitation until complete.
Optional: Update the node drain grace period for a machine pool by running the following command:
$ rosa edit machinepool --node-drain-grace-period="<node_drain_grace_period_value>" --cluster=<cluster_name> <machinepool_name>NoteChanging the node drain grace period during a machine pool upgrade applies to future upgrades, not in-progress upgrades.
Verification
Check the node drain grace period for a machine pool by running the following command:
$ rosa describe machinepool --cluster <cluster_name> <machinepool_name>Example output
ID: workers Cluster ID: 2a90jdl0i4p9r9k9956v5ocv40se1kqs ... Node drain grace period: 30 minutes ...-
Verify the correct
Node drain grace periodfor your machine pool in the output.
4.2.11. Additional resources
4.3. About autoscaling nodes on a cluster
The autoscaler option can be configured to automatically scale the number of machines in a machine pool.
The cluster autoscaler increases the size of the machine pool when there are pods that failed to schedule on any of the current nodes due to insufficient resources or when another node is necessary to meet deployment needs. The cluster autoscaler does not increase the cluster resources beyond the limits that you specify.
Additionally, the cluster autoscaler decreases the size of the machine pool when some nodes are consistently not needed for a significant period, such as when it has low resource use and all of its important pods can fit on other nodes.
When you enable autoscaling, you must also set a minimum and maximum number of worker nodes.
Only cluster owners and organization admins can scale or delete a cluster.
4.3.1. Enabling autoscaling nodes on a cluster
You can enable autoscaling on worker nodes to increase or decrease the number of nodes available by editing the machine pool definition for an existing cluster.
4.3.1.1. Enabling autoscaling nodes in an existing cluster using Red Hat OpenShift Cluster Manager
Enable autoscaling for worker nodes in the machine pool definition from OpenShift Cluster Manager console.
Procedure
- From OpenShift Cluster Manager, navigate to the Cluster List page and select the cluster that you want to enable autoscaling for.
- On the selected cluster, select the Machine pools tab.
-
Click the Options menu
at the end of the machine pool that you want to enable autoscaling for and select Edit.
- On the Edit machine pool dialog, select the Enable autoscaling checkbox.
- Select Save to save these changes and enable autoscaling for the machine pool.
4.3.1.2. Enabling autoscaling nodes in an existing cluster using the ROSA CLI
Configure autoscaling to dynamically scale the number of worker nodes up or down based on load.
Successful autoscaling is dependent on having the correct AWS resource quotas in your AWS account. Verify resource quotas and request quota increases from the AWS console.
Procedure
To identify the machine pool IDs in a cluster, enter the following command:
$ rosa list machinepools --cluster=<cluster_name>Example output
ID AUTOSCALING REPLICAS INSTANCE TYPE LABELS TAINTS AVAILABILITY ZONE SUBNET VERSION AUTOREPAIR workers No 2/2 m5.xlarge us-east-2a subnet-03c2998b482bf3b20 4.16.6 Yes mp1 No 2/2 m5.xlarge us-east-2a subnet-03c2998b482bf3b20 4.16.6 Yes- Get the ID of the machine pools that you want to configure.
To enable autoscaling on a machine pool, enter the following command:
$ rosa edit machinepool --cluster=<cluster_name> <machinepool_ID> --enable-autoscaling --min-replicas=<number> --max-replicas=<number>Example
Enable autoscaling on a machine pool with the ID
mp1on a cluster namedmycluster, with the number of replicas set to scale between 2 and 5 worker nodes:$ rosa edit machinepool --cluster=mycluster mp1 --enable-autoscaling --min-replicas=2 --max-replicas=5
4.3.2. Disabling autoscaling nodes on a cluster
You can disable autoscaling on worker nodes to increase or decrease the number of nodes available by editing the machine pool definition for an existing cluster.
You can disable autoscaling on a cluster using Red Hat OpenShift Cluster Manager or the ROSA command-line interface (CLI) (rosa).
4.3.2.1. Disabling autoscaling nodes in an existing cluster using Red Hat OpenShift Cluster Manager
Disable autoscaling for worker nodes in the machine pool definition from OpenShift Cluster Manager.
Procedure
- From OpenShift Cluster Manager, navigate to the Cluster List page and select the cluster with autoscaling that must be disabled.
- On the selected cluster, select the Machine pools tab.
-
Click the Options menu
at the end of the machine pool with autoscaling and select Edit.
- On the Edit machine pool dialog, deselect the Enable autoscaling checkbox.
- Select Save to save these changes and disable autoscaling from the machine pool.
4.3.2.2. Disabling autoscaling nodes in an existing cluster using the ROSA CLI
Disable autoscaling for worker nodes in the machine pool definition using the ROSA command-line interface (CLI) (rosa).
Procedure
Enter the following command:
$ rosa edit machinepool --cluster=<cluster_name> <machinepool_ID> --enable-autoscaling=false --replicas=<number>Example
Disable autoscaling on the
defaultmachine pool on a cluster namedmycluster:$ rosa edit machinepool --cluster=mycluster default --enable-autoscaling=false --replicas=3
4.4. Configuring cluster memory to meet container memory and risk requirements
As a cluster administrator, you can help your clusters operate efficiently through managing application memory by:
- Determining the memory and risk requirements of a containerized application component and configuring the container memory parameters to suit those requirements.
- Configuring containerized application runtimes (for example, OpenJDK) to adhere optimally to the configured container memory parameters.
- Diagnosing and resolving memory-related error conditions associated with running in a container.
4.4.1. Understanding how to manage application memory
You can review the following concepts to learn how Red Hat OpenShift Service on AWS manages compute resources so that you can lean how to keep your cluster running efficiently.
For each kind of resource (memory, CPU, storage), Red Hat OpenShift Service on AWS allows optional request and limit values to be placed on each container in a pod.
Note the following information about memory requests and memory limits:
Memory request
- The memory request value, if specified, influences the Red Hat OpenShift Service on AWS scheduler. The scheduler considers the memory request when scheduling a container to a node, then fences off the requested memory on the chosen node for the use of the container.
- If a node’s memory is exhausted, Red Hat OpenShift Service on AWS prioritizes evicting its containers whose memory usage most exceeds their memory request. In serious cases of memory exhaustion, the node OOM killer might select and kill a process in a container based on a similar metric.
- The cluster administrator can assign quota or assign default values for the memory request value.
- The cluster administrator can override the memory request values that a developer specifies, to manage cluster overcommit.
Memory limit
- The memory limit value, if specified, provides a hard limit on the memory that can be allocated across all the processes in a container.
- If the memory allocated by all of the processes in a container exceeds the memory limit, the node Out of Memory (OOM) killer immediately selects and kills a process in the container.
- If both memory request and limit are specified, the memory limit value must be greater than or equal to the memory request.
- The cluster administrator can assign quota or assign default values for the memory limit value.
-
The minimum memory limit is 12 MB. If a container fails to start due to a
Cannot allocate memorypod event, the memory limit is too low. Either increase or remove the memory limit. Removing the limit allows pods to consume unbounded node resources.
The steps for sizing application memory on Red Hat OpenShift Service on AWS are as follows:
Determine expected container memory usage
Determine expected mean and peak container memory usage. For example, you could perform separate load testing. Remember to consider all the processes that could potentially run in parallel in the container, such as any ancillary scripts that might be spawned by the main application.
Determine risk appetite
Determine risk appetite for eviction. If the risk appetite is low, the container should request memory according to the expected peak usage plus a percentage safety margin. If the risk appetite is higher, it might be more appropriate to request memory according to the expected mean usage.
Set container memory request
Set the container memory request based on the above. The request should represent the application memory usage as accurately as possible. If the request is too high, cluster and quota usage will be inefficient. If the request is too low, the chances of application eviction increase.
Set container memory limit, if required
Set the container memory limit, if required. Setting a limit has the effect of immediately killing a container process if the combined memory usage of all processes in the container exceeds the limit. Setting a limit might make unanticipated excess memory usage obvious early (fail fast). However, setting a limit also terminates processes abruptly.
Note that some Red Hat OpenShift Service on AWS clusters might require a limit value to be set; some might override the request based on the limit; and some application images rely on a limit value being set as this is easier to detect than a request value.
If the memory limit is set, it should not be set to less than the expected peak container memory usage plus a percentage safety margin.
Ensure applications are tuned
Ensure your applications are tuned with respect to configured request and limit values, if appropriate. This step is particularly relevant to applications which pool memory, such as the JVM. The rest of this page discusses this.
4.4.2. Understanding OpenJDK settings for Red Hat OpenShift Service on AWS
You can review the following concepts to learn about how to deploy OpenJDK applications in your cluster effectively.
The default OpenJDK settings do not work well with containerized environments. As a result, some additional Java memory settings must always be provided whenever running the OpenJDK in a container.
The JVM memory layout is complex, version dependent, and describing it in detail is beyond the scope of this documentation. However, as a starting point for running OpenJDK in a container, at least the following three memory-related tasks are key:
- Overriding the JVM maximum heap size
OpenJDK defaults to using a maximum of 25% of available memory (recognizing any container memory limits in place) for heap memory. This default value is conservative, and, in a properly-configured container environment, would result in 75% of the memory assigned to a container being mostly unused. A much higher percentage for the JVM to use for heap memory, such as 80%, is more suitable in a container context where memory limits are imposed on the container level.
Most of the Red Hat containers include a startup script that replaces the OpenJDK default by setting updated values when the JVM launches.
For example, the Red Hat build of OpenJDK containers have a default value of 80%. This value can be set to a different percentage by defining the
JAVA_MAX_RAM_RATIOenvironment variable.For other OpenJDK deployements, the default value of 25% can be changed using the following command:
Example
$ java -XX:MaxRAMPercentage=80.0- Encouraging the JVM to release unused memory to the operating system, if appropriate
By default, the OpenJDK does not aggressively return unused memory to the operating system. This could be appropriate for many containerized Java workloads, but notable exceptions include workloads where additional active processes co-exist with a JVM within a container, whether those additional processes are native, additional JVMs, or a combination of the two.
Java-based agents can use the following JVM arguments to encourage the JVM to release unused memory to the operating system:
-XX:+UseParallelGC
-XX:MinHeapFreeRatio=5 -XX:MaxHeapFreeRatio=10 -XX:GCTimeRatio=4
-XX:AdaptiveSizePolicyWeight=90
These arguments are intended to return heap memory to the operating system whenever allocated memory exceeds 110% of in-use memory (
-XX:MaxHeapFreeRatio), spending up to 20% of CPU time in the garbage collector (-XX:GCTimeRatio). At no time will the application heap allocation be less than the initial heap allocation (overridden by-XX:InitialHeapSize/-Xms). Detailed additional information is available Tuning Java’s footprint in OpenShift (Part 1), Tuning Java’s footprint in OpenShift (Part 2), and at OpenJDK and Containers.- Ensuring all JVM processes within a container are appropriately configured
In the case that multiple JVMs run in the same container, it is essential to ensure that they are all configured appropriately. For many workloads it will be necessary to grant each JVM a percentage memory budget, leaving a perhaps substantial additional safety margin.
Many Java tools use different environment variables (
JAVA_OPTS,GRADLE_OPTS, and so on) to configure their JVMs and it can be challenging to ensure that the right settings are being passed to the right JVM.The
JAVA_TOOL_OPTIONSenvironment variable is always respected by the OpenJDK, and values specified inJAVA_TOOL_OPTIONSwill be overridden by other options specified on the JVM command line. By default, to ensure that these options are used by default for all JVM workloads run in the Java-based agent image, the Red Hat OpenShift Service on AWS Jenkins Maven agent image sets the following variable:JAVA_TOOL_OPTIONS="-Dsun.zip.disableMemoryMapping=true"
This does not guarantee that additional options are not required, but is intended to be a helpful starting point. Optimally tuning JVM workloads for running in a container is beyond the scope of this documentation, and may involve setting multiple additional JVM options.
4.4.3. Finding the memory request and limit from within a pod
You can configure your container to use the Downward API to dynamically discover its memory request and limit from within a pod. This allows your applications to better manage these resources without needing to use the API server.
Procedure
Configure the pod to add the
MEMORY_REQUESTandMEMORY_LIMITstanzas:Create a YAML file similar to the following:
apiVersion: v1
kind: Pod
metadata:
  name: test
spec:
  securityContext:
    runAsNonRoot: false
    seccompProfile:
      type: RuntimeDefault
  containers:
  - name: test
    image: fedora:latest
    command:
    - sleep
    - "3600"
    env:
    - name: MEMORY_REQUEST
      valueFrom:
        resourceFieldRef:
          containerName: test
          resource: requests.memory
    - name: MEMORY_LIMIT
      valueFrom:
        resourceFieldRef:
          containerName: test
          resource: limits.memory
    resources:
      requests:
        memory: 384Mi
      limits:
        memory: 512Mi
    securityContext:
      allowPrivilegeEscalation: false
      capabilities:
        drop: [ALL]
where:
spec.consinters.env.name.MEMORY_REQUEST- This stanza discovers the application memory request value.
spec.consinters.env.name.MEMORY_LIMIT- This stanza discovers the application memory limit value.
Create the pod by running the following command:
$ oc create -f <file_name>.yaml
Verification
Access the pod using a remote shell:
$ oc rsh testCheck that the requested values were applied:
$ env | grep MEMORY | sortExample output
MEMORY_LIMIT=536870912
MEMORY_REQUEST=402653184
The memory limit value can also be read from inside the container by the /sys/fs/cgroup/memory/memory.limit_in_bytes file.
4.4.4. Understanding OOM kill policy
Red Hat OpenShift Service on AWS can kill a process in a container if the total memory usage of all the processes in the container exceeds the memory limit, or in serious cases of node memory exhaustion.
If a process is Out of Memory (OOM) killed, the container could exit immediately. If the container PID 1 process receives the SIGKILL, the container does exit immediately. Otherwise, the container behavior is dependent on the behavior of the other processes.
For example, a container process exited with code 137, indicating it received a SIGKILL signal.
If the container does not exit immediately, use the following stepts to detect if an OOM kill occurred.
Procedure
Access the pod using a remote shell:
# oc rsh <pod name>Run the following command to see the current OOM kill count in
/sys/fs/cgroup/memory/memory.oom_control:$ grep '^oom_kill ' /sys/fs/cgroup/memory/memory.oom_controlExample output
oom_kill 0Run the following command to provoke an OOM kill:
$ sed -e '' </dev/zeroExample output
KilledRun the following command to see that the OOM kill counter in
/sys/fs/cgroup/memory/memory.oom_controlincremented:$ grep '^oom_kill ' /sys/fs/cgroup/memory/memory.oom_controlExample output
oom_kill 1If one or more processes in a pod are OOM killed, when the pod subsequently exits, whether immediately or not, it will have phase Failed and reason OOMKilled. An OOM-killed pod might be restarted depending on the value of
restartPolicy. If not restarted, controllers such as the replication controller will notice the pod’s failed status and create a new pod to replace the old one.Use the following command to get the pod status:
$ oc get pod testExample output
NAME      READY     STATUS      RESTARTS   AGE
test      0/1       OOMKilled   0          1m
If the pod has not restarted, run the following command to view the pod:
$ oc get pod test -o yamlExample output
apiVersion: v1
kind: Pod
metadata:
  name: test
# ...
status:
  containerStatuses:
  - name: test
    ready: false
    restartCount: 0
    state:
      terminated:
        exitCode: 137
        reason: OOMKilled
  phase: Failed
If restarted, run the following command to view the pod:
$ oc get pod test -o yamlExample output
apiVersion: v1
kind: Pod
metadata:
  name: test
# ...
status:
  containerStatuses:
  - name: test
    ready: true
    restartCount: 1
    lastState:
      terminated:
        exitCode: 137
        reason: OOMKilled
    state:
      running:
  phase: Running
4.4.5. Understanding pod eviction
You can review the following concepts to learn the Red Hat OpenShift Service on AWS pod eviction policy.
Red Hat OpenShift Service on AWS can evict a pod from its node when the node’s memory is exhausted. Depending on the extent of memory exhaustion, the eviction might or might not be graceful. Graceful eviction implies the main process (PID 1) of each container receiving a SIGTERM signal, then some time later a SIGKILL signal if the process has not exited already. Non-graceful eviction implies the main process of each container immediately receiving a SIGKILL signal.
An evicted pod has phase Failed and reason Evicted. It is not restarted, regardless of the value of restartPolicy. However, controllers such as the replication controller will notice the pod’s failed status and create a new pod to replace the old one.
$ oc get pod testExample output
NAME      READY     STATUS    RESTARTS   AGE
test      0/1       Evicted   0          1m
$ oc get pod test -o yamlExample output
apiVersion: v1
kind: Pod
metadata:
  name: test
...
status:
  message: 'Pod The node was low on resource: [MemoryPressure].'
  phase: Failed
  reason: Evicted
Chapter 5. Configuring PID limits
A process identifier (PID) is a unique identifier assigned by the Linux kernel to each process or thread currently running on a system. The number of processes that can run simultaneously on a system is limited to 4,194,304 by the Linux kernel. This number might also be affected by limited access to other system resources such as memory, CPU, and disk space.
In Red Hat OpenShift Service on AWS 4.11 and later, by default, a pod can have a maximum of 4,096 PIDs. If your workload requires more than that, you can increase the allowed maximum number of PIDs by configuring a KubeletConfig object.
Red Hat OpenShift Service on AWS clusters running versions earlier than 4.11 use a default PID limit of 1024.
5.1. Understanding process ID limits
You can review the following information to learn how to limit the number of processes running on your nodes. Configuring an appropriate number of processes can help keep the nodes in your cluster running efficiently.
In Red Hat OpenShift Service on AWS, consider these two supported limits for process ID (PID) usage before you schedule work on your cluster:
Maximum number of PIDs per pod.
The default value is 4,096 in Red Hat OpenShift Service on AWS 4.11 and later. This value is controlled by the
podPidsLimitparameter set on the node.Maximum number of PIDs per node.
The default value depends on node resources. In Red Hat OpenShift Service on AWS, this value is controlled by the
--system-reservedparameter, which reserves PIDs on each node based on the total resources of the node.
When a pod exceeds the allowed maximum number of PIDs per pod, the pod might stop functioning correctly and might be evicted from the node. See the Kubernetes documentation for eviction signals and thresholds for more information.
When a node exceeds the allowed maximum number of PIDs per node, the node can become unstable because new processes cannot have PIDs assigned. If existing processes cannot complete without creating additional processes, the entire node can become unusable and require reboot. This situation can result in data loss, depending on the processes and applications being run. Customer administrators and Red Hat Site Reliability Engineering are notified when this threshold is reached, and a Worker node is experiencing PIDPressure warning will appear in the cluster logs.
5.2. Risks of setting higher process ID limits for Red Hat OpenShift Service on AWS pods
You can review the following information to learn about some considerations about allowing a high maximum number of processes to run on your nodes. Configuring an appropriate number of processes can help keep the nodes in your cluster running efficiently.
You can increase the value for podPidsLimit from the default of 4,096 to a maximum of 16,384. Changing this value might incur downtime for applications, because changing the podPidsLimit requires rebooting the affected node.
If you are running a large number of pods per node, and you have a high podPidsLimit value on your nodes, you risk exceeding the PID maximum for the node.
To find the maximum number of pods that you can run simultaneously on a single node without exceeding the PID maximum for the node, divide 3,650,000 by your podPidsLimit value. For example, if your podPidsLimit value is 16,384, and you expect the pods to use close to that number of process IDs, you can safely run 222 pods on a single node.
Memory, CPU, and available storage can also limit the maximum number of pods that can run simultaneously, even when the podPidsLimit value is set appropriately. For more information, see "Planning your environment" and "Limits and scalability".
5.3. Setting a higher process ID limit on a machine pool in a Red Hat OpenShift Service on AWS cluster
You can set a higher podPidsLimit for machine pools in an existing Red Hat OpenShift Service on AWS cluster by creating or editing a KubeletConfig object that changes the --pod-pids-limit parameter.
Changing the podPidsLimit on an existing machine pool triggers nodes in the machine pool to reboot one at a time. Make this change outside of peak usage hours for workloads in your machine pool and avoid upgrading or hibernating your cluster until all nodes have rebooted.
Prerequisites
- You have a Red Hat OpenShift Service on AWS cluster.
-
You have installed the ROSA command-line interface (CLI) (
rosa). - You have logged in to your Red Hat account by using the ROSA CLI.
Procedure
Create a new
KubeletConfigobject for your cluster that specifies a new--pod-pids-limit:$ rosa create kubeletconfig -c <cluster_name> --name=<kubeletconfig_name> --pod-pids-limit=<value>For example, the following command creates a
set-high-pidsKubeletConfigobject for themy-clustercluster that sets a maximum of 16,384 PIDs per pod:$ rosa create kubeletconfig -c my-cluster --name=set-high-pids --pod-pids-limit=16384Associate the new
KubeletConfigobject with a new or existing machine pool.For a new machine pool:
$ rosa create machinepool -c <cluster_name> --name <machinepool_name> --kubelet-configs=<kubeletconfig_name>For an existing machine pool:
$ rosa edit machinepool -c <cluster_name> --kubelet-configs=<kubeletconfig_name> <machinepool_name>Example output
Editing the kubelet config will cause the Nodes for your Machine Pool to be recreated. This may cause outages to your applications. Do you wish to continue? (y/N)
For example, the following command associates the
set-high-pidsKubeletConfigobject with thehigh-pid-poolmachine pool in themy-clustercluster:$ rosa edit machinepool -c my-cluster --kubelet-configs=set-high-pids high-pid-poolA rolling reboot of worker nodes is triggered when a new
KubeletConfigobject is attached to an existing machine pool. You can check the progress of the rollout in the machine pool description:$ rosa describe machinepool --cluster <cluster_name> --machinepool <machinepool_name>
Verification
Confirm that the new setting is in place on nodes in the machine pool:
$ rosa describe kubeletconfig --cluster=<cluster_name> --name <kubeletconfig_name>The new PIDs limit appears in the output, as shown in the following example:
Example output
Pod Pids Limit: 16384
5.4. Removing custom configuration from a machine pool
You can remove custom configuration on your machine pools by removing the KubeletConfig object that contains the configuration details.
Prerequisites
- You have an existing Red Hat OpenShift Service on AWS cluster.
- You have installed the ROSA CLI (rosa).
- You have logged in to your Red Hat account by using the ROSA CLI.
Procedure
Edit the machine pool and set the
--kubeletconfigsparameter so that theKubeletConfigobject you want to remove is omitted.To remove all
KubeletConfigobjects from the machine pool, set an empty value for the--kubeletconfigsparameter, for example:$ rosa edit machinepool -c <cluster_name> --kubelet-configs="" <machinepool_name>
Verification steps
Confirm that the
KubeletConfigobject you removed is not visible in the machine pool description:$ rosa describe machinepool --cluster <cluster_name> --machinepool=<machinepool_name>
Chapter 6. Managing a cluster with multi-architecture compute machines
Managing a cluster that has nodes with multiple architectures requires you to consider node architecture as you monitor the cluster and manage your workloads. This requires you to take additional considerations into account when you schedule workloads in a multi-architecture cluster.
6.1. Scheduling workloads on clusters with multi-architecture compute machines
When you deploy workloads on a cluster with compute nodes that use different architectures, you must align pod architecture with the architecture of the underlying node. Your workload may also require additional configuration to particular resources depending on the underlying node architecture.
You can use the Multiarch Tuning Operator to enable architecture-aware scheduling of workloads on clusters with multi-architecture compute machines. The Multiarch Tuning Operator implements additional scheduler predicates in the pods specifications based on the architectures that the pods can support at creation time.
For information about the Multiarch Tuning Operator, see Managing workloads on multi-architecture clusters by using the Multiarch Tuning Operator.
6.1.1. Sample multi-architecture node workload deployments
Scheduling a workload to an appropriate node based on architecture works in the same way as scheduling based on any other node characteristic.
- Using
nodeAffinityto schedule nodes with specific architectures You can allow a workload to be scheduled on only a set of nodes with architectures supported by its images, you can set the
spec.affinity.nodeAffinityfield in your pod’s template specification.Example deployment with node affinity set
apiVersion: apps/v1
kind: Deployment
metadata: # ...
spec:
   # ...
  template:
     # ...
    spec:
      affinity:
        nodeAffinity:
          requiredDuringSchedulingIgnoredDuringExecution:
            nodeSelectorTerms:
            - matchExpressions:
              - key: kubernetes.io/arch
                operator: In
                values:
1 - amd64 - arm64- 1
- Specify the supported architectures. Valid values include
amd64,arm64, or both values.
Legal Notice
Copyright © Red Hat
OpenShift documentation is licensed under the Apache License 2.0 (https://www.apache.org/licenses/LICENSE-2.0).
Modified versions must remove all Red Hat trademarks.
Portions adapted from https://github.com/kubernetes-incubator/service-catalog/ with modifications by Red Hat.
Red Hat, Red Hat Enterprise Linux, the Red Hat logo, the Shadowman logo, JBoss, OpenShift, Fedora, the Infinity logo, and RHCE are trademarks of Red Hat, Inc., registered in the United States and other countries.
Linux® is the registered trademark of Linus Torvalds in the United States and other countries.
Java® is a registered trademark of Oracle and/or its affiliates.
XFS® is a trademark of Silicon Graphics International Corp. or its subsidiaries in the United States and/or other countries.
MySQL® is a registered trademark of MySQL AB in the United States, the European Union and other countries.
Node.js® is an official trademark of the OpenJS Foundation.
The OpenStack® Word Mark and OpenStack logo are either registered trademarks/service marks or trademarks/service marks of the OpenStack Foundation, in the United States and other countries and are used with the OpenStack Foundation’s permission. We are not affiliated with, endorsed or sponsored by the OpenStack Foundation, or the OpenStack community.
All other trademarks are the property of their respective owners.