Este contenido no está disponible en el idioma seleccionado.
Chapter 16. Load Balancing-as-a-Service (LBaaS) with Octavia
The OpenStack Load-balancing service (Octavia) provides a Load Balancing-as-a-Service (LBaaS) version 2 implementation for Red Hat OpenStack platform director based installations. This section describes how to enable Octavia and assumes Octavia services are hosted on the same nodes as the Networking API server. By default, the Load-balancing services are on the controller nodes.
Red Hat does not support a migration path from Neutron-LBaaS to Octavia. However, there are some unsupported open source tools that are available. For more information, see https://github.com/nmagnezi/nlbaas2octavia-lb-replicator/tree/stable_1.
LBaaSv2 with Octavia does not currently support plugins. If you use commercial OpenStack load-balancing solutions, you must continue to use the LBaaSv2 API. See Chapter 15, Configure Load Balancing-as-a-Service with the Networking LBaaSv2 API for details.
16.1. Overview of Octavia
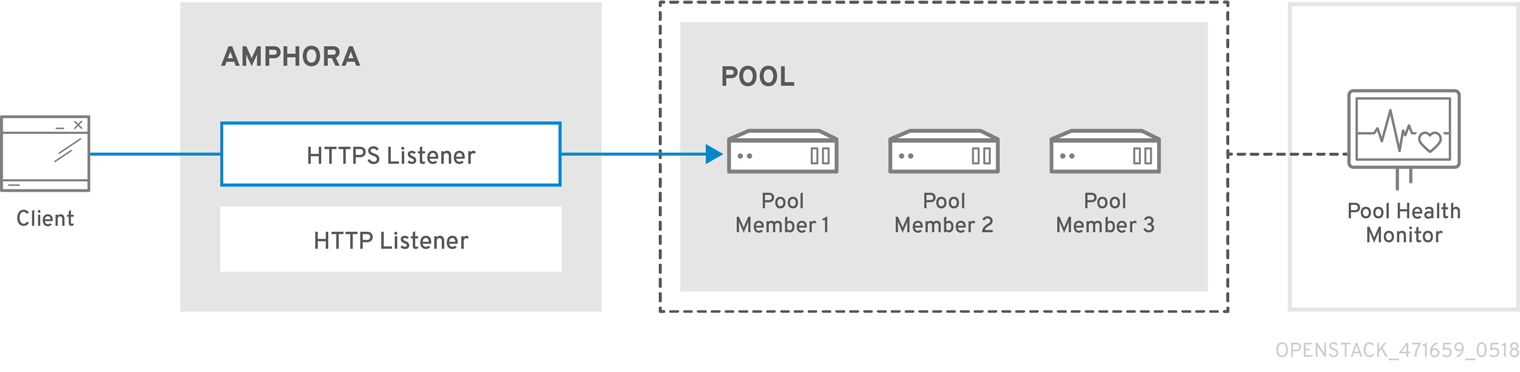
Octavia uses a set of instances on a Compute node called amphorae and communicates with the amphorae over a load-balancing management network (lb-mgmt-net).
Octavia includes the following:
- API Controller(
octavia_api container) - Communicates with the controller worker for configuration updates and to deploy, monitor, or remove amphora instances.
- Controller Worker(
octavia_worker container) - Send configuration and configuration updates to amphorae over the LB network.
- Health Manager
- Monitors the health of individual amphorae and handles failover events if amphorae fail unexpectedly.
- Housekeeping Manager
- Cleans up stale (deleted) database records, manages the spares pool, and manages amphora certificate rotation.
- Loadbalancer
- The top API object that represents the load balancing entity. The VIP address is allocated when the loadbalancer is created. When creating the loadbalancer, an Amphora instance is booted on the compute node.
- Amphora
- The instance that does the load balancing. Amphorae are typically instances running on the Compute nodes and are configured with load balancing parameters according to the listener, pool, health monitor, L7 policies, and members configuration. Amphorae send a periodic heartbeat to the Health Manager.
- Listener
- The listening endpoint,for example HTTP, of a load balanced service. A listener might refer to several pools (and switch between them using layer 7 rules).
- Pool
- A group of members that handle client requests from the load balancer (amphora). A pool is associated with only one listener.
- Member
- Compute instances that serve traffic behind the load balancer (amphora) in a pool.
The following diagram describes the flow of HTTPS traffic through to a pool member:
16.2. Software Requirements
Octavia requires that you configure the following core OpenStack components:
- Compute (nova)
-
Networking (enable
allowed_address_pairs) - Image (glance)
- Identity (keystone)
- RabbitMQ
- MySQL
16.3. Prerequisites for the undercloud
This section assumes that your undercloud is already installed and ready to deploy an overcloud with Octavia enabled. Only container deployments are supported. Octavia runs on your Controller node.
If you want to enable the Octavia service on an existing overcloud deployment, you must prepare the undercloud. Failure to do so results in the overcloud installation being reported as successful yet without Octavia running. To prepare the undercloud, see Transitioning to Containerized Services.
16.3.1. Octavia feature support matrix
| Feature | Support level in RHOSP 14 |
| ML2/OVS L3 HA | Full support |
| ML2/OVS DVR | Full support |
| ML2/OVS L3 HA + composable network node [a] | Full support |
| ML2/OVS DVR + composable network node [b] | Full support |
| ML2/OVN L3 HA | Full support |
| ML2/OVN DVR | Full support |
| ML2/ODL | Full support |
| Amphora active-standby | |
| Terminated HTTPS load balancers | Technology Preview only |
| Amphora spare pool | Technology Preview only |
| UDP | Technology Preview only |
| Backup members | Technology Preview only |
| Provider framework | No support |
[a]
Network node with OVS, metadata, DHCP, L3, and Octavia (worker, health monitor, house keeping).
[b]
Network node with OVS, metadata, DHCP, L3, and Octavia (worker, health monitor, house keeping).
| |
16.4. Planning your Octavia deployment
Red Hat OpenStack Platform provides a workflow task to simplify the post-deployment steps for the Load-balancing service. The tripleo-common/workbooks/octavia_post.yaml workbook is configured from the tripleo-heat-templates/docker/services/octavia/octavia-deployment-config.yaml file.
This Octavia workflow runs a set of Ansible playbooks to provide the following post-deployment steps as the last phase of the overcloud deployment:
- Configure certificates and keys.
- Configure the load-balancing management network between the amphorae and the Octavia Controller worker and health manager.
Do not modify the OpenStack heat templates directly. Create a custom environment file (for example, octavia-environment.yaml) to override default parameter values.
Amphora Image
The director automatically downloads the default amphora image, uploads it to the overcloud Image service, and then configures Octavia to use this amphora image. The director updates this image to the latest amphora image during a stack update or upgrade.
Custom amphora images are not supported.
16.4.1. Configuring Octavia certificates and keys
Octavia containers require secure communication with load balancers and with each other. You can specify your own certificates and keys or allow these to be automatically generated by Red Hat OpenStack Platform director. We recommend you allow director to automatically create the required private certificate authorities and issue the necessary certificates.
If you must use your own certificates and keys, complete the following steps:
On the machine on which you run the
openstack overcloud deploycommand, create a custom YAML environment file.vi /usr/share/openstack-tripleo-heat-templates/environments/services/octavia-environment.yaml
$ vi /usr/share/openstack-tripleo-heat-templates/environments/services/octavia-environment.yamlCopy to Clipboard Copied! Toggle word wrap Toggle overflow In the YAML environment file, add the following parameters with values appropriate for your site:
OctaviaCaCert:The certificate for the CA Octavia will use to generate certificates.
OctaviaCaKey:The private CA key used to sign the generated certificates.
OctaviaClientCert:The client certificate and un-encrypted key issued by the Octavia CA for the controllers.
OctaviaCaKeyPassphrase:The passphrase used with the private CA key above.
OctaviaGenerateCerts:The Boolean that instructs director to enable (true) or disable (false) automatic certificate and key generation.
Here is an example:
NoteThe certificates and keys are multi-line values, and you must indent all of the lines to the same level.
Copy to Clipboard Copied! Toggle word wrap Toggle overflow
16.5. Deploying Octavia
You deploy Octavia using the Red Hat OpenStack Platform (RHOSP) director. Director uses heat templates to deploy Octavia (and other RHOSP components).
Ensure that your environment has access to the Octavia image. For more information about image registry methods, see the Containerization section of the Director Installation and Usage guide.
To deploy Octavia in the overcloud:
openstack overcloud deploy --templates -e \
/usr/share/openstack-tripleo-heat-templates/environments/services/octavia.yaml
$ openstack overcloud deploy --templates -e \
/usr/share/openstack-tripleo-heat-templates/environments/services/octavia.yamlThe director updates the amphora image to the latest amphora image during a stack update or upgrade.
16.5.1. Changing default settings
If you want to override the default parameters that director uses to deploy Octavia, you can specify your values in one or more custom, YAML-formatted environment files (for example, octavia-environment.yaml).
The parameters that director uses to deploy and configure Octavia are pretty straightforward. Here are a few examples:
OctaviaControlNetworkThe name for the neutron network used for the amphora control network.
OctaviaControlSubnetCidrThe subnet for amphora control subnet in CIDR form.
OctaviaMgmtPortDevNameThe name of the Octavia management network interface used for communication between octavia worker/health-manager with the amphora machine.
For the list of Octavia parameters that director uses, consult the following file on the undercloud:
/usr/share/openstack-tripleo-heat-templates/docker/services/octavia/octavia-deployment-config.yaml
/usr/share/openstack-tripleo-heat-templates/docker/services/octavia/octavia-deployment-config.yaml
Your environment file must contain the keywords parameter_defaults:. Put your parameter value pairs after the parameter_defaults: keyword. Here is an example:
YAML files are extremely sensitive about where in the file a parameter is placed. Make sure that parameter_defaults: starts in the first column (no leading whitespace characters), and your parameter value pairs start in column five (each parameter has four whitespace characters in front of it).
16.6. Configuring an HTTP load balancer
To configure a simple HTTP load balancer:
Create the load balancer on a subnet:
openstack loadbalancer create --name lb1 --vip-subnet-id private-subnet
$ openstack loadbalancer create --name lb1 --vip-subnet-id private-subnetCopy to Clipboard Copied! Toggle word wrap Toggle overflow Monitor the state of the load balancer:
openstack loadbalancer show lb1
$ openstack loadbalancer show lb1Copy to Clipboard Copied! Toggle word wrap Toggle overflow When you see a status of Active and ONLINE, the load balancer is created and running and you can go to the next step.
NoteTo check load balancer status from the Compute service (nova), use the
openstack server list --all | grep amphoracommand. Creating load balancers can appear to be a slow process (status displaying as PENDING) because load balancers are virtual machines (VMs) and not containers.Create a listener:
openstack loadbalancer listener create --name listener1 --protocol HTTP --protocol-port 80 lb1
$ openstack loadbalancer listener create --name listener1 --protocol HTTP --protocol-port 80 lb1Copy to Clipboard Copied! Toggle word wrap Toggle overflow Create the listener default pool:
openstack loadbalancer pool create --name pool1 --lb-algorithm ROUND_ROBIN --listener listener1 --protocol HTTP
$ openstack loadbalancer pool create --name pool1 --lb-algorithm ROUND_ROBIN --listener listener1 --protocol HTTPCopy to Clipboard Copied! Toggle word wrap Toggle overflow Create a health monitor on the pool to test the “/healthcheck” path:
openstack loadbalancer healthmonitor create --delay 5 --max-retries 4 --timeout 10 --type HTTP --url-path /healthcheck pool1
$ openstack loadbalancer healthmonitor create --delay 5 --max-retries 4 --timeout 10 --type HTTP --url-path /healthcheck pool1Copy to Clipboard Copied! Toggle word wrap Toggle overflow Add load balancer members to the pool:
openstack loadbalancer member create --subnet-id private-subnet --address 192.0.2.10 --protocol-port 80 pool1
openstack loadbalancer member create --subnet-id private-subnet --address 192.0.2.11 --protocol-port 80 pool1
$ openstack loadbalancer member create --subnet-id private-subnet --address 192.0.2.10 --protocol-port 80 pool1
$ openstack loadbalancer member create --subnet-id private-subnet --address 192.0.2.11 --protocol-port 80 pool1
Copy to Clipboard Copied! Toggle word wrap Toggle overflow Create a floating IP address on a public subnet:
openstack floating ip create public
$ openstack floating ip create publicCopy to Clipboard Copied! Toggle word wrap Toggle overflow Associate this floating IP with the load balancer VIP port:
openstack floating ip set --port `_LOAD_BALANCER_VIP_PORT_` `_FLOATING_IP_`
$ openstack floating ip set --port `_LOAD_BALANCER_VIP_PORT_` `_FLOATING_IP_`Copy to Clipboard Copied! Toggle word wrap Toggle overflow TipTo locate LOAD_BALANCER_VIP_PORT, run this command:
openstack loadbalancer show lb1.
16.7. Verifying the load balancer
To verify the load balancer:
Use the
openstack loadbalancer showcommand to verify the load balancer settings:Copy to Clipboard Copied! Toggle word wrap Toggle overflow Use the
amphora listcommand to find the UUID of the amphora associated with load balancer lb1:openstack loadbalancer amphora list | grep <UUID of loadbalancer lb1>
(overcloud) [stack@undercloud-0 ~]$ openstack loadbalancer amphora list | grep <UUID of loadbalancer lb1>Copy to Clipboard Copied! Toggle word wrap Toggle overflow Use the
amphora showcommand with the amphora UUID to view amphora information:Copy to Clipboard Copied! Toggle word wrap Toggle overflow Use the
openstack loadbalancer listener showcommand to view the listener details:Copy to Clipboard Copied! Toggle word wrap Toggle overflow Use the
openstack loadbalancer pool showcommand to view the pool and load-balancer members:Copy to Clipboard Copied! Toggle word wrap Toggle overflow Use the
openstack floating ip listcommand to verify the floating IP address:Copy to Clipboard Copied! Toggle word wrap Toggle overflow Verify HTTPS traffic flows across the load balancer:
Copy to Clipboard Copied! Toggle word wrap Toggle overflow
16.8. Accessing Amphora logs
Amphora is the instance that performs load balancing. You can view Amphora logging information in the systemd journal.
Start the ssh-agent, and add your user’s identity key to the agent:
[stack@undercloud-0] $ eval `ssh-agent -s`
[stack@undercloud-0] $ ssh-add
[stack@undercloud-0] $ eval `ssh-agent -s`
[stack@undercloud-0] $ ssh-add
Copy to Clipboard Copied! Toggle word wrap Toggle overflow Use SSH to connect to the Amphora instance:
[stack@undercloud-0] $ ssh -A -t heat-admin@<controller node IP address> ssh cloud-user@<IP address of Amphora in load-balancing management network>
[stack@undercloud-0] $ ssh -A -t heat-admin@<controller node IP address> ssh cloud-user@<IP address of Amphora in load-balancing management network>Copy to Clipboard Copied! Toggle word wrap Toggle overflow View the systemd journal:
[cloud-user@amphora-f60af64d-570f-4461-b80a-0f1f8ab0c422 ~] $ sudo journalctl
[cloud-user@amphora-f60af64d-570f-4461-b80a-0f1f8ab0c422 ~] $ sudo journalctlCopy to Clipboard Copied! Toggle word wrap Toggle overflow Refer to the journalctl man page for information about filtering journal output.
When you are finished viewing the journal, and have closed your connections to the Amphora instance and the Controller node, make sure that you stop the SSH agent:
[stack@undercloud-0] $ exit
[stack@undercloud-0] $ exitCopy to Clipboard Copied! Toggle word wrap Toggle overflow
16.9. Updating running amphora instances
16.9.1. Overview
Periodically, you must update a running load balancing instance (amphora) with a newer image. Some events that might cause you to update your amphora instances are:
- An update or upgrade of Red Hat OpenStack Platform.
- A security update to your system.
- A change to a different flavor for the underlying virtual machine.
Updating an amphora image requires failing over the load balancer, and then waiting for the load balancer to regain an active state. When the load balancer is again active, it is running the new image.
16.9.2. Prerequisites
New images for amphora are available during an OpenStack update or upgrade.
16.9.3. Update amphora instances with new images
During an OpenStack update or upgrade, director automatically downloads the default amphora image, uploads it to the overcloud Image service (glance), and then configures Octavia to use the new image. When you failover the load balancer, you are forcing Octavia to start the new amphora image.
- Make sure that you have reviewed the prerequisites before you begin updating amphora.
List the IDs for all the load balancers that you want to update:
openstack loadbalancer list -c id -f value
$ openstack loadbalancer list -c id -f valueCopy to Clipboard Copied! Toggle word wrap Toggle overflow Failover each load balancer:
openstack loadbalancer failover <loadbalancer_id>
$ openstack loadbalancer failover <loadbalancer_id>Copy to Clipboard Copied! Toggle word wrap Toggle overflow NoteWhen you start failing over the load balancers, monitor system utilization, and as needed, adjust the rate at which you perform failovers. A load balancer failover creates new virtual machines and ports, which might temporarily increase the load on OpenStack Networking.
Monitor the state of the failed over load balancer:
openstack loadbalancer show <loadbalancer_id>
$ openstack loadbalancer show <loadbalancer_id>Copy to Clipboard Copied! Toggle word wrap Toggle overflow The update is complete when the load balancer status is
ACTIVE.