Este contenido no está disponible en el idioma seleccionado.
Chapter 19. Configure Firewall-as-a-Service (FWaaS)
The Firewall-as-a-Service (FWaaS) plug-in adds perimeter firewall management to OpenStack Networking (neutron). FWaaS uses iptables to apply firewall policy to all virtual routers within a project, and supports one firewall policy and logical firewall instance per project.
FWaaS operates at the perimeter by filtering traffic at the OpenStack Networking (neutron) router. This distinguishes it from security groups, which operate at the instance level.
FWaaS is currently in technical preview; untested operation is not recommended.
The example diagram below illustrates the flow of ingress and egress traffic for the VM2 instance:
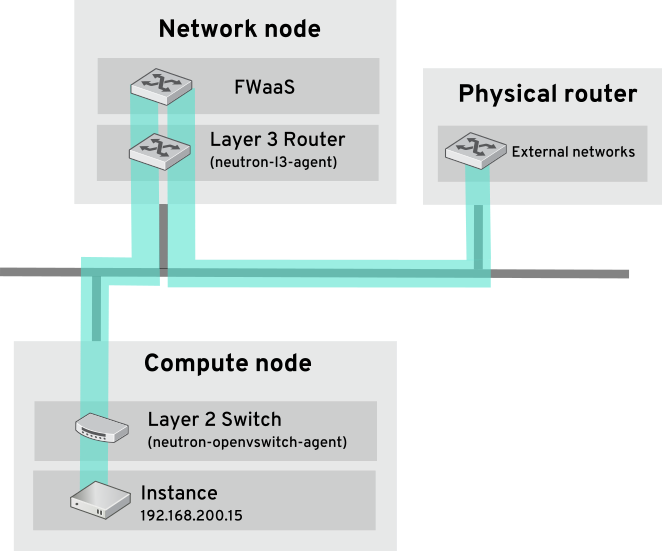
Figure 1. FWaaS architecture
19.1. Enable FWaaS
1. Install the FWaaS packages:
# yum install openstack-neutron-fwaas python-neutron-fwaas
2. Enable the FWaaS plugin in the neutron.conf file:
service_plugins = neutron.services.firewall.fwaas_plugin.FirewallPlugin
3. Configure FWaaS in the fwaas_driver.ini file:
[fwaas]
driver = neutron.services.firewall.drivers.linux.iptables_fwaas.IptablesFwaasDriver
enabled = True

[service_providers]
service_provider = LOADBALANCER:Haproxy:neutron_lbaas.services.loadbalancer.drivers.haproxy.plugin_driver.HaproxyOnHostPluginDriver:default
4. FWaaS management options are available in OpenStack dashboard. Enable this option in the local_settings.py file, usually located on the Controller node:
/usr/share/openstack-dashboard/openstack_dashboard/local/local_settings.py
'enable_firewall' = True
5. Restart neutron-server to apply the changes.
# systemctl restart neutron-server19.2. Configure FWaaS
First create the firewall rules and create a policy to contain them, then create a firewall and apply the policy:
1. Create a firewall rule:
$ neutron firewall-rule-create --protocol <tcp|udp|icmp|any> --destination-port <port-range> --action <allow|deny>The CLI requires a protocol value; if the rule is protocol agnostic, the any value can be used.
2. Create a firewall policy:
$ neutron firewall-policy-create --firewall-rules "<firewall-rule IDs or names separated by space>" myfirewallpolicyThe order of the rules specified above is important. You can create an empty firewall policy and add rules later, either with the update operation (when adding multiple rules) or with the insert-rule operations (when adding a single rule).
Note: FWaaS always adds a default deny all rule at the lowest precedence of each policy. Consequently, a firewall policy with no rules blocks all traffic by default.
19.3. Create a firewall
$ neutron firewall-create <firewall-policy-uuid>The firewall remains in PENDING_CREATE state until an OpenStack Networking router is created, and an interface is attached.
19.4. Allowed-address-pairs
Allowed-address-pairs allow you to specify mac_address/ip_address (CIDR) pairs that pass through a port regardless of subnet. This enables the use of protocols such as VRRP, which floats an IP address between two instances to enable fast data plane failover.
The allowed-address-pairs extension is currently only supported by these plug-ins: ML2, Open vSwitch, and VMware NSX.
19.4.1. Basic allowed-address-pairs operations
Create a port with a specific allowed-address-pairs:
# neutron port-create net1 --allowed-address-pairs type=dict list=true mac_address=<mac_address>,ip_address=<ip_cidr>19.4.2. Adding allowed-address-pairs
# neutron port-update <port-uuid> --allowed-address-pairs type=dict list=true mac_address=<mac_address>,ip_address=<ip_cidr>OpenStack Networking prevents setting an allowed-address-pair that matches the mac_address and ip_address of a port. This is because such a setting would have no effect since traffic matching the mac_address and ip_address is already allowed to pass through the port.