Este contenido no está disponible en el idioma seleccionado.
Chapter 9. Change requests in Business Central
If you have more than one branch in a Business Central project and you make a change in a branch that you want to merge to another branch, you can create a change request. Any user with permission to view the target branch, usually the master branch, can see the change request.
9.1. Creating change requests
You can create a change request in a Business Central project after you have made a change in your project, for example after you have added or deleted an attribute to an asset.
Prerequisites
- You have more than one branch of a Business Central project.
- You made a change in one branch that you want to merge to another branch.
Procedure
-
In Business Central, go to Menu
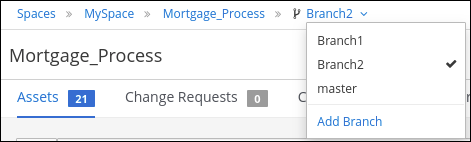
Design Projects and select the space and project that contains the change that you want to merge. On the project page, select the branch that contains the change.
Figure 9.1. Select a branch menu
Do one of the following tasks to submit the change request:
-
Click
 in the upper-right corner of the screen and select Submit Change Request.
Click the Change Requests tab and then click Submit Change Request.
The Submit Change Request window appears.
-
Click
- Enter a summary and a description, select the target branch, and click Submit. The target branch is the branch where the change will be merged. After you click Submit, the change request window appears.
9.2. Working with change requests
You can view change requests for any branch that you have access to. You must have administrator permissions to accept a change request.
Prerequisites
- You have more than one branch of a Business Central project.
Procedure
-
In Business Central, go to Menu
Design Projects and select a space and project. On the project page, verify that you are on the correct branch.
- Click the Change Requests tab. A list of pending change requests appears.
- To filter change requests, select Open, Closed, or All to the left of the Search box.
- To search for specific change requests, enter an ID or text in the Search box and click the magnifying glass.
To view the change request details, click the summary link. The change request window has two tabs:
- Review the Overview tab for general information about the change request.
- Click the Changed Files tab and expand a file to review the proposed changes.
Click a button in the top right corner.
- Click Squash and Merge to squash all commits into a single commit and merge the commit to the target branch.
- Click Merge to merge the changes into the target branch.
- Click Reject to reject the changes and leave the target branch unchanged.
- Click Close to close the change request without rejecting or accepting it. Note that only the user who created the submitted the change request can close it.
- Click Cancel to return to the project window without making any changes.