Este contenido no está disponible en el idioma seleccionado.
Chapter 2. Using SSL to protect connections to Red Hat Quay
This document assumes you have deployed Red Hat Quay in a single-node or highly available deployment.
To configure Red Hat Quay with a self-signed certificate, you need to create a Certificate Authority (CA), then generate the required key and certificate files. You then enter those files using the Red Hat Quay Config Tool or command line.
2.1. Create a CA and sign a certificate
Create a root CA.
$ openssl genrsa -out rootCA.key 2048
$ openssl req -x509 -new -nodes -key rootCA.key -sha256 -days 1024 -out rootCA.pem
The result are rootCA.key and rootCA.pem files in the current directory.
Create certificate and private key: If you are having Red Hat Quay handle TLS, you need to create a certificate and private key to provide during configuration. You can get those files from a certificate signing authority. Here we show how to create those files using the self-signed certificate authority you just created.
In this example, you create device.crt and device.key files, which will be uploaded to Red Hat Quay and renamed ssl.cert and ssl.key, respectively.
Because OpenShift creates long fully qualified domain names, consider using a wildcard to identify the larger domain, instead of the specific route to the Red Hat Quay application. For example, use something like *.apps.openshift.example.com when prompted for the server’s hostname:
Common Name (eg, your name or your server's hostname) []:*apps.openshift.example.com$ openssl genrsa -out device.key 2048 $ openssl req -new -key device.key -out device.csrThen sign the certificate with the root CA created earlier:
$ openssl x509 -req -in device.csr -CA rootCA.pem \
       -CAkey rootCA.key -CAcreateserial -out device.crt -days 500 -sha256
Instead generating the *.key and *.crt files as just shown, you could create an openssl.cnf file. This lets you add more information to the resulting certificate than you can get by just responding to the prompts in the command for generating the certificate request. In this example of an openssl.cnf file, replace DNS.1 and IP.1 with the hostname and IP address of the Red Hat Quay server:
openssl.cnf
[req]
req_extensions = v3_req
distinguished_name = req_distinguished_name
[req_distinguished_name]
[ v3_req ]
basicConstraints = CA:FALSE
keyUsage = nonRepudiation, digitalSignature, keyEncipherment
subjectAltName = @alt_names
[alt_names]
DNS.1 = reg.example.com
IP.1 = 12.345.678.9
You could then generate the key as follows:
$ openssl x509 -req -in ssl.csr -CA rootCA.pem \
   -CAkey rootCA.key -CAcreateserial -out ssl.cert \
   -days 356 -extensions v3_req -extfile openssl.cnf
2.2. Configure Red Hat Quay to use the new certificate
The next step can be accomplished either in the Red Hat Quay screen or from the terminal.
2.2.1. Configure SSL from the Red Hat Quay Setup screen
Start the quay container in config mode, as described in each deployment guide. In the server Configuration section, enable SSL as follows:
-
Set the
Server Hostnameto the appropriate value and check theEnable SSLbox, then upload thessl.keyandssl.certfiles (in our example, nameddevice.keyanddevice.crt, respectively):
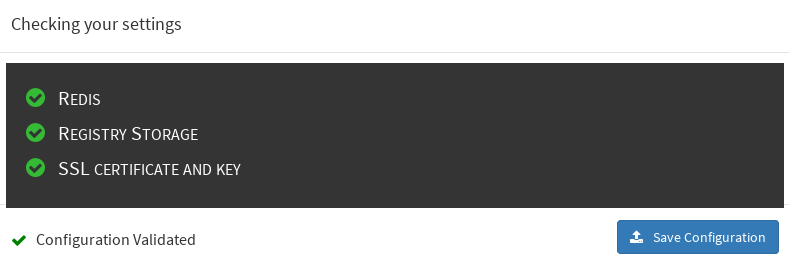
-
Save the configuration. Red Hat Quay will automatically validate the SSL certificate:
-
Restart the container

2.2.2. Configure with the command line
By not using the web interface the configuration checking mechanism built into Red Hat Quay is unavailable. It is suggested to use the web interface if possible. For non-OpenShift installations, you can configure SSL from the command-line interface as follows:
Copy the
ssl.keyandssl.certinto the specifiedconfigdirectory. In this example, the config directory for Red Hat Quay is on a host named reg.example.com in a directory named /mnt/quay/config.NoteThe certificate/key files must be named ssl.key and ssl.cert.
$ ls
ssl.cert  ssl.key
$ scp ssl.* root@reg.example.com:/mnt/quay/config/
[root@reg.example.com ~]$ ls /mnt/quay/config/
config.yaml  ssl.cert  ssl.key
Modify the
PREFERRED_URL_SCHEME:parameter in config.yaml fromhttptohttpsPREFERRED_URL_SCHEME: httpsRestart the Red Hat Quay container:
$ docker ps
CONTAINER ID  IMAGE                     COMMAND                 CREATED       STATUS      PORTS                   NAMES
eaf45a4aa12d  ...redhat.com/rhscl/redis  "/usr/bin/redis-serve" 22 hours ago  Up 22 hours 0.0.0.0:6379->6379/tcp  dreamy...
cbe7b0fa39d8  quay.io/redhat/quay       "/sbin/my_init"         22 hours ago  Up one hour 80/tcp,443/tcp,443/tcp  ferv...
705fe7311940  mysql:5.7                 "/entrypoint.sh mysql"  23 hours ago  Up 22 hours 0.0.0.0:3306->3306/tcp  mysql
$ docker restart cbe7b0fa39d8
2.2.3. Test the secure connection
Confirm the configuration by visiting the URL from a browser https://reg.example.com/  "Your Connection is not secure" means the CA is untrusted but confirms that SSL is functioning properly. To avoid these messages, you need to get a certificate from a trusted certificate authority.
2.3. Configuring Docker to Trust a Certificate Authority
Docker requires that custom certs be installed to /etc/docker/certs.d/ under a directory with the same name as the hostname private registry. It is also required for the cert to be called ca.crt. Here is how to do that:
Copy the rootCA file.
$ cp tmp/rootCA.pem /etc/docker/certs.d/reg.example.com/ca.crtAfter you have copied the rootCA.pem file,
docker loginshould authenticate successfully and pushing to the repository should succeed.$ sudo docker push reg.example.com/kbrwn/hello The push refers to a repository [reg.example.com/kbrwn/hello] 5f70bf18a086: Layer already exists e493e9cb9dac: Pushed 1770dbc4af14: Pushed a7bb4eb71da7: Pushed 9fad7adcbd46: Pushed 2cec07a74a9f: Pushed f342e0a3e445: Pushed b12f995330bb: Pushed 2016366cdd69: Pushed a930437ab3a5: Pushed 15eb0f73cd14: Pushed latest: digest: sha256:c24be6d92b0a4e2bb8a8cc7c9bd044278d6abdf31534729b1660a485b1cd315c size: 7864