Este contenido no está disponible en el idioma seleccionado.
7.2. Preparing and Adding NFS Storage
7.2.1. Preparing NFS Storage
Copiar enlaceEnlace copiado en el portapapeles!
Set up NFS shares that will serve as a data domain on a Red Hat Enterprise Linux server. It is not necessary to create an ISO domain if one was created during the Red Hat Enterprise Virtualization Manager installation procedure.
For information on the setup and configuration of NFS on Red Hat Enterprise Linux, see Network File System (NFS) in the Red Hat Enterprise Linux 6 Storage Administration Guide or Network File System (NFS) in the Red Hat Enterprise Linux 7 Storage Administration Guide.
Specific system user accounts and system user groups are required by Red Hat Enterprise Virtualization so the Manager can store data in the storage domains represented by the exported directories.
Procedure 7.1. Configuring the Required System User Accounts and System User Groups
- Create the group
kvm:groupadd kvm -g 36
# groupadd kvm -g 36Copy to Clipboard Copied! Toggle word wrap Toggle overflow - Create the user
vdsmin the groupkvm:useradd vdsm -u 36 -g 36
# useradd vdsm -u 36 -g 36Copy to Clipboard Copied! Toggle word wrap Toggle overflow - Set the ownership of your exported directories to 36:36, which gives vdsm:kvm ownership:
chown -R 36:36 /exports/data
chown -R 36:36 /exports/export
# chown -R 36:36 /exports/data
# chown -R 36:36 /exports/export
Copy to Clipboard Copied! Toggle word wrap Toggle overflow - Change the mode of the directories so that read and write access is granted to the owner, and so that read and execute access is granted to the group and other users:
chmod 0755 /exports/data
chmod 0755 /exports/export
# chmod 0755 /exports/data
# chmod 0755 /exports/export
Copy to Clipboard Copied! Toggle word wrap Toggle overflow
For more information on the required system users and groups see Appendix G, System Accounts.
7.2.2. Attaching NFS Storage
Copiar enlaceEnlace copiado en el portapapeles!
Attach an NFS storage domain to the data center in your Red Hat Enterprise Virtualization environment. This storage domain provides storage for virtualized guest images and ISO boot media. This procedure assumes that you have already exported shares. You must create the data domain before creating the export domain. Use the same procedure to create the export domain, selecting Export / NFS in the Domain Function / Storage Type list.
- In the Red Hat Enterprise Virtualization Manager Administration Portal, click the resource tab.
- Click .
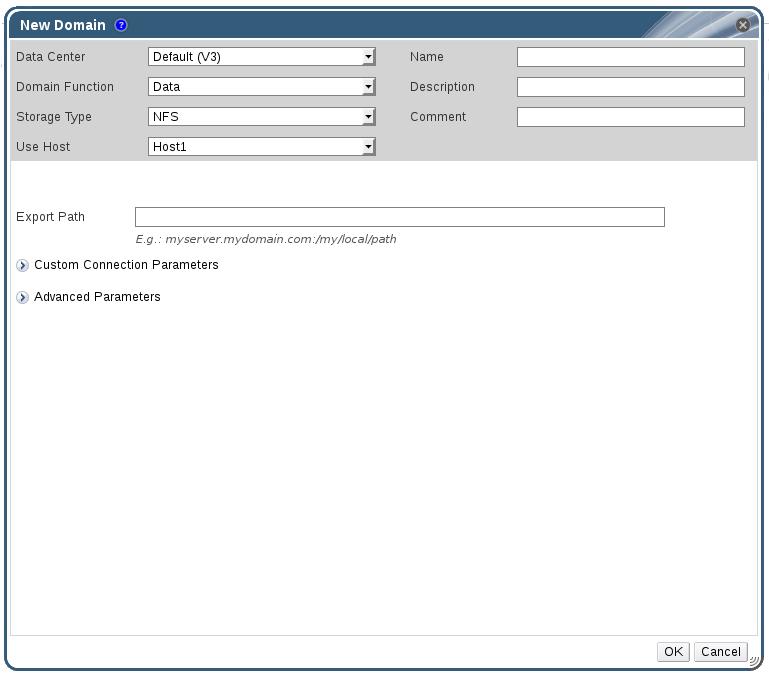
Figure 7.1. The New Domain Window
- Enter a Name for the storage domain.
- Accept the default values for the Data Center, Domain Function, Storage Type, Format, and Use Host lists.
- Enter the Export Path to be used for the storage domain.The export path should be in the format of 192.168.0.10:/data or domain.example.com:/data.
- Optionally, you can configure the advanced parameters.
- Click Advanced Parameters.
- Enter a percentage value into the Warning Low Space Indicator field. If the free space available on the storage domain is below this percentage, warning messages are displayed to the user and logged.
- Enter a GB value into the Critical Space Action Blocker field. If the free space available on the storage domain is below this value, error messages are displayed to the user and logged, and any new action that consumes space, even temporarily, will be blocked.
- Select the Wipe After Delete check box to enable the wipe after delete option. This option can be edited after the domain is created, but doing so will not change the wipe after delete property of disks that already exist.
- Click OK.The new NFS data domain is displayed in the Storage tab with a status of
Lockeduntil the disk is prepared. The data domain is then automatically attached to the data center.
7.2.3. Increasing NFS Storage
Copiar enlaceEnlace copiado en el portapapeles!
To increase the amount of NFS storage, you can either create a new storage domain and add it to an existing data center, or increase the available free space on the NFS server. For the former option, see Section 7.2.2, “Attaching NFS Storage”. The following procedure explains how to increase the available free space on the existing NFS server.
Procedure 7.2. Increasing an Existing NFS Storage Domain
- Click the Storage resource tab and select an NFS storage domain.
- In the details pane, click the Data Center tab and click the button to place the storage domain into maintenance mode. This unmounts the existing share and makes it possible to resize the storage domain.
- On the NFS server, resize the storage. For Red Hat Enterprise Linux 6 systems, see Red Hat Enterprise Linux 6 Storage Administration Guide. For Red Hat Enterprise Linux 7 systems, see Red Hat Enterprise Linux 7 Storage Administration Guide.
- In the details pane, click the Data Center tab and click the button to mount the storage domain.