Ce contenu n'est pas disponible dans la langue sélectionnée.
Chapter 2. Tutorial
Study the following tutorial to learn how to use basic process constructs in the JPDL. The tutorial also demonstrates ways in which to manage run-time executions via the application programming interface.
The examples in this tutorial can be found in the JBPM download package (located in the
src/java.examples sub-directory).
Note
Red Hat recommends creating a project at this point. You can then freely experiment and create variations of each of the examples.
First, download and install the JBPM.
jBPM includes a graphical designer tool for authoring the XML that is shown in the examples. You can find download instructions for the graphical designer in the Downloadables Overview section.. You don't need the graphical designer tool to complete this tutorial.
2.1. "Hello World" Example
Copier lienLien copié sur presse-papiers!
A process definition is a directed graph, made up of nodes and transitions. The
Hello World process definition has three of these nodes. (It is best to learn how the pieces fit together by studying this simple process without using the Designer Tool.) The following diagram presents a graphical representation of the Hello World process:
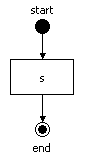
Figure 2.1. The Hello World Process Graph
public void testHelloWorldProcess() {
  // This method shows a process definition and one execution
  // of the process definition.  The process definition has
  // 3 nodes: an unnamed start-state, a state 's' and an
  // end-state named 'end'.
  // The next line parses a piece of xml text into a
  // ProcessDefinition.  A ProcessDefinition is the formal
  // description of a process represented as a java object.
  ProcessDefinition processDefinition = ProcessDefinition.parseXmlString(
      "<process-definition>" +
      "  <start-state>" +
      "    <transition to='s' />" +
      "  </start-state>" +
      "  <state name='s'>" +
      "    <transition to='end' />" +
      "  </state>" +
      "  <end-state name='end' />" +
      "</process-definition>"
  );

    // The next line creates one execution of the process definition.
    // After construction, the process execution has one main path
    // of execution (=the root token) that is positioned in the
    // start-state.
    ProcessInstance processInstance =
      new ProcessInstance(processDefinition);

    // After construction, the process execution has one main path
    // of execution (=the root token).
    Token token = processInstance.getRootToken();

    // Also after construction, the main path of execution is positioned
    // in the start-state of the process definition.
    assertSame(processDefinition.getStartState(), token.getNode());

    // Let's start the process execution, leaving the start-state
    // over its default transition.
    token.signal();
    // The signal method will block until the process execution
    // enters a wait state.

    // The process execution will have entered the first wait state
    // in state 's'. So the main path of execution is now
    // positioned in state 's'
    assertSame(processDefinition.getNode("s"), token.getNode());

    // Let's send another signal.  This will resume execution by
    // leaving the state 's' over its default transition.
    token.signal();
    // Now the signal method returned because the process instance
    // has arrived in the end-state.

    assertSame(processDefinition.getNode("end"), token.getNode());
}
2.2. Database Example
Copier lienLien copié sur presse-papiers!
One of the jBPM's basic features is the ability to make the execution of database processes persist while they are in a
wait state. The next example demonstrates this ability, storing a process instance in the jBPM database.
It works by creating separate
methods for different pieces of user code. For instance, a piece of user code in a web application starts a process and "persists" the execution in the database. Later, a message-driven bean loads that process instance and resumes the execution of it.
Here, separate
methods are created for different pieces of user code. For instance, a piece of code in a web application starts a process and "persists" the execution in the database. Later, a message-driven bean loads the process instance and resumes executing it.
Note
More information about jBPM persistence can be found in Chapter 4, Persistence .
public class HelloWorldDbTest extends TestCase {

  static JbpmConfiguration jbpmConfiguration = null;

  static {
    // An example configuration file such as this can be found in
    // 'src/config.files'.  Typically the configuration information
    // is in the resource file 'jbpm.cfg.xml', but here we pass in
    // the configuration information as an XML string.

    // First we create a JbpmConfiguration statically.  One
    // JbpmConfiguration can be used for all threads in the system,
    // that is why we can safely make it static.

    jbpmConfiguration = JbpmConfiguration.parseXmlString(
      "<jbpm-configuration>" +

      // A jbpm-context mechanism separates the jbpm core
      // engine from the services that jbpm uses from
      // the environment.

      "<jbpm-context>"+
      "<service name='persistence' "+
      " factory='org.jbpm.persistence.db.DbPersistenceServiceFactory' />" +
      "</jbpm-context>"+

      // Also all the resource files that are used by jbpm are
      // referenced from the jbpm.cfg.xml

      "<string name='resource.hibernate.cfg.xml' " +
      "  value='hibernate.cfg.xml' />" +
      "<string name='resource.business.calendar' " +
      "  value='org/jbpm/calendar/jbpm.business.calendar.properties' />" +
      "<string name='resource.default.modules' " +
      "  value='org/jbpm/graph/def/jbpm.default.modules.properties' />" +
      "<string name='resource.converter' " +
      "  value='org/jbpm/db/hibernate/jbpm.converter.properties' />" +
      "<string name='resource.action.types' " +
      "  value='org/jbpm/graph/action/action.types.xml' />" +
      "<string name='resource.node.types' " +
      "  value='org/jbpm/graph/node/node.types.xml' />" +
      "<string name='resource.varmapping' " +
      "  value='org/jbpm/context/exe/jbpm.varmapping.xml' />" +
      "</jbpm-configuration>"
    );
  }

  public void setUp() {
    jbpmConfiguration.createSchema();
  }

  public void tearDown() {
    jbpmConfiguration.dropSchema();
  }

  public void testSimplePersistence() {
    // Between the 3 method calls below, all data is passed via the
    // database.  Here, in this unit test, these 3 methods are executed
    // right after each other because we want to test a complete process
    // scenario.  But in reality, these methods represent different
    // requests to a server.

    // Since we start with a clean, empty in-memory database, we have to
    // deploy the process first.  In reality, this is done once by the
    // process developer.
    deployProcessDefinition();

    // Suppose we want to start a process instance (=process execution)
    // when a user submits a form in a web application...
    processInstanceIsCreatedWhenUserSubmitsWebappForm();

    // Then, later, upon the arrival of an asynchronous message the
    // execution must continue.
    theProcessInstanceContinuesWhenAnAsyncMessageIsReceived();
  }

  public void deployProcessDefinition() {
    // This test shows a process definition and one execution
    // of the process definition.  The process definition has
    // 3 nodes: an unnamed start-state, a state 's' and an
    // end-state named 'end'.
    ProcessDefinition processDefinition =
        ProcessDefinition.parseXmlString(
      "<process-definition name='hello world'>" +
      "  <start-state name='start'>" +
      "    <transition to='s' />" +
      "  </start-state>" +
      "  <state name='s'>" +
      "    <transition to='end' />" +
      "  </state>" +
      "  <end-state name='end' />" +
      "</process-definition>"
    );

    //Lookup the pojo persistence context-builder that is configured above
    JbpmContext jbpmContext = jbpmConfiguration.createJbpmContext();
    try {
      // Deploy the process definition in the database
      jbpmContext.deployProcessDefinition(processDefinition);

    } finally {
      // Tear down the pojo persistence context.
      // This includes flush the SQL for inserting the process definition
      // to the database.
      jbpmContext.close();
    }
  }

  public void processInstanceIsCreatedWhenUserSubmitsWebappForm() {
    // The code in this method could be inside a struts-action
    // or a JSF managed bean.

    //Lookup the pojo persistence context-builder that is configured above
    JbpmContext jbpmContext = jbpmConfiguration.createJbpmContext();
    try {

      GraphSession graphSession = jbpmContext.getGraphSession();

      ProcessDefinition processDefinition =
          graphSession.findLatestProcessDefinition("hello world");

      //With the processDefinition that we retrieved from the database, we
      //can create an execution of the process definition just like in the
      //hello world example (which was without persistence).
      ProcessInstance processInstance =
          new ProcessInstance(processDefinition);

      Token token = processInstance.getRootToken();
      assertEquals("start", token.getNode().getName());
      // Let's start the process execution
      token.signal();
      // Now the process is in the state 's'.
      assertEquals("s", token.getNode().getName());

      // Now the processInstance is saved in the database.  So the
      // current state of the execution of the process is stored in the
      // database.
      jbpmContext.save(processInstance);
      // The method below will get the process instance back out
      // of the database and resume execution by providing another
      // external signal.

    } finally {
      // Tear down the pojo persistence context.
      jbpmContext.close();
    }
  }

  public void theProcessInstanceContinuesWhenAnAsyncMessageIsReceived() {
  //The code in this method could be the content of a message driven bean.

    // Lookup the pojo persistence context-builder that is configured above
    JbpmContext jbpmContext = jbpmConfiguration.createJbpmContext();
    try {

      GraphSession graphSession = jbpmContext.getGraphSession();
      // First, we need to get the process instance back out of the
      // database.  There are several options to know what process
      // instance we are dealing  with here.  The easiest in this simple
      // test case is just to look for the full list of process instances.
      // That should give us only one result.  So let's look up the
      // process definition.

      ProcessDefinition processDefinition =
          graphSession.findLatestProcessDefinition("hello world");

      //Now search for all process instances of this process definition.
      List processInstances =
          graphSession.findProcessInstances(processDefinition.getId());

      // Because we know that in the context of this unit test, there is
      // only one execution.  In real life, the processInstanceId can be
      // extracted from the content of the message that arrived or from
      // the user making a choice.
      ProcessInstance processInstance =
          (ProcessInstance) processInstances.get(0);

      // Now we can continue the execution.  Note that the processInstance
      // delegates signals to the main path of execution (=the root token).
      processInstance.signal();

      // After this signal, we know the process execution should have
      // arrived in the end-state.
      assertTrue(processInstance.hasEnded());

      // Now we can update the state of the execution in the database
      jbpmContext.save(processInstance);

    } finally {
      // Tear down the pojo persistence context.
      jbpmContext.close();
    }
  }
}
2.3. Contextual Example: Process Variables
Copier lienLien copié sur presse-papiers!
Whilst processes are executed, the context information is held in process variables. These are similar to
java.util.Map classes, in that they map variable names to values, the latter being Java objects. (The process variables are "persisted" as part of the process instance.)
Note
In order to keep the following example simple, only the application programming interface that is needed to work with variables is shown (without any persistence functionality.)
Note
Find out more about variables by reading Chapter 7, The Context
// This example also starts from the hello world process.
// This time even without modification.
ProcessDefinition processDefinition = ProcessDefinition.parseXmlString(
  "<process-definition>" +
  "  <start-state>" +
  "    <transition to='s' />" +
  "  </start-state>" +
  "  <state name='s'>" +
  "    <transition to='end' />" +
  "  </state>" +
  "  <end-state name='end' />" +
  "</process-definition>"
);

ProcessInstance processInstance =
  new ProcessInstance(processDefinition);

// Fetch the context instance from the process instance
// for working with the process variables.
ContextInstance contextInstance =
  processInstance.getContextInstance();

// Before the process has left the start-state,
// we are going to set some process variables in the
// context of the process instance.
contextInstance.setVariable("amount", new Integer(500));
contextInstance.setVariable("reason", "i met my deadline");

// From now on, these variables are associated with the
// process instance.  The process variables are now accessible
// by user code via the API shown here, but also in the actions
// and node implementations.  The process variables are also
// stored into the database as a part of the process instance.

processInstance.signal();

// The variables are accessible via the contextInstance.

assertEquals(new Integer(500),
             contextInstance.getVariable("amount"));
assertEquals("i met my deadline",
             contextInstance.getVariable("reason"));
2.4. Task Assignment Example
Copier lienLien copié sur presse-papiers!
The next example demonstrates how to assign a task to a user. Because of the separation between the jBPM workflow engine and the organizational model, expression languages will always be too limited to use to calculate actors. Instead, specify an implementation of
AssignmentHandler and use it to include the calculation of actors for tasks.
public void testTaskAssignment() {
  // The process shown below is based on the hello world process.
  // The state node is replaced by a task-node.  The task-node
  // is a node in JPDL that represents a wait state and generates
  // task(s) to be completed before the process can continue to
  // execute.
  ProcessDefinition processDefinition = ProcessDefinition.parseXmlString(
    "<process-definition name='the baby process'>" +
    "  <start-state>" +
    "    <transition name='baby cries' to='t' />" +
    "  </start-state>" +
    "  <task-node name='t'>" +
    "    <task name='change nappy'>" +
    "      <assignment" +
    "       class='org.jbpm.tutorial.taskmgmt.NappyAssignmentHandler' />" +
    "    </task>" +
    "    <transition to='end' />" +
    "  </task-node>" +
    "  <end-state name='end' />" +
    "</process-definition>"
  );

  // Create an execution of the process definition.
  ProcessInstance processInstance =
      new ProcessInstance(processDefinition);
  Token token = processInstance.getRootToken();

  // Let's start the process execution, leaving the start-state
  // over its default transition.
  token.signal();
  // The signal method will block until the process execution
  // enters a wait state.   In this case, that is the task-node.
  assertSame(processDefinition.getNode("t"), token.getNode());

  // When execution arrived in the task-node, a task 'change nappy'
  // was created and the NappyAssignmentHandler was called to determine
  // to whom the task should be assigned.  The NappyAssignmentHandler
  // returned 'papa'.

  // In a real environment, the tasks would be fetched from the
  // database with the methods in the org.jbpm.db.TaskMgmtSession.
  // Since we don't want to include the persistence complexity in
  // this example, we just take the first task-instance of this
  // process instance (we know there is only one in this test
  // scenario).
  TaskInstance taskInstance = (TaskInstance)
      processInstance
        .getTaskMgmtInstance()
        .getTaskInstances()
        .iterator().next();

  // Now, we check if the taskInstance was actually assigned to 'papa'.
  assertEquals("papa", taskInstance.getActorId() );

  // Now we suppose that 'papa' has done his duties and mark the task
  // as done.
  taskInstance.end();
  // Since this was the last (only) task to do, the completion of this
  // task triggered the continuation of the process instance execution.

  assertSame(processDefinition.getNode("end"), token.getNode());
}
2.5. Example of a Custom Action
Copier lienLien copié sur presse-papiers!
Actions are mechanisms designed to bind custom Java code to jBPM processes. They can be associated with their own nodes (if these are relevant to the graphical representation of the process.) Alternatively, actions can be "placed on" events (for instance, when taking a transition, or entering or leaving a node.) If they are placed on events, the actions are not treated as part of the graphical representation (but they are still run when the events are "fired" during a run-time process execution.)
Firstly, look at the action handler implementation to be used in the next example:
MyActionHandler. It is not particularly impressive of itself: it merely sets the Boolean variable isExecuted to true. Note that this variable is static so one can access it from within the action handler (and from the action itself) to verify its value.
Note
More information about "actions" can be found in Section 6.5, “Actions”
// MyActionHandler represents a class that could execute
// some user code during the execution of a jBPM process.
public class MyActionHandler implements ActionHandler {

  // Before each test (in the setUp), the isExecuted member
  // will be set to false.
  public static boolean isExecuted = false;

  // The action will set the isExecuted to true so the
  // unit test will be able to show when the action
  // is being executed.
  public void execute(ExecutionContext executionContext) {
    isExecuted = true;
  }
}
Important
Prior to each test, set the static field
MyActionHandler.isExecuted to false.
  // Each test will start with setting the static isExecuted
  // member of MyActionHandler to false.
  public void setUp() {
    MyActionHandler.isExecuted = false;
  }
The first example illustrates an action on a transition:
public void testTransitionAction() {
    // The next process is a variant of the hello world process.
    // We have added an action on the transition from state 's'
    // to the end-state.  The purpose of this test is to show
    // how easy it is to integrate Java code in a jBPM process.
    ProcessDefinition processDefinition = ProcessDefinition.parseXmlString(
      "<process-definition>" +
      "  <start-state>" +
      "    <transition to='s' />" +
      "  </start-state>" +
      "  <state name='s'>" +
      "    <transition to='end'>" +
      "      <action class='org.jbpm.tutorial.action.MyActionHandler' />" +
      "    </transition>" +
      "  </state>" +
      "  <end-state name='end' />" +
      "</process-definition>"
    );

    // Let's start a new execution for the process definition.
    ProcessInstance processInstance =
      new ProcessInstance(processDefinition);

    // The next signal will cause the execution to leave the start
    // state and enter the state 's'
    processInstance.signal();

    // Here we show that MyActionHandler was not yet executed.
    assertFalse(MyActionHandler.isExecuted);
    // ... and that the main path of execution is positioned in
    // the state 's'
    assertSame(processDefinition.getNode("s"),
               processInstance.getRootToken().getNode());

    // The next signal will trigger the execution of the root
    // token.  The token will take the transition with the
    // action and the action will be executed during the
    // call to the signal method.
    processInstance.signal();

    // Here we can see that MyActionHandler was executed during
    // the call to the signal method.
    assertTrue(MyActionHandler.isExecuted);
  }
The next example shows the same action now being placed on both the
enter-node and leave-node events. Note that a node has more than one event type. This is in contrast to a transition, which has only one event. Hence, when placing actions on a node, always put them in an event element.
ProcessDefinition processDefinition = ProcessDefinition.parseXmlString(
  "<process-definition>" +
  "  <start-state>" +
  "    <transition to='s' />" +
  "  </start-state>" +
  "  <state name='s'>" +
  "    <event type='node-enter'>" +
  "      <action class='org.jbpm.tutorial.action.MyActionHandler' />" +
  "    </event>" +
  "    <event type='node-leave'>" +
  "      <action class='org.jbpm.tutorial.action.MyActionHandler' />" +
  "    </event>" +
  "    <transition to='end'/>" +
  "  </state>" +
  "  <end-state name='end' />" +
  "</process-definition>"
);

ProcessInstance processInstance =
  new ProcessInstance(processDefinition);

assertFalse(MyActionHandler.isExecuted);
// The next signal will cause the execution to leave the start
// state and enter the state 's'.  So the state 's' is entered
// and hence the action is executed.
processInstance.signal();
assertTrue(MyActionHandler.isExecuted);

// Let's reset the MyActionHandler.isExecuted
MyActionHandler.isExecuted = false;

// The next signal will trigger execution to leave the
// state 's'.  So the action will be executed again.
processInstance.signal();
// Voila.
assertTrue(MyActionHandler.isExecuted);