Ce contenu n'est pas disponible dans la langue sélectionnée.
2. Installer
The Red Hat Enterprise Linux installer (also known as
anaconda) assists in the installation of Red Hat Enterprise Linux 6. This section of the release notes provides an overview of the new features implemented in the installer for Red Hat Enterprise Linux 6.
Note
The Red Hat Enterprise Linux 6 Installation Guide provides detailed documentation of the installer and the installation process.
2.1. Installation Methods
Copier lienLien copié sur presse-papiers!
The installer provides three main interfaces to install Red Hat Enterprise Linux: kickstart, the graphical installer and the text-based installer.
2.1.1. Graphical Installer
Copier lienLien copié sur presse-papiers!
The Red Hat Enterprise Linux graphical installer steps the user through the major steps involved in preparing a system for installation. The Red Hat Enterprise Linux 6 installation GUI introduces major usability enhancements for disk partitioning and storage configuration.
Early in the installation process, the user is now given the choice of basic storage devices or specialized storage devices. Basic Storage Devices typically do not need any additional configuration settings before the device is usable. A new interface has been implemented for configuring specialized storage devices. Firmware RAID devices, Fibre Channel over Ethernet (FCoE) devices, multipath devices, and other storage area network (SAN) devices can now be easily configured using the new interface.
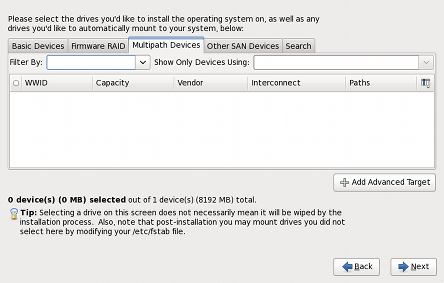
Figure 1. Specialized Storage Devices Configuration
The interface for choosing partitioning layouts has been enhanced, providing detailed descriptions and diagrams for each default partitioning layout
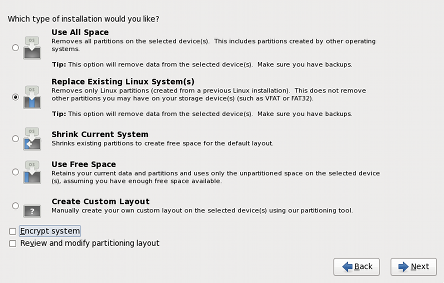
Figure 2. Partitioning layout choices
The Installer allows storage devices to be specified as either install target devices or data storage devices prior to installation.
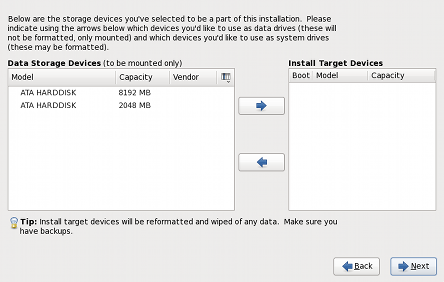
Figure 3. Specifying Storage Devices
2.1.2. Kickstart
Copier lienLien copié sur presse-papiers!
Kickstart is an automated installation method that system administrators use to install Red Hat Enterprise Linux. Using kickstart, a single file is created, containing the answers to all the questions that would normally be asked during a typical installation.
Red Hat Enterprise Linux 6 introduces improvements to the validation of kickstart files, allowing the installer to capture issues with kickstart file syntax before an installation commences.
2.1.3. Text-based Installer
Copier lienLien copié sur presse-papiers!
The text-based installer is provided primarily for systems with limited resources. The text-based installer has been simplified, permitting installation to the default disk layouts, and installation of new and updated packages.
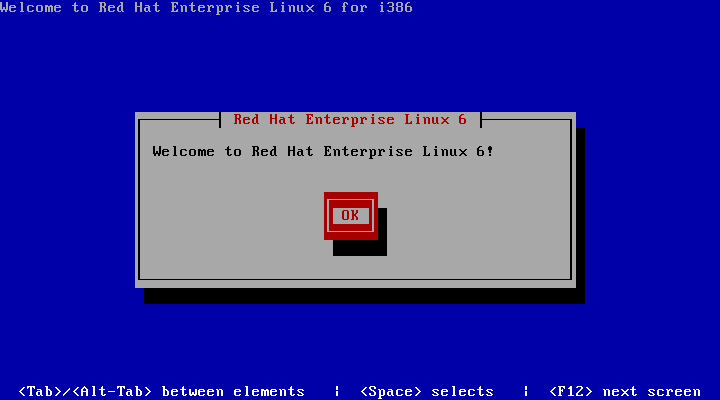
Figure 4. text-based installer
Note
Some installations require advanced installation options that are not present in the text-based installer. If the target system cannot run the graphical installer locally, use the Virtual Network Computing (VNC) display protocol to complete the installation.
2.2. Creating Backup Passphrases During Installation
Copier lienLien copié sur presse-papiers!
The installer in Red Hat Enterprise Linux 6 provides the ability to save encryption keys and create backup passphrases for encrypted filesystems. This feature is discussed in futher detail in Section 8.3, “Backup Passphrases for Encrypted Storage Devices”
Note
Currently, creating backup passphrases for encrypted devices during installation can only be achieved during a kickstart installation. More information on this new feature, including how to utilize this feature in a kickstart installation of Red Hat Enterprise Linux 6, refer to the Disk Encryption appendix in the Installation Guide.
2.3. DVD Media Boot Catalog Entries
Copier lienLien copié sur presse-papiers!
The DVD media for Red Hat Enterprise Linux 6 include boot catalog entries for both BIOS- and UEFI-based computers. This allows the media to boot systems based on either firmware interface. (UEFI is the Unified Extensible Firmware Interface, a standard software interface initially developed by Intel and now managed by the Unified EFI Forum. It is intended as a replacement for the older BIOS firmware.)
Important
Some systems with very old BIOS implementations will not boot from media which include more than one boot catalog entry. Such systems will not boot from a Red Hat Enterprise Linux 6 DVD but may be bootable using a USB drive or over a network using PXE.
Note
UEFI and BIOS boot configurations differ significantly from each other and are not interchangeable. An installed instance of Red Hat Enterprise Linux 6 will not boot if the firmware it was configured for is changed. You cannot, for example, install the operating system on a BIOS-based system and then boot the installed instance on a UEFI-based system.
2.4. Installation Crash Reporting
Copier lienLien copié sur presse-papiers!
Red Hat Enterprise Linux 6 features enhanced installation crash reporting in the installer. If the installer encounters an error during the installation process, details of the error are reported to the user.

Figure 5. installation error reporting
The details of the error can be instantly reported to the Red Hat Bugzilla bug tracking website, or in cases where there is no internet connectivity, saved locally to disk.
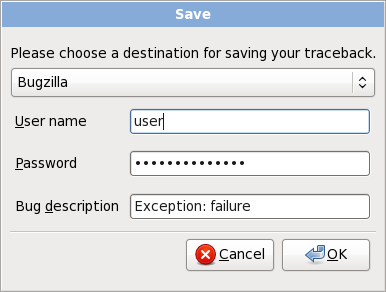
Figure 6. Sending to Bugzilla
2.5. Installation Logs
Copier lienLien copié sur presse-papiers!
To assist troubleshooting and debugging of installations, additional details are now included in log files produced by the installer. Further information on installation logs, and how to use them for troubleshooting can be found in the following sections of the Installation Guide.