Ce contenu n'est pas disponible dans la langue sélectionnée.
Chapter 4. Backup, restore, and disaster recovery for hosted control planes
If you need to back up and restore etcd on a hosted cluster or provide disaster recovery for a hosted cluster, see the following procedures.
Hosted control planes is a Technology Preview feature only. Technology Preview features are not supported with Red Hat production service level agreements (SLAs) and might not be functionally complete. Red Hat does not recommend using them in production. These features provide early access to upcoming product features, enabling customers to test functionality and provide feedback during the development process.
For more information about the support scope of Red Hat Technology Preview features, see Technology Preview Features Support Scope.
4.1. Backing up and restoring etcd on a hosted cluster
If you use hosted control planes on OpenShift Container Platform, the process to back up and restore etcd is different from the usual etcd backup process.
4.1.1. Taking a snapshot of etcd on a hosted cluster
As part of the process to back up etcd for a hosted cluster, you take a snapshot of etcd. After you take the snapshot, you can restore it, for example, as part of a disaster recovery operation.
This procedure requires API downtime.
Procedure
Pause reconciliation of the hosted cluster by entering this command:
$ oc patch -n clusters hostedclusters/${CLUSTER_NAME} -p '{"spec":{"pausedUntil":"'${PAUSED_UNTIL}'"}}' --type=mergeStop all etcd-writer deployments by entering this command:
$ oc scale deployment -n ${HOSTED_CLUSTER_NAMESPACE} --replicas=0 kube-apiserver openshift-apiserver openshift-oauth-apiserverTake an etcd snapshot by using the
execcommand in each etcd container:$ oc exec -it etcd-0 -n ${HOSTED_CLUSTER_NAMESPACE} -- env ETCDCTL_API=3 /usr/bin/etcdctl --cacert /etc/etcd/tls/client/etcd-client-ca.crt --cert /etc/etcd/tls/client/etcd-client.crt --key /etc/etcd/tls/client/etcd-client.key --endpoints=localhost:2379 snapshot save /var/lib/data/snapshot.db$ oc exec -it etcd-0 -n ${HOSTED_CLUSTER_NAMESPACE} -- env ETCDCTL_API=3 /usr/bin/etcdctl -w table snapshot status /var/lib/data/snapshot.dbCopy the snapshot data to a location where you can retrieve it later, such as an S3 bucket, as shown in the following example.
NoteThe following example uses signature version 2. If you are in a region that supports signature version 4, such as the us-east-2 region, use signature version 4. Otherwise, if you use signature version 2 to copy the snapshot to an S3 bucket, the upload fails and signature version 2 is deprecated.
Example
BUCKET_NAME=somebucket
FILEPATH="/${BUCKET_NAME}/${CLUSTER_NAME}-snapshot.db"
CONTENT_TYPE="application/x-compressed-tar"
DATE_VALUE=`date -R`
SIGNATURE_STRING="PUT\n\n${CONTENT_TYPE}\n${DATE_VALUE}\n${FILEPATH}"
ACCESS_KEY=accesskey
SECRET_KEY=secret
SIGNATURE_HASH=`echo -en ${SIGNATURE_STRING} | openssl sha1 -hmac ${SECRET_KEY} -binary | base64`

oc exec -it etcd-0 -n ${HOSTED_CLUSTER_NAMESPACE} -- curl -X PUT -T "/var/lib/data/snapshot.db" \
  -H "Host: ${BUCKET_NAME}.s3.amazonaws.com" \
  -H "Date: ${DATE_VALUE}" \
  -H "Content-Type: ${CONTENT_TYPE}" \
  -H "Authorization: AWS ${ACCESS_KEY}:${SIGNATURE_HASH}" \
  https://${BUCKET_NAME}.s3.amazonaws.com/${CLUSTER_NAME}-snapshot.db
If you want to be able to restore the snapshot on a new cluster later, save the encryption secret that the hosted cluster references, as shown in this example:
Example
oc get hostedcluster $CLUSTER_NAME -o=jsonpath='{.spec.secretEncryption.aescbc}'
{"activeKey":{"name":"CLUSTER_NAME-etcd-encryption-key"}}

# Save this secret, or the key it contains so the etcd data can later be decrypted
oc get secret ${CLUSTER_NAME}-etcd-encryption-key -o=jsonpath='{.data.key}'
Next steps
Restore the etcd snapshot.
4.1.2. Restoring an etcd snapshot on a hosted cluster
If you have a snapshot of etcd from your hosted cluster, you can restore it. Currently, you can restore an etcd snapshot only during cluster creation.
To restore an etcd snapshot, you modify the output from the create cluster --render command and define a restoreSnapshotURL value in the etcd section of the HostedCluster specification.
The --render flag in the hcp create command does not render the secrets. To render the secrets, you must use both the --render and the --render-sensitive flags in the hcp create command.
Prerequisites
You took an etcd snapshot on a hosted cluster.
Procedure
On the
awscommand-line interface (CLI), create a pre-signed URL so that you can download your etcd snapshot from S3 without passing credentials to the etcd deployment:ETCD_SNAPSHOT=${ETCD_SNAPSHOT:-"s3://${BUCKET_NAME}/${CLUSTER_NAME}-snapshot.db"} ETCD_SNAPSHOT_URL=$(aws s3 presign ${ETCD_SNAPSHOT})Modify the
HostedClusterspecification to refer to the URL:spec: etcd: managed: storage: persistentVolume: size: 4Gi type: PersistentVolume restoreSnapshotURL: - "${ETCD_SNAPSHOT_URL}" managementType: Managed-
Ensure that the secret that you referenced from the
spec.secretEncryption.aescbcvalue contains the same AES key that you saved in the previous steps.
4.2. Disaster recovery for a hosted cluster within an AWS region
In a situation where you need disaster recovery (DR) for a hosted cluster, you can recover a hosted cluster to the same region within AWS. For example, you need DR when the upgrade of a management cluster fails and the hosted cluster is in a read-only state.
Hosted control planes is a Technology Preview feature only. Technology Preview features are not supported with Red Hat production service level agreements (SLAs) and might not be functionally complete. Red Hat does not recommend using them in production. These features provide early access to upcoming product features, enabling customers to test functionality and provide feedback during the development process.
For more information about the support scope of Red Hat Technology Preview features, see Technology Preview Features Support Scope.
The DR process involves three main steps:
- Backing up the hosted cluster on the source management cluster
- Restoring the hosted cluster on a destination management cluster
- Deleting the hosted cluster from the source management cluster
Your workloads remain running during the process. The Cluster API might be unavailable for a period, but that will not affect the services that are running on the worker nodes.
Both the source management cluster and the destination management cluster must have the --external-dns flags to maintain the API server URL, as shown in this example:
Example: External DNS flags
--external-dns-provider=aws \
--external-dns-credentials=<AWS Credentials location> \
--external-dns-domain-filter=<DNS Base Domain>
That way, the server URL ends with https://api-sample-hosted.sample-hosted.aws.openshift.com.
If you do not include the --external-dns flags to maintain the API server URL, the hosted cluster cannot be migrated.
4.2.1. Example environment and context
Consider an scenario where you have three clusters to restore. Two are management clusters, and one is a hosted cluster. You can restore either the control plane only or the control plane and the nodes. Before you begin, you need the following information:
- Source MGMT Namespace: The source management namespace
- Source MGMT ClusterName: The source management cluster name
-
Source MGMT Kubeconfig: The source management
kubeconfigfile -
Destination MGMT Kubeconfig: The destination management
kubeconfigfile -
HC Kubeconfig: The hosted cluster
kubeconfigfile - SSH key file: The SSH public key
- Pull secret: The pull secret file to access the release images
- AWS credentials
- AWS region
- Base domain: The DNS base domain to use as an external DNS
- S3 bucket name: The bucket in the AWS region where you plan to upload the etcd backup
This information is shown in the following example environment variables.
Example environment variables
SSH_KEY_FILE=${HOME}/.ssh/id_rsa.pub
BASE_PATH=${HOME}/hypershift
BASE_DOMAIN="aws.sample.com"
PULL_SECRET_FILE="${HOME}/pull_secret.json"
AWS_CREDS="${HOME}/.aws/credentials"
AWS_ZONE_ID="Z02718293M33QHDEQBROL"

CONTROL_PLANE_AVAILABILITY_POLICY=SingleReplica
HYPERSHIFT_PATH=${BASE_PATH}/src/hypershift
HYPERSHIFT_CLI=${HYPERSHIFT_PATH}/bin/hypershift
HYPERSHIFT_IMAGE=${HYPERSHIFT_IMAGE:-"quay.io/${USER}/hypershift:latest"}
NODE_POOL_REPLICAS=${NODE_POOL_REPLICAS:-2}

# MGMT Context
MGMT_REGION=us-west-1
MGMT_CLUSTER_NAME="${USER}-dev"
MGMT_CLUSTER_NS=${USER}
MGMT_CLUSTER_DIR="${BASE_PATH}/hosted_clusters/${MGMT_CLUSTER_NS}-${MGMT_CLUSTER_NAME}"
MGMT_KUBECONFIG="${MGMT_CLUSTER_DIR}/kubeconfig"

# MGMT2 Context
MGMT2_CLUSTER_NAME="${USER}-dest"
MGMT2_CLUSTER_NS=${USER}
MGMT2_CLUSTER_DIR="${BASE_PATH}/hosted_clusters/${MGMT2_CLUSTER_NS}-${MGMT2_CLUSTER_NAME}"
MGMT2_KUBECONFIG="${MGMT2_CLUSTER_DIR}/kubeconfig"

# Hosted Cluster Context
HC_CLUSTER_NS=clusters
HC_REGION=us-west-1
HC_CLUSTER_NAME="${USER}-hosted"
HC_CLUSTER_DIR="${BASE_PATH}/hosted_clusters/${HC_CLUSTER_NS}-${HC_CLUSTER_NAME}"
HC_KUBECONFIG="${HC_CLUSTER_DIR}/kubeconfig"
BACKUP_DIR=${HC_CLUSTER_DIR}/backup

BUCKET_NAME="${USER}-hosted-${MGMT_REGION}"

# DNS
AWS_ZONE_ID="Z07342811SH9AA102K1AC"
EXTERNAL_DNS_DOMAIN="hc.jpdv.aws.kerbeross.com"
4.2.2. Overview of the backup and restore process
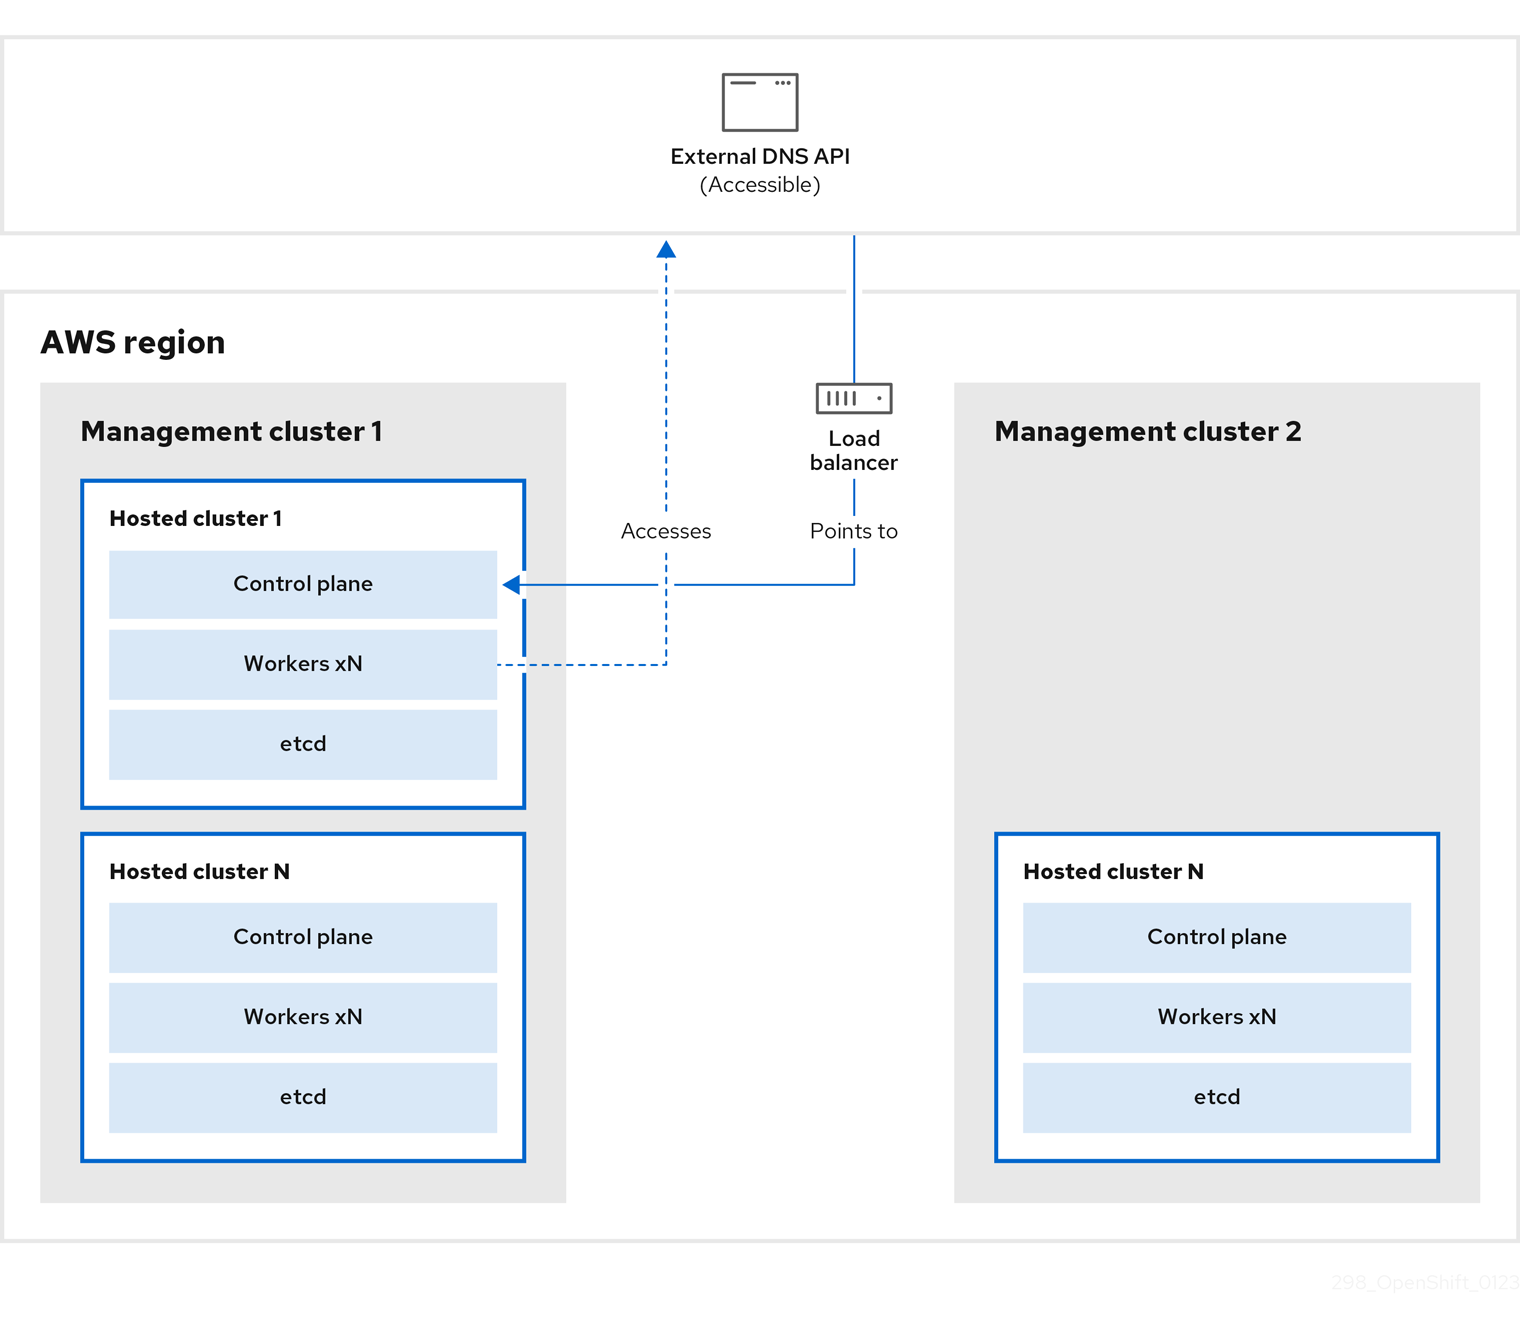
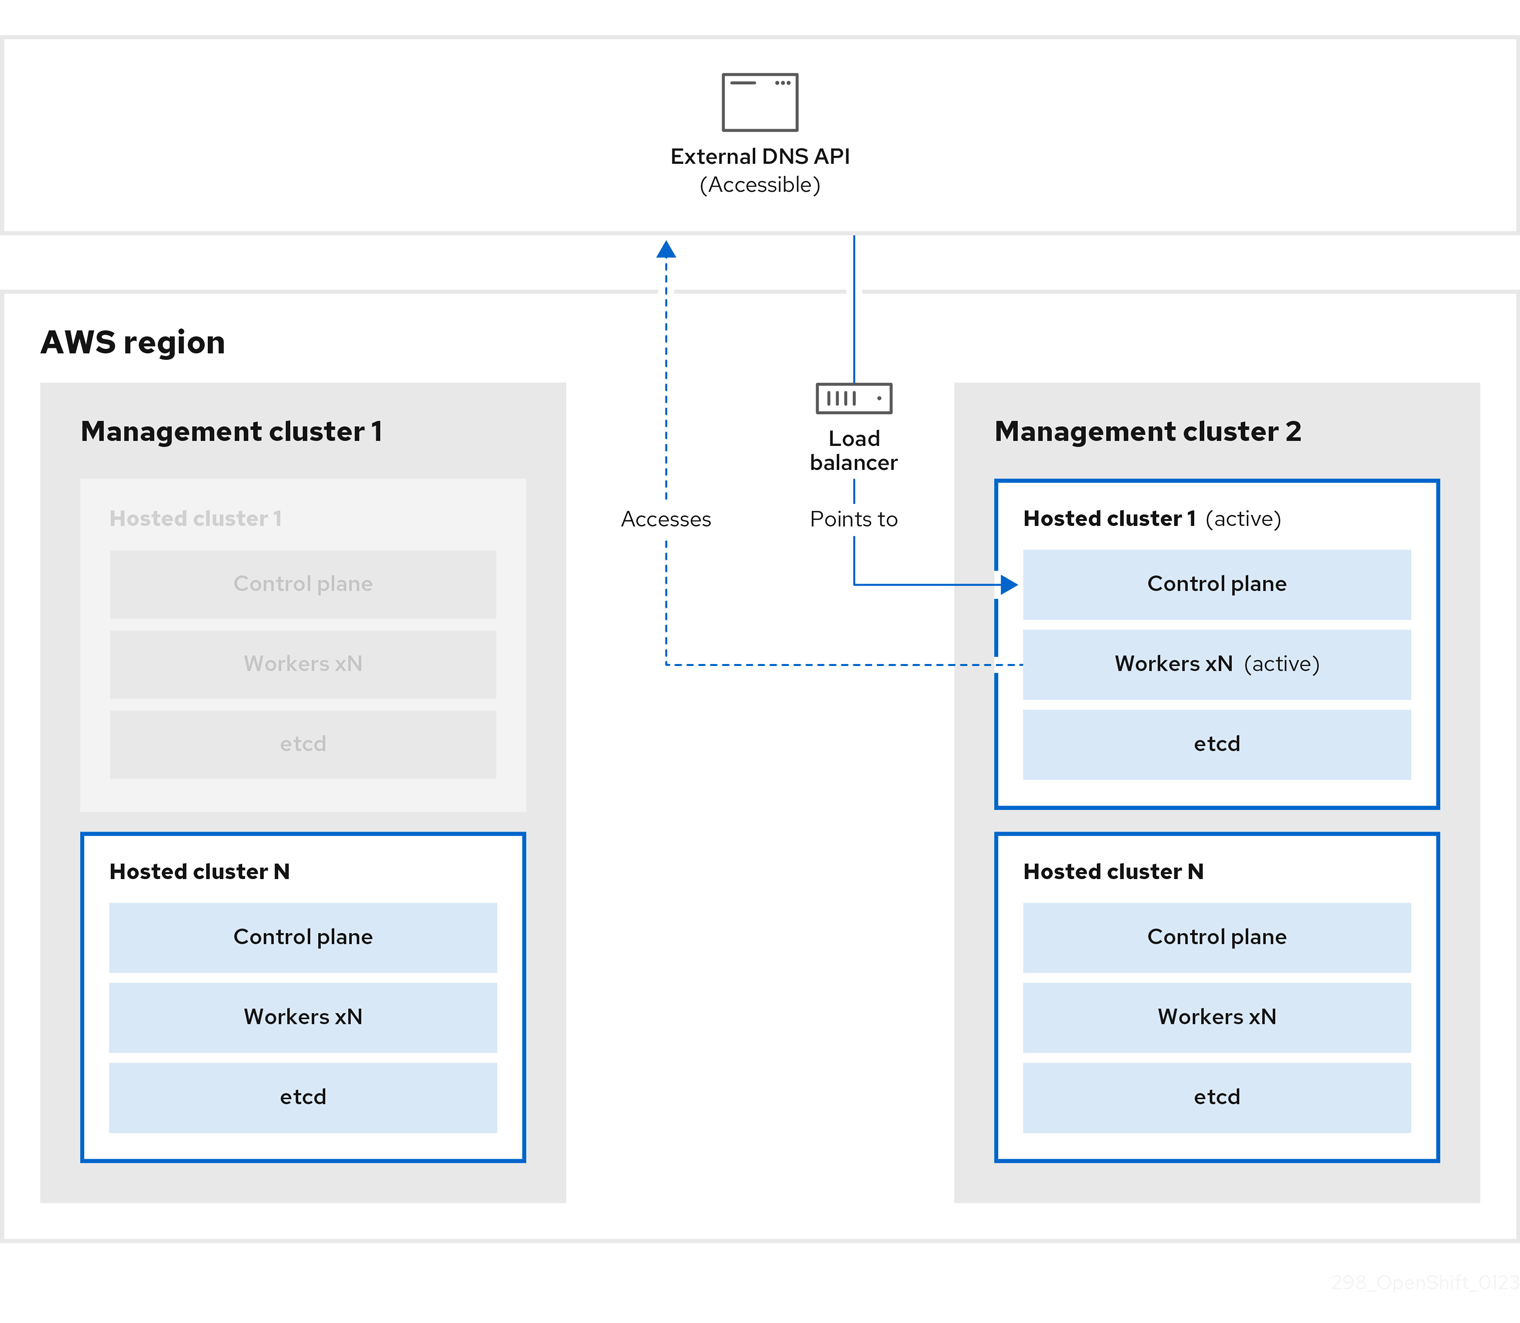
The backup and restore process works as follows:
On management cluster 1, which you can think of as the source management cluster, the control plane and workers interact by using the external DNS API. The external DNS API is accessible, and a load balancer sits between the management clusters.
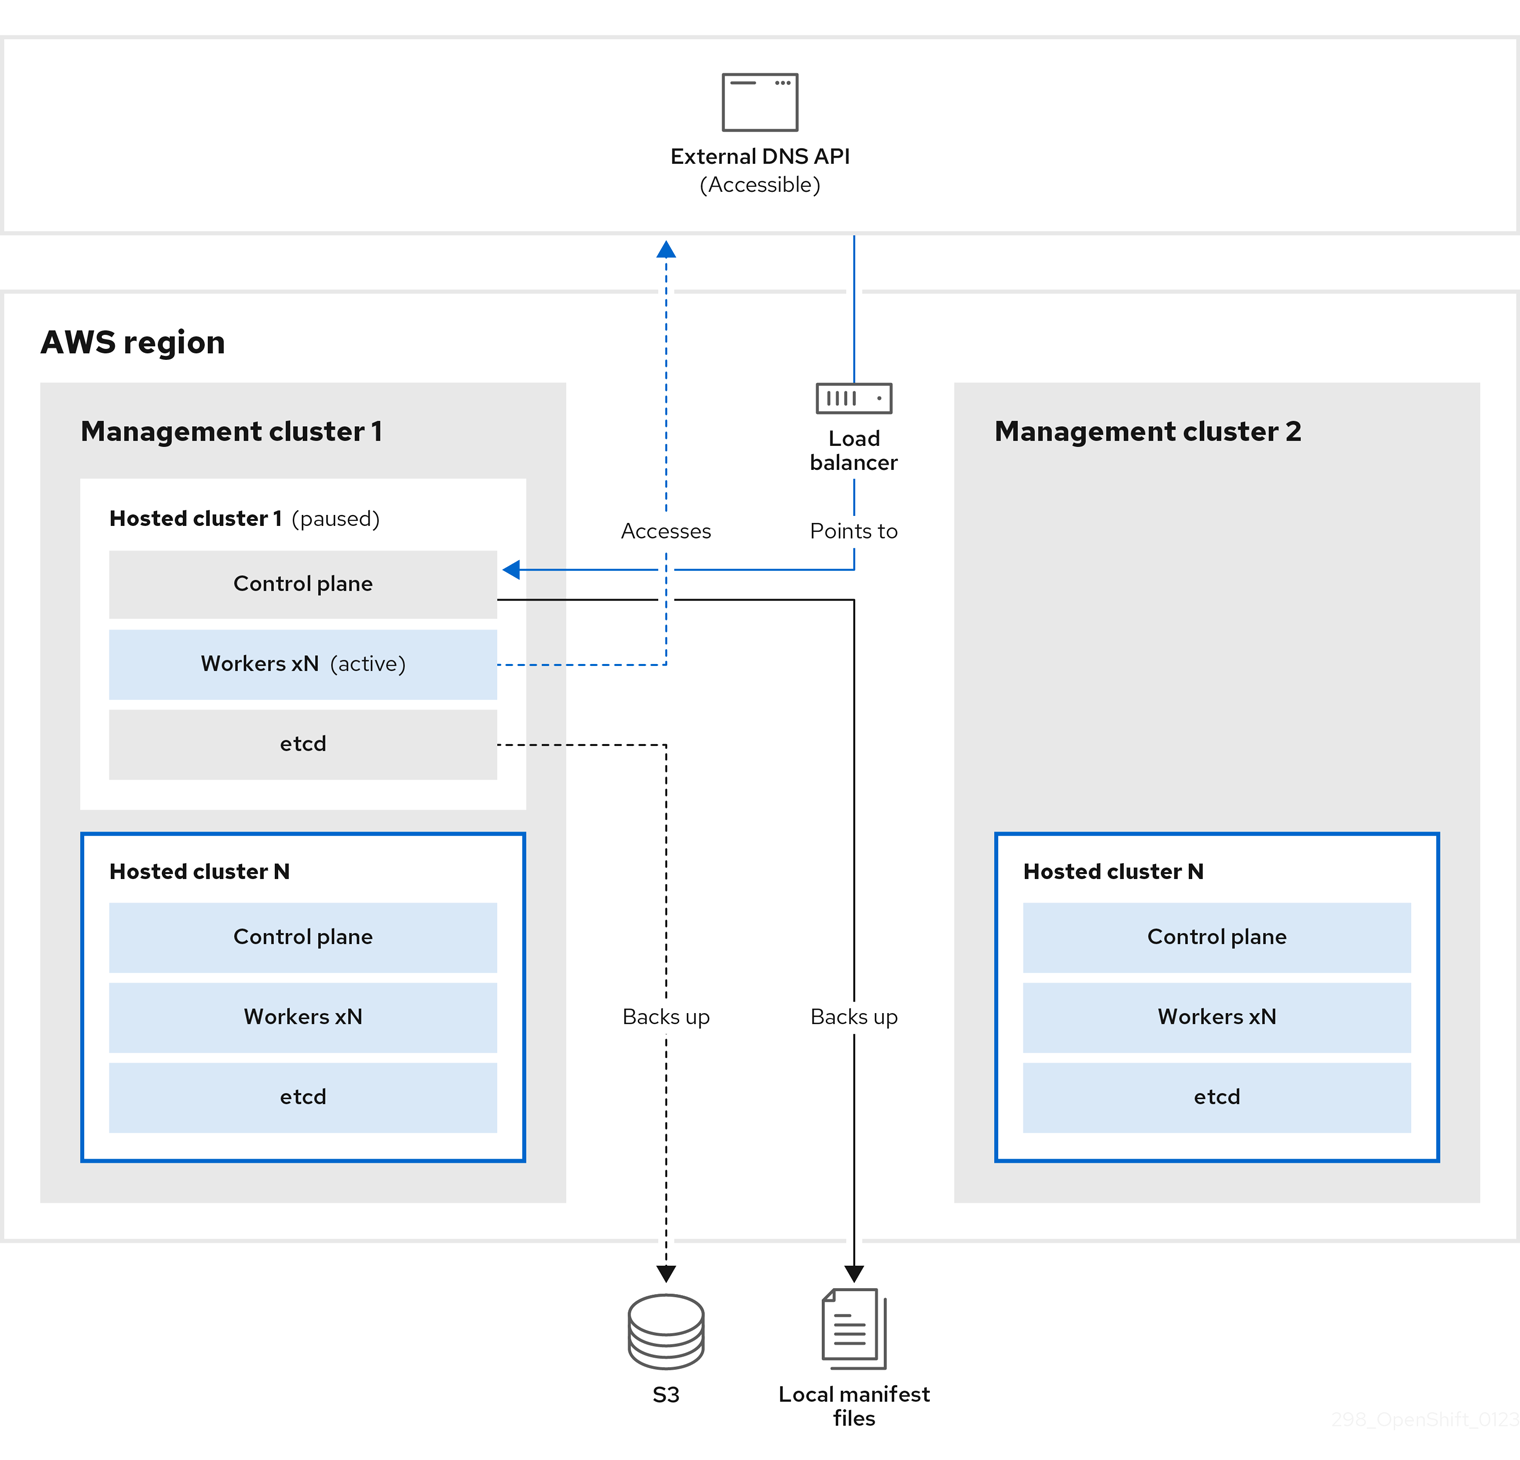
You take a snapshot of the hosted cluster, which includes etcd, the control plane, and the worker nodes. During this process, the worker nodes continue to try to access the external DNS API even if it is not accessible, the workloads are running, the control plane is saved in a local manifest file, and etcd is backed up to an S3 bucket. The data plane is active and the control plane is paused.
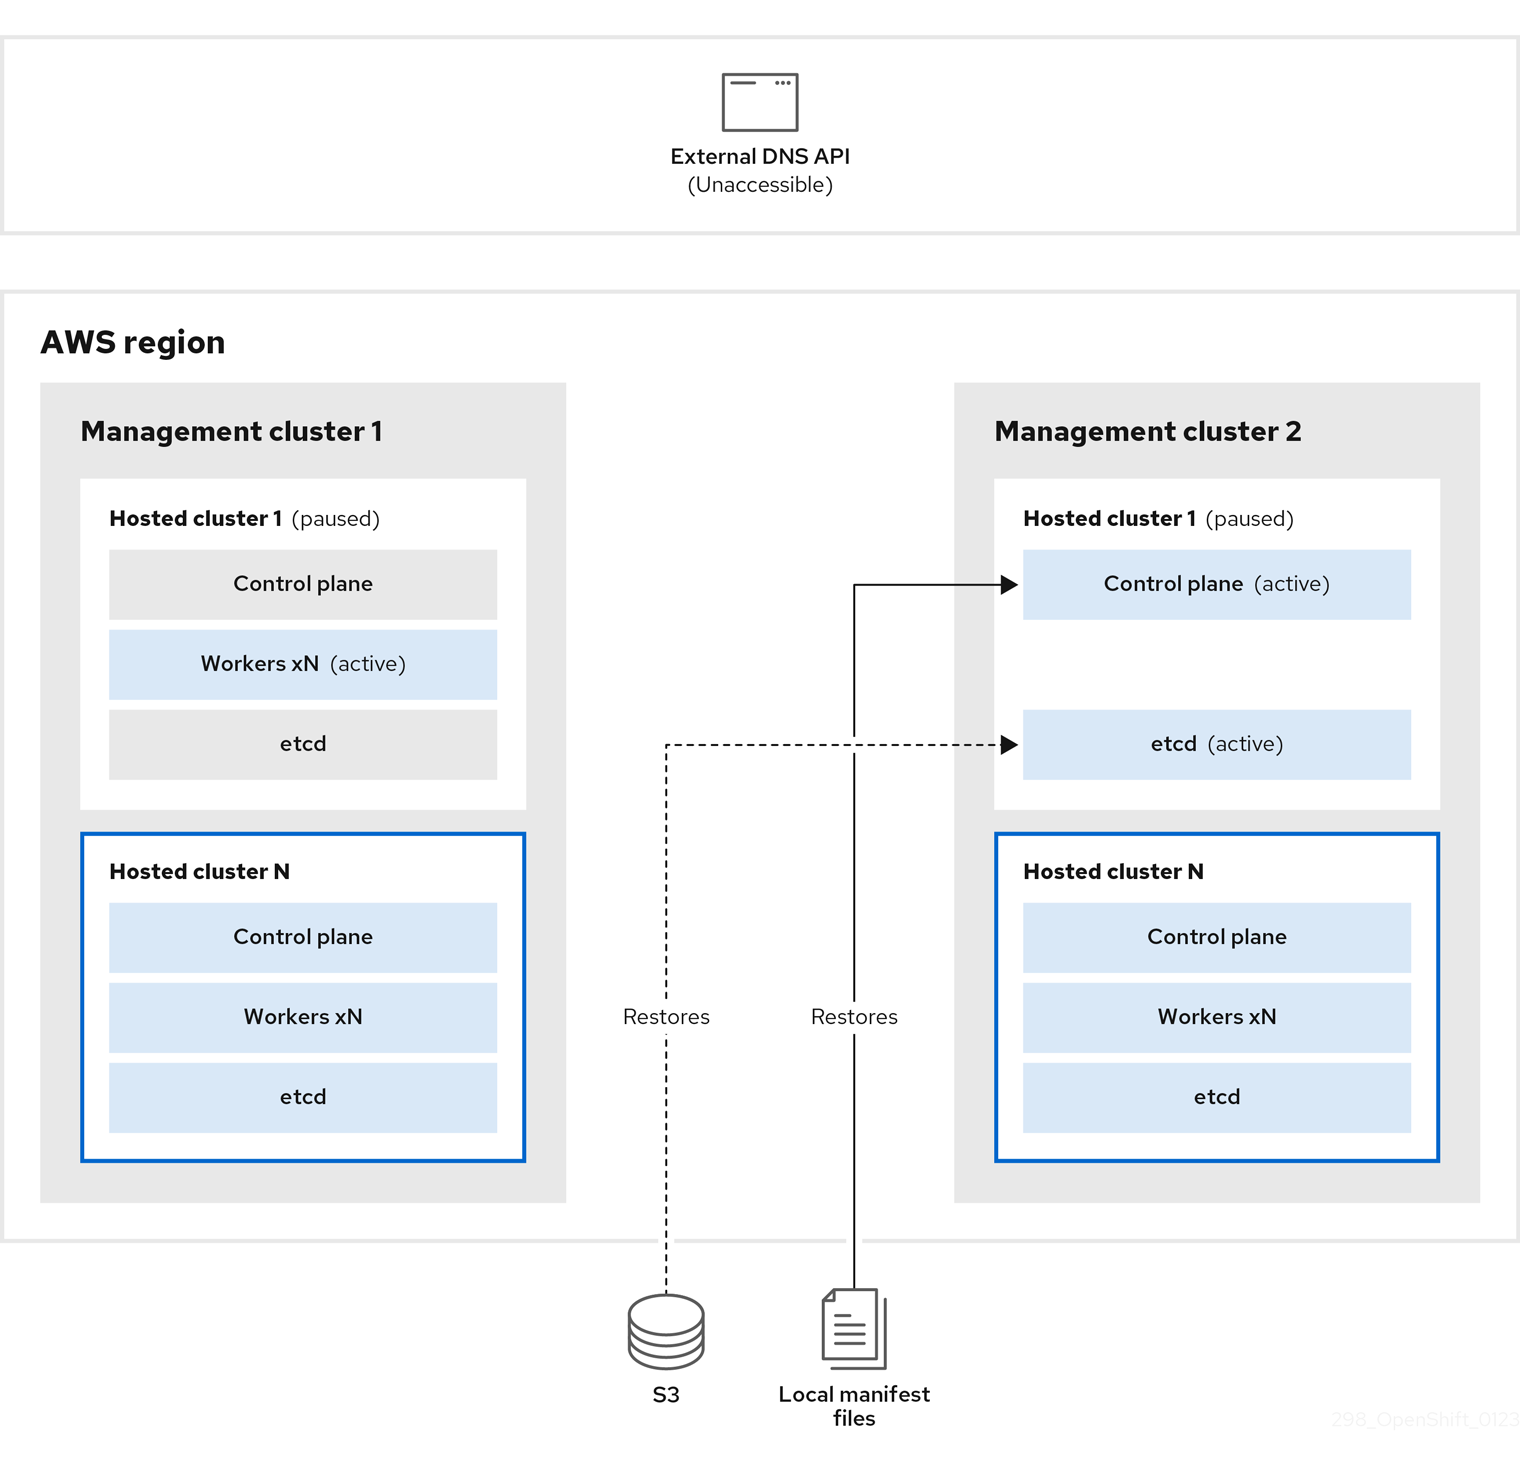
On management cluster 2, which you can think of as the destination management cluster, you restore etcd from the S3 bucket and restore the control plane from the local manifest file. During this process, the external DNS API is stopped, the hosted cluster API becomes inaccessible, and any workers that use the API are unable to update their manifest files, but the workloads are still running.
The external DNS API is accessible again, and the worker nodes use it to move to management cluster 2. The external DNS API can access the load balancer that points to the control plane.
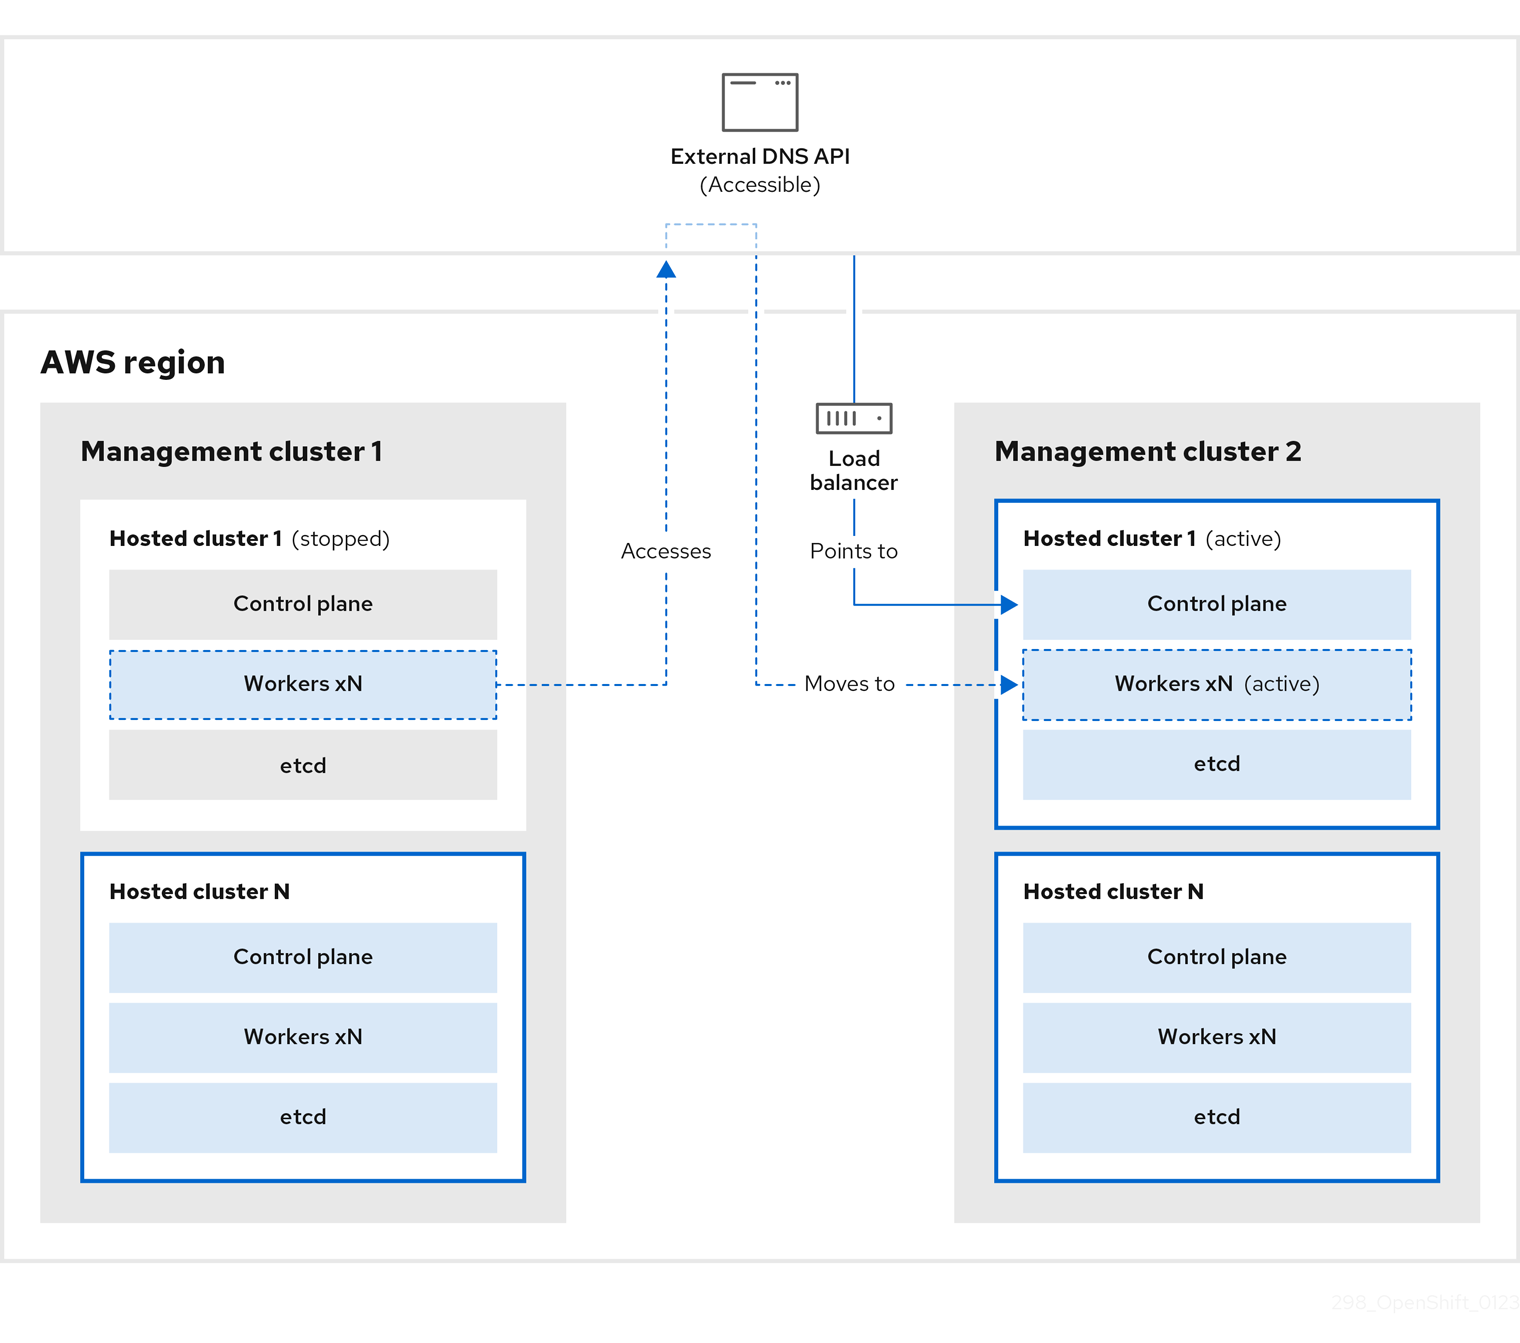
On management cluster 2, the control plane and worker nodes interact by using the external DNS API. The resources are deleted from management cluster 1, except for the S3 backup of etcd. If you try to set up the hosted cluster again on mangagement cluster 1, it will not work.
You can manually back up and restore your hosted cluster, or you can run a script to complete the process. For more information about the script, see "Running a script to back up and restore a hosted cluster".
4.2.3. Backing up a hosted cluster
To recover your hosted cluster in your target management cluster, you first need to back up all of the relevant data.
Procedure
Create a configmap file to declare the source management cluster by entering this command:
$ oc create configmap mgmt-parent-cluster -n default --from-literal=from=${MGMT_CLUSTER_NAME}Shut down the reconciliation in the hosted cluster and in the node pools by entering these commands:
$ PAUSED_UNTIL="true"
$ oc patch -n ${HC_CLUSTER_NS} hostedclusters/${HC_CLUSTER_NAME} -p '{"spec":{"pausedUntil":"'${PAUSED_UNTIL}'"}}' --type=merge
$ oc scale deployment -n ${HC_CLUSTER_NS}-${HC_CLUSTER_NAME} --replicas=0 kube-apiserver openshift-apiserver openshift-oauth-apiserver control-plane-operator
$ PAUSED_UNTIL="true" $ oc patch -n ${HC_CLUSTER_NS} hostedclusters/${HC_CLUSTER_NAME} -p '{"spec":{"pausedUntil":"'${PAUSED_UNTIL}'"}}' --type=merge $ oc patch -n ${HC_CLUSTER_NS} nodepools/${NODEPOOLS} -p '{"spec":{"pausedUntil":"'${PAUSED_UNTIL}'"}}' --type=merge $ oc scale deployment -n ${HC_CLUSTER_NS}-${HC_CLUSTER_NAME} --replicas=0 kube-apiserver openshift-apiserver openshift-oauth-apiserver control-plane-operatorBack up etcd and upload the data to an S3 bucket by running this bash script:
TipWrap this script in a function and call it from the main function.
# ETCD Backup
ETCD_PODS="etcd-0"
if [ "${CONTROL_PLANE_AVAILABILITY_POLICY}" = "HighlyAvailable" ]; then
  ETCD_PODS="etcd-0 etcd-1 etcd-2"
fi

for POD in ${ETCD_PODS}; do
  # Create an etcd snapshot
  oc exec -it ${POD} -n ${HC_CLUSTER_NS}-${HC_CLUSTER_NAME} -- env ETCDCTL_API=3 /usr/bin/etcdctl --cacert /etc/etcd/tls/client/etcd-client-ca.crt --cert /etc/etcd/tls/client/etcd-client.crt --key /etc/etcd/tls/client/etcd-client.key --endpoints=localhost:2379 snapshot save /var/lib/data/snapshot.db
  oc exec -it ${POD} -n ${HC_CLUSTER_NS}-${HC_CLUSTER_NAME} -- env ETCDCTL_API=3 /usr/bin/etcdctl -w table snapshot status /var/lib/data/snapshot.db

  FILEPATH="/${BUCKET_NAME}/${HC_CLUSTER_NAME}-${POD}-snapshot.db"
  CONTENT_TYPE="application/x-compressed-tar"
  DATE_VALUE=`date -R`
  SIGNATURE_STRING="PUT\n\n${CONTENT_TYPE}\n${DATE_VALUE}\n${FILEPATH}"

  set +x
  ACCESS_KEY=$(grep aws_access_key_id ${AWS_CREDS} | head -n1 | cut -d= -f2 | sed "s/ //g")
  SECRET_KEY=$(grep aws_secret_access_key ${AWS_CREDS} | head -n1 | cut -d= -f2 | sed "s/ //g")
  SIGNATURE_HASH=$(echo -en ${SIGNATURE_STRING} | openssl sha1 -hmac "${SECRET_KEY}" -binary | base64)
  set -x

  # FIXME: this is pushing to the OIDC bucket
  oc exec -it etcd-0 -n ${HC_CLUSTER_NS}-${HC_CLUSTER_NAME} -- curl -X PUT -T "/var/lib/data/snapshot.db" \
    -H "Host: ${BUCKET_NAME}.s3.amazonaws.com" \
    -H "Date: ${DATE_VALUE}" \
    -H "Content-Type: ${CONTENT_TYPE}" \
    -H "Authorization: AWS ${ACCESS_KEY}:${SIGNATURE_HASH}" \
    https://${BUCKET_NAME}.s3.amazonaws.com/${HC_CLUSTER_NAME}-${POD}-snapshot.db
done
For more information about backing up etcd, see "Backing up and restoring etcd on a hosted cluster".
Back up Kubernetes and OpenShift Container Platform objects by entering the following commands. You need to back up the following objects:
-
HostedClusterandNodePoolobjects from the HostedCluster namespace -
HostedClustersecrets from the HostedCluster namespace -
HostedControlPlanefrom the Hosted Control Plane namespace -
Clusterfrom the Hosted Control Plane namespace -
AWSCluster,AWSMachineTemplate, andAWSMachinefrom the Hosted Control Plane namespace -
MachineDeployments,MachineSets, andMachinesfrom the Hosted Control Plane namespace ControlPlanesecrets from the Hosted Control Plane namespace$ mkdir -p ${BACKUP_DIR}/namespaces/${HC_CLUSTER_NS} ${BACKUP_DIR}/namespaces/${HC_CLUSTER_NS}-${HC_CLUSTER_NAME} $ chmod 700 ${BACKUP_DIR}/namespaces/ # HostedCluster $ echo "Backing Up HostedCluster Objects:" $ oc get hc ${HC_CLUSTER_NAME} -n ${HC_CLUSTER_NS} -o yaml > ${BACKUP_DIR}/namespaces/${HC_CLUSTER_NS}/hc-${HC_CLUSTER_NAME}.yaml $ echo "--> HostedCluster" $ sed -i '' -e '/^status:$/,$d' ${BACKUP_DIR}/namespaces/${HC_CLUSTER_NS}/hc-${HC_CLUSTER_NAME}.yaml # NodePool $ oc get np ${NODEPOOLS} -n ${HC_CLUSTER_NS} -o yaml > ${BACKUP_DIR}/namespaces/${HC_CLUSTER_NS}/np-${NODEPOOLS}.yaml $ echo "--> NodePool" $ sed -i '' -e '/^status:$/,$ d' ${BACKUP_DIR}/namespaces/${HC_CLUSTER_NS}/np-${NODEPOOLS}.yaml # Secrets in the HC Namespace $ echo "--> HostedCluster Secrets:" for s in $(oc get secret -n ${HC_CLUSTER_NS} | grep "^${HC_CLUSTER_NAME}" | awk '{print $1}'); do oc get secret -n ${HC_CLUSTER_NS} $s -o yaml > ${BACKUP_DIR}/namespaces/${HC_CLUSTER_NS}/secret-${s}.yaml done # Secrets in the HC Control Plane Namespace $ echo "--> HostedCluster ControlPlane Secrets:" for s in $(oc get secret -n ${HC_CLUSTER_NS}-${HC_CLUSTER_NAME} | egrep -v "docker|service-account-token|oauth-openshift|NAME|token-${HC_CLUSTER_NAME}" | awk '{print $1}'); do oc get secret -n ${HC_CLUSTER_NS}-${HC_CLUSTER_NAME} $s -o yaml > ${BACKUP_DIR}/namespaces/${HC_CLUSTER_NS}-${HC_CLUSTER_NAME}/secret-${s}.yaml done # Hosted Control Plane $ echo "--> HostedControlPlane:" $ oc get hcp ${HC_CLUSTER_NAME} -n ${HC_CLUSTER_NS}-${HC_CLUSTER_NAME} -o yaml > ${BACKUP_DIR}/namespaces/${HC_CLUSTER_NS}-${HC_CLUSTER_NAME}/hcp-${HC_CLUSTER_NAME}.yaml # Cluster $ echo "--> Cluster:" $ CL_NAME=$(oc get hcp ${HC_CLUSTER_NAME} -n ${HC_CLUSTER_NS}-${HC_CLUSTER_NAME} -o jsonpath={.metadata.labels.\*} | grep ${HC_CLUSTER_NAME}) $ oc get cluster ${CL_NAME} -n ${HC_CLUSTER_NS}-${HC_CLUSTER_NAME} -o yaml > ${BACKUP_DIR}/namespaces/${HC_CLUSTER_NS}-${HC_CLUSTER_NAME}/cl-${HC_CLUSTER_NAME}.yaml # AWS Cluster $ echo "--> AWS Cluster:" $ oc get awscluster ${HC_CLUSTER_NAME} -n ${HC_CLUSTER_NS}-${HC_CLUSTER_NAME} -o yaml > ${BACKUP_DIR}/namespaces/${HC_CLUSTER_NS}-${HC_CLUSTER_NAME}/awscl-${HC_CLUSTER_NAME}.yaml # AWS MachineTemplate $ echo "--> AWS Machine Template:" $ oc get awsmachinetemplate ${NODEPOOLS} -n ${HC_CLUSTER_NS}-${HC_CLUSTER_NAME} -o yaml > ${BACKUP_DIR}/namespaces/${HC_CLUSTER_NS}-${HC_CLUSTER_NAME}/awsmt-${HC_CLUSTER_NAME}.yaml # AWS Machines $ echo "--> AWS Machine:" $ CL_NAME=$(oc get hcp ${HC_CLUSTER_NAME} -n ${HC_CLUSTER_NS}-${HC_CLUSTER_NAME} -o jsonpath={.metadata.labels.\*} | grep ${HC_CLUSTER_NAME}) for s in $(oc get awsmachines -n ${HC_CLUSTER_NS}-${HC_CLUSTER_NAME} --no-headers | grep ${CL_NAME} | cut -f1 -d\ ); do oc get -n ${HC_CLUSTER_NS}-${HC_CLUSTER_NAME} awsmachines $s -o yaml > ${BACKUP_DIR}/namespaces/${HC_CLUSTER_NS}-${HC_CLUSTER_NAME}/awsm-${s}.yaml done # MachineDeployments $ echo "--> HostedCluster MachineDeployments:" for s in $(oc get machinedeployment -n ${HC_CLUSTER_NS}-${HC_CLUSTER_NAME} -o name); do mdp_name=$(echo ${s} | cut -f 2 -d /) oc get -n ${HC_CLUSTER_NS}-${HC_CLUSTER_NAME} $s -o yaml > ${BACKUP_DIR}/namespaces/${HC_CLUSTER_NS}-${HC_CLUSTER_NAME}/machinedeployment-${mdp_name}.yaml done # MachineSets $ echo "--> HostedCluster MachineSets:" for s in $(oc get machineset -n ${HC_CLUSTER_NS}-${HC_CLUSTER_NAME} -o name); do ms_name=$(echo ${s} | cut -f 2 -d /) oc get -n ${HC_CLUSTER_NS}-${HC_CLUSTER_NAME} $s -o yaml > ${BACKUP_DIR}/namespaces/${HC_CLUSTER_NS}-${HC_CLUSTER_NAME}/machineset-${ms_name}.yaml done # Machines $ echo "--> HostedCluster Machine:" for s in $(oc get machine -n ${HC_CLUSTER_NS}-${HC_CLUSTER_NAME} -o name); do m_name=$(echo ${s} | cut -f 2 -d /) oc get -n ${HC_CLUSTER_NS}-${HC_CLUSTER_NAME} $s -o yaml > ${BACKUP_DIR}/namespaces/${HC_CLUSTER_NS}-${HC_CLUSTER_NAME}/machine-${m_name}.yaml done
-
Clean up the
ControlPlaneroutes by entering this command:$ oc delete routes -n ${HC_CLUSTER_NS}-${HC_CLUSTER_NAME} --allBy entering that command, you enable the ExternalDNS Operator to delete the Route53 entries.
Verify that the Route53 entries are clean by running this script:
function clean_routes() {

    if [[ -z "${1}" ]];then
        echo "Give me the NS where to clean the routes"
        exit 1
    fi

    # Constants
    if [[ -z "${2}" ]];then
        echo "Give me the Route53 zone ID"
        exit 1
    fi

    ZONE_ID=${2}
    ROUTES=10
    timeout=40
    count=0

    # This allows us to remove the ownership in the AWS for the API route
    oc delete route -n ${1} --all

    while [ ${ROUTES} -gt 2 ]
    do
        echo "Waiting for ExternalDNS Operator to clean the DNS Records in AWS Route53 where the zone id is: ${ZONE_ID}..."
        echo "Try: (${count}/${timeout})"
        sleep 10
        if [[ $count -eq timeout ]];then
            echo "Timeout waiting for cleaning the Route53 DNS records"
            exit 1
        fi
        count=$((count+1))
        ROUTES=$(aws route53 list-resource-record-sets --hosted-zone-id ${ZONE_ID} --max-items 10000 --output json | grep -c ${EXTERNAL_DNS_DOMAIN})
    done
}

# SAMPLE: clean_routes "<HC ControlPlane Namespace>" "<AWS_ZONE_ID>"
clean_routes "${HC_CLUSTER_NS}-${HC_CLUSTER_NAME}" "${AWS_ZONE_ID}"
Verification
Check all of the OpenShift Container Platform objects and the S3 bucket to verify that everything looks as expected.
Next steps
Restore your hosted cluster.
4.2.4. Restoring a hosted cluster
Gather all of the objects that you backed up and restore them in your destination management cluster.
Prerequisites
You backed up the data from your source management cluster.
Ensure that the kubeconfig file of the destination management cluster is placed as it is set in the KUBECONFIG variable or, if you use the script, in the MGMT2_KUBECONFIG variable. Use export KUBECONFIG=<Kubeconfig FilePath> or, if you use the script, use export KUBECONFIG=${MGMT2_KUBECONFIG}.
Procedure
Verify that the new management cluster does not contain any namespaces from the cluster that you are restoring by entering these commands:
$ export KUBECONFIG=${MGMT2_KUBECONFIG}$ BACKUP_DIR=${HC_CLUSTER_DIR}/backupNamespace deletion in the destination Management cluster
$ oc delete ns ${HC_CLUSTER_NS} || true$ oc delete ns ${HC_CLUSTER_NS}-{HC_CLUSTER_NAME} || trueRe-create the deleted namespaces by entering these commands:
Namespace creation commands
$ oc new-project ${HC_CLUSTER_NS}$ oc new-project ${HC_CLUSTER_NS}-${HC_CLUSTER_NAME}Restore the secrets in the HC namespace by entering this command:
$ oc apply -f ${BACKUP_DIR}/namespaces/${HC_CLUSTER_NS}/secret-*Restore the objects in the
HostedClustercontrol plane namespace by entering these commands:Restore secret command
$ oc apply -f ${BACKUP_DIR}/namespaces/${HC_CLUSTER_NS}-${HC_CLUSTER_NAME}/secret-*Cluster restore commands
$ oc apply -f ${BACKUP_DIR}/namespaces/${HC_CLUSTER_NS}-${HC_CLUSTER_NAME}/hcp-*$ oc apply -f ${BACKUP_DIR}/namespaces/${HC_CLUSTER_NS}-${HC_CLUSTER_NAME}/cl-*If you are recovering the nodes and the node pool to reuse AWS instances, restore the objects in the HC control plane namespace by entering these commands:
Commands for AWS
$ oc apply -f ${BACKUP_DIR}/namespaces/${HC_CLUSTER_NS}-${HC_CLUSTER_NAME}/awscl-*$ oc apply -f ${BACKUP_DIR}/namespaces/${HC_CLUSTER_NS}-${HC_CLUSTER_NAME}/awsmt-*$ oc apply -f ${BACKUP_DIR}/namespaces/${HC_CLUSTER_NS}-${HC_CLUSTER_NAME}/awsm-*Commands for machines
$ oc apply -f ${BACKUP_DIR}/namespaces/${HC_CLUSTER_NS}-${HC_CLUSTER_NAME}/machinedeployment-*$ oc apply -f ${BACKUP_DIR}/namespaces/${HC_CLUSTER_NS}-${HC_CLUSTER_NAME}/machineset-*$ oc apply -f ${BACKUP_DIR}/namespaces/${HC_CLUSTER_NS}-${HC_CLUSTER_NAME}/machine-*Restore the etcd data and the hosted cluster by running this bash script:
ETCD_PODS="etcd-0"
if [ "${CONTROL_PLANE_AVAILABILITY_POLICY}" = "HighlyAvailable" ]; then
  ETCD_PODS="etcd-0 etcd-1 etcd-2"
fi

HC_RESTORE_FILE=${BACKUP_DIR}/namespaces/${HC_CLUSTER_NS}/hc-${HC_CLUSTER_NAME}-restore.yaml
HC_BACKUP_FILE=${BACKUP_DIR}/namespaces/${HC_CLUSTER_NS}/hc-${HC_CLUSTER_NAME}.yaml
HC_NEW_FILE=${BACKUP_DIR}/namespaces/${HC_CLUSTER_NS}/hc-${HC_CLUSTER_NAME}-new.yaml
cat ${HC_BACKUP_FILE} > ${HC_NEW_FILE}
cat > ${HC_RESTORE_FILE} <<EOF
    restoreSnapshotURL:
EOF

for POD in ${ETCD_PODS}; do
  # Create a pre-signed URL for the etcd snapshot
  ETCD_SNAPSHOT="s3://${BUCKET_NAME}/${HC_CLUSTER_NAME}-${POD}-snapshot.db"
  ETCD_SNAPSHOT_URL=$(AWS_DEFAULT_REGION=${MGMT2_REGION} aws s3 presign ${ETCD_SNAPSHOT})

  # FIXME no CLI support for restoreSnapshotURL yet
  cat >> ${HC_RESTORE_FILE} <<EOF
    - "${ETCD_SNAPSHOT_URL}"
EOF
done

cat ${HC_RESTORE_FILE}

if ! grep ${HC_CLUSTER_NAME}-snapshot.db ${HC_NEW_FILE}; then
  sed -i '' -e "/type: PersistentVolume/r ${HC_RESTORE_FILE}" ${HC_NEW_FILE}
  sed -i '' -e '/pausedUntil:/d' ${HC_NEW_FILE}
fi

HC=$(oc get hc -n ${HC_CLUSTER_NS} ${HC_CLUSTER_NAME} -o name || true)
if [[ ${HC} == "" ]];then
    echo "Deploying HC Cluster: ${HC_CLUSTER_NAME} in ${HC_CLUSTER_NS} namespace"
    oc apply -f ${HC_NEW_FILE}
else
    echo "HC Cluster ${HC_CLUSTER_NAME} already exists, avoiding step"
fi
If you are recovering the nodes and the node pool to reuse AWS instances, restore the node pool by entering this command:
$ oc apply -f ${BACKUP_DIR}/namespaces/${HC_CLUSTER_NS}/np-*
Verification
To verify that the nodes are fully restored, use this function:
timeout=40
count=0
NODE_STATUS=$(oc get nodes --kubeconfig=${HC_KUBECONFIG} | grep -v NotReady | grep -c "worker") || NODE_STATUS=0

while [ ${NODE_POOL_REPLICAS} != ${NODE_STATUS} ]
do
    echo "Waiting for Nodes to be Ready in the destination MGMT Cluster: ${MGMT2_CLUSTER_NAME}"
    echo "Try: (${count}/${timeout})"
    sleep 30
    if [[ $count -eq timeout ]];then
        echo "Timeout waiting for Nodes in the destination MGMT Cluster"
        exit 1
    fi
    count=$((count+1))
    NODE_STATUS=$(oc get nodes --kubeconfig=${HC_KUBECONFIG} | grep -v NotReady | grep -c "worker") || NODE_STATUS=0
done
Next steps
Shut down and delete your cluster.
4.2.5. Deleting a hosted cluster from your source management cluster
After you back up your hosted cluster and restore it to your destination management cluster, you shut down and delete the hosted cluster on your source management cluster.
Prerequisites
You backed up your data and restored it to your source management cluster.
Ensure that the kubeconfig file of the destination management cluster is placed as it is set in the KUBECONFIG variable or, if you use the script, in the MGMT_KUBECONFIG variable. Use export KUBECONFIG=<Kubeconfig FilePath> or, if you use the script, use export KUBECONFIG=${MGMT_KUBECONFIG}.
Procedure
Scale the
deploymentandstatefulsetobjects by entering these commands:$ export KUBECONFIG=${MGMT_KUBECONFIG}Scale down deployment commands
$ oc scale deployment -n ${HC_CLUSTER_NS}-${HC_CLUSTER_NAME} --replicas=0 --all$ oc scale statefulset.apps -n ${HC_CLUSTER_NS}-${HC_CLUSTER_NAME} --replicas=0 --all$ sleep 15Delete the
NodePoolobjects by entering these commands:NODEPOOLS=$(oc get nodepools -n ${HC_CLUSTER_NS} -o=jsonpath='{.items[?(@.spec.clusterName=="'${HC_CLUSTER_NAME}'")].metadata.name}') if [[ ! -z "${NODEPOOLS}" ]];then oc patch -n "${HC_CLUSTER_NS}" nodepool ${NODEPOOLS} --type=json --patch='[ { "op":"remove", "path": "/metadata/finalizers" }]' oc delete np -n ${HC_CLUSTER_NS} ${NODEPOOLS} fiDelete the
machineandmachinesetobjects by entering these commands:# Machines for m in $(oc get machines -n ${HC_CLUSTER_NS}-${HC_CLUSTER_NAME} -o name); do oc patch -n ${HC_CLUSTER_NS}-${HC_CLUSTER_NAME} ${m} --type=json --patch='[ { "op":"remove", "path": "/metadata/finalizers" }]' || true oc delete -n ${HC_CLUSTER_NS}-${HC_CLUSTER_NAME} ${m} || true done$ oc delete machineset -n ${HC_CLUSTER_NS}-${HC_CLUSTER_NAME} --all || trueDelete the cluster object by entering these commands:
$ C_NAME=$(oc get cluster -n ${HC_CLUSTER_NS}-${HC_CLUSTER_NAME} -o name)$ oc patch -n ${HC_CLUSTER_NS}-${HC_CLUSTER_NAME} ${C_NAME} --type=json --patch='[ { "op":"remove", "path": "/metadata/finalizers" }]'$ oc delete cluster.cluster.x-k8s.io -n ${HC_CLUSTER_NS}-${HC_CLUSTER_NAME} --allDelete the AWS machines (Kubernetes objects) by entering these commands. Do not worry about deleting the real AWS machines. The cloud instances will not be affected.
for m in $(oc get awsmachine.infrastructure.cluster.x-k8s.io -n ${HC_CLUSTER_NS}-${HC_CLUSTER_NAME} -o name)
do
    oc patch -n ${HC_CLUSTER_NS}-${HC_CLUSTER_NAME} ${m} --type=json --patch='[ { "op":"remove", "path": "/metadata/finalizers" }]' || true
    oc delete -n ${HC_CLUSTER_NS}-${HC_CLUSTER_NAME} ${m} || true
done
Delete the
HostedControlPlaneandControlPlaneHC namespace objects by entering these commands:Delete HCP and ControlPlane HC NS commands
$ oc patch -n ${HC_CLUSTER_NS}-${HC_CLUSTER_NAME} hostedcontrolplane.hypershift.openshift.io ${HC_CLUSTER_NAME} --type=json --patch='[ { "op":"remove", "path": "/metadata/finalizers" }]'$ oc delete hostedcontrolplane.hypershift.openshift.io -n ${HC_CLUSTER_NS}-${HC_CLUSTER_NAME} --all$ oc delete ns ${HC_CLUSTER_NS}-${HC_CLUSTER_NAME} || trueDelete the
HostedClusterand HC namespace objects by entering these commands:Delete HC and HC Namespace commands
$ oc -n ${HC_CLUSTER_NS} patch hostedclusters ${HC_CLUSTER_NAME} -p '{"metadata":{"finalizers":null}}' --type merge || true$ oc delete hc -n ${HC_CLUSTER_NS} ${HC_CLUSTER_NAME} || true$ oc delete ns ${HC_CLUSTER_NS} || true
Verification
To verify that everything works, enter these commands:
Validations commands
$ export KUBECONFIG=${MGMT2_KUBECONFIG}$ oc get hc -n ${HC_CLUSTER_NS}$ oc get np -n ${HC_CLUSTER_NS}$ oc get pod -n ${HC_CLUSTER_NS}-${HC_CLUSTER_NAME}$ oc get machines -n ${HC_CLUSTER_NS}-${HC_CLUSTER_NAME}Commands for inside the HostedCluster
$ export KUBECONFIG=${HC_KUBECONFIG}$ oc get clusterversion$ oc get nodes
Next steps
Delete the OVN pods in the hosted cluster so that you can connect to the new OVN control plane that runs in the new management cluster:
-
Load the
KUBECONFIGenvironment variable with the hosted cluster’s kubeconfig path. Enter this command:
$ oc delete pod -n openshift-ovn-kubernetes --all
4.2.6. Running a script to back up and restore a hosted cluster
To expedite the process to back up a hosted cluster and restore it within the same region on AWS, you can modify and run a script.
Procedure
Replace the variables in the following script with your information:
# Fill the Common variables to fit your environment, this is just a sample SSH_KEY_FILE=${HOME}/.ssh/id_rsa.pub BASE_PATH=${HOME}/hypershift BASE_DOMAIN="aws.sample.com" PULL_SECRET_FILE="${HOME}/pull_secret.json" AWS_CREDS="${HOME}/.aws/credentials" CONTROL_PLANE_AVAILABILITY_POLICY=SingleReplica HYPERSHIFT_PATH=${BASE_PATH}/src/hypershift HYPERSHIFT_CLI=${HYPERSHIFT_PATH}/bin/hypershift HYPERSHIFT_IMAGE=${HYPERSHIFT_IMAGE:-"quay.io/${USER}/hypershift:latest"} NODE_POOL_REPLICAS=${NODE_POOL_REPLICAS:-2} # MGMT Context MGMT_REGION=us-west-1 MGMT_CLUSTER_NAME="${USER}-dev" MGMT_CLUSTER_NS=${USER} MGMT_CLUSTER_DIR="${BASE_PATH}/hosted_clusters/${MGMT_CLUSTER_NS}-${MGMT_CLUSTER_NAME}" MGMT_KUBECONFIG="${MGMT_CLUSTER_DIR}/kubeconfig" # MGMT2 Context MGMT2_CLUSTER_NAME="${USER}-dest" MGMT2_CLUSTER_NS=${USER} MGMT2_CLUSTER_DIR="${BASE_PATH}/hosted_clusters/${MGMT2_CLUSTER_NS}-${MGMT2_CLUSTER_NAME}" MGMT2_KUBECONFIG="${MGMT2_CLUSTER_DIR}/kubeconfig" # Hosted Cluster Context HC_CLUSTER_NS=clusters HC_REGION=us-west-1 HC_CLUSTER_NAME="${USER}-hosted" HC_CLUSTER_DIR="${BASE_PATH}/hosted_clusters/${HC_CLUSTER_NS}-${HC_CLUSTER_NAME}" HC_KUBECONFIG="${HC_CLUSTER_DIR}/kubeconfig" BACKUP_DIR=${HC_CLUSTER_DIR}/backup BUCKET_NAME="${USER}-hosted-${MGMT_REGION}" # DNS AWS_ZONE_ID="Z026552815SS3YPH9H6MG" EXTERNAL_DNS_DOMAIN="guest.jpdv.aws.kerbeross.com"- Save the script to your local file system.
Run the script by entering the following command:
source <env_file>where:
env_fileis the name of the file where you saved the script.The migration script is maintained at the following repository: https://github.com/openshift/hypershift/blob/main/contrib/migration/migrate-hcp.sh.