Ce contenu n'est pas disponible dans la langue sélectionnée.
Chapter 7. Network security
7.1. Understanding network policy APIs
Kubernetes offers two features that users can use to enforce network security. One feature that allows users to enforce network policy is the NetworkPolicy API that is designed mainly for application developers and namespace tenants to protect their namespaces by creating namespace-scoped policies.
The second feature is AdminNetworkPolicy which consists of two APIs: the AdminNetworkPolicy (ANP) API and the BaselineAdminNetworkPolicy (BANP) API. ANP and BANP are designed for cluster and network administrators to protect their entire cluster by creating cluster-scoped policies. Cluster administrators can use ANPs to enforce non-overridable policies that take precedence over NetworkPolicy objects. Administrators can use BANP to set up and enforce optional cluster-scoped network policy rules that are overridable by users using NetworkPolicy objects when necessary. When used together, ANP, BANP, and network policy can achieve full multi-tenant isolation that administrators can use to secure their cluster.
OVN-Kubernetes CNI in OpenShift Container Platform implements these network policies using Access Control List (ACL) Tiers to evaluate and apply them. ACLs are evaluated in descending order from Tier 1 to Tier 3.
Tier 1 evaluates AdminNetworkPolicy (ANP) objects. Tier 2 evaluates NetworkPolicy objects. Tier 3 evaluates BaselineAdminNetworkPolicy (BANP) objects.
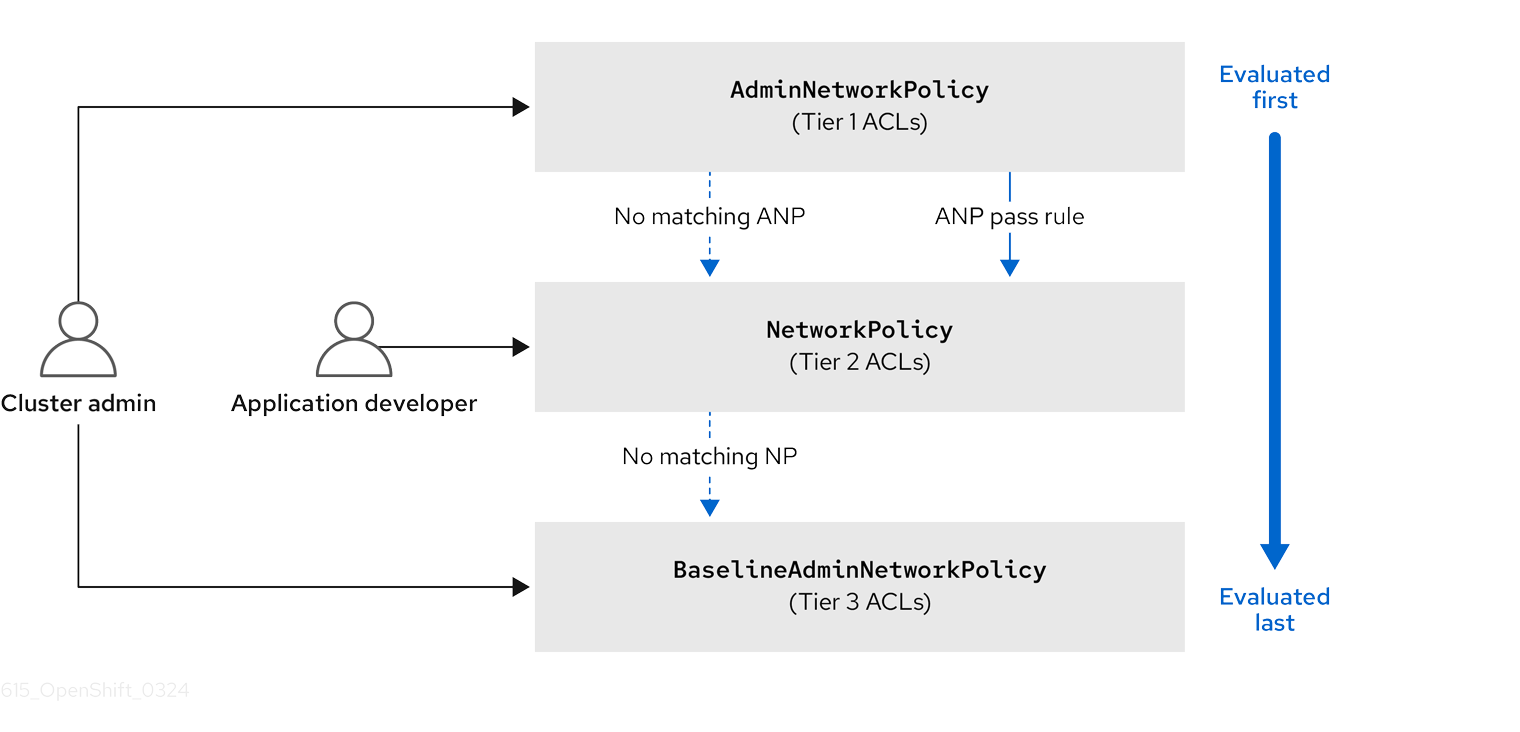
ANPs are evaluated first. When the match is an ANP allow or deny rule, any existing NetworkPolicy and BaselineAdminNetworkPolicy (BANP) objects in the cluster are skipped from evaluation. When the match is an ANP pass rule, then evaluation moves from tier 1 of the ACL to tier 2 where the NetworkPolicy policy is evaluated. If no NetworkPolicy matches the traffic then evaluation moves from tier 2 ACLs to tier 3 ACLs where BANP is evaluated.
7.1.1. Key differences between AdminNetworkPolicy and NetworkPolicy custom resources
The following table explains key differences between the cluster scoped AdminNetworkPolicy API and the namespace scoped NetworkPolicy API.
| Policy elements | AdminNetworkPolicy | NetworkPolicy |
|---|---|---|
| Applicable user | Cluster administrator or equivalent | Namespace owners |
| Scope | Cluster | Namespaced |
| Drop traffic |
Supported with an explicit |
Supported via implicit |
| Delegate traffic |
Supported with an | Not applicable |
| Allow traffic |
Supported with an explicit | The default action for all rules is to allow. |
| Rule precedence within the policy | Depends on the order in which they appear within an ANP. The higher the rule’s position the higher the precedence. | Rules are additive |
| Policy precedence |
Among ANPs the | There is no policy ordering between policies. |
| Feature precedence | Evaluated first via tier 1 ACL and BANP is evaluated last via tier 3 ACL. | Enforced after ANP and before BANP, they are evaluated in tier 2 of the ACL. |
| Matching pod selection | Can apply different rules across namespaces. | Can apply different rules across pods in single namespace. |
| Cluster egress traffic |
Supported via |
Supported through |
| Cluster ingress traffic | Not supported | Not supported |
| Fully qualified domain names (FQDN) peer support | Not supported | Not supported |
| Namespace selectors |
Supports advanced selection of Namespaces with the use of |
Supports label based namespace selection with the use of |
7.2. Admin network policy
7.2.1. OVN-Kubernetes AdminNetworkPolicy
7.2.1.1. AdminNetworkPolicy
An AdminNetworkPolicy (ANP) is a cluster-scoped custom resource definition (CRD). As a OpenShift Container Platform administrator, you can use ANP to secure your network by creating network policies before creating namespaces. Additionally, you can create network policies on a cluster-scoped level that is non-overridable by NetworkPolicy objects.
The key difference between AdminNetworkPolicy and NetworkPolicy objects are that the former is for administrators and is cluster scoped while the latter is for tenant owners and is namespace scoped.
An ANP allows administrators to specify the following:
-
A
priorityvalue that determines the order of its evaluation. The lower the value the higher the precedence. - A set of pods that consists of a set of namespaces or namespace on which the policy is applied.
-
A list of ingress rules to be applied for all ingress traffic towards the
subject. -
A list of egress rules to be applied for all egress traffic from the
subject.
7.2.1.1.1. AdminNetworkPolicy example
Example 7.1. Example YAML file for an ANP
apiVersion: policy.networking.k8s.io/v1alpha1
kind: AdminNetworkPolicy
metadata:
  name: sample-anp-deny-pass-rules
spec:
  priority: 50
  subject:
    namespaces:
      matchLabels:
          kubernetes.io/metadata.name: example.name
ingress:
- name: "deny-all-ingress-tenant-1"
    action: "Deny"
    from:
    - pods:
        namespaceSelector:
          matchLabels:
            custom-anp: tenant-1
        podSelector:
          matchLabels:
            custom-anp: tenant-1
egress:
  - name: "pass-all-egress-to-tenant-1"
    action: "Pass"
    to:
    - pods:
        namespaceSelector:
          matchLabels:
            custom-anp: tenant-1
        podSelector:
          matchLabels:
custom-anp: tenant-1- 1
- Specify a name for your ANP.
- 2
- The
spec.priorityfield supports a maximum of 100 ANPs in the range of values0-99in a cluster. The lower the value, the higher the precedence because the range is read in order from the lowest to highest value. Because there is no guarantee which policy takes precedence when ANPs are created at the same priority, set ANPs at different priorities so that precedence is deliberate. - 3
- Specify the namespace to apply the ANP resource.
- 4
- ANP have both ingress and egress rules. ANP rules for
spec.ingressfield accepts values ofPass,Deny, andAllowfor theactionfield. - 5
- Specify a name for the
ingress.name. - 6
- Specify
podSelector.matchLabelsto select pods within the namespaces selected bynamespaceSelector.matchLabelsas ingress peers. - 7
- ANPs have both ingress and egress rules. ANP rules for
spec.egressfield accepts values ofPass,Deny, andAllowfor theactionfield.
Additional resources
7.2.1.1.2. AdminNetworkPolicy actions for rules
As an administrator, you can set Allow, Deny, or Pass as the action field for your AdminNetworkPolicy rules. Because OVN-Kubernetes uses a tiered ACLs to evaluate network traffic rules, ANP allow you to set very strong policy rules that can only be changed by an administrator modifying them, deleting the rule, or overriding them by setting a higher priority rule.
7.2.1.1.2.1. AdminNetworkPolicy Allow example
The following ANP that is defined at priority 9 ensures all ingress traffic is allowed from the monitoring namespace towards any tenant (all other namespaces) in the cluster.
Example 7.2. Example YAML file for a strong Allow ANP
apiVersion: policy.networking.k8s.io/v1alpha1
kind: AdminNetworkPolicy
metadata:
  name: allow-monitoring
spec:
  priority: 9
  subject:
    namespaces: {} # Use the empty selector with caution because it also selects OpenShift namespaces as well.
  ingress:
  - name: "allow-ingress-from-monitoring"
    action: "Allow"
    from:
    - namespaces:
        matchLabels:
          kubernetes.io/metadata.name: monitoring
# ...
This is an example of a strong Allow ANP because it is non-overridable by all the parties involved. No tenants can block themselves from being monitored using NetworkPolicy objects and the monitoring tenant also has no say in what it can or cannot monitor.
7.2.1.1.2.2. AdminNetworkPolicy Deny example
The following ANP that is defined at priority 5 ensures all ingress traffic from the monitoring namespace is blocked towards restricted tenants (namespaces that have labels security: restricted).
Example 7.3. Example YAML file for a strong Deny ANP
apiVersion: policy.networking.k8s.io/v1alpha1
kind: AdminNetworkPolicy
metadata:
  name: block-monitoring
spec:
  priority: 5
  subject:
    namespaces:
      matchLabels:
        security: restricted
  ingress:
  - name: "deny-ingress-from-monitoring"
    action: "Deny"
    from:
    - namespaces:
        matchLabels:
          kubernetes.io/metadata.name: monitoring
# ...
This is a strong Deny ANP that is non-overridable by all the parties involved. The restricted tenant owners cannot authorize themselves to allow monitoring traffic, and the infrastructure’s monitoring service cannot scrape anything from these sensitive namespaces.
When combined with the strong Allow example, the block-monitoring ANP has a lower priority value giving it higher precedence, which ensures restricted tenants are never monitored.
7.2.1.1.2.3. AdminNetworkPolicy Pass example
The following ANP that is defined at priority 7 ensures all ingress traffic from the monitoring namespace towards internal infrastructure tenants (namespaces that have labels security: internal) are passed on to tier 2 of the ACLs and evaluated by the namespaces’ NetworkPolicy objects.
Example 7.4. Example YAML file for a strong Pass ANP
apiVersion: policy.networking.k8s.io/v1alpha1
kind: AdminNetworkPolicy
metadata:
  name: pass-monitoring
spec:
  priority: 7
  subject:
    namespaces:
      matchLabels:
        security: internal
  ingress:
  - name: "pass-ingress-from-monitoring"
    action: "Pass"
    from:
    - namespaces:
        matchLabels:
          kubernetes.io/metadata.name: monitoring
# ...
This example is a strong Pass action ANP because it delegates the decision to NetworkPolicy objects defined by tenant owners. This pass-monitoring ANP allows all tenant owners grouped at security level internal to choose if their metrics should be scraped by the infrastructures' monitoring service using namespace scoped NetworkPolicy objects.
7.2.2. OVN-Kubernetes BaselineAdminNetworkPolicy
7.2.2.1. BaselineAdminNetworkPolicy
BaselineAdminNetworkPolicy (BANP) is a cluster-scoped custom resource definition (CRD). As a OpenShift Container Platform administrator, you can use BANP to setup and enforce optional baseline network policy rules that are overridable by users using NetworkPolicy objects if need be. Rule actions for BANP are allow or deny.
The BaselineAdminNetworkPolicy resource is a cluster singleton object that can be used as a guardrail policy incase a passed traffic policy does not match any NetworkPolicy objects in the cluster. A BANP can also be used as a default security model that provides guardrails that intra-cluster traffic is blocked by default and a user will need to use NetworkPolicy objects to allow known traffic. You must use default as the name when creating a BANP resource.
A BANP allows administrators to specify:
-
A
subjectthat consists of a set of namespaces or namespace. -
A list of ingress rules to be applied for all ingress traffic towards the
subject. -
A list of egress rules to be applied for all egress traffic from the
subject.
7.2.2.1.1. BaselineAdminNetworkPolicy example
Example 7.5. Example YAML file for BANP
apiVersion: policy.networking.k8s.io/v1alpha1
kind: BaselineAdminNetworkPolicy
metadata:
  name: default
spec:
  subject:
    namespaces:
      matchLabels:
          kubernetes.io/metadata.name: example.name
ingress:
- name: "deny-all-ingress-from-tenant-1"
    action: "Deny"
    from:
    - pods:
        namespaceSelector:
          matchLabels:
            custom-banp: tenant-1
        podSelector:
          matchLabels:
            custom-banp: tenant-1
  egress:
  - name: "allow-all-egress-to-tenant-1"
    action: "Allow"
    to:
    - pods:
        namespaceSelector:
          matchLabels:
            custom-banp: tenant-1
        podSelector:
          matchLabels:
custom-banp: tenant-1- 1
- The policy name must be
defaultbecause BANP is a singleton object. - 2
- Specify the namespace to apply the ANP to.
- 3
- BANP have both ingress and egress rules. BANP rules for
spec.ingressandspec.egressfields accepts values ofDenyandAllowfor theactionfield. - 4
- Specify a name for the
ingress.name - 5
- Specify the namespaces to select the pods from to apply the BANP resource.
- 6
- Specify
podSelector.matchLabelsname of the pods to apply the BANP resource.
7.2.2.1.2. BaselineAdminNetworkPolicy Deny example
The following BANP singleton ensures that the administrator has set up a default deny policy for all ingress monitoring traffic coming into the tenants at internal security level. When combined with the "AdminNetworkPolicy Pass example", this deny policy acts as a guardrail policy for all ingress traffic that is passed by the ANP pass-monitoring policy.
Example 7.6. Example YAML file for a guardrail Deny rule
apiVersion: policy.networking.k8s.io/v1alpha1
kind: BaselineAdminNetworkPolicy
metadata:
  name: default
spec:
  subject:
    namespaces:
      matchLabels:
        security: internal
  ingress:
  - name: "deny-ingress-from-monitoring"
    action: "Deny"
    from:
    - namespaces:
        matchLabels:
          kubernetes.io/metadata.name: monitoring
# ...
You can use an AdminNetworkPolicy resource with a Pass value for the action field in conjunction with the BaselineAdminNetworkPolicy resource to create a multi-tenant policy. This multi-tenant policy allows one tenant to collect monitoring data on their application while simultaneously not collecting data from a second tenant.
As an administrator, if you apply both the "AdminNetworkPolicy Pass action example" and the "BaselineAdminNetwork Policy Deny example", tenants are then left with the ability to choose to create a NetworkPolicy resource that will be evaluated before the BANP.
For example, Tenant 1 can set up the following NetworkPolicy resource to monitor ingress traffic:
Example 7.7. Example NetworkPolicy
apiVersion: networking.k8s.io/v1
kind: NetworkPolicy
metadata:
  name: allow-monitoring
  namespace: tenant 1
spec:
  podSelector:
  policyTypes:
    - Ingress
  ingress:
  - from:
    - namespaceSelector:
        matchLabels:
          kubernetes.io/metadata.name: monitoring
# ...
In this scenario, Tenant 1’s policy would be evaluated after the "AdminNetworkPolicy Pass action example" and before the "BaselineAdminNetwork Policy Deny example", which denies all ingress monitoring traffic coming into tenants with security level internal. With Tenant 1’s NetworkPolicy object in place, they will be able to collect data on their application. Tenant 2, however, who does not have any NetworkPolicy objects in place, will not be able to collect data. As an administrator, you have not by default monitored internal tenants, but instead, you created a BANP that allows tenants to use NetworkPolicy objects to override the default behavior of your BANP.
7.2.3. Monitoring ANP and BANP
AdminNetworkPolicy and BaselineAdminNetworkPolicy resources have metrics that can be used for monitoring and managing your policies. See the following table for more details on the metrics.
7.2.3.1. Metrics for AdminNetworkPolicy
| Name | Description | Explanation |
|---|---|---|
|
| Not applicable |
The total number of |
|
| Not applicable |
The total number of |
|
|
|
The total number of rules across all ANP policies in the cluster grouped by |
|
|
|
The total number of rules across all BANP policies in the cluster grouped by |
|
|
|
The total number of OVN Northbound database (nbdb) objects that are created by all the ANP in the cluster grouped by the |
|
|
|
The total number of OVN Northbound database (nbdb) objects that are created by all the BANP in the cluster grouped by the |
7.2.4. Egress nodes and networks peer for AdminNetworkPolicy
This section explains nodes and networks peers. Administrators can use the examples in this section to design AdminNetworkPolicy and BaselineAdminNetworkPolicy to control northbound traffic in their cluster.
7.2.4.1. Northbound traffic controls for AdminNetworkPolicy and BaselineAdminNetworkPolicy
In addition to supporting east-west traffic controls, ANP and BANP also allow administrators to control their northbound traffic leaving the cluster or traffic leaving the node to other nodes in the cluster. End-users can do the following:
-
Implement egress traffic control towards cluster nodes using
nodesegress peer -
Implement egress traffic control towards Kubernetes API servers using
nodesornetworksegress peers -
Implement egress traffic control towards external destinations outside the cluster using
networkspeer
For ANP and BANP, nodes and networks peers can be specified for egress rules only.
7.2.4.1.1. Using nodes peer to control egress traffic to cluster nodes
Using the nodes peer administrators can control egress traffic from pods to nodes in the cluster. A benefit of this is that you do not have to change the policy when nodes are added to or deleted from the cluster.
The following example allows egress traffic to the Kubernetes API server on port 6443 by any of the namespaces with a restricted, confidential, or internal level of security using the node selector peer. It also denies traffic to all worker nodes in your cluster from any of the namespaces with a restricted, confidential, or internal level of security.
Example 7.8. Example of ANP Allow egress using nodes peer
apiVersion: policy.networking.k8s.io/v1alpha1
kind: AdminNetworkPolicy
metadata:
  name: egress-security-allow
spec:
  egress:
  - action: Deny
    to:
    - nodes:
        matchExpressions:
        - key: node-role.kubernetes.io/worker
          operator: Exists
  - action: Allow
    name: allow-to-kubernetes-api-server-and-engr-dept-pods
    ports:
    - portNumber:
        port: 6443
        protocol: TCP
    to:
    - nodes:
        matchExpressions:
        - key: node-role.kubernetes.io/control-plane
          operator: Exists
    - pods:
        namespaceSelector:
          matchLabels:
            dept: engr
        podSelector: {}
  priority: 55
  subject:
    namespaces:
      matchExpressions:
      - key: security
        operator: In
        values:
        - restricted
        - confidential
- internal- 1
- Specifies a node or set of nodes in the cluster using the
matchExpressionsfield. - 2
- Specifies all the pods labeled with
dept: engr. - 3
- Specifies the subject of the ANP which includes any namespaces that match the labels used by the network policy. The example matches any of the namespaces with
restricted,confidential, orinternallevel ofsecurity. - 4
- Specifies key/value pairs for
matchExpressionsfield.
7.2.4.1.2. Using networks peer to control egress traffic towards external destinations
Cluster administrators can use CIDR ranges in networks peer and apply a policy to control egress traffic leaving from pods and going to a destination configured at the IP address that is within the CIDR range specified with networks field.
The following example uses networks peer and combines ANP and BANP policies to restrict egress traffic.
Use the empty selector ({}) in the namespace field for ANP and BANP with caution. When using an empty selector, it also selects OpenShift namespaces.
If you use values of 0.0.0.0/0 in a ANP or BANP Deny rule, you must set a higher priority ANP Allow rule to necessary destinations before setting the Deny to 0.0.0.0/0.
Example 7.9. Example of ANP and BANP using networks peers
apiVersion: policy.networking.k8s.io/v1alpha1
kind: AdminNetworkPolicy
metadata:
  name: network-as-egress-peer
spec:
  priority: 70
  subject:
    namespaces: {} # Use the empty selector with caution because it also selects OpenShift namespaces as well.
  egress:
  - name: "deny-egress-to-external-dns-servers"
    action: "Deny"
    to:
    - networks:
      - 8.8.8.8/32
      - 8.8.4.4/32
      - 208.67.222.222/32
    ports:
      - portNumber:
          protocol: UDP
          port: 53
  - name: "allow-all-egress-to-intranet"
    action: "Allow"
    to:
    - networks:
      - 89.246.180.0/22
      - 60.45.72.0/22
  - name: "allow-all-intra-cluster-traffic"
    action: "Allow"
    to:
    - namespaces: {} # Use the empty selector with caution because it also selects OpenShift namespaces as well.
  - name: "pass-all-egress-to-internet"
    action: "Pass"
    to:
    - networks:
      - 0.0.0.0/0
---
apiVersion: policy.networking.k8s.io/v1alpha1
kind: BaselineAdminNetworkPolicy
metadata:
  name: default
spec:
  subject:
    namespaces: {} # Use the empty selector with caution because it also selects OpenShift namespaces as well.
  egress:
  - name: "deny-all-egress-to-internet"
    action: "Deny"
    to:
    - networks:
      - 0.0.0.0/0
---- 1
- Use
networksto specify a range of CIDR networks outside of the cluster. - 2
- Specifies the CIDR ranges for the intra-cluster traffic from your resources.
- 3 4
- Specifies a
Denyegress to everything by settingnetworksvalues to0.0.0.0/0. Make sure you have a higher priorityAllowrule to necessary destinations before setting aDenyto0.0.0.0/0because this will deny all traffic including to Kubernetes API and DNS servers.
Collectively the network-as-egress-peer ANP and default BANP using networks peers enforces the following egress policy:
- All pods cannot talk to external DNS servers at the listed IP addresses.
- All pods can talk to rest of the company’s intranet.
- All pods can talk to other pods, nodes, and services.
-
All pods cannot talk to the internet. Combining the last ANP
Passrule and the strong BANPDenyrule a guardrail policy is created that secures traffic in the cluster.
7.2.4.1.3. Using nodes peer and networks peer together
Cluster administrators can combine nodes and networks peer in your ANP and BANP policies.
Example 7.10. Example of nodes and networks peer
apiVersion: policy.networking.k8s.io/v1alpha1
kind: AdminNetworkPolicy
metadata:
  name: egress-peer-1
spec:
  egress:
  - action: "Allow"
    name: "allow-egress"
    to:
    - nodes:
        matchExpressions:
        - key: worker-group
          operator: In
          values:
          - workloads # Egress traffic from nodes with label worker-group: workloads is allowed.
    - networks:
      - 104.154.164.170/32
    - pods:
        namespaceSelector:
          matchLabels:
            apps: external-apps
        podSelector:
          matchLabels:
            app: web # This rule in the policy allows the traffic directed to pods labeled apps: web in projects with apps: external-apps to leave the cluster.
  - action: "Deny"
    name: "deny-egress"
    to:
    - nodes:
        matchExpressions:
        - key: worker-group
          operator: In
          values:
          - infra # Egress traffic from nodes with label worker-group: infra is denied.
    - networks:
      - 104.154.164.160/32 # Egress traffic to this IP address from cluster is denied.
    - pods:
        namespaceSelector:
          matchLabels:
            apps: internal-apps
        podSelector: {}
  - action: "Pass"
    name: "pass-egress"
    to:
    - nodes:
        matchExpressions:
        - key: node-role.kubernetes.io/worker
          operator: Exists # All other egress traffic is passed to NetworkPolicy or BANP for evaluation.
  priority: 30
subject:
    namespaces:
      matchLabels:
apps: all-apps- 1
- Specifies the name of the policy.
- 2
- For
nodesandnetworkspeers, you can only use northbound traffic controls in ANP asegress. - 3
- Specifies the priority of the ANP, determining the order in which they should be evaluated. Lower priority rules have higher precedence. ANP accepts values of 0-99 with 0 being the highest priority and 99 being the lowest.
- 4
- Specifies the set of pods in the cluster on which the rules of the policy are to be applied. In the example, any pods with the
apps: all-appslabel across all namespaces are thesubjectof the policy.
7.2.5. Troubleshooting AdminNetworkPolicy
7.2.5.1. Checking creation of ANP
To check that your AdminNetworkPolicy (ANP) and BaselineAdminNetworkPolicy (BANP) are created correctly, check the status outputs of the following commands: oc describe anp or oc describe banp.
A good status indicates OVN DB plumbing was successful and the SetupSucceeded.
Example 7.11. Example ANP with a good status
...
Conditions:
Last Transition Time:  2024-06-08T20:29:00Z
Message:               Setting up OVN DB plumbing was successful
Reason:                SetupSucceeded
Status:                True
Type:                  Ready-In-Zone-ovn-control-plane Last Transition Time:  2024-06-08T20:29:00Z
Message:               Setting up OVN DB plumbing was successful
Reason:                SetupSucceeded
Status:                True
Type:                  Ready-In-Zone-ovn-worker
Last Transition Time:  2024-06-08T20:29:00Z
Message:               Setting up OVN DB plumbing was successful
Reason:                SetupSucceeded
Status:                True
Type:                  Ready-In-Zone-ovn-worker2
...
If plumbing is unsuccessful, an error is reported from the respective zone controller.
Example 7.12. Example of an ANP with a bad status and error message
...
Status:
  Conditions:
    Last Transition Time:  2024-06-25T12:47:44Z
    Message:               error attempting to add ANP cluster-control with priority 600 because, OVNK only supports priority ranges 0-99
    Reason:                SetupFailed
    Status:                False
    Type:                  Ready-In-Zone-example-worker-1.example.example-org.net
    Last Transition Time:  2024-06-25T12:47:45Z
    Message:               error attempting to add ANP cluster-control with priority 600 because, OVNK only supports priority ranges 0-99
    Reason:                SetupFailed
    Status:                False
    Type:                  Ready-In-Zone-example-worker-0.example.example-org.net
    Last Transition Time:  2024-06-25T12:47:44Z
    Message:               error attempting to add ANP cluster-control with priority 600 because, OVNK only supports priority ranges 0-99
    Reason:                SetupFailed
    Status:                False
    Type:                  Ready-In-Zone-example-ctlplane-1.example.example-org.net
    Last Transition Time:  2024-06-25T12:47:44Z
    Message:               error attempting to add ANP cluster-control with priority 600 because, OVNK only supports priority ranges 0-99
    Reason:                SetupFailed
    Status:                False
    Type:                  Ready-In-Zone-example-ctlplane-2.example.example-org.net
    Last Transition Time:  2024-06-25T12:47:44Z
    Message:               error attempting to add ANP cluster-control with priority 600 because, OVNK only supports priority ranges 0-99
    Reason:                SetupFailed
    Status:                False
    Type:                  Ready-In-Zone-example-ctlplane-0.example.example-org.net
    ```
See the following section for nbctl commands to help troubleshoot unsuccessful policies.
7.2.5.1.1. Using nbctl commands for ANP and BANP
To troubleshoot an unsuccessful setup, start by looking at OVN Northbound database (nbdb) objects including ACL, AdressSet, and Port_Group. To view the nbdb, you need to be inside the pod on that node to view the objects in that node’s database.
Prerequisites
-
Access to the cluster as a user with the
cluster-adminrole. -
The OpenShift CLI (
oc) installed.
To run ovn nbctl commands in a cluster, you must open a remote shell into the `nbdb`on the relevant node.
The following policy was used to generate outputs.
Example 7.13. AdminNetworkPolicy used to generate outputs
apiVersion: policy.networking.k8s.io/v1alpha1
kind: AdminNetworkPolicy
metadata:
  name: cluster-control
spec:
  priority: 34
  subject:
    namespaces:
      matchLabels:
        anp: cluster-control-anp # Only namespaces with this label have this ANP
  ingress:
  - name: "allow-from-ingress-router" # rule0
    action: "Allow"
    from:
    - namespaces:
        matchLabels:
          policy-group.network.openshift.io/ingress: ""
  - name: "allow-from-monitoring" # rule1
    action: "Allow"
    from:
    - namespaces:
        matchLabels:
          kubernetes.io/metadata.name: openshift-monitoring
    ports:
    - portNumber:
        protocol: TCP
        port: 7564
    - namedPort: "scrape"
  - name: "allow-from-open-tenants" # rule2
    action: "Allow"
    from:
    - namespaces: # open tenants
        matchLabels:
          tenant: open
  - name: "pass-from-restricted-tenants" # rule3
    action: "Pass"
    from:
    - namespaces: # restricted tenants
        matchLabels:
          tenant: restricted
  - name: "default-deny" # rule4
    action: "Deny"
    from:
    - namespaces: {} # Use the empty selector with caution because it also selects OpenShift namespaces as well.
  egress:
  - name: "allow-to-dns" # rule0
    action: "Allow"
    to:
    - pods:
        namespaceSelector:
          matchlabels:
            kubernetes.io/metadata.name: openshift-dns
        podSelector:
          matchlabels:
            app: dns
    ports:
    - portNumber:
        protocol: UDP
        port: 5353
  - name: "allow-to-kapi-server" # rule1
    action: "Allow"
    to:
    - nodes:
        matchExpressions:
        - key: node-role.kubernetes.io/control-plane
          operator: Exists
    ports:
    - portNumber:
        protocol: TCP
        port: 6443
  - name: "allow-to-splunk" # rule2
    action: "Allow"
    to:
    - namespaces:
        matchlabels:
          tenant: splunk
    ports:
    - portNumber:
        protocol: TCP
        port: 8991
    - portNumber:
        protocol: TCP
        port: 8992
  - name: "allow-to-open-tenants-and-intranet-and-worker-nodes" # rule3
    action: "Allow"
    to:
    - nodes: # worker-nodes
        matchExpressions:
        - key: node-role.kubernetes.io/worker
          operator: Exists
    - networks: # intranet
      - 172.29.0.0/30
      - 10.0.54.0/19
      - 10.0.56.38/32
      - 10.0.69.0/24
    - namespaces: # open tenants
        matchLabels:
          tenant: open
  - name: "pass-to-restricted-tenants" # rule4
    action: "Pass"
    to:
    - namespaces: # restricted tenants
        matchLabels:
          tenant: restricted
  - name: "default-deny"
    action: "Deny"
    to:
    - networks:
      - 0.0.0.0/0
Procedure
List pods with node information by running the following command:
$ oc get pods -n openshift-ovn-kubernetes -owideExample output
NAME                                     READY   STATUS    RESTARTS   AGE   IP           NODE                                       NOMINATED NODE   READINESS GATES
ovnkube-control-plane-5c95487779-8k9fd   2/2     Running   0          34m   10.0.0.5     ci-ln-0tv5gg2-72292-6sjw5-master-0         <none>           <none>
ovnkube-control-plane-5c95487779-v2xn8   2/2     Running   0          34m   10.0.0.3     ci-ln-0tv5gg2-72292-6sjw5-master-1         <none>           <none>
ovnkube-node-524dt                       8/8     Running   0          33m   10.0.0.4     ci-ln-0tv5gg2-72292-6sjw5-master-2         <none>           <none>
ovnkube-node-gbwr9                       8/8     Running   0          24m   10.0.128.4   ci-ln-0tv5gg2-72292-6sjw5-worker-c-s9gqt   <none>           <none>
ovnkube-node-h4fpx                       8/8     Running   0          33m   10.0.0.5     ci-ln-0tv5gg2-72292-6sjw5-master-0         <none>           <none>
ovnkube-node-j4hzw                       8/8     Running   0          24m   10.0.128.2   ci-ln-0tv5gg2-72292-6sjw5-worker-a-hzbh5   <none>           <none>
ovnkube-node-wdhgv                       8/8     Running   0          33m   10.0.0.3     ci-ln-0tv5gg2-72292-6sjw5-master-1         <none>           <none>
ovnkube-node-wfncn                       8/8     Running   0          24m   10.0.128.3   ci-ln-0tv5gg2-72292-6sjw5-worker-b-5bb7f   <none>           <none>
Navigate into a pod to look at the northbound database by running the following command:
$ oc rsh -c nbdb -n openshift-ovn-kubernetes ovnkube-node-524dtRun the following command to look at the ACLs nbdb:
$ ovn-nbctl find ACL 'external_ids{>=}{"k8s.ovn.org/owner-type"=AdminNetworkPolicy,"k8s.ovn.org/name"=cluster-control}'- Where, cluster-control
-
Specifies the name of the
AdminNetworkPolicyyou are troubleshooting. - AdminNetworkPolicy
-
Specifies the type:
AdminNetworkPolicyorBaselineAdminNetworkPolicy.
Example 7.14. Example output for ACLs
_uuid : 0d5e4722-b608-4bb1-b625-23c323cc9926 action : allow-related direction : to-lport external_ids : {direction=Ingress, gress-index="2", "k8s.ovn.org/id"="default-network-controller:AdminNetworkPolicy:cluster-control:Ingress:2:None", "k8s.ovn.org/name"=cluster-control, "k8s.ovn.org/owner-controller"=default-network-controller, "k8s.ovn.org/owner-type"=AdminNetworkPolicy, port-policy-protocol=None} label : 0 log : false match : "outport == @a14645450421485494999 && ((ip4.src == $a13730899355151937870))" meter : acl-logging name : "ANP:cluster-control:Ingress:2" options : {} priority : 26598 severity : [] tier : 1 _uuid : b7be6472-df67-439c-8c9c-f55929f0a6e0 action : drop direction : from-lport external_ids : {direction=Egress, gress-index="5", "k8s.ovn.org/id"="default-network-controller:AdminNetworkPolicy:cluster-control:Egress:5:None", "k8s.ovn.org/name"=cluster-control, "k8s.ovn.org/owner-controller"=default-network-controller, "k8s.ovn.org/owner-type"=AdminNetworkPolicy, port-policy-protocol=None} label : 0 log : false match : "inport == @a14645450421485494999 && ((ip4.dst == $a11452480169090787059))" meter : acl-logging name : "ANP:cluster-control:Egress:5" options : {apply-after-lb="true"} priority : 26595 severity : [] tier : 1 _uuid : 5a6e5bb4-36eb-4209-b8bc-c611983d4624 action : pass direction : to-lport external_ids : {direction=Ingress, gress-index="3", "k8s.ovn.org/id"="default-network-controller:AdminNetworkPolicy:cluster-control:Ingress:3:None", "k8s.ovn.org/name"=cluster-control, "k8s.ovn.org/owner-controller"=default-network-controller, "k8s.ovn.org/owner-type"=AdminNetworkPolicy, port-policy-protocol=None} label : 0 log : false match : "outport == @a14645450421485494999 && ((ip4.src == $a764182844364804195))" meter : acl-logging name : "ANP:cluster-control:Ingress:3" options : {} priority : 26597 severity : [] tier : 1 _uuid : 04f20275-c410-405c-a923-0e677f767889 action : pass direction : from-lport external_ids : {direction=Egress, gress-index="4", "k8s.ovn.org/id"="default-network-controller:AdminNetworkPolicy:cluster-control:Egress:4:None", "k8s.ovn.org/name"=cluster-control, "k8s.ovn.org/owner-controller"=default-network-controller, "k8s.ovn.org/owner-type"=AdminNetworkPolicy, port-policy-protocol=None} label : 0 log : false match : "inport == @a14645450421485494999 && ((ip4.dst == $a5972452606168369118))" meter : acl-logging name : "ANP:cluster-control:Egress:4" options : {apply-after-lb="true"} priority : 26596 severity : [] tier : 1 _uuid : 4b5d836a-e0a3-4088-825e-f9f0ca58e538 action : drop direction : to-lport external_ids : {direction=Ingress, gress-index="4", "k8s.ovn.org/id"="default-network-controller:AdminNetworkPolicy:cluster-control:Ingress:4:None", "k8s.ovn.org/name"=cluster-control, "k8s.ovn.org/owner-controller"=default-network-controller, "k8s.ovn.org/owner-type"=AdminNetworkPolicy, port-policy-protocol=None} label : 0 log : false match : "outport == @a14645450421485494999 && ((ip4.src == $a13814616246365836720))" meter : acl-logging name : "ANP:cluster-control:Ingress:4" options : {} priority : 26596 severity : [] tier : 1 _uuid : 5d09957d-d2cc-4f5a-9ddd-b97d9d772023 action : allow-related direction : from-lport external_ids : {direction=Egress, gress-index="2", "k8s.ovn.org/id"="default-network-controller:AdminNetworkPolicy:cluster-control:Egress:2:tcp", "k8s.ovn.org/name"=cluster-control, "k8s.ovn.org/owner-controller"=default-network-controller, "k8s.ovn.org/owner-type"=AdminNetworkPolicy, port-policy-protocol=tcp} label : 0 log : false match : "inport == @a14645450421485494999 && ((ip4.dst == $a18396736153283155648)) && tcp && tcp.dst=={8991,8992}" meter : acl-logging name : "ANP:cluster-control:Egress:2" options : {apply-after-lb="true"} priority : 26598 severity : [] tier : 1 _uuid : 1a68a5ed-e7f9-47d0-b55c-89184d97e81a action : allow-related direction : from-lport external_ids : {direction=Egress, gress-index="1", "k8s.ovn.org/id"="default-network-controller:AdminNetworkPolicy:cluster-control:Egress:1:tcp", "k8s.ovn.org/name"=cluster-control, "k8s.ovn.org/owner-controller"=default-network-controller, "k8s.ovn.org/owner-type"=AdminNetworkPolicy, port-policy-protocol=tcp} label : 0 log : false match : "inport == @a14645450421485494999 && ((ip4.dst == $a10706246167277696183)) && tcp && tcp.dst==6443" meter : acl-logging name : "ANP:cluster-control:Egress:1" options : {apply-after-lb="true"} priority : 26599 severity : [] tier : 1 _uuid : aa1a224d-7960-4952-bdfb-35246bafbac8 action : allow-related direction : to-lport external_ids : {direction=Ingress, gress-index="1", "k8s.ovn.org/id"="default-network-controller:AdminNetworkPolicy:cluster-control:Ingress:1:tcp", "k8s.ovn.org/name"=cluster-control, "k8s.ovn.org/owner-controller"=default-network-controller, "k8s.ovn.org/owner-type"=AdminNetworkPolicy, port-policy-protocol=tcp} label : 0 log : false match : "outport == @a14645450421485494999 && ((ip4.src == $a6786643370959569281)) && tcp && tcp.dst==7564" meter : acl-logging name : "ANP:cluster-control:Ingress:1" options : {} priority : 26599 severity : [] tier : 1 _uuid : 1a27d30e-3f96-4915-8ddd-ade7f22c117b action : allow-related direction : from-lport external_ids : {direction=Egress, gress-index="3", "k8s.ovn.org/id"="default-network-controller:AdminNetworkPolicy:cluster-control:Egress:3:None", "k8s.ovn.org/name"=cluster-control, "k8s.ovn.org/owner-controller"=default-network-controller, "k8s.ovn.org/owner-type"=AdminNetworkPolicy, port-policy-protocol=None} label : 0 log : false match : "inport == @a14645450421485494999 && ((ip4.dst == $a10622494091691694581))" meter : acl-logging name : "ANP:cluster-control:Egress:3" options : {apply-after-lb="true"} priority : 26597 severity : [] tier : 1 _uuid : b23a087f-08f8-4225-8c27-4a9a9ee0c407 action : allow-related direction : from-lport external_ids : {direction=Egress, gress-index="0", "k8s.ovn.org/id"="default-network-controller:AdminNetworkPolicy:cluster-control:Egress:0:udp", "k8s.ovn.org/name"=cluster-control, "k8s.ovn.org/owner-controller"=default-network-controller, "k8s.ovn.org/owner-type"=AdminNetworkPolicy, port-policy-protocol=udp} label : 0 log : false match : "inport == @a14645450421485494999 && ((ip4.dst == $a13517855690389298082)) && udp && udp.dst==5353" meter : acl-logging name : "ANP:cluster-control:Egress:0" options : {apply-after-lb="true"} priority : 26600 severity : [] tier : 1 _uuid : d14ed5cf-2e06-496e-8cae-6b76d5dd5ccd action : allow-related direction : to-lport external_ids : {direction=Ingress, gress-index="0", "k8s.ovn.org/id"="default-network-controller:AdminNetworkPolicy:cluster-control:Ingress:0:None", "k8s.ovn.org/name"=cluster-control, "k8s.ovn.org/owner-controller"=default-network-controller, "k8s.ovn.org/owner-type"=AdminNetworkPolicy, port-policy-protocol=None} label : 0 log : false match : "outport == @a14645450421485494999 && ((ip4.src == $a14545668191619617708))" meter : acl-logging name : "ANP:cluster-control:Ingress:0" options : {} priority : 26600 severity : [] tier : 1NoteThe outputs for ingress and egress show you the logic of the policy in the ACL. For example, every time a packet matches the provided
matchtheactionis taken.Examine the specific ACL for the rule by running the following command:
$ ovn-nbctl find ACL 'external_ids{>=}{"k8s.ovn.org/owner-type"=AdminNetworkPolicy,direction=Ingress,"k8s.ovn.org/name"=cluster-control,gress-index="1"}'- Where,
cluster-control -
Specifies the
nameof your ANP. Ingress-
Specifies the
directionof traffic either of typeIngressorEgress. 1- Specifies the rule you want to look at.
For the example ANP named
cluster-controlatpriority34, the following is an example output forIngressrule1:Example 7.15. Example output
_uuid : aa1a224d-7960-4952-bdfb-35246bafbac8 action : allow-related direction : to-lport external_ids : {direction=Ingress, gress-index="1", "k8s.ovn.org/id"="default-network-controller:AdminNetworkPolicy:cluster-control:Ingress:1:tcp", "k8s.ovn.org/name"=cluster-control, "k8s.ovn.org/owner-controller"=default-network-controller, "k8s.ovn.org/owner-type"=AdminNetworkPolicy, port-policy-protocol=tcp} label : 0 log : false match : "outport == @a14645450421485494999 && ((ip4.src == $a6786643370959569281)) && tcp && tcp.dst==7564" meter : acl-logging name : "ANP:cluster-control:Ingress:1" options : {} priority : 26599 severity : [] tier : 1- Where,
Run the following command to look at address sets in the nbdb:
$ ovn-nbctl find Address_Set 'external_ids{>=}{"k8s.ovn.org/owner-type"=AdminNetworkPolicy,"k8s.ovn.org/name"=cluster-control}'Example 7.16. Example outputs for
Address_Set_uuid : 56e89601-5552-4238-9fc3-8833f5494869 addresses : ["192.168.194.135", "192.168.194.152", "192.168.194.193", "192.168.194.254"] external_ids : {direction=Egress, gress-index="1", ip-family=v4, "k8s.ovn.org/id"="default-network-controller:AdminNetworkPolicy:cluster-control:Egress:1:v4", "k8s.ovn.org/name"=cluster-control, "k8s.ovn.org/owner-controller"=default-network-controller, "k8s.ovn.org/owner-type"=AdminNetworkPolicy} name : a10706246167277696183 _uuid : 7df9330d-380b-4bdb-8acd-4eddeda2419c addresses : ["10.132.0.10", "10.132.0.11", "10.132.0.12", "10.132.0.13", "10.132.0.14", "10.132.0.15", "10.132.0.16", "10.132.0.17", "10.132.0.5", "10.132.0.7", "10.132.0.71", "10.132.0.75", "10.132.0.8", "10.132.0.81", "10.132.0.9", "10.132.2.10", "10.132.2.11", "10.132.2.12", "10.132.2.14", "10.132.2.15", "10.132.2.3", "10.132.2.4", "10.132.2.5", "10.132.2.6", "10.132.2.7", "10.132.2.8", "10.132.2.9", "10.132.3.64", "10.132.3.65", "10.132.3.72", "10.132.3.73", "10.132.3.76", "10.133.0.10", "10.133.0.11", "10.133.0.12", "10.133.0.13", "10.133.0.14", "10.133.0.15", "10.133.0.16", "10.133.0.17", "10.133.0.18", "10.133.0.19", "10.133.0.20", "10.133.0.21", "10.133.0.22", "10.133.0.23", "10.133.0.24", "10.133.0.25", "10.133.0.26", "10.133.0.27", "10.133.0.28", "10.133.0.29", "10.133.0.30", "10.133.0.31", "10.133.0.32", "10.133.0.33", "10.133.0.34", "10.133.0.35", "10.133.0.36", "10.133.0.37", "10.133.0.38", "10.133.0.39", "10.133.0.40", "10.133.0.41", "10.133.0.42", "10.133.0.44", "10.133.0.45", "10.133.0.46", "10.133.0.47", "10.133.0.48", "10.133.0.5", "10.133.0.6", "10.133.0.7", "10.133.0.8", "10.133.0.9", "10.134.0.10", "10.134.0.11", "10.134.0.12", "10.134.0.13", "10.134.0.14", "10.134.0.15", "10.134.0.16", "10.134.0.17", "10.134.0.18", "10.134.0.19", "10.134.0.20", "10.134.0.21", "10.134.0.22", "10.134.0.23", "10.134.0.24", "10.134.0.25", "10.134.0.26", "10.134.0.27", "10.134.0.28", "10.134.0.30", "10.134.0.31", "10.134.0.32", "10.134.0.33", "10.134.0.34", "10.134.0.35", "10.134.0.36", "10.134.0.37", "10.134.0.38", "10.134.0.4", "10.134.0.42", "10.134.0.9", "10.135.0.10", "10.135.0.11", "10.135.0.12", "10.135.0.13", "10.135.0.14", "10.135.0.15", "10.135.0.16", "10.135.0.17", "10.135.0.18", "10.135.0.19", "10.135.0.23", "10.135.0.24", "10.135.0.26", "10.135.0.27", "10.135.0.29", "10.135.0.3", "10.135.0.4", "10.135.0.40", "10.135.0.41", "10.135.0.42", "10.135.0.43", "10.135.0.44", "10.135.0.5", "10.135.0.6", "10.135.0.7", "10.135.0.8", "10.135.0.9"] external_ids : {direction=Ingress, gress-index="4", ip-family=v4, "k8s.ovn.org/id"="default-network-controller:AdminNetworkPolicy:cluster-control:Ingress:4:v4", "k8s.ovn.org/name"=cluster-control, "k8s.ovn.org/owner-controller"=default-network-controller, "k8s.ovn.org/owner-type"=AdminNetworkPolicy} name : a13814616246365836720 _uuid : 84d76f13-ad95-4c00-8329-a0b1d023c289 addresses : ["10.132.3.76", "10.135.0.44"] external_ids : {direction=Egress, gress-index="4", ip-family=v4, "k8s.ovn.org/id"="default-network-controller:AdminNetworkPolicy:cluster-control:Egress:4:v4", "k8s.ovn.org/name"=cluster-control, "k8s.ovn.org/owner-controller"=default-network-controller, "k8s.ovn.org/owner-type"=AdminNetworkPolicy} name : a5972452606168369118 _uuid : 0c53e917-f7ee-4256-8f3a-9522c0481e52 addresses : ["10.132.0.10", "10.132.0.11", "10.132.0.12", "10.132.0.13", "10.132.0.14", "10.132.0.15", "10.132.0.16", "10.132.0.17", "10.132.0.5", "10.132.0.7", "10.132.0.71", "10.132.0.75", "10.132.0.8", "10.132.0.81", "10.132.0.9", "10.132.2.10", "10.132.2.11", "10.132.2.12", "10.132.2.14", "10.132.2.15", "10.132.2.3", "10.132.2.4", "10.132.2.5", "10.132.2.6", "10.132.2.7", "10.132.2.8", "10.132.2.9", "10.132.3.64", "10.132.3.65", "10.132.3.72", "10.132.3.73", "10.132.3.76", "10.133.0.10", "10.133.0.11", "10.133.0.12", "10.133.0.13", "10.133.0.14", "10.133.0.15", "10.133.0.16", "10.133.0.17", "10.133.0.18", "10.133.0.19", "10.133.0.20", "10.133.0.21", "10.133.0.22", "10.133.0.23", "10.133.0.24", "10.133.0.25", "10.133.0.26", "10.133.0.27", "10.133.0.28", "10.133.0.29", "10.133.0.30", "10.133.0.31", "10.133.0.32", "10.133.0.33", "10.133.0.34", "10.133.0.35", "10.133.0.36", "10.133.0.37", "10.133.0.38", "10.133.0.39", "10.133.0.40", "10.133.0.41", "10.133.0.42", "10.133.0.44", "10.133.0.45", "10.133.0.46", "10.133.0.47", "10.133.0.48", "10.133.0.5", "10.133.0.6", "10.133.0.7", "10.133.0.8", "10.133.0.9", "10.134.0.10", "10.134.0.11", "10.134.0.12", "10.134.0.13", "10.134.0.14", "10.134.0.15", "10.134.0.16", "10.134.0.17", "10.134.0.18", "10.134.0.19", "10.134.0.20", "10.134.0.21", "10.134.0.22", "10.134.0.23", "10.134.0.24", "10.134.0.25", "10.134.0.26", "10.134.0.27", "10.134.0.28", "10.134.0.30", "10.134.0.31", "10.134.0.32", "10.134.0.33", "10.134.0.34", "10.134.0.35", "10.134.0.36", "10.134.0.37", "10.134.0.38", "10.134.0.4", "10.134.0.42", "10.134.0.9", "10.135.0.10", "10.135.0.11", "10.135.0.12", "10.135.0.13", "10.135.0.14", "10.135.0.15", "10.135.0.16", "10.135.0.17", "10.135.0.18", "10.135.0.19", "10.135.0.23", "10.135.0.24", "10.135.0.26", "10.135.0.27", "10.135.0.29", "10.135.0.3", "10.135.0.4", "10.135.0.40", "10.135.0.41", "10.135.0.42", "10.135.0.43", "10.135.0.44", "10.135.0.5", "10.135.0.6", "10.135.0.7", "10.135.0.8", "10.135.0.9"] external_ids : {direction=Egress, gress-index="2", ip-family=v4, "k8s.ovn.org/id"="default-network-controller:AdminNetworkPolicy:cluster-control:Egress:2:v4", "k8s.ovn.org/name"=cluster-control, "k8s.ovn.org/owner-controller"=default-network-controller, "k8s.ovn.org/owner-type"=AdminNetworkPolicy} name : a18396736153283155648 _uuid : 5228bf1b-dfd8-40ec-bfa8-95c5bf9aded9 addresses : [] external_ids : {direction=Ingress, gress-index="0", ip-family=v4, "k8s.ovn.org/id"="default-network-controller:AdminNetworkPolicy:cluster-control:Ingress:0:v4", "k8s.ovn.org/name"=cluster-control, "k8s.ovn.org/owner-controller"=default-network-controller, "k8s.ovn.org/owner-type"=AdminNetworkPolicy} name : a14545668191619617708 _uuid : 46530d69-70da-4558-8c63-884ec9dc4f25 addresses : ["10.132.2.10", "10.132.2.5", "10.132.2.6", "10.132.2.7", "10.132.2.8", "10.132.2.9", "10.133.0.47", "10.134.0.33", "10.135.0.10", "10.135.0.11", "10.135.0.12", "10.135.0.19", "10.135.0.24", "10.135.0.7", "10.135.0.8", "10.135.0.9"] external_ids : {direction=Ingress, gress-index="1", ip-family=v4, "k8s.ovn.org/id"="default-network-controller:AdminNetworkPolicy:cluster-control:Ingress:1:v4", "k8s.ovn.org/name"=cluster-control, "k8s.ovn.org/owner-controller"=default-network-controller, "k8s.ovn.org/owner-type"=AdminNetworkPolicy} name : a6786643370959569281 _uuid : 65fdcdea-0b9f-4318-9884-1b51d231ad1d addresses : ["10.132.3.72", "10.135.0.42"] external_ids : {direction=Ingress, gress-index="2", ip-family=v4, "k8s.ovn.org/id"="default-network-controller:AdminNetworkPolicy:cluster-control:Ingress:2:v4", "k8s.ovn.org/name"=cluster-control, "k8s.ovn.org/owner-controller"=default-network-controller, "k8s.ovn.org/owner-type"=AdminNetworkPolicy} name : a13730899355151937870 _uuid : 73eabdb0-36bf-4ca3-b66d-156ac710df4c addresses : ["10.0.32.0/19", "10.0.56.38/32", "10.0.69.0/24", "10.132.3.72", "10.135.0.42", "172.29.0.0/30", "192.168.194.103", "192.168.194.2"] external_ids : {direction=Egress, gress-index="3", ip-family=v4, "k8s.ovn.org/id"="default-network-controller:AdminNetworkPolicy:cluster-control:Egress:3:v4", "k8s.ovn.org/name"=cluster-control, "k8s.ovn.org/owner-controller"=default-network-controller, "k8s.ovn.org/owner-type"=AdminNetworkPolicy} name : a10622494091691694581 _uuid : 50cdbef2-71b5-474b-914c-6fcd1d7712d3 addresses : ["10.132.0.10", "10.132.0.11", "10.132.0.12", "10.132.0.13", "10.132.0.14", "10.132.0.15", "10.132.0.16", "10.132.0.17", "10.132.0.5", "10.132.0.7", "10.132.0.71", "10.132.0.75", "10.132.0.8", "10.132.0.81", "10.132.0.9", "10.132.2.10", "10.132.2.11", "10.132.2.12", "10.132.2.14", "10.132.2.15", "10.132.2.3", "10.132.2.4", "10.132.2.5", "10.132.2.6", "10.132.2.7", "10.132.2.8", "10.132.2.9", "10.132.3.64", "10.132.3.65", "10.132.3.72", "10.132.3.73", "10.132.3.76", "10.133.0.10", "10.133.0.11", "10.133.0.12", "10.133.0.13", "10.133.0.14", "10.133.0.15", "10.133.0.16", "10.133.0.17", "10.133.0.18", "10.133.0.19", "10.133.0.20", "10.133.0.21", "10.133.0.22", "10.133.0.23", "10.133.0.24", "10.133.0.25", "10.133.0.26", "10.133.0.27", "10.133.0.28", "10.133.0.29", "10.133.0.30", "10.133.0.31", "10.133.0.32", "10.133.0.33", "10.133.0.34", "10.133.0.35", "10.133.0.36", "10.133.0.37", "10.133.0.38", "10.133.0.39", "10.133.0.40", "10.133.0.41", "10.133.0.42", "10.133.0.44", "10.133.0.45", "10.133.0.46", "10.133.0.47", "10.133.0.48", "10.133.0.5", "10.133.0.6", "10.133.0.7", "10.133.0.8", "10.133.0.9", "10.134.0.10", "10.134.0.11", "10.134.0.12", "10.134.0.13", "10.134.0.14", "10.134.0.15", "10.134.0.16", "10.134.0.17", "10.134.0.18", "10.134.0.19", "10.134.0.20", "10.134.0.21", "10.134.0.22", "10.134.0.23", "10.134.0.24", "10.134.0.25", "10.134.0.26", "10.134.0.27", "10.134.0.28", "10.134.0.30", "10.134.0.31", "10.134.0.32", "10.134.0.33", "10.134.0.34", "10.134.0.35", "10.134.0.36", "10.134.0.37", "10.134.0.38", "10.134.0.4", "10.134.0.42", "10.134.0.9", "10.135.0.10", "10.135.0.11", "10.135.0.12", "10.135.0.13", "10.135.0.14", "10.135.0.15", "10.135.0.16", "10.135.0.17", "10.135.0.18", "10.135.0.19", "10.135.0.23", "10.135.0.24", "10.135.0.26", "10.135.0.27", "10.135.0.29", "10.135.0.3", "10.135.0.4", "10.135.0.40", "10.135.0.41", "10.135.0.42", "10.135.0.43", "10.135.0.44", "10.135.0.5", "10.135.0.6", "10.135.0.7", "10.135.0.8", "10.135.0.9"] external_ids : {direction=Egress, gress-index="0", ip-family=v4, "k8s.ovn.org/id"="default-network-controller:AdminNetworkPolicy:cluster-control:Egress:0:v4", "k8s.ovn.org/name"=cluster-control, "k8s.ovn.org/owner-controller"=default-network-controller, "k8s.ovn.org/owner-type"=AdminNetworkPolicy} name : a13517855690389298082 _uuid : 32a42f32-2d11-43dd-979d-a56d7ee6aa57 addresses : ["10.132.3.76", "10.135.0.44"] external_ids : {direction=Ingress, gress-index="3", ip-family=v4, "k8s.ovn.org/id"="default-network-controller:AdminNetworkPolicy:cluster-control:Ingress:3:v4", "k8s.ovn.org/name"=cluster-control, "k8s.ovn.org/owner-controller"=default-network-controller, "k8s.ovn.org/owner-type"=AdminNetworkPolicy} name : a764182844364804195 _uuid : 8fd3b977-6e1c-47aa-82b7-e3e3136c4a72 addresses : ["0.0.0.0/0"] external_ids : {direction=Egress, gress-index="5", ip-family=v4, "k8s.ovn.org/id"="default-network-controller:AdminNetworkPolicy:cluster-control:Egress:5:v4", "k8s.ovn.org/name"=cluster-control, "k8s.ovn.org/owner-controller"=default-network-controller, "k8s.ovn.org/owner-type"=AdminNetworkPolicy} name : a11452480169090787059Examine the specific address set of the rule by running the following command:
$ ovn-nbctl find Address_Set 'external_ids{>=}{"k8s.ovn.org/owner-type"=AdminNetworkPolicy,direction=Egress,"k8s.ovn.org/name"=cluster-control,gress-index="5"}'Example 7.17. Example outputs for
Address_Set_uuid : 8fd3b977-6e1c-47aa-82b7-e3e3136c4a72 addresses : ["0.0.0.0/0"] external_ids : {direction=Egress, gress-index="5", ip-family=v4, "k8s.ovn.org/id"="default-network-controller:AdminNetworkPolicy:cluster-control:Egress:5:v4", "k8s.ovn.org/name"=cluster-control, "k8s.ovn.org/owner-controller"=default-network-controller, "k8s.ovn.org/owner-type"=AdminNetworkPolicy} name : a11452480169090787059
Run the following command to look at the port groups in the nbdb:
$ ovn-nbctl find Port_Group 'external_ids{>=}{"k8s.ovn.org/owner-type"=AdminNetworkPolicy,"k8s.ovn.org/name"=cluster-control}'Example 7.18. Example outputs for
Port_Group_uuid : f50acf71-7488-4b9a-b7b8-c8a024e99d21 acls : [04f20275-c410-405c-a923-0e677f767889, 0d5e4722-b608-4bb1-b625-23c323cc9926, 1a27d30e-3f96-4915-8ddd-ade7f22c117b, 1a68a5ed-e7f9-47d0-b55c-89184d97e81a, 4b5d836a-e0a3-4088-825e-f9f0ca58e538, 5a6e5bb4-36eb-4209-b8bc-c611983d4624, 5d09957d-d2cc-4f5a-9ddd-b97d9d772023, aa1a224d-7960-4952-bdfb-35246bafbac8, b23a087f-08f8-4225-8c27-4a9a9ee0c407, b7be6472-df67-439c-8c9c-f55929f0a6e0, d14ed5cf-2e06-496e-8cae-6b76d5dd5ccd] external_ids : {"k8s.ovn.org/id"="default-network-controller:AdminNetworkPolicy:cluster-control", "k8s.ovn.org/name"=cluster-control, "k8s.ovn.org/owner-controller"=default-network-controller, "k8s.ovn.org/owner-type"=AdminNetworkPolicy} name : a14645450421485494999 ports : [5e75f289-8273-4f8a-8798-8c10f7318833, de7e1b71-6184-445d-93e7-b20acadf41ea]
7.2.6. Best practices for AdminNetworkPolicy
This section provides best practices for the AdminNetworkPolicy and BaselineAdminNetworkPolicy resources.
7.2.6.1. Designing AdminNetworkPolicy
When building AdminNetworkPolicy (ANP) resources, you might consider the following when creating your policies:
- You can create ANPs that have the same priority. If you do create two ANPs at the same priority, ensure that they do not apply overlapping rules to the same traffic. Only one rule per value is applied and there is no guarantee which rule is applied when there is more than one at the same priority value. Because there is no guarantee which policy takes precedence when overlapping ANPs are created, set ANPs at different priorities so that precedence is well defined.
- Administrators must create ANP that apply to user namespaces not system namespaces.
Applying ANP and BaselineAdminNetworkPolicy (BANP) to system namespaces (default, kube-system, any namespace whose name starts with openshift-, etc) is not supported, and this can leave your cluster unresponsive and in a non-functional state.
-
Because
0-100is the supported priority range, you might design your ANP to use a middle range like30-70. This leaves some placeholder for priorities before and after. Even in the middle range, you might want to leave gaps so that as your infrastructure requirements evolve over time, you are able to insert new ANPs when needed at the right priority level. If you pack your ANPs, then you might need to recreate all of them to accommodate any changes in the future. -
When using
0.0.0.0/0or::/0to create a strongDenypolicy, ensure that you have higher priorityAlloworPassrules for essential traffic. -
Use
Allowas youractionfield when you want to ensure that a connection is allowed no matter what. AnAllowrule in an ANP means that the connection will always be allowed, andNetworkPolicywill be ignored. -
Use
Passas youractionfield to delegate the policy decision of allowing or denying the connection to theNetworkPolicylayer. - Ensure that the selectors across multiple rules do not overlap so that the same IPs do not appear in multiple policies, which can cause performance and scale limitations.
-
Avoid using
namedPortsin conjunction withPortNumberandPortRangebecause this creates 6 ACLs and cause inefficiencies in your cluster.
7.2.6.1.1. Considerations for using BaselineAdminNetworkPolicy
You can define only a single
BaselineAdminNetworkPolicy(BANP) resource within a cluster. The following are supported uses for BANP that administrators might consider in designing their BANP:-
You can set a default deny policy for cluster-local ingress in user namespaces. This BANP will force developers to have to add
NetworkPolicyobjects to allow the ingress traffic that they want to allow, and if they do not add network policies for ingress it will be denied. -
You can set a default deny policy for cluster-local egress in user namespaces. This BANP will force developers to have to add
NetworkPolicyobjects to allow the egress traffic that they want to allow, and if they do not add network policies it will be denied. -
You can set a default allow policy for egress to the in-cluster DNS service. Such a BANP ensures that the namespaced users do not have to set an allow egress
NetworkPolicyto the in-cluster DNS service. -
You can set an egress policy that allows internal egress traffic to all pods but denies access to all external endpoints (i.e
0.0.0.0/0and::/0). This BANP allows user workloads to send traffic to other in-cluster endpoints, but not to external endpoints by default.NetworkPolicycan then be used by developers in order to allow their applications to send traffic to an explicit set of external services.
-
You can set a default deny policy for cluster-local ingress in user namespaces. This BANP will force developers to have to add
-
Ensure you scope your BANP so that it only denies traffic to user namespaces and not to system namespaces. This is because the system namespaces do not have
NetworkPolicyobjects to override your BANP.
7.2.6.1.2. Differences to consider between AdminNetworkPolicy and NetworkPolicy
-
Unlike
NetworkPolicyobjects, you must use explicit labels to reference your workloads within ANP and BANP rather than using the empty ({}) catch all selector to avoid accidental traffic selection.
An empty namespace selector applied to a infrastructure namespace can make your cluster unresponsive and in a non-functional state.
-
In API semantics for ANP, you have to explicitly define allow or deny rules when you create the policy, unlike
NetworkPolicyobjects which have an implicit deny. -
Unlike
NetworkPolicyobjects,AdminNetworkPolicyobjects ingress rules are limited to in-cluster pods and namespaces so you cannot, and do not need to, set rules for ingress from the host network.
7.3. Network policy
7.3.1. About network policy
As a developer, you can define network policies that restrict traffic to pods in your cluster.
7.3.1.1. About network policy
In a cluster that uses a network plugin that supports a Kubernetes network policy, a NetworkPolicy object controls network isolation. In OpenShift Container Platform 4.16, OpenShift SDN supports using network policy in its default network isolation mode.
- On OpenShift SDN: A network policy does not apply to the host network namespace. Network policy rules do not impact pods configured with host networking enabled. Network policy rules might impact pods connected to host-networked pods.
-
On Openshift-OVN-Kubernetes: Network policies do impact pods that have host networking enabled, so you must explicitly allow a connection to these pods in your network policy rules. If a namespace has any network policy applied, traffic originating from system components, such as
openshift-ingressoropenshift-kube-apiserver, get dropped by default; You must explicitly enable this traffic to allow it through. -
Using the
namespaceSelectorfield without thepodSelectorfield set to{}will not includehostNetworkpods. You must use thepodSelectorset to{}with thenamespaceSelectorfield in order to targethostNetworkpods when creating network policies. - Network policies cannot block traffic from localhost or from their resident nodes.
By default, all pods in a project are accessible from other pods and network endpoints. To isolate one or more pods in a project, you can create NetworkPolicy objects in that project to indicate the allowed incoming connections. Project administrators can create and delete NetworkPolicy objects within their own project.
If a pod is matched by selectors in one or more NetworkPolicy objects, then the pod will accept only connections that are allowed by at least one of those NetworkPolicy objects. A pod that is not selected by any NetworkPolicy objects is fully accessible.
A network policy applies to only the Transmission Control Protocol (TCP), User Datagram Protocol (UDP), Internet Control Message Protocol (ICMP), and Stream Control Transmission Protocol (SCTP) protocols. Other protocols are not affected.
The following example NetworkPolicy objects demonstrate supporting different scenarios:
Deny all traffic:
To make a project deny by default, add a
NetworkPolicyobject that matches all pods but accepts no traffic:kind: NetworkPolicy apiVersion: networking.k8s.io/v1 metadata: name: deny-by-default spec: podSelector: {} ingress: []Only allow connections from the OpenShift Container Platform Ingress Controller:
To make a project allow only connections from the OpenShift Container Platform Ingress Controller, add the following
NetworkPolicyobject.apiVersion: networking.k8s.io/v1 kind: NetworkPolicy metadata: name: allow-from-openshift-ingress spec: ingress: - from: - namespaceSelector: matchLabels: policy-group.network.openshift.io/ingress: "" podSelector: {} policyTypes: - IngressOnly accept connections from pods within a project:
ImportantTo allow ingress connections from
hostNetworkpods in the same namespace, you need to apply theallow-from-hostnetworkpolicy together with theallow-same-namespacepolicy.To make pods accept connections from other pods in the same project, but reject all other connections from pods in other projects, add the following
NetworkPolicyobject:kind: NetworkPolicy apiVersion: networking.k8s.io/v1 metadata: name: allow-same-namespace spec: podSelector: {} ingress: - from: - podSelector: {}Only allow HTTP and HTTPS traffic based on pod labels:
To enable only HTTP and HTTPS access to the pods with a specific label (
role=frontendin following example), add aNetworkPolicyobject similar to the following:kind: NetworkPolicy apiVersion: networking.k8s.io/v1 metadata: name: allow-http-and-https spec: podSelector: matchLabels: role: frontend ingress: - ports: - protocol: TCP port: 80 - protocol: TCP port: 443Accept connections by using both namespace and pod selectors:
To match network traffic by combining namespace and pod selectors, you can use a
NetworkPolicyobject similar to the following:kind: NetworkPolicy apiVersion: networking.k8s.io/v1 metadata: name: allow-pod-and-namespace-both spec: podSelector: matchLabels: name: test-pods ingress: - from: - namespaceSelector: matchLabels: project: project_name podSelector: matchLabels: name: test-pods
NetworkPolicy objects are additive, which means you can combine multiple NetworkPolicy objects together to satisfy complex network requirements.
For example, for the NetworkPolicy objects defined in previous samples, you can define both allow-same-namespace and allow-http-and-https policies within the same project. Thus allowing the pods with the label role=frontend, to accept any connection allowed by each policy. That is, connections on any port from pods in the same namespace, and connections on ports 80 and 443 from pods in any namespace.
7.3.1.1.1. Using the allow-from-router network policy
Use the following NetworkPolicy to allow external traffic regardless of the router configuration:
apiVersion: networking.k8s.io/v1
kind: NetworkPolicy
metadata:
  name: allow-from-router
spec:
  ingress:
  - from:
    - namespaceSelector:
        matchLabels:
          policy-group.network.openshift.io/ingress: ""
  podSelector: {}
  policyTypes:
- Ingress- 1
policy-group.network.openshift.io/ingress:""label supports both OpenShift-SDN and OVN-Kubernetes.
7.3.1.1.2. Using the allow-from-hostnetwork network policy
Add the following allow-from-hostnetwork NetworkPolicy object to direct traffic from the host network pods.
apiVersion: networking.k8s.io/v1
kind: NetworkPolicy
metadata:
  name: allow-from-hostnetwork
spec:
  ingress:
  - from:
    - namespaceSelector:
        matchLabels:
          policy-group.network.openshift.io/host-network: ""
  podSelector: {}
  policyTypes:
  - Ingress
7.3.1.2. Optimizations for network policy with OpenShift SDN
Use a network policy to isolate pods that are differentiated from one another by labels within a namespace.
It is inefficient to apply NetworkPolicy objects to large numbers of individual pods in a single namespace. Pod labels do not exist at the IP address level, so a network policy generates a separate Open vSwitch (OVS) flow rule for every possible link between every pod selected with a podSelector.
For example, if the spec podSelector and the ingress podSelector within a NetworkPolicy object each match 200 pods, then 40,000 (200*200) OVS flow rules are generated. This might slow down a node.
When designing your network policy, refer to the following guidelines:
Reduce the number of OVS flow rules by using namespaces to contain groups of pods that need to be isolated.
NetworkPolicyobjects that select a whole namespace, by using thenamespaceSelectoror an emptypodSelector, generate only a single OVS flow rule that matches the VXLAN virtual network ID (VNID) of the namespace.- Keep the pods that do not need to be isolated in their original namespace, and move the pods that require isolation into one or more different namespaces.
- Create additional targeted cross-namespace network policies to allow the specific traffic that you do want to allow from the isolated pods.
7.3.1.3. Optimizations for network policy with OVN-Kubernetes network plugin
Learn how to optimize OVN-Kubernetes network policies to reduce flow count and ensure external IP traffic is allowed when needed.
When designing your network policy, refer to the following guidelines:
-
For network policies with the same
spec.podSelectorspec, it is more efficient to use one network policy with multipleingressoregressrules, than multiple network policies with subsets ofingressoregressrules. Every
ingressoregressrule based on thepodSelectorornamespaceSelectorspec generates the number of OVS flows proportional tonumber of pods selected by network policy + number of pods selected by ingress or egress rule. Therefore, it is preferable to use thepodSelectorornamespaceSelectorspec that can select as many pods as you need in one rule, instead of creating individual rules for every pod.For example, the following policy contains two rules:
apiVersion: networking.k8s.io/v1
kind: NetworkPolicy
metadata:
  name: test-network-policy
spec:
  podSelector: {}
  ingress:
  - from:
    - podSelector:
        matchLabels:
          role: frontend
  - from:
    - podSelector:
        matchLabels:
          role: backend
The following policy expresses those same two rules as one:
apiVersion: networking.k8s.io/v1
kind: NetworkPolicy
metadata:
  name: test-network-policy
spec:
  podSelector: {}
  ingress:
  - from:
    - podSelector:
        matchExpressions:
        - {key: role, operator: In, values: [frontend, backend]}
The same guideline applies to the
spec.podSelectorspec. If you have the sameingressoregressrules for different network policies, it might be more efficient to create one network policy with a commonspec.podSelectorspec. For example, the following two policies have different rules:apiVersion: networking.k8s.io/v1 kind: NetworkPolicy metadata: name: policy1 spec: podSelector: matchLabels: role: db ingress: - from: - podSelector: matchLabels: role: frontend --- apiVersion: networking.k8s.io/v1 kind: NetworkPolicy metadata: name: policy2 spec: podSelector: matchLabels: role: client ingress: - from: - podSelector: matchLabels: role: frontendThe following network policy expresses those same two rules as one:
apiVersion: networking.k8s.io/v1
kind: NetworkPolicy
metadata:
  name: policy3
spec:
  podSelector:
    matchExpressions:
    - {key: role, operator: In, values: [db, client]}
  ingress:
  - from:
    - podSelector:
        matchLabels:
          role: frontend
You can apply this optimization when only multiple selectors are expressed as one. In cases where selectors are based on different labels, it may not be possible to apply this optimization. In those cases, consider applying some new labels for network policy optimization specifically.
7.3.1.3.1. NetworkPolicy CR and external IPs in OVN-Kubernetes
In OVN-Kubernetes, the NetworkPolicy custom resource (CR) enforces strict isolation rules. If a service is exposed using an external IP, a network policy can block access from other namespaces unless explicitly configured to allow traffic.
To allow access to external IPs across namespaces, create a NetworkPolicy CR that explicitly permits ingress from the required namespaces and ensures traffic is allowed to the designated service ports. Without allowing traffic to the required ports, access might still be restricted.
Example output
  apiVersion: networking.k8s.io/v1
  kind: NetworkPolicy
  metadata:
    annotations:
    name: <policy_name>
    namespace: openshift-ingress
  spec:
    ingress:
    - ports:
      - port: 80
        protocol: TCP
    - ports:
      - port: 443
        protocol: TCP
    - from:
      - namespaceSelector:
          matchLabels:
          kubernetes.io/metadata.name: <my_namespace>
    podSelector: {}
    policyTypes:
    - Ingress
where:
<policy_name>- Specifies your name for the policy.
<my_namespace>- Specifies the name of the namespace where the policy is deployed.
For more details, see "About network policy".
7.3.1.4. Next steps
7.3.2. Creating a network policy
As a cluster administrator, you can create a network policy for a namespace.
7.3.2.1. Example NetworkPolicy object
The following configuration annotates an example NetworkPolicy object:
kind: NetworkPolicy
apiVersion: networking.k8s.io/v1
metadata:
  name: allow-27107
spec:
  podSelector:
    matchLabels:
      app: mongodb
  ingress:
  - from:
    - podSelector:
        matchLabels:
          app: app
    ports:
    - protocol: TCP
      port: 27017
where:
name- The name of the NetworkPolicy object.
spec.podSelector- A selector that describes the pods to which the policy applies. The policy object can only select pods in the project that defines the NetworkPolicy object.
ingress.from.podSelector- A selector that matches the pods from which the policy object allows ingress traffic. The selector matches pods in the same namespace as the NetworkPolicy.
ingress.ports- A list of one or more destination ports on which to accept traffic.
7.3.2.2. Creating a network policy using the CLI
To define granular rules describing ingress or egress network traffic allowed for namespaces in your cluster, you can create a network policy.
If you log in with a user with the cluster-admin role, then you can create a network policy in any namespace in the cluster.
Prerequisites
-
Your cluster uses a network plugin that supports
NetworkPolicyobjects, such as the OVN-Kubernetes network plugin or the OpenShift SDN network plugin withmode: NetworkPolicyset. This mode is the default for OpenShift SDN. -
You installed the OpenShift CLI (
oc). -
You logged in to the cluster with a user with
adminprivileges. - You are working in the namespace that the network policy applies to.
Procedure
Create a policy rule.
Create a
<policy_name>.yamlfile:$ touch <policy_name>.yamlwhere:
<policy_name>- Specifies the network policy file name.
Define a network policy in the created file. The following example denies ingress traffic from all pods in all namespaces. This is a fundamental policy, blocking all cross-pod networking other than cross-pod traffic allowed by the configuration of other Network Policies.
kind: NetworkPolicy
apiVersion: networking.k8s.io/v1
spec:
  podSelector: {}
  policyTypes:
  - Ingress
  ingress: []
The following example configuration allows ingress traffic from all pods in the same namespace:
kind: NetworkPolicy
apiVersion: networking.k8s.io/v1
metadata:
  name: allow-same-namespace
spec:
  podSelector:
  ingress:
  - from:
    - podSelector: {}
# ...
The following example allows ingress traffic to one pod from a particular namespace. This policy allows traffic to pods that have the
pod-alabel from pods running innamespace-y.kind: NetworkPolicy apiVersion: networking.k8s.io/v1 metadata: name: allow-traffic-pod spec: podSelector: matchLabels: pod: pod-a policyTypes: - Ingress ingress: - from: - namespaceSelector: matchLabels: kubernetes.io/metadata.name: namespace-y # ...The following example configuration restricts traffic to a service. This policy when applied ensures every pod with both labels
app=bookstoreandrole=apican only be accessed by pods with labelapp=bookstore. In this example the application could be a REST API server, marked with labelsapp=bookstoreandrole=api.This example configuration addresses the following use cases:
- Restricting the traffic to a service to only the other microservices that need to use it.
Restricting the connections to a database to only permit the application using it.
kind: NetworkPolicy
apiVersion: networking.k8s.io/v1
metadata:
  name: api-allow
spec:
  podSelector:
    matchLabels:
      app: bookstore
      role: api
  ingress:
  - from:
      - podSelector:
          matchLabels:
            app: bookstore
# ...
To create the network policy object, enter the following command. Successful output lists the name of the policy object and the
createdstatus.$ oc apply -f <policy_name>.yaml -n <namespace>where:
<policy_name>- Specifies the network policy file name.
<namespace>- Optional parameter. If you defined the object in a different namespace than the current namespace, the parameter specifices the namespace.
Successful output lists the name of the policy object and the
createdstatus.NoteIf you log in to the web console with
cluster-adminprivileges, you have a choice of creating a network policy in any namespace in the cluster directly in YAML or from a form in the web console.
7.3.2.3. Creating a default deny all network policy
The default deny all network policy blocks all cross-pod networking other than network traffic allowed by the configuration of other deployed network policies and traffic between host-networked pods. This procedure enforces a strong deny policy by applying a deny-by-default policy in the my-project namespace.
Without configuring a NetworkPolicy custom resource (CR) that allows traffic communication, the following policy might cause communication problems across your cluster.
Prerequisites
-
Your cluster uses a network plugin that supports
NetworkPolicyobjects, such as the OVN-Kubernetes network plugin or the OpenShift SDN network plugin withmode: NetworkPolicyset. This mode is the default for OpenShift SDN. -
You installed the OpenShift CLI (
oc). -
You logged in to the cluster with a user with
adminprivileges. - You are working in the namespace that the network policy applies to.
Procedure
Create the following YAML that defines a
deny-by-defaultpolicy to deny ingress from all pods in all namespaces. Save the YAML in thedeny-by-default.yamlfile:kind: NetworkPolicy apiVersion: networking.k8s.io/v1 metadata: name: deny-by-default namespace: my-project spec: podSelector: {} ingress: []where:
namespace-
Specifies the namespace in which to deploy the policy. For example, the
my-projectnamespace. podSelector-
If this field is empty, the configuration matches all the pods. Therefore, the policy applies to all pods in the
my-projectnamespace. ingress-
Where
[]indicates that noingressrules are specified. This causes incoming traffic to be dropped to all pods.
Apply the policy by entering the following command. Successful output lists the name of the policy object and the
createdstatus.$ oc apply -f deny-by-default.yaml
7.3.2.4. Creating a network policy to allow traffic from external clients
With the deny-by-default policy in place you can proceed to configure a policy that allows traffic from external clients to a pod with the label app=web.
If you log in with a user with the cluster-admin role, then you can create a network policy in any namespace in the cluster.
Follow this procedure to configure a policy that allows external service from the public Internet directly or by using a Load Balancer to access the pod. Traffic is only allowed to a pod with the label app=web.
Prerequisites
-
Your cluster uses a network plugin that supports
NetworkPolicyobjects, such as the OVN-Kubernetes network plugin or the OpenShift SDN network plugin withmode: NetworkPolicyset. This mode is the default for OpenShift SDN. -
You installed the OpenShift CLI (
oc). -
You logged in to the cluster with a user with
adminprivileges. - You are working in the namespace that the network policy applies to.
Procedure
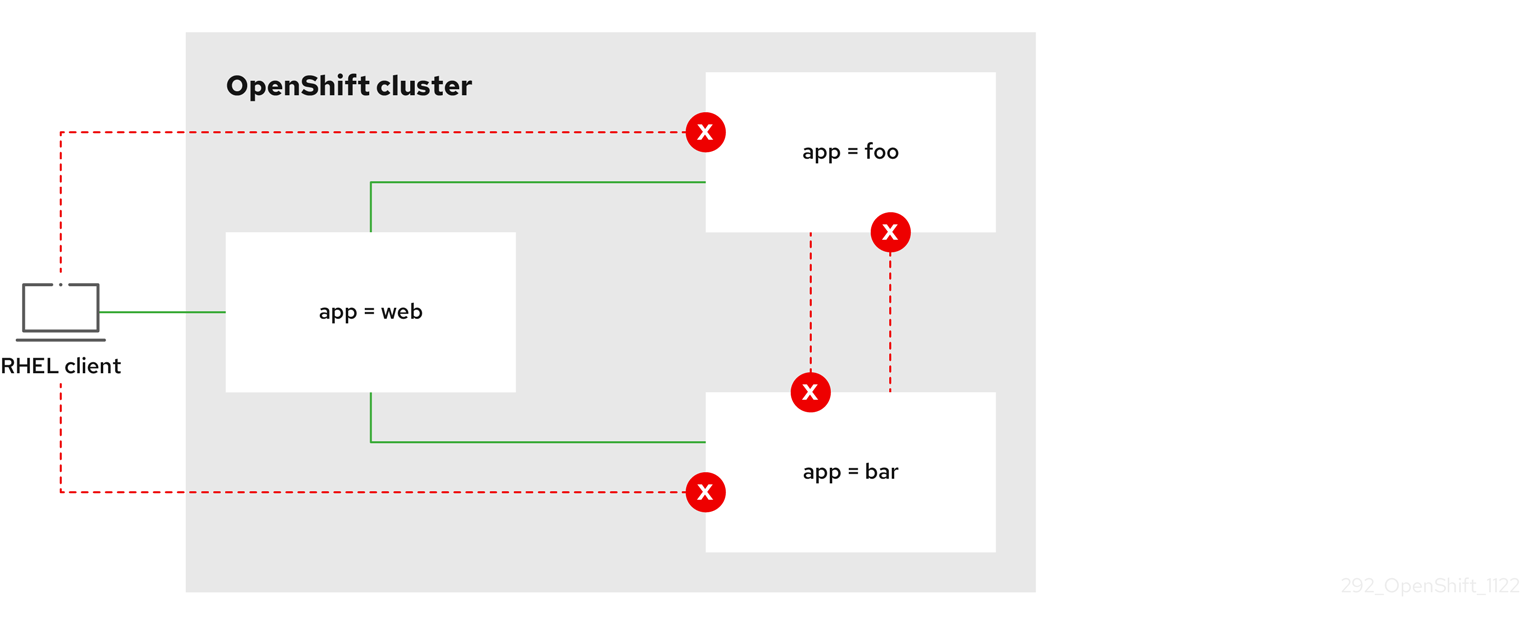
Create a policy that allows traffic from the public Internet directly or by using a load balancer to access the pod. Save the YAML in the
web-allow-external.yamlfile:kind: NetworkPolicy apiVersion: networking.k8s.io/v1 spec: policyTypes: - Ingress podSelector: matchLabels: app: web ingress: - {}Apply the policy by entering the following command. Successful output lists the name of the policy object and the
createdstatus.$ oc apply -f web-allow-external.yamlThis policy allows traffic from all resources, including external traffic as illustrated in the following diagram:
7.3.2.5. Creating a network policy allowing traffic to an application from all namespaces
You can configure a policy that allows traffic from all pods in all namespaces to a particular application.
If you log in with a user with the cluster-admin role, then you can create a network policy in any namespace in the cluster.
Prerequisites
-
Your cluster uses a network plugin that supports
NetworkPolicyobjects, such as the OVN-Kubernetes network plugin or the OpenShift SDN network plugin withmode: NetworkPolicyset. This mode is the default for OpenShift SDN. -
You installed the OpenShift CLI (
oc). -
You logged in to the cluster with a user with
adminprivileges. - You are working in the namespace that the network policy applies to.
Procedure
Create a policy that allows traffic from all pods in all namespaces to a particular application. Save the YAML in the
web-allow-all-namespaces.yamlfile:apiVersion: networking.k8s.io/v1 kind: NetworkPolicy metadata: name: web-allow-all-namespaces namespace: default spec: podSelector: matchLabels: app: web policyTypes: - Ingress ingress: - from: - namespaceSelector: {}where:
app-
Applies the policy only to
app:webpods in default namespace. namespaceSelectorSelects all pods in all namespaces.
NoteBy default, if you do not specify a
namespaceSelectorparameter in the policy object, no namespaces get selected. This means the policy allows traffic only from the namespace where the network policy deployes.
Apply the policy by entering the following command. Successful output lists the name of the policy object and the
createdstatus.$ oc apply -f web-allow-all-namespaces.yaml
Verification
Start a web service in the
defaultnamespace by entering the following command:$ oc run web --namespace=default --image=nginx --labels="app=web" --expose --port=80Run the following command to deploy an
alpineimage in thesecondarynamespace and to start a shell:$ oc run test-$RANDOM --namespace=secondary --rm -i -t --image=alpine -- shRun the following command in the shell and observe that the service allows the request:
# wget -qO- --timeout=2 http://web.default<!DOCTYPE html> <html> <head> <title>Welcome to nginx!</title> <style> html { color-scheme: light dark; } body { width: 35em; margin: 0 auto; font-family: Tahoma, Verdana, Arial, sans-serif; } </style> </head> <body> <h1>Welcome to nginx!</h1> <p>If you see this page, the nginx web server is successfully installed and working. Further configuration is required.</p> <p>For online documentation and support please refer to <a href="http://nginx.org/">nginx.org</a>.<br/> Commercial support is available at <a href="http://nginx.com/">nginx.com</a>.</p> <p><em>Thank you for using nginx.</em></p> </body> </html>
7.3.2.6. Creating a network policy allowing traffic to an application from a namespace
You can configure a policy that allows traffic to a pod with the label app=web from a particular namespace. This configuration is useful in the following use cases:
- Restrict traffic to a production database only to namespaces that have production workloads deployed.
- Enable monitoring tools deployed to a particular namespace to scrape metrics from the current namespace.
If you log in with a user with the cluster-admin role, then you can create a network policy in any namespace in the cluster.
Prerequisites
-
Your cluster uses a network plugin that supports
NetworkPolicyobjects, such as the OVN-Kubernetes network plugin or the OpenShift SDN network plugin withmode: NetworkPolicyset. This mode is the default for OpenShift SDN. -
You installed the OpenShift CLI (
oc). -
You logged in to the cluster with a user with
adminprivileges. - You are working in the namespace that the network policy applies to.
Procedure
Create a policy that allows traffic from all pods in a particular namespaces with a label
purpose=production. Save the YAML in theweb-allow-prod.yamlfile:kind: NetworkPolicy apiVersion: networking.k8s.io/v1 metadata: name: web-allow-prod namespace: default spec: podSelector: matchLabels: app: web policyTypes: - Ingress ingress: - from: - namespaceSelector: matchLabels: purpose: productionwhere:
app-
Applies the policy only to
app:webpods in the default namespace. purpose-
Restricts traffic to only pods in namespaces that have the label
purpose=production.
Apply the policy by entering the following command. Successful output lists the name of the policy object and the
createdstatus.$ oc apply -f web-allow-prod.yaml
Verification
Start a web service in the
defaultnamespace by entering the following command:$ oc run web --namespace=default --image=nginx --labels="app=web" --expose --port=80Run the following command to create the
prodnamespace:$ oc create namespace prodRun the following command to label the
prodnamespace:$ oc label namespace/prod purpose=productionRun the following command to create the
devnamespace:$ oc create namespace devRun the following command to label the
devnamespace:$ oc label namespace/dev purpose=testingRun the following command to deploy an
alpineimage in thedevnamespace and to start a shell:$ oc run test-$RANDOM --namespace=dev --rm -i -t --image=alpine -- shRun the following command in the shell and observe the reason for the blocked request. For example, expected output states
wget: download timed out.# wget -qO- --timeout=2 http://web.defaultRun the following command to deploy an
alpineimage in theprodnamespace and start a shell:$ oc run test-$RANDOM --namespace=prod --rm -i -t --image=alpine -- shRun the following command in the shell and observe that the request is allowed:
# wget -qO- --timeout=2 http://web.default<!DOCTYPE html> <html> <head> <title>Welcome to nginx!</title> <style> html { color-scheme: light dark; } body { width: 35em; margin: 0 auto; font-family: Tahoma, Verdana, Arial, sans-serif; } </style> </head> <body> <h1>Welcome to nginx!</h1> <p>If you see this page, the nginx web server is successfully installed and working. Further configuration is required.</p> <p>For online documentation and support please refer to <a href="http://nginx.org/">nginx.org</a>.<br/> Commercial support is available at <a href="http://nginx.com/">nginx.com</a>.</p> <p><em>Thank you for using nginx.</em></p> </body> </html>
7.3.3. Viewing a network policy
As a cluster administrator, you can view a network policy for a namespace.
7.3.3.1. Example NetworkPolicy object
The following configuration annotates an example NetworkPolicy object:
kind: NetworkPolicy
apiVersion: networking.k8s.io/v1
metadata:
  name: allow-27107
spec:
  podSelector:
    matchLabels:
      app: mongodb
  ingress:
  - from:
    - podSelector:
        matchLabels:
          app: app
    ports:
    - protocol: TCP
      port: 27017
where:
name- The name of the NetworkPolicy object.
spec.podSelector- A selector that describes the pods to which the policy applies. The policy object can only select pods in the project that defines the NetworkPolicy object.
ingress.from.podSelector- A selector that matches the pods from which the policy object allows ingress traffic. The selector matches pods in the same namespace as the NetworkPolicy.
ingress.ports- A list of one or more destination ports on which to accept traffic.
7.3.3.2. Viewing network policies using the CLI
You can examine the network policies in a namespace.
If you log in with cluster-admin privileges, you can edit network policies in any namespace in the cluster.
If you log in with cluster-admin privileges, you can edit network policies in any namespace in the cluster. In the web console, you can edit policies directly in YAML or by using the Actions menu.
Prerequisites
-
You installed the OpenShift CLI (
oc). -
You are logged in to the cluster with a user with
adminprivileges. - You are working in the namespace where the network policy exists.
Procedure
List network policies in a namespace.
To view network policy objects defined in a namespace enter the following command:
$ oc get networkpolicyOptional: To examine a specific network policy enter the following command:
$ oc describe networkpolicy <policy_name> -n <namespace>where:
<policy_name>- Specifies the name of the network policy to inspect.
<namespace>Optional: Specifies the namespace if the object is defined in a different namespace than the current namespace.
$ oc describe networkpolicy allow-same-namespaceName: allow-same-namespace Namespace: ns1 Created on: 2021-05-24 22:28:56 -0400 EDT Labels: <none> Annotations: <none> Spec: PodSelector: <none> (Allowing the specific traffic to all pods in this namespace) Allowing ingress traffic: To Port: <any> (traffic allowed to all ports) From: PodSelector: <none> Not affecting egress traffic Policy Types: Ingress
7.3.4. Editing a network policy
As a cluster administrator, you can edit an existing network policy for a namespace.
7.3.4.1. Editing a network policy
To modify existing policy configurations, you can edit a network policy in a namespace. Edit policies by modifying the policy file and applying it with oc apply, or by using the oc edit command directly.
If you log in with cluster-admin privileges, you can edit network policies in any namespace in the cluster.
If you log in with cluster-admin privileges, you can edit network policies in any namespace in the cluster. In the web console, you can edit policies directly in YAML or by using the Actions menu.
Prerequisites
-
Your cluster uses a network plugin that supports
NetworkPolicyobjects, such as the OVN-Kubernetes network plugin or the OpenShift SDN network plugin withmode: NetworkPolicyset. This mode is the default for OpenShift SDN. -
You installed the OpenShift CLI (
oc). -
You are logged in to the cluster with a user with
adminprivileges. - You are working in the namespace where the network policy exists.
Procedure
Optional: To list the network policy objects in a namespace, enter the following command:
$ oc get network policy -n <namespace>where:
<namespace>- Optional: Specifies the namespace if the object is defined in a different namespace than the current namespace.
Edit the network policy object.
If you saved the network policy definition in a file, edit the file and make any necessary changes, and then enter the following command.
$ oc apply -n <namespace> -f <policy_file>.yamlwhere:
<namespace>- Optional: Specifies the namespace if the object is defined in a different namespace than the current namespace.
<policy_file>- Specifies the name of the file containing the network policy.
If you need to update the network policy object directly, enter the following command:
$ oc edit network policy <policy_name> -n <namespace>where:
<policy_name>- Specifies the name of the network policy.
<namespace>- Optional: Specifies the namespace if the object is defined in a different namespace than the current namespace.
Confirm that the network policy object is updated.
$ oc describe networkpolicy <policy_name> -n <namespace>where:
<policy_name>- Specifies the name of the network policy.
<namespace>- Optional: Specifies the namespace if the object is defined in a different namespace than the current namespace.
7.3.4.2. Example NetworkPolicy object
The following configuration annotates an example NetworkPolicy object:
kind: NetworkPolicy
apiVersion: networking.k8s.io/v1
metadata:
  name: allow-27107
spec:
  podSelector:
    matchLabels:
      app: mongodb
  ingress:
  - from:
    - podSelector:
        matchLabels:
          app: app
    ports:
    - protocol: TCP
      port: 27017
where:
name- The name of the NetworkPolicy object.
spec.podSelector- A selector that describes the pods to which the policy applies. The policy object can only select pods in the project that defines the NetworkPolicy object.
ingress.from.podSelector- A selector that matches the pods from which the policy object allows ingress traffic. The selector matches pods in the same namespace as the NetworkPolicy.
ingress.ports- A list of one or more destination ports on which to accept traffic.
7.3.5. Deleting a network policy
As a cluster administrator, you can delete a network policy from a namespace.
7.3.5.1. Deleting a network policy using the CLI
You can delete a network policy in a namespace.
If you log in with cluster-admin privileges, you can delete network policies in any namespace in the cluster.
If you log in with cluster-admin privileges, you can delete network policies in any namespace in the cluster. In the web console, you can delete policies directly in YAML or by using the Actions menu.
Prerequisites
-
Your cluster uses a network plugin that supports
NetworkPolicyobjects, such as the OVN-Kubernetes network plugin or the OpenShift SDN network plugin withmode: NetworkPolicyset. This mode is the default for OpenShift SDN. -
You installed the OpenShift CLI (
oc). -
You logged in to the cluster with a user with
adminprivileges. - You are working in the namespace where the network policy exists.
Procedure
To delete a network policy object, enter the following command. Successful output lists the name of the policy object and the
deletedstatus.$ oc delete networkpolicy <policy_name> -n <namespace>where:
<policy_name>- Specifies the name of the network policy.
<namespace>- Optional parameter. If you defined the object in a different namespace than the current namespace, the parameter specifices the namespace.
7.3.6. Defining a default network policy for projects
As a cluster administrator, you can modify the new project template to automatically include network policies when you create a new project. If you do not yet have a customized template for new projects, you must first create one.
7.3.6.1. Modifying the template for new projects
As a cluster administrator, you can modify the default project template so that new projects are created using your custom requirements.
To create your own custom project template:
Prerequisites
-
You have access to an OpenShift Container Platform cluster using an account with
cluster-adminpermissions.
Procedure
-
Log in as a user with
cluster-adminprivileges. Generate the default project template:
$ oc adm create-bootstrap-project-template -o yaml > template.yaml-
Use a text editor to modify the generated
template.yamlfile by adding objects or modifying existing objects. The project template must be created in the
openshift-confignamespace. Load your modified template:$ oc create -f template.yaml -n openshift-configEdit the project configuration resource using the web console or CLI.
Using the web console:
-
Navigate to the Administration
Cluster Settings page. - Click Configuration to view all configuration resources.
- Find the entry for Project and click Edit YAML.
-
Navigate to the Administration
Using the CLI:
Edit the
project.config.openshift.io/clusterresource:$ oc edit project.config.openshift.io/cluster
Update the
specsection to include theprojectRequestTemplateandnameparameters, and set the name of your uploaded project template. The default name isproject-request.Project configuration resource with custom project template
apiVersion: config.openshift.io/v1 kind: Project metadata: # ... spec: projectRequestTemplate: name: <template_name> # ...- After you save your changes, create a new project to verify that your changes were successfully applied.
7.3.6.2. Adding network policies to the new project template
As a cluster administrator, you can add network policies to the default template for new projects. OpenShift Container Platform will automatically create all the NetworkPolicy objects specified in the template in the project.
Prerequisites
-
Your cluster uses a default CNI network plugin that supports
NetworkPolicyobjects, such as the OpenShift SDN network plugin withmode: NetworkPolicyset. This mode is the default for OpenShift SDN. -
You installed the OpenShift CLI (
oc). -
You must log in to the cluster with a user with
cluster-adminprivileges. - You must have created a custom default project template for new projects.
Procedure
Edit the default template for a new project by running the following command:
$ oc edit template <project_template> -n openshift-configReplace
<project_template>with the name of the default template that you configured for your cluster. The default template name isproject-request.In the template, add each
NetworkPolicyobject as an element to theobjectsparameter. Theobjectsparameter accepts a collection of one or more objects.In the following example, the
objectsparameter collection includes severalNetworkPolicyobjects.objects: - apiVersion: networking.k8s.io/v1 kind: NetworkPolicy metadata: name: allow-from-same-namespace spec: podSelector: {} ingress: - from: - podSelector: {} - apiVersion: networking.k8s.io/v1 kind: NetworkPolicy metadata: name: allow-from-openshift-ingress spec: ingress: - from: - namespaceSelector: matchLabels: policy-group.network.openshift.io/ingress: podSelector: {} policyTypes: - Ingress - apiVersion: networking.k8s.io/v1 kind: NetworkPolicy metadata: name: allow-from-kube-apiserver-operator spec: ingress: - from: - namespaceSelector: matchLabels: kubernetes.io/metadata.name: openshift-kube-apiserver-operator podSelector: matchLabels: app: kube-apiserver-operator policyTypes: - Ingress ...Optional: Create a new project and confirm the successful creation of your network policy objects.
Create a new project:
$ oc new-project <project>1 - 1
- Replace
<project>with the name for the project you are creating.
Confirm that the network policy objects in the new project template exist in the new project:
$ oc get networkpolicyExpected output:
NAME                           POD-SELECTOR   AGE
allow-from-openshift-ingress   <none>         7s
allow-from-same-namespace      <none>         7s
7.3.7. Configuring multitenant isolation with network policy
As a cluster administrator, you can configure your network policies to provide multitenant network isolation.
If you are using the OpenShift SDN network plugin, configuring network policies as described in this section provides network isolation similar to multitenant mode but with network policy mode set.
7.3.7.1. Configuring multitenant isolation by using network policy
You can configure your project to isolate it from pods and services in other project namespaces.
Prerequisites
-
Your cluster uses a network plugin that supports
NetworkPolicyobjects, such as the OVN-Kubernetes network plugin or the OpenShift SDN network plugin withmode: NetworkPolicyset. This mode is the default for OpenShift SDN. -
You installed the OpenShift CLI (
oc). -
You are logged in to the cluster with a user with
adminprivileges.
Procedure
Create the following
NetworkPolicyobjects:A policy named
allow-from-openshift-ingress.$ cat << EOF| oc create -f - apiVersion: networking.k8s.io/v1 kind: NetworkPolicy metadata: name: allow-from-openshift-ingress spec: ingress: - from: - namespaceSelector: matchLabels: policy-group.network.openshift.io/ingress: "" podSelector: {} policyTypes: - Ingress EOFNotepolicy-group.network.openshift.io/ingress: ""is the preferred namespace selector label for OpenShift SDN. You can use thenetwork.openshift.io/policy-group: ingressnamespace selector label, but this is a legacy label.A policy named
allow-from-openshift-monitoring:$ cat << EOF| oc create -f - apiVersion: networking.k8s.io/v1 kind: NetworkPolicy metadata: name: allow-from-openshift-monitoring spec: ingress: - from: - namespaceSelector: matchLabels: network.openshift.io/policy-group: monitoring podSelector: {} policyTypes: - Ingress EOFA policy named
allow-same-namespace:$ cat << EOF| oc create -f - kind: NetworkPolicy apiVersion: networking.k8s.io/v1 metadata: name: allow-same-namespace spec: podSelector: ingress: - from: - podSelector: {} EOFA policy named
allow-from-kube-apiserver-operator:$ cat << EOF| oc create -f - apiVersion: networking.k8s.io/v1 kind: NetworkPolicy metadata: name: allow-from-kube-apiserver-operator spec: ingress: - from: - namespaceSelector: matchLabels: kubernetes.io/metadata.name: openshift-kube-apiserver-operator podSelector: matchLabels: app: kube-apiserver-operator policyTypes: - Ingress EOFFor more details, see New
kube-apiserver-operatorwebhook controller validating health of webhook.
Optional: To confirm that the network policies exist in your current project, enter the following command:
$ oc describe networkpolicyExample output
Name:         allow-from-openshift-ingress
Namespace:    example1
Created on:   2020-06-09 00:28:17 -0400 EDT
Labels:       <none>
Annotations:  <none>
Spec:
  PodSelector:     <none> (Allowing the specific traffic to all pods in this namespace)
  Allowing ingress traffic:
    To Port: <any> (traffic allowed to all ports)
    From:
      NamespaceSelector: policy-group.network.openshift.io/ingress:
  Not affecting egress traffic
  Policy Types: Ingress


Name:         allow-from-openshift-monitoring
Namespace:    example1
Created on:   2020-06-09 00:29:57 -0400 EDT
Labels:       <none>
Annotations:  <none>
Spec:
  PodSelector:     <none> (Allowing the specific traffic to all pods in this namespace)
  Allowing ingress traffic:
    To Port: <any> (traffic allowed to all ports)
    From:
      NamespaceSelector: network.openshift.io/policy-group: monitoring
  Not affecting egress traffic
  Policy Types: Ingress
7.3.7.2. Next steps
7.4. Audit logging for network security
The OVN-Kubernetes network plugin uses Open Virtual Network (OVN) access control lists (ACLs) to manage AdminNetworkPolicy, BaselineAdminNetworkPolicy, NetworkPolicy, and EgressFirewall objects. Audit logging exposes allow and deny ACL events for NetworkPolicy, EgressFirewall and BaselineAdminNetworkPolicy custom resources (CR). Logging also exposes allow, deny, and pass ACL events for AdminNetworkPolicy (ANP) CR.
Audit logging is available for only the OVN-Kubernetes network plugin.
7.4.1. Audit configuration
The configuration for audit logging is specified as part of the OVN-Kubernetes cluster network provider configuration. The following YAML illustrates the default values for the audit logging:
Audit logging configuration
apiVersion: operator.openshift.io/v1
kind: Network
metadata:
  name: cluster
spec:
  defaultNetwork:
    ovnKubernetesConfig:
      policyAuditConfig:
        destination: "null"
        maxFileSize: 50
        rateLimit: 20
        syslogFacility: local0
The following table describes the configuration fields for audit logging.
| Field | Type | Description |
|---|---|---|
|
| integer |
The maximum number of messages to generate every second per node. The default value is |
|
| integer |
The maximum size for the audit log in bytes. The default value is |
|
| integer | The maximum number of log files that are retained. |
|
| string | One of the following additional audit log targets:
|
|
| string |
The syslog facility, such as |
7.4.2. Audit logging
You can configure the destination for audit logs, such as a syslog server or a UNIX domain socket. Regardless of any additional configuration, an audit log is always saved to /var/log/ovn/acl-audit-log.log on each OVN-Kubernetes pod in the cluster.
You can enable audit logging for each namespace by annotating each namespace configuration with a k8s.ovn.org/acl-logging section. In the k8s.ovn.org/acl-logging section, you must specify allow, deny, or both values to enable audit logging for a namespace.
A network policy does not support setting the Pass action set as a rule.
The ACL-logging implementation logs access control list (ACL) events for a network. You can view these logs to analyze any potential security issues.
Example namespace annotation
kind: Namespace
apiVersion: v1
metadata:
  name: example1
  annotations:
    k8s.ovn.org/acl-logging: |-
      {
        "deny": "info",
        "allow": "info"
      }
To view the default ACL logging configuration values, see the policyAuditConfig object in the cluster-network-03-config.yml file. If required, you can change the ACL logging configuration values for log file parameters in this file.
The logging message format is compatible with syslog as defined by RFC5424. The syslog facility is configurable and defaults to local0. The following example shows key parameters and their values outputted in a log message:
Example logging message that outputs parameters and their values
<timestamp>|<message_serial>|acl_log(ovn_pinctrl0)|<severity>|name="<acl_name>", verdict="<verdict>", severity="<severity>", direction="<direction>": <flow>Where:
-
<timestamp>states the time and date for the creation of a log message. -
<message_serial>lists the serial number for a log message. -
acl_log(ovn_pinctrl0)is a literal string that prints the location of the log message in the OVN-Kubernetes plugin. -
<severity>sets the severity level for a log message. If you enable audit logging that supportsallowanddenytasks then two severity levels show in the log message output. -
<name>states the name of the ACL-logging implementation in the OVN Network Bridging Database (nbdb) that was created by the network policy. -
<verdict>can be eitherallowordrop. -
<direction>can be eitherto-lportorfrom-lportto indicate that the policy was applied to traffic going to or away from a pod. -
<flow>shows packet information in a format equivalent to theOpenFlowprotocol. This parameter comprises Open vSwitch (OVS) fields.
The following example shows OVS fields that the flow parameter uses to extract packet information from system memory:
Example of OVS fields used by the flow parameter to extract packet information
<proto>,vlan_tci=0x0000,dl_src=<src_mac>,dl_dst=<source_mac>,nw_src=<source_ip>,nw_dst=<target_ip>,nw_tos=<tos_dscp>,nw_ecn=<tos_ecn>,nw_ttl=<ip_ttl>,nw_frag=<fragment>,tp_src=<tcp_src_port>,tp_dst=<tcp_dst_port>,tcp_flags=<tcp_flags>Where:
-
<proto>states the protocol. Valid values aretcpandudp. -
vlan_tci=0x0000states the VLAN header as0because a VLAN ID is not set for internal pod network traffic. -
<src_mac>specifies the source for the Media Access Control (MAC) address. -
<source_mac>specifies the destination for the MAC address. -
<source_ip>lists the source IP address -
<target_ip>lists the target IP address. -
<tos_dscp>states Differentiated Services Code Point (DSCP) values to classify and prioritize certain network traffic over other traffic. -
<tos_ecn>states Explicit Congestion Notification (ECN) values that indicate any congested traffic in your network. -
<ip_ttl>states the Time To Live (TTP) information for an packet. -
<fragment>specifies what type of IP fragments or IP non-fragments to match. -
<tcp_src_port>shows the source for the port for TCP and UDP protocols. -
<tcp_dst_port>lists the destination port for TCP and UDP protocols. -
<tcp_flags>supports numerous flags such asSYN,ACK,PSHand so on. If you need to set multiple values then each value is separated by a vertical bar (|). The UDP protocol does not support this parameter.
For more information about the previous field descriptions, go to the OVS manual page for ovs-fields.
Example ACL deny log entry for a network policy
2023-11-02T16:28:54.139Z|00004|acl_log(ovn_pinctrl0)|INFO|name="NP:verify-audit-logging:Ingress", verdict=drop, severity=alert, direction=to-lport: tcp,vlan_tci=0x0000,dl_src=0a:58:0a:81:02:01,dl_dst=0a:58:0a:81:02:23,nw_src=10.131.0.39,nw_dst=10.129.2.35,nw_tos=0,nw_ecn=0,nw_ttl=62,nw_frag=no,tp_src=58496,tp_dst=8080,tcp_flags=syn
2023-11-02T16:28:55.187Z|00005|acl_log(ovn_pinctrl0)|INFO|name="NP:verify-audit-logging:Ingress", verdict=drop, severity=alert, direction=to-lport: tcp,vlan_tci=0x0000,dl_src=0a:58:0a:81:02:01,dl_dst=0a:58:0a:81:02:23,nw_src=10.131.0.39,nw_dst=10.129.2.35,nw_tos=0,nw_ecn=0,nw_ttl=62,nw_frag=no,tp_src=58496,tp_dst=8080,tcp_flags=syn
2023-11-02T16:28:57.235Z|00006|acl_log(ovn_pinctrl0)|INFO|name="NP:verify-audit-logging:Ingress", verdict=drop, severity=alert, direction=to-lport: tcp,vlan_tci=0x0000,dl_src=0a:58:0a:81:02:01,dl_dst=0a:58:0a:81:02:23,nw_src=10.131.0.39,nw_dst=10.129.2.35,nw_tos=0,nw_ecn=0,nw_ttl=62,nw_frag=no,tp_src=58496,tp_dst=8080,tcp_flags=syn
The following table describes namespace annotation values:
| Field | Description |
|---|---|
|
|
Blocks namespace access to any traffic that matches an ACL rule with the |
|
|
Permits namespace access to any traffic that matches an ACL rule with the |
|
|
A |
7.4.3. AdminNetworkPolicy audit logging
Audit logging is enabled per AdminNetworkPolicy CR by annotating an ANP policy with the k8s.ovn.org/acl-logging key such as in the following example:
Example 7.19. Example of annotation for AdminNetworkPolicy CR
apiVersion: policy.networking.k8s.io/v1alpha1
kind: AdminNetworkPolicy
metadata:
  annotations:
    k8s.ovn.org/acl-logging: '{ "deny": "alert", "allow": "alert", "pass" : "warning" }'
  name: anp-tenant-log
spec:
  priority: 5
  subject:
    namespaces:
      matchLabels:
        tenant: backend-storage # Selects all pods owned by storage tenant.
  ingress:
    - name: "allow-all-ingress-product-development-and-customer" # Product development and customer tenant ingress to backend storage.
      action: "Allow"
      from:
      - pods:
          namespaceSelector:
            matchExpressions:
            - key: tenant
              operator: In
              values:
              - product-development
              - customer
          podSelector: {}
    - name: "pass-all-ingress-product-security"
      action: "Pass"
      from:
      - namespaces:
          matchLabels:
              tenant: product-security
    - name: "deny-all-ingress" # Ingress to backend from all other pods in the cluster.
      action: "Deny"
      from:
      - namespaces: {}
  egress:
    - name: "allow-all-egress-product-development"
      action: "Allow"
      to:
      - pods:
          namespaceSelector:
            matchLabels:
              tenant: product-development
          podSelector: {}
    - name: "pass-egress-product-security"
      action: "Pass"
      to:
      - namespaces:
           matchLabels:
             tenant: product-security
    - name: "deny-all-egress" # Egress from backend denied to all other pods.
      action: "Deny"
      to:
      - namespaces: {}
Logs are generated whenever a specific OVN ACL is hit and meets the action criteria set in your logging annotation. For example, an event in which any of the namespaces with the label tenant: product-development accesses the namespaces with the label tenant: backend-storage, a log is generated.
ACL logging is limited to 60 characters. If your ANP name field is long, the rest of the log will be truncated.
The following is a direction index for the examples log entries that follow:
| Direction | Rule |
|---|---|
| Ingress |
|
| Egress |
|
Example 7.20. Example ACL log entry for Allow action of the AdminNetworkPolicy named anp-tenant-log with Ingress:0 and Egress:0
2024-06-10T16:27:45.194Z|00052|acl_log(ovn_pinctrl0)|INFO|name="ANP:anp-tenant-log:Ingress:0", verdict=allow, severity=alert, direction=to-lport: tcp,vlan_tci=0x0000,dl_src=0a:58:0a:80:02:1a,dl_dst=0a:58:0a:80:02:19,nw_src=10.128.2.26,nw_dst=10.128.2.25,nw_tos=0,nw_ecn=0,nw_ttl=64,nw_frag=no,tp_src=57814,tp_dst=8080,tcp_flags=syn
2024-06-10T16:28:23.130Z|00059|acl_log(ovn_pinctrl0)|INFO|name="ANP:anp-tenant-log:Ingress:0", verdict=allow, severity=alert, direction=to-lport: tcp,vlan_tci=0x0000,dl_src=0a:58:0a:80:02:18,dl_dst=0a:58:0a:80:02:19,nw_src=10.128.2.24,nw_dst=10.128.2.25,nw_tos=0,nw_ecn=0,nw_ttl=64,nw_frag=no,tp_src=38620,tp_dst=8080,tcp_flags=ack
2024-06-10T16:28:38.293Z|00069|acl_log(ovn_pinctrl0)|INFO|name="ANP:anp-tenant-log:Egress:0", verdict=allow, severity=alert, direction=from-lport: tcp,vlan_tci=0x0000,dl_src=0a:58:0a:80:02:19,dl_dst=0a:58:0a:80:02:1a,nw_src=10.128.2.25,nw_dst=10.128.2.26,nw_tos=0,nw_ecn=0,nw_ttl=64,nw_frag=no,tp_src=47566,tp_dst=8080,tcp_flags=fin|ack=0,nw_ecn=0,nw_ttl=64,nw_frag=no,tp_src=55704,tp_dst=8080,tcp_flags=ack
Example 7.21. Example ACL log entry for Pass action of the AdminNetworkPolicy named anp-tenant-log with Ingress:1 and Egress:1
2024-06-10T16:33:12.019Z|00075|acl_log(ovn_pinctrl0)|INFO|name="ANP:anp-tenant-log:Ingress:1", verdict=pass, severity=warning, direction=to-lport: tcp,vlan_tci=0x0000,dl_src=0a:58:0a:80:02:1b,dl_dst=0a:58:0a:80:02:19,nw_src=10.128.2.27,nw_dst=10.128.2.25,nw_tos=0,nw_ecn=0,nw_ttl=64,nw_frag=no,tp_src=37394,tp_dst=8080,tcp_flags=ack
2024-06-10T16:35:04.209Z|00081|acl_log(ovn_pinctrl0)|INFO|name="ANP:anp-tenant-log:Egress:1", verdict=pass, severity=warning, direction=from-lport: tcp,vlan_tci=0x0000,dl_src=0a:58:0a:80:02:19,dl_dst=0a:58:0a:80:02:1b,nw_src=10.128.2.25,nw_dst=10.128.2.27,nw_tos=0,nw_ecn=0,nw_ttl=64,nw_frag=no,tp_src=34018,tp_dst=8080,tcp_flags=ack
Example 7.22. Example ACL log entry for Deny action of the AdminNetworkPolicy named anp-tenant-log with Egress:2 and Ingress2
2024-06-10T16:43:05.287Z|00087|acl_log(ovn_pinctrl0)|INFO|name="ANP:anp-tenant-log:Egress:2", verdict=drop, severity=alert, direction=from-lport: tcp,vlan_tci=0x0000,dl_src=0a:58:0a:80:02:19,dl_dst=0a:58:0a:80:02:18,nw_src=10.128.2.25,nw_dst=10.128.2.24,nw_tos=0,nw_ecn=0,nw_ttl=64,nw_frag=no,tp_src=51598,tp_dst=8080,tcp_flags=syn
2024-06-10T16:44:43.591Z|00090|acl_log(ovn_pinctrl0)|INFO|name="ANP:anp-tenant-log:Ingress:2", verdict=drop, severity=alert, direction=to-lport: tcp,vlan_tci=0x0000,dl_src=0a:58:0a:80:02:1c,dl_dst=0a:58:0a:80:02:19,nw_src=10.128.2.28,nw_dst=10.128.2.25,nw_tos=0,nw_ecn=0,nw_ttl=64,nw_frag=no,tp_src=33774,tp_dst=8080,tcp_flags=syn
The following table describes ANP annotation:
| Annotation | Value |
|---|---|
|
|
You must specify at least one of
|
7.4.4. BaselineAdminNetworkPolicy audit logging
Audit logging is enabled in the BaselineAdminNetworkPolicy CR by annotating an BANP policy with the k8s.ovn.org/acl-logging key such as in the following example:
Example 7.23. Example of annotation for BaselineAdminNetworkPolicy CR
apiVersion: policy.networking.k8s.io/v1alpha1
kind: BaselineAdminNetworkPolicy
metadata:
  annotations:
    k8s.ovn.org/acl-logging: '{ "deny": "alert", "allow": "alert"}'
  name: default
spec:
  subject:
    namespaces:
      matchLabels:
          tenant: workloads # Selects all workload pods in the cluster.
  ingress:
  - name: "default-allow-dns" # This rule allows ingress from dns tenant to all workloads.
    action: "Allow"
    from:
    - namespaces:
          matchLabels:
            tenant: dns
  - name: "default-deny-dns" # This rule denies all ingress from all pods to workloads.
    action: "Deny"
    from:
    - namespaces: {} # Use the empty selector with caution because it also selects OpenShift namespaces as well.
  egress:
  - name: "default-deny-dns" # This rule denies all egress from workloads. It will be applied when no ANP or network policy matches.
    action: "Deny"
    to:
    - namespaces: {} # Use the empty selector with caution because it also selects OpenShift namespaces as well.
In the example, an event in which any of the namespaces with the label tenant: dns accesses the namespaces with the label tenant: workloads, a log is generated.
The following is a direction index for the examples log entries that follow:
| Direction | Rule |
|---|---|
| Ingress |
|
| Egress |
|
Example 7.24. Example ACL allow log entry for Allow action of default BANP with Ingress:0
2024-06-10T18:11:58.263Z|00022|acl_log(ovn_pinctrl0)|INFO|name="BANP:default:Ingress:0", verdict=allow, severity=alert, direction=to-lport: tcp,vlan_tci=0x0000,dl_src=0a:58:0a:82:02:57,dl_dst=0a:58:0a:82:02:56,nw_src=10.130.2.87,nw_dst=10.130.2.86,nw_tos=0,nw_ecn=0,nw_ttl=64,nw_frag=no,tp_src=60510,tp_dst=8080,tcp_flags=syn
2024-06-10T18:11:58.264Z|00023|acl_log(ovn_pinctrl0)|INFO|name="BANP:default:Ingress:0", verdict=allow, severity=alert, direction=to-lport: tcp,vlan_tci=0x0000,dl_src=0a:58:0a:82:02:57,dl_dst=0a:58:0a:82:02:56,nw_src=10.130.2.87,nw_dst=10.130.2.86,nw_tos=0,nw_ecn=0,nw_ttl=64,nw_frag=no,tp_src=60510,tp_dst=8080,tcp_flags=psh|ack
2024-06-10T18:11:58.264Z|00024|acl_log(ovn_pinctrl0)|INFO|name="BANP:default:Ingress:0", verdict=allow, severity=alert, direction=to-lport: tcp,vlan_tci=0x0000,dl_src=0a:58:0a:82:02:57,dl_dst=0a:58:0a:82:02:56,nw_src=10.130.2.87,nw_dst=10.130.2.86,nw_tos=0,nw_ecn=0,nw_ttl=64,nw_frag=no,tp_src=60510,tp_dst=8080,tcp_flags=ack
2024-06-10T18:11:58.264Z|00025|acl_log(ovn_pinctrl0)|INFO|name="BANP:default:Ingress:0", verdict=allow, severity=alert, direction=to-lport: tcp,vlan_tci=0x0000,dl_src=0a:58:0a:82:02:57,dl_dst=0a:58:0a:82:02:56,nw_src=10.130.2.87,nw_dst=10.130.2.86,nw_tos=0,nw_ecn=0,nw_ttl=64,nw_frag=no,tp_src=60510,tp_dst=8080,tcp_flags=ack
2024-06-10T18:11:58.264Z|00026|acl_log(ovn_pinctrl0)|INFO|name="BANP:default:Ingress:0", verdict=allow, severity=alert, direction=to-lport: tcp,vlan_tci=0x0000,dl_src=0a:58:0a:82:02:57,dl_dst=0a:58:0a:82:02:56,nw_src=10.130.2.87,nw_dst=10.130.2.86,nw_tos=0,nw_ecn=0,nw_ttl=64,nw_frag=no,tp_src=60510,tp_dst=8080,tcp_flags=fin|ack
2024-06-10T18:11:58.264Z|00027|acl_log(ovn_pinctrl0)|INFO|name="BANP:default:Ingress:0", verdict=allow, severity=alert, direction=to-lport: tcp,vlan_tci=0x0000,dl_src=0a:58:0a:82:02:57,dl_dst=0a:58:0a:82:02:56,nw_src=10.130.2.87,nw_dst=10.130.2.86,nw_tos=0,nw_ecn=0,nw_ttl=64,nw_frag=no,tp_src=60510,tp_dst=8080,tcp_flags=ack
Example 7.25. Example ACL allow log entry for Allow action of default BANP with Egress:0 and Ingress:1
2024-06-10T18:09:57.774Z|00016|acl_log(ovn_pinctrl0)|INFO|name="BANP:default:Egress:0", verdict=drop, severity=alert, direction=from-lport: tcp,vlan_tci=0x0000,dl_src=0a:58:0a:82:02:56,dl_dst=0a:58:0a:82:02:57,nw_src=10.130.2.86,nw_dst=10.130.2.87,nw_tos=0,nw_ecn=0,nw_ttl=64,nw_frag=no,tp_src=45614,tp_dst=8080,tcp_flags=syn
2024-06-10T18:09:58.809Z|00017|acl_log(ovn_pinctrl0)|INFO|name="BANP:default:Egress:0", verdict=drop, severity=alert, direction=from-lport: tcp,vlan_tci=0x0000,dl_src=0a:58:0a:82:02:56,dl_dst=0a:58:0a:82:02:57,nw_src=10.130.2.86,nw_dst=10.130.2.87,nw_tos=0,nw_ecn=0,nw_ttl=64,nw_frag=no,tp_src=45614,tp_dst=8080,tcp_flags=syn
2024-06-10T18:10:00.857Z|00018|acl_log(ovn_pinctrl0)|INFO|name="BANP:default:Egress:0", verdict=drop, severity=alert, direction=from-lport: tcp,vlan_tci=0x0000,dl_src=0a:58:0a:82:02:56,dl_dst=0a:58:0a:82:02:57,nw_src=10.130.2.86,nw_dst=10.130.2.87,nw_tos=0,nw_ecn=0,nw_ttl=64,nw_frag=no,tp_src=45614,tp_dst=8080,tcp_flags=syn
2024-06-10T18:10:25.414Z|00019|acl_log(ovn_pinctrl0)|INFO|name="BANP:default:Ingress:1", verdict=drop, severity=alert, direction=to-lport: tcp,vlan_tci=0x0000,dl_src=0a:58:0a:82:02:58,dl_dst=0a:58:0a:82:02:56,nw_src=10.130.2.88,nw_dst=10.130.2.86,nw_tos=0,nw_ecn=0,nw_ttl=64,nw_frag=no,tp_src=40630,tp_dst=8080,tcp_flags=syn
2024-06-10T18:10:26.457Z|00020|acl_log(ovn_pinctrl0)|INFO|name="BANP:default:Ingress:1", verdict=drop, severity=alert, direction=to-lport: tcp,vlan_tci=0x0000,dl_src=0a:58:0a:82:02:58,dl_dst=0a:58:0a:82:02:56,nw_src=10.130.2.88,nw_dst=10.130.2.86,nw_tos=0,nw_ecn=0,nw_ttl=64,nw_frag=no,tp_src=40630,tp_dst=8080,tcp_flags=syn
2024-06-10T18:10:28.505Z|00021|acl_log(ovn_pinctrl0)|INFO|name="BANP:default:Ingress:1", verdict=drop, severity=alert, direction=to-lport: tcp,vlan_tci=0x0000,dl_src=0a:58:0a:82:02:58,dl_dst=0a:58:0a:82:02:56,nw_src=10.130.2.88,nw_dst=10.130.2.86,nw_tos=0,nw_ecn=0,nw_ttl=64,nw_frag=no,tp_src=40630,tp_dst=8080,tcp_flags=syn
The following table describes BANP annotation:
| Annotation | Value |
|---|---|
|
|
You must specify at least one of
|
7.4.5. Configuring egress firewall and network policy auditing for a cluster
As a cluster administrator, you can customize audit logging for your cluster.
Prerequisites
-
Install the OpenShift CLI (
oc). -
Log in to the cluster with a user with
cluster-adminprivileges.
Procedure
To customize the audit logging configuration, enter the following command:
$ oc edit network.operator.openshift.io/clusterTipYou can also customize and apply the following YAML to configure audit logging:
apiVersion: operator.openshift.io/v1
kind: Network
metadata:
  name: cluster
spec:
  defaultNetwork:
    ovnKubernetesConfig:
      policyAuditConfig:
        destination: "null"
        maxFileSize: 50
        rateLimit: 20
        syslogFacility: local0
Verification
To create a namespace with network policies complete the following steps:
Create a namespace for verification:
$ cat <<EOF| oc create -f -
kind: Namespace
apiVersion: v1
metadata:
  name: verify-audit-logging
  annotations:
    k8s.ovn.org/acl-logging: '{ "deny": "alert", "allow": "alert" }'
EOF
Successful output lists the namespace with the network policy and the
createdstatus.Create network policies for the namespace:
$ cat <<EOF| oc create -n verify-audit-logging -f -
apiVersion: networking.k8s.io/v1
kind: NetworkPolicy
metadata:
  name: deny-all
spec:
  podSelector:
    matchLabels:
  policyTypes:
  - Ingress
  - Egress
---
apiVersion: networking.k8s.io/v1
kind: NetworkPolicy
metadata:
  name: allow-from-same-namespace
  namespace: verify-audit-logging
spec:
  podSelector: {}
  policyTypes:
   - Ingress
   - Egress
  ingress:
    - from:
        - podSelector: {}
  egress:
    - to:
       - namespaceSelector:
          matchLabels:
            kubernetes.io/metadata.name: verify-audit-logging
EOF
Example output
networkpolicy.networking.k8s.io/deny-all created
networkpolicy.networking.k8s.io/allow-from-same-namespace created
Create a pod for source traffic in the
defaultnamespace:$ cat <<EOF| oc create -n default -f - apiVersion: v1 kind: Pod metadata: name: client spec: containers: - name: client image: registry.access.redhat.com/rhel7/rhel-tools command: ["/bin/sh", "-c"] args: ["sleep inf"] EOFCreate two pods in the
verify-audit-loggingnamespace:$ for name in client server; do cat <<EOF| oc create -n verify-audit-logging -f - apiVersion: v1 kind: Pod metadata: name: ${name} spec: containers: - name: ${name} image: registry.access.redhat.com/rhel7/rhel-tools command: ["/bin/sh", "-c"] args: ["sleep inf"] EOF doneSuccessful output lists the two pods, such as
pod/clientandpod/server, and thecreatedstatus.To generate traffic and produce network policy audit log entries, complete the following steps:
Obtain the IP address for pod named
serverin theverify-audit-loggingnamespace:$ POD_IP=$(oc get pods server -n verify-audit-logging -o jsonpath='{.status.podIP}')Ping the IP address from an earlier command from the pod named
clientin thedefaultnamespace and confirm the all packets are dropped:$ oc exec -it client -n default -- /bin/ping -c 2 $POD_IPExample output
PING 10.128.2.55 (10.128.2.55) 56(84) bytes of data.

--- 10.128.2.55 ping statistics ---
2 packets transmitted, 0 received, 100% packet loss, time 2041ms
From the client pod in the
verify-audit-loggingnamespace, ping the IP address stored in thePOD_IP shellenvironment variable and confirm the system allows all packets.$ oc exec -it client -n verify-audit-logging -- /bin/ping -c 2 $POD_IPExample output
PING 10.128.0.86 (10.128.0.86) 56(84) bytes of data.
64 bytes from 10.128.0.86: icmp_seq=1 ttl=64 time=2.21 ms
64 bytes from 10.128.0.86: icmp_seq=2 ttl=64 time=0.440 ms

--- 10.128.0.86 ping statistics ---
2 packets transmitted, 2 received, 0% packet loss, time 1001ms
rtt min/avg/max/mdev = 0.440/1.329/2.219/0.890 ms
Display the latest entries in the network policy audit log:
$ for pod in $(oc get pods -n openshift-ovn-kubernetes -l app=ovnkube-node --no-headers=true | awk '{ print $1 }') ; do
    oc exec -it $pod -n openshift-ovn-kubernetes -- tail -4 /var/log/ovn/acl-audit-log.log
  done
Example output
2023-11-02T16:28:54.139Z|00004|acl_log(ovn_pinctrl0)|INFO|name="NP:verify-audit-logging:Ingress", verdict=drop, severity=alert, direction=to-lport: tcp,vlan_tci=0x0000,dl_src=0a:58:0a:81:02:01,dl_dst=0a:58:0a:81:02:23,nw_src=10.131.0.39,nw_dst=10.129.2.35,nw_tos=0,nw_ecn=0,nw_ttl=62,nw_frag=no,tp_src=58496,tp_dst=8080,tcp_flags=syn
2023-11-02T16:28:55.187Z|00005|acl_log(ovn_pinctrl0)|INFO|name="NP:verify-audit-logging:Ingress", verdict=drop, severity=alert, direction=to-lport: tcp,vlan_tci=0x0000,dl_src=0a:58:0a:81:02:01,dl_dst=0a:58:0a:81:02:23,nw_src=10.131.0.39,nw_dst=10.129.2.35,nw_tos=0,nw_ecn=0,nw_ttl=62,nw_frag=no,tp_src=58496,tp_dst=8080,tcp_flags=syn
2023-11-02T16:28:57.235Z|00006|acl_log(ovn_pinctrl0)|INFO|name="NP:verify-audit-logging:Ingress", verdict=drop, severity=alert, direction=to-lport: tcp,vlan_tci=0x0000,dl_src=0a:58:0a:81:02:01,dl_dst=0a:58:0a:81:02:23,nw_src=10.131.0.39,nw_dst=10.129.2.35,nw_tos=0,nw_ecn=0,nw_ttl=62,nw_frag=no,tp_src=58496,tp_dst=8080,tcp_flags=syn
2023-11-02T16:49:57.909Z|00028|acl_log(ovn_pinctrl0)|INFO|name="NP:verify-audit-logging:allow-from-same-namespace:Egress:0", verdict=allow, severity=alert, direction=from-lport: icmp,vlan_tci=0x0000,dl_src=0a:58:0a:81:02:22,dl_dst=0a:58:0a:81:02:23,nw_src=10.129.2.34,nw_dst=10.129.2.35,nw_tos=0,nw_ecn=0,nw_ttl=64,nw_frag=no,icmp_type=8,icmp_code=0
2023-11-02T16:49:57.909Z|00029|acl_log(ovn_pinctrl0)|INFO|name="NP:verify-audit-logging:allow-from-same-namespace:Ingress:0", verdict=allow, severity=alert, direction=to-lport: icmp,vlan_tci=0x0000,dl_src=0a:58:0a:81:02:22,dl_dst=0a:58:0a:81:02:23,nw_src=10.129.2.34,nw_dst=10.129.2.35,nw_tos=0,nw_ecn=0,nw_ttl=64,nw_frag=no,icmp_type=8,icmp_code=0
2023-11-02T16:49:58.932Z|00030|acl_log(ovn_pinctrl0)|INFO|name="NP:verify-audit-logging:allow-from-same-namespace:Egress:0", verdict=allow, severity=alert, direction=from-lport: icmp,vlan_tci=0x0000,dl_src=0a:58:0a:81:02:22,dl_dst=0a:58:0a:81:02:23,nw_src=10.129.2.34,nw_dst=10.129.2.35,nw_tos=0,nw_ecn=0,nw_ttl=64,nw_frag=no,icmp_type=8,icmp_code=0
2023-11-02T16:49:58.932Z|00031|acl_log(ovn_pinctrl0)|INFO|name="NP:verify-audit-logging:allow-from-same-namespace:Ingress:0", verdict=allow, severity=alert, direction=to-lport: icmp,vlan_tci=0x0000,dl_src=0a:58:0a:81:02:22,dl_dst=0a:58:0a:81:02:23,nw_src=10.129.2.34,nw_dst=10.129.2.35,nw_tos=0,nw_ecn=0,nw_ttl=64,nw_frag=no,icmp_type=8,icmp_code=0
7.4.6. Enabling egress firewall and network policy audit logging for a namespace
As a cluster administrator, you can enable audit logging for a namespace.
Prerequisites
-
Install the OpenShift CLI (
oc). -
Log in to the cluster with a user with
cluster-adminprivileges.
Procedure
To enable audit logging for a namespace, enter the following command:
$ oc annotate namespace <namespace> \
  k8s.ovn.org/acl-logging='{ "deny": "alert", "allow": "notice" }'
where:
<namespace>- Specifies the name of the namespace.
TipYou can also apply the following YAML to enable audit logging:
kind: Namespace
apiVersion: v1
metadata:
  name: <namespace>
  annotations:
    k8s.ovn.org/acl-logging: |-
      {
        "deny": "alert",
        "allow": "notice"
      }
Successful output lists the audit logging name and the
annotatedstatus.
Verification
Display the latest entries in the audit log:
$ for pod in $(oc get pods -n openshift-ovn-kubernetes -l app=ovnkube-node --no-headers=true | awk '{ print $1 }') ; do
    oc exec -it $pod -n openshift-ovn-kubernetes -- tail -4 /var/log/ovn/acl-audit-log.log
  done
Example output
2023-11-02T16:49:57.909Z|00028|acl_log(ovn_pinctrl0)|INFO|name="NP:verify-audit-logging:allow-from-same-namespace:Egress:0", verdict=allow, severity=alert, direction=from-lport: icmp,vlan_tci=0x0000,dl_src=0a:58:0a:81:02:22,dl_dst=0a:58:0a:81:02:23,nw_src=10.129.2.34,nw_dst=10.129.2.35,nw_tos=0,nw_ecn=0,nw_ttl=64,nw_frag=no,icmp_type=8,icmp_code=0
2023-11-02T16:49:57.909Z|00029|acl_log(ovn_pinctrl0)|INFO|name="NP:verify-audit-logging:allow-from-same-namespace:Ingress:0", verdict=allow, severity=alert, direction=to-lport: icmp,vlan_tci=0x0000,dl_src=0a:58:0a:81:02:22,dl_dst=0a:58:0a:81:02:23,nw_src=10.129.2.34,nw_dst=10.129.2.35,nw_tos=0,nw_ecn=0,nw_ttl=64,nw_frag=no,icmp_type=8,icmp_code=0
2023-11-02T16:49:58.932Z|00030|acl_log(ovn_pinctrl0)|INFO|name="NP:verify-audit-logging:allow-from-same-namespace:Egress:0", verdict=allow, severity=alert, direction=from-lport: icmp,vlan_tci=0x0000,dl_src=0a:58:0a:81:02:22,dl_dst=0a:58:0a:81:02:23,nw_src=10.129.2.34,nw_dst=10.129.2.35,nw_tos=0,nw_ecn=0,nw_ttl=64,nw_frag=no,icmp_type=8,icmp_code=0
2023-11-02T16:49:58.932Z|00031|acl_log(ovn_pinctrl0)|INFO|name="NP:verify-audit-logging:allow-from-same-namespace:Ingress:0", verdict=allow, severity=alert, direction=to-lport: icmp,vlan_tci=0x0000,dl_src=0a:58:0a:81:02:22,dl_dst=0a:58:0a:81:02:23,nw_src=10.129.2.34,nw_dst=10.129.2.35,nw_tos=0,nw_ecn=0,nw_ttl=64,nw_frag=no,icmp_type=8,icmp_code=0
7.4.7. Disabling egress firewall and network policy audit logging for a namespace
As a cluster administrator, you can disable audit logging for a namespace.
Prerequisites
-
Install the OpenShift CLI (
oc). -
Log in to the cluster with a user with
cluster-adminprivileges.
Procedure
To disable audit logging for a namespace, enter the following command:
$ oc annotate --overwrite namespace <namespace> k8s.ovn.org/acl-logging-where:
<namespace>- Specifies the name of the namespace.
TipYou can also apply the following YAML to disable audit logging:
kind: Namespace
apiVersion: v1
metadata:
  name: <namespace>
  annotations:
    k8s.ovn.org/acl-logging: null
Successful output lists the audit logging name and the
annotatedstatus.
7.5. Egress Firewall
7.5.1. Viewing an egress firewall for a project
As a cluster administrator, you can list the names of any existing egress firewalls and view the traffic rules for a specific egress firewall.
OpenShift SDN CNI is deprecated as of OpenShift Container Platform 4.14. As of OpenShift Container Platform 4.15, the network plugin is not an option for new installations. In a subsequent future release, the OpenShift SDN network plugin is planned to be removed and no longer supported. Red Hat will provide bug fixes and support for this feature until it is removed, but this feature will no longer receive enhancements. As an alternative to OpenShift SDN CNI, you can use OVN Kubernetes CNI instead. For more information, see OpenShift SDN CNI removal.
7.5.1.1. Viewing an EgressNetworkPolicy custom resource (CR)
You can view an EgressNetworkPolicy CR in your cluster.
Prerequisites
- A cluster using the OpenShift SDN network plugin.
-
Install the OpenShift Command-line Interface (CLI), commonly known as
oc. - You must log in to the cluster.
Procedure
Optional: To view the names of the
EgressNetworkPolicyCRs defined in your cluster, enter the following command:$ oc get egressnetworkpolicy --all-namespacesTo inspect a policy, enter the following command. Replace
<policy_name>with the name of the policy to inspect.$ oc describe egressnetworkpolicy <policy_name>Example output
Name:		default
Namespace:	project1
Created:	20 minutes ago
Labels:		<none>
Annotations:	<none>
Rule:		Allow to 1.2.3.0/24
Rule:		Allow to www.example.com
Rule:		Deny to 0.0.0.0/0
7.5.1.2. Viewing an EgressFirewall custom resource (CR)
You can view an EgressFirewall CR in your cluster.
Prerequisites
- A cluster using the OVN-Kubernetes network plugin.
-
Install the OpenShift Command-line Interface (CLI), commonly known as
oc. - You must log in to the cluster.
Procedure
Optional: To view the names of the
EgressFirewallCR defined in your cluster, enter the following command:$ oc get egressfirewall --all-namespacesTo inspect a policy, enter the following command. Replace
<policy_name>with the name of the policy to inspect.$ oc describe egressfirewall <policy_name>Example output
Name:		default
Namespace:	project1
Created:	20 minutes ago
Labels:		<none>
Annotations:	<none>
Rule:		Allow to 1.2.3.0/24
Rule:		Allow to www.example.com
Rule:		Deny to 0.0.0.0/0
7.5.2. Editing an egress firewall for a project
As a cluster administrator, you can modify network traffic rules for an existing egress firewall.
7.5.2.1. Editing an EgressFirewall custom resource (CR)
As a cluster administrator, you can update the egress firewall for a project.
Prerequisites
- A cluster using the OVN-Kubernetes network plugin.
-
Install the OpenShift CLI (
oc). - You must log in to the cluster as a cluster administrator.
Procedure
Find the name of the
EgressFirewallCR for the project. Replace<project>with the name of the project.$ oc get -n <project> egressfirewallOptional: If you did not save a copy of the
EgressFirewallobject when you created the egress network firewall, enter the following command to create a copy.$ oc get -n <project> egressfirewall <name> -o yaml > <filename>.yamlReplace
<project>with the name of the project. Replace<name>with the name of the object. Replace<filename>with the name of the file to save the YAML to.After making changes to the policy rules, enter the following command to replace the
EgressFirewallCR. Replace<filename>with the name of the file containing the updatedEgressFirewallCR.$ oc replace -f <filename>.yaml
7.5.3. Removing an egress firewall from a project
As a cluster administrator, you can remove an egress firewall from a project to remove all restrictions on network traffic from the project that leaves the OpenShift Container Platform cluster.
7.5.3.1. Removing an EgressFirewall CR
As a cluster administrator, you can remove an egress firewall from a project.
Prerequisites
- A cluster using the OVN-Kubernetes network plugin.
-
Install the OpenShift CLI (
oc). - You must log in to the cluster as a cluster administrator.
Procedure
Find the name of the
EgressFirewallCR for the project. Replace<project>with the name of the project.$ oc get egressfirewall -n <project>Delete the
EgressFirewallCR by entering the following command. Replace<project>with the name of the project and<name>with the name of the object.$ oc delete -n <project> egressfirewall <name>
7.5.4. Configuring an egress firewall for a project
As a cluster administrator, you can create an egress firewall for a project that restricts egress traffic leaving your OpenShift Container Platform cluster.
7.5.4.1. How an egress firewall works in a project
As a cluster administrator, you can use an egress firewall to limit the external hosts that some or all pods can access from within the cluster. An egress firewall supports the following scenarios:
- A pod can only connect to internal hosts and cannot initiate connections to the public internet.
- A pod can only connect to the public internet and cannot initiate connections to internal hosts that are outside the OpenShift Container Platform cluster.
- A pod cannot reach specified internal subnets or hosts outside the OpenShift Container Platform cluster.
- A pod can only connect to specific external hosts.
For example, you can allow one project access to a specified IP range but deny the same access to a different project. Or, you can restrict application developers from updating from Python pip mirrors, and force updates to come only from approved sources.
You configure an egress firewall policy by creating an EgressFirewall custom resource (CR). The egress firewall matches network traffic that meets any of the following criteria:
- An IP address range in CIDR format
- A DNS name that resolves to an IP address
- A port number
- A protocol that is one of the following protocols: TCP, UDP, and SCTP
7.5.4.1.1. Limitations of an egress firewall
An egress firewall has the following limitations:
-
No project can have more than one
EgressFirewallCR. -
Egress firewall rules do not apply to traffic that goes through routers. Any user with permission to create a
RouteCR object can bypass egress firewall policy rules by creating a route that points to a forbidden destination. - Egress firewall does not apply to the host network namespace. Pods with host networking enabled are unaffected by egress firewall rules.
If your egress firewall includes a deny rule for
0.0.0.0/0, access to your OpenShift Container Platform API servers is blocked. You must either add allow rules for each IP address or use thenodeSelectortype allow rule in your egress policy rules to connect to API servers.The following example illustrates the order of the egress firewall rules necessary to ensure API server access:
EgressFirewallAPI server access exampleapiVersion: k8s.ovn.org/v1 kind: EgressFirewall metadata: name: default namespace: <namespace>1 spec: egress: - to: cidrSelector: <api_server_address_range>2 type: Allow # ... - to: cidrSelector: 0.0.0.0/03 type: Denywhere:
- <namespace>
- Specifies the namespace for the egress firewall.
- <api_server_address_range>
- Specifies the IP address range that includes your OpenShift Container Platform API servers.
- <cidrSelector>
Specifies a value of
0.0.0.0/0to set a global deny rule that prevents access to the OpenShift Container Platform API servers.To find the IP address for your API servers, run
oc get ep kubernetes -n default.For more information, see BZ#1988324.
-
A maximum of one
EgressFirewallobject with a maximum of 8,000 rules can be defined per project. - If you are using the OVN-Kubernetes network plugin with shared gateway mode in Red Hat OpenShift Networking, return ingress replies are affected by egress firewall rules. If the egress firewall rules drop the ingress reply destination IP, the traffic is dropped.
- In general, using Domain Name Server (DNS) names in your egress firewall policy does not affect local DNS resolution through CoreDNS. However, if your egress firewall policy uses domain names and an external DNS server handles DNS resolution for an affected pod, you must include egress firewall rules that permit access to the IP addresses of your DNS server.
Violating any of these restrictions results in a broken egress firewall for the project. Consequently, all external network traffic is dropped, which can cause security risks for your organization.
An EgressFirewall resource is created in the kube-node-lease, kube-public, kube-system, openshift and openshift- projects.
7.5.4.1.2. Matching order for egress firewall policy rules
OVN-Kubernetes evaluates egress firewall policy rules in the order they are defined in, from first to last. The first rule that matches an egress connection from a pod applies. Any subsequent rules are ignored for that connection.
7.5.4.1.3. How Domain Name Server (DNS) resolution works
If you use DNS names in any of your egress firewall policy rules, proper resolution of the domain names is subject to the following restrictions:
- Domain name updates are polled based on a time-to-live (TTL) duration. By default, the duration is 30 minutes. When the egress firewall controller queries the local name servers for a domain name, if the response includes a TTL and the TTL is less than 30 minutes, the controller sets the duration for that DNS name to the returned value. Each DNS name is queried after the TTL for the DNS record expires.
- The pod must resolve the domain from the same local name servers when necessary. Otherwise the IP addresses for the domain known by the egress firewall controller and the pod can be different. If the IP addresses for a hostname differ, the egress firewall might not be enforced consistently.
-
Because the egress firewall controller and pods asynchronously poll the same local name server, the pod might obtain the updated IP address before the egress controller does, which causes a race condition. Due to this current limitation, domain name usage in
EgressFirewallobjects is only recommended for domains with infrequent IP address changes.
7.5.4.1.3.1. Improved DNS resolution and resolving wildcard domain names
There might be situations where the IP addresses associated with a DNS record change frequently, or you might want to specify wildcard domain names in your egress firewall policy rules.
In this situation, the OVN-Kubernetes cluster manager creates a DNSNameResolver custom resource object for each unique DNS name used in your egress firewall policy rules. This custom resource stores the following information:
Improved DNS resolution for egress firewall rules is a Technology Preview feature only. Technology Preview features are not supported with Red Hat production service level agreements (SLAs) and might not be functionally complete. Red Hat does not recommend using them in production. These features provide early access to upcoming product features, enabling customers to test functionality and provide feedback during the development process.
For more information about the support scope of Red Hat Technology Preview features, see Technology Preview Features Support Scope.
Example DNSNameResolver CR definition
apiVersion: networking.openshift.io/v1alpha1
kind: DNSNameResolver
spec:
  name: www.example.com.
status:
  resolvedNames:
  - dnsName: www.example.com.
    resolvedAddress:
    - ip: "1.2.3.4"
      ttlSeconds: 60
      lastLookupTime: "2023-08-08T15:07:04Z"
where:
- <name>
- Specifies the DNS name. This can be either a standard DNS name or a wildcard DNS name. For a wildcard DNS name, the DNS name resolution information contains all of the DNS names that match the wildcard DNS name.
- <dnsName>
-
Specifies the resolved DNS name matching the
spec.namefield. If thespec.namefield contains a wildcard DNS name, then multiplednsNameentries are created that contain the standard DNS names that match the wildcard DNS name when resolved. If the wildcard DNS name can also be successfully resolved, then this field also stores the wildcard DNS name. <ip> Specifies the current IP addresses associated with the DNS name. - <ttlSeconds>
- Specifies the last time-to-live (TTL) duration.
- <lastLookupTime>
- Specifies the last lookup time.
If during DNS resolution the DNS name in the query matches any name defined in a DNSNameResolver CR, then the previous information is updated accordingly in the CR status field. For unsuccessful DNS wildcard name lookups, the request is retried after a default TTL of 30 minutes.
The OVN-Kubernetes cluster manager watches for updates to an EgressFirewall custom resource object, and creates, modifies, or deletes DNSNameResolver CRs associated with those egress firewall policies when that update occurs.
Do not modify DNSNameResolver custom resources directly. This can lead to unwanted behavior of your egress firewall.
7.5.4.2. EgressFirewall custom resource (CR)
You can define one or more rules for an egress firewall. A rule is either an Allow rule or a Deny rule, with a specification for the traffic that the rule applies to.
The following YAML describes an EgressFirewall CR:
EgressFirewall object
apiVersion: k8s.ovn.org/v1
kind: EgressFirewall
metadata:
  name: <ovn>
spec:
  egress: <egress_rules>
    ...
where:
- <ovn>
-
The name for the object must be
default. - <egress_rules>
- Specifies a collection of one or more egress network policy rules as described in the following section.
7.5.4.2.1. EgressFirewall rules
The following YAML describes the rules for an EgressFirewall resource. The user can select either an IP address range in CIDR format, a domain name, or use the nodeSelector field to allow or deny egress traffic. The egress stanza expects an array of one or more objects.
Egress policy rule stanza
egress:
- type: <type>
  to:
    cidrSelector: <cidr_range>
    dnsName: <dns_name>
    nodeSelector: <label_name>: <label_value>
  ports: <optional_port>
      ...
where:
- <type>
-
Specifies the type of rule. The value must be either
AlloworDeny. - <to>
-
Specifies a stanza describing an egress traffic match rule that specifies the
cidrSelectorfield or thednsNamefield. You cannot use both fields in the same rule. - <cidr_range>
- Specifies an IP address range in CIDR format.
- <dns_name>
- Specifies a DNS domain name.
- <nodeSelector>
-
Specifies labels which are key and value pairs that the user defines. Labels are attached to objects, such as pods. The
nodeSelectorallows for one or more node labels to be selected and attached to pods. - <ports>
- Specifies an optional field that describes a collection of network ports and protocols for the rule.
Ports stanza
ports:
- port:
  protocol:
where:
- <port>
-
Specifies a network port, such as
80or443. If you specify a value for this field, you must also specify a value for theprotocolfield. - <protocol>
-
Specifies a network protocol. The value must be either
TCP,UDP, orSCTP.
7.5.4.2.2. Example EgressFirewall CR
The following example defines several egress firewall policy rules:
apiVersion: k8s.ovn.org/v1
kind: EgressFirewall
metadata:
  name: default
spec:
  egress:
  - type: Allow
    to:
      cidrSelector: 1.2.3.0/24
  - type: Deny
    to:
      cidrSelector: 0.0.0.0/0
where:
- <egress>
- Specifies a collection of egress firewall policy rule objects.
The following example defines a policy rule that denies traffic to the host at the 172.16.1.1/32 IP address, if the traffic is using either the TCP protocol and destination port 80 or any protocol and destination port 443.
apiVersion: k8s.ovn.org/v1
kind: EgressFirewall
metadata:
  name: default
spec:
  egress:
  - type: Deny
    to:
      cidrSelector: 172.16.1.1/32
    ports:
    - port: 80
      protocol: TCP
    - port: 443
7.5.4.2.3. Example EgressFirewall CR using nodeSelector
As a cluster administrator, you can allow or deny egress traffic to nodes in your cluster by specifying a label using nodeSelector field. Labels can be applied to one or more nodes. Labels can be helpful because instead of adding manual rules per node IP address, you can use node selectors to create a label that allows pods behind an egress firewall to access host network pods. The following is an example with the region=east label:
apiVersion: k8s.ovn.org/v1
kind: EgressFirewall
metadata:
  name: default
spec:
    egress:
    - to:
        nodeSelector:
          matchLabels:
            region: east
      type: Allow
7.5.4.3. Creating an EgressFirewall custom resource (CR)
As a cluster administrator, you can create an egress firewall policy object for a project.
If the project already has an EgressFirewall resource, you must edit the existing policy to make changes to egress firewall rules.
Prerequisites
- A cluster that uses the OVN-Kubernetes network plugin.
-
Install the OpenShift CLI (
oc). - You must log in to the cluster as a cluster administrator.
Procedure
Create a policy rule:
-
Create a
<policy_name>.yamlfile where<policy_name>describes the egress policy rules. -
Define the
EgressFirewallobject in the file.
-
Create a
Create the policy object by entering the following command. Replace
<policy_name>with the name of the policy and<project>with the project that the rule applies to.$ oc create -f <policy_name>.yaml -n <project>Successful output lists the
egressfirewall.k8s.ovn.org/v1name and thecreatedstatus.-
Optional: Save the
<policy_name>.yamlfile so that you can make changes later.
7.6. Configuring IPsec encryption
By enabling IPsec, you can encrypt both internal pod-to-pod cluster traffic between nodes and external traffic between pods and IPsec endpoints external to your cluster. All pod-to-pod network traffic between nodes on the OVN-Kubernetes cluster network is encrypted with IPsec in Transport mode.
IPsec is disabled by default. You can enable IPsec either during or after installing the cluster. For information about cluster installation, see OpenShift Container Platform installation overview.
Upgrading your cluster to OpenShift Container Platform 4.16 when the libreswan and NetworkManager-libreswan packages have different OpenShift Container Platform versions causes two consecutive compute node reboot operations. For the first reboot, the Cluster Network Operator (CNO) applies the IPsec configuration to compute nodes. For the second reboot, the Machine Config Operator (MCO) applies the latest machine configs to the cluster.
To combine the CNO and MCO updates into a single node reboot, complete the following tasks:
-
Before upgrading your cluster, set the
pausedparameter totruein theMachineConfigPoolscustom resource (CR) that groups compute nodes. -
After you upgrade your cluster, set the parameter to
false.
For more information, see Performing a Control Plane Only update.
The following support limitations exist for IPsec on a OpenShift Container Platform cluster:
- On IBM Cloud®, IPsec supports only NAT-T. Encapsulating Security Payload (ESP) is not supported on this platform.
- If your cluster uses hosted control planes for Red Hat OpenShift Container Platform, IPsec is not supported for IPsec encryption of either pod-to-pod or traffic to external hosts.
- Using ESP hardware offloading on any network interface is not supported if one or more of those interfaces is attached to Open vSwitch (OVS). Enabling IPsec for your cluster triggers the use of IPsec with interfaces attached to OVS. By default, OpenShift Container Platform disables ESP hardware offloading on any interfaces attached to OVS.
- If you enabled IPsec for network interfaces that are not attached to OVS, a cluster administrator must manually disable ESP hardware offloading on each interface that is not attached to OVS.
-
IPsec is not supported on Red Hat Enterprise Linux (RHEL) compute nodes because of a
libreswanincompatiblility issue between a host and anovn-ipseccontainer that exist in each compute node. See (OCPBUGS-53316).
The following list outlines key tasks in the IPsec documentation:
- Enable and disable IPsec after cluster installation.
- Configure IPsec encryption for traffic between the cluster and external hosts.
- Verify that IPsec encrypts traffic between pods on different nodes.
7.6.1. Modes of operation
When using IPsec on your OpenShift Container Platform cluster, you can choose from the following operating modes:
| Mode | Description | Default |
|---|---|---|
|
| No traffic is encrypted. This is the cluster default. | Yes |
|
| Pod-to-pod traffic is encrypted as described in "Types of network traffic flows encrypted by pod-to-pod IPsec". Traffic to external nodes may be encrypted after you complete the required configuration steps for IPsec. | No |
|
| Traffic to external nodes may be encrypted after you complete the required configuration steps for IPsec. | No |
7.6.2. Prerequisites
For IPsec support for encrypting traffic to external hosts, ensure that you meet the following prerequisites:
-
Set
routingViaHost=truein theovnKubernetesConfig.gatewayConfigspecification of the OVN-Kubernetes network plugin. Install the NMState Operator. This Operator is required for specifying the IPsec configuration. For more information, see Kubernetes NMState Operator.
NoteThe NMState Operator is supported on Google Cloud only for configuring IPsec.
-
The Butane tool (
butane) is installed. To install Butane, see Installing Butane.
These prerequisites are required to add certificates into the host NSS database and to configure IPsec to communicate with external hosts.
7.6.3. Network connectivity requirements when IPsec is enabled
You must configure the network connectivity between machines to allow OpenShift Container Platform cluster components to communicate. Each machine must be able to resolve the hostnames of all other machines in the cluster.
| Protocol | Port | Description |
|---|---|---|
| UDP |
| IPsec IKE packets |
|
| IPsec NAT-T packets | |
| ESP | N/A | IPsec Encapsulating Security Payload (ESP) |
7.6.4. IPsec encryption for pod-to-pod traffic
For IPsec encryption of pod-to-pod traffic, the following sections describe which specific pod-to-pod traffic is encrypted, what kind of encryption protocol is used, and how X.509 certificates are handled. These sections do not apply to IPsec encryption between the cluster and external hosts, which you must configure manually for your specific external network infrastructure.
7.6.4.1. Types of network traffic flows encrypted by pod-to-pod IPsec
With IPsec enabled, only the following network traffic flows between pods are encrypted:
- Traffic between pods on different nodes on the cluster network
- Traffic from a pod on the host network to a pod on the cluster network
The following traffic flows are not encrypted:
- Traffic between pods on the same node on the cluster network
- Traffic between pods on the host network
- Traffic from a pod on the cluster network to a pod on the host network
The encrypted and unencrypted flows are illustrated in the following diagram:
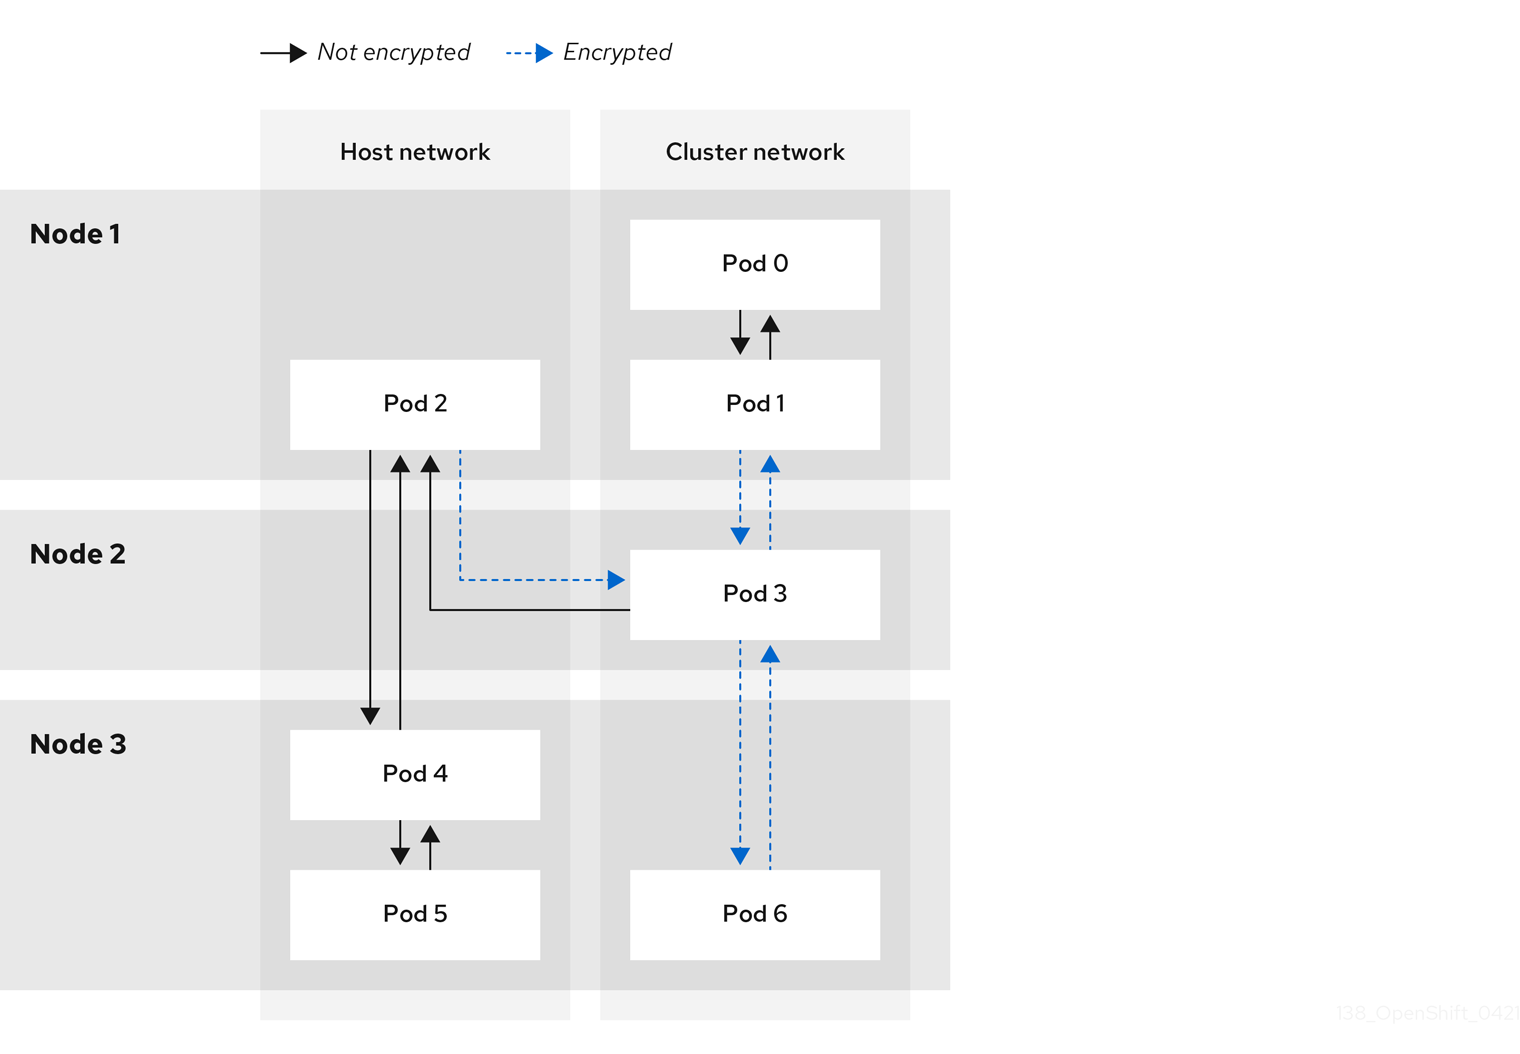
7.6.4.2. Encryption protocol and IPsec mode
The encrypt cipher used is AES-GCM-16-256. The integrity check value (ICV) is 16 bytes. The key length is 256 bits.
The IPsec mode used is Transport mode, a mode that encrypts end-to-end communication by adding an Encapsulated Security Payload (ESP) header to the IP header of the original packet and encrypts the packet data. OpenShift Container Platform does not currently use or support IPsec Tunnel mode for pod-to-pod communication.
7.6.4.3. Security certificate generation and rotation
The Cluster Network Operator (CNO) generates a self-signed X.509 certificate authority (CA) that is used by IPsec for encryption. Certificate signing requests (CSRs) from each node are automatically fulfilled by the CNO.
The CA is valid for 10 years. The individual node certificates are valid for 5 years and are automatically rotated after 4 1/2 years elapse.
7.6.5. IPsec encryption for external traffic
OpenShift Container Platform supports the use of IPsec to encrypt traffic destined for external hosts, ensuring confidentiality and integrity of data in transit. This feature relies on X.509 certificates that you must supply.
7.6.5.1. Supported platforms
This feature is supported on the following platforms:
- Bare metal
- Google Cloud
- Red Hat OpenStack Platform (RHOSP)
- VMware vSphere
If you have Red Hat Enterprise Linux (RHEL) compute nodes, these do not support IPsec encryption for external traffic.
If your cluster uses hosted control planes for Red Hat OpenShift Container Platform, configuring IPsec for encrypting traffic to external hosts is not supported.
7.6.5.2. Limitations
Ensure that the following prohibitions are observed:
- IPv6 configuration is not currently supported by the NMState Operator when configuring IPsec for external traffic.
-
Certificate common names (CN) in the provided certificate bundle must not begin with the
ovs_prefix, because this naming can conflict with pod-to-pod IPsec CN names in the Network Security Services (NSS) database of each node.
7.6.6. Enabling IPsec encryption
As a cluster administrator, you can enable pod-to-pod IPsec encryption, IPsec encryption between the cluster, and external IPsec endpoints.
You can configure IPsec in either of the following modes:
-
Full: Encryption for pod-to-pod and external traffic -
External: Encryption for external traffic
If you configure IPsec in Full mode, you must also complete the "Configuring IPsec encryption for external traffic" procedure.
Prerequisites
-
Install the OpenShift CLI (
oc). -
You are logged in to the cluster as a user with
cluster-adminprivileges. -
You have reduced the size of your cluster MTU by
46bytes to allow for the overhead of the IPsec ESP header.
Procedure
To enable IPsec encryption, enter the following command:
$ oc patch networks.operator.openshift.io cluster --type=merge -p \
  '{
  "spec":{
    "defaultNetwork":{
      "ovnKubernetesConfig":{
        "ipsecConfig":{
          "mode":"<mode">
1 }}}}}'- Encrypt external traffic with IPsec by completing the "Configuring IPsec encryption for external traffic" procedure.
Verification
To find the names of the OVN-Kubernetes data plane pods, enter the following command:
$ oc get pods -n openshift-ovn-kubernetes -l=app=ovnkube-nodeExample output
ovnkube-node-5xqbf                       8/8     Running   0              28m
ovnkube-node-6mwcx                       8/8     Running   0              29m
ovnkube-node-ck5fr                       8/8     Running   0              31m
ovnkube-node-fr4ld                       8/8     Running   0              26m
ovnkube-node-wgs4l                       8/8     Running   0              33m
ovnkube-node-zfvcl                       8/8     Running   0              34m
...
Verify that you enabled IPsec on your cluster by running the following command:
NoteAs a cluster administrator, you can verify that you enabled IPsec between pods on your cluster when you configured IPsec in
Fullmode. This step does not verify whether IPsec is working between your cluster and external hosts.$ oc -n openshift-ovn-kubernetes rsh ovnkube-node-<XXXXX> ovn-nbctl --no-leader-only get nb_global . ipsec1 where:
<XXXXX>specifies the random sequence of letters for a pod from an earlier step.Successful output from the command shows the status as
true.
7.6.7. Configuring IPsec encryption for external traffic
As a cluster administrator, to encrypt external traffic with IPsec you must configure IPsec for your network infrastructure, including providing PKCS#12 certificates. Because this procedure uses Butane to create machine configs, you must have the butane tool installed.
After you apply the machine config, the Machine Config Operator (MCO) reboots affected nodes in your cluster to rollout the new machine config.
Prerequisites
-
Install the OpenShift CLI (
oc). -
You have installed the
butanetool on your local computer. - You have installed the NMState Operator on the cluster.
-
You logged in to the cluster as a user with
cluster-adminprivileges. - You have an existing PKCS#12 certificate for the IPsec endpoint and a CA cert in Privacy Enhanced Mail (PEM) format.
-
You enabled IPsec in either
FullorExternalmode on your cluster. -
You must set the
routingViaHostparameter totruein theovnKubernetesConfig.gatewayConfigspecification of the OVN-Kubernetes network plugin.
Procedure
Create an IPsec configuration with an NMState Operator node network configuration policy. For more information, see Configuring an IPsec based VPN connection by using nmstatectl.
To identify the IP address of the cluster node that is the IPsec endpoint, enter the following command:
$ oc get nodesCreate a file named
ipsec-config.yamlthat has a node network configuration policy for the NMState Operator, such as in the following examples. For an overview aboutNodeNetworkConfigurationPolicyobjects, see The Kubernetes NMState project.Example NMState IPsec transport configuration
apiVersion: nmstate.io/v1
kind: NodeNetworkConfigurationPolicy
metadata:
  name: ipsec-config
spec:
  nodeSelector:
    kubernetes.io/hostname: "<hostname>"
  desiredState:
    interfaces:
    - name: <interface_name>
      type: ipsec
      libreswan:
        left: <cluster_node>
        leftid: '%fromcert'
        leftrsasigkey: '%cert'
        leftcert: left_server
        leftmodecfgclient: false
        right: <external_host>
        rightid: '%fromcert'
        rightrsasigkey: '%cert'
        rightsubnet: <external_address>/32
        ikev2: insist
        type: transport
where:
kubernetes.io/hostname- Specifies the hostname to apply the policy to. This host serves as the left side host in the IPsec configuration.
name- Specifies the name of the interface to create on the host.
left-
Specifies the hostname of the cluster node that terminates the IPsec tunnel on the cluster side. The name must match the SAN
[Subject Alternate Name]from your supplied PKCS#12 certificates. right-
Specifies the external hostname, such as
host.example.com. The name should match the SAN[Subject Alternate Name]from your supplied PKCS#12 certificates. rightsubnetSpecifies the IP address of the external host, such as
10.1.2.3/32.Example NMState IPsec tunnel configuration
apiVersion: nmstate.io/v1
kind: NodeNetworkConfigurationPolicy
metadata:
  name: ipsec-config
spec:
  nodeSelector:
    kubernetes.io/hostname: "<hostname>"
  desiredState:
    interfaces:
    - name: <interface_name>
      type: ipsec
      libreswan:
        left: <cluster_node>
        leftid: '%fromcert'
        leftmodecfgclient: false
        leftrsasigkey: '%cert'
        leftcert: left_server
        right: <external_host>
        rightid: '%fromcert'
        rightrsasigkey: '%cert'
        rightsubnet: <external_address>/32
        ikev2: insist
        type: tunnel
To configure the IPsec interface, enter the following command:
$ oc create -f ipsec-config.yaml
Give the following certificate files to add to the Network Security Services (NSS) database on each host. These files are imported as part of the Butane configuration in the next steps.
-
left_server.p12: The certificate bundle for the IPsec endpoints -
ca.pem: The certificate authority that you signed your certificates with
-
- Create a machine config to add your certificates to the cluster.
Read the password from a mounted secret file:
$ password=$(cat run/secrets/<left_server_password>)-
left_server_password:: The name of the file that contains the password. This file exists in the mounted secret.
-
Use the
pk12utiltool, which comes prepackaged with Red Hat Enterprise Linux (RHEL), to specify a password that protectsPKCS#12files by entering the following command. Ensure that you replace the<password>value with your password.$ pk12util -W "<password>" -i /etc/pki/certs/left_server.p12 -d /var/lib/ipsec/nss/To create Butane config files for the control plane and compute nodes, enter the following command:
NoteThe Butane version you specify in the config file should match the OpenShift Container Platform version and always ends in
0. For example,4.16.0. See "Creating machine configs with Butane" for information about Butane.$ for role in master worker; do cat >> "99-ipsec-${role}-endpoint-config.bu" <<-EOF variant: openshift version: 4.16.0 metadata: name: 99-${role}-import-certs labels: machineconfiguration.openshift.io/role: $role systemd: units: - name: ipsec-import.service enabled: true contents: | [Unit] Description=Import external certs into ipsec NSS Before=ipsec.service [Service] Type=oneshot ExecStart=/usr/local/bin/ipsec-addcert.sh RemainAfterExit=false StandardOutput=journal [Install] WantedBy=multi-user.target storage: files: - path: /etc/pki/certs/ca.pem mode: 0400 overwrite: true contents: local: ca.pem - path: /etc/pki/certs/left_server.p12 mode: 0400 overwrite: true contents: local: left_server.p12 - path: /usr/local/bin/ipsec-addcert.sh mode: 0740 overwrite: true contents: inline: | #!/bin/bash -e echo "importing cert to NSS" certutil -A -n "CA" -t "CT,C,C" -d /var/lib/ipsec/nss/ -i /etc/pki/certs/ca.pem pk12util -W "" -i /etc/pki/certs/left_server.p12 -d /var/lib/ipsec/nss/ certutil -M -n "left_server" -t "u,u,u" -d /var/lib/ipsec/nss/ EOF doneTo transform the Butane files that you created in the earlier step into machine configs, enter the following command:
$ for role in master worker; do
  butane -d . 99-ipsec-${role}-endpoint-config.bu -o ./99-ipsec-$role-endpoint-config.yaml
done
To apply the machine configs to your cluster, enter the following command:
$ for role in master worker; do oc apply -f 99-ipsec-${role}-endpoint-config.yaml doneImportantAs the Machine Config Operator (MCO) updates machines in each machine config pool, it reboots each node one by one. You must wait for all the nodes to update before external IPsec connectivity is available.
Verification
Check the machine config pool status by entering the following command:
$ oc get mcpA successfully updated node has the following status:
UPDATED=true,UPDATING=false,DEGRADED=false.NoteBy default, the MCO updates one machine per pool at a time, causing the total time the migration takes to increase with the size of the cluster.
To confirm that IPsec machine configs rolled out successfully, enter the following commands:
Confirm the creation of the IPsec machine configs:
$ oc get mc | grep ipsecExample output
80-ipsec-master-extensions        3.2.0        6d15h
80-ipsec-worker-extensions        3.2.0        6d15h
Confirm you have applied the IPsec extension to control plane nodes:
$ oc get mcp master -o yaml | grep 80-ipsec-master-extensions -cConfirm the application of the IPsec extension to compute nodes. Example output would show
2.$ oc get mcp worker -o yaml | grep 80-ipsec-worker-extensions -c
7.6.9. Disabling IPsec encryption for an external IPsec endpoint
As a cluster administrator, you can remove an existing IPsec tunnel to an external host.
Prerequisites
-
Install the OpenShift CLI (
oc). -
You are logged in to the cluster as a user with
cluster-adminprivileges. -
You enabled IPsec in either
FullorExternalmode on your cluster.
Procedure
Create a file named
remove-ipsec-tunnel.yamlwith the following YAML:kind: NodeNetworkConfigurationPolicy apiVersion: nmstate.io/v1 metadata: name: <name> spec: nodeSelector: kubernetes.io/hostname: <node_name> desiredState: interfaces: - name: <tunnel_name> type: ipsec state: absentwhere:
name- Specifies a name for the node network configuration policy.
node_name- Specifies the name of the node where the IPsec tunnel that you want to remove exists.
tunnel_name- Specifies the interface name for the existing IPsec tunnel.
To remove the IPsec tunnel, enter the following command:
$ oc apply -f remove-ipsec-tunnel.yaml
7.6.10. Disabling IPsec encryption
As a cluster administrator, you can disable IPsec encryption.
Prerequisites
-
Install the OpenShift CLI (
oc). -
Log in to the cluster with a user with
cluster-adminprivileges.
Procedure
To disable IPsec encryption, enter the following command:
$ oc patch networks.operator.openshift.io cluster --type=merge \ -p '{ "spec":{ "defaultNetwork":{ "ovnKubernetesConfig":{ "ipsecConfig":{ "mode":"Disabled" }}}}}'-
Optional: You can increase the size of your cluster MTU by
46bytes because there is no longer any overhead from the IPsec ESP header in IP packets.
7.7. Zero trust networking
Zero trust is an approach to designing security architectures based on the premise that every interaction begins in an untrusted state. This contrasts with traditional architectures, which might determine trustworthiness based on whether communication starts inside a firewall. More specifically, zero trust attempts to close gaps in security architectures that rely on implicit trust models and one-time authentication.
OpenShift Container Platform can add some zero trust networking capabilities to containers running on the platform without requiring changes to the containers or the software running in them. There are also several products that Red Hat offers that can further augment the zero trust networking capabilities of containers. If you have the ability to change the software running in the containers, then there are other projects that Red Hat supports that can add further capabilities.
Explore the following targeted capabilities of zero trust networking.
7.7.1. Root of trust
Public certificates and private keys are critical to zero trust networking. These are used to identify components to one another, authenticate, and to secure traffic. The certificates are signed by other certificates, and there is a chain of trust to a root certificate authority (CA). Everything participating in the network needs to ultimately have the public key for a root CA so that it can validate the chain of trust. For public-facing things, these are usually the set of root CAs that are globally known, and whose keys are distributed with operating systems, web browsers, and so on. However, it is possible to run a private CA for a cluster or a corporation if the certificate of the private CA is distributed to all parties.
Leverage:
- OpenShift Container Platform: OpenShift creates a cluster CA at installation that is used to secure the cluster resources. However, OpenShift Container Platform can also create and sign certificates for services in the cluster, and can inject the cluster CA bundle into a pod if requested. Service certificates created and signed by OpenShift Container Platform have a 26-month time to live (TTL) and are rotated automatically at 13 months. They can also be rotated manually if necessary.
- OpenShift cert-manager Operator: cert-manager allows you to request keys that are signed by an external root of trust. There are many configurable issuers to integrate with external issuers, along with ways to run with a delegated signing certificate. The cert-manager API can be used by other software in zero trust networking to request the necessary certificates (for example, Red Hat OpenShift Service Mesh), or can be used directly by customer software.
7.7.2. Traffic authentication and encryption
Ensure that all traffic on the wire is encrypted and the endpoints are identifiable. An example of this is Mutual TLS, or mTLS, which is a method for mutual authentication.
Leverage:
- OpenShift Container Platform: With transparent pod-to-pod IPsec, the source and destination of the traffic can be identified by the IP address. There is the capability for egress traffic to be encrypted using IPsec. By using the egress IP feature, the source IP address of the traffic can be used to identify the source of the traffic inside the cluster.
- Red Hat OpenShift Service Mesh: Provides powerful mTLS capabilities that can transparently augment traffic leaving a pod to provide authentication and encryption.
- OpenShift cert-manager Operator: Use custom resource definitions (CRDs) to request certificates that can be mounted for your programs to use for SSL/TLS protocols.
7.7.3. Identification and authentication
After you have the ability to mint certificates using a CA, you can use it to establish trust relationships by verification of the identity of the other end of a connection — either a user or a client machine. This also requires management of certificate lifecycles to limit use if compromised.
Leverage:
- OpenShift Container Platform: Cluster-signed service certificates to ensure that a client is talking to a trusted endpoint. This requires that the service uses SSL/TLS and that the client uses the cluster CA. The client identity must be provided using some other means.
- Red Hat Single Sign-On: Provides request authentication integration with enterprise user directories or third-party identity providers.
- Red Hat OpenShift Service Mesh: Transparent upgrade of connections to mTLS, auto-rotation, custom certificate expiration, and request authentication with JSON web token (JWT).
- OpenShift cert-manager Operator: Creation and management of certificates for use by your application. Certificates can be controlled by CRDs and mounted as secrets, or your application can be changed to interact directly with the cert-manager API.
7.7.4. Inter-service authorization
It is critical to be able to control access to services based on the identity of the requester. This is done by the platform and does not require each application to implement it. That allows better auditing and inspection of the policies.
Leverage:
-
OpenShift Container Platform: Can enforce isolation in the networking layer of the platform using the Kubernetes
NetworkPolicyandAdminNetworkPolicyobjects. - Red Hat OpenShift Service Mesh: Sophisticated L4 and L7 control of traffic using standard Istio objects and using mTLS to identify the source and destination of traffic and then apply policies based on that information.
7.7.5. Transaction-level verification
In addition to the ability to identify and authenticate connections, it is also useful to control access to individual transactions. This can include rate-limiting by source, observability, and semantic validation that a transaction is well formed.
Leverage:
- Red Hat OpenShift Service Mesh: Perform L7 inspection of requests, rejecting malformed HTTP requests, transaction-level observability and reporting. Service Mesh can also provide request-based authentication using JWT.
7.7.6. Risk assessment
As the number of security policies in a cluster increase, visualization of what the policies allow and deny becomes increasingly important. These tools make it easier to create, visualize, and manage cluster security policies.
Leverage:
-
Red Hat OpenShift Service Mesh: Create and visualize Kubernetes
NetworkPolicyandAdminNetworkPolicy, and OpenShift NetworkingEgressFirewallobjects using the OpenShift web console. - Red Hat Advanced Cluster Security for Kubernetes: Advanced visualization of objects.
7.7.7. Site-wide policy enforcement and distribution
After deploying applications on a cluster, it becomes challenging to manage all of the objects that make up the security rules. It becomes critical to be able to apply site-wide policies and audit the deployed objects for compliance with the policies. This should allow for delegation of some permissions to users and cluster administrators within defined bounds, and should allow for exceptions to the policies if necessary.
Leverage:
- Red Hat OpenShift Service Mesh: RBAC to control policy objects and delegate control.
- Red Hat Advanced Cluster Security for Kubernetes: Policy enforcement engine.
- Red Hat Advanced Cluster Management (RHACM) for Kubernetes: Centralized policy control.
7.7.8. Observability for constant, and retrospective, evaluation
After you have a running cluster, you want to be able to observe the traffic and verify that the traffic comports with the defined rules. This is important for intrusion detection, forensics, and is helpful for operational load management.
Leverage:
- Network Observability Operator: Allows for inspection, monitoring, and alerting on network connections to pods and nodes in the cluster.
- Red Hat Advanced Cluster Management (RHACM) for Kubernetes: Monitors, collects, and evaluates system-level events such as process execution, network connections and flows, and privilege escalation. It can determine a baseline for a cluster, and then detect anomalous activity and alert you about it.
- Red Hat OpenShift Service Mesh: Can monitor traffic entering and leaving a pod.
- Red Hat OpenShift Distributed Tracing Platform: For suitably instrumented applications, you can see all traffic associated with a particular action as it splits into sub-requests to microservices. This allows you to identify bottlenecks within a distributed application.
7.7.9. Endpoint security
It is important to be able to trust that the software running the services in your cluster has not been compromised. For example, you might need to ensure that certified images are run on trusted hardware, and have policies to only allow connections to or from an endpoint based on endpoint characteristics.
Leverage:
- OpenShift Container Platform: Secureboot can ensure that the nodes in the cluster are running trusted software, so the platform itself (including the container runtime) have not been tampered with. You can configure OpenShift Container Platform to only run images that have been signed by certain signatures.
- Red Hat Trusted Artifact Signer: This can be used in a trusted build chain and produce signed container images.
7.7.10. Extending trust outside of the cluster
You might want to extend trust outside of the cluster by allowing a cluster to mint CAs for a subdomain. Alternatively, you might want to attest to workload identity in the cluster to a remote endpoint.
Leverage:
- OpenShift cert-manager Operator: You can use cert-manager to manage delegated CAs so that you can distribute trust across different clusters, or through your organization.
- Red Hat OpenShift Service Mesh: Can use SPIFFE to provide remote attestation of workloads to endpoints running in remote or local clusters.