Ce contenu n'est pas disponible dans la langue sélectionnée.
Chapter 6. Managing Kafka
Use additional configuration properties to maintain a deployment of AMQ Streams. You can add and adjust settings to respond to the performance of AMQ Streams. For example, you can introduce additional configuration to improve throughput and data reliability.
6.1. Tuning Kafka configuration
Use configuration properties to optimize the performance of Kafka brokers, producers and consumers.
A minimum set of configuration properties is required, but you can add or adjust properties to change how producers and consumers interact with Kafka brokers. For example, you can tune latency and throughput of messages so that clients can respond to data in real time.
You might start by analyzing metrics to gauge where to make your initial configurations, then make incremental changes and further comparisons of metrics until you have the configuration you need.
6.1.1. Kafka broker configuration tuning
Use configuration properties to optimize the performance of Kafka brokers. You can use standard Kafka broker configuration options, except for properties managed directly by AMQ Streams.
6.1.1.1. Basic broker configuration
A basic configuration will include the following properties to identify your brokers and provide secure access:
-
broker.idis the ID of the Kafka broker -
log.dirsare the directories for log data -
zookeeper.connectis the configuration to connect Kafka with ZooKeeper -
listenerexposes the Kafka cluster to clients -
authorizationmechanisms allow or decline actions executed by users -
authenticationmechanisms prove the identity of users requiring access to Kafka
You can find more details on the basic configuration options in Configuring Kafka.
A typical broker configuration will also include settings for properties related to topics, threads and logs.
Basic broker configuration properties
6.1.1.2. Replicating topics for high availability
Basic topic properties set the default number of partitions and replication factor for topics, which will apply to topics that are created without these properties being explicitly set, including when topics are created automatically.
The auto.create.topics.enable property is enabled by default so that topics that do not already exist are created automatically when needed by producers and consumers. If you are using automatic topic creation, you can set the default number of partitions for topics using num.partitions. Generally, however, this property is disabled so that more control is provided over topics through explicit topic creation
For high availability environments, it is advisable to increase the replication factor to at least 3 for topics and set the minimum number of in-sync replicas required to 1 less than the replication factor.
For data durability, you should also set min.insync.replicas in your topic configuration and message delivery acknowledgments using acks=all in your producer configuration.
Use replica.fetch.max.bytes to set the maximum size, in bytes, of messages fetched by each follower that replicates the leader partition. Change this value according to the average message size and throughput. When considering the total memory allocation required for read/write buffering, the memory available must also be able to accommodate the maximum replicated message size when multiplied by all followers. The size must also be greater than message.max.bytes, so that all messages can be replicated.
The delete.topic.enable property is enabled by default to allow topics to be deleted. In a production environment, you should disable this property to avoid accidental topic deletion, resulting in data loss. You can, however, temporarily enable it and delete topics and then disable it again.
...
...
# ...
auto.create.topics.enable=false
delete.topic.enable=true
# ...6.1.1.3. Internal topic settings for transactions and commits
If you are using transactions to enable atomic writes to partitions from producers, the state of the transactions is stored in the internal __transaction_state topic. By default, the brokers are configured with a replication factor of 3 and a minimum of 2 in-sync replicas for this topic, which means that a minimum of three brokers are required in your Kafka cluster.
...
...
# ...
transaction.state.log.replication.factor=3
transaction.state.log.min.isr=2
# ...
Similarly, the internal __consumer_offsets topic, which stores consumer state, has default settings for the number of partitions and replication factor.
...
...
# ...
offsets.topic.num.partitions=50
offsets.topic.replication.factor=3
# ...Do not reduce these settings in production. You can increase the settings in a production environment. As an exception, you might want to reduce the settings in a single-broker test environment.
6.1.1.4. Improving request handling throughput by increasing I/O threads
Network threads handle requests to the Kafka cluster, such as produce and fetch requests from client applications. Produce requests are placed in a request queue. Responses are placed in a response queue.
The number of network threads should reflect the replication factor and the levels of activity from client producers and consumers interacting with the Kafka cluster. If you are going to have a lot of requests, you can increase the number of threads, using the amount of time threads are idle to determine when to add more threads.
To reduce congestion and regulate the request traffic, you can limit the number of requests allowed in the request queue before the network thread is blocked.
I/O threads pick up requests from the request queue to process them. Adding more threads can improve throughput, but the number of CPU cores and disk bandwidth imposes a practical upper limit. At a minimum, the number of I/O threads should equal the number of storage volumes.
Configuration updates to the thread pools for all brokers might occur dynamically at the cluster level. These updates are restricted to between half the current size and twice the current size.
Kafka broker metrics can help with working out the number of threads required. For example, metrics for the average time network threads are idle (kafka.network:type=SocketServer,name=NetworkProcessorAvgIdlePercent) indicate the percentage of resources used. If there is 0% idle time, all resources are in use, which means that adding more threads might be beneficial.
If threads are slow or limited due to the number of disks, you can try increasing the size of the buffers for network requests to improve throughput:
...
...
# ...
replica.socket.receive.buffer.bytes=65536
# ...And also increase the maximum number of bytes Kafka can receive:
...
...
# ...
socket.request.max.bytes=104857600
# ...6.1.1.5. Increasing bandwidth for high latency connections
Kafka batches data to achieve reasonable throughput over high-latency connections from Kafka to clients, such as connections between datacenters. However, if high latency is a problem, you can increase the size of the buffers for sending and receiving messages.
...
...
# ...
socket.send.buffer.bytes=1048576
socket.receive.buffer.bytes=1048576
# ...You can estimate the optimal size of your buffers using a bandwidth-delay product calculation, which multiplies the maximum bandwidth of the link (in bytes/s) with the round-trip delay (in seconds) to give an estimate of how large a buffer is required to sustain maximum throughput.
6.1.1.6. Managing logs with data retention policies
Kafka uses logs to store message data. Logs are a series of segments associated with various indexes. New messages are written to an active segment, and never subsequently modified. Segments are read when serving fetch requests from consumers. Periodically, the active segment is rolled to become read-only and a new active segment is created to replace it. There is only a single segment active at a time. Older segments are retained until they are eligible for deletion.
Configuration at the broker level sets the maximum size in bytes of a log segment and the amount of time in milliseconds before an active segment is rolled:
...
...
# ...
log.segment.bytes=1073741824
log.roll.ms=604800000
# ...
You can override these settings at the topic level using segment.bytes and segment.ms. Whether you need to lower or raise these values depends on the policy for segment deletion. A larger size means the active segment contains more messages and is rolled less often. Segments also become eligible for deletion less often.
You can set time-based or size-based log retention and cleanup policies so that logs are kept manageable. Depending on your requirements, you can use log retention configuration to delete old segments. If log retention policies are used, non-active log segments are removed when retention limits are reached. Deleting old segments bounds the storage space required for the log so you do not exceed disk capacity.
For time-based log retention, you set a retention period based on hours, minutes and milliseconds. The retention period is based on the time messages were appended to the segment.
The milliseconds configuration has priority over minutes, which has priority over hours. The minutes and milliseconds configuration is null by default, but the three options provide a substantial level of control over the data you wish to retain. Preference should be given to the milliseconds configuration, as it is the only one of the three properties that is dynamically updateable.
...
...
# ...
log.retention.ms=1680000
# ...
If log.retention.ms is set to -1, no time limit is applied to log retention, so all logs are retained. Disk usage should always be monitored, but the -1 setting is not generally recommended as it can lead to issues with full disks, which can be hard to rectify.
For size-based log retention, you set a maximum log size (of all segments in the log) in bytes:
...
...
# ...
log.retention.bytes=1073741824
# ...In other words, a log will typically have approximately log.retention.bytes/log.segment.bytes segments once it reaches a steady state. When the maximum log size is reached, older segments are removed.
A potential issue with using a maximum log size is that it does not take into account the time messages were appended to a segment. You can use time-based and size-based log retention for your cleanup policy to get the balance you need. Whichever threshold is reached first triggers the cleanup.
If you wish to add a time delay before a segment file is deleted from the system, you can add the delay using log.segment.delete.delay.ms for all topics at the broker level or file.delete.delay.ms for specific topics in the topic configuration.
...
...
# ...
log.segment.delete.delay.ms=60000
# ...6.1.1.7. Removing log data with cleanup policies
The method of removing older log data is determined by the log cleaner configuration.
The log cleaner is enabled for the broker by default:
...
...
# ...
log.cleaner.enable=true
# ...You can set the cleanup policy at the topic or broker level. Broker-level configuration is the default for topics that do not have policy set.
You can set policy to delete logs, compact logs, or do both:
...
...
# ...
log.cleanup.policy=compact,delete
# ...
The delete policy corresponds to managing logs with data retention policies. It is suitable when data does not need to be retained forever. The compact policy guarantees to keep the most recent message for each message key. Log compaction is suitable where message values are changeable, and you want to retain the latest update.
If cleanup policy is set to delete logs, older segments are deleted based on log retention limits. Otherwise, if the log cleaner is not enabled, and there are no log retention limits, the log will continue to grow.
If cleanup policy is set for log compaction, the head of the log operates as a standard Kafka log, with writes for new messages appended in order. In the tail of a compacted log, where the log cleaner operates, records will be deleted if another record with the same key occurs later in the log. Messages with null values are also deleted. If you’re not using keys, you can’t use compaction because keys are needed to identify related messages. While Kafka guarantees that the latest messages for each key will be retained, it does not guarantee that the whole compacted log will not contain duplicates.
Figure 6.1. Log showing key value writes with offset positions before compaction
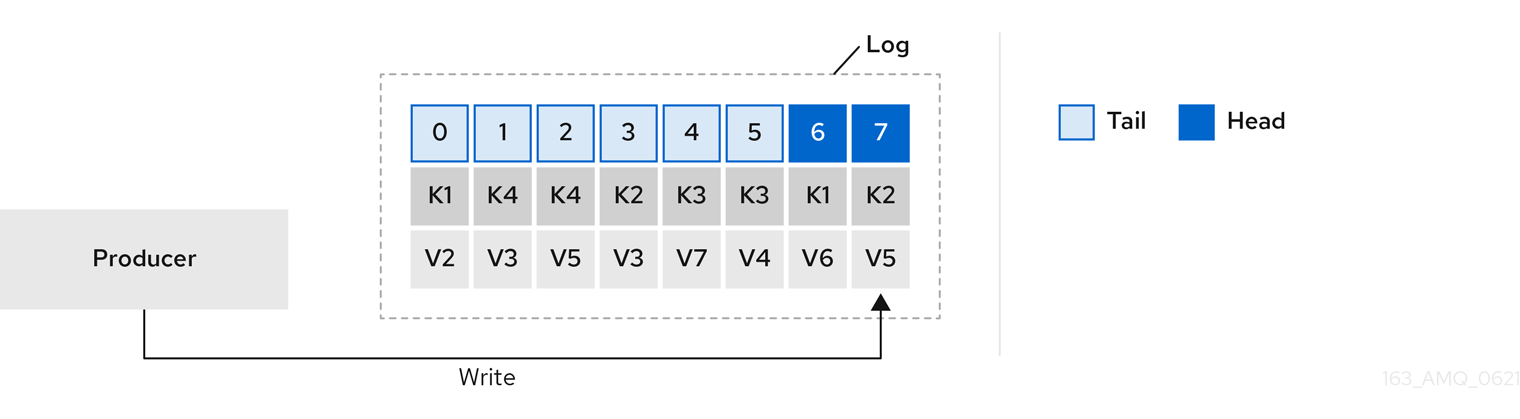
Using keys to identify messages, Kafka compaction keeps the latest message (with the highest offset) for a specific message key, eventually discarding earlier messages that have the same key. In other words, the message in its latest state is always available and any out-of-date records of that particular message are eventually removed when the log cleaner runs. You can restore a message back to a previous state.
Records retain their original offsets even when surrounding records get deleted. Consequently, the tail can have non-contiguous offsets. When consuming an offset that’s no longer available in the tail, the record with the next higher offset is found.
Figure 6.2. Log after compaction
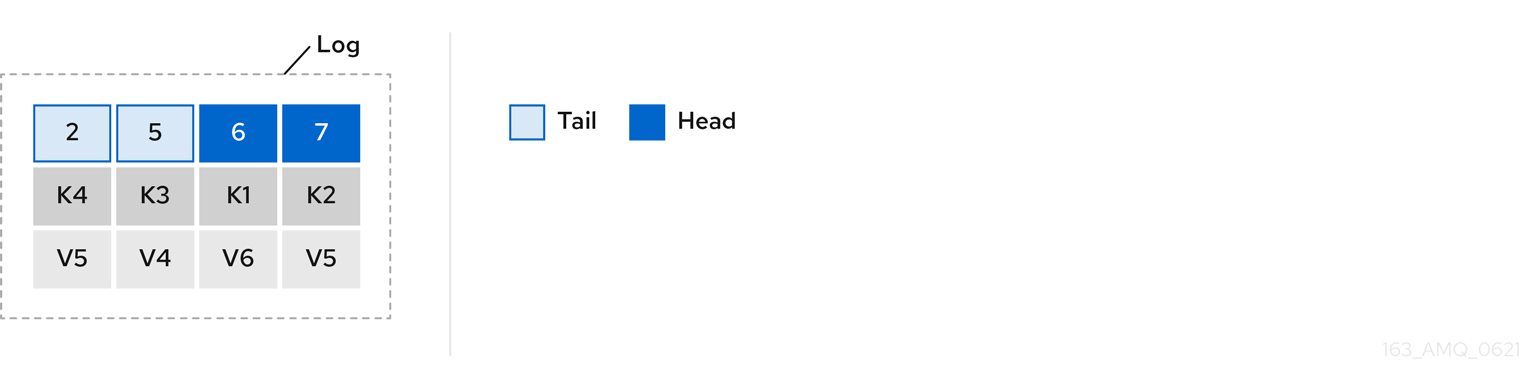
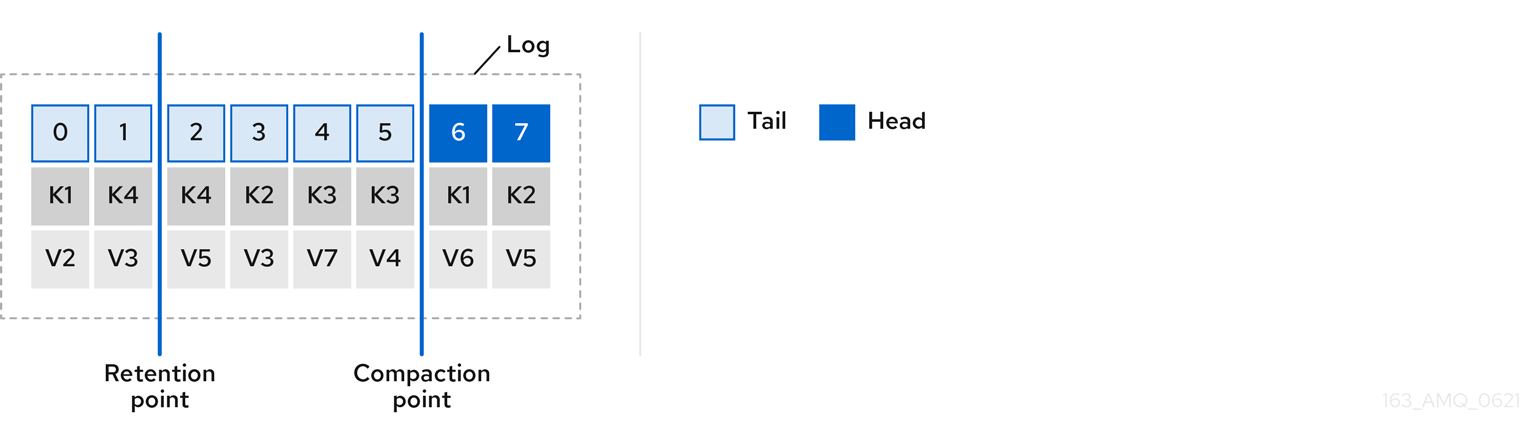
If you choose only a compact policy, your log can still become arbitrarily large. In which case, you can set policy to compact and delete logs. If you choose to compact and delete, first the log data is compacted, removing records with a key in the head of the log. After which, data that falls before the log retention threshold is deleted.
Figure 6.3. Log retention point and compaction point
You set the frequency the log is checked for cleanup in milliseconds:
...
...
# ...
log.retention.check.interval.ms=300000
# ...Adjust the log retention check interval in relation to the log retention settings. Smaller retention sizes might require more frequent checks.
The frequency of cleanup should be often enough to manage the disk space, but not so often it affects performance on a topic.
You can also set a time in milliseconds to put the cleaner on standby if there are no logs to clean:
...
...
# ...
log.cleaner.backoff.ms=15000
# ...If you choose to delete older log data, you can set a period in milliseconds to retain the deleted data before it is purged:
...
...
# ...
log.cleaner.delete.retention.ms=86400000
# ...The deleted data retention period gives time to notice the data is gone before it is irretrievably deleted.
To delete all messages related to a specific key, a producer can send a tombstone message. A tombstone has a null value and acts as a marker to tell a consumer the value is deleted. After compaction, only the tombstone is retained, which must be for a long enough period for the consumer to know that the message is deleted. When older messages are deleted, having no value, the tombstone key is also deleted from the partition.
6.1.1.8. Managing disk utilization
There are many other configuration settings related to log cleanup, but of particular importance is memory allocation.
The deduplication property specifies the total memory for cleanup across all log cleaner threads. You can set an upper limit on the percentage of memory used through the buffer load factor.
...
...
# ...
log.cleaner.dedupe.buffer.size=134217728
log.cleaner.io.buffer.load.factor=0.9
# ...Each log entry uses exactly 24 bytes, so you can work out how many log entries the buffer can handle in a single run and adjust the setting accordingly.
If possible, consider increasing the number of log cleaner threads if you are looking to reduce the log cleaning time:
...
...
# ...
log.cleaner.threads=8
# ...If you are experiencing issues with 100% disk bandwidth usage, you can throttle the log cleaner I/O so that the sum of the read/write operations is less than a specified double value based on the capabilities of the disks performing the operations:
...
...
# ...
log.cleaner.io.max.bytes.per.second=1.7976931348623157E308
# ...6.1.1.9. Handling large message sizes
The default batch size for messages is 1MB, which is optimal for maximum throughput in most use cases. Kafka can accommodate larger batches at a reduced throughput, assuming adequate disk capacity.
Large message sizes are handled in four ways:
- Producer-side message compression writes compressed messages to the log.
- Reference-based messaging sends only a reference to data stored in some other system in the message’s value.
- Inline messaging splits messages into chunks that use the same key, which are then combined on output using a stream-processor like Kafka Streams.
- Broker and producer/consumer client application configuration built to handle larger message sizes.
The reference-based messaging and message compression options are recommended and cover most situations. With any of these options, care must be take to avoid introducing performance issues.
Producer-side compression
For producer configuration, you specify a compression.type, such as Gzip, which is then applied to batches of data generated by the producer. Using the broker configuration compression.type=producer, the broker retains whatever compression the producer used. Whenever producer and topic compression do not match, the broker has to compress batches again prior to appending them to the log, which impacts broker performance.
Compression also adds additional processing overhead on the producer and decompression overhead on the consumer, but includes more data in a batch, so is often beneficial to throughput when message data compresses well.
Combine producer-side compression with fine-tuning of the batch size to facilitate optimum throughput. Using metrics helps to gauge the average batch size needed.
Reference-based messaging
Reference-based messaging is useful for data replication when you do not know how big a message will be. The external data store must be fast, durable, and highly available for this configuration to work. Data is written to the data store and a reference to the data is returned. The producer sends a message containing the reference to Kafka. The consumer gets the reference from the message and uses it to fetch the data from the data store.
Figure 6.4. Reference-based messaging flow
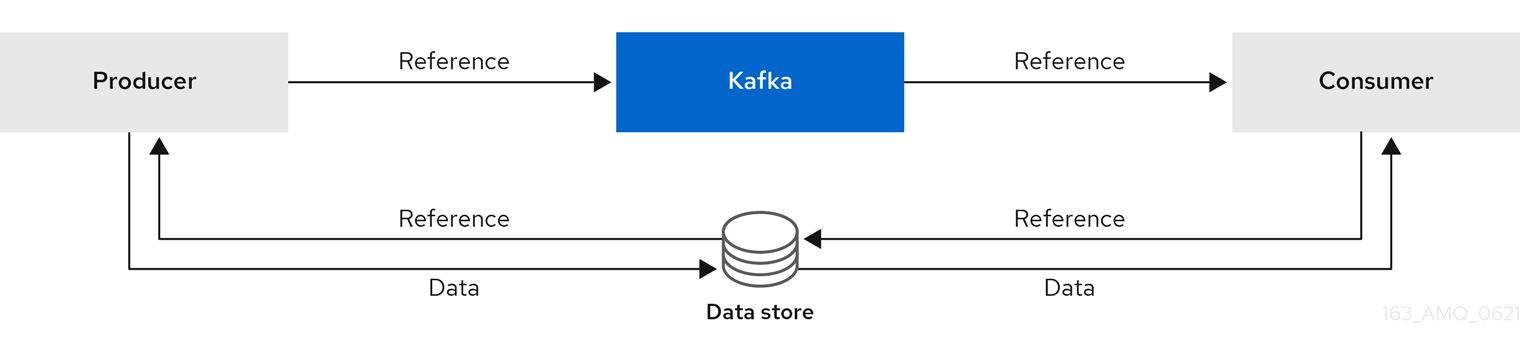
As the message passing requires more trips, end-to-end latency will increase. Another significant drawback of this approach is there is no automatic clean up of the data in the external system when the Kafka message gets cleaned up. A hybrid approach would be to only send large messages to the data store and process standard-sized messages directly.
Inline messaging
Inline messaging is complex, but it does not have the overhead of depending on external systems like reference-based messaging.
The producing client application has to serialize and then chunk the data if the message is too big. The producer then uses the Kafka ByteArraySerializer or similar to serialize each chunk again before sending it. The consumer tracks messages and buffers chunks until it has a complete message. The consuming client application receives the chunks, which are assembled before deserialization. Complete messages are delivered to the rest of the consuming application in order according to the offset of the first or last chunk for each set of chunked messages. Successful delivery of the complete message is checked against offset metadata to avoid duplicates during a rebalance.
Figure 6.5. Inline messaging flow
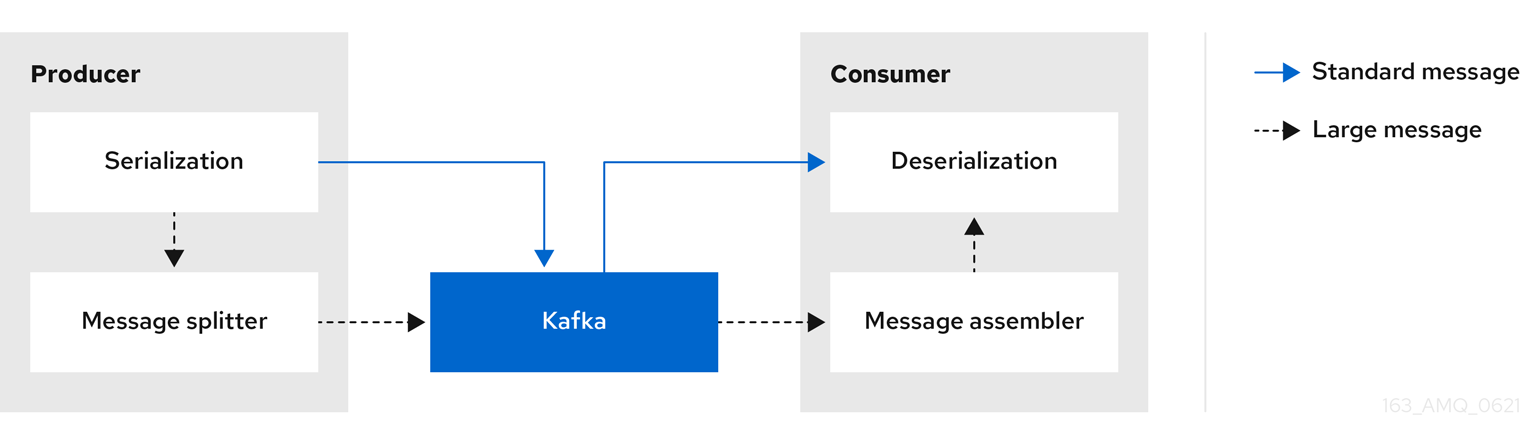
Inline messaging has a performance overhead on the consumer side because of the buffering required, particularly when handling a series of large messages in parallel. The chunks of large messages can become interleaved, so that it is not always possible to commit when all the chunks of a message have been consumed if the chunks of another large message in the buffer are incomplete. For this reason, the buffering is usually supported by persisting message chunks or by implementing commit logic.
Configuration to handle larger messages
If larger messages cannot be avoided, and to avoid blocks at any point of the message flow, you can increase message limits. To do this, configure message.max.bytes at the topic level to set the maximum record batch size for individual topics. If you set message.max.bytes at the broker level, larger messages are allowed for all topics.
The broker will reject any message that is greater than the limit set with message.max.bytes. The buffer size for the producers (max.request.size) and consumers (message.max.bytes) must be able to accommodate the larger messages.
6.1.1.10. Controlling the log flush of message data
Log flush properties control the periodic writes of cached message data to disk. The scheduler specifies the frequency of checks on the log cache in milliseconds:
...
...
# ...
log.flush.scheduler.interval.ms=2000
# ...You can control the frequency of the flush based on the maximum amount of time that a message is kept in-memory and the maximum number of messages in the log before writing to disk:
...
...
# ...
log.flush.interval.ms=50000
log.flush.interval.messages=100000
# ...The wait between flushes includes the time to make the check and the specified interval before the flush is carried out. Increasing the frequency of flushes can affect throughput.
Generally, the recommendation is to not set explicit flush thresholds and let the operating system perform background flush using its default settings. Partition replication provides greater data durability than writes to any single disk as a failed broker can recover from its in-sync replicas.
If you are using application flush management, setting lower flush thresholds might be appropriate if you are using faster disks.
6.1.1.11. Partition rebalancing for availability
Partitions can be replicated across brokers for fault tolerance. For a given partition, one broker is elected leader and handles all produce requests (writes to the log). Partition followers on other brokers replicate the partition data of the partition leader for data reliability in the event of the leader failing.
Followers do not normally serve clients, though broker.rack allows a consumer to consume messages from the closest replica when a Kafka cluster spans multiple datacenters. Followers operate only to replicate messages from the partition leader and allow recovery should the leader fail. Recovery requires an in-sync follower. Followers stay in sync by sending fetch requests to the leader, which returns messages to the follower in order. The follower is considered to be in sync if it has caught up with the most recently committed message on the leader. The leader checks this by looking at the last offset requested by the follower. An out-of-sync follower is usually not eligible as a leader should the current leader fail, unless unclean leader election is allowed.
You can adjust the lag time before a follower is considered out of sync:
...
...
# ...
replica.lag.time.max.ms=30000
# ...Lag time puts an upper limit on the time to replicate a message to all in-sync replicas and how long a producer has to wait for an acknowledgment. If a follower fails to make a fetch request and catch up with the latest message within the specified lag time, it is removed from in-sync replicas. You can reduce the lag time to detect failed replicas sooner, but by doing so you might increase the number of followers that fall out of sync needlessly. The right lag time value depends on both network latency and broker disk bandwidth.
When a leader partition is no longer available, one of the in-sync replicas is chosen as the new leader. The first broker in a partition’s list of replicas is known as the preferred leader. By default, Kafka is enabled for automatic partition leader rebalancing based on a periodic check of leader distribution. That is, Kafka checks to see if the preferred leader is the current leader. A rebalance ensures that leaders are evenly distributed across brokers and brokers are not overloaded.
You can use Cruise Control for AMQ Streams to figure out replica assignments to brokers that balance load evenly across the cluster. Its calculation takes into account the differing load experienced by leaders and followers. A failed leader affects the balance of a Kafka cluster because the remaining brokers get the extra work of leading additional partitions.
For the assignment found by Cruise Control to actually be balanced it is necessary that partitions are lead by the preferred leader. Kafka can automatically ensure that the preferred leader is being used (where possible), changing the current leader if necessary. This ensures that the cluster remains in the balanced state found by Cruise Control.
You can control the frequency, in seconds, of the rebalance check and the maximum percentage of imbalance allowed for a broker before a rebalance is triggered.
#... auto.leader.rebalance.enable=true leader.imbalance.check.interval.seconds=300 leader.imbalance.per.broker.percentage=10 #...
#...
auto.leader.rebalance.enable=true
leader.imbalance.check.interval.seconds=300
leader.imbalance.per.broker.percentage=10
#...The percentage leader imbalance for a broker is the ratio between the current number of partitions for which the broker is the current leader and the number of partitions for which it is the preferred leader. You can set the percentage to zero to ensure that preferred leaders are always elected, assuming they are in sync.
If the checks for rebalances need more control, you can disable automated rebalances. You can then choose when to trigger a rebalance using the kafka-leader-election.sh command line tool.
The Grafana dashboards provided with AMQ Streams show metrics for under-replicated partitions and partitions that do not have an active leader.
6.1.1.12. Unclean leader election
Leader election to an in-sync replica is considered clean because it guarantees no loss of data. And this is what happens by default. But what if there is no in-sync replica to take on leadership? Perhaps the ISR (in-sync replica) only contained the leader when the leader’s disk died. If a minimum number of in-sync replicas is not set, and there are no followers in sync with the partition leader when its hard drive fails irrevocably, data is already lost. Not only that, but a new leader cannot be elected because there are no in-sync followers.
You can configure how Kafka handles leader failure:
...
...
# ...
unclean.leader.election.enable=false
# ...Unclean leader election is disabled by default, which means that out-of-sync replicas cannot become leaders. With clean leader election, if no other broker was in the ISR when the old leader was lost, Kafka waits until that leader is back online before messages can be written or read. Unclean leader election means out-of-sync replicas can become leaders, but you risk losing messages. The choice you make depends on whether your requirements favor availability or durability.
You can override the default configuration for specific topics at the topic level. If you cannot afford the risk of data loss, then leave the default configuration.
6.1.1.13. Avoiding unnecessary consumer group rebalances
For consumers joining a new consumer group, you can add a delay so that unnecessary rebalances to the broker are avoided:
...
...
# ...
group.initial.rebalance.delay.ms=3000
# ...The delay is the amount of time that the coordinator waits for members to join. The longer the delay, the more likely it is that all the members will join in time and avoid a rebalance. But the delay also prevents the group from consuming until the period has ended.
6.1.2. Kafka producer configuration tuning
Use a basic producer configuration with optional properties that are tailored to specific use cases.
Adjusting your configuration to maximize throughput might increase latency or vice versa. You will need to experiment and tune your producer configuration to get the balance you need.
6.1.2.1. Basic producer configuration
Connection and serializer properties are required for every producer. Generally, it is good practice to add a client id for tracking, and use compression on the producer to reduce batch sizes in requests.
In a basic producer configuration:
- The order of messages in a partition is not guaranteed.
- The acknowledgment of messages reaching the broker does not guarantee durability.
Basic producer configuration properties
- 1
- (Required) Tells the producer to connect to a Kafka cluster using a host:port bootstrap server address for a Kafka broker. The producer uses the address to discover and connect to all brokers in the cluster. Use a comma-separated list to specify two or three addresses in case a server is down, but it’s not necessary to provide a list of all the brokers in the cluster.
- 2
- (Required) Serializer to transform the key of each message to bytes prior to them being sent to a broker.
- 3
- (Required) Serializer to transform the value of each message to bytes prior to them being sent to a broker.
- 4
- (Optional) The logical name for the client, which is used in logs and metrics to identify the source of a request.
- 5
- (Optional) The codec for compressing messages, which are sent and might be stored in compressed format and then decompressed when reaching a consumer. Compression is useful for improving throughput and reducing the load on storage, but might not be suitable for low latency applications where the cost of compression or decompression could be prohibitive.
6.1.2.2. Data durability
You can apply greater data durability, to minimize the likelihood that messages are lost, using message delivery acknowledgments.
...
...
# ...
acks=all
# ...- 1
- Specifying
acks=allforces a partition leader to replicate messages to a certain number of followers before acknowledging that the message request was successfully received. Because of the additional checks,acks=allincreases the latency between the producer sending a message and receiving acknowledgment.
The number of brokers which need to have appended the messages to their logs before the acknowledgment is sent to the producer is determined by the topic’s min.insync.replicas configuration. A typical starting point is to have a topic replication factor of 3, with two in-sync replicas on other brokers. In this configuration, the producer can continue unaffected if a single broker is unavailable. If a second broker becomes unavailable, the producer won’t receive acknowledgments and won’t be able to produce more messages.
Topic configuration to support acks=all
...
...
# ...
min.insync.replicas=2
# ...- 1
- Use
2in-sync replicas. The default is1.
If the system fails, there is a risk of unsent data in the buffer being lost.
6.1.2.3. Ordered delivery
Idempotent producers avoid duplicates as messages are delivered exactly once. IDs and sequence numbers are assigned to messages to ensure the order of delivery, even in the event of failure. If you are using acks=all for data consistency, enabling idempotency makes sense for ordered delivery.
Ordered delivery with idempotency
- 1
- Set to
trueto enable the idempotent producer. - 2
- With idempotent delivery the number of in-flight requests may be greater than 1 while still providing the message ordering guarantee. The default is 5 in-flight requests.
- 3
- Set
ackstoall. - 4
- Set the number of attempts to resend a failed message request.
If you are not using acks=all and idempotency because of the performance cost, set the number of in-flight (unacknowledged) requests to 1 to preserve ordering. Otherwise, a situation is possible where Message-A fails only to succeed after Message-B was already written to the broker.
Ordered delivery without idempotency
...
...
# ...
enable.idempotence=false
max.in.flight.requests.per.connection=1
retries=2147483647
# ...6.1.2.4. Reliability guarantees
Idempotence is useful for exactly once writes to a single partition. Transactions, when used with idempotence, allow exactly once writes across multiple partitions.
Transactions guarantee that messages using the same transactional ID are produced once, and either all are successfully written to the respective logs or none of them are.
The choice of transactional.id is important in order that the transactional guarantee is maintained. Each transactional id should be used for a unique set of topic partitions. For example, this can be achieved using an external mapping of topic partition names to transactional ids, or by computing the transactional id from the topic partition names using a function that avoids collisions.
6.1.2.5. Optimizing throughput and latency
Usually, the requirement of a system is to satisfy a particular throughput target for a proportion of messages within a given latency. For example, targeting 500,000 messages per second with 95% of messages being acknowledged within 2 seconds.
It’s likely that the messaging semantics (message ordering and durability) of your producer are defined by the requirements for your application. For instance, it’s possible that you don’t have the option of using acks=0 or acks=1 without breaking some important property or guarantee provided by your application.
Broker restarts have a significant impact on high percentile statistics. For example, over a long period the 99th percentile latency is dominated by behavior around broker restarts. This is worth considering when designing benchmarks or comparing performance numbers from benchmarking with performance numbers seen in production.
Depending on your objective, Kafka offers a number of configuration parameters and techniques for tuning producer performance for throughput and latency.
- Message batching (
linger.msandbatch.size) -
Message batching delays sending messages in the hope that more messages destined for the same broker will be sent, allowing them to be batched into a single produce request. Batching is a compromise between higher latency in return for higher throughput. Time-based batching is configured using
linger.ms, and size-based batching is configured usingbatch.size. - Compression (
compression.type) -
Message compression adds latency in the producer (CPU time spent compressing the messages), but makes requests (and potentially disk writes) smaller, which can increase throughput. Whether compression is worthwhile, and the best compression to use, will depend on the messages being sent. Compression happens on the thread which calls
KafkaProducer.send(), so if the latency of this method matters for your application you should consider using more threads. - Pipelining (
max.in.flight.requests.per.connection) - Pipelining means sending more requests before the response to a previous request has been received. In general more pipelining means better throughput, up to a threshold at which other effects, such as worse batching, start to counteract the effect on throughput.
Lowering latency
When your application calls KafkaProducer.send() the messages are:
- Processed by any interceptors
- Serialized
- Assigned to a partition
- Compressed
- Added to a batch of messages in a per-partition queue
At which point the send() method returns. So the time send() is blocked is determined by:
- The time spent in the interceptors, serializers and partitioner
- The compression algorithm used
- The time spent waiting for a buffer to use for compression
Batches will remain in the queue until one of the following occurs:
-
The batch is full (according to
batch.size) -
The delay introduced by
linger.mshas passed - The sender is about to send message batches for other partitions to the same broker, and it is possible to add this batch too
- The producer is being flushed or closed
Look at the configuration for batching and buffering to mitigate the impact of send() blocking on latency.
...
...
# ...
linger.ms=100
batch.size=16384
buffer.memory=33554432
# ...- 1
- The
lingerproperty adds a delay in milliseconds so that larger batches of messages are accumulated and sent in a request. The default is0'. - 2
- If a maximum
batch.sizein bytes is used, a request is sent when the maximum is reached, or messages have been queued for longer thanlinger.ms(whichever comes sooner). Adding the delay allows batches to accumulate messages up to the batch size. - 3
- The buffer size must be at least as big as the batch size, and be able to accommodate buffering, compression and in-flight requests.
Increasing throughput
Improve throughput of your message requests by adjusting the maximum time to wait before a message is delivered and completes a send request.
You can also direct messages to a specified partition by writing a custom partitioner to replace the default.
...
...
# ...
delivery.timeout.ms=120000
partitioner.class=my-custom-partitioner
# ...6.1.3. Kafka consumer configuration tuning
Use a basic consumer configuration with optional properties that are tailored to specific use cases.
When tuning your consumers your primary concern will be ensuring that they cope efficiently with the amount of data ingested. As with the producer tuning, be prepared to make incremental changes until the consumers operate as expected.
6.1.3.1. Basic consumer configuration
Connection and deserializer properties are required for every consumer. Generally, it is good practice to add a client id for tracking.
In a consumer configuration, irrespective of any subsequent configuration:
- The consumer fetches from a given offset and consumes the messages in order, unless the offset is changed to skip or re-read messages.
- The broker does not know if the consumer processed the responses, even when committing offsets to Kafka, because the offsets might be sent to a different broker in the cluster.
Basic consumer configuration properties
- 1
- (Required) Tells the consumer to connect to a Kafka cluster using a host:port bootstrap server address for a Kafka broker. The consumer uses the address to discover and connect to all brokers in the cluster. Use a comma-separated list to specify two or three addresses in case a server is down, but it is not necessary to provide a list of all the brokers in the cluster. If you are using a loadbalancer service to expose the Kafka cluster, you only need the address for the service because the availability is handled by the loadbalancer.
- 2
- (Required) Deserializer to transform the bytes fetched from the Kafka broker into message keys.
- 3
- (Required) Deserializer to transform the bytes fetched from the Kafka broker into message values.
- 4
- (Optional) The logical name for the client, which is used in logs and metrics to identify the source of a request. The id can also be used to throttle consumers based on processing time quotas.
- 5
- (Conditional) A group id is required for a consumer to be able to join a consumer group.
6.1.3.2. Scaling data consumption using consumer groups
Consumer groups share a typically large data stream generated by one or multiple producers from a given topic. Consumers are grouped using a group.id property, allowing messages to be spread across the members. One of the consumers in the group is elected leader and decides how the partitions are assigned to the consumers in the group. Each partition can only be assigned to a single consumer.
If you do not already have as many consumers as partitions, you can scale data consumption by adding more consumer instances with the same group.id. Adding more consumers to a group than there are partitions will not help throughput, but it does mean that there are consumers on standby should one stop functioning. If you can meet throughput goals with fewer consumers, you save on resources.
Consumers within the same consumer group send offset commits and heartbeats to the same broker. So the greater the number of consumers in the group, the higher the request load on the broker.
...
...
# ...
group.id=my-group-id
# ...- 1
- Add a consumer to a consumer group using a group id.
6.1.3.3. Message ordering guarantees
Kafka brokers receive fetch requests from consumers that ask the broker to send messages from a list of topics, partitions and offset positions.
A consumer observes messages in a single partition in the same order that they were committed to the broker, which means that Kafka only provides ordering guarantees for messages in a single partition. Conversely, if a consumer is consuming messages from multiple partitions, the order of messages in different partitions as observed by the consumer does not necessarily reflect the order in which they were sent.
If you want a strict ordering of messages from one topic, use one partition per consumer.
6.1.3.4. Optimizing throughput and latency
Control the number of messages returned when your client application calls KafkaConsumer.poll().
Use the fetch.max.wait.ms and fetch.min.bytes properties to increase the minimum amount of data fetched by the consumer from the Kafka broker. Time-based batching is configured using fetch.max.wait.ms, and size-based batching is configured using fetch.min.bytes.
If CPU utilization in the consumer or broker is high, it might be because there are too many requests from the consumer. You can adjust fetch.max.wait.ms and fetch.min.bytes properties higher so that there are fewer requests and messages are delivered in bigger batches. By adjusting higher, throughput is improved with some cost to latency. You can also adjust higher if the amount of data being produced is low.
For example, if you set fetch.max.wait.ms to 500ms and fetch.min.bytes to 16384 bytes, when Kafka receives a fetch request from the consumer it will respond when the first of either threshold is reached.
Conversely, you can adjust the fetch.max.wait.ms and fetch.min.bytes properties lower to improve end-to-end latency.
...
...
# ...
fetch.max.wait.ms=500
fetch.min.bytes=16384
# ...- 1
- The maximum time in milliseconds the broker will wait before completing fetch requests. The default is
500milliseconds. - 2
- If a minimum batch size in bytes is used, a request is sent when the minimum is reached, or messages have been queued for longer than
fetch.max.wait.ms(whichever comes sooner). Adding the delay allows batches to accumulate messages up to the batch size.
Lowering latency by increasing the fetch request size
Use the fetch.max.bytes and max.partition.fetch.bytes properties to increase the maximum amount of data fetched by the consumer from the Kafka broker.
The fetch.max.bytes property sets a maximum limit in bytes on the amount of data fetched from the broker at one time.
The max.partition.fetch.bytes sets a maximum limit in bytes on how much data is returned for each partition, which must always be larger than the number of bytes set in the broker or topic configuration for max.message.bytes.
The maximum amount of memory a client can consume is calculated approximately as:
NUMBER-OF-BROKERS * fetch.max.bytes and NUMBER-OF-PARTITIONS * max.partition.fetch.bytes
NUMBER-OF-BROKERS * fetch.max.bytes and NUMBER-OF-PARTITIONS * max.partition.fetch.bytesIf memory usage can accommodate it, you can increase the values of these two properties. By allowing more data in each request, latency is improved as there are fewer fetch requests.
...
...
# ...
fetch.max.bytes=52428800
max.partition.fetch.bytes=1048576
# ...6.1.3.5. Avoiding data loss or duplication when committing offsets
The Kafka auto-commit mechanism allows a consumer to commit the offsets of messages automatically. If enabled, the consumer will commit offsets received from polling the broker at 5000ms intervals.
The auto-commit mechanism is convenient, but it introduces a risk of data loss and duplication. If a consumer has fetched and transformed a number of messages, but the system crashes with processed messages in the consumer buffer when performing an auto-commit, that data is lost. If the system crashes after processing the messages, but before performing the auto-commit, the data is duplicated on another consumer instance after rebalancing.
Auto-committing can avoid data loss only when all messages are processed before the next poll to the broker, or the consumer closes.
To minimize the likelihood of data loss or duplication, you can set enable.auto.commit to false and develop your client application to have more control over committing offsets. Or you can use auto.commit.interval.ms to decrease the intervals between commits.
...
...
# ...
enable.auto.commit=false
# ...- 1
- Auto commit is set to false to provide more control over committing offsets.
By setting to enable.auto.commit to false, you can commit offsets after all processing has been performed and the message has been consumed. For example, you can set up your application to call the Kafka commitSync and commitAsync commit APIs.
The commitSync API commits the offsets in a message batch returned from polling. You call the API when you are finished processing all the messages in the batch. If you use the commitSync API, the application will not poll for new messages until the last offset in the batch is committed. If this negatively affects throughput, you can commit less frequently, or you can use the commitAsync API. The commitAsync API does not wait for the broker to respond to a commit request, but risks creating more duplicates when rebalancing. A common approach is to combine both commit APIs in an application, with the commitSync API used just before shutting the consumer down or rebalancing to make sure the final commit is successful.
6.1.3.5.1. Controlling transactional messages
Consider using transactional ids and enabling idempotence (enable.idempotence=true) on the producer side to guarantee exactly-once delivery. On the consumer side, you can then use the isolation.level property to control how transactional messages are read by the consumer.
The isolation.level property has two valid values:
-
read_committed -
read_uncommitted(default)
Use read_committed to ensure that only transactional messages that have been committed are read by the consumer. However, this will cause an increase in end-to-end latency, because the consumer will not be able to return a message until the brokers have written the transaction markers that record the result of the transaction (committed or aborted).
...
...
# ...
enable.auto.commit=false
isolation.level=read_committed
# ...- 1
- Set to
read_committedso that only committed messages are read by the consumer.
6.1.3.6. Recovering from failure to avoid data loss
Use the session.timeout.ms and heartbeat.interval.ms properties to configure the time taken to check and recover from consumer failure within a consumer group.
The session.timeout.ms property specifies the maximum amount of time in milliseconds a consumer within a consumer group can be out of contact with a broker before being considered inactive and a rebalancing is triggered between the active consumers in the group. When the group rebalances, the partitions are reassigned to the members of the group.
The heartbeat.interval.ms property specifies the interval in milliseconds between heartbeat checks to the consumer group coordinator to indicate that the consumer is active and connected. The heartbeat interval must be lower, usually by a third, than the session timeout interval.
If you set the session.timeout.ms property lower, failing consumers are detected earlier, and rebalancing can take place quicker. However, take care not to set the timeout so low that the broker fails to receive a heartbeat in time and triggers an unnecessary rebalance.
Decreasing the heartbeat interval reduces the chance of accidental rebalancing, but more frequent heartbeats increases the overhead on broker resources.
6.1.3.7. Managing offset policy
Use the auto.offset.reset property to control how a consumer behaves when no offsets have been committed, or a committed offset is no longer valid or deleted.
Suppose you deploy a consumer application for the first time, and it reads messages from an existing topic. Because this is the first time the group.id is used, the __consumer_offsets topic does not contain any offset information for this application. The new application can start processing all existing messages from the start of the log or only new messages. The default reset value is latest, which starts at the end of the partition, and consequently means some messages are missed. To avoid data loss, but increase the amount of processing, set auto.offset.reset to earliest to start at the beginning of the partition.
Also consider using the earliest option to avoid messages being lost when the offsets retention period (offsets.retention.minutes) configured for a broker has ended. If a consumer group or standalone consumer is inactive and commits no offsets during the retention period, previously committed offsets are deleted from __consumer_offsets.
...
...
# ...
heartbeat.interval.ms=3000
session.timeout.ms=10000
auto.offset.reset=earliest
# ...- 1
- Adjust the heartbeat interval lower according to anticipated rebalances.
- 2
- If no heartbeats are received by the Kafka broker before the timeout duration expires, the consumer is removed from the consumer group and a rebalance is initiated. If the broker configuration has a
group.min.session.timeout.msandgroup.max.session.timeout.ms, the session timeout value must be within that range. - 3
- Set to
earliestto return to the start of a partition and avoid data loss if offsets were not committed.
If the amount of data returned in a single fetch request is large, a timeout might occur before the consumer has processed it. In this case, you can lower max.partition.fetch.bytes or increase session.timeout.ms.
6.1.3.8. Minimizing the impact of rebalances
The rebalancing of a partition between active consumers in a group is the time it takes for:
- Consumers to commit their offsets
- The new consumer group to be formed
- The group leader to assign partitions to group members
- The consumers in the group to receive their assignments and start fetching
Clearly, the process increases the downtime of a service, particularly when it happens repeatedly during a rolling restart of a consumer group cluster.
In this situation, you can use the concept of static membership to reduce the number of rebalances. Rebalancing assigns topic partitions evenly among consumer group members. Static membership uses persistence so that a consumer instance is recognized during a restart after a session timeout.
The consumer group coordinator can identify a new consumer instance using a unique id that is specified using the group.instance.id property. During a restart, the consumer is assigned a new member id, but as a static member it continues with the same instance id, and the same assignment of topic partitions is made.
If the consumer application does not make a call to poll at least every max.poll.interval.ms milliseconds, the consumer is considered to be failed, causing a rebalance. If the application cannot process all the records returned from poll in time, you can avoid a rebalance by using the max.poll.interval.ms property to specify the interval in milliseconds between polls for new messages from a consumer. Or you can use the max.poll.records property to set a maximum limit on the number of records returned from the consumer buffer, allowing your application to process fewer records within the max.poll.interval.ms limit.
...
...
# ...
group.instance.id=_UNIQUE-ID_
max.poll.interval.ms=300000
max.poll.records=500
# ...6.2. Setting limits on brokers using the Kafka Static Quota plugin
The Kafka Static Quota plugin is a Technology Preview only. Technology Preview features are not supported with Red Hat production service-level agreements (SLAs) and might not be functionally complete. Red Hat does not recommend implementing any Technology Preview features in production environments. This Technology Preview feature provides early access to upcoming product innovations, enabling you to test functionality and provide feedback during the development process. For more information about the support scope of Red Hat Technology Preview features, see Technology Preview Features Support Scope.
Use the Kafka Static Quota plugin to set throughput and storage limits on brokers in your Kafka cluster. You enable the plugin and set limits by adding properties to the Kafka configuration file. You can set a byte-rate threshold and storage quotas to put limits on the clients interacting with your brokers.
You can set byte-rate thresholds for producer and consumer bandwidth. The total limit is distributed across all clients accessing the broker. For example, you can set a byte-rate threshold of 40 MBps for producers. If two producers are running, they are each limited to a throughput of 20 MBps.
Storage quotas throttle Kafka disk storage limits between a soft limit and hard limit. The limits apply to all available disk space. Producers are slowed gradually between the soft and hard limit. The limits prevent disks filling up too quickly and exceeding their capacity. Full disks can lead to issues that are hard to rectify. The hard limit is the maximum storage limit.
For JBOD storage, the limit applies across all disks. If a broker is using two 1 TB disks and the quota is 1.1 TB, one disk might fill and the other disk will be almost empty.
Prerequisites
- AMQ Streams is installed on all hosts which will be used as Kafka brokers.
- A ZooKeeper cluster is configured and running.
Procedure
Edit the
/opt/kafka/config/server.propertiesKafka configuration file.The plugin properties are shown in this example configuration.
Example Kafka Static Quota plugin configuration
Copy to Clipboard Copied! Toggle word wrap Toggle overflow - 1
- Loads the Kafka Static Quota plugin.
- 2
- Sets the producer byte-rate threshold. 1 MBps in this example.
- 3
- Sets the consumer byte-rate threshold. 1 MBps in this example.
- 4
- Sets the lower soft limit for storage. 400 GB in this example.
- 5
- Sets the higher hard limit for storage. 500 GB in this example.
- 6
- Sets the interval in seconds between checks on storage. 5 seconds in this example. You can set this to 0 to disable the check.
Start the Kafka broker with the default configuration file.
su - kafka
/opt/kafka/bin/kafka-server-start.sh -daemon /opt/kafka/config/server.properties
su - kafka
/opt/kafka/bin/kafka-server-start.sh -daemon /opt/kafka/config/server.properties
Copy to Clipboard Copied! Toggle word wrap Toggle overflow Verify that the Kafka broker is running.
jcmd | grep Kafka
jcmd | grep KafkaCopy to Clipboard Copied! Toggle word wrap Toggle overflow
6.3. Scaling Clusters
6.3.1. Scaling Kafka clusters
6.3.1.1. Adding brokers to a cluster
The primary way of increasing throughput for a topic is to increase the number of partitions for that topic. That works because the partitions allow the load for that topic to be shared between the brokers in the cluster. When the brokers are all constrained by some resource (typically I/O), then using more partitions will not yield an increase in throughput. Instead, you must add brokers to the cluster.
When you add an extra broker to the cluster, AMQ Streams does not assign any partitions to it automatically. You have to decide which partitions to move from the existing brokers to the new broker.
Once the partitions have been redistributed between all brokers, each broker should have a lower resource utilization.
6.3.1.2. Removing brokers from the cluster
Before you remove a broker from a cluster, you must ensure that it is not assigned to any partitions. You should decide which remaining brokers will be responsible for each of the partitions on the broker being decommissioned. Once the broker has no assigned partitions, you can stop it.
6.3.2. Reassignment of partitions
The kafka-reassign-partitions.sh utility is used to reassign partitions to different brokers.
It has three different modes:
--generate- Takes a set of topics and brokers and generates a reassignment JSON file which will result in the partitions of those topics being assigned to those brokers. It is an easy way to generate a reassignment JSON file, but it operates on whole topics, so its use is not always appropriate.
--execute- Takes a reassignment JSON file and applies it to the partitions and brokers in the cluster. Brokers which are gaining partitions will become followers of the partition leader. For a given partition, once the new broker has caught up and joined the ISR the old broker will stop being a follower and will delete its replica.
--verify-
Using the same reassignment JSON file as the
--executestep,--verifychecks whether all of the partitions in the file have been moved to their intended brokers. If the reassignment is complete it will also remove any throttles which are in effect. Unless removed, throttles will continue to affect the cluster even after the reassignment has finished.
It is only possible to have one reassignment running in the cluster at any given time, and it is not possible to cancel a running reassignment. If you need to cancel a reassignment you have to wait for it to complete and then perform another reassignment to revert the effects of the first one. The kafka-reassign-partitions.sh will print the reassignment JSON for this reversion as part of its output. Very large reassignments should be broken down into a number of smaller reassignments in case there is a need to stop in-progress reassignment.
6.3.2.1. Reassignment JSON file
The reassignment JSON file has a specific structure:
Where <PartitionObjects> is a comma-separated list of objects like:
The "log_dirs" property is optional and is used to move the partition to a specific log directory.
The following is an example reassignment JSON file that assigns topic topic-a, partition 4 to brokers 2, 4 and 7, and topic topic-b partition 2 to brokers 1, 5 and 7:
Partitions not included in the JSON are not changed.
6.3.2.2. Generating reassignment JSON files
The easiest way to assign all the partitions for a given set of topics to a given set of brokers is to generate a reassignment JSON file using the kafka-reassign-partitions.sh --generate, command.
bin/kafka-reassign-partitions.sh --zookeeper <ZooKeeper> --topics-to-move-json-file <TopicsFile> --broker-list <BrokerList> --generate
bin/kafka-reassign-partitions.sh --zookeeper <ZooKeeper> --topics-to-move-json-file <TopicsFile> --broker-list <BrokerList> --generate
The <TopicsFile> is a JSON file which lists the topics to move. It has the following structure:
where <TopicObjects> is a comma-separated list of objects like:
{
  "topic": <TopicName>
}
{
  "topic": <TopicName>
}
For example to move all the partitions of topic-a and topic-b to brokers 4 and 7
bin/kafka-reassign-partitions.sh --zookeeper localhost:2181 --topics-to-move-json-file topics-to-be-moved.json --broker-list 4,7 --generate
bin/kafka-reassign-partitions.sh --zookeeper localhost:2181 --topics-to-move-json-file topics-to-be-moved.json --broker-list 4,7 --generate
where topics-to-be-moved.json has contents:
6.3.2.3. Creating reassignment JSON files manually
You can manually create the reassignment JSON file if you want to move specific partitions.
6.3.3. Reassignment throttles
Reassigning partitions can be a slow process because it can require moving lots of data between brokers. To avoid this having a detrimental impact on clients it is possible to throttle the reassignment. Using a throttle can mean the reassignment takes longer. If the throttle is too low then the newly assigned brokers will not be able to keep up with records being published and the reassignment will never complete. If the throttle is too high then clients will be impacted. For example, for producers, this could manifest as higher than normal latency waiting for acknowledgement. For consumers, this could manifest as a drop in throughput caused by higher latency between polls.
6.3.4. Scaling up a Kafka cluster
This procedure describes how to increase the number of brokers in a Kafka cluster.
Prerequisites
- An existing Kafka cluster.
- A new machine with the AMQ broker installed.
- A reassignment JSON file of how partitions should be reassigned to brokers in the enlarged cluster.
Procedure
-
Create a configuration file for the new broker using the same settings as for the other brokers in your cluster, except for
broker.idwhich should be a number that is not already used by any of the other brokers. Start the new Kafka broker passing the configuration file you created in the previous step as the argument to the
kafka-server-start.shscript:su - kafka /opt/kafka/bin/kafka-server-start.sh -daemon /opt/kafka/config/server.properties
su - kafka /opt/kafka/bin/kafka-server-start.sh -daemon /opt/kafka/config/server.propertiesCopy to Clipboard Copied! Toggle word wrap Toggle overflow Verify that the Kafka broker is running.
jcmd | grep Kafka
jcmd | grep KafkaCopy to Clipboard Copied! Toggle word wrap Toggle overflow - Repeat the above steps for each new broker.
Execute the partition reassignment using the
kafka-reassign-partitions.shcommand line tool.kafka-reassign-partitions.sh --zookeeper <ZooKeeperHostAndPort> --reassignment-json-file <ReassignmentJsonFile> --execute
kafka-reassign-partitions.sh --zookeeper <ZooKeeperHostAndPort> --reassignment-json-file <ReassignmentJsonFile> --executeCopy to Clipboard Copied! Toggle word wrap Toggle overflow If you are going to throttle replication you can also pass the
--throttleoption with an inter-broker throttled rate in bytes per second. For example:kafka-reassign-partitions.sh --zookeeper zookeeper1:2181 --reassignment-json-file reassignment.json --throttle 5000000 --execute
kafka-reassign-partitions.sh --zookeeper zookeeper1:2181 --reassignment-json-file reassignment.json --throttle 5000000 --executeCopy to Clipboard Copied! Toggle word wrap Toggle overflow This command will print out two reassignment JSON objects. The first records the current assignment for the partitions being moved. You should save this to a file in case you need to revert the reassignment later on. The second JSON object is the target reassignment you have passed in your reassignment JSON file.
If you need to change the throttle during reassignment you can use the same command line with a different throttled rate. For example:
kafka-reassign-partitions.sh --zookeeper zookeeper1:2181 --reassignment-json-file reassignment.json --throttle 10000000 --execute
kafka-reassign-partitions.sh --zookeeper zookeeper1:2181 --reassignment-json-file reassignment.json --throttle 10000000 --executeCopy to Clipboard Copied! Toggle word wrap Toggle overflow Periodically verify whether the reassignment has completed using the
kafka-reassign-partitions.shcommand line tool. This is the same command as the previous step but with the--verifyoption instead of the--executeoption.kafka-reassign-partitions.sh --zookeeper <ZooKeeperHostAndPort> --reassignment-json-file <ReassignmentJsonFile> --verify
kafka-reassign-partitions.sh --zookeeper <ZooKeeperHostAndPort> --reassignment-json-file <ReassignmentJsonFile> --verifyCopy to Clipboard Copied! Toggle word wrap Toggle overflow For example:
kafka-reassign-partitions.sh --zookeeper zookeeper1:2181 --reassignment-json-file reassignment.json --verify
kafka-reassign-partitions.sh --zookeeper zookeeper1:2181 --reassignment-json-file reassignment.json --verifyCopy to Clipboard Copied! Toggle word wrap Toggle overflow -
The reassignment has finished when the
--verifycommand reports each of the partitions being moved as completed successfully. This final--verifywill also have the effect of removing any reassignment throttles. You can now delete the revert file if you saved the JSON for reverting the assignment to their original brokers.
6.3.5. Scaling down a Kafka cluster
Additional resources
This procedure describes how to decrease the number of brokers in a Kafka cluster.
Prerequisites
- An existing Kafka cluster.
- A reassignment JSON file of how partitions should be reassigned to brokers in the cluster once the broker(s) have been removed.
Procedure
Execute the partition reassignment using the
kafka-reassign-partitions.shcommand line tool.kafka-reassign-partitions.sh --zookeeper <ZooKeeperHostAndPort> --reassignment-json-file <ReassignmentJsonFile> --execute
kafka-reassign-partitions.sh --zookeeper <ZooKeeperHostAndPort> --reassignment-json-file <ReassignmentJsonFile> --executeCopy to Clipboard Copied! Toggle word wrap Toggle overflow If you are going to throttle replication you can also pass the
--throttleoption with an inter-broker throttled rate in bytes per second. For example:kafka-reassign-partitions.sh --zookeeper zookeeper1:2181 --reassignment-json-file reassignment.json --throttle 5000000 --execute
kafka-reassign-partitions.sh --zookeeper zookeeper1:2181 --reassignment-json-file reassignment.json --throttle 5000000 --executeCopy to Clipboard Copied! Toggle word wrap Toggle overflow This command will print out two reassignment JSON objects. The first records the current assignment for the partitions being moved. You should save this to a file in case you need to revert the reassignment later on. The second JSON object is the target reassignment you have passed in your reassignment JSON file.
If you need to change the throttle during reassignment you can use the same command line with a different throttled rate. For example:
kafka-reassign-partitions.sh --zookeeper zookeeper1:2181 --reassignment-json-file reassignment.json --throttle 10000000 --execute
kafka-reassign-partitions.sh --zookeeper zookeeper1:2181 --reassignment-json-file reassignment.json --throttle 10000000 --executeCopy to Clipboard Copied! Toggle word wrap Toggle overflow Periodically verify whether the reassignment has completed using the
kafka-reassign-partitions.shcommand line tool. This is the same command as the previous step but with the--verifyoption instead of the--executeoption.kafka-reassign-partitions.sh --zookeeper <ZooKeeperHostAndPort> --reassignment-json-file <ReassignmentJsonFile> --verify
kafka-reassign-partitions.sh --zookeeper <ZooKeeperHostAndPort> --reassignment-json-file <ReassignmentJsonFile> --verifyCopy to Clipboard Copied! Toggle word wrap Toggle overflow For example:
kafka-reassign-partitions.sh --zookeeper zookeeper1:2181 --reassignment-json-file reassignment.json --verify
kafka-reassign-partitions.sh --zookeeper zookeeper1:2181 --reassignment-json-file reassignment.json --verifyCopy to Clipboard Copied! Toggle word wrap Toggle overflow -
The reassignment has finished when the
--verifycommand reports each of the partitions being moved as completed successfully. This final--verifywill also have the effect of removing any reassignment throttles. You can now delete the revert file if you saved the JSON for reverting the assignment to their original brokers. Once all the partition reassignments have finished, the broker being removed should not have responsibility for any of the partitions in the cluster. You can verify this by checking each of the directories given in the broker’s
log.dirsconfiguration parameters. If any of the log directories on the broker contains a directory that does not match the extended regular expression\.[a-z0-9]-delete$then the broker still has live partitions and it should not be stopped.You can check this by executing the command:
ls -l <LogDir> | grep -E '^d' | grep -vE '[a-zA-Z0-9.-]+\.[a-z0-9]+-delete$'
ls -l <LogDir> | grep -E '^d' | grep -vE '[a-zA-Z0-9.-]+\.[a-z0-9]+-delete$'Copy to Clipboard Copied! Toggle word wrap Toggle overflow If the above command prints any output then the broker still has live partitions. In this case, either the reassignment has not finished, or the reassignment JSON file was incorrect.
Once you have confirmed that the broker has no live partitions you can stop it.
su - kafka
/opt/kafka/bin/kafka-server-stop.sh
su - kafka
/opt/kafka/bin/kafka-server-stop.sh
Copy to Clipboard Copied! Toggle word wrap Toggle overflow Confirm that the Kafka broker is stopped.
jcmd | grep kafka
jcmd | grep kafkaCopy to Clipboard Copied! Toggle word wrap Toggle overflow
6.3.6. Scaling up a ZooKeeper cluster
This procedure describes how to add servers (nodes) to a ZooKeeper cluster. The dynamic reconfiguration feature of ZooKeeper maintains a stable ZooKeeper cluster during the scale up process.
Prerequisites
-
Dynamic reconfiguration is enabled in the ZooKeeper configuration file (
reconfigEnabled=true). - ZooKeeper authentication is enabled and you can access the new server using the authentication mechanism.
Procedure
Perform the following steps for each ZooKeeper server, one at a time:
- Add a server to the ZooKeeper cluster as described in Section 3.3, “Running multi-node ZooKeeper cluster” and then start ZooKeeper.
- Note the IP address and configured access ports of the new server.
Start a
zookeeper-shellsession for the server. Run the following command from a machine that has access to the cluster (this might be one of the ZooKeeper nodes or your local machine, if it has access).su - kafka /opt/kafka/bin/zookeeper-shell.sh <ip-address>:<zk-port>
su - kafka /opt/kafka/bin/zookeeper-shell.sh <ip-address>:<zk-port>Copy to Clipboard Copied! Toggle word wrap Toggle overflow In the shell session, with the ZooKeeper node running, enter the following line to add the new server to the quorum as a voting member:
reconfig -add server.<positive-id> = <address1>:<port1>:<port2>[:role];[<client-port-address>:]<client-port>
reconfig -add server.<positive-id> = <address1>:<port1>:<port2>[:role];[<client-port-address>:]<client-port>Copy to Clipboard Copied! Toggle word wrap Toggle overflow For example:
reconfig -add server.4=172.17.0.4:2888:3888:participant;172.17.0.4:2181
reconfig -add server.4=172.17.0.4:2888:3888:participant;172.17.0.4:2181Copy to Clipboard Copied! Toggle word wrap Toggle overflow Where
<positive-id>is the new server ID4.For the two ports,
<port1>2888 is for communication between ZooKeeper servers, and<port2>3888 is for leader election.The new configuration propagates to the other servers in the ZooKeeper cluster; the new server is now a full member of the quorum.
- Repeat steps 1-4 for the other servers that you want to add.
Additional resources
6.3.7. Scaling down a ZooKeeper cluster
This procedure describes how to remove servers (nodes) from a ZooKeeper cluster. The dynamic reconfiguration feature of ZooKeeper maintains a stable ZooKeeper cluster during the scale down process.
Prerequisites
-
Dynamic reconfiguration is enabled in the ZooKeeper configuration file (
reconfigEnabled=true). - ZooKeeper authentication is enabled and you can access the new server using the authentication mechanism.
Procedure
Perform the following steps for each ZooKeeper server, one at a time:
Log in to the
zookeeper-shellon one of the servers that will be retained after the scale down (for example, server 1).NoteAccess the server using the authentication mechanism configured for the ZooKeeper cluster.
Remove a server, for example server 5.
reconfig -remove 5
reconfig -remove 5Copy to Clipboard Copied! Toggle word wrap Toggle overflow - Deactivate the server that you removed.
- Repeat steps 1-3 to reduce the cluster size.
Additional resources
- Section 6.3.6, “Scaling up a ZooKeeper cluster”
- Removing servers in the ZooKeeper documentation