Ce contenu n'est pas disponible dans la langue sélectionnée.
8.6. Add Authorization Entries
Overview
Copier lienLien copié sur presse-papiers!
Before enabling LDAP authorization in the broker, you need to create a suitable tree of entries in the directory server to represent permissions. You need to create the following kinds of entry:
- Queue entries
- Each queue entry has a Common Name (
cn), which can be the name of a specific queue or a wildcard pattern that matches multiple queues. Under each queue entry, you must create sub-entries for the admin, read, and write permissions. - Topic entries
- Each topic entry has a Common Name (
cn), which can be the name of a specific topic or a wildcard pattern that matches multiple topics. Under each topic entry, you must create sub-entries for the admin, read, and write permissions. - Advisory topics entry
- In particular, you must define one topic entry with the Common Name,
ActiveMQ.Advisory.$, which is a wildcard pattern that matches all advisory topics. - Temporary queues entry
- A single
Tempentry contains the admin, read, and write permissions that apply to all temporary queues.
Using wildcards in queue and topic entries
Copier lienLien copié sur presse-papiers!
When setting the common name of queue and topic entries in the directory server, you can use any of the wildcards shown in Table 8.1, “Destination Name Wildcards in LDAP” to match one or more segments of a destination name.
| Wildcard | Description |
|---|---|
. | Separates segments in a path name. |
* | Matches any single segment in a path name. |
$ | Matches any number of segments in a path name. |
For example, the pattern,
FOO.*, will match FOO.BAR, but not FOO.BAR.LONG; whereas the pattern, FOO.$, will match FOO.BAR and FOO.BAR.LONG.
Note
In the context of LDAP entries, the
$ character is used instead of the usual > character to match multiple destination name segments.
Steps to add authorization entries
Copier lienLien copié sur presse-papiers!
Perform the following steps to add authorization entries to the directory server:
- The next few steps describe how to create the
ou=ActiveMQnode.- Right-click on the
ou=systemnode and select. The New Entry wizard appears. - In the Entry Creation Method pane, select the Create entry from scratch radiobutton. Click Next.
- In the Object Classes pane, select
organisationalUnitfrom the list of Available object classes on the left and then click Add to populate the list of Selected object classes. Click Next. - In the Distinguished Name pane, complete the RDN field, putting
ouin front andActiveMQafter the equals sign. Click Next and then click Finish.
- The next few steps describe how to create the
ou=Destination,ou=Queue,ou=Topic, andou=Tempnodes.- Right-click on the
ou=ActiveMQnode and select. The New Entry wizard appears. - In the Entry Creation Method pane, select the Create entry from scratch radiobutton. Click Next.
- In the Object Classes pane, select
organisationalUnitfrom the list of Available object classes on the left and then click Add to populate the list of Selected object classes. Click Next. - In the Distinguished Name pane, complete the RDN field, putting
ouin front andDestinationafter the equals sign. Click Next and then click Finish. - In a similar manner to the preceding steps, by right-clicking on the
ou=Destinationnode and invoking the New Entry wizard, create the followingorganisationalUnitnodes as children of theou=Destinationnode:ou=Queue,ou=Destination,ou=ActiveMQ,ou=system ou=Topic,ou=Destination,ou=ActiveMQ,ou=system ou=Temp,ou=Destination,ou=ActiveMQ,ou=system
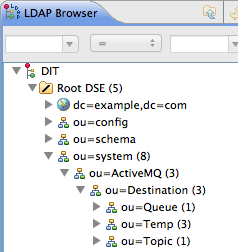
- In the LDAP Browser window, you should now see the following tree:
Figure 8.3. DIT after Creating Destination, Queue, Topic and Temp Nodes
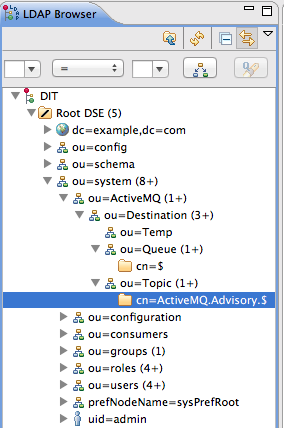
- The next few steps describe how to create the following nodes:
cn=$,ou=Queue,ou=Destination,ou=ActiveMQ,ou=system
cn=ActiveMQ.Advisory.$,ou=Topic,ou=Destination,ou=ActiveMQ,ou=system
These nodes represent name patterns that match queue names and topic names, respectively. Thecn=$queue node defines an entry that matches all queue names, so it can be used to define access rights for all queues. Thecn=ActiveMQ.Advisory.$node defines a topic entry that matches all advisory topics.- Right-click on the
ou=Queuenode and select. The New Entry wizard appears. - In the Entry Creation Method pane, select the Create entry from scratch radiobutton. Click Next.
- In the Object Classes pane, select
applicationProcessfrom the list of Available object classes on the left and then click Add to populate the list of Selected object classes. Click Next. - In the Distinguished Name pane, complete the RDN field, putting
cnin front and$after the equals sign (where$represents the wildcard that matches any queue name). Click Next and then click Finish. - In a similar manner to the preceding steps, by right-clicking on the
ou=Topicnode and invoking the New Entry wizard, create the followingapplicationProcessnode as a child of theou=Topicnode:cn=ActiveMQ.Advisory.$,ou=Topic,ou=Destination,ou=ActiveMQ,ou=system
- In the LDAP Browser window, you should now see the following tree:
Figure 8.4. DIT after Creating Children of Queue and Topic Nodes
- The next few steps describe how to create nodes that represent
admin,read, andwritepermissions for the queues and topics.- Right-click on the
cn=$node and select. The New Entry wizard appears. - In the Entry Creation Method pane, select the Create entry from scratch radiobutton. Click Next.
- In the Object Classes pane, select
groupOfNamesfrom the list of Available object classes on the left and then click Add to populate the list of Selected object classes. Click Next. - In the Distinguished Name pane, complete the RDN field, putting
cnin front andadminafter the equals sign. Click Next. - You are now prompted to provide a value for the mandatory
memberattribute, through the DN Editor dialog. In the text field, entercn=admin,ou=roles,ou=system. Click Ok.NoteThecn=admin,ou=roles,ou=systemreferences a role that was created for the Apache Karaf JAAS authentication plug-in in a previous tutorial. These roles can be reused by the Apache ActiveMQ authorization plug-in, under certain conditions. See the section called “Compatibility with Apache Karaf principals” for details. - Click Finish, to close the New Entry wizard.
- In a similar manner to the preceding steps, by right-clicking on the
cn=$node and invoking the New Entry wizard, create the following additionalgroupOfNamesnodes as children of thecn=$node:cn=read,cn=$,ou=Queue,ou=Destination,ou=ActiveMQ,ou=system cn=write,cn=$,ou=Queue,ou=Destination,ou=ActiveMQ,ou=system
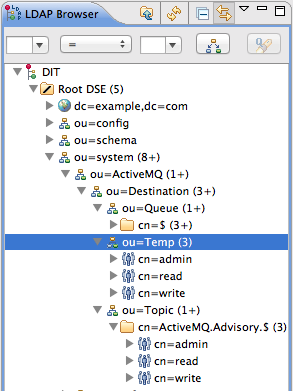
- Copy the
cn=admin,cn=read, andcn=writepermission nodes and paste them as children of thecn=ActiveMQ.Advisory.$node, as follows.Using a combination of mouse and keyboard, select the three nodes,cn=admin,cn=read, andcn=write, and typeCtrl-Cto copy them. Select thecn=ActiveMQ.Advisory.$node and typeCtrl-Vto paste the copied nodes as children. - Similarly, copy the
cn=admin,cn=read, andcn=writepermission nodes and paste them as children of theou=Tempnode. - In the LDAP Browser window, you should now see the following tree:
Figure 8.5. DIT after Creating Children of Queue, Topic and Temp Nodes