Ce contenu n'est pas disponible dans la langue sélectionnée.
Chapter 2. Installing Cryostat
You can install the Red Hat build of Cryostat Operator in a project on Red Hat OpenShift by using Operator Lifecycle Manager (OLM).
With the Red Hat build of Cryostat Operator installed, you can create instances of Cryostat that you can access by using a web console from the Red Hat OpenShift web console.
You can also download the latest Cryostat component images from the Red Hat Ecosystem Catalog.
2.1. Installing Cryostat on Red Hat OpenShift by using a Red Hat build of Cryostat Operator
You can use the Operator Lifecycle Manager (OLM) to install the Red Hat build of Cryostat Operator in a project on your Red Hat OpenShift cluster. You can use the Red Hat build of Cryostat Operator to create single namespace or multi-namespace Cryostat instances. You can control these instances by using a GUI that is accessible from the Red Hat OpenShift web console.
If you need to upgrade your Red Hat build of Cryostat Operator subscription from Cryostat 2.0 to Cryostat 3.0, you must change the update channel from stable-2.0 to stable.
Prerequisites
- Created an OpenShift Container Platform 4.12 or later cluster.
- Created a Red Hat OpenShift user account with permissions to install Red Hat build of Cryostat Operator in a project.
- Installed Operator Lifecycle Manager (OLM) on your cluster.
Installed cert-manager with the cert-manager Operator for Red Hat OpenShift.
- If you are using OpenShift Container Platform 4.12 or later, you can install the cert-manager Operator for Red Hat OpenShift. For more information, see cert-manager Operator for Red Hat OpenShift (OpenShift Container Platform).
- Logged in to Red Hat OpenShift by using the Red Hat OpenShift web console.
Procedure
- In your browser, navigate to Home > Projects by using the web console.
- Select the name of the project in which you want to install the Red Hat build of Cryostat Operator.
Install the Red Hat build of Cryostat Operator:
- In the navigation menu of your web console, navigate to Operators > OperatorHub.
- Select the Red Hat build of Cryostat Operator from the list. You can use the search box in the upper part of the screen to find the Red Hat build of Cryostat Operator.
To install the Red Hat build of Cryostat Operator in your project, click Install.
The Red Hat OpenShift web console prompts you to create a Cryostat custom resource (CR).
NoteFrom Cryostat 3.0 onward, in the Installation mode area, the All namespaces on the cluster (default) radio button is the only available option.
You can create the CR either manually or automatically. If you want to create the CR manually, see step 4. If you want to create the CR automatically, see step 5.
If you want to create the CR manually, complete the following steps:
Navigate to Operators > Installed Operators by using the web console and select Red Hat build of Cryostat Operator from the list of installed operators:
Figure 2.1. Viewing the Red Hat build of Cryostat operator in the list of installed operators
- Click the Details tab.
To create a Cryostat instance, go to the Provided APIs section. Then, under Cryostat, click Create instance.
NoteFrom Cryostat 3.0 onward, the Cryostat API enables you to create both single-namespace and multi-namespace Cryostat instances.
Figure 2.2. Selecting the Cryostat API that is provided by the Red Hat build of Cryostat Operator
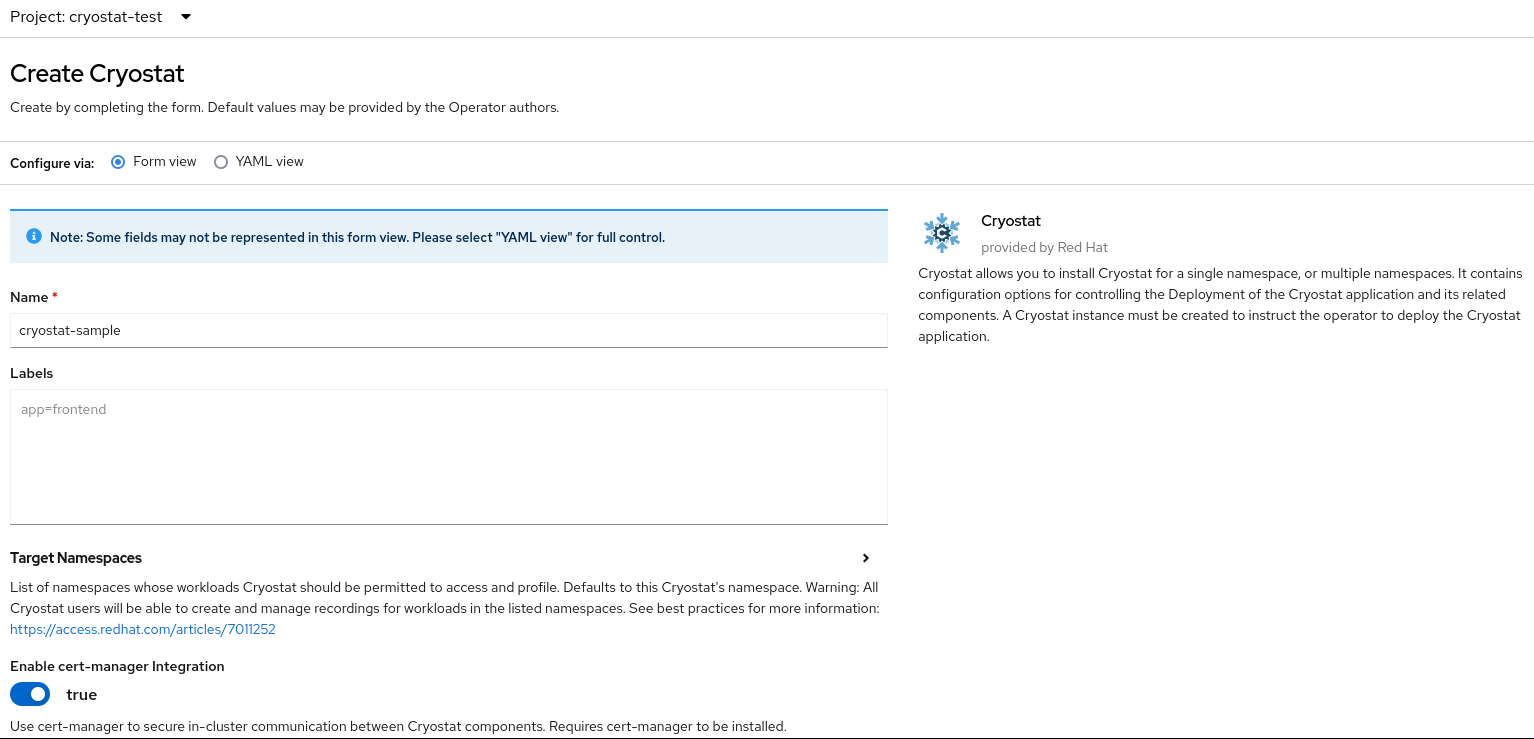
- Click either the Form view radio button or the YAML view radio button. If you want to enter your information in the YAML configuration file, click YAML view .
- Specify a unique name for the instance of Cryostat that you want to create.
- Optional: In the Labels field, specify a label or annotation for the Operand workload you want to deploy.
In the Target Namespaces field, select namespaces whose workloads you want to permit this instance of Cryostat to access and work with. Optionally, you can select the same namespace where you installed Cryostat or you can choose a different namespace. To add additional namespaces, click +Add Target Namespace.
ImportantUsers who can access the Cryostat instance have access to all target applications in any namespace that is visible to that Cryostat instance. Therefore, when you deploy a multi-namespace Cryostat instance, you must consider which namespaces to select for monitoring, which namespace to install Cryostat into, and which users you want to grant access to.
You can also specify additional configuration options for your deployment:
Figure 2.3. Creating an instance of Cryostat by using a form in the web console
Alternatively, you can use a YAML template to create your instance and specify additional configuration options instead of using the form:
Figure 2.4. Creating an instance of Cryostat by using a YAML template in the web console
If you want to create the CR by using the automatic prompt option, follow the prompt’s instructions and then complete the following steps:
- Click either the Form view radio button or the YAML view radio button. If you want to enter your information in the YAML configuration file, click YAML view.
- Specify a unique name for the instance of Cryostat that you want to create.
- Optional: In the Labels field, specify a label or annotation for the Operand workload you want to deploy.
In the Target Namespaces field, select namespaces whose workloads you want to permit this instance of Cryostat to access and work with. Optionally, you can select the same namespace where you installed Cryostat or you can choose a different namespace. To add additional namespaces, click +Add Target Namespace.
ImportantUsers who can access the Cryostat instance have access to all target applications in any namespace that is visible to that Cryostat instance. Therefore, when you deploy a multi-namespace Cryostat instance, you must consider which namespaces to select for monitoring, which namespace to install Cryostat into, and which users you want to grant access to.
You can also specify additional configuration options for your deployment:
Figure 2.5. Creating an instance of Cryostat by using a form in the web console
Alternatively, you can use a YAML template to create your instance and specify additional configuration options instead of using the form:
Figure 2.6. Creating an instance of Cryostat by using a YAML template in the web console
To start the creation process for your Cryostat instance, click Create.
You must wait for all resources of your Cryostat instance to be ready before you can access it.


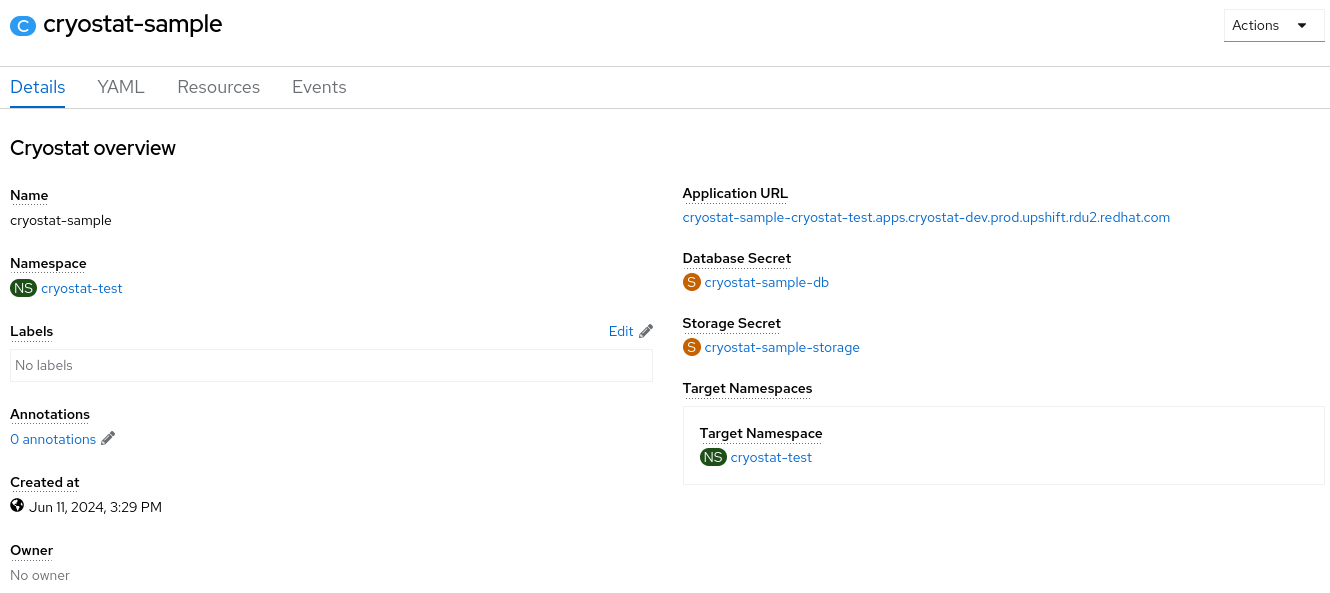
Verification
- In the navigation menu of the web console, click Operators, then click Installed Operators.
- From the table of installed operators, select Red Hat build of Cryostat Operator.
Select the Cryostat tab.
Your Cryostat instance opens in the table of instances and lists the following conditions:
-
TLSSetupCompleteis set totrue. -
MainDeploymentAvailableis set totrue. Optional: If you enabled the reports generator service then
ReportsDeploymentAvailableis shown and set totrue.Figure 2.7. Example of conditions set to True under the Status column for a Cryostat instance on OpenShift
-
Optional: Select your Cryostat instance from the Cryostat table. Go to the Cryostat Conditions table, where you can see more information for each condition.
Figure 2.8. Example of a Cryostat Conditions table that lists each condition and its criteria


Additional resources
2.1.1. Accessing Cryostat by using the web console
You can access and control Cryostat by using a web console that is accessible from the Red Hat OpenShift web console.
Cryostat integrates with the OAuth server that is built into Red Hat OpenShift. When you attempt to access Cryostat on Red Hat OpenShift, the OAuth server directs you to the Red Hat OpenShift login page, where you can enter your Red Hat OpenShift credentials. After you enter your credentials, the OAuth server directs you to the Cryostat web console.
If you want to access all of Cryostat’s features on the OpenShift Container Platform, you must request Cryostat-specific Role-Based Access Controls (RBAC) permissions for your Red Hat OpenShift user account.
See RBAC permissions.
Prerequisites
- Created a Cryostat instance in your project.
- Logged in using the Red Hat OpenShift web console.
Procedure
- On the Red Hat OpenShift web console, navigate to Installed Operators and select Red Hat build of Cryostat Operator from the list.
To select the Cryostat instance that you want to access, click the Cryostat tab and select this Cryostat instance from the table.
Figure 2.9. Example of selecting a Cryostat instance under the Cryostat tab
To access the Cryostat login screen, click the link in the Application URL section. The OAuth server redirects you to an OpenShift Container Platform login page, so that you can obtain OAuth access tokens for authenticating to the Cryostat API.
Figure 2.10. Example of selecting a link under the Application URL section
Enter your credential details and then click Login. When you log in through the OAuth server for the first time, an Authorize Access page opens on your web browser.
Figure 2.11. Example of an Authorize Access page that opens in a web browser
- Review the Requested permissions options and then select the required checkboxes. For optimal Cryostat performance, select both checkboxes.
Choose one of the following options:
- If you want to accept the requested permissions that you selected, click the Allow selected permissions button.
If you want to reject all requested permission options, click the Deny button.
Your web browser redirects you to the Cryostat web console, where you can monitor Java applications that are running in a Java Virtual Machine (JVM).


2.1.2. RBAC permissions
From Cryostat 3.0 onward, when installing a Cryostat instance, you can use the .spec.authorizationOptions.openShiftSSO.accessReview field in the Cryostat CRD to specify the required role-based access control (RBAC) permissions for accessing Cryostat. The default role in the Cryostat application’s installation namespace is create pods/exec.
Any Red Hat OpenShift user accounts that are assigned the specified RBAC role have full access to the Cryostat console and all Cryostat features. If a Red Hat OpenShift account does not have the required RBAC permissions, this user is blocked from accessing Cryostat.
Figure 2.12. Specifying OpenShift SSO Access Review authorization options

You can use the following fields to specify any customized RBAC settings that are required for accessing Cryostat:
| Field | Details |
|---|---|
| group | API group of the resource
Specifying a |
| name |
Name of the resource being requested for a Specifying an empty value means all names. |
| namespace | Namespace of the action being requested Currently, there is no distinction between no namespace and all namespaces. Consider the following guidelines:
|
| resource | An existing resource type
Specifying a |
| subresource | An existing resource type Specifying an empty value means no resource types. |
| verb |
A kubernetes resource API verb (for example,
Specifying a |
| version | API version of the resource
Specifying a |
2.2. Helm charts
Instead of using the Red Hat build of Cryostat Operator on Red Hat OpenShift to install Cryostat, you can use a Helm chart. The Red Hat build of Cryostat Operator is the preferred way to install Cryostat, but if you require a flexible installation method that requires fewer cluster permissions, you can install Cryostat with a Helm chart.
Helm is a package manager on Red Hat OpenShift that provides the following benefits:
- Applies regular application updates by using custom hooks.
- Manages the installation of complex applications.
- Provides charts that you can host on public or private servers. If sharing charts on a public server, ensure you’re aware of the security risks.
- Supports rolling back to previous application versions.
By default, Red Hat OpenShift 4.12 includes the Helm chart package manager.
Before you install Cryostat with a Cryostat Helm chart, consider the following supported functions for the Cryostat Helm chart and the Red Hat build of Cryostat Operator:
| Function ↓ | Cryostat Helm chart | Red Hat build of Cryostat Operator |
|---|---|---|
| Access Cryostat by using Services | ✓ | ✓ |
| Access Cryostat by using Routes | ✓ | ✓ |
| Basic authentication | ✓ | |
| OpenShift OAuth authentication | ✓ | |
| End-to-end encryption | ✓ | |
| Grafana integration | ✓ | ✓ |
| Persistent storage | ✓ | ✓ |
| Sidecar report generator | ✓ |
The previous table shows that the Cryostat Helm chart does not support the same level of functionality as the Red Hat build of Cryostat Operator.
2.2.1. Installing Cryostat by using a Helm chart
By default, Red Hat OpenShift 4.12 includes the Helm chart package manager. You can use this package manager to install a Cryostat Helm chart on Red Hat OpenShift. In turn, you can use this Helm chart to install a Cryostat instance on Red Hat OpenShift.
After you install the Cryostat Helm chart, the Helm chart creates the following objects:
- Deployment, which contains Cryostat, Grafana, and a data source for Grafana.
- Routes that exposes the Cryostat and Grafana services outside a Red Hat OpenShift cluster. This object is enabled by default on Red Hat OpenShift.
- Services for Cryostat and Grafana.
- Service Account, Role, and Role Binding for Cryostat, so that Cryostat Helm chart can use these objects to discover your applications.
Prerequisites
- Logged in to the OpenShift Container Platform by using the Red Hat OpenShift web console.
- Configured appropriate roles and permissions in a project to create applications and other workloads in OpenShift Container Platform.
Procedure
- Switch to Developer mode on your Red Hat OpenShift web console.
- Click the +Add menu.
- From the Developer Catalog panel, click Helm Chart.
Click the Cryostat tile. A window displays on your Red Hat OpenShift web console.
TipTo quickly find the Cryostat tile, enter
Cryostatin the search field.- Click Create.
From the Create Helm Release window, complete the following actions:
- In the Release name field, enter a name for your Cryostat Helm chart.
- From the Chart version drop-down list, ensure a version of Cryostat is selected.
- Optional: From Form view, click Chart Values, and then configure options for your Cryostat Helm chart.
Optional: To access more configuration options, switch to the YAML View and then edit the parameters to meet your needs.
Figure 2.13. OpenShift Create Helm Release window
Click Create.
A window with tabs might open in your web console where you can view information for the Cryostat Helm chart. From the Release notes tab, you can view post-installation steps that you must perform. To perform these steps, you must use the
ocCLI for your Red Hat OpenShift cluster. By default, Cryostat Helm chart usesRoutesfor networking. If you have disabledRoutes, the instructions might differ depending on the kind of networking that you selected.ImportantIf you set
core.route.enabledorgrafana.route.enabledtofalsefor your Cryostat Helm chart, which disables theRoutesresource, port-forwardingocinstructions display in the web console.Optional: From the topology window, click a pod icon and then go to either the Details tab or the Resources tab to view more information about the pod.
TipIf you need to quickly find a pod, consider using the filter toolbar, where you can display options, filter by resource, or enter a name of a pod.
When you completed the post-installation steps that are outlined on the Release notes tab, you can use Cryostat with your applications.
Figure 2.14. OpenShift pod topology window


Verification
- In the same terminal where you completed the post-installation steps, go to the "Visit the Cryostat application at …" step to view the URL with which you can access the Cryostat application.
The URL to access the Cryostat application URL varies depending on the configuration parameters that you chose.
Revised on 2024-07-02 13:35:21 UTC