Ce contenu n'est pas disponible dans la langue sélectionnée.
Chapter 1. Getting started with Red Hat build of Quarkus
As an application developer, you can use Red Hat build of Quarkus to create microservices-based applications written in Java that run on OpenShift environments. Quarkus applications can run on top of a Java virtual machine (JVM) or be compiled to native executables. Native applications have a smaller memory footprint and a faster startup time than their JVM counterpart.
You can create a Quarkus application in either of the following ways:
- Using Apache Maven and the Quarkus Maven plugin
- Using code.quarkus.redhat.com
- Using the Quarkus command-line interface (CLI)
You can get started with Quarkus and create, test, package, and run a simple Quarkus project that exposes a hello HTTP endpoint. To demonstrate dependency injection, the hello HTTP endpoint uses a greeting bean.

For a completed example of the getting started exercise, download the Quarkus Quickstarts archive or clone the Quarkus Quickstarts Git repository and go to the getting-started directory.
1.1. About Red Hat build of Quarkus
Red Hat build of Quarkus is a Kubernetes-native Java stack optimized for containers and Red Hat OpenShift Container Platform. Quarkus is designed to work with popular Java standards, frameworks, and libraries such as Eclipse MicroProfile, Eclipse Vert.x, Apache Camel, Apache Kafka, Hibernate ORM with Jakarta Persistence, and RESTEasy Reactive (Jakarta REST).
As a developer, you can choose the Java frameworks you want for your Java applications, which you can run in Java Virtual Machine (JVM) mode or compile and run in native mode. Quarkus provides a container-first approach to building Java applications. The container-first approach facilitates the containerization and efficient execution of microservices and functions. For this reason, Quarkus applications have a smaller memory footprint and faster startup times.
Quarkus also optimizes the application development process with capabilities such as unified configuration, automatic provisioning of unconfigured services, live coding, and continuous testing that gives you instant feedback on your code changes.
For information about the differences between the Quarkus community version and Red Hat build of Quarkus, see Differences between the Quarkus community version and Red Hat build of Quarkus.
1.2. Preparing your environment
Before you start using Quarkus, you must prepare your environment.
Procedure
Confirm the following installations are completed on your system:
You have installed OpenJDK 17 or 21 and set the
JAVA_HOMEenvironment variable to specify the location of the Java SDK.- To download Red Hat build of OpenJDK, log in to the Red Hat Customer Portal and go to Software Downloads.
- You have installed Apache Maven 3.8.6 or later. Apache Maven is available from the Apache Maven Project website.
Optional: If you want to use the Quarkus command-line interface (CLI), ensure that it is installed.
- For instructions on how to install the Quarkus CLI, refer to the community-specific information at Quarkus CLI.
The Quarkus CLI is intended for dev mode only. Red Hat does not support using the Quarkus CLI in production environments.
1.2.1. About Red Hat build of Quarkus BOMs
From Red Hat build of Quarkus 2.2, dependency versions of all core Quarkus extensions are managed by using the com.redhat.quarkus.platform:quarkus-bom file.
The purpose of the Bill of Materials (BOM) file is to manage dependency versions of Quarkus artifacts in your project so that when you use a BOM in your project, you do not need to specify which dependency versions work together. Instead, you can import the Quarkus BOM file to the pom.xml configuration file, where the dependency versions are included in the <dependencyManagement> section. Therefore, you do not need to list the versions of individual Quarkus dependencies that are managed by the specified BOM in the pom.xml file.
To view information about supported extension-specific BOMs that are available with Red Hat build of Quarkus, see Red Hat build of Quarkus Component details.
You only need to import the member-specific BOM for the platform-member extensions that you use in your application. Therefore, you have fewer dependencies to manage as compared to a monolithic single BOM. Because every member-specific BOM is a fragment of the universal Quarkus BOM, you can import the member BOMs in any order without creating a conflict.
1.2.2. About Apache Maven and Red Hat build of Quarkus
Apache Maven is a distributed build automation tool that is used in Java application development to create, manage, and build software projects.
To learn more about Apache Maven, see Apache Maven documentation.
Maven repositories
A Maven repository stores Java libraries, plugins, and other build artifacts. The default public repository is the Maven 2 Central Repository, but repositories can be private and internal within a company to share common artifacts among development teams. Repositories are also available from third parties.
You can use the Red Hat-hosted Maven repository with your Quarkus projects, or you can download the Red Hat build of Quarkus Maven repository.
Maven plugins
Maven plugins are defined parts of a POM file that run one or more tasks. Red Hat build of Quarkus applications use the following Maven plugins:
-
Quarkus Maven plugin (
quarkus-maven-plugin): Enables Maven to create Quarkus projects, packages your applications into JAR files, and provides a dev mode. -
Maven Surefire plugin (
maven-surefire-plugin): When Quarkus enables thetestprofile, the Maven Surefire plugin is used during thetestphase of the build lifecycle to run unit tests on your application. The plugin generates text and XML files that contain the test reports.
Additional resources
1.2.3. Configuring the Maven settings.xml file for the online repository
To use the Red Hat-hosted Quarkus repository with your Quarkus Maven project, configure the settings.xml file for your user. Maven settings that are used with a repository manager or a repository on a shared server offer better control and manageability of projects.
When you configure the repository by modifying the Maven settings.xml file, the changes apply to all of your Maven projects. If you want to apply the configuration to a specific project only, use the -s option and specify the path to the project-specific settings.xml file.
Procedure
Open the Maven
$HOME/.m2/settings.xmlfile in a text editor or an integrated development environment (IDE).NoteIf no
settings.xmlfile is present in the$HOME/.m2/directory, copy thesettings.xmlfile from the$MAVEN_HOME/conf/directory into the$HOME/.m2/directory.Add the following lines to the
<profiles>element of thesettings.xmlfile:<!-- Configure the Red Hat build of Quarkus Maven repository --> <profile> <id>red-hat-enterprise-maven-repository</id> <repositories> <repository> <id>red-hat-enterprise-maven-repository</id> <url>https://maven.repository.redhat.com/ga/</url> <releases> <enabled>true</enabled> </releases> <snapshots> <enabled>false</enabled> </snapshots> </repository> </repositories> <pluginRepositories> <pluginRepository> <id>red-hat-enterprise-maven-repository</id> <url>https://maven.repository.redhat.com/ga/</url> <releases> <enabled>true</enabled> </releases> <snapshots> <enabled>false</enabled> </snapshots> </pluginRepository> </pluginRepositories> </profile>Add the following lines to the
<activeProfiles>element of thesettings.xmlfile and save the file.<activeProfile>red-hat-enterprise-maven-repository</activeProfile>
1.2.4. Reconfiguring your Maven project to Red Hat build of Quarkus
You can migrate a Quarkus community project to Red Hat build of Quarkus by changing the Maven configuration in your project POM file.
Prerequisites
-
You have a Quarkus project built with Maven that depends on Quarkus community artifacts in the
pom.xmlfile.
Procedure
Change the following values in the
<properties>section of thepom.xmlfile of your project:-
Change the value of the
<quarkus.platform.group-id>property tocom.redhat.quarkus.platform. Change the value of the
<quarkus.platform.version>property to3.8.4.redhat-00002.pom.xml
<project>
  ...
  <properties>
     ...
     <quarkus.platform.group-id>com.redhat.quarkus.platform</quarkus.platform.group-id>
     <quarkus.platform.artifact-id>quarkus-bom</quarkus.platform.artifact-id>
     <quarkus.platform.version>3.8.4.redhat-00002</quarkus.platform.version>
     ...
  </properties>
  ...
</project>
-
Change the value of the
1.3. Configuring Red Hat build of Quarkus developer tools
By using Quarkus developer tools, you can complete tasks such as:
- Creating a Maven project for your application
- Adding and configuring an extension to use in your application
- Deploying your application on an OpenShift cluster
1.3.1. Configuring Red Hat build of Quarkus extension registry client
The extension registry, registry.quarkus.redhat.com, hosts the Quarkus extensions that Red Hat provides. You can configure your Quarkus developer tools to access extensions in this registry by adding the registry to your registry client configuration file. The registry client configuration file is a YAML file that contains a list of registries.
-
The default Quarkus registry is
registry.quarkus.io; typically, you do not need to configure it. However, if a user provides a custom registry list andregistry.quarkus.iois not on it, thenregistry.quarkus.iois not enabled. - Ensure that the registry you prefer appears first on the registry list. When Quarkus developer tools search for registries, they begin at the top of the list.
Procedure
-
Open the
config.yamlfile that contains your extension registry configuration. When you configure your extension registries for the first time, you might need to create aconfig.yamlfile in the$HOME/.quarkusdirectory on your machine. Add the new registry to the
config.yamlfile. For example:config.yaml
registries:
  - registry.quarkus.redhat.com
  - registry.quarkus.io
1.4. Creating the Getting Started project
By creating a getting-started project, you can get up and running with a simple Quarkus application. You can create a getting-started project in one of the following ways:
- Using Apache Maven and the Quarkus Maven plugin
- Using code.quarkus.redhat.com to generate a Quarkus Maven project
- Using the Quarkus command-line interface (CLI)
Prerequisites
- You have prepared your environment. For more information, see Preparing your environment.
Procedure
-
Depending on your requirements, select the method you want to use to create your
getting-startedproject.
1.4.1. Creating the Getting Started project by using Apache Maven
You can create a getting-started project by using Apache Maven and the Quarkus Maven plugin. With this getting-started project, you can get up and running with a simple Quarkus application.
Prerequisites
- You have prepared your environment to use Maven. For more information, see Preparing your environment.
- You have configured your Quarkus Maven repository. To create a Quarkus application with Maven, use the Red Hat-hosted Quarkus repository. For more information, see Configuring the Maven settings.xml file for the online repository.
Procedure
To verify that Maven is using OpenJDK 17 or 21, that the Maven version is 3.8.6 or later, and that
mvnis accessible from the PATH environment variable, enter the following command:mvn --version
- If the preceding command does not return OpenJDK 17 or 21, add the path to OpenJDK 17 or 21 to the PATH environment variable and enter the preceding command again.
To generate the project, enter one of the following commands:
If you are using Linux or Apple macOS, enter the following command:
mvn com.redhat.quarkus.platform:quarkus-maven-plugin:3.8.4.redhat-00002:create \
    -DprojectGroupId=org.acme \
    -DprojectArtifactId=getting-started \
    -DplatformGroupId=com.redhat.quarkus.platform \
    -DplatformVersion=3.8.4.redhat-00002 \
    -DclassName="org.acme.quickstart.GreetingResource" \
    -Dpath="/hello"
cd getting-started
If you are using the Microsoft Windows command line, enter the following command:
mvn com.redhat.quarkus.platform:quarkus-maven-plugin:3.8.4.redhat-00002:create
-DprojectGroupId=org.acme -DprojectArtifactId=getting-started
-DplatformGroupId=com.redhat.quarkus.platform
-DplatformVersion=3.8.4.redhat-00002
-DclassName="org.acme.quickstart.GreetingResource"
-Dpath="/hello"
If you are using the Microsoft Windows PowerShell, enter the following command:
mvn com.redhat.quarkus.platform:quarkus-maven-plugin:3.8.4.redhat-00002:create
"-DprojectGroupId=org.acme"
"-DprojectArtifactId=getting-started"
"-DplatformVersion=3.8.4.redhat-00002"
"-DplatformGroupId=com.redhat.quarkus.platform"
"-DclassName=org.acme.quickstart.GreetingResource"
"-Dpath=/hello"
These commands create the following elements in the
./getting-starteddirectory:- The Maven project directory structure
-
An
org.acme.quickstart.GreetingResourceresource exposed on/hello - Associated unit tests for testing your application in native mode and JVM mode
-
A landing page that is accessible on
http://localhost:8080after you start the application -
Example Dockerfiles in the
src/main/dockerdirectory The application configuration file
NoteBecause Mandrel does not support macOS, you can use Oracle GraalVM to build native executables on this operating system.
You can also build native executables by using Oracle GraalVM directly on bare metal Linux or Windows distributions. For more information about this process, see the Oracle GraalVM README and release notes.
For more information about supported configurations, see Red Hat build of Quarkus Supported configurations.
After the directory structure is created, open the
pom.xmlfile in a text editor and examine the contents of the file:pom.xml
<project>
  ...
  <properties>
     ...
     <quarkus.platform.artifact-id>quarkus-bom</quarkus.platform.artifact-id>
     <quarkus.platform.group-id>com.redhat.quarkus.platform</quarkus.platform.group-id>
     <quarkus.platform.version>3.8.4.redhat-00002</quarkus.platform.version>
     ...
  </properties>
  ...
  <dependencyManagement>
      <dependencies>
        <dependency>
          <groupId>${quarkus.platform.group-id}</groupId>
          <artifactId>${quarkus.platform.artifact-id}</artifactId>
          <version>${quarkus.platform.version}</version>
          <type>pom</type>
          <scope>import</scope>
        </dependency>
      </dependencies>
  </dependencyManagement>
  ...
  <build>
      ...
      <plugins>
        ...
        <plugin>
          <groupId>${quarkus.platform.group-id}</groupId>
          <artifactId>quarkus-maven-plugin</artifactId>
          <version>${quarkus.platform.version}</version>
          <extensions>true</extensions>
          <executions>
            <execution>
              <goals>
                <goal>build</goal>
                <goal>generate-code</goal>
                <goal>generate-code-tests</goal>
              </goals>
            </execution>
          </executions>
        </plugin>
        ...
      </plugins>
      ...
  </build>
 ...
</project>
The
<dependencyManagement>section of thepom.xmlfile contains the Quarkus BOM. Therefore, you do not need to list the versions of individual Quarkus dependencies in thepom.xmlfile. In this configuration file, you can also find thequarkus-maven-pluginplugin that is responsible for packaging the application.Review the
quarkus-resteasy-reactivedependency in thepom.xmlfile. This dependency enables you to develop REST applications:<dependency> <groupId>io.quarkus</groupId> <artifactId>quarkus-resteasy-reactive</artifactId> </dependency>Review the
src/main/java/org/acme/quickstart/GreetingResource.javafile:import jakarta.ws.rs.GET; import jakarta.ws.rs.Path; import jakarta.ws.rs.Produces; import jakarta.ws.rs.core.MediaType; @Path("/hello") public class GreetingResource { @GET @Produces(MediaType.TEXT_PLAIN) public String hello() { return "Hello from RESTEasy Reactive"; } }This file contains a simple REST endpoint that returns
Hello from RESTEasy Reactiveas a response to a request that you send to the/helloendpoint.NoteWith Quarkus, the
Applicationclass for Jakarta REST (formerly known as JAX-RS) is supported but not required. In addition, only one instance of theGreetingResourceclass is created and not one per request. You can configure this by using different*Scopedannotations, for exampleApplicationScoped,RequestScoped, and so on.
1.4.2. Creating the Getting Started project by using code.quarkus.redhat.com
As an application developer, you can use code.quarkus.redhat.com to generate a Quarkus Maven project and automatically add and configure the extensions that you want to use in your application. In addition, code.quarkus.redhat.com automatically manages the configuration parameters that are required to compile your project into a native executable.
You can generate a Quarkus Maven project, including the following activities:
- Specifying basic details about your application
- Choosing the extensions that you want to include in your project
- Generating a downloadable archive with your project files
- Using custom commands for compiling and starting your application
Prerequisites
- You have a web browser.
- You have prepared your environment to use Apache Maven. For more information, see Preparing your environment.
- You have configured your Quarkus Maven repository. To create a Quarkus application with Maven, use the Red Hat-hosted Quarkus repository. For more information, see Configuring the Maven settings.xml file for the online repository.
Optional: You have installed the Quarkus command-line interface (CLI), which is one of the methods you can use to start Quarkus in dev mode.
For more information, see Installing the Quarkus CLI.
The Quarkus CLI is intended for dev mode only. Red Hat does not support using the Quarkus CLI in production environments.
Procedure
- On your web browser, go to https://code.quarkus.redhat.com.
Specify basic details about your project:
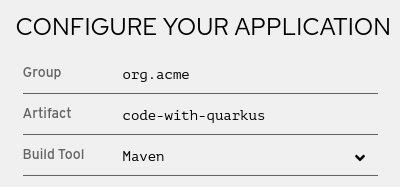
-
Enter a group name for your project. The name format follows the Java package naming convention; for example,
org.acme. -
Enter a name for the Maven artifacts generated by your project, such as
code-with-quarkus. Select the build tool you want to use to compile and start your application. The build tool that you choose determines the following setups:
- The directory structure of your generated project
- The format of configuration files that are used in your generated project
The custom build script and command for compiling and starting your application that code.quarkus.redhat.com displays for you after you generate your project
NoteRed Hat provides support for using code.quarkus.redhat.com to create Quarkus Maven projects only.
-
Enter a group name for your project. The name format follows the Java package naming convention; for example,
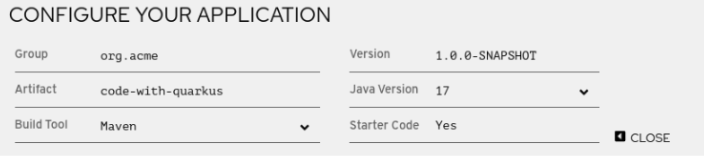
Specify additional details about your application project:
- To display the fields that contain further application details, select More options.
-
Enter a version you want to use for artifacts generated by your project. The default value of this field is
1.0.0-SNAPSHOT. Using semantic versioning is preferred; however, you can choose to specify a different type of versioning. Select whether you want code.quarkus.redhat.com to add starter code to your project. When you add extensions that are marked with "STARTER-CODE" to your project, you can enable this option to automatically create example class and resource files for those extensions when you generate your project. However, this option does not affect your generated project if you do not add any extensions that provide an example code.
NoteThe code.quarkus.redhat.com application automatically uses the latest release of Red Hat build of Quarkus. However, should you require, it is possible to manually change to an earlier BOM version in the
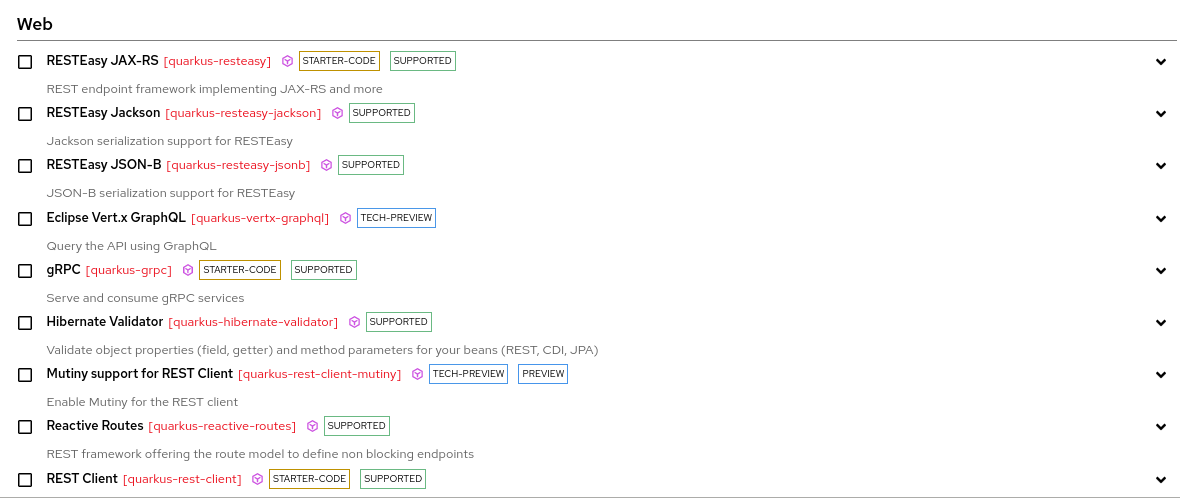
pom.xmlfile after you generate your project, but this is not recommended.Select the extensions that you want to use. The Quarkus application includes the extensions you select as dependencies. The Quarkus platform also ensures these extensions are compatible with future versions.
ImportantDo not use the
RESTEasyand theRESTEasy Reactiveextensions in the same project.The quark icon (
 ) next to an extension indicates that the extension is part of the Red Hat build of Quarkus platform release. Red Hat prefers using extensions from the same platform because they are tested and verified together and are therefore easier to use and upgrade.
You can enable the option to automatically generate starter code for extensions marked with "STARTER-CODE".
To confirm your choices, select Generate your application. The dialog box that appears displays the following items:
- A link to download the archive that contains your generated project
- A command that you can use to compile and start your application
- To save the archive with the generated project files to your machine, select Download the ZIP.
- Extract the contents of the archive.
Go to the directory that contains your extracted project files:
cd <directory_name>To compile and start your application in dev mode, use one of the following methods:
Using Maven:
./mvnw quarkus:dev
Using the Quarkus CLI:
quarkus dev
Additional resources
Support levels for Red Hat build of Quarkus extensions in the "Getting Started with Red Hat build of Quarkus" guide.
1.4.2.1. Support levels for Red Hat build of Quarkus extensions
Red Hat provides different levels of support for extensions that are available on code.quarkus.redhat.com that you can add to your Quarkus project. Labels next to the name of each extension indicate the support level.
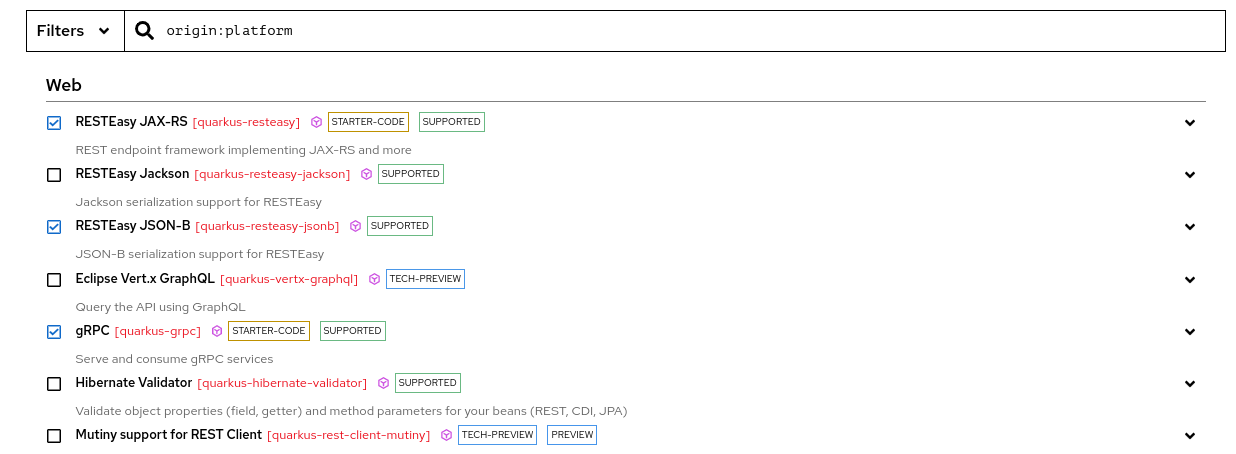
Red Hat does not support unlabeled extensions for use in production environments.
Red Hat provides the following levels of support for Red Hat build of Quarkus extensions:
| Support level | Description |
|---|---|
| SUPPORTED | Red Hat fully supports extensions for use in enterprise applications in production environments. |
| TECH-PREVIEW | Red Hat offers limited support to extensions in production environments under the Technology Preview Features Support Scope. |
| PREVIEW | Red Hat does not support extensions for use in production environments. Extensions are available in the Quarkus community version only. |
| DEV-SUPPORT | Red Hat does not support extensions for use in production environments, but Red Hat developers support the core functionality that they provide for use in developing new applications. |
| DEPRECATED | Red Hat plans to replace extensions with more recent technology or implementation that provides the same functionality. |
| STARTER-CODE | You can automatically generate the example code for extensions. |
By clicking the arrow icon (⌄) beside each of the extensions, you can expand the overflow menu to access further actions for that extension. For example:
- Add the extension to an existing project by using the Quarkus Maven plugin on the command line
-
Copy an XML snippet to add the extension to a project’s
pom.xmlfile -
Obtain the
groupId,artifactId, andversionof each extension - Open the extension guide
1.4.3. Creating the Getting Started project by using the Red Hat build of Quarkus CLI
You can create your getting-started project by using the Quarkus command-line interface (CLI).
With the Quarkus CLI, you can create projects, manage extensions, and run build and development commands.
The Quarkus CLI is intended for dev mode only. Red Hat does not support using the Quarkus CLI in production environments.
Prerequisites
- You have the Quarkus CLI installed. For more information, see Preparing your environment.
- You have configured your Quarkus developer tools to access extensions in the extension registry. For more information, see Configuring Red Hat build of Quarkus extension registry client.
Procedure
To generate the project, in a command terminal, enter the following command:
quarkus create && cd code-with-quarkus
NoteYou can also specify the 'app' subcommand, for example,
quarkus create app. However, it is not mandatory to do so because the 'app' subcommand is implied if it is not specified.With this command, you create the Quarkus project in a folder called 'code-with-quarkus' in your current working directory.
By default, the
groupId,artifactId, andversionattributes are specified with the following default values:- groupId='org.acme'
- artifactId='code-with-quarkus'
version='1.0.0-SNAPSHOT'
To change the values of the
groupId,artifactId, andversionattributes, issue thequarkus createcommand and specify the following syntax on the CLI:groupId:artifactId:versionFor example,
quarkus create app mygroupId:myartifactid:version
NoteTo view information about all the available Quarkus commands, specify the
helpparameter:quarkus --help
Review the
src/main/java/org/acme/GreetingResource.javafile in a text editor:package org.acme; import jakarta.ws.rs.GET; import jakarta.ws.rs.Path; import jakarta.ws.rs.Produces; import jakarta.ws.rs.core.MediaType; @Path("/hello") public class GreetingResource { @GET @Produces(MediaType.TEXT_PLAIN) public String hello() { return "Hello from RESTEasy Reactive"; } }This file contains a simple REST endpoint that returns
Hello from RESTEasy Reactiveas a response to a request that you send to the/helloendpoint.
Verification
- Compile and start your application in dev mode. For more information, see Compiling and starting the Red Hat build of Quarkus Getting Started project.
- Package and run your Getting Started project from the Quarkus CLI. For more information, see Packaging and running the Red Hat build of Quarkus Getting Started application.
1.5. Compiling and starting the Red Hat build of Quarkus Getting Started project
After you create the Quarkus Getting Started project, you can compile the Hello application and verify that the hello endpoint returns "Hello from RESTEasy Reactive.
This procedure uses the Quarkus built-in dev mode, so you can update the application sources and configurations while your application is running. The changes you make appear in the running application.
The command that you use to compile your Quarkus Hello application depends on the developer tool that you installed on the machine.
Prerequisites
- You have created the Quarkus Getting Started project.
Procedure
- Go to the project directory.
To compile the Quarkus
Helloapplication in dev mode, use one of the following methods, depending on the developer tool that you intend to use:If you prefer to use Apache Maven, enter the following command:
mvn quarkus:dev
If you prefer to use the Quarkus command-line interface (CLI), enter the following command:
quarkus dev
If you prefer to use the Maven wrapper, enter the following command:
./mvnw quarkus:dev
Expected output
The following extract shows an example of the expected output:
INFO  [io.quarkus] (Quarkus Main Thread) Profile dev activated. Live Coding activated.
INFO  [io.quarkus] (Quarkus Main Thread) Installed features: [cdi, resteasy-reactive, smallrye-context-propagation, vertx]
Verification
To send a request to the endpoint that the application provides, enter the following command in a new terminal window:
curl -w "\n" http://localhost:8080/hello
Hello from RESTEasy Reactive
NoteThe
"\n"attribute automatically adds a new line before the output of the command, which prevents your terminal from printing a '%' character or putting both the result and the next shell prompt on the same line.
1.6. Using Red Hat build of Quarkus dependency injection
With dependency injection, you can use a service in a way that is completely independent of any client consumption. It separates the creation of client dependencies from the client’s behavior, which enables program designs to be loosely coupled.
Dependency injection in Red Hat build of Quarkus is based on Quarkus ArC, which is a Contexts and Dependency Injection (CDI)-based build-time oriented dependency injection solution that is tailored for Quarkus architecture. Because ArC is a transitive dependency of quarkus-resteasy-reactive, and because quarkus-resteasy-reactive is a dependency of your project, ArC is downloaded already.
Prerequisites
- You have created the Quarkus Getting Started project.
Procedure
To modify the application and add a companion bean, create the
src/main/java/org/acme/quickstart/GreetingService.javafile with the following content:package org.acme.quickstart; import jakarta.enterprise.context.ApplicationScoped; @ApplicationScoped public class GreetingService { public String greeting(String name) { return "hello " + name; } }Edit the
src/main/java/org/acme/quickstart/GreetingResource.javato inject theGreetingServiceand use it to create a new endpoint:package org.acme.quickstart; import jakarta.inject.Inject; import jakarta.ws.rs.GET; import jakarta.ws.rs.Path; import jakarta.ws.rs.Produces; import jakarta.ws.rs.core.MediaType; @Path("/hello") public class GreetingResource { @Inject GreetingService service; @GET @Produces(MediaType.TEXT_PLAIN) @Path("/greeting/{name}") public String greeting(String name) { return service.greeting(name); } @GET @Produces(MediaType.TEXT_PLAIN) public String hello() { return "Hello from RESTEasy Reactive"; } }If you stopped the application, enter the following command to restart it:
./mvnw quarkus:dev
To verify that the endpoint returns
hello quarkus, enter the following command in a new terminal window:curl -w "\n" http://localhost:8080/hello/greeting/quarkus hello quarkus
1.7. Testing your Red Hat build of Quarkus application
After you compile your Quarkus Getting Started project, you can verify that it runs as expected by testing your application with the JUnit 5 framework.
Alternatively, you can enable continuous testing of your Quarkus application. For more information, see Enabling and running continuous testing.
The Quarkus project generates the following two test dependencies in the pom.xml file:
-
quarkus-junit5: Required for testing because it provides the@QuarkusTestannotation that controls the JUnit 5 testing framework. -
rest-assured: Therest-assureddependency is not required but, because it provides a convenient way to test HTTP endpoints, it is integrated. Therest-assureddependency automatically sets the correct URL, so no configuration is required.
Example pom.xml file:
<dependency>
    <groupId>io.quarkus</groupId>
    <artifactId>quarkus-junit5</artifactId>
    <scope>test</scope>
</dependency>
<dependency>
    <groupId>io.rest-assured</groupId>
    <artifactId>rest-assured</artifactId>
    <scope>test</scope>
</dependency>These tests use the REST-Assured framework, but you can use a different library if you prefer.
Prerequisites
- You have compiled the Quarkus Getting Started project. For more information, see Compiling and starting the Red Hat build of Quarkus Getting Started project.
Procedure
Open the generated
pom.xmlfile and review the contents:<plugin> <artifactId>maven-surefire-plugin</artifactId> <version>${surefire-plugin.version}</version> <configuration> <systemPropertyVariables> <java.util.logging.manager>org.jboss.logmanager.LogManager</java.util.logging.manager> <maven.home>${maven.home}</maven.home> </systemPropertyVariable> </configuration> </plugin>Note the values of the following properties:
-
The
java.util.logging.managersystem property is set to ensure that your application uses the correct log manager for the test. -
The
maven.homeproperty points to the location of thesettings.xmlfile, in which you can store the custom Maven configuration that you want to apply to your project.
-
The
Edit the
src/test/java/org/acme/quickstart/GreetingResourceTest.javafile to match the following content:package org.acme.quickstart; import io.quarkus.test.junit.QuarkusTest; import org.junit.jupiter.api.Test; import java.util.UUID; import static io.restassured.RestAssured.given; import static org.hamcrest.CoreMatchers.is; @QuarkusTest public class GreetingResourceTest { @Test public void testHelloEndpoint() { given() .when().get("/hello") .then() .statusCode(200) .body(is("Hello from RESTEasy Reactive")); } @Test public void testGreetingEndpoint() { String uuid = UUID.randomUUID().toString(); given() .pathParam("name", uuid) .when().get("/hello/greeting/{name}") .then() .statusCode(200) .body(is("hello " + uuid)); } }NoteBy using the
QuarkusTestrunner, you instruct JUnit to start the application before starting the tests.To run the tests from Maven, enter the following command:
./mvnw test
NoteYou can also run the tests from your IDE. If you do this, stop the application first.
By default, tests run on port
8081so they do not conflict with the running application. In Quarkus, theRestAssureddependency is configured to use this port.NoteIf you want to use a different client, use the
@TestHTTPResourceannotation to directly inject the URL of the tested application into a field in theTestclass. This field can be of typeString,URL, orURI. You can also enter the test path in the@TestHTTPResourceannotation. For example, to test a resource exposed to/foo, add the following lines to your test:@TestHTTPResource("/foo") URL testUrl;-
If necessary, specify the test port in the
quarkus.http.test-portconfiguration property.
1.8. Enabling and running continuous testing
With Red Hat build of Quarkus, you can continuously test your code changes as you develop your applications. Quarkus provides a continuous testing feature, which you can run immediately after you make and save a change to the code.
When you run continuous testing, testing is paused after you start the application. You can resume the testing as soon as the application starts. The Quarkus application determines which tests run so that tests are run only on code that has changed.
The continuous testing feature of Quarkus is enabled by default. You can choose to disable continuous testing by setting the quarkus.test.continuous-testing property in the src/main/resources/application.properties file to disabled.
If you disabled continuous testing previously and want to enable it again, you must restart your Quarkus application before you can start testing.
Prerequisites
- You have compiled the Quarkus Getting Started application (or any other application). For more information, see Compiling and starting the Red Hat build of Quarkus Getting Started project.
Procedure
Start your Quarkus application.
If you created your Getting Project project by using the code.quarkus.redhat.com or the Quarkus CLI, the Maven wrapper is provided when you generate the project. Enter the following command from your project directory:
./mvnw quarkus:dev
If you created your Getting Project project by using Apache Maven, which is installed on your machine, enter the following command:
mvn quarkus:dev
If you are running continuous testing in dev mode and are using the Quarkus CLI, enter the following command:
quarkus dev
View details of the testing status in the generated output log.
NoteTo view the output log, you might need to scroll to the bottom of the screen.
When continuous testing is enabled, the following message is displayed:
Press [e] to edit command line args (currently ''), [r] to re-run, [o] Toggle test output, [:] for the terminal, [h] for more options>
When continuous testing is paused, the following message is displayed:
Press [e] to edit command line args (currently ''), [r] to resume testing, [o] Toggle test output, [:] for the terminal, [h] for more options>
NoteBy default, when continuous testing is enabled, testing is paused after you start the application. To view the keyboard commands that are available for controlling how you run your tests, see Commands for controlling continuous testing.
-
To start running the tests, press
ron your keyboard. View the updated output log to monitor the test status and test results, check test statistics, and get guidance for follow-up actions. For example:
All 2 tests are passing (0 skipped), 2 tests were run in 2094ms. Tests completed at 14:45:11.
Press [e] to edit command line args (currently ''), [r] to re-run, [o] Toggle test output, [:] for the terminal, [h] for more options>
Verification
-
Make a code change. For example, in a text editor, open the
src/main/java/org/acme/quickstart/GreetingsResource.javafile. Change the "hello" endpoint to return "Hello world" and save the file.
import jakarta.ws.rs.GET; import jakarta.ws.rs.Path; import jakarta.ws.rs.Produces; import jakarta.ws.rs.core.MediaType; @Path("/hello") public class GreetingResource { @GET @Produces(MediaType.TEXT_PLAIN) public String hello() { return "Hello world"; } }- Verify that Quarkus immediately re-runs the test to test the changed code.
View the output log to check the test results. In this example, the test checks whether the changed string contains the value "Hello from RESTEasy Reactive". The test fails because the string was changed to "Hello world".
2024-02-26 15:03:45,911 ERROR [io.qua.test] (Test runner thread) Test GreetingResourceTest#testHelloEndpoint() failed: java.lang.AssertionError: 1 expectation failed. Response body doesn't match expectation. Expected: is "Hello from RESTEasy Reactive" Actual: Hello world at io.restassured.internal.ValidatableResponseOptionsImpl.body(ValidatableResponseOptionsImpl.java:238) at org.acme.quickstart.GreetingResourceTest.testHelloEndpoint(GreetingResourceTest.java:20) -- 1 test failed (1 passing, 0 skipped), 2 tests were run in 2076ms. Tests completed at 15:03:45. Press [e] to edit command line args (currently ''), [r] to re-run, [o] Toggle test output, [:] for the terminal, [h] for more options>-
To exit continuous testing, press
Ctrl-Corqon your keyboard.
If you change the value back to "Hello from RESTEasy Reactive" again, the test automatically runs again.
1.8.1. Commands for controlling continuous testing
You can use hotkey commands on your keyboard to control your options for continuous testing. To view the full list of commands, press 'h' on your keyboard. The following options are available:
| Command | Description |
|---|---|
| r | Re-run all tests. |
| f | Re-run all tests that failed. |
| b | Toggle 'broken only' mode. Only the tests that were failing previously are run, even if other tests are affected by your code changes. This option might be useful if you change code that is used by many tests, but you want to only review the failed tests. |
| v | Print output detailing test failures from the last test run to the console. This option might be useful if there was a considerable amount of console output since the last test run. |
| p | Pause running tests temporarily. This might be useful if you are making many code changes, but do not want to get test feedback until you finish making the changes. |
| q | Exit continuous testing. |
| o | Print test output to the console. This is disabled by default. When test output is disabled, the output is filtered and saved, but not displayed on the console. You can view the test output on the Development UI. |
| i | Toggle instrumentation-based reload. Using this option does not directly affect testing, but does allow live reload to occur. This might be useful to avoid a restart if a change does not affect the structure of a class. |
| l | Toggle live reload. Using this option does not directly affect testing, however, you can turn live reloading on and off. |
| s | Force restart. Using this option, you can force a scan of changed files and a live reload that includes the changes. Note that even if there are no code changes and live reload is disabled, the application still restarts. |
1.9. Packaging and running the Red Hat build of Quarkus Getting Started application
After you compile your Quarkus Getting Started project, you can package it in a JAR file and run it from the command line.
The command that you use to package and run your Quarkus Getting Started application depends on the developer tool that you have installed on the machine.
Prerequisites
- You have compiled the Quarkus Getting Started project.
Procedure
-
Go to the
getting-startedproject directory. To package your Quarkus Getting Started project, use one of the following methods, depending on the developer tool that you intend to use:
If you prefer to use Apache Maven, enter the following command:
mvn package
If you prefer to use the Quarkus command-line interface (CLI), enter the following command:
quarkus build
If you prefer to use the Maven wrapper, enter the following command:
./mvnw package
This command produces the following JAR files in the
/targetdirectory:-
getting-started-1.0-0-SNAPSHOT.jar: Contains the classes and resources of the projects. This is the regular artifact produced by the Maven build. -
quarkus-app/quarkus-run.jar: Is an executable JAR file. This file is not an uber-JAR file. The dependencies are copied into thetarget/quarkus-app/libdirectory.
-
To start your application, enter the following command:
java -jar target/quarkus-app/quarkus-run.jar
Note- Before running the application, ensure that you stop dev mode, (press CTRL+C), or you will have a port conflict.
-
The
Class-Pathentry of theMANIFEST.MFfile from thequarkus-run.jarfile explicitly lists the JAR files from thelibdirectory. If you want to deploy your application from another location, you must deploy the wholequarkus-appdirectory.
Various Red Hat build of Quarkus extensions contribute non-application endpoints that provide different kinds of information about the application. For example, the quarkus-smallrye-health, quarkus-micrometer-registry-prometheus, and quarkus-smallrye-openapi extensions.
You can access these non-application endpoints by specifying a /q prefix. For example, /q/health, /q/metrics, /q/openapi.
For non-application endpoints that might present a security risk, you can choose to expose those endpoints under a different TCP port by using a dedicated management interface. For more information, see the Quarkus Management interface reference guide.
1.10. JVM and native building modes
You can compile a classic Java Virtual Machine (JVM) application or compile a native application with Mandrel or GraalVM’s native-image tool.
1.10.1. Compiling an application as a classic JVM application
You can compile your application as a JVM application. This option is based on the quarkus.package.type configuration property and generates one of the following files:
-
fast-jar: A JAR file that is optimized for Quarkus and the default configuration option. Results in slightly faster startup times and slightly reduced memory usage. -
legacy-jar: A typical JAR file. uber-jar: A single standalone JAR file.These JAR files work on all operating systems and build much faster than native images.
1.10.2. Compiling an application into a native image
You can compile your application into a native image. To do so, you set the quarkus.package.type configuration property to native.
With this property, you create an executable binary file that is compiled specifically for an operating system of your choice, such as an .exe file for Windows. These files have faster start times and lesser RAM consumption than JAVA JAR files, but their compilation takes several minutes. In addition, the maximum throughput achievable by using a native binary is lower than a regular JVM application because the profile-guided optimizations are missing.
Using Mandrel
Mandrel is a specialized distribution of GraalVM for Red Hat build of Quarkus and also the preferred approach for building native executables that target Linux containerized environments. While the Mandrel approach is perfect for embedding the compilation output in a containerized environment, only a Linux64-bit native executable is provided. Therefore, an outcome such as
.exeis not an option.Mandrel users are encouraged to use containers to build their native executables.
To use the official Mandrel image to compile an application into native mode by using a local installation of Docker or Podman, enter the
mvn packagecommand with the following properties:-Dquarkus.package.type=native -Dquarkus.native.container-build=true -Dquarkus.native.builder-image=registry.access.redhat.com/quarkus/mandrel-for-jdk-21-rhel8:23.1
- For information about how to build a native executable by using Mandrel, see Compiling your Red Hat build of Quarkus applications to native executables
- For a list of available Mandrel images, see Available Mandrel images
Using GraalVM
Because Mandrel does not support macOS, you can use Oracle GraalVM to build native executables on this operating system.
You can also build native executables by using Oracle GraalVM directly on bare metal Linux or Windows distributions.
For information about how to build a native executable by using Oracle GraalVM, see Compiling your Red Hat build of Quarkus applications to native executables.
Additional resources
- For more information about building, compiling, packaging, and debugging a native executable, see Building a native executable.
- For tips to help troubleshoot issues that might occur when attempting to run Java applications as native executables, see Tips for writing native applications.
1.11. Packaging and running the Red Hat build of Quarkus Getting Started application in native mode
In native mode, the output from the application builds is a platform-dependent native binary file rather than a compress or archive JAR file. For more information about how native mode differs from the Java Virtual Machine (JVM), see the JVM and native building modes chapter of the Getting Started guide.
Prerequisites
-
You have installed OpenJDK 17 or 21 installed and set the
JAVA_HOMEenvironment variable to specify the location of the Java SDK. - You have installed Apache Maven 3.8.6 or later.
- You have a working C development environment.
- You have a working container runtime, such as Docker or Podman.
Optional: If you want to use the Quarkus command-line interface (CLI), ensure that it is installed.
- For instructions on how to install the Quarkus CLI, refer to the community-specific information at Quarkus CLI.
- You have cloned and compiled the Quarkus Getting Started project.
You have downloaded and installed a community or enterprise edition of GraalVM.
- To download and install a community or an enterprise edition of GraalVM, refer to the official Getting Started with GraalVM documentation.
- Alternatively, use platform-specific install tools such as sdkman, homebrew, or scoop.
While you can use the community edition of GraalVM to complete all of the procedures in the Getting Started guide, the community edition of GraalVM is not supported in a Red Hat build of Quarkus production environment. For more information, see Compiling your Red Hat build of Quarkus applications to native executables.
Procedure
Configure the runtime environment by setting the
GRAALVM_HOMEenvironment variable to the GraalVM installation directory. For example:export GRAALVM_HOME=$HOME/Development/graalvm/
On macOS, point the variable to the
Homesub-directory:export GRAALVM_HOME=$HOME/Development/graalvm/Contents/Home/
- On Windows Server, set your environment variables by using the Control Panel.
Install the
native-imagetool:${GRAALVM_HOME}/bin/gu install native-imageSet the
JAVA_HOMEenvironment variable to the GraalVM installation directory:export JAVA_HOME=${GRAALVM_HOME}Add the GraalVM
bindirectory to the path:export PATH=${GRAALVM_HOME}/bin:$PATHGo to the Getting Started project folder:
cd getting-started
Compile a native image in one of the following ways:
Using Maven:
mvn clean package -Pnative
Using the Quarkus CLI:
quarkus build --native
Verification
Start the application:
./target/getting-started-1.0.0-SNAPSHOT-runner
Observe the log message and verify that it contains the word
native:2024-02-15 09:51:51,505 INFO [io.quarkus] (main) getting-started 1.0.0-SNAPSHOT native (powered by Red Hat build of Quarkus 3.8.4.redhat-00002) started in 0.043s. Listening on: http://0.0.0.0:8080
Additional resources
- For additional tips or troubleshooting information, see the Quarkus Building a native executable guide.
1.12. Additional resources
Revised on 2024-05-09 15:26:33 UTC