Ce contenu n'est pas disponible dans la langue sélectionnée.
Chapter 5. Advanced configuration
As a storage administrator, you can configure some of the more advanced features of the Ceph Object Gateway. You can configure a multisite Ceph Object Gateway and integrate it with directory services, such as Microsoft Active Directory and OpenStack Keystone service.
5.1. Prerequisites
- A healthy running Red Hat Ceph Storage cluster.
5.2. Multi-site configuration and administration
As a storage administrator, you can configure and administer multiple Ceph Object Gateways for a variety of use cases. You can learn what to do during a disaster recovery and failover events. Also, you can learn more about realms, zones, and syncing policies in multi-site Ceph Object Gateway environments.
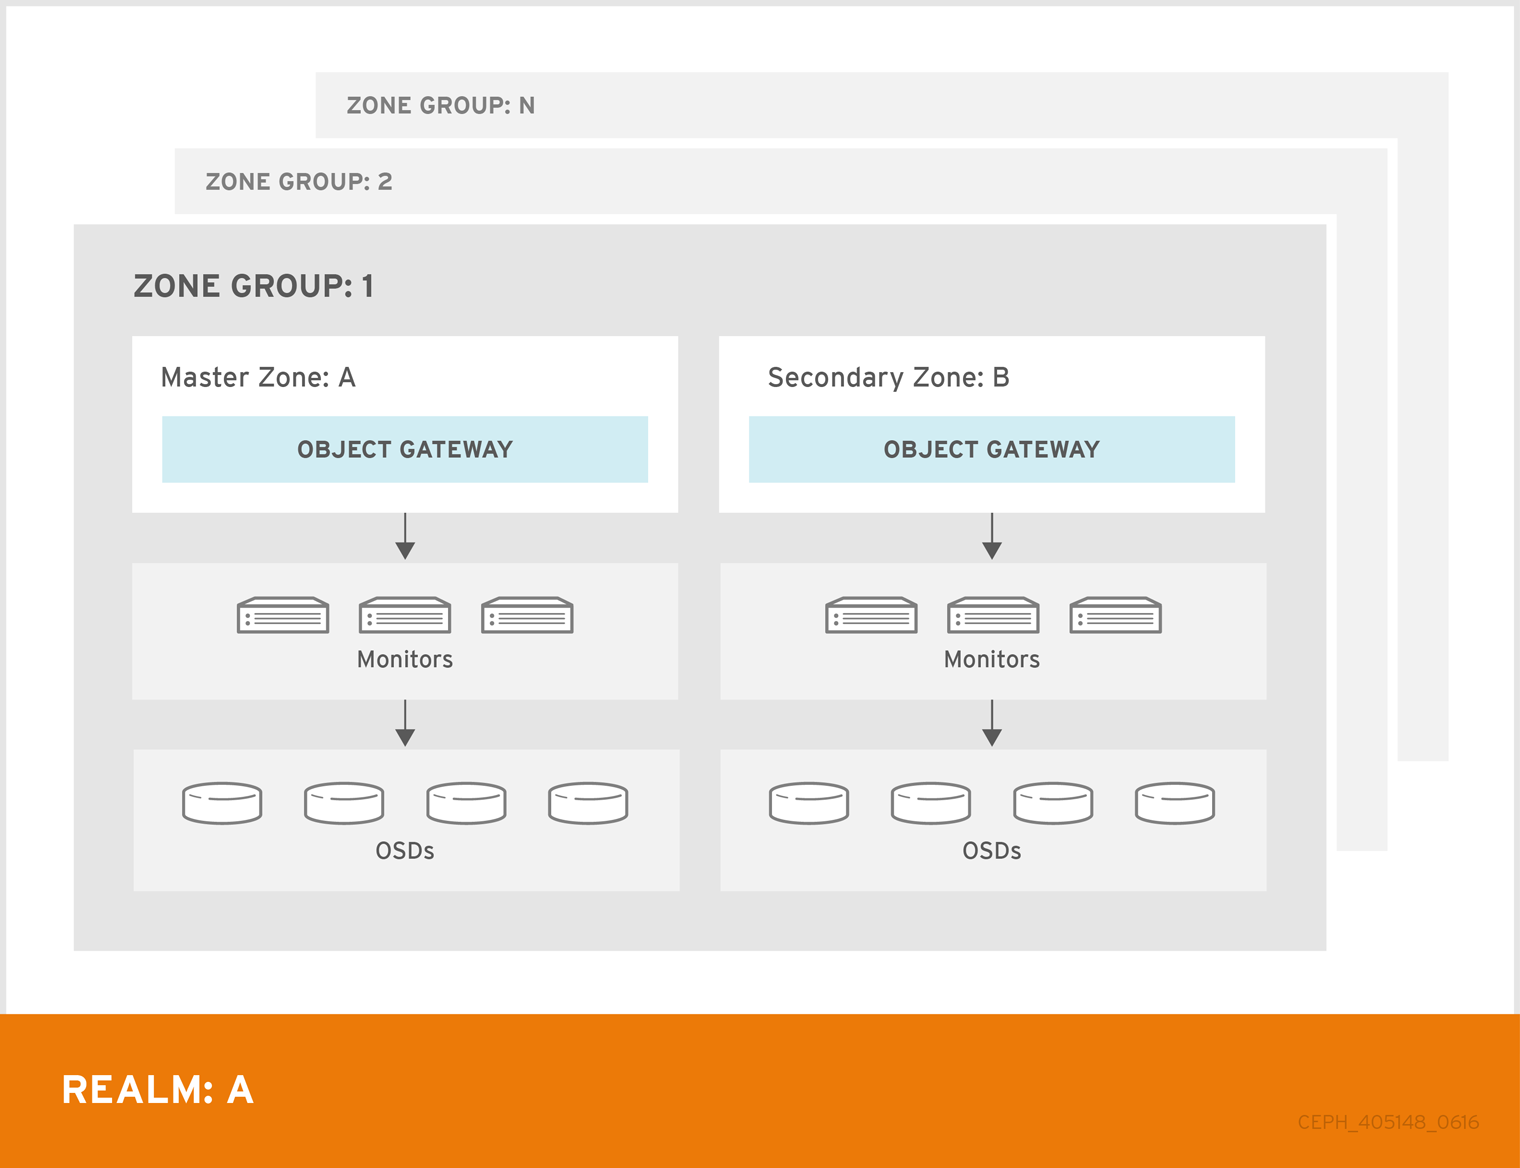
A single zone configuration typically consists of one zone group containing one zone and one or more ceph-radosgw instances where you may load-balance gateway client requests between the instances. In a single zone configuration, typically multiple gateway instances point to a single Ceph storage cluster. However, Red Hat supports several multi-site configuration options for the Ceph Object Gateway:
-
Multi-zone: A more advanced configuration consists of one zone group and multiple zones, each zone with one or more
ceph-radosgwinstances. Each zone is backed by its own Ceph Storage Cluster. Multiple zones in a zone group provides disaster recovery for the zone group should one of the zones experience a significant failure. Each zone is active and may receive write operations. In addition to disaster recovery, multiple active zones may also serve as a foundation for content delivery networks. - Multi-zone-group: Formerly called 'regions', the Ceph Object Gateway can also support multiple zone groups, each zone group with one or more zones. Objects stored to zone groups within the same realm share a global namespace, ensuring unique object IDs across zone groups and zones.
- Multiple Realms: The Ceph Object Gateway supports the notion of realms, which can be a single zone group or multiple zone groups and a globally unique namespace for the realm. Multiple realms provides the ability to support numerous configurations and namespaces.
Prerequisites
- A healthy running Red Hat Ceph Storage cluster.
- Deployment of the Ceph Object Gateway software.
5.2.1. Requirements and Assumptions
A multi-site configuration requires at least two Ceph storage clusters, and At least two Ceph object gateway instances, one for each Ceph storage cluster.
This guide assumes at least two Ceph storage clusters in geographically separate locations; however, the configuration can work on the same physical site. This guide also assumes four Ceph object gateway servers named rgw1, rgw2, rgw3 and rgw4 respectively.
A multi-site configuration requires a master zone group and a master zone. Additionally, each zone group requires a master zone. Zone groups may have one or more secondary or non-master zones.
When planning network considerations for multi-site, it is important to understand the relation bandwidth and latency observed on the multi-site synchronization network and the clients ingest rate in direct correlation with the current sync state of the objects owed to the secondary site. The network link between Red Hat Ceph Storage multi-site clusters must be able to handle the ingest into the primary cluster to maintain an effective recovery time on the secondary site. Multi-site synchronization is asynchronous and one of the limitations is the rate at which the sync gateways can process data across the link. An example to look at in terms of network inter-connectivity speed could be 1 GbE or inter-datacenter connectivity, for every 8 TB or cumulative receive data, per client gateway. Thus, if you replicate to two other sites, and ingest 16 TB a day, you need 6 GbE of dedicated bandwidth for multi-site replication.
Red Hat also recommends private Ethernet or Dense wavelength-division multiplexing (DWDM) as a VPN over the internet is not ideal due to the additional overhead incurred.
The master zone within the master zone group of a realm is responsible for storing the master copy of the realm’s metadata, including users, quotas and buckets (created by the radosgw-admin CLI). This metadata gets synchronized to secondary zones and secondary zone groups automatically. Metadata operations executed with the radosgw-admin CLI MUST be executed on a host within the master zone of the master zone group in order to ensure that they get synchronized to the secondary zone groups and zones. Currently, it is possible to execute metadata operations on secondary zones and zone groups, but it is NOT recommended because they WILL NOT be synchronized, leading to fragmented metadata.
In the following examples, the rgw1 host will serve as the master zone of the master zone group; the rgw2 host will serve as the secondary zone of the master zone group; the rgw3 host will serve as the master zone of the secondary zone group; and the rgw4 host will serve as the secondary zone of the secondary zone group.
When you have a large cluster with more Ceph Object Gateways configured in a multi-site storage cluster, Red Hat recommends to dedicate not more than three sync-enabled Ceph Object Gateways with HAProxy load balancer per site for multi-site synchronization. If there are more than three syncing Ceph Object Gateways, it has diminishing returns sync rate in terms of performance and the increased contention creates an incremental risk for hitting timing-related error conditions. This is due to a sync-fairness known issue BZ#1740782.
For the rest of the Ceph Object Gateways in such a configuration, which are dedicated for client I/O operations through load balancers, run the ceph config set client.rgw.CLIENT_NODE rgw_run_sync_thread false command to prevent them from performing sync operations, and then restart the Ceph Object Gateway.
Following is a typical configuration file for HAProxy for syncing gateways:
Example
[root@host01 ~]# cat ./haproxy.cfg

global

	log     	127.0.0.1 local2

	chroot  	/var/lib/haproxy
	pidfile 	/var/run/haproxy.pid
	maxconn 	7000
	user    	haproxy
	group   	haproxy
	daemon

	stats socket /var/lib/haproxy/stats

defaults
	mode                	http
	log                 	global
	option              	httplog
	option              	dontlognull
	option http-server-close
	option forwardfor   	except 127.0.0.0/8
	option              	redispatch
	retries             	3
	timeout http-request	10s
	timeout queue       	1m
	timeout connect     	10s
	timeout client      	30s
	timeout server      	30s
	timeout http-keep-alive 10s
	timeout check       	10s
        timeout client-fin 1s
        timeout server-fin 1s
	maxconn             	6000


listen  stats
	bind	0.0.0.0:1936
    	mode        	http
    	log         	global

    	maxconn 256


    	clitimeout  	10m
    	srvtimeout  	10m
    	contimeout  	10m
    	timeout queue   10m

# JTH start
    	stats enable
    	stats hide-version
    	stats refresh 30s
    	stats show-node
##    	stats auth admin:password
    	stats uri  /haproxy?stats
       stats admin if TRUE


frontend  main
	bind	 *:5000
	acl url_static   	path_beg   	-i /static /images /javascript /stylesheets
	acl url_static   	path_end   	-i .jpg .gif .png .css .js

	use_backend static      	if url_static
	default_backend         	app
        maxconn 6000

backend static
	balance 	roundrobin
    fullconn 6000
    server  app8 host01:8080 check maxconn 2000
    server  app9 host02:8080 check maxconn 2000
    server  app10 host03:8080 check maxconn 2000


backend app
	balance 	roundrobin
    fullconn 6000
    server  app8 host01:8080 check maxconn 2000
    server  app9 host02:8080 check maxconn 2000
    server  app10 host03:8080 check maxconn 2000
5.2.2. Pools
Red Hat recommends using the Ceph Placement Group’s per Pool Calculator to calculate a suitable number of placement groups for the pools the radosgw daemon will create. Set the calculated values as defaults in the Ceph configuration database.
Example
[ceph: root@host01 /]#  ceph config set osd osd_pool_default_pg_num 50
[ceph: root@host01 /]# ceph config set osd osd_pool_default_pgp_num 50Making this change to the Ceph configuration will use those defaults when the Ceph Object Gateway instance creates the pools. Alternatively, you can create the pools manually.
Pool names particular to a zone follow the naming convention ZONE_NAME.POOL_NAME. For example, a zone named us-east will have the following pools:
-
.rgw.root -
us-east.rgw.control -
us-east.rgw.meta -
us-east.rgw.log -
us-east.rgw.buckets.index -
us-east.rgw.buckets.data -
us-east.rgw.buckets.non-ec -
us-east.rgw.meta:users.keys -
us-east.rgw.meta:users.email -
us-east.rgw.meta:users.swift -
us-east.rgw.meta:users.uid
5.2.3. Migrating a single site system to multi-site
To migrate from a single site system with a default zone group and zone to a multi-site system, use the following steps:
Create a realm. Replace
NAMEwith the realm name.Syntax
radosgw-admin realm create --rgw-realm=NAME --defaultRename the default zone and zonegroup. Replace
<name>with the zonegroup or zone name.Syntax
radosgw-admin zonegroup rename --rgw-zonegroup default --zonegroup-new-name=NEW_ZONE_GROUP_NAME
radosgw-admin zone rename --rgw-zone default --zone-new-name us-east-1 --rgw-zonegroup=ZONE_GROUP_NAME
Configure the primary zonegroup. Replace
NAMEwith the realm or zonegroup name. ReplaceFQDNwith the fully qualified domain name(s) in the zonegroup.Syntax
radosgw-admin zonegroup modify --rgw-realm=REALM_NAME --rgw-zonegroup=ZONE_GROUP_NAME --endpoints http://FQDN:80 --master --defaultCreate a system user. Replace
USER_IDwith the username. ReplaceDISPLAY_NAMEwith a display name. It can contain spaces.Syntax
radosgw-admin user create --uid=USER_ID \
                            --display-name="DISPLAY_NAME" \
                            --access-key=ACCESS_KEY --secret=SECRET_KEY \ --system
Configure the primary zone. Replace
NAMEwith the realm, zonegroup, or zone name. ReplaceFQDNwith the fully qualified domain name(s) in the zonegroup.Syntax
radosgw-admin zone modify --rgw-realm=REALM_NAME --rgw-zonegroup=ZONE_GROUP_NAME \
                            --rgw-zone=ZONE_NAME --endpoints http://FQDN:80 \
                            --access-key=ACCESS_KEY --secret=SECRET_KEY \
                            --master --default
Optional: If you specified the realm and zone in the service specification during the deployment of the Ceph Object Gateway, update the
specsection of the specification file:Syntax
spec:
  rgw_realm: REALM_NAME
  rgw_zone: ZONE_NAME
Update the Ceph configuration database:
Syntax
ceph config set client.rgw.SERVICE_NAME rgw_realm REALM_NAME
ceph config set client.rgw.SERVICE_NAME rgw_zonegroup ZONE_GROUP_NAME
ceph config set client.rgw.SERVICE_NAME rgw_zone PRIMARY_ZONE_NAME
Example
[ceph: root@host01 /]# ceph config set client.rgw.rgwsvcid.mons-1.jwgwwp rgw_realm test_realm
[ceph: root@host01 /]# ceph config set client.rgw.rgwsvcid.mons-1.jwgwwp rgw_zonegroup us
[ceph: root@host01 /]# ceph config set client.rgw.rgwsvcid.mons-1.jwgwwp rgw_zone us-east-1
Commit the updated configuration:
Example
[ceph: root@host01 /]# radosgw-admin period update --commitRestart the Ceph Object Gateway:
NoteUse the output from the
ceph orch pscommand, under theNAMEcolumn, to get the SERVICE_TYPE.ID information.To restart the Ceph Object Gateway on an individual node in the storage cluster:
Syntax
systemctl restart ceph-CLUSTER_ID@SERVICE_TYPE.ID.serviceExample
[root@host01 ~]# systemctl restart ceph-c4b34c6f-8365-11ba-dc31-529020a7702d@rgw.realm.zone.host01.gwasto.serviceTo restart the Ceph Object Gateways on all nodes in the storage cluster:
Syntax
ceph orch restart SERVICE_TYPEExample
[ceph: root@host01 /]# ceph orch restart rgw
- Establish the secondary zone. See the Establishing a secondary zone section.
5.2.4. Establishing a secondary zone
Zones within a zone group replicate all data to ensure that each zone has the same data. When creating the secondary zone, issue ALL of the radosgw-admin zone operations on a host identified to serve the secondary zone.
To add a additional zones, follow the same procedures as for adding the secondary zone. Use a different zone name.
-
You must run metadata operations, such as user creation and quotas, on a host within the master zone of the master zonegroup. The master zone and the secondary zone can receive bucket operations from the RESTful APIs, but the secondary zone redirects bucket operations to the master zone. If the master zone is down, bucket operations will fail. If you create a bucket using the
radosgw-adminCLI, you must run it on a host within the master zone of the master zone group so that the buckets will synchronize with other zone groups and zones. -
Bucket creation for a particular user is not supported, even if you create a user in the secondary zone with
--yes-i-really-mean-it.
Prerequisites
- At least two running Red Hat Ceph Storage clusters.
- At least two Ceph Object Gateway instances, one for each Red Hat Ceph Storage cluster.
- Root-level access to all the nodes.
- Nodes or containers are added to the storage cluster.
- All Ceph Manager, Monitor, and OSD daemons are deployed.
Procedure
Log into the
cephadmshell:Example
[root@host04 ~]# cephadm shellPull the primary realm configuration from the host:
Syntax
radosgw-admin realm pull --url=URL_TO_PRIMARY_ZONE_GATEWAY --access-key=ACCESS_KEY --secret-key=SECRET_KEYExample
[ceph: root@host04 /]# radosgw-admin realm pull --url=http://10.74.249.26:80 --access-key=LIPEYZJLTWXRKXS9LPJC --secret-key=IsAje0AVDNXNw48LjMAimpCpI7VaxJYSnfD0FFKQPull the primary period configuration from the host:
Syntax
radosgw-admin period pull --url=URL_TO_PRIMARY_ZONE_GATEWAY --access-key=ACCESS_KEY --secret-key=SECRET_KEYExample
[ceph: root@host04 /]# radosgw-admin period pull --url=http://10.74.249.26:80 --access-key=LIPEYZJLTWXRKXS9LPJC --secret-key=IsAje0AVDNXNw48LjMAimpCpI7VaxJYSnfD0FFKQConfigure a secondary zone:
NoteAll zones run in an active-active configuration by default; that is, a gateway client might write data to any zone and the zone will replicate the data to all other zones within the zone group. If the secondary zone should not accept write operations, specify the
`--read-onlyflag to create an active-passive configuration between the master zone and the secondary zone. Additionally, provide theaccess_keyandsecret_keyof the generated system user stored in the master zone of the master zone group.Syntax
radosgw-admin zone create --rgw-zonegroup=_ZONE_GROUP_NAME_ \
             --rgw-zone=_SECONDARY_ZONE_NAME_ --endpoints=http://_RGW_SECONDARY_HOSTNAME_:_RGW_PRIMARY_PORT_NUMBER_1_ \
             --access-key=_SYSTEM_ACCESS_KEY_ --secret=_SYSTEM_SECRET_KEY_ \
             [--read-only]
Example
[ceph: root@host04 /]# radosgw-admin zone create --rgw-zonegroup=us --rgw-zone=us-east-2 --endpoints=http://rgw2:80 --access-key=LIPEYZJLTWXRKXS9LPJC --secret-key=IsAje0AVDNXNw48LjMAimpCpI7VaxJYSnfD0FFKQOptional: Delete the default zone:
ImportantDo not delete the default zone and its pools if you are using the default zone and zone group to store data.
Example
[ceph: root@host04 /]# radosgw-admin zone rm --rgw-zone=default
[ceph: root@host04 /]# ceph osd pool rm default.rgw.log default.rgw.log --yes-i-really-really-mean-it
[ceph: root@host04 /]# ceph osd pool rm default.rgw.meta default.rgw.meta --yes-i-really-really-mean-it
[ceph: root@host04 /]# ceph osd pool rm default.rgw.control default.rgw.control --yes-i-really-really-mean-it
[ceph: root@host04 /]# ceph osd pool rm default.rgw.data.root default.rgw.data.root --yes-i-really-really-mean-it
[ceph: root@host04 /]# ceph osd pool rm default.rgw.gc default.rgw.gc --yes-i-really-really-mean-it
Optional: If you specified the realm and zone in the service specification during the deployment of the Ceph Object Gateway, update the
specsection of the specification file:Syntax
spec:
  rgw_realm: REALM_NAME
  rgw_zone: ZONE_NAME
Update the Ceph configuration database:
Syntax
ceph config set client.rgw.SERVICE_NAME rgw_realm REALM_NAME
ceph config set client.rgw.SERVICE_NAME rgw_zonegroup ZONE_GROUP_NAME
ceph config set client.rgw.SERVICE_NAME rgw_zone SECONDARY_ZONE_NAME
Example
[ceph: root@host04 /]# ceph config set client.rgw.rgwsvcid.mons-1.jwgwwp rgw_realm test_realm
[ceph: root@host04 /]# ceph config set client.rgw.rgwsvcid.mons-1.jwgwwp rgw_zonegroup us
[ceph: root@host04 /]# ceph config set client.rgw.rgwsvcid.mons-1.jwgwwp rgw_zone us-east-2
Commit the changes:
Syntax
radosgw-admin period update --commitExample
[ceph: root@host04 /]# radosgw-admin period update --commitOutside the
cephadmshell, fetch the FSID of the storage cluster and the processes:Example
[root@host04 ~]# systemctl list-units | grep cephStart the Ceph Object Gateway daemon:
Syntax
systemctl start ceph-FSID@DAEMON_NAME
systemctl enable ceph-FSID@DAEMON_NAME
Example
[root@host04 ~]# systemctl start ceph-62a081a6-88aa-11eb-a367-001a4a000672@rgw.test_realm.us-east-2.host04.ahdtsw.service
[root@host04 ~]# systemctl enable ceph-62a081a6-88aa-11eb-a367-001a4a000672@rgw.test_realm.us-east-2.host04.ahdtsw.service
5.2.5. Configuring the archive zone (Technology Preview)
Ensure you have a realm before configuring a zone as an archive. Without a realm, you cannot archive data through an archive zone for default zone/zonegroups.
The archive sync module uses the versioning feature of S3 objects in Ceph Object Gateway to have an archive zone. The archive zone has a history of versions of S3 objects that can only be eliminated through the gateways that are associated with the archive zone. It captures all the data updates and metadata to consolidate them as versions of S3 objects.
The archive sync module is a Technology Preview feature only. Technology Preview features are not supported with Red Hat production service level agreements (SLAs), might not be functionally complete, and Red Hat does not recommend using them for production. These features provide early access to upcoming product features, enabling customers to test functionality and provide feedback during the development process. See the support scope for Red Hat Technology Preview features for more details.
Prerequisites
- A running Red Hat Ceph Storage cluster.
- Root-level access to a Ceph Monitor node.
- Installation of the Ceph Object Gateway software.
Procedure
Configure the archive zone when creating a new zone by using the
archivetier:Syntax
radosgw-admin zone create --rgw-zonegroup={ZONE_GROUP_NAME} --rgw-zone={ZONE_NAME} --endpoints={http://FQDN:PORT},{http://FQDN:PORT} --tier-type=archiveExample
[ceph: root@host01 /]# radosgw-admin zone create --rgw-zonegroup=us --rgw-zone=us-east --endpoints={http://example.com:8080} --tier-type=archive
5.2.5.1. Deleting objects in archive zone
You can use an S3 lifecycle policy extension to delete objects within an <ArchiveZone> element.
Archive zone objects can only be deleted using the expiration lifecycle policy rule.
-
If any
<Rule>section contains an<ArchiveZone>element, that rule executes in archive zone and are the ONLY rules which run in an archive zone. -
Rules marked
<ArchiveZone>do NOT execute in non-archive zones.
The rules within the lifecycle policy determine when and what objects to delete. For more information about lifecycle creation and management, see Bucket lifecycle.
Prerequisites
- A running Red Hat Ceph Storage cluster.
- Root-level access to a Ceph Monitor node.
- Installation of the Ceph Object Gateway software.
Procedure
Set the
<ArchiveZone>lifecycle policy rule. For more information about creating a lifecycle policy, see See the Creating a lifecycle management policy section in the Red Hat Ceph Storage Object Gateway Guide for more details.Example
<?xml version="1.0" ?>
<LifecycleConfiguration xmlns="http://s3.amazonaws.com/doc/2006-03-01/">
        <Rule>
                <ID>delete-1-days-az</ID>
                <Filter>
		  <Prefix></Prefix>
		  <ArchiveZone />
1 </Filter> <Status>Enabled</Status> <Expiration> <Days>1</Days> </Expiration> </Rule> </LifecycleConfiguration>Optional: See if a specific lifecycle policy contains an archive zone rule.
Syntax
radosgw-admin lc get --bucket BUCKET_NAMEExample
[ceph: root@host01 /]# radosgw-admin lc get --bucket test-bkt

{
    "prefix_map": {
        "": {
            "status": true,
            "dm_expiration": true,
            "expiration": 0,
            "noncur_expiration": 2,
            "mp_expiration": 0,
            "transitions": {},
            "noncur_transitions": {}
        }
    },
    "rule_map": [
        {
            "id": "Rule 1",
            "rule": {
                "id": "Rule 1",
                "prefix": "",
                "status": "Enabled",
                "expiration": {
                    "days": "",
                    "date": ""
                },
                "noncur_expiration": {
                    "days": "2",
                    "date": ""
                },
                "mp_expiration": {
                    "days": "",
                    "date": ""
                },
                "filter": {
                    "prefix": "",
                    "obj_tags": {
                        "tagset": {}
                    },
                    "archivezone": ""
1 }, "transitions": {}, "noncur_transitions": {}, "dm_expiration": true } } ] }If the Ceph Object Gateway user is deleted, the buckets at the archive site owned by that user is inaccessible. Link those buckets to another Ceph Object Gateway user to access the data.
Syntax
radosgw-admin bucket link --uid NEW_USER_ID --bucket BUCKET_NAME --yes-i-really-mean-itExample
[ceph: root@host01 /]# radosgw-admin bucket link --uid arcuser1 --bucket arc1-deleted-da473fbbaded232dc5d1e434675c1068 --yes-i-really-mean-it
5.2.5.2. Deleting objects in archive module
Starting from Red Hat Ceph Storage 5.3 and later, you can use an S3 lifecycle policy extension to delete objects within an <ArchiveZone> element.
-
If any
<Rule>section contains an<ArchiveZone>element, that rule executes in archive zone and are the ONLY rules which run in an archive zone. -
Rules marked
<ArchiveZone>do NOT execute in non-archive zones.
The rules within the lifecycle policy determine when and what objects to delete. For more information about lifecycle creation and management, see Bucket lifecycle.
Prerequisites
- A running Red Hat Ceph Storage cluster.
- Root-level access to a Ceph Monitor node.
- Installation of the Ceph Object Gateway software.
Procedure
Set the
<ArchiveZone>lifecycle policy rule. For more information about creating a lifecycle policy, see * See the Creating a lifecycle management policy section in the Red Hat Ceph Storage Object Gateway Guide for more details.Example
<?xml version="1.0" ?>
<LifecycleConfiguration xmlns="http://s3.amazonaws.com/doc/2006-03-01/">
        <Rule>
                <ID>delete-1-days-az</ID>
                <Filter>
		  <Prefix></Prefix>
		  <ArchiveZone />
1 </Filter> <Status>Enabled</Status> <Expiration> <Days>1</Days> </Expiration> </Rule> </LifecycleConfiguration>Optional: See if a specific lifecycle policy contains an archive zone rule.
Syntax
radosgw-admin lc get -- _BUCKET_NAME_Example
[ceph: root@host01 /]# radosgw-admin lc get --bucket test-bkt

{
    "prefix_map": {
        "": {
            "status": true,
            "dm_expiration": true,
            "expiration": 0,
            "noncur_expiration": 2,
            "mp_expiration": 0,
            "transitions": {},
            "noncur_transitions": {}
        }
    },
    "rule_map": [
        {
            "id": "Rule 1",
            "rule": {
                "id": "Rule 1",
                "prefix": "",
                "status": "Enabled",
                "expiration": {
                    "days": "",
                    "date": ""
                },
                "noncur_expiration": {
                    "days": "2",
                    "date": ""
                },
                "mp_expiration": {
                    "days": "",
                    "date": ""
                },
                "filter": {
                    "prefix": "",
                    "obj_tags": {
                        "tagset": {}
                    },
                    "archivezone": ""
1 }, "transitions": {}, "noncur_transitions": {}, "dm_expiration": true } } ] }
5.2.6. Failover and disaster recovery
If the primary zone fails, failover to the secondary zone for disaster recovery.
Prerequisites
- A running Red Hat Ceph Storage cluster.
- Root-level access to a Ceph Monitor node.
- Installation of the Ceph Object Gateway software.
Procedure
Make the secondary zone the primary and default zone. For example:
Syntax
radosgw-admin zone modify --rgw-zone=ZONE_NAME --master --defaultBy default, Ceph Object Gateway runs in an active-active configuration. If the cluster was configured to run in an active-passive configuration, the secondary zone is a read-only zone. Remove the
--read-onlystatus to allow the zone to receive write operations. For example:Syntax
radosgw-admin zone modify --rgw-zone=ZONE_NAME --master --default --read-only=falseUpdate the period to make the changes take effect:
Example
[ceph: root@host01 /]# radosgw-admin period update --commitRestart the Ceph Object Gateway.
NoteUse the output from the
ceph orch pscommand, under theNAMEcolumn, to get the SERVICE_TYPE.ID information.To restart the Ceph Object Gateway on an individual node in the storage cluster:
Syntax
systemctl restart ceph-CLUSTER_ID@SERVICE_TYPE.ID.serviceExample
[root@host01 ~]# systemctl restart ceph-c4b34c6f-8365-11ba-dc31-529020a7702d@rgw.realm.zone.host01.gwasto.serviceTo restart the Ceph Object Gateways on all nodes in the storage cluster:
Syntax
ceph orch restart SERVICE_TYPEExample
[ceph: root@host01 /]# ceph orch restart rgw
If the former primary zone recovers, revert the operation.
From the recovered zone, pull the realm from the current primary zone:
Syntax
radosgw-admin realm pull --url=URL_TO_PRIMARY_ZONE_GATEWAY \
                            --access-key=ACCESS_KEY --secret=SECRET_KEY
Make the recovered zone the primary and default zone:
Syntax
radosgw-admin zone modify --rgw-zone=ZONE_NAME --master --defaultUpdate the period to make the changes take effect:
Example
[ceph: root@host01 /]# radosgw-admin period update --commitRestart the Ceph Object Gateway in the recovered zone:
Syntax
ceph orch restart SERVICE_TYPEExample
[ceph: root@host01 /]# ceph orch restart rgwIf the secondary zone needs to be a read-only configuration, update the secondary zone:
Syntax
radosgw-admin zone modify --rgw-zone=ZONE_NAME --read-only
radosgw-admin zone modify --rgw-zone=ZONE_NAME --read-only
Update the period to make the changes take effect:
Example
[ceph: root@host01 /]# radosgw-admin period update --commitRestart the Ceph Object Gateway in the secondary zone:
Syntax
ceph orch restart SERVICE_TYPEExample
[ceph: root@host01 /]# ceph orch restart rgw
5.2.7. Synchronizing multi-site data logs
By default, in Red Hat Ceph Storage 4 and earlier versions, multi-site data logging is set to object map (OMAP) data logs.
It is recommended to use default datalog type.
You do not have to synchronize and trim everything down when switching. The Red Hat Ceph Storage cluster starts a data log of the requested type when you use the radosgw-admin data log type, and continues synchronizing and trimming the old log, purging it when it is empty, before going to the new log.
Prerequisites
- A running Red Hat Ceph Storage cluster.
- Ceph Object Gateway multi-site installed.
- Root-level access on all the nodes.
Procedure
View the type of data log:
Example
[root@host01 ~]# radosgw-admin datalog status { "marker": "1_1657793517.559260_543389.1", "last_update": "2022-07-14 10:11:57.559260Z" },1_in marker reflects OMAP data log type.Change the data log type to FIFO:
NoteConfiguration values are case-sensitive. Use
fifoin lowercase to set configuration options.NoteAfter upgrading from Red Hat Ceph Storage 4 to Red Hat Ceph Storage 5, change the default data log type to
fifo.Example
[root@host01 ~]# radosgw-admin --log-type fifo datalog typeVerify the changes:
Example
[root@host01 ~]# radosgw-admin datalog status { "marker": "G00000000000000000001@00000000000000000037:00000000000003563105", "last_update": "2022-07-14T10:14:07.516629Z" },:in marker reflects FIFO data log type.
5.2.8. Configuring multiple realms in the same storage cluster
You can configure multiple realms in the same storage cluster. This is a more advanced use case for multi-site. Configuring multiple realms in the same storage cluster enables you to use a local realm to handle local Ceph Object Gateway client traffic, as well as a replicated realm for data that will be replicated to a secondary site.
Red Hat recommends that each realm has its own Ceph Object Gateway.
Prerequisites
- Two running Red Hat Ceph Storage data centers in a storage cluster.
- The access key and secret key for each data center in the storage cluster.
- Root-level access to all the Ceph Object Gateway nodes.
- Each data center has its own local realm. They share a realm that replicates on both sites.
Procedure
Create one local realm on the first data center in the storage cluster:
Syntax
radosgw-admin realm create --rgw-realm=REALM_NAME --defaultExample
[ceph: root@host01 /]# radosgw-admin realm create --rgw-realm=ldc1 --defaultCreate one local master zonegroup on the first data center:
Syntax
radosgw-admin zonegroup create --rgw-zonegroup=ZONE_GROUP_NAME --endpoints=http://RGW_NODE_NAME:80 --rgw-realm=REALM_NAME --master --defaultExample
[ceph: root@host01 /]# radosgw-admin zonegroup create --rgw-zonegroup=ldc1zg --endpoints=http://rgw1:80 --rgw-realm=ldc1 --master --defaultCreate one local zone on the first data center:
Syntax
radosgw-admin zone create --rgw-zonegroup=ZONE_GROUP_NAME --rgw-zone=ZONE_NAME --master --default --endpoints=HTTP_FQDN[,HTTP_FQDN]Example
[ceph: root@host01 /]# radosgw-admin zone create --rgw-zonegroup=ldc1zg --rgw-zone=ldc1z --master --default --endpoints=http://rgw.example.comCommit the period:
Example
[ceph: root@host01 /]# radosgw-admin period update --commitOptional: If you specified the realm and zone in the service specification during the deployment of the Ceph Object Gateway, update the
specsection of the specification file:Syntax
spec:
  rgw_realm: REALM_NAME
  rgw_zone: ZONE_NAME
You can either deploy the Ceph Object Gateway daemons with the appropriate realm and zone or update the configuration database:
Deploy the Ceph Object Gateway using placement specification:
Syntax
ceph orch apply rgw SERVICE_NAME --realm=REALM_NAME --zone=ZONE_NAME --placement="NUMBER_OF_DAEMONS HOST_NAME_1 HOST_NAME_2"Example
[ceph: root@host01 /]# ceph orch apply rgw rgw --realm=ldc1 --zone=ldc1z --placement="1 host01"Update the Ceph configuration database:
Syntax
ceph config set client.rgw.SERVICE_NAME rgw_realm REALM_NAME
ceph config set client.rgw.SERVICE_NAME rgw_zonegroup ZONE_GROUP_NAME
ceph config set client.rgw.SERVICE_NAME rgw_zone ZONE_NAME
Example
[ceph: root@host01 /]# ceph config set client.rgw.rgwsvcid.mons-1.jwgwwp rgw_realm ldc1
[ceph: root@host01 /]# ceph config set client.rgw.rgwsvcid.mons-1.jwgwwp rgw_zonegroup ldc1zg
[ceph: root@host01 /]# ceph config set client.rgw.rgwsvcid.mons-1.jwgwwp rgw_zone ldc1z
Restart the Ceph Object Gateway.
NoteUse the output from the
ceph orch pscommand, under theNAMEcolumn, to get the SERVICE_TYPE.ID information.To restart the Ceph Object Gateway on an individual node in the storage cluster:
Syntax
systemctl restart ceph-CLUSTER_ID@SERVICE_TYPE.ID.serviceExample
[root@host01 ~]# systemctl restart ceph-c4b34c6f-8365-11ba-dc31-529020a7702d@rgw.realm.zone.host01.gwasto.serviceTo restart the Ceph Object Gateways on all nodes in the storage cluster:
Syntax
ceph orch restart SERVICE_TYPEExample
[ceph: root@host01 /]# ceph orch restart rgw
Create one local realm on the second data center in the storage cluster:
Syntax
radosgw-admin realm create --rgw-realm=REALM_NAME --defaultExample
[ceph: root@host04 /]# radosgw-admin realm create --rgw-realm=ldc2 --defaultCreate one local master zonegroup on the second data center:
Syntax
radosgw-admin zonegroup create --rgw-zonegroup=ZONE_GROUP_NAME --endpoints=http://RGW_NODE_NAME:80 --rgw-realm=REALM_NAME --master --defaultExample
[ceph: root@host04 /]# radosgw-admin zonegroup create --rgw-zonegroup=ldc2zg --endpoints=http://rgw2:80 --rgw-realm=ldc2 --master --defaultCreate one local zone on the second data center:
Syntax
radosgw-admin zone create --rgw-zonegroup=ZONE_GROUP_NAME --rgw-zone=ZONE_NAME --master --default --endpoints=HTTP_FQDN[, HTTP_FQDN]Example
[ceph: root@host04 /]# radosgw-admin zone create --rgw-zonegroup=ldc2zg --rgw-zone=ldc2z --master --default --endpoints=http://rgw.example.comCommit the period:
Example
[ceph: root@host04 /]# radosgw-admin period update --commitOptional: If you specified the realm and zone in the service specification during the deployment of the Ceph Object Gateway, update the
specsection of the specification file:Syntax
spec:
  rgw_realm: REALM_NAME
  rgw_zone: ZONE_NAME
You can either deploy the Ceph Object Gateway daemons with the appropriate realm and zone or update the configuration database:
Deploy the Ceph Object Gateway using placement specification:
Syntax
ceph orch apply rgw SERVICE_NAME --realm=REALM_NAME --zone=ZONE_NAME --placement="NUMBER_OF_DAEMONS HOST_NAME_1 HOST_NAME_2"Example
[ceph: root@host01 /]# ceph orch apply rgw rgw --realm=ldc2 --zone=ldc2z --placement="1 host01"Update the Ceph configuration database:
Syntax
ceph config set client.rgw.SERVICE_NAME rgw_realm REALM_NAME
ceph config set client.rgw.SERVICE_NAME rgw_zonegroup ZONE_GROUP_NAME
ceph config set client.rgw.SERVICE_NAME rgw_zone ZONE_NAME
Example
[ceph: root@host01 /]# ceph config set client.rgw.rgwsvcid.mons-1.jwgwwp rgw_realm ldc2
[ceph: root@host01 /]# ceph config set client.rgw.rgwsvcid.mons-1.jwgwwp rgw_zonegroup ldc2zg
[ceph: root@host01 /]# ceph config set client.rgw.rgwsvcid.mons-1.jwgwwp rgw_zone ldc2z
Restart the Ceph Object Gateway.
NoteUse the output from the
ceph orch pscommand, under theNAMEcolumn, to get the SERVICE_TYPE.ID information.To restart the Ceph Object Gateway on individual node in the storage cluster:
Syntax
systemctl restart ceph-CLUSTER_ID@SERVICE_TYPE.ID.serviceExample
[root@host04 ~]# systemctl restart ceph-c4b34c6f-8365-11ba-dc31-529020a7702d@rgw.realm.zone.host01.gwasto.serviceTo restart the Ceph Object Gateways on all nodes in the storage cluster:
Syntax
ceph orch restart SERVICE_TYPEExample
[ceph: root@host04 /]# ceph orch restart rgw
Create a replicated realm on the first data center in the storage cluster:
Syntax
radosgw-admin realm create --rgw-realm=REPLICATED_REALM_1 --defaultExample
[ceph: root@host01 /]# radosgw-admin realm create --rgw-realm=rdc1 --defaultUse the
--defaultflag to make the replicated realm default on the primary site.Create a master zonegroup for the first data center:
Syntax
radosgw-admin zonegroup create --rgw-zonegroup=RGW_ZONE_GROUP --endpoints=http://_RGW_NODE_NAME:80 --rgw-realm=_RGW_REALM_NAME --master --defaultExample
[ceph: root@host01 /]# radosgw-admin zonegroup create --rgw-zonegroup=rdc1zg --endpoints=http://rgw1:80 --rgw-realm=rdc1 --master --defaultCreate a master zone on the first data center:
Syntax
radosgw-admin zone create --rgw-zonegroup=RGW_ZONE_GROUP --rgw-zone=_MASTER_RGW_NODE_NAME --master --default --endpoints=HTTP_FQDN[,HTTP_FQDN]Example
[ceph: root@host01 /]# radosgw-admin zone create --rgw-zonegroup=rdc1zg --rgw-zone=rdc1z --master --default --endpoints=http://rgw.example.comCreate a synchronization user and add the system user to the master zone for multi-site:
Syntax
radosgw-admin user create --uid="SYNCHRONIZATION_USER" --display-name="Synchronization User" --system
radosgw-admin zone modify --rgw-zone=RGW_ZONE --access-key=ACCESS_KEY --secret=SECRET_KEY
Example
radosgw-admin user create --uid="synchronization-user" --display-name="Synchronization User" --system
[ceph: root@host01 /]# radosgw-admin zone modify --rgw-zone=rdc1zg --access-key=3QV0D6ZMMCJZMSCXJ2QJ --secret=VpvQWcsfI9OPzUCpR4kynDLAbqa1OIKqRB6WEnH8
Commit the period:
Example
[ceph: root@host01 /]# radosgw-admin period update --commitOptional: If you specified the realm and zone in the service specification during the deployment of the Ceph Object Gateway, update the
specsection of the specification file:Syntax
spec:
  rgw_realm: REALM_NAME
  rgw_zone: ZONE_NAME
You can either deploy the Ceph Object Gateway daemons with the appropriate realm and zone or update the configuration database:
Deploy the Ceph Object Gateway using placement specification:
Syntax
ceph orch apply rgw SERVICE_NAME --realm=REALM_NAME --zone=ZONE_NAME --placement="NUMBER_OF_DAEMONS HOST_NAME_1 HOST_NAME_2"Example
[ceph: root@host01 /]# ceph orch apply rgw rgw --realm=rdc1 --zone=rdc1z --placement="1 host01"Update the Ceph configuration database:
Syntax
ceph config set client.rgw.SERVICE_NAME  rgw_realm REALM_NAME
ceph config set client.rgw.SERVICE_NAME  rgw_zonegroup ZONE_GROUP_NAME
ceph config set client.rgw.SERVICE_NAME  rgw_zone ZONE_NAME
Example
[ceph: root@host01 /]# ceph config set client.rgw.rgwsvcid.mons-1.jwgwwp rgw_realm rdc1
[ceph: root@host01 /]# ceph config set client.rgw.rgwsvcid.mons-1.jwgwwp rgw_zonegroup rdc1zg
[ceph: root@host01 /]# ceph config set client.rgw.rgwsvcid.mons-1.jwgwwp rgw_zone rdc1z
Restart the Ceph Object Gateway.
NoteUse the output from the
ceph orch pscommand, under theNAMEcolumn, to get the SERVICE_TYPE.ID information.To restart the Ceph Object Gateway on individual node in the storage cluster:
Syntax
systemctl restart ceph-CLUSTER_ID@SERVICE_TYPE.ID.serviceExample
[root@host01 ~]# systemctl restart ceph-c4b34c6f-8365-11ba-dc31-529020a7702d@rgw.realm.zone.host01.gwasto.serviceTo restart the Ceph Object Gateways on all nodes in the storage cluster:
Syntax
ceph orch restart SERVICE_TYPEExample
[ceph: root@host01 /]# ceph orch restart rgw
Pull the replicated realm on the second data center:
Syntax
radosgw-admin realm pull --url=https://tower-osd1.cephtips.com --access-key=ACCESS_KEY --secret-key=SECRET_KEYExample
[ceph: root@host01 /]# radosgw-admin realm pull --url=https://tower-osd1.cephtips.com --access-key=3QV0D6ZMMCJZMSCXJ2QJ --secret-key=VpvQWcsfI9OPzUCpR4kynDLAbqa1OIKqRB6WEnH8Pull the period from the first data center:
Syntax
radosgw-admin period pull --url=https://tower-osd1.cephtips.com --access-key=ACCESS_KEY --secret-key=SECRET_KEYExample
[ceph: root@host01 /]# radosgw-admin period pull --url=https://tower-osd1.cephtips.com --access-key=3QV0D6ZMMCJZMSCXJ2QJ --secret-key=VpvQWcsfI9OPzUCpR4kynDLAbqa1OIKqRB6WEnH8Create the secondary zone on the second data center:
Syntax
radosgw-admin zone create --rgw-zone=RGW_ZONE --rgw-zonegroup=RGW_ZONE_GROUP --endpoints=https://tower-osd4.cephtips.com --access-key=_ACCESS_KEY --secret-key=SECRET_KEYExample
[ceph: root@host04 /]# radosgw-admin zone create --rgw-zone=rdc2z --rgw-zonegroup=rdc1zg --endpoints=https://tower-osd4.cephtips.com --access-key=3QV0D6ZMMCJZMSCXJ2QJ --secret-key=VpvQWcsfI9OPzUCpR4kynDLAbqa1OIKqRB6WEnH8Commit the period:
Example
[ceph: root@host04 /]# radosgw-admin period update --commitOptional: If you specified the realm and zone in the service specification during the deployment of the Ceph Object Gateway, update the
specsection of the specification file:Syntax
spec:
  rgw_realm: REALM_NAME
  rgw_zone: ZONE_NAME
You can either deploy the Ceph Object Gateway daemons with the appropriate realm and zone or update the configuration database:
Deploy the Ceph Object Gateway using placement specification:
Syntax
ceph orch apply rgw SERVICE_NAME --realm=REALM_NAME --zone=ZONE_NAME --placement="NUMBER_OF_DAEMONS HOST_NAME_1 HOST_NAME_2"Example
[ceph: root@host04 /]# ceph orch apply rgw rgw --realm=rdc1 --zone=rdc2z --placement="1 host04"Update the Ceph configuration database:
Syntax
ceph config set client.rgw.SERVICE_NAME rgw_realm REALM_NAME
ceph config set client.rgw.SERVICE_NAME rgw_zonegroup ZONE_GROUP_NAME
ceph config set client.rgw.SERVICE_NAME rgw_zone ZONE_NAME
Example
[ceph: root@host04 /]# ceph config set client.rgw.rgwsvcid.mons-1.jwgwwp rgw_realm rdc1
[ceph: root@host04 /]# ceph config set client.rgw.rgwsvcid.mons-1.jwgwwp rgw_zonegroup rdc1zg
[ceph: root@host04 /]# ceph config set client.rgw.rgwsvcid.mons-1.jwgwwp rgw_zone rdc2z
Restart the Ceph Object Gateway.
NoteUse the output from the
ceph orch pscommand, under theNAMEcolumn, to get the SERVICE_TYPE.ID information.To restart the Ceph Object Gateway on individual node in the storage cluster:
Syntax
systemctl restart ceph-CLUSTER_ID@SERVICE_TYPE.ID.serviceExample
[root@host02 ~]# systemctl restart ceph-c4b34c6f-8365-11ba-dc31-529020a7702d@rgw.realm.zone.host01.gwasto.serviceTo restart the Ceph Object Gateways on all nodes in the storage cluster:
Syntax
ceph orch restart SERVICE_TYPEExample
[ceph: root@host04 /]# ceph orch restart rgw
-
Log in as
rooton the endpoint for the second data center. Verify the synchronization status on the master realm:
Syntax
radosgw-admin sync statusExample
[ceph: root@host04 /]# radosgw-admin sync status realm 59762f08-470c-46de-b2b1-d92c50986e67 (ldc2) zonegroup 7cf8daf8-d279-4d5c-b73e-c7fd2af65197 (ldc2zg) zone 034ae8d3-ae0c-4e35-8760-134782cb4196 (ldc2z) metadata sync no sync (zone is master) current time 2023-08-17T05:49:56Z zonegroup features enabled: resharding disabled: compress-encryptedImportantIn Red Hat Ceph Storage 5.3z5 release,
compress-encryptedfeature is displayed withradosgw-admin sync statuscommand and it is disabled by default. Do not enable this feature as it is not supported until Red Hat Ceph Storage 6.1z2.-
Log in as
rooton the endpoint for the first data center. Verify the synchronization status for the replication-synchronization realm:
Syntax
radosgw-admin sync status --rgw-realm RGW_REALM_NAMEExample
[ceph: root@host01 /]# radosgw-admin sync status --rgw-realm rdc1
          realm 73c7b801-3736-4a89-aaf8-e23c96e6e29d (rdc1)
      zonegroup d67cc9c9-690a-4076-89b8-e8127d868398 (rdc1zg)
           zone 67584789-375b-4d61-8f12-d1cf71998b38 (rdc2z)
  metadata sync syncing
                full sync: 0/64 shards
                incremental sync: 64/64 shards
                metadata is caught up with master
      data sync source: 705ff9b0-68d5-4475-9017-452107cec9a0 (rdc1z)
                        syncing
                        full sync: 0/128 shards
                        incremental sync: 128/128 shards
                        data is caught up with source
To store and access data in the local site, create the user for local realm:
Syntax
radosgw-admin user create --uid="LOCAL_USER" --display-name="Local user" --rgw-realm=_REALM_NAME --rgw-zonegroup=ZONE_GROUP_NAME --rgw-zone=ZONE_NAMEExample
[ceph: root@host04 /]# radosgw-admin user create --uid="local-user" --display-name="Local user" --rgw-realm=ldc1 --rgw-zonegroup=ldc1zg --rgw-zone=ldc1zImportantBy default, users are created under the default realm. For the users to access data in the local realm, the
radosgw-admincommand requires the--rgw-realmargument.
5.2.9. Using multi-site sync policies (Technology Preview)
The Ceph Object Gateway multi-site sync policies are a Technology Preview feature only. Technology Preview features are not supported with Red Hat production service level agreements (SLAs), might not be functionally complete, and Red Hat does not recommend using them for production. These features provide early access to upcoming product features, enabling customers to test functionality and provide feedback during the development process. See the support scope for Red Hat Technology Preview features for more details.
As a storage administrator, you can use multi-site sync policies at the bucket level to control data movement between buckets in different zones. These policies are called bucket-granularity sync policies. Previously, all buckets within zones were treated symmetrically. This means that each zone contained a mirror copy of a given bucket, and the copies of buckets were identical in all of the zones. The sync process assumed that the bucket sync source and the bucket sync destination referred to the same bucket.
Using bucket-granularity sync policies allows for the buckets in different zones to contain different data. This enables a bucket to pull data from other buckets in other zones, and those buckets do not have the same name or ID as the bucket pulling the data. In this case, the bucket sync source and the bucket sync destination refer to different buckets.
The sync policy supersedes the old zone group coarse configuration (sync_from*). The sync policy can be configured at the zone group level. If it is configured, it replaces the old-style configuration at the zone group level, but it can also be configured at the bucket level.
5.2.9.1. Prerequisites
- A running Red Hat Ceph Storage cluster.
- Root-level access to a Ceph Monitor node.
- Installation of the Ceph Object Gateway software.
5.2.9.2. Multi-site sync policy group state
In the sync policy, multiple groups that can contain lists of data-flow configurations can be defined, as well as lists of pipe configurations. The data-flow defines the flow of data between the different zones. It can define symmetrical data flow, in which multiple zones sync data from each other, and it can define directional data flow, in which the data moves in one way from one zone to another.
A pipe defines the actual buckets that can use these data flows, and the properties that are associated with it, such as the source object prefix.
A sync policy group can be in 3 states:
- Enabled — sync is allowed and enabled.
- Allowed — sync is allowed.
- Forbidden — sync, as defined by this group, is not allowed. Sync states in this group can override other groups.
A policy can be defined at the bucket level. A bucket level sync policy inherits the data flow of the zonegroup policy, and can only define a subset of what the zonegroup allows.
A wildcard zone, and a wildcard bucket parameter in the policy defines all relevant zones, or all relevant buckets. In the context of a bucket policy it means the current bucket instance. A disaster recovery configuration where entire zones are mirrored does not require configuring anything on the buckets. However, for a fine grained bucket sync it would be better to configure the pipes to be synced by allowing (status=allowed) them at the zonegroup level, such as using wildcards, but only enable the specific sync at the bucket level (status=enabled). If needed, the policy at the bucket level can limit the data movement to specific relevant zones.
| ZoneGroup | Bucket | Sync in the bucket |
|---|---|---|
| enabled | enabled | enabled |
| enabled | allowed | enabled |
| enabled | forbidden | disabled |
| allowed | enabled | enabled |
| allowed | allowed | disabled |
| allowed | forbidden | disabled |
| forbidden | enabled | disabled |
| forbidden | allowed | disabled |
| forbidden | forbidden | disabled |
For multiple group polices that are set to reflect for any sync pair (SOURCE_ZONE, SOURCE_BUCKET), (DESTINATION_ZONE, DESTINATION_BUCKET), the following rules are applied in the following order:
-
Even if one sync policy is
forbidden, the sync isdisabled. -
At least one policy should be
enabledfor the sync to beallowed.
Sync states in this group can override other groups.
A wildcard zone, and a wildcard bucket parameter in the policy defines all relevant zones, or all relevant buckets. In the context of a bucket policy, it means the current bucket instance. A disaster recovery configuration where entire zones are mirrored does not require configuring anything on the buckets. However, for a fine grained bucket sync it would be better to configure the pipes to be synced by allowing (status=allowed) them at the zonegroup level (for example, by using wildcard). However, enable the specific sync at the bucket level (status=enabled) only.
Any changes to the zonegroup policy need to be applied on the zonegroup master zone, and require period update and commit. Changes to the bucket policy need to be applied on the zonegroup master zone. Ceph Object Gateway handles these changes dynamically.
5.2.9.3. Retrieving the current policy
You can use the get command to retrieve the current zonegroup sync policy, or a specific bucket policy.
Prerequisites
- A running Red Hat Ceph Storage cluster.
-
Root or
sudoaccess. - The Ceph Object Gateway is installed.
Procedure
Retrieve the current zonegroup sync policy or bucket policy. To retrieve a specific bucket policy, use the
--bucketoption:Syntax
radosgw-admin sync policy get --bucket=BUCKET_NAMEExample
[ceph: root@host01 /]# radosgw-admin sync policy get --bucket=mybucket
5.2.9.4. Creating a sync policy group
You can create a sync policy group for the current zone group, or for a specific bucket.
Prerequisites
- A running Red Hat Ceph Storage cluster.
-
Root or
sudoaccess. - The Ceph Object Gateway is installed.
Procedure
Create a sync policy group or a bucket policy. To create a bucket policy, use the
--bucketoption:Syntax
radosgw-admin sync group create --bucket=BUCKET_NAME --group-id=GROUP_ID --status=enabled | allowed | forbiddenExample
[ceph: root@host01 /]# radosgw-admin sync group create --group-id=mygroup1 --status=enabled
5.2.9.5. Modifying a sync policy group
You can modify an existing sync policy group for the current zone group, or for a specific bucket.
Prerequisites
- A running Red Hat Ceph Storage cluster.
-
Root or
sudoaccess. - The Ceph Object Gateway is installed.
Procedure
Modify the sync policy group or a bucket policy. To modify a bucket policy, use the
--bucketoption:Syntax
radosgw-admin sync group modify --bucket=BUCKET_NAME --group-id=GROUP_ID --status=enabled | allowed | forbiddenExample
[ceph: root@host01 /]# radosgw-admin sync group modify --group-id=mygroup1 --status=forbidden
5.2.9.6. Get a sync policy group
You can use the group get command to show the current sync policy group by group ID, or to show a specific bucket policy.
Prerequisites
- A running Red Hat Ceph Storage cluster.
-
Root or
sudoaccess. - The Ceph Object Gateway is installed.
Procedure
Show the current sync policy group or bucket policy. To show a specific bucket policy, use the
--bucketoption:NoteIf
--bucketoption is not provided, then the group created at zonegroup-level is retrieved and not bucket-level.Syntax
radosgw-admin sync group get --bucket=BUCKET_NAME --group-id=GROUP_IDExample
[ceph: root@host01 /]# radosgw-admin sync group get --group-id=mygroup
5.2.9.7. Removing a sync policy group
You can use the group remove command to remove the current sync policy group by group ID, or to remove a specific bucket policy.
Prerequisites
- A running Red Hat Ceph Storage cluster.
-
Root or
sudoaccess. - The Ceph Object Gateway is installed.
Procedure
Remove the current sync policy group or bucket policy. To remove a specific bucket policy, use the
--bucketoption:Syntax
radosgw-admin sync group remove --bucket=BUCKET_NAME --group-id=GROUP_IDExample
[ceph: root@host01 /]# radosgw-admin sync group remove --group-id=mygroup
5.2.9.8. Creating a sync flow
You can create two different types of flows for a sync policy group or for a specific bucket:
- Directional sync flow
- Symmetrical sync flow
The group flow create command creates a sync flow. If you issue the group flow create command for a sync policy group or bucket that already has a sync flow, the command overwrites the existing settings for the sync flow and applies the settings you specify.
| Option | Description | Required/Optional |
|---|---|---|
| --bucket | Name of the bucket to which the sync policy needs to be configured. Used only in bucket-level sync policy. | Optional |
| --group-id | ID of the sync group. | Required |
| --flow-id | ID of the flow. | Required |
| --flow-type | Types of flows for a sync policy group or for a specific bucket - directional or symmetrical. | Required |
| --source-zone | To specify the source zone from which sync should happen. Zone that send data to the sync group. Required if flow type of sync group is directional. | Optional |
| --dest-zone | To specify the destination zone to which sync should happen. Zone that receive data from the sync group. Required if flow type of sync group is directional. | Optional |
| --zones | Zones that part of the sync group. Zones mention will be both sender and receiver zone. Specify zones separated by ",". Required if flow type of sync group is symmetrical. | Optional |
Prerequisites
- A running Red Hat Ceph Storage cluster.
-
Root or
sudoaccess. - The Ceph Object Gateway is installed.
Procedure
Create or update a directional sync flow. To create or update directional sync flow for a specific bucket, use the
--bucketoption.Syntax
radosgw-admin sync group flow create --bucket=BUCKET_NAME --group-id=GROUP_ID --flow-id=FLOW_ID --flow-type=directional --source-zone=SOURCE_ZONE --dest-zone=DESTINATION_ZONECreate or update a symmetrical sync flow. To specify multiple zones for a symmetrical flow type, use a comma-separated list for the
--zonesoption.Syntax
radosgw-admin sync group flow create --bucket=BUCKET_NAME --group-id=GROUP_ID --flow-id=FLOW_ID --flow-type=symmetrical --zones=ZONE_NAME
5.2.9.9. Removing sync flows and zones
The group flow remove command removes sync flows or zones from a sync policy group or bucket.
For sync policy groups or buckets using directional flows, group flow remove command removes the flow. For sync policy groups or buckets using symmetrical flows, you can use the group flow remove command to remove specified zones from the flow, or to remove the flow.
Prerequisites
- A running Red Hat Ceph Storage cluster.
-
Root or
sudoaccess. - The Ceph Object Gateway is installed.
Procedure
Remove a directional sync flow. To remove the directional sync flow for a specific bucket, use the
--bucketoption.Syntax
radosgw-admin sync group flow remove --bucket=BUCKET_NAME --group-id=GROUP_ID --flow-id=FLOW_ID --flow-type=directional --source-zone=SOURCE_ZONE --dest-zone=DESTINATION_ZONERemove specific zones from a symmetrical sync flow. To remove multiple zones from a symmetrical flow, use a comma-separated list for the
--zonesoption.Syntax
radosgw-admin sync group flow remove --bucket=BUCKET_NAME --group-id=GROUP_ID --flow-id=FLOW_ID --flow-type=symmetrical --zones=ZONE_NAMERemove a symmetrical sync flow. To remove the sync flow from a bucket, use the
--bucketoption.Syntax
radosgw-admin sync group flow remove --bucket=BUCKET_NAME --group-id=GROUP_ID --flow-id=FLOW_ID --flow-type=symmetrical --zones=ZONE_NAME
5.2.9.10. Creating or modifying a sync group pipe
As a storage administrator, you can define pipes to specify which buckets can use your configured data flows and the properties associated with those data flows.
The sync group pipe create command enables you to create pipes, which are custom sync group data flows between specific buckets or groups of buckets, or between specific zones or groups of zones.
This command uses the following options:
| Option | Description | Required/Optional |
|---|---|---|
| --bucket | Name of the bucket to which sync policy need to be configured. Used only in bucket-level sync policy. | Optional |
| --group-id | ID of the sync group | Required |
| --pipe-id | ID of the pipe | Required |
| --source-zones |
Zones that send data to the sync group. Use single quotes (') for value. Use commas to separate multiple zones. Use the wildcard | Required |
| --source-bucket |
Bucket or buckets that send data to the sync group. If bucket name is not mentioned, then | Optional |
| --source-bucket-id | ID of the source bucket. | Optional |
| --dest-zones |
Zone or zones that receive the sync data. Use single quotes (') for value. Use commas to separate multiple zones. Use the wildcard | Required |
| --dest-bucket |
Bucket or buckets that receive the sync data. If bucket name is not mentioned, then | Optional |
| --dest-bucket-id | ID of the destination bucket. | Optional |
| --prefix |
Bucket prefix. Use the wildcard | Optional |
| --prefix-rm | Do not use bucket prefix for filtering. | Optional |
| --tags-add | Comma-separated list of key=value pairs. | Optional |
| --tags-rm | Removes one or more key=value pairs of tags. | Optional |
| --dest-owner | Destination owner of the objects from source. | Optional |
| --storage-class | Destination storage class for the objects from source. | Optional |
| --mode |
Use | Optional |
| --uid | Used for permissions validation in user mode. Specifies the user ID under which the sync operation will be issued. | Optional |
To enable or disable sync at zonegroup level for certain buckets, set zonegroup level sync policy to enable or disable state respectively, and create a pipe for each bucket with --source-bucket and --dest-bucket with its bucket name or with bucket-id, i.e, --source-bucket-id and --dest-bucket-id.
Prerequisites
- A running Red Hat Ceph Storage cluster.
-
Root or
sudoaccess. - The Ceph Object Gateway is installed.
Procedure
Create the sync group pipe:
Syntax
radosgw-admin sync group pipe create --bucket=BUCKET_NAME --group-id=GROUP_ID --pipe-id=PIPE_ID --source-zones='ZONE_NAME','ZONE_NAME2'... --source-bucket=SOURCE_BUCKET1 --source-bucket-id=SOURCE_BUCKET_ID --dest-zones='ZONE_NAME','ZONE_NAME2'... --dest-bucket=DESTINATION_BUCKET1 --dest-bucket-id=DESTINATION_BUCKET_ID --prefix=SOURCE_PREFIX --prefix-rm --tags-add=KEY1=VALUE1, KEY2=VALUE2, ... --tags-rm=KEY1=VALUE1, KEY2=VALUE2, ... --dest-owner=OWNER_ID --storage-class=STORAGE_CLASS --mode=USER --uid=USER_ID
5.2.9.11. Modifying or deleting a sync group pipe
As a storage administrator, you can use the sync group pipe modify command to modify the sync group pipe and sync group pipe remove to remove the sync group pipe.
Prerequisites
- A running Red Hat Ceph Storage cluster.
-
Root or
sudoaccess. - The Ceph Object Gateway is installed.
Procedure
Modify the sync group pipe options.
Syntax
radosgw-admin sync group pipe modify --bucket=BUCKET_NAME --group-id=GROUP_ID --pipe-id=PIPE_ID --source-zones='ZONE_NAME','ZONE_NAME2'... --source-bucket=SOURCE_BUCKET1 --source-bucket-id=SOURCE_BUCKET_ID --dest-zones='ZONE_NAME','ZONE_NAME2'... --dest-bucket=DESTINATION_BUCKET1 --dest-bucket-id=DESTINATION_BUCKET-IDDelete a sync group pipe.
Syntax
radosgw-admin sync group pipe remove --bucket=BUCKET_NAME --group-id=GROUP_ID --pipe-id=PIPE_ID
5.2.9.12. Obtaining information about sync operations
The sync info command enables you to get information about the expected sync sources and targets, as defined by the sync policy.
When you create a sync policy for a bucket, that policy defines how data moves from that bucket toward a different bucket in a different zone. Creating the policy also creates a list of bucket dependencies that are used as hints whenever that bucket syncs with another bucket. Note that a bucket can refer to another bucket without actually syncing to it, since syncing depends on whether the data flow allows the sync to take place.
Both the --bucket and effective-zone-name parameters are optional. If you invoke the sync info command without specifying any options, the Object Gateway returns all of the sync operations defined by the sync policy in all zones.
Prerequisites
- A running Red Hat Ceph Storage cluster.
-
Root or
sudoaccess. - The Ceph Object Gateway is installed.
- A group sync policy is defined.
Procedure
Get information about sync operations:
Syntax
radosgw-admin sync info --bucket=BUCKET_NAME --effective-zone-name=ZONE_NAME
5.2.10. Multi-site Ceph Object Gateway command line usage
As a storage administrator, you can have a good understanding of how to use the Ceph Object Gateway in a multi-site environment. You can learn how to better manage the realms, zone groups, and zones in a multi-site environment.
5.2.10.1. Prerequisites
- A running Red Hat Ceph Storage.
- Deployment of the Ceph Object Gateway software.
- Access to a Ceph Object Gateway node or container.
5.2.10.2. Realms
A realm represents a globally unique namespace consisting of one or more zonegroups containing one or more zones, and zones containing buckets, which in turn contain objects. A realm enables the Ceph Object Gateway to support multiple namespaces and their configuration on the same hardware.
A realm contains the notion of periods. Each period represents the state of the zone group and zone configuration in time. Each time you make a change to a zonegroup or zone, update the period and commit it.
Red Hat recommends creating realms for new clusters.
5.2.10.2.1. Creating a realm
To create a realm, issue the realm create command and specify the realm name. If the realm is the default, specify --default.
Syntax
radosgw-admin realm create --rgw-realm=REALM_NAME [--default]Example
[ceph: root@host01 /]# radosgw-admin realm create --rgw-realm=test_realm --default
By specifying --default, the realm will be called implicitly with each radosgw-admin call unless --rgw-realm and the realm name are explicitly provided.
5.2.10.2.2. Making a Realm the Default
One realm in the list of realms should be the default realm. There may be only one default realm. If there is only one realm and it wasn’t specified as the default realm when it was created, make it the default realm. Alternatively, to change which realm is the default, run the following command:
[ceph: root@host01 /]# radosgw-admin realm default --rgw-realm=test_realm
When the realm is default, the command line assumes --rgw-realm=REALM_NAME as an argument.
5.2.10.2.3. Deleting a Realm
To delete a realm, run the realm delete command and specify the realm name.
Syntax
radosgw-admin realm delete --rgw-realm=REALM_NAMEExample
[ceph: root@host01 /]# radosgw-admin realm delete --rgw-realm=test_realm5.2.10.2.4. Getting a realm
To get a realm, run the realm get command and specify the realm name.
Syntax
radosgw-admin realm get --rgw-realm=REALM_NAMEExample
[ceph: root@host01 /]# radosgw-admin realm get --rgw-realm=test_realm >filename.jsonThe CLI will echo a JSON object with the realm properties.
{
    "id": "0a68d52e-a19c-4e8e-b012-a8f831cb3ebc",
    "name": "test_realm",
    "current_period": "b0c5bbef-4337-4edd-8184-5aeab2ec413b",
    "epoch": 1
}
Use > and an output file name to output the JSON object to a file.
5.2.10.2.5. Setting a realm
To set a realm, run the realm set command, specify the realm name, and --infile= with an input file name.
Syntax
radosgw-admin realm set --rgw-realm=REALM_NAME --infile=IN_FILENAMEExample
[ceph: root@host01 /]# radosgw-admin realm set --rgw-realm=test_realm --infile=filename.json5.2.10.2.6. Listing realms
To list realms, run the realm list command:
Example
[ceph: root@host01 /]# radosgw-admin realm list5.2.10.2.7. Listing Realm Periods
To list realm periods, run the realm list-periods command.
Example
[ceph: root@host01 /]# radosgw-admin realm list-periods5.2.10.2.8. Pulling a Realm
To pull a realm from the node containing the master zone group and master zone to a node containing a secondary zone group or zone, run the realm pull command on the node that will receive the realm configuration.
Syntax
radosgw-admin realm pull --url=URL_TO_MASTER_ZONE_GATEWAY--access-key=ACCESS_KEY --secret=SECRET_KEY5.2.10.2.9. Renaming a Realm
A realm is not part of the period. Consequently, renaming the realm is only applied locally, and will not get pulled with realm pull. When renaming a realm with multiple zones, run the command on each zone. To rename a realm, run the following command:
Syntax
radosgw-admin realm rename --rgw-realm=REALM_NAME --realm-new-name=NEW_REALM_NAME
Do NOT use realm set to change the name parameter. That changes the internal name only. Specifying --rgw-realm would still use the old realm name.
5.2.10.3. Zone Groups
The Ceph Object Gateway supports multi-site deployments and a global namespace by using the notion of zone groups. Formerly called a region, a zone group defines the geographic location of one or more Ceph Object Gateway instances within one or more zones.
Configuring zone groups differs from typical configuration procedures, because not all of the settings end up in a Ceph configuration file. You can list zone groups, get a zone group configuration, and set a zone group configuration.
The radosgw-admin zonegroup operations can be performed on any node within the realm, because the step of updating the period propagates the changes throughout the cluster. However, radosgw-admin zone operations MUST be performed on a host within the zone.
5.2.10.3.1. Creating a Zone Group
Creating a zone group consists of specifying the zone group name. Creating a zone assumes it will live in the default realm unless --rgw-realm=REALM_NAME is specified. If the zonegroup is the default zonegroup, specify the --default flag. If the zonegroup is the master zonegroup, specify the --master flag.
Syntax
radosgw-admin zonegroup create --rgw-zonegroup=ZONE_GROUP_NAME [--rgw-realm=REALM_NAME] [--master] [--default]
Use zonegroup modify --rgw-zonegroup=ZONE_GROUP_NAME to modify an existing zone group’s settings.
5.2.10.3.2. Making a Zone Group the Default
One zonegroup in the list of zonegroups should be the default zonegroup. There may be only one default zonegroup. If there is only one zonegroup and it wasn’t specified as the default zonegroup when it was created, make it the default zonegroup. Alternatively, to change which zonegroup is the default, run the following command:
Example
[ceph: root@host01 /]# radosgw-admin zonegroup default --rgw-zonegroup=us
When the zonegroup is the default, the command line assumes --rgw-zonegroup=ZONE_GROUP_NAME as an argument.
Then, update the period:
[ceph: root@host01 /]# radosgw-admin period update --commit5.2.10.3.3. Adding a Zone to a Zone Group
To add a zone to a zonegroup, you MUST run this command on a host that will be in the zone. To add a zone to a zonegroup, run the following command:
Syntax
radosgw-admin zonegroup add --rgw-zonegroup=ZONE_GROUP_NAME --rgw-zone=ZONE_NAMEThen, update the period:
Example
[ceph: root@host01 /]# radosgw-admin period update --commit5.2.10.3.4. Removing a Zone from a Zone Group
To remove a zone from a zonegroup, run the following command:
Syntax
radosgw-admin zonegroup remove --rgw-zonegroup=ZONE_GROUP_NAME --rgw-zone=ZONE_NAMEThen, update the period:
Example
[ceph: root@host01 /]# radosgw-admin period update --commit5.2.10.3.5. Renaming a Zone Group
To rename a zonegroup, run the following command:
Syntax
radosgw-admin zonegroup rename --rgw-zonegroup=ZONE_GROUP_NAME --zonegroup-new-name=NEW_ZONE_GROUP_NAMEThen, update the period:
Example
[ceph: root@host01 /]# radosgw-admin period update --commit5.2.10.3.6. Deleting a Zone group
To delete a zonegroup, run the following command:
Syntax
radosgw-admin zonegroup delete --rgw-zonegroup=ZONE_GROUP_NAMEThen, update the period:
Example
[ceph: root@host01 /]# radosgw-admin period update --commit5.2.10.3.7. Listing Zone Groups
A Ceph cluster contains a list of zone groups. To list the zone groups, run the following command:
[ceph: root@host01 /]# radosgw-admin zonegroup list
The radosgw-admin returns a JSON formatted list of zone groups.
{
    "default_info": "90b28698-e7c3-462c-a42d-4aa780d24eda",
    "zonegroups": [
        "us"
    ]
}
5.2.10.3.8. Getting a Zone Group
To view the configuration of a zone group, run the following command:
Syntax
radosgw-admin zonegroup get [--rgw-zonegroup=ZONE_GROUP_NAME]The zone group configuration looks like this:
{
    "id": "90b28698-e7c3-462c-a42d-4aa780d24eda",
    "name": "us",
    "api_name": "us",
    "is_master": "true",
    "endpoints": [
        "http:\/\/rgw1:80"
    ],
    "hostnames": [],
    "hostnames_s3website": [],
    "master_zone": "9248cab2-afe7-43d8-a661-a40bf316665e",
    "zones": [
        {
            "id": "9248cab2-afe7-43d8-a661-a40bf316665e",
            "name": "us-east",
            "endpoints": [
                "http:\/\/rgw1"
            ],
            "log_meta": "true",
            "log_data": "true",
            "bucket_index_max_shards": 11,
            "read_only": "false"
        },
        {
            "id": "d1024e59-7d28-49d1-8222-af101965a939",
            "name": "us-west",
            "endpoints": [
                "http:\/\/rgw2:80"
            ],
            "log_meta": "false",
            "log_data": "true",
            "bucket_index_max_shards": 11,
            "read_only": "false"
        }
    ],
    "placement_targets": [
        {
            "name": "default-placement",
            "tags": []
        }
    ],
    "default_placement": "default-placement",
    "realm_id": "ae031368-8715-4e27-9a99-0c9468852cfe"
}
5.2.10.3.9. Setting a Zone Group
Defining a zone group consists of creating a JSON object, specifying at least the required settings:
-
name: The name of the zone group. Required. -
api_name: The API name for the zone group. Optional. is_master: Determines if the zone group is the master zone group. Required.Note: You can only have one master zone group.
-
endpoints: A list of all the endpoints in the zone group. For example, you may use multiple domain names to refer to the same zone group. Remember to escape the forward slashes (\/). You may also specify a port (fqdn:port) for each endpoint. Optional. -
hostnames: A list of all the hostnames in the zone group. For example, you may use multiple domain names to refer to the same zone group. Optional. Thergw dns namesetting will automatically be included in this list. You should restart the gateway daemon(s) after changing this setting. master_zone: The master zone for the zone group. Optional. Uses the default zone if not specified.NoteYou can only have one master zone per zone group.
-
zones: A list of all zones within the zone group. Each zone has a name (required), a list of endpoints (optional), and whether or not the gateway will log metadata and data operations (false by default). -
placement_targets: A list of placement targets (optional). Each placement target contains a name (required) for the placement target and a list of tags (optional) so that only users with the tag can use the placement target (i.e., the user’splacement_tagsfield in the user info). -
default_placement: The default placement target for the object index and object data. Set todefault-placementby default. You may also set a per-user default placement in the user info for each user.
To set a zone group, create a JSON object consisting of the required fields, save the object to a file, for example, zonegroup.json; then, run the following command:
Example
[ceph: root@host01 /]# radosgw-admin zonegroup set --infile zonegroup.json
Where zonegroup.json is the JSON file you created.
The default zone group is_master setting is true by default. If you create a new zone group and want to make it the master zone group, you must either set the default zone group is_master setting to false, or delete the default zone group.
Finally, update the period:
Example
[ceph: root@host01 /]# radosgw-admin period update --commit5.2.10.3.10. Setting a Zone Group Map
Setting a zone group map consists of creating a JSON object consisting of one or more zone groups, and setting the master_zonegroup for the cluster. Each zone group in the zone group map consists of a key/value pair, where the key setting is equivalent to the name setting for an individual zone group configuration, and the val is a JSON object consisting of an individual zone group configuration.
You may only have one zone group with is_master equal to true, and it must be specified as the master_zonegroup at the end of the zone group map. The following JSON object is an example of a default zone group map.
{
    "zonegroups": [
        {
            "key": "90b28698-e7c3-462c-a42d-4aa780d24eda",
            "val": {
                "id": "90b28698-e7c3-462c-a42d-4aa780d24eda",
                "name": "us",
                "api_name": "us",
                "is_master": "true",
                "endpoints": [
                    "http:\/\/rgw1:80"
                ],
                "hostnames": [],
                "hostnames_s3website": [],
                "master_zone": "9248cab2-afe7-43d8-a661-a40bf316665e",
                "zones": [
                    {
                        "id": "9248cab2-afe7-43d8-a661-a40bf316665e",
                        "name": "us-east",
                        "endpoints": [
                            "http:\/\/rgw1"
                        ],
                        "log_meta": "true",
                        "log_data": "true",
                        "bucket_index_max_shards": 11,
                        "read_only": "false"
                    },
                    {
                        "id": "d1024e59-7d28-49d1-8222-af101965a939",
                        "name": "us-west",
                        "endpoints": [
                            "http:\/\/rgw2:80"
                        ],
                        "log_meta": "false",
                        "log_data": "true",
                        "bucket_index_max_shards": 11,
                        "read_only": "false"
                    }
                ],
                "placement_targets": [
                    {
                        "name": "default-placement",
                        "tags": []
                    }
                ],
                "default_placement": "default-placement",
                "realm_id": "ae031368-8715-4e27-9a99-0c9468852cfe"
            }
        }
    ],
    "master_zonegroup": "90b28698-e7c3-462c-a42d-4aa780d24eda",
    "bucket_quota": {
        "enabled": false,
        "max_size_kb": -1,
        "max_objects": -1
    },
    "user_quota": {
        "enabled": false,
        "max_size_kb": -1,
        "max_objects": -1
    }
}
To set a zone group map, run the following command:
Example
[ceph: root@host01 /]# radosgw-admin zonegroup-map set --infile zonegroupmap.json
Where zonegroupmap.json is the JSON file you created. Ensure that you have zones created for the ones specified in the zone group map. Finally, update the period.
Example
[ceph: root@host01 /]# radosgw-admin period update --commit5.2.10.4. Zones
Ceph Object Gateway supports the notion of zones. A zone defines a logical group consisting of one or more Ceph Object Gateway instances.
Configuring zones differs from typical configuration procedures, because not all of the settings end up in a Ceph configuration file. You can list zones, get a zone configuration, and set a zone configuration.
All radosgw-admin zone operations MUST be issued on a host that operates or will operate within the zone.
5.2.10.4.1. Creating a Zone
To create a zone, specify a zone name. If it is a master zone, specify the --master option. Only one zone in a zone group may be a master zone. To add the zone to a zonegroup, specify the --rgw-zonegroup option with the zonegroup name.
Zones must be created on a Ceph Object Gateway node that will be within the zone.
Syntax
radosgw-admin zone create --rgw-zone=ZONE_NAME \
                [--zonegroup=ZONE_GROUP_NAME]\
                [--endpoints=ENDPOINT_PORT [,<endpoint:port>] \
                [--master] [--default] \
                --access-key ACCESS_KEY --secret SECRET_KEY
Then, update the period:
Example
[ceph: root@host01 /]# radosgw-admin period update --commit5.2.10.4.2. Deleting a zone
To delete a zone, first remove it from the zonegroup.
Procedure
Remove the zone from the zonegroup:
Syntax
radosgw-admin zonegroup remove --rgw-zonegroup=ZONE_GROUP_NAME\
                                 --rgw-zone=ZONE_NAME
Update the period:
Example
[ceph: root@host01 /]# radosgw-admin period update --commitDelete the zone:
ImportantThis procedure MUST be used on a host within the zone.
Syntax
radosgw-admin zone delete --rgw-zone=ZONE_NAMEUpdate the period:
Example
[ceph: root@host01 /]# radosgw-admin period update --commitImportantDo not delete a zone without removing it from a zone group first. Otherwise, updating the period will fail.
If the pools for the deleted zone will not be used anywhere else, consider deleting the pools. Replace DELETED_ZONE_NAME in the example below with the deleted zone’s name.
Once Ceph deletes the zone pools, it deletes all of the data within them in an unrecoverable manner. Only delete the zone pools if Ceph clients no longer need the pool contents.
In a multi-realm cluster, deleting the .rgw.root pool along with the zone pools will remove ALL the realm information for the cluster. Ensure that .rgw.root does not contain other active realms before deleting the .rgw.root pool.
Syntax
ceph osd pool delete DELETED_ZONE_NAME.rgw.control DELETED_ZONE_NAME.rgw.control --yes-i-really-really-mean-it
ceph osd pool delete DELETED_ZONE_NAME.rgw.data.root DELETED_ZONE_NAME.rgw.data.root --yes-i-really-really-mean-it
ceph osd pool delete DELETED_ZONE_NAME.rgw.log DELETED_ZONE_NAME.rgw.log --yes-i-really-really-mean-it
ceph osd pool delete DELETED_ZONE_NAME.rgw.users.uid DELETED_ZONE_NAME.rgw.users.uid --yes-i-really-really-mean-itAfter deleting the pools, restart the RGW process.
5.2.10.4.3. Modifying a Zone
To modify a zone, specify the zone name and the parameters you wish to modify.
Zones should be modified on a Ceph Object Gateway node that will be within the zone.
Syntax
radosgw-admin zone modify [options]

--access-key=<key>
--secret/--secret-key=<key>
--master
--default
--endpoints=<list>
Then, update the period:
Example
[ceph: root@host01 /]# radosgw-admin period update --commit5.2.10.4.4. Listing Zones
As root, to list the zones in a cluster, run the following command:
Example
[ceph: root@host01 /]# radosgw-admin zone list5.2.10.4.5. Getting a Zone
As root, to get the configuration of a zone, run the following command:
Syntax
radosgw-admin zone get [--rgw-zone=ZONE_NAME]
The default zone looks like this:
{ "domain_root": ".rgw",
  "control_pool": ".rgw.control",
  "gc_pool": ".rgw.gc",
  "log_pool": ".log",
  "intent_log_pool": ".intent-log",
  "usage_log_pool": ".usage",
  "user_keys_pool": ".users",
  "user_email_pool": ".users.email",
  "user_swift_pool": ".users.swift",
  "user_uid_pool": ".users.uid",
  "system_key": { "access_key": "", "secret_key": ""},
  "placement_pools": [
      {  "key": "default-placement",
         "val": { "index_pool": ".rgw.buckets.index",
                  "data_pool": ".rgw.buckets"}
      }
    ]
  }
5.2.10.4.6. Setting a Zone
Configuring a zone involves specifying a series of Ceph Object Gateway pools. For consistency, we recommend using a pool prefix that is the same as the zone name. See the Pools chapter in the Red Hat Ceph Storage Storage Strategies Guide for details on configuring pools.
Zones should be set on a Ceph Object Gateway node that will be within the zone.
To set a zone, create a JSON object consisting of the pools, save the object to a file, for example, zone.json; then, run the following command, replacing ZONE_NAME with the name of the zone:
Example
[ceph: root@host01 /]# radosgw-admin zone set --rgw-zone=test-zone --infile zone.json
Where zone.json is the JSON file you created.
Then, as root, update the period:
Example
[ceph: root@host01 /]# radosgw-admin period update --commit5.2.10.4.7. Renaming a Zone
To rename a zone, specify the zone name and the new zone name. Issue the following command on a host within the zone:
Syntax
radosgw-admin zone rename --rgw-zone=ZONE_NAME --zone-new-name=NEW_ZONE_NAMEThen, update the period:
Example
[ceph: root@host01 /]# radosgw-admin period update --commit5.3. Configure LDAP and Ceph Object Gateway
Perform the following steps to configure the Red Hat Directory Server to authenticate Ceph Object Gateway users.
5.3.1. Installing a Red Hat Directory Server
Red Hat Directory Server should be installed on a Red Hat Enterprise Linux 8 with a graphical user interface (GUI) in order to use the Java Swing GUI Directory and Administration consoles. However, Red Hat Directory Server can still be serviced exclusively from the command line interface (CLI).
Prerequisites
- Red Hat Enterprise Linux (RHEL) is installed on the server.
-
The Directory Server node’s FQDN is resolvable using DNS or the
/etc/hostsfile. - Register the Directory Server node to the Red Hat subscription management service.
- A valid Red Hat Directory Server subscription is available in your Red Hat account.
5.3.2. Configure the Directory Server firewall
On the LDAP host, make sure that the firewall allows access to the Directory Server’s secure (636) port, so that LDAP clients can access the Directory Server. Leave the default unsecure port (389) closed.
# firewall-cmd --zone=public --add-port=636/tcp
# firewall-cmd --zone=public --add-port=636/tcp --permanent
5.3.3. Label ports for SELinux
To ensure SELinux does not block requests, label the ports for SELinux. For details see the Changing Directory Server Port Numbers section in the Administration Guide for Red Hat Directory Server 10.
5.3.4. Configure LDAPS
The Ceph Object Gateway uses a simple ID and password to authenticate with the LDAP server, so the connection requires an SSL certificate for LDAP. To configure the Directory Server for LDAP, see the Configuring Secure Connections chapter in the Administration Guide for Red Hat Directory Server 11.
Once the LDAP is working, configure the Ceph Object Gateway servers to trust the Directory Server’s certificate.
- Extract/Download a PEM-formatted certificate for the Certificate Authority (CA) that signed the LDAP server’s SSL certificate.
-
Confirm that
/etc/openldap/ldap.confdoes not haveTLS_REQCERTset. -
Confirm that
/etc/openldap/ldap.confcontains aTLS_CACERTDIR /etc/openldap/certssetting. Use the
certutilcommand to add the AD CA to the store at/etc/openldap/certs.For example, if the CA is "msad-frog-MSAD-FROG-CA", and the PEM-formatted CA file isldap.pem, use the following command:Example
# certutil -d /etc/openldap/certs -A -t "TC,," -n "msad-frog-MSAD-FROG-CA" -i /path/to/ldap.pemUpdate SELinux on all remote LDAP sites:
Example
# setsebool -P httpd_can_network_connect onNoteThis still has to be set even if SELinux is in permissive mode.
Make the
certsdatabase world-readable:Example
# chmod 644 /etc/openldap/certs/*Connect to the server using the "ldapwhoami" command as a non-root user.
Example
$ ldapwhoami -H ldaps://rh-directory-server.example.com -d 9The
-d 9option will provide debugging information in case something went wrong with the SSL negotiation.
5.3.5. Check if the gateway user exists
Before creating the gateway user, ensure that the Ceph Object Gateway does not already have the user.
Example
[ceph: root@host01 /]# radosgw-admin metadata list userThe user name should NOT be in this list of users.
5.3.6. Add a gateway user
Create a Ceph Object Gateway user to user LDAP.
Procedure
-
Create an LDAP user for the Ceph Object Gateway, and make a note of the
binddn. Since the Ceph object gateway uses thecephuser, consider usingcephas the username. The user needs to have permissions to search the directory. The Ceph Object Gateway binds to this user as specified inrgw_ldap_binddn. Test to ensure that the user creation worked. Where
cephis the user ID underPeopleandexample.comis the domain, you can perform a search for the user.# ldapsearch -x -D "uid=ceph,ou=People,dc=example,dc=com" -W -H ldaps://example.com -b "ou=People,dc=example,dc=com" -s sub 'uid=ceph'-
On each gateway node, create a file for the user’s secret. For example, the secret might get stored in a file entitled
/etc/bindpass. For security, change the owner of this file to thecephuser and group to ensure it is not globally readable. Add the
rgw_ldap_secretoption:Syntax
ceph config set client.rgw OPTION VALUEExample
[ceph: root@host01 /]# ceph config set client.rgw rgw_ldap_secret /etc/bindpassPatch the bind password file to the Ceph Object Gateway container and reapply the Ceph Object Gateway specification:
Example
service_type: rgw service_id: rgw.1 service_name: rgw.rgw.1 placement: label: rgw extra_container_args: - -v - /etc/bindpass:/etc/bindpassNote/etc/bindpassis not shipped automatically with Red Hat Ceph Storage and you need to ensure that the content is available on all the possible Ceph Object Gateway instance nodes.
5.3.7. Configure the gateway to use LDAP
Change the Ceph configuration with the following commands on all the Ceph nodes:
Syntax
ceph config set client.rgw OPTION VALUEExample
[ceph: root@host01 /]# ceph config set client.rgw rgw_ldap_uri ldaps://:636
[ceph: root@host01 /]# ceph config set client.rgw rgw_ldap_binddn "ou=poc,dc=example,dc=local"
[ceph: root@host01 /]# ceph config set client.rgw rgw_ldap_searchdn "ou=poc,dc=example,dc=local"
[ceph: root@host01 /]# ceph config set client.rgw rgw_ldap_dnattr "uid"
[ceph: root@host01 /]# ceph config set client.rgw rgw_s3_auth_use_ldap true
Restart the Ceph Object Gateway.
NoteUse the output from the
ceph orch pscommand, under theNAMEcolumn, to get the SERVICE_TYPE.ID information.To restart the Ceph Object Gateway on an individual node in the storage cluster:
Syntax
systemctl restart ceph-CLUSTER_ID@SERVICE_TYPE.ID.serviceExample
[root@host01 ~]# systemctl restart ceph-c4b34c6f-8365-11ba-dc31-529020a7702d@rgw.realm.zone.host01.gwasto.serviceTo restart the Ceph Object Gateways on all nodes in the storage cluster:
Syntax
ceph orch restart SERVICE_TYPEExample
[ceph: root@host01 /]# ceph orch restart rgw
5.3.8. Using a custom search filter
You can create a custom search filter to limit user access by using the rgw_ldap_searchfilter setting. There are two ways to use the rgw_ldap_searchfilter setting:
Specifying a partial filter:
Example
"objectclass=inetorgperson"The Ceph Object Gateway generates the search filter with the user name from the token and the value of
rgw_ldap_dnattr. The constructed filter is then combined with the partial filter from thergw_ldap_searchfiltervalue. For example, the user name and the settings generate the final search filter:Example
"(&(uid=joe)(objectclass=inetorgperson))"User
joeis only granted access if he is found in the LDAP directory, has an object class ofinetorgperson, and specifies a valid password.Specifying a complete filter:
A complete filter must contain a
USERNAMEtoken which is substituted with the user name during the authentication attempt. Thergw_ldap_dnattrsetting is not used in this case. For example, to limit valid users to a specific group, use the following filter:Example
"(&(uid=@USERNAME@)(memberOf=cn=ceph-users,ou=groups,dc=mycompany,dc=com))"
5.3.9. Add an S3 user to the LDAP server
In the administrative console on the LDAP server, create at least one S3 user so that an S3 client can use the LDAP user credentials. Make a note of the user name and secret for use when passing the credentials to the S3 client.
5.3.10. Export an LDAP token
When running Ceph Object Gateway with LDAP, the access token is all that is required. However, the access token is created from the access key and secret key. Export the access key and secret key as an LDAP token.
Export the access key:
Syntax
export RGW_ACCESS_KEY_ID="USERNAME"Export the secret key:
Syntax
export RGW_SECRET_ACCESS_KEY="PASSWORD"Export the token. For LDAP, use
ldapas the token type (ttype).Example
radosgw-token --encode --ttype=ldapFor Active Directory, use
adas the token type.Example
radosgw-token --encode --ttype=adThe result is a base-64 encoded string, which is the access token. Provide this access token to S3 clients in lieu of the access key. The secret key is no longer required.
Optional: For added convenience, export the base-64 encoded string to the
RGW_ACCESS_KEY_IDenvironment variable if the S3 client uses the environment variable.Example
export RGW_ACCESS_KEY_ID="ewogICAgIlJHV19UT0tFTiI6IHsKICAgICAgICAidmVyc2lvbiI6IDEsCiAgICAgICAgInR5cGUiOiAibGRhcCIsCiAgICAgICAgImlkIjogImNlcGgiLAogICAgICAgICJrZXkiOiAiODAwI0dvcmlsbGEiCiAgICB9Cn0K"
5.3.11. Test the configuration with an S3 client
Test the configuration with a Ceph Object Gateway client, using a script such as Python Boto.
Procedure
Use the
RGW_ACCESS_KEY_IDenvironment variable to configure the Ceph Object Gateway client. Alternatively, you can copy the base-64 encoded string and specify it as the access key. Following is an example of the configured S3 client:Example
cat .aws/credentials [default] aws_access_key_id = ewogICaGbnjlwe9UT0tFTiI6IHsKICAgICAgICAidmVyc2lvbiI6IDEsCiAgICAgICAgInR5cGUiOiAiYWQiLAogICAgICAgICJpZCI6ICJjZXBoIiwKICAgICAgICAia2V5IjogInBhc3M0Q2VwaCIKICAgIH0KfQo= aws_secret_access_key =NoteThe secret key is no longer required.
Run the
aws s3 lscommand to verify the user:Example
[root@host01 ~]# aws s3 ls --endpoint http://host03

2023-12-11 17:08:50 mybucket
2023-12-24 14:55:44 mybucket2
Optional: You can also run the
radosgw-admin usercommand to verify the user in the directory:Example
[root@host01 ~]# radosgw-admin user info --uid dir1
{
    "user_id": "dir1",
    "display_name": "dir1",
    "email": "",
    "suspended": 0,
    "max_buckets": 1000,
    "subusers": [],
    "keys": [],
    "swift_keys": [],
    "caps": [],
    "op_mask": "read, write, delete",
    "default_placement": "",
    "default_storage_class": "",
    "placement_tags": [],
    "bucket_quota": {
        "enabled": false,
        "check_on_raw": false,
        "max_size": -1,
        "max_size_kb": 0,
        "max_objects": -1
    },
    "user_quota": {
        "enabled": false,
        "check_on_raw": false,
        "max_size": -1,
        "max_size_kb": 0,
        "max_objects": -1
    },
    "temp_url_keys": [],
    "type": "ldap",
    "mfa_ids": []
}
5.4. Configure Active Directory and Ceph Object Gateway
Perform the following steps to configure an Active Directory server to authenticate Ceph Object Gateway users.
5.4.1. Using Microsoft Active Directory
Ceph Object Gateway LDAP authentication is compatible with any LDAP-compliant directory service that can be configured for simple bind, including Microsoft Active Directory. Using Active Directory is similar to using RH Directory server in that the Ceph Object Gateway binds as the user configured in the rgw_ldap_binddn setting, and uses LDAPs to ensure security.
The process for configuring Active Directory is essentially identical to Configure LDAP and Ceph Object Gateway, but may have some Windows-specific usage.
5.4.2. Configuring Active Directory for LDAPS
Active Directory LDAP servers are configured to use LDAPs by default. Windows Server 2012 and higher can use Active Directory Certificate Services. Instructions for generating and installing SSL certificates for use with Active Directory LDAP are available in the following MS TechNet article: LDAP over SSL (LDAPS) Certificate.
Ensure that port 636 is open on the Active Directory host.
5.4.3. Check if the gateway user exists
Before creating the gateway user, ensure that the Ceph Object Gateway does not already have the user.
Example
[ceph: root@host01 /]# radosgw-admin metadata list userThe user name should NOT be in this list of users.
5.4.4. Add a gateway user
Create a Ceph Object Gateway user to user LDAP.
Procedure
-
Create an LDAP user for the Ceph Object Gateway, and make a note of the
binddn. Since the Ceph object gateway uses thecephuser, consider usingcephas the username. The user needs to have permissions to search the directory. The Ceph Object Gateway binds to this user as specified inrgw_ldap_binddn. Test to ensure that the user creation worked. Where
cephis the user ID underPeopleandexample.comis the domain, you can perform a search for the user.# ldapsearch -x -D "uid=ceph,ou=People,dc=example,dc=com" -W -H ldaps://example.com -b "ou=People,dc=example,dc=com" -s sub 'uid=ceph'-
On each gateway node, create a file for the user’s secret. For example, the secret might get stored in a file entitled
/etc/bindpass. For security, change the owner of this file to thecephuser and group to ensure it is not globally readable. Add the
rgw_ldap_secretoption:Syntax
ceph config set client.rgw OPTION VALUEExample
[ceph: root@host01 /]# ceph config set client.rgw rgw_ldap_secret /etc/bindpassPatch the bind password file to the Ceph Object Gateway container and reapply the Ceph Object Gateway specification:
Example
service_type: rgw service_id: rgw.1 service_name: rgw.rgw.1 placement: label: rgw extra_container_args: - -v - /etc/bindpass:/etc/bindpassNote/etc/bindpassis not shipped automatically with Red Hat Ceph Storage and you need to ensure that the content is available on all the possible Ceph Object Gateway instance nodes.
5.4.5. Configuring the gateway to use Active Directory
Add the following options after setting the
rgw_ldap_secretsetting:Syntax
ceph config set client.rgw OPTION VALUEExample
[ceph: root@host01 /]# ceph config set client.rgw rgw_ldap_uri ldaps://_FQDN_:636
[ceph: root@host01 /]# ceph config set client.rgw rgw_ldap_binddn "_BINDDN_"
[ceph: root@host01 /]# ceph config set client.rgw rgw_ldap_searchdn "_SEARCHDN_"
[ceph: root@host01 /]# ceph config set client.rgw rgw_ldap_dnattr "cn"
[ceph: root@host01 /]# ceph config set client.rgw rgw_s3_auth_use_ldap true
For the
rgw_ldap_urisetting, substitute FQDN with the fully qualified domain name of the LDAP server. If there is more than one LDAP server, specify each domain.For the
rgw_ldap_binddnsetting, substitute BINDDN with the bind domain. With a domain ofexample.comand acephuser underusersandaccounts, it should look something like this:Example
rgw_ldap_binddn "uid=ceph,cn=users,cn=accounts,dc=example,dc=com"For the
rgw_ldap_searchdnsetting, substitute SEARCHDN with the search domain. With a domain ofexample.comand users underusersandaccounts, it should look something like this:rgw_ldap_searchdn "cn=users,cn=accounts,dc=example,dc=com"Restart the Ceph Object Gateway:
NoteUse the output from the
ceph orch pscommand, under theNAMEcolumn, to get the SERVICE_TYPE.ID information.To restart the Ceph Object Gateway on an individual node in the storage cluster:
Syntax
systemctl restart ceph-CLUSTER_ID@SERVICE_TYPE.ID.serviceExample
[root@host01 ~]# systemctl restart ceph-c4b34c6f-8365-11ba-dc31-529020a7702d@rgw.realm.zone.host01.gwasto.serviceTo restart the Ceph Object Gateways on all nodes in the storage cluster:
Syntax
ceph orch restart SERVICE_TYPEExample
[ceph: root@host01 /]# ceph orch restart rgw
5.4.6. Add an S3 user to the LDAP server
In the administrative console on the LDAP server, create at least one S3 user so that an S3 client can use the LDAP user credentials. Make a note of the user name and secret for use when passing the credentials to the S3 client.
5.4.7. Export an LDAP token
When running Ceph Object Gateway with LDAP, the access token is all that is required. However, the access token is created from the access key and secret key. Export the access key and secret key as an LDAP token.
Export the access key:
Syntax
export RGW_ACCESS_KEY_ID="USERNAME"Export the secret key:
Syntax
export RGW_SECRET_ACCESS_KEY="PASSWORD"Export the token. For LDAP, use
ldapas the token type (ttype).Example
radosgw-token --encode --ttype=ldapFor Active Directory, use
adas the token type.Example
radosgw-token --encode --ttype=adThe result is a base-64 encoded string, which is the access token. Provide this access token to S3 clients in lieu of the access key. The secret key is no longer required.
Optional: For added convenience, export the base-64 encoded string to the
RGW_ACCESS_KEY_IDenvironment variable if the S3 client uses the environment variable.Example
export RGW_ACCESS_KEY_ID="ewogICAgIlJHV19UT0tFTiI6IHsKICAgICAgICAidmVyc2lvbiI6IDEsCiAgICAgICAgInR5cGUiOiAibGRhcCIsCiAgICAgICAgImlkIjogImNlcGgiLAogICAgICAgICJrZXkiOiAiODAwI0dvcmlsbGEiCiAgICB9Cn0K"
5.4.8. Test the configuration with an S3 client
Test the configuration with a Ceph Object Gateway client, using a script such as Python Boto.
Procedure
Use the
RGW_ACCESS_KEY_IDenvironment variable to configure the Ceph Object Gateway client. Alternatively, you can copy the base-64 encoded string and specify it as the access key. Following is an example of the configured S3 client:Example
cat .aws/credentials [default] aws_access_key_id = ewogICaGbnjlwe9UT0tFTiI6IHsKICAgICAgICAidmVyc2lvbiI6IDEsCiAgICAgICAgInR5cGUiOiAiYWQiLAogICAgICAgICJpZCI6ICJjZXBoIiwKICAgICAgICAia2V5IjogInBhc3M0Q2VwaCIKICAgIH0KfQo= aws_secret_access_key =NoteThe secret key is no longer required.
Run the
aws s3 lscommand to verify the user:Example
[root@host01 ~]# aws s3 ls --endpoint http://host03

2023-12-11 17:08:50 mybucket
2023-12-24 14:55:44 mybucket2
Optional: You can also run the
radosgw-admin usercommand to verify the user in the directory:Example
[root@host01 ~]# radosgw-admin user info --uid dir1
{
    "user_id": "dir1",
    "display_name": "dir1",
    "email": "",
    "suspended": 0,
    "max_buckets": 1000,
    "subusers": [],
    "keys": [],
    "swift_keys": [],
    "caps": [],
    "op_mask": "read, write, delete",
    "default_placement": "",
    "default_storage_class": "",
    "placement_tags": [],
    "bucket_quota": {
        "enabled": false,
        "check_on_raw": false,
        "max_size": -1,
        "max_size_kb": 0,
        "max_objects": -1
    },
    "user_quota": {
        "enabled": false,
        "check_on_raw": false,
        "max_size": -1,
        "max_size_kb": 0,
        "max_objects": -1
    },
    "temp_url_keys": [],
    "type": "ldap",
    "mfa_ids": []
}
5.5. The Ceph Object Gateway and OpenStack Keystone
As a storage administrator, you can use OpenStack’s Keystone authentication service to authenticate users through the Ceph Object Gateway. Before you can configure the Ceph Object Gateway, you need to configure Keystone first. This enables the Swift service, and points the Keystone service to the Ceph Object Gateway. Next, you need to configure the Ceph Object Gateway to accept authentication requests from the Keystone service.
5.5.1. Prerequisites
- A running Red Hat OpenStack Platform environment.
- A running Red Hat Ceph Storage environment.
- A running Ceph Object Gateway environment.
5.5.2. Roles for Keystone authentication
The OpenStack Keystone service provides three roles: admin, member, and reader. These roles are hierarchical; users with the admin role inherit the capabilities of the member role and users with the member role inherit the capabilities of the reader role.
The member role’s read permissions only apply to objects of the project it belongs to.
admin
The admin role is reserved for the highest level of authorization within a particular scope. This usually includes all the create, read, update, or delete operations on a resource or API.
member
The member role is not used directly by default. It provides flexibility during deployments and helps reduce responsibility for administrators.
For example, you can override a policy for a deployment by using the default member role and a simple policy override, to allow system members to update services and endpoints. This provides a layer of authorization between admin and reader roles.
reader
The reader role is reserved for read-only operations regardless of the scope.
If you use a reader to access sensitive information such as image license keys, administrative image data, administrative volume metadata, application credentials, and secrets, you might unintentionally expose sensitive information. Hence, APIs that expose these resources should carefully consider the impact of the reader role and appropriately defer access to the member and admin roles.
5.5.3. Keystone authentication and the Ceph Object Gateway
Organizations using OpenStack Keystone to authenticate users can integrate Keystone with the Ceph Object Gateway. The Ceph Object Gateway enables the gateway to accept a Keystone token, authenticate the user, and create a corresponding Ceph Object Gateway user. When Keystone validates a token, the gateway considers the user authenticated.
Benefits
-
Assigning
admin,member, andreaderroles to users with Keystone. - Automatic user creation in the Ceph Object Gateway.
- Managing users with Keystone.
- The Ceph Object Gateway will query Keystone periodically for a list of revoked tokens.
5.5.4. Creating the Swift service
Before configuring the Ceph Object Gateway, configure Keystone so that the Swift service is enabled and pointing to the Ceph Object Gateway.
Prerequisites
- A running Red Hat Ceph Storage cluster.
- Access to the Ceph software repository.
- Root-level access to OpenStack controller node.
Procedure
Create the Swift service:
[root@swift~]# openstack service create --name=swift --description="Swift Service" object-storeCreating the service will echo the service settings.
Expand Table 5.1. Example Field Value description
Swift Service
enabled
True
id
37c4c0e79571404cb4644201a4a6e5ee
name
swift
type
object-store
5.5.5. Setting the Ceph Object Gateway endpoints
After creating the Swift service, point the service to a Ceph Object Gateway.
Prerequisites
- A running Red Hat Ceph Storage cluster.
- Access to the Ceph software repository.
- A running Swift service on a Red Hat OpenStack Platform 17 environment.
Procedure
Create the OpenStack endpoints pointing to the Ceph Object Gateway:
Syntax
openstack endpoint create --region REGION_NAME swift admin "URL"
openstack endpoint create --region REGION_NAME swift public "URL"
openstack endpoint create --region REGION_NAME swift internal "URL"
Replace REGION_NAME with the name of the gateway’s zone group name or region name. Replace URL with URLs appropriate for the Ceph Object Gateway.
Example
[root@osp ~]# openstack endpoint create --region us-west swift admin "http://radosgw.example.com:8080/swift/v1"
[root@osp ~]# openstack endpoint create --region us-west swift public "http://radosgw.example.com:8080/swift/v1"
[root@osp ~]# openstack endpoint create --region us-west swift internal "http://radosgw.example.com:8080/swift/v1"
Expand Field Value adminurl
id
e4249d2b60e44743a67b5e5b38c18dd3internalurl
publicurl
region
us-westservice_id
37c4c0e79571404cb4644201a4a6e5eeservice_name
swiftservice_type
object-storeSetting the endpoints will output the service endpoint settings.
5.5.6. Verifying Openstack is using the Ceph Object Gateway endpoints
After creating the Swift service and setting the endpoints, show the endpoints to ensure that all settings are correct.
Prerequisites
- A running Red Hat Ceph Storage cluster.
- Access to the Ceph software repository.
Procedure
List the endpoints under the Swift service:
[root@swift~]# openstack endpoint list --service=swiftVerify settings for the endpoints listed in the previous command:
Syntax
[root@swift~]# openstack endpoint show ENDPOINT_IDShowing the endpoints will echo the endpoints settings, and the service settings.
Expand Table 5.2. Example Field Value adminurl
enabled
True
id
e4249d2b60e44743a67b5e5b38c18dd3
internalurl
publicurl
region
us-west
service_id
37c4c0e79571404cb4644201a4a6e5ee
service_name
swift
service_type
object-store
Additional Resources
- For more information on getting the details about endpoints, see Show endpoints in the Red Hat OpenStack guide.
5.5.7. Configuring the Ceph Object Gateway to use Keystone SSL
Converting the OpenSSL certificates that Keystone uses configures the Ceph Object Gateway to work with Keystone. When the Ceph Object Gateway interacts with OpenStack’s Keystone authentication, Keystone will terminate with a self-signed SSL certificate.
Prerequisites
- A running Red Hat Ceph Storage cluster.
- Access to the Ceph software repository.
Procedure
Convert the OpenSSL certificate to the
nss dbformat:Example
[root@osp ~]# mkdir /var/ceph/nss

[root@osp ~]# openssl x509 -in /etc/keystone/ssl/certs/ca.pem -pubkey | \
    certutil -d /var/ceph/nss -A -n ca -t "TCu,Cu,Tuw"

[root@osp ~]# openssl x509 -in /etc/keystone/ssl/certs/signing_cert.pem -pubkey | \
    certutil -A -d /var/ceph/nss -n signing_cert -t "P,P,P"
Install Keystone’s SSL certificate in the node running the Ceph Object Gateway. Alternatively set the value of the configurable
rgw_keystone_verify_sslsetting tofalse.Setting
rgw_keystone_verify_ssltofalsemeans that the gateway will not attempt to verify the certificate.
5.5.8. Configuring the Ceph Object Gateway to use Keystone authentication
Configure the Red Hat Ceph Storage to use OpenStack’s Keystone authentication.
Prerequisites
- A running Red Hat Ceph Storage cluster.
- Access to the Ceph software repository.
-
Have
adminprivileges to the production environment.
Procedure
Do the following for each gateway instance.
Set the
rgw_s3_auth_use_keystoneoption totrue:Example
[ceph: root@host01 /]# ceph config set client.rgw rgw_s3_auth_use_keystone trueSet the
nss_db_pathsetting to the path where the NSS database is stored:Example
[ceph: root@host01 /]# ceph config set client.rgw nss_db_path "/var/lib/ceph/radosgw/ceph-rgw.rgw01/nss"
Provide authentication credentials:
It is possible to configure a Keystone service tenant, user, and password for keystone for the OpenStack Identity API, similar to the way system administrators tend to configure OpenStack services. Providing a username and password avoids providing the shared secret to the
rgw_keystone_admin_tokensetting.ImportantRed Hat recommends disabling authentication by admin token in production environments. The service tenant credentials should have
adminprivileges.The necessary configuration options are:
Syntax
ceph config set client.rgw rgw_keystone_url KEYSTONE_URL:ADMIN_PORT
ceph config set client.rgw rgw_keystone_admin_user KEYSTONE_TENANT_USER_NAME
ceph config set client.rgw rgw_keystone_admin_password KEYSTONE_TENANT_USER_PASSWORD
ceph config set client.rgw rgw_keystone_admin_tenant KEYSTONE_TENANT_NAME
ceph config set client.rgw rgw_keystone_accepted_roles KEYSTONE_ACCEPTED_USER_ROLES
ceph config set client.rgw rgw_keystone_token_cache_size NUMBER_OF_TOKENS_TO_CACHE
ceph config set client.rgw rgw_keystone_revocation_interval NUMBER_OF_SECONDS_BEFORE_CHECKING_REVOKED_TICKETS
ceph config set client.rgw rgw_keystone_implicit_tenants TRUE_FOR_PRIVATE_TENANT_FOR_EACH_NEW_USER
A Ceph Object Gateway user is mapped into a Keystone
tenant. A Keystone user has different roles assigned to it on possibly more than a single tenant. When the Ceph Object Gateway gets the ticket, it looks at the tenant, and the user roles that are assigned to that ticket, and accepts or rejects the request according to thergw_keystone_accepted_rolesconfigurable.
5.5.9. Restarting the Ceph Object Gateway daemon
Restarting the Ceph Object Gateway must be done to active configuration changes.
Prerequisites
- A running Red Hat Ceph Storage cluster.
- Access to the Ceph software repository.
-
adminprivileges to the production environment.
Procedure
Once you have saved the Ceph configuration file and distributed it to each Ceph node, restart the Ceph Object Gateway instances:
NoteUse the output from the
ceph orch pscommand, under theNAMEcolumn, to get the SERVICE_TYPE.ID information.To restart the Ceph Object Gateway on an individual node in the storage cluster:
Syntax
systemctl restart ceph-CLUSTER_ID@SERVICE_TYPE.ID.serviceExample
[root@host01 ~]# systemctl restart ceph-c4b34c6f-8365-11ba-dc31-529020a7702d@rgw.realm.zone.host01.gwasto.serviceTo restart the Ceph Object Gateways on all nodes in the storage cluster:
Syntax
ceph orch restart SERVICE_TYPEExample
[ceph: root@host01 /]# ceph orch restart rgw