Ce contenu n'est pas disponible dans la langue sélectionnée.
Chapter 3. Red Hat Ceph Storage installation
As a storage administrator, you can use the cephadm utility to deploy new Red Hat Ceph Storage clusters.
The cephadm utility manages the entire life cycle of a Ceph cluster. Installation and management tasks comprise two types of operations:
- Day One operations involve installing and bootstrapping a bare-minimum, containerized Ceph storage cluster, running on a single node. Day One also includes deploying the Monitor and Manager daemons and adding Ceph OSDs.
-
Day Two operations use the Ceph orchestration interface,
cephadm orch, or the Red Hat Ceph Storage Dashboard to expand the storage cluster by adding other Ceph services to the storage cluster.
Prerequisites
- At least one running virtual machine (VM) or bare-metal server with an active internet connection.
-
Red Hat Enterprise Linux 9.2 with
ansible-corebundled into AppStream. - A valid Red Hat subscription with the appropriate entitlements.
- Root-level access to all nodes.
- An active Red Hat Network (RHN) or service account to access the Red Hat Registry.
- Remove troubling configurations in iptables so that refresh of iptables services does not cause issues to the cluster. For an example, refer to the Verifying firewall rules are configured for default Ceph ports section of the Red Hat Ceph Storage Configuration Guide.
3.1. The cephadm utility
The cephadm utility deploys and manages a Ceph storage cluster. It is tightly integrated with both the command-line interface (CLI) and the Red Hat Ceph Storage Dashboard web interface so that you can manage storage clusters from either environment. cephadm uses SSH to connect to hosts from the manager daemon to add, remove, or update Ceph daemon containers. It does not rely on external configuration or orchestration tools such as Ansible or Rook.
The cephadm utility is available after running the preflight playbook on a host.
The cephadm utility consists of two main components:
-
The
cephadmshell. -
The
cephadmorchestrator.
The cephadm shell
The cephadm shell starts a bash shell within a container. Use the shell to complete “Day One” cluster setup tasks, such as installation and bootstrapping, and to use ceph commands.
For more information about how to start the cephadm shell, see Starting the cephadm shell.
The cephadm orchestrator
Use the cephadm orchestrator to perform “Day Two” Ceph functions, such as expanding the storage cluster and provisioning Ceph daemons and services. You can use the cephadm orchestrator through either the command-line interface (CLI) or the web-based Red Hat Ceph Storage Dashboard. Orchestrator commands take the form ceph orch.
The cephadm script interacts with the Ceph orchestration module used by the Ceph Manager.
3.2. How cephadm works
The cephadm command manages the full lifecycle of a Red Hat Ceph Storage cluster. The cephadm command can perform the following operations:
- Bootstrap a new Red Hat Ceph Storage cluster.
- Launch a containerized shell that works with the Red Hat Ceph Storage command-line interface (CLI).
- Aid in debugging containerized daemons.
The cephadm command uses ssh to communicate with the nodes in the storage cluster. This allows you to add, remove, or update Red Hat Ceph Storage containers without using external tools. Generate the ssh key pair during the bootstrapping process, or use your own ssh key.
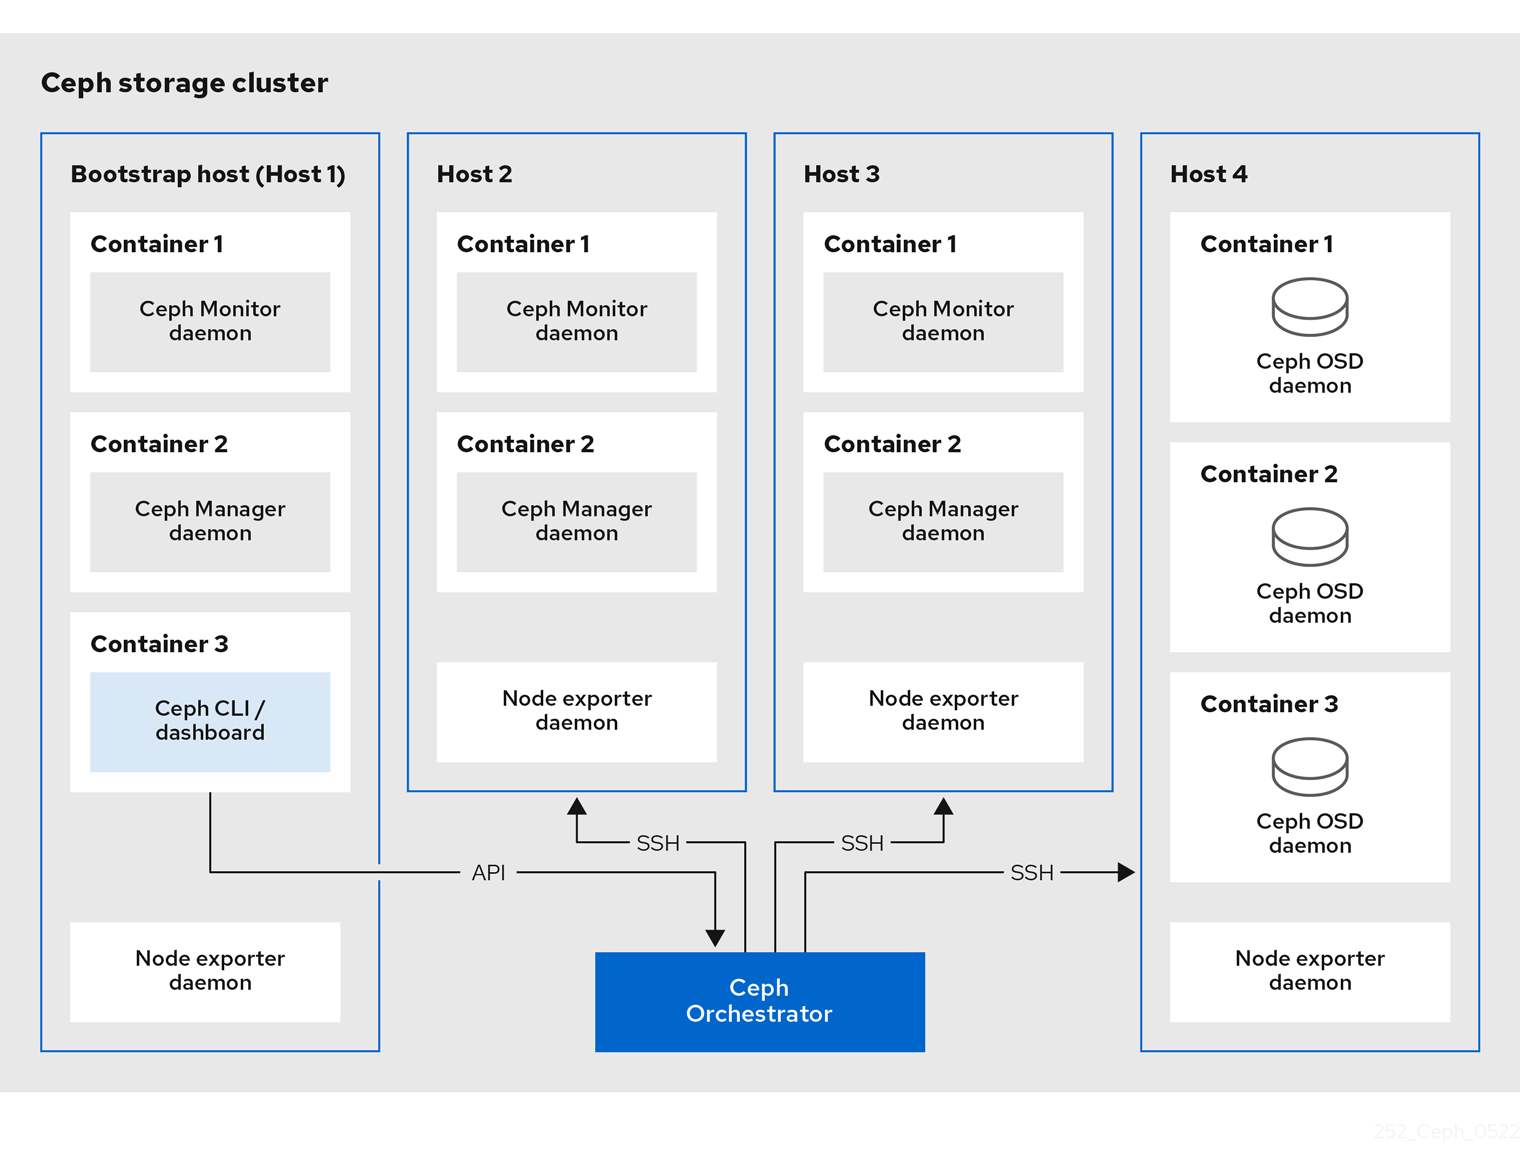
The cephadm bootstrapping process creates a small storage cluster on a single node, consisting of one Ceph Monitor and one Ceph Manager, as well as any required dependencies. You then use the orchestrator CLI or the Red Hat Ceph Storage Dashboard to expand the storage cluster to include nodes, and to provision all of the Red Hat Ceph Storage daemons and services. You can perform management functions through the CLI or from the Red Hat Ceph Storage Dashboard web interface.
3.3. The cephadm-ansible playbooks
The cephadm-ansible package is a collection of Ansible playbooks to simplify workflows that are not covered by cephadm. After installation, the playbooks are located in /usr/share/cephadm-ansible/.
The cephadm-ansible package includes the following playbooks:
-
cephadm-preflight.yml -
cephadm-clients.yml -
cephadm-purge-cluster.yml
The cephadm-preflight playbook
Use the cephadm-preflight playbook to initially setup hosts before bootstrapping the storage cluster and before adding new nodes or clients to your storage cluster. This playbook configures the Ceph repository and installs some prerequisites such as podman, lvm2, chronyd, and cephadm.
The cephadm-clients playbook
Use the cephadm-clients playbook to set up client hosts. This playbook handles the distribution of configuration and keyring files to a group of Ceph clients.
The cephadm-purge-cluster playbook
Use the cephadm-purge-cluster playbook to remove a Ceph cluster. This playbook purges a Ceph cluster managed with cephadm.
Additional Resources
-
For more information about the
cephadm-preflightplaybook, see Running the preflight playbook. -
For more information about the
cephadm-clientsplaybook, see Running the cephadm-clients playbook. -
For more information about the
cephadm-purge-clusterplaybook, see Purging the Ceph storage cluster.
3.4. Registering the Red Hat Ceph Storage nodes to the CDN and attaching subscriptions
Red Hat Ceph Storage 7.1 is supported on Red Hat Enterprise Linux 8.10 and 9.4.
When using Red Hat Enterprise Linux 8.x, the Admin node must be running a supported Red Hat Enterprise Linux 9.x version for your Red Hat Ceph Storage.
For full compatibility information, see Compatibility Guide.
Prerequisites
- At least one running virtual machine (VM) or bare-metal server with an active internet connection.
-
Red Hat Enterprise Linux 8.10 or 9.4 with
ansible-corebundled into AppStream. - A valid Red Hat subscription with the appropriate entitlements.
- Root-level access to all nodes.
Procedure
Register the node, and when prompted, enter your Red Hat Customer Portal credentials:
Syntax
subscription-manager register
Pull the latest subscription data from the CDN:
Syntax
subscription-manager refresh
List all available subscriptions for Red Hat Ceph Storage:
Syntax
subscription-manager list --available --matches 'Red Hat Ceph Storage'- Identify the appropriate subscription and retrieve its Pool ID.
Attach a pool ID to gain access to the software entitlements. Use the Pool ID you identified in the previous step.
Syntax
subscription-manager attach --pool=POOL_IDDisable the default software repositories, and then enable the server and the extras repositories on the respective version of Red Hat Enterprise Linux:
Red Hat Enterprise Linux 9
subscription-manager repos --disable=*
subscription-manager repos --enable=rhel-9-for-x86_64-baseos-rpms
subscription-manager repos --enable=rhel-9-for-x86_64-appstream-rpms
Update the system to receive the latest packages for Red Hat Enterprise Linux:
Syntax
# dnf update
- Subscribe to Red Hat Ceph Storage 7 content. Follow the instructions in How to Register Ceph with Red Hat Satellite 6.
Enable the
ceph-toolsrepository:Red Hat Enterprise Linux 9
subscription-manager repos --enable=rhceph-7-tools-for-rhel-9-x86_64-rpms
- Repeat the above steps on all nodes you are adding to the cluster.
Install
cephadm-ansible:Syntax
dnf install cephadm-ansible
3.5. Configuring Ansible inventory location
You can configure inventory location files for the cephadm-ansible staging and production environments. The Ansible inventory hosts file contains all the hosts that are part of the storage cluster. You can list nodes individually in the inventory hosts file or you can create groups such as [mons],[osds], and [rgws] to provide clarity to your inventory and ease the usage of the --limit option to target a group or node when running a playbook.
If deploying clients, client nodes must be defined in a dedicated [clients] group.
Prerequisites
- An Ansible administration node.
- Root-level access to the Ansible administration node.
-
The
cephadm-ansiblepackage is installed on the node.
Procedure
Navigate to the
/usr/share/cephadm-ansible/directory:[root@admin ~]# cd /usr/share/cephadm-ansible
Optional: Create subdirectories for staging and production:
[root@admin cephadm-ansible]# mkdir -p inventory/staging inventory/production
Optional: Edit the
ansible.cfgfile and add the following line to assign a default inventory location:[defaults] inventory = ./inventory/staging
Optional: Create an inventory
hostsfile for each environment:[root@admin cephadm-ansible]# touch inventory/staging/hosts [root@admin cephadm-ansible]# touch inventory/production/hosts
Open and edit each
hostsfile and add the nodes and[admin]group:NODE_NAME_1 NODE_NAME_2 [admin] ADMIN_NODE_NAME_1
- Replace NODE_NAME_1 and NODE_NAME_2 with the Ceph nodes such as monitors, OSDs, MDSs, and gateway nodes.
Replace ADMIN_NODE_NAME_1 with the name of the node where the admin keyring is stored.
Example
host02
host03
host04

[admin]
host01
NoteIf you set the inventory location in the
ansible.cfgfile to staging, you need to run the playbooks in the staging environment as follows:Syntax
ansible-playbook -i inventory/staging/hosts PLAYBOOK.ymlTo run the playbooks in the production environment:
Syntax
ansible-playbook -i inventory/production/hosts PLAYBOOK.yml
3.6. Enabling SSH login as root user on Red Hat Enterprise Linux 9
Red Hat Enterprise Linux 9 does not support SSH login as a root user even if PermitRootLogin parameter is set to yes in the /etc/ssh/sshd_config file. You get the following error:
Example
[root@host01 ~]# ssh root@myhostname
root@myhostname password:
Permission denied, please try again.
You can run one of the following methods to enable login as a root user:
- Use "Allow root SSH login with password" flag while setting the root password during installation of Red Hat Enterprise Linux 9.
-
Manually set the
PermitRootLoginparameter after Red Hat Enterprise Linux 9 installation.
This section describes manual setting of the PermitRootLogin parameter.
Prerequisites
- Root-level access to all nodes.
Procedure
Open the
etc/ssh/sshd_configfile and set thePermitRootLogintoyes:Example
[root@admin ~]# echo 'PermitRootLogin yes' >> /etc/ssh/sshd_config.d/01-permitrootlogin.conf
Restart the
SSHservice:Example
[root@admin ~]# systemctl restart sshd.service
Login to the node as the
rootuser:Syntax
ssh root@HOST_NAMEReplace HOST_NAME with the host name of the Ceph node.
Example
[root@admin ~]# ssh root@host01
Enter the
rootpassword when prompted.
Additional Resources
- For more information, see the Not able to login as root user via ssh in RHEL 9 server Knowledgebase solution.
3.7. Creating an Ansible user with sudo access
You can create an Ansible user with password-less root access on all nodes in the storage cluster to run the cephadm-ansible playbooks. The Ansible user must be able to log into all the Red Hat Ceph Storage nodes as a user that has root privileges to install software and create configuration files without prompting for a password.
Prerequisites
- Root-level access to all nodes.
- For Red Hat Enterprise Linux 9, to log in as a root user, see Enabling SSH log in as root user on Red Hat Enterprise Linux 9
Procedure
Log in to the node as the
rootuser:Syntax
ssh root@HOST_NAMEReplace HOST_NAME with the host name of the Ceph node.
Example
[root@admin ~]# ssh root@host01
Enter the
rootpassword when prompted.Create a new Ansible user:
Syntax
adduser USER_NAMEReplace USER_NAME with the new user name for the Ansible user.
Example
[root@host01 ~]# adduser ceph-admin
ImportantDo not use
cephas the user name. Thecephuser name is reserved for the Ceph daemons. A uniform user name across the cluster can improve ease of use, but avoid using obvious user names, because intruders typically use them for brute-force attacks.Set a new password for this user:
Syntax
passwd USER_NAMEReplace USER_NAME with the new user name for the Ansible user.
Example
[root@host01 ~]# passwd ceph-admin
Enter the new password twice when prompted.
Configure
sudoaccess for the newly created user:Syntax
cat << EOF >/etc/sudoers.d/USER_NAME
$USER_NAME ALL = (root) NOPASSWD:ALL
EOF
Replace USER_NAME with the new user name for the Ansible user.
Example
[root@host01 ~]# cat << EOF >/etc/sudoers.d/ceph-admin
ceph-admin ALL = (root) NOPASSWD:ALL
EOF
Assign the correct file permissions to the new file:
Syntax
chmod 0440 /etc/sudoers.d/USER_NAMEReplace USER_NAME with the new user name for the Ansible user.
Example
[root@host01 ~]# chmod 0440 /etc/sudoers.d/ceph-admin
- Repeat the above steps on all nodes in the storage cluster.
Additional Resources
- For more information about creating user accounts, see the Getting started with managing user accounts section in the Configuring basic system settings chapter of the Red Hat Enterprise Linux 9 guide.
3.8. Enabling password-less SSH for Ansible
Generate an SSH key pair on the Ansible administration node and distribute the public key to each node in the storage cluster so that Ansible can access the nodes without being prompted for a password.
Prerequisites
- Access to the Ansible administration node.
- Ansible user with sudo access to all nodes in the storage cluster.
- For Red Hat Enterprise Linux 9, to log in as a root user, see Enabling SSH log in as root user on Red Hat Enterprise Linux 9
Procedure
Generate the SSH key pair, accept the default file name and leave the passphrase empty:
[ceph-admin@admin ~]$ ssh-keygen
Copy the public key to all nodes in the storage cluster:
ssh-copy-id USER_NAME@HOST_NAME
Replace USER_NAME with the new user name for the Ansible user. Replace HOST_NAME with the host name of the Ceph node.
Example
[ceph-admin@admin ~]$ ssh-copy-id ceph-admin@host01
Create the user’s SSH
configfile:[ceph-admin@admin ~]$ touch ~/.ssh/config
Open for editing the
configfile. Set values for theHostnameandUseroptions for each node in the storage cluster:Host host01 Hostname HOST_NAME User USER_NAME Host host02 Hostname HOST_NAME User USER_NAME ...
Replace HOST_NAME with the host name of the Ceph node. Replace USER_NAME with the new user name for the Ansible user.
Example
Host host01
   Hostname host01
   User ceph-admin
Host host02
   Hostname host02
   User ceph-admin
Host host03
   Hostname host03
   User ceph-admin
ImportantBy configuring the
~/.ssh/configfile you do not have to specify the-u USER_NAMEoption each time you execute theansible-playbookcommand.Set the correct file permissions for the
~/.ssh/configfile:[ceph-admin@admin ~]$ chmod 600 ~/.ssh/config
Additional Resources
-
The
ssh_config(5)manual page. - See Using secure communications between two systems with OpenSSH.
3.9. Running the preflight playbook
This Ansible playbook configures the Ceph repository and prepares the storage cluster for bootstrapping. It also installs some prerequisites, such as podman, lvm2, chronyd, and cephadm. The default location for cephadm-ansible and cephadm-preflight.yml is /usr/share/cephadm-ansible.
The preflight playbook uses the cephadm-ansible inventory file to identify all the admin and nodes in the storage cluster.
The default location for the inventory file is /usr/share/cephadm-ansible/hosts. The following example shows the structure of a typical inventory file:
Example
host02
host03
host04

[admin]
host01
The [admin] group in the inventory file contains the name of the node where the admin keyring is stored. On a new storage cluster, the node in the [admin] group will be the bootstrap node. To add additional admin hosts after bootstrapping the cluster see Setting up the admin node in the Installation Guide for more information.
Run the preflight playbook before you bootstrap the initial host.
If you are performing a disconnected installation, see Running the preflight playbook for a disconnected installation.
Prerequisites
- Root-level access to the Ansible administration node.
Ansible user with sudo and passwordless
sshaccess to all nodes in the storage cluster.NoteIn the below example, host01 is the bootstrap node.
Procedure
-
Navigate to the the
/usr/share/cephadm-ansibledirectory. Open and edit the
hostsfile and add your nodes:Example
host02
host03
host04

[admin]
host01
Run the preflight playbook:
Syntax
ansible-playbook -i INVENTORY_FILE cephadm-preflight.yml --extra-vars "ceph_origin=rhcs"Example
[ceph-admin@admin cephadm-ansible]$ ansible-playbook -i hosts cephadm-preflight.yml --extra-vars "ceph_origin=rhcs"
After installation is complete,
cephadmresides in the/usr/sbin/directory.Use the
--limitoption to run the preflight playbook on a selected set of hosts in the storage cluster:Syntax
ansible-playbook -i INVENTORY_FILE cephadm-preflight.yml --extra-vars "ceph_origin=rhcs" --limit GROUP_NAME|NODE_NAME
Replace GROUP_NAME with a group name from your inventory file. Replace NODE_NAME with a specific node name from your inventory file.
NoteOptionally, you can group your nodes in your inventory file by group name such as
[mons],[osds], and[mgrs]. However, admin nodes must be added to the[admin]group and clients must be added to the[clients]group.Example
[ceph-admin@admin cephadm-ansible]$ ansible-playbook -i hosts cephadm-preflight.yml --extra-vars "ceph_origin=rhcs" --limit clients
[ceph-admin@admin cephadm-ansible]$ ansible-playbook -i hosts cephadm-preflight.yml --extra-vars "ceph_origin=rhcs" --limit host01
When you run the preflight playbook,
cephadm-ansibleautomatically installschronydandceph-commonon the client nodes.The preflight playbook installs
chronydbut configures it for a single NTP source. If you want to configure multiple sources or if you have a disconnected environment, see the following documentation for more information:
3.10. Bootstrapping a new storage cluster
The cephadm utility performs the following tasks during the bootstrap process:
- Installs and starts a Ceph Monitor daemon and a Ceph Manager daemon for a new Red Hat Ceph Storage cluster on the local node as containers.
-
Creates the
/etc/cephdirectory. -
Writes a copy of the public key to
/etc/ceph/ceph.pubfor the Red Hat Ceph Storage cluster and adds the SSH key to the root user’s/root/.ssh/authorized_keysfile. -
Applies the
_adminlabel to the bootstrap node. -
Writes a minimal configuration file needed to communicate with the new cluster to
/etc/ceph/ceph.conf. -
Writes a copy of the
client.adminadministrative secret key to/etc/ceph/ceph.client.admin.keyring. -
Deploys a basic monitoring stack with prometheus, grafana, and other tools such as
node-exporterandalert-manager.
If you are performing a disconnected installation, see Performing a disconnected installation.
If you have existing prometheus services that you want to run with the new storage cluster, or if you are running Ceph with Rook, use the --skip-monitoring-stack option with the cephadm bootstrap command. This option bypasses the basic monitoring stack so that you can manually configure it later.
If you are deploying a monitoring stack, see Deploying the monitoring stack using the Ceph Orchestrator in the Red Hat Ceph Storage Operations Guide.
Bootstrapping provides the default user name and password for the initial login to the Dashboard. Bootstrap requires you to change the password after you log in.
Before you begin the bootstrapping process, make sure that the container image that you want to use has the same version of Red Hat Ceph Storage as cephadm. If the two versions do not match, bootstrapping fails at the Creating initial admin user stage.
Before you begin the bootstrapping process, you must create a username and password for the registry.redhat.io container registry. For more information about Red Hat container registry authentication, see the knowledge base article Red Hat Container Registry Authentication
Prerequisites
- An IP address for the first Ceph Monitor container, which is also the IP address for the first node in the storage cluster.
-
Login access to
registry.redhat.io. -
A minimum of 10 GB of free space for
/var/lib/containers/. - Root-level access to all nodes.
If the storage cluster includes multiple networks and interfaces, be sure to choose a network that is accessible by any node that uses the storage cluster.
If the local node uses fully-qualified domain names (FQDN), then add the --allow-fqdn-hostname option to cephadm bootstrap on the command line.
Run cephadm bootstrap on the node that you want to be the initial Monitor node in the cluster. The IP_ADDRESS option should be the IP address of the node you are using to run cephadm bootstrap.
If you want to deploy a storage cluster using IPV6 addresses, then use the IPV6 address format for the --mon-ip IP_ADDRESS option. For example: cephadm bootstrap --mon-ip 2620:52:0:880:225:90ff:fefc:2536 --registry-json /etc/mylogin.json
Procedure
Bootstrap a storage cluster:
Syntax
cephadm bootstrap --cluster-network NETWORK_CIDR --mon-ip IP_ADDRESS --registry-url registry.redhat.io --registry-username USER_NAME --registry-password PASSWORD --yes-i-know
Example
[root@host01 ~]# cephadm bootstrap --cluster-network 10.10.128.0/24 --mon-ip 10.10.128.68 --registry-url registry.redhat.io --registry-username myuser1 --registry-password mypassword1 --yes-i-know
NoteIf you want internal cluster traffic routed over the public network, you can omit the
--cluster-network NETWORK_CIDRoption.The script takes a few minutes to complete. Once the script completes, it provides the credentials to the Red Hat Ceph Storage Dashboard URL, a command to access the Ceph command-line interface (CLI), and a request to enable telemetry.
Ceph Dashboard is now available at:

             URL: https://host01:8443/
            User: admin
        Password: i8nhu7zham

Enabling client.admin keyring and conf on hosts with "admin" label
You can access the Ceph CLI with:

        sudo /usr/sbin/cephadm shell --fsid 266ee7a8-2a05-11eb-b846-5254002d4916 -c /etc/ceph/ceph.conf -k /etc/ceph/ceph.client.admin.keyring

Please consider enabling telemetry to help improve Ceph:

        ceph telemetry on

For more information see:

        https://docs.ceph.com/docs/master/mgr/telemetry/

Bootstrap complete.
Additional Resources
- For more information about the recommended bootstrap command options, see Recommended cephadm bootstrap command options.
- For more information about the options available for the bootstrap command, see Bootstrap command options.
- For information about using a JSON file to contain login credentials for the bootstrap process, see Using a JSON file to protect login information.
3.10.1. Recommended cephadm bootstrap command options
The cephadm bootstrap command has multiple options that allow you to specify file locations, configure ssh settings, set passwords, and perform other initial configuration tasks.
Red Hat recommends that you use a basic set of command options for cephadm bootstrap. You can configure additional options after your initial cluster is up and running.
The following examples show how to specify the recommended options.
Syntax
cephadm bootstrap --ssh-user USER_NAME --mon-ip IP_ADDRESS --allow-fqdn-hostname --registry-json REGISTRY_JSON
Example
[root@host01 ~]# cephadm bootstrap --ssh-user ceph --mon-ip 10.10.128.68 --allow-fqdn-hostname --registry-json /etc/mylogin.json
Additional Resources
-
For more information about the
--registry-jsonoption, see Using a JSON file to protect login information. -
For more information about all available
cephadm bootstrapoptions, see Bootstrap command options. - For more information about bootstrapping the storage cluster as a non-root user, see Bootstrapping the storage cluster as a non-root user.
3.10.2. Using a JSON file to protect login information
As a storage administrator, you might choose to add login and password information to a JSON file, and then refer to the JSON file for bootstrapping. This protects the login credentials from exposure.
You can also use a JSON file with the cephadm --registry-login command.
Prerequisites
- An IP address for the first Ceph Monitor container, which is also the IP address for the first node in the storage cluster.
-
Login access to
registry.redhat.io. -
A minimum of 10 GB of free space for
/var/lib/containers/. - Root-level access to all nodes.
Procedure
Create the JSON file. In this example, the file is named
mylogin.json.Syntax
{
 "url":"REGISTRY_URL",
 "username":"USER_NAME",
 "password":"PASSWORD"
}
Example
{
 "url":"registry.redhat.io",
 "username":"myuser1",
 "password":"mypassword1"
}
Bootstrap a storage cluster:
Syntax
cephadm bootstrap --mon-ip IP_ADDRESS --registry-json /etc/mylogin.jsonExample
[root@host01 ~]# cephadm bootstrap --mon-ip 10.10.128.68 --registry-json /etc/mylogin.json
3.10.3. Bootstrapping a storage cluster using a service configuration file
To bootstrap the storage cluster and configure additional hosts and daemons using a service configuration file, use the --apply-spec option with the cephadm bootstrap command. The configuration file is a .yaml file that contains the service type, placement, and designated nodes for services that you want to deploy.
If you want to use a non-default realm or zone for applications such as multi-site, configure your Ceph Object Gateway daemons after you bootstrap the storage cluster, instead of adding them to the configuration file and using the --apply-spec option. This gives you the opportunity to create the realm or zone you need for the Ceph Object Gateway daemons before deploying them. See the Red Hat Ceph Storage Operations Guide for more information.
If deploying a NFS-Ganesha gateway, or Metadata Server (MDS) service, configure them after bootstrapping the storage cluster.
- To deploy a Ceph NFS-Ganesha gateway, you must create a RADOS pool first.
- To deploy the MDS service, you must create a CephFS volume first.
See the Red Hat Ceph Storage Operations Guide for more information.
Prerequisites
- At least one running virtual machine (VM) or server.
-
Red Hat Enterprise Linux 8.10 or 9.4 with
ansible-corebundled into AppStream. - Root-level access to all nodes.
-
Login access to
registry.redhat.io. -
Passwordless
sshis set up on all hosts in the storage cluster. -
cephadmis installed on the node that you want to be the initial Monitor node in the storage cluster.
Procedure
- Log in to the bootstrap host.
Create the service configuration
.yamlfile for your storage cluster. The example file directscephadm bootstrapto configure the initial host and two additional hosts, and it specifies that OSDs be created on all available disks.Example
service_type: host
addr: host01
hostname: host01
---
service_type: host
addr: host02
hostname: host02
---
service_type: host
addr: host03
hostname: host03
---
service_type: host
addr: host04
hostname: host04
---
service_type: mon
placement:
  host_pattern: "host[0-2]"
---
service_type: osd
service_id: my_osds
placement:
  host_pattern: "host[1-3]"
data_devices:
  all: true
Bootstrap the storage cluster with the
--apply-specoption:Syntax
cephadm bootstrap --apply-spec CONFIGURATION_FILE_NAME --mon-ip MONITOR_IP_ADDRESS --registry-url registry.redhat.io --registry-username USER_NAME --registry-password PASSWORD
Example
[root@host01 ~]# cephadm bootstrap --apply-spec initial-config.yaml --mon-ip 10.10.128.68 --registry-url registry.redhat.io --registry-username myuser1 --registry-password mypassword1
The script takes a few minutes to complete. Once the script completes, it provides the credentials to the Red Hat Ceph Storage Dashboard URL, a command to access the Ceph command-line interface (CLI), and a request to enable telemetry.
- Once your storage cluster is up and running, see the Red Hat Ceph Storage Operations Guide for more information about configuring additional daemons and services.
Additional Resources
- For more information about the options available for the bootstrap command, see the Bootstrap command options.
3.10.4. Bootstrapping the storage cluster as a non-root user
You can bootstrap the storage cluster as a non-root user if you have passwordless sudo privileges.
To bootstrap the Red Hat Ceph Storage cluster as a non-root user on the bootstrap node, use the --ssh-user option with the cephadm bootstrap command. --ssh-user specifies a user for SSH connections to cluster nodes.
Non-root users must have passwordless sudo access.
Prerequisites
- An IP address for the first Ceph Monitor container, which is also the IP address for the initial Monitor node in the storage cluster.
-
Login access to
registry.redhat.io. -
A minimum of 10 GB of free space for
/var/lib/containers/. - Optional: SSH public and private keys.
-
Passwordless
sudoaccess to the bootstrap node. -
Non-root users have passwordless
sudoaccess on all nodes intended to be part of the cluster. -
cephadminstalled on the node that you want to be the initial Monitor node in the storage cluster.
Procedure
Change to
sudoon the bootstrap node:Syntax
su - SSH_USER_NAMEExample
[root@host01 ~]# su - ceph
Last login: Tue Sep 14 12:00:29 EST 2021 on pts/0
Check the SSH connection to the bootstrap node:
Example
[ceph@host01 ~]$ ssh host01
Last login: Tue Sep 14 12:03:29 EST 2021 on pts/0
Optional: Invoke the
cephadm bootstrapcommand.NoteUsing private and public keys is optional. If SSH keys have not previously been created, these can be created during this step.
Include the
--ssh-private-keyand--ssh-public-keyoptions:Syntax
sudo cephadm bootstrap --ssh-user USER_NAME --mon-ip IP_ADDRESS --ssh-private-key PRIVATE_KEY --ssh-public-key PUBLIC_KEY --registry-url registry.redhat.io --registry-username USER_NAME --registry-password PASSWORD
Example
sudo cephadm bootstrap --ssh-user ceph --mon-ip 10.10.128.68 --ssh-private-key /home/ceph/.ssh/id_rsa --ssh-public-key /home/ceph/.ssh/id_rsa.pub --registry-url registry.redhat.io --registry-username myuser1 --registry-password mypassword1
Additional Resources
-
For more information about all available
cephadm bootstrapoptions, see Bootstrap command options. - For more information about utilizing Ansible to automate bootstrapping a rootless cluster, see the knowledge base article Red Hat Ceph Storage 6 rootless deployment utilizing ansible ad-hoc commands.
- For more information about sudo privileges, see Managing sudo access.
3.10.5. Bootstrap command options
The cephadm bootstrap command bootstraps a Ceph storage cluster on the local host. It deploys a MON daemon and a MGR daemon on the bootstrap node, automatically deploys the monitoring stack on the local host, and calls ceph orch host add HOSTNAME.
The following table lists the available options for cephadm bootstrap.
cephadm bootstrap option | Description |
|---|---|
| --config CONFIG_FILE, -c CONFIG_FILE |
CONFIG_FILE is the |
| --cluster-network NETWORK_CIDR |
Use the subnet defined by NETWORK_CIDR for internal cluster traffic. This is specified in CIDR notation. For example: |
| --mon-id MON_ID | Bootstraps on the host named MON_ID. Default value is the local host. |
| --mon-addrv MON_ADDRV | mon IPs (e.g., [v2:localipaddr:3300,v1:localipaddr:6789]) |
| --mon-ip IP_ADDRESS |
IP address of the node you are using to run |
| --mgr-id MGR_ID | Host ID where a MGR node should be installed. Default: randomly generated. |
| --fsid FSID | Cluster FSID. |
| --output-dir OUTPUT_DIR | Use this directory to write config, keyring, and pub key files. |
| --output-keyring OUTPUT_KEYRING | Use this location to write the keyring file with the new cluster admin and mon keys. |
| --output-config OUTPUT_CONFIG | Use this location to write the configuration file to connect to the new cluster. |
| --output-pub-ssh-key OUTPUT_PUB_SSH_KEY | Use this location to write the public SSH key for the cluster. |
| --skip-ssh | Skip the setup of the ssh key on the local host. |
| --initial-dashboard-user INITIAL_DASHBOARD_USER | Initial user for the dashboard. |
| --initial-dashboard-password INITIAL_DASHBOARD_PASSWORD | Initial password for the initial dashboard user. |
| --ssl-dashboard-port SSL_DASHBOARD_PORT | Port number used to connect with the dashboard using SSL. |
| --dashboard-key DASHBOARD_KEY | Dashboard key. |
| --dashboard-crt DASHBOARD_CRT | Dashboard certificate. |
| --ssh-config SSH_CONFIG | SSH config. |
| --ssh-private-key SSH_PRIVATE_KEY | SSH private key. |
| --ssh-public-key SSH_PUBLIC_KEY | SSH public key. |
| --ssh-user SSH_USER | Sets the user for SSH connections to cluster hosts. Passwordless sudo is needed for non-root users. |
| --skip-mon-network | Sets mon public_network based on the bootstrap mon ip. |
| --skip-dashboard | Do not enable the Ceph Dashboard. |
| --dashboard-password-noupdate | Disable forced dashboard password change. |
| --no-minimize-config | Do not assimilate and minimize the configuration file. |
| --skip-ping-check | Do not verify that the mon IP is pingable. |
| --skip-pull | Do not pull the latest image before bootstrapping. |
| --skip-firewalld | Do not configure firewalld. |
| --allow-overwrite | Allow the overwrite of existing –output-* config/keyring/ssh files. |
| --allow-fqdn-hostname | Allow fully qualified host name. |
| --skip-prepare-host | Do not prepare host. |
| --orphan-initial-daemons | Do not create initial mon, mgr, and crash service specs. |
| --skip-monitoring-stack | Do not automatically provision the monitoring stack] (prometheus, grafana, alertmanager, node-exporter). |
| --apply-spec APPLY_SPEC | Apply cluster spec file after bootstrap (copy ssh key, add hosts and apply services). |
| --registry-url REGISTRY_URL |
Specifies the URL of the custom registry to log into. For example: |
| --registry-username REGISTRY_USERNAME | User name of the login account to the custom registry. |
| --registry-password REGISTRY_PASSWORD | Password of the login account to the custom registry. |
| --registry-json REGISTRY_JSON | JSON file containing registry login information. |
Additional Resources
-
For more information about the
--skip-monitoring-stackoption, see Adding hosts. -
For more information about logging into the registry with the
registry-jsonoption, see help for theregistry-logincommand. -
For more information about
cephadmoptions, see help forcephadm.
3.10.6. Configuring a private registry for a disconnected installation
You can use a disconnected installation procedure to install cephadm and bootstrap your storage cluster on a private network. A disconnected installation uses a private registry for installation. Use this procedure when the Red Hat Ceph Storage nodes do NOT have access to the Internet during deployment.
Follow this procedure to set up a secure private registry using authentication and a self-signed certificate. Perform these steps on a node that has both Internet access and access to the local cluster.
Using an insecure registry for production is not recommended.
Prerequisites
- At least one running virtual machine (VM) or server with an active internet connection.
-
Red Hat Enterprise Linux 8.10 or 9.4 with
ansible-corebundled into AppStream. -
Login access to
registry.redhat.io. - Root-level access to all nodes.
Procedure
- Log in to the node that has access to both the public network and the cluster nodes.
Register the node, and when prompted, enter the appropriate Red Hat Customer Portal credentials:
Example
[root@admin ~]# subscription-manager register
Pull the latest subscription data:
Example
[root@admin ~]# subscription-manager refresh
List all available subscriptions for Red Hat Ceph Storage:
Example
[root@admin ~]# subscription-manager list --available --all --matches="*Ceph*"
Copy the Pool ID from the list of available subscriptions for Red Hat Ceph Storage.
Attach the subscription to get access to the software entitlements:
Syntax
subscription-manager attach --pool=POOL_IDReplace POOL_ID with the Pool ID identified in the previous step.
Disable the default software repositories, and enable the server and the extras repositories:
Red Hat Enterprise Linux 9
[root@admin ~]# subscription-manager repos --disable=*
[root@admin ~]# subscription-manager repos --enable=rhel-9-for-x86_64-baseos-rpms
[root@admin ~]# subscription-manager repos --enable=rhel-9-for-x86_64-appstream-rpms
Install the
podmanandhttpd-toolspackages:Example
[root@admin ~]# dnf install -y podman httpd-tools
Create folders for the private registry:
Example
[root@admin ~]# mkdir -p /opt/registry/{auth,certs,data}The registry will be stored in
/opt/registryand the directories are mounted in the container running the registry.-
The
authdirectory stores thehtpasswdfile the registry uses for authentication. -
The
certsdirectory stores the certificates the registry uses for authentication. -
The
datadirectory stores the registry images.
-
The
Create credentials for accessing the private registry:
Syntax
htpasswd -bBc /opt/registry/auth/htpasswd PRIVATE_REGISTRY_USERNAME PRIVATE_REGISTRY_PASSWORD
-
The
boption provides the password from the command line. -
The
Boption stores the password usingBcryptencryption. -
The
coption creates thehtpasswdfile. - Replace PRIVATE_REGISTRY_USERNAME with the username to create for the private registry.
Replace PRIVATE_REGISTRY_PASSWORD with the password to create for the private registry username.
Example
[root@admin ~]# htpasswd -bBc /opt/registry/auth/htpasswd myregistryusername myregistrypassword1
-
The
Create a self-signed certificate:
Syntax
openssl req -newkey rsa:4096 -nodes -sha256 -keyout /opt/registry/certs/domain.key -x509 -days 365 -out /opt/registry/certs/domain.crt -addext "subjectAltName = DNS:LOCAL_NODE_FQDN"Replace LOCAL_NODE_FQDN with the fully qualified host name of the private registry node.
NoteYou will be prompted for the respective options for your certificate. The
CN=value is the host name of your node and should be resolvable by DNS or the/etc/hostsfile.Example
[root@admin ~]# openssl req -newkey rsa:4096 -nodes -sha256 -keyout /opt/registry/certs/domain.key -x509 -days 365 -out /opt/registry/certs/domain.crt -addext "subjectAltName = DNS:admin.lab.redhat.com"
NoteWhen creating a self-signed certificate, be sure to create a certificate with a proper Subject Alternative Name (SAN). Podman commands that require TLS verification for certificates that do not include a proper SAN, return the following error: x509: certificate relies on legacy Common Name field, use SANs or temporarily enable Common Name matching with GODEBUG=x509ignoreCN=0
Create a symbolic link to
domain.certto allowskopeoto locate the certificate with the file extension.cert:Example
[root@admin ~]# ln -s /opt/registry/certs/domain.crt /opt/registry/certs/domain.cert
Add the certificate to the trusted list on the private registry node:
Syntax
cp /opt/registry/certs/domain.crt /etc/pki/ca-trust/source/anchors/
update-ca-trust
trust list | grep -i "LOCAL_NODE_FQDN"
Replace LOCAL_NODE_FQDN with the FQDN of the private registry node.
Example
[root@admin ~]# cp /opt/registry/certs/domain.crt /etc/pki/ca-trust/source/anchors/
[root@admin ~]# update-ca-trust
[root@admin ~]# trust list | grep -i "admin.lab.redhat.com"

    label: admin.lab.redhat.com
Copy the certificate to any nodes that will access the private registry for installation and update the trusted list:
Example
[root@admin ~]# scp /opt/registry/certs/domain.crt root@host01:/etc/pki/ca-trust/source/anchors/
[root@admin ~]# ssh root@host01
[root@host01 ~]# update-ca-trust
[root@host01 ~]# trust list | grep -i "admin.lab.redhat.com"

    label: admin.lab.redhat.com
Start the local secure private registry:
Syntax
podman run --restart=always --name NAME_OF_CONTAINER \
-p 5000:5000 -v /opt/registry/data:/var/lib/registry:z \
-v /opt/registry/auth:/auth:z \
-v /opt/registry/certs:/certs:z \
-e "REGISTRY_AUTH=htpasswd" \
-e "REGISTRY_AUTH_HTPASSWD_REALM=Registry Realm" \
-e REGISTRY_AUTH_HTPASSWD_PATH=/auth/htpasswd \
-e "REGISTRY_HTTP_TLS_CERTIFICATE=/certs/domain.crt" \
-e "REGISTRY_HTTP_TLS_KEY=/certs/domain.key" \
-e REGISTRY_COMPATIBILITY_SCHEMA1_ENABLED=true \
-d registry:2
Replace NAME_OF_CONTAINER with a name to assign to the container.
Example
[root@admin ~]# podman run --restart=always --name myprivateregistry \
-p 5000:5000 -v /opt/registry/data:/var/lib/registry:z \
-v /opt/registry/auth:/auth:z \
-v /opt/registry/certs:/certs:z \
-e "REGISTRY_AUTH=htpasswd" \
-e "REGISTRY_AUTH_HTPASSWD_REALM=Registry Realm" \
-e REGISTRY_AUTH_HTPASSWD_PATH=/auth/htpasswd \
-e "REGISTRY_HTTP_TLS_CERTIFICATE=/certs/domain.crt" \
-e "REGISTRY_HTTP_TLS_KEY=/certs/domain.key" \
-e REGISTRY_COMPATIBILITY_SCHEMA1_ENABLED=true \
-d registry:2
This starts the private registry on port 5000 and mounts the volumes of the registry directories in the container running the registry.
On the local registry node, verify that
registry.redhat.iois in the container registry search path.Open for editing the
/etc/containers/registries.conffile, and addregistry.redhat.ioto theunqualified-search-registrieslist, if it does not exist:Example
unqualified-search-registries = ["registry.redhat.io", "registry.access.redhat.com", "registry.fedoraproject.org", "registry.centos.org", "docker.io"]
Login to
registry.redhat.iowith your Red Hat Customer Portal credentials:Syntax
podman login registry.redhat.io
Copy the following Red Hat Ceph Storage 7 image, Prometheus images, and Dashboard image from the Red Hat Customer Portal to the private registry:
Table 3.1. Custom image details for monitoring stack Monitoring stack component Image details Prometheus
registry.redhat.io/openshift4/ose-prometheus:v4.12
Grafana
registry.redhat.io/rhceph/grafana-rhel9:latest
Node-exporter
registry.redhat.io/openshift4/ose-prometheus-node-exporter:v4.12
AlertManager
registry.redhat.io/openshift4/ose-prometheus-alertmanager:v4.12
HAProxy
registry.redhat.io/rhceph/rhceph-haproxy-rhel9:latest
Keepalived
registry.redhat.io/rhceph/keepalived-rhel9:latest
SNMP Gateway
registry.redhat.io/rhceph/snmp-notifier-rhel9:latest
Syntax
podman run -v /CERTIFICATE_DIRECTORY_PATH:/certs:Z -v /CERTIFICATE_DIRECTORY_PATH/domain.cert:/certs/domain.cert:Z --rm registry.redhat.io/rhel9/skopeo:8.5-8 skopeo copy --remove-signatures --src-creds RED_HAT_CUSTOMER_PORTAL_LOGIN:RED_HAT_CUSTOMER_PORTAL_PASSWORD --dest-cert-dir=./certs/ --dest-creds PRIVATE_REGISTRY_USERNAME:PRIVATE_REGISTRY_PASSWORD docker://registry.redhat.io/SRC_IMAGE:SRC_TAG docker://LOCAL_NODE_FQDN:5000/DST_IMAGE:DST_TAG
- Replace CERTIFICATE_DIRECTORY_PATH with the directory path to the self-signed certificates.
- Replace RED_HAT_CUSTOMER_PORTAL_LOGIN and RED_HAT_CUSTOMER_PORTAL_PASSWORD with your Red Hat Customer Portal credentials.
- Replace PRIVATE_REGISTRY_USERNAME and PRIVATE_REGISTRY_PASSWORD with the private registry credentials.
- Replace SRC_IMAGE and SRC_TAG with the name and tag of the image to copy from registry.redhat.io.
- Replace DST_IMAGE and DST_TAG with the name and tag of the image to copy to the private registry.
Replace LOCAL_NODE_FQDN with the FQDN of the private registry.
Example
[root@admin ~]#  podman run -v /opt/registry/certs:/certs:Z -v /opt/registry/certs/domain.cert:/certs/domain.cert:Z --rm registry.redhat.io/rhel9/skopeo skopeo copy --remove-signatures --src-creds myusername:mypassword1 --dest-cert-dir=./certs/ --dest-creds myregistryusername:myregistrypassword1 docker://registry.redhat.io/rhceph/rhceph-7-rhel9:latest docker://admin.lab.redhat.com:5000/rhceph/rhceph-7-rhel9:latest

[root@admin ~]# podman run -v /opt/registry/certs:/certs:Z -v /opt/registry/certs/domain.cert:/certs/domain.cert:Z --rm registry.redhat.io/rhel9/skopeo skopeo copy --remove-signatures --src-creds myusername:mypassword1 --dest-cert-dir=./certs/ --dest-creds myregistryusername:myregistrypassword1 docker://registry.redhat.io/openshift4/ose-prometheus-node-exporter:v4.12 docker://admin.lab.redhat.com:5000/openshift4/ose-prometheus-node-exporter:v4.12

[root@admin ~]# podman run -v /opt/registry/certs:/certs:Z -v /opt/registry/certs/domain.cert:/certs/domain.cert:Z --rm registry.redhat.io/rhel9/skopeo skopeo copy --remove-signatures --src-creds myusername:mypassword1 --dest-cert-dir=./certs/ --dest-creds myregistryusername:myregistrypassword1 docker://registry.redhat.io/rhceph/grafana-rhel9:latest docker://admin.lab.redhat.com:5000/rhceph/grafana-rhel9:latest

[root@admin ~]# podman run -v /opt/registry/certs:/certs:Z -v /opt/registry/certs/domain.cert:/certs/domain.cert:Z --rm registry.redhat.io/rhel9/skopeo skopeo copy --remove-signatures --src-creds myusername:mypassword1 --dest-cert-dir=./certs/ --dest-creds myregistryusername:myregistrypassword1 docker://registry.redhat.io/openshift4/ose-prometheus:v4.12 docker://admin.lab.redhat.com:5000/openshift4/ose-prometheus:v4.12

[root@admin ~]# podman run -v /opt/registry/certs:/certs:Z -v /opt/registry/certs/domain.cert:/certs/domain.cert:Z --rm registry.redhat.io/rhel9/skopeo skopeo copy --remove-signatures --src-creds myusername:mypassword1 --dest-cert-dir=./certs/ --dest-creds myregistryusername:myregistrypassword1 docker://registry.redhat.io/openshift4/ose-prometheus-alertmanager:v4.12 docker://admin.lab.redhat.com:5000/openshift4/ose-prometheus-alertmanager:v4.12
Using the
curlcommand, verify the images reside in the local registry:Syntax
curl -u PRIVATE_REGISTRY_USERNAME:PRIVATE_REGISTRY_PASSWORD https://LOCAL_NODE_FQDN:5000/v2/_catalog
Example
[root@admin ~]# curl -u myregistryusername:myregistrypassword1 https://admin.lab.redhat.com:5000/v2/_catalog

{"repositories":["openshift4/ose-prometheus","openshift4/ose-prometheus-alertmanager","openshift4/ose-prometheus-node-exporter","rhceph/rhceph-7-dashboard-rhel9","rhceph/rhceph-7-rhel9"]}
Additional Resources
- For more information on different image Ceph package versions, see the knowledge base solution for details on What are the Red Hat Ceph Storage releases and corresponding Ceph package versions?
3.10.7. Running the preflight playbook for a disconnected installation
You use the cephadm-preflight.yml Ansible playbook to configure the Ceph repository and prepare the storage cluster for bootstrapping. It also installs some prerequisites, such as podman, lvm2, chronyd, and cephadm.
The preflight playbook uses the cephadm-ansible inventory hosts file to identify all the nodes in the storage cluster. The default location for cephadm-ansible, cephadm-preflight.yml, and the inventory hosts file is /usr/share/cephadm-ansible/.
The following example shows the structure of a typical inventory file:
Example
host02
host03
host04

[admin]
host01
The [admin] group in the inventory file contains the name of the node where the admin keyring is stored.
Run the preflight playbook before you bootstrap the initial host.
Prerequisites
-
The
cephadm-ansiblepackage is installed on the Ansible administration node. - Root-level access to all nodes in the storage cluster.
-
Passwordless
sshis set up on all hosts in the storage cluster. Nodes configured to access a local YUM repository server with the following repositories enabled:
- rhel-9-for-x86_64-baseos-rpms
- rhel-9-for-x86_64-appstream-rpms
- rhceph-7-tools-for-rhel-9-x86_64-rpms
For more information about setting up a local YUM repository, see the knowledge base article Creating a Local Repository and Sharing with Disconnected/Offline/Air-gapped Systems
Procedure
-
Navigate to the
/usr/share/cephadm-ansibledirectory on the Ansible administration node. -
Open and edit the
hostsfile and add your nodes. Run the preflight playbook with the
ceph_originparameter set tocustomto use a local YUM repository:Syntax
ansible-playbook -i INVENTORY_FILE cephadm-preflight.yml --extra-vars "ceph_origin=custom" -e "custom_repo_url=CUSTOM_REPO_URL"
Example
[ceph-admin@admin cephadm-ansible]$ ansible-playbook -i hosts cephadm-preflight.yml --extra-vars "ceph_origin=custom" -e "custom_repo_url=http://mycustomrepo.lab.redhat.com/x86_64/os/"
After installation is complete,
cephadmresides in the/usr/sbin/directory.NotePopulate the contents of the
registries.conffile with the Ansible playbook:Syntax
ansible-playbook -vvv -i INVENTORY_HOST_FILE_ cephadm-set-container-insecure-registries.yml -e insecure_registry=REGISTRY_URL
Example
[root@admin ~]# ansible-playbook -vvv -i hosts cephadm-set-container-insecure-registries.yml -e insecure_registry=host01:5050
Alternatively, you can use the
--limitoption to run the preflight playbook on a selected set of hosts in the storage cluster:Syntax
ansible-playbook -i INVENTORY_FILE cephadm-preflight.yml --extra-vars "ceph_origin=custom" -e "custom_repo_url=CUSTOM_REPO_URL" --limit GROUP_NAME|NODE_NAME
Replace GROUP_NAME with a group name from your inventory file. Replace NODE_NAME with a specific node name from your inventory file.
Example
[ceph-admin@admin cephadm-ansible]$ ansible-playbook -i hosts cephadm-preflight.yml --extra-vars "ceph_origin=custom" -e "custom_repo_url=http://mycustomrepo.lab.redhat.com/x86_64/os/" --limit clients
[ceph-admin@admin cephadm-ansible]$ ansible-playbook -i hosts cephadm-preflight.yml --extra-vars "ceph_origin=custom" -e "custom_repo_url=http://mycustomrepo.lab.redhat.com/x86_64/os/" --limit host02
NoteWhen you run the preflight playbook,
cephadm-ansibleautomatically installschronydandceph-commonon the client nodes.
3.10.8. Performing a disconnected installation
Before you can perform the installation, you must obtain a Red Hat Ceph Storage container image, either from a proxy host that has access to the Red Hat registry or by copying the image to your local registry.
If your local registry uses a self-signed certificate with a local registry, ensure you have added the trusted root certificate to the bootstrap host. For more information, see Configuring a private registry for a disconnected installation.
Before you begin the bootstrapping process, make sure that the container image that you want to use has the same version of Red Hat Ceph Storage as cephadm. If the two versions do not match, bootstrapping fails at the Creating initial admin user stage.
Prerequisites
- At least one running virtual machine (VM) or server.
- Root-level access to all nodes.
-
Passwordless
sshis set up on all hosts in the storage cluster. - The preflight playbook has been run on the bootstrap host in the storage cluster. For more information, see Running the preflight playbook for a disconnected installation.
- A private registry has been configured and the bootstrap node has access to it. For more information, see Configuring a private registry for a disconnected installation.
- A Red Hat Ceph Storage container image resides in the custom registry.
Procedure
- Log in to the bootstrap host.
Bootstrap the storage cluster:
Syntax
cephadm --image PRIVATE_REGISTRY_NODE_FQDN:5000/CUSTOM_IMAGE_NAME:IMAGE_TAG bootstrap --mon-ip IP_ADDRESS --registry-url PRIVATE_REGISTRY_NODE_FQDN:5000 --registry-username PRIVATE_REGISTRY_USERNAME --registry-password PRIVATE_REGISTRY_PASSWORD
- Replace PRIVATE_REGISTRY_NODE_FQDN with the fully qualified domain name of your private registry.
- Replace CUSTOM_IMAGE_NAME and IMAGE_TAG with the name and tag of the Red Hat Ceph Storage container image that resides in the private registry.
-
Replace IP_ADDRESS with the IP address of the node you are using to run
cephadm bootstrap. - Replace PRIVATE_REGISTRY_USERNAME with the username to create for the private registry.
Replace PRIVATE_REGISTRY_PASSWORD with the password to create for the private registry username.
Example
[root@host01 ~]# cephadm --image admin.lab.redhat.com:5000/rhceph-7-rhel9:latest bootstrap --mon-ip 10.10.128.68 --registry-url admin.lab.redhat.com:5000 --registry-username myregistryusername --registry-password myregistrypassword1
The script takes a few minutes to complete. Once the script completes, it provides the credentials to the Red Hat Ceph Storage Dashboard URL, a command to access the Ceph command-line interface (CLI), and a request to enable telemetry.
Ceph Dashboard is now available at:

             URL: https://host01:8443/
            User: admin
        Password: i8nhu7zham

Enabling client.admin keyring and conf on hosts with "admin" label
You can access the Ceph CLI with:

        sudo /usr/sbin/cephadm shell --fsid 266ee7a8-2a05-11eb-b846-5254002d4916 -c /etc/ceph/ceph.conf -k /etc/ceph/ceph.client.admin.keyring

Please consider enabling telemetry to help improve Ceph:

        ceph telemetry on

For more information see:

        https://docs.ceph.com/docs/master/mgr/telemetry/

Bootstrap complete.
After the bootstrap process is complete, see Changing configurations of custom container images for disconnected installations to configure the container images.
Additional Resources
- Once your storage cluster is up and running, see the Red Hat Ceph Storage Operations Guide for more information about configuring additional daemons and services.
3.10.9. Changing configurations of custom container images for disconnected installations
After you perform the initial bootstrap for disconnected nodes, you must specify custom container images for monitoring stack daemons. You can override the default container images for monitoring stack daemons, since the nodes do not have access to the default container registry.
Make sure that the bootstrap process on the initial host is complete before making any configuration changes.
By default, the monitoring stack components are deployed based on the primary Ceph image. For disconnected environment of the storage cluster, you can use the latest available monitoring stack component images.
When using a custom registry, be sure to log in to the custom registry on newly added nodes before adding any Ceph daemons.
Syntax
# ceph cephadm registry-login --registry-url CUSTOM_REGISTRY_NAME --registry_username REGISTRY_USERNAME --registry_password REGISTRY_PASSWORD
Example
# ceph cephadm registry-login --registry-url myregistry --registry_username myregistryusername --registry_password myregistrypassword1
Prerequisites
- At least one running virtual machine (VM) or server.
-
Red Hat Enterprise Linux 8.10 or 9.4 with
ansible-corebundled into AppStream. - Root-level access to all nodes.
-
Passwordless
sshis set up on all hosts in the storage cluster.
Procedure
Set the custom container images with the
ceph configcommand:Syntax
ceph config set mgr mgr/cephadm/OPTION_NAME CUSTOM_REGISTRY_NAME/CONTAINER_NAME
Use the following options for OPTION_NAME:
container_image_prometheus
container_image_grafana
container_image_alertmanager
container_image_node_exporter
Example
[root@host01 ~]# ceph config set mgr mgr/cephadm/container_image_prometheus myregistry/mycontainer
[root@host01 ~]# ceph config set mgr mgr/cephadm/container_image_grafana myregistry/mycontainer
[root@host01 ~]# ceph config set mgr mgr/cephadm/container_image_alertmanager myregistry/mycontainer
[root@host01 ~]# ceph config set mgr mgr/cephadm/container_image_node_exporter myregistry/mycontainer
Redeploy
node-exporter:Syntax
ceph orch redeploy node-exporter
If any of the services do not deploy, you can redeploy them with the ceph orch redeploy command.
By setting a custom image, the default values for the configuration image name and tag will be overridden, but not overwritten. The default values change when updates become available. By setting a custom image, you will not be able to configure the component for which you have set the custom image for automatic updates. You will need to manually update the configuration image name and tag to be able to install updates.
If you choose to revert to using the default configuration, you can reset the custom container image. Use
ceph config rmto reset the configuration option:Syntax
ceph config rm mgr mgr/cephadm/OPTION_NAMEExample
ceph config rm mgr mgr/cephadm/container_image_prometheus
Additional Resources
- For more information about performing a disconnected installation, see Performing a disconnected installation.
3.11. Distributing SSH keys
You can use the cephadm-distribute-ssh-key.yml playbook to distribute the SSH keys instead of creating and distributing the keys manually. The playbook distributes an SSH public key over all hosts in the inventory.
You can also generate an SSH key pair on the Ansible administration node and distribute the public key to each node in the storage cluster so that Ansible can access the nodes without being prompted for a password.
Prerequisites
- Ansible is installed on the administration node.
- Access to the Ansible administration node.
- Ansible user with sudo access to all nodes in the storage cluster.
- Bootstrapping is completed. See the Bootstrapping a new storage cluster section in the Red Hat Ceph Storage Installation Guide.
Procedure
Navigate to the
/usr/share/cephadm-ansibledirectory on the Ansible administration node:Example
[ansible@admin ~]$ cd /usr/share/cephadm-ansible
From the Ansible administration node, distribute the SSH keys. The optional
cephadm_pubkey_pathparameter is the full path name of the SSH public key file on the ansible controller host.NoteIf
cephadm_pubkey_pathis not specified, the playbook gets the key from thecephadm get-pub-keycommand. This implies that you have at least bootstrapped a minimal cluster.Syntax
ansible-playbook -i INVENTORY_HOST_FILE cephadm-distribute-ssh-key.yml -e cephadm_ssh_user=USER_NAME -e cephadm_pubkey_path= home/cephadm/ceph.key -e admin_node=ADMIN_NODE_NAME_1
Example
[ansible@admin cephadm-ansible]$ ansible-playbook -i hosts cephadm-distribute-ssh-key.yml -e cephadm_ssh_user=ceph-admin -e cephadm_pubkey_path=/home/cephadm/ceph.key -e admin_node=host01

[ansible@admin cephadm-ansible]$ ansible-playbook -i hosts cephadm-distribute-ssh-key.yml -e cephadm_ssh_user=ceph-admin -e admin_node=host01
3.12. Starting the cephadm shell
The cephadm shell command opens a bash shell in a container with all Ceph packages installed. Use the shell to run “Day One” cluster setup tasks, such as installation and bootstrapping, and to run ceph commands.
If the node contains configuration and keyring files in /etc/ceph/, the container environment uses the values in those files as defaults for the cephadm shell. If you execute the cephadm shell on a MON node, the cephadm shell inherits its default configuration from the MON container, instead of using the default configuration.
Prerequisites
- A storage cluster that has been installed and bootstrapped.
- Root-level access to all nodes in the storage cluster.
Procedure
Open the cephadm shell in one of the following ways:
Enter
cephadm shellat the system prompt. This example runs theceph -scommand from within the shell.Example
[root@host01 ~]# cephadm shell
[ceph: root@host01 /]# ceph -s
At the system prompt, type
cephadm shelland the command you want to run:Example
[root@host01 ~]# cephadm shell ceph -s
To exit the cephadm shell, use the exit command.
[ceph: root@host01 /]# exit
[root@host01 ~]#
3.13. Verifying the cluster installation
Once the cluster installation is complete, you can verify that the Red Hat Ceph Storage 7 installation is running properly.
There are two ways of verifying the storage cluster installation as a root user:
-
Run the
podman pscommand. -
Run the
cephadm shell ceph -s.
Prerequisites
- Root-level access to all nodes in the storage cluster.
Procedure
Run the
podman pscommand:Example
[root@host01 ~]# podman ps
NoteIn Red Hat Ceph Storage 7, the format of the
systemdunits has changed. In theNAMEScolumn, the unit files now include theFSID.Run the
cephadm shell ceph -scommand:Example
[root@host01 ~]# cephadm shell ceph -s cluster: id: f64f341c-655d-11eb-8778-fa163e914bcc health: HEALTH_OK services: mon: 3 daemons, quorum host01,host02,host03 (age 94m) mgr: host01.lbnhug(active, since 59m), standbys: host02.rofgay, host03.ohipra mds: 1/1 daemons up, 1 standby osd: 18 osds: 18 up (since 10m), 18 in (since 10m) rgw: 4 daemons active (2 hosts, 1 zones) data: volumes: 1/1 healthy pools: 8 pools, 225 pgs objects: 230 objects, 9.9 KiB usage: 271 MiB used, 269 GiB / 270 GiB avail pgs: 225 active+clean io: client: 85 B/s rd, 0 op/s rd, 0 op/s wrNoteThe health of the storage cluster is in HEALTH_WARN status as the hosts and the daemons are not added.
3.14. Adding hosts
Bootstrapping the Red Hat Ceph Storage installation creates a working storage cluster, consisting of one Monitor daemon and one Manager daemon within the same container. As a storage administrator, you can add additional hosts to the storage cluster and configure them.
-
Running the preflight playbook installs
podman,lvm2,chronyd, andcephadmon all hosts listed in the Ansible inventory file. When using a custom registry, be sure to log in to the custom registry on newly added nodes before adding any Ceph daemons.
.Syntax
[source,subs="verbatim,quotes"]
----
# ceph cephadm registry-login --registry-url _CUSTOM_REGISTRY_NAME_  --registry_username _REGISTRY_USERNAME_ --registry_password _REGISTRY_PASSWORD_
----
.Example
----
# ceph cephadm registry-login --registry-url myregistry --registry_username myregistryusername --registry_password myregistrypassword1
----
Prerequisites
- A running Red Hat Ceph Storage cluster.
- Root-level or user with sudo access to all nodes in the storage cluster.
- Register the nodes to the CDN and attach subscriptions.
-
Ansible user with sudo and passwordless
sshaccess to all nodes in the storage cluster.
Procedure
+
In the following procedure, use either root, as indicated, or the username with which the user is bootstrapped.
From the node that contains the admin keyring, install the storage cluster’s public SSH key in the root user’s
authorized_keysfile on the new host:Syntax
ssh-copy-id -f -i /etc/ceph/ceph.pub user@NEWHOSTExample
[root@host01 ~]# ssh-copy-id -f -i /etc/ceph/ceph.pub root@host02
[root@host01 ~]# ssh-copy-id -f -i /etc/ceph/ceph.pub root@host03
Navigate to the
/usr/share/cephadm-ansibledirectory on the Ansible administration node.Example
[ceph-admin@admin ~]$ cd /usr/share/cephadm-ansible
From the Ansible administration node, add the new host to the Ansible inventory file. The default location for the file is
/usr/share/cephadm-ansible/hosts. The following example shows the structure of a typical inventory file:Example
[ceph-admin@admin ~]$ cat hosts

host02
host03
host04

[admin]
host01
NoteIf you have previously added the new host to the Ansible inventory file and run the preflight playbook on the host, skip to step 4.
Run the preflight playbook with the
--limitoption:Syntax
ansible-playbook -i INVENTORY_FILE cephadm-preflight.yml --extra-vars "ceph_origin=rhcs" --limit NEWHOST
Example
[ceph-admin@admin cephadm-ansible]$ ansible-playbook -i hosts cephadm-preflight.yml --extra-vars "ceph_origin=rhcs" --limit host02
The preflight playbook installs
podman,lvm2,chronyd, andcephadmon the new host. After installation is complete,cephadmresides in the/usr/sbin/directory.From the bootstrap node, use the
cephadmorchestrator to add the new host to the storage cluster:Syntax
ceph orch host add NEWHOSTExample
[ceph: root@host01 /]# ceph orch host add host02
Added host 'host02' with addr '10.10.128.69'
[ceph: root@host01 /]# ceph orch host add host03
Added host 'host03' with addr '10.10.128.70'
Optional: You can also add nodes by IP address, before and after you run the preflight playbook. If you do not have DNS configured in your storage cluster environment, you can add the hosts by IP address, along with the host names.
Syntax
ceph orch host add HOSTNAME IP_ADDRESS
Example
[ceph: root@host01 /]# ceph orch host add host02 10.10.128.69
Added host 'host02' with addr '10.10.128.69'
Verification
View the status of the storage cluster and verify that the new host has been added. The STATUS of the hosts is blank, in the output of the
ceph orch host lscommand.Example
[ceph: root@host01 /]# ceph orch host ls
Additional Resources
- See the Registering Red Hat Ceph Storage nodes to the CDN and attaching subscriptions section in the Red Hat Ceph Storage Installation Guide.
- See the Creating an Ansible user with sudo access section in the Red Hat Ceph Storage Installation Guide.
3.14.1. Using the addr option to identify hosts
The addr option offers an additional way to contact a host. Add the IP address of the host to the addr option. If ssh cannot connect to the host by its hostname, then it uses the value stored in addr to reach the host by its IP address.
Prerequisites
- A storage cluster that has been installed and bootstrapped.
- Root-level access to all nodes in the storage cluster.
Procedure
Run this procedure from inside the cephadm shell.
Add the IP address:
Syntax
ceph orch host add HOSTNAME IP_ADDR
Example
[ceph: root@host01 /]# ceph orch host add host01 10.10.128.68
If adding a host by hostname results in that host being added with an IPv6 address instead of an IPv4 address, use ceph orch host to specify the IP address of that host:
ceph orch host set-addr HOSTNAME IP_ADDR
To convert the IP address from IPv6 format to IPv4 format for a host you have added, use the following command:
ceph orch host set-addr HOSTNAME IPV4_ADDRESS
3.14.2. Adding multiple hosts
Use a YAML file to add multiple hosts to the storage cluster at the same time.
Be sure to create the hosts.yaml file within a host container, or create the file on the local host and then use the cephadm shell to mount the file within the container. The cephadm shell automatically places mounted files in /mnt. If you create the file directly on the local host and then apply the hosts.yaml file instead of mounting it, you might see a File does not exist error.
Prerequisites
- A storage cluster that has been installed and bootstrapped.
- Root-level access to all nodes in the storage cluster.
Procedure
-
Copy over the public
sshkey to each of the hosts that you want to add. -
Use a text editor to create a
hosts.yamlfile. Add the host descriptions to the
hosts.yamlfile, as shown in the following example. Include the labels to identify placements for the daemons that you want to deploy on each host. Separate each host description with three dashes (---).Example
service_type: host
addr:
hostname: host02
labels:
- mon
- osd
- mgr
---
service_type: host
addr:
hostname: host03
labels:
- mon
- osd
- mgr
---
service_type: host
addr:
hostname: host04
labels:
- mon
- osd
If you created the
hosts.yamlfile within the host container, invoke theceph orch applycommand:Example
[root@host01 ~]# ceph orch apply -i hosts.yaml
Added host 'host02' with addr '10.10.128.69'
Added host 'host03' with addr '10.10.128.70'
Added host 'host04' with addr '10.10.128.71'
If you created the
hosts.yamlfile directly on the local host, use thecephadmshell to mount the file:Example
[root@host01 ~]# cephadm shell --mount hosts.yaml -- ceph orch apply -i /mnt/hosts.yaml
View the list of hosts and their labels:
Example
[root@host01 ~]# ceph orch host ls
HOST      ADDR      LABELS          STATUS
host02   host02    mon osd mgr
host03   host03    mon osd mgr
host04   host04    mon osd
NoteIf a host is online and operating normally, its status is blank. An offline host shows a status of OFFLINE, and a host in maintenance mode shows a status of MAINTENANCE.
3.14.3. Adding hosts in disconnected deployments
If you are running a storage cluster on a private network and your host domain name server (DNS) cannot be reached through private IP, you must include both the host name and the IP address for each host you want to add to the storage cluster.
Prerequisites
- A running storage cluster.
- Root-level access to all hosts in the storage cluster.
Procedure
Invoke the
cephadmshell.Syntax
[root@host01 ~]# cephadm shell
Add the host:
Syntax
ceph orch host add HOST_NAME HOST_ADDRESS
Example
[ceph: root@host01 /]# ceph orch host add host03 10.10.128.70
3.14.4. Removing hosts
You can remove hosts of a Ceph cluster with the Ceph Orchestrators. All the daemons are removed with the drain option which adds the _no_schedule label to ensure that you cannot deploy any daemons or a cluster till the operation is complete.
If you are removing the bootstrap host, be sure to copy the admin keyring and the configuration file to another host in the storage cluster before you remove the host.
Prerequisites
- A running Red Hat Ceph Storage cluster.
- Root-level access to all the nodes.
- Hosts are added to the storage cluster.
- All the services are deployed.
- Cephadm is deployed on the nodes where the services have to be removed.
Procedure
Log into the Cephadm shell:
Example
[root@host01 ~]# cephadm shell
Fetch the host details:
Example
[ceph: root@host01 /]# ceph orch host ls
Drain all the daemons from the host:
Syntax
ceph orch host drain HOSTNAMEExample
[ceph: root@host01 /]# ceph orch host drain host02
The
_no_schedulelabel is automatically applied to the host which blocks deployment.Check the status of OSD removal:
Example
[ceph: root@host01 /]# ceph orch osd rm status
When no placement groups (PG) are left on the OSD, the OSD is decommissioned and removed from the storage cluster.
Check if all the daemons are removed from the storage cluster:
Syntax
ceph orch ps HOSTNAMEExample
[ceph: root@host01 /]# ceph orch ps host02
Remove the host:
Syntax
ceph orch host rm HOSTNAMEExample
[ceph: root@host01 /]# ceph orch host rm host02
Additional Resources
- See the Adding hosts using the Ceph Orchestrator section in the Red Hat Ceph Storage Operations Guide for more information.
- See the Listing hosts using the Ceph Orchestrator section in the Red Hat Ceph Storage Operations Guide for more information.
3.15. Labeling hosts
The Ceph orchestrator supports assigning labels to hosts. Labels are free-form and have no specific meanings. This means that you can use mon, monitor, mycluster_monitor, or any other text string. Each host can have multiple labels.
For example, apply the mon label to all hosts on which you want to deploy Ceph Monitor daemons, mgr for all hosts on which you want to deploy Ceph Manager daemons, rgw for Ceph Object Gateway daemons, and so on.
Labeling all the hosts in the storage cluster helps to simplify system management tasks by allowing you to quickly identify the daemons running on each host. In addition, you can use the Ceph orchestrator or a YAML file to deploy or remove daemons on hosts that have specific host labels.
3.15.1. Adding a label to a host
Use the Ceph Orchestrator to add a label to a host. Labels can be used to specify placement of daemons.
A few examples of labels are mgr, mon, and osd based on the service deployed on the hosts. Each host can have multiple labels.
You can also add the following host labels that have special meaning to cephadm and they begin with _:
-
_no_schedule: This label preventscephadmfrom scheduling or deploying daemons on the host. If it is added to an existing host that already contains Ceph daemons, it causescephadmto move those daemons elsewhere, except OSDs which are not removed automatically. When a host is added with the_no_schedulelabel, no daemons are deployed on it. When the daemons are drained before the host is removed, the_no_schedulelabel is set on that host. -
_no_autotune_memory: This label does not autotune memory on the host. It prevents the daemon memory from being tuned even when theosd_memory_target_autotuneoption or other similar options are enabled for one or more daemons on that host. -
_admin: By default, the_adminlabel is applied to the bootstrapped host in the storage cluster and theclient.adminkey is set to be distributed to that host with theceph orch client-keyring {ls|set|rm}function. Adding this label to additional hosts normally causescephadmto deploy configuration and keyring files in the/etc/cephdirectory.
Prerequisites
- A storage cluster that has been installed and bootstrapped.
- Root-level access to all nodes in the storage cluster.
- Hosts are added to the storage cluster.
Procedure
Log in to the Cephadm shell:
Example
[root@host01 ~]# cephadm shell
Add a label to a host:
Syntax
ceph orch host label add HOSTNAME LABEL
Example
[ceph: root@host01 /]# ceph orch host label add host02 mon
Verification
List the hosts:
Example
[ceph: root@host01 /]# ceph orch host ls
3.15.2. Removing a label from a host
You can use the Ceph orchestrator to remove a label from a host.
Prerequisites
- A storage cluster that has been installed and bootstrapped.
- Root-level access to all nodes in the storage cluster.
Procedure
Launch the
cephadmshell:[root@host01 ~]# cephadm shell [ceph: root@host01 /]#
Remove the label.
Syntax
ceph orch host label rm HOSTNAME LABEL
Example
[ceph: root@host01 /]# ceph orch host label rm host02 mon
Verification
List the hosts:
Example
[ceph: root@host01 /]# ceph orch host ls
3.15.3. Using host labels to deploy daemons on specific hosts
You can use host labels to deploy daemons to specific hosts. There are two ways to use host labels to deploy daemons on specific hosts:
-
By using the
--placementoption from the command line. - By using a YAML file.
Prerequisites
- A storage cluster that has been installed and bootstrapped.
- Root-level access to all nodes in the storage cluster.
Procedure
Log into the Cephadm shell:
Example
[root@host01 ~]# cephadm shell
List current hosts and labels:
Example
[ceph: root@host01 /]# ceph orch host ls
HOST      ADDR     LABELS               STATUS
host01              _admin mon osd mgr
host02              mon osd mgr mylabel
Method 1: Use the
--placementoption to deploy a daemon from the command line:Syntax
ceph orch apply DAEMON --placement="label:LABEL"
Example
[ceph: root@host01 /]# ceph orch apply prometheus --placement="label:mylabel"
Method 2 To assign the daemon to a specific host label in a YAML file, specify the service type and label in the YAML file:
Create the
placement.ymlfile:Example
[ceph: root@host01 /]# vi placement.yml
Specify the service type and label in the
placement.ymlfile:Example
service_type: prometheus
placement:
  label: "mylabel"
Apply the daemon placement file:
Syntax
ceph orch apply -i FILENAMEExample
[ceph: root@host01 /]# ceph orch apply -i placement.yml
Scheduled prometheus update…
Verification
List the status of the daemons:
Syntax
ceph orch ps --daemon_type=DAEMON_NAMEExample
[ceph: root@host01 /]# ceph orch ps --daemon_type=prometheus
NAME               HOST   PORTS   STATUS        REFRESHED  AGE  MEM USE  MEM LIM  VERSION  IMAGE ID      CONTAINER ID
prometheus.host02  host02  *:9095  running (2h)     8m ago   2h    85.3M        -  2.22.2   ac25aac5d567  ad8c7593d7c0
3.16. Adding Monitor service
A typical Red Hat Ceph Storage storage cluster has three or five monitor daemons deployed on different hosts. If your storage cluster has five or more hosts, Red Hat recommends that you deploy five Monitor nodes.
In the case of a firewall, see the Firewall settings for Ceph Monitor node section of the Red Hat Ceph Storage Configuration Guide for details.
The bootstrap node is the initial monitor of the storage cluster. Be sure to include the bootstrap node in the list of hosts to which you want to deploy.
If you want to apply Monitor service to more than one specific host, be sure to specify all of the host names within the same ceph orch apply command. If you specify ceph orch apply mon --placement host1 and then specify ceph orch apply mon --placement host2, the second command removes the Monitor service on host1 and applies a Monitor service to host2.
If your Monitor nodes or your entire cluster are located on a single subnet, then cephadm automatically adds up to five Monitor daemons as you add new hosts to the cluster. cephadm automatically configures the Monitor daemons on the new hosts. The new hosts reside on the same subnet as the first (bootstrap) host in the storage cluster. cephadm can also deploy and scale monitors to correspond to changes in the size of the storage cluster.
Prerequisites
- Root-level access to all hosts in the storage cluster.
- A running storage cluster.
Procedure
Apply the five Monitor daemons to five random hosts in the storage cluster:
ceph orch apply mon 5
Disable automatic Monitor deployment:
ceph orch apply mon --unmanaged
3.16.1. Adding Monitor nodes to specific hosts
Use host labels to identify the hosts that contain Monitor nodes.
Prerequisites
- Root-level access to all nodes in the storage cluster.
- A running storage cluster.
Procedure
Assign the
monlabel to the host:Syntax
ceph orch host label add HOSTNAME monExample
[ceph: root@host01 /]# ceph orch host label add host01 mon
View the current hosts and labels:
Syntax
ceph orch host ls
Example
[ceph: root@host01 /]# ceph orch host label add host02 mon
[ceph: root@host01 /]# ceph orch host label add host03 mon
[ceph: root@host01 /]# ceph orch host ls
HOST   ADDR   LABELS  STATUS
host01        mon
host02        mon
host03        mon
host04
host05
host06
Deploy monitors based on the host label:
Syntax
ceph orch apply mon label:mon
Deploy monitors on a specific set of hosts:
Syntax
ceph orch apply mon HOSTNAME1,HOSTNAME2,HOSTNAME3
Example
[root@host01 ~]# ceph orch apply mon host01,host02,host03
NoteBe sure to include the bootstrap node in the list of hosts to which you want to deploy.
3.17. Setting up a custom SSH key on an existing cluster
As a storage administrator, with Cephadm, you can use an SSH key to securely authenticate with remote hosts. The SSH key is stored in the monitor to connect to remote hosts.
When the cluster is bootstrapped, this SSH key is generated automatically and no additional configuration is necessary. However, you can generate a new SSH key with the ceph cephadm generate-key command.
Prerequisites
- An Ansible administration node.
- Root-level access to the Ansible administration node.
-
The
cephadm-ansiblepackage is installed on the node.
Procedure
-
Navigate to the
cephadm-ansibledirectory. Generate a new SSH key:
Example
[ceph-admin@admin cephadm-ansible]$ ceph cephadm generate-key
Retrieve the public portion of the SSH key:
Example
[ceph-admin@admin cephadm-ansible]$ ceph cephadm get-pub-key
Delete the currently stored SSH key:
Example
[ceph-admin@admin cephadm-ansible]$ceph cephadm clear-key
Restart the mgr daemon to reload the configuration:
Example
[ceph-admin@admin cephadm-ansible]$ ceph mgr fail
3.17.1. Configuring a different SSH user
As a storage administrator, you can configure a non-root SSH user who can log into all the Ceph cluster nodes with enough privileges to download container images, start containers, and execute commands without prompting for a password.
Prior to configuring a non-root SSH user, the cluster SSH key needs to be added to the user’s authorized_keys file and non-root users must have passwordless sudo access.
Prerequisites
- A running Red Hat Ceph Storage cluster.
- An Ansible administration node.
- Root-level access to the Ansible administration node.
-
The
cephadm-ansiblepackage is installed on the node. -
Add the cluster SSH keys to the user’s
authorized_keys. - Enable passwordless sudo access for the non-root users.
Procedure
-
Navigate to the
cephadm-ansibledirectory. Provide Cephadm the name of the user who is going to perform all the Cephadm operations:
Syntax
[ceph-admin@admin cephadm-ansible]$ ceph cephadm set-user <user>
Example
[ceph-admin@admin cephadm-ansible]$ ceph cephadm set-user user
Retrieve the SSH public key.
Syntax
ceph cephadm get-pub-key > ~/ceph.pub
Example
[ceph-admin@admin cephadm-ansible]$ ceph cephadm get-pub-key > ~/ceph.pub
Copy the SSH keys to all the hosts.
Syntax
ssh-copy-id -f -i ~/ceph.pub USER@HOST
Example
[ceph-admin@admin cephadm-ansible]$ ssh-copy-id ceph-admin@host01
3.18. Setting up the admin node
Use an admin node to administer the storage cluster.
An admin node contains both the cluster configuration file and the admin keyring. Both of these files are stored in the directory /etc/ceph and use the name of the storage cluster as a prefix.
For example, the default ceph cluster name is ceph. In a cluster using the default name, the admin keyring is named /etc/ceph/ceph.client.admin.keyring. The corresponding cluster configuration file is named /etc/ceph/ceph.conf.
To set up additional hosts in the storage cluster as admin nodes, apply the _admin label to the host you want to designate as an administrator node.
By default, after applying the _admin label to a node, cephadm copies the ceph.conf and client.admin keyring files to that node. The _admin label is automatically applied to the bootstrap node unless the --skip-admin-label option was specified with the cephadm bootstrap command.
Prerequisites
-
A running storage cluster with
cephadminstalled. - The storage cluster has running Monitor and Manager nodes.
- Root-level access to all nodes in the cluster.
Procedure
Use
ceph orch host lsto view the hosts in your storage cluster:Example
[root@host01 ~]# ceph orch host ls
HOST   ADDR   LABELS  STATUS
host01        mon,mgr,_admin
host02        mon
host03        mon,mgr
host04
host05
host06
Use the
_adminlabel to designate the admin host in your storage cluster. For best results, this host should have both Monitor and Manager daemons running.Syntax
ceph orch host label add HOSTNAME _adminExample
[root@host01 ~]# ceph orch host label add host03 _admin
Verify that the admin host has the
_adminlabel.Example
[root@host01 ~]#  ceph orch host ls
HOST   ADDR   LABELS  STATUS
host01        mon,mgr,_admin
host02        mon
host03        mon,mgr,_admin
host04
host05
host06
- Log in to the admin node to manage the storage cluster.
3.18.1. Deploying Ceph monitor nodes using host labels
A typical Red Hat Ceph Storage storage cluster has three or five Ceph Monitor daemons deployed on different hosts. If your storage cluster has five or more hosts, Red Hat recommends that you deploy five Ceph Monitor nodes.
If your Ceph Monitor nodes or your entire cluster are located on a single subnet, then cephadm automatically adds up to five Ceph Monitor daemons as you add new nodes to the cluster. cephadm automatically configures the Ceph Monitor daemons on the new nodes. The new nodes reside on the same subnet as the first (bootstrap) node in the storage cluster. cephadm can also deploy and scale monitors to correspond to changes in the size of the storage cluster.
Use host labels to identify the hosts that contain Ceph Monitor nodes.
Prerequisites
- Root-level access to all nodes in the storage cluster.
- A running storage cluster.
Procedure
Assign the mon label to the host:
Syntax
ceph orch host label add HOSTNAME monExample
[ceph: root@host01 /]# ceph orch host label add host02 mon
[ceph: root@host01 /]# ceph orch host label add host03 mon
View the current hosts and labels:
Syntax
ceph orch host ls
Example
[ceph: root@host01 /]# ceph orch host ls
HOST   ADDR   LABELS  STATUS
host01        mon,mgr,_admin
host02        mon
host03        mon
host04
host05
host06
Deploy Ceph Monitor daemons based on the host label:
Syntax
ceph orch apply mon label:mon
Deploy Ceph Monitor daemons on a specific set of hosts:
Syntax
ceph orch apply mon HOSTNAME1,HOSTNAME2,HOSTNAME3
Example
[ceph: root@host01 /]# ceph orch apply mon host01,host02,host03
NoteBe sure to include the bootstrap node in the list of hosts to which you want to deploy.
3.18.2. Adding Ceph Monitor nodes by IP address or network name
A typical Red Hat Ceph Storage storage cluster has three or five monitor daemons deployed on different hosts. If your storage cluster has five or more hosts, Red Hat recommends that you deploy five Monitor nodes.
If your Monitor nodes or your entire cluster are located on a single subnet, then cephadm automatically adds up to five Monitor daemons as you add new nodes to the cluster. You do not need to configure the Monitor daemons on the new nodes. The new nodes reside on the same subnet as the first node in the storage cluster. The first node in the storage cluster is the bootstrap node. cephadm can also deploy and scale monitors to correspond to changes in the size of the storage cluster.
Prerequisites
- Root-level access to all nodes in the storage cluster.
- A running storage cluster.
Procedure
To deploy each additional Ceph Monitor node:
Syntax
ceph orch apply mon NODE:IP_ADDRESS_OR_NETWORK_NAME [NODE:IP_ADDRESS_OR_NETWORK_NAME...]
Example
[ceph: root@host01 /]# ceph orch apply mon host02:10.10.128.69 host03:mynetwork
3.19. Adding Manager service
cephadm automatically installs a Manager daemon on the bootstrap node during the bootstrapping process. Use the Ceph orchestrator to deploy additional Manager daemons.
The Ceph orchestrator deploys two Manager daemons by default. To deploy a different number of Manager daemons, specify a different number. If you do not specify the hosts where the Manager daemons should be deployed, the Ceph orchestrator randomly selects the hosts and deploys the Manager daemons to them.
If you want to apply Manager daemons to more than one specific host, be sure to specify all of the host names within the same ceph orch apply command. If you specify ceph orch apply mgr --placement host1 and then specify ceph orch apply mgr --placement host2, the second command removes the Manager daemon on host1 and applies a Manager daemon to host2.
Red Hat recommends that you use the --placement option to deploy to specific hosts.
Prerequisites
- A running storage cluster.
Procedure
To specify that you want to apply a certain number of Manager daemons to randomly selected hosts:
Syntax
ceph orch apply mgr NUMBER_OF_DAEMONSExample
[ceph: root@host01 /]# ceph orch apply mgr 3
To add Manager daemons to specific hosts in your storage cluster:
Syntax
ceph orch apply mgr --placement "HOSTNAME1 HOSTNAME2 HOSTNAME3"
Example
[ceph: root@host01 /]# ceph orch apply mgr --placement "host02 host03 host04"
3.20. Adding OSDs
Cephadm will not provision an OSD on a device that is not available. A storage device is considered available if it meets all of the following conditions:
- The device must have no partitions.
- The device must not be mounted.
- The device must not contain a file system.
- The device must not contain a Ceph BlueStore OSD.
- The device must be larger than 5 GB.
Prerequisites
- A running Red Hat Ceph Storage cluster.
Procedure
List the available devices to deploy OSDs:
Syntax
ceph orch device ls [--hostname=HOSTNAME1 HOSTNAME2] [--wide] [--refresh]
Example
[ceph: root@host01 /]# ceph orch device ls --wide --refresh
You can either deploy the OSDs on specific hosts or on all the available devices:
To create an OSD from a specific device on a specific host:
Syntax
ceph orch daemon add osd HOSTNAME:DEVICE_PATH
Example
[ceph: root@host01 /]# ceph orch daemon add osd host02:/dev/sdb
To deploy OSDs on any available and unused devices, use the
--all-available-devicesoption.Example
[ceph: root@host01 /]# ceph orch apply osd --all-available-devices
This command creates colocated WAL and DB daemons. If you want to create non-colocated daemons, do not use this command.
Additional Resources
- For more information about drive specifications for OSDs, see the Advanced service specifications and filters for deploying OSDs section in the Red Hat Ceph Storage Operations Guide.
- For more information about zapping devices to clear data on devices, see the Zapping devices for Ceph OSD deployment section in the Red Hat Ceph Storage Operations Guide.
3.21. Running the cephadm-clients playbook
The cephadm-clients.yml playbook handles the distribution of configuration and admin keyring files to a group of Ceph clients.
If you do not specify a configuration file when you run the playbook, the playbook will generate and distribute a minimal configuration file. By default, the generated file is located at /etc/ceph/ceph.conf.
If you are not using the cephadm-ansible playbooks, after upgrading your Ceph cluster, you must upgrade the ceph-common package and client libraries on your client nodes. For more information, see Upgrading the Red Hat Ceph Storage cluster section in the Red Hat Ceph Storage Upgrade Guide.
Prerequisites
- Root-level access to the Ansible administration node.
-
Ansible user with sudo and passwordless
sshaccess to all nodes in the storage cluster. -
The
cephadm-ansiblepackage is installed. - The preflight playbook has been run on the initial host in the storage cluster. For more information, see Running the preflight playbook.
-
The
client_groupvariable must be specified in the Ansible inventory file. -
The
[admin]group is defined in the inventory file with a node where the admin keyring is present at/etc/ceph/ceph.client.admin.keyring.
Procedure
- Navigate to the /usr/share/cephadm-ansible directory.
Run the
cephadm-clients.ymlplaybook on the initial host in the group of clients. Use the full path name to the admin keyring on the admin host for PATH_TO_KEYRING. Optional: If you want to specify an existing configuration file to use, specify the full path to the configuration file for CONFIG-FILE. Use the Ansible group name for the group of clients for ANSIBLE_GROUP_NAME. Use the FSID of the cluster where the admin keyring and configuration files are stored for FSID. The default path for the FSID is/var/lib/ceph/.Syntax
ansible-playbook -i hosts cephadm-clients.yml -extra-vars '{"fsid":"FSID", "client_group":"ANSIBLE_GROUP_NAME", "keyring":"PATH_TO_KEYRING", "conf":"CONFIG_FILE"}'Example
[ceph-admin@admin cephadm-ansible]$ ansible-playbook -i hosts cephadm-clients.yml --extra-vars '{"fsid":"be3ca2b2-27db-11ec-892b-005056833d58","client_group":"fs_clients","keyring":"/etc/ceph/fs.keyring", "conf": "/etc/ceph/ceph.conf"}'
After installation is complete, the specified clients in the group have the admin keyring. If you did not specify a configuration file, cephadm-ansible creates a minimal default configuration file on each client.
Additional Resources
- For more information about admin keys, see the Ceph User Management section in the Red Hat Ceph Storage Administration Guide.
3.22. Purging the Ceph storage cluster
Purging the Ceph storage cluster clears any data or connections that remain from previous deployments on your server. Use the cephadm rm-cluster command since Ansible is not supported.
Prerequisites
- A running Red Hat Ceph Storage cluster.
Procedure
Disable
cephadmto stop all the orchestration operations to avoid deploying new daemons:Example
[ceph: root#host01 /]# ceph mgr module disable cephadm
Get the FSID of the cluster:
Example
[ceph: root#host01 /]# ceph fsid
Exit the cephadm shell.
Example
[ceph: root@host01 /]# exit
Purge the Ceph daemons from all hosts in the cluster:
Syntax
cephadm rm-cluster --force --zap-osds --fsid FSIDExample
[root@host01 ~]# cephadm rm-cluster --force --zap-osds --fsid a6ca415a-cde7-11eb-a41a-002590fc2544
3.23. Deploying client nodes
As a storage administrator, you can deploy client nodes by running the cephadm-preflight.yml and cephadm-clients.yml playbooks. The cephadm-preflight.yml playbook configures the Ceph repository and prepares the storage cluster for bootstrapping. It also installs some prerequisites, such as podman, lvm2, chronyd, and cephadm.
The cephadm-clients.yml playbook handles the distribution of configuration and keyring files to a group of Ceph clients.
if you are not using the cephadm-ansible playbooks, after upgrading your Ceph cluster, you must upgrade the ceph-common package and client libraries on your client nodes. For more information, see Upgrading the Red Hat Ceph Storage cluster.
Prerequisites
- Root-level access to the Ansible administration node.
-
Ansible user with sudo and passwordless
sshaccess to all nodes in the storage cluster. -
Installation of the
cephadm-ansiblepackage. -
The
[clients]group variable must be specified in the Ansible inventory file. -
The
[admin]group is defined in the inventory file with a node where the admin keyring is present at/etc/ceph/ceph.client.admin.keyring.
Procedure
As an Ansible user, navigate to the
/usr/share/cephadm-ansibledirectory on the Ansible administration node:Example
[ceph-admin@admin ~]$ cd /usr/share/cephadm-ansible
Open and edit the
hostsinventory file and add the[clients]group and clients to your inventory:Example
host02
host03
host04

[admin]
host01

[clients]
client01
client02
client03
Run the
cephadm-preflight.ymlplaybook to install the prerequisites on the clients:Syntax
ansible-playbook -i INVENTORY_FILE cephadm-preflight.yml --limit CLIENT_GROUP_NAME|CLIENT_NODE_NAME
Example
[ceph-admin@admin cephadm-ansible]$ ansible-playbook -i hosts cephadm-preflight.yml --limit clients
Run the
cephadm-clients.ymlplaybook to distribute the keyring and Ceph configuration files to a set of clients.To copy the keyring with a custom destination keyring name:
Syntax
ansible-playbook -i INVENTORY_FILE cephadm-clients.yml --extra-vars '{"fsid":"FSID","keyring":"KEYRING_PATH","client_group":"CLIENT_GROUP_NAME","conf":"CEPH_CONFIGURATION_PATH","keyring_dest":"KEYRING_DESTINATION_PATH"}'
- Replace INVENTORY_FILE with the Ansible inventory file name.
- Replace FSID with the FSID of the cluster.
- Replace KEYRING_PATH with the full path name to the keyring on the admin host that you want to copy to the client.
- Optional: Replace CLIENT_GROUP_NAME with the Ansible group name for the clients to set up.
- Optional: Replace CEPH_CONFIGURATION_PATH with the full path to the Ceph configuration file on the admin node.
Optional: Replace KEYRING_DESTINATION_PATH with the full path name of the destination where the keyring will be copied.
NoteIf you do not specify a configuration file with the conf option when you run the playbook, the playbook generates and distributes a minimal configuration file. By default, the generated file is located at
/etc/ceph/ceph.conf.Example
[ceph-admin@host01 cephadm-ansible]$ ansible-playbook -i hosts cephadm-clients.yml --extra-vars '{"fsid":"266ee7a8-2a05-11eb-b846-5254002d4916","keyring":"/etc/ceph/ceph.client.admin.keyring","client_group":"clients","conf":"/etc/ceph/ceph.conf","keyring_dest":"/etc/ceph/custom.name.ceph.keyring"}'
To copy a keyring with the default destination keyring name of
ceph.keyringand using the default group of clients:Syntax
ansible-playbook -i INVENTORY_FILE cephadm-clients.yml --extra-vars '{"fsid":"FSID","keyring":"KEYRING_PATH","conf":"CONF_PATH"}'
Verification
Log into the client nodes and verify that the keyring and configuration files exist.
Example
[user@client01 ~]# ls -l /etc/ceph/

-rw-------. 1 ceph ceph 151 Jul 11 12:23 custom.name.ceph.keyring
-rw-------. 1 ceph ceph 151 Jul 11 12:23 ceph.keyring
-rw-------. 1 ceph ceph 269 Jul 11 12:23 ceph.conf