Ce contenu n'est pas disponible dans la langue sélectionnée.
Chapter 2. Getting started with solvers in Business Central: An employee rostering example
You can build and deploy the employee-rostering sample project in Business Central. The project demonstrates how to create each of the Business Central assets required to solve the shift rostering planning problem and use Red Hat Business Optimizer to find the best possible solution.
You can deploy the preconfigured employee-rostering project in Business Central. Alternatively, you can create the project yourself using Business Central.
The employee-rostering sample project in Business Central does not include a data set. You must supply a data set in XML format using a REST API call.
2.1. Deploying the employee rostering sample project in Business Central
Business Central includes a number of sample projects that you can use to get familiar with the product and its features. The employee rostering sample project is designed and created to demonstrate the shift rostering use case for Red Hat Business Optimizer. Use the following procedure to deploy and run the employee rostering sample in Business Central.
Prerequisites
- Red Hat Decision Manager has been downloaded and installed. For installation options, see Planning a Red Hat Decision Manager installation.
-
You have started Red Hat Decision Manager, as described in the installation documentation, and you are logged in to Business Central as a user with
adminpermissions.
Procedure
-
In Business Central, click Menu
Design Projects. -
In the preconfigured
MySpacespace, click Try Samples. - Select employee-rostering from the list of sample projects and click Ok in the upper-right corner to import the project.
- After the asset list has complied, click Build & Deploy to deploy the employee rostering example.
The rest of this document explains each of the project assets and their configuration.
2.2. Re-creating the employee rostering sample project
The employee rostering sample project is a preconfigured project available in Business Central. You can learn about how to deploy this project in Section 2.1, “Deploying the employee rostering sample project in Business Central”.
You can create the employee rostering example "from scratch". You can use the workflow in this example to create a similar project of your own in Business Central.
2.2.1. Setting up the employee rostering project
To start developing a solver in Business Central, you must set up the project.
Prerequisites
- Red Hat Decision Manager has been downloaded and installed.
-
You have deployed Business Central and logged in with a user that has the
adminrole.
Procedure
-
Create a new project in Business Central by clicking Menu
Design Projects Add Project. In the Add Project window, fill out the following fields:
-
Name:
employee-rostering - Description(optional): Employee rostering problem optimization using Business Optimizer. Assigns employees to shifts based on their skill.
Optionally, click Configure Advanced Options to populate the
Group ID,Artifact ID, andVersioninformation.-
Group ID:
employeerostering -
Artifact ID:
employeerostering -
Version:
1.0.0-SNAPSHOT
-
Name:
- Click Add to add the project to the Business Central project repository.
2.2.2. Problem facts and planning entities
Each of the domain classes in the employee rostering planning problem is categorized as one of the following:
- An unrelated class: not used by any of the score constraints. From a planning standpoint, this data is obsolete.
-
A problem fact class: used by the score constraints, but does not change during planning (as long as the problem stays the same), for example,
ShiftandEmployee. All the properties of a problem fact class are problem properties. A planning entity class: used by the score constraints and changes during planning, for example,
ShiftAssignment. The properties that change during planning are planning variables. The other properties are problem properties.Ask yourself the following questions:
- What class changes during planning?
Which class has variables that I want the
Solverto change?That class is a planning entity.
A planning entity class needs to be annotated with the
@PlanningEntityannotation, or defined in Business Central using the Red Hat Business Optimizer dock in the domain designer.Each planning entity class has one or more planning variables, and must also have one or more defining properties.
Most use cases have only one planning entity class, and only one planning variable per planning entity class.
2.2.3. Creating the data model for the employee rostering project
Use this section to create the data objects required to run the employee rostering sample project in Business Central.
Prerequisites
- You have completed the project setup described in Section 2.2.1, “Setting up the employee rostering project”.
Procedure
-
With your new project, either click Data Object in the project perspective, or click Add Asset
Data Object to create a new data object. Name the first data object
Timeslot, and selectemployeerostering.employeerosteringas the Package.Click Ok.
-
In the Data Objects perspective, click +add field to add fields to the
Timeslotdata object. -
In the id field, type
endTime. -
Click the drop-down menu next to Type and select
LocalDateTime. - Click Create and continue to add another field.
-
Add another field with the id
startTimeand TypeLocalDateTime. - Click Create.
-
Click Save in the upper-right corner to save the
Timeslotdata object. - Click the x in the upper-right corner to close the Data Objects perspective and return to the Assets menu.
Using the previous steps, create the following data objects and their attributes:
Expand Table 2.1. Skill id Type nameStringExpand Table 2.2. Employee id Type nameStringskillsemployeerostering.employeerostering.Skill[List]Expand Table 2.3. Shift id Type requiredSkillemployeerostering.employeerostering.Skilltimeslotemployeerostering.employeerostering.TimeslotExpand Table 2.4. DayOffRequest id Type dateLocalDateemployeeemployeerostering.employeerostering.EmployeeExpand Table 2.5. ShiftAssignment id Type employeeemployeerostering.employeerostering.Employeeshiftemployeerostering.employeerostering.Shift
For more examples of creating data objects, see Getting started with decision services.
2.2.3.1. Creating the employee roster planning entity
In order to solve the employee rostering planning problem, you must create a planning entity and a solver. The planning entity is defined in the domain designer using the attributes available in the Red Hat Business Optimizer dock.
Use the following procedure to define the ShiftAssignment data object as the planning entity for the employee rostering example.
Prerequisites
- You have created the relevant data objects and planning entity required to run the employee rostering example by completing the procedures in Section 2.2.3, “Creating the data model for the employee rostering project”.
Procedure
-
From the project Assets menu, open the
ShiftAssignmentdata object. -
In the Data Objects perspective, open the Red Hat Business Optimizer dock by clicking the
 on the right.
- Select Planning Entity.
-
Select
employeefrom the list of fields under theShiftAssignmentdata object. In the Red Hat Business Optimizer dock, select Planning Variable.
In the Value Range Id input field, type
employeeRange. This adds the@ValueRangeProviderannotation to the planning entity, which you can view by clicking theSourcetab in the designer.The value range of a planning variable is defined with the
@ValueRangeProviderannotation. A@ValueRangeProviderannotation always has a propertyid, which is referenced by the@PlanningVariablepropertyvalueRangeProviderRefs.- Close the dock and click Save to save the data object.
2.2.3.2. Creating the employee roster planning solution
The employee roster problem relies on a defined planning solution. The planning solution is defined in the domain designer using the attributes available in the Red Hat Business Optimizer dock.
Prerequisites
- You have created the relevant data objects and planning entity required to run the employee rostering example by completing the procedures in Section 2.2.3, “Creating the data model for the employee rostering project” and Section 2.2.3.1, “Creating the employee roster planning entity”.
Procedure
-
Create a new data object with the identifier
EmployeeRoster. Create the following fields:
Expand Table 2.6. EmployeeRoster id Type dayOffRequestListemployeerostering.employeerostering.DayOffRequest[List]shiftAssignmentListemployeerostering.employeerostering.ShiftAssignment[List]shiftListemployeerostering.employeerostering.Shift[List]skillListemployeerostering.employeerostering.Skill[List]timeslotListemployeerostering.employeerostering.Timeslot[List]-
In the Data Objects perspective, open the Red Hat Business Optimizer dock by clicking the
on the right.
- Select Planning Solution.
-
Leave the default
Hard soft scoreas the Solution Score Type. This automatically generates ascorefield in theEmployeeRosterdata object with the solution score as the type. Add a new field with the following attributes:
Expand id Type employeeListemployeerostering.employeerostering.Employee[List]With the
employeeListfield selected, open the Red Hat Business Optimizer dock and select the Planning Value Range Provider box.In the id field, type
employeeRange. Close the dock.- Click Save in the upper-right corner to save the asset.
2.2.4. Employee rostering constraints
Employee rostering is a planning problem. All planning problems include constraints that must be satisfied in order to find an optimal solution.
The employee rostering sample project in Business Central includes the following hard and soft constraints:
- Hard constraint
- Employees are only assigned one shift per day.
- All shifts that require a particular employee skill are assigned an employee with that particular skill.
- Soft constraints
- All employees are assigned a shift.
- If an employee requests a day off, their shift is reassigned to another employee.
Hard and soft constraints are defined in Business Central using either the free-form DRL designer, or using guided rules.
2.2.4.1. DRL (Drools Rule Language) rules
DRL (Drools Rule Language) rules are business rules that you define directly in .drl text files. These DRL files are the source in which all other rule assets in Business Central are ultimately rendered. You can create and manage DRL files within the Business Central interface, or create them externally as part of a Maven or Java project using Red Hat CodeReady Studio or another integrated development environment (IDE). A DRL file can contain one or more rules that define at a minimum the rule conditions (when) and actions (then). The DRL designer in Business Central provides syntax highlighting for Java, DRL, and XML.
DRL files consist of the following components:
Components in a DRL file
The following example DRL rule determines the age limit in a loan application decision service:
Example rule for loan application age limit
A DRL file can contain single or multiple rules, queries, and functions, and can define resource declarations such as imports, globals, and attributes that are assigned and used by your rules and queries. The DRL package must be listed at the top of a DRL file and the rules are typically listed last. All other DRL components can follow any order.
Each rule must have a unique name within the rule package. If you use the same rule name more than once in any DRL file in the package, the rules fail to compile. Always enclose rule names with double quotation marks (rule "rule name") to prevent possible compilation errors, especially if you use spaces in rule names.
All data objects related to a DRL rule must be in the same project package as the DRL file in Business Central. Assets in the same package are imported by default. Existing assets in other packages can be imported with the DRL rule.
2.2.4.2. Defining constraints for employee rostering using the DRL designer
You can create constraint definitions for the employee rostering example using the free-form DRL designer in Business Central.
Use this procedure to create a hard constraint where no employee is assigned a shift that begins less than 10 hours after their previous shift ended.
Procedure
-
In Business Central, go to Menu
Design Projects and click the project name. -
Click Add Asset
DRL file. -
In the DRL file name field, type
ComplexScoreRules. -
Select the
employeerostering.employeerosteringpackage. - Click +Ok to create the DRL file.
In the Model tab of the DRL designer, define the
Employee10HourShiftSpacerule as a DRL file:Copy to Clipboard Copied! Toggle word wrap Toggle overflow - Click Save to save the DRL file.
For more information about creating DRL files, see Designing a decision service using DRL rules.
2.2.5. Creating rules for employee rostering using guided rules
You can create rules that define hard and soft constraints for employee rostering using the guided rules designer in Business Central.
2.2.5.1. Guided rules
Guided rules are business rules that you create in a UI-based guided rules designer in Business Central that leads you through the rule-creation process. The guided rules designer provides fields and options for acceptable input based on the data objects for the rule being defined. The guided rules that you define are compiled into Drools Rule Language (DRL) rules as with all other rule assets.
All data objects related to a guided rule must be in the same project package as the guided rule. Assets in the same package are imported by default. After you create the necessary data objects and the guided rule, you can use the Data Objects tab of the guided rules designer to verify that all required data objects are listed or to import other existing data objects by adding a New item.
2.2.5.2. Creating a guided rule to balance employee shift numbers
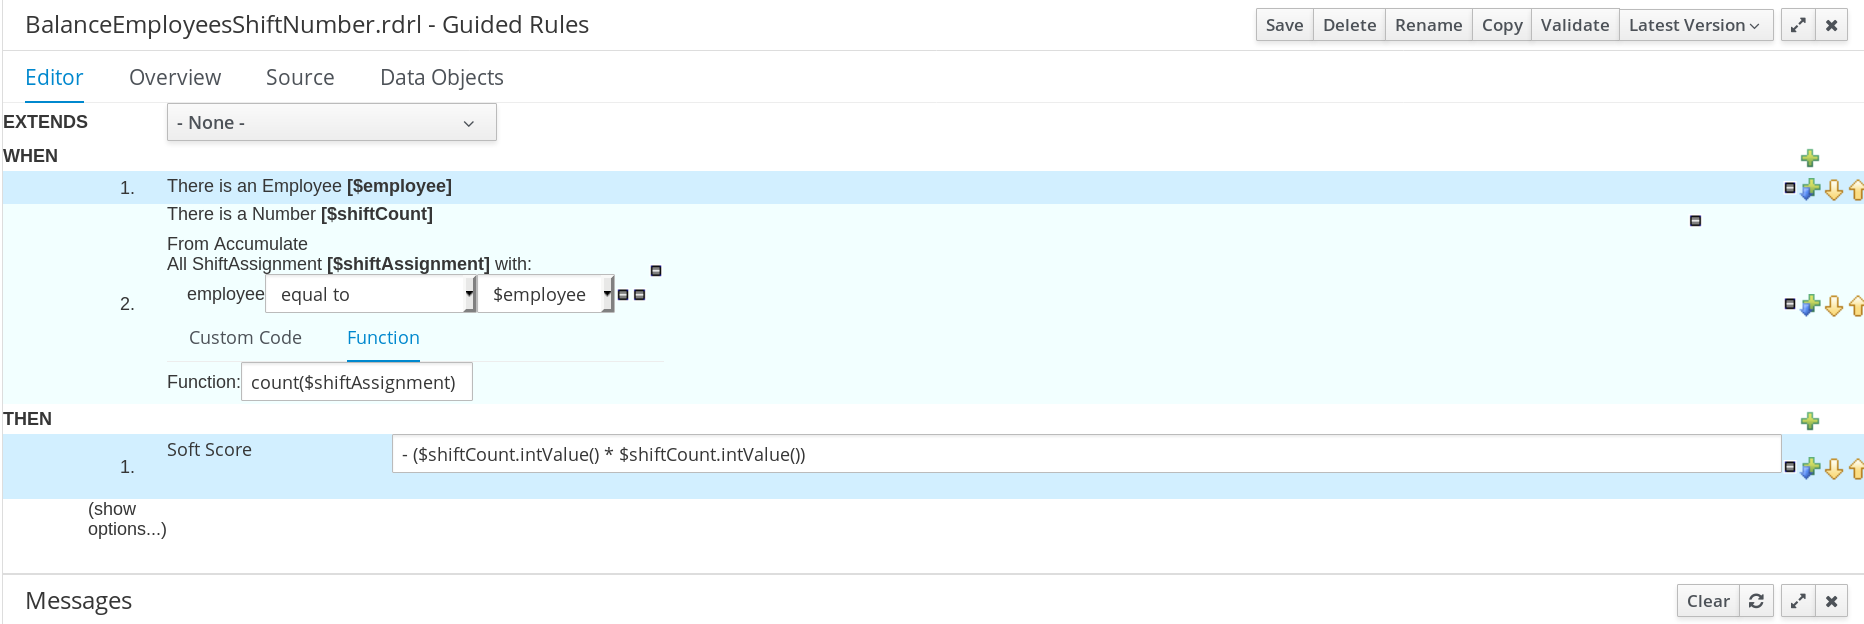
The BalanceEmployeesShiftNumber guided rule creates a soft constraint that ensures shifts are assigned to employees in a way that is balanced as evenly as possible. It does this by creating a score penalty that increases when shift distribution is less even. The score formula, implemented by the rule, incentivizes the Solver to distribute shifts in a more balanced way.
Procedure
-
In Business Central, go to Menu
Design Projects and click the project name. -
Click Add Asset
Guided Rule. -
Enter
BalanceEmployeesShiftNumberas the Guided Rule name and select theemployeerostering.employeerosteringPackage. - Click Ok to create the rule asset.
-
Add a WHEN condition by clicking the
 in the WHEN field.
-
Select
Employeein the Add a condition to the rule window. Click +Ok. -
Click the
Employeecondition to modify the constraints and add the variable name$employee. Add the WHEN condition
From Accumulate.-
Above the
From Accumulatecondition, click click to add pattern and selectNumberas the fact type from the drop-down list. -
Add the variable name
$shiftCountto theNumbercondition. -
Below the
From Accumulatecondition, click click to add pattern and select theShiftAssignmentfact type from the drop-down list. -
Add the variable name
$shiftAssignmentto theShiftAssignmentfact type. -
Click the
ShiftAssignmentcondition again and from the Add a restriction on a field drop-down list, selectemployee. -
Select
equal tofrom the drop-down list next to theemployeeconstraint. -
Click the
 icon next to the drop-down button to add a variable, and click Bound variable in the Field value window.
-
Select
$employeefrom the drop-down list. -
In the Function box type
count($shiftAssignment).
-
Above the
-
Add the THEN condition by clicking the
in the THEN field.
Select
Modify Soft Scorein the Add a new action window. Click +Ok.-
Type the following expression into the box:
-($shiftCount.intValue()*$shiftCount.intValue())
-
Type the following expression into the box:
- Click Validate in the upper-right corner to check all rule conditions are valid. If the rule validation fails, address any problems described in the error message, review all components in the rule, and try again to validate the rule until the rule passes.
- Click Save to save the rule.
For more information about creating guided rules, see Designing a decision service using guided rules.
2.2.5.3. Creating a guided rule for no more than one shift per day
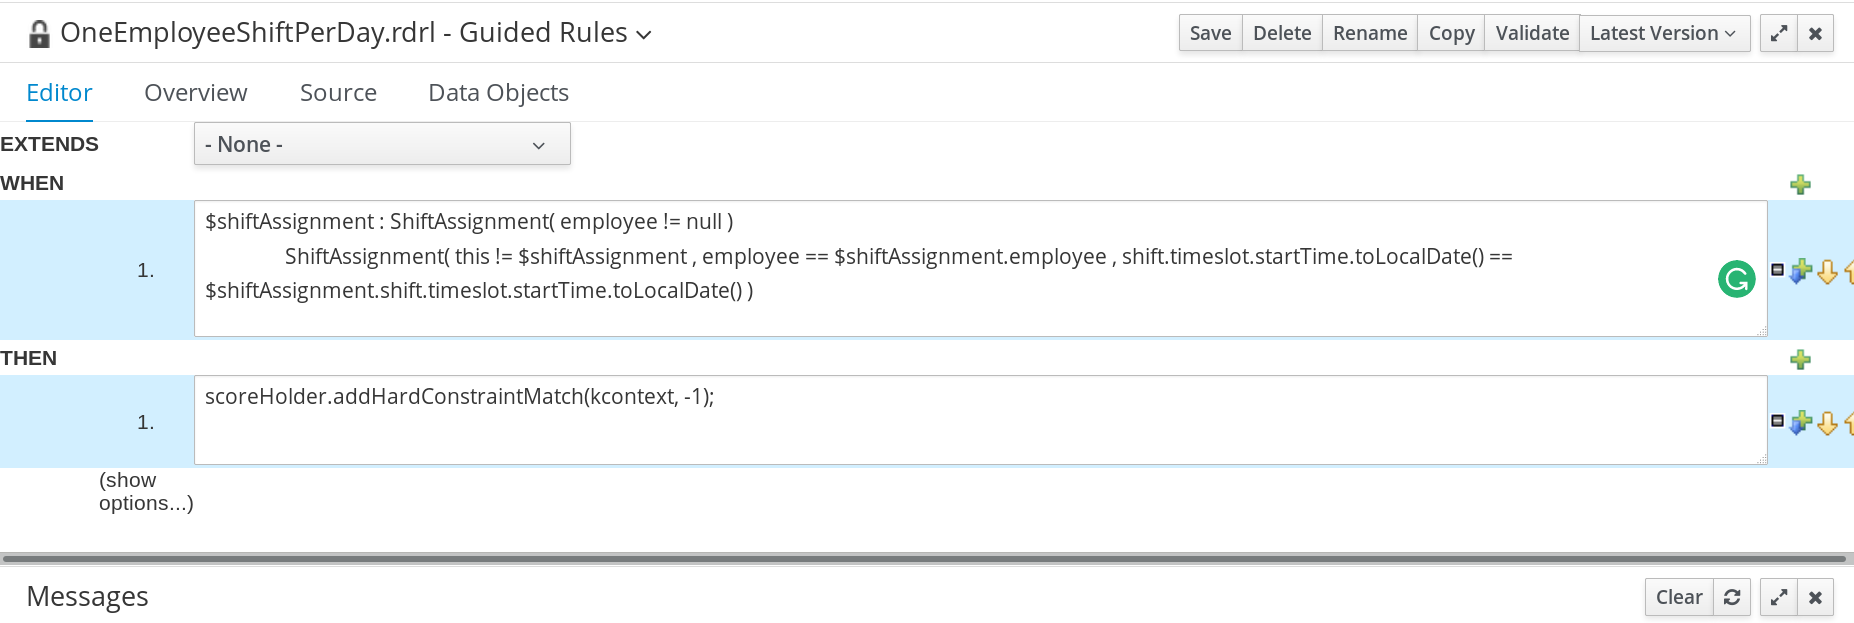
The OneEmployeeShiftPerDay guided rule creates a hard constraint that employees are not assigned more than one shift per day. In the employee rostering example, this constraint is created using the guided rule designer.
Procedure
-
In Business Central, go to Menu
Design Projects and click the project name. -
Click Add Asset
Guided Rule. -
Enter
OneEmployeeShiftPerDayas the Guided Rule name and select theemployeerostering.employeerosteringPackage. - Click Ok to create the rule asset.
-
Add a WHEN condition by clicking the
in the WHEN field.
- Select Free form DRL from the Add a condition to the rule window.
In the free form DRL box, type the following condition:
$shiftAssignment : ShiftAssignment( employee != null )
		ShiftAssignment( this != $shiftAssignment , employee == $shiftAssignment.employee , shift.timeslot.startTime.toLocalDate() == $shiftAssignment.shift.timeslot.startTime.toLocalDate() )
$shiftAssignment : ShiftAssignment( employee != null )
		ShiftAssignment( this != $shiftAssignment , employee == $shiftAssignment.employee , shift.timeslot.startTime.toLocalDate() == $shiftAssignment.shift.timeslot.startTime.toLocalDate() )
Copy to Clipboard Copied! Toggle word wrap Toggle overflow This condition states that a shift cannot be assigned to an employee that already has another shift assignment on the same day.
-
Add the THEN condition by clicking the
in the THEN field.
- Select Add free form DRL from the Add a new action window.
In the free form DRL box, type the following condition:
scoreHolder.addHardConstraintMatch(kcontext, -1);
scoreHolder.addHardConstraintMatch(kcontext, -1);Copy to Clipboard Copied! Toggle word wrap Toggle overflow - Click Validate in the upper-right corner to check all rule conditions are valid. If the rule validation fails, address any problems described in the error message, review all components in the rule, and try again to validate the rule until the rule passes.
- Click Save to save the rule.
For more information about creating guided rules, see Designing a decision service using guided rules.
2.2.5.4. Creating a guided rule to match skills to shift requirements
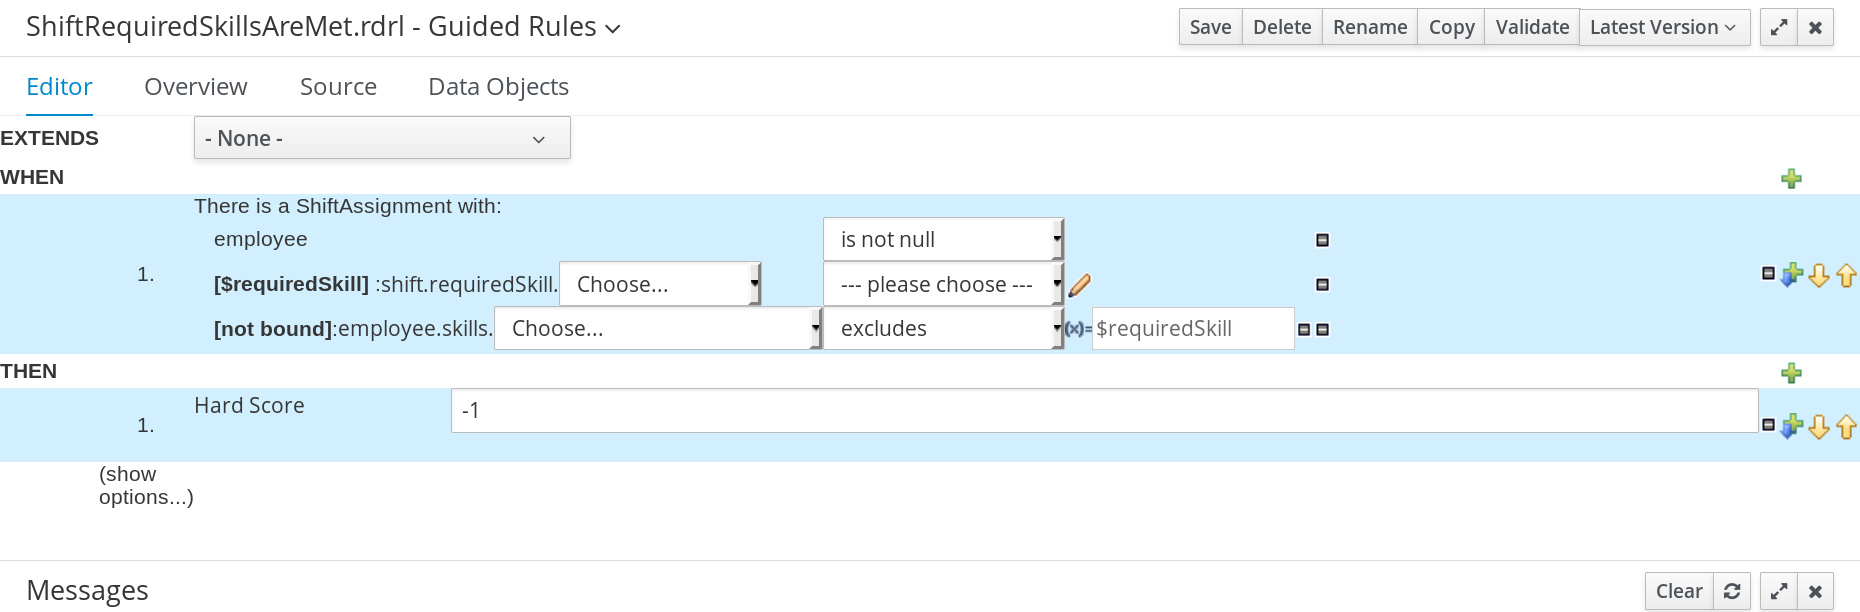
The ShiftReqiredSkillsAreMet guided rule creates a hard constraint that ensures all shifts are assigned an employee with the correct set of skills. In the employee rostering example, this constraint is created using the guided rule designer.
Procedure
-
In Business Central, go to Menu
Design Projects and click the project name. -
Click Add Asset
Guided Rule. -
Enter
ShiftReqiredSkillsAreMetas the Guided Rule name and select theemployeerostering.employeerosteringPackage. - Click Ok to create the rule asset.
-
Add a WHEN condition by clicking the
in the WHEN field.
-
Select
ShiftAssignmentin the Add a condition to the rule window. Click +Ok. -
Click the
ShiftAssignmentcondition, and selectemployeefrom the Add a restriction on a field drop-down list. -
In the designer, click the drop-down list next to
employeeand selectis not null. Click the
ShiftAssignmentcondition, and click Expression editor.-
In the designer, click
[not bound]to open the Expression editor, and bind the expression to the variable$requiredSkill. Click Set. -
In the designer, next to
$requiredSkill, selectshiftfrom the first drop-down list, thenrequiredSkillfrom the next drop-down list.
-
In the designer, click
Click the
ShiftAssignmentcondition, and click Expression editor.-
In the designer, next to
[not bound], selectemployeefrom the first drop-down list, thenskillsfrom the next drop-down list. -
Leave the next drop-down list as
Choose. -
In the next drop-down box, change
please choosetoexcludes. -
Click the
icon next to
excludes, and in the Field value window, click the New formula button. -
Type
$requiredSkillinto the formula box.
-
In the designer, next to
-
Add the THEN condition by clicking the
in the THEN field.
-
Select
Modify Hard Scorein the Add a new action window. Click +Ok. -
Type
-1into the score actions box. - Click Validate in the upper-right corner to check all rule conditions are valid. If the rule validation fails, address any problems described in the error message, review all components in the rule, and try again to validate the rule until the rule passes.
- Click Save to save the rule.
For more information about creating guided rules, see Designing a decision service using guided rules.
2.2.5.5. Creating a guided rule to manage day off requests
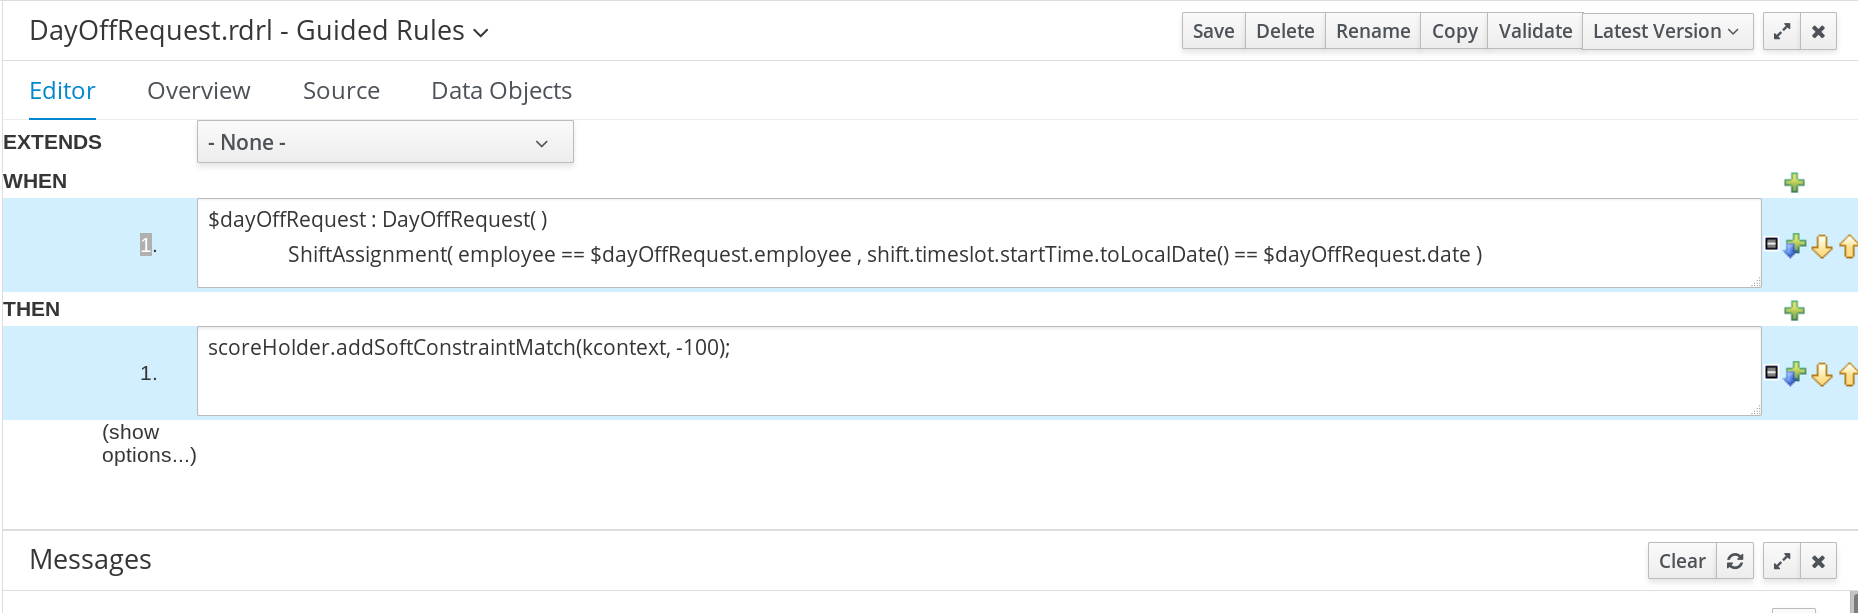
The DayOffRequest guided rule creates a soft constraint. This constraint allows a shift to be reassigned to another employee in the event the employee who was originally assigned the shift is no longer able to work that day. In the employee rostering example, this constraint is created using the guided rule designer.
Procedure
-
In Business Central, go to Menu
Design Projects and click the project name. -
Click Add Asset
Guided Rule. -
Enter
DayOffRequestas the Guided Rule name and select theemployeerostering.employeerosteringPackage. - Click Ok to create the rule asset.
-
Add a WHEN condition by clicking the
in the WHEN field.
- Select Free form DRL from the Add a condition to the rule window.
In the free form DRL box, type the following condition:
$dayOffRequest : DayOffRequest( )
		ShiftAssignment( employee == $dayOffRequest.employee , shift.timeslot.startTime.toLocalDate() == $dayOffRequest.date )
$dayOffRequest : DayOffRequest( )
		ShiftAssignment( employee == $dayOffRequest.employee , shift.timeslot.startTime.toLocalDate() == $dayOffRequest.date )
Copy to Clipboard Copied! Toggle word wrap Toggle overflow This condition states if a shift is assigned to an employee who has made a day off request, the employee can be unassigned the shift on that day.
-
Add the THEN condition by clicking the
in the THEN field.
- Select Add free form DRL from the Add a new action window.
In the free form DRL box, type the following condition:
scoreHolder.addSoftConstraintMatch(kcontext, -100);
scoreHolder.addSoftConstraintMatch(kcontext, -100);Copy to Clipboard Copied! Toggle word wrap Toggle overflow - Click Validate in the upper-right corner to check all rule conditions are valid. If the rule validation fails, address any problems described in the error message, review all components in the rule, and try again to validate the rule until the rule passes.
- Click Save to save the rule.
For more information about creating guided rules, see Designing a decision service using guided rules.
2.2.6. Creating a solver configuration for employee rostering
You can create and edit Solver configurations in Business Central. The Solver configuration designer creates a solver configuration that can be run after the project is deployed.
Prerequisites
- Red Hat Decision Manager has been downloaded and installed.
- You have created and configured all of the relevant assets for the employee rostering example.
Procedure
-
In Business Central, click Menu
Projects, and click your project to open it. -
In the Assets perspective, click Add Asset
Solver configuration In the Create new Solver configuration window, type the name
EmployeeRosteringSolverConfigfor your Solver and click Ok.This opens the Solver configuration designer.
In the Score Director Factory configuration section, define a KIE base that contains scoring rule definitions. The employee rostering sample project uses
defaultKieBase.-
Select one of the KIE sessions defined within the KIE base. The employee rostering sample project uses
defaultKieSession.
-
Select one of the KIE sessions defined within the KIE base. The employee rostering sample project uses
- Click Validate in the upper-right corner to check the Score Director Factory configuration is correct. If validation fails, address any problems described in the error message, and try again to validate until the configuration passes.
- Click Save to save the Solver configuration.
2.2.7. Configuring Solver termination for the employee rostering project
You can configure the Solver to terminate after a specified amount of time. By default, the planning engine is given an unlimited time period to solve a problem instance.
The employee rostering sample project is set up to run for 30 seconds.
Prerequisites
-
You have created all relevant assets for the employee rostering project and created the
EmployeeRosteringSolverConfigsolver configuration in Business Central as described in Section 2.2.6, “Creating a solver configuration for employee rostering”.
Procedure
-
Open the
EmployeeRosteringSolverConfigfrom the Assets perspective. This will open the Solver configuration designer. - In the Termination section, click Add to create new termination element within the selected logical group.
-
Select the
Time spenttermination type from the drop-down list. This is added as an input field in the termination configuration. - Use the arrows next to the time elements to adjust the amount of time spent to 30 seconds.
- Click Validate in the upper-right corner to check the Score Director Factory configuration is correct. If validation fails, address any problems described in the error message, and try again to validate until the configuration passes.
- Click Save to save the Solver configuration.
2.3. Accessing the solver using the REST API
After deploying or re-creating the sample solver, you can access it using the REST API.
You must register a solver instance using the REST API. Then you can supply data sets and retrieve optimized solutions.
Prerequisites
- The employee rostering project is set up and deployed according to the previous sections in this document. You can either deploy the sample project, as described in Section 2.1, “Deploying the employee rostering sample project in Business Central”, or re-create the project, as described in Section 2.2, “Re-creating the employee rostering sample project”.
2.3.1. Registering the Solver using the REST API
You must register the solver instance using the REST API before you can use the solver.
Each solver instance is capable of optimizing one planning problem at a time.
Procedure
Create a HTTP request using the following header:
authorization: admin:admin
X-KIE-ContentType: xstream
content-type: application/xml
authorization: admin:admin
X-KIE-ContentType: xstream
content-type: application/xml
Copy to Clipboard Copied! Toggle word wrap Toggle overflow Register the Solver using the following request:
- PUT
-
http://localhost:8080/kie-server/services/rest/server/containers/employeerostering_1.0.0-SNAPSHOT/solvers/EmployeeRosteringSolver - Request body
<solver-instance>
  <solver-config-file>employeerostering/employeerostering/EmployeeRosteringSolverConfig.solver.xml</solver-config-file>
</solver-instance>
<solver-instance>
  <solver-config-file>employeerostering/employeerostering/EmployeeRosteringSolverConfig.solver.xml</solver-config-file>
</solver-instance>
Copy to Clipboard Copied! Toggle word wrap Toggle overflow
2.3.2. Calling the Solver using the REST API
After registering the solver instance, you can use the REST API to submit a data set to the solver and to retrieve an optimized solution.
Procedure
Create a HTTP request using the following header:
authorization: admin:admin
X-KIE-ContentType: xstream
content-type: application/xml
authorization: admin:admin
X-KIE-ContentType: xstream
content-type: application/xml
Copy to Clipboard Copied! Toggle word wrap Toggle overflow Submit a request to the Solver with a data set, as in the following example:
- POST
-
http://localhost:8080/kie-server/services/rest/server/containers/employeerostering_1.0.0-SNAPSHOT/solvers/EmployeeRosteringSolver/state/solving - Request body
Copy to Clipboard Copied! Toggle word wrap Toggle overflow
Request the best solution to the planning problem:
- GET
http://localhost:8080/kie-server/services/rest/server/containers/employeerostering_1.0.0-SNAPSHOT/solvers/EmployeeRosteringSolver/bestsolutionExample response
Copy to Clipboard Copied! Toggle word wrap Toggle overflow